Wish you could touch your toes?
Feel like your hamstrings are always tight?
What if I told you the solution was NOT to stretch them more…?
What if stretching them, while it may provide TEMPORARY relief is only making the problem WORSE!?
The best way to think about your hamstrings is like a rubber band.
When a rubber band is just hanging there it isn’t tight. But when you pull it out long, it becomes super tight and taut.
That rubber band becomes tight feeling because it is stretched out.
This is exactly the same reason your hamstrings feel tight. And it is exactly why more stretching is NOT the answer!
Your hamstrings feels tight because they are already pulled long.
So instead of stretching them out further, we need to address the postural distortions and muscular imbalances that cause our hamstrings to be overstretched, such as Anterior Pelvic Tilt and tight hip flexors.
We need to focus on returning our hamstring to their optimal length through addressing muscular imbalances and stability issues.
This often means we need to address hip flexor tightness and glute underactivity. It may even mean addressing lat tightness as well because of the impact our lats can have on our lumbo-pelvic-hip complex functioning through our thoracolumbar fascia.
This means that instead of spending a ton of time stretching our hamstrings we actually need to be doing the following things…
- Foam Rolling Hip Flexors And Lats
- Stretching Hip Flexors And Lats
- Activating Our Glutes And Abs
But First…What Is Anterior Pelvic Tilt?
Anterior pelvic tilt is the “Donald Duck” posture – an overarched back and butt sticking out.
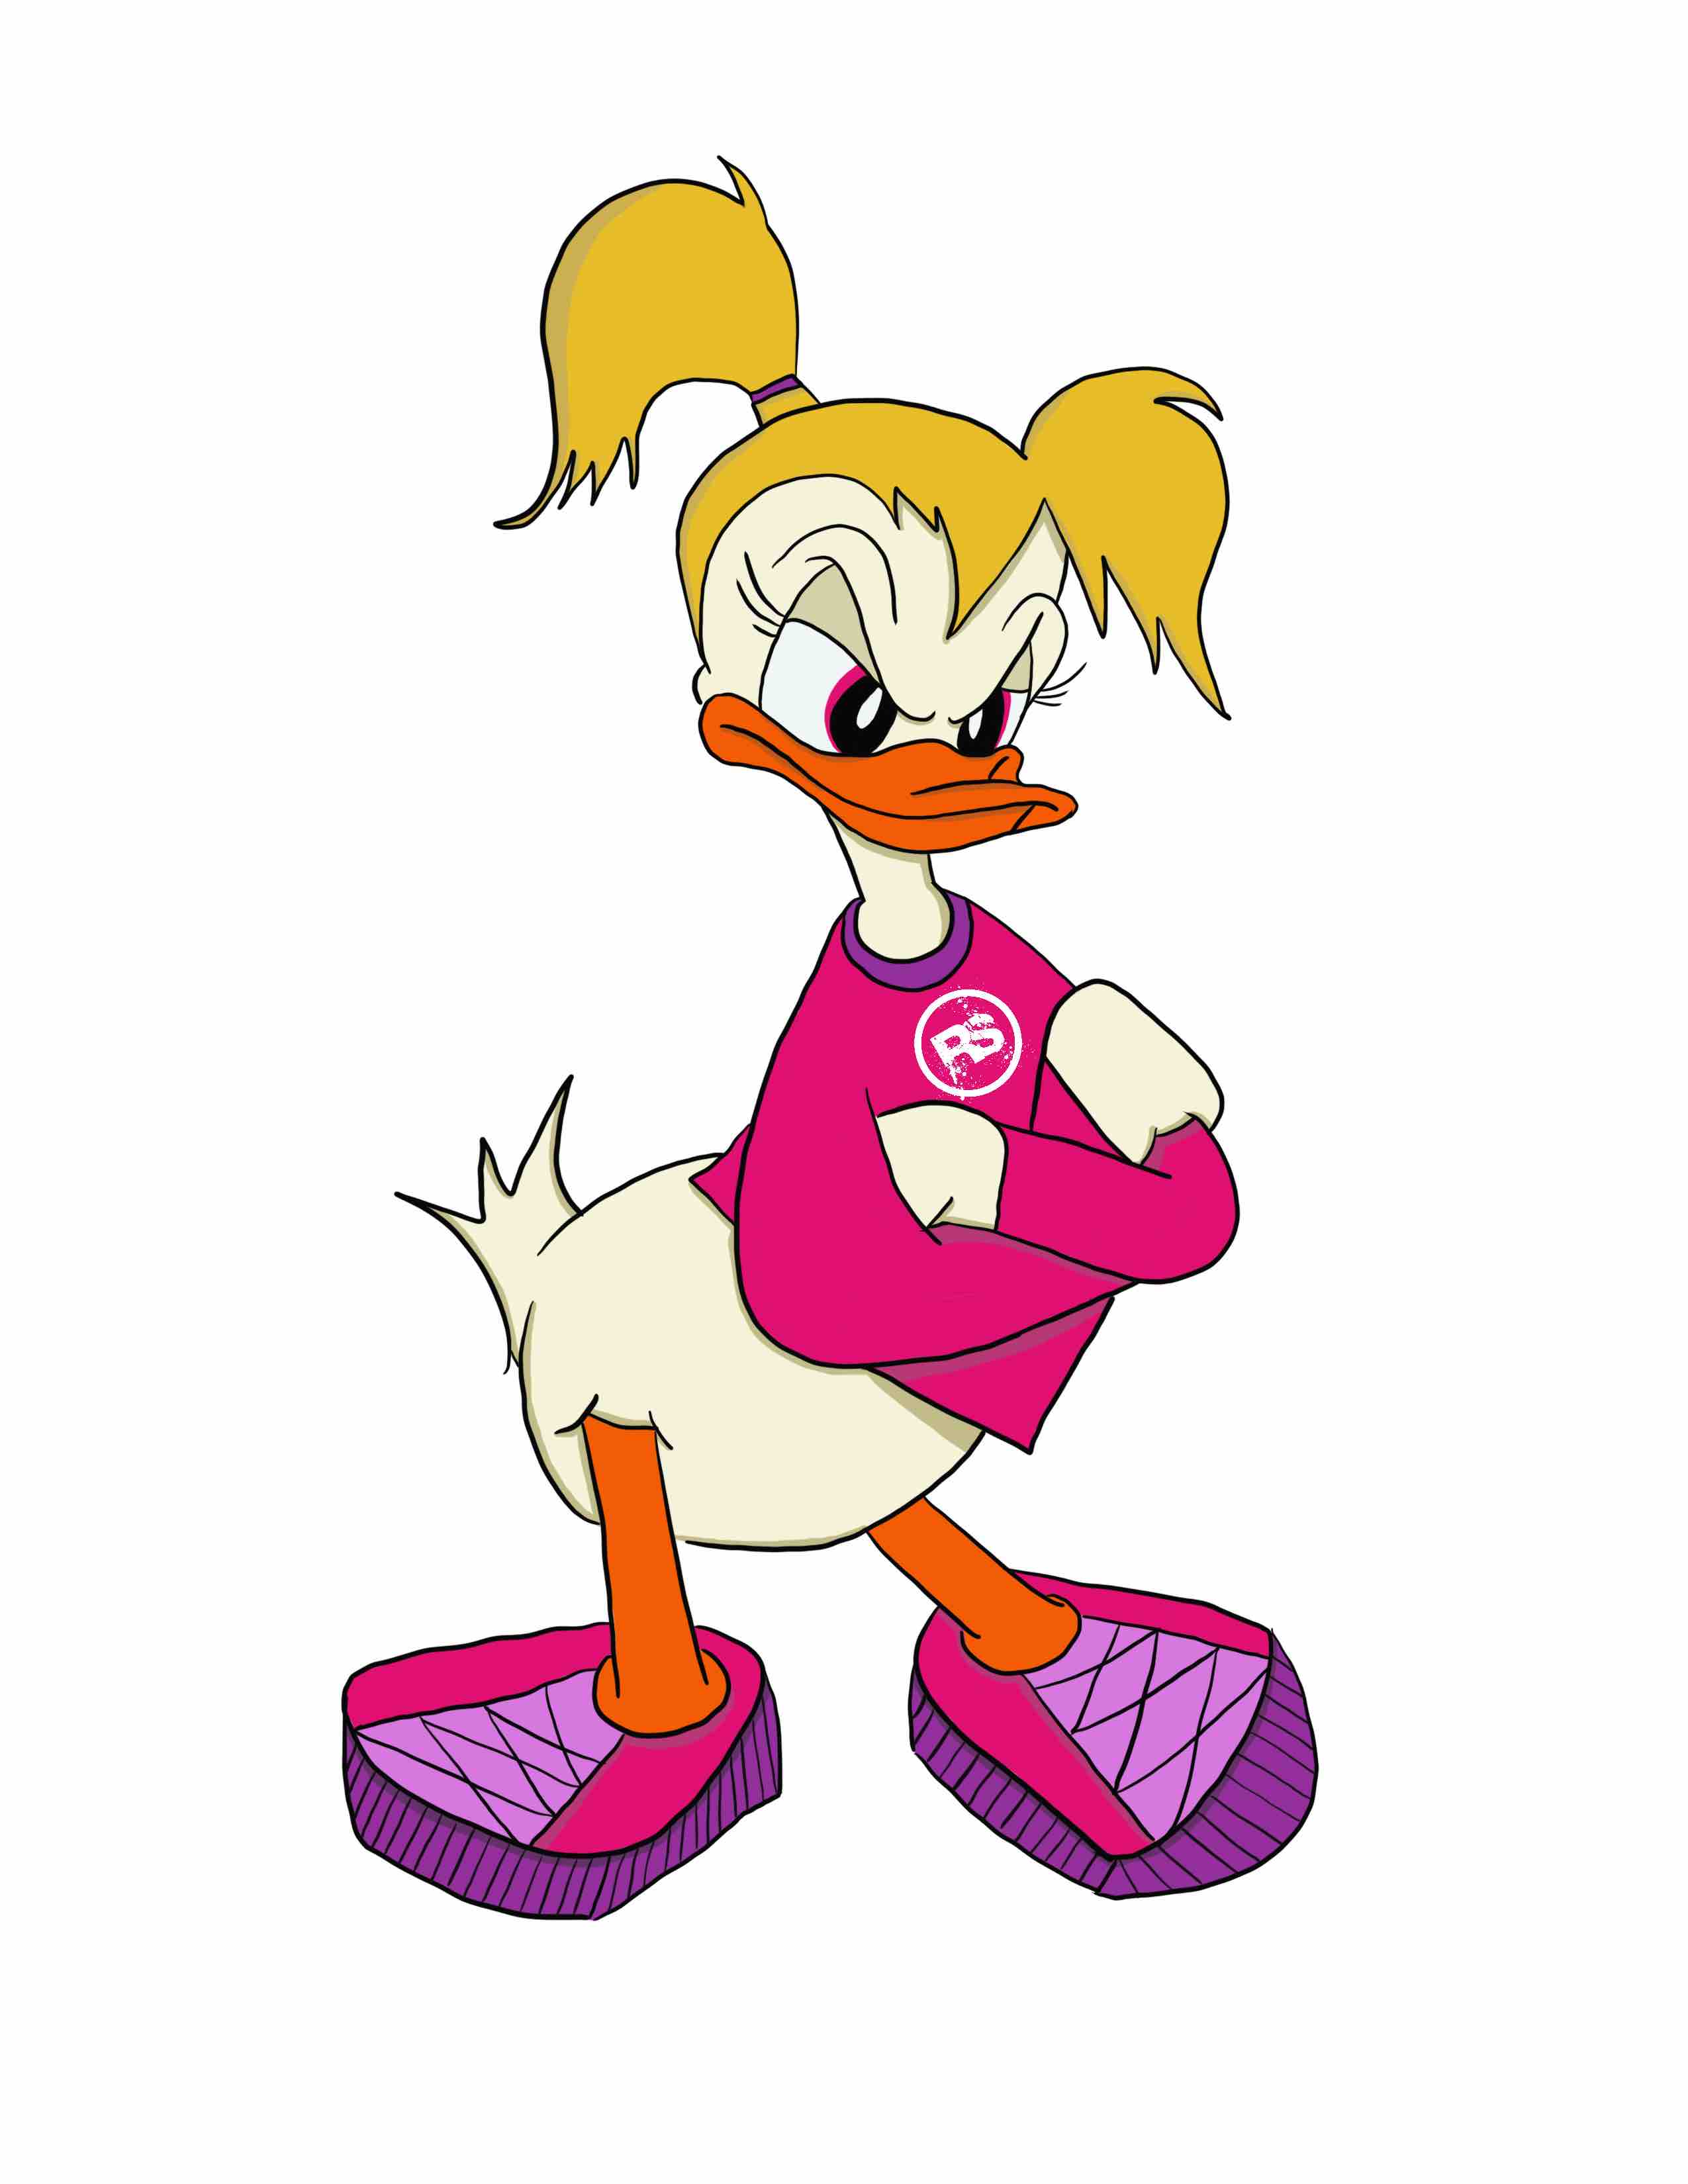
This anterior tilting of our pelvis is what over stretches the hamstrings and can make them feel tight.
The muscles that are ACTUALLY being shortened by this posture are our hip flexors. Which means our hip flexors, and not our hamstrings, need the flexibility work.
It also means that our glutes and abs need to be strengthened and activated to improve the stability of our hip complex to also help our hamstrings feel less tight and even prevent them from becoming synergistically dominant and overused (overuse of a muscle can lead to injury!).
While it’s key we recognize that each of us WILL have slightly different natural postures, and we shouldn’t “freak out” over fitting one ideal, we want to watch for overarching of the lower back, or excessive lordosis, ESPECIALLY if we struggle with lower back, SI Joint, hip, or knee pain or hamstring tightness and strains.
This posture changes our natural proper recruitment patterns during moves EVEN if we perform the exercises with technically “correct” form.
What does this mean?
It means that while the moves may LOOK correct, if we actually THINK about what muscles we FEEL working, it wouldn’t be the muscles that SHOULD be working.
Our body will take the path of least resistance to do the exercise we ask it to do. This means that it will recruit whatever muscles it can to replicate a movement pattern – even if it means using muscles that really shouldn’t be working that much.
And this is what leads to compensations, overuse and INJURY.
So we need to address our overall posture over focusing on just the single muscle that “feels” tight.
And we need to do this by:
- Foam rolling overactive muscles.
- Stretching shortened tight muscles (using dynamic stretching to even help restore proper joint range of motion).
- Activating underactive muscles that may not be firing and working as efficiently or effectively as they should be.
Loosen Up Tight Hip Flexors – Foam Rolling And Stretching Moves
The first step in addressing excessive anterior pelvic tilt is to loosen up short and overactive hip flexors.
If your hip flexors are tight and shortened, they tilt your pelvis forward which then pulls the hamstrings longer. This is why your hamstrings “feel” tight even if they aren’t in need of stretching.
The first step in addressing tight hip flexors is foam rolling.
Foam rolling helps inhibit the communication between the muscle you’re rolling and your brain. It helps “relax” the muscle so you aren’t necessarily as quick to recruit it during other moves. And it then allows you to better stretch and improve your flexibility and mobility.
Basically, foam rolling can help you improve your ROM or range of motion.
There has been some “debate” about the benefits of foam rolling. And as a standalone exercise, the effects are short lived.
You NEED to then stretch the tight muscles and activate underactive muscles if you want the benefits to last. This is just the first step in improving your posture and mind-body connection!
Then after you foam roll your hip flexors, you need to stretch them. Depending on when you are doing the mobility work, you may use dynamic or static stretching.
Dynamic stretches are stretches where you move through a range of motion whereas static stretches are stretches you hold in one position.
Especially prior to your workouts, focus on dynamic stretches. They put the joint through a range of motion and also get your blood pumping.
Static stretches are better kept to cool downs as some studies have shown them to negatively impact your strength and power during workouts.
Below are 5 moves to help you get started addressing hip flexor tightness.
5 Hip Flexor Foam Rolling And Stretching Moves:
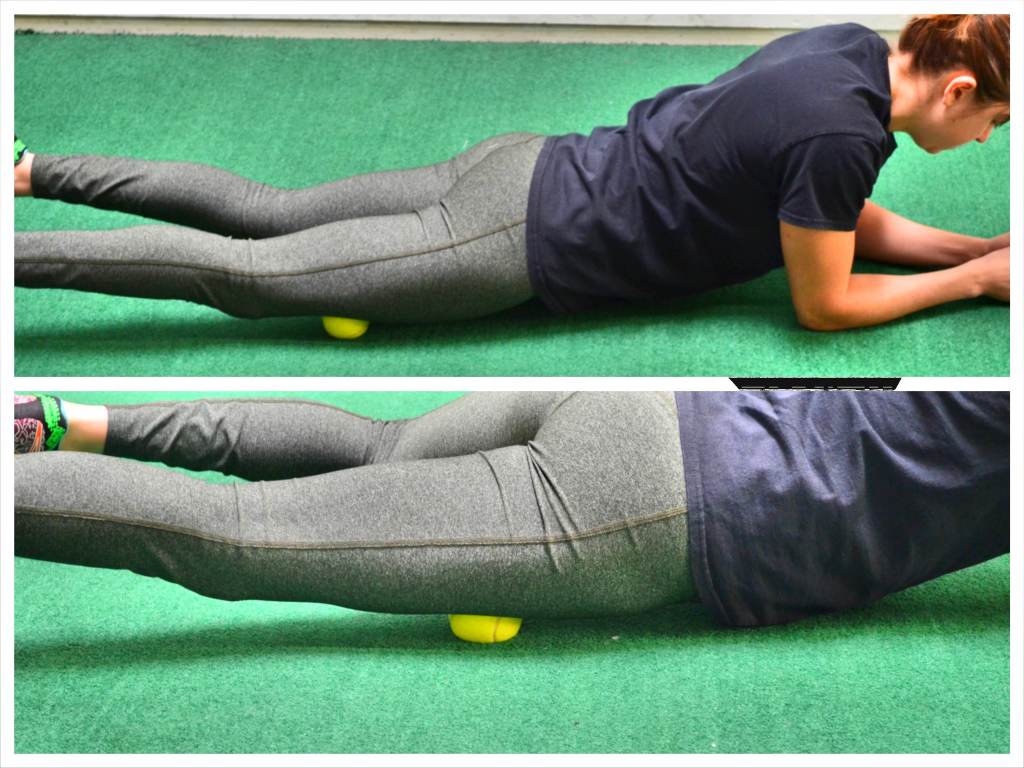
1. Psoas Foam Rolling:
The psoas has become a very “popular” muscle in the fitness world.
And the one most often blamed for our hips being locked up. This muscle can become short and tight due to the fact many of us spend far too much time with our hips in flexion – seated in the car or at a desk. So it is key we start our mobility work by addressing it.
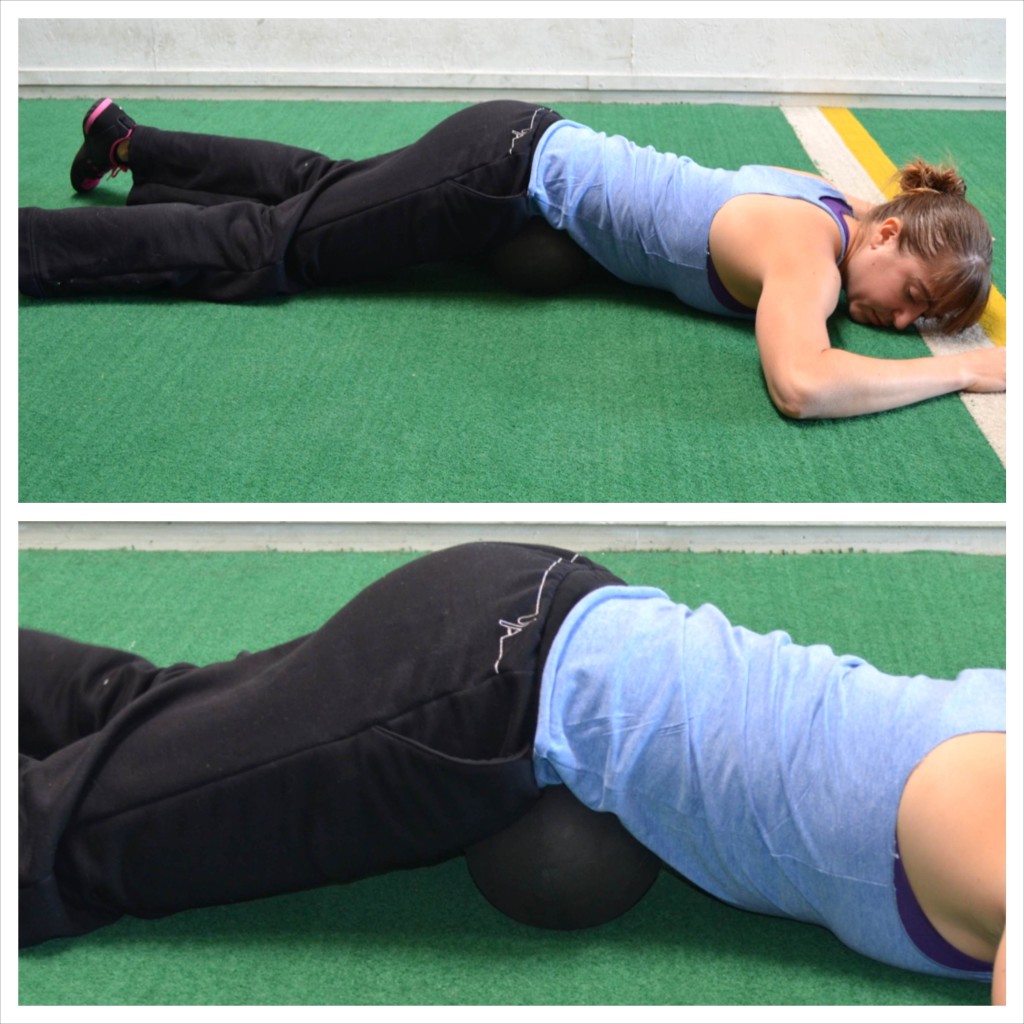
To roll out your Psoas, a big foam ball/posture ball works best. Place the ball in your abs above your hip to one side of your belly button.
Relax over the ball and lie face down on the ground. Breathe.
Then move the ball, working your way around the side of your lower abs between your belly button and hip. After you move the ball, relax completely back over it.
If you don’t have a larger ball, you can use a tennis ball; however, the tennis ball will dig in more. To use the tennis ball, you will also need some books or a yoga block. Place the ball up on the books or block and lie over it just like you would with the posture ball. Relax and breathe.
2. TFL Foam Rolling:
The TFL or Tensor Fasciae Latae is an all too often IGNORED hip muscle that can contribute to not only hip pain but even knee pain and IT Band Issues! It can also hinder our glute medius from activating and working as it should. It’s key we start by foam rolling and then stretching this muscle. It’s also important that during our activation moves, we do not let it compensate and try to take over!
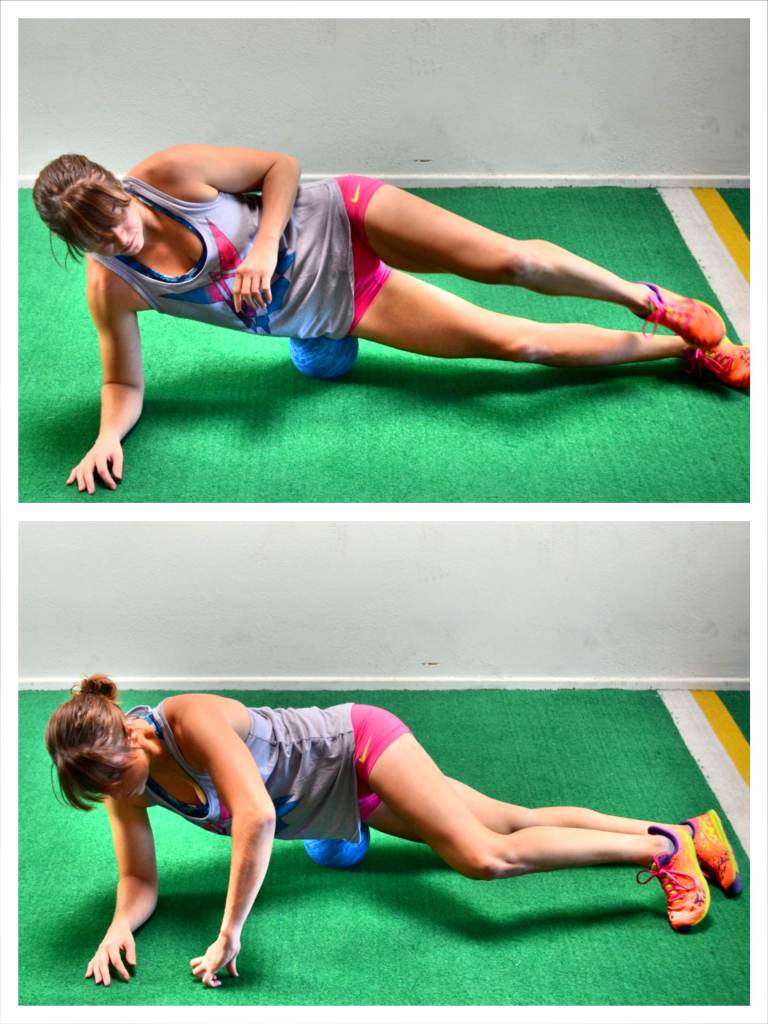
To roll out your Hips/TFL, place a ball on the side of your hip just to the front of the fleshy part of your butt. Roll the ball around and hold on any tight spots.
If you find a tight spot, hold on that spot and lift and lower your leg up and down. By lifting and lower the leg, you are flexing and relaxing the muscle, which will help loosen everything up as you hold.
As you seek out tight spots in your hip, bring the ball around front and right to the side under your hip bone into your TFL (right in front of your IT Band).
Again hold on any tight spots and even flex and relax your leg to help dig in.
Move the ball under your hip bone and again hold on any tight spots.
You can work your way back out to the side of your hip as well if you found any sore or tight spots.
3. Rectus Femoris Foam Rolling:
There is one quad muscle that crosses both the hip and the knee – the Rectus Femoris.
And because of this muscles impact on both locations, it’s key we address that it may be tight and shortened, which means it may need to be rolled and stretched!
To roll out your rectus femoris a ball works best although you can use a roller. Place the tennis ball on the ground and lie on your belly supported on your forearms with the ball right in the middle of your thigh. You can start down toward the knee or higher up toward the hip, but you really want to focus right on that middle portion of your thigh.
Rock the leg gentle slightly side-to-side as you hold on the ball. You can even flex and relax your quad as you hold. Then move the ball up higher on your quad and again gentle rock and hold. Do not just roll quickly but really breathe and relax as you hold on any tight spots.
4. Half Kneeling Hip And Quad Stretch:
Stretch your hip flexors and your quads with this stretch.
You can add movement by releasing your foot and rocking back out of the stretch before squeezing your glute to drive your hips forward OR you can simply hold as you squeeze your glute for a static option!
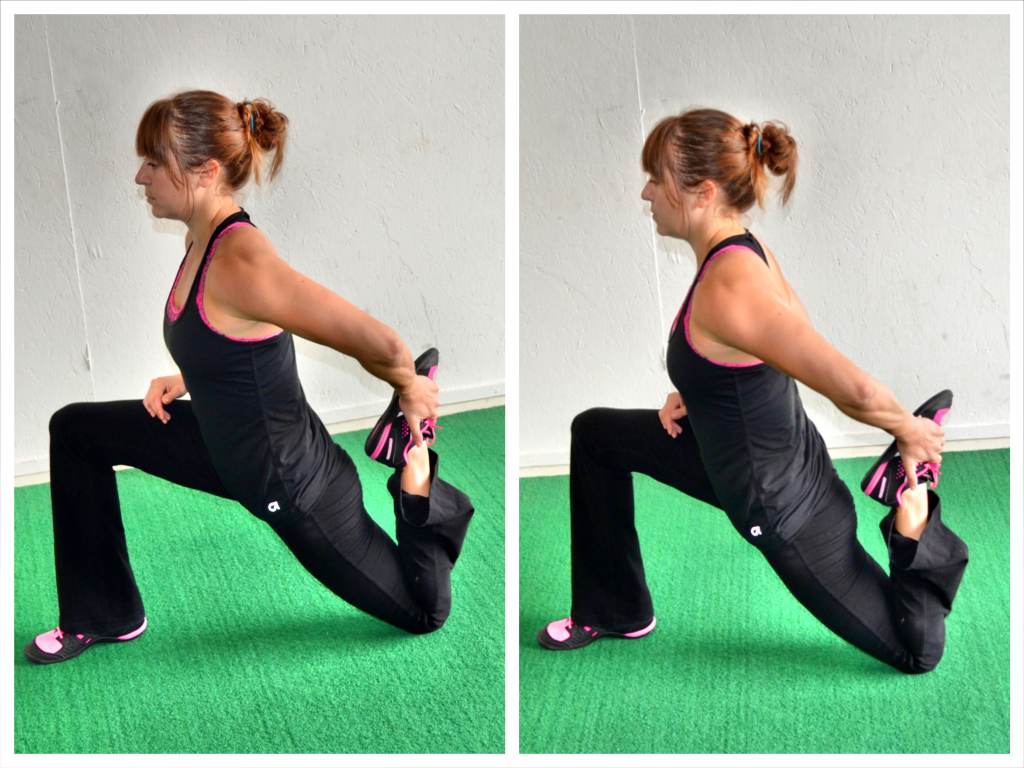
To do the Half Kneeling Hip and Quad Stretch, set up half-kneeling with your right leg back. It is best to do this with a wall or bench in front of you to help you balance.
Then reach back and grab your right foot/ankle with your right hand and pull it in toward your butt. In the half-kneeling position with your heel pulled in and the wall to balance you, rock forward and backward, pressing the hip forward to increase the stretch down your quad. Then relax back out of it and repeat. Complete all reps then switch sides.
Make sure to squeeze your glute as you press your hips forward to stretch your right hip and quad. Do not simply hyperextend your low back as you rock forward.
You can also simply hold and press the hip forward without doing the slightly rock, especially if using this stretch post workout.
Beginners can also use a towel to grab their back foot if they can’t reach it.
5. Standing TFL Stretch:
After you roll your TFL, you also want to stretch it as this muscle can be short and tight and compensate for your glute medius during abduction or lateral raise movements.
And when it engages and works for your glute medius, that can prevent you from getting the results you want and even perpetuate your pain despite doing the “correct” rehab moves!
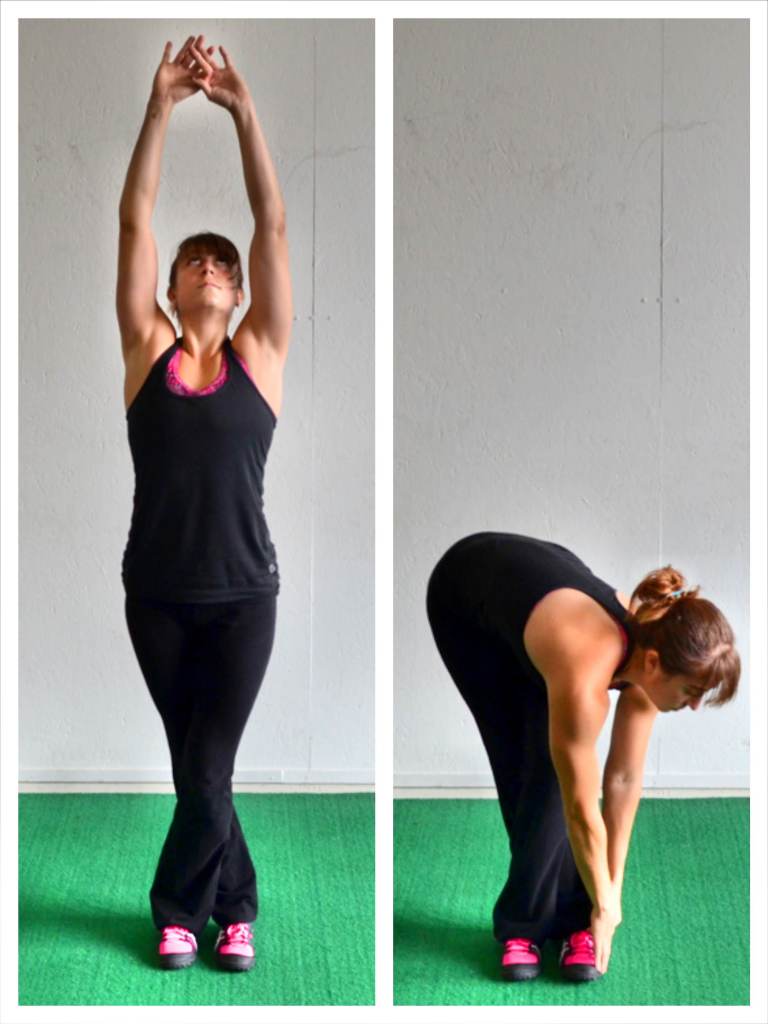
To do the Standing TFL Stretch, start standing with your feet together. Then cross your left leg over your right leg. Bring the left foot over and back across until the big toe is even with the big toe of the right foot. You want your feet even so that your front leg (the left leg) is pressing the back leg (right leg) straight during the stretch.
If you struggle to balance or it is too much pressure on your knees to have your legs so tightly crossed, place the front foot a bit out in front, but make sure that you don’t bend that back knee as you hinge over to stretch.
Then reach your arms up overhead for a nice big stretch. After reaching up, hang over, reaching your arms down toward the instep of the back foot (right foot). Push your hips out to the right as you reach toward your right foot so you feel a stretch down the outside of that right hip and side. You may even feel it down your right hamstring and calf.
Hold for a breath or two. Then reach back up overhead and cross your legs the other way so your left foot is back. Again reach up overhead then reach down toward your left instep, pushing your hips out to the left. Keep alternating sides with a reach up overhead in between every time.
Try to touch the ground as you reach down while making sure to keep your legs straight.
If you really struggle to balance, you may need to stand with your feet together and not crossed over as you reach toward the outside of each foot while pushing your hips away.
How Can Your Lats Can Affect Your Hamstrings!?
When we have aches, pains or “issues” in a specific area, we often get very focused ONLY on that point of “pain.”
But all too often there are even mobility restrictions or imbalances elsewhere that contribute to the dysfunction. For instance, if you’re doing all of the things in this article and NOT seeing results, it may be time you start to look at your ANKLE MOBILITY!
So while the most common “culprit” of anterior pelvic tilt is tight hip flexors and underactive glutes, we can’t ignore our lats.
Our lats can play a huge role in our overall posture, affecting not only our upper body, but also our lower body.
Because lat tightness can not only perpetuate rounded shoulders, it can also contribute to anterior pelvic tilt.
And if we have excessive anterior pelvic tilt, our hamstrings really are the losers that suffer no matter whether it’s tight hip flexors or lats or both creating the posture.
So we can’t ignore our lats!
Below are 3 moves to help you start addressing lat tightness.
3 Foam Rolling And Stretching Moves For Tight Lats:
1. Lat Foam Rolling:
Rolling out your lats is a key first step to relaxing this overactive muscle. And even though we are focused on our lumbo-pelvic-hip complex, we want to focus on rolling this muscle closer to our shoulders to start!
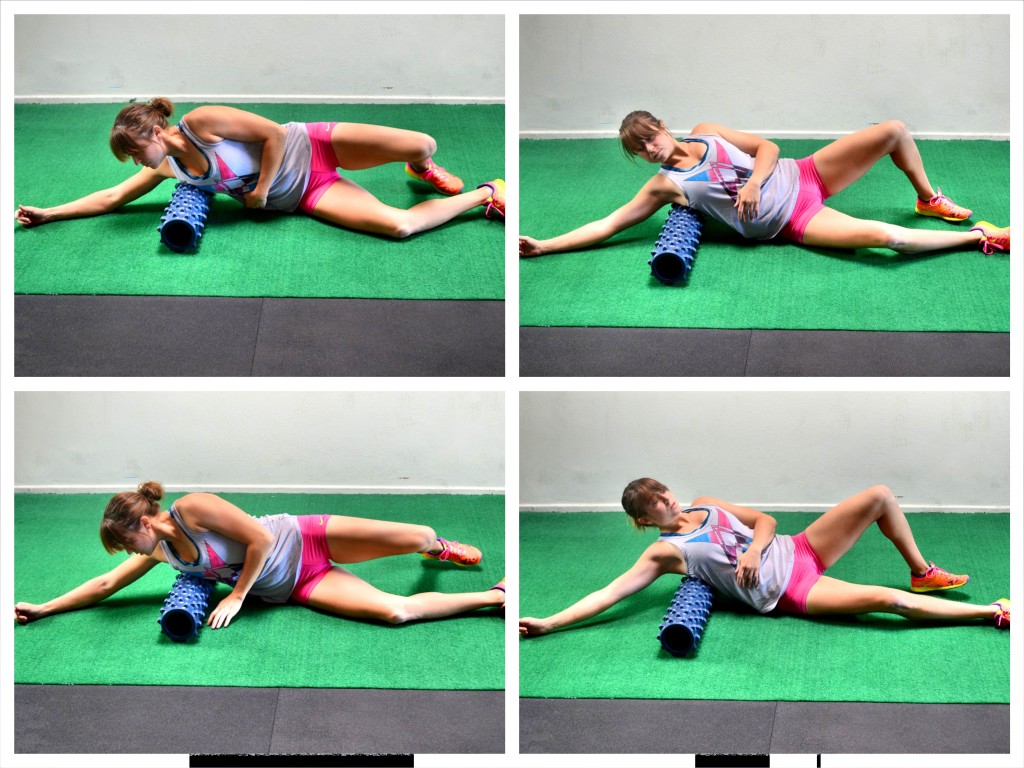
To roll out your lats a roller is best although you can use a foam ball or even a tennis ball.
Start by lying on your side with a roller under one armpit. Extend the arm on the side with the roller up above the roller. Then rock forward and backward on the roller, rotating your chest toward the ground and then up toward the ceiling as you roll on the roller so it hits toward your ribs and then toward your back.
Hold on any tight spots you find then move it lower down the side of your back. Hold on any tight spots as you go and make sure to rock forward and backward as you make your way down your side.
As you work down your side, you may want to rotate slightly more toward your back. Work all the way from your armpit to about the end of your rib cage.
Be careful when rolling lower down your back into your low back. You do not want to arch over the roller and hyperextend your low back.
2. Child’s Pose With Shoulder External Rotation:
The Child’s Pose is a great way to stretch out the entire lat as well as the erector spinae (the muscles along your spine) and the quadratus lumborum (which is a muscle that can contribute to a hip hike…sort of like our back’s side bendy muscle or the muscle you feel when you reach to the side).
All of these muscles can become tight and overactive if our glutes are underactive so this stretch is an oh so important one! And the external rotation of the shoulders gives the lats just that little bit extra stretch!
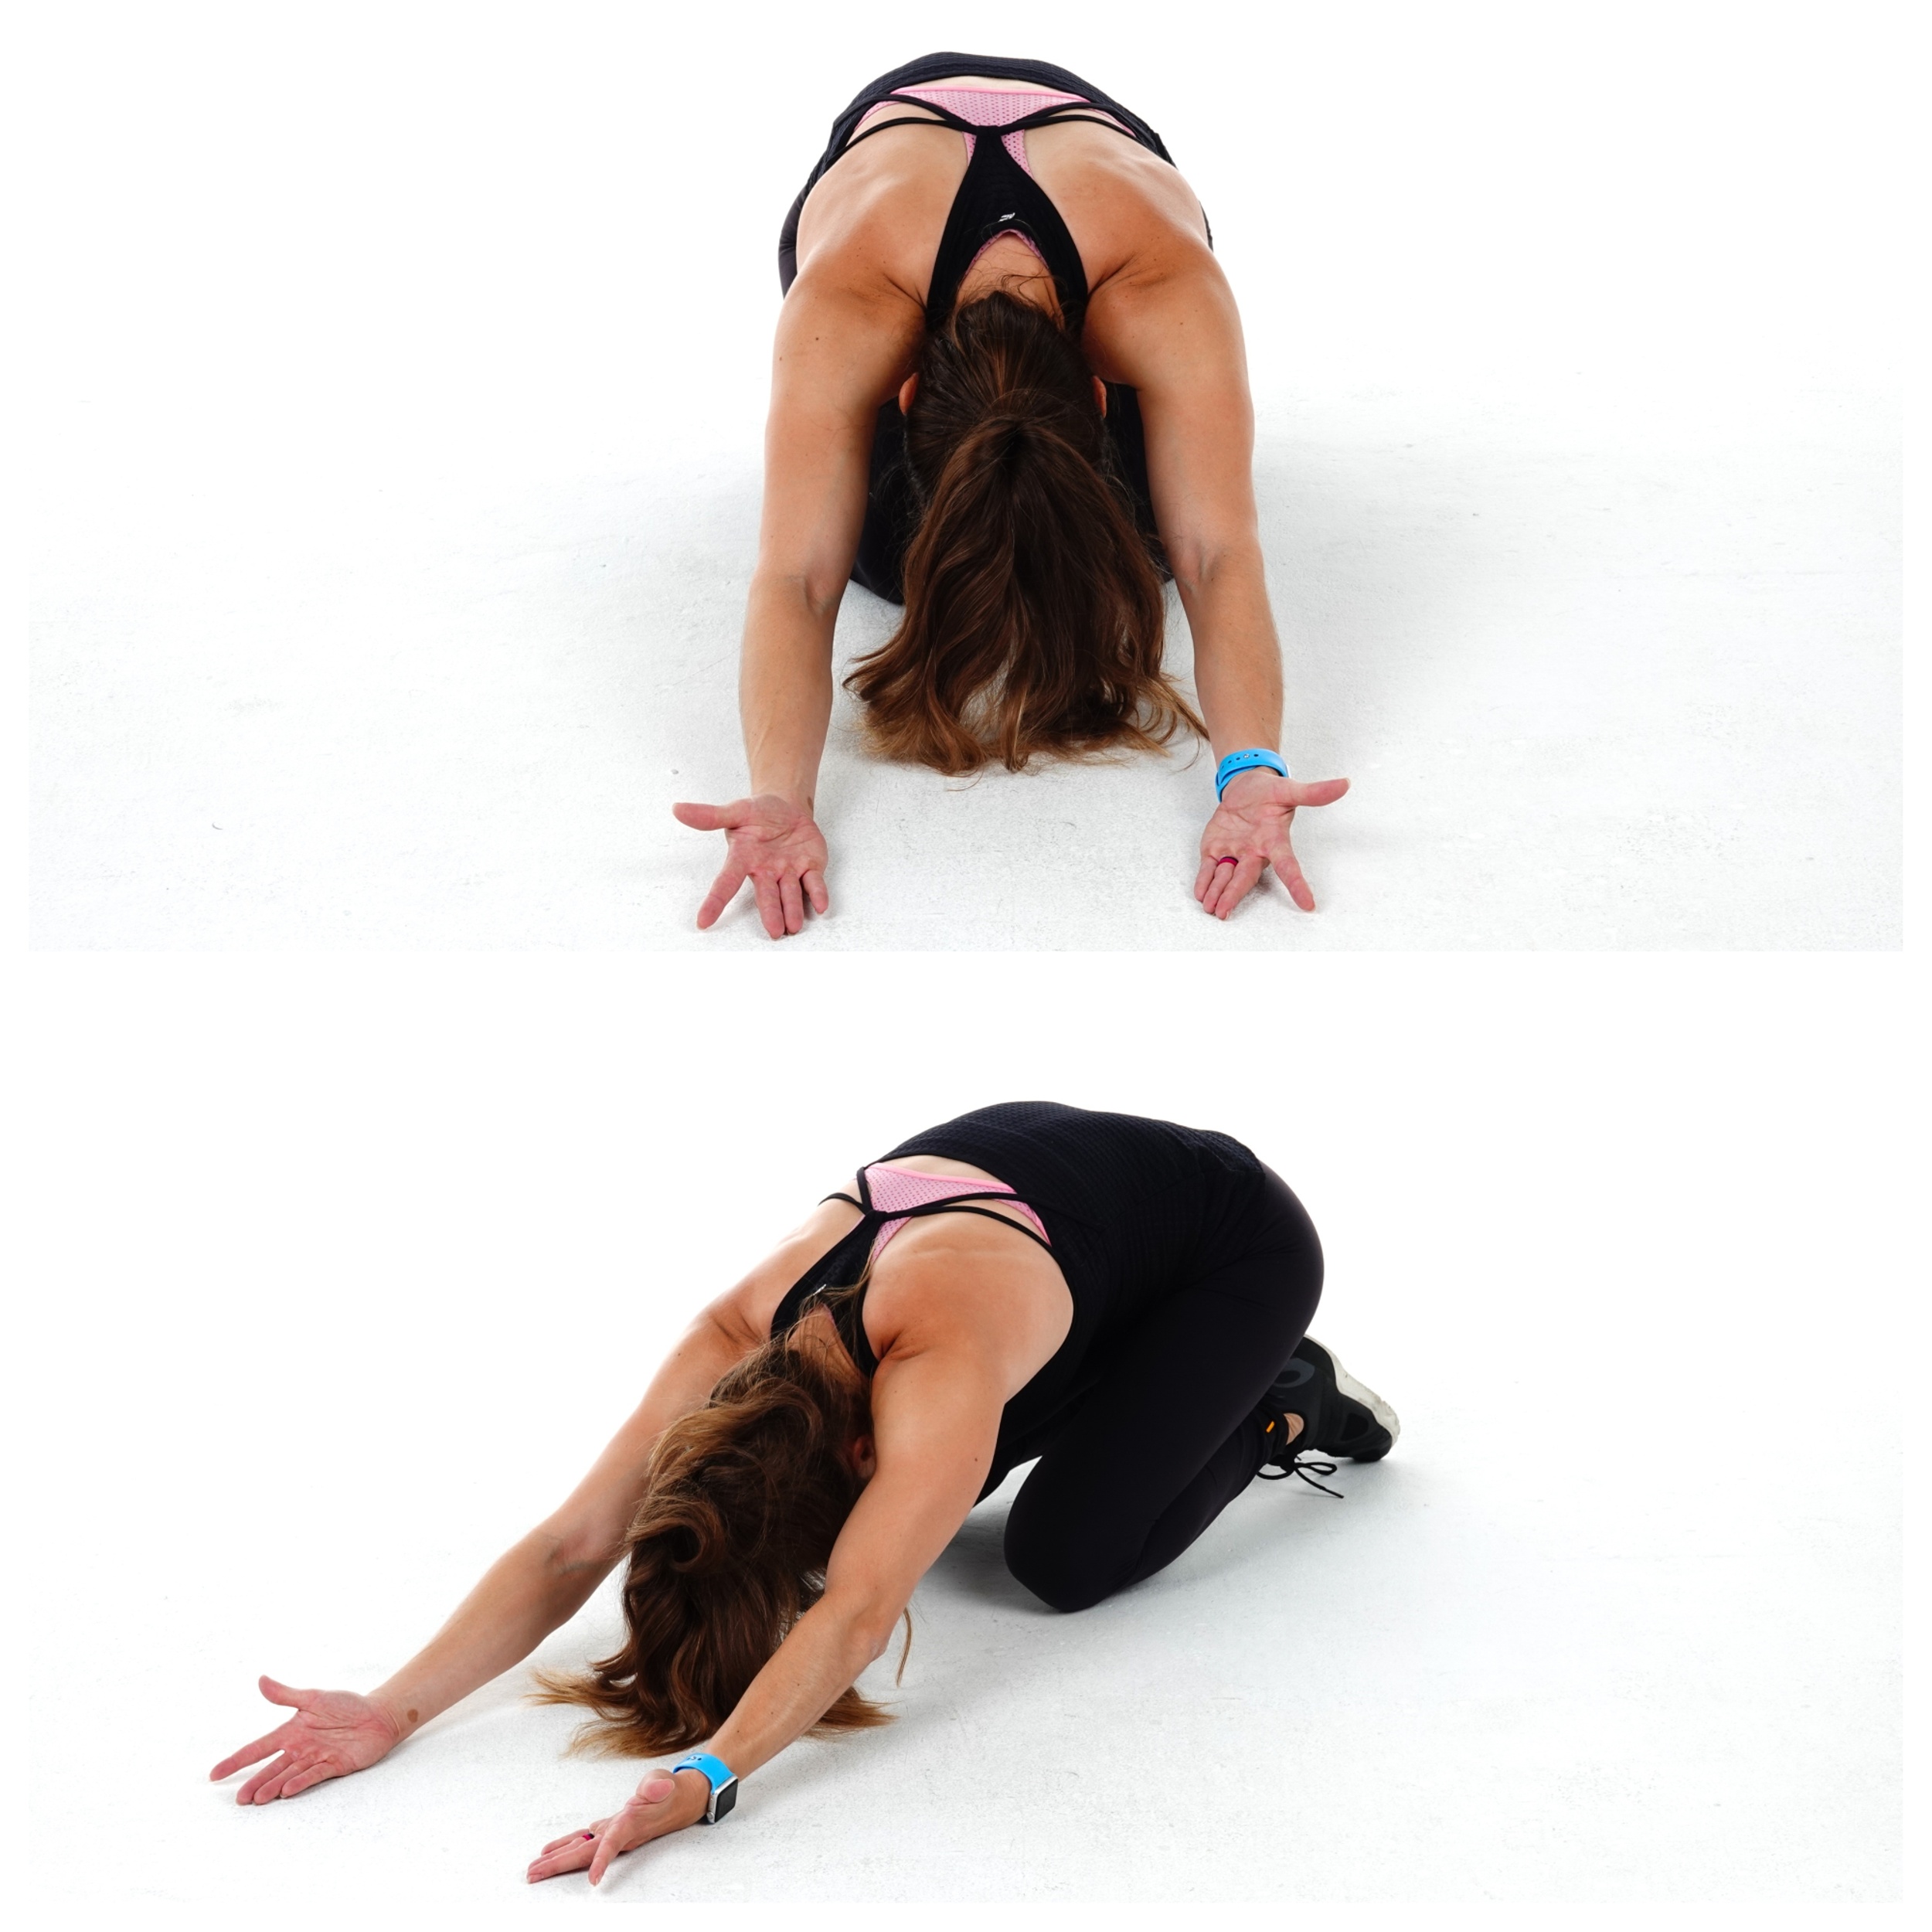
To do the Child’s Pose with External Rotation, kneel on the ground and sit back on your heels reaching your arms out overhead on the ground. Rotate your palms open toward the ceiling rotating your thumbs out to the sides. Really reach out as far as you can as you rotate your palms open.
You can then walk your hands to one side, keeping your palms open. Pause then walk your hands to the other side. Again keep your palms open for an extra stretch.
3. Kneeling Thoracic Extension And Lat Stretch:
Working on our spinal mobility, especially our thoracic mobility can also help prevent extra overuse of our lumbar spine. If one area of our spine isn’t mobile, we’ll seek out mobility from other segments.
So if your thoracic spine isn’t mobile, it will cause you to seek out mobility or extension from your lumbar spine. This will only perpetuate or add to the overload that may already be occurring due to anterior pelvic tilt!
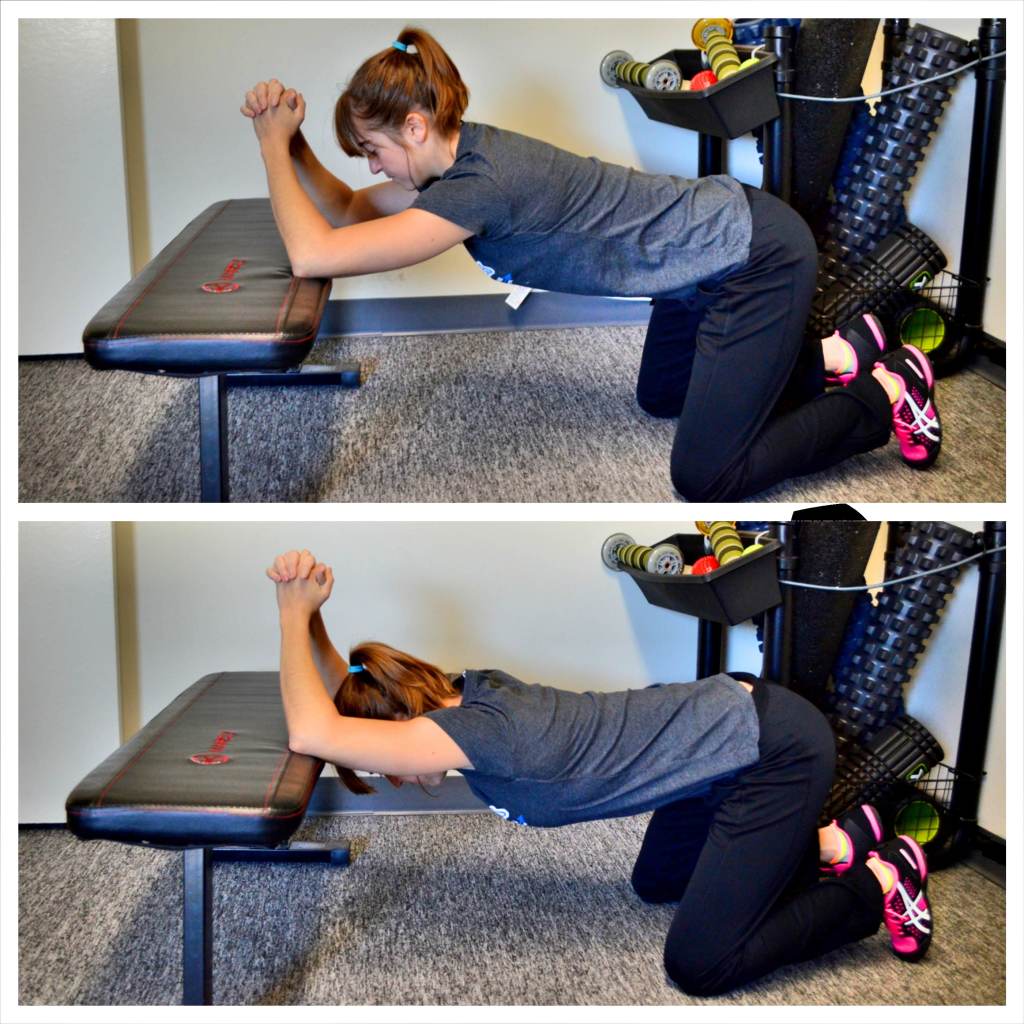
To do the Kneeling Thoracic and Lat Stretch, place your elbows up on a bench about shoulder-width apart and kneel on the ground in front of the bench. Make sure you are back far enough that you have room to lean forward and over and drop your head between your elbows.
Then with your elbows on the bench, relax your chest and head over, sitting your butt back just slightly. Press your chest toward the ground and feel a nice stretch down your triceps and lats as well as through your thoracic spine. Try to extend your back as much as possible as you press your chest toward the ground.
You can either hold here and breathe to stretch deeper or you can come out of the stretch and then relax back into it and try to get further with each rep.
Glute Activation Moves: Always Feel Your Hamstrings Taking Over During Glute Exercises?
Ever do a glute bridge or quadruped kickback move and only feel your hamstrings working?
Yes? Well you aren’t alone!
It’s because your hamstrings have become synergistically dominant. They try to do more than their fair share of the work to assist your glutes in moves that require hip extension or hyperextension.
Synergistically what?!?
Basically your hamstrings are doing more work than they should be to assist with a movement because you’re glutes aren’t working as they should.
For a glute bridge, your glutes should be the main muscle group working with your hamstrings assisting. But too often, it is the other way around.
It’s why you may do a glute bridge and only feel your hamstrings.
So while we are doing the right move, this only perpetuates the overuse of our hamstrings and can lead to injuries.
It’s why it’s so important we include glute activation moves in our routine. (Learn more about dialing in your glute bridge form to prevent yourself from bridging wrong.)
But isn’t as simple as doing the “right” moves. You must also really focus on what you FEEL working.
If you’re doing that glute bridge and NOT feeling your glutes, but instead feeling your hamstrings, you need to TWEAK the exercise.
Below are 5 moves to activate your glutes that help prevent your hamstrings from engaging as easily when they always seem to want to take over!
I did also mention that with anterior pelvic tilt you may want to do ab activation as well.
One way to do this DURING glute activation moves is by using the posterior pelvic tilt, especially during bridging exercises (and even some plank moves).
The posterior pelvic tilt is where you tilt your hips under, drawing your hip bones toward your ribs. This move not only works your abs but can also work your glutes more.
You would then bridge up as you hold the posterior pelvic tilt. To set up the posterior pelvic tilt before you bridge, here are some tips.
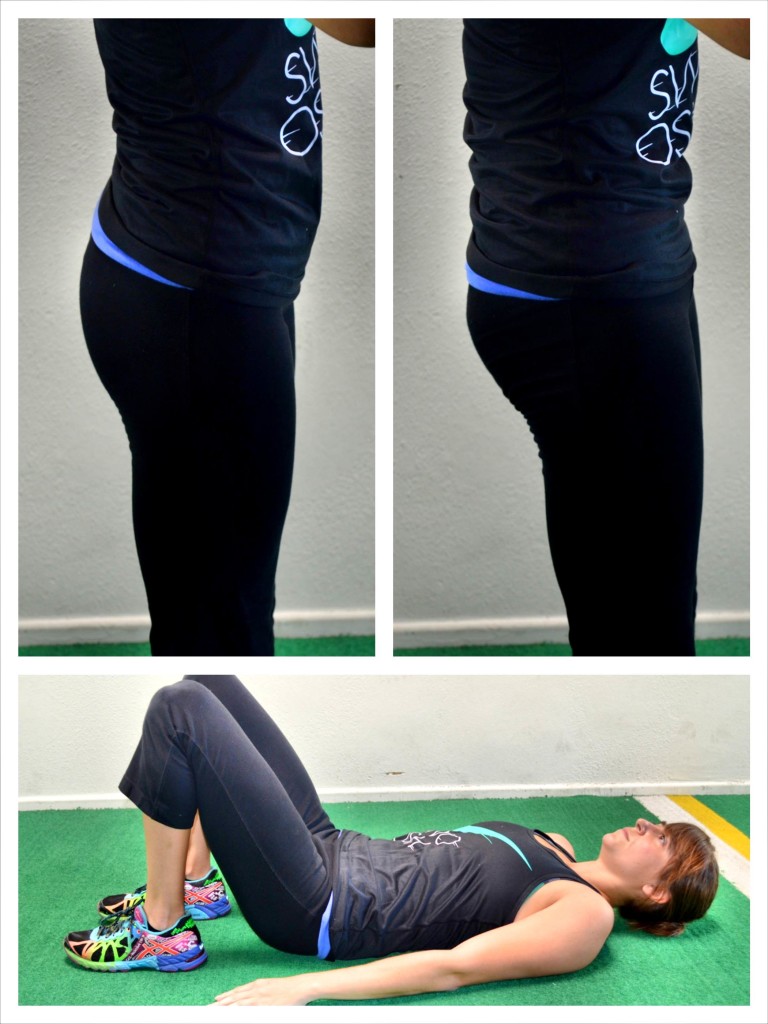
To do the basic variation of the Pelvic Tilt, lie on your back with your knees bent and your feet flat on the ground. Relax your arms down by your side.
Then feel the space between your low back and the ground. Press that space away by drawing your belly button toward your spine and “tilting” your pelvic.
You want to feel your low back press against the ground. Hold there with your abs braced and making sure to breathe as you hold.
Then if you are adding this to a bridge, you would lift up while maintaining this position. It is basically the exact OPPOSITE of anterior pelvic tilt. We are rounding the lower back.
SIDE NOTE But ESSENTIAL NOTE:
If you DO feel your hamstrings during a glute activation move, while you don’t want to stretch them between rounds, you may ROLL them!
Foam rolling your hamstrings may temporarily inhibit the muscle group, which means you won’t “feel” it as much. This can then even help you more easily FEEL your glutes working and focus on using them to drive the movement.
5 Must-Do Glute Activation Moves:
1. Mini Band Glute Bridge:
Adding a mini band to the basic glute bridge can be a way to progress the movement. It can also be a way to engage your glute medius and help PREVENT your hamstrings from taking over.
By activating our glute medius, we can actually better help ourselves engage our glute maximus. This then helps us avoid our hamstrings compensating! So if you really struggle with the basic glute bridge, try this variation!
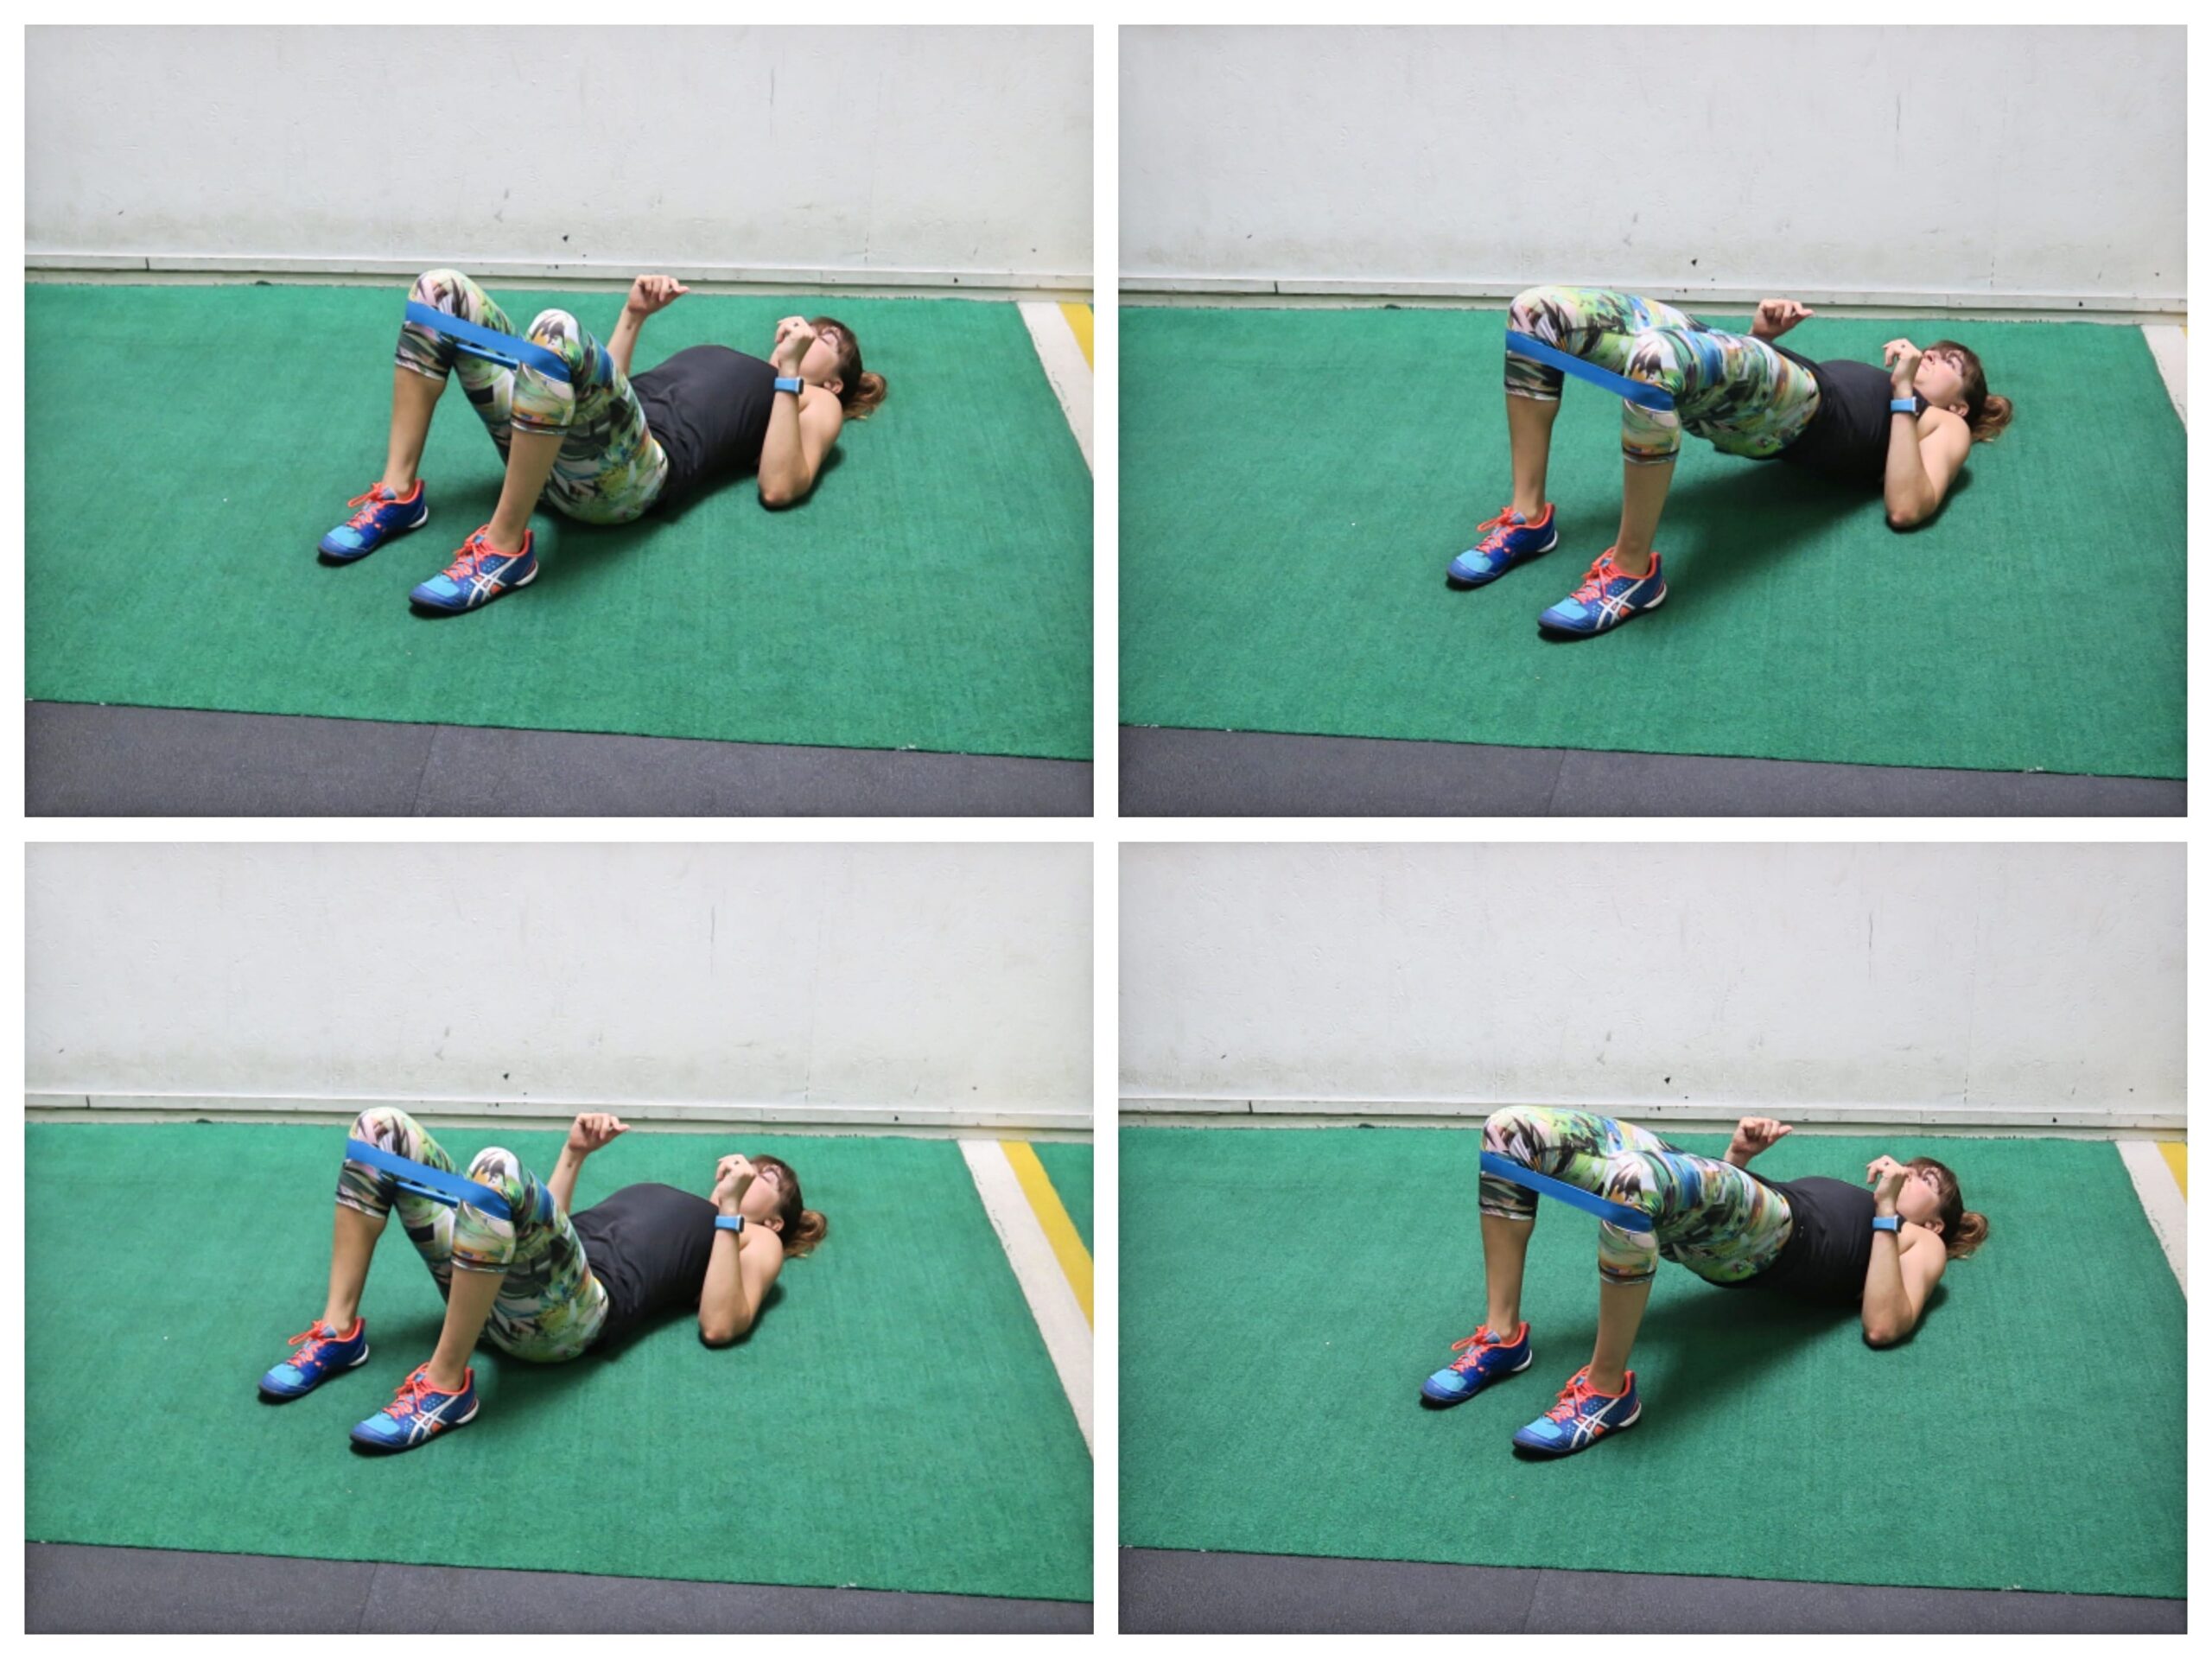
To do the Mini Band Glute Bridge, you will perform a two-leg bridge with the band around your knees. To set up, place the band right above, below or at your knees. Below will be a bit more challenging than above. Make sure though that wherever you place the band, you feel your glutes working. Above the knee can help if you struggle to feel your glutes activating and instead feel your quads taking over.
With the band around your knees, lie flat on your back with your feet flat on the ground about hip-width to shoulder-width apart. Make sure your feet are just beyond your fingertips when your arms are down by your sides. You can move your feet slightly further away if your hips are tight. Make sure that your feet are at least about hip-width apart so that you are forced to press your knees out and open against the band to keep them in line with your ankles and hips.
Bend your elbows to 90 degrees and press your knees out against the band. Then, driving through your heels and upper back and arms, bridge up. Keep pressing out against the band as you bridge up. Do not let your knees cave in. Fully extend your hips and squeeze your glutes at the top. Do not hyperextend your low back at the top. Keep your abs engaged.
Hold for a second or two at the top then lower back down and repeat. Do not let your knees cave in as you lower back down. Keep pressing out against the band the entire time!
Adjust the band placement or even use a heavier band to make the move harder. You can also vary the move up by doing a Single Leg Mini Band Glute Bridge.
2. Band Y Reverse Hypers:
Being able to use your glutes to extend your hips, and even hyperextend your hips, is key. Too often during Reverse Hypers we allow our backs to do all of the work instead of actually extending at our hip.
By adding in the mini band, we can help engage our glutes better to prevent our lower back from taking over.
Because if we are using our lower backs to power this move, we are often going to simply perpetuate our anterior pelvic tilt by perpetuating overuse of our lower back muscles instead of activating our underactive glutes!
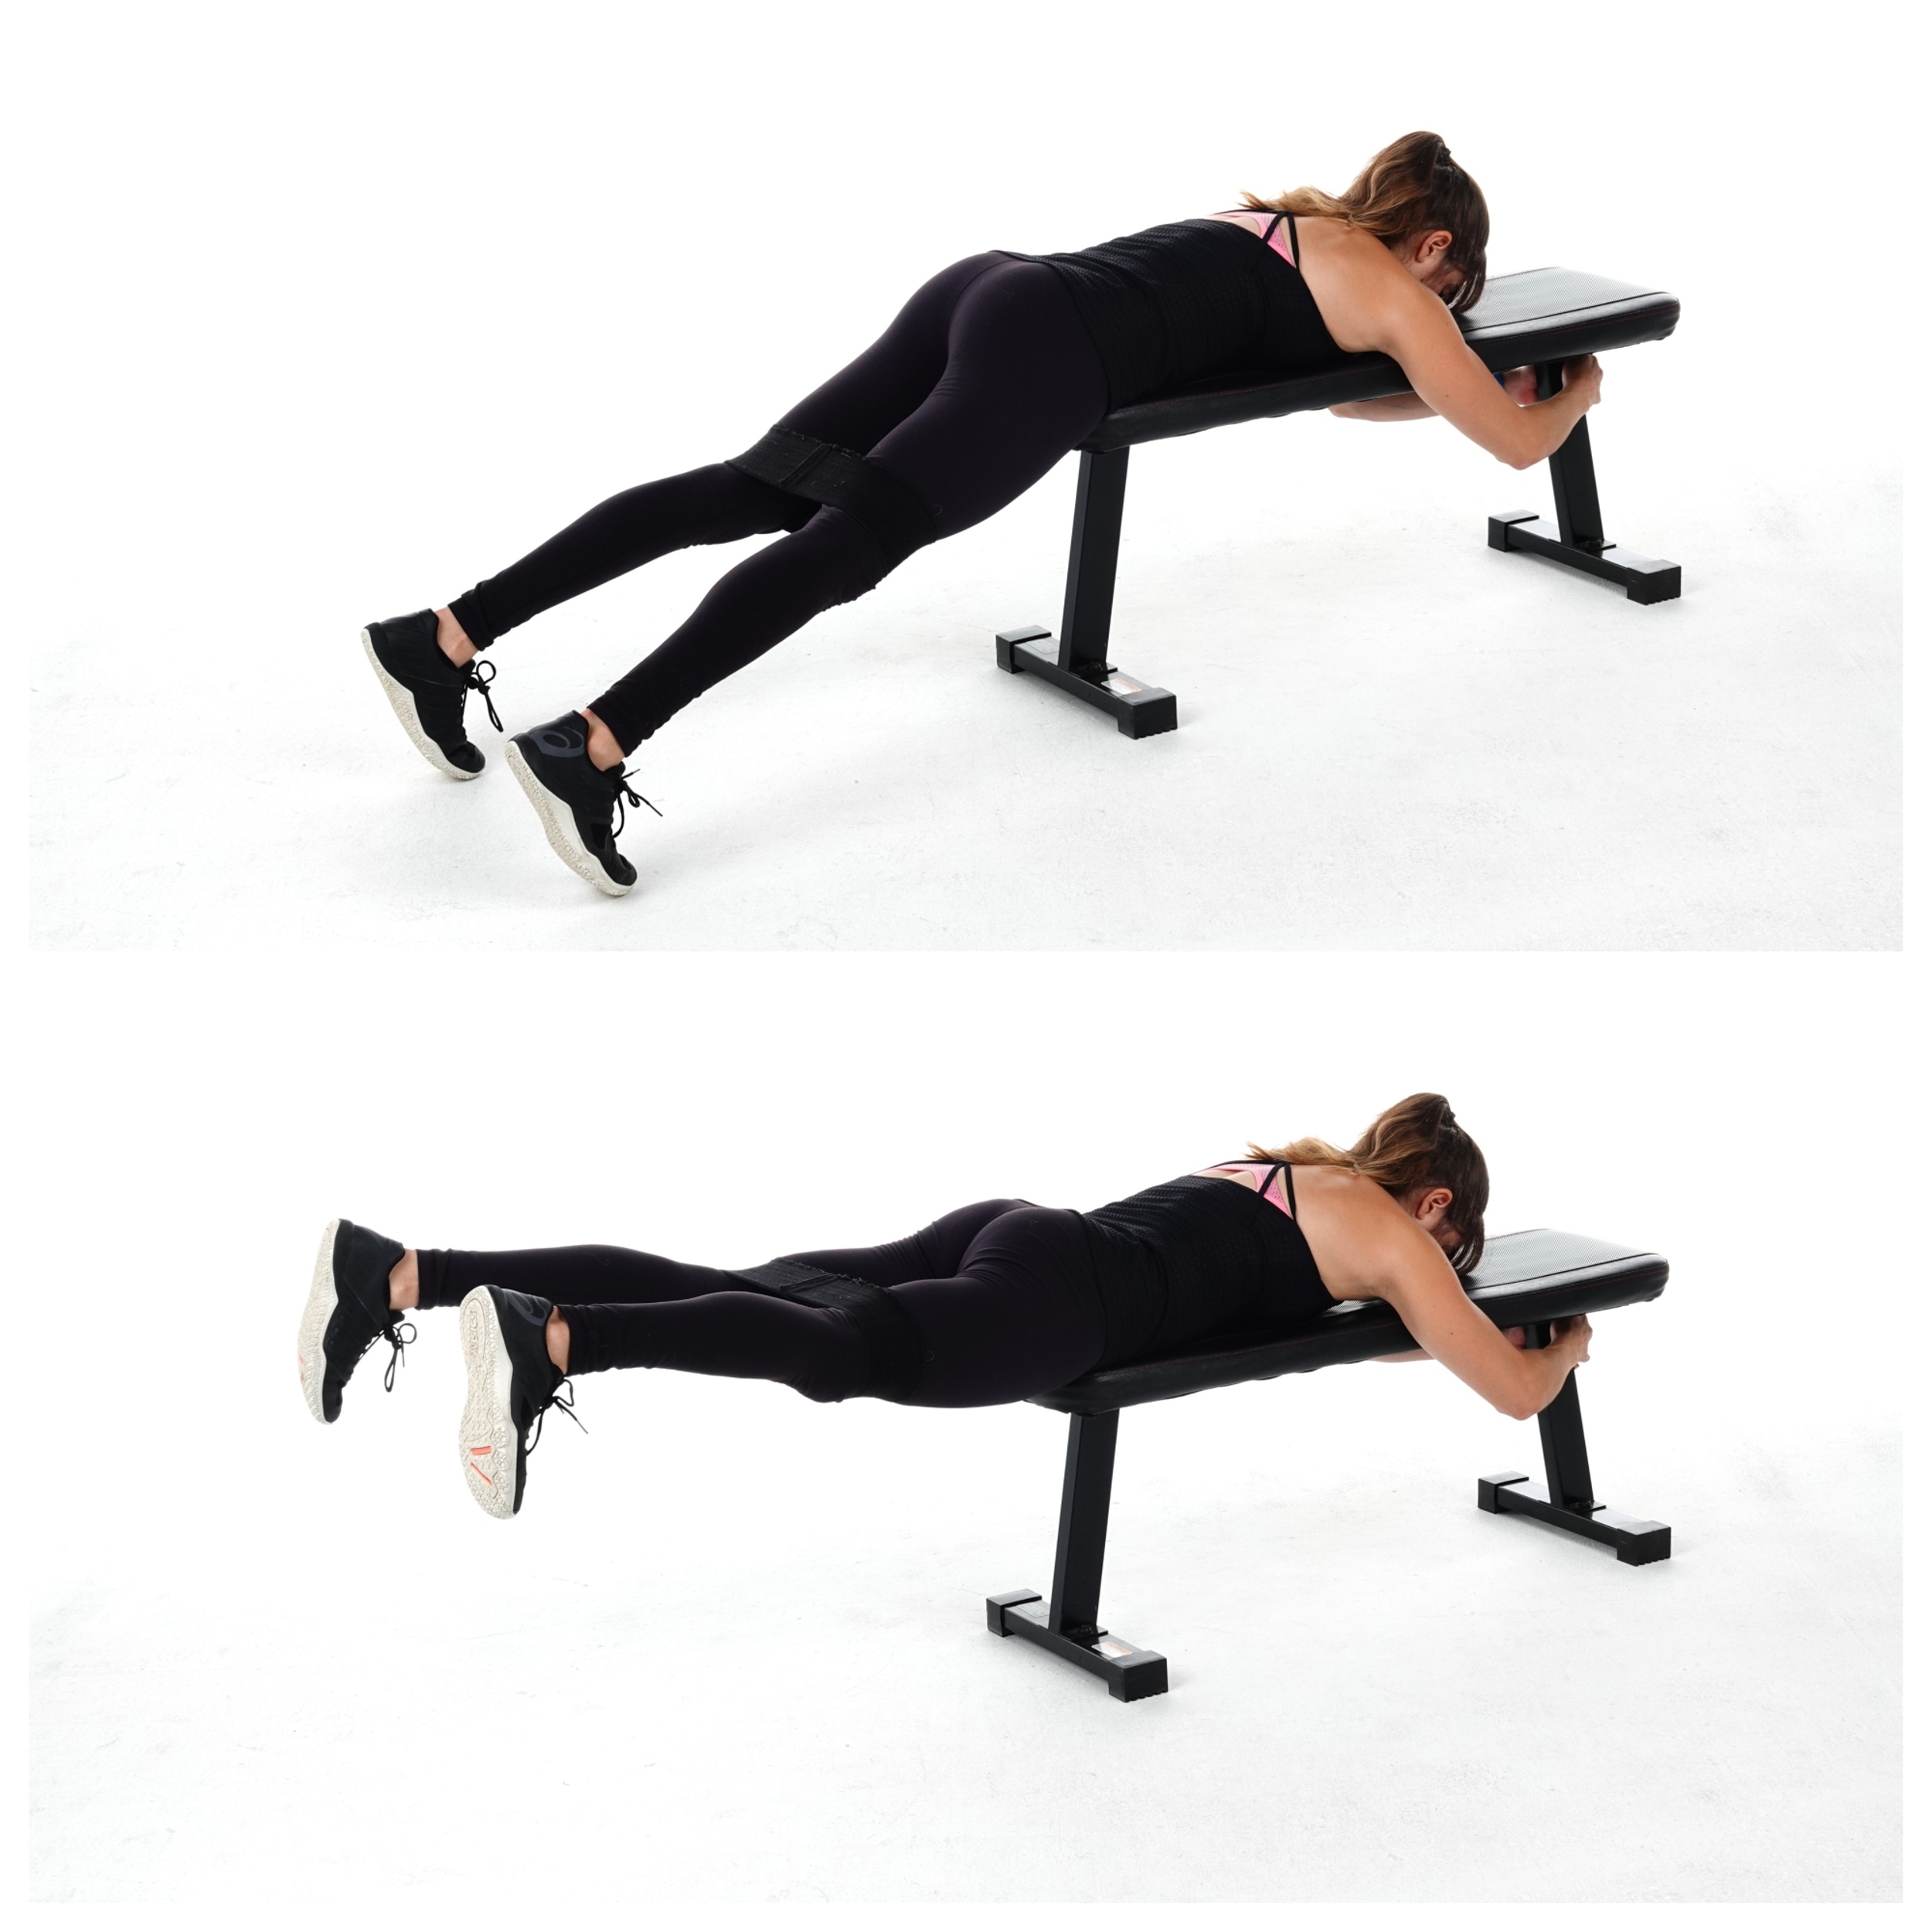
To do Band Y Reverse Hypers, place a mini band right below or above your knees or a booty band right above your knees and lie face down on a bench with your hips right on the edge of the bench. Grab onto the bench as you legs hang straight down. Push out against the band as your feet are on the ground so that your feet are wider than shoulder width apart. You want your legs to create a Y with your body.
Keeping tension on the band, press your hips down into the bench as you squeeze your butt to lift your legs up to parallel to the ground. Keep your legs pressed out against the band and make sure you are using your glutes to lift and not feeling your lower back take over.
Pause at the top and really even brace your abs by pushing into the bench. Then lower back down without letting your legs come together and repeat the lift.
3. Band Squat Pulses:
While often during activation moves we want to isolate our glutes as much as possible to focus on really establishing that mind-body connection, it is also key we learn how to do this in a variety of hip flexion positions and postures.
That’s why the Band Squat Pulses are key to include. The constant tension and smaller range of motion, really help you create that burn in your glutes!
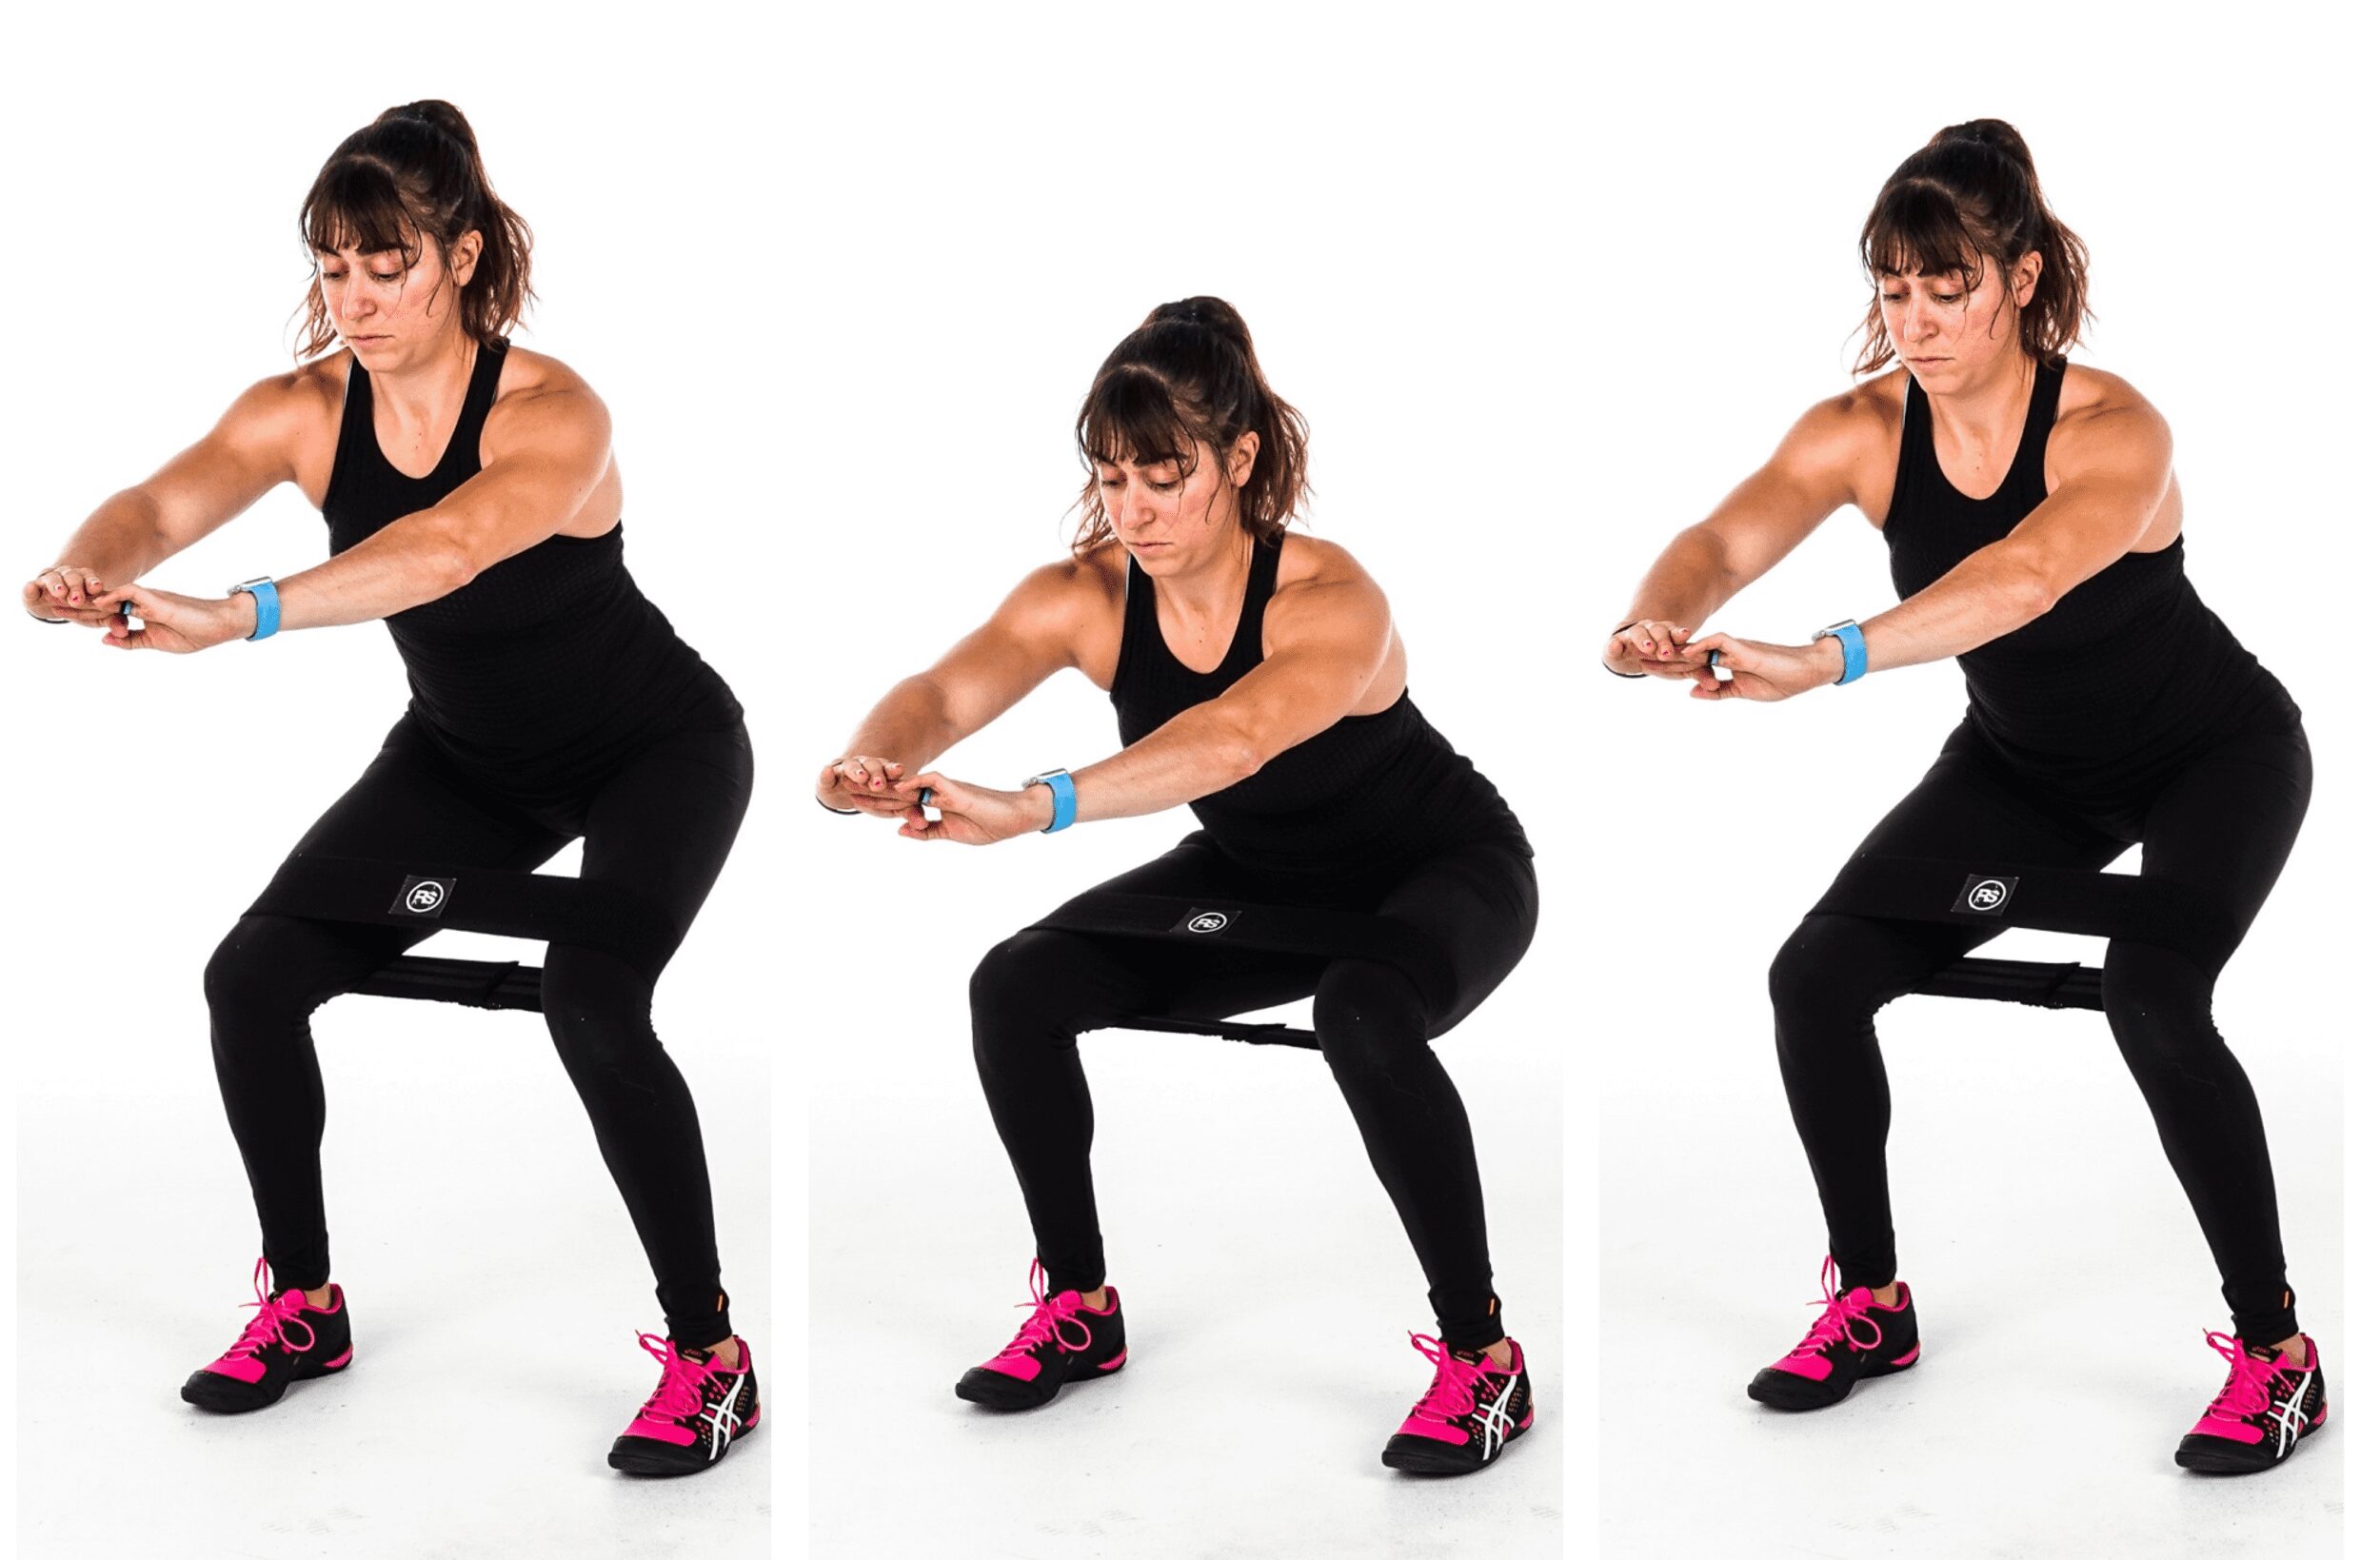
To do Band Squat Pulses, place the booty band around your legs above your knees and stand with your feet about hip-width apart.
Sit back and down, pressing your knees out against the band so your ankles, knees and hips stay in line. You do not want your knees to cave in.
Sink to about parallel to the ground and then pulse a few inches up and down from here. You do not want to start below parallel and you don’t want to stand fully up as you pulse. You want the range of motion to be about 6 inches around that parallel position.
Once all pulses are complete, stand up.
Make sure your knees don’t cave in as you pulse and that your heels stay down and feet are flat on the ground. Do not round over. Make sure to keep your back flat and chest up.
Beginners may pulse over a bench or even hold on to help them balance. You can also stay up higher in the pulse squat instead of sinking as low.
4. 3-Way Seated Abductions:
As you begin to work on activating your glutes, you may find you aren’t as easily able to FEEL the correct muscles working during certain postures.
This may mean you need to first start with the variations you feel in the correct muscles before then moving on to those other positions. But you want to work to improve that mind-body connection from as many positions and postures as possible to help you avoid injury.
That’s why these 3-Way Seated Abductions are so amazing to include.
While you may start with just one based on what you can feel working during the move, especially if your TFL tends to take over (and you feel it in the front of your hip NOT the side of your butt), you can also use all 3 in a row. If you find you struggle most in one position, use that in the middle after you already feel the correct muscles working BUT before you’re at all fatigued!
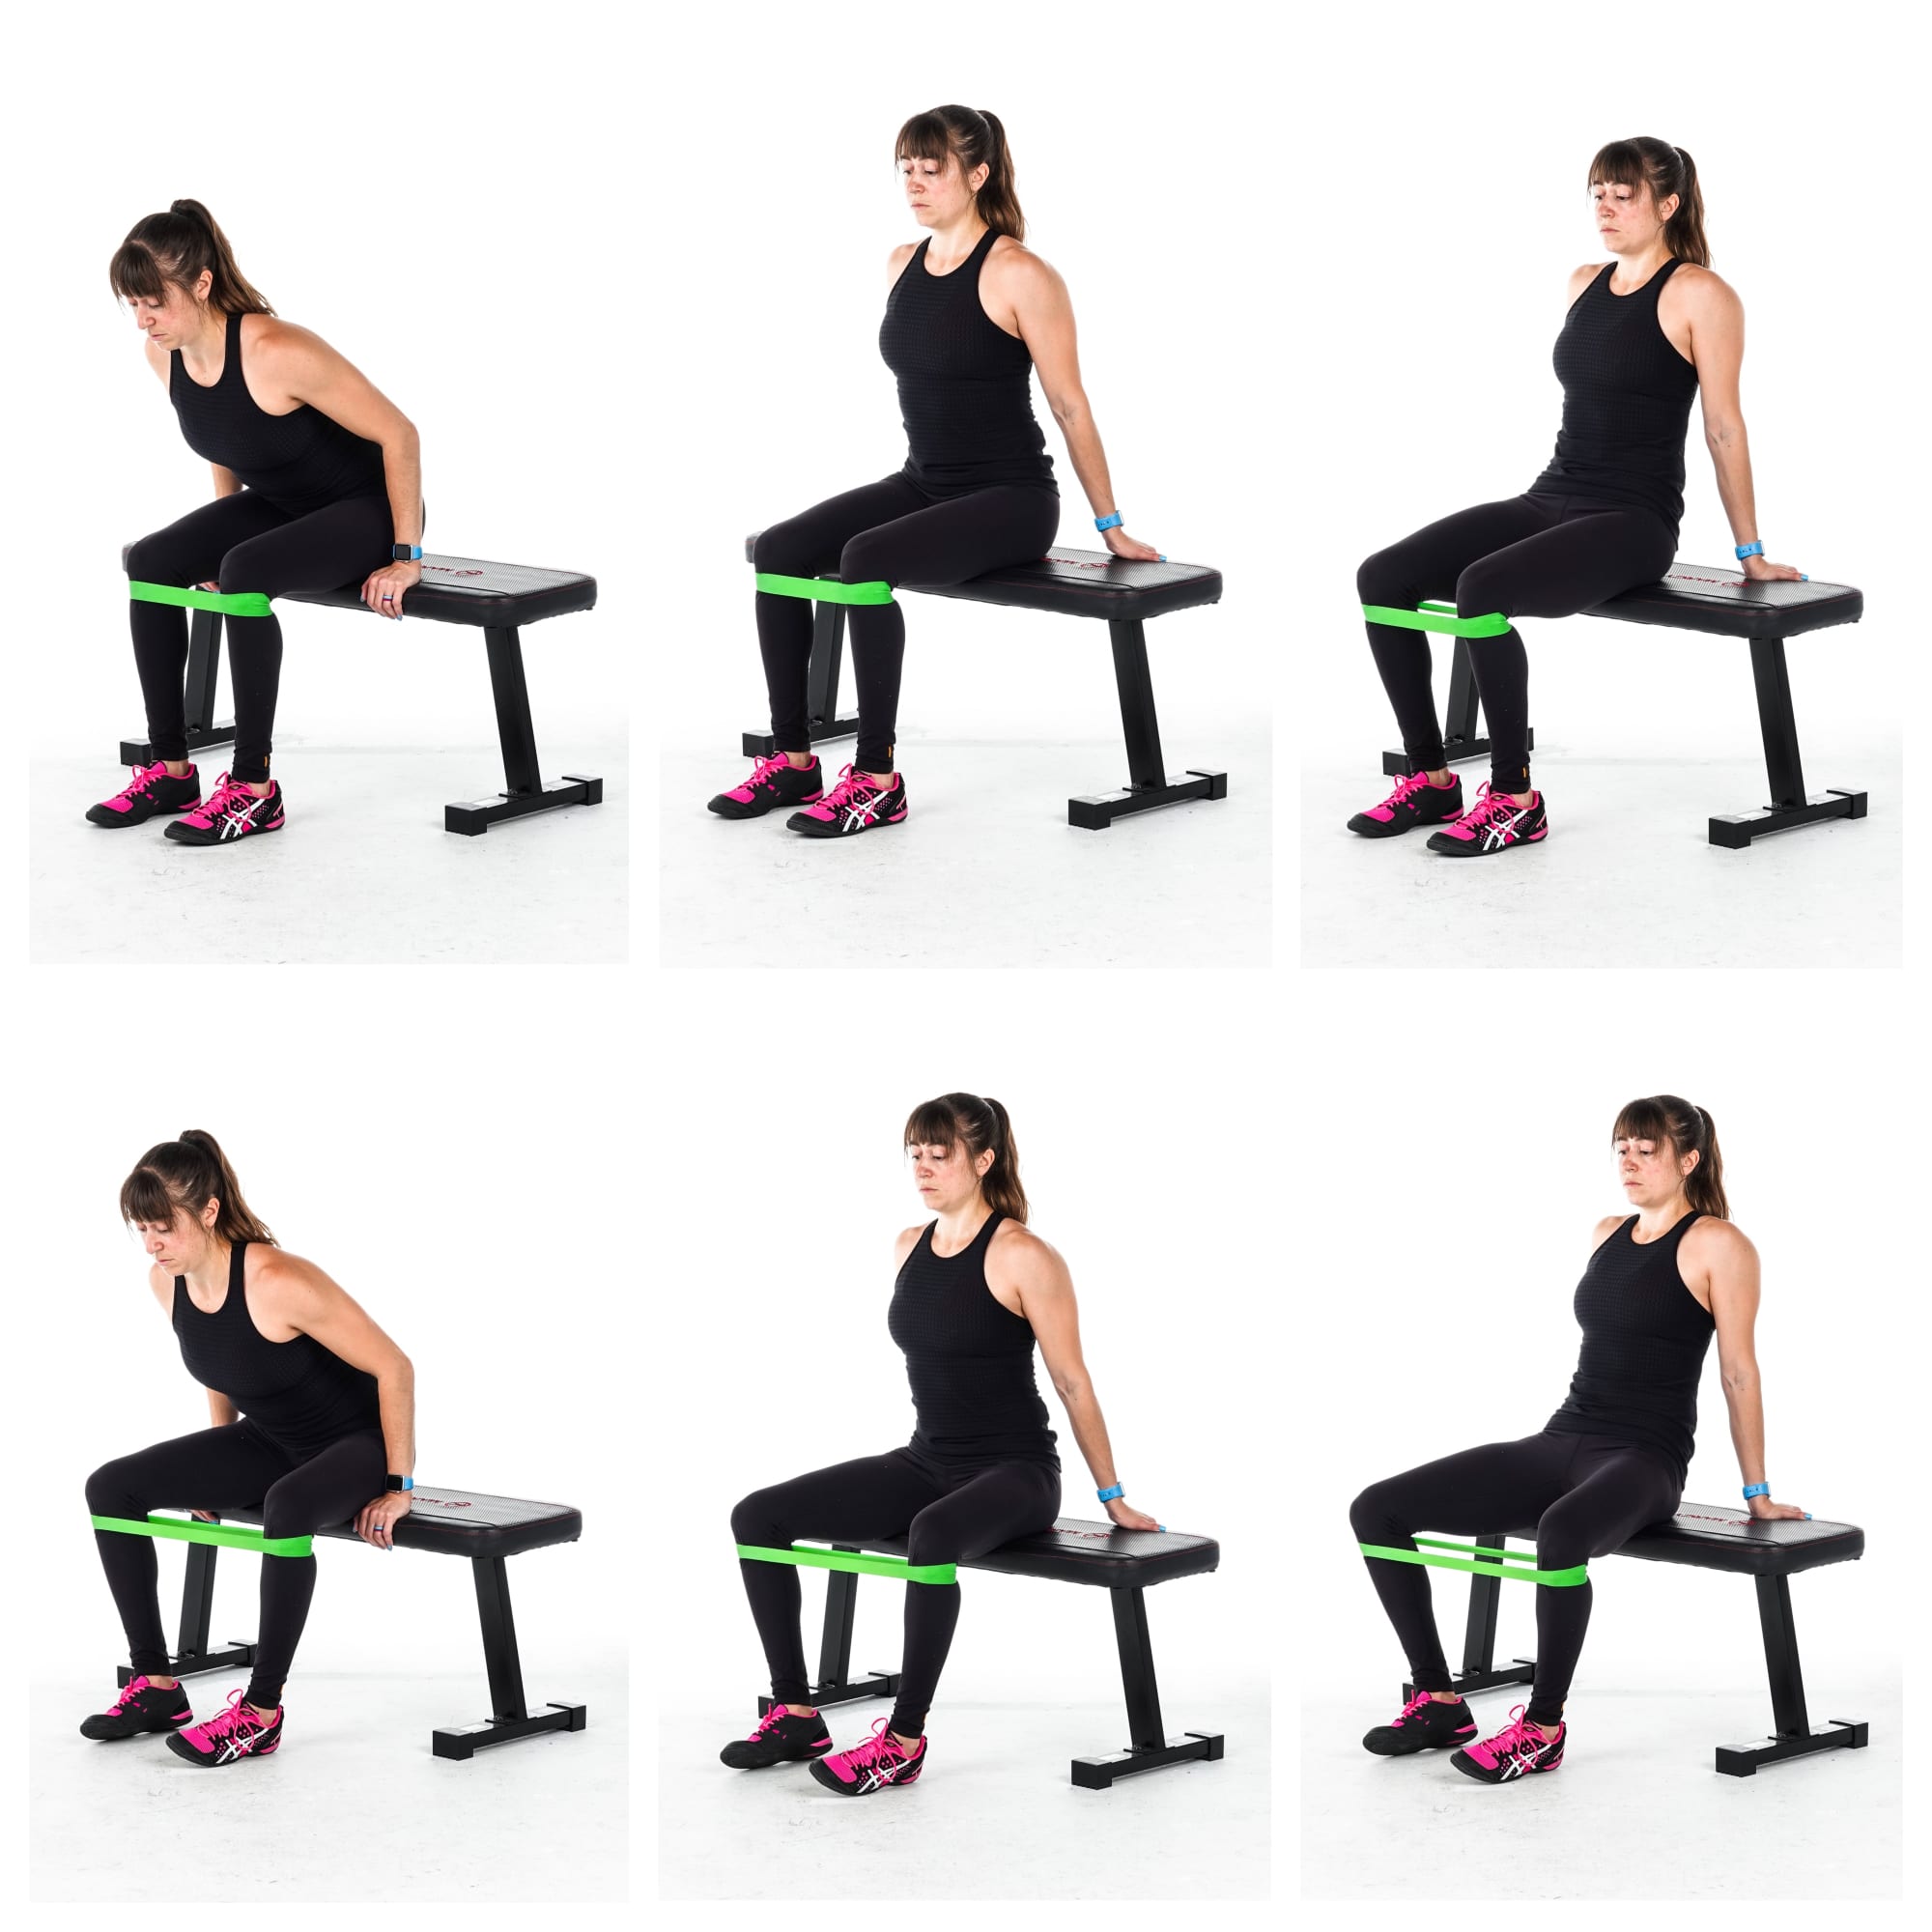
To do 3-Way Seated Mini Band Abductions, place the mini band right below your knees and sit on a bench. Start by sitting toward the front of the bench so you can lean back and put your hands on the bench behind you. Place your feet about hip-width apart.
Then press your knees open against the band as you lean back. Your feet may rock open but focus on using your glutes to press the band open with your knees. Do not let your knees cave in as you come back to the starting position. Complete all reps then move to sit up nice and tall.
Sitting nice and tall repeat, pressing out with your knees so you feel your glutes working. After completing all reps, lean forward and repeat the movement. You can hold on the bench outside your legs to lean forward or just lean over even lightly resting your arms on your legs.
Complete all reps in each of the 3 positions. Make sure you’re really focused on pressing your knees out to feel your glutes while controlling the band back in. To reduce tension, you can start with a lighter band or put your feet slightly closer together, but make sure there is tension on the band even in that starting position.
5. Side Lying Extended ROM Lateral Raises:
Lateral raise movements are essential to include to activate your glute medius.
You DO need to be very conscious though that you don’t feel your TFL taking over! So you may find that you foam roll it between rounds or slightly kick back as you raise to the side. You may also slightly internally rotate your foot or turn your toe to the ground as you lift!
The added bonus of these extended range of motion is that stretch you put on the muscle at the bottom. This can really help you build strong glutes through the full range of motion your hip is capable of and even PROGRESS that basic side lying lateral raise without you even needing to add weight!
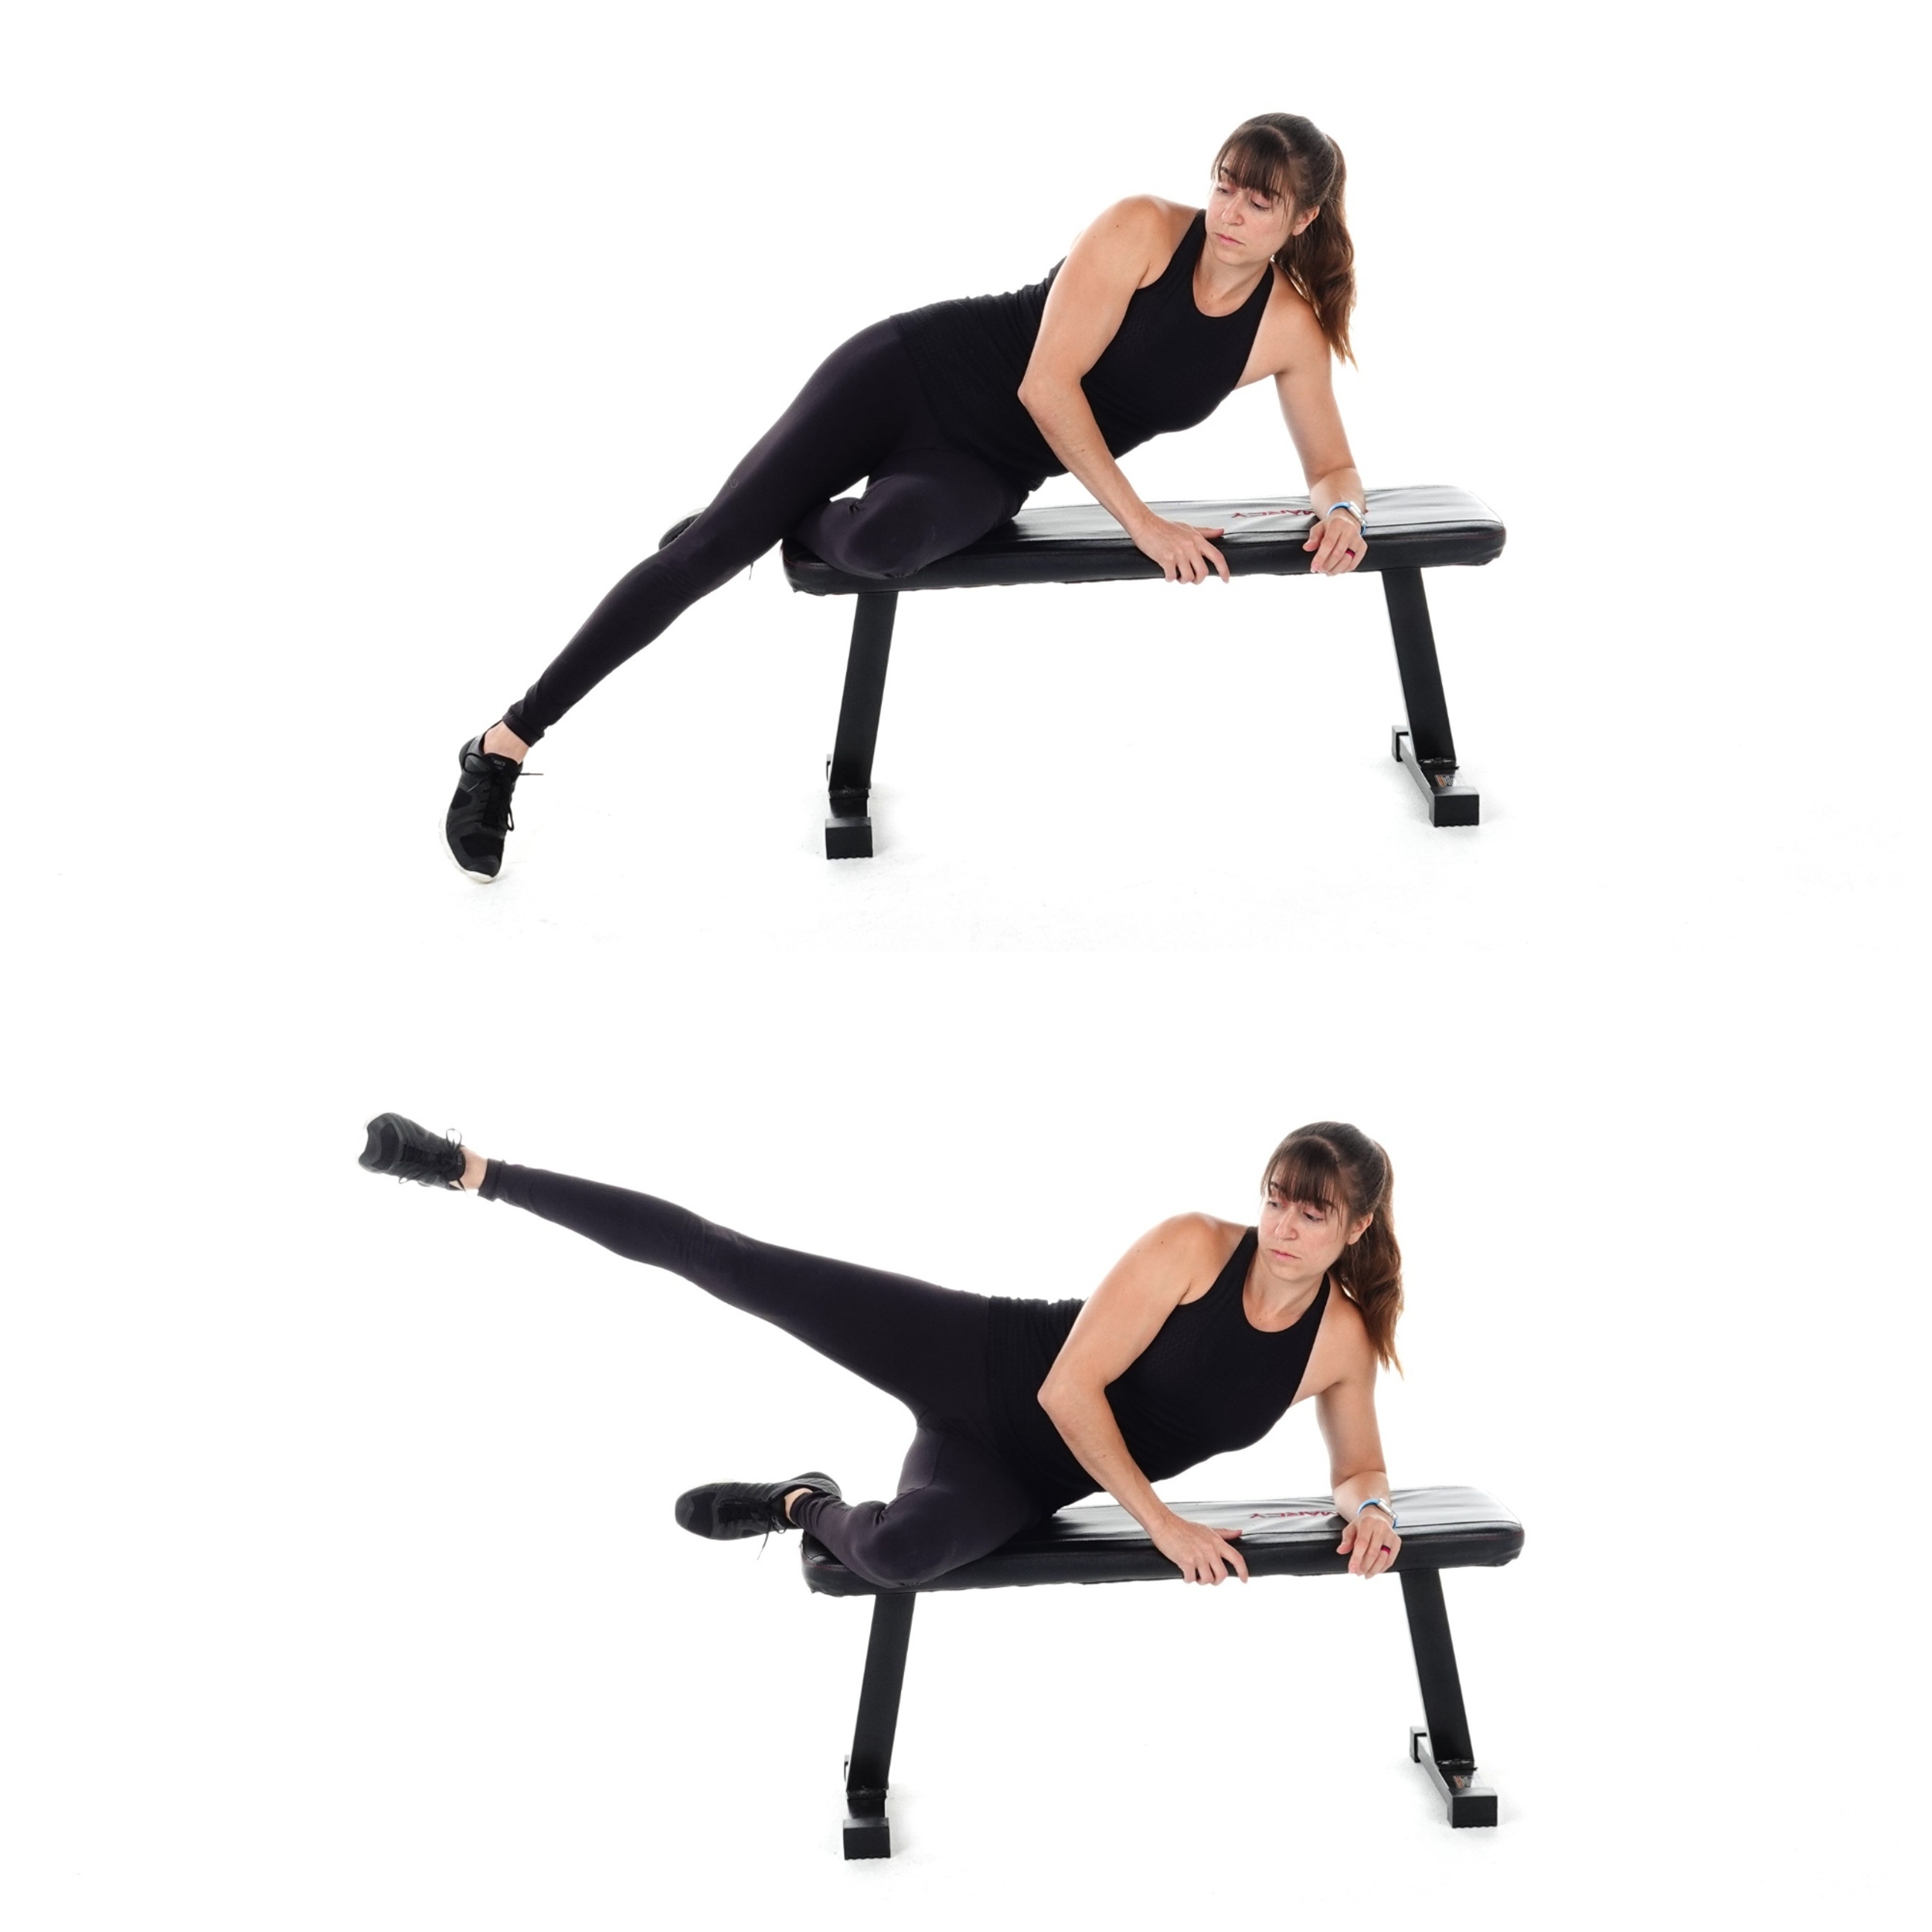
To do the Extended ROM Side Lying Leg Raise, lie on your side on a bench so that your bottom knee is bent and your bottom leg is close to the end. Prop yourself up on your elbow and position yourself so that your top leg can hang down over the edge and your foot is just a few inches off the ground. You can hold a plate weight on the outside of your top thigh, or wear ankle weights.
Then lift that top leg up and kick slightly back, feeling your glute medius, or the side of your butt, working to lift your leg. Keep that foot parallel to the ground or even turn your toe to slightly face the ground. This can help if you tend to feel your TFL or hips engage with lateral raises.
Do not rotate open as you lift. Lower that leg back down so that your toe touches the ground or hovers just an inch or so off the ground. You want to make sure you can lower that leg past parallel to the ground.
The bench allows you to have an extended range of motion from what you would have when side lying on the ground.
To modify, start with just your own bodyweight.
So…Should I Never Stretch My Hamstrings?
But what about those hamstring stretches you still see in warm up routines and recovery sessions?
Should you not be stretching at all?
While your focus should NOT be on stretching your hamstrings if you do have excessive anterior pelvic tilt, tight hip flexors and underactive glutes, this doesn’t mean you have to avoid hamstring stretches like the plague.
Especially in your warm up, you may find that dynamic stretches to put your hip through a full range of motion DO include a hamstring stretch component.
You do NOT need to avoid these. But spending a ton of time in your warm ups or cool downs focused on stretching your hamstrings IS going to be a waste and potentially even HINDER your results.
And this is of course talking about hamstring tightness due to anterior pelvic tilt.
With certain postural distortions you MAY still need to stretch your hamstrings. For instance, if you actually have POSTERIOR pelvic tilt, your hamstrings MAY actually be shortened.
However, the best place to start if you have a desk job, anterior pelvic tilt, tight hip flexors and/or stretching hasn’t really helped in the past, is to FOAM ROLL your hamstrings and NOT stretch them.
Foam rolling can help relax that overactive muscle so you can get your glutes activated and strong no matter WHY your hamstrings feel tight!
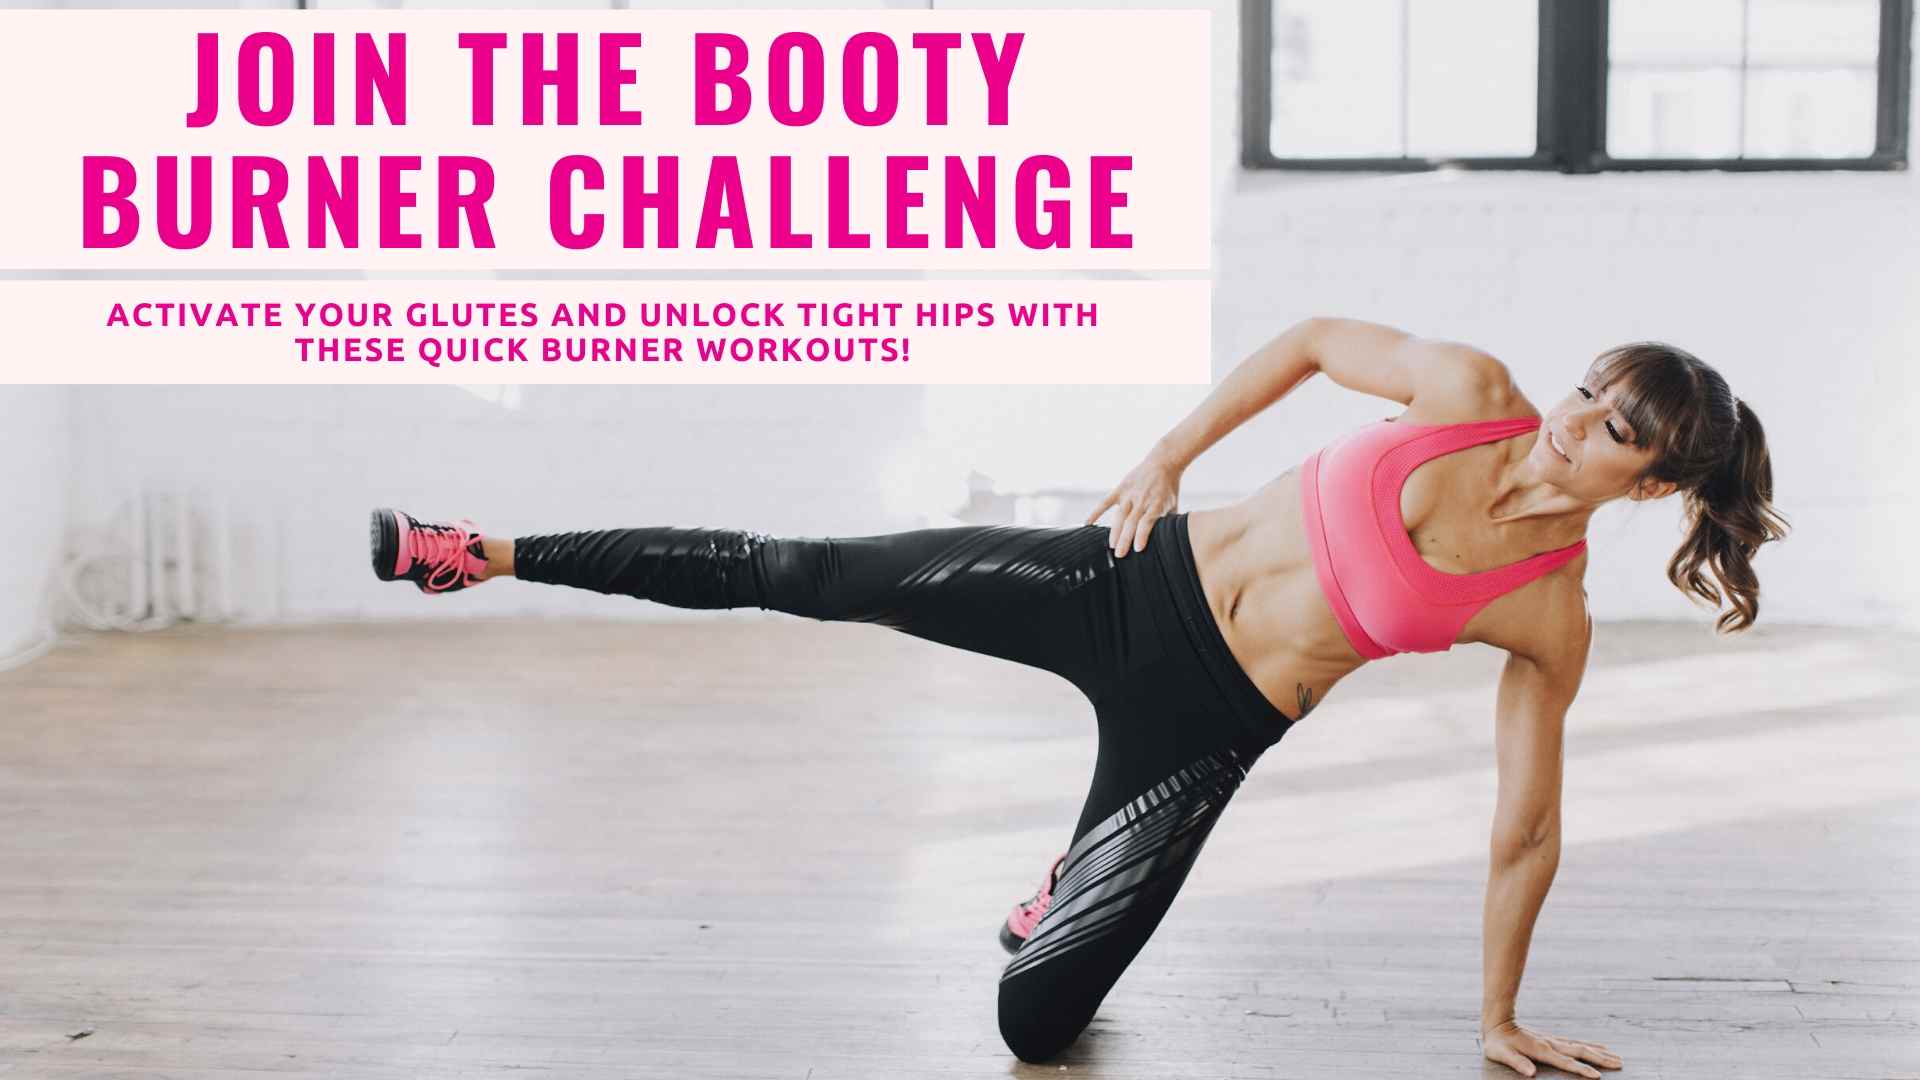
If you’re ready to improve your hip mobility and activate your glutes?
Join my Booty Burner Challenge!


Wonderful demo and explanation that certainly applies to me!
Just had a quick look over an article on tight hamstrings. The information is well presented and logical. I would recommend your site.
Thanks!
Glad it helps Donna!
I’m interested in the Booty Burner videos for the issues here, but I was wondering if there are 28 different workouts or if some are repeated.
There are about 21 different workouts. So that you can see progression I do repeat a few so you see the growth. But you won’t be repeating most of them until your second round through 😉
Hi Lori,
The booty burner system $27, does it includes videos? Does the one time cost perpetual or time bound?
Thanks
Hi Cherry. It does include follow along videos and is yours forever!
Hi, is this specific ‘Donald Duck’ program available on video? Thank you.
Hi Joseph. Yes the Booty Burner program, if that is the one you’re asking about, is all follow along videos. But it is digital not a physical DVD.
Brilliant!! This is so helpful. Thank you!
Thanks Suzie I’m glad you enjoyed!
Do you have this program above on video?
Can I just ourchae this and no cookbooks of fat burning foods.
My weight is great.
I am in constant pain, IT joint is rotated in back and t bands and ankle hurst all day right side.
Super tight and it all started with menopause and running stairs.
Would love your help.
I’m 58 years old and in pretty good shape still.
I just want to stop hurting.
Going to PT with little results
Need coaching. And a good video.
Your my girl so far.
Makes the most sense.
I’m a visual learner.
Please let me know what might be best for me.
The best explanation I have found- and I have studied yoga and Pilates for years. I’m a follower now! Thx so much from Diana in London, England.x
Thanks Diana!
Hi Angela. If you want videos to guide you through these moves, definitely check out my Booty Burner – https://bootyburner.redefiningstrength.com/the-28-day-booty-burner-challenge?sl=blogcomment
Hi Cori,
Just bought your restoration program and really like your presentation of information. I’m a student and curious what your training/education background is.
Thanks!
Hi Chris! Thank you! Keep me posted as you go through them! Here to help!
Very informative. I am currently dealing with tight adductor muscles, TFL issues and probably everything you talk about in this article.
I am your follower on FB. Love your videos and explanation.
I sometimes have trouble understanding you since you speak too fast and you have so much to convey….haha. But I love you ?
Thanks
Glad the tips help! Definitely dial in that prehab!
thank you for sharing such detailed & informative methods for glute.activation and strengthening. I wouldn’t have connected lats to my tight hamstrings! I’m going to start foam rolling them too.
So glad it helps!
Thank you great article
Thanks Kim!
where does the pitiformus figure in?
In what way? The piriformis muscle can figure into the equation in multiple ways, being overused and tight most often and contributing to hip ER.
Really informative – thank you ?
Definitely applies to me, so I’m going to get started with some of these today ??
Glad they help Marie!
I am sure that I could benefit from similar excercises suited to myself as a 79 year old who has continuous back and neck pain. Maybe something that could be done in a pool. I cannot get up from ground level easily on ground easily. Thank you for the informative article.
Hi Andrea. Definitely check out a handheld roller. And lots of ways to do moves modified standing as well!
So the booty burner challenge will help with my hip flexors, hamstrings and glutes? How long do the workouts take?
They are all under 15 minutes and yes, they focus on core and glute activation and hip and spinal mobility. I even have quick burners that address ankle mobility restrictions as those can lead to hip and knee issues as well.
Hi Cori.
Keen to give the above a go. And then move onto the booty burner.
I’ve googled -“big foam ball/posture ball”, but it’s difficult to tell the size based on the pictures that accompany the product. Could you point me in the right direction regarding exact size, or a link to the posture ball that you use.
Thank you so much Sally
I like a softball or lacrosse ball most often but the 6 inch posture ball is a slightly softer option. https://www.amazon.com/shop/redefiningstrength?listId=10VDUL6C0XGRN
What in the actual F?! I suffer from every single ailment mentioned & consistently cramp up in my hamstrings . Thank you! Some steps to start alleviating this issue !
Glad the tips help Crystal!
This will amazingly helpful for me. Particularly that you don’t just ignore the fact that people with weaker glutes like myself, may really struggle to engage them and hamstrings will try to take over. So many guides just skim over this and say ‘strengthen your glutes’, when it’s not that simple unfortunately. Useful as well to hear about foam rolling temporarily putting a muscle to sleep.
So glad it helps!
I’ve been suffering from various issues including lordosis and tight hamstrings to the point that i can’t even crouch or squat down. not at all. i can’t sit up and when I try to sit with my legs stretched out my knees stay in locked position and my back hurts. i’ve been living like this for over a year. i did various stretches and physical therapy but it feels like there’s a piece of iron in my back no matter what i do. i can’t walk without slippers or sit unless i have a cushion under me, with my feet planted on the ground. the floor feels like rocks to walk on. my nerve pains and sciatica got better in a year but my range of motion still sucks. i want to be able to wear my own shoes and be employed. i’m 30, normal weight. i’ve always been very flexible, diagnosed with ehler danlos and been told my excessively joints were compensating for my weak muscles and this vicious circle combined with my sedentary lifestyle created these problems and the heavy lifting that i did helping someone move only gave me bulging discs. Even trying a new stretch or exercise is stressful for me because it can put me in pain for weeks. Your advices are so nice but I’m scared to do it wrong. Could you please advice exactly what foam I’d need to do that psoas stretch? They’re always so tight.
Hi Linnie. Honestly if you’re hypermobile you want to avoid stretching and focus more on activation like the glute activation shown here. Hope you’re going to see someone about regressing to progress so you can focus on activating those muscles correctly!
Very informative but I am 71 years old and been suffering with tightness in my thighs for two years and I am in so much pain I can hardly walk and I cry most days because I am to old to do most of these exercises so what can I do ?
Hi Hilary. Have you seen someone to assess what is causing your pain and work on it? Always a way to move forward and meet ourselves where we are at!
How long should you wait to use your hamstring again after you pulled it, I’d say I’ve got a grade 2 tear/pulling my hamstring I’ve iced and heated it tonight
Hopefully you’ve gone to see someone to get assessed so they can create a recovery program based on exactly which hamstring you strained and the culprit of your strain!