Often when people think about training their core, they think of six-pack abs and crunches.
They think about aesthetics. But core training is about more than getting six-pack abs. A strong core means less risk for pain and injury and it also means you can lift more and run faster.
Plus, core training is about more than working your abs – it is about strengthening everything from your shoulders to your knees.
Proper core training isn’t about doing a million crunches. It is about doing exercises that work everything from your shoulders to your knees.
Core training will improve your stability and strength in every plane of motion.
Below are the Best Core Training Exercises to train your core and improve your stability and strength to prevent injury and help you move better (aka run faster and lift more!).
Listed first are just some of our plain old favorites. The other categories break down core exercises by equipment type in case you only have specific pieces available to use! Even if you don’t have any equipment, you can get in a great core workout!
Best Core Training Exercises:
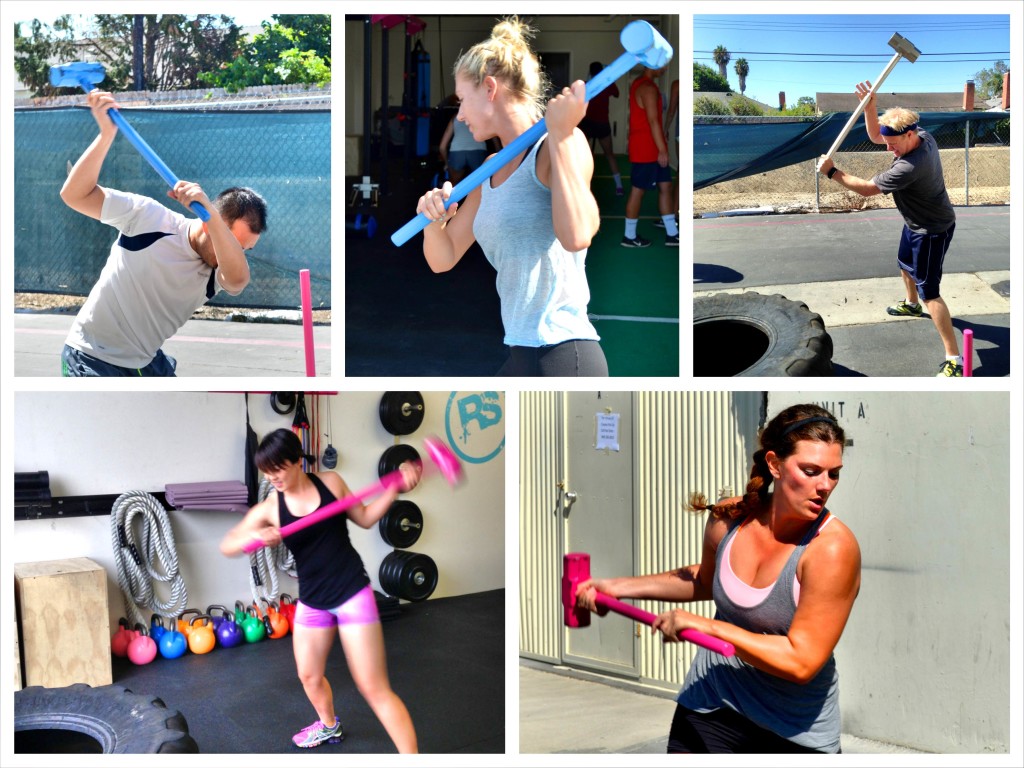
1. Sledgehammer – A great rotational exercise to work your core, the Sledgehammer slam is one of our favorite moves. With the sledgehammer slam, you aren’t looking to move the most weight possible. Instead you are trying to move a lighter weight quickly to work on your power.

To do the Sledgehammer Slam, place one hand low on the sledgehammer handle and one hand right up under the head of the hammer. When you grab the hammer, you always want to have one hand right at the top so that you have more control over the movement.
Set your feet in a staggered stance about 2 feet away from the tire with the opposite foot from the hand at the top of the hammer forward.
Bring the sledgehammer down and back to side that is back and then circle up and around overhead before slamming the sledgehammer down into the tire.
Bend your knees and use your legs as you slam the hammer down. Do not just slam with your back.
As you slam, your top hand will also slide down the hammer handle to meet your bottom hand.
Then when the hammer bounces back up off the tire, release the top hand to catch the hammer right below the head again.
Make sure to catch the hammer as it comes back up off the tire right at the top so you can control the movement back and around to slam again.
Beginners may want to break the movement down into two parts. First slam, sliding the hand down. Then let the hammer settle on the tire so that you can reset your hand at the top without having to time the catch. This will help engrain the slide and catch.
With this staggered stance, you will stay on one side till all reps are complete.
As you become more comfortable with the sledgehammer swing, you may want to attempt the figure 8! With the figure 8, you will alternate swings on each side. You will want to stand square to the tire to do the figure 8 instead of in a staggered stance.
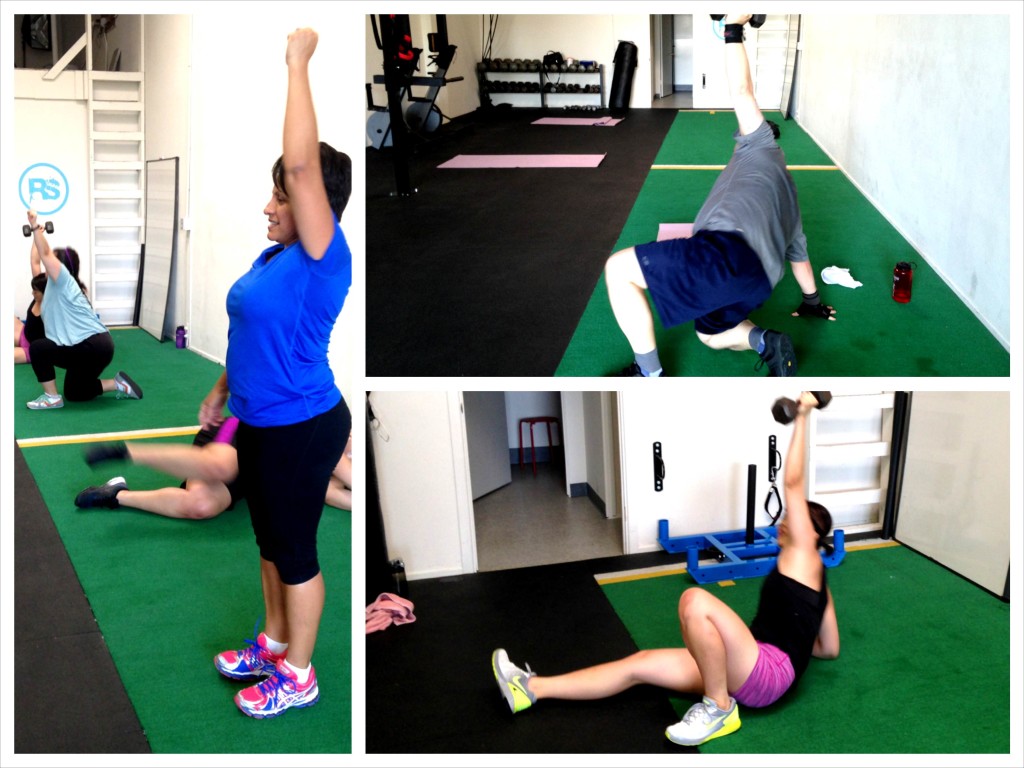
2. Turkish Get Up – A great multi-planar movement to work your entire core, especially your glutes and shoulders. It is also a great move to improve your mind-body connection and work on your core sequencing.
When you do the Turkish Get Up, make sure to take your time with each step. You do not want to rush or skip steps just to get the movement done faster. Take your time and even assess your body at each point. You will only get stronger by strengthening the weak links in the movement.
Do not add weight to this movement if you can’t complete each step correctly, especially if you are using a weight held in your hand. This move requires a lot of shoulder stability and you shouldn’t weight it down if you can’t keep the hand pointed directly up to the ceiling.
For a full breakdown of this great functional strength-building core training move, check out The Turkish Get Up.
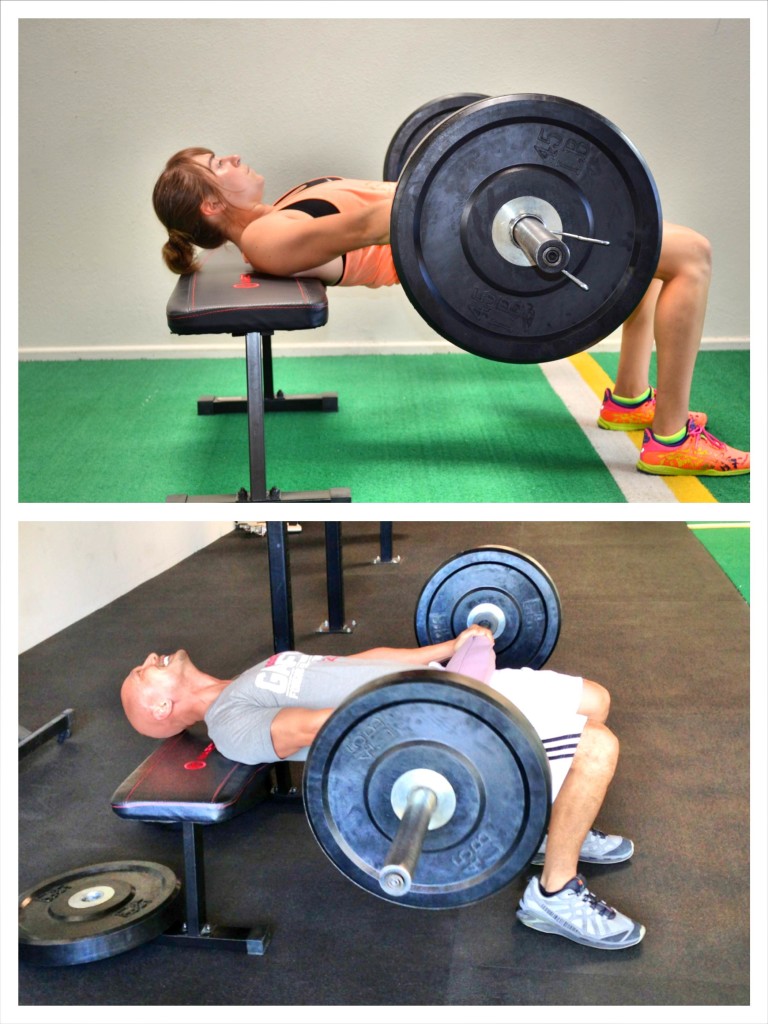
3. Hip Thrusters – Arguably the best glute strengthening exercise out there, the Hip Thruster is a great way to build a strong backside.
To do the Barbell Hip Thruster, set up a bench so that it won’t move as you bridge up onto it. Sit with your upper back against and roll a barbell up your legs to your hips. (You may want to pad the barbell so it doesn’t dig in.)
Bend your knees and place your feet firmly on the ground. And, holding onto the barbell, bridge your hips up, squeezing your glutes and driving through your heels.
As you bridge up and drive through your heels, you will also drive through your upper back on the bench. At the top of the bridge, squeeze your glutes and fully extend your hips. You may want to maintain a pelvic tilt at the top so you don’t hyperextend your low back. Hold a second or two at the top and then lower back down and repeat.
Do not arch your low back at the top just to get higher. You just want full extension of the hips and to squeeze your glutes. Keep your belly button pulled in toward your spine and really consciously squeeze your glutes at the top. Make sure you are driving straight up through your heels. Do not push yourself backward over the bench or go up onto your toes.
The Barbell Hip Thruster is a more advanced move. If you need to regress it, try these glute bridge variations.
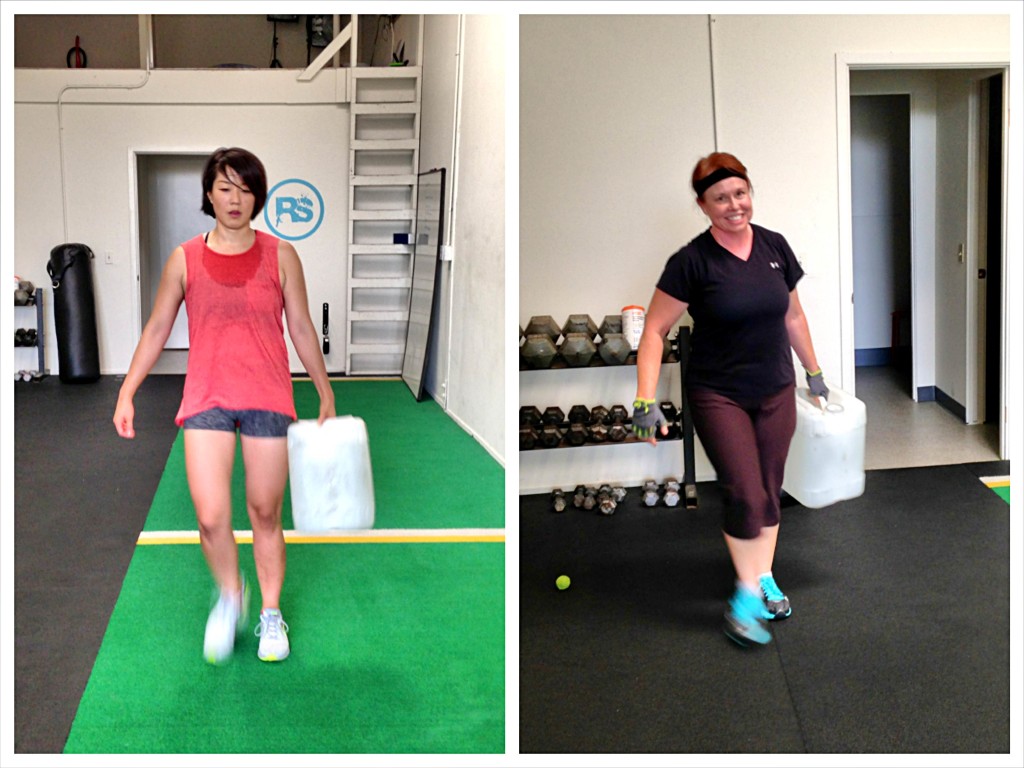
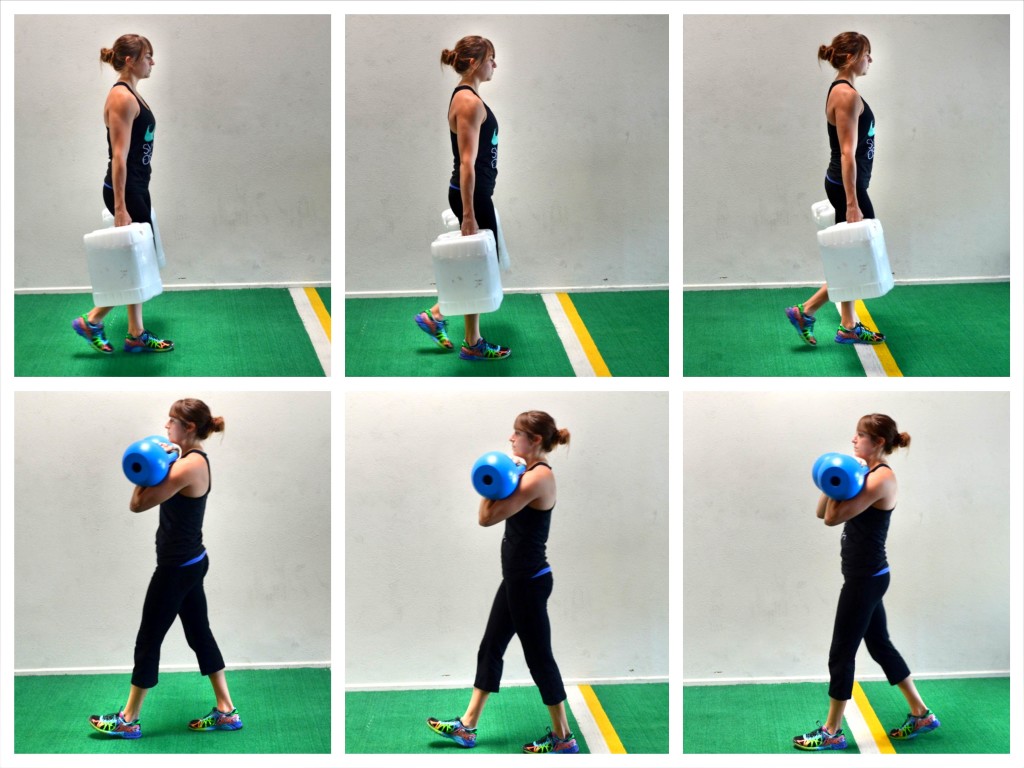
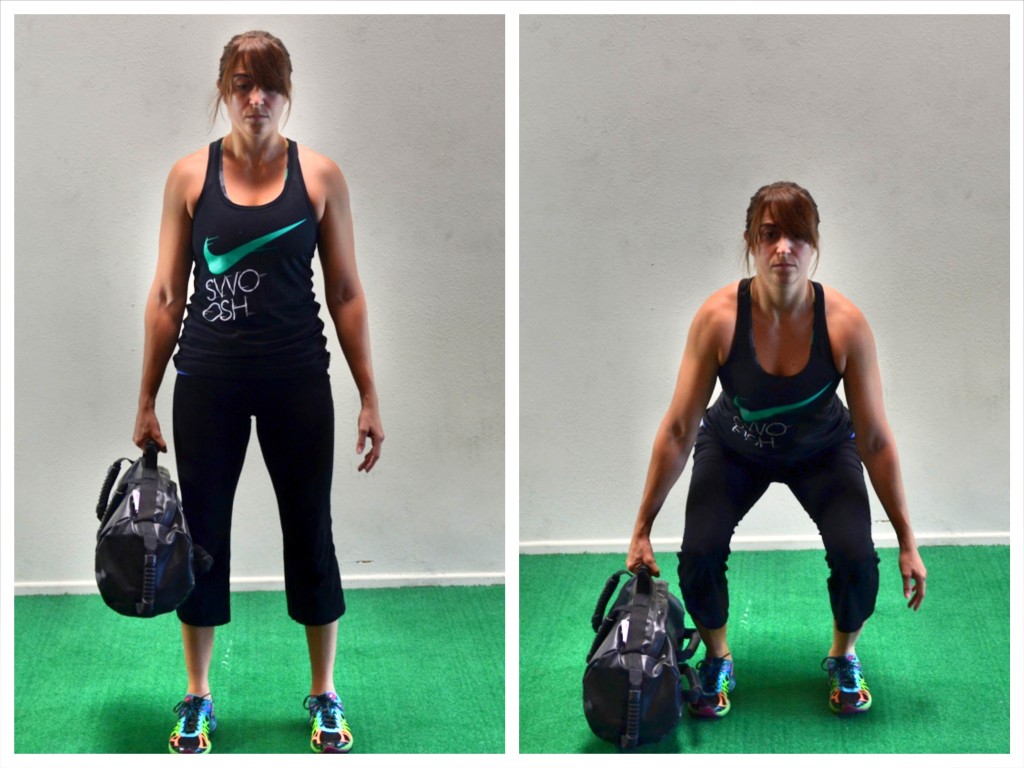
4. Heavy Carries – Heavy carries are a great way to build core stability in a functional way. There are a variety of different carries you can do to work your body in different ways. Here is a great post on with 10 different carries to try.
Two of our favorite carries are the Racked Carry and the Farmers Carry.
- Racked Carry – A great core exercise and a great way to improve your posture. To do a racked carry, place your hands through the handles of two kettlebells and let the weights rest on the back of your forearms. Bring your arms into your chest with your hands right at your sternum. Your forearm should be right against your chest with your elbow flaring out just a little to the side. Do not let your hands fall out to the side. Keep them in at your chest to protect your shoulder. Also do not let your elbows flare up as high as your shoulder. Keeping the kettlebell in that racked position, stand up nice and tall. You want to keep your core engaged and your shoulders wide. Squeeze your belly button in toward your spine and engage your glutes. Do not lean back or to either side as you walk. Use a heavy enough weight that you feel everything engage as you walk. The racked carry can also be done unilaterally or with an asymmetrical load.
- Farmers Carry (aka Farmers Walk) – The farmers carry is a great way to develop full body strength while also really working to improve grip strength. We are only as strong as our weakest link and if we can’t hold the weight, we can’t use it to lift! Hold heavy kettlebells, dumbbells, barbells, sandbags or any other heavy obejcts in each hand. The more awkward, the better. Do not let them rest on your legs. Hold them just off your thighs. Keep your chest pressed out and your shoulders down and back. Do not let your back round and keep your shoulders wide. Walk around, maintaining a nice tall spine. Do not let your head jut forward or your shoulders round. Do not look down at the ground as you walk. Maintaining perfect posture is essential to getting the most out of this move. Do not let the weights rest on your legs. Keep your core tight and glutes engaged as you walk with your shoulders down and back and your head up. The farmer’s walk can be done bilaterally (described above), unilaterally or with an asymmetrical weight. (Again check out the 10 different carries in the post above for variations!)
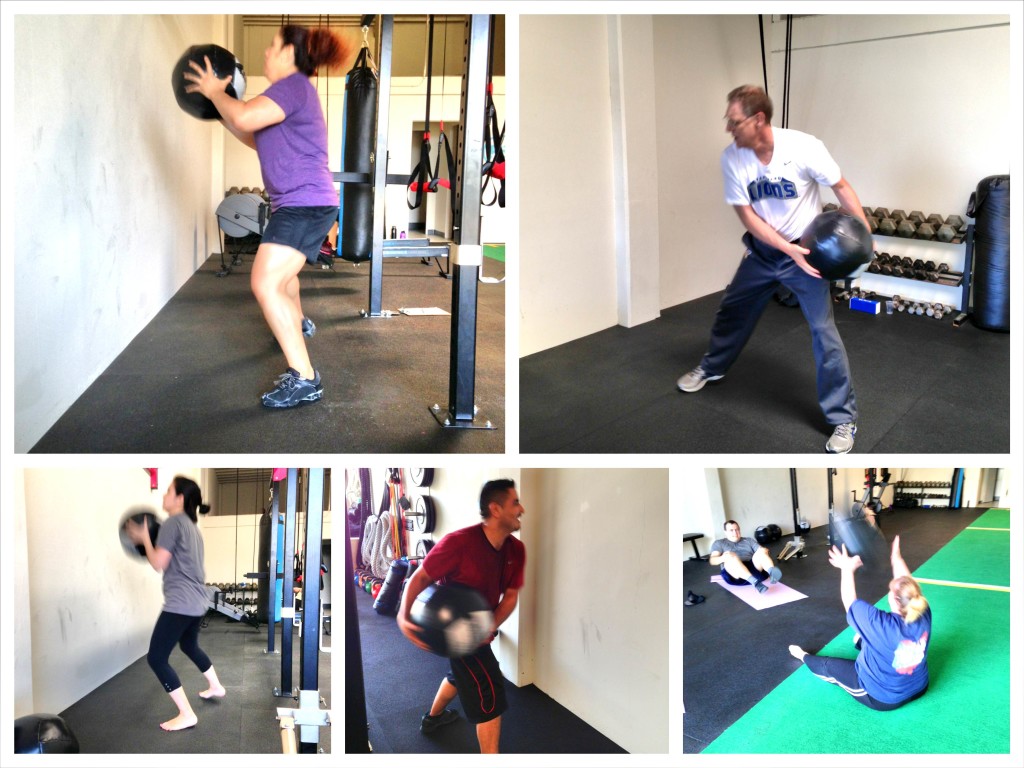
5. Med Ball Throws – There are so many different med ball exercises you can do to work your core. Listed below are three of our favorites – the rotational throw, the chest pass and shuffle and the sit up and throw. However, for a bazillion more to keep things interesting, just google “med ball throws.” There are so many med ball moves to make you work in every plane of motion.
Below is how to do three of our favorite med ball throws:
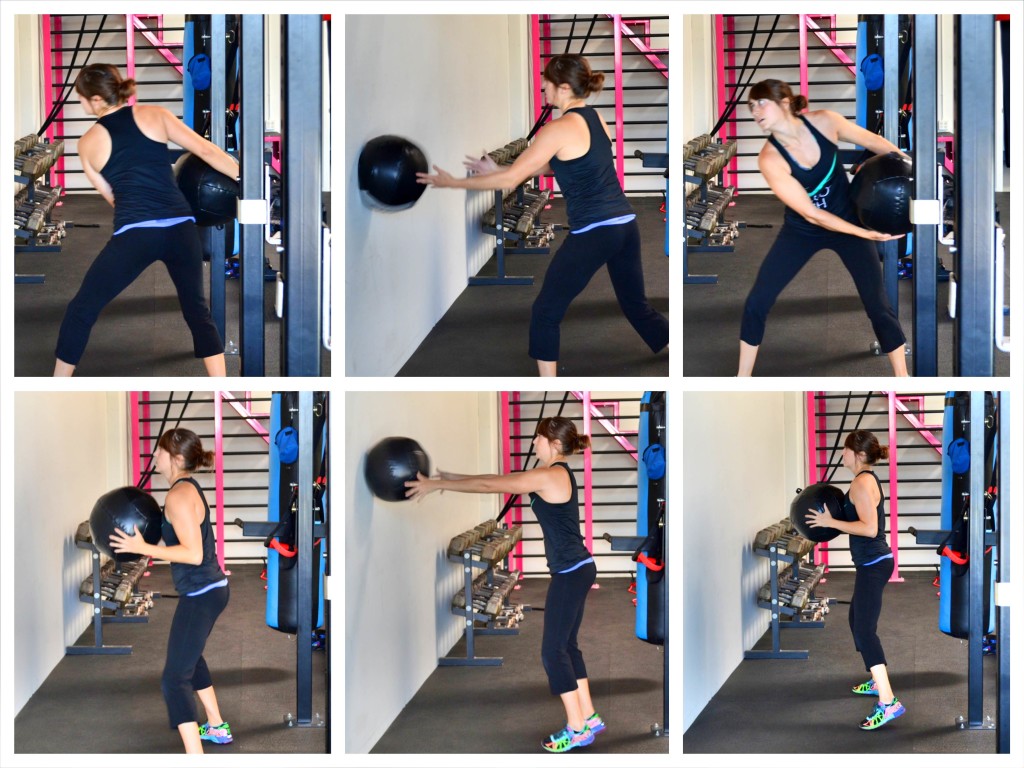
- Rotational Throws – Start in a staggered stance facing the wall. Holding the ball in both hands, reach the ball back toward the hip of the back foot. Then, throwing it underhanded, toss it straight against the wall as hard as possible. As you throw, bring your back foot forward and switch into a staggered stance on the other side to catch the ball. Then throw the ball against the wall and switch back to the first side. Keep rotating and alternating back and forth. The harder you throw the ball and the quicker you move, the harder the move will be. Use a light ball with this move. It isn’t a strength move. It is a power move, which means it is more important to move quickly than use a heavy weight.
- Chest Pass and Shuffle – Hold the med ball in both hands at your chest and face a wall or a partner. If doing this against a wall, begin to shuffle laterally and throw the ball at chest height into the wall. You should be close enough to the wall that the passes are quick and straight out into the wall. Move back and forth while doing as many chest passes against the wall as you can. If doing this with a partner, you will both shuffle one way together, passing the ball back and forth quickly. Do not get so far apart that the passes aren’t quick.
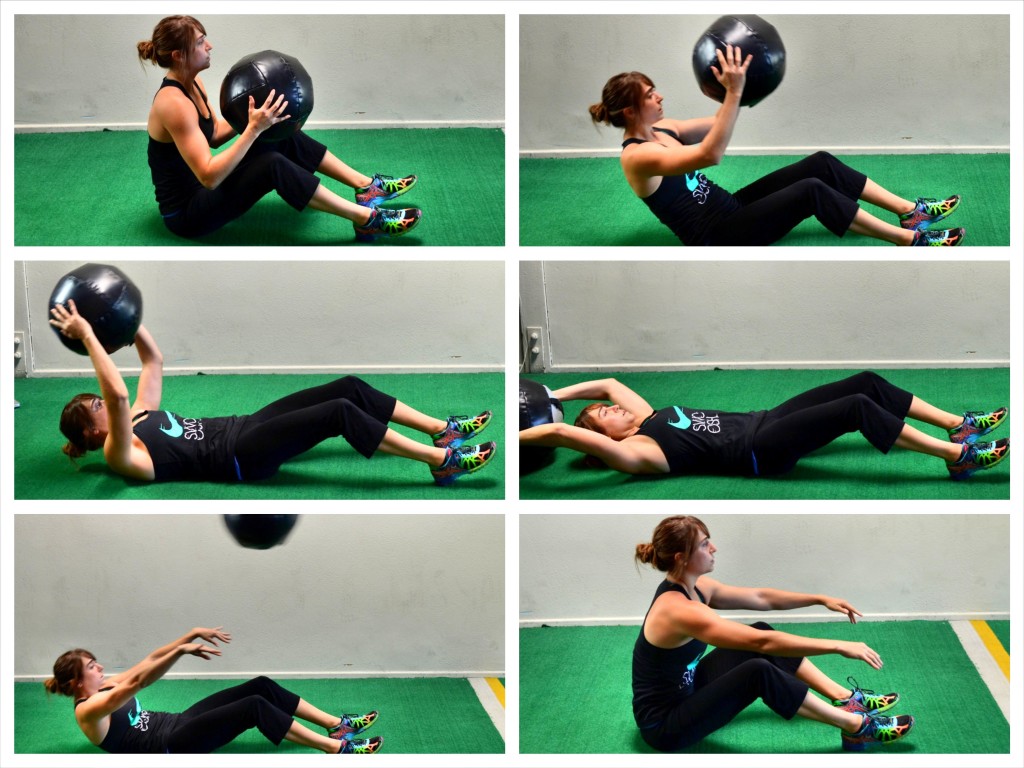
- Sit Up and Throw – This move can also be done against the wall or with a partner. Sit on the ground with your knees bent and feet flat on the ground. Holding the ball in both hands, lie back on the ground and extend the ball overhead. Then sit up and as you do perform an overhead throw, throwing the ball into the wall or to your partner. Sit all the way up. Then as you catch the ball, lie back down, extending the ball back overhead. Do not sit up and then throw. Perform an overhead throw as you sit up.
Here is also a great med ball workout if you like these med ball core training moves. It can easily be modified and done alone or with a partner!
Best Bodyweight Core Exercises:
Planks aren’t your only option if you don’t have much space or equipment to work with. Below are five great bodyweight core training exercises.
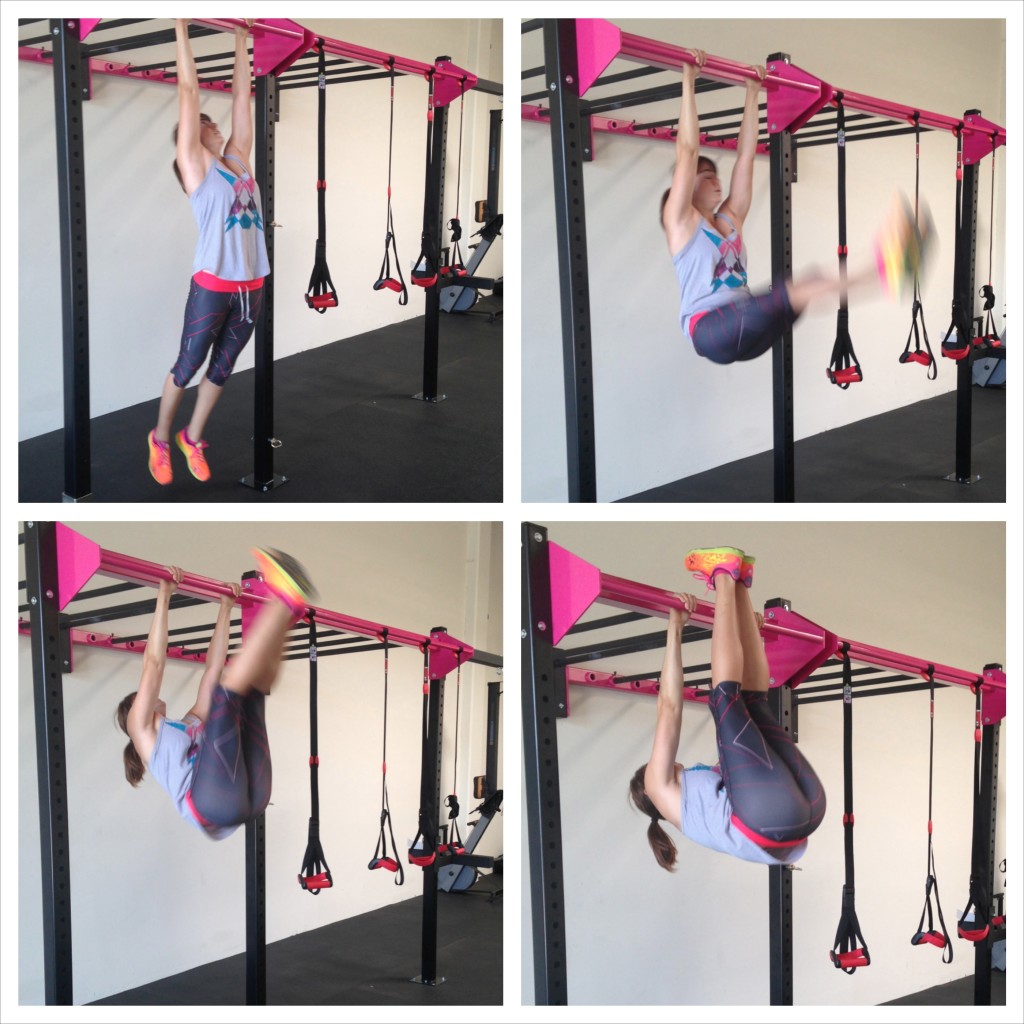
1. Hanging Abs – Hanging Ab Exercises are a great way to work your entire core as well as develop grip and lat strength. If you want to improve your pull ups and work your lower abs, you need to try these 10 Hanging Ab Exercises.
Beginners will want to start with the Hanging Pelvic Tilt and progress from there. However, the Hanging Pelvic Tilt is a move that everyone, even advanced lifters, need to return to every once in awhile to keep their intrinsic core stabilizers strong and help prevent low back pain.
Once you’ve mastered some of the basic Hanging Ab variations, have some fun with the Hanging Toes to Bar and Wipers!
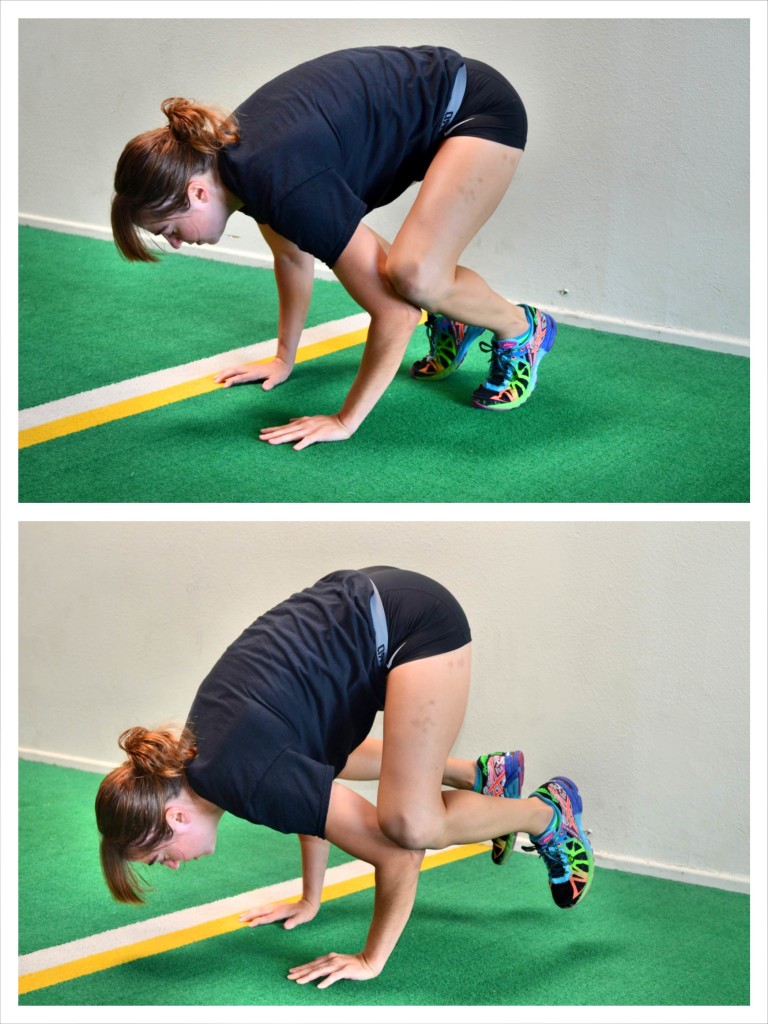
2. Crow/Handstands – Balancing movements require a ton of core strength – and balancing movements don’t always have to be done on your feet!
Handstands, headstands and movements like the crow are a great way to improve your core strength, especially your shoulder strength.
The Crow is a great hand balancing exercise to improve your core strength.
To do the Crow, place your hands on the ground about shoulder-width apart. As you set up, feel your hands gripping the ground. Be conscious of your hands connection to the ground.
Bend your arms and place your knees on your arms above your elbows with your feet on the ground. Then slowly lean forward, lifting one foot at a time off of the ground as you balance your weight on your legs.
Do not try to rush the balancing. Slowly shift your weight and lift your feet.
Love the Crow and want to work on your handstands? Try this handstand, and one-arm handstand, progression.
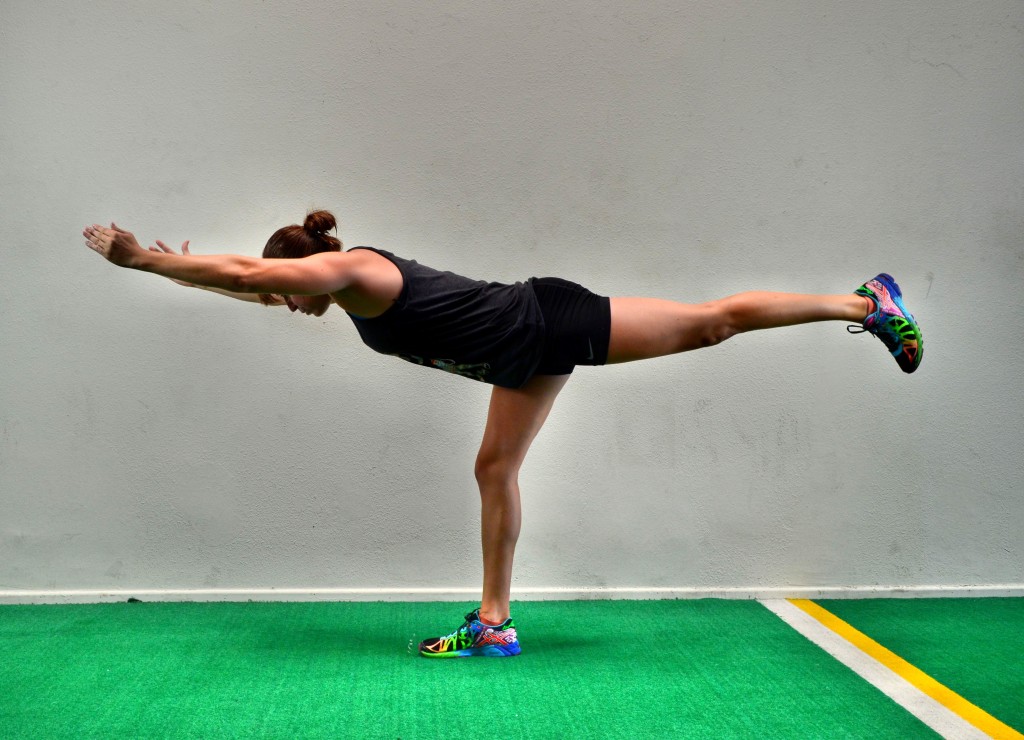
3. Warrior III – Another great balancing movement to work your core, and specifically your glutes, is the Warrior III Hold.
To do the Warrior III Hold, balance on one foot with your knee slightly bent. The more you straighten your leg the harder the move will be. Do not force it straight though if you don’t have the hamstring flexibility.
Hinge over at your hips and lift your back leg toward the wall behind you. Keep your back flat as you hinge forward. Drive the foot of the raised leg straight back toward the wall behind you.
Keep your core tight as you hold in this position. Do not let your hips rotate open as you hold. Reach your hands overhead in front of you or out to the sides.
Hold here. Focus on your foot’s connection to the ground and squeeze your glutes to keep your hips level. You want a nice straight line down your spine from your head to the heel of the raised leg.
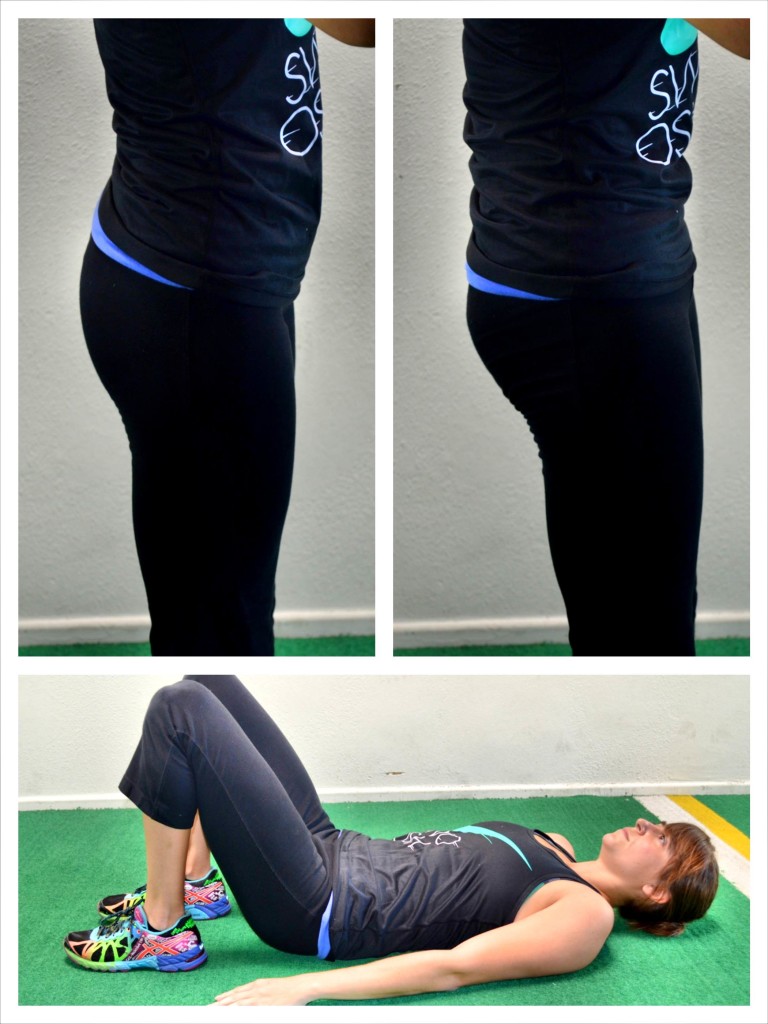
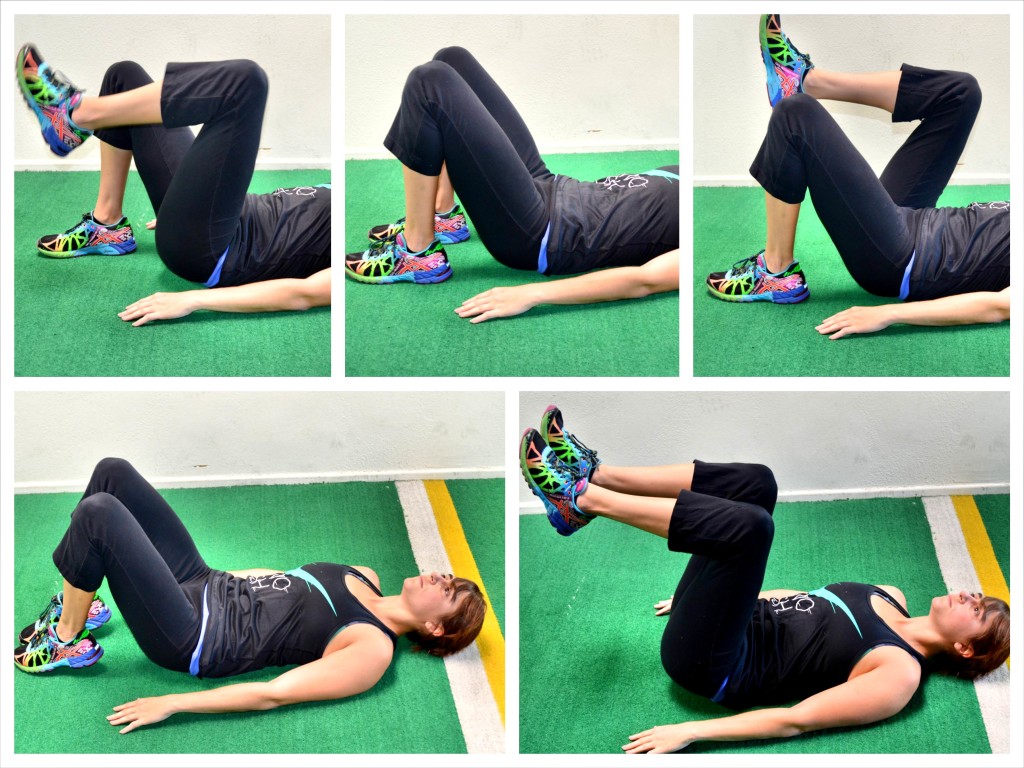
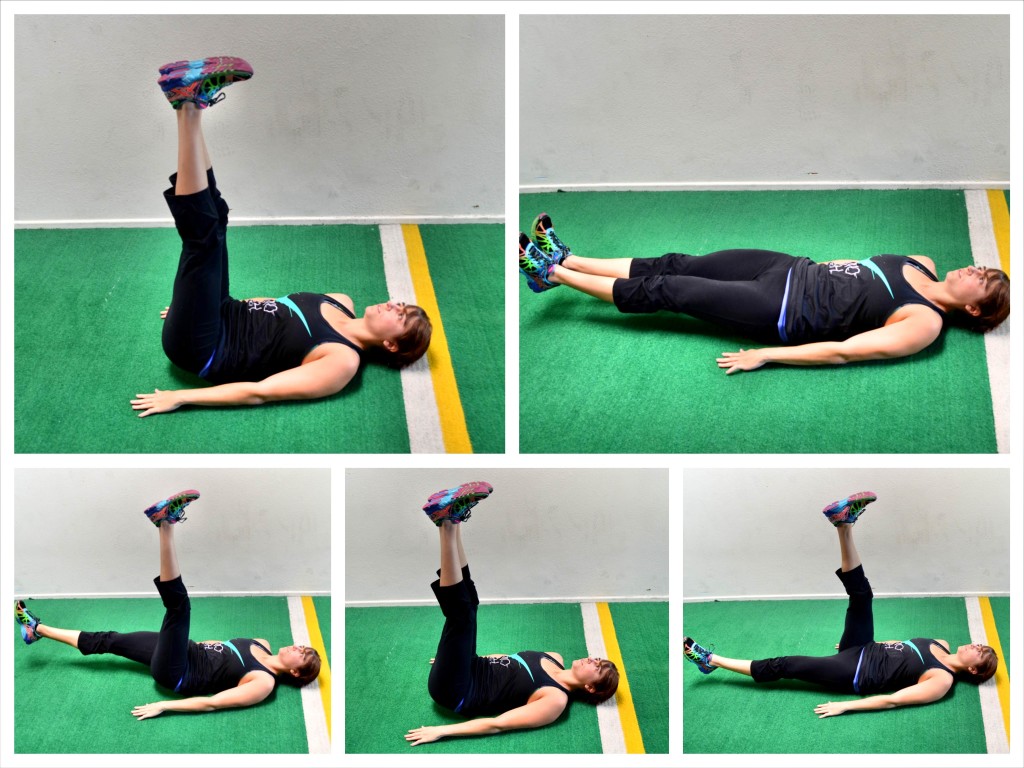
4. Pelvic Tilt – The Pelvic Tilt is a must-do exercise for everyone, especially if you have low back pain or sit at a desk all day.
The Pelvic Tilt is an exercise to activate your intrinsic core stabilizers so that your core is truly working and other muscles aren’t taking over. This is a great move to help alleviate and prevent back pain.
To do the Pelvic Tilt, lie on your back with your knees bent and your feet flat on the ground. You should almost be able to reach your hands down by your sides and touch your heels with your fingertips.
Feel the space between your low back and the ground as you lie there. Then draw your belly button in toward your spine and press that space away. You should feel your low back against the ground. Hold there, making sure to breathe as you hold.
Once the basic hold becomes easy, you will want to do a bent knee march then a bent-knee two leg lift and then finally straight leg lifts. Advance the pelvic tilt slowly. Make sure that as you progress, your low back stays firmly connected with the ground. If you can’t keep your low back against the ground, you aren’t ready for the next progression.
Keeping your low back connected with the ground is the most important part of the movement. Do not progress until you can maintain that connection. If you lose the connection, reset and regress as necessary.
5. Sit Thrus – A great rotational core exercise that can also help improve your mobility, the Sit Thru works everything from your shoulders to your knees. And it can also be a little cardio if you do it quickly!
To do the Sit Thru, start on your hands and knees with your hands under your shoulders and your knees under your hips. Flex your feet and press up onto your hands and toes.
Then rotate open toward the right and bring your left leg under and through toward where your right hand is. As you bring your left leg forward and through, lift your right hand. You want to rotate all the way through with your left leg out straight so that you are almost sitting with your left hand down to support you.
Then bring the left leg back through so you are back in the starting position. Next rotate to the left and kick your right leg through and forward as you lift your left hand. Move as quickly as you can back and forth.
Beginners may need to move slowly or even start in a more spread out position with their legs out straight instead of their knees under their hips.
Best Slider Core Exercises:
Sliders are a great tool to work your entire body and they aren’t expensive and can be stored anywhere. They are a great piece of equipment for anyone who travels a lot since they easily fit in a suitcase. And if you have hardwood floors, you can use towels instead of sliders!
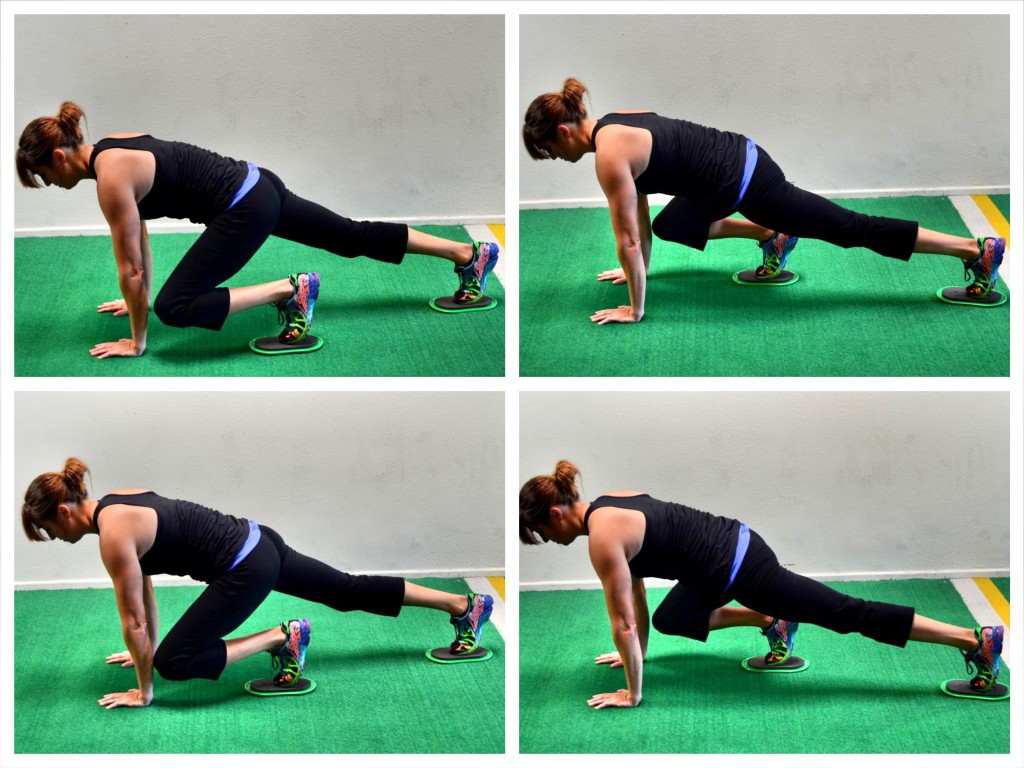
1. Mountain Climbers – If you want to work your core and get your heart rate up, Mt. Climbers are a must-do exercise. Mountain Climbers focus on your shoulders and your quads.
To do the Slider Mountain Climber, set up in a high plank position with your feet on the sliders. Your hands should be under your shoulders and your body should be in a nice straight line from your head to your heels.
Then, maintaining the nice plank position, bring your right knee in toward your chest, sliding your foot in. Your left leg should still be out straight. Then slide the foot back out and bring your left knee in toward your chest.
“Run” your knees in as quickly as possible until all reps are complete.
Beginners may want to start without the sliders.
2. Plank Wipers – Plank Wipers are a great plank variation to work your obliques and your glutes. This is an advanced move so beginners may need to start without sliders or even regress the movement to a basic plank hold.
To do Plank Wipers, set up in a plank on your forearms with your feet on the sliders. Your body should be in a nice straight line from your head to your heels with your elbows under your shoulders.
Then slide one foot up and out to the side. Keep the leg straight as you slide it out as far as you can.
Slide it back and then slide the other leg out to the side. Keep alternating sides as you hold the plank position. Do not let your butt go up in the air or your hips drop to the ground.
Your hips may rotate a little as you slide the legs out to each side, but make sure your abs stay engaged.
Don’t slide out as far to make the move easier. Beginners may also want to just step the foot out instead of using the sliders.
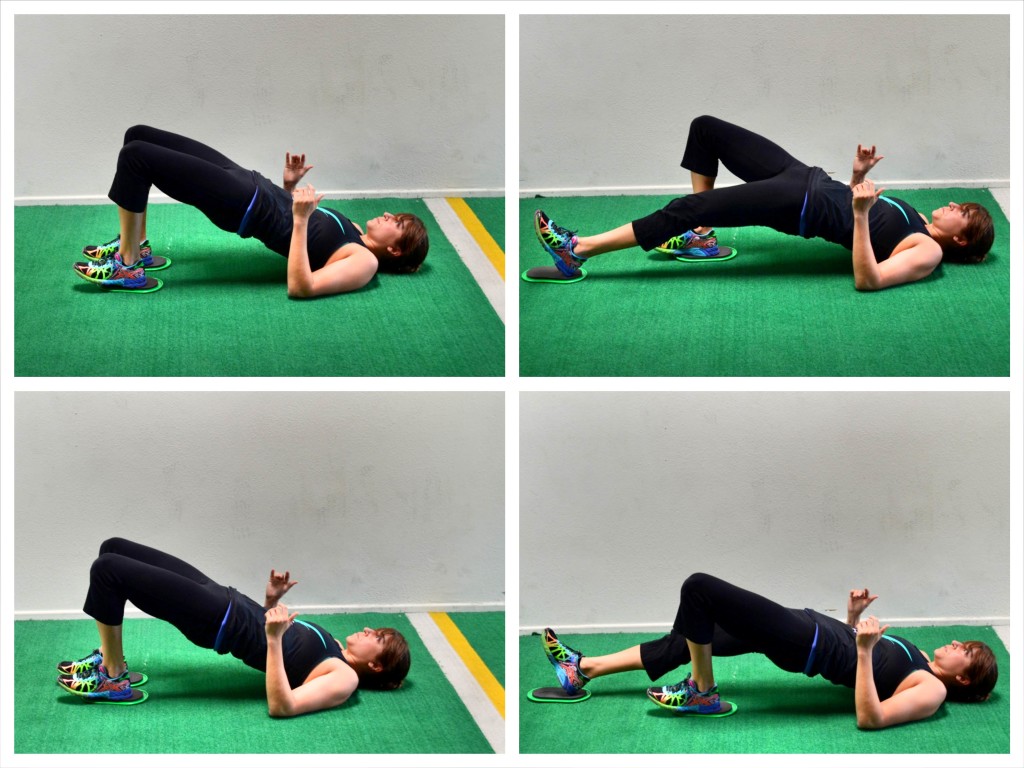
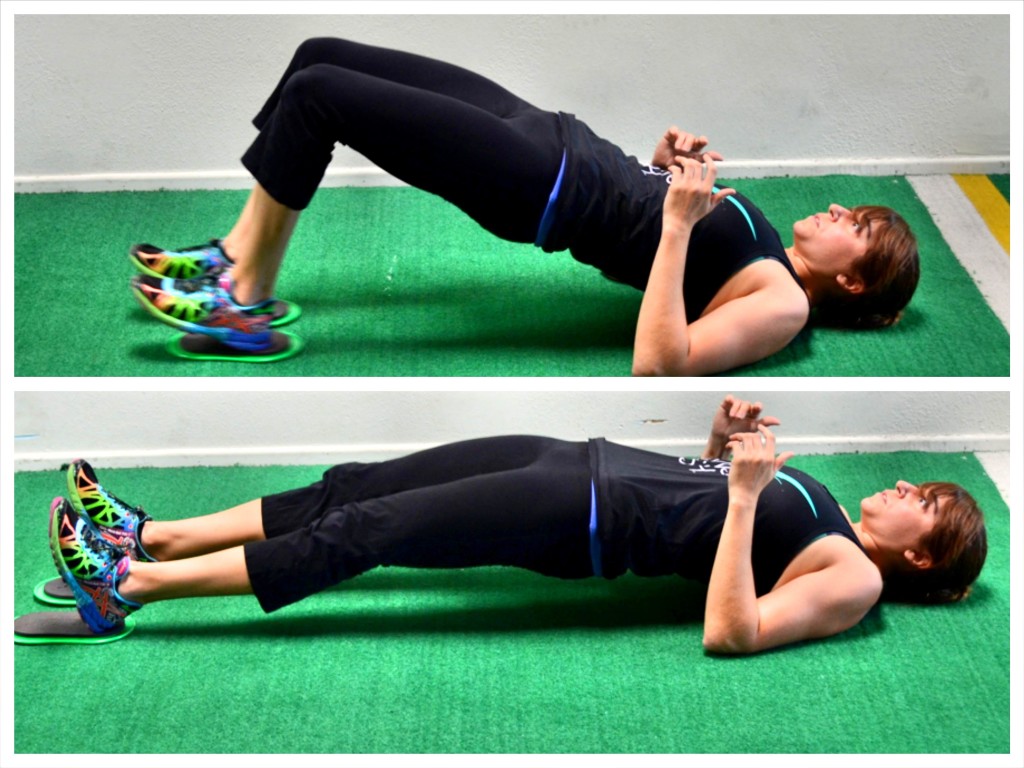
3. Glute Bridge and Curl – When we think of doing core work, we often get really focused on working our abs. But our glutes and even our hamstrings are a very important part of our core.
Working your glutes is essential to preventing injury and alleviating low back, hip and knee pain.
The Glute Bridge and Curl can be done with a variety of equipment, including suspension trainers and yoga balls, but our favorite variation is the Slider Bridge and Curl.
Beginners will start with a Single Leg Bridge and Curl.
While more advanced exercisers will do a two-leg variation.
Click here for all the Glute Bridge and Curl variations and how to do them.
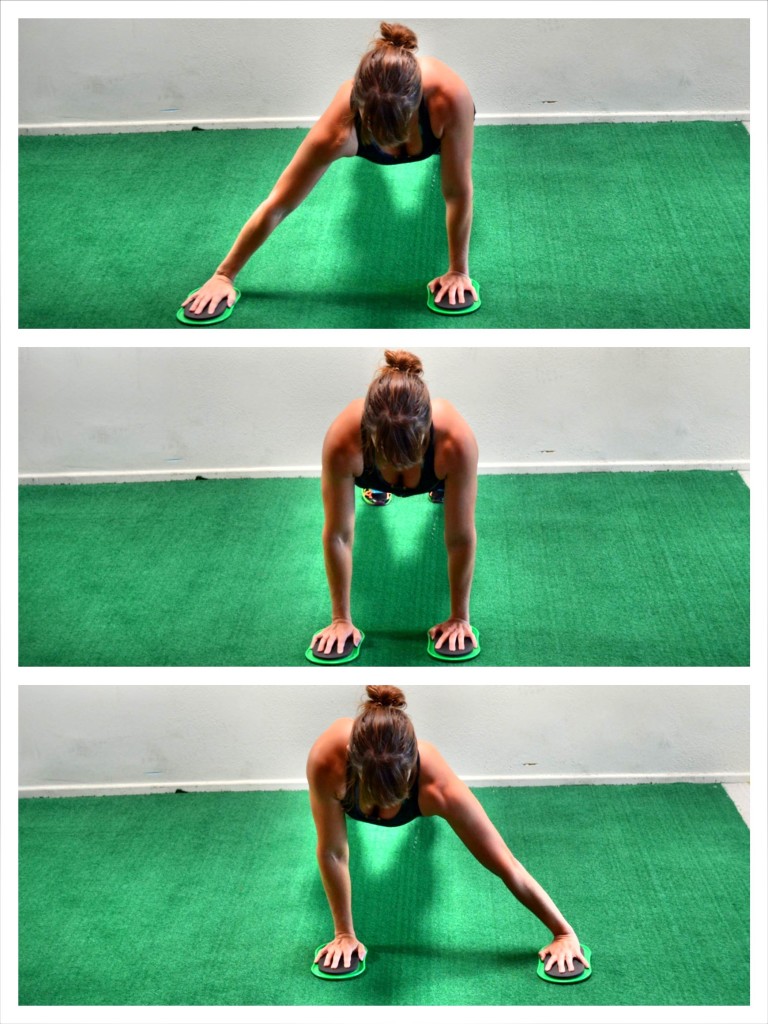
4. Plank with Reaches – Make the basic plank more challenging with reaches on the sliders. The sliders reduce traction and when you reach and extend the arm out either forward or to the side, you make holding the plank position more unstable.
To do the Plank with Reaches, place a slider under each hand and set up in a high plank position with your hands under your shoulders. You can either do the plank from your knees or from your toes, but either way, make sure your body is in a nice straight line from your head to your knees or your heels. Make sure to engage the abs by tucking your pelvic under like you would for a pelvic tilt.
Then, holding this nice straight line with your body, extend one arm forward and out. This extension should force your core to work harder to stabilize.
After reaching out, bring the hand back in and under your shoulder. Then extend the other hand out in front of you.
You can continue with the forward reaches or you can do lateral touches, reaching out to the side with one hand at a time. You can even alternate forward and lateral reaches if you want.
Make sure your core stays tight the entire time and that your hips don’t sag or your butt doesn’t go up in the air as you hold. Also, do not tuck your chin as you perform the move. Your head should stay in line with the rest of your body.
Beginners may not want to use the sliders, but instead just reach their hands forward or out to the sides.
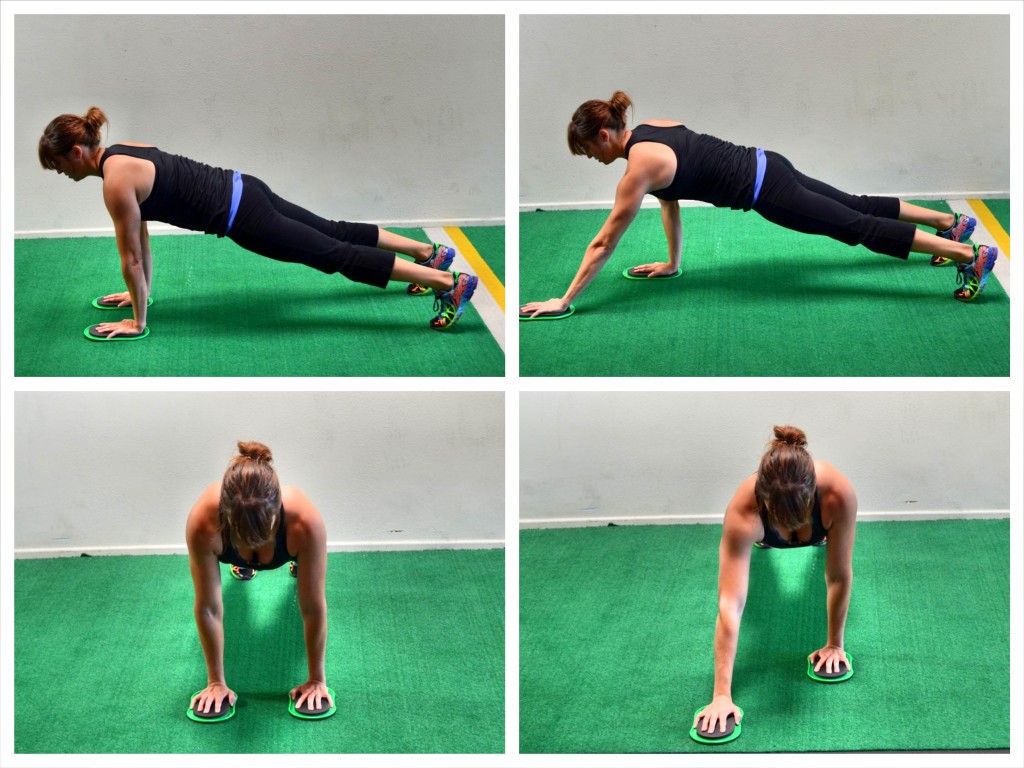
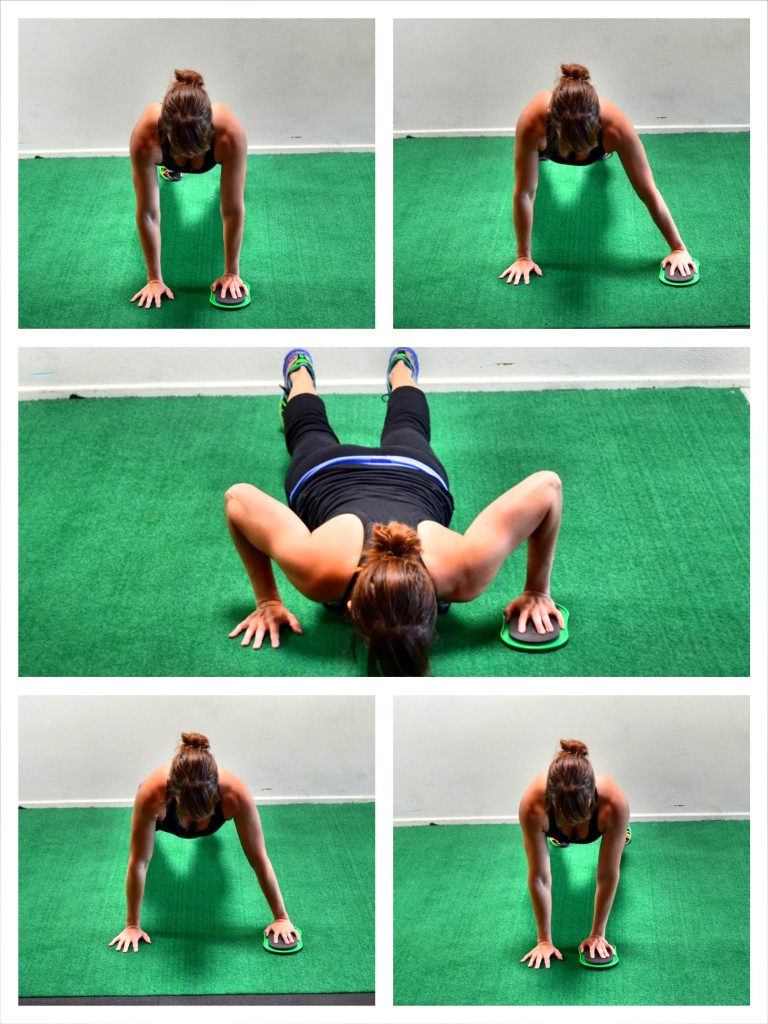
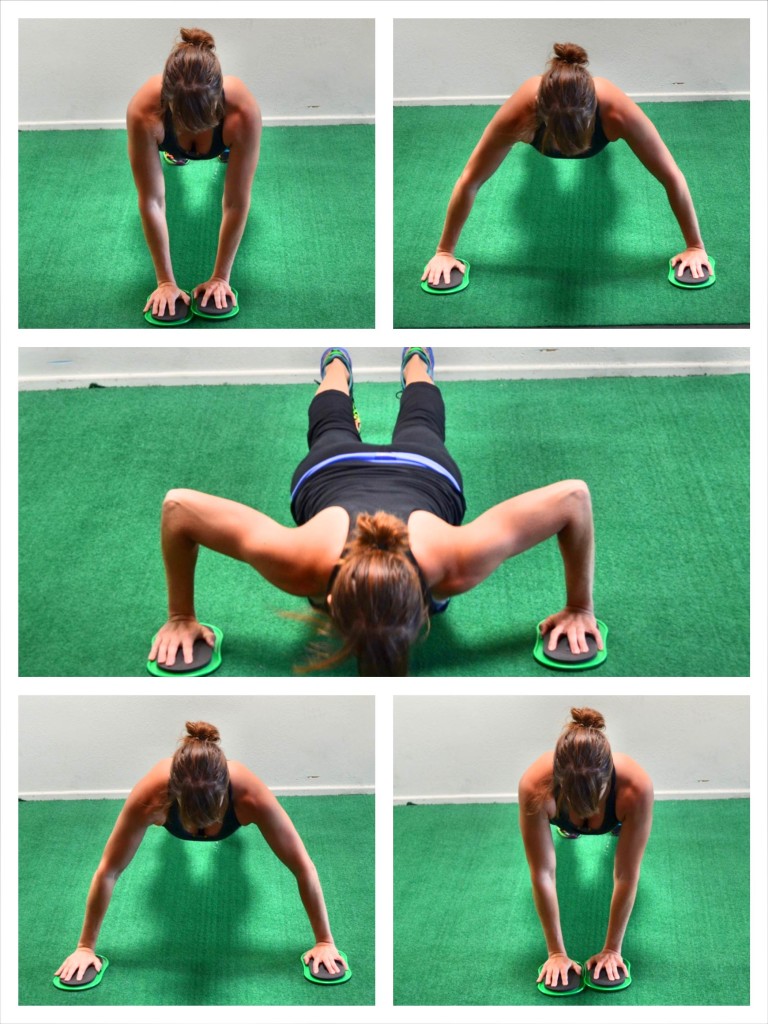
5. Fly to Push Up – Often we forget that our upper body is an important part of our core and instead focus on our abs and, hopefully, even our glutes.
And while it is very important that we work our back to prevent injury and reverse the effects of sitting all day, we should also work our chest, shoulders and triceps.
Plus, push ups are basically moving planks and work your entire body!
To do the Fly to Push Up, set up in a push up position with a towel or slider under each hand. You can do the Fly to Push Up from your knees (beginner) or toes (advanced).
Beginners may also want to start with one hand on a slider and the other hand on the ground. They will then slide the hand on the slider out to the side and perform a push up. As they push up, they will slide the hand back in toward their hand on the ground. They will complete all reps on one side before switching.
If the single slider Fly to Push Up is too much, this move can be done by just stepping the hand out to the side on the ground or even on an incline.
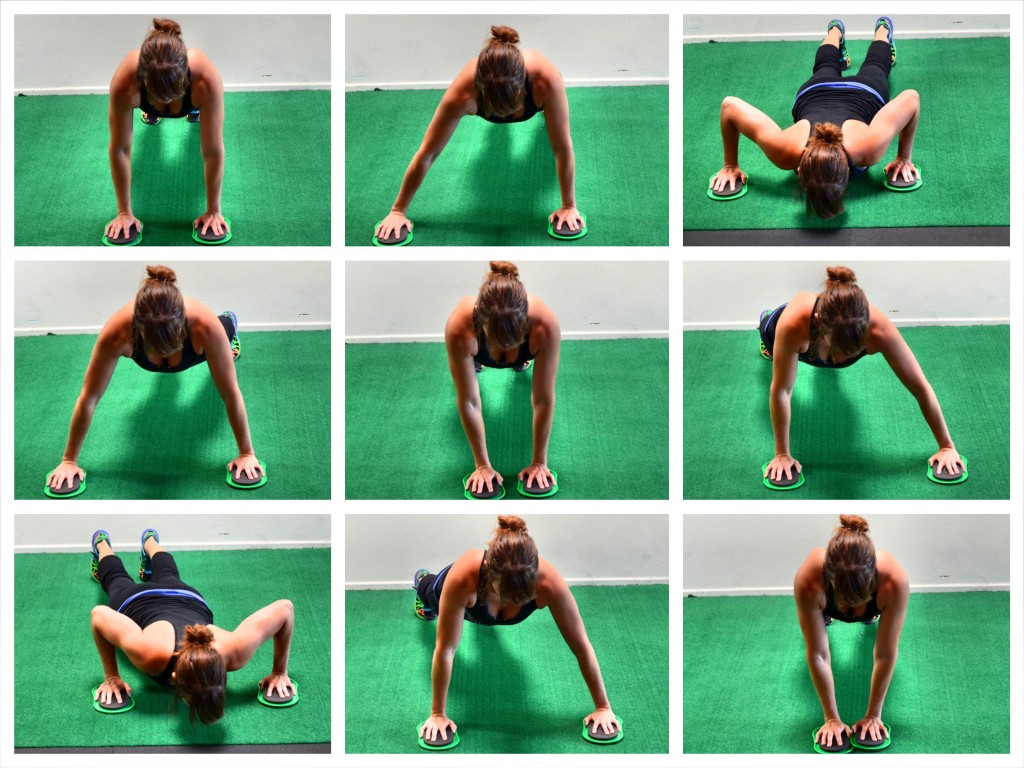
To advance the Fly to Push Up, you will use two sliders.
Start at the top of a push up and then slide one hand out to the side and perform a push up. After the push up, slide the hand back into the starting position. Even though this is a wider push up, don’t let your elbows flare way out by your ears. Then slide the other hand out on the slider and perform a push up. Keep alternating sides until all reps are complete.
If you want to do the Full Fly to Push Up, you will have a slider on each hand. You will then slide both hands out to the side as you lower into the push up and then pull them back in as you come back up out of the push up. You will perform the fly as you perform the push up instead of sliding out, doing a push up and sliding back in.
This move is very chest and shoulder intensive. It also requires a lot of core strength. Do not let your butt go up in the air or your hips sag toward the ground as you do the push up. Also make sure not to shrug or let your elbows flare up by your ears.
If you love these Slider Core Training Exercises, check out these Slider Workouts:
Best Resistance Band Core Exercises:
Resistance bands are another great tool to work your core that you can easily use at home or take with you when you travel. Resistance bands are great because they maintain tension throughout the entire movement and force you to work every ounce of the way.
1. Stability Press – Rotational core exercise are great. They get our body moving in a functional way. However, often in life our body also has to fight not to rotate and maintain stability. If we aren’t able to maintain stability and balance in certain circumstances we risk injury because of rotation force. Which is why our core training needs to include anti-rotational movements.
The Stability Press is an anti-rotational move that works on core stability and makes us strong enough to fight rotational forces that could lead to injury. And this move really works your obliques and glutes!
To do the Stability Press, anchor a band in a door or around a pole.
Holding the band handle in both hands, step away from the anchor point and create tension in the band. Your feet should be no more than shoulder-width apart. The closer your feet are together, the harder the move will be.
You will also want enough tension in the band that you feel your body wanting to rotate back toward the anchor point, but not so much tension that you can’t stabilize.
Then facing the handle with your side to the anchor point, bring your hands into the center of your chest. Slowly oush the band straight out from the center of your chest until your arms are straight out. Do not let your arms rotate open and go back toward the anchor. You want to press straight out. Also make sure not to shrug your shoulders. Maintain a nice tall posture.
Then slowly bring your arms back in and repeat. Complete all reps on one side before turning and facing the other way to work the other side.
This move looks easy, but when you try it, you realize how much your entire body fights rotating back toward the band hook! Use a heavier band or step further away from the anchor point to make the move harder.
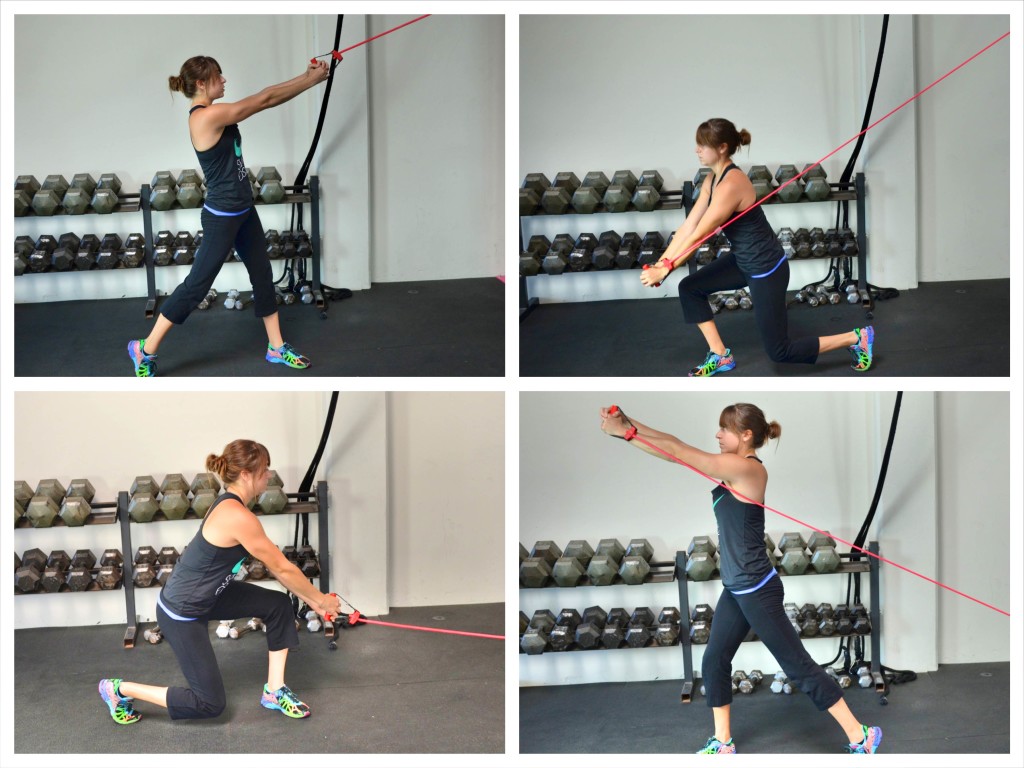
2. Woodchoppers – Woodchoppers are a great complement to the stability press because they are a rotational move that can be done low to high or high to low.
They work everything from your shoulders to your knees. And if you move slowly instead of letting the band just pull you back, they can be incredibly killer!
- Low-To-High Woodchopper – Place a band around a low anchor point. Grab the handle of the band in both hands and stand with your feet about shoulder-width apart. Your side will be to the anchor point. Step away from the anchor point so that there is tension in the band even at the end range of motion. Then pivot your feet and bend your knees to reach the handle down outside the knee closest to the anchor point. Your arms should be straight and your chest should be up and there should be tension on the band. Do not round your back to reach lower. Bend your knees and bring the hands outside your knee. Then bring your arms and the band up and across your body as you stand up and pivot toward the opposite shoulder. You should end reaching the other way with your arms reaching up and out at about shoulder height. Do not reach to high up as you reach across. Then control the band back down and across as you pivot and bend your knees. Move in a slow and controlled fashion back down. Do not let the band pull you. Complete all reps to one side before switching.
- High-To-Low Chop – The High-To-Low Chop is just the opposite. You will anchor the band up high and reverse your position. You would start outside your shoulder with your arms straight and tension on the band and then pivot as you bend your knees to bring the band down outside your opposite knee. Once you’ve brought the band outside your knee, you will then bring it back across your body and up outside the shoulder. Move slowly and make sure their is tension on the band the entire way. Do not round your back to reach lower as you bring the band across. Keep your chest up. Just reach down outside the knee as you pivot your feet.
With both moves, you need to keep tension on the band at all times.
And you want to make sure to pivot your feet. When you pivot, you keep your knee in a safe position. Plus the pivot puts your back leg in triple extension, which is an important position to generate more force and power.
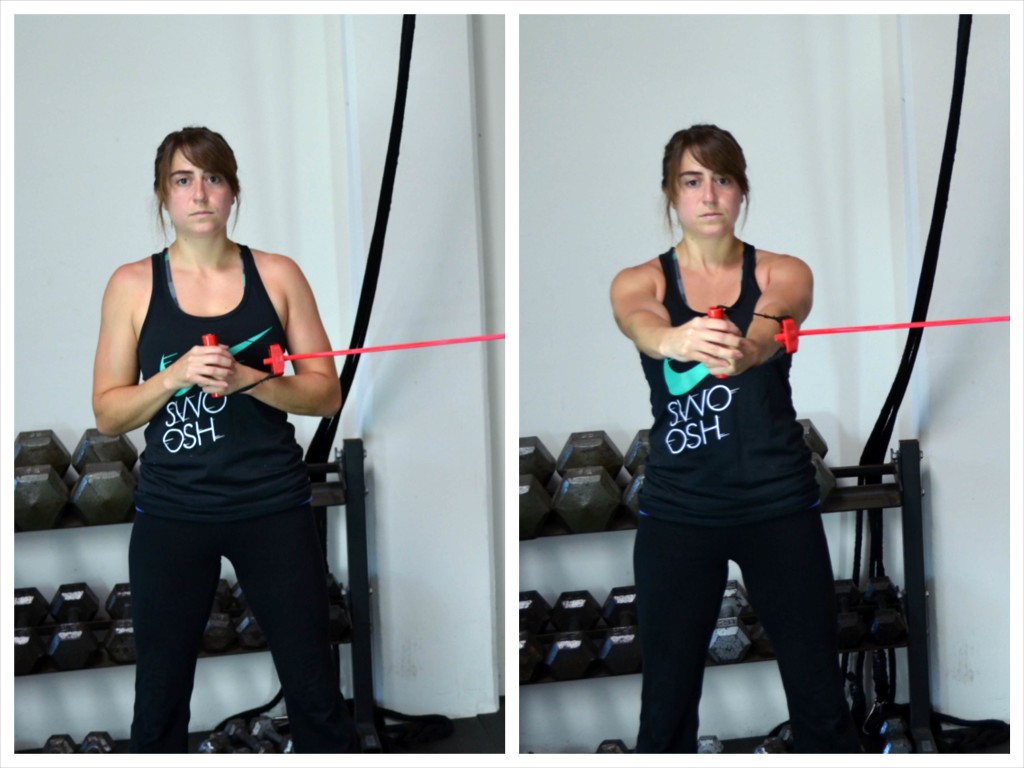
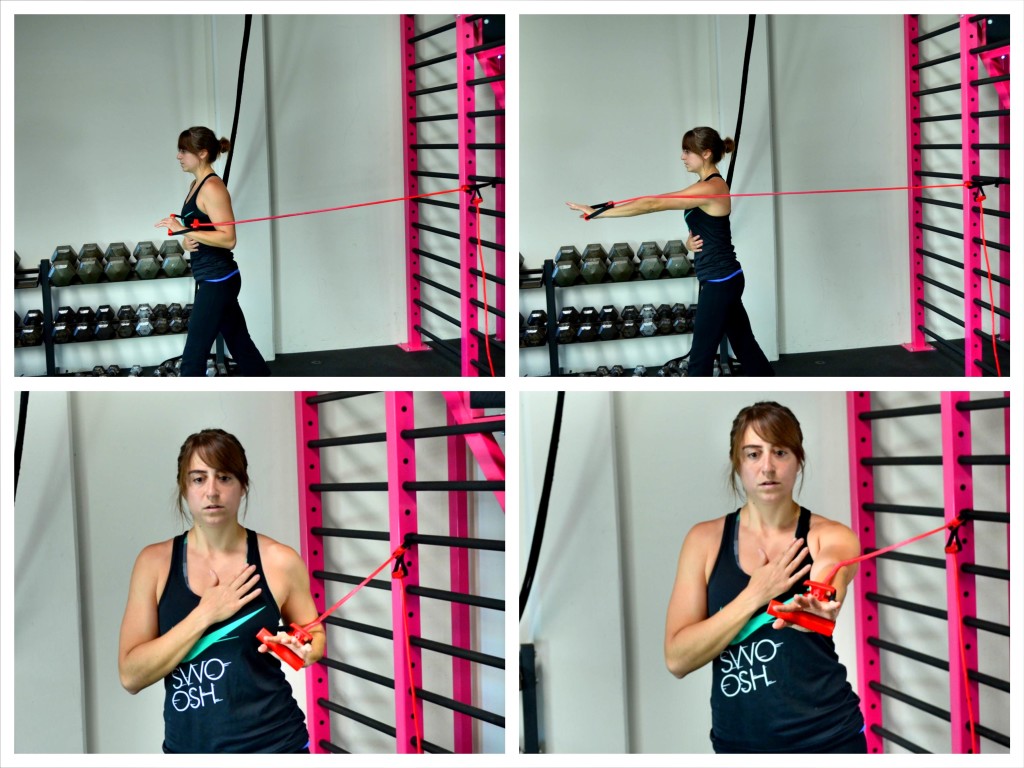
3. Single Arm Chest Press – This is another great anti-rotational core move that also works your chest, shoulders and triceps.
To do the Single Arm Chest Press, anchor a resistance band behind you at about chest height. Grab one handle and step away so that there is tension in the band when your hand is in at your chest. You can stand in a staggered stance or with both feet even. Standing with your feet together will make the move more challenging.
Then without letting your body rotate, press your arm straight out from your chest. Move slowly and do not let the shoulder shrug or the hand press up and out.
You want to press straight out from the chest and then bring the hand back in all without letting your body rotate. You want your body to move as if you were pressing both hands instead of rotating with the hand that is pressing.
Complete all reps on one side before switching. You can place the hand that isn’t working across your chest, by your side or on your hip.
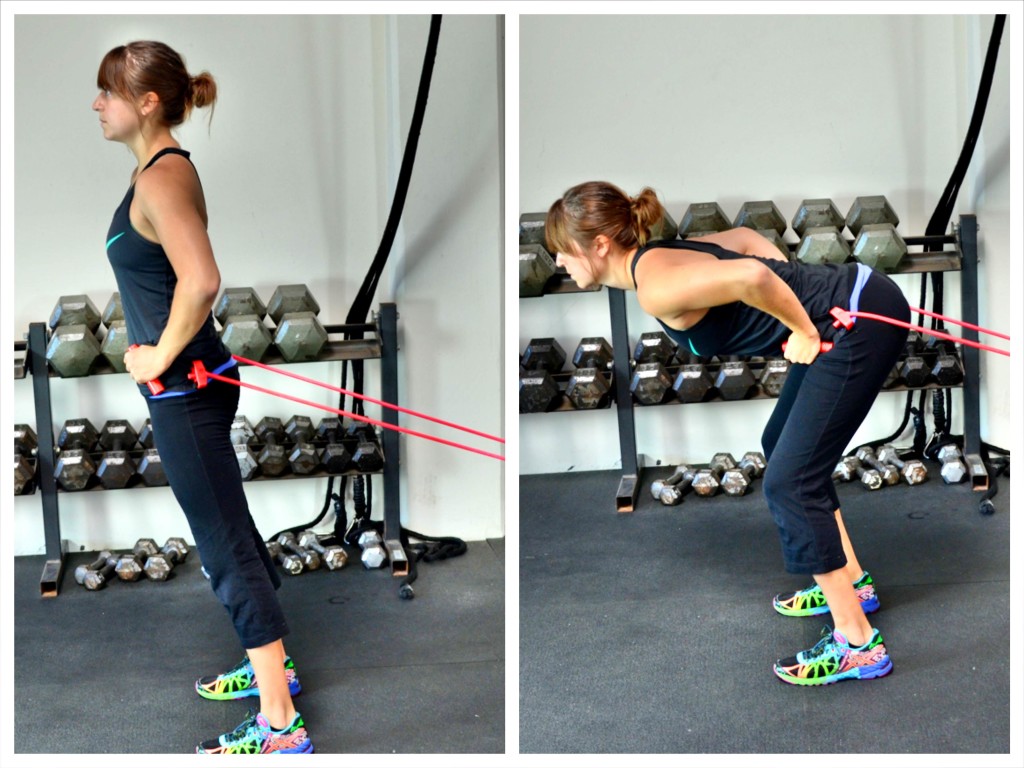
4. Hip Hinge – Any hip extension movements we can do to reverse the effects of sitting all day and activate the glutes are essential to include in our workout routines. And the hip hinge with the resistance band is just such a move.
Plus if you want to learn the kettlebell swing, it is a great place to start.
To do the Resistance Band Hip Hinge, anchor the band low behind you and hold a handle in each hand.
Place your hands on your hips and walk away from the anchor point so that the tension on the band tries to pull you back. Stand with your hands on your hips and your feet no wider than shoulder-width apart.
Then hinge over with soft knees, sitting your butt back toward the anchor point. As you hinge over, you will lean forward to counterbalance, but do not let your back round.
Squeeze your glutes to come back up to standing. At the top of the movement, stand tall and consciously squeeze your glutes. Then hinge back over and repeat.
This should be a quick powerful movement. Stay controlled as you hinge over, but come back to standing explosively and feel the glutes engage. You may even feel a little stretch in your hamstrings as you hinge over.
Do not squat when you perform this movement. It is a hip hinge with soft knees.
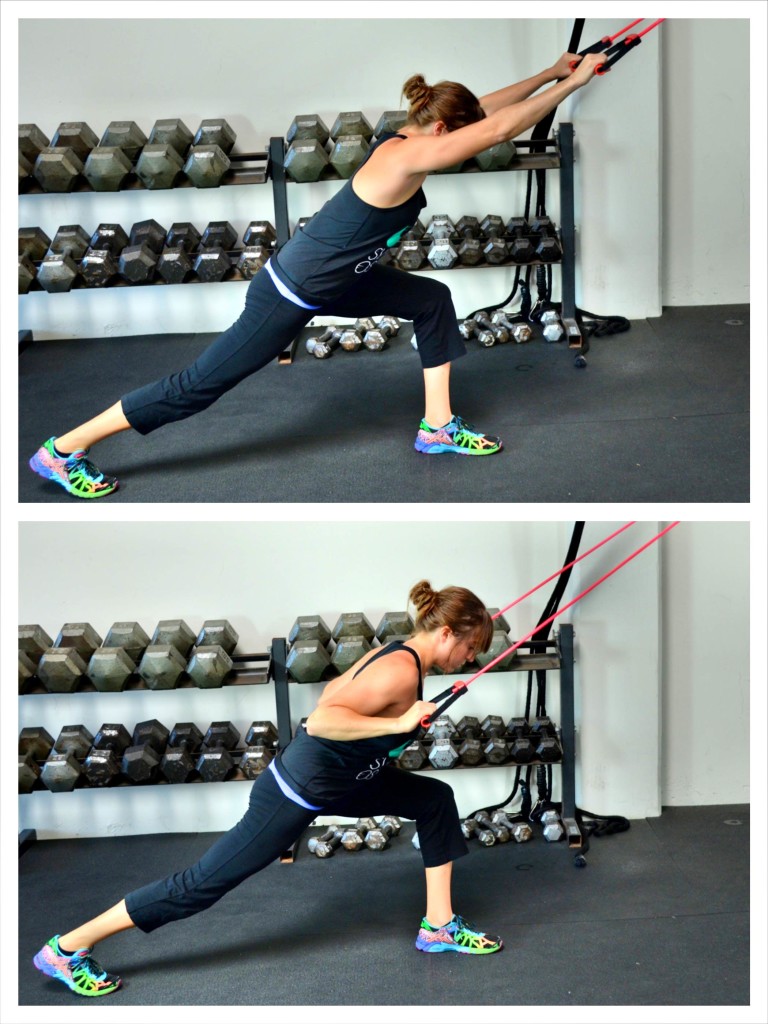
5. Lunge Pull Down – If you want to work on your pull ups but don’t have a pull up bar, the Lunge Pull Down is a great option. It is a full body move that will really work your lats.
To do the Lunge Pull Down, anchor the band up high and, holding a handle in each hand, walk back away from the anchor point.
Lunge back while facing the anchor point and lean your chest over your front knee. Your back leg can be straight, but you want to make sure to lean forward so that you work your lats.
Reach your hands up overhead. Make sure there is tension in the band. If there isn’t, scoot back. Then pull the band down toward your shoulders, driving your elbows down and back.
As you pull down, pinch your shoulder blades down and together. Focus on working your back muscles. Don’t just go through the motions. You want to consciously activate the big muscles of your back.
The slowly extend your arms back out and repeat. Each time you pull down, drive your elbows down and back.
Keep your core engaged the entire time and your back flat.
You may also feel this move in your legs because you are holding a low lunge.
Here are the Resistance Bands we use – Exercise Bands.
Best Sandbag Core Exercises:
The Sandbag is a great awkward weight to use to strengthen your core. However, if you don’t have a sandbag, these moves can be done with dumbbells or even, in some cases, kettlebells.
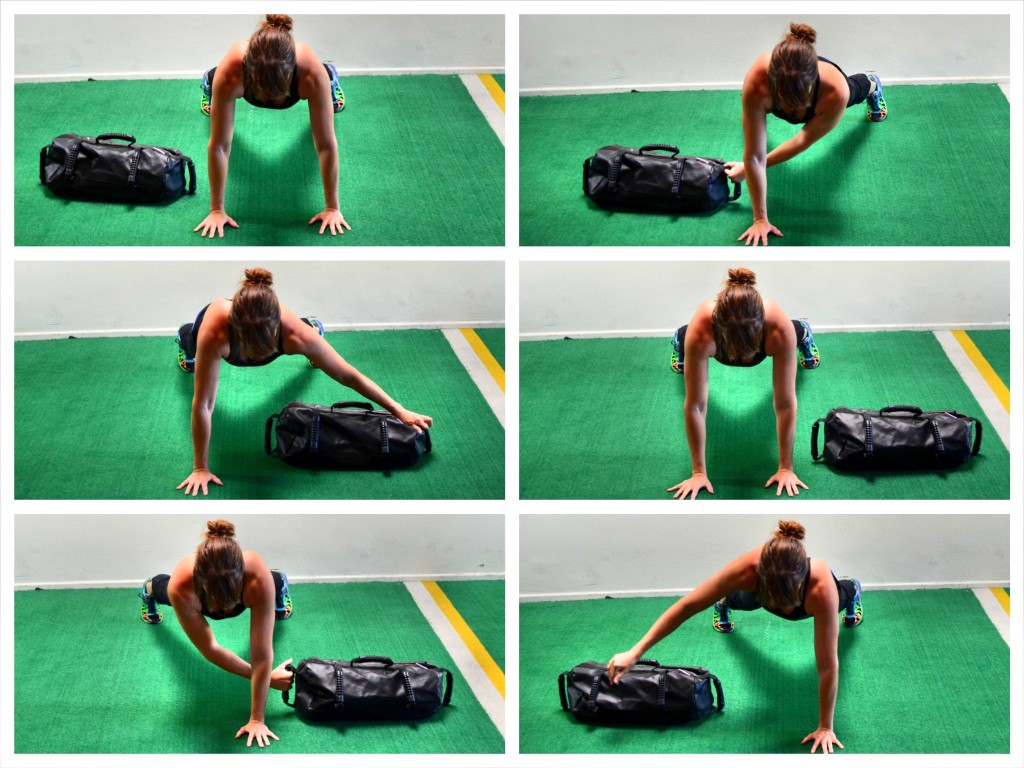
1. Sandbag Plank Pulls – Plank pulls can be either a great hip hinge exercise or a great anti-rotational exercise. Because we do the Crawl with Pull Through, we most often do the anti-rotational Sandbag Plank Pulls.
To do the Anti-Rotational Sandbag Plank Pulls, set up in a plank position from your hands and toes or hands and knees and place the sandbag on the ground to one side of your body just outside and below your shoulder.
Make sure your hands are under your shoulders and you may want to set your feet or knees wider apart. The closer together your feet are, the harder the move will be.
Then reach one hand under your body and across to grab the sandbag. Without rotating your hips, pull the sandbag through and across to the other side of your body.
Then reach through with the other hand to pull it back.
Do not let your hips rotate or your butt go up in the air as you pull the sandbag back and forth across. Also, do not let your hips sag.
To fight your body’s desire to rotate, you will need to engage your core and really squeeze your glutes.
Keep alternating reaches until all reps are complete. Your goal is to keep a nice straight line from your head to your heels the entire time.
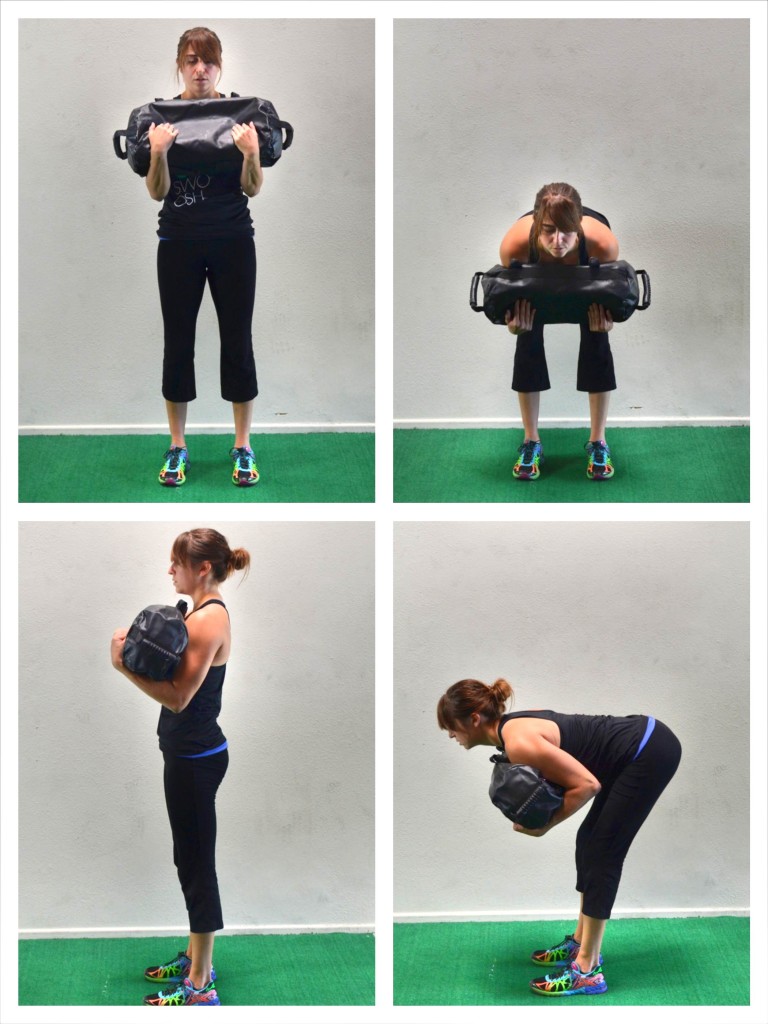
2. Front-loaded Good Morning – While the Front-Loaded Good Morning is another great hinge exercise to work your glutes, it is a must-do because you are front loading the weight, which forces your core to work harder to stabilize.
To do the Front-Loaded Good Morning, hold the sandbag up at your chest in your elbow pits.
Stand with your feet about hip-width apart. Keeping your back flat, hinge over. As you hinge over, push your butt back and keep your knees soft.
Do not rock forward as you hinge over. Make sure to sit back in your heels and keep your back flat as you lean forward to counterbalance.
Do not let your back round as you hold the weight at your chest.
Drive through your heels to come back up to standing and really squeeze your glutes at the top of the move. Make sure to keep the sandbag up at your chest the entire time.
3. Rotational Lunge – If you want a great full-body move that works your body in multiple planes of motion and gets your heart rate up, then you need to do the Rotational Lunge.
This is a challenging move to coordinate and beginners will want to start by breaking it down a bit.
To start, grab a handle of the sandbag in each hand so that your palms are facing toward each other. Stand nice and tall with your feet together and sandbag in front of your legs.
Then step back with one foot into a nice deep lunge. Bend the front knee to sink into the lunge, but keep the back leg fairly straight.
As you lunge, lean forward a bit and rotate the sandbag down outside the front knee. Do not round forward as you rotate with the sandbag.
Then stand back up and stomp the back foot in forward as you bring the sandbag back around front. You want to squeeze your glutes as you come back to standing and stand up nice and tall.
Once you come back to standing, quickly lunge back on the other leg, letting the sandbag swing outside the front knee. To come back up to standing, again stomp the back foot up forward.
The reason you want to “stomp” is to make sure you drive through your heels and full extend your hips every time you come back up to standing. There will be a little more weight in this move on the front foot than on the back foot as well.
Advanced exercisers will want to use the momentum of their lunge to propel the sandbag from side to side quickly. They will want to swing it and rotate with it as they lunge.
Beginners will want to “place” the sandbag outside the leg instead of using the momentum and swinging the bag to the outside. By placing the bag instead of swinging, they will have better balance and more control.
Make sure you stay in control of the sandbag. If you get out of control it could make you rotate too far and lead to injury. Also make sure your back stays flat and your core is engaged the entire time.
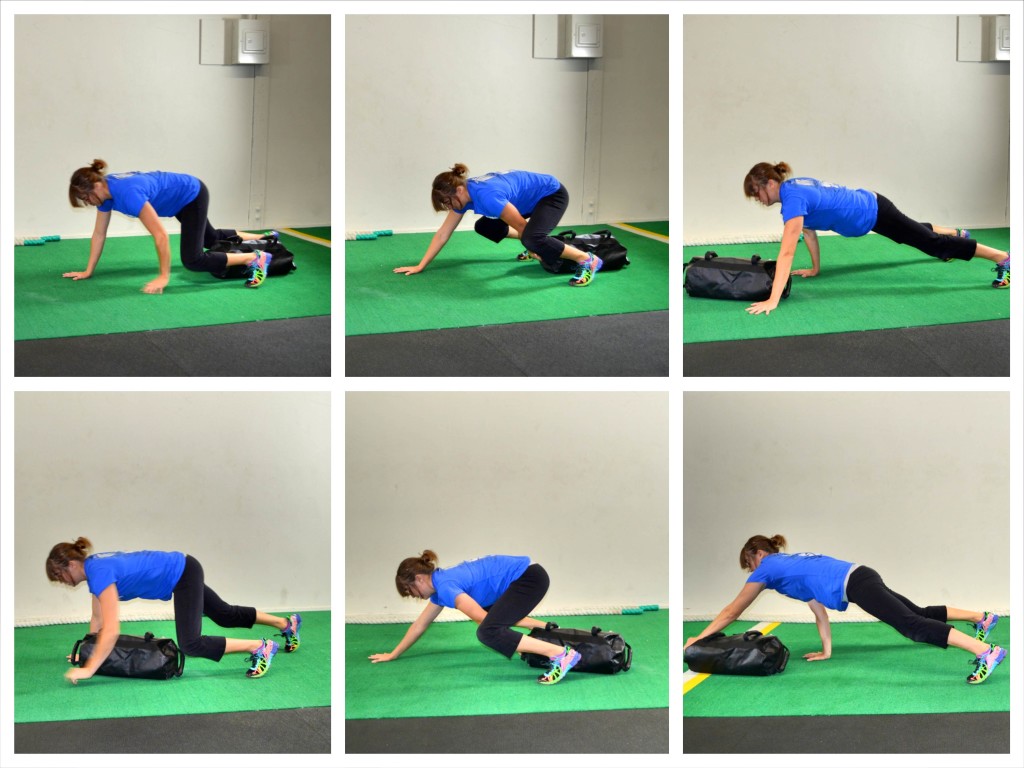
4. Crawl with Pull Through – The Crawl with Pull Through is a great full body cardio move that works on hip extension and power.
To do the move, you will perform a basic forward crawl (like a table top or cougar crawl with your hips low) while pulling the sandbag through. Use a heavy enough sandbag to challenge you, but make sure the movement is still quick and powerful.
It is key that you crawl all the way past the sandbag and reach back and through to pull it overhead. Make sure that you also full extend your hips as you pull. You want your hips to power the pull instead of just using your upper body.
For a full description of the move and a great 30-minute core workout using the Crawl with Pull Through, check out this 30-Minute Core Workout.
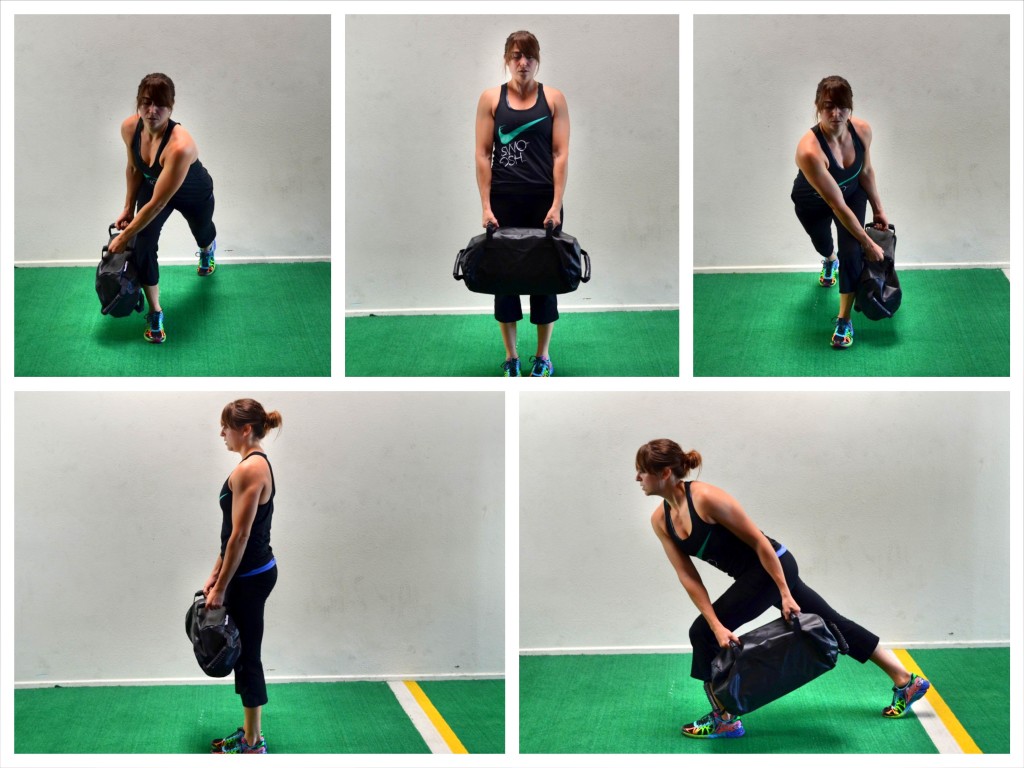
5. Unilateral Deadlift – Loading down basic movements like the squat or deadlift in asymmetrical or unilateral ways is a great way to force your core to work hard to stabilize. They are another “anti-rotational” move.
To do the Unilateral Deadlift with a sandbag, grab the sandbag in one hand and hold it at your side like a briefcase.
Stand nice and tall with your feet about hip-width to shoulder-width apart. Then holding the sandbag at your side, sit your butt back and hinge over. Drop the sandbag to the ground while keeping your back flat.
Do not lean or rotate as you sink. You want the move to look like you are holding weights in both hands.
Driving through your heels, come back to standing. Squeeze your glutes at the top and then repeat. Do not let your back round as you lower down.
This is a conventional deadlift, which means your knees do bend as you hinge over.
Once you’ve completed all reps on one side, switch the weight to the other hand.
If you love these Sandbag Core Training Moves, check out these Sandbag Workouts:
- Sandbag Squat Workout – This workout is leg intensive, but because it has front-loaded leg exercises, it also really blasts your entire core!
- Sandbag Metabolic Workout – This is a great workout using both the Lunge with Rotation and the Crawl with Pull Through so of course we love it!
- Sandbag Core Workout – All three of these moves made our list so this is a MUST-DO Core Workout!
You’ll notice “Planks” as an exercise didn’t make our Core Training List, but that isn’t to say Planks aren’t one of the best core exercises out there. It is just that their are so many great variations that we chose to only include a few. For more plank variations, check out these 47 Plank Variations from Greatist.
All of these core moves work you in every plane of motion and each focuses on a different aspect of your core, be it your back, your butt, your abs, your shoulders or your quads. Each works your body in a functional way to create stability and strength and prevent injury!
What are your favorite core exercises?


0 Comments
Trackbacks/Pingbacks