The Suspension Trainer is a great way to work your upper body when you don’t have access to weights because it can help make exercises more challenging.
It also is a great way to get the muscles of our core more involved even on isolated movements like bicep curls and triceps extensions to give you more bang for your buck when you don’t have as much time to workout.
If you have a Suspension Trainer check out these 10 Suspension Trainer Exercises to work your upper body and core.
10 Suspension Trainer Exercises To Work The Upper Body
These 10 moves are mainly compound movements to work the big muscles of your upper body including your chest and back. By using the Suspension Trainer, you also make many of these compound movements even more core intensive.
However, if you are looking to get in a bit of extra work for your arms (even though back exercises do really work your biceps and chest exercises do really work your triceps), check out moves 9 and 10 for Bicep Curls and a Tricep Extension exercise.
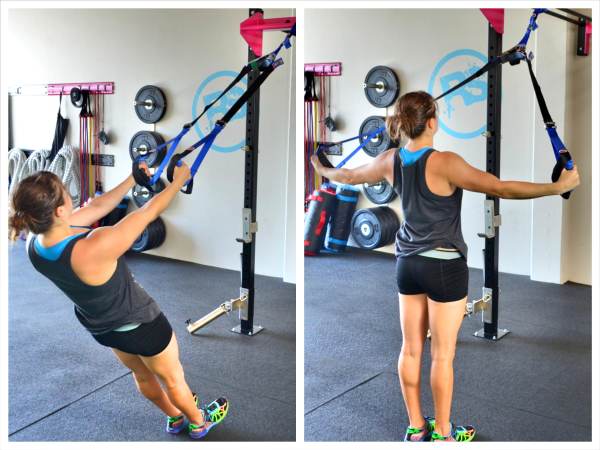
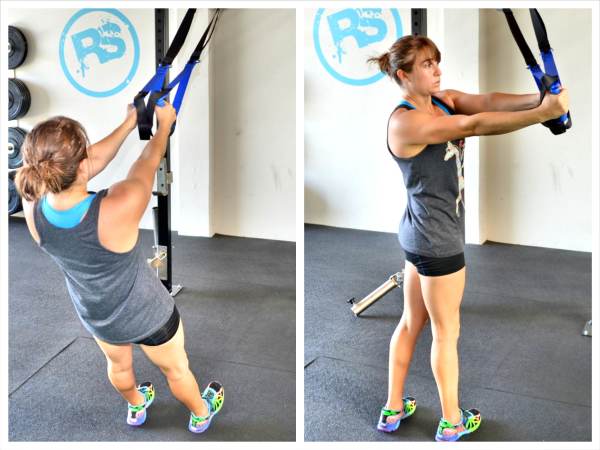
1. Inverted Row and Variations – This is a must do back exercise. Honestly, if you do two moves for your back for the rest of your life, they should be the Pull Up and the Inverted Row.
To do the Basic Inverted Row, hold a suspension trainer strap in each hand. There are three basic grips you can use – palms facing your head, palms facing your feet or palms facing in toward each other.

Walk your feet forward toward the anchor point so that you are leaning back. The further forward you walk your feet and the closer to parallel to the ground you get, the harder the move will be. Do not sacrifice form though to get lower. If you can’t row all the way up or your body doesn’t stay in a nice straight line, walk your feet back and make the move easier.
Then starting at the bottom of the row with your arms out straight, squeeze your core and glutes and press your chest out so there is tension between your shoulder blades. Make sure you don’t shrug your shoulders and that your body is in a nice straight line from your feet to your head.
Then row up, keeping your body in that nice straight line. Drive your elbows down and back as you row up to make sure you don’t shrug your shoulders.
Row until your chest comes up to the handles and then lower yourself back down. Do not curl your wrists to row all the way up. Keep your wrists in a nice straight line. Also, do not let your back arch in order to get your chest to the handles.
Then lower back down until your arms are straight. As you lower back down, don’t let your hips sink toward the ground or your low back arch. Also, keep your chest pressed out the entire time. Make sure you don’t round your thoracic spine at the bottom, but instead keep tension between your shoulder blades at all times.
Move in a controlled fashion. You can change up the tempo of the movement to make it easier or harder; however, make sure you are in control of the movement the entire time and not bouncing off the bottom of the row to get back up. Make sure you row low and don’t shrug your shoulders at any point. This is a great movement to activate the big muscles of our back and help alleviate neck, shoulder and upper back pain if it is done correctly. If you shrug your shoulders when you row, you will not activate the big muscles of your back.
Want to do an Inverted Row but bored with the same basic variation? Then try these great Inverted Row variations! For more information about these variations, check out this post on The Inverted Row.
2. Push Up Variations – Push ups are a great compound movement to work your chest, shoulders and triceps. They actually even work your entire core, especially when done from a Suspension Trainer.
There are two Push Up Variations we like to use – one is the Incline Push Up (with your hands in the trainer) and the other is the Decline Push Up (with your feet in the trainer).
Incline Suspension Trainer Push Up:
The Incline Suspension Trainer Push Up is not necessarily an easier push up variation. While often raising your hands up off the ground to perform an incline push up can make the movement easier, when you add in the instability of the trainer, the incline push up requires a lot of shoulder and core strength and stability. Beginners may find they want to start either at more of an incline or on a more stable surface.
To do the Incline Suspension Trainer Push Up, hold a suspension trainer strap in each hand. You can hold the straps so your palms are facing each other or so that your thumbs are facing each other.
Walk your feet back so your body is at an incline. The closer to parallel to the ground you get, the harder the move will be.
Set up with your arms out straight in front of you in line with your shoulders and your feet together. Make sure you aren’t shrugging your shoulders.
Keeping your body in a nice straight line, lower your chest down between your hands. Keep your elbows from flaring up by your shoulders. You want your arms to create an arrow shape with your body not a “T.” Make sure that as you perform the push up, you are driving back through your heels and not rising up onto your toes. You also want to engage your quads and glutes to help keep your body in a nice straight line.
Then press back up. Keep your core tight as you lower down and press back up. Do not let your low back arch or your butt go up in the air. You want your body to move together in one straight line. Make sure your hands stay right outside your chest and don’t spread out wider than your shoulders.
Do not let your shoulders shrug as you perform the push up.
If your form breaks down, walk your feet toward the anchor point so you are at more of an incline. To make it harder, walk your feet back.
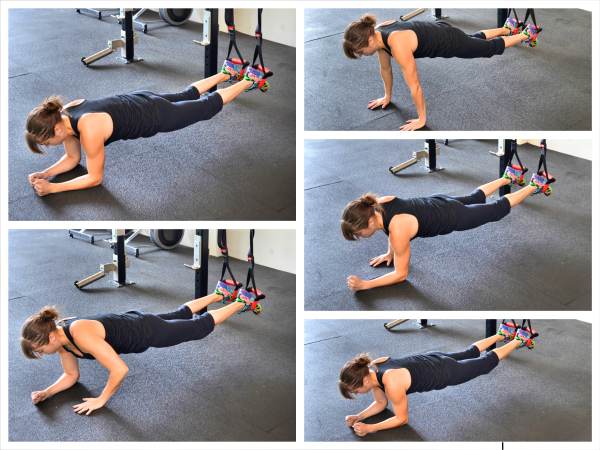
Decline Suspension Trainer Push Up:
The Decline Suspension Trainer Push Up is a more challenging push up variation. To make it more challenging, you will raise your feet up higher and put your body at a bigger incline. To make the move easier, you will lower the foot straps down closer toward the ground so that your feet are in line with your body. This move is very core intensive so beginners may want to start with a push up from the ground first.
To do the Decline Suspension Trainer Push Up, place your feet in the straps and walk your hands out so that you are in a plank position with your hands under your shoulders and your body in a nice straight line.
Squeeze your glutes and quads and draw your belly button in toward your spine. Keep your feet together and your body in a nice straight line as you lower your chest down toward the ground.
Do not let your elbows flare out toward your shoulders. You want to create an arrow shape with your arms and body as you lower down.
Then press back up, making sure your body moves together as one unit. Do not let your hips sag or your butt rise up toward the ceiling.
To make the move harder, make the suspension straps shorter so that the push up is even more of a decline push up. You can also walk your hands forward and pull the suspension trainers straps forward so that when you do the push up, the straps are trying to pull you backward.
This Decline Suspension Trainer Push Up is an advanced move to begin with. Do not attempt this if you can’t easily complete a perfect push up from your toes on the ground.
3. Chest Fly – Chest Flyes are a great exercise to work your chest. And when you do Chest Flyes with a Suspension Trainer, you are using your own bodyweight to work your chest while working your core because of the instability of the trainer.
To do Suspension Trainer Chest Flyes, stand facing away from the suspension trainer anchor point with a hand in each strap. Hold the straps so that your palms are facing each other.
Walk your feet back so your body is at an incline. The closer to parallel to the ground you get, the harder the move will be.
Set up with your arms out in front of you in line with your shoulders and your feet together. Your elbows may be slightly bent.
Then, keeping your body in a nice straight line, let your arms open up to the sides as you lower your body down forward. Your arms may bend a little as you open them up; however, you don’t want to turn this into a press.
Do not let your arms flare up above your shoulders as you open them. Drop your chest in between your open arms. Then, keeping your body in a nice straight line, pull your arms back together and move back to the top of the fly.
As you pull your hands back together and return to the top of the fly, do not let your butt go up in the air or your hips sag down toward the ground. You want your body to move in a nice straight line.
Only open your arms out as wide as you can control. If you can’t maintain a straight line with your body or you can’t open your arms up very far, regress the movement by walking your feet forward so you are more vertical instead of parallel to the ground.
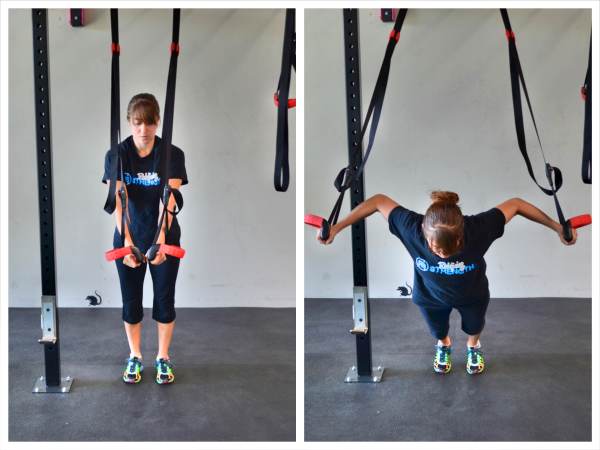
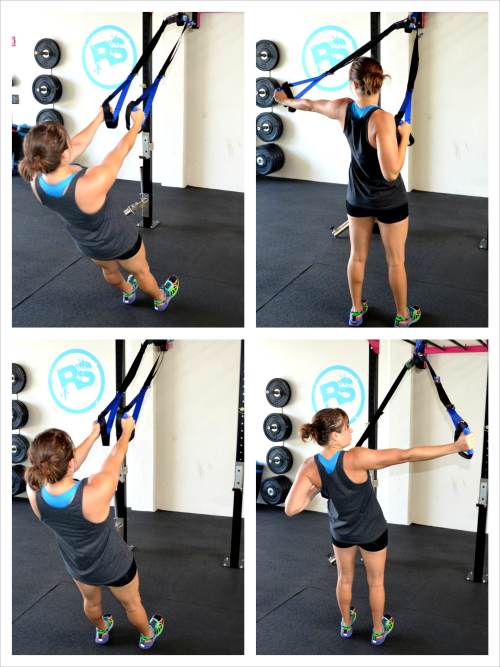
4. Back Fly – Back Flyes are a great way to alleviate and prevent neck, shoulder and upper back pain when they are done correctly. To get the most out of this movement, you must make sure you do not shrug your shoulders as you fly your arms open. You want to make sure to activate the big muscles of your back instead of over using your upper traps.
To do Back Flyes with the Suspension Trainer, hold a strap in each hand, facing the anchor point of the trainer. Walk your feet forward toward the anchor point. You will not want to walk them in as far as you do with the Inverted Row.
Keeping your body in a nice straight line from your head to your heels, open your arms out to the side. You may open them slightly out and down to make sure you don’t shrug your shoulders.
Keep your elbows soft, but do not bend your arms as you open to the side. Do not turn this into a row.
Pull yourself up so your arms are even with your body and then lower back down, bringing your hands back together. Keep your body in a nice straight line as you row. Do not arch your back to help yourself get all the way up. If you can’t fly your arms all the way open, walk your feet back so you are more vertical instead of horizontal.
Do not let your hips sag or arch as you perform the fly. Squeeze your glutes and keep your abs engaged.
Make sure you don’t shrug your shoulders as you open. Keep your chest pressed out as you perform the fly. Move slowly and don’t bounce off the bottom.
Focus on squeezing your shoulder blades down and together as you perform the Back Fly.
If you feel this too much in your neck and upper traps, you may want to try the Scapular Band Fly first to learn how to engage your lower traps. (This post has some other great back exercises as well!)
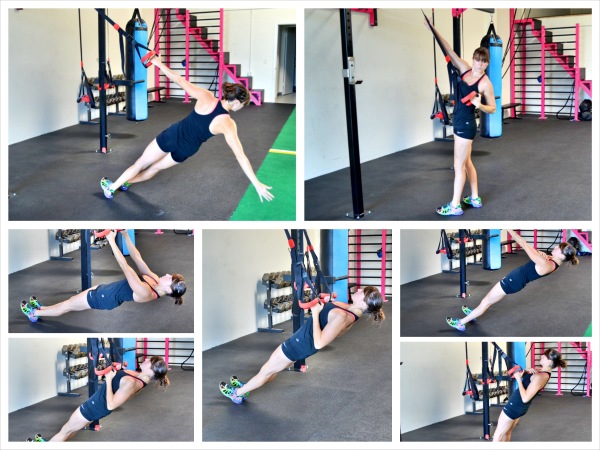
5. The Archer – The Archer is another great back exercise that combines the fly and the row to make each side work in a different way.
To do The Archer, hold a handle in each hand and, facing the anchor point, walk your feet forward so that you are at an incline. The closer to parallel to the ground you get, the harder the move will be.
Each arm will then perform a different motion to pull your body up. Make sure to keep your body in a nice straight line from your head to your heels.
Keeping your left arm in by your side, you will row up, bringing your chest up to the handle. As you row up with your left arm, you are going to bring your right arm out to the side, keeping it straight (but not locked out). Your right arm will be performing a “fly” motion, like with the back fly, as your left arm “rows.”
Make sure that as you do this move, your body stays in a nice straight line. Do not let your low back arch or your shoulders shrug. Move slowly and under control. Do not bounce off the bottom or use momentum to get yourself back to the top of the movement.
You can perform all reps to one side first or alternate sides until all reps are complete.
If your form starts to break down, change your incline. To make the move easier, walk your feet back away from the anchor point. To make the move harder, walk your feet forward so that you are closer to parallel to the ground.
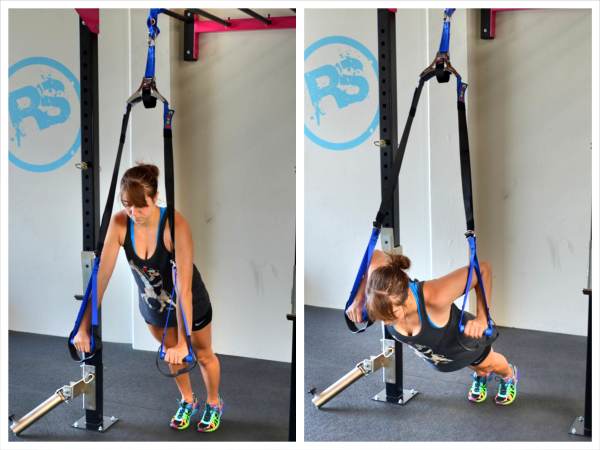
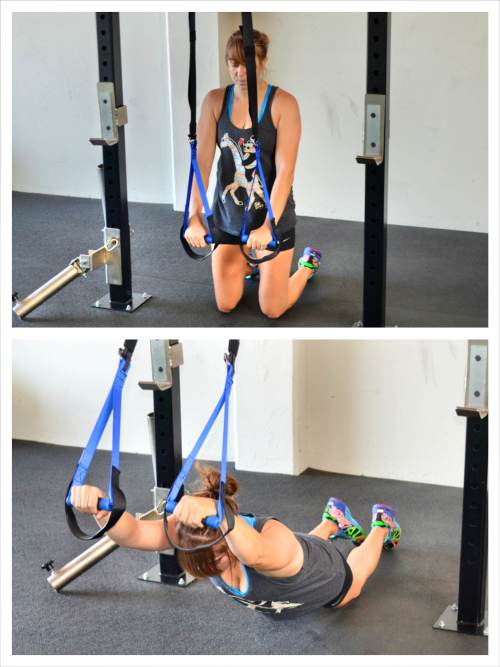
6. Ab Roll Out – The Ab Roll Out is often done as an ab exercise but it is also a great movement to work your lats.
To do the Ab Roll Out on the Suspension Trainer, kneel on the ground behind the trainer with a hand on each handle.
Extend your arms straight out in front of you at about chest height. Then, keeping your core tight, begin to reach your hands up toward the ceiling, leaning forward as you do.
Keep your body in a nice straight line as you lean forward and extend your arms up overhead. Squeeze your glutes and brace your abs so that you don’t feel the move in your low back.
Reach up as far as you can and then, pulling your arms back down with your lats, lower your arms back down in front of you, bringing your body back up.
Do not let your butt sit back first as you come back up. You want your body to move as one unit driven by your lats pulling your arms back down to push your body back to the starting position.
Repeat, reaching up as far as you can each and every time. Do not let your low back arch. Engage your abs and glutes to keep your low back safe!
7. Row to Rotational Press – This Row not only works your back but also your shoulders and your core. And the bonus to this movement is that it works your body in a different plan of motion than many of the other pushes and pulls we do with the Suspension Trainer to make your body stronger for every day life.
To do the Row to Rotational Press, hold a strap in each hand and walk your feet forward so that your body is at an appropriate incline. The closer to parallel to the ground you are, the harder the move will be.
Start at more of an incline than you would for the Inverted Row because of the press portion of this movement.
Once you are set at an appropriate incline, place your arms outstretched in front of you with your hands together.
Then row your hands in toward your chest, driving your elbows down and back. Do not shrug your shoulders as you row. Once you’ve brought your chest up to your hands, rotate and press your hands out to the right. Then bring them back to the center of your chest and lower back down, straightening your arms out in front of you.
Make sure to keep your shoulders down the entire time. Do not let them shrug up by your ears. You want to make the big muscles of your back work.
Throughout the entire movement, keep your body in a straight line. Do not let your hips sag toward the ground or your low back arch as your row and press.
Alternate presses, rowing up and pressing to the right and then the left. As you fatigue, do not bounce or swing to get up. If you need to make the movement easier as you fatigue, walk your feet back so that you are more vertical.
8. Plank Climbers – Plank Climbers work your shoulders and your triceps as well as your core. Beginners may need to do this movement without the suspension trainer as it makes the move even more challenging for your upper body as well as your core.
To do Plank Climbers in the Suspension Trainer, place your toes in the straps and set up in a high plank position from your hands. Your hands should be under your shoulders and your body should be in a nice straight line from your head to your toes.
The farther out you set up in the plank from the straps hanging straight down, the harder the move will be because the trainer will work to pull you back.
Then, engaging your quads, glutes and abs to keep your body in a nice straight line, lower down onto one forearm and then the other. Once in a plank position from your forearms, climb back up one hand at a time, placing your hand where your elbow was.
Keep your core engaged and wiggle your hips as little as possible as you climb up and down. Make sure that both hands lead the climb up and down. You can alternate which hand leads each rep or you can switch after a certain number of reps.
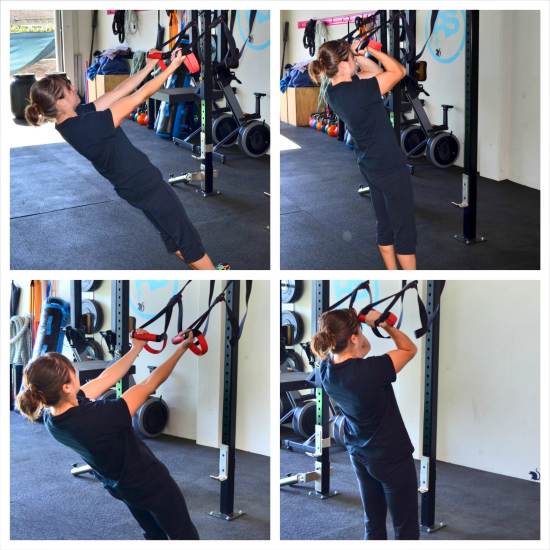
9. Bicep Curl – While the bicep curl is generally an isolated exercise that doesn’t work as many muscles, or even the big muscles of your upper body like compound exercises do, Bicep Curls on the Suspension Trainer give you more bang for your buck because they are more core intensive.
To do the Bicep Curl, hold a suspension trainer strap in each hand with your palms facing toward your head (so pinkies close to each other). Walk your feet out so you are leaning back. The closer to parallel to the ground you get, the harder the move will be. To start, do not walk out as much as you would for the Inverted Row because this movement is focused on working a smaller muscle group.
Lean back with your arms out straight in front of you and your body in a nice straight line from your head to your heels. Do not let your hips sink toward the ground or your back arch. Keep your core tight and your chest pressed out.
Then, keeping your elbows at shoulder height, curl your hands in toward your forehead. As you curl your arms, make sure your body stays in a nice straight line.
Then slowly uncurl your arms, keeping your upper arms in the same place. Once your arms are straight, curl your hands back in. Do not let your hips sag or your back arch as you curl. Do not bounce off the bottom of the movement to help yourself curl back up.
Slow down the tempo of the movement to make it more challenging.
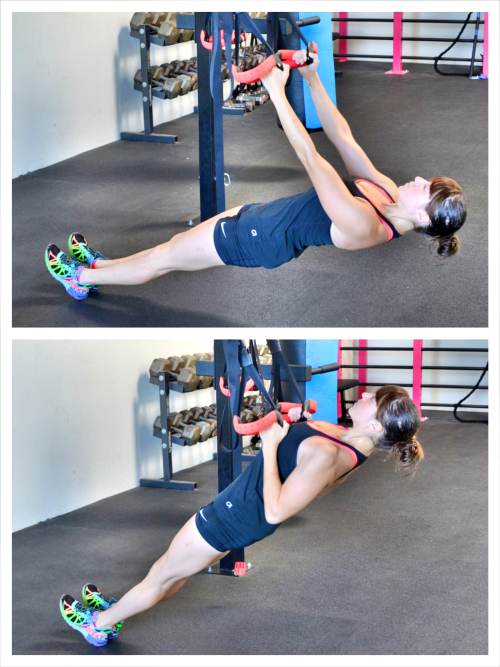
10. Tricep Extension – Like the Bicep Curl, the Tricep Extension is generally an isolation exercise, but by doing it on the Suspension Trainer you force your core to have to work hard to stabilize during the exercise.
To do the Suspension Trainer Tricep Extension, stand facing away from the suspension trainer anchor point with a hand in each strap and your palms facing away from you (so thumbs next to each other). Walk your feet back so your body is at an incline. The closer to parallel to the ground you get, the harder the move will be. Remember this isn’t a big muscle group working so don’t go too low to start.
Set up with your arms out straight in front of you in line with your shoulders and your feet together. Make sure your shoulders are relaxed and that you aren’t shrugging them up by your ears.
Then, keeping your body in a nice straight line and your upper arms in line with your shoulders, curl the backs of your hands toward your forehead.
Do not let your hips sag down toward the ground or your butt go back as you curl your hands back.
Then, once you’ve brought your hands to your forehead, press your hands back out until your arms are fully extended again at shoulder height.
As you press your hands back out, you will press your body away. Curl and press away in a slow and control manner. Make sure to press your arms straight back out. Do not let them go out to the sides.
Also, you should not feel this move in your low back. Keep your core engaged and make sure your feel your triceps working.
Use these 10 Suspension Trainer Exercises to work your upper body. And in case you need help designing a workout, try one of our Upper Body Suspension Trainer Workouts below!


Great options to try. Which suspension trainer are you using? It looks like 2 different types. And do you find them easier to set than TRX?
I have a CoreX and a Jungle Gym XT. I actually prefer the Jungle Gym XT. It is not only cheaper, but I like the fact that the straps are separate unless you choose to connect them. So I don’t know about easier, but I definitely like them better.
Those are really usefull. Go on cori.i m from turkey. Nice Job.
Glad you found it helpful! Hi over there in Turkey!