by Cori Lefkowith | Sep 9, 2017 | Blog, Exercises, Pain Relief, Pull Ups
I want to ask you a couple of questions…And tell me if these sound familiar….
- Have you ever had neck, shoulder or upper back pain?
- Do you feel like your upper back and neck are constantly tight?
- Do you have poor posture and tend to round forward?
- Have you been struggling to improve your pull ups no matter how much you work at them?
- Heck have you ever tried to work on pull ups only to end up with neck or shoulder pain?!
Maybe all of the above even!?!
Do you feel like no amount of stretching helps permanently and that you just have to keep doing more and more for momentary relief?
Unfortunately that is because stretching alone isn’t the answer.
Stretching alone doesn’t solve the problem for a two main reasons…
- We aren’t stretching the RIGHT muscles.
- We don’t get the right muscles activated so we keep overusing the wrong muscles.
Often our back “feels” tight so we stretch it.
But that tight feeling often isn’t from muscles being shortened.
When muscles are shortened, stretching can really help. But in this case, stretching a muscle that is overly lengthened may feel good for a moment but doesn’t SOLVE the problem. Our back may “feel” tight and even gets trigger points because our chest is overly tight and causing our back muscles to be over-stretched.
Therefore stretching our back alone doesn’t really SOLVE the problem.
If we’ve suffered upper body pain or injury and sit hunched over a computer or walk texting on our phones, often the big muscles of our back aren’t working correctly and carrying the load they should be carrying. It can also cause our chest and lats to become tight and our shoulder blades to become less mobile.
This leads small muscles, like our rotator cuff muscles, to become overworked, which can injured to injury. It can cause neck pain and shoulder pain.
But only stretching won’t get the right muscles working.
Stretching the right muscles, aka the muscles that are SHORTENED and TIGHT, can help open everything up, but then we NEED to activate the right muscles.
If you don’t then ACTIVATE, you’ll keep overusing muscles that weren’t meant to be the prime movers!
So if you’re ready to get the right muscles working to improve your posture AND even your pull ups, you’ll want to start including these 5 moves daily even!
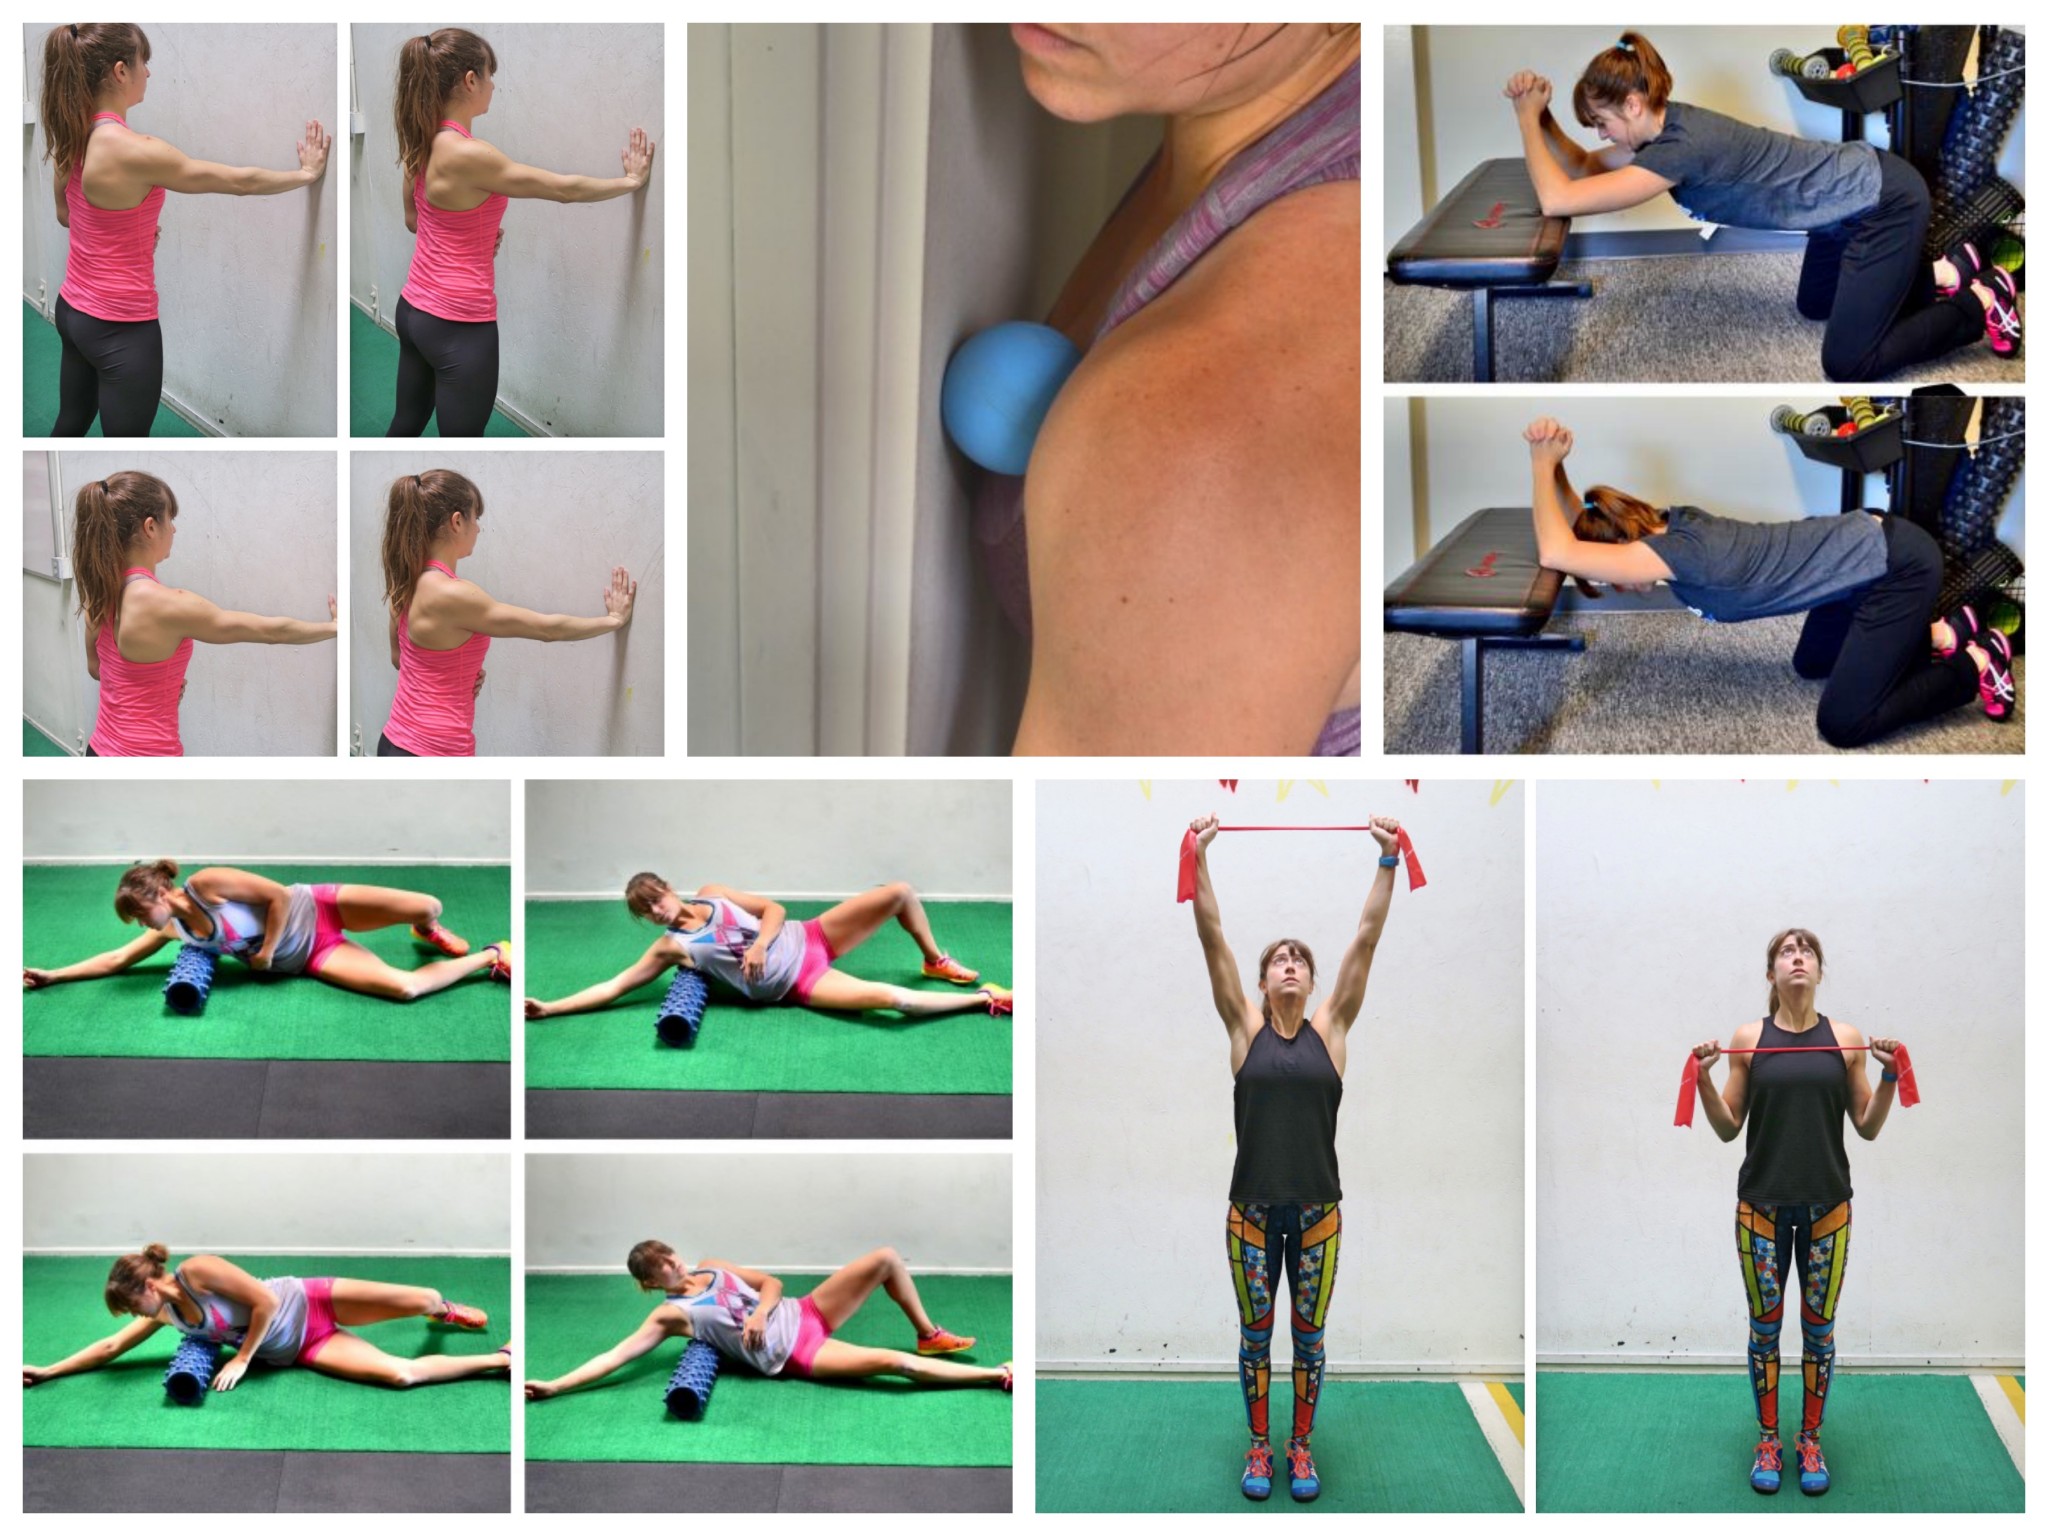
Using these 5 moves, you can relax tight muscles and activate the big muscles of your back! They combine foam rolling, stretching and activation to help you restore mobility and build that mind-body connection.
Chest Foam Rolling:
Neck, shoulder, upper back pain? Always feel like you have “knots” in your back, but the relief from massage or stretching is only temporary?
Well guess what? Part of the problem is that your chest muscles are tight and actually perpetuating you rounding forward and even the rounding forward of your shoulders.
So to help relieve those aches and pains and help yourself get the muscles of your back working correctly, you need to start rolling out your chest.
To roll out your chest, you can either use a bigger foam ball against the ground or you can use a smaller, harder ball in a doorway.
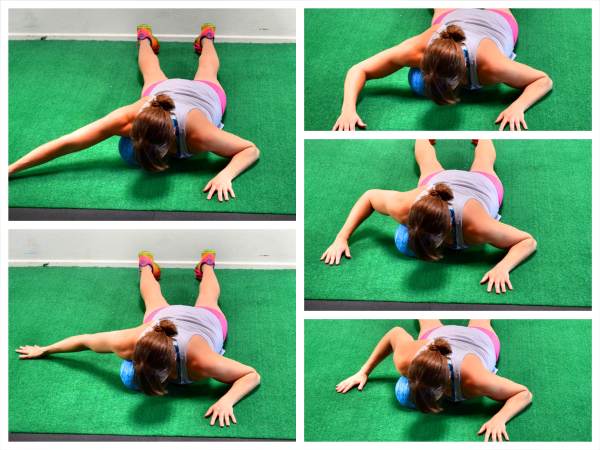
To roll out your chest using a foam ball against the ground, place the ball on the ground and lie face down on top of it with the ball starting right at the side and top of your chest beside your shoulder joint and below your collarbone.
Holding the ball there, begin to sweep your arm overhead and then back down toward your legs. You can sweep your arm almost as if making snow angels. Or you can move your arm overhead and then tuck it under to reach down toward your feet and rotate your shoulder a bit. You can make full and partial sweeps to dig into a spot.
Then move the ball a little more toward your sternum and repeat. You can work all along underneath your collarbone, holding on any tight spots and moving your arm. You want to make sure to work all around the front of your shoulder joint and toward your sternum.
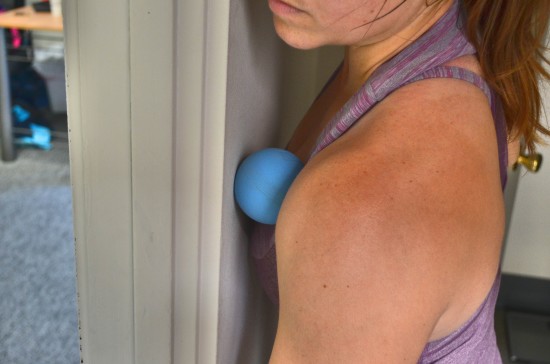
To roll out your chest in a doorway, it is best to use a smaller, harder ball instead of the foam ball.
Stand facing the wall besides the doorway and place the ball between your chest and the wall. You want to be right on the edge of the wall so that you can extend your arm forward through the doorway. Place the ball in your chest right by your shoulder joint. Hold on any tight spots as you work down toward your armpit then up under your collarbone. You will want to lift your arm out in front as you roll as well as out to the side like you did on the ground.
Lat Foam Rolling:
Because we sit way too much hunched forward over our computers, phones or even our bikes, our lats can become tight. It is important that you get everything loosened up if you want to improve your posture and your pull ups.
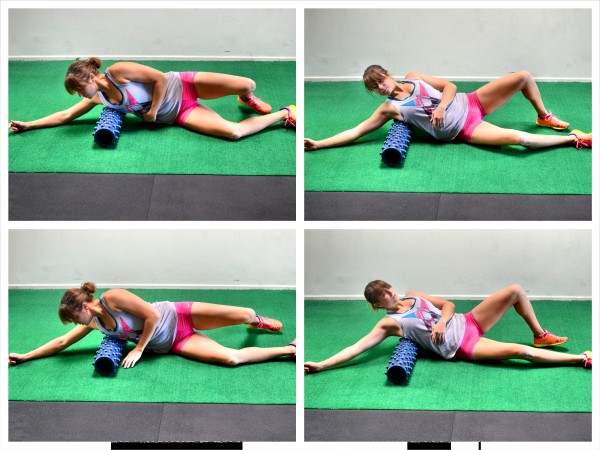
To roll out your lats, you can use a ball or a roller. Start by lying on your side with a roller under one armpit along the side of your back. Extend the arm on the side with the roller up above the roller. Then rock forward and backward on the roller, rotating your chest toward the ground and then up toward the ceiling as you roll on the roller so it hits toward your ribs and then toward your back.
Hold on any tight spots you find then move it lower down the side of your back. Hold on any tight spots as you go and make sure to rock forward and backward as you make your way down your side.
As you work down your side, you may want to rotate slightly more toward your back. Work all the way from your armpit to about the end of your rib cage.
Be careful as you work your way down your lat. Do not start to hyperextend your low back or tense to arch over the roller.
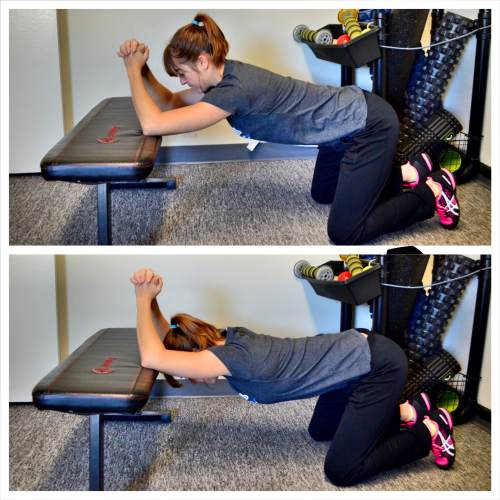
Kneeling Thoracic Extension and Lat Stretch:
When we sit all day in forward flexion, hunched over, our spine is in flexion. This stretch works on the exact opposite – extension. It will help you reverse the hunch (improve your spinal extension) as you stretch out your lats and even your triceps.
To do the Kneeling Thoracic Extension and Lat Stretch, place a box, bench or table on the ground in front of you. Kneel on the ground facing the bench and place your elbows up on it about shoulder-width apart. Make sure that you are kneeling far enough away from the bench that you can lean forward and drop your head between your elbows as you press your chest toward the ground.
From this kneeling position, relax your chest and head over, sitting your butt back. Press your chest toward the ground and feel your spine extend. You should feel a nice stretch down your triceps and lats as well as through your thoracic spine. Try to extend your back as much as possible as you press your chest toward the ground, but don’t simply arch your lower back. Keep your abs braced so that you force your mid and upper back to extend.
Breathe to stretch deeper and then relax back out and repeat, trying to get further with each rep.
If you really feel your elbows constantly sliding out on the bench, you can hold a dowel or even a towel between your hands to help keep everything in line. You can also increase the stretch by bringing your hands back toward your head as you maintain extension.
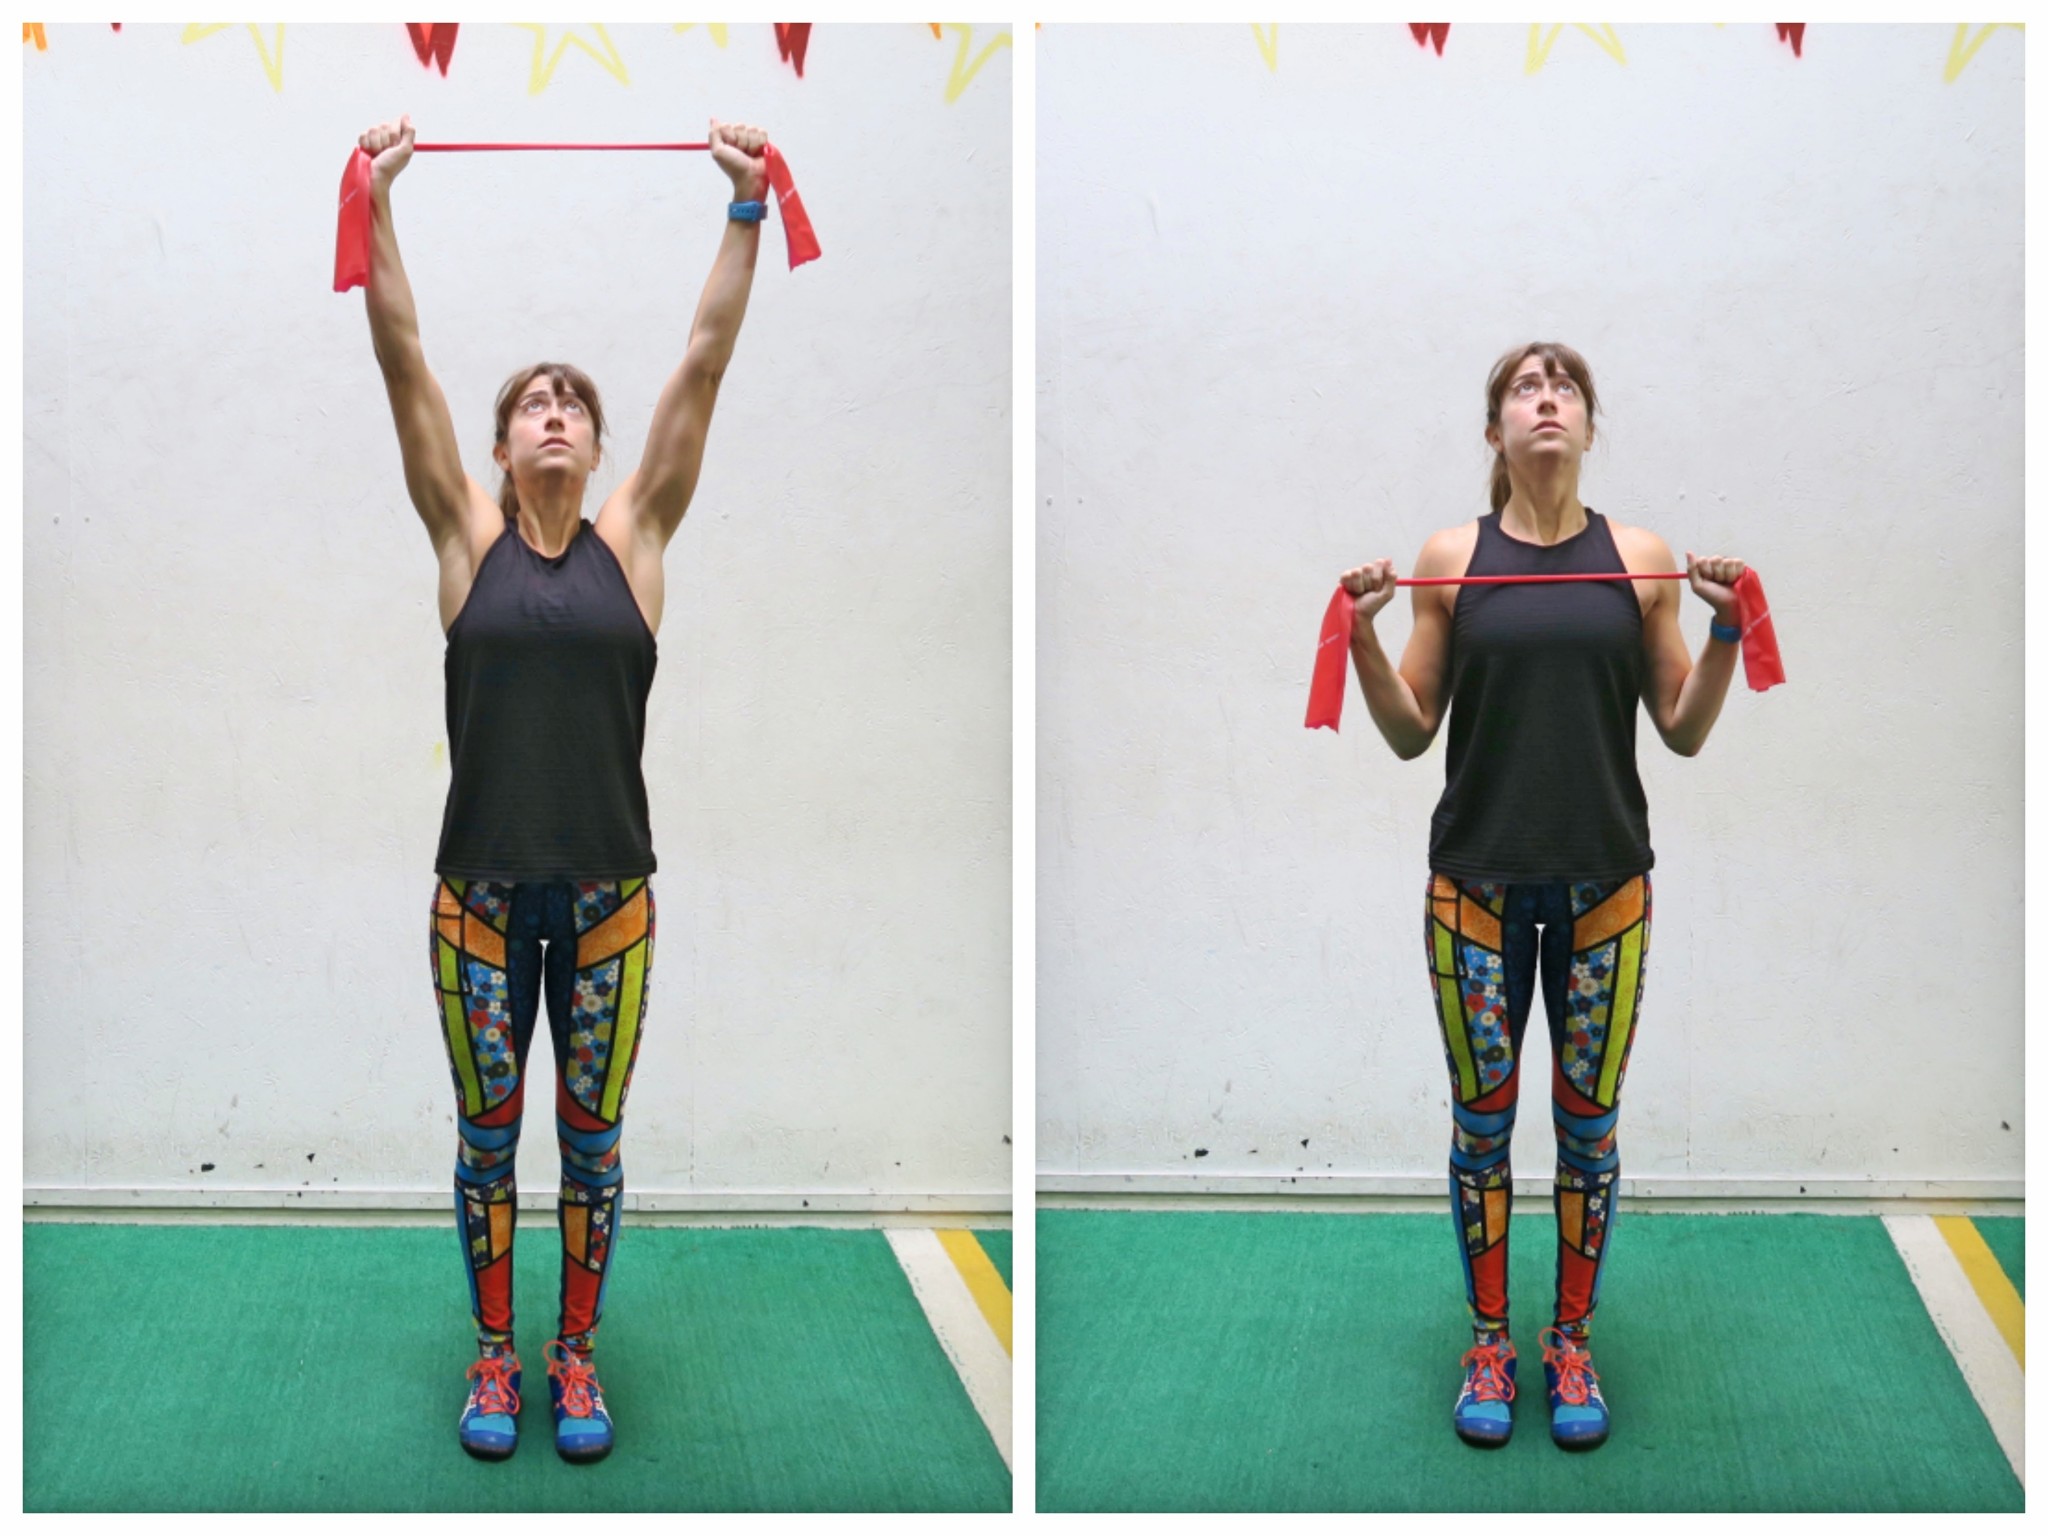
Pull Downs:
Once you’ve foam rolled and stretched to loosen tight muscles, you have to get the right muscles activated and working. Otherwise you’ll just end up constantly stretching everything only to tighten back up because you keep overusing muscles that aren’t meant to carry the load.
The Pull Downs are a great activation exercise to work your lats and lower traps and help mobilize your shoulder blades.
To do Pull Downs, hold a band, or even a towel, in both hands with your hands about hip-width apart. Slightly pull out on the band so that there is tension on the band or towel. Press your chest out and reach the band overhead, keeping the band/towel tight between your hands. You may need to adjust your hands in closer if the band is light. On a towel as long as you pull out with your hands a little wider than shoulder-width you should be fine since it won’t stretch like the band. You want to pull out on it so your hands are just slightly wider than shoulder-width apart.
Then pull the band down toward your chest, as if pulling your chest up to the bar during a Pull Up. Lead with your chest as you draw your shoulder blades down and back and feel your back working to pull the band down. As you pull the band down, keep it tight between your hands.
Hold at this bottom position. Really press your chest out and engage your upper back as you hold. You want to think that you were leading with your chest up toward the bar. Do not arch your low back even though you want to press your chest out. Make sure you also don’t simply feel the outsides of your shoulders working, but instead feel your back. If you only feel your shoulders, you may be using too heavy a band or you may be too focused on pulling out on the band instead of down.
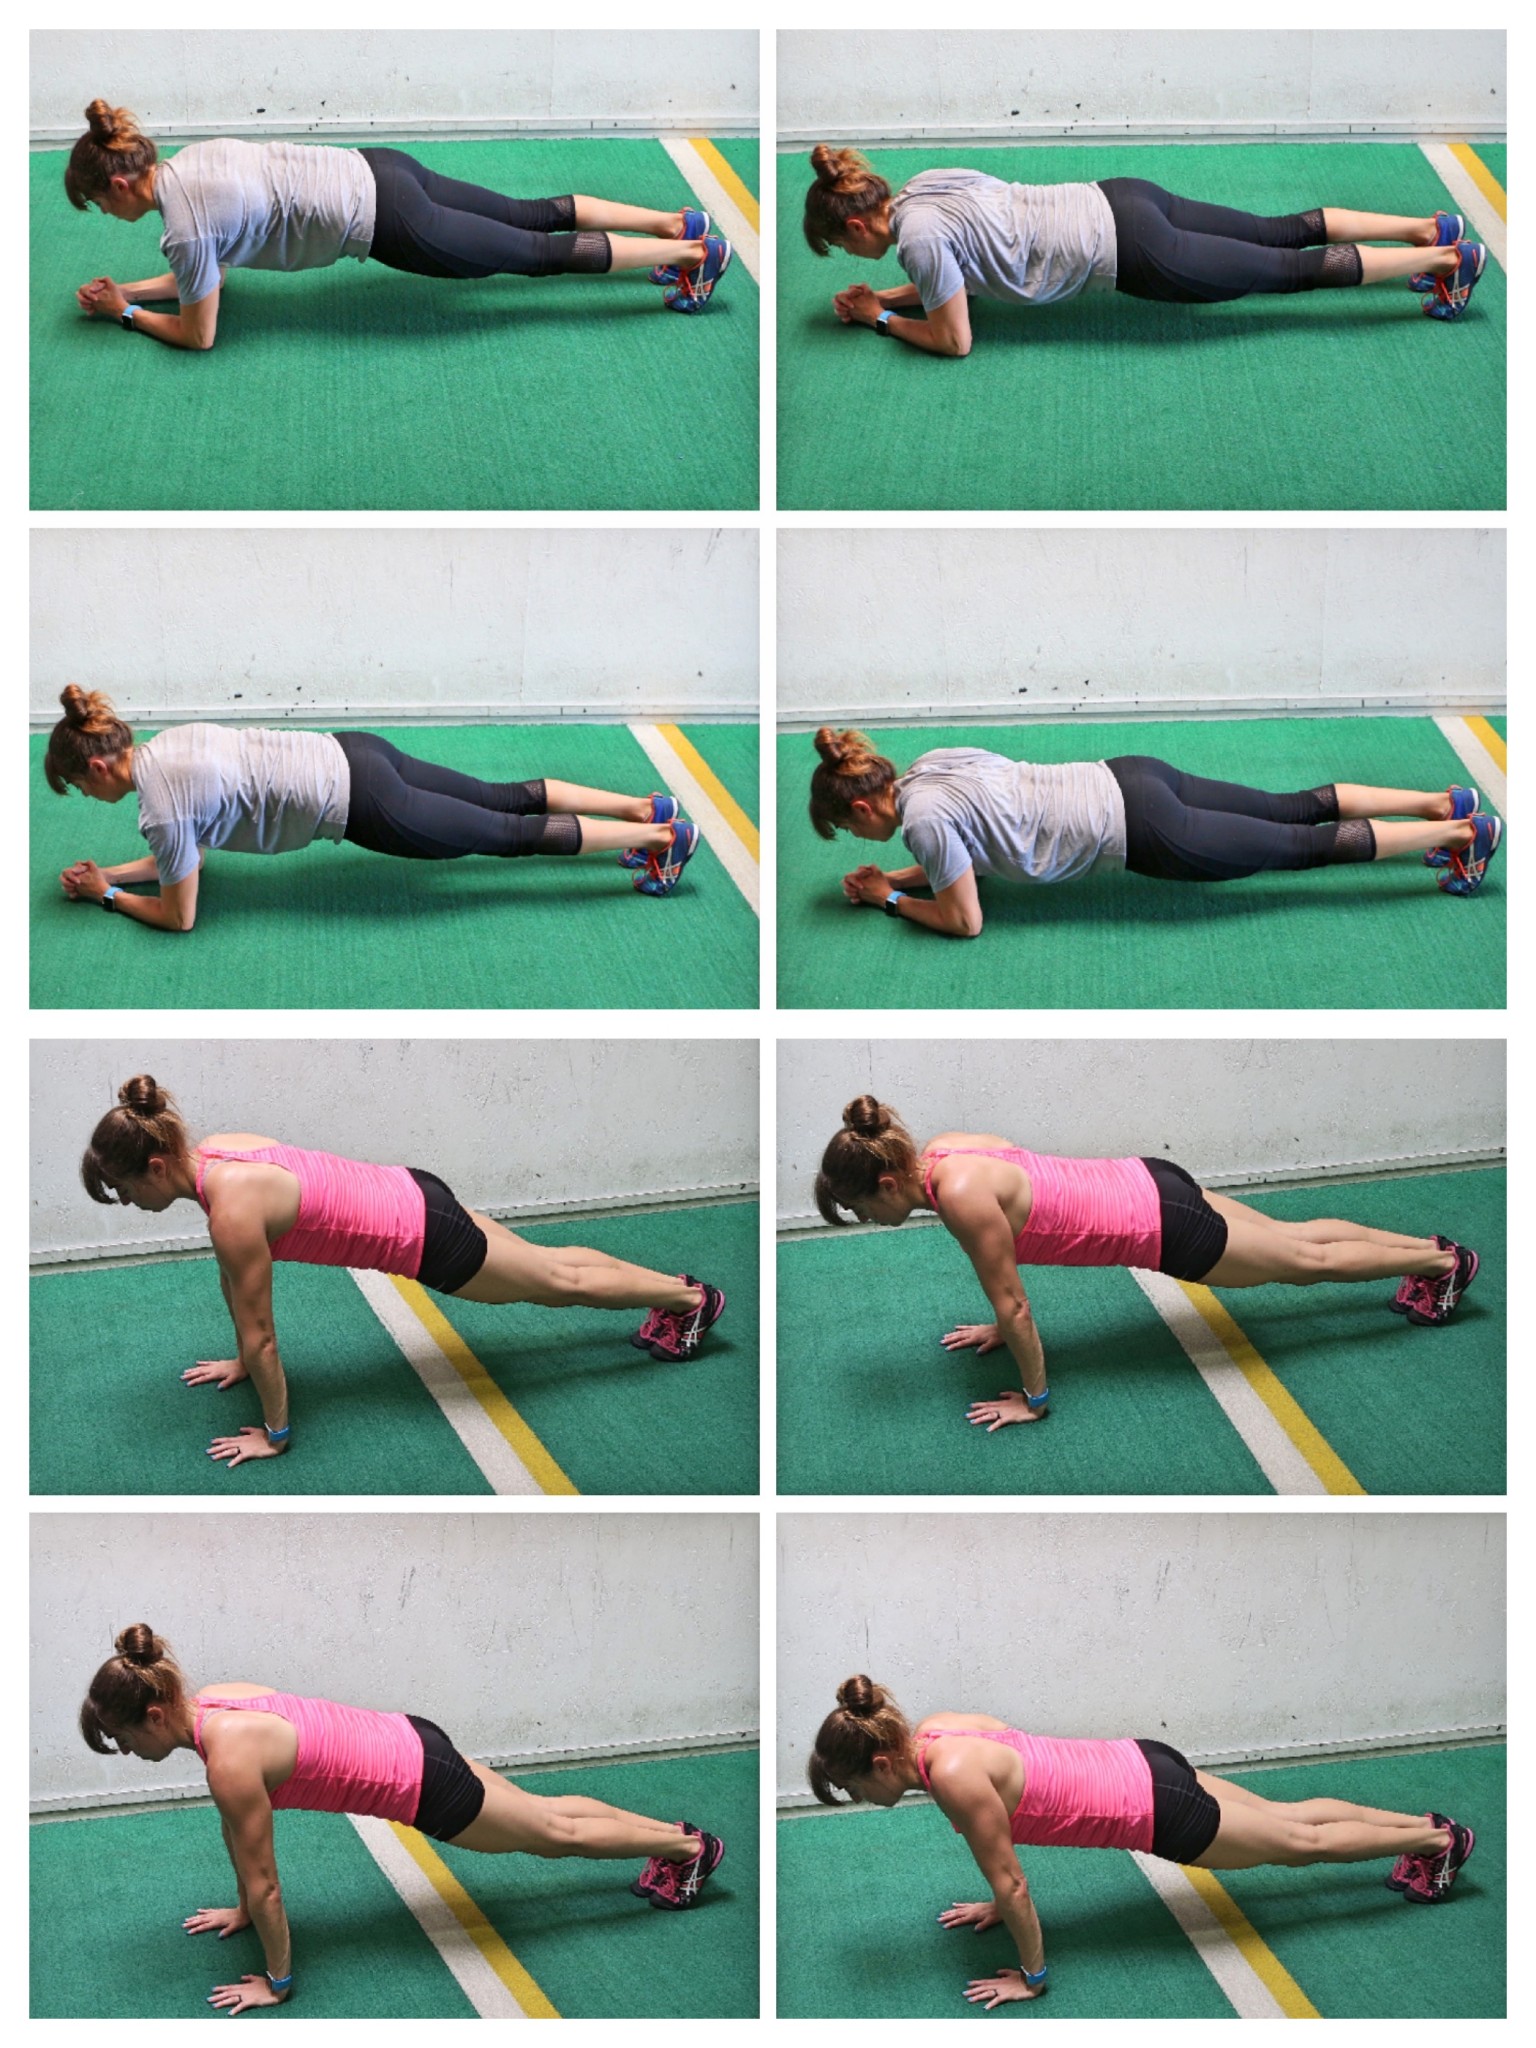
Scapular Push Ups:
The Scapular Push Up is a must-do move.
If you have a desk job, want to improve your posture, improve your pull ups…heck improve your deadlift or press or just about anything, this is a must-do move!
It works on mobilizing your shoulder blades to create shoulder stability. It will activate your back and the muscles around your rib cage. It can even work your core.
You can do this move from the quadruped position or modified push up position to start. Beginners may even need to do it off the wall if they aren’t able to isolate and move their shoulder blades.
As you can actively recruit the proper muscles, you can do the scapular push up from the high plank or forearm plank position.
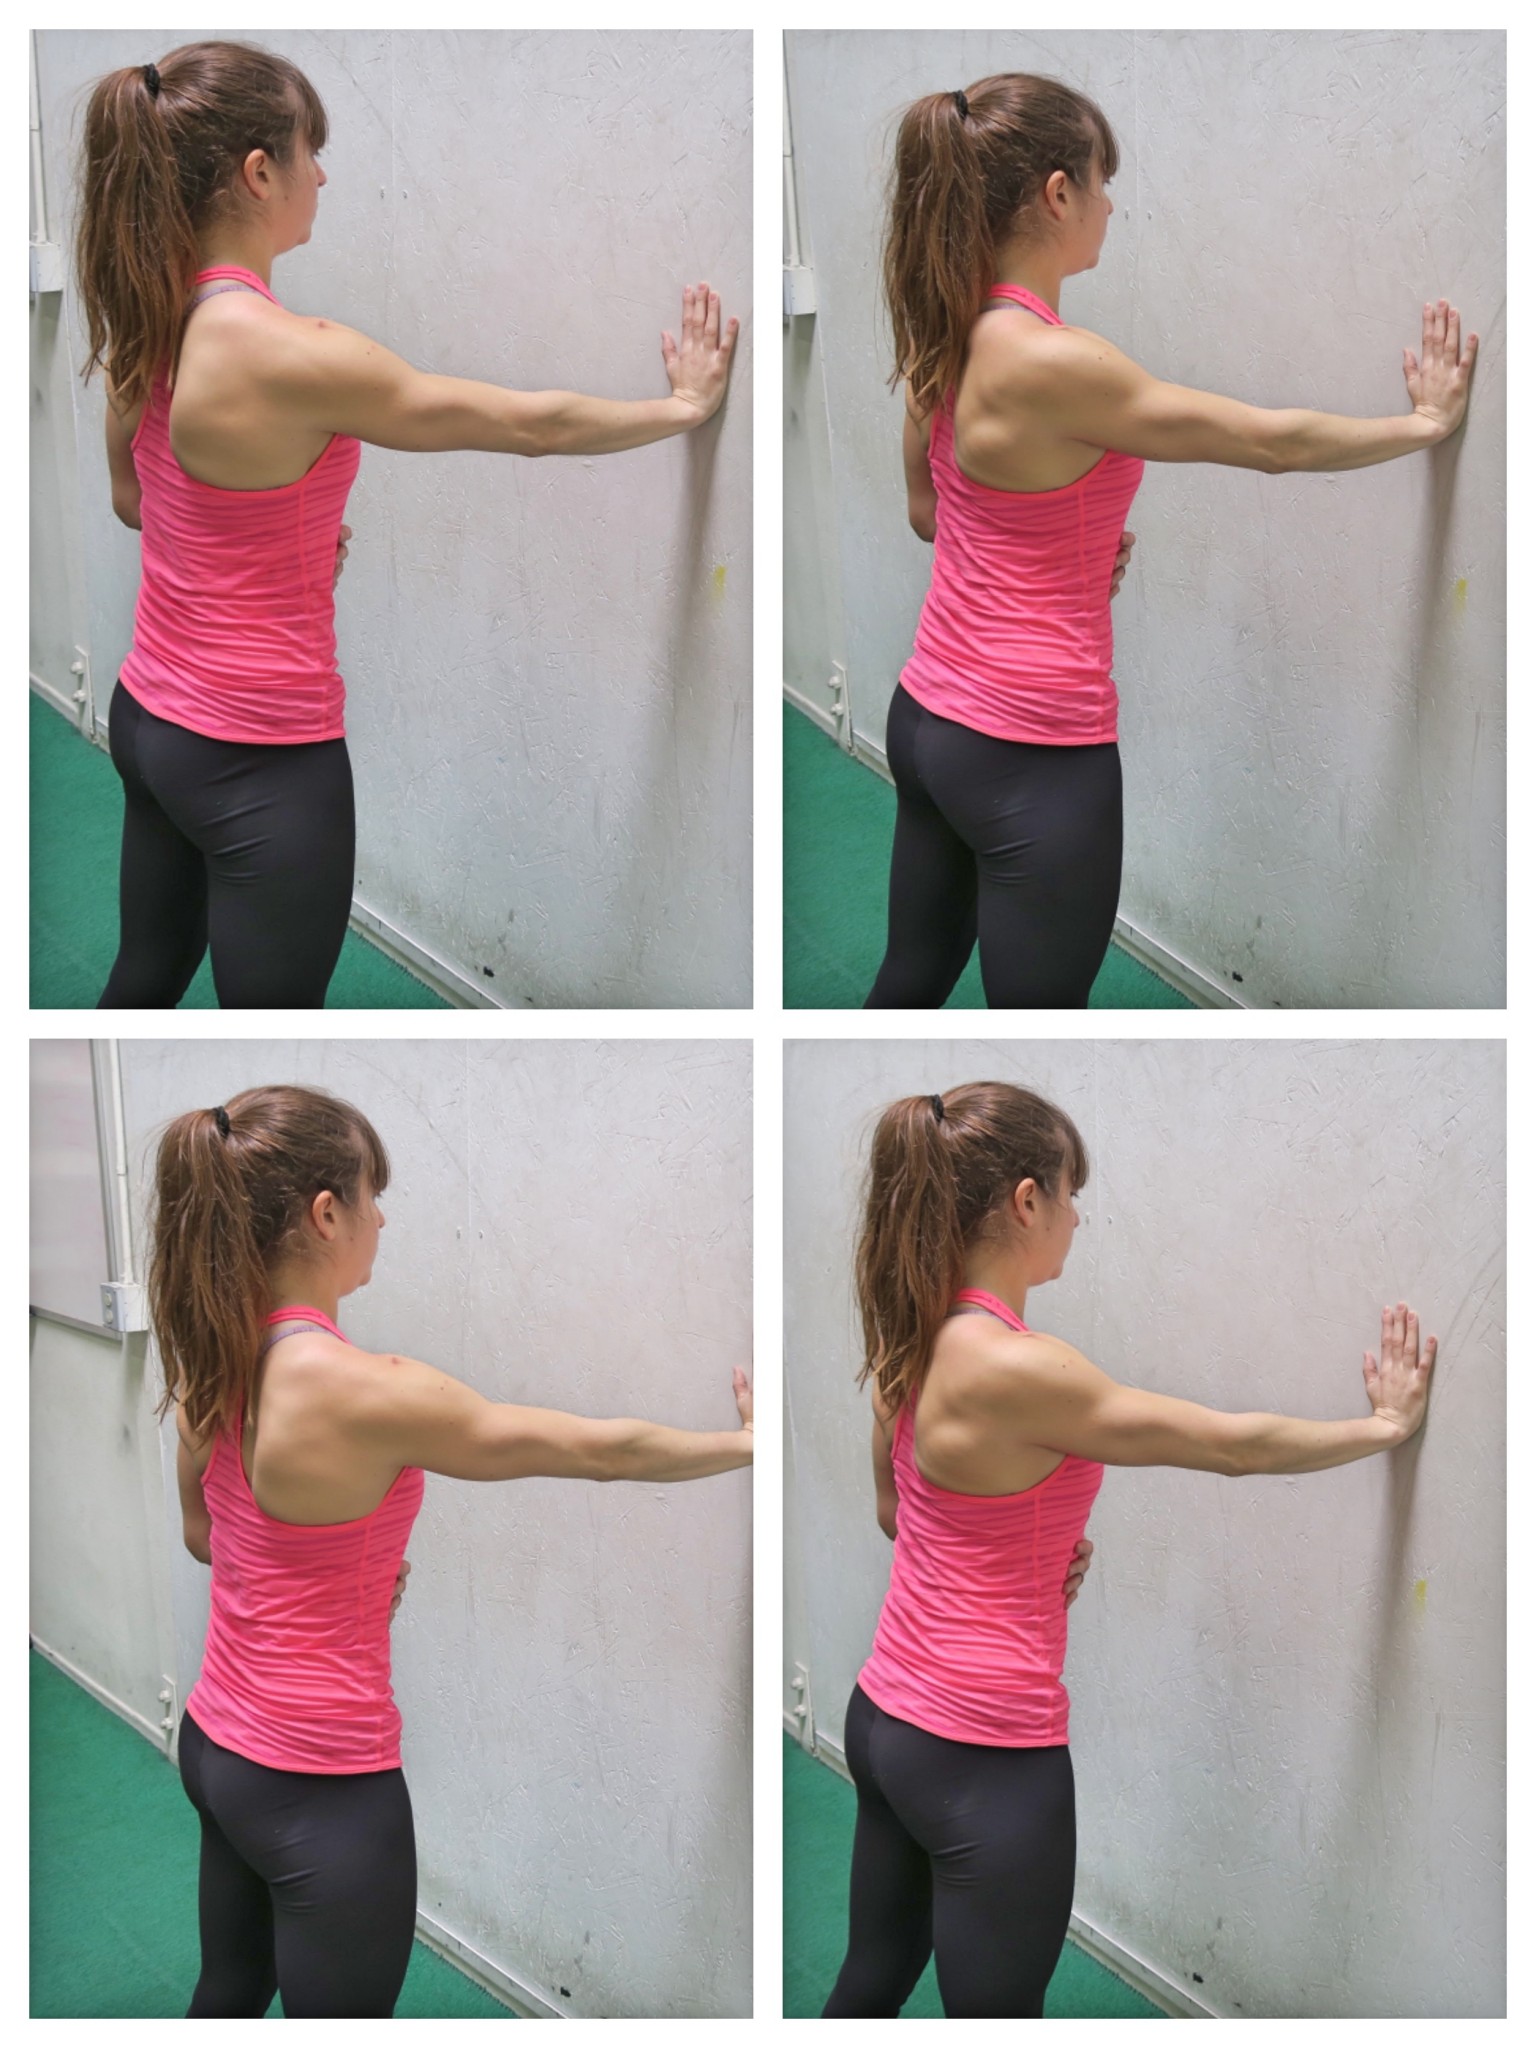
No matter your level, you can also do Single Arm Scapular Push Ups off the wall, which is my current favorite because it also allows you to address imbalances between your right and left sides.
To do Single Arm Scapular Push Ups, set up facing a wall. Place one hand up on the wall at about shoulder height. Your arm should be straight, but make sure you aren’t shrugging. You can be at a slight incline to make the move harder by walking your feet back, but start standing more vertical to the wall so you can really focus on proper movement of your shoulder blade.
Then, keeping your elbow straight, press your chest toward the wall as you feel your shoulder blade retract back. You should feel your shoulder blade move toward your spine. Do not shrug your shoulder as you focus on moving the shoulder blade. Pause then relax back out.
Make sure you don’t shrug or bend your elbows or rotate to try to make the movement bigger. Keep your core tight and isolate that one side working. You will feel the muscles along the side of your back and your ribs working. You can even put the opposite hand below your armpit on the working side to feel those muscles working.
Posture Or Pull Ups?
While these exercise will help with both, if you’d like to learn more about one or the other, click below! I’ve got programs to help with both
Learn more about improving your Posture –>
Learn more about improving your Pull Ups –>
by Cori Lefkowith | Sep 5, 2017 | Blog, Butt, Core, Exercises, Functional Fitness
I LOVE the deadlift. It is an amazing compound movement to target your posterior chain aka your entire backside.
But it is also a more complicated move than we give it credit for. And there are a ton of variations to choose from.
First let’s discuss WHY you should use the deadlift. Then we’ll review form and breakdown the conventional deadlift before explaining what variations to use and how to use them!
So Why Use The Deadlift In Your Workouts?
Deadlifts are ESSENTIAL to include because they:
- Are a compound move that works numerous muscle groups at once.
- Are a hip hinge exercise to train a functional movement pattern
- Work your backside to reverse the constant flexion we sit in or walk in as we text all day.
- Work on hip extension to strengthen our glutes to help us run faster and lift more.
Because deadlifts are a compound exercise, you work more muscles at once.
This not only helps you build functional strength because muscles have to work together to perform a movement, but it also helps you burn more calories in less time because more muscles are working at once. And compound moves that use the large muscles of our body, also allow us to lift MORE weight!
And on top of being a compound movement, the deadlift is a hip hinge exercise that works our posterior chain AKA our BACKSIDE!
What is a hip hinge?
It is a movement that loads your posterior chain when you hinge, aka flex your hips, to push your butt back then extend your hips to stand tall using your glutes. It is a functional move we need to do every day to reach down to the ground to pick things up…like a DEADLIFT!
The problem with this functional hip hinge exercise?
All too many people do incorrectly.
They simply lean forward without loading their posterior chain. Or they turn it into a squat.
Or they recruit their low back and hamstrings to do work their GLUTES should be doing.
So how do you deadlift properly to get the benefits of the deadlift and really work your backside?
How To Deadlift With Proper Form:
The most important thing you can ask someone is, “Where do you feel working?”
And with the deadlift, they can answer “upper back.” Or “glutes.” Or even “hamstring.” Actually all of the above. Especially their glutes.
However, the one place they shouldn’t feel acting as the prime mover is their low back. Which honestly too often is!
So how do you do the deadlift properly?
There are three things I think are key:
- Think about pushing the ground away with your feet INSTEAD of lifting the bar off the ground.
- Push your butt back to hinge over don’t just lean forward.
- Squeeze your butt hard at the top!
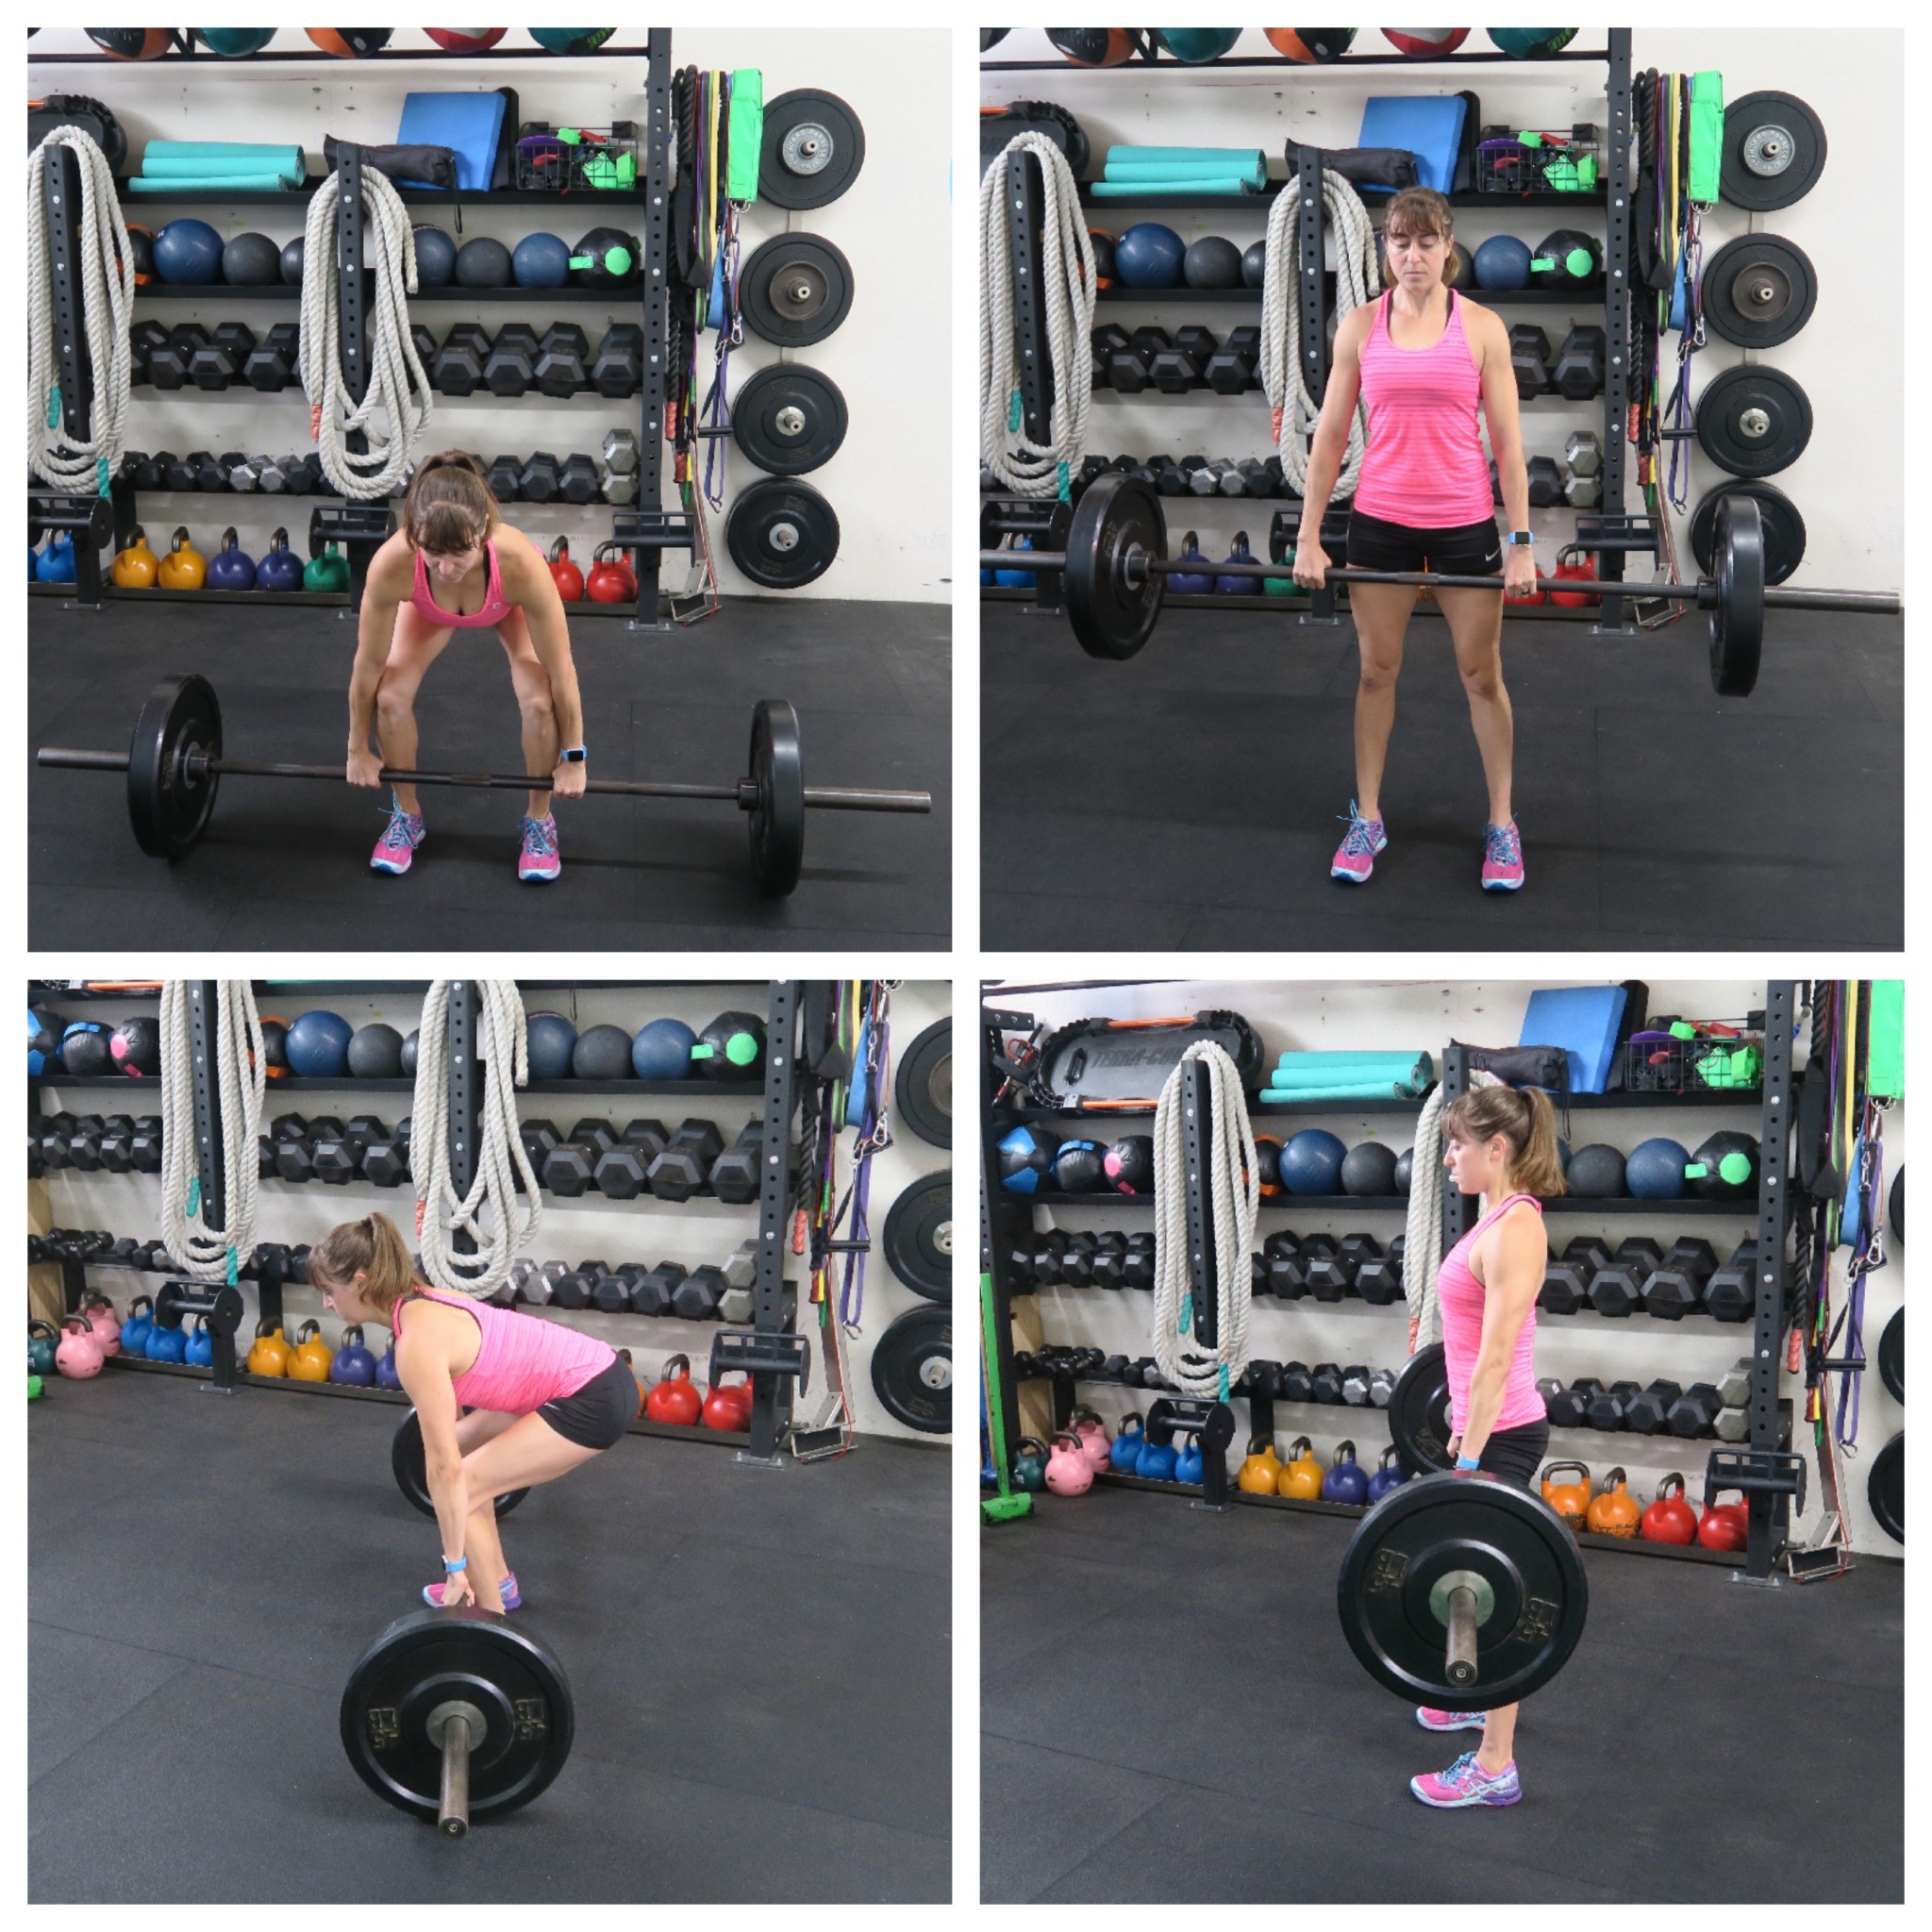
Thinking about these 3 things, here’s how to break down the Conventional Barbell Deadlift or the traditional or main deadlift variation.
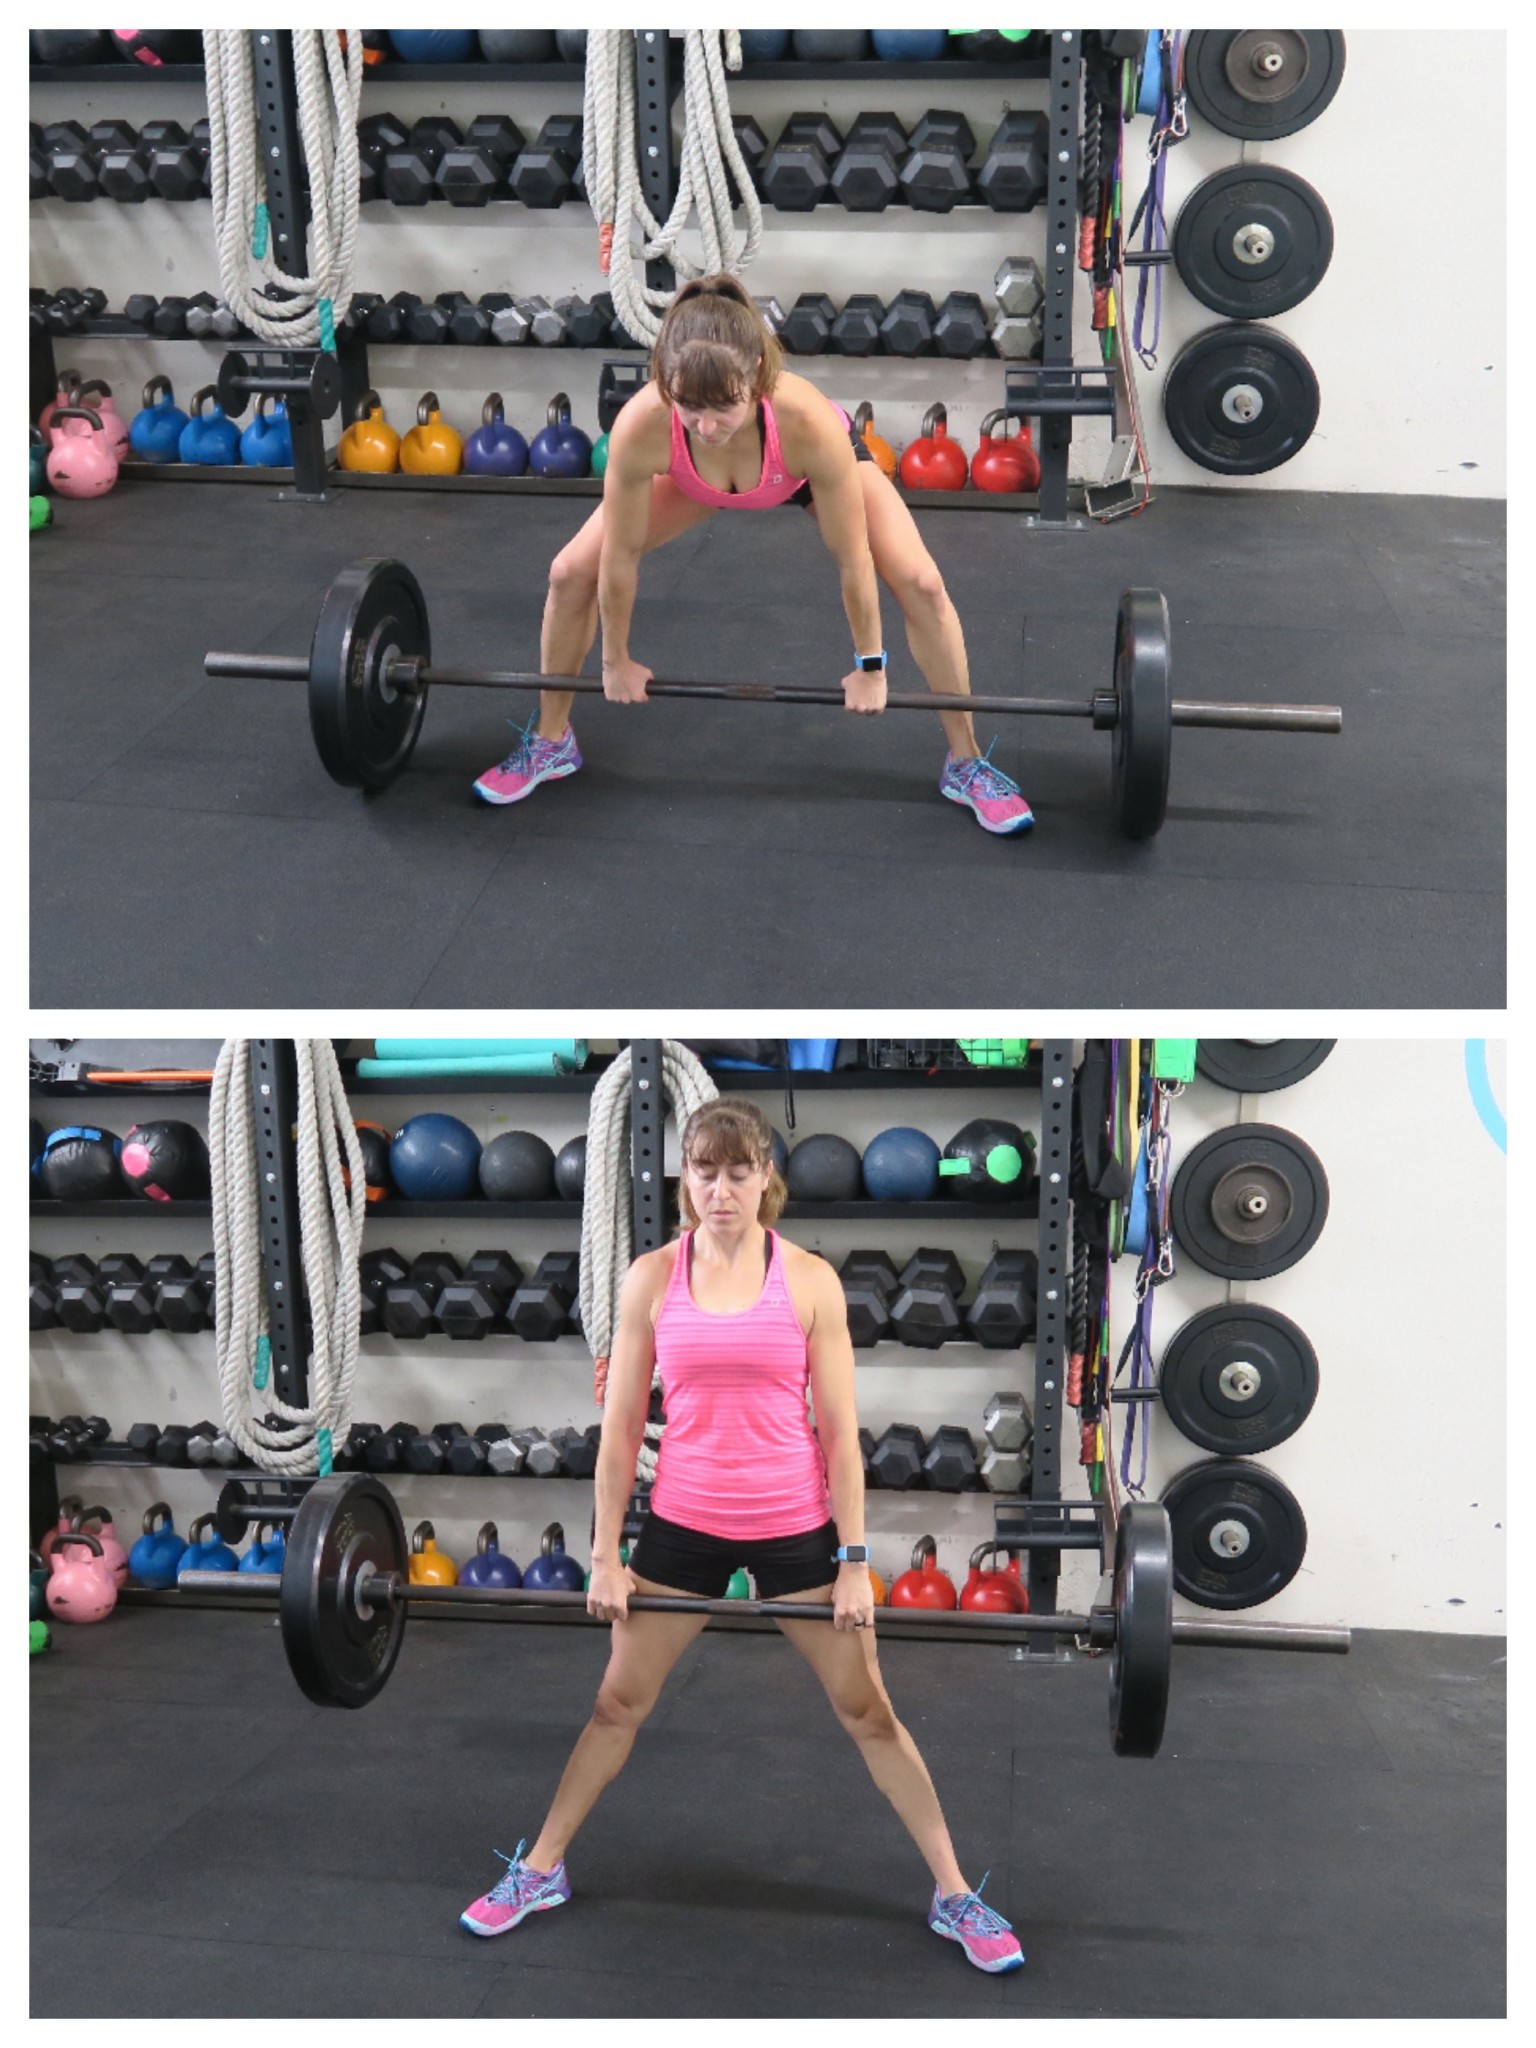
To do a Conventional Barbell Deadlift, set a barbell up in front of you. Walk up to the center of the bar with your feet parallel and about hip-width apart. Set up so your shins are right up against the bar. You do not want the bar to drift away from your legs or you risk loading your low back.
Hinge at the hips, pushing your butt back as you reach to grab the bar just outside your shins. Your knees should be soft as you push your butt back to grab the bar, keeping your back flat.
Think about engaging your lats and upper back to keep your spine flat. Traditional form will tell you to keep your head in line with your spine and look out on the ground in front of you. Powerlifting form will often tell you to look up to help you pull up. Choose the one that feels most comfortable without straining anything weird.
With your arms straight and core engaged, put tension on the bar. Then drive through your feet, pushing the ground away to lift the bar up off the ground. Exhale as you lift, “dragging” the bar up your shins to stand up.
At the top, stand tall and squeeze your glutes to fully extend your hips. Don’t lean back at the top or arch your back. Squeeze your butt, then lower back down. Keep the bar close to your body as you lower. Control the decent so you don’t drop the bar, but don’t eccentrically lower.
Once you touch the ground, you can either perform a quick rep without pausing or you can completely release at the bottom and repeat.
The key is really to keep that bar close to your shin, drive the ground away and even use your breathing to engage your core. Do NOT try to squat or simply lean or round over. Keep tension through your upper back and engage your lats. And sit your butt back, hinging at the hips.
Your knees should be soft, but your exact knee bend will be dependent on your mobility. Do NOT actively bend your knees and turn this into a squat though!
So what if you aren’t comfortable with the barbell? What if you’re a beginner? Or what if you want to target different muscles and challenge your body with a new variation?
Check out these deadlift variations below!
Deadlift Variations And When To Use Them:
There are so many great variations of the deadlift you can use to regress and progress the movement and even change up exactly what you’re working or use different tools that you may have available.
Yes, it will always be posterior chain, but you can isolate each glute, add in more adductor or even engage your hamstrings or core more.
Because the deadlift is a more technical move, there are a few ways I like to teach the deadlift and hip hinge movement WITHOUT the barbell.
Three versions of the deadlift I like to use with beginners are:
- The Bodyweight Wall Hinge
- The Band Hinge
- The Kettlebell Conventional Deadlift
I’ve found these three deadlift variations to be an easier way to teach and train the hip hinge movement so that people learn to load their glutes and posterior chain instead of just leaning forward or engaging their low backs.
Here’s how to perform each and why each can be a great training tool.
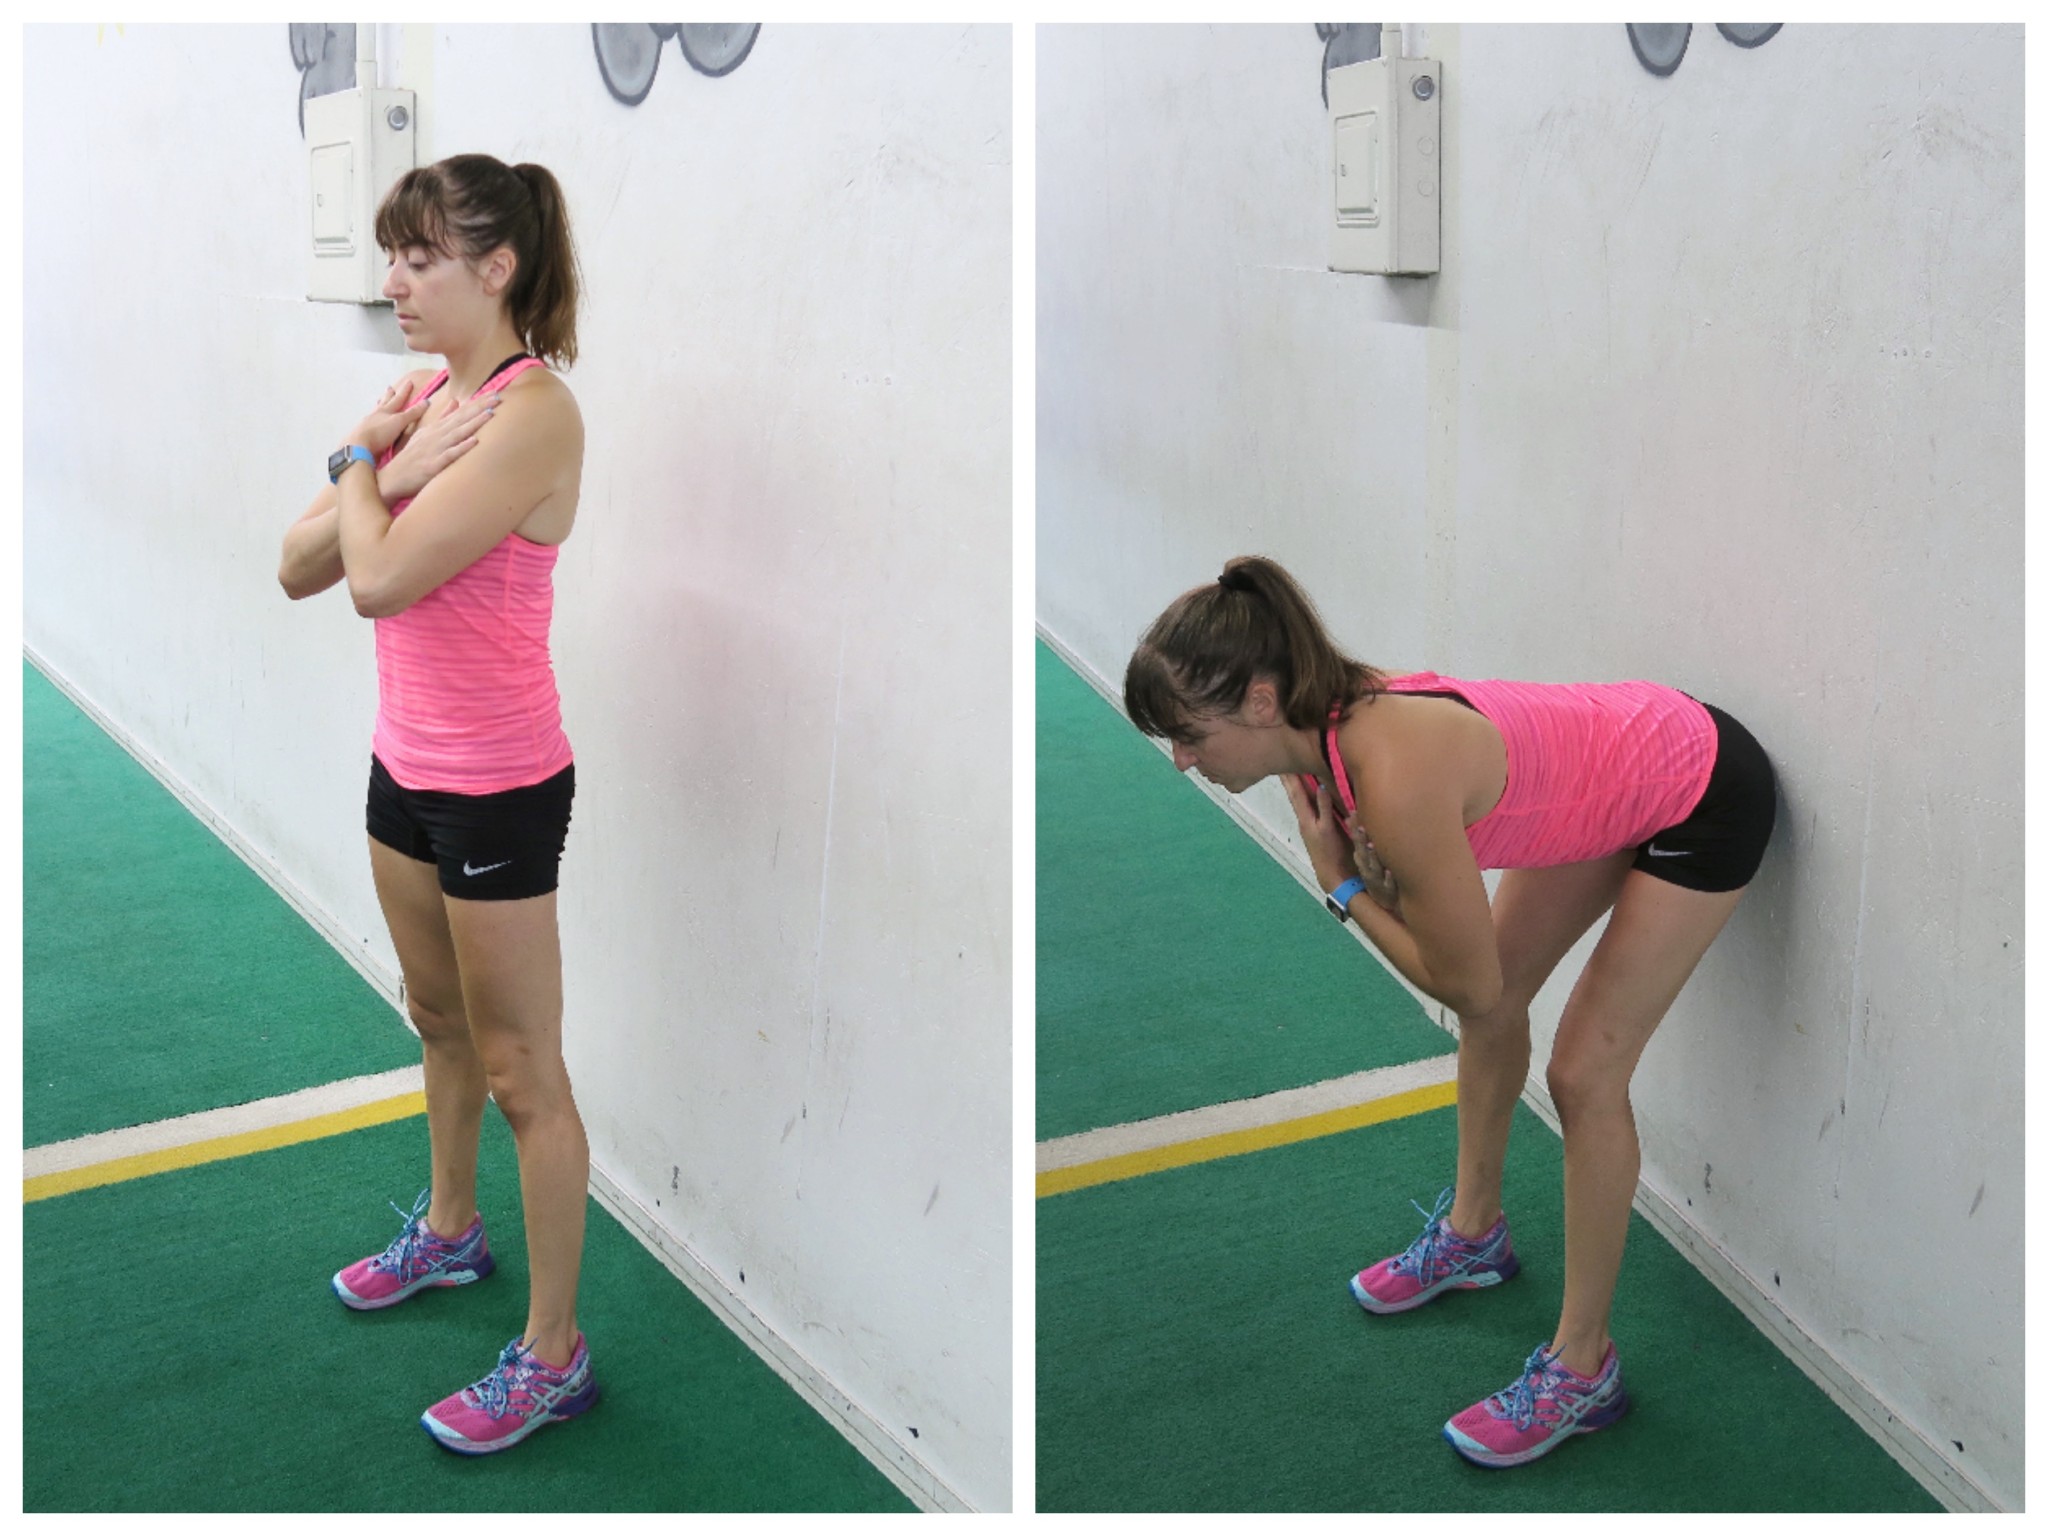
The Bodyweight Wall Hinge – When you are first learning a movement, it is key to start with your own bodyweight. If you can’t do the move without a load, you haven’t earned adding a weight. Remember you need to EARN the weight and more advanced variations. No point in doing something if it won’t be quality. Hard for hard sake won’t get you results!
So the Bodyweight Wall Hinge is great for beginners because it helps them learn the hip hinge and deadlift movement without any weight. This allows them to focus on feeling the right muscles working. And by using the wall as a guide, you can learn to load your glutes and push your butt back.
To do the Bodyweight Wall Hinge, stand in front of a wall facing away. You want to stand between 3-6 inches away from the wall so as you hinge over, you can use the wall as a guide to help you push your butt back. AKA you want to hinge over and touch your butt to the wall. This will prevent you from simply leaning forward.
Stand nice and tall facing away from the wall. Then hinge at the hips, pushing your butt back to touch the wall. Keep your knees soft as you hinge over and your back flat. Then drive through your feel to come back up to standing tall. Squeeze your glutes at the top to extend your hips. Don’t lean or arch back though.
Then hinge back over again, pushing your butt back to touch the wall. The wall is a great training tool to teach yourself to push your butt back and load your posterior chain. I even sometimes use it as a reminder with clients as they add a load, especially with Good Mornings.
The Band Hinge – A resistance band is another great training tool to help you remember to load your glutes. And it also adds some resistance to really get those glutes burning. This variation, while a great way to regress for the beginner, is also still an important move for advanced lifters because it really activates those glutes.
It’s great for glute activation, teaching the hip hinge for deadlift and reminding people that, while the Conventional Deadlift means some knee bend, it is NOT a squat! It also teaches you to “push the ground away” to power the hip extension against the band.
To do the Band Hinge, anchor a band or loop behind you and step into the band, bringing it right up below your hips. Walk away from the anchor point so that there is tension in the band and stand with your feet about hip-width to shoulder-width apart. The more the band tries to pull you back (aka the further out you walk), the harder the move will be.
Then hinge over, allowing the band to pull your butt back toward the anchor point. Bend your knees slightly as you push your butt back to help load your glutes and keep you from flying back with the band.
Then explosively drive your hips forward to come back up to standing. You may lean slightly forward against the band, but you want to explosively stand up and drive your hips forward against the band, contracting your glutes as you do.
Stand up tall and squeeze your glutes then quickly hinge back over before repeating. This should be a quicker move and you should really focus on loading your glutes as you hinge over and then on quickly driving your hips into extension as you stand back up, squeezing your glutes hard at the top.
Do not lean back or arch your back as you stand up. Also, make sure you don’t lock out your legs OR squat to much as you hinge over. Make sure there is tension in the band even as you hinge over.
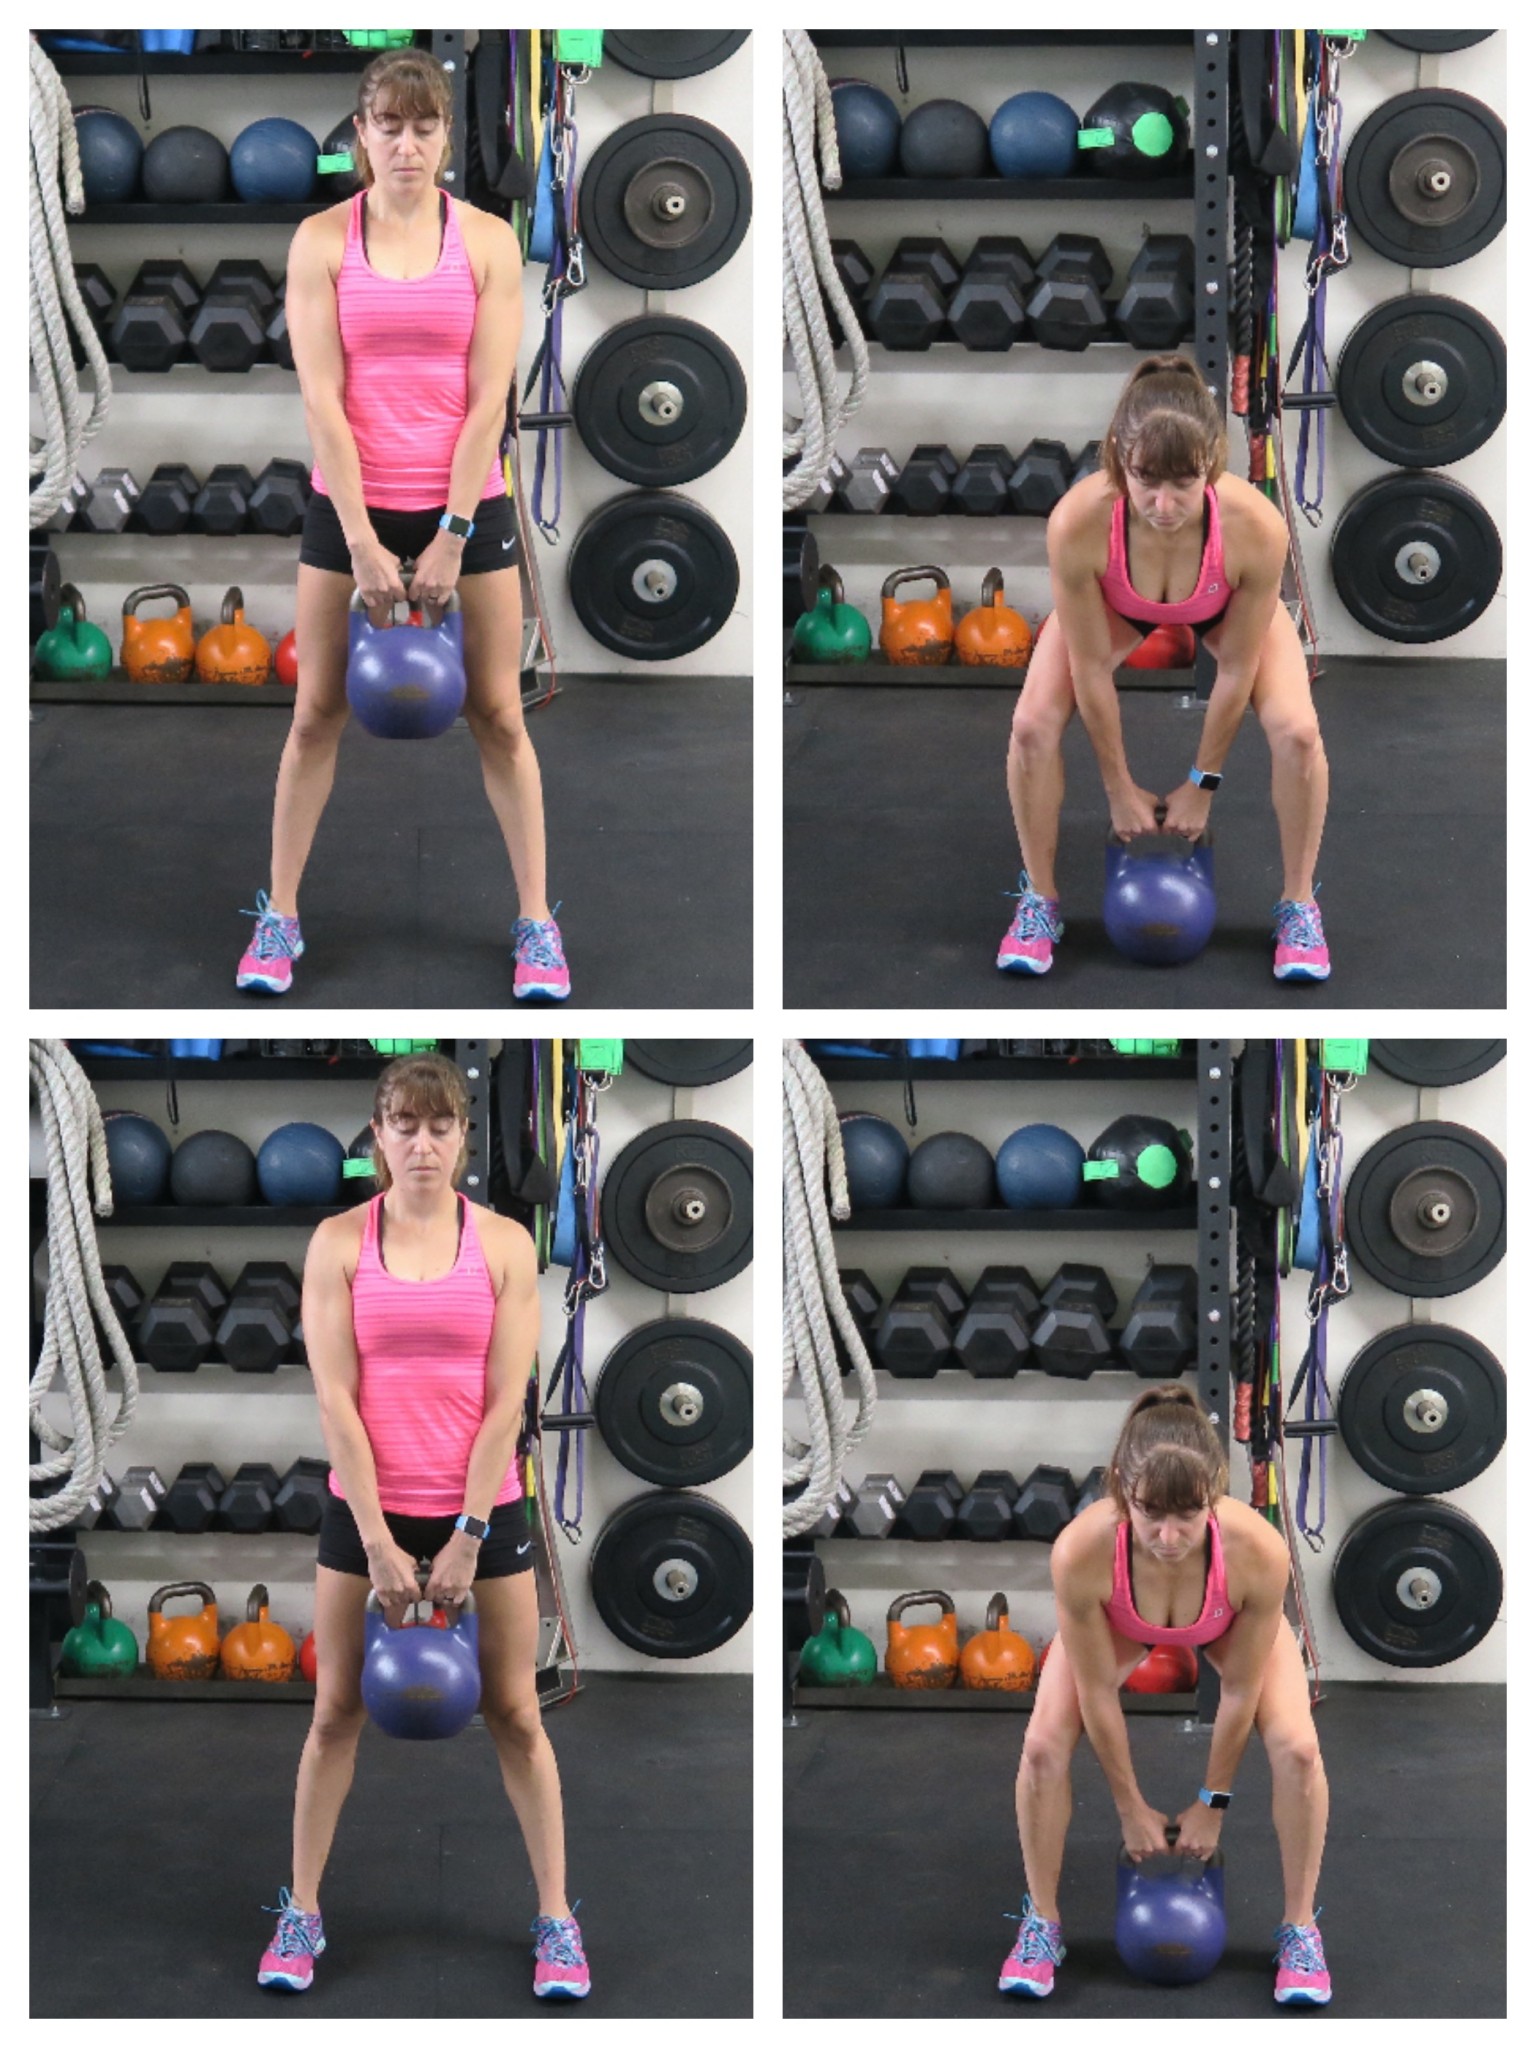
The Kettlebell Conventional Deadlift – The third deadlift variation I like to use to help teach the deadlift is the single kettlebell Conventional Deadlift. This is a great way to load down the hip hinge, but teach people to really sit their butt back instead of just squatting down.
With the barbell Conventional Deadlift, we can often struggle with keeping the bar back against our shins and legs. And this can cause us to load our low back. Because we can have a tendency to let the bar drift away, it can be a struggle to sit back and load our glutes and even drive the ground away when we are first learning.
This is why I like to often use the kettlebell instead of the barbell when someone is first starting out. The fact that you can place the kettlebell back between your legs and toward your heels can really help ingrain the proper hip hinge movement and proper loading of the glutes.(BONUS: I even find that often the height of the kettlebell can help prevent people from wanting to squat as much.)
To do the Kettlebell Conventional Deadlift, place a kettlebell in between your feet as you stand with your feet about hip-width to shoulder-width apart. Your feet should be parallel and the kettlebell should be back by your heels.
Then sit your butt back and hinge at the hips so you can reach and grab the kettlebell handle. Your knees will be soft so you can load your glutes. Engage your lats as you grab the weight and keep your back flat.
Then drive the ground away as you lift the weight up. Stand up nice and tall and squeeze your glutes at the top. Then sit your butt back as you hinge at the hips to drop the weight back toward your heels.
Make sure you don’t reach out or lower the weight out in front of you. Really make sure to lower the kettlebell back down toward your heels. You don’t want to just lean over or let your back round. Load your glutes and sit your butt back, bending your knees to allow yourself to load your glutes. Do not lock out your legs.
Along with these three basic variations to really learn the hip hinge movement and even return to basics to make sure your foundation is strong (yes I LOVE using the Band Hinge even with my most advanced lifters), there are a variety of deadlift variations you can use to target your posterior chain in different ways and even work your core and balance.
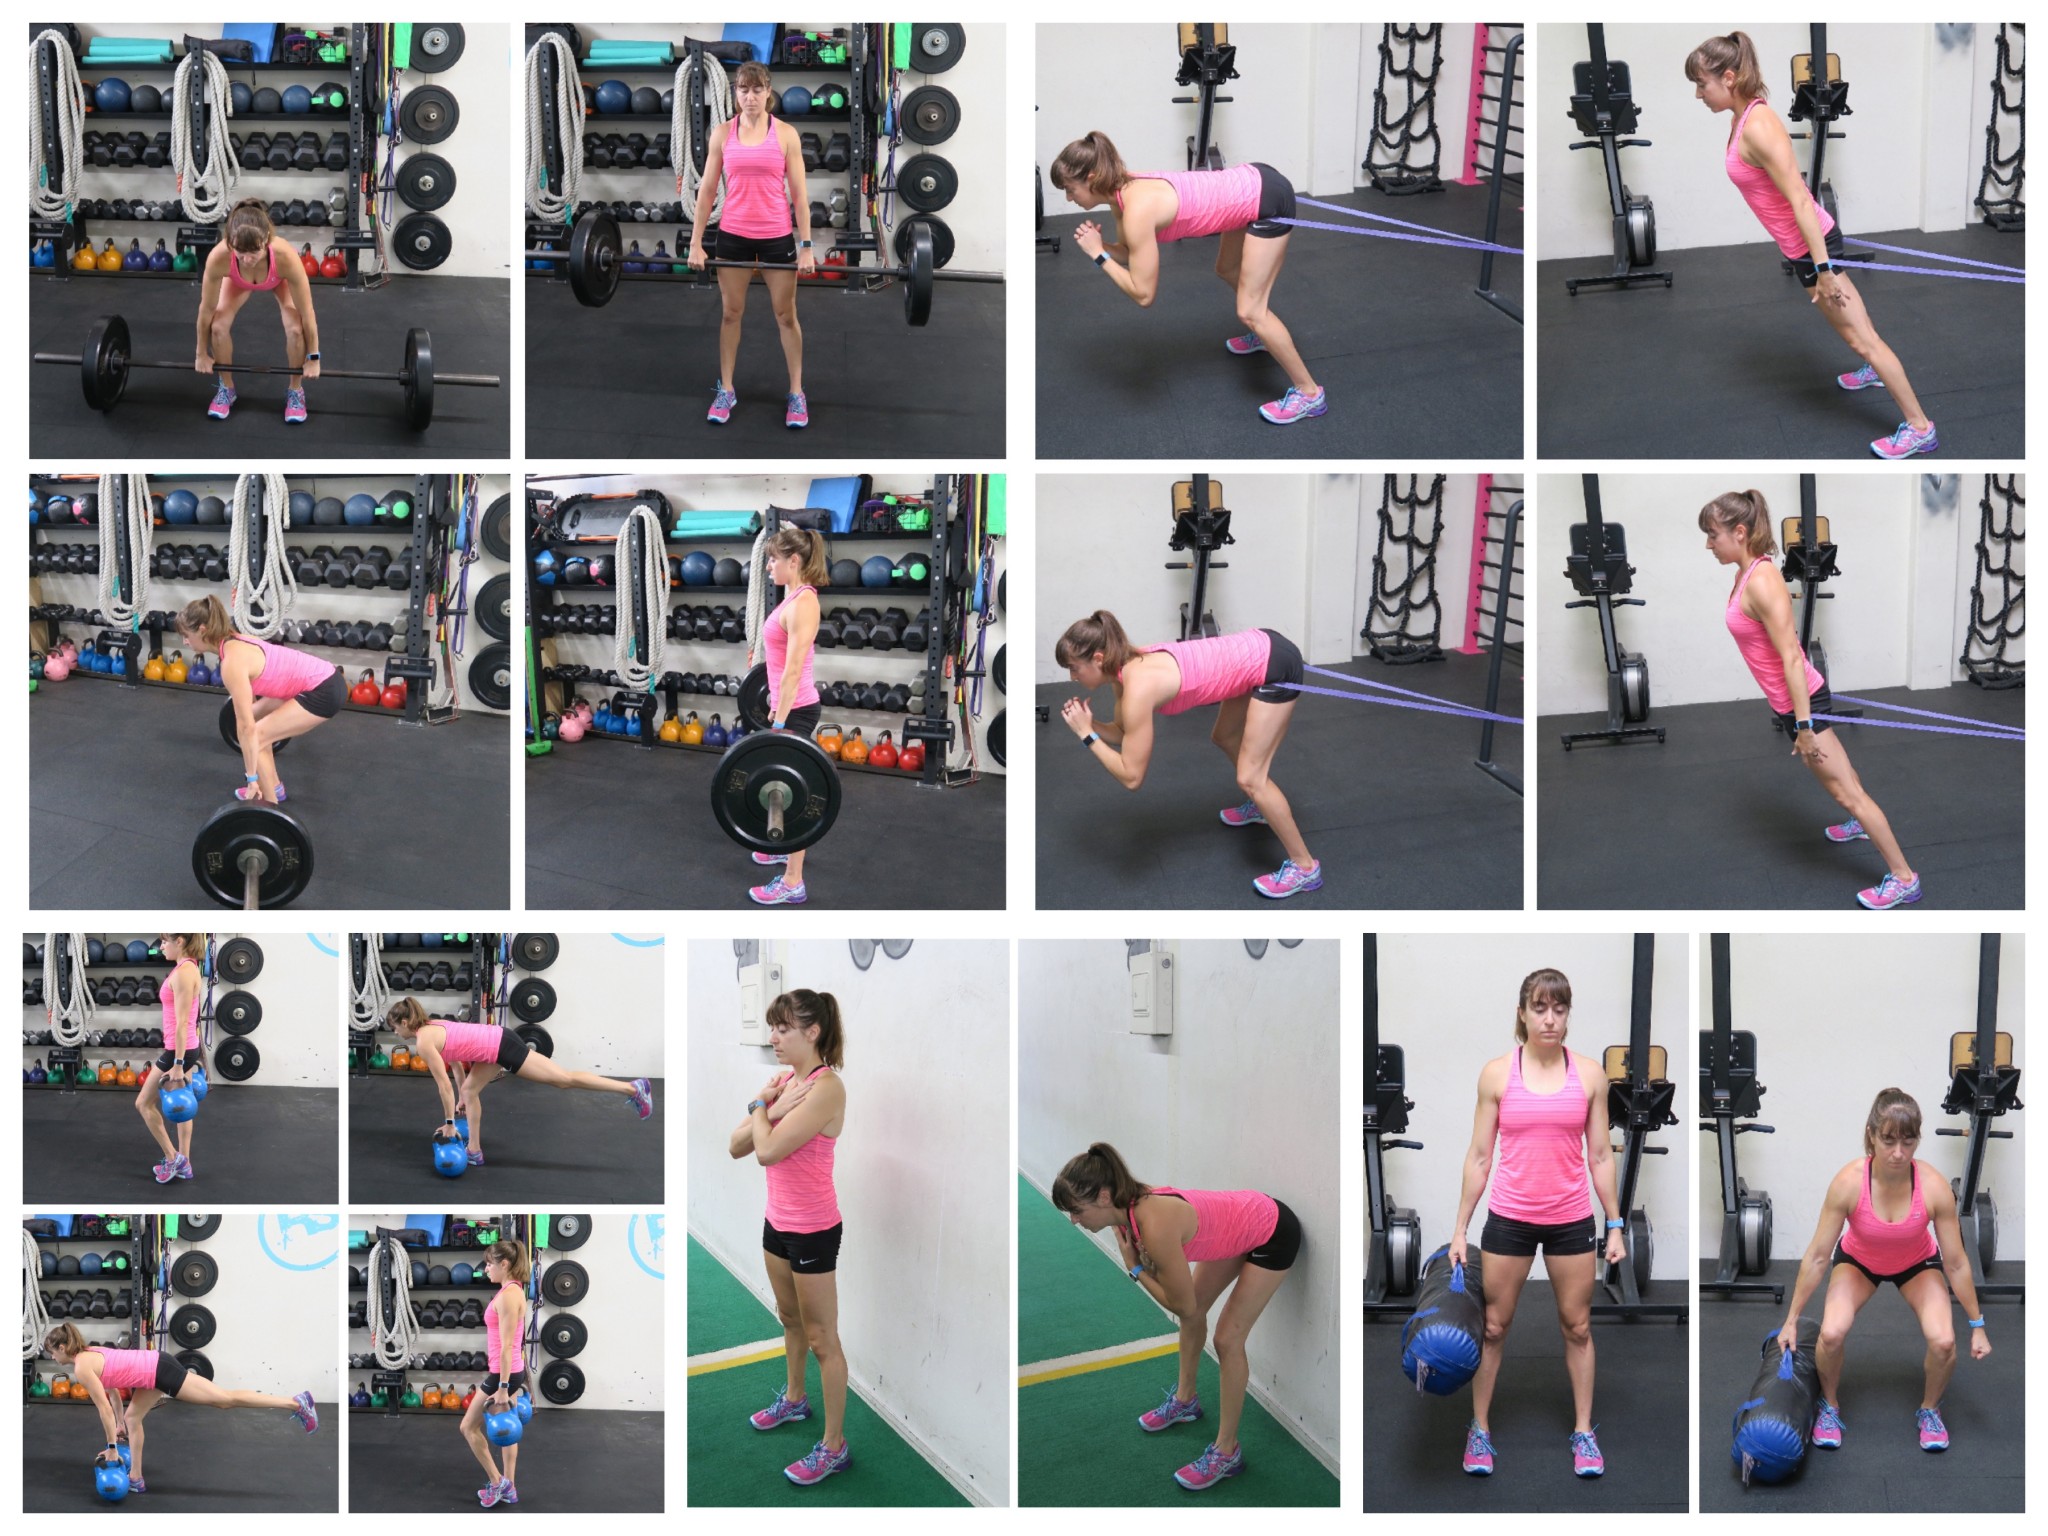
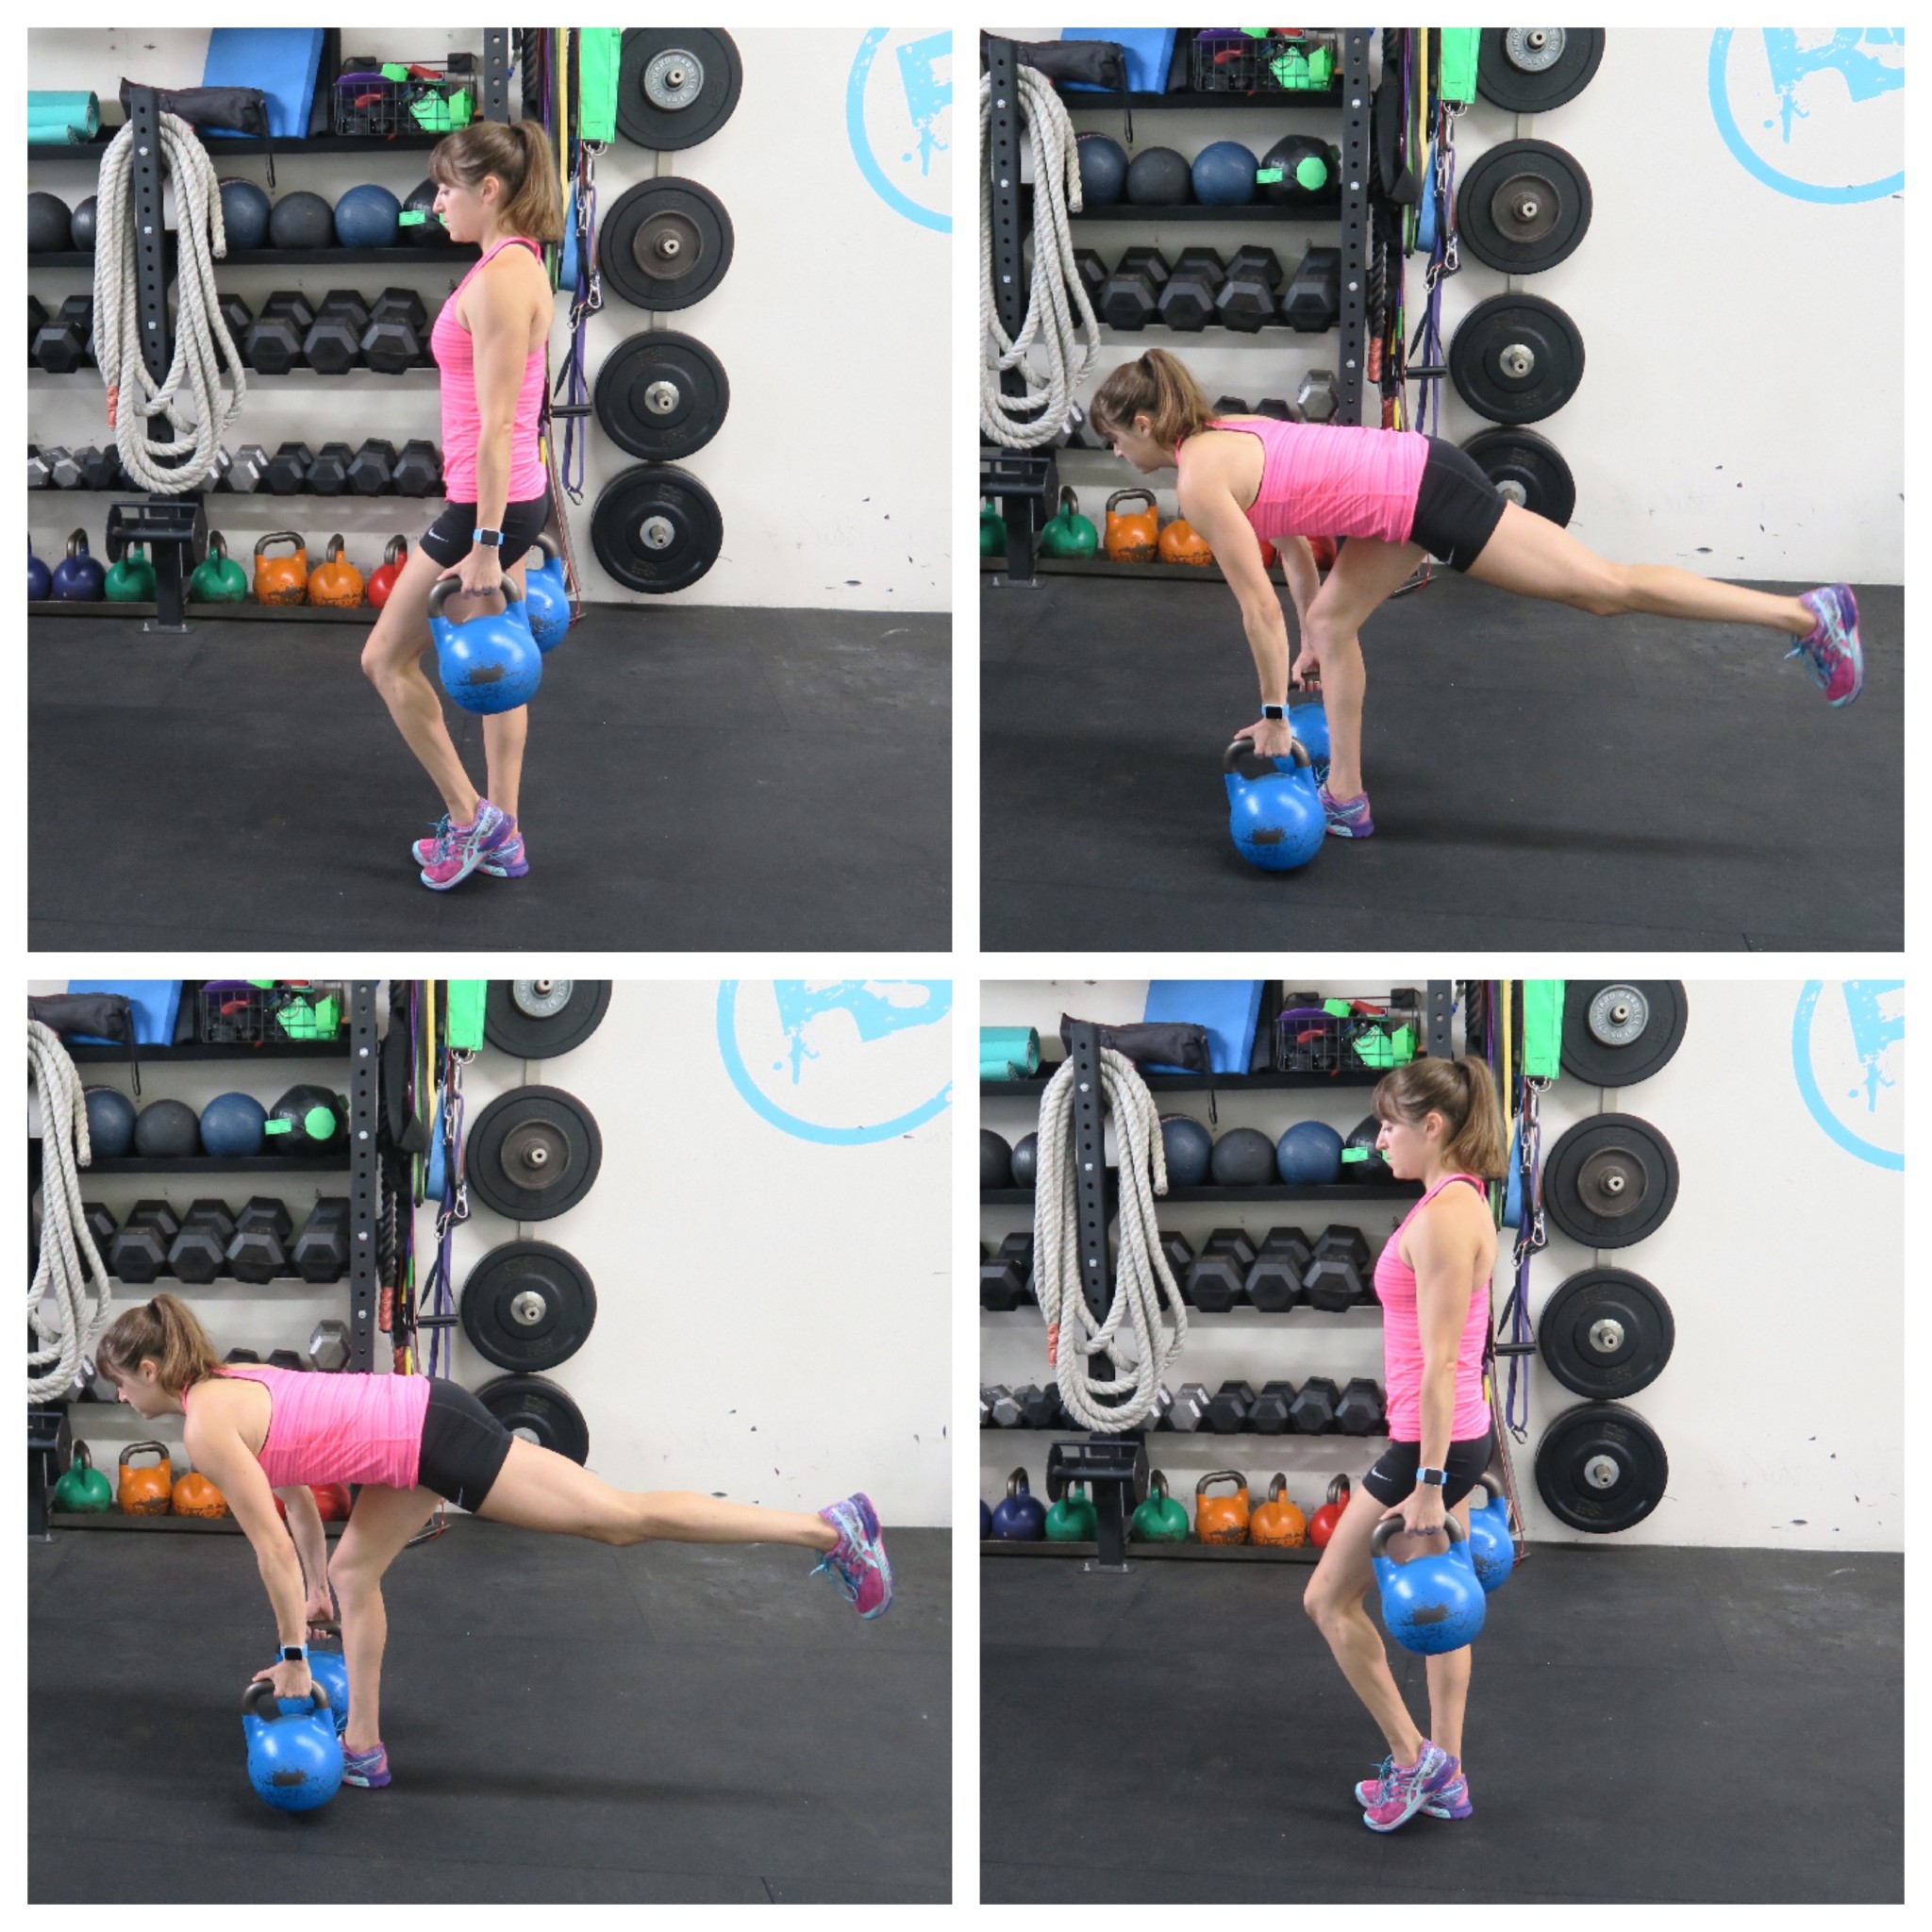
Single Leg Deadlift – The Single Leg Deadlift is a must-do move for beginners and advanced lifters alike. It is an essential move to include because it will not only work your posterior chain and train the hip hinge, but it will also improve your core stability and balance.
It is also key because it is a unilateral exercise, which means it will work each side individually and help correct any imbalances. Aka if you have a stronger and weaker side, this allows you to make sure both sides are working and strong!
Beginners can start by doing more of a staggered stance deadlift or even a deadlift with one foot down on a slider. Once your balance improves, you’ll want to do the full Single Leg Deadlift.
To do the Single Leg Deadlift, you can use kettlebells, dumbbells or a barbell. You can even unilaterally load the move down to make it even more challenging for your core and your balance.
To do the basic move with bodyweight, start standing on both legs. Lightly touch one toe on the ground as you shift your weight onto the other leg. Begin to then hinge over, lifting your raised leg toward the wall behind you. Push your butt back and even slightly bend the knee of the standing leg to load your glutes.
You do not want to squat, but you want to soften your knee to push your butt back and load your glutes. As you hinge at the hips, don’t let your raised leg swing way open and don’t simply lean forward. Really focus on loading that standing glute as you feel your hamstring as well.
Keep your back flat and hips as square to the ground as possible. Do not worry about straightening the raised leg if it makes your hips rotate open.
Then driving through your standing foot, come back up to standing tall. You may tap your toe at the top, but do not use your other leg to help you come back up to standing. Stand tall and straighten your standing leg as you contract and squeeze your glute at the top. Really feel your hamstring and glute work to help you come back up to standing.
Then hinge back over and repeat. Make sure you don’t round toward the ground. When you add weights, you’ll want to think about dropping the weights down and back toward your standing heel to help you sit back. You’ll also need to engage your lats and upper back to support the weights.
Do not let your low back take over and make sure to brace your core. Complete all reps on one side before switching. Remember if you are starting out and balance is an issue, use a staggered stance, slider or even no weight to start.
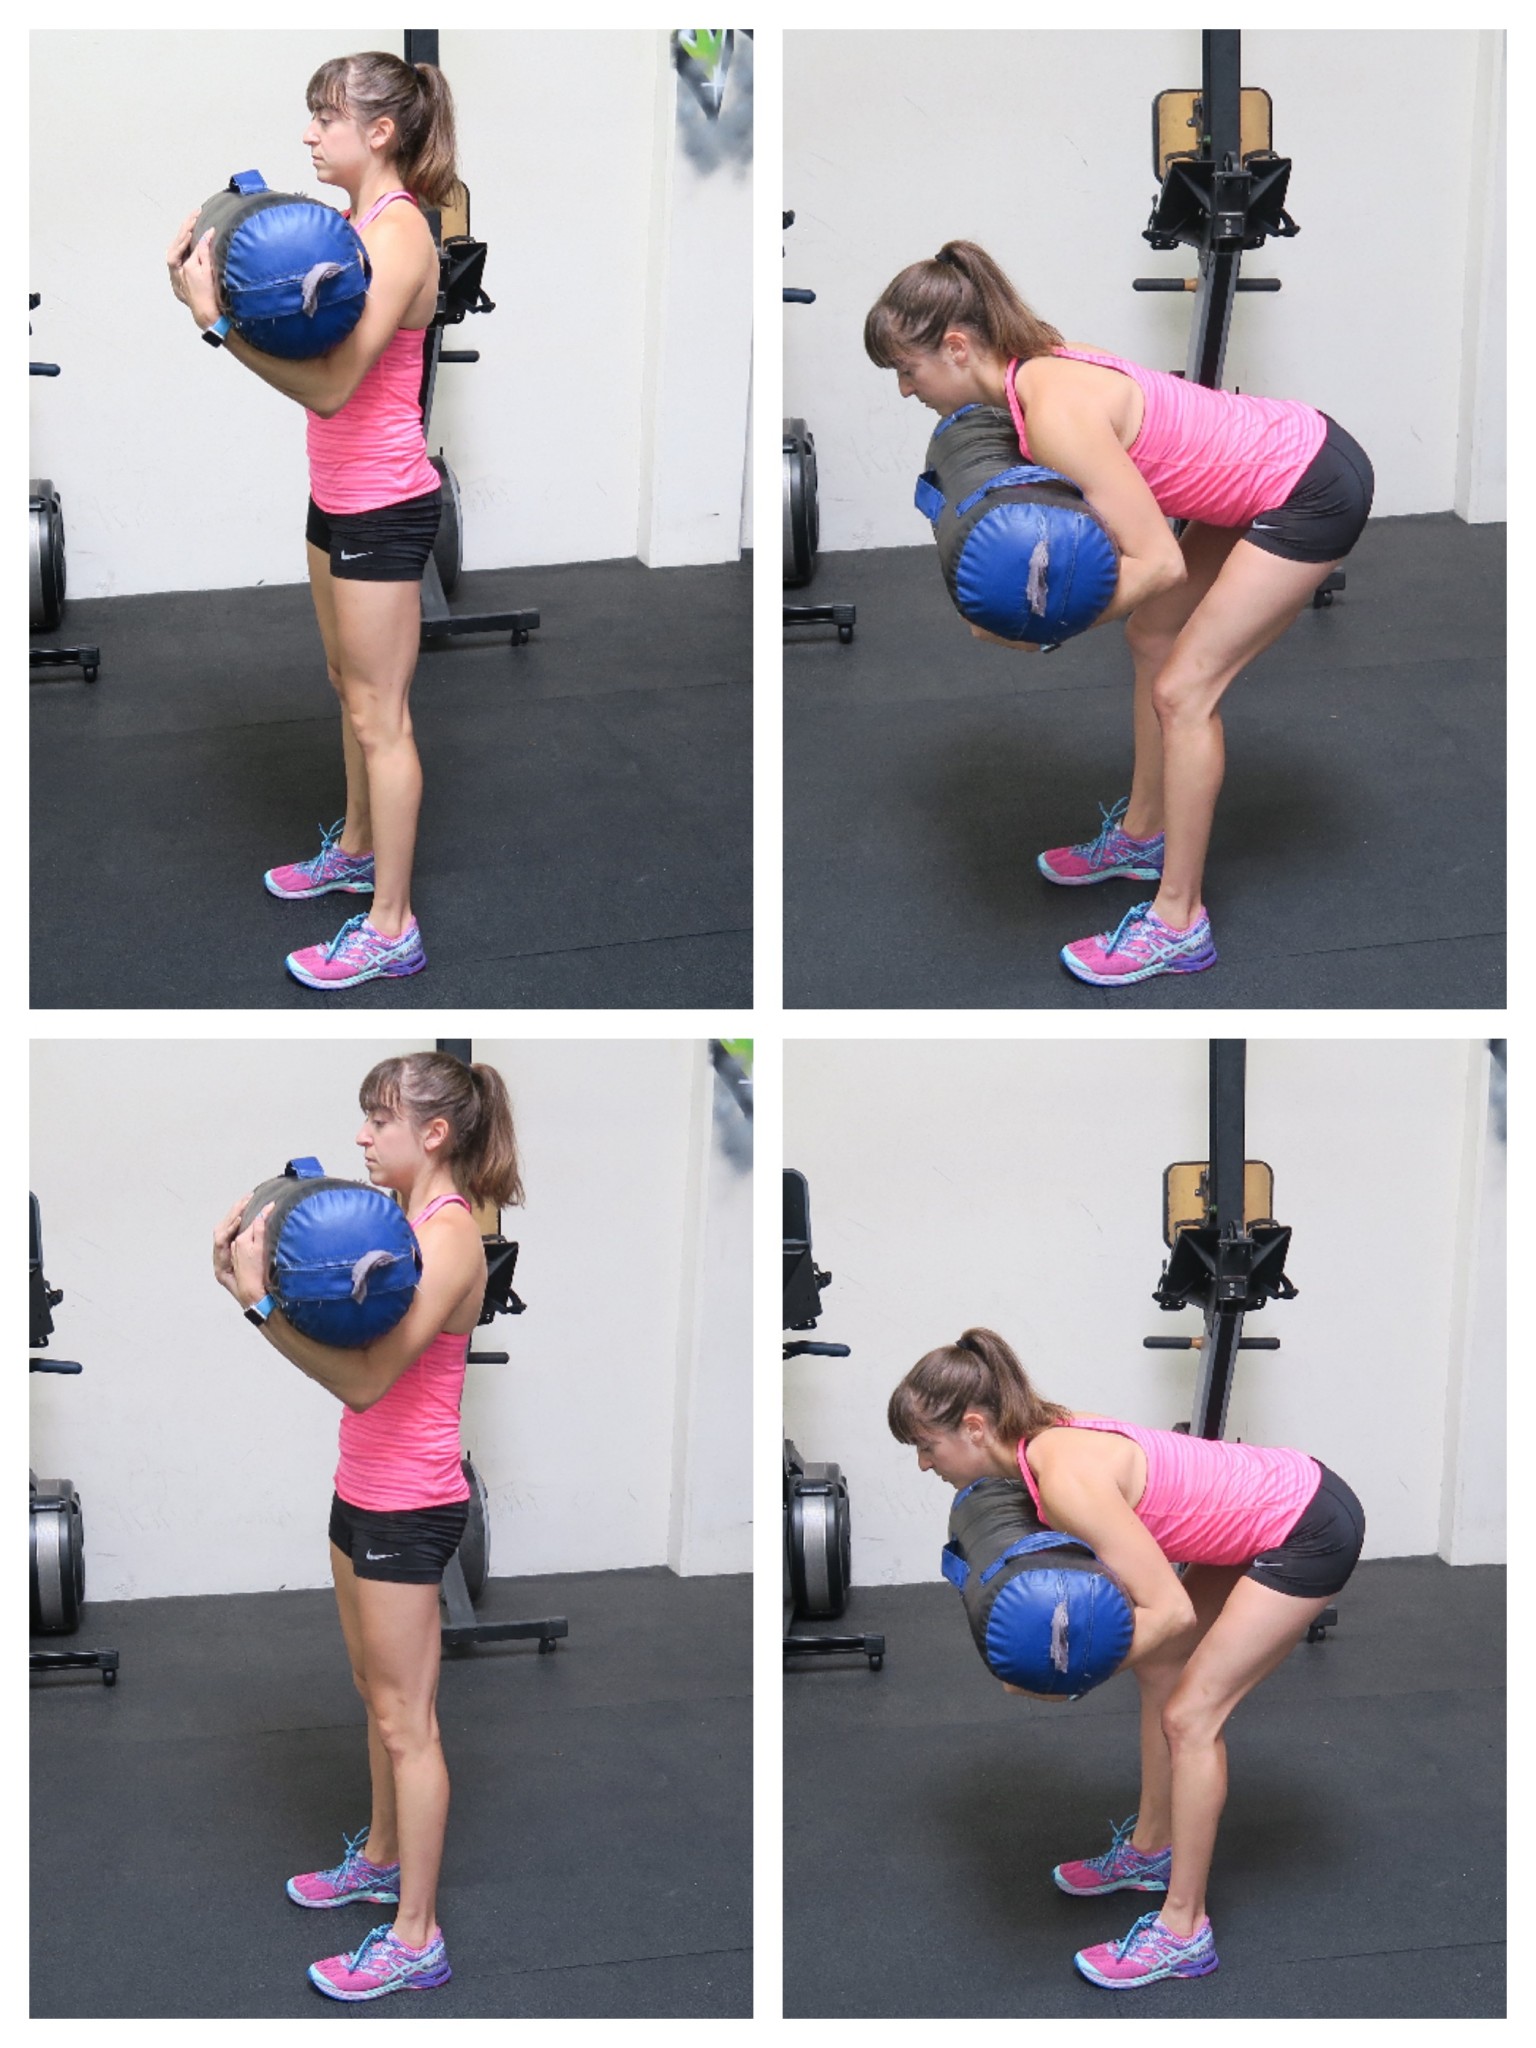
Good Mornings and Straight Leg Deadlifts – The Deadlift is a posterior chain exercise and your glutes are definitely the prime mover, HOWEVER, you can make the deadlift focus and work different muscles to different extents. One great Deadlift Variation to really work your hamstrings, is the Straight Leg Deadlift. And when you make it a front-loaded move like the Good Morning, you force your abs and core to work even harder!
To do the Straight Leg Deadlift, you can use barbells, kettlebells, sandbags, dumbbells or even resistance bands. I even like front-loading it down for the Good Morning variation. If you front-load the movement, hold a sandbag up at your chest cradled in your arms. You’ll wrap your arms around the bag and then pull it into your chest engaging your upper back to support it. Stand tall with your feet about hip-width apart.
Then, bracing your abs, hinge over at the hips, pushing your butt back as you keep your back flat. Feel your hamstrings and glutes loading as you hinge over. You will want to very slightly bend or soften your knees to help you push your butt back, but do not turn this into a squat.
After hinging over, drive back up to standing, pushing through your feet as you squeeze your glutes at the top. Do not rock forward, but instead drive straight up. Keep your abs engaged and do not round over.
Stand up nice and tall and squeeze your glutes, then hinge back over and repeat. Do not simply lean forward. You will want to keep your legs straighter but NOT lock out your knees.
Sumo – The Sumo Deadlift is another great variation if you want to target your legs a bit more and even get your adductors working. For some, this deadlift variation even allows them to lift heavier weights than the other variations. However, because of the wide stance, you will want to make sure to take care of your hips as the external rotation and wide stance can occasionally be hard on them.
To the Sumo Deadlift, beginners can start with a kettlebell just like they did for the Conventional Deadlift. You can also use a sandbag, dumbbells or even a barbell.
For the Barbell Sumo Deadlift, set your feet wider than shoulder-width with your toes turned out slightly and your shins against the barbell. Reach down and grab the bar between your legs about hip-width apart. Hinge at the hips as you bend your knees to sit your butt back and grab the bar. Keep your back flat and engage your lats and upper back to support the tension on the bar. Make sure your knees are in line with your ankles and hips. You do not want your knees caving in with the wide stance.
Then driving up through your heels, come back up to standing. Think more about pushing the ground away than on picking the bar up. You won’t want to lose tension in your upper body as you initiate the pull so it can help to think about pushing the ground away. This can also help you focus on using your legs and glutes.
Drive all the way up to standing tall and squeeze your glutes at the top. You do not want to lean back, but you do fully want to extend your hips. Then begin to lower the bar back down, siting your butt back as you hinge over to return it to the ground. Stay in control of the bar, but do not turn this into a slow eccentric lower down.
Make sure to keep the bar close to your body the entire time to make sure you are using your posterior chain to lift!
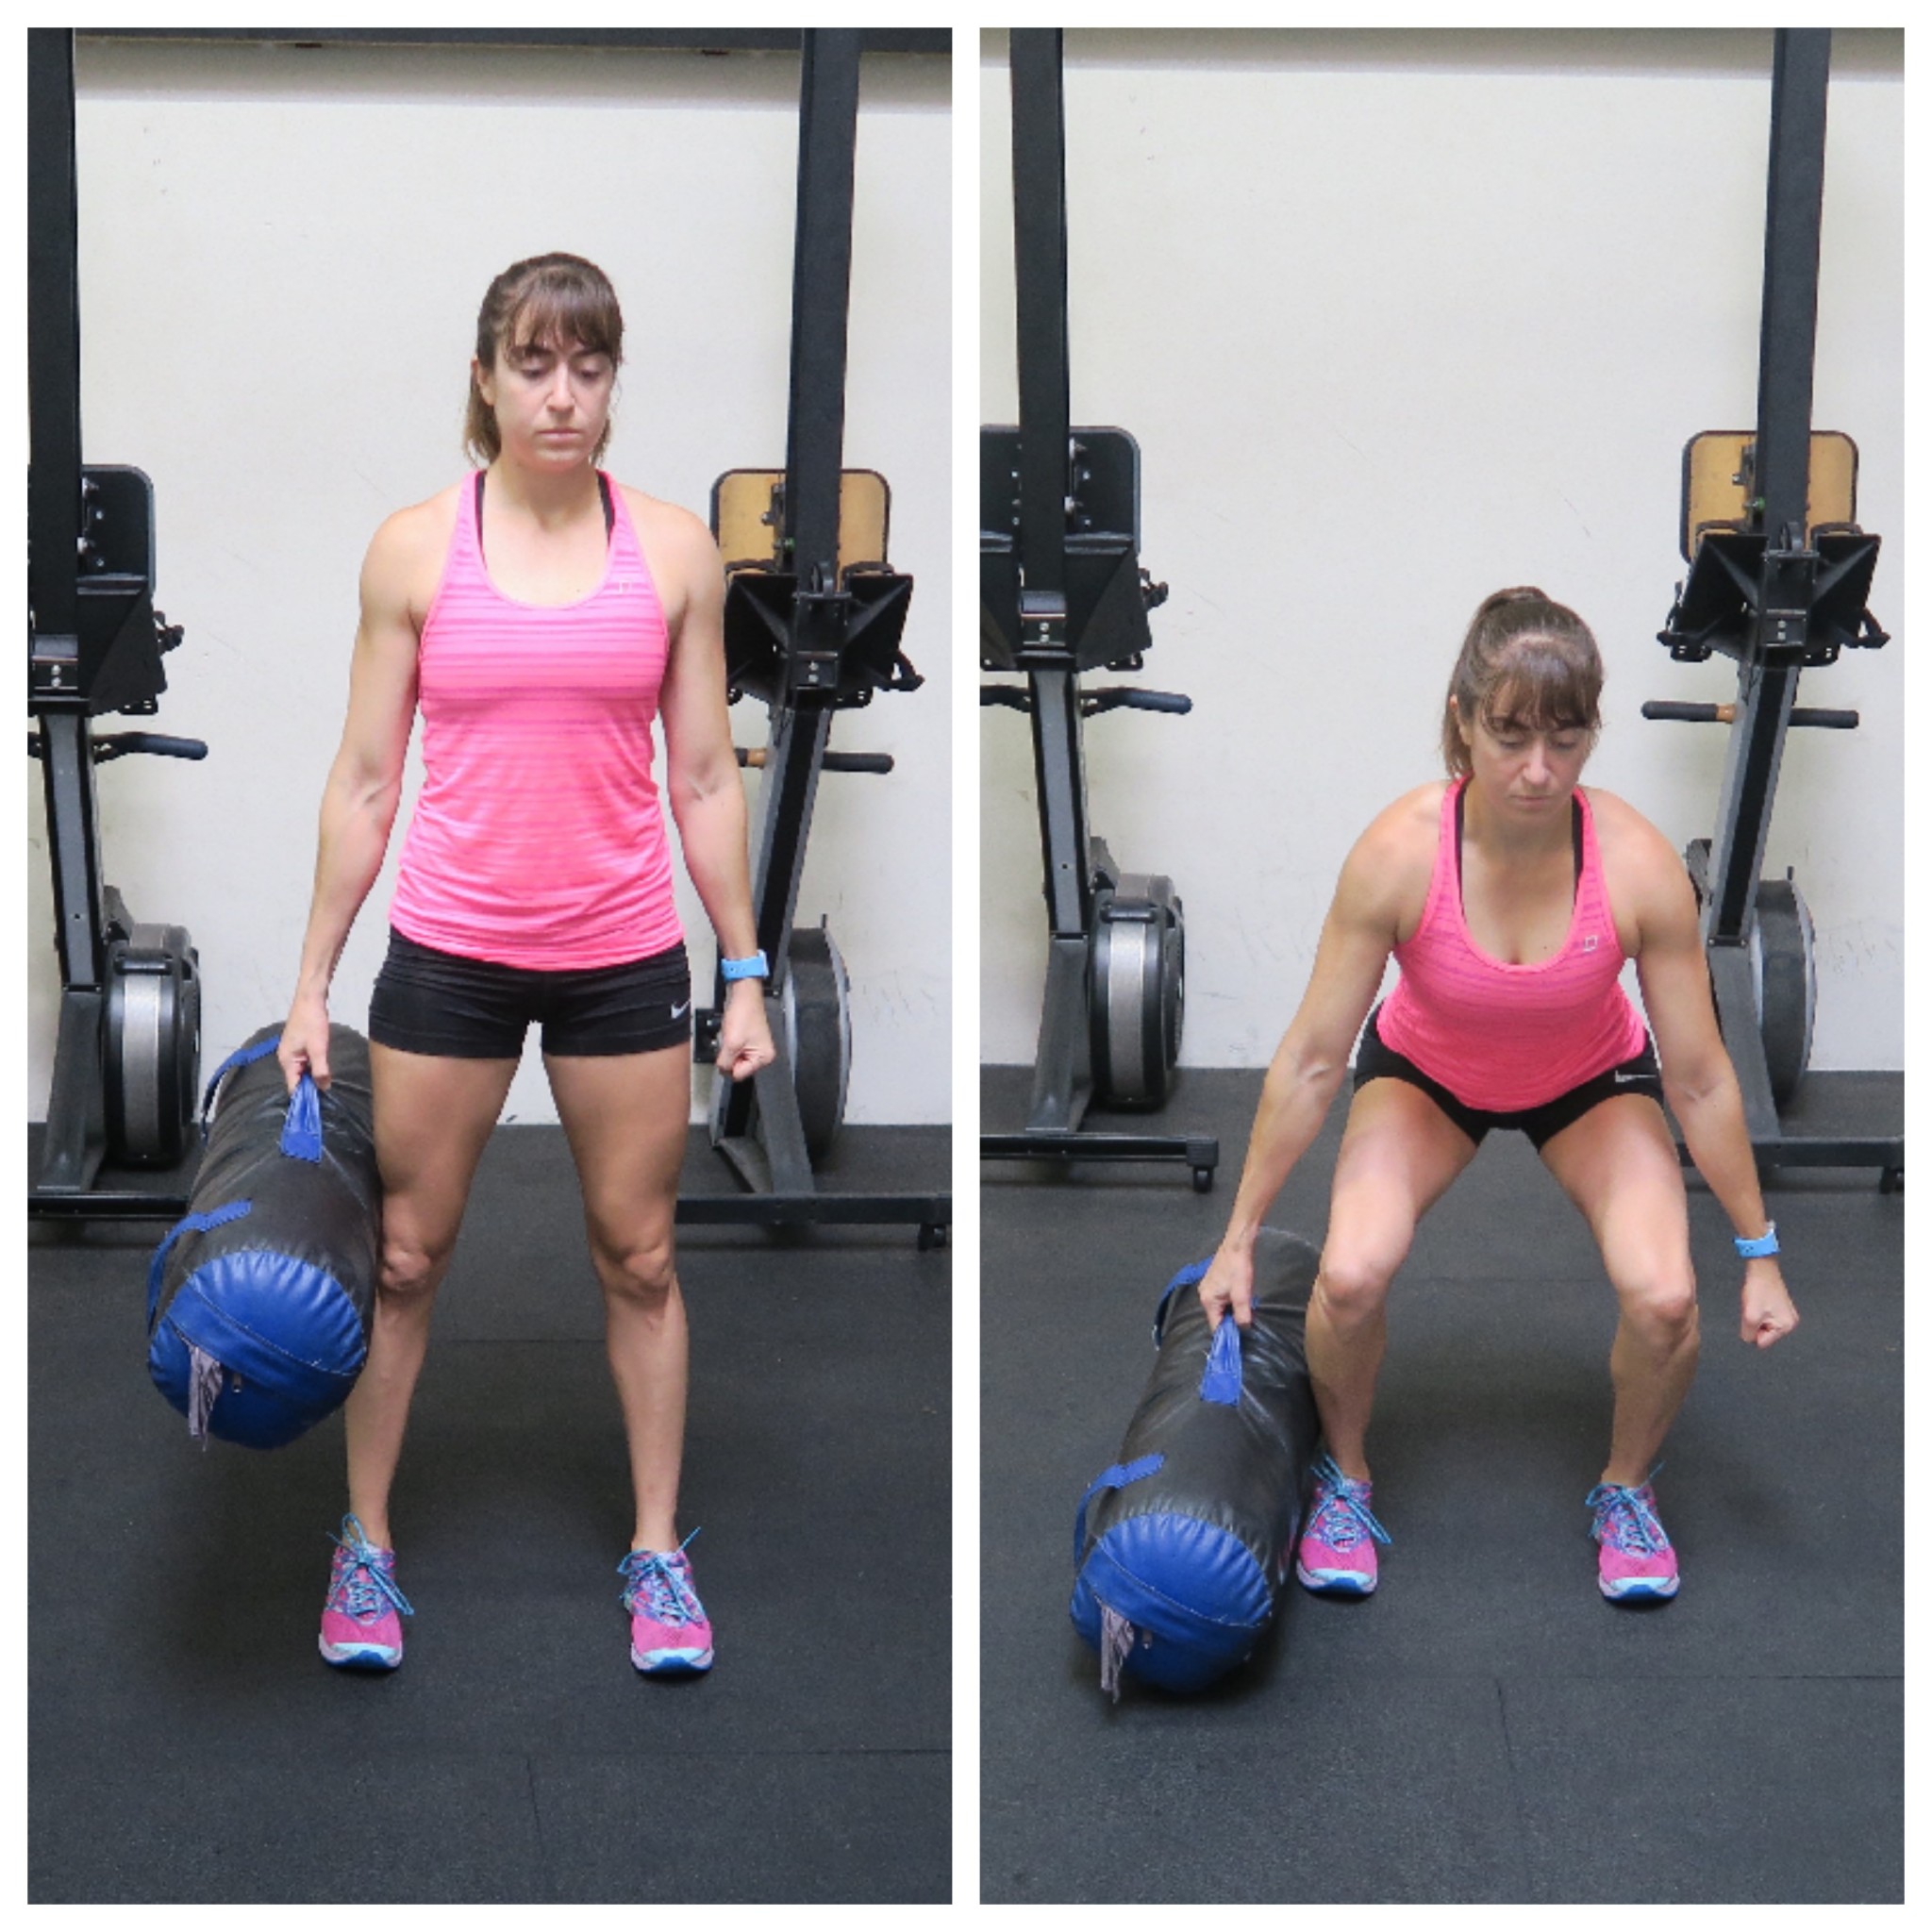
Unilateral Loads – With all of these great deadlift variations, you can also change how you load the move. From making the Conventional Deadlift a bit easier for beginners by using kettlebells to even making moves harder and more core intense by front loading OR even adding a unilateral load.
Unilateral loading is a great way to work on anti-rotational core strength and stability. It allows you to add weight, but make your core work even harder to stay balanced. Because you are adding weight on only one side though, make sure your core is ready for the challenge of fighting your body’s urge to compensate and rotate or you risk injury.
To unilaterally load down any variation, you can simply hold a kettlebell, sandbag or dumbbell in one hand. For the Single Leg Deadlift, you can hold it in the same or the opposite hand from your standing leg and for the conventional, you can hold it like a suitcase outside one side. Just make sure to do reps holding the weight on each side.
All of these moves can be used in your programming to work your posterior chain and strengthen those glutes. Make sure to pick variations that target your specific goals and don’t hesitate to mix things over progressions to not only challenge your body, but even focus on your weaker areas!
For even more coaching cues, tips and variations, check out my Mastery Series – Deadlift Edition!