Many of the AMAZING glute activation exercises that we should all be doing are those funny looking moves that Jane Fonda used to do in her leotard with ankle weights.
They are the moves that most people, especially guys, avoid.
However, everyone from the professional athlete to the guy or gal sitting behind the desk for 9 hours a day (especially actually that guy or gal with a desk job) should do those funny looking glute activation moves!
Glute activation can help you reduce your risk of injury and even alleviate your lower back pain by relaxing overactive hip flexors AND by getting your glutes to fire efficiently and effectively so that your lower back and hamstrings don’t compensate and become overworked.
Because so many of us spend so much time seated, our hips can become tight and our glutes can become underactive.
So getting them firing efficiently is key!
When your glutes are strong you’ll also find your running speed and endurance improves AND you can lift more!
Plus, strong glutes look pretty darn nice too!
And you can accomplish all of this by using those SILLY LOOKING ISOLATION MOVES!
Glute activation exercises should be included in your warm up to establish that mind-body connection so you can effectively recruit the muscles during your compound lifts or runs.
This will help you use proper recruitment patterns so your lower back doesn’t become overworked!
You can also include these more isolated moves in your supplemental circuits OR even as a nice quick finisher to your workout routine!
10 Must-Do Glute Activation Exercises:
1. Glute Bridge:
The glute bridge is a versatile move that can be used for activation as well as developing great glute strength. It is a great move to strengthen your glutes and open up your hips because by activating your glutes to drive your hips into extension, you inhibit or relax your hip flexors. This process is called reciprocal inhibition.
You can the glute bridge with just your own bodyweight or even add weight! Another way to progress or vary the movement is by adding a mini band.
The mini band allows you to also activate your glute medius during the bridge, a glute muscle key to hip stability.
Especially if you struggle to feel your glutes working, and instead often feel your hamstrings taking over, this variation can be a good one to use. It can be done as a bilateral, or two leg movement, or even a unilateral move to help you correct imbalances and even advance the move further.
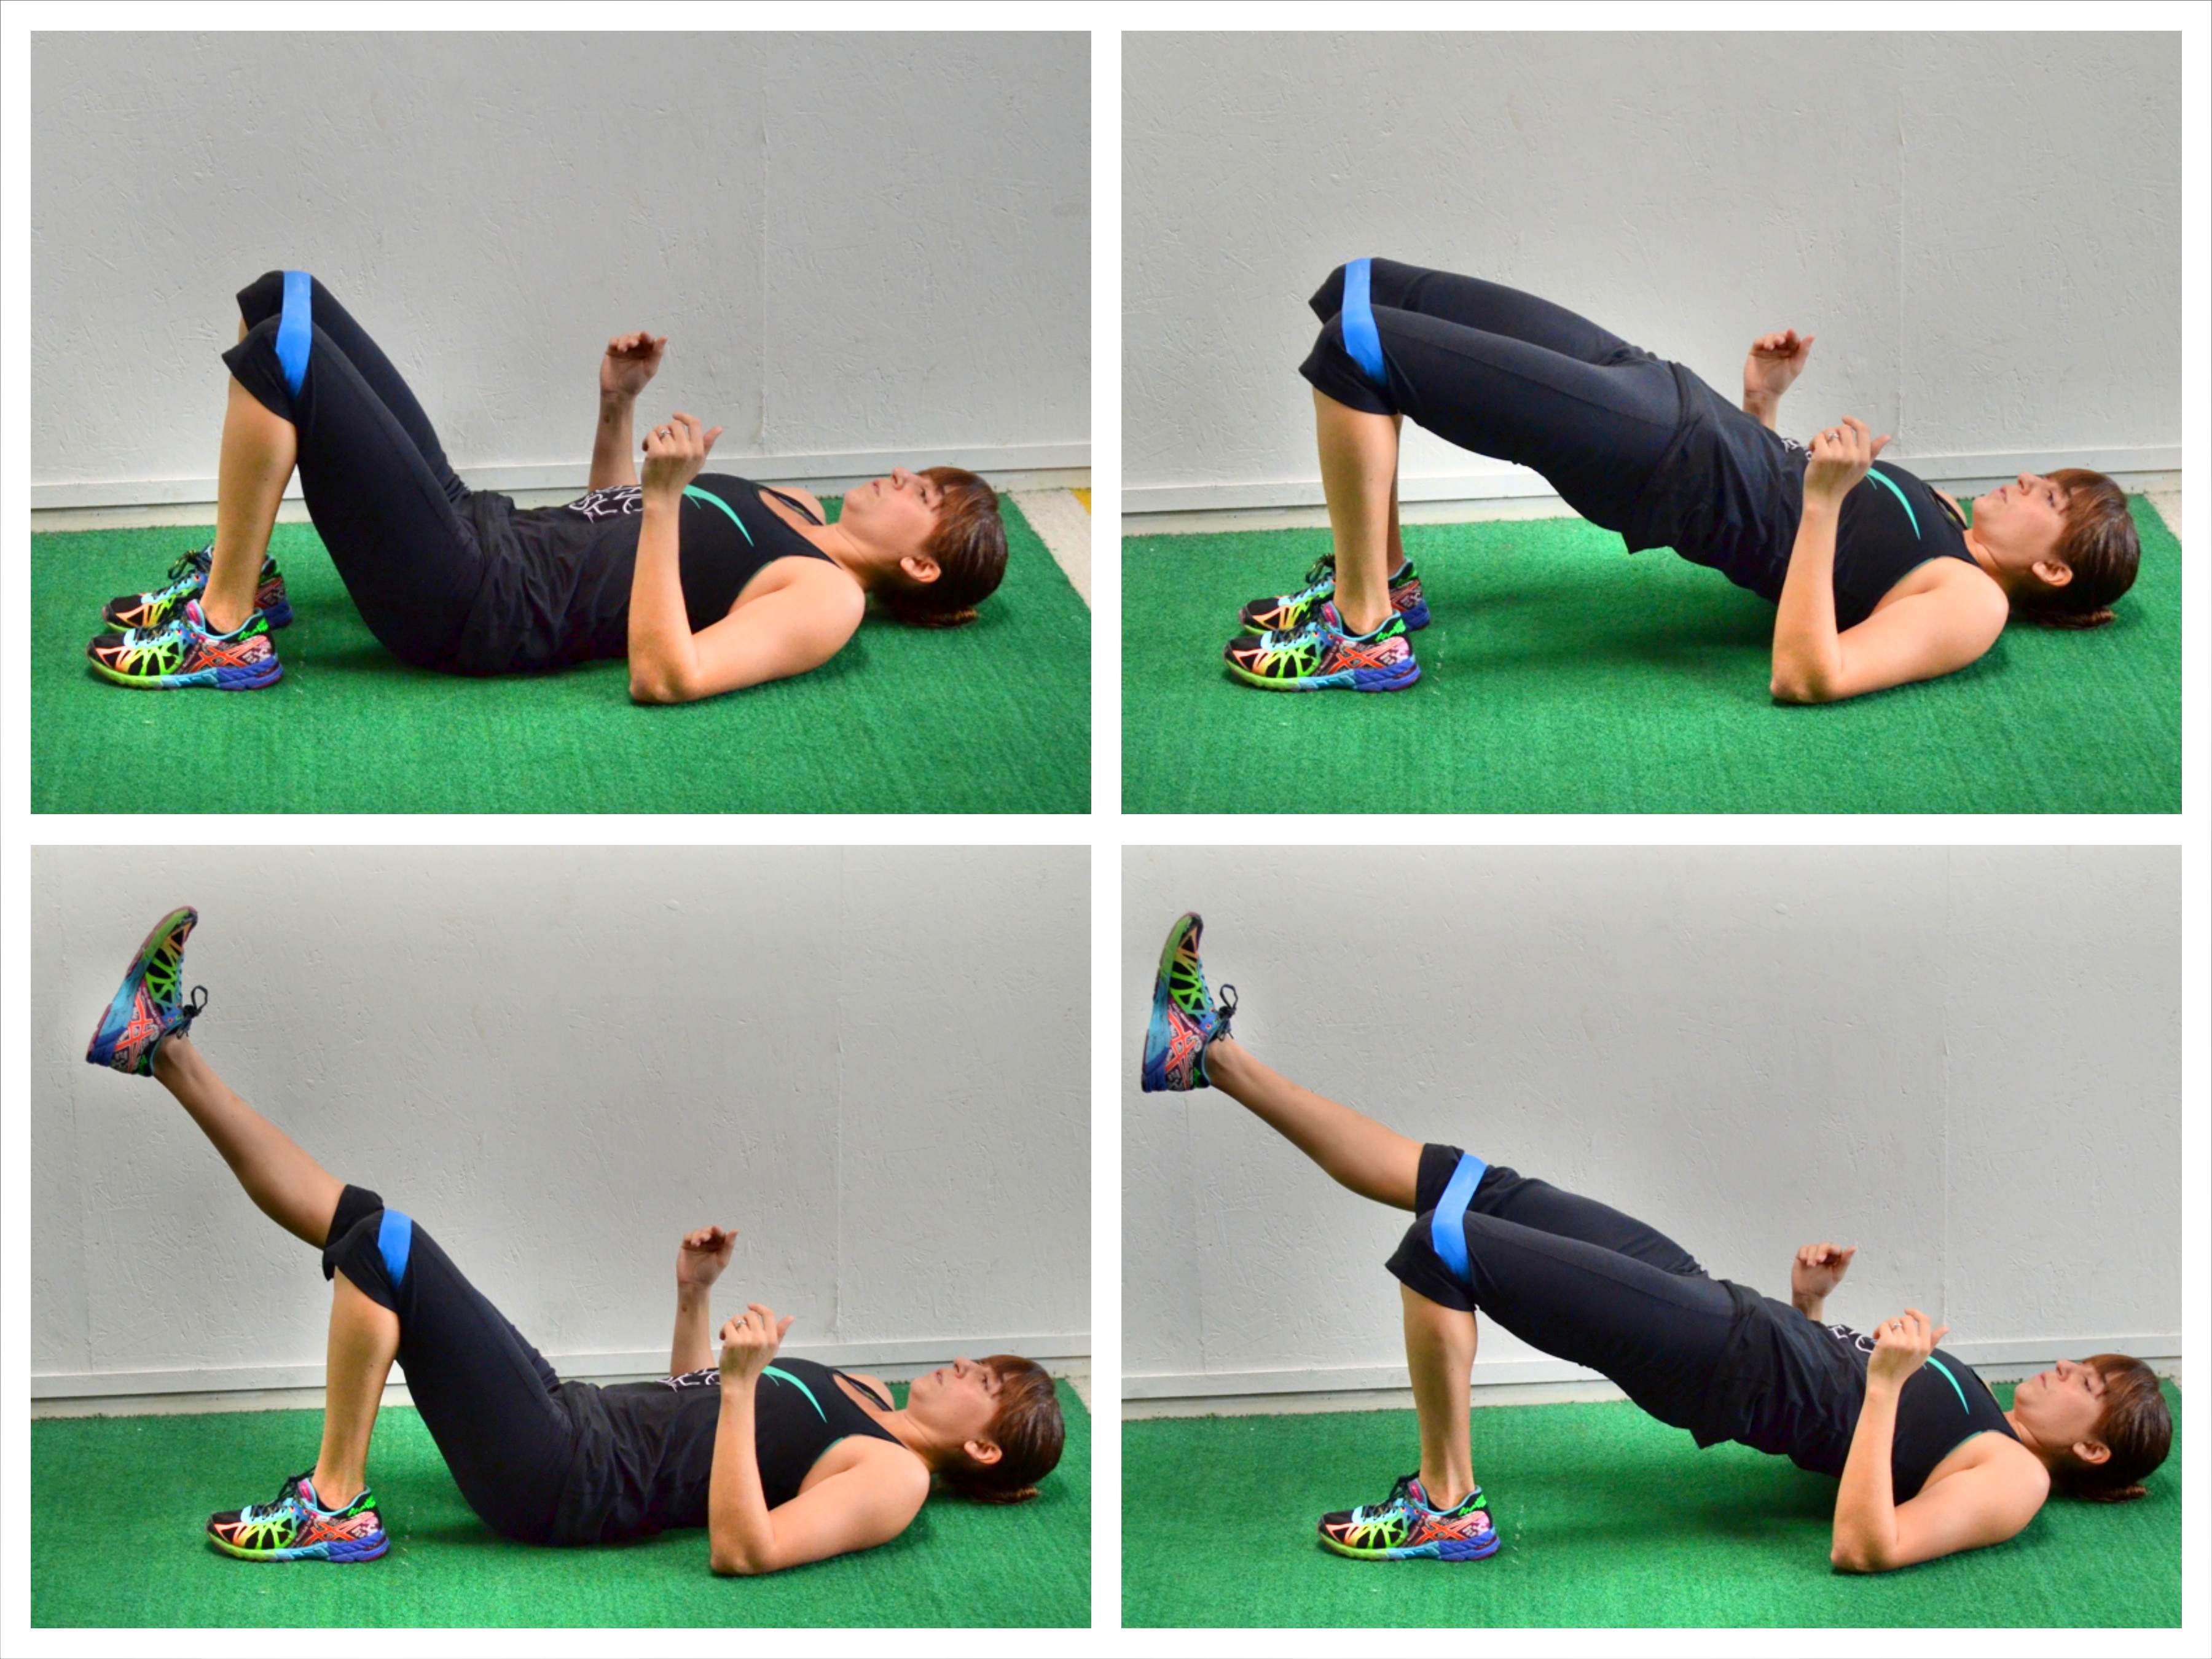
If you’re using the glute bridge for, well, glute activation, it is key you ACTUALLY feel your glutes working. It’s not enough to just do the move. If you struggle to feel your glutes engaging and instead feel your hamstrings or lower back taking over, these tips will help you avoid bridging wrong!
Another great bridge variation to use in your warm up is the Sit Thru to Thoracic Bridge.
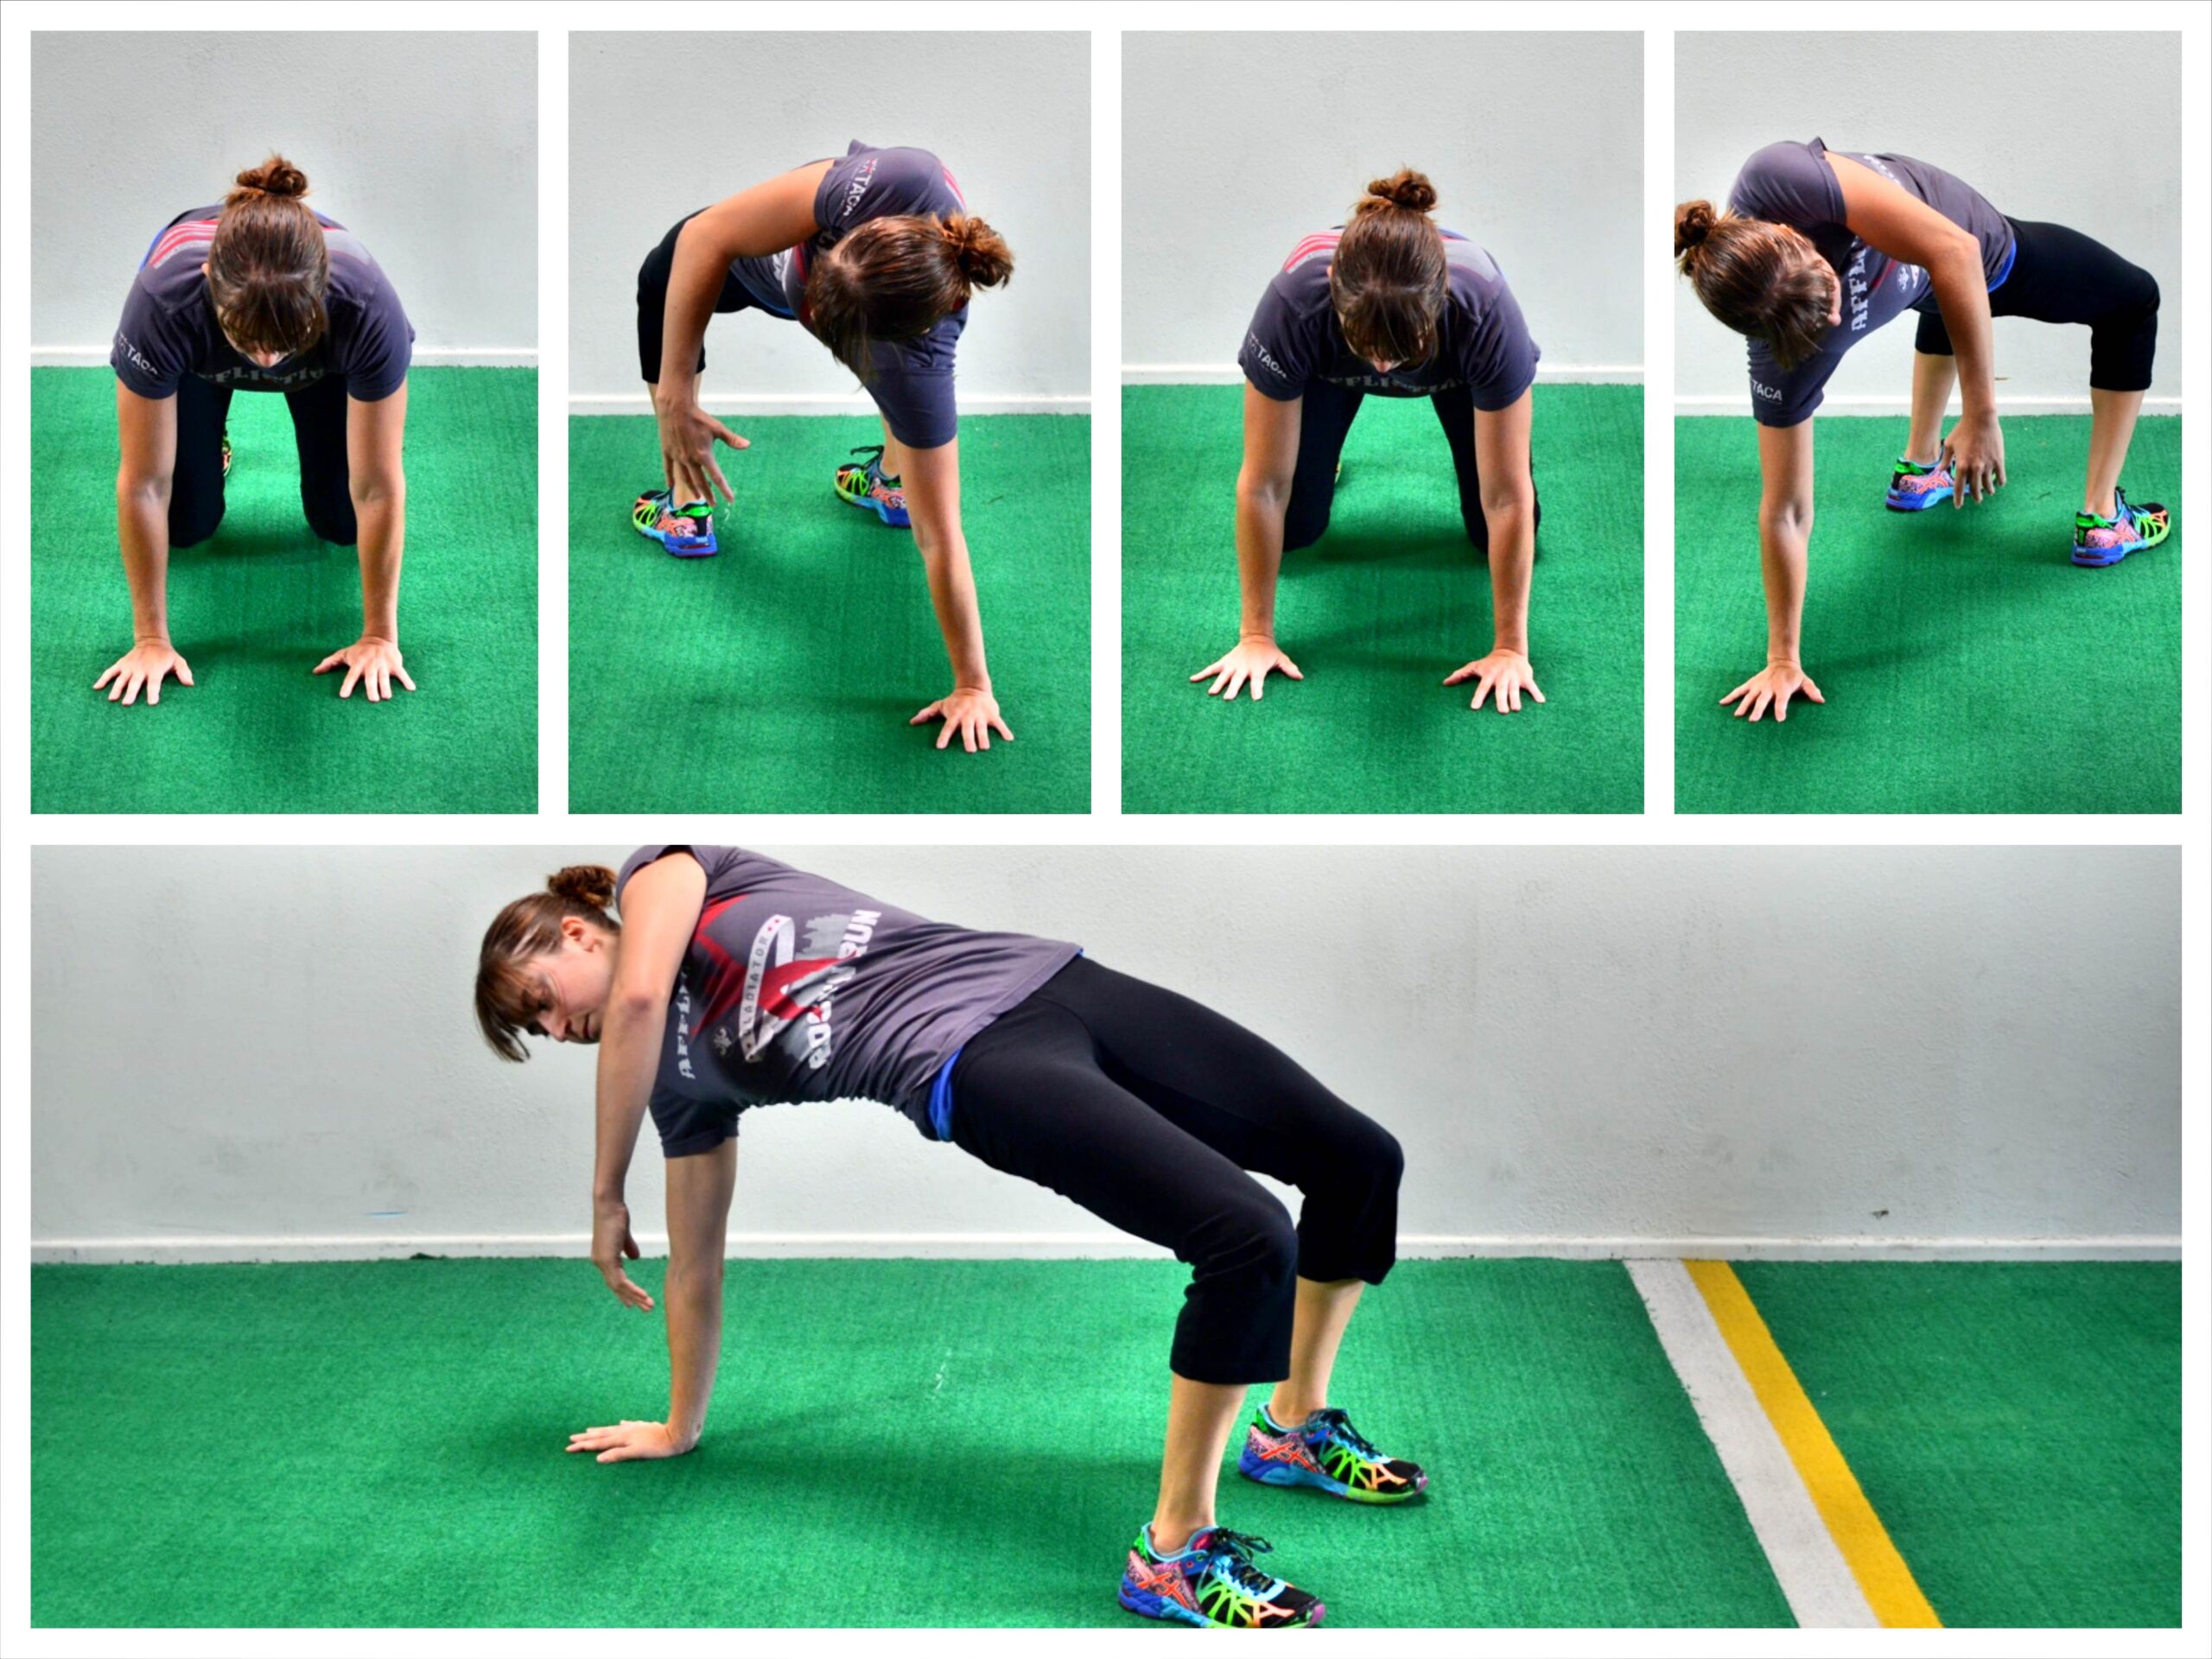
To do the Sit Thru to Thoracic Bridge, start on your hands and knees with your hands under your shoulders and your knees under your hips. Flex your feet and lift up onto your hands and the balls of your feet.
Then lift your right hand up and bring your left leg under your body and through and place your left foot flat on the ground. Rotate your hips up toward the ceiling, squeezing your glutes to lift them up as high as you can. Really try to open your hips up toward the ceiling and squeeze your glutes to fully extend your hips.
With your hips lifted, reach your right hand down toward the ground, rotating your chest toward the floor. Really reach your hand toward the ground as the rest of your body opens toward the ceiling to feel a nice stretch as you rotate. Feel your glutes working to keep BOTH hips up, while you reach your hand down. Don’t let your hips drop as you rotate.
You should feel a nice rotation and stretch through your spine. You are twisting almost like someone wringing out a towel. Make sure though that you aren’t hyperextending your low back to bridge up but are instead squeezing your glutes.
Then drop your hips and step your foot back through while placing your hand back down on the ground. Rotate to the other side, bridging your hips up as high as you can.
2. Donkey Kick:
The Donkey Kick is an oldie, but goodie. It is a great move to work on core stability and hip extension in a unilateral way! This move will work your entire core while activating your glutes.
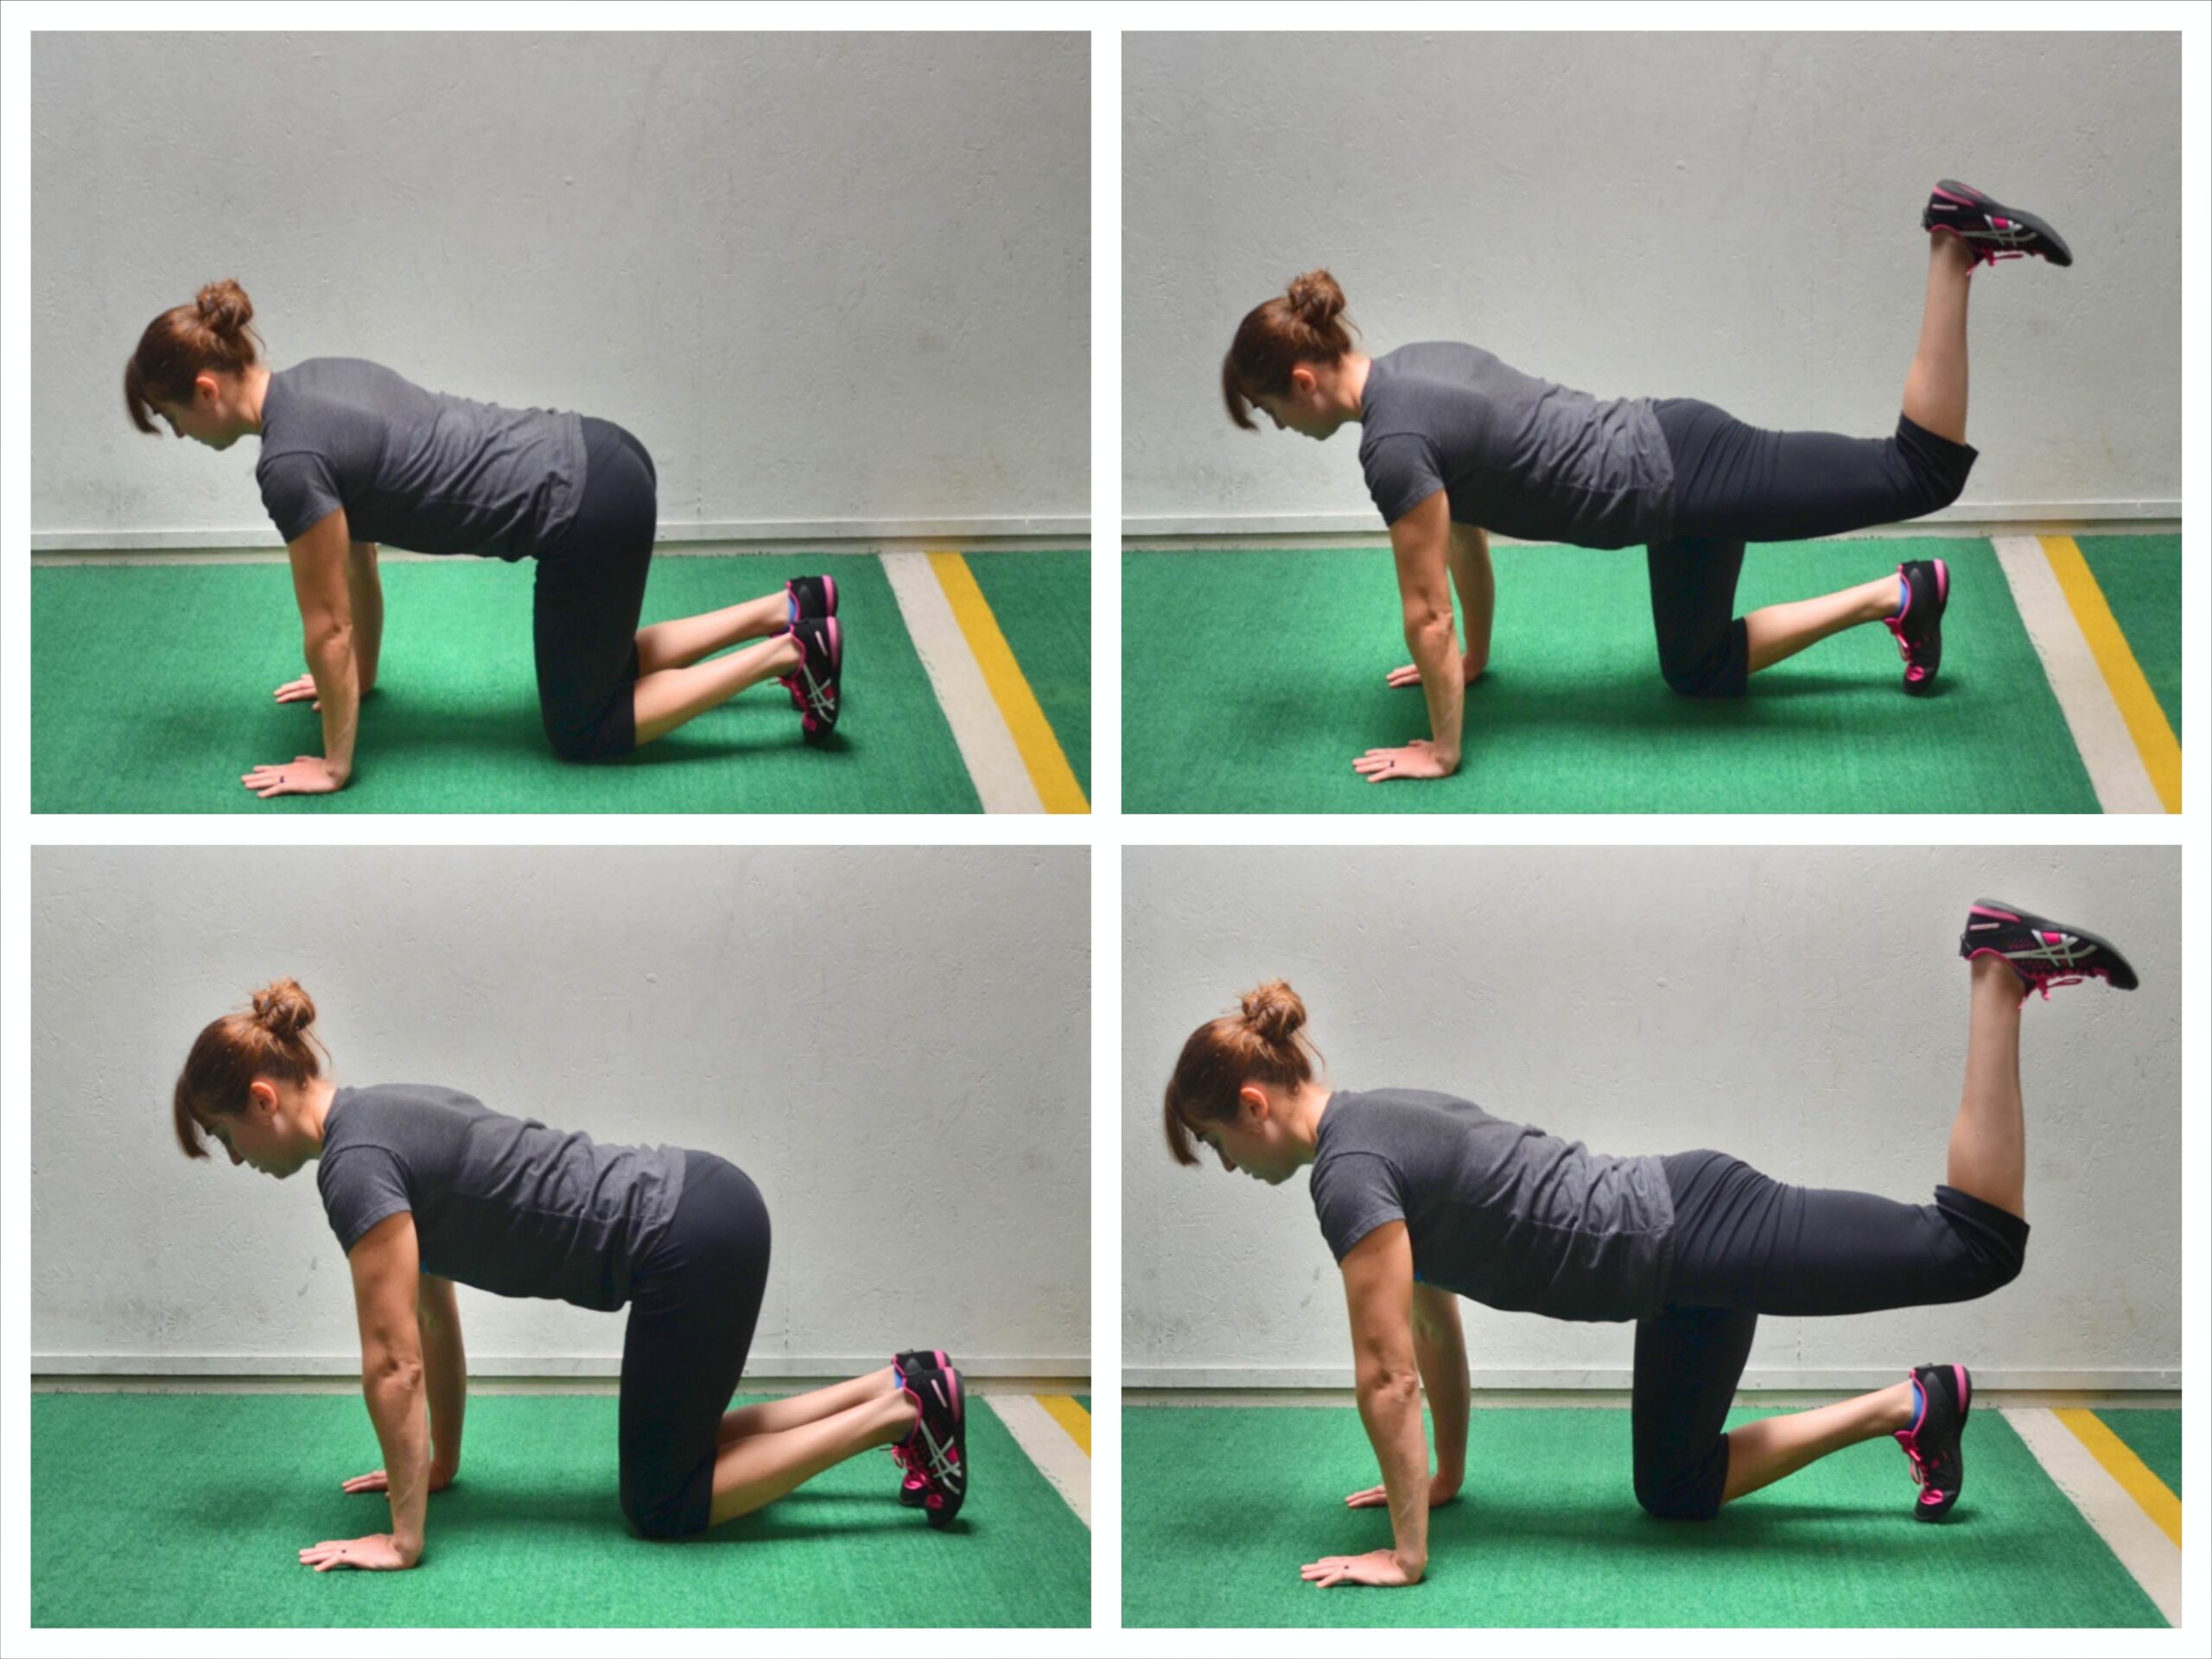
To do the Donkey Kick, start on your hands and knees with your knees under your hips and your hands under your shoulders. Flex your feet.
Then, keeping the knee bent close to 90 and the foot flexed, kick one leg back and drive the heel up toward the ceiling. Don’t let your lower back arch and make sure you draw your belly button in toward your spine to brace your abs. Make sure that as you lift you are squeezing the glute of the leg you are raising to drive the heel up.
The foot should drive straight up to the ceiling and the knee shouldn’t flare out. Do not let your elbows bend to try to get your leg higher. Hold at the top and squeeze your glute then lower and repeat. Focus on keeping your hips square to the ground as well. You do not want to rotate open just to drive up higher.
There is no need to weight down this move if you are using it in your warm up, although you can add a mini band or ankle weight to advance it or even make it a great supplemental move. To get the most out of this activation move, hold at the top for 2-5 seconds. Do not rush through the reps. And really focus on even thinking about your glute STOPPING your leg from driving up higher.
3. Fire Hydrant:
Talk about a silly looking, but oh so effective move! This abduction movement to target your glute medius is KEY to include to improve your hip stability.
The Fire Hydrant is a great way to wake up the glute medius, which is a critical muscle for maintaining balance and preventing hip, knee and ankle injuries. A strong glute medius will improve your running and even your ability to change directions quickly to “cut” quickly and pivot during your sport!
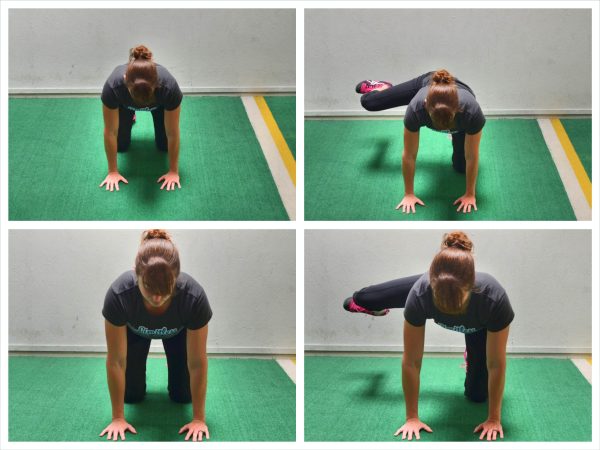
To do the Fire Hydrant, place your hands underneath your shoulders and your knees underneath your hips. Flex your feet and keep both your feet flexed even as you raise one leg.
Then raise one leg out to the side, keeping the knee bent to 90 degrees. Lift it as high as you can while keeping your arms straight and not leaning or compensating just to get it up higher.
Fight to prevent the foot from getting higher than the knee or the knee get higher than the foot. Really squeeze the butt cheek as you lift. Better to focus on lifting your knee up than on lifting from your foot though.
Think about raising straight up and out to the side even if the range of motion is smaller than you’d like.
Hold for a second or two at the top. Lower down and then repeat. Complete all reps on one side before switching.
4. 3-Way Hip Circles:
This move is a great way to improve your hip mobility as you activate your glutes. It combines the donkey kick with the fire hydrant while also adding in a great ab activation movement with the knee drive.
Ab activation is also key to include in your warm up, especially if you struggle with your lower back wanting to take over!
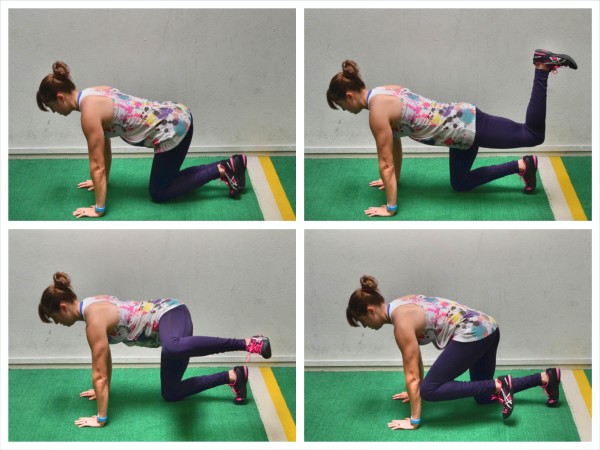
To do 3-Way Hip Circles, set up on your hands and knees with your knees under your hips and your hands under your shoulders. Flex your feet.
Then drive one heel back toward the ceiling, keeping the knee bent to 90 and the foot flexed (this is the donkey kick). Focus on keeping your hips level as you kick back.
Then without lowering your knee to the ground, bring that same leg out to the side, keeping the knee bent to 90 and the foot flexed. It should look like the top of the fire hydrant move. You want to think of kicking back then circling the knee up and out to the side.
Then without setting the knee down, bring it down and around to drive it forward into the elbow on the same side, Keep the foot flexed the entire time and your elbows straight. When you drive into the elbow, you should really feel your abs engage. Even think about drawing your belly button in toward your spine as you crunch that knee in, rounding your back.
Then lower the knee down and repeat.
5. Posterior Plank:
The Posterior Plank is a great glute activation, nah full posterior chain activation, move. It basically addresses everything that is underactive and everything that is tight from sitting hunched over a computer!
This is a tougher move though so beginners may need to start with the Tabletop Bridge. This may even be where you start if you’ve had knee pain.
To do the Posterior Plank, start seated on the ground with your legs out straight in front of you and your hands on the ground behind your butt. Your fingertips should be pointing toward your butt or out to the side.
(While I demoed with fingertips back toward me, out to the side is great if you want to open up your chest even a bit more!)
Drive through your hands and heels and raise your hips up off the ground toward the ceiling, keeping your legs straight. Squeeze your butt to drive your hips up and press your chest up and out. Keep your legs straight as you bridge up. You can relax your head back or slightly look toward your feet. Do what does NOT strain your neck.
If you feel pressure on your knees, flex your feet hard as you lift up. Squeeze your butt and avoid arching your lower back as you pause at the top, then lower back down and repeat!
6. Band Monster Walks and Side Shuffle:
Mini Bands are a great tool to use to activate your glutes from every angle and work all 3 glute muscles. Two of my favorite standing moves are the Monster Walks and Side Shuffle since they hit everything AND you don’t even need to get down on the ground to do them. If you even just include these two moves in your warm up, you are good to go in terms of glute activation!
The key with both of these moves is to keep your feet apart and tension on the band. The further down your leg you put the band, the more other muscles can engage. Most of the time, I do like to now use the band right below, or above, my knees to really focus on those glutes. If it is lighter, below the knees. If it is heavier, above the knees. If you do have a super light band OR find you’re efficient at engaging those glutes and do NOT feel your TFL taking over, you may place the band lower down near your ankles.
To do the Monster Walks, choose a place for the band (knees, ankles, feet) that allows you to take large steps while feeling your glute working and not other muscles taking over. With the band around your ankles, step your feet out to about hip-width to shoulder-width apart (maybe even a bit wider) so that there is tension in the band. Make sure your knees don’t cave in as you widen your feet out.
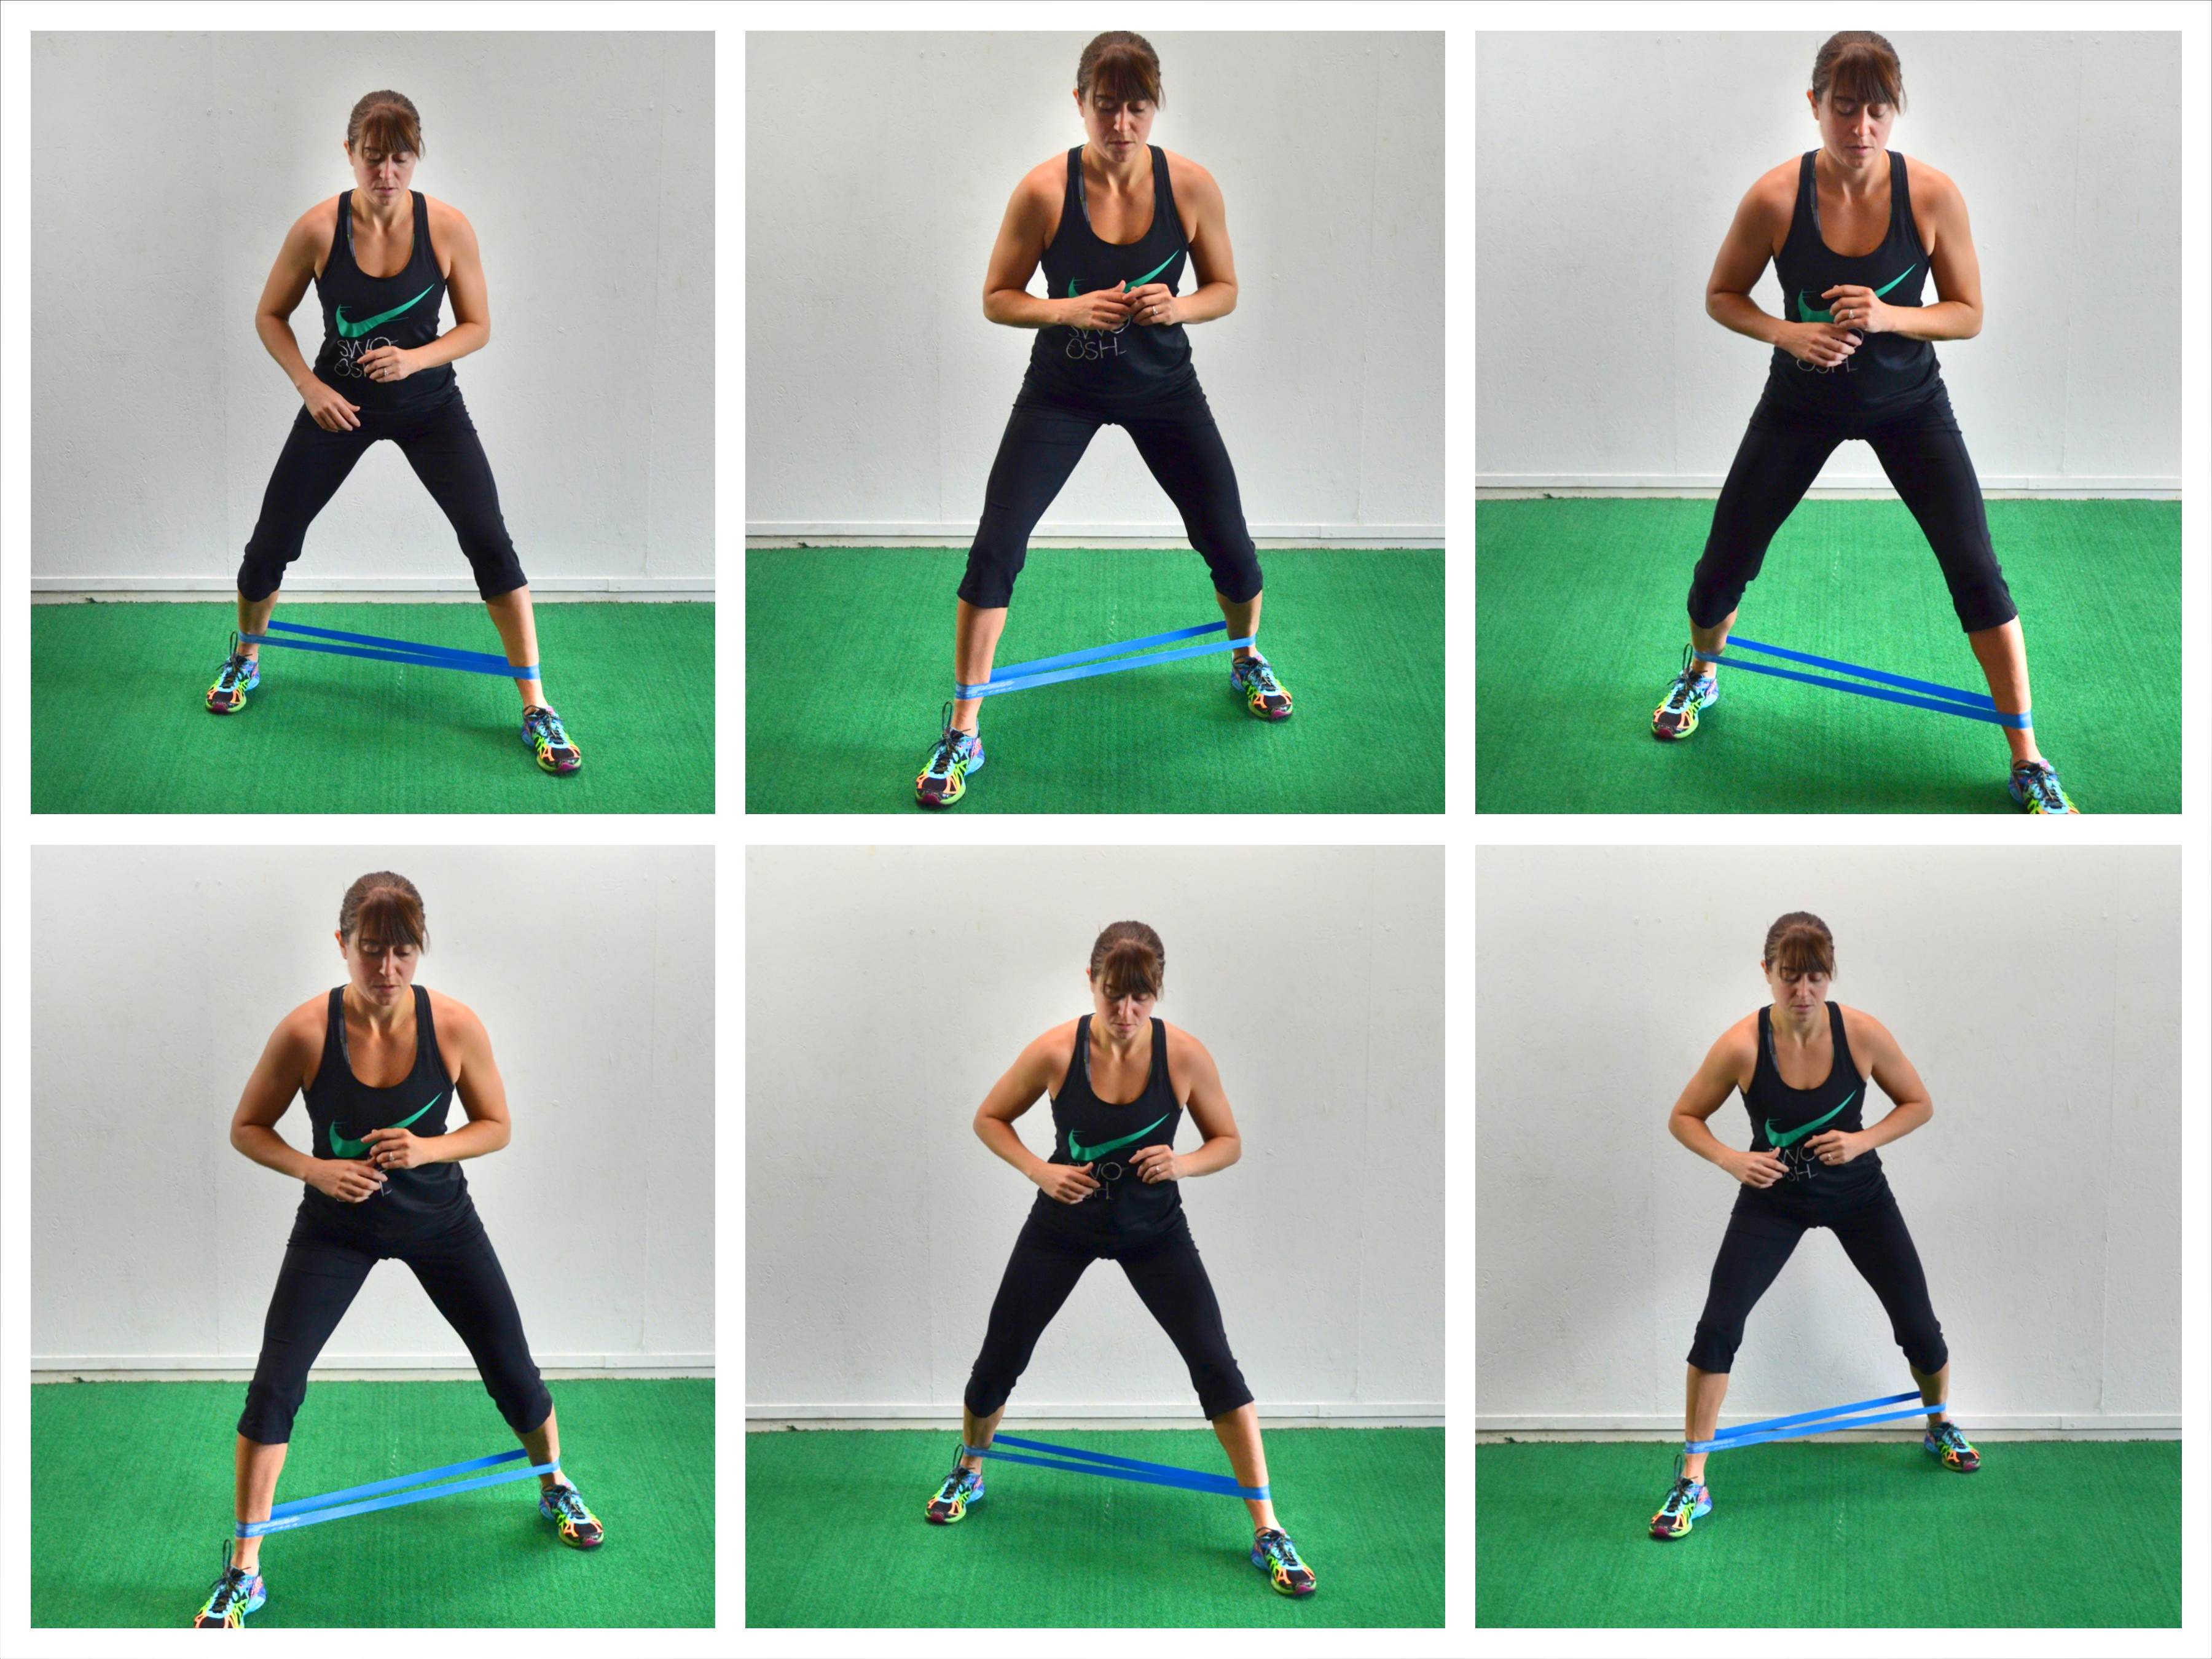
Keeping tension on the band, step one foot forward and out to the side. Then step the other foot forward and out to the other side. You want to make sure that you are not only taking big steps forward but also out wide so that there is lots of tension on the band. Make sure that your knees don’t cave in as you step and that you aren’t “swinging” your legs but actually stepping and forcing your glutes to work.
Continue walking forward, taking big “monster” steps. Keep your feet as wide apart as you can while moving forward. You can slightly bend your knees (and again, remember to not let your knees cave in!).
Then walk backward in the same manner. Step back and out with each foot, keeping tension on the band. Do not wiggle your hips open as you walk back or “swing” your leg around to help you walk. You want to focus on stepping straight back and out so that you feel your glutes working.
You can also do either a low monster walk (more of a squat) or a straighter leg variation. Try not to waddle or rotate your hips though as you walk. If you can’t control the move and you don’t feel your glutes working, use a lighter band or place it higher up on your legs. Also, make sure your knees don’t cave in as you walk!
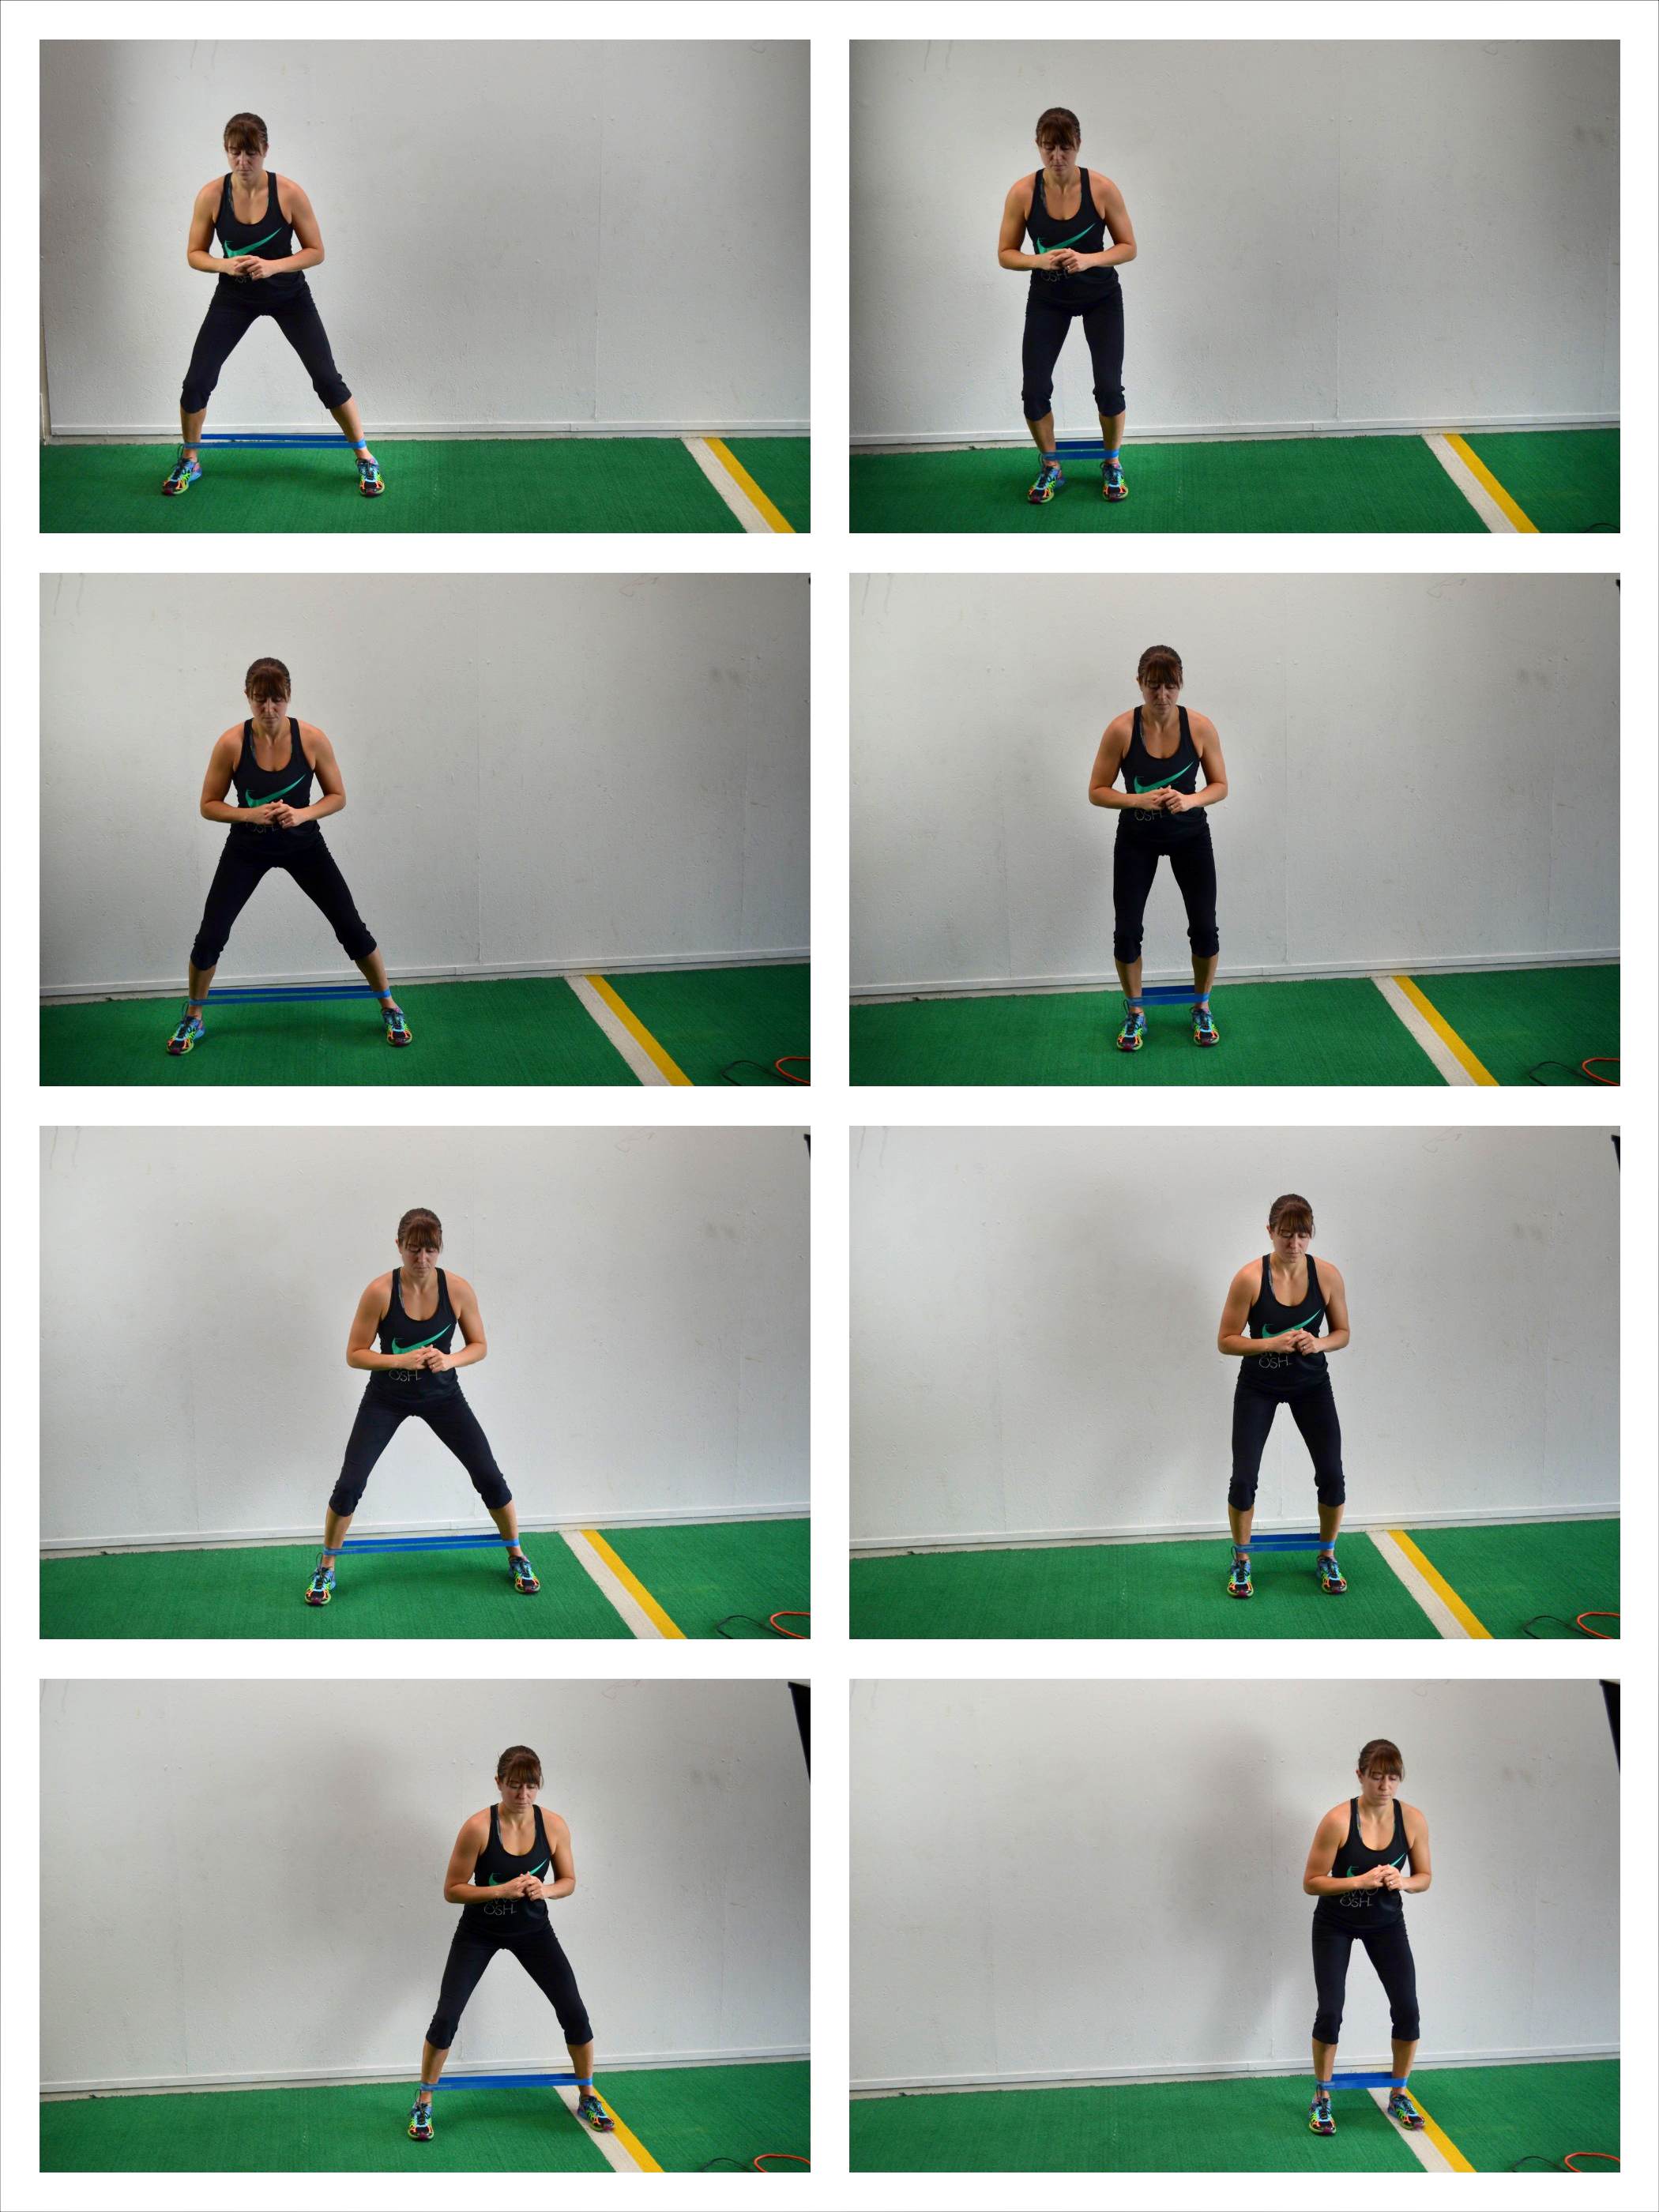
To do the Mini Band Side Shuffle, place the band around both legs. If you place higher up the leg, the move will be easier. If you place it around your ankles, or even your feet, the move will be more difficult.
Pull the band so your feet are about hip-width to shoulder-width apart. Toes should both be pointing forward and your feet should be parallel. Step laterally with one foot and then step in with the other foot. Always keep tension on the band when you are stepping and don’t let the feet come together.
Always keep them about hip-width to shoulder-width apart. Every time you step try to step as far apart as possible to really work the glutes. Do not drag the back foot when you step back in. Also try not to rock as you shuffle. You can do either a straighter leg side shuffle or a lower, bent knee shuffle.
If you love the mini band, here are 10 more Mini Band Butt Exercises!
7. Clams:
This is another staple activation move to target the glute medius. This move is commonly used by people rehabbing hip injuries and lower back pain BUT it is also a great move to activate the glutes and PREVENT those problems!
You can do this move without a mini band; however, the mini band does provide resistance. You can also push down with your own hand if you don’t have a band or hold a plate weight on top of your leg.
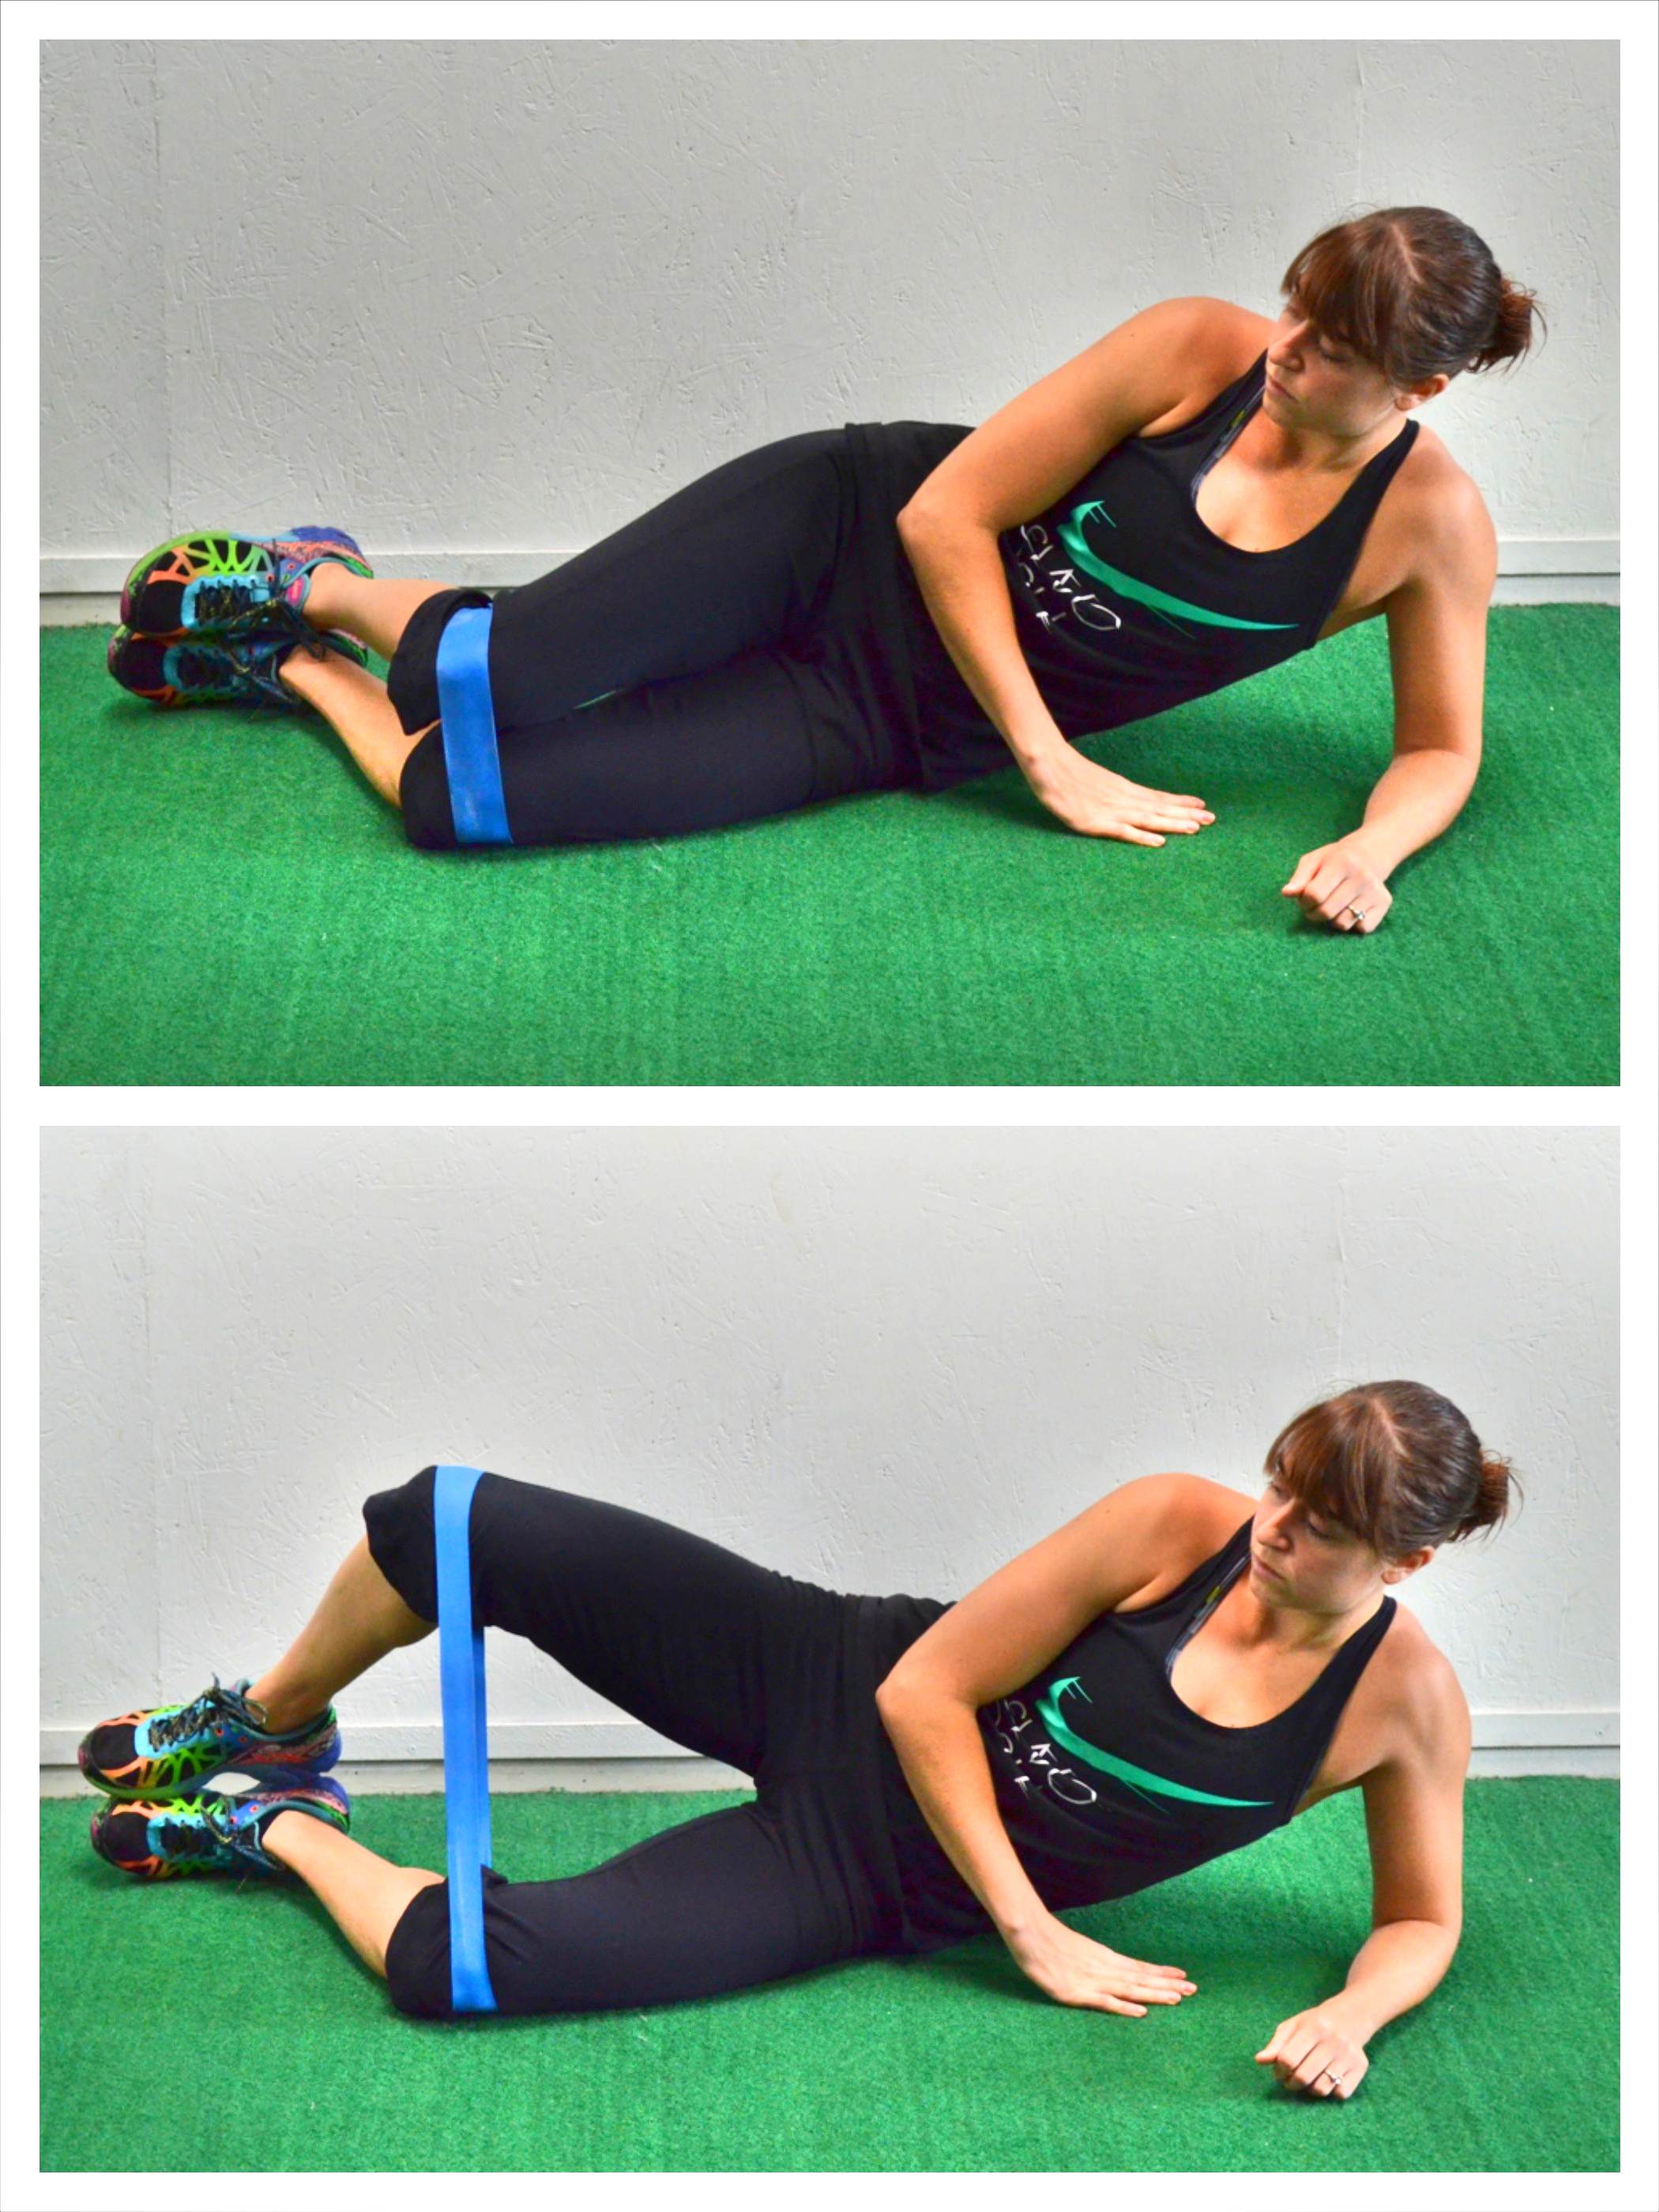
To do the Clam, place the Mini Band right up above your knees. Lie on your side propped up on your forearm with your knees bent and your feet together. You can place your other hand on the ground in front of you or on your side. Steady yourself so you don’t rock when you lift.
You may even want to set up with a wall behind you so that you don’t rock back when you lift and open your hips up. We tend to rock back to try to get the leg up higher, but that doesn’t force our glute medius to work as hard and can lead to us feeling only our piriformis or TFL. So don’t worry about range of motion. Simply focus on working your glute and the outside of your hip.
Without rocking back, lift your top knee up as high as you can, squeezing your glutes “forward” as you lift. Hold at the top then lower back down. Complete all reps on that side before switching.
Really squeeze your glutes, almost thinking about slightly driving your hips forward, as you lift. If you struggle to feel your glute medius, you can turn that top foot so the toe is pointing down toward the ground. You can also play around with MORE or LESS knee bend.
8. Bird Dog:
This is a must-do move to improve core stability. Especially if you are returning to exercise post pregnancy, you’ll want to do this move!
The key with the Bird Dog is to move slowly. You can add a band connecting your hand to your heel if you want to add resistance or even add an ankle weight to your leg to focus more on your glutes.
You can also advance the bird dog by doing this from the high plank, or even forearm plank, position instead of from your hands and knees. Just make sure you then focus on PREVENTING rotation as those two plank variations are great anti-rotational core moves!
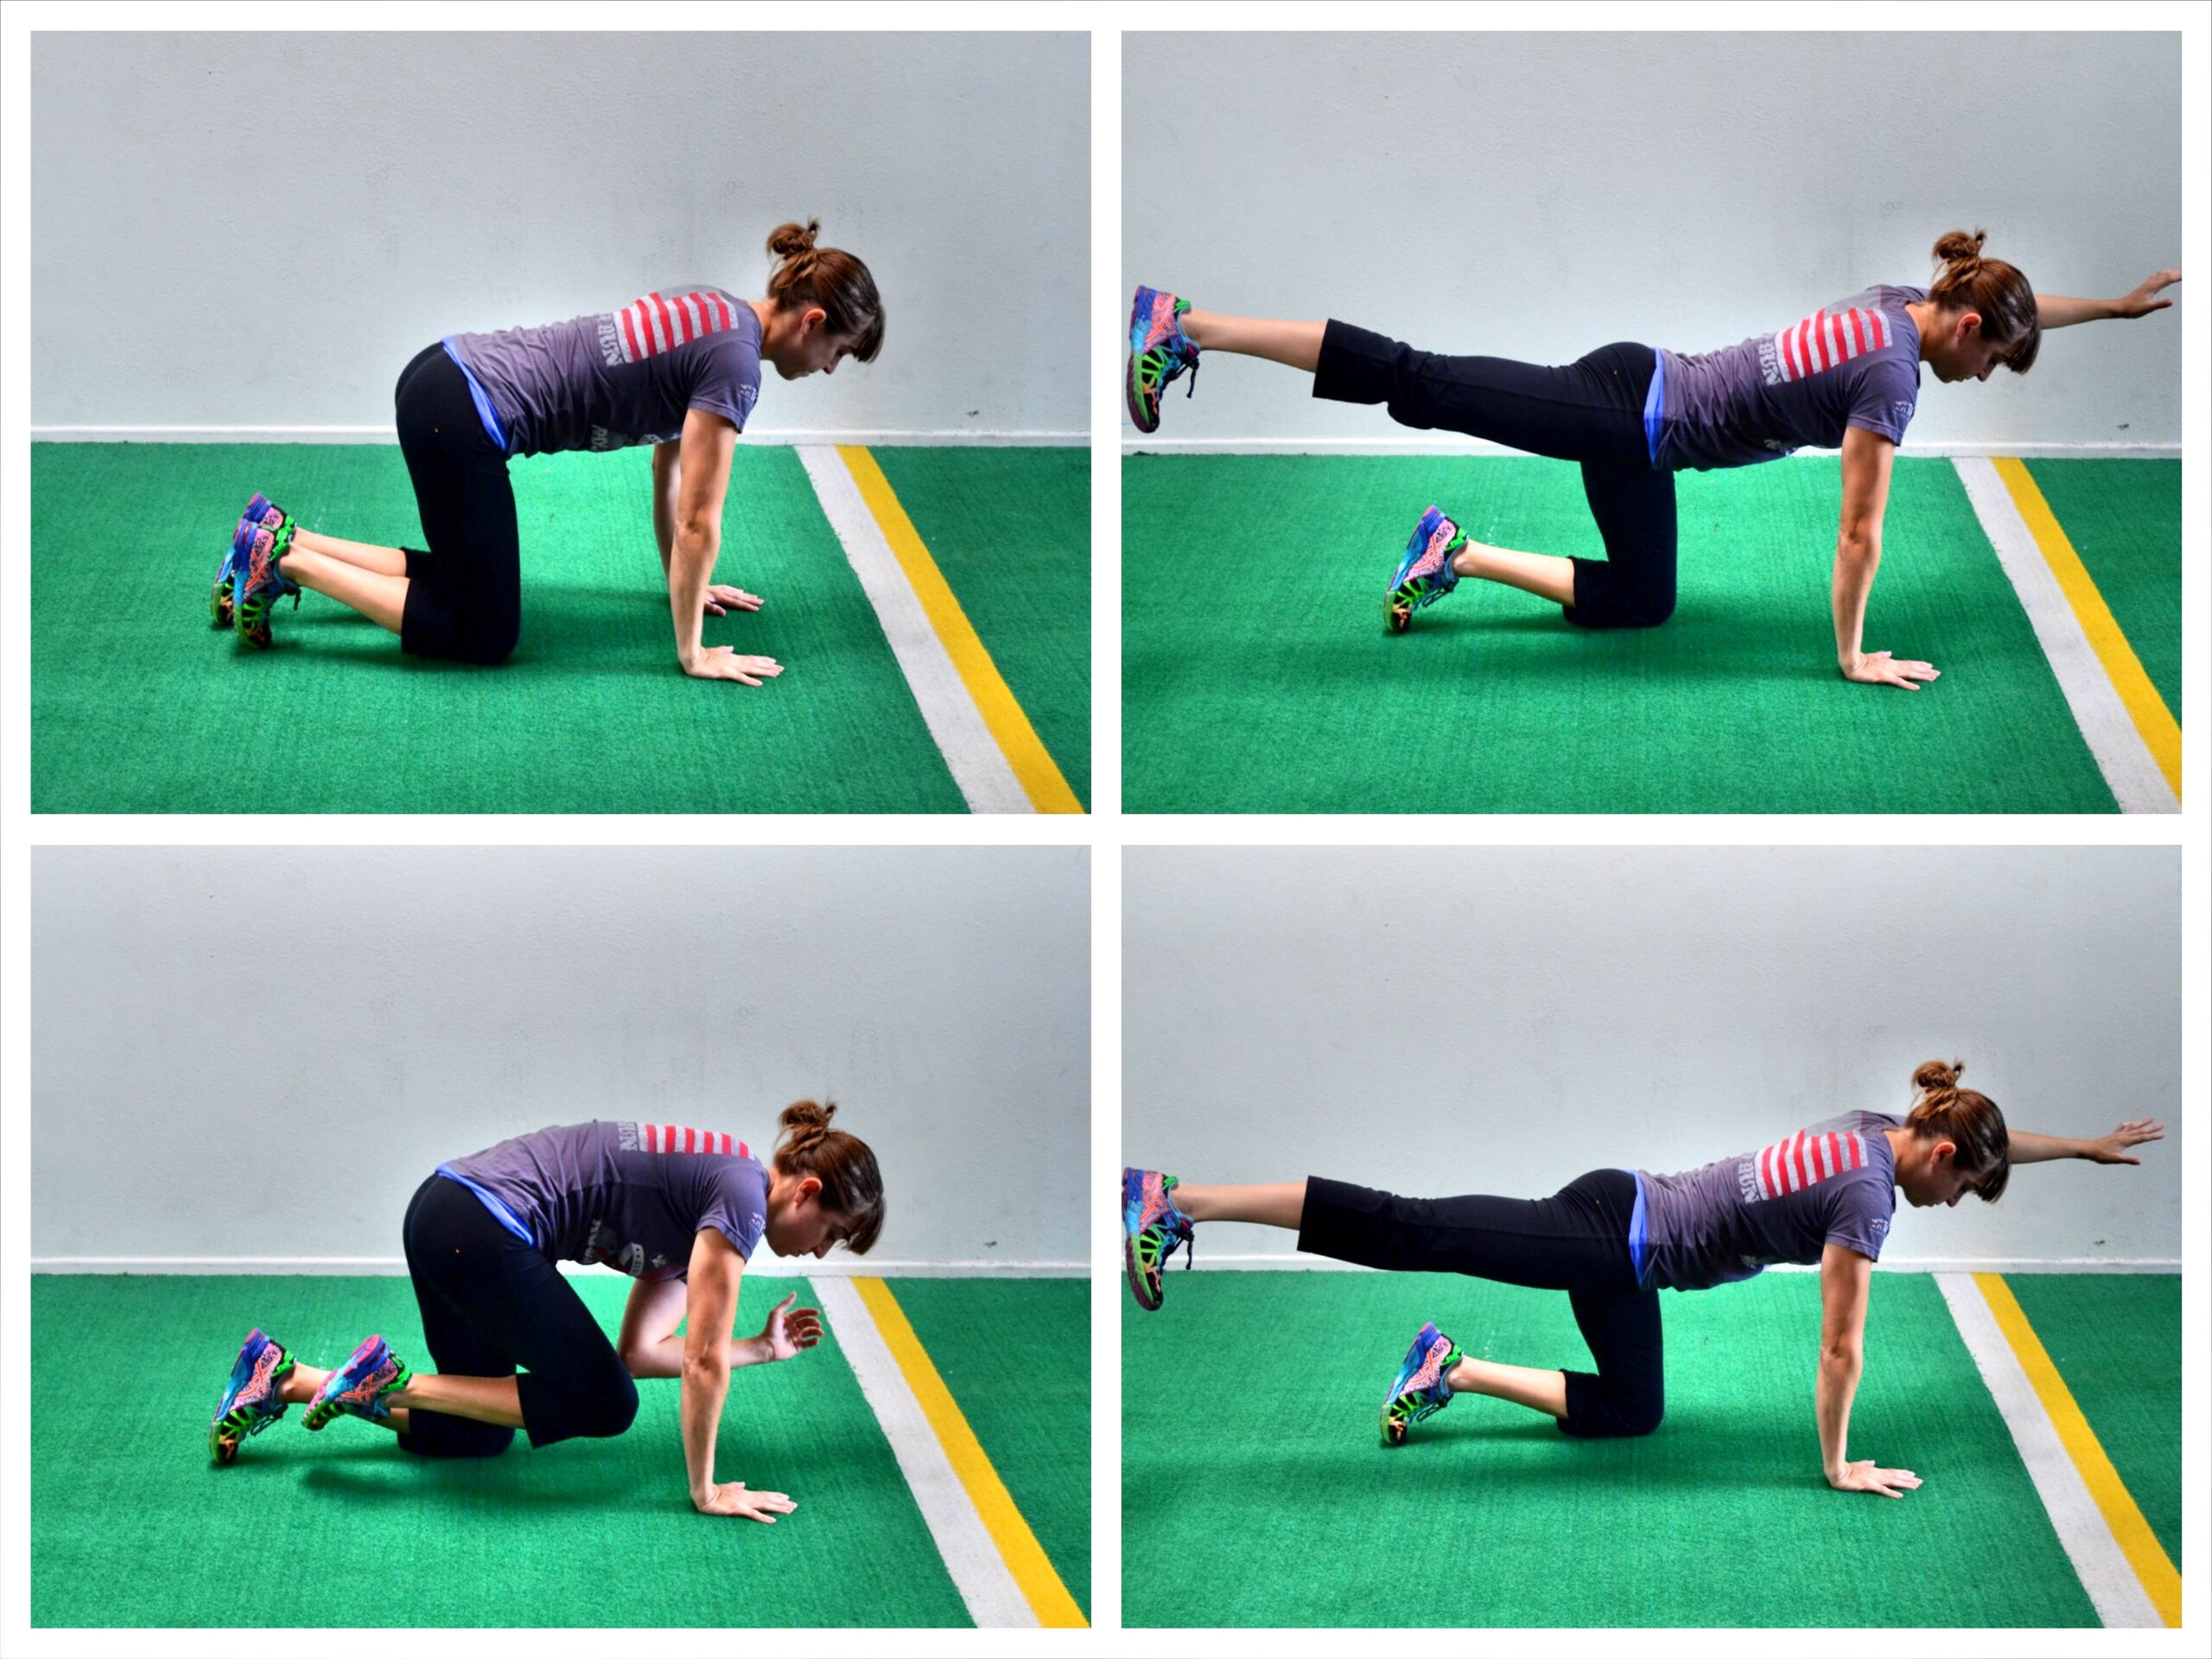
To do the basic Bird Dog, place your hands under your shoulders and your knees under your hips. Flex your feet.
Kick one leg straight out and back as if kicking it into the wall behind you while you reach the opposite arm straight out toward the wall in front of your head (reaching opposite arm and opposite leg in opposite directions).
Don’t worry about lifting your leg or arm up high. You do not want to arch your back just to lift up more. Think about reaching out as if trying to get as long as possible from the raised fingertips to raised foot.
Squeeze your glutes and keep your belly button pulled in toward your spine.
As you lower your arm and leg, bend your elbow and knee to crunch them together under your body. Try to touch your knee to your elbow before extending back out. This crunch will work your abs as well.
Repeat all reps on one side before switching to the other side. All reps should be done in a slow and controlled manner. You should even hold for a second or two at the top of the move and pause to feel your abs in the crunch.
9. Reverse Hypers (Single Leg Reverse Hypers):
Reverse Hypers are a great hip hyperextension move. However, they are also often a tough move for people to isolate their glutes during. Too often we end up only loading our lower backs so it is key you are very conscious of what you truly feel powering the movement instead of just going through the motions!
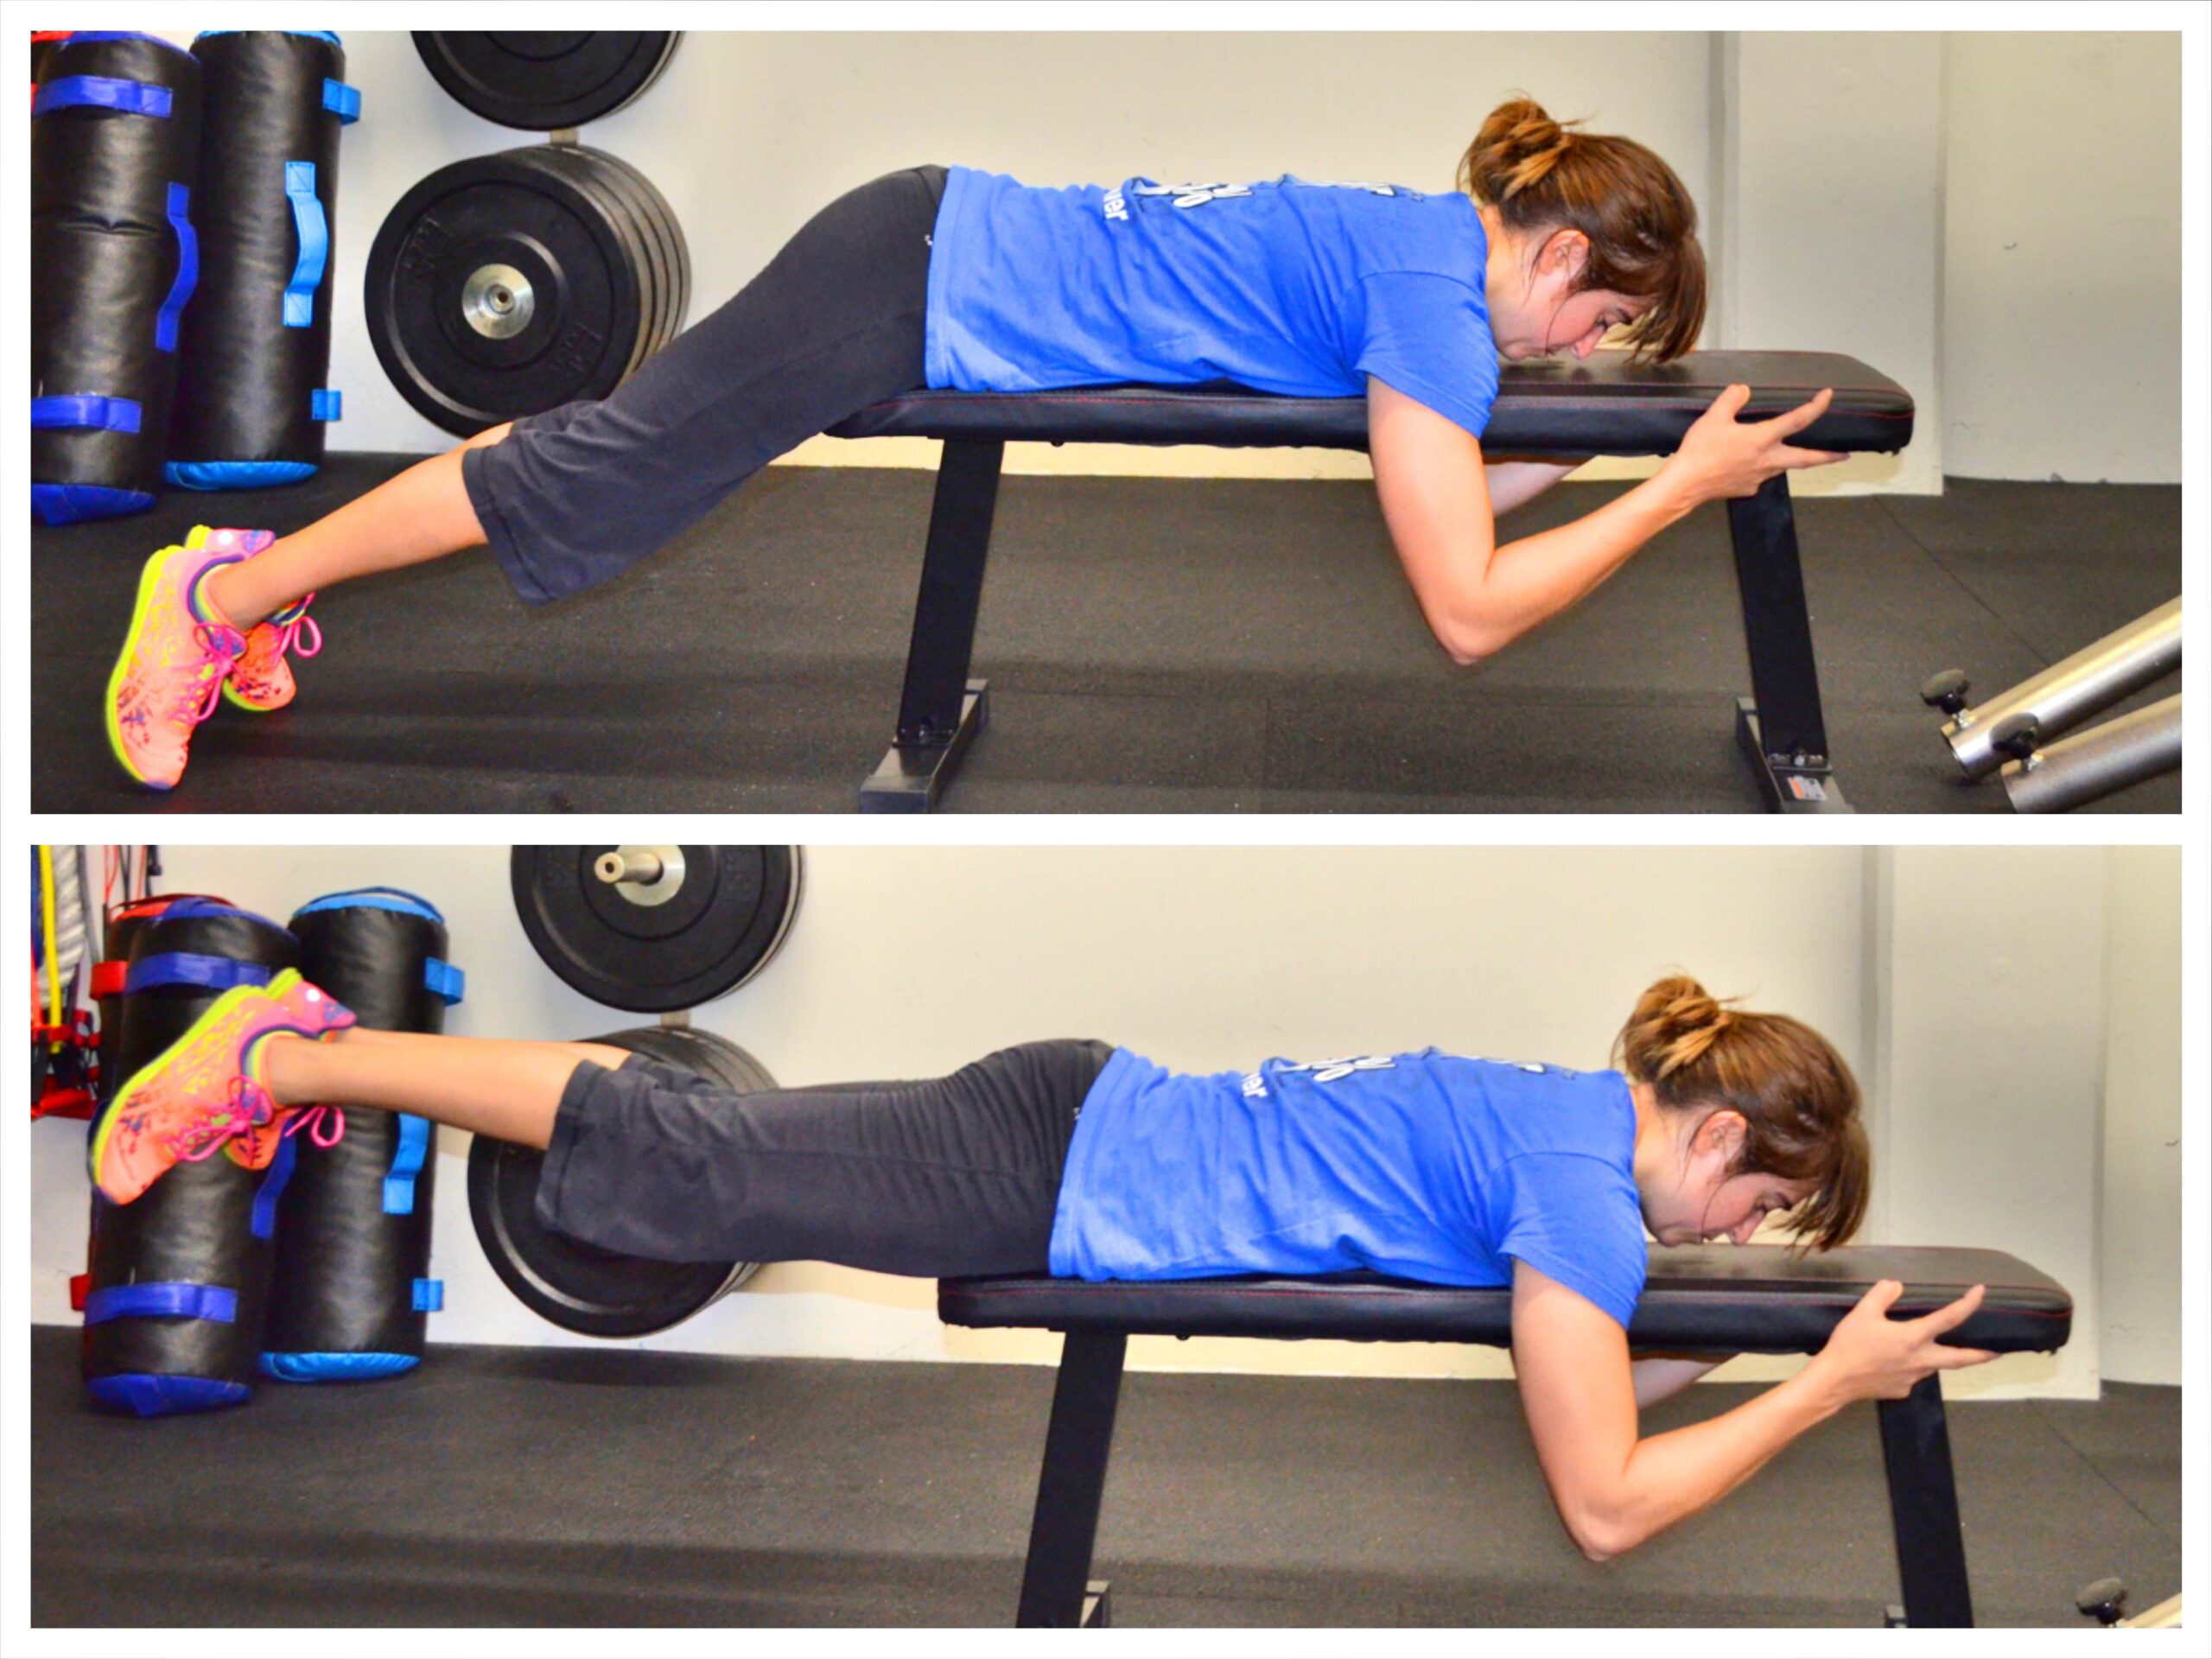
To do the basic Straight Leg Reverse Hyper, lie face down on a bench or box. Make sure your hips are right at the edge. Hold on to the bench or something in front of you. Keep your upper body relaxed.
Squeeze your legs together and point your toes out a bit if you are having trouble activating your glutes.
Then lift your legs to basically parallel to the ground, keeping your legs straight. Think about pushing your hip bones down into the bench as you lift. And focus on contracting the glutes to almost STOP your legs from going higher.
Do not hyperextend your back and lift way higher than parallel. You do not want to feel this in your lower back. Hold for 2-5 seconds and then lower down. Keep your core tight and really squeeze your glutes as you lift.
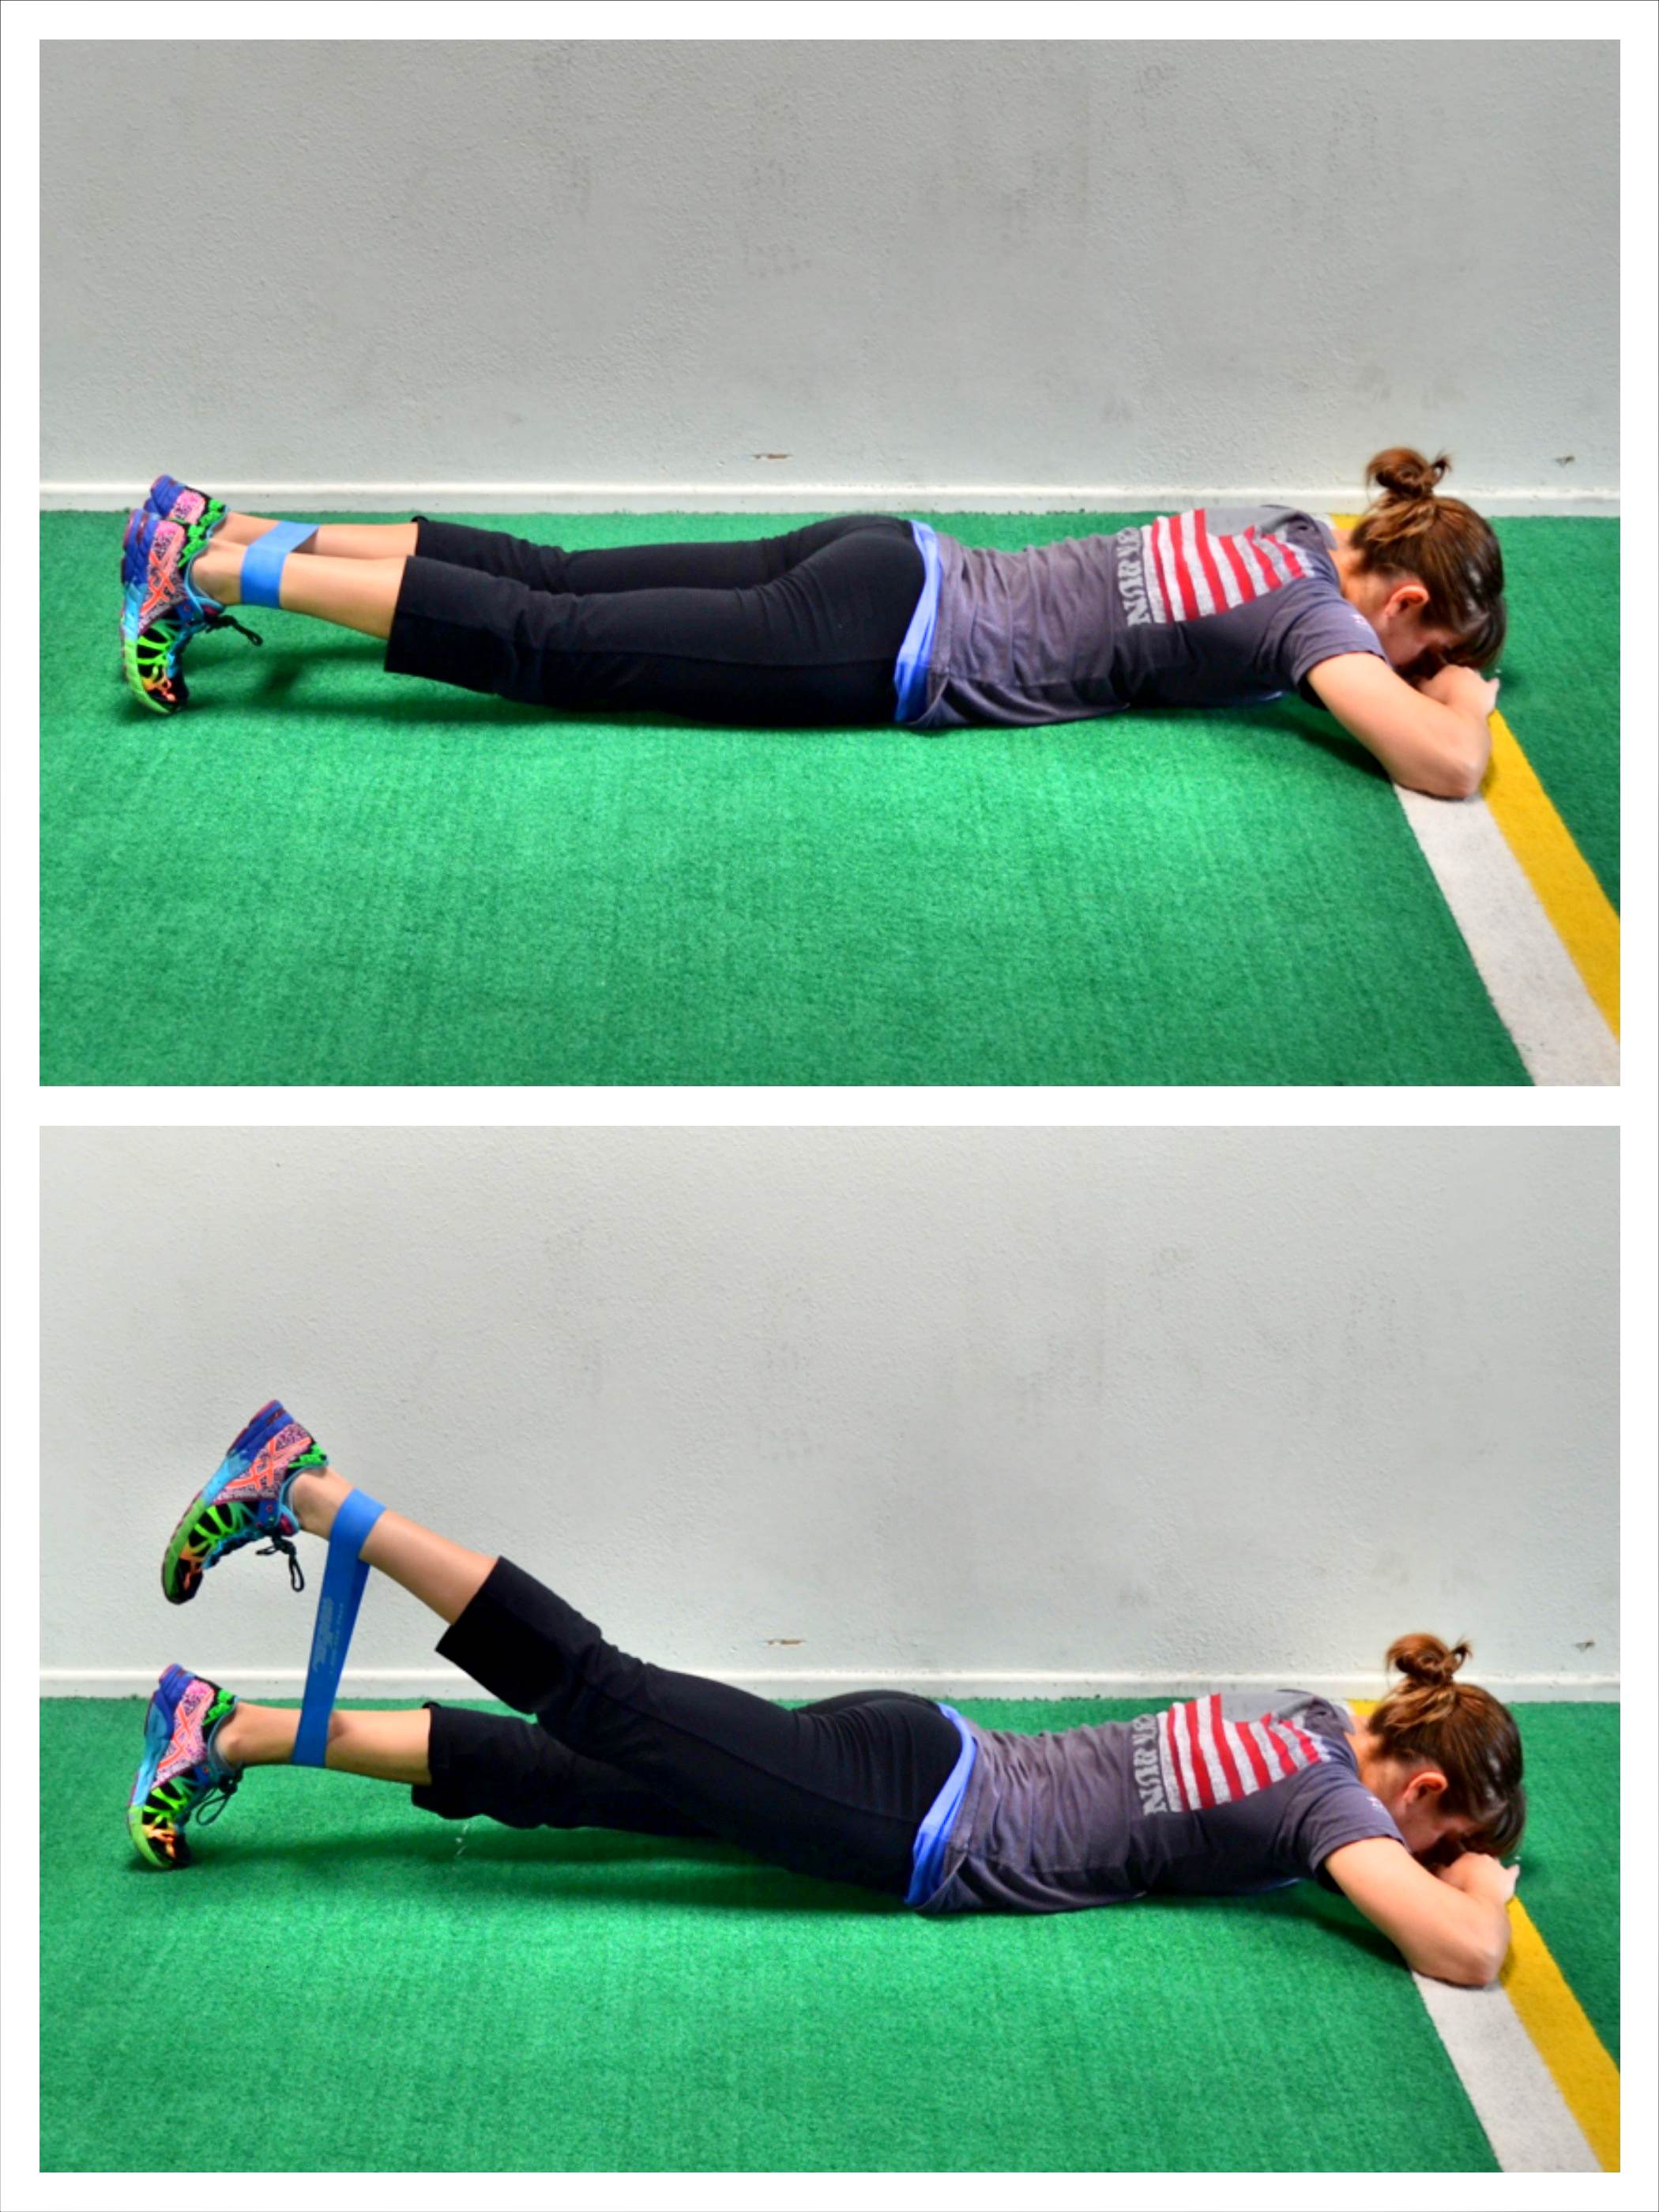
The reverse hyper can also be done from the ground, however, I prefer to do a single-leg reverse hyper (or lying kickback) from the ground instead.
Not only can this help you correct imbalances between both sides, but it can even allow you to add some resistance with the mini band.
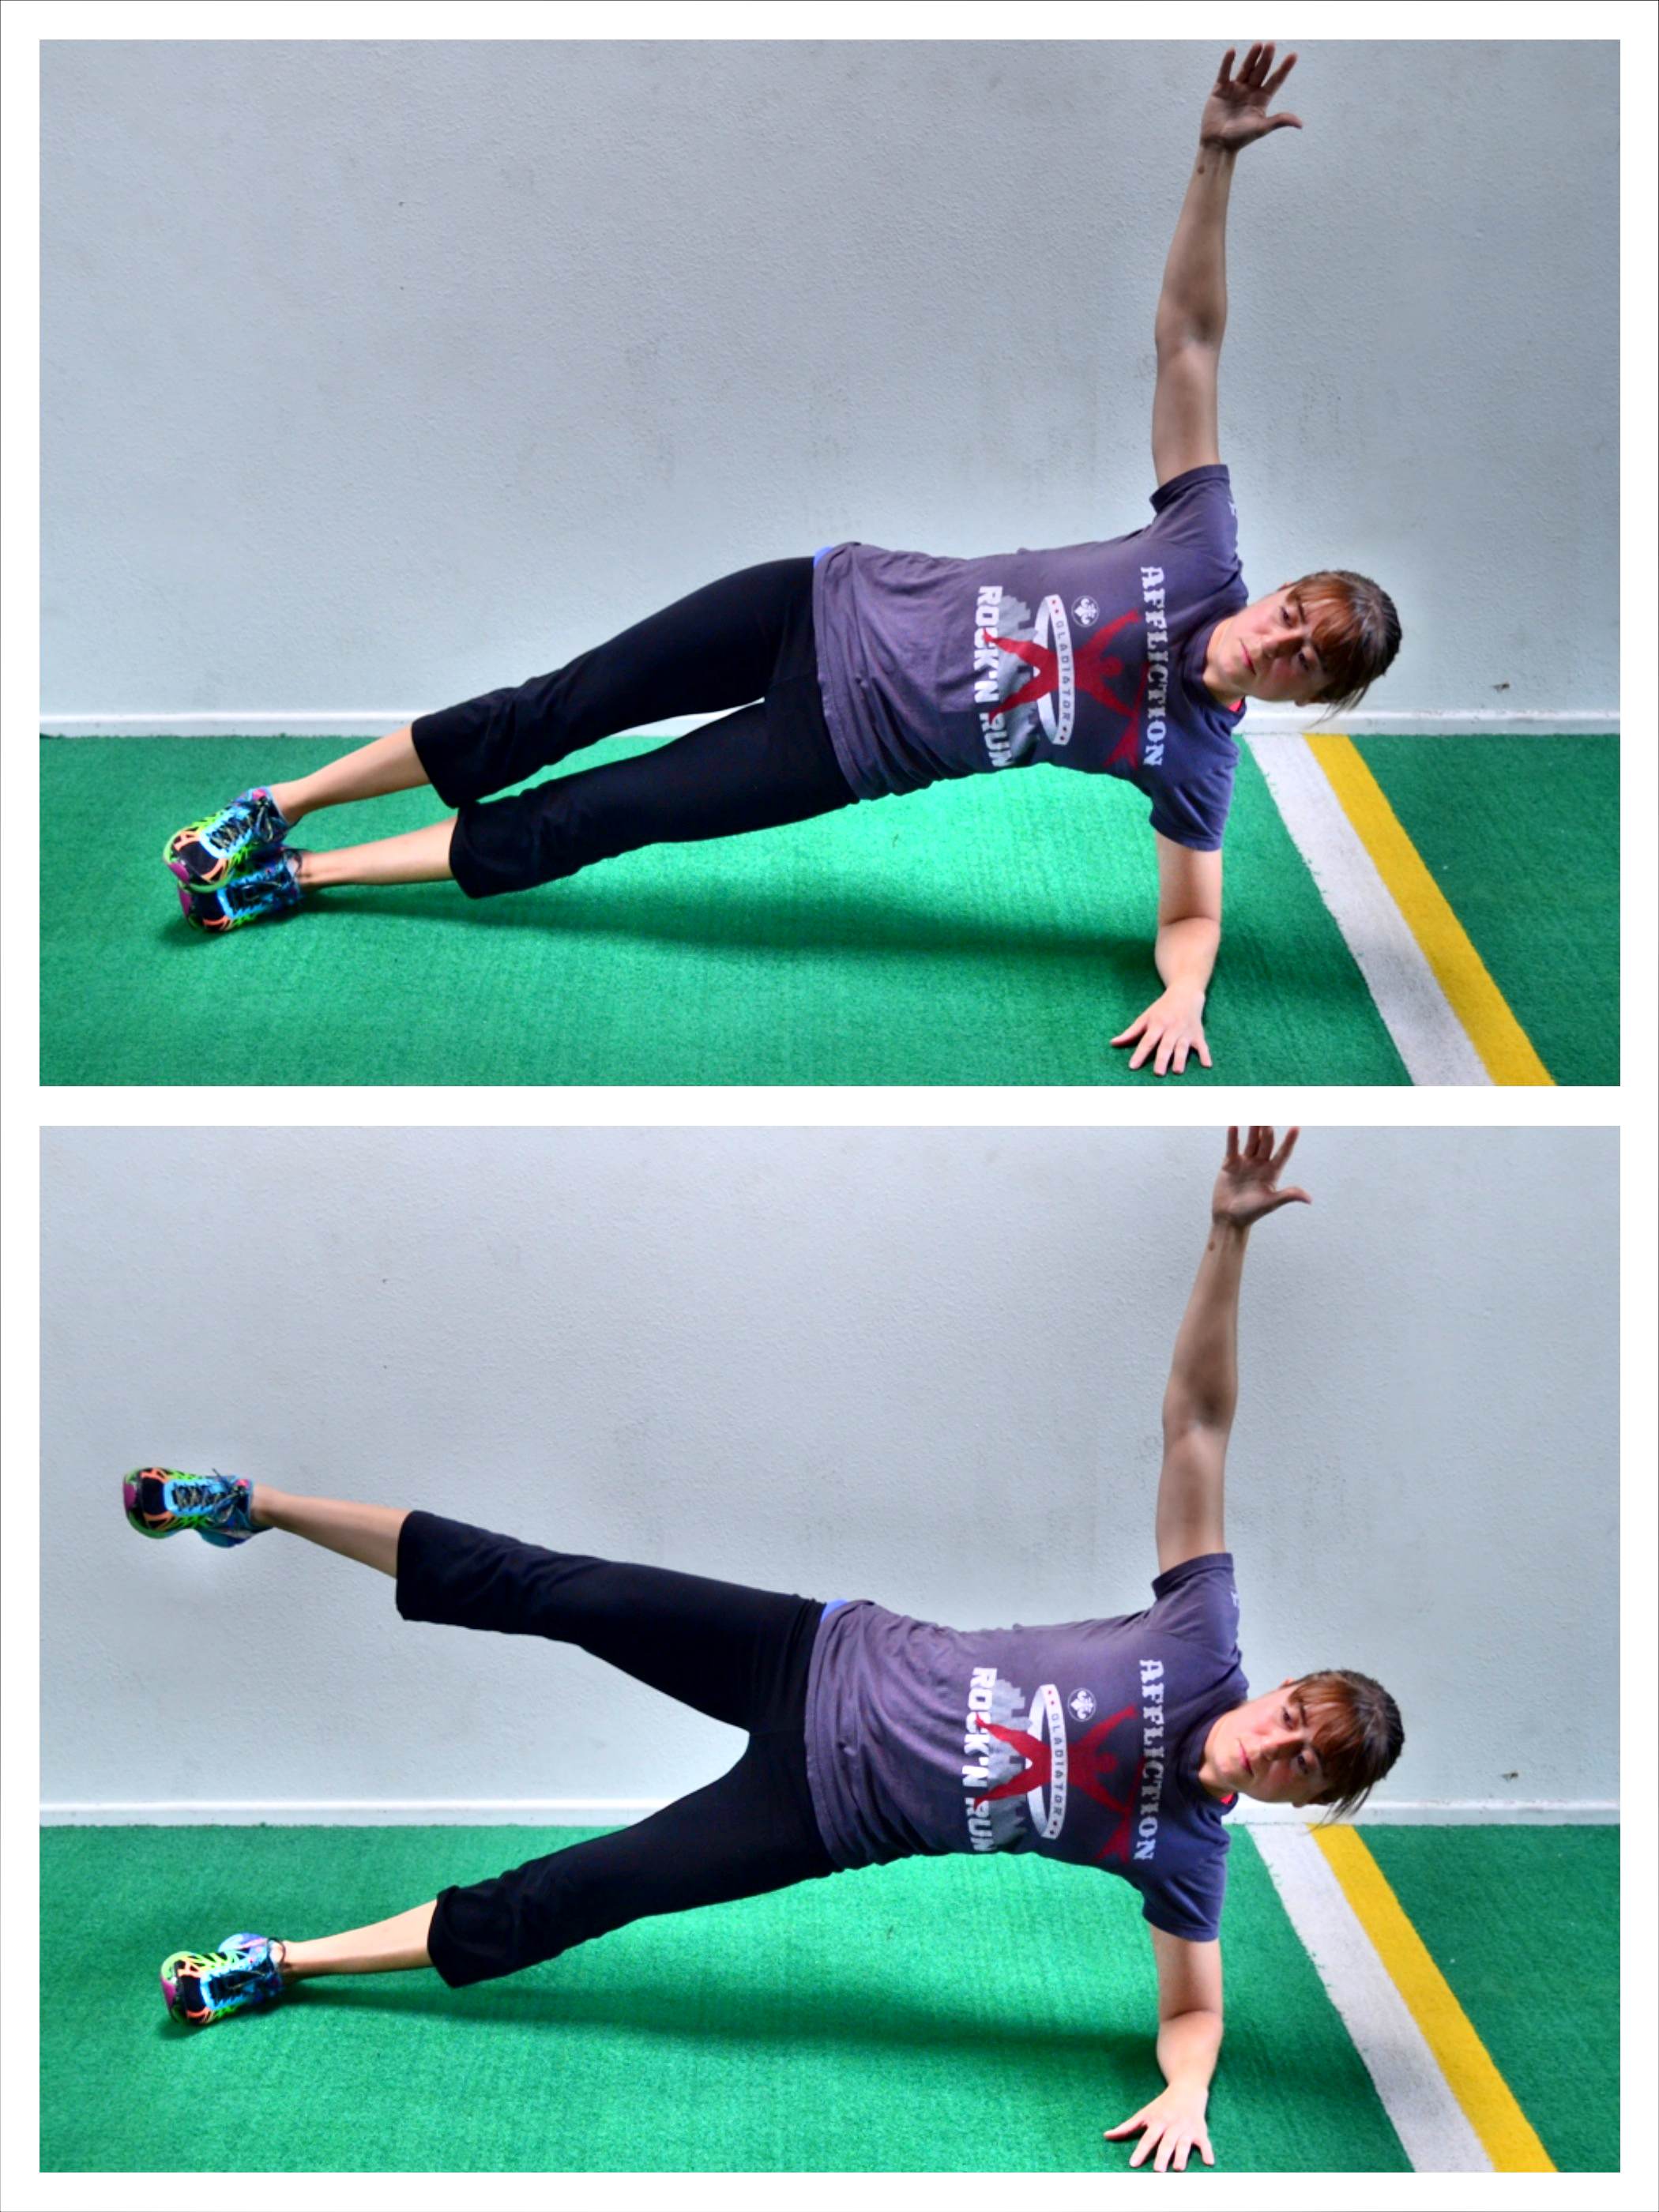
10. Side Plank with Leg Lift:
While we don’t often think of planks as glute activation exercises, they truly can be great glute moves with an added core focus!
One of the best planks for glute activation is the Side Plank with Leg Lift.
However, this is an advanced movement. Beginners can start with a Side Lying Lateral Raise or even a Side Plank Clam.
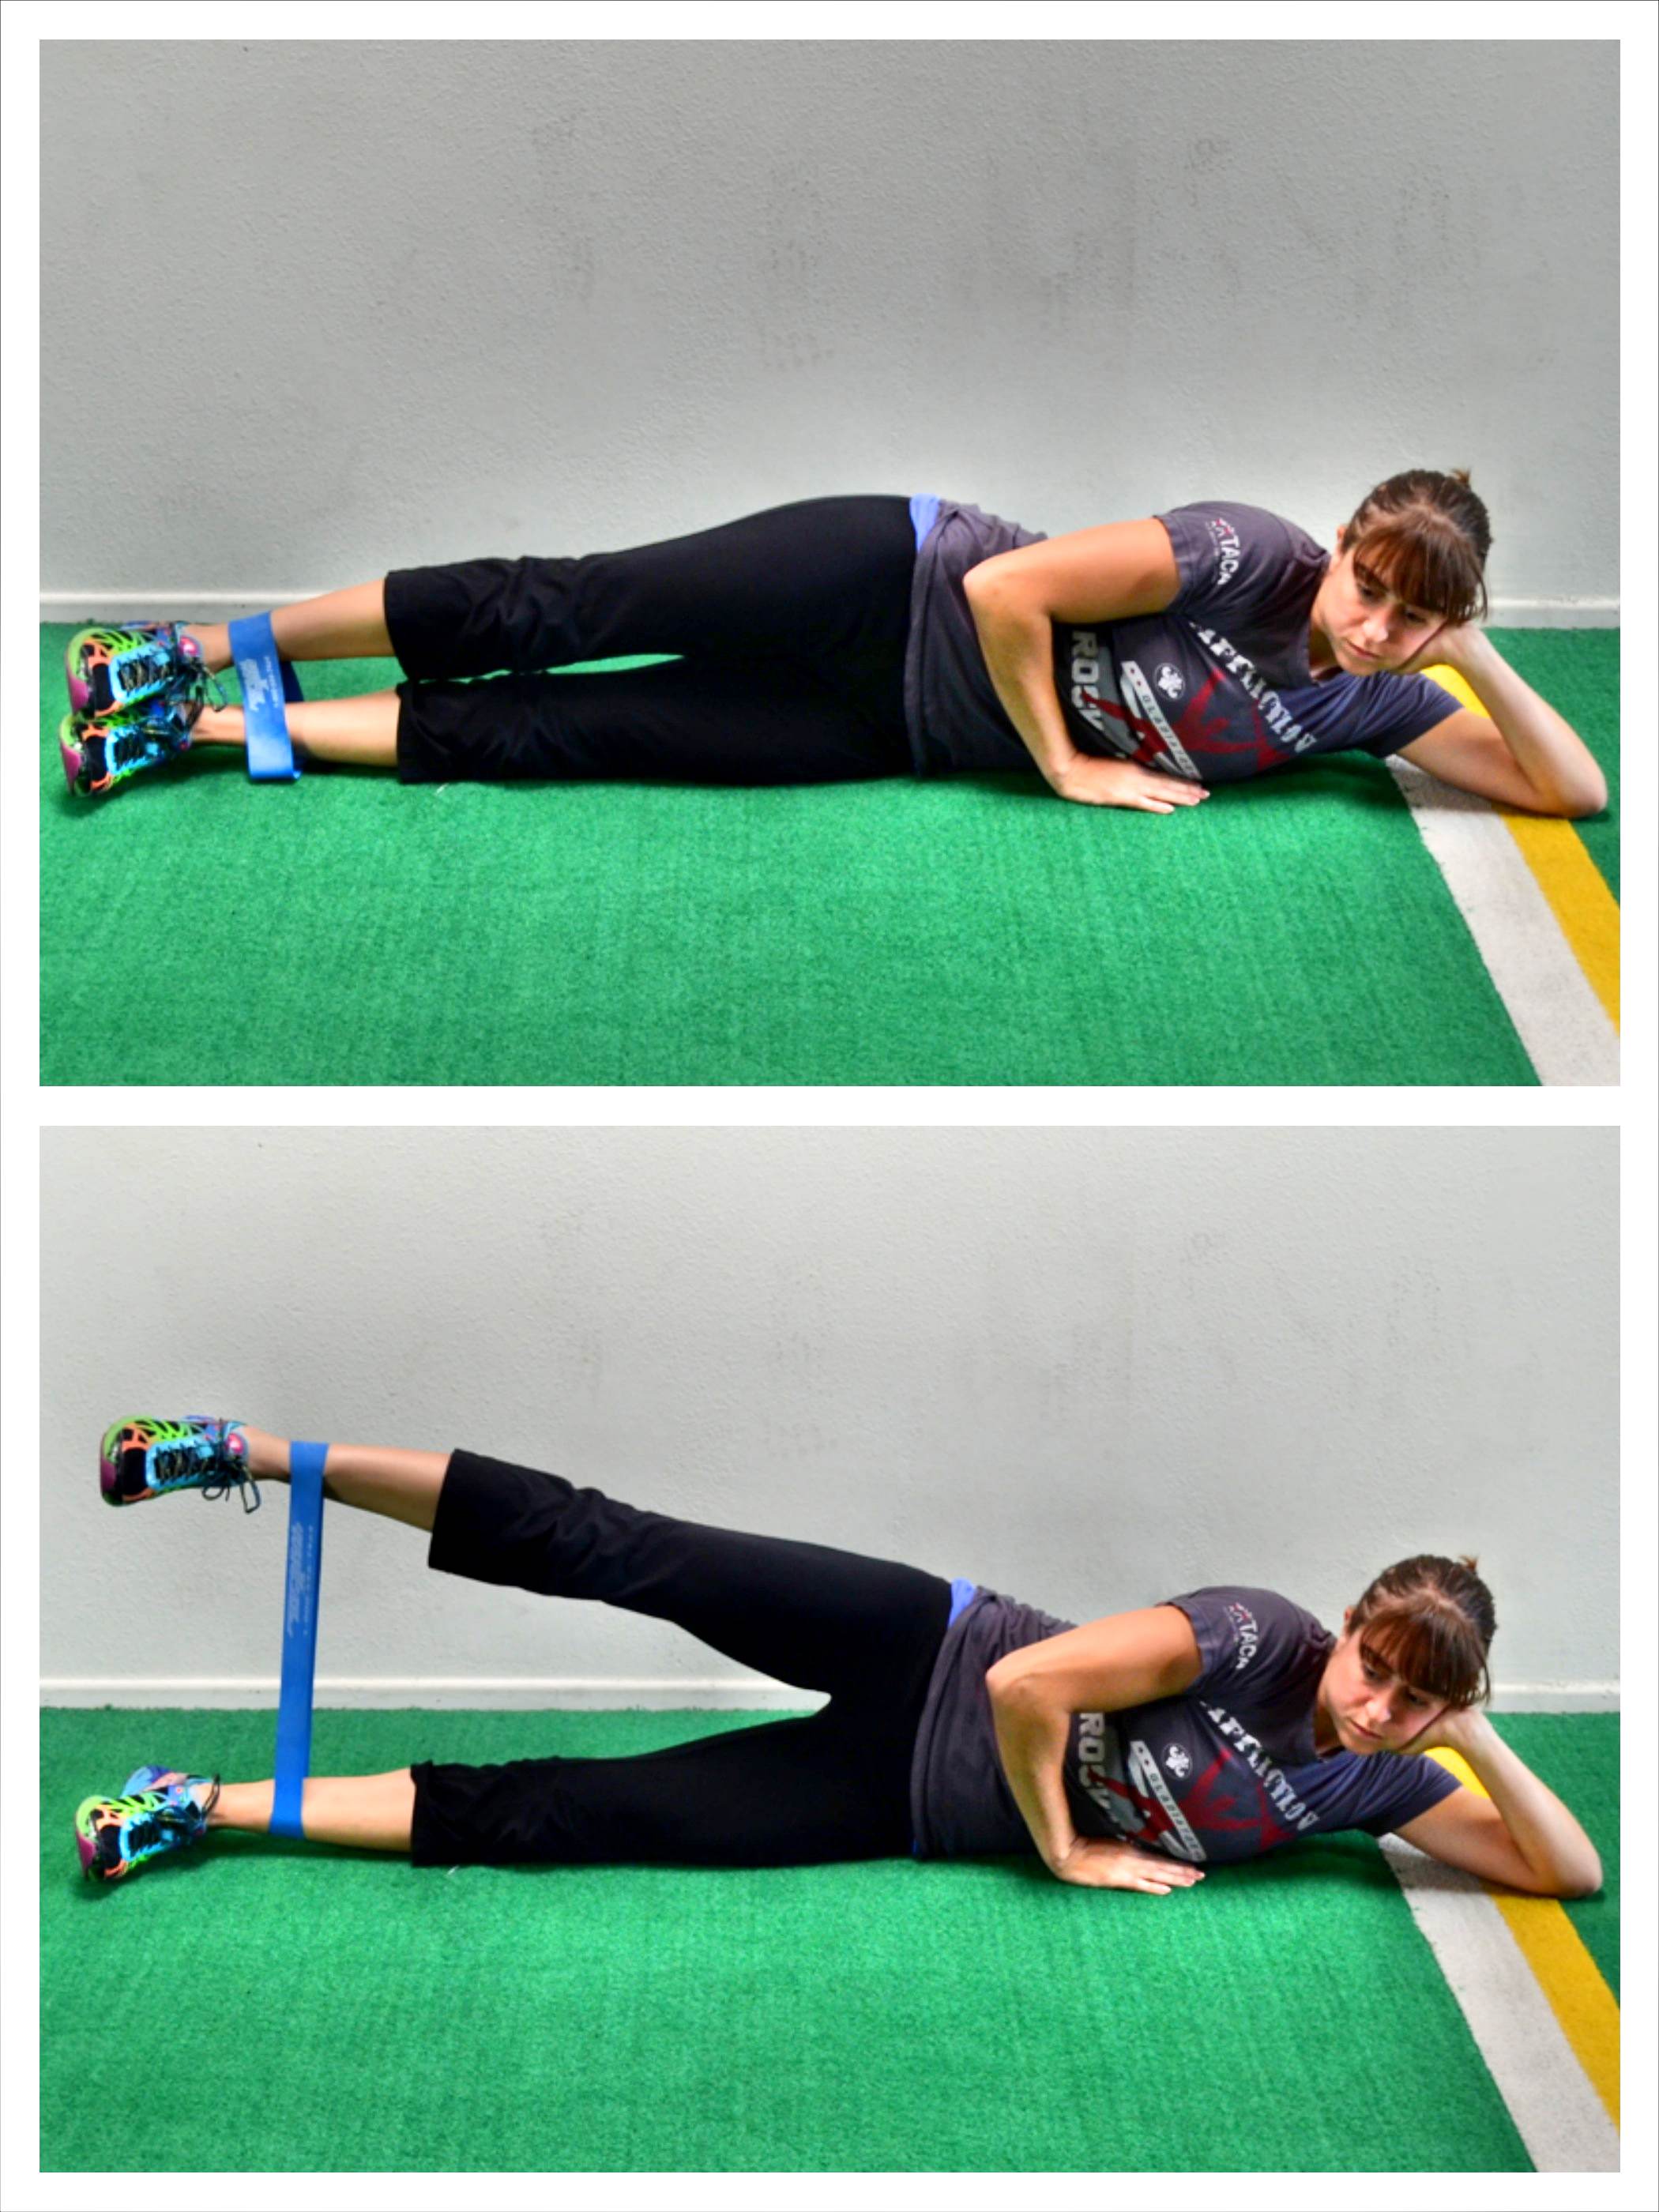
To do the Side Lying Lateral Raise or Side Lying Abductor Lift, place the band around your ankle, or higher up your leg to really focus on those glutes, and lie on your side on the ground. You can support your head in your hand while lying on your side and place the other hand in front of you on the ground or fully relax on your side.
Stack your feet on top of each other and then lift your top leg straight up as high as you can without letting your foot rotate open.
Keep the foot that you lift parallel to the one on the ground or even rotate the toe slightly down toward the ground if you struggle to feel your glute medius working. This rotation toward the ground is key if you have piriformis issues or tend to feel the front of your hip working with lateral raises.
Then once you lift up, lower back down, but keep tension on the band after that first rep so your glute has to work the entire time.
If you also struggle to feel your glutes working, kick slightly back as you raise.

To do the Side Plank with Leg Lift, set up on your side and prop yourself up on your forearm with your elbow right below your shoulder. Your legs should be out straight. You can either stack your feet or place your top foot on the ground in front of your bottom foot. Beginners may need to place their bottom knee down on the ground.
Then, driving through your forearm and the sides of your feet, lift your bottom hip up off the ground as high as possible while keeping your body in a nice straight line. Squeeze your belly button in toward your spine and keep your glutes tight. Do not let your chest rotate forward toward the ground or your top hand touch the ground. Keep your top hand on your hip or reach it up toward the ceiling.
Holding this Side Plank position, lift and lower your top leg up and down. Do not let your hips drop toward the ground as you lift the leg. Keep your legs straight and that perfect Plank position as you lift and lower that top leg. If this lift is too much, try it from your knee.
This move is great because not only do you work your BOTTOM glute to keep your hip up (as well as your oblique), but you also work your top glute to perform the leg raise!
You can progress the move further by adding a mini band in even!
Below are 3 booty burner workouts using some of these amazing glute activation moves:
NOTES: Do not use all of these moves with every single workout. Pick and choose just a couple to include with warm up and even during the workout based on your needs and goals!



Great stuff!!!!! I have a qquestion though. How do I squeeze my glute to do these exercises. Let’s say the donkey kick. Do I try to do the exercise in such a way that the glute squeezes or try to consciously squeeze the glute? Im having trouble with it, the squeeze feels like its not involved in the exercise organically.
Hi Rick! Sorry just saw this. So you want to think about the glute powering the movement so it does squeeze but like with all exercises, you also want to concentrate and consciously squeeze the muscle.
So especially at the top of the donkey kick, focus on contracting the muscle..Heck even do the poke test and feel the glute contract with your finger! Does that make sense?
Often we have trouble getting our glutes activated because of sitting at a desk all day and they need a little help. Plus concentrating and even holding the move at the top to make sure the glutes are activated can improve our mind-body connection!
If you have any other questions, let me know!
Cori
Theres something going on here. I dont think the type of squeeze that your talking about is the same type that im using. If you go do a bicep curl and flex your bicep as you do it, im not talking about the contraction that is part of the curl, im talking about adding a superfluous one on top of that. Very weird feeling. I know it has to contract its the way its contracting “squeezing” that is screwed up.
Sorry for the miscommunication. I’m not sure I fully understand what you are asking. When you do the glute bridge, or any activation exercise, I’ve found it is best to hold at the top of the movement to consciously think about the contraction and make sure your glutes are actually working. And because our glute are inactive and there is a chance other muscles may take over we often do have to focus on the muscle working unlike with a bicep curl. I guess you could also say there is an extra little contraction at the top and not just the contraction as you lift the leg to kick back in a donkey kick. Sorry hope I’m answering your question. If this wasn’t what you are asking, feel free to email me at [email protected] so we can clarify and I can hopefully help you out!
Aw i almost liked these:( But since i do them my thighs got bigger which i don’t understand because these exercises suppose to activate my glutes? These are the only exercises what i do (plus i run) so it’s obvious but i don’t understand why:(
Hi Meti. If you are doing these moves correctly, they don’t work your thighs at all. They are all glute and hamstring focused. So either you aren’t correctly engaging your glutes or your form is off. If you want to send me videos, I can review your form and help out.
Also, your nutrition may not be on point, which may be causing you to gain weight in your legs even with the running.
Hope that helps! Let me know if you want me to check your form.
Cori
Hi, where do you get the blue Eleanor card bands from?
Kelly
These are the Mini Bands 🙂 http://www.anrdoezrs.net/click-7872037-12155281-1430857535000?url=http%3A%2F%2Fwww.performbetter.com%2Fwebapp%2Fwcs%2Fstores%2Fservlet%2FProduct2_10151_10751_1003893_-1_1000327_1000281_1000281_ProductDisplayErrorView&cjsku=6545
Hi,
Do you have any tips for preventing hamstrings from taking over in these moves where you face upwards (bridge, modified posterior plank, thoracic bridge)? I have weak gluteus medius muscles and am trying to build them. The other exercises I do consistently yet I cannot seem to get the coordination or activation for these. I’ve tried flexing before starting and driving down through various parts of my foot just to see, but my hamstrings take over and I get cramping pretty fast on the hold (in the arch of my foot and hamstring). Any tips? Thanks, this is one of the best descriptors of these exercises out there.
Hi Donna. Thanks! So have you played around with how close to your glutes your feet are? Sometimes if your feet are too far away or even in too close, you can feel your hamstrings. Also, do you roll out your hamstrings BEFORE the bridging? And do you have a mini band? I find that the Mini Band Bridge is great for activation if you struggle with hamstrings taking over and the frog bridge is also good. I would stay away from Posterior Plank as that works the hamstrings as well.
Does that make sense? This article has some moves that may be helpful as well – https://redefiningstrength.com/glute-activation-15-glute-bridge-variations-and-2-activation-series/
Cori
I have scoliosis and I have trouble squeezing my left glute and I am pretty sure it’s because of the scoliosis and tenleft leg and arm are way weaker than my right …. I can squeeze the entire right glute and the left one I can barely squeeze it almost nothing to be honest ….and I am working on building my glutes but I don’t want to have one bigger than the other one …. any advise ???
I would recommend unilateral activation moves to isolate that side. Also, figure out what moves allow you to start activating and then do more reps on that side. So a unilateral workout may be something like this – https://redefiningstrength.com/unilateral-booty-burner-workout/
Great article! How many repetitions should i do and how many sets??
I would only pick a couple to use…But depends on your workout…This workout may help! https://redefiningstrength.com/unilateral-booty-burner-workout/
Ive literally tried everything but i dont feel the burn in my glutes. I want to grow my glutes without gaining weight in other areas. I do these glute activation exercises before i do my lunges and squats but i dont feel anything in my glutes at all. I only feel the burn in my back and thighs. My back has a natural arch to it and it doesnt keep straight even while doing a plank. Please help me
You need to stretch your hips then and roll out your hips and quads. You then need to learn the pelvic tilt and work on the basic glute bridge first. This may be helpful because right now you are doing the movements but not activating your glutes during anything. Part of that is also thinking about the muscles that should be working during the moves too – https://redefiningstrength.com/unlock-your-hips-and-activate-your-glutes/
Thank you so much for getting back to me 🙂 I will do these everyday. I have a few more questions for you.During squats and bridges u should always squeeze ur glutes eg in a bridge we should squeeze the glutes when we go up and hold it for a few seconds but i feel as if i cant squeeze my glutes when my legs are hip width apart i can squeeze them when im sitting or lying down but not during these exercises.How can i change that? Also Im a beginner at working out. My weight is around 45 kg and 23 years old and my height is around 5’6 so im not looking to lose weight i want to lose the tummy pooch and gain muscle in my glutes but when i do cardio lose a lot of weight so ive combined streenth training and weights with it . I dont want a massive Kim kardashian kind of butt, i just want some definition as i have these huge dents on my glutes idk why which makes them look flat. What do u suggest i should do? Also my knees are pretty weak i usually end up getting an injury when i do squats n all. Sorry for asking so many questions but this is the first time someone has actually taken out time to answer my workout dilemmas
I was just browsing through the comments and i have similar issues like nora. Jeez i thought i was the only one lol. Pleaseeeee guide us so we can get maximum results
It’s about building a mind-body connection. You need to think about the muscles working during the moves. I’m not sure which moves you struggle with. You say you don’t feel your glutes contract at the top of a bridge? If you want to build your butt and prevent knee pain and get rid of the dents, you need to work all three gluteal muscles and open up your hips. These will help build a base so you can lift heavy and get lean. Although you can’t out exercise a bad diet. You should consider my 28 day glute activation program – https://goo.gl/DJWXTT This goes into how to use these and more moves and can be used even as a workout to prevent injury and help you get more out of your training. If you need help with diet to lose fat around your tummy, check out my Macro Shred in the menu bar 🙂
If you want a program to guide you, you should join my Booty Burner. My clients doing it love it. It gets the glutes working to prevent injury and help you get more out of your workouts. It helps open your tight hips and even builds core stability – https://goo.gl/DJWXTT
When doing the donkey kicks I suddenly feel a click deep in my hip/pelvis and then after this click it gives me a higher range of movement out to the side. Do you know what this could be? It’s usually after doing the first 5-10.
Sorry, it’s not doing donkey kicks. It’s doing the fire hydrants
I would try rolling beforehand to restore proper mobility. Sounds like you have a muscle that is tight and when you start to warm up it loosens so your hip is “tracking” correctly or allowed full mobility 🙂
How often and how long to do these before noticing the changes in activation and glute strength? With dead glutes i am very inpatient to see changes….what else should I do to be able to actually squat?
I would be using these before every workout. And really it just depends on what else you’re doing to complement, or hurt, your progress. Are you foam rolling? Stretching? You can start squatting, just change up the variations you use to complement your work. And even consider other glute focused lifts. But you should start to feel them engaging that first workout. And then over even a week, you should be able to tell they are engaging more quickly because you’re improving that mind-body connection. But it is key you don’t just go through the motions, but focus on what you FEEL working.
This is the best question and answer thread!!! Thanks Cori!
Glad it helps!
I love the variety of exercises you’ve included! I’ve been trying to improve my glute activation, and your tips are super helpful. Can’t wait to incorporate these into my routine! Thanks for sharing!
So glad they help!