How To Modify Your Workouts And Exercises To Fit Your Fitness Level
That is why it is important to understand how to modify exercises and workouts to fit our needs.
Heck even if you’ve been exercising for awhile, you may find at points you need to modify due to injury or even simply because you took some time off.
For that reason, I want to go over some basic tips to help you modify moves and workouts as well as a few modified variations of moves you may often see in workouts!
First, 3 Tips To Help You Get Into A Workout Routine (or BACK into one) and then 5 Basic Moves And How To Modify Them For Your Needs!
(Please note, this is a very long article. If you want regressions to 5 Basic Moves click the linked text above. If you want the tips, just scroll down)
3 Tips To Help You Get Into A Workout Routine (or BACK into one!)
Tip #1: Less is more – Start slowly
Often when we begin a new workout program, we are extra super motivated. But we are also extra super deconditioned. Whether we’ve been out with an injury or…well…life has just gotten in the way, we often come back to a workout routine nowhere near where we’d like to be.
And sometimes we even have expectations of where we should be that cause us to push way too hard, way too fast and do way too much!
When you go from zero to 60 right away (aka you get super excited and go all out even trying to be right back where you feel like you should be), you not only risk injury, but chances are, you’ll also make yourself so sore you can’t workout consistently, which may make it hard for you to get in a routine.
Because part of getting started is not only taking it slow to avoid injury but also about getting in a routine. It’s hard to get in a routine if the first days you just destroy yourself.
Start slowly.
I even like to tell my clients coming back…Start as if you sort of aim not to be sore for the first week. Trust me…Most of the time, you’ll still get super sore, BUT it will be more tolerable if you pushed as hard as humanly possible.
Less is more. It allows you to keep going. To rebuild SMARTLY AND to set yourself up with goals that keep you on track.
Getting so sore you can’t move, can make it hard to go back into the gym the next day if you set your goal to go to the gym 5 times a week for an hour each time.
Also, trying to go from never working out, or working out in a very limited way, to doing as much as you’d ideally want to do, isn’t an easy transition.
Sometimes you have to find a happy middle ground. Say ideally you’d want 5 times a week for 1 hour a day. What about starting with 3 times a week, 30 minutes a day?
Seems way easier mentally, right?
It’s a much smaller commitment to start, making it an EASIER commitment to start.
And when something is more easily attainable, we stick with it and even EXCEED our own expectations. And not only hitting our goal, but sometimes exceeding it, can create the momentum we need to not only continue, but fully commit.
Reaching a goal is motivational. On the flip side, giving ourselves too much and expecting too much to start (even if we “should” be able to do it, especially eventually) can actually prevent us from developing a routine.
You want to almost underwhelm vs. overwhelm yourself and your body to start so you can develop a routine.
LESS IS MORE.
Start slow so you can rebuild your body stronger. Start slow so you can get in a routine. Start slow so you can get consistent and see results.
Less is more means starting with a schedule you know without doubt you can commit to and workouts that are shorter and lower in intensity.
Less is more in a way summarizes even Tip #2 and #3 below!
Tip #2: Regress to Progress
As I mentioned already, often we come in with expectations of where we should be and what moves we should be able to do. But jumping right back into those variations can lead to injury. And often if we are just beginning, we can’t properly perform moves, which can lead to us becoming discouraged or even injured.
So we need to remember to REGRESS TO PROGRESS to start.
Just because you can lift a weight or do a move DOESN’T mean you are A. doing it well or B. using the right muscles.
That is why it is key to sometimes make a move even easier to start to make sure you are doing it correctly, ESPECIALLY as you fatigue. And rebuilding slowly with regressed moves and weights allows not only our muscles to adapt, but also our connective tissues, which can easily get overloaded if not prepped correctly AND take way longer to heal!
Plus, whether you’ve never worked out before OR have been out with injury, especially injury, your mind-body connection probably isn’t as good as you would hope it was.
What does that mean?
It means that because of poor movement patterns, either due to sitting too much and a lack of activity OR even injury, we don’t necessarily recruit the right muscles to perform the exercises.
Our bodies take the path of least resistance, meaning we recruit the muscles we have the best mind-body connection with instead of necessarily the big muscles that SHOULD be handling the load.
So when you jump into working out, even if you can perform an advanced variation, you are probably more focused on “getting the move done” than on the right muscles working. Because of this, you could end up with an injury (or maybe even another injury seemingly unrelated to your previous one).
So you need to regress so you can focus on the right muscles working and slowly progress to keep the right things working. If you just go through the motions of a harder move, you WON’T get more out of your workouts. You’ll only really perpetuate imbalances and compensations, which can lead to injury.
DON’T JUST GO THROUGH THE MOTIONS! Work out SMARTER.
Regress to progress so you can establish a mind-body connection that allows you to use the right muscles for the movements. You’ll end up stronger!
Tip #3: Build the FOUNDATION
This really overlaps with regressing to progress in that you need to restore a proper mind-body connection and regress moves as necessary to get the right muscles working.
However, it isn’t just about regressing moves, but also about using activation, foam rolling and stretching exercises to make sure that you are mobile and strong through that full range of motion.
Compound moves are KEY to building full-body, functional strength. We don’t really live every day life doing isolation exercises. That is why it is key to regress compound moves so we can do them correctly.
HOWEVER, the more muscles working and the more joints involved in a movement, the harder it can be to focus on the muscles working instead of just doing the movement.
That is why isolation moves used as ACTIVATION are key to make sure the right muscles are working and rebuild that mind-body connection and reverse the imbalances and compensations we’ve created.
Movements that isolate and activate the glutes, abs and back are super key as we spend way too much time in forward flexion. AND activating these three muscle groups means we’ll open up tight hips, prevent our low backs from overworking and mobilize our shoulder blades, which will go a long way in PREVENTING most injuries from occurring.
Rebuilding your foundation happens by including Foam Rolling, Stretching and Activation BEFORE your workout to get your body working correctly. Loosen tight muscles, mobilize your joints then get the right muscles working through the full range of motion.
Then add weight and intensity to get your blood pumping and build strength!
But if your foundation is weak, if you can’t engage the right muscles and if your mind-body connection isn’t there, you’re not going to reach your goals near as quickly OR you may even end up injured and worse off than where you started.
For more activation exercises, foam rolling moves and stretches to help you rebuild your foundation:
Want guidance and coaching to help you dial in your workouts AND your diet to match your needs and goals? Schedule a call with Redefining Strength to chat about program options!
5 Basic Moves And How To Modify Them For Your Needs
Almost every move out there can be modified to fit your fitness level. Yes…Sometimes a move isn’t “right” for you, but often simple swaps can make you able to still get benefit from a movement!
Below I want to review 5 moves you see in many programs and how you can modify, and even progress them, to fit your needs.
Burpee:
The Burpee – It’s a horribly wonderful move that truly is a full-body workout in one movement. It is also a ridiculous hard movement. It requires not only strength, but a good aerobic base AND even more mobility than we realize to get down and up.
Often to modify the burpee, we simply take out the push up.
Maybe we go one step further even and step back instead of jumping back into the high plank position.
But guess what?
Sometimes that isn’t enough.
What if you CAN’T get all the way down to the ground?
How about putting a box or bench in front of you and instead of putting your hands on the ground to move into plank, you put your hands on the bench?
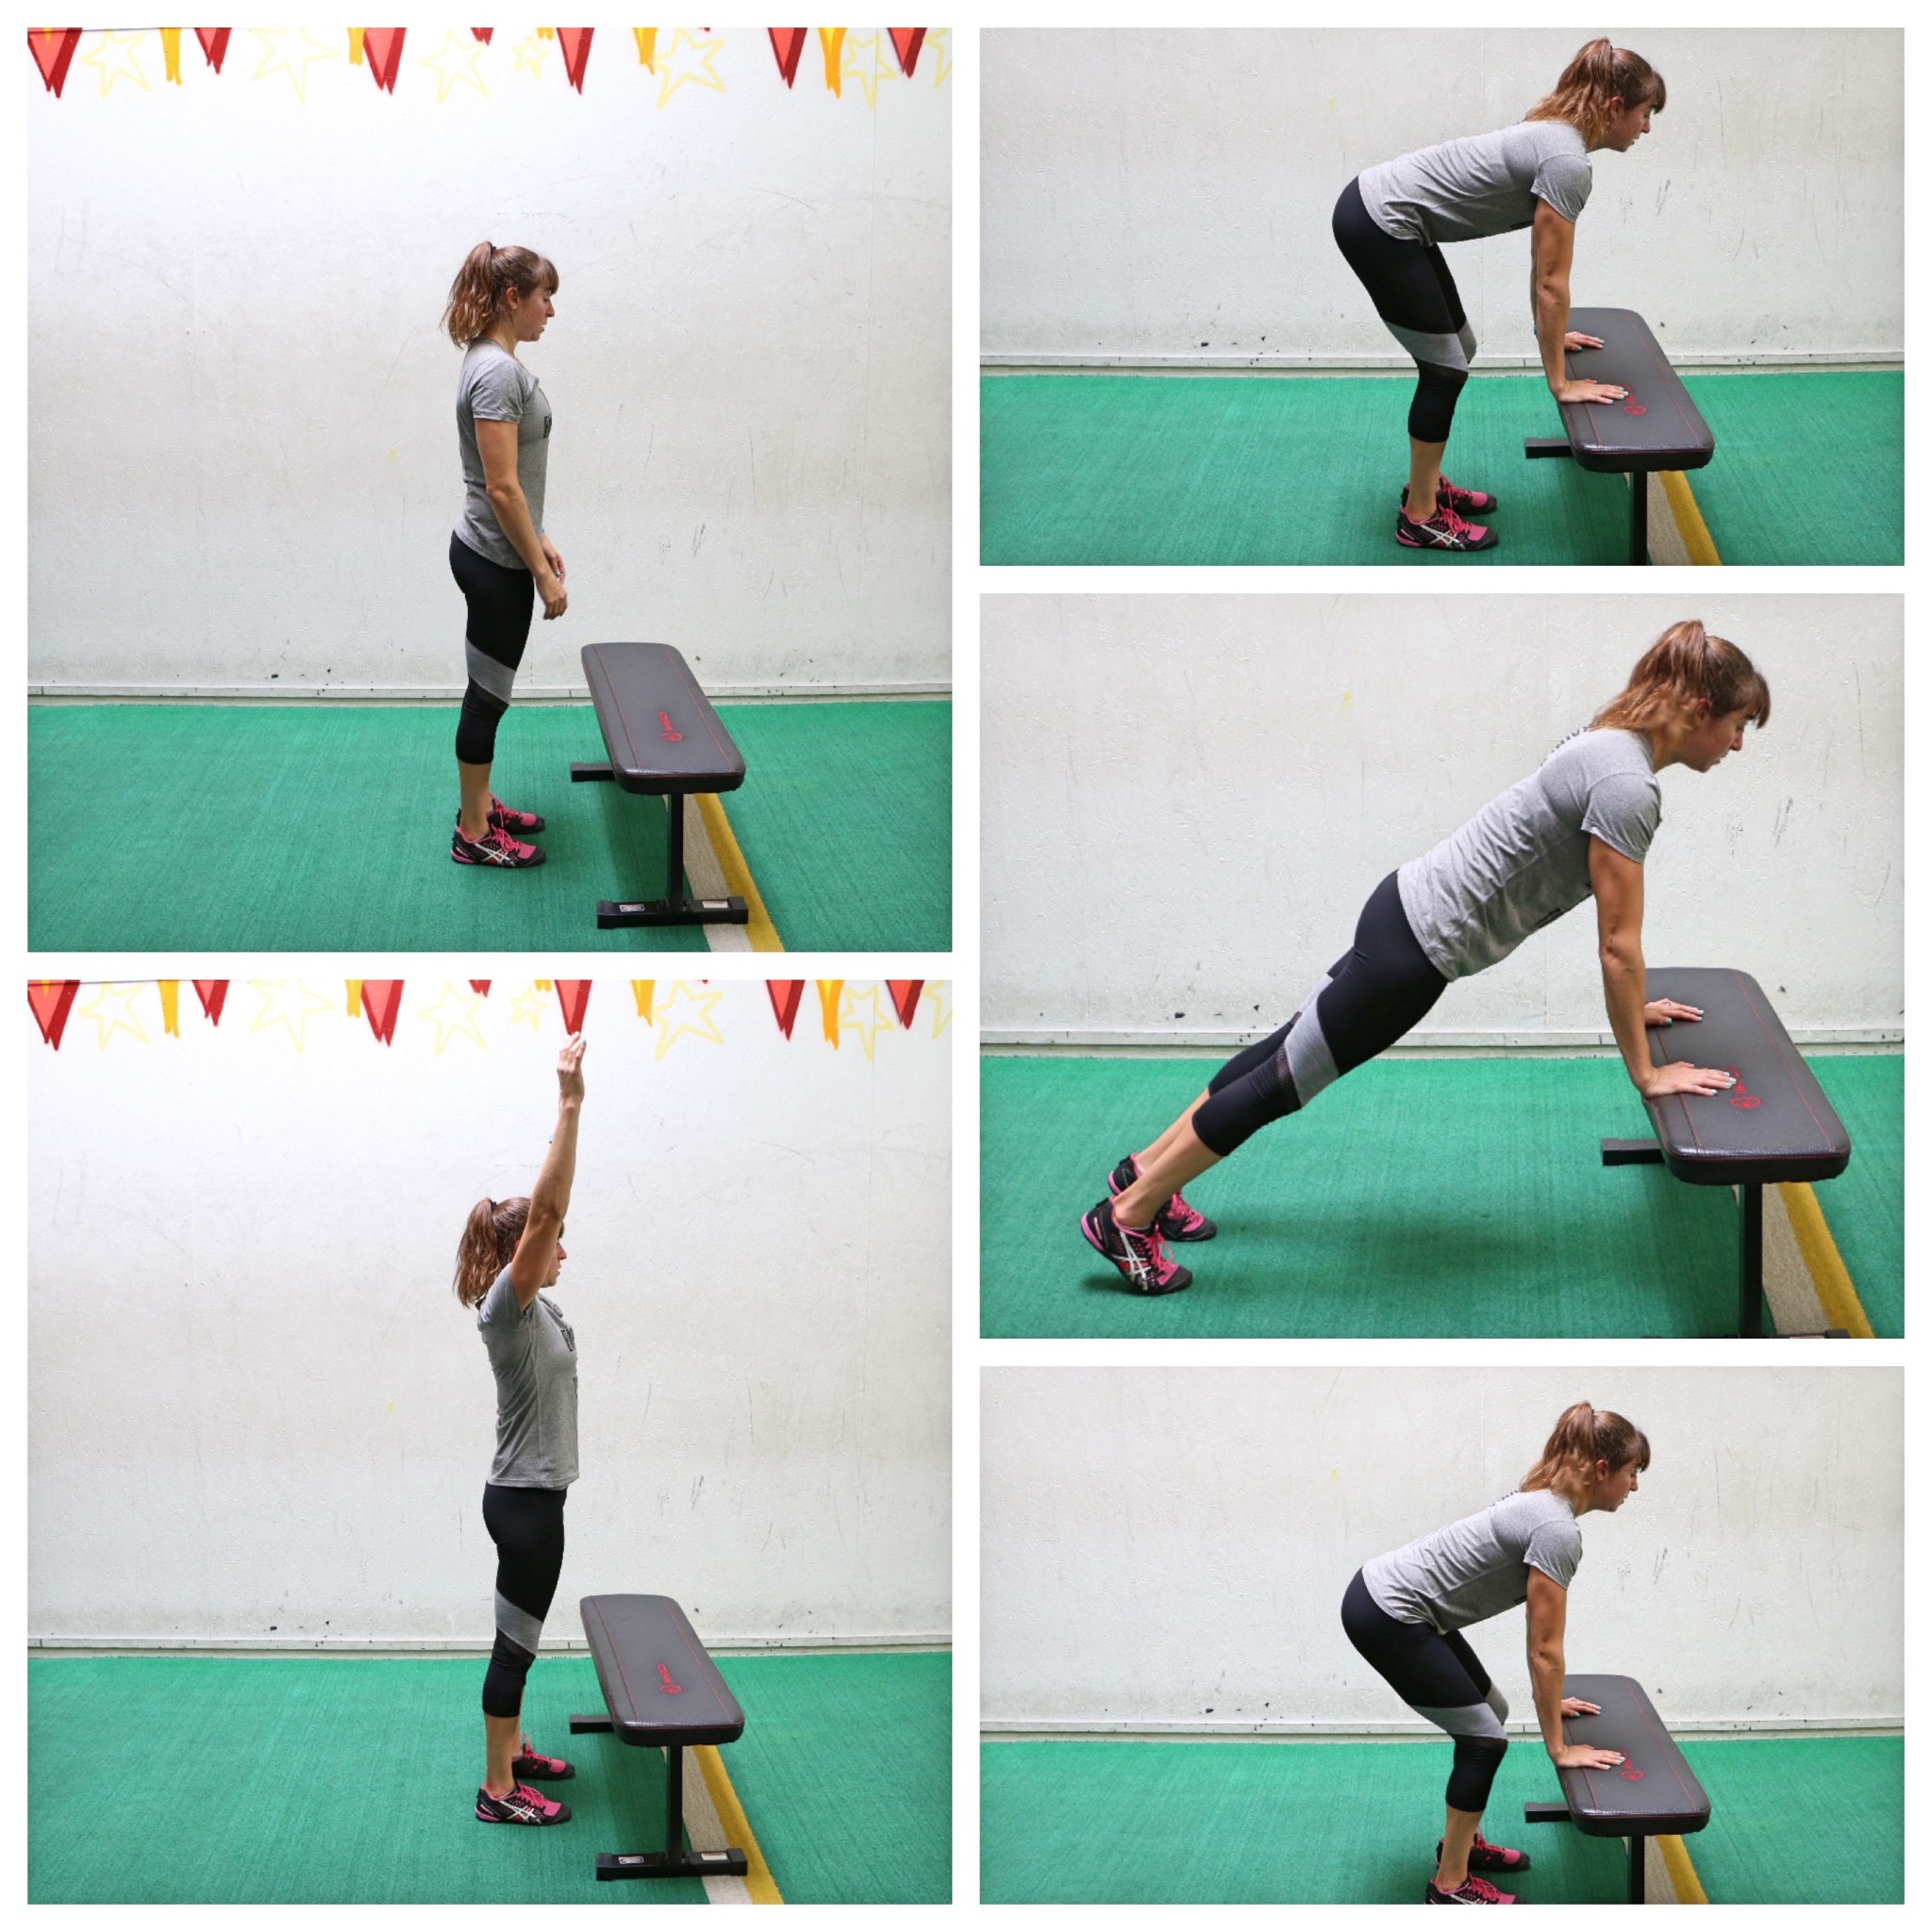
Sounds more doable, right?
There is always a way to regress a movement to fit your needs. And as you get stronger and more mobile, you can slowly lower the incline until you can get your hands all the way down to the ground.
Then you can start by stepping back as you move to the ground. And then start jumping back instead of stepping back into plank on the ground.
Then maybe you add in a push up from your knees.
And then finally? Well finally maybe you’re doing the full burpee and even some fun variations!
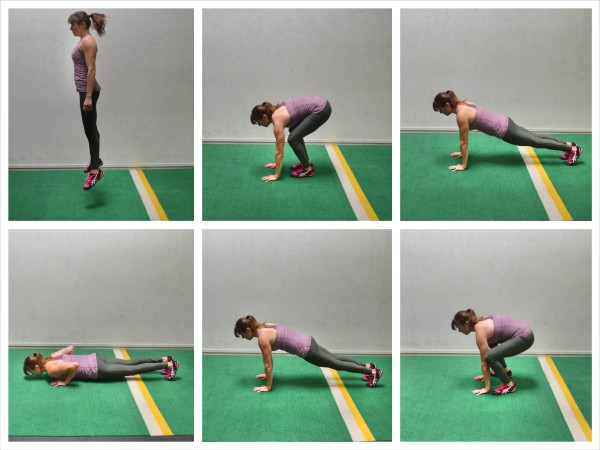
Another “modification” I use for the burpee at points is the Spiderman Mountain Climber OR even Half Burpee. I like both of these moves because they take out the down-up part of the burpee while still being more cardio. And both can work on the mobility that is really required to get down and up from the plank position in the burpee.
For the Spiderman Mountain Climber, you can advance and regress as necessary too. The variation I usually use to modify the burpee is the Modified Spiderman Mountain Climber.
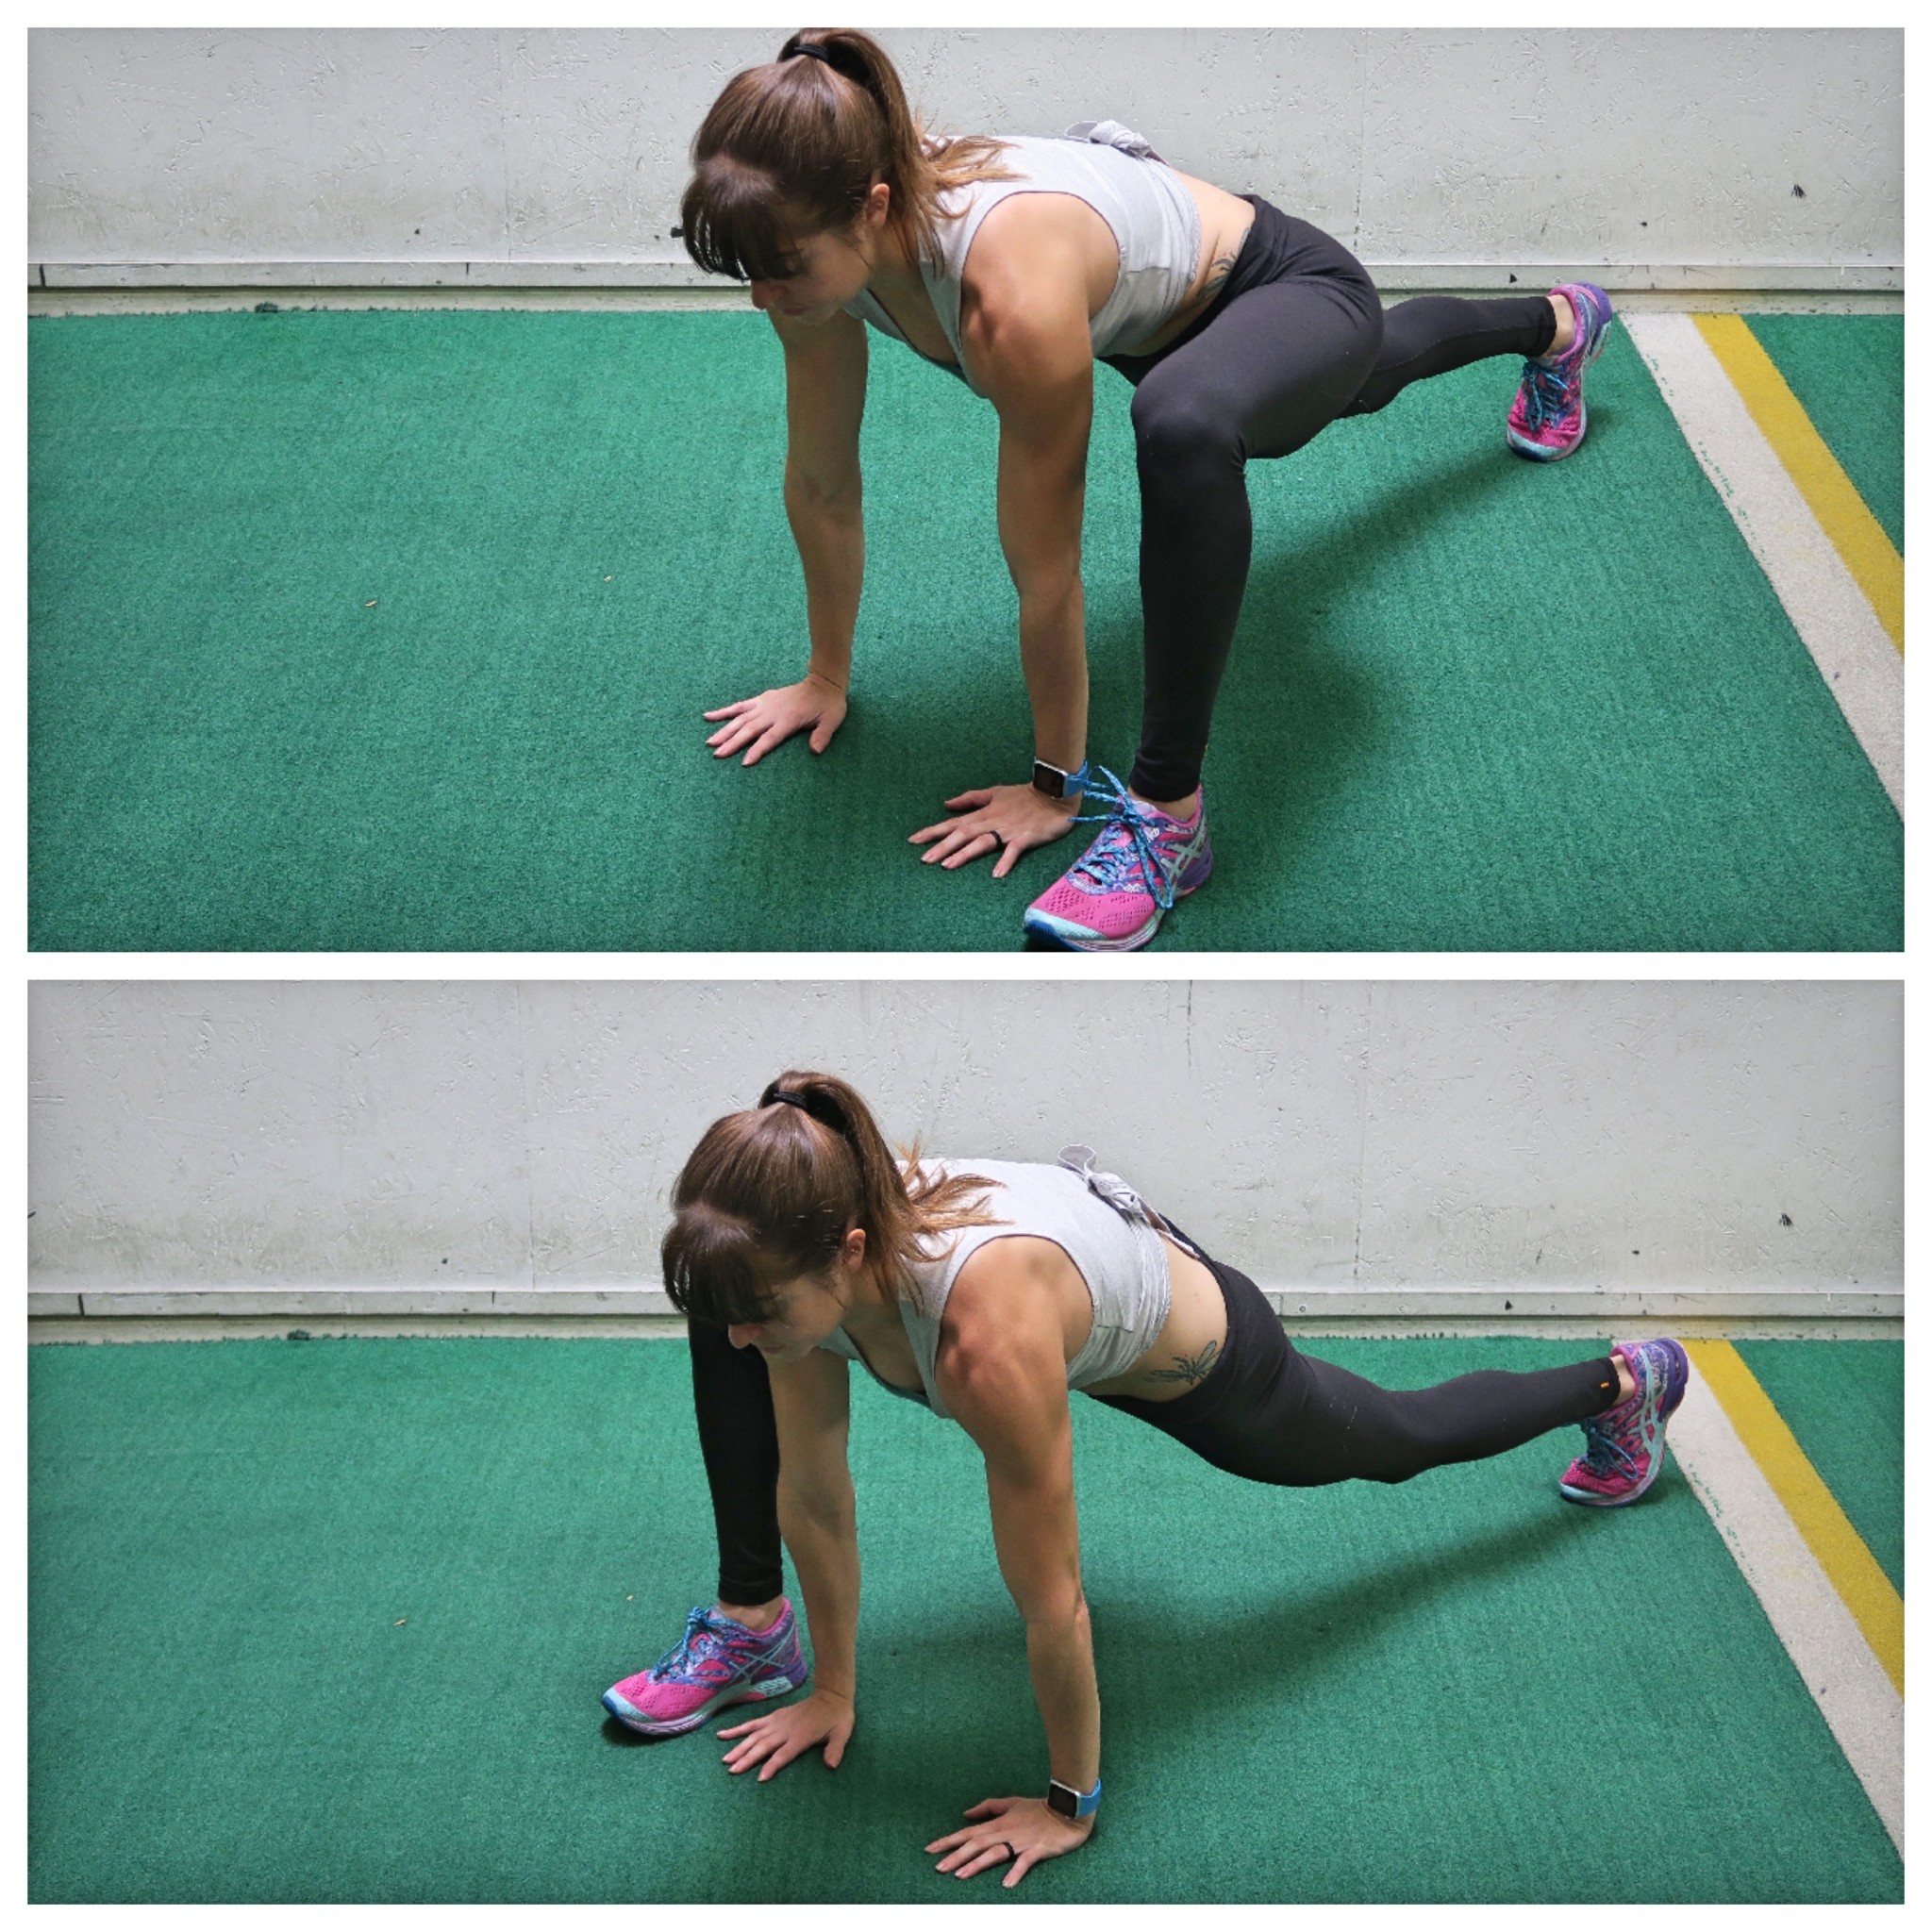
To do the Spiderman Mountain Climber, start in the high plank position from your hands and feet.
Keeping your core engaged, step one foot up and outside your hand into a nice low spiderman or runner’s lunge. Try not to let your butt go way up in the air as you step your foot outside. You also want to work to get your foot up as close outside your hands as possible. This will help improve your mobility. If you can’t step all the way up, you can readjust to get it as close as possible.
Beginners will then quickly step back into plank and then step the other foot forward into a lunge on the other side. They will move as quickly as possible, stepping their foot all the way outside their hand or as close as possible, working to get a little further each time.
More advanced exercisers will jump from lunge to lunge. The faster you jump between lunges and the less you pause on each side, the harder the move will be. Still try to keep your butt down and make sure to land in a lunge with your foot outside your hand each time.
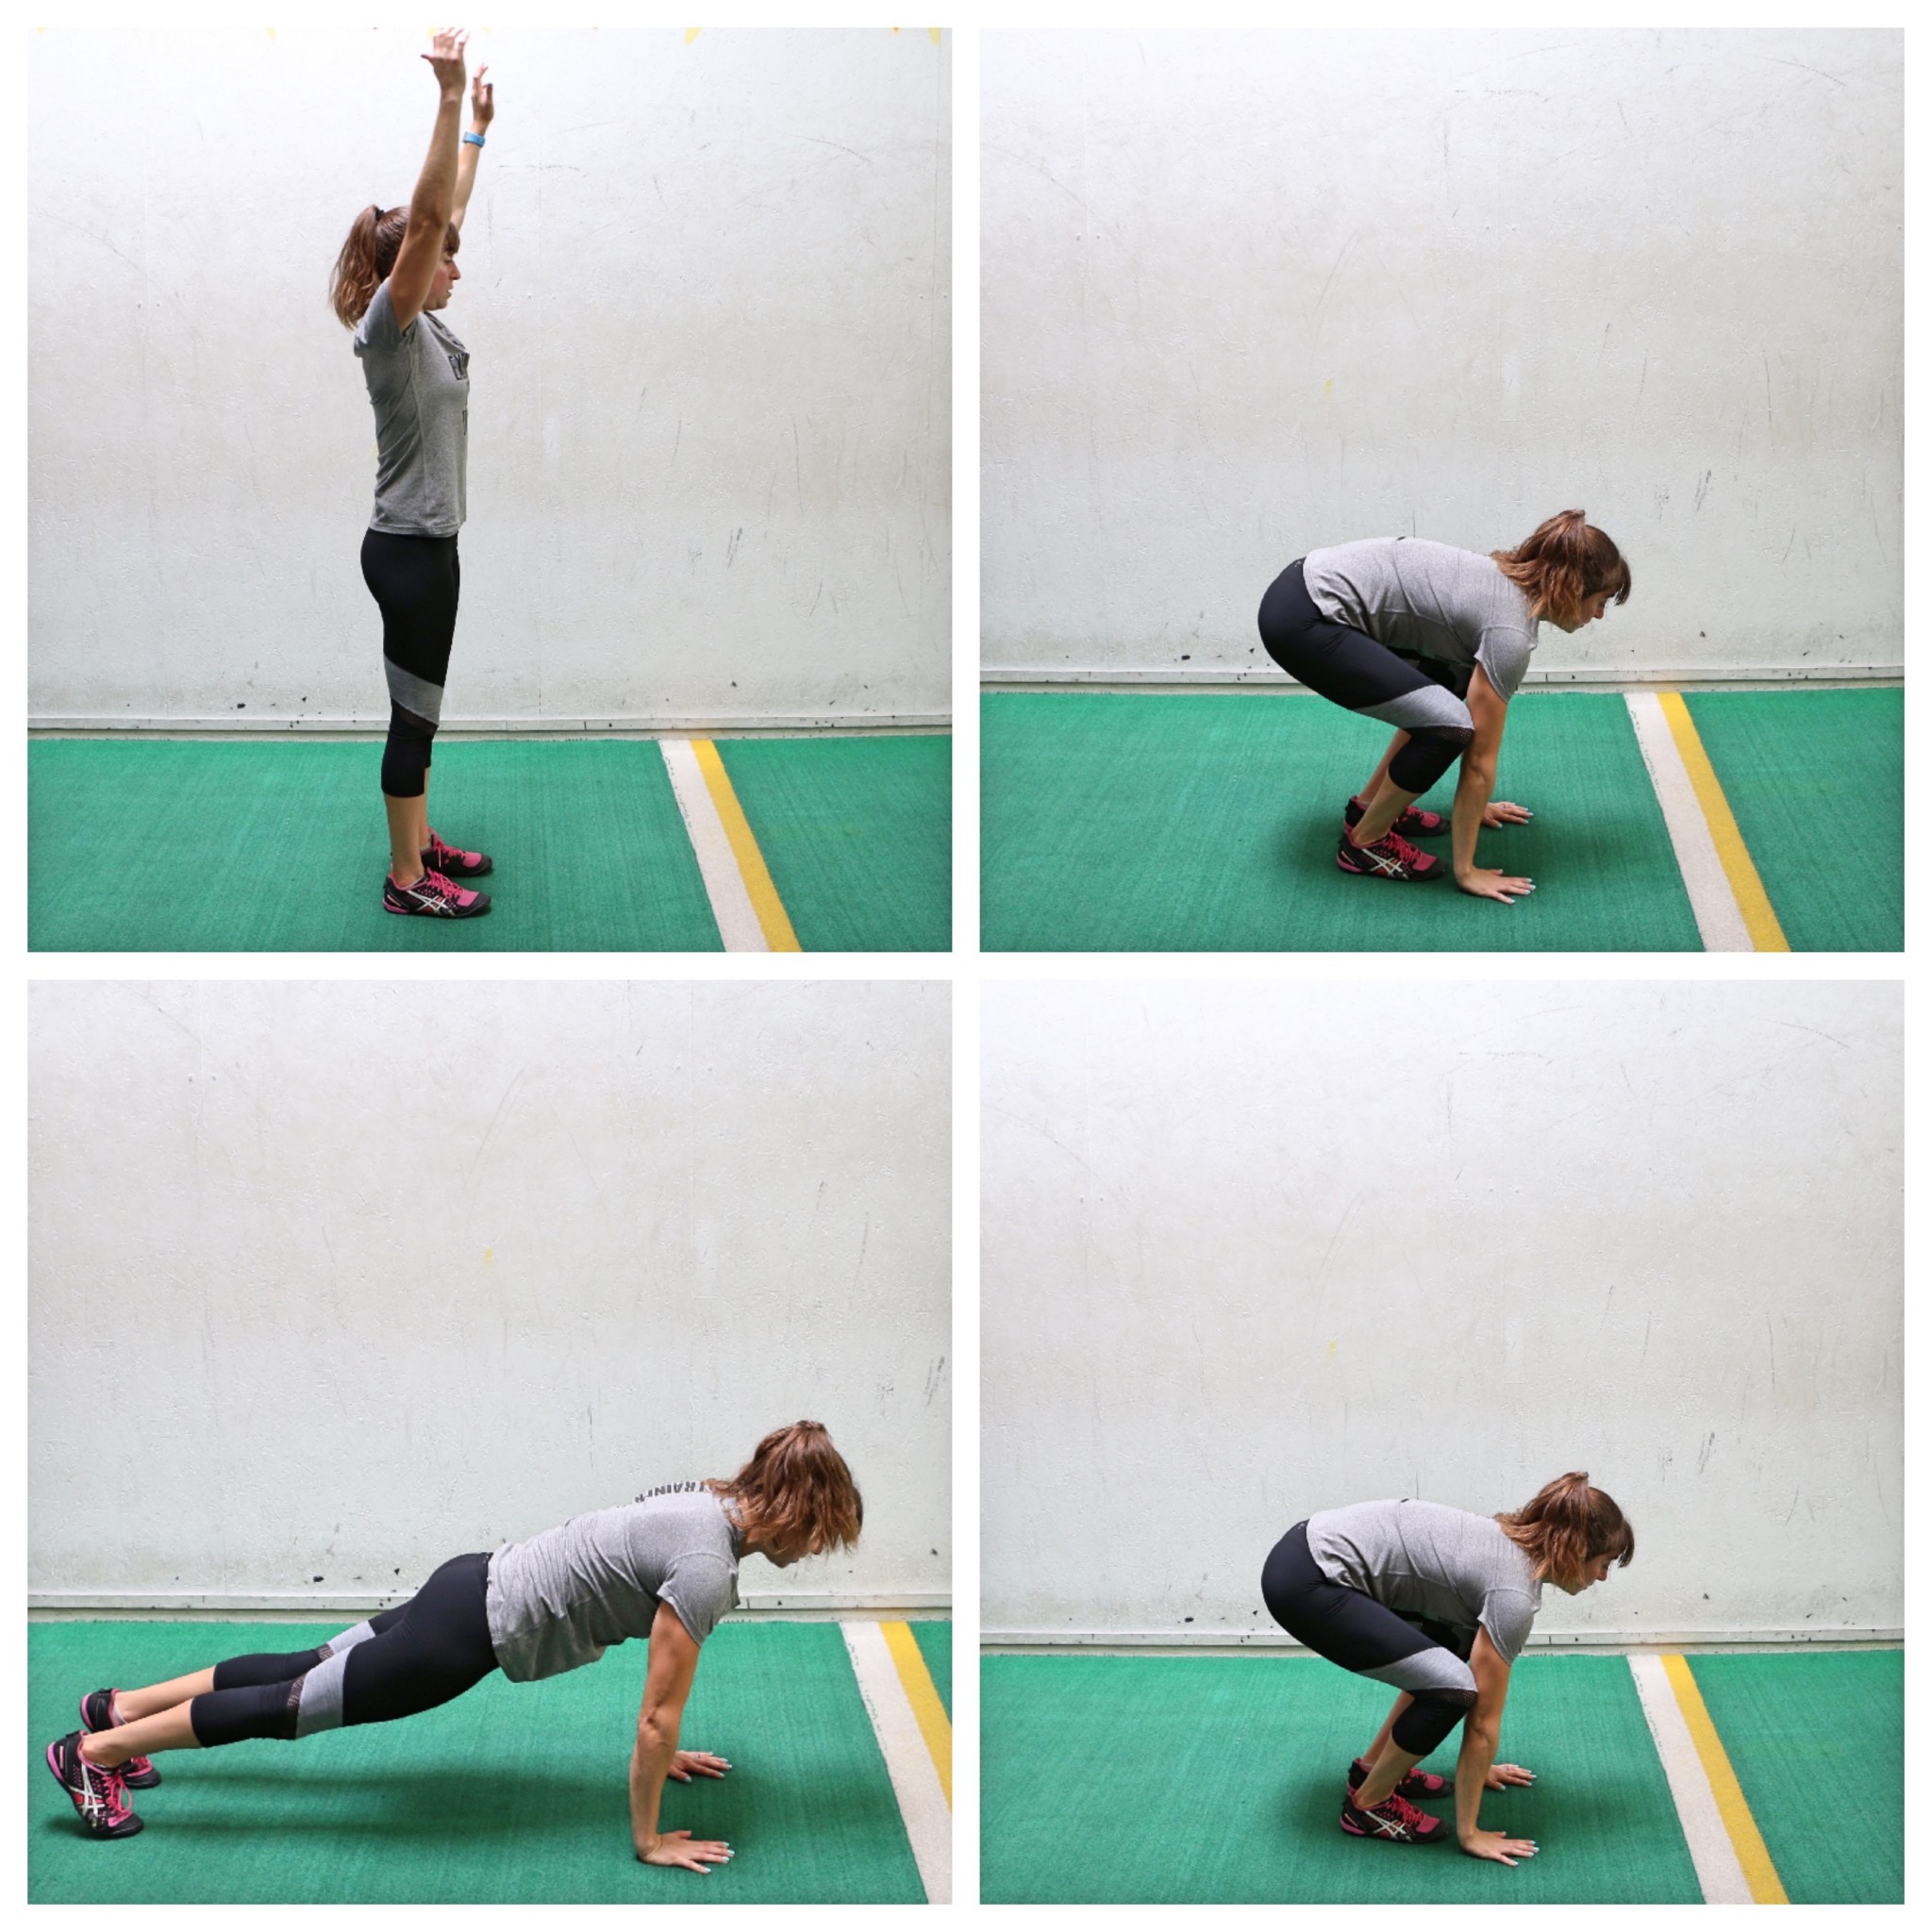
Another great way to modify the burpee and improve mobility while getting your blood pumping is the Half Burpee. With this move, you can keep in the push up to add in the upper body work of a burpee or take it out to modify. This is a great way to remove the down-up from the burpee too without losing the benefit of the move!
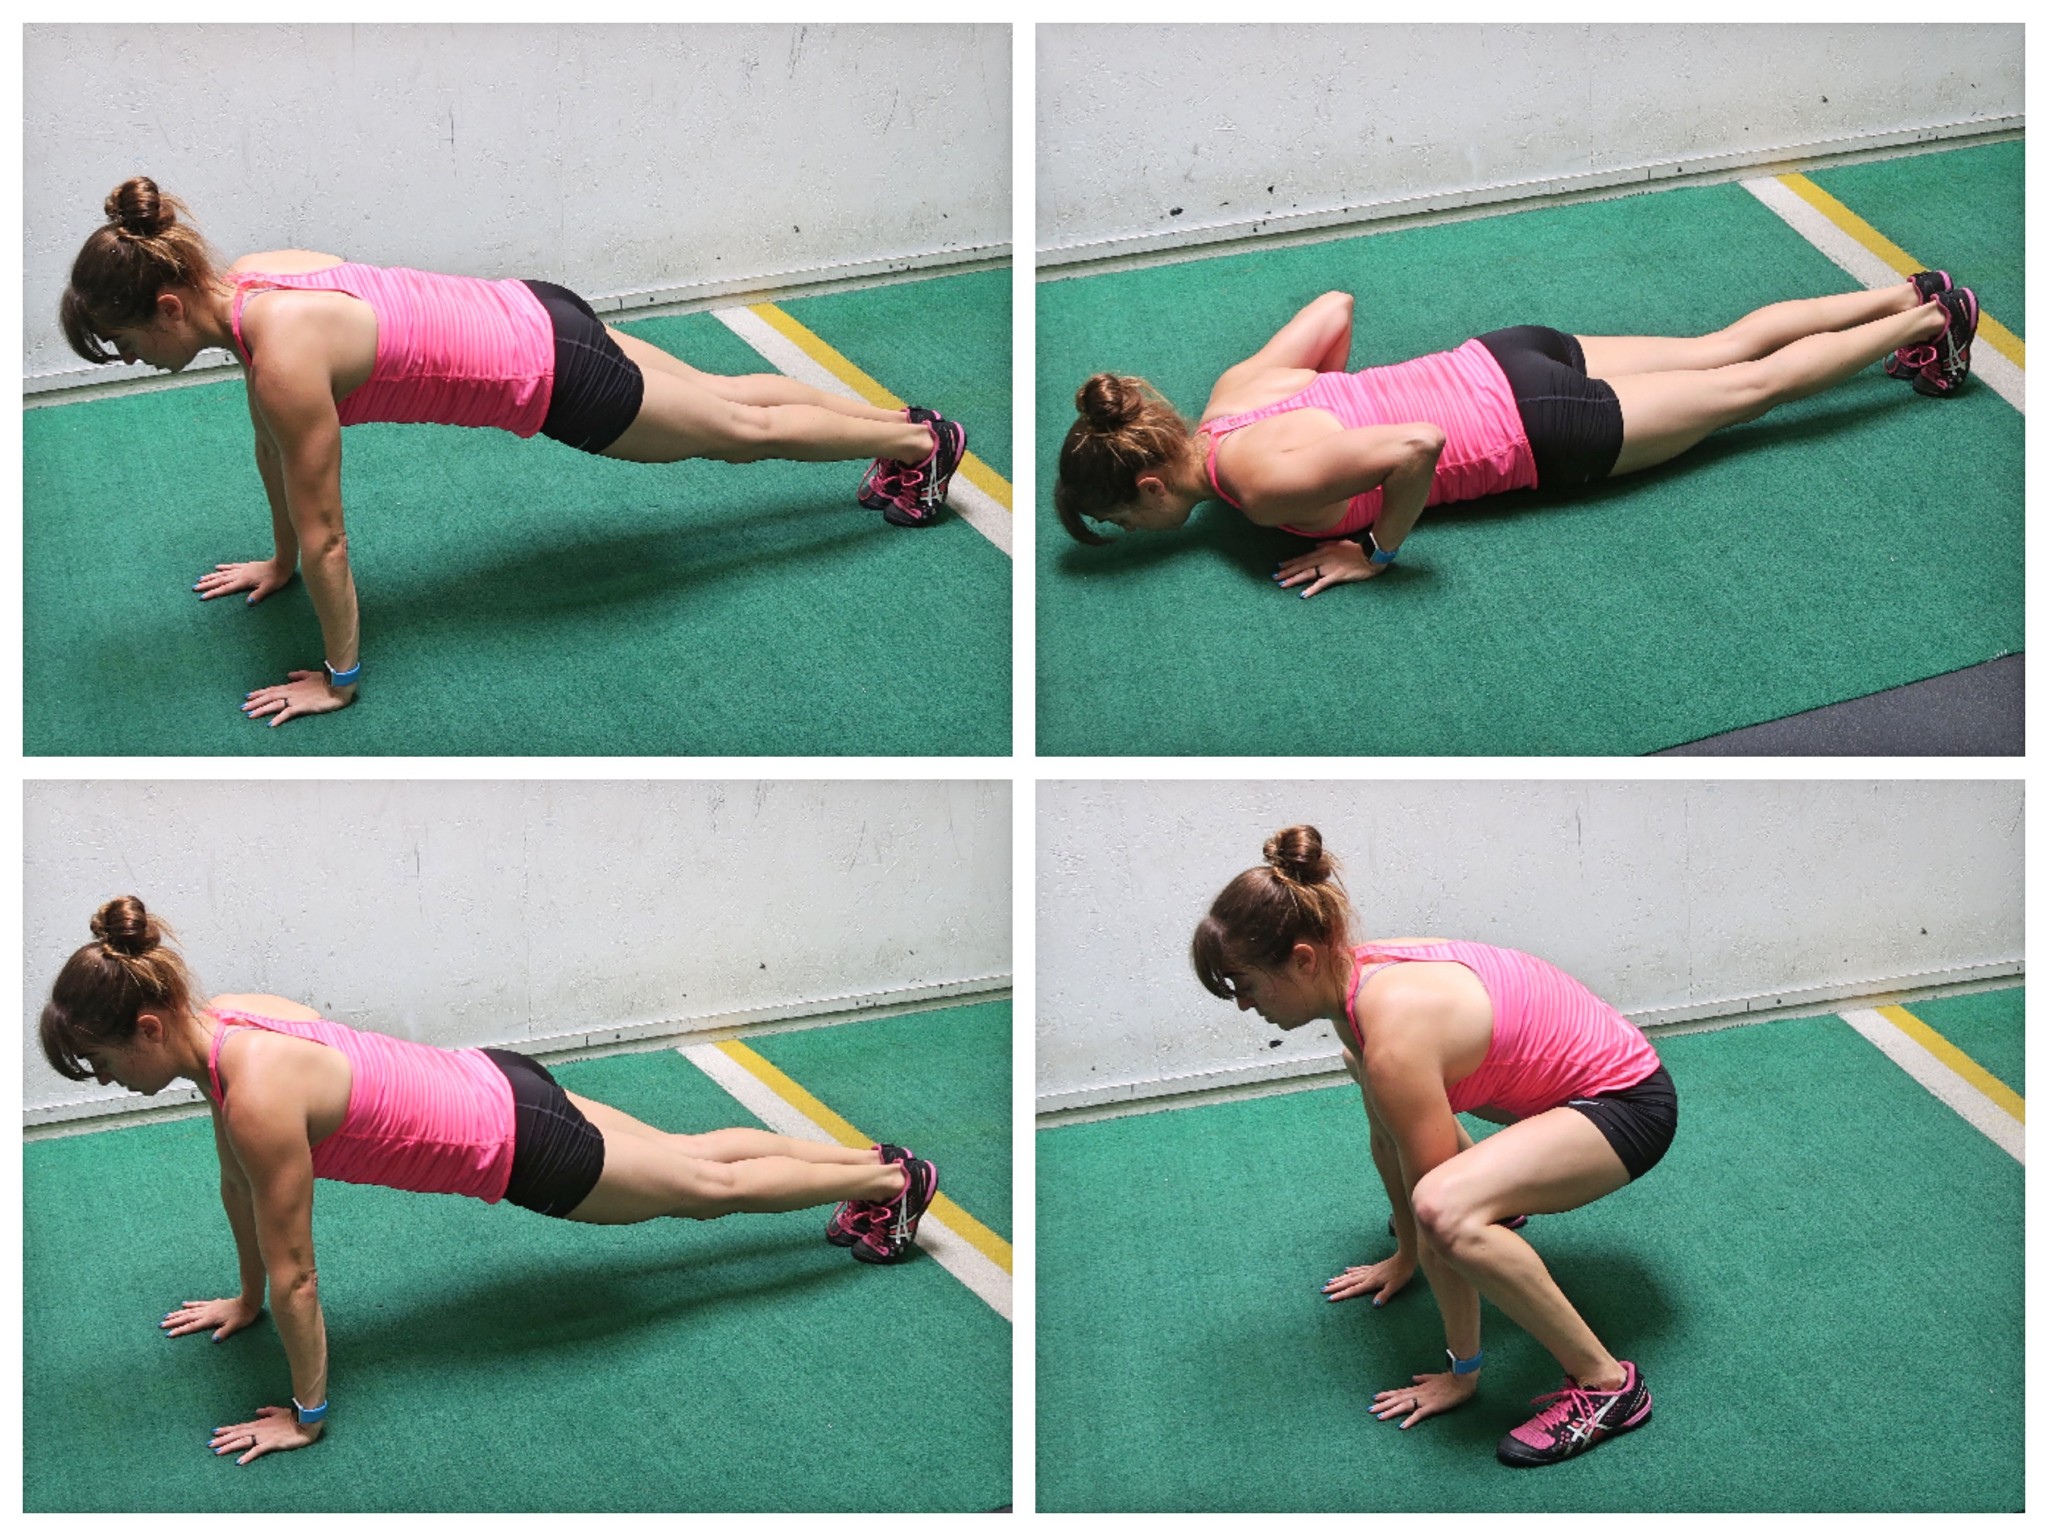
To do the Half Burpee, set up in the high plank position with your hands under your shoulders and your feet about shoulder-width apart. Then jump both feet up and outside your hands so your in a squat position or frog position. Try to really jump all the way outside your hands.
Quickly jump back into plank. Try not to let your butt go way up in the air as you jump from the squat back to plank and from the plank into a squat. Back in the plank position perform a push up. Beginners may go down to their knees to maintain proper form during the push up OR simply take the push up out altogether.
Then after returning to plank, move quickly, jumping into the squat position and back out into plank before doing another push up. Do not let your hips sag or your butt go up in the air in the plank/push up position.
Beginners can also even step one foot at a time up to move into the squat position instead of jumping.
Squat:
The Squat is a great compound lower body exercise to work your quads, hamstrings and glutes. However, often people avoid the squat because they are worried about injuring their knees.
And yes…with certain injuries, squats aren’t a move you should be doing. The problem is, far too many people avoid squats thinking they’ll cause injury when they won’t.
A huge reason most people think they’ll hurt their knees with squats is because they don’t know how to squat properly. It may be due to the fact they’ve never learned proper form or it may be because they have mobility issues and their glutes are underactive.
That is why it is important to know how to regress squats so you can do them properly and build up without injury.
One of the best ways to learn how to do the basic bodyweight squat is using a bench. The Bench Squat is a great way to teach you how to load things properly while giving you the security to perform the movement because you have something you are sitting down to. And let’s face it…This is why a squat is important. You should be able to sit down to a chair or a toilet no matter your age!
Even if you lack a bit of core stability or mobility, the Bench Squat gives you a way to squat without risking injury as you work to improve your mobility and activate the right muscles.
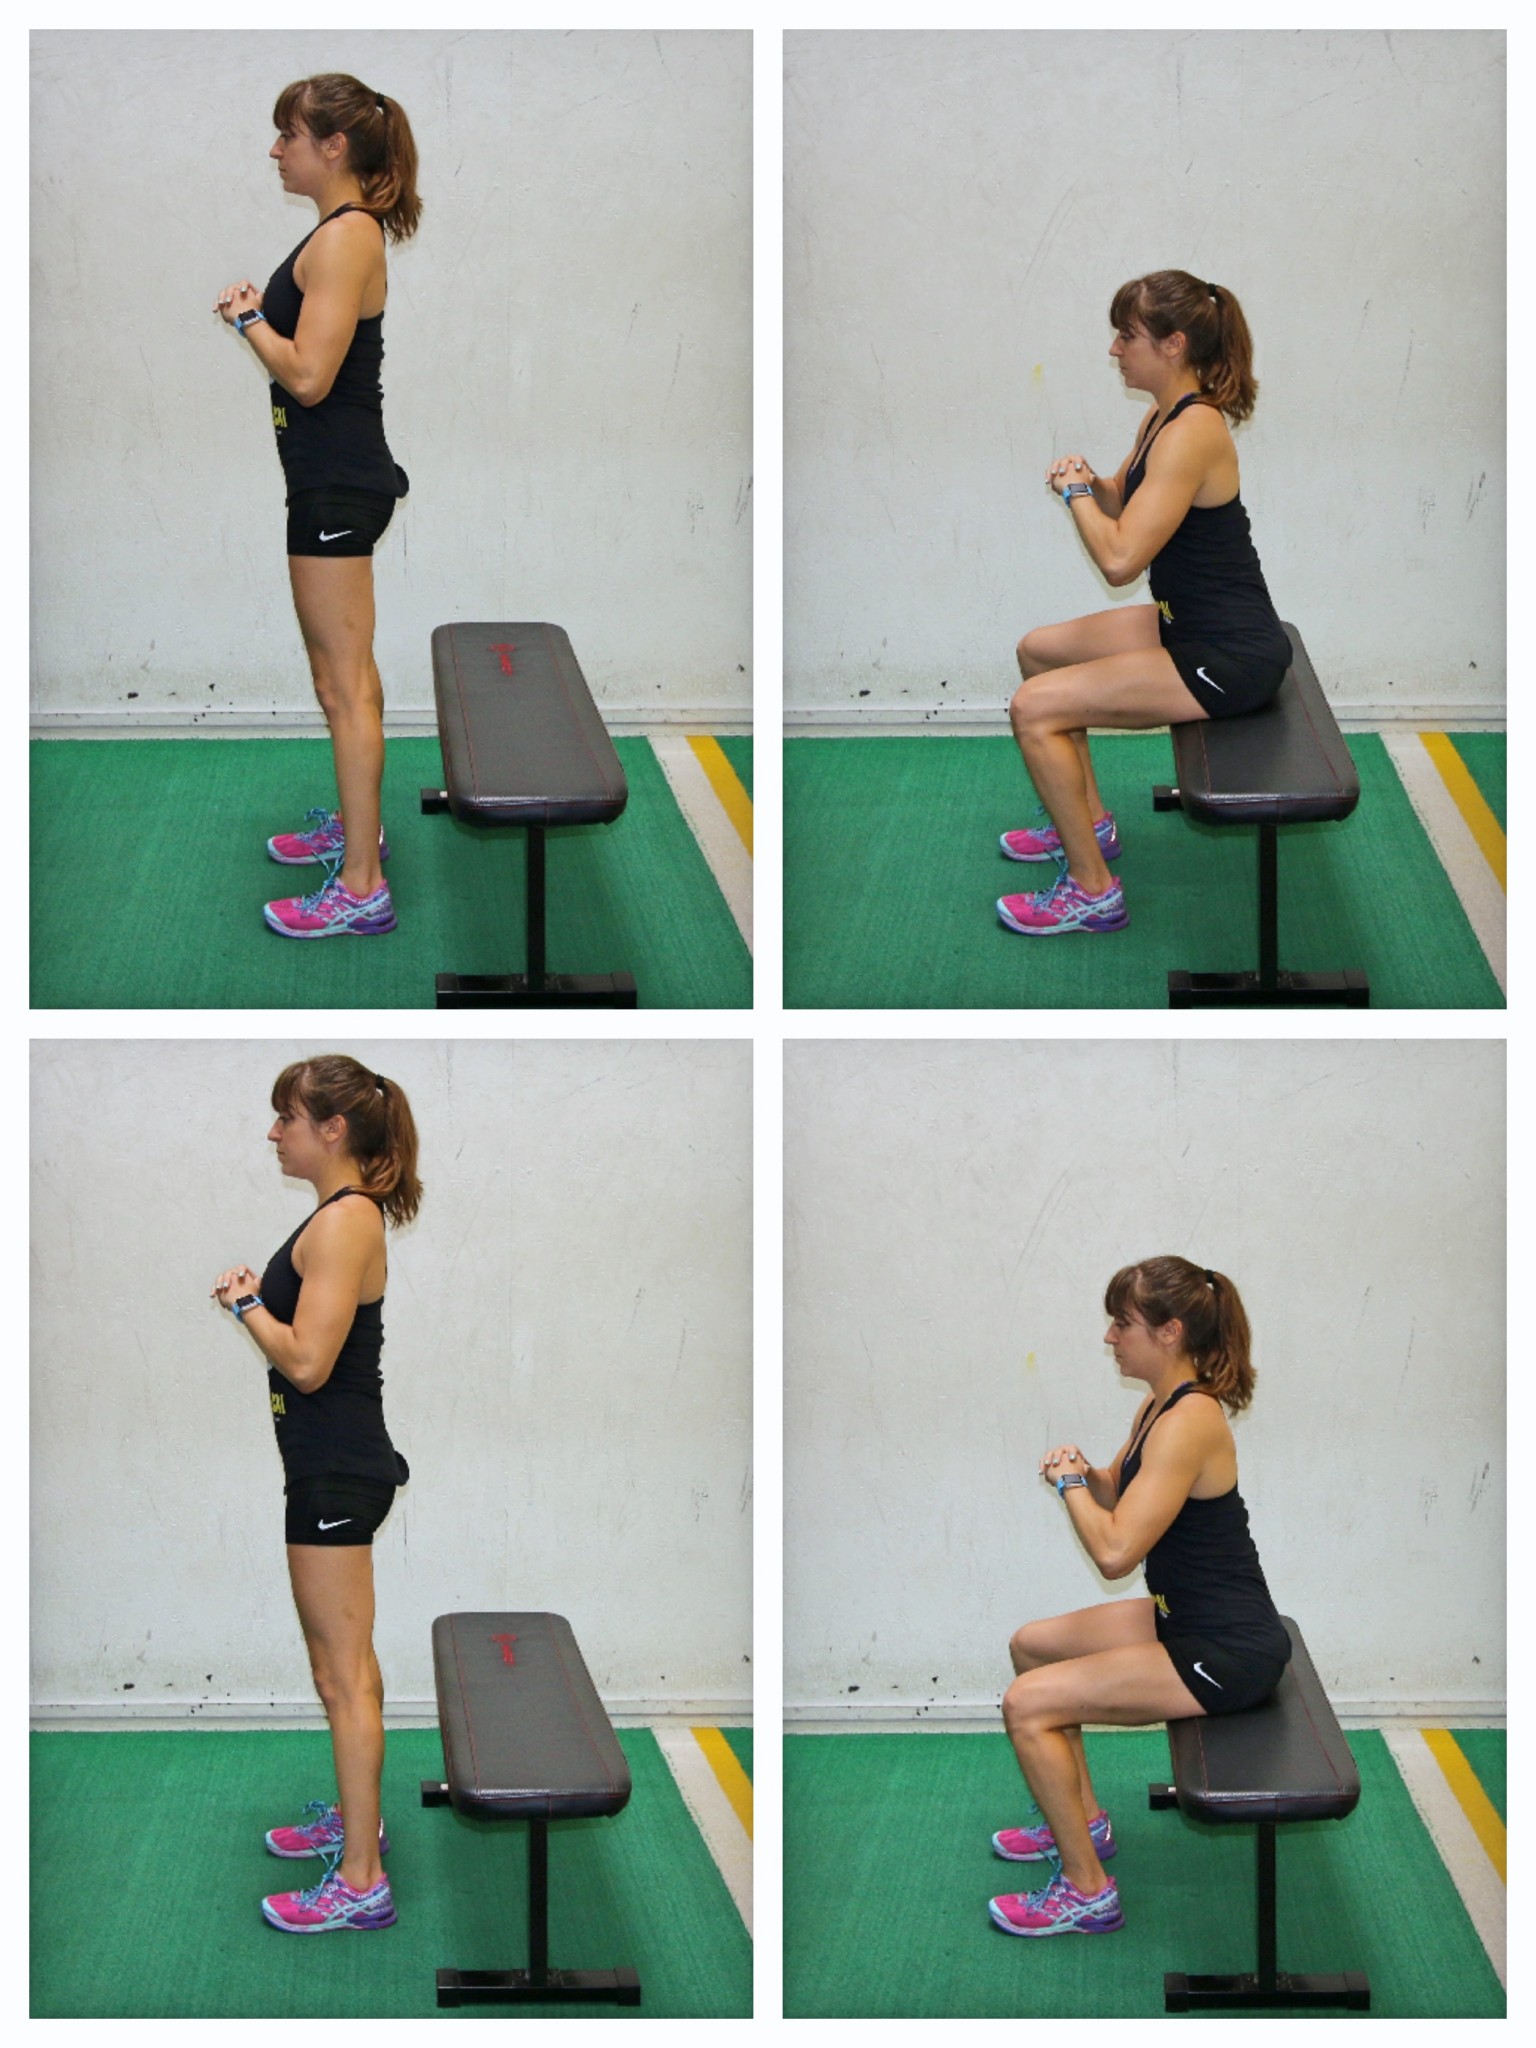
To do the Bench Squat, you will want to pick a box or bench that let’s you squat to at least parallel to the ground. Beginners can start with a higher box and work down to even below parallel. Sometimes even when coming back from knee injury, a limited range of motion squat is a great option.
Stand in front of the box or bench and face away. It can also be helpful if you are nervous to start seated on the box to set up and then stand up. Set up with your feet about hip-width to shoulder-width apart. Then squat down to the box as if sitting back. You want to make sure you are sitting your butt back and down to the box. Do not lean forward too much and hinge at the hips.
Also, do not come forward onto the balls of your feet. Sit back with our chest up. Sit all the way down on the bench or box then drive back up to standing tall. Try not to rock forward or lean forward as you come up, but think about driving through your entire foot on the ground. Make sure your heels stay down at all times.
Come back up to standing and then repeat. Do not plop onto the bench. Control your decent and then quickly stand back up.
The lower the box or bench, the harder the move and the bigger the range of motion you are strengthening through!
After you feel comfortable squatting to a box about parallel to the ground, you can begin to not actually relax and fully sit on the box, but instead just hover right above it. And from there you can move into a full bodyweight squat.
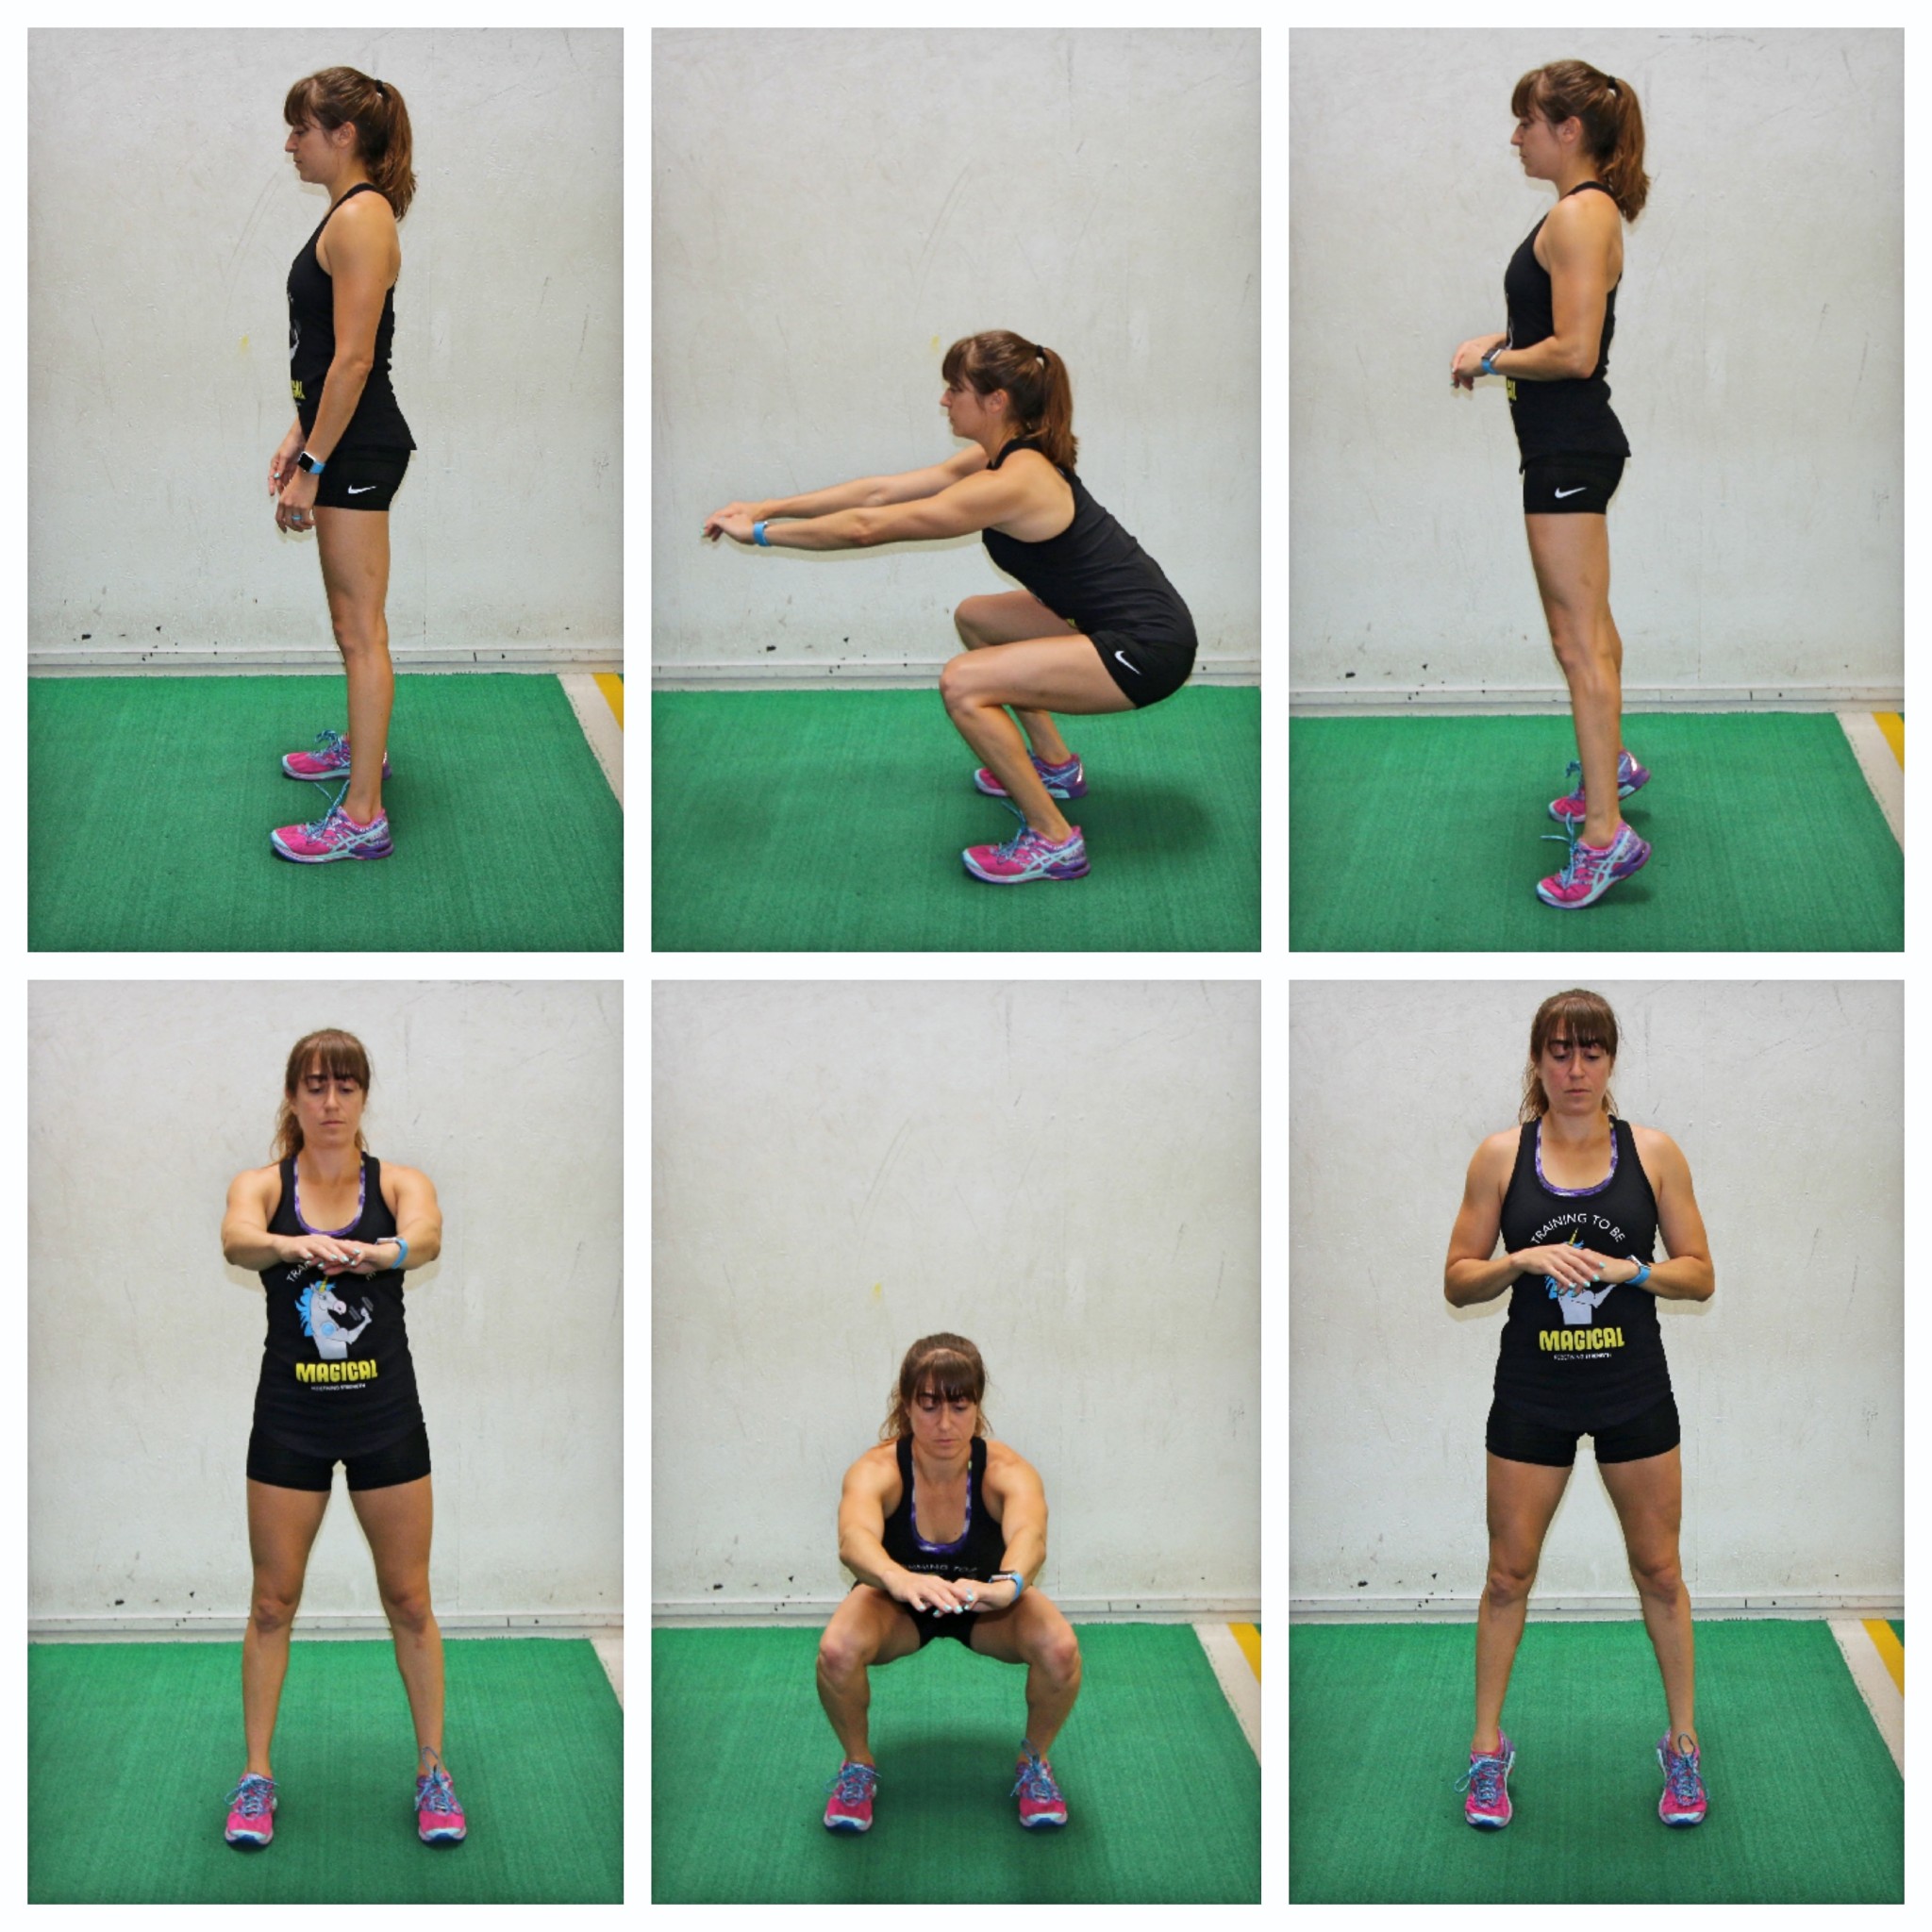
If you’re still struggling to feel comfortable with the full bodyweight squat and lack the core stability and even mobility to squat without the bench, you can also try a Counterbalanced Squat.
You can do a Counterbalanced Squat in a number of ways. You can hold onto a pole or suspension trainer to help you remain stabile and work through a full range of motion. However, you do want to make sure you don’t turn it into an upper body exercise.
Holding the trainer or pole can help if you lack a bit of core stability. And the assistance can often help you get a bit lower in that squat as you work on your strength and mobility.
Or you can even press a weight out at shoulder height. Holding a weight out with your arms extended can help you brace your core and perform a fuller range of motion.
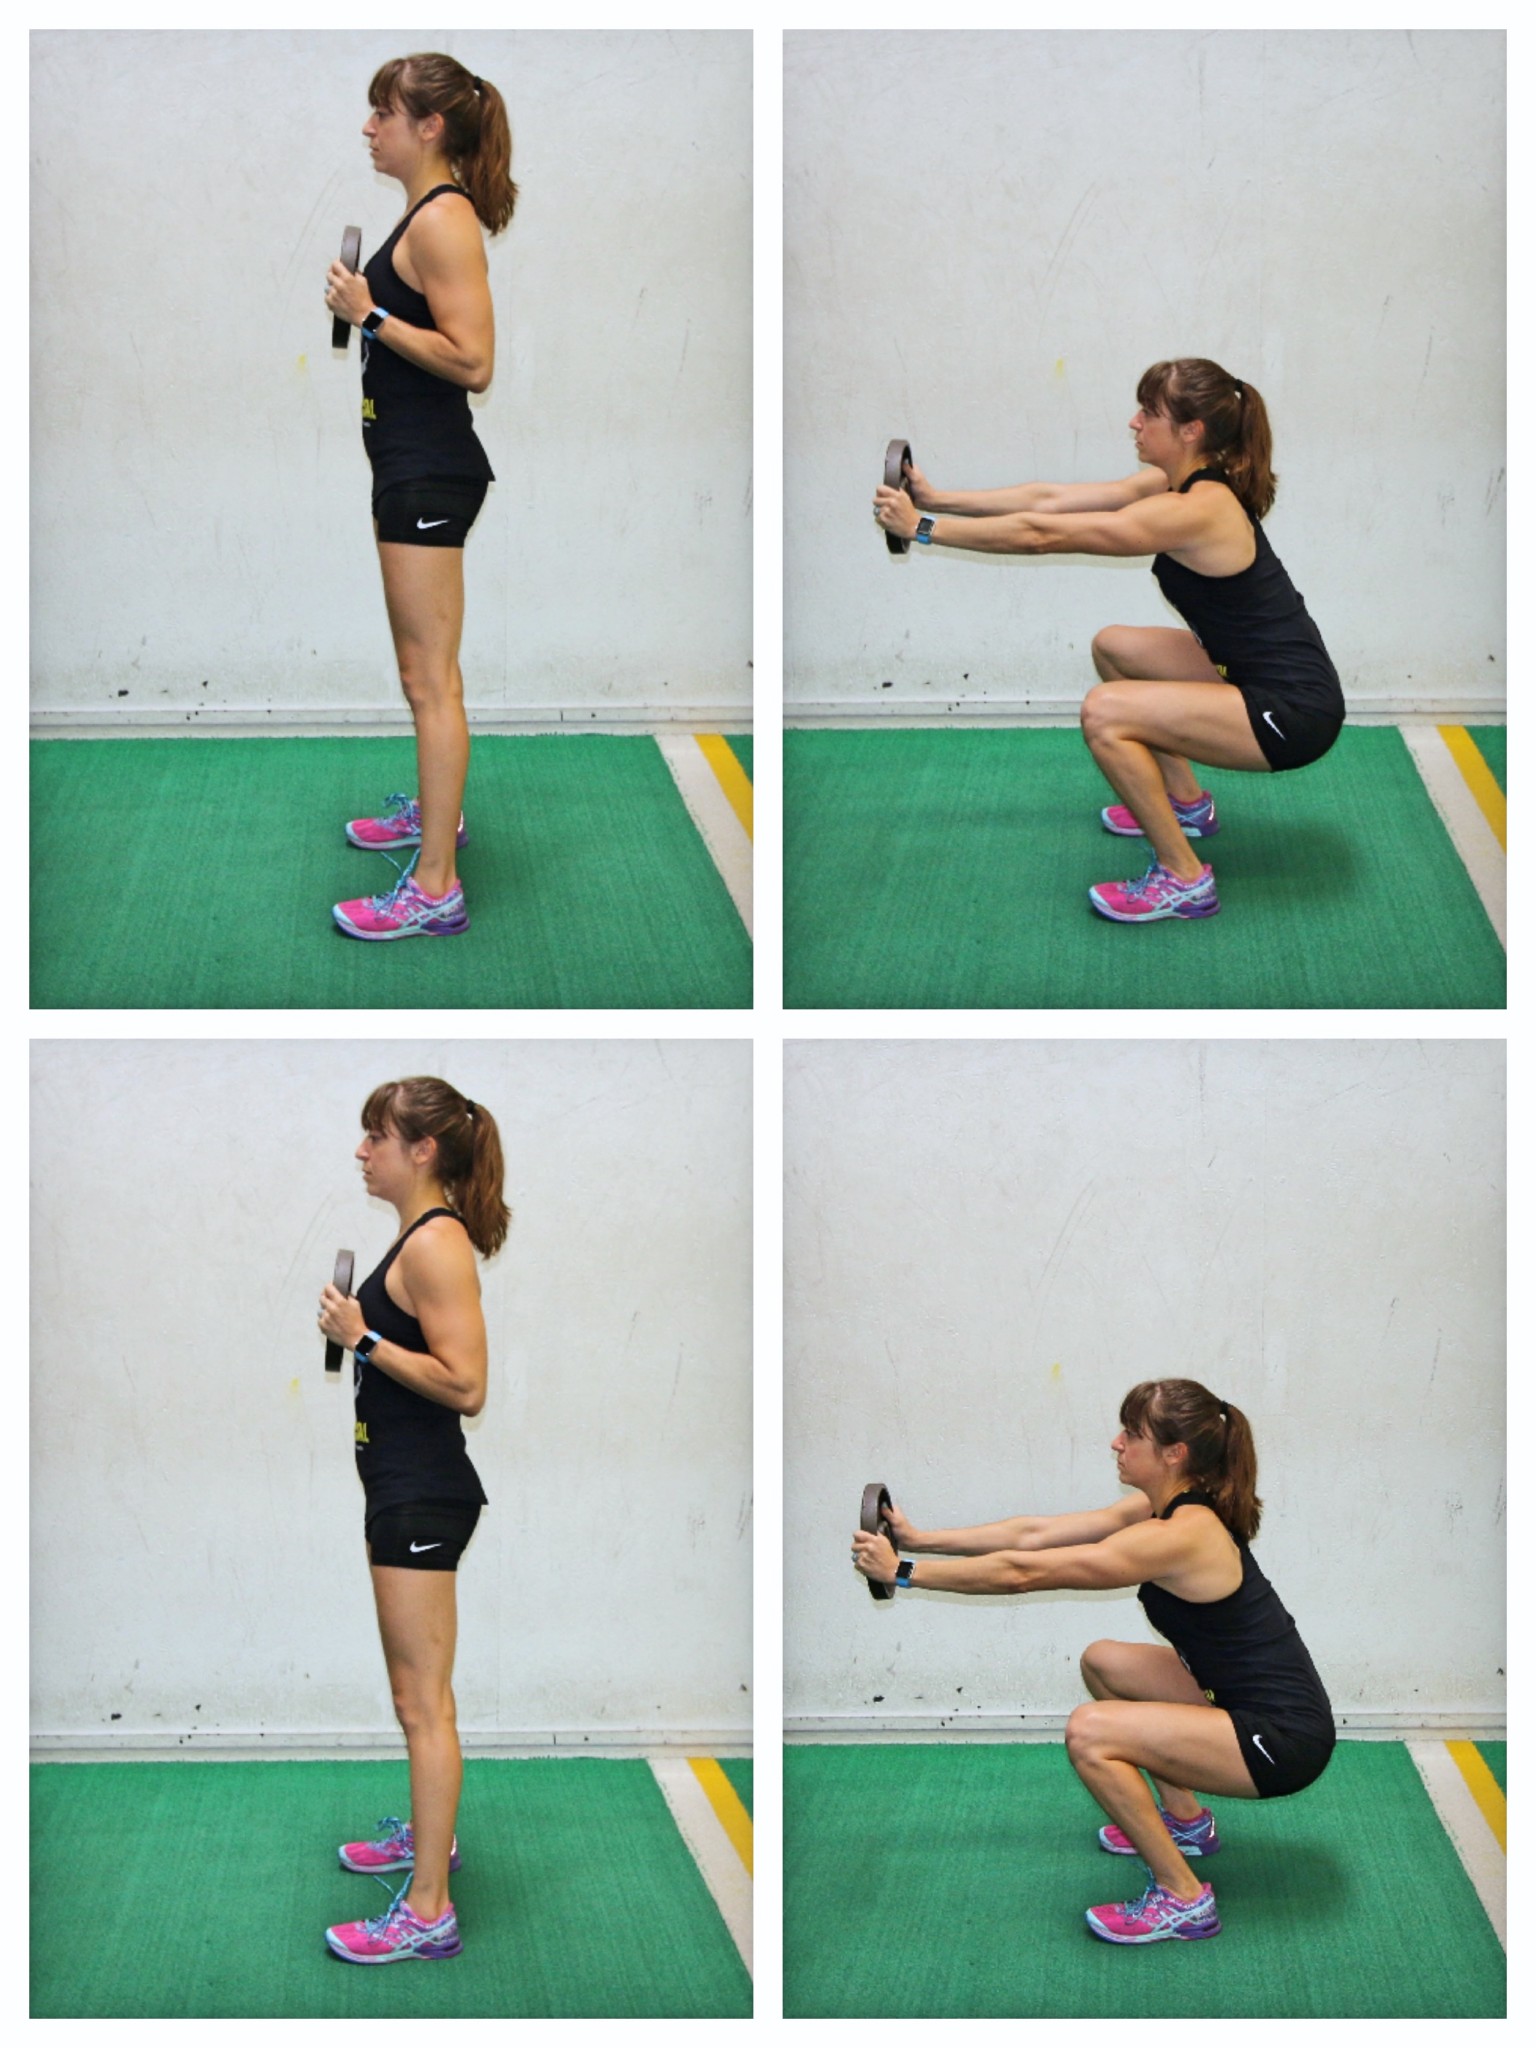
To do the weight Counterbalanced Squat, hold a dumbbell or sandbag in both hands at chest height. Stand with your feet about hip-width to shoulder-width apart. Then, as you sit your butt back and squat down, press the weight out at chest height. You want a weight that is light enough you can press out without shrugging your shoulders, but enough to help you sit down and back while keeping your chest up.
Sink as low as you can with good form, making sure to sit into your heels instead of rocking forward onto the balls of your feet. Then drive back up to standing and, as you do, you can bring the weight back into your chest. You can also hold the weight out the entire time, but often the press out and then pull back in can help you to sink down and stand back up with proper form.
Another way to modify the squat, and even tell if a lack of ankle mobility may be contributing to your inability to get lower or even load your glutes correctly, is to try a Heels Up Squat.
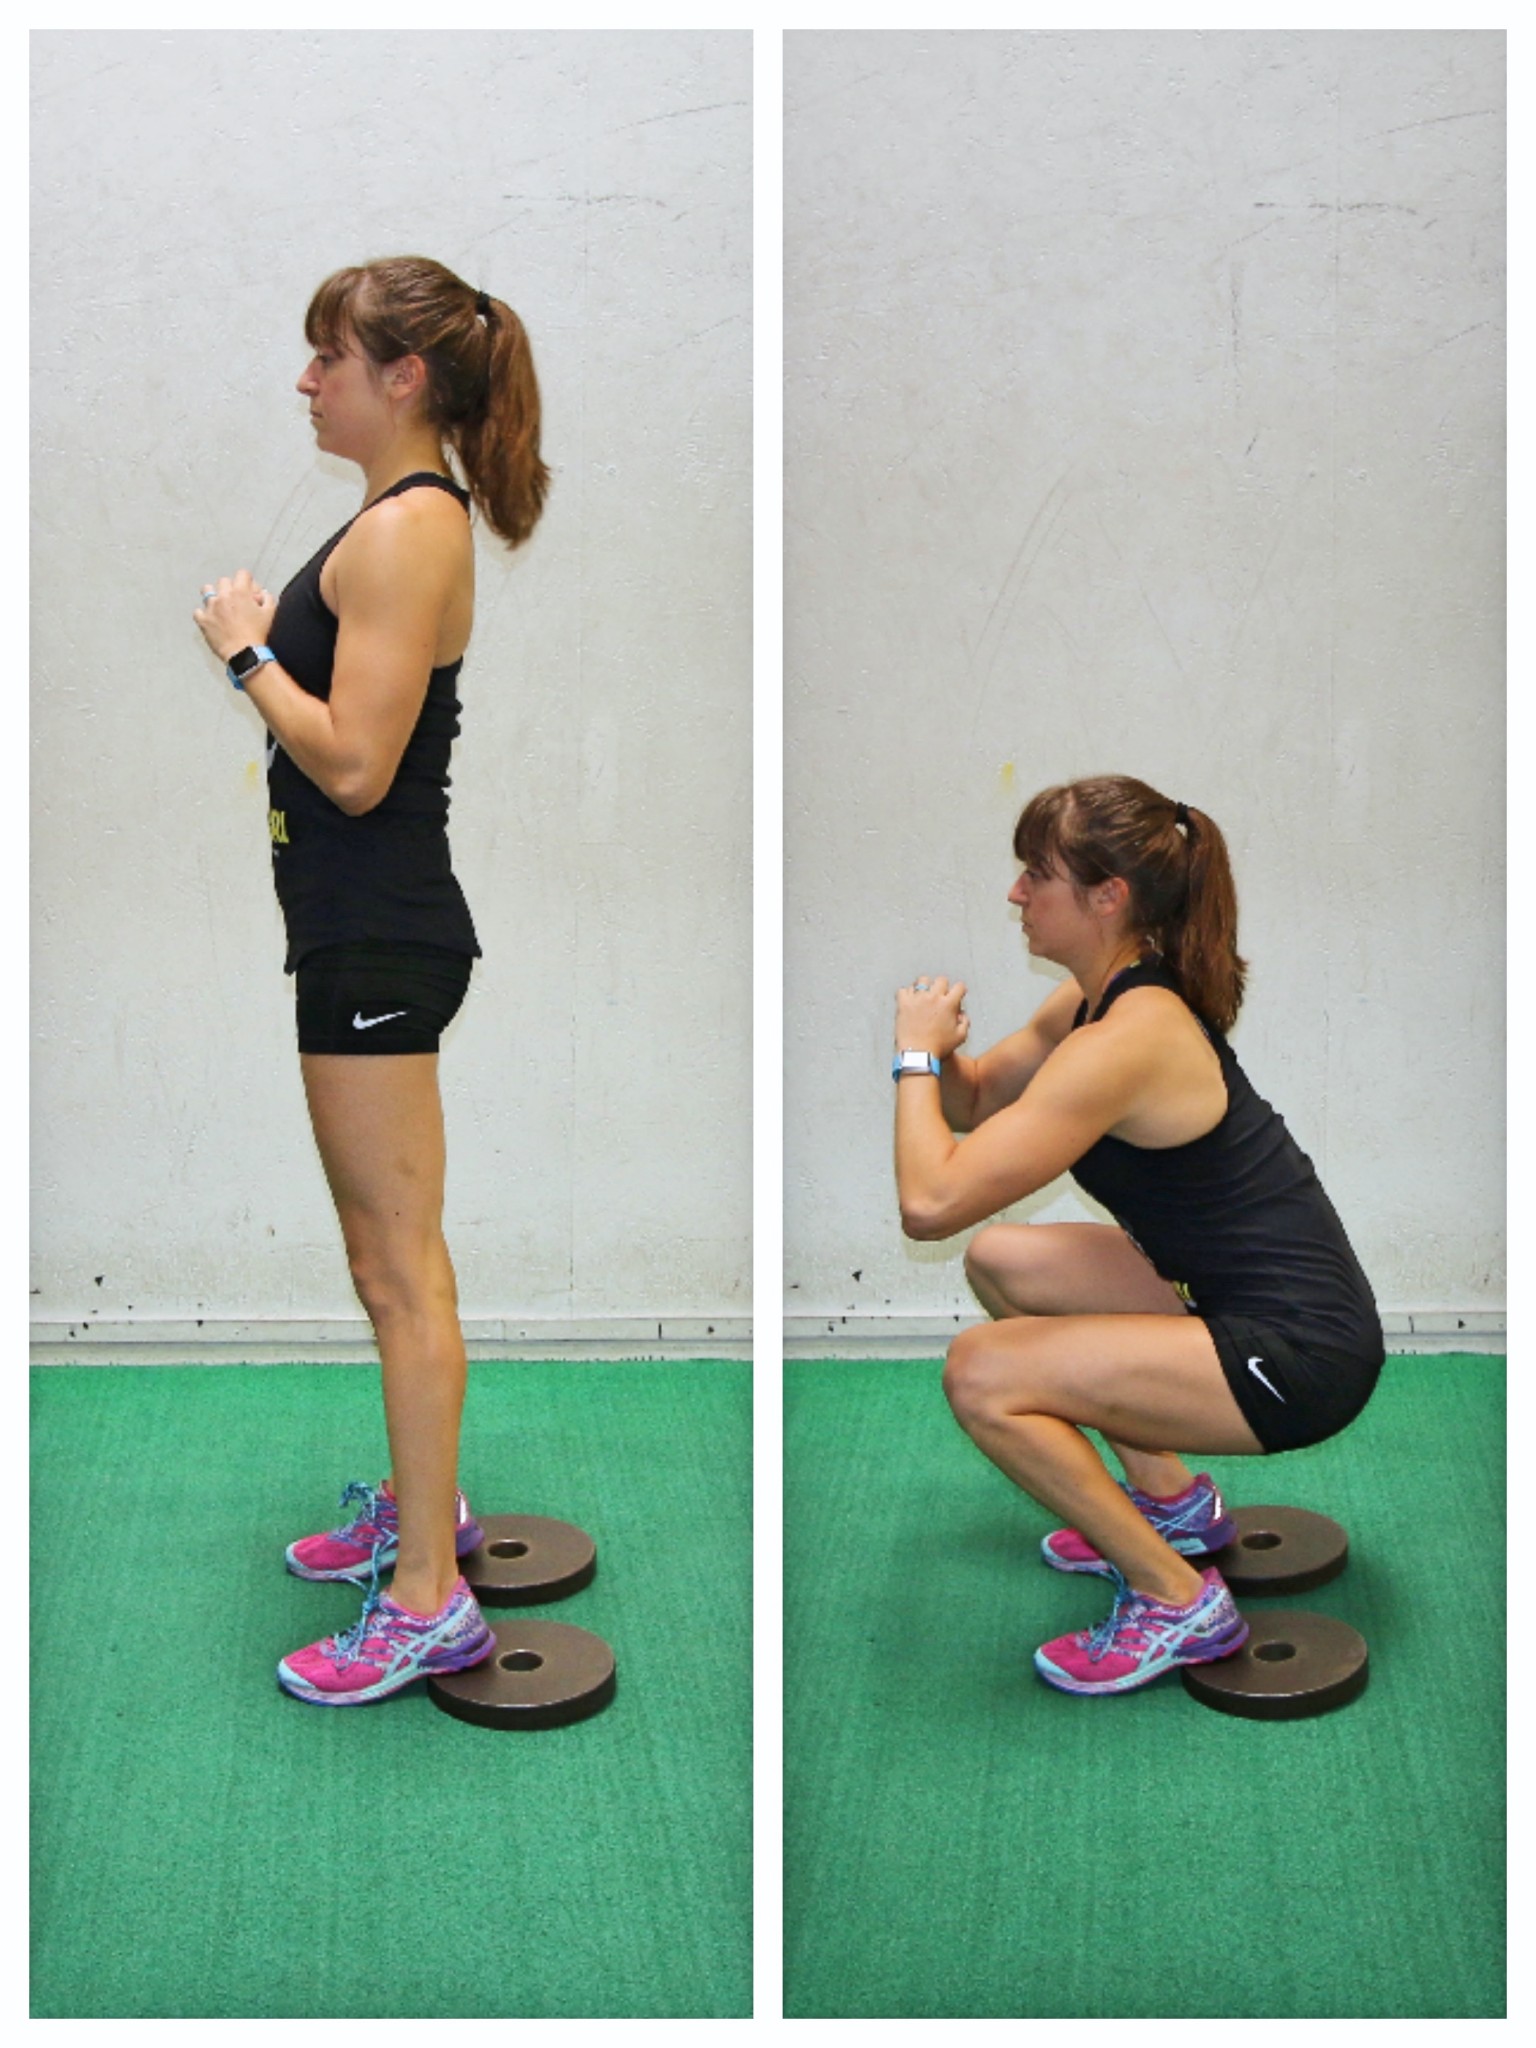
To do the Heels Up Squat, you can use plate weights or a small block, but you want something an inch or two high to place your heels up on as the balls of your feet and toes rest on the ground. With your heels up on the weights and your feet about hip-width to shoulder-width apart, squat down. Sit back into your heels on the plates, but do not let your toes come up. Keep your chest up as you sit down.
Then drive back up through your heels to come to standing. Do not rock forward as you stand back up. Squeeze your glutes at the top and repeat the squat. If you find you can get lower with ease, you may want to start working on your ankle mobility a bit more.
Band Mini Squats can be another great way to help activate the glutes as you squat. The band right below or above your knees can help get your glute medius and minimus especially engaged and working as you squat. If you’ve suffered from knee valgus or your knees caving in as you squat, this is a great way to train a proper position.
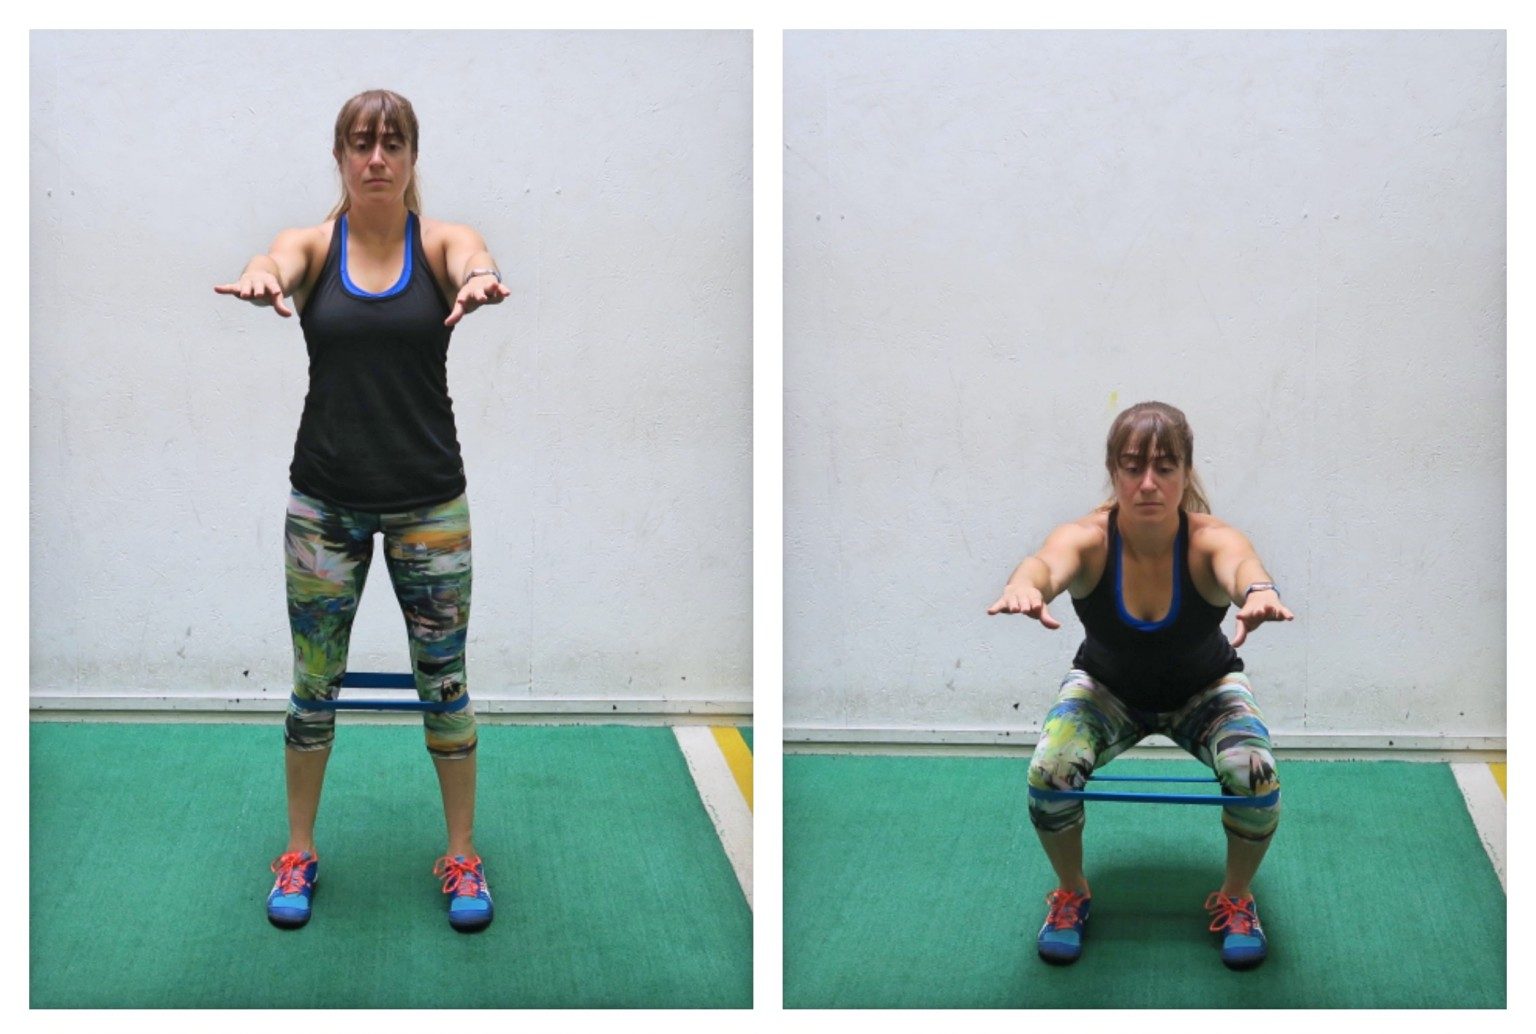
To do a Mini Band Squat, place a band just above or below your knees and stand with your feet between hip-width and shoulder-width apart. Your feet should be parallel. Putting the band below your knees makes the move harder while putting the band above your kenes can make it easier to activate your glutes.
Then sit down until your thighs are parallel to the ground. You can go lower if you are able to maintain proper form. Do not let your knees collapse in as you squat down and keep your chest up. You want to make sure you are pressing out against the band.
Then drive back up to standing, pushing through your heels. Do not rock forward onto the balls of your feet. Your knees shouldn’t cave in as you stand back up. This move is a great way to make sure your glutes are engaged while doing a squat. Beginners may want to perform the squat with band down to a chair or bench to help remind them to sit back as they squat.
To progress the basic squat, you can add weight or even change up the tempo. Changing up the tempo can mean slowing down the movement or even making it into a quick squat jump. Or you can even make it a unilateral move and do a Single Leg Squat variation!
If you can’t do a jump squat, remember you can always just do a quicker bodyweight squat without leaving the ground or you can even do a squat to calf raise. The Squat to Calf Raise is a great way to mimic coming off the ground and work to improve your triple extension (aka extension of your hips, knees and ankles) without actually leaving the ground. It will also get your blood pumping.
For even more squat variations, check out the post and video below!
Push Up:
Push ups are a great upper body and core exercise. But a full push up is by no means an easy move to do…and do PROPERLY.
It not only requires, chest, shoulder and tricep strength but also a great deal of core strength. It’s basically a moving plank!
Too often when people try to advance the push up, they end up doing the worm, or their head is forward as if they’re smelling the ground or their elbows flare way up by their head. All of these things can results in not only injury, but you not really getting the full benefit out of the movement that you should.
And who wants to waste time doing a move that doesn’t really benefit them!?
The problem is, when we go to modify the push up, we all too often just turn to Knee Push Ups. And while those can be a great way to modify the full push up, they don’t force you to engage your core the same way you would during a full push up AND they can often still be too advanced and cause you to compensate.
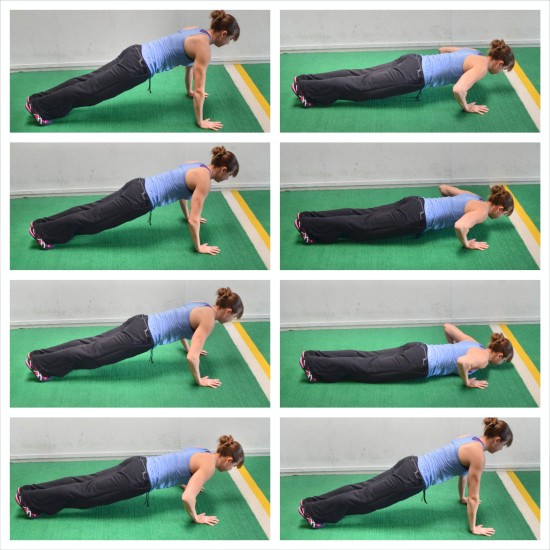
That is why the Incline Push Up is such a great way to modify. It allows you to choose an incline that allows you to perform the movement with perfect form AND forces you to engage your core in the same way you’ll have to with a full push up. As you get stronger, you will simply lower the incline until you reach the ground.

To do an Incline Push Up, find an incline that allows you to perform push ups with perfect form. It may have to be higher to start, but you can use anything really – a wall, bench, shelf or bar at an appropriate height that allows you to drop your chest all the way down while maintaining perfect form. A smith machine even at a gym can be a great adjustable incline.
With your hands on the incline, place your feet together and your hands right outside your chest. You may want to set up at the bottom of the push up so that you know your chest will hit the incline right at nipple height between your hands. By setting up at the bottom of the push up, you can ensure that your upper body will be in perfect alignment with your arms forming an arrow shape (->) with your body. You do not need to keep your arms right in by your sides; however, you don’t want your elbows to flare up above your shoulders or you will put more strain on your shoulders.
Drive back through your heels to engage your quads as you brace your core and keep your body in a nice straight line. If you press forward onto your toes, you are going to make your push ups weaker because your legs won’t be engaged to help keep your body in a nice straight line. Then press up from the bar, extending your arms out all the way and locking out at the top. Do not round your back at the top.
As you press up, make sure your body moves as one unit. Your head should be in line with your spine and your hips shouldn’t sag toward the ground or your butt shouldn’t go up in the air. Make sure your shoulders don’t shrug as you push up. You also don’t want your back to round at the top of the push up. Do not tuck your chin in toward your chest or let your head jut forward. Feel your back working and even the muscles around the sides of your ribs supporting your shoulders.
Then with your body moving as one unit, lower your chest back down to the bar. As you perform the movement, if your feet are together, you may even feel your inner thighs working to help keep everything tight and in a nice straight line. Even at the bottom of the push up, do not relax. Keep everything engaged so you can press right back up.
As the incline becomes easier, make it lower and lower. If your form starts to falter, do fewer reps from the lower incline or regress the incline and bring it back up.
As you work to lower the incline for your push ups, you can also add in some Eccentric Only Push Ups to help you learn to take on your own bodyweight while keeping your core engaged correctly through the push up movement.
These can be a great way to use a lower incline or even no incline at all even if you can’t still complete a full push up.
To do Eccentric Only Push Ups, set up in a high plank position with your hands outside your chest and your feet together. Your body should be in a nice straight line from your head to your heels. Brace your core, flex your quads and drive back through your heels. Feel your back even engage to support your shoulders. Then, keeping your body in a nice straight line, slowly begin to lower your body down to the ground. Lower as slowly as possible until you hit the ground. Make sure your chest hits first and that you don’t sag your hips or let your head go forward.
At the bottom release then sit back and simply reset in the high plank position. With the Eccentric Only, you are simply lowering down as slowly as possible and using that slow lower to learn how to maintain proper form and keep everything engaged even while you’re not yet able to do a full push up.
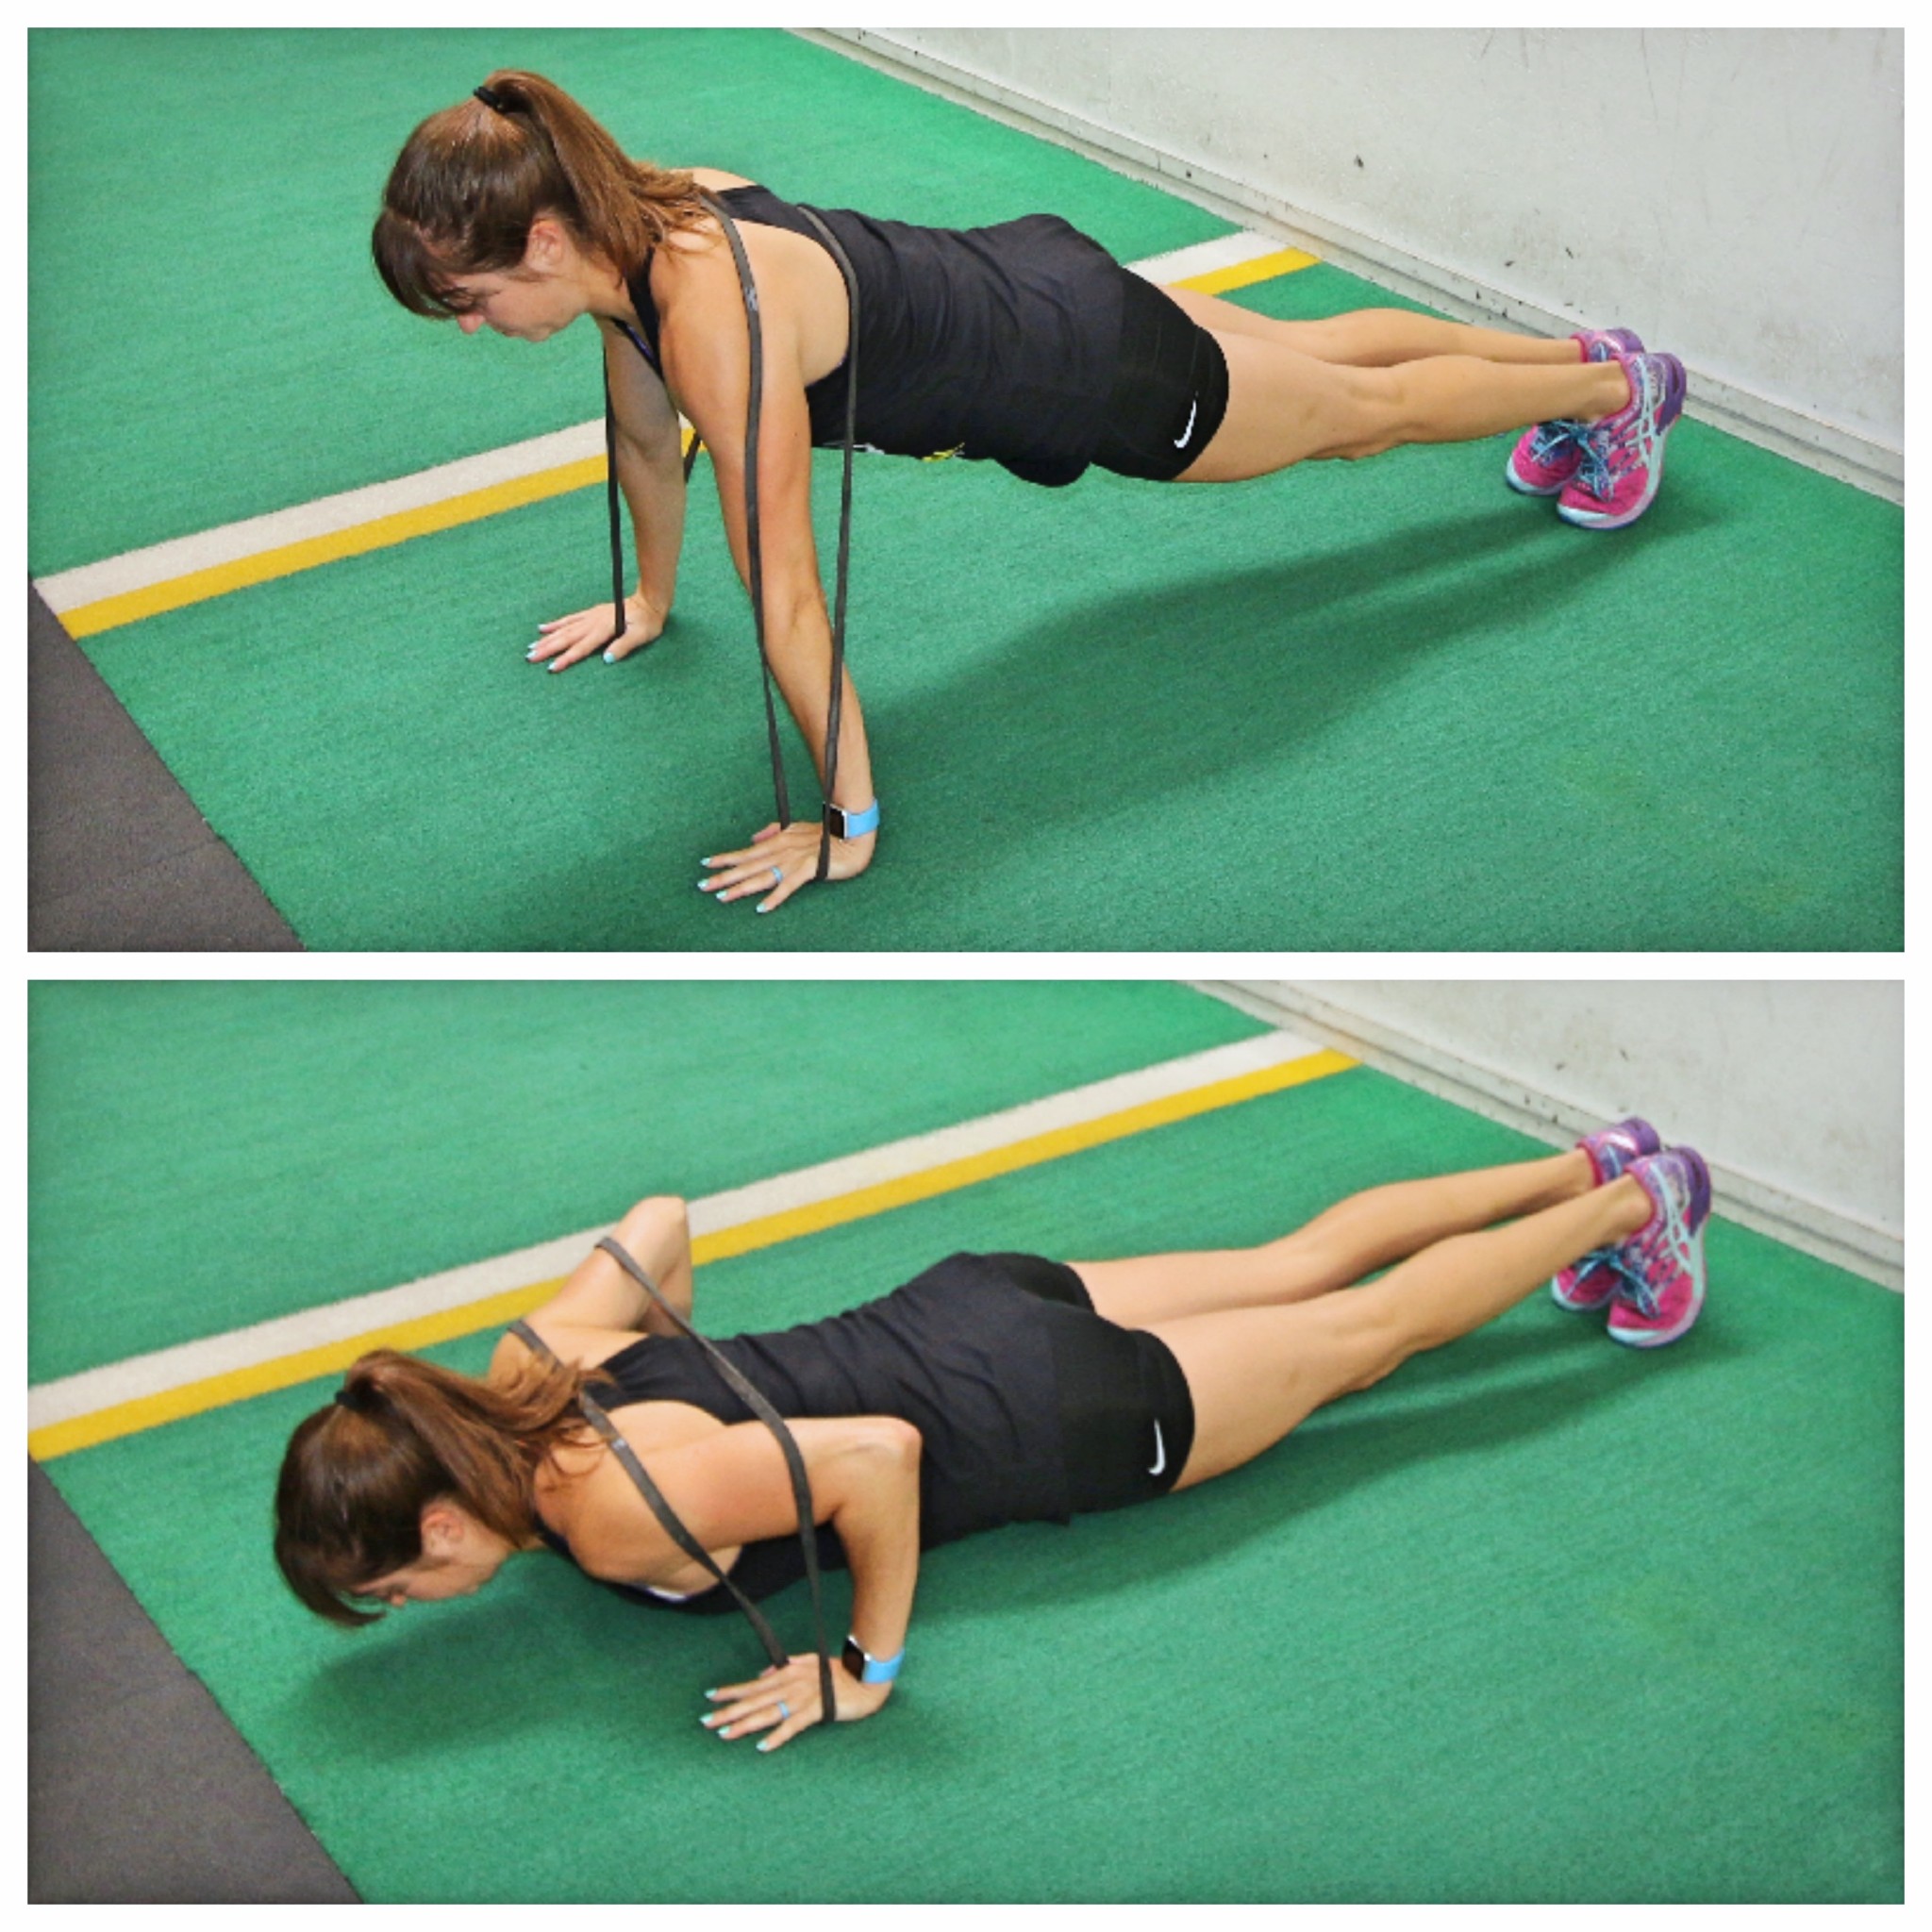
Another way to regress the push up, is by doing a Band Push Up. Like with the Incline Push Up, your body still has to engage and work as one unit, but you are reducing the amount of weight you have to move.
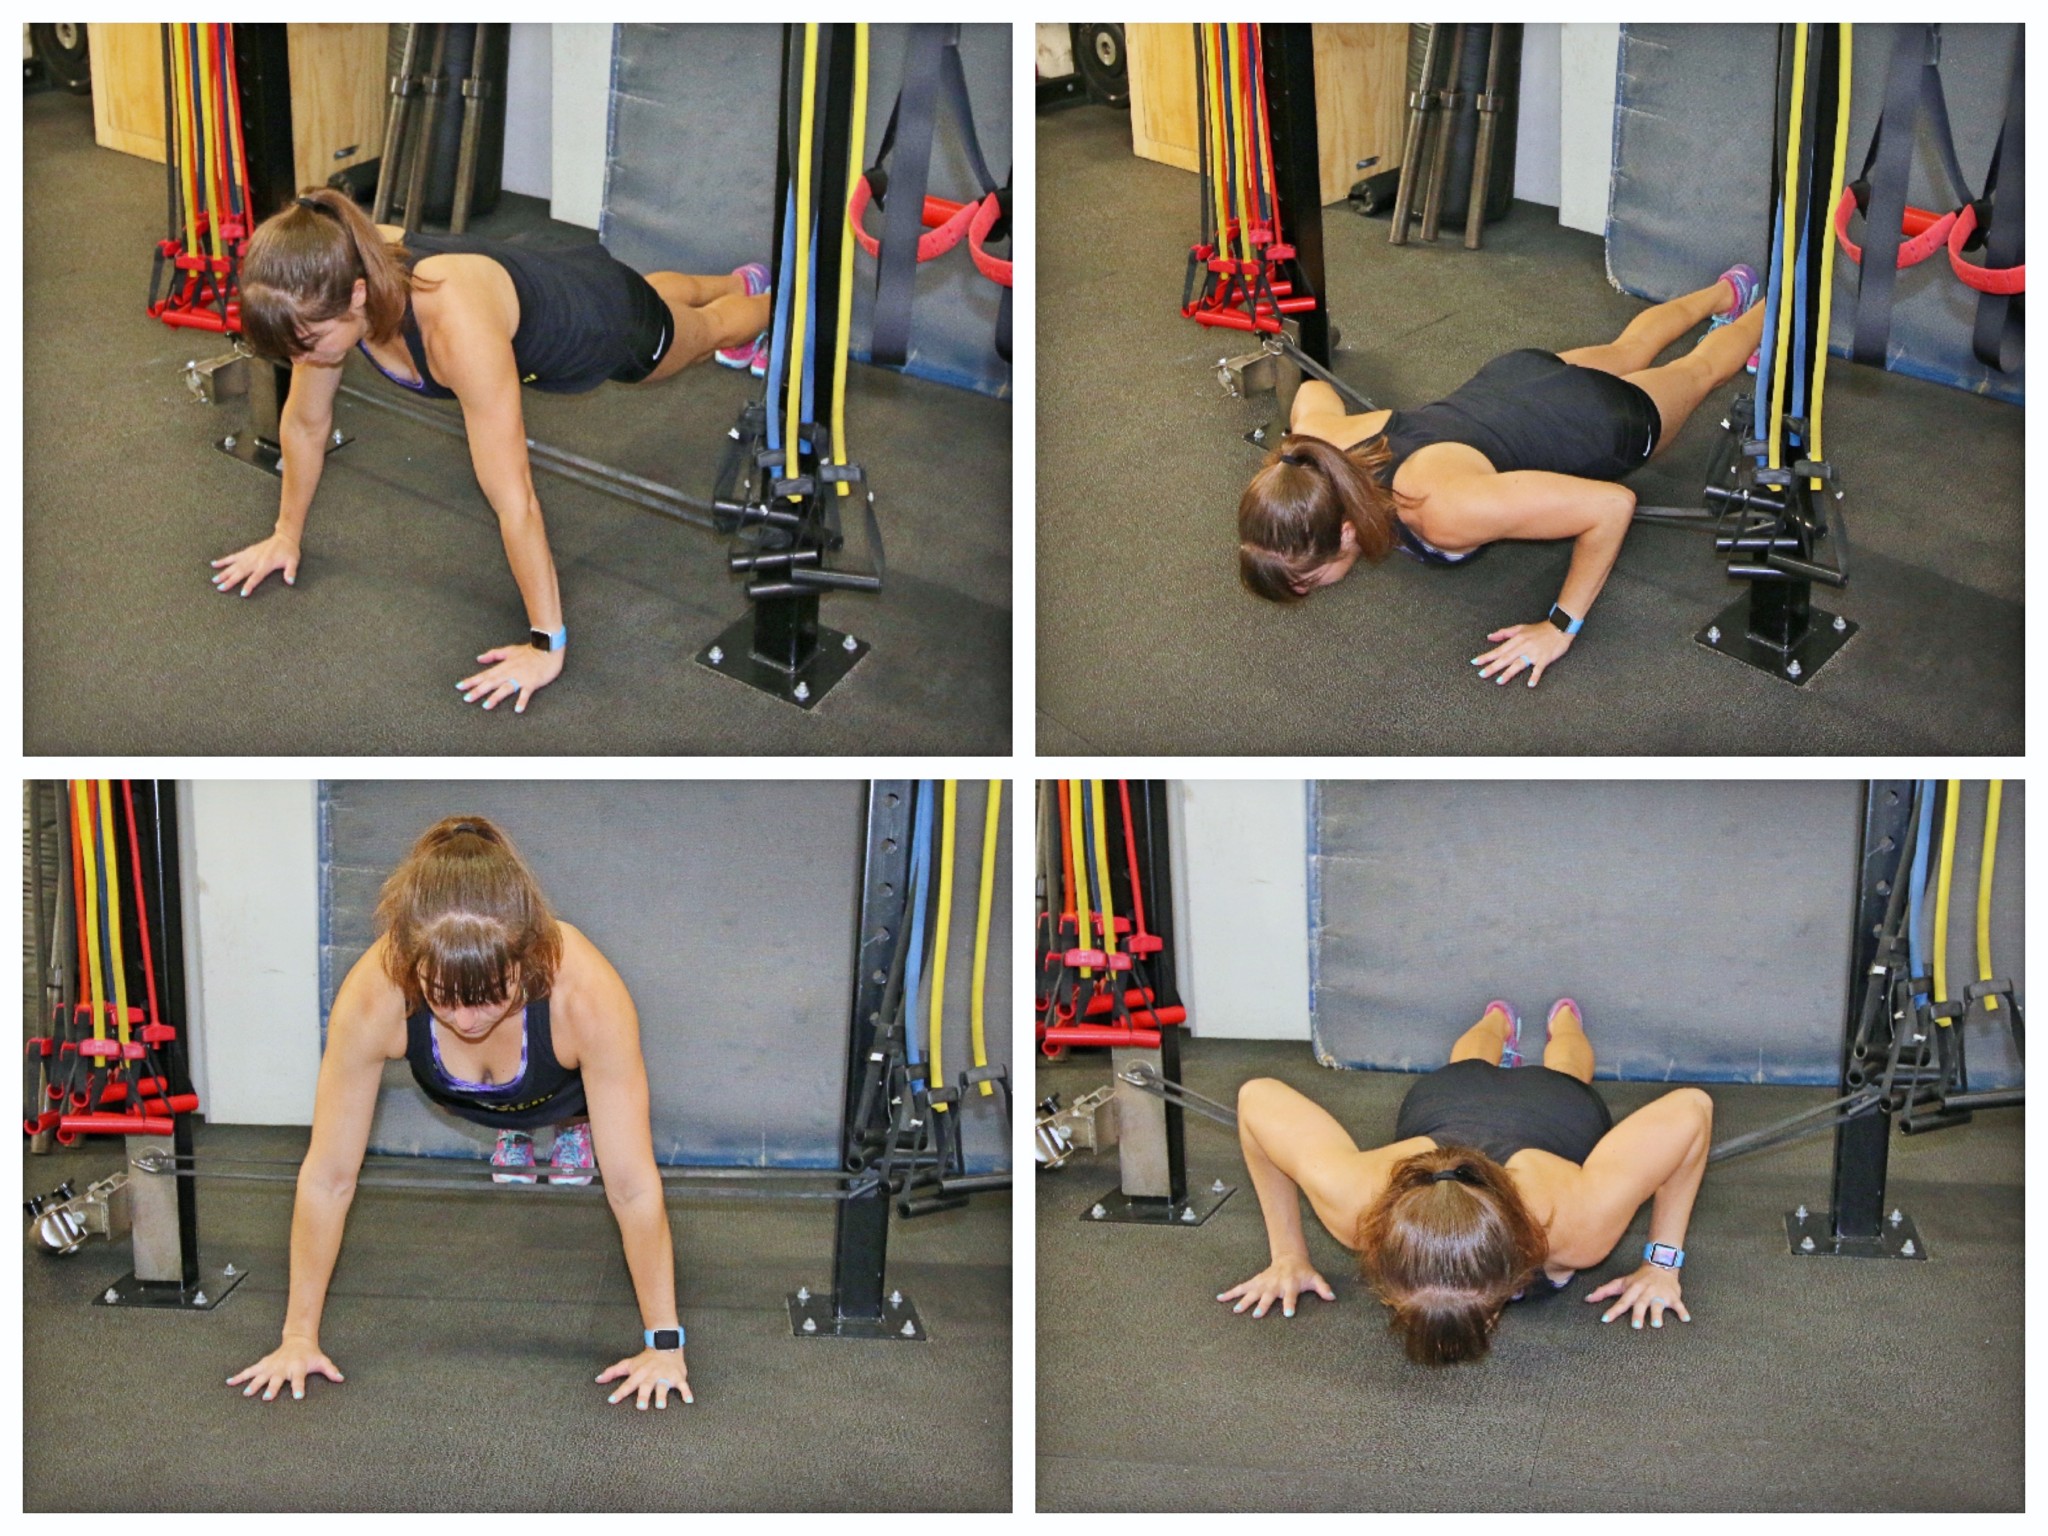
To do the Band Push Up, hook a band around two anchor points close to the ground. The lighter the band and the closer to the ground you put it, the less assistance you’ll get and the more it will only help at the bottom. The band should have tension on it when anchored and be parallel to the ground. Set up in a push up from the ground with the band about at the bottom of your ribs and your hands under your shoulders and body in a nice straight line to your feet. Your feet should be together.
Then lower down, dropping your chest to the ground or just an inch off and press back up. As you lower, the band will help you control the decent and maintain a nice straight line from your head to your heels since your arms won’t need to handle your full bodyweight yet.
Then once you lower down, press back up. Make sure to focus on engaging your core and performing the push up with proper form.
The cool part about the band is it can also be used later to add resistance to the push up. To do an Advanced Band Push Up, you’ll simply place the band under your hands but instead of in front of you, you’ll want to put it across your back. That way it will resist your push back up!
For even more tips to help you improve those push ups and strengthen your weak links, check out these 5 Tips To Improve Your Push Ups.
And if you’re ready to advance your push ups, try some of these fun 31 Push Up Variations! And beginners, some of these you can even use off an incline to keep things fun and interesting as you target different muscles!
Want guidance and coaching to help you dial in your workouts AND your diet to match your needs and goals? Schedule a call with Redefining Strength to chat about program options!
Pull Up:
Have you had Pull Ups as one of your goals for awhile? Feel like you’ll just never get there no matter how much you work on them? Feel like all you ever do is get better at the assisted variations?
Well maybe it’s because you’re not doing the right assisted variations or using them in the right way!
If you just keep trying to do MORE REPS with assistance, instead of fewer reps with constantly harder and harder variations, you’ll simply become better at the assisted variation.
Plus, depending on the type of assistance you use, it may be causing you to not learn how to properly engage at different points in the pull ups.
While Band Pull Ups are a popular way to modify the pull up, they are not my favorite.
Why?
Because bands give the most assistance at the bottom and often start us at a point where we never have to learn how to engage our back properly at the bottom.
Ever feel like if you just started a little above a dead hang you could easily do a full pull up?
That’s because you haven’t been working to learn that initial engagement from a dead hang. You aren’t able to engage your back and go from just hanging to retracting and depressing your shoulder blades. And if you’ve been using bands, it’s because the band puts you in a position where you’re above that initial engagement point.
So because the band hinders you from learning that initial engagement, they aren’t my favorite way to modify. (Of course now knowing that, you can use them if that isn’t your problem OR even keep using them but also include Mini Pull Ups. Just always know why you are using certain moves and their upsides and downsides!)
Instead of doing Band Pull Ups, I like to use Foot-Assisted variations or even Jumping Pull Ups…and with both you can even use a controlled Eccentric to build even more strength!
The Foot-Assisted Pull Ups are a great way to control exactly how much assistance you give yourself and even adjust as you fatigue. Plus, you can provide consistent tension throughout the entire move.
To do Foot-Assisted Pull Ups, hang from the bar or trainer and place your feet flat on the ground in front of you or your toes right behind you. Either foot position works, just make sure you set up so you can pull straight up without arching your back or letting your hips come up and forward. You don’t want a huge arch in your body or to turn this into a row. You want a vertical pull.
As you hang at the bottom, you’ll want to move from a dead hang with your shoulder up by your ears to retracting your shoulder blades down and back as you press your chest up toward the bar. Leading with your chest, pull yourself up.
Use your feet only as much as needed to pull up. Your goal is to use your back and arms as much as possible. Pull your chin all the way above your hands and try to get your chest to your hands.
Then lower back down, fully extending your arms at the bottom, returning to the full dead hang. Feel your back working as you lead with your chest to pull up and lower down. You don’t want your upper traps or arms to be the only thing you feel.
To make the move harder, use your feet less or even just one one foot. You can also change up the tempo of this movement and do a very controlled slow lower down. By slowing down the eccentric portion aka the lower down, you will spend more time under tension, which can help you build more strength more quickly.
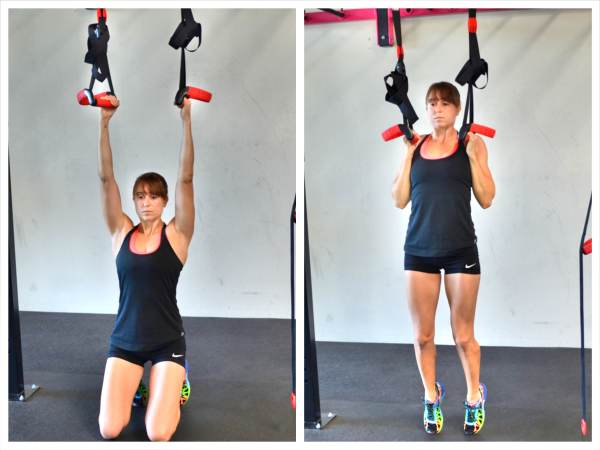
If you’re ready or maybe don’t have a bar at a height you can use your toes, you can also modify the pull up by doing a Jumping Pull Up with slow eccentric.
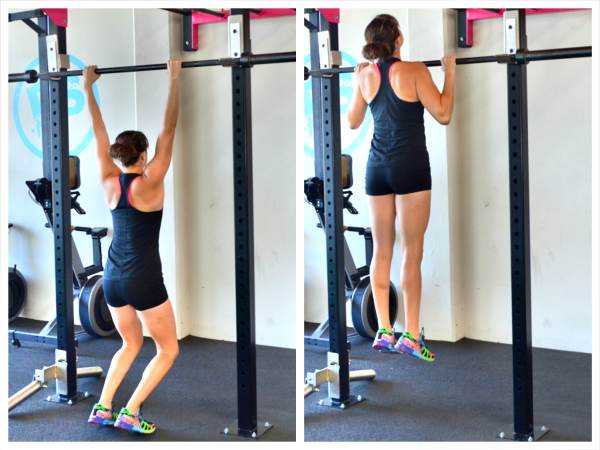
To do the Jumping Pull Up, set up under a bar that is high enough off the ground that you can hang from it, but low enough that you can use your legs to help get your chin up over the bar.
Hang from the bar with your feet flat on the ground. You can do this with either a chin up or pull up grip. Then jump, and at the same time, pull yourself up with your arms to get your chin up over the bar. Only use your legs as much as is needed to get your chin over the bar. Think about leading with your chest as you jump up.
At the top pause if possible and then slowly lower yourself back down, fully extending your arms at the bottom before you jump up again.
Try not to pause at the bottom or let go of the bar but quickly repeat the move, slowing down the lower down to take on your own bodyweight as long as possible. By slowing down the lower down, you’ll spend more time under tension AND take on your own bodyweight even though you’re not yet able to do a full pull up.
With both of these modified variations, it is best to do fewer reps with a more advanced variation. If you’re looking for that first full pull up, you don’t need to be doing 10 reps, but instead 1-3 reps with the hardest variation you can do!
Ok so say these are all well and good but you want to modify the pull up because you don’t have a bar to do them from and they are included in your program?
Two great exercises I will sometimes sub to modify the Pull Up are the Band Lat Pull Down and the Inverted Row.
Both of these can help you build back strength and work on your scapular mobility to improve your pull ups as well as your posture.
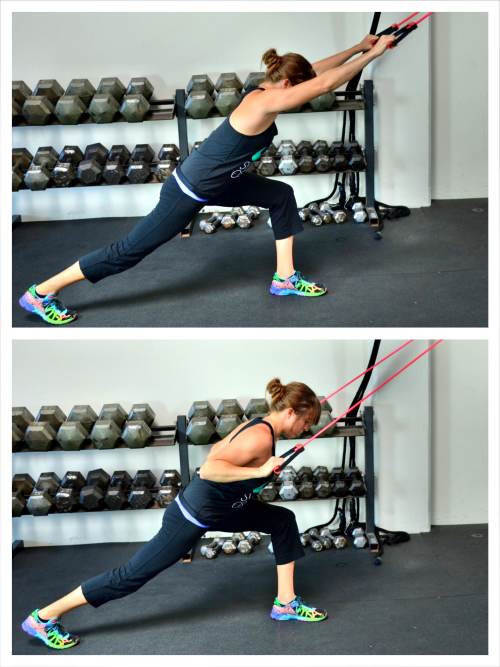
To do the Band Lat Pull Down, anchor the band up high and, holding a handle in each hand. Walk back away from the anchor point and set up in a lunge stance.
Lunge back while facing the anchor point and lean your chest over your front knee. Your back leg can be straight, but you want to make sure to lean forward so that you work your lats and are performing a movement that mimics a vertical pull.
Reach your hands up overhead. There should be tension in the band with your arms extended. If there isn’t, move back. Then pull the band down toward your shoulders, driving your elbows down and back. The movement should mimic you pulling yourself up to a bar for a pull up.
As you pull down, pinch your shoulder blades down and together. Focus on working your back muscles. You want to feel the sides of your back pulling the band down. Don’t just go through the motions. You want to consciously activate the big muscles of your back.
The slowly extend your arms back out and repeat. Each time you pull down, drive your elbows down and back.
Keep your core engaged the entire time and your back flat. Do not start to straighten up and turn this into a row instead of a pulldown.
You may also feel this move in your legs because you are holding a low lunge. You can do pulldowns with a few different grips. You can have your palms facing the ground (pull up grip), palms facing you (chin up grip) or palms facing each other (neutral grip).
Change the tempo or move back further from the anchor point to make the move more challenging. Just like with the pull ups, you can slow down the eccentric portion.
And while the Inverted Row is a horizontal pull, unlike the Band Lat Pull Down that mimics the vertical pull, it is a great move to supplement your pull up work and even modify the pull up to start.
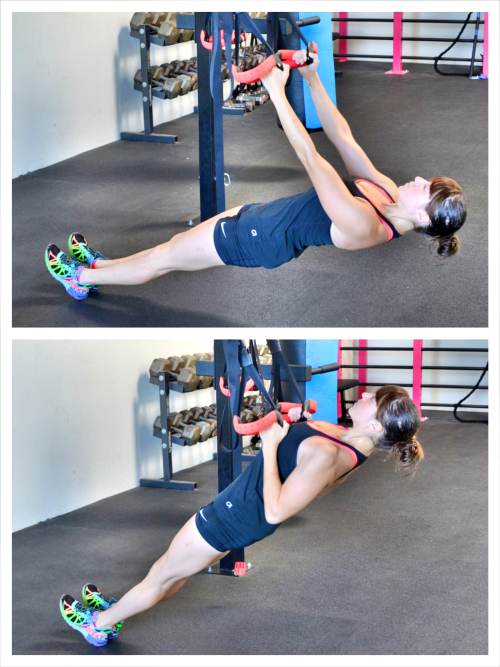
To do the Basic Inverted Row, you can either use a Suspension Trainer or a Bar. Using a Suspension Trainer, hold a handle in each hand with your palms facing in. Walk your feet forward so that your body is at an incline. The closer to parallel to the ground you get, the harder the move will be.
Hang from the straps with your body in a nice straight line and your chest pressed out. Engage your core and glutes and keep your legs straight. You want a nice straight line from your head to your heels. Do not let your low back arch or your hips sag toward the ground.
Then drive your elbows down and back to row your chest up to the handles. Keep your body in a nice straight line as you row up and do not bounce off the bottom. Keep your wrists straight as you row up. Also, do not shrug your shoulders.
Then lower back down. Do not lose tension at the bottom. Make sure to keep the chest pressed out and your body in a nice straight line. Do not swing to row back up.
Make sure to feel your back and arms working to row and not just your arms. Focus on feeling your back pull.
As you build up your pull ups, you can even have some fun playing around with these 28 Pull Up Variations.
And for 3 keys to help you improve your pull ups, check out this Pull Up post as well!
Deadlift:
The Deadlift is a must-do compound exercise that trains the hip hinge movement and works your entire posterior chain aka your backside. But it is far from an easy move to do, especially with a barbell which is the most common variation we see done and taught.
The hip hinge is a fundamental movement but one that isn’t easy for many of us to do because we want to either turn it into a squat OR simply lean forward. It’s hard because all too many of us sit for way too many hours during the day and our hips become tight so our glutes don’t want to fire correctly and we instead want to squat or load our low backs instead of hinging properly at the hips.
That is why it is important to learn the hip hinge movement before moving on to the barbell deadlifts. No back injuries please!
A great way to modify and learn the hip hinge movement is with the Band Hinge or even the Kettlebell Deadlift.
The Band Hip Hinge teaches you to load your glutes and hinge at the hips properly without simply leaning over. It is also a great move to activate those glutes (and one even advanced exercisers should include).
It is such a key modification because it activates the glutes and trains you to “push the ground away” to power the hip extension. Too often when people go to deadlift, they think about simply picking the weight up, which can cause them to lose tension and end up lifting with their backs. Training to “push the ground away” helps you focus on using your legs to lift the weight up.

To do the Band Hip Hinge, anchor a band behind you and step into the band so it is below your hips. Walk away from the anchor point so that there is tension in the band and stand with your feet about hip-width to shoulder-width apart. The more the band tries to pull you back (aka the further out you walk), the harder the move will be.
Then hinge over, allowing the band to pull your butt back toward the anchor point. Make sure your knees are soft so that you can sit your butt back and load your glutes. You will need to have a slight bend to your knees to keep you from flying back with the band.
Then explosively drive your hips forward to come back up to standing tall. Think about driving through the ground to extend your hips as you squeeze your glutes at the top. You may lean slightly forward against the band, but you want to stand up tall and drive your hips forward against the band without arching your low back.
Stand up tall and squeeze your glutes then quickly hinge back over before repeating. This should be a quicker move and you should really focus on loading your glutes as you hinge over and then on quickly driving your hips into extension as you stand back up, squeezing your glutes hard at the top.
Also, make sure you don’t lock out your legs OR squat to much as you hinge over. Make sure there is tension in the band even as you hinge over. Think about this move almost as if you are going to leap forward.
Another great way to learn the deadlift is using a kettlebell. During the barbell deadlift, it is key you keep the bar right up against your body. If the bar drifts away, people will often load their low backs to lift.
BUT it can be awkward to basically “scrap the bar up your shins” as you deadlift. Which causes people to try to keep the bar away from their body, which puts them at risk for injury.
So to avoid the bar drifting away and to teach you to sit back and keep the weight by your body, a kettlebell can be a great way to modify!
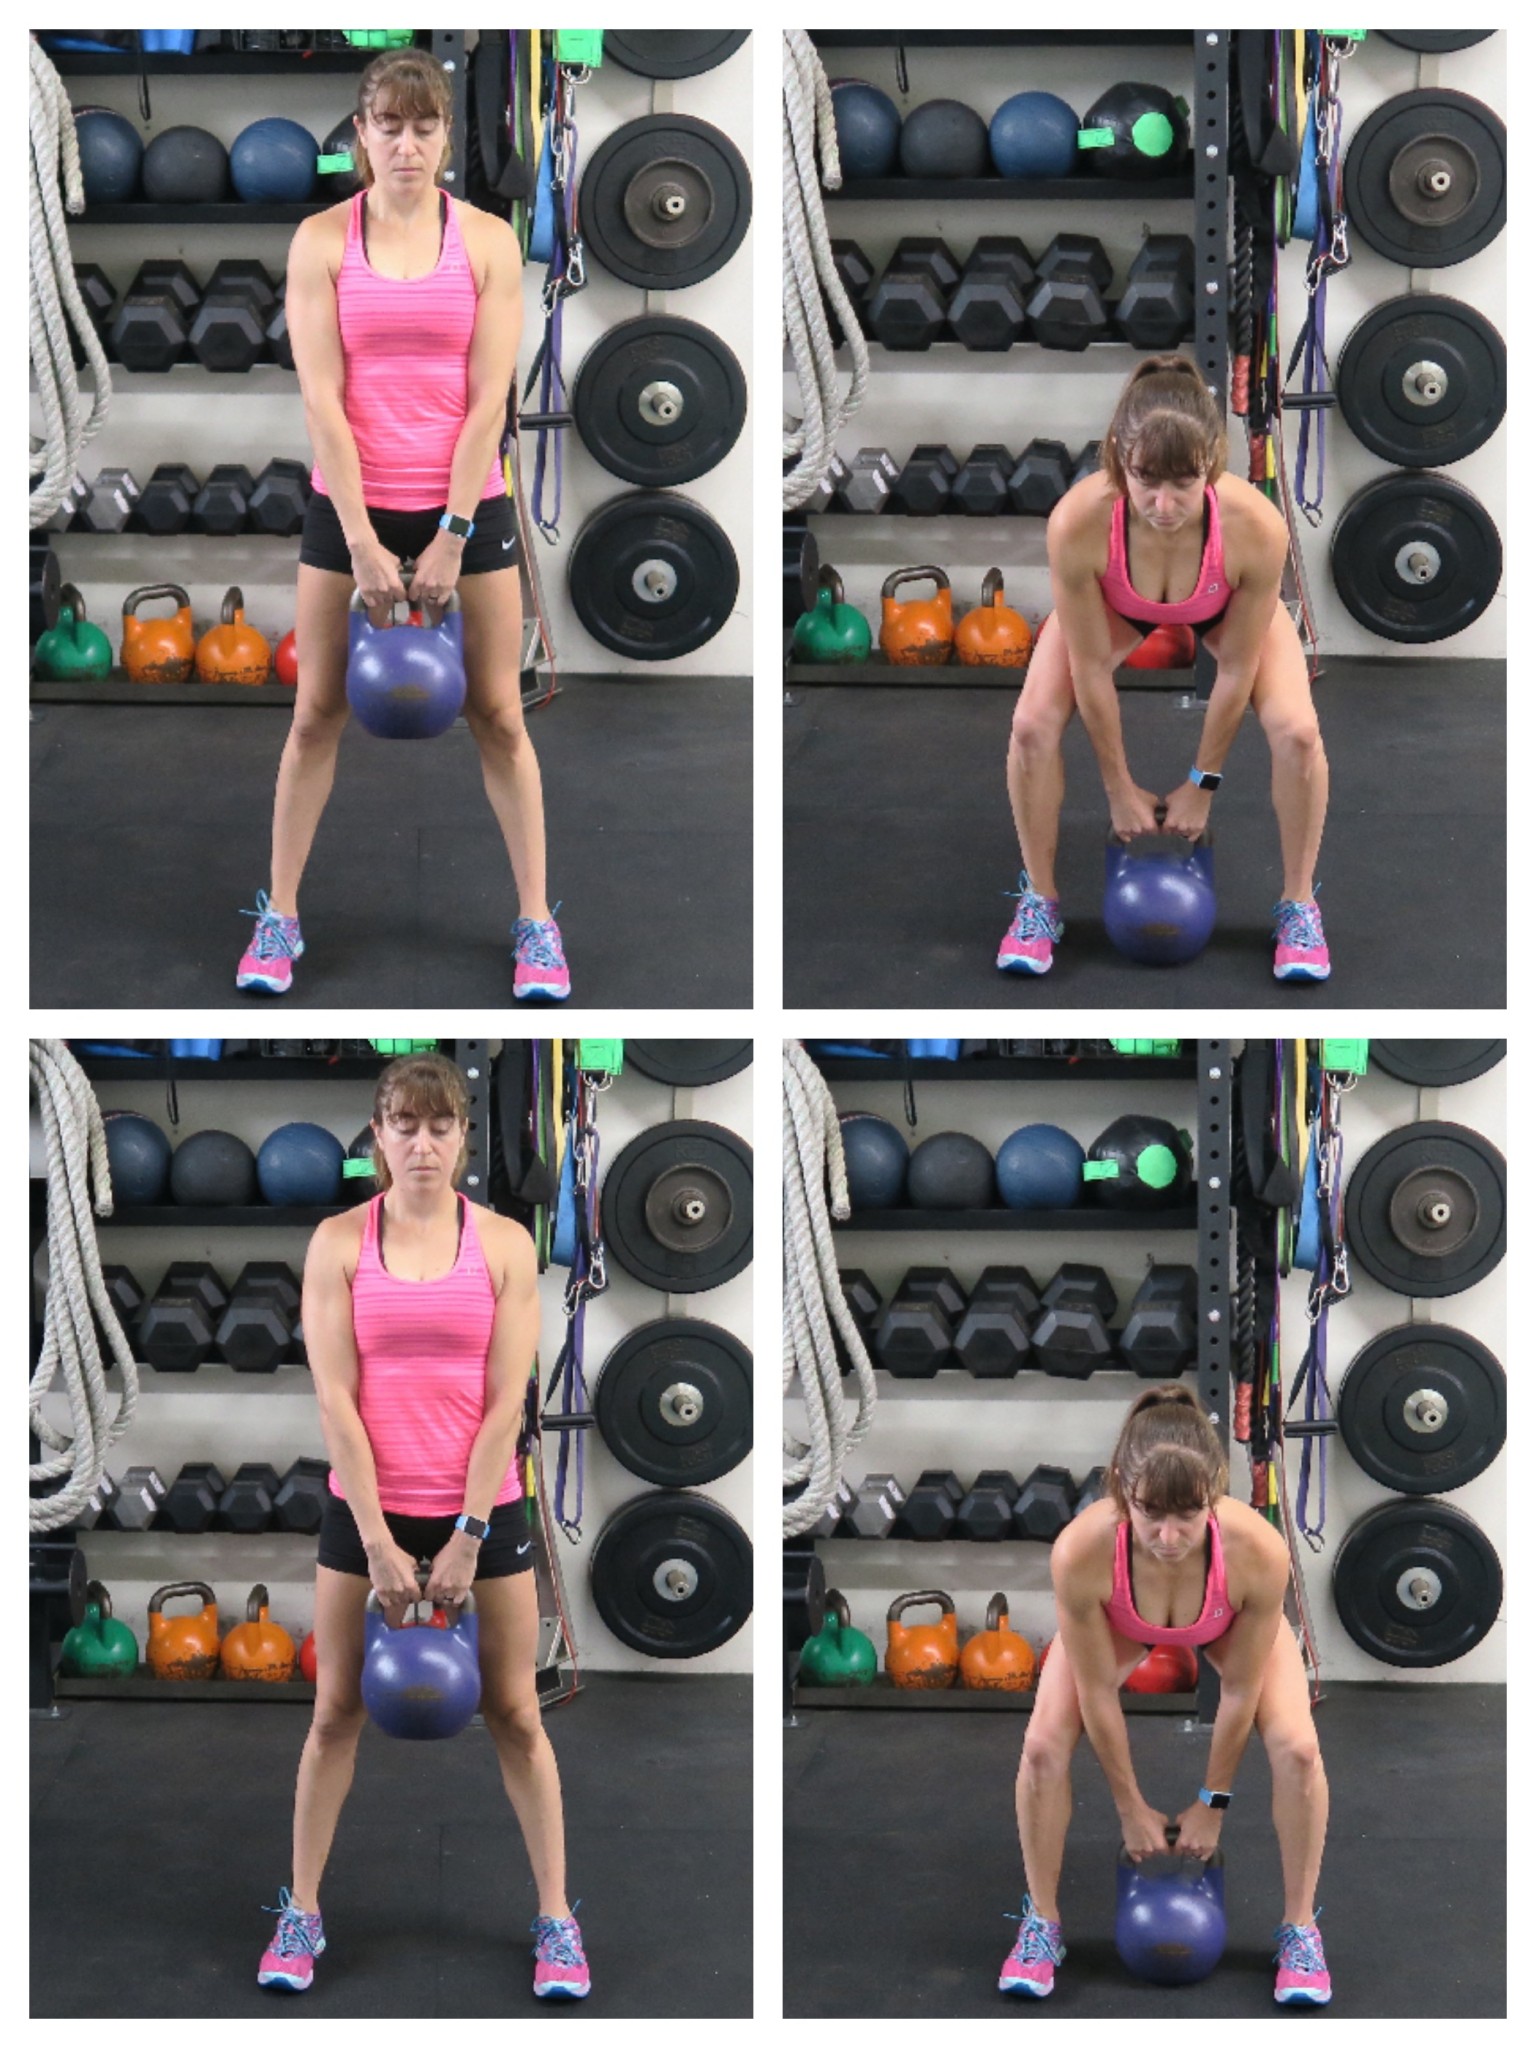
To do the Kettlebell Deadlift, place a kettlebell in between your feet as you stand with your feet about hip-width to shoulder-width apart. Your feet should be parallel and the kettlebell should be back by your heels.
Sit your butt back and hinge at the hips so you can reach and grab the kettlebell handle with your spine and arms straight. Your knees will be soft so you can load your glutes. As you hold the ketllebell, create tension through your arms and engage your lats to keep your back flat.
Then drive the ground away as you lift the weight up. Stand up nice and tall and squeeze your glutes at the top. Then sit your butt back as you hinge at the hips to drop the weight back toward your heels.
Make sure you don’t lean forward to lower the weight out in front of you as you put it back down. Really make sure to lower the kettlebell back down toward your heels, forcing yourself to sit back and hinge at the hips with your knees soft. You don’t want to just lean over or let your back round. Load your glutes and sit your butt back, bending your knees to allow yourself to load your glutes. Do not lock out your legs.
Another must do variation of the deadlift is the Single Leg Deadlift. But what if your balance sucks and you still want the benefits of the unilateral move? Because the unilateral move, or one sided movement is key to help build core strength as you correct imbalances between both sides. During a unilateral move, your strong side can’t take over!
To modify the Single Leg Deadlift, you can use a slider or even do a Staggered 80/20 Deadlift. Both of these variations will give you the benefits of a unilateral move and allow you to start working toward that full single leg move while helping reduce how much balance is needed. These moves may be “modifications” but they are great moves for even the advanced lifter especially if they add weight!
The best variation to start with is the Staggered 80/20 Deadlift.
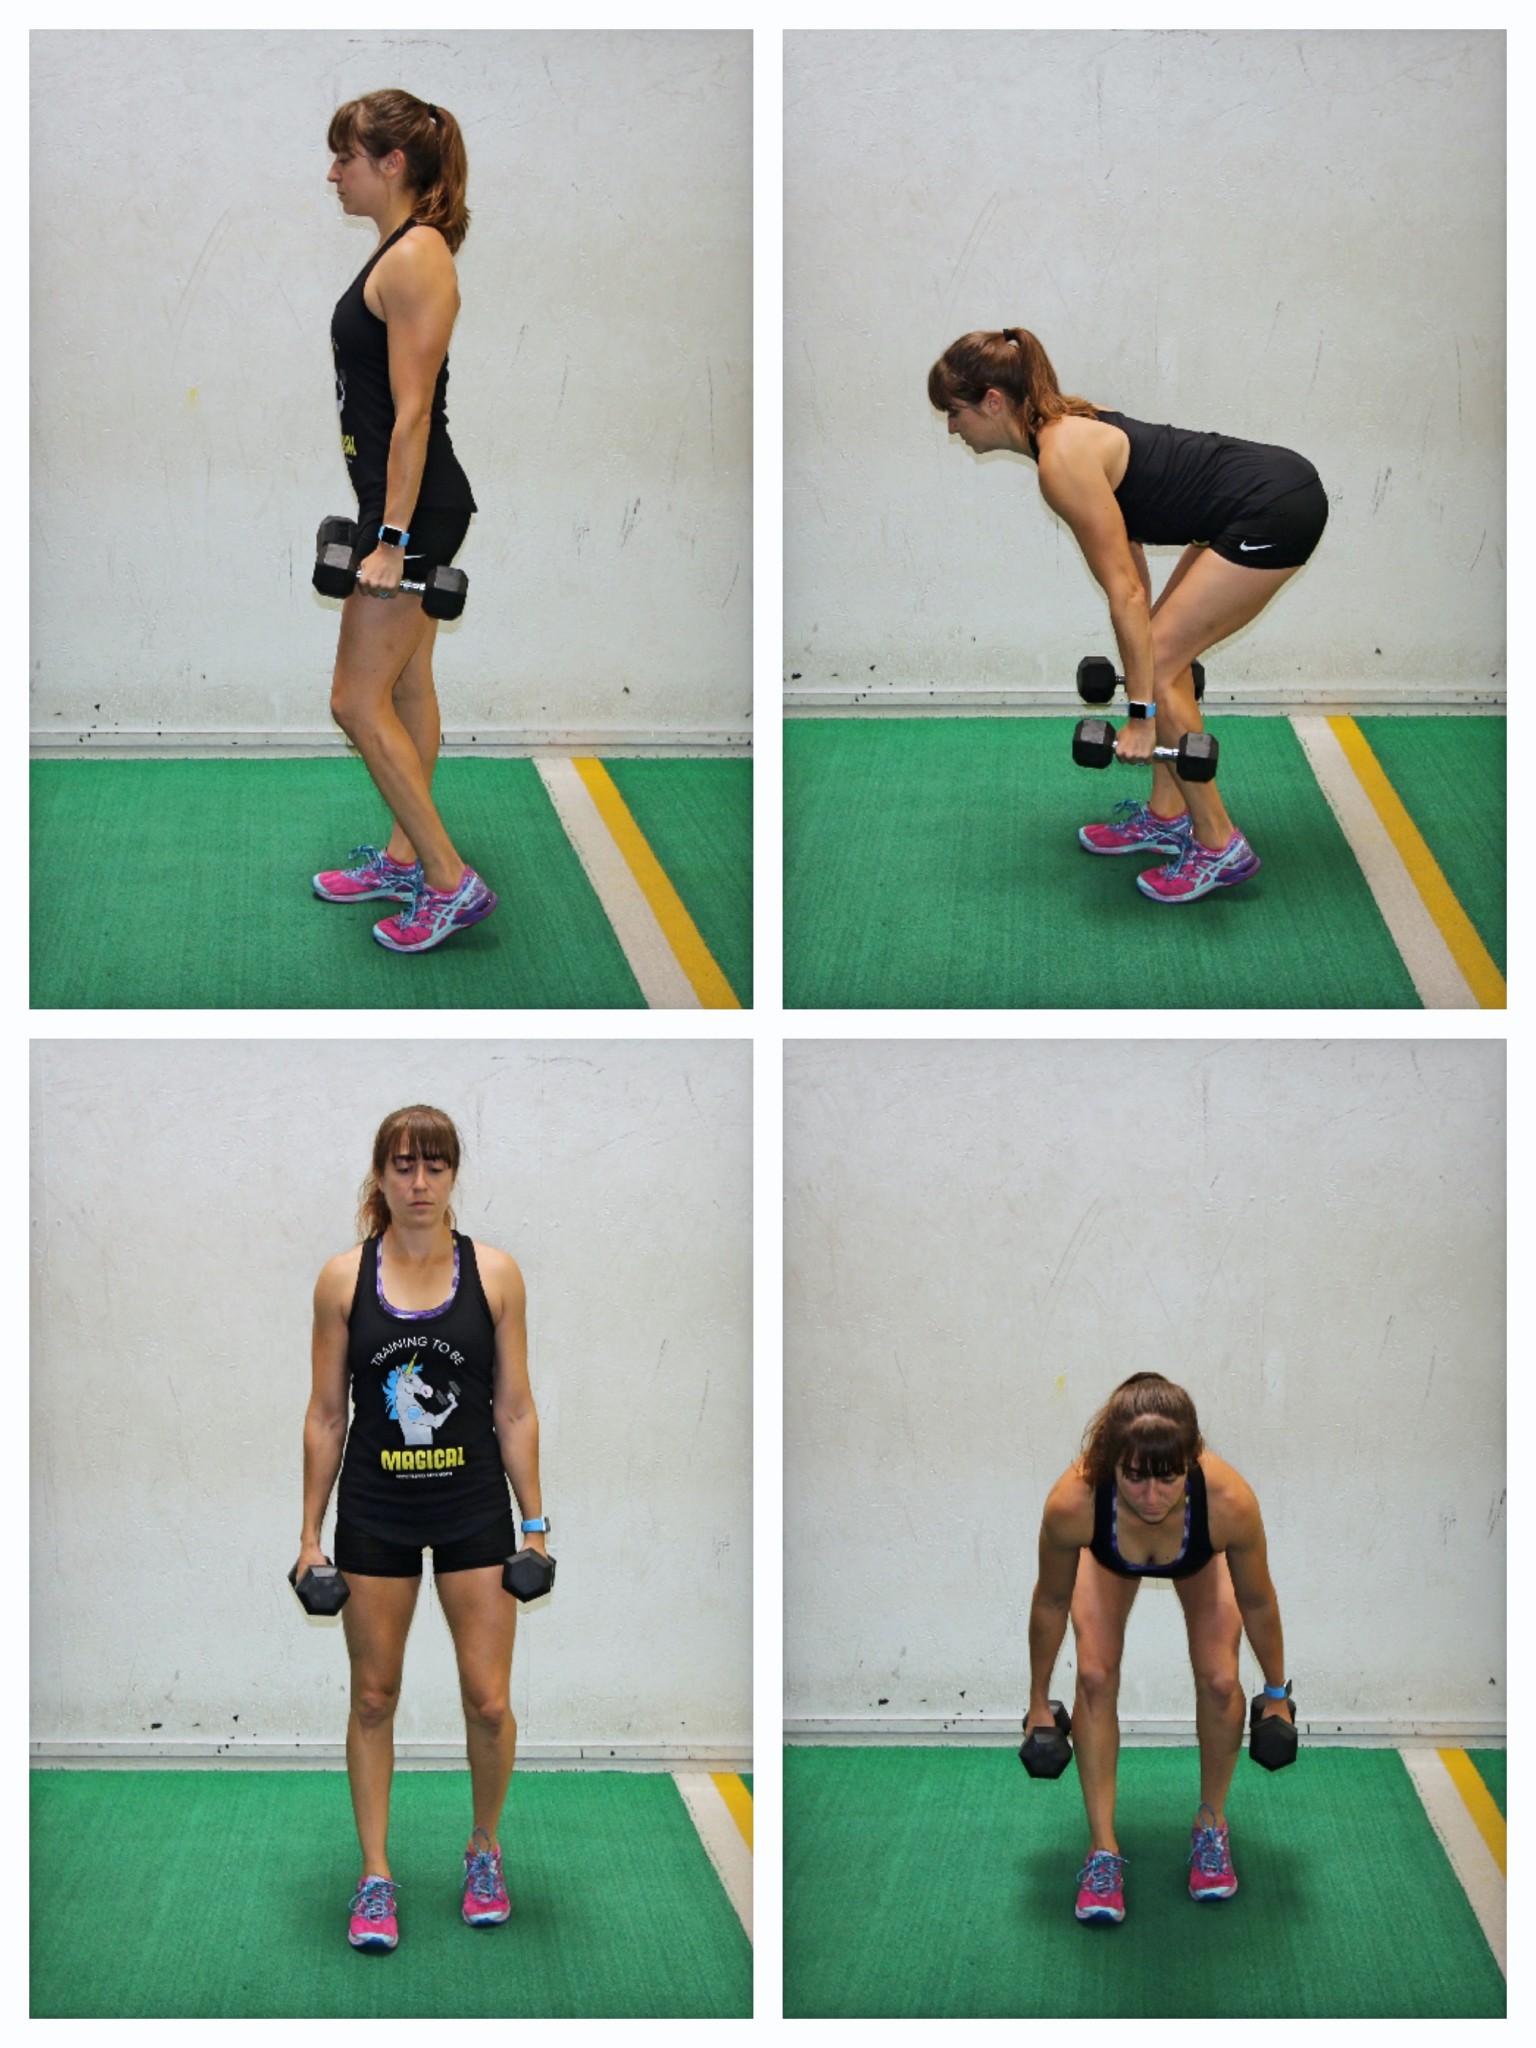
To do the Staggered 80/20 Deadlift, you can hold a ketllebell in both hands down in front or a sandbag up at your chest (any weight can actually work in either loading position). Stand with your feet about hip-width apart then step one foot back toward the instep of the other foot or even back toward the heel. Do not put that foot any further back then your heel. Lift up onto the toe of that back foot so it is just lightly on the ground for balance and that back knee is bent.
Then push your butt back and hinge over softening your front knee as you sit back and load your glutes. Keep your back flat as you hinge over and feel your hamstrings stretch and glutes load. Then drive back up to standing and squeeze your glutes at the top. 80-90% of your weight will be on that front leg with the back leg really there for balance. You will feel that standing glute and hamstring load. Do not rotate or shift your weight back toward the staggered leg as you hinge and drive back up.
The Slider Single Leg Deadlift, is another variation that focuses on each leg individually without the balance requirements of the full single leg variation. This one can be tougher for people as often it becomes a lunge instead of a deadlift. You want to remember your weight is all on the standing leg and you are just allowing the foot on the slider to slide back for balance.
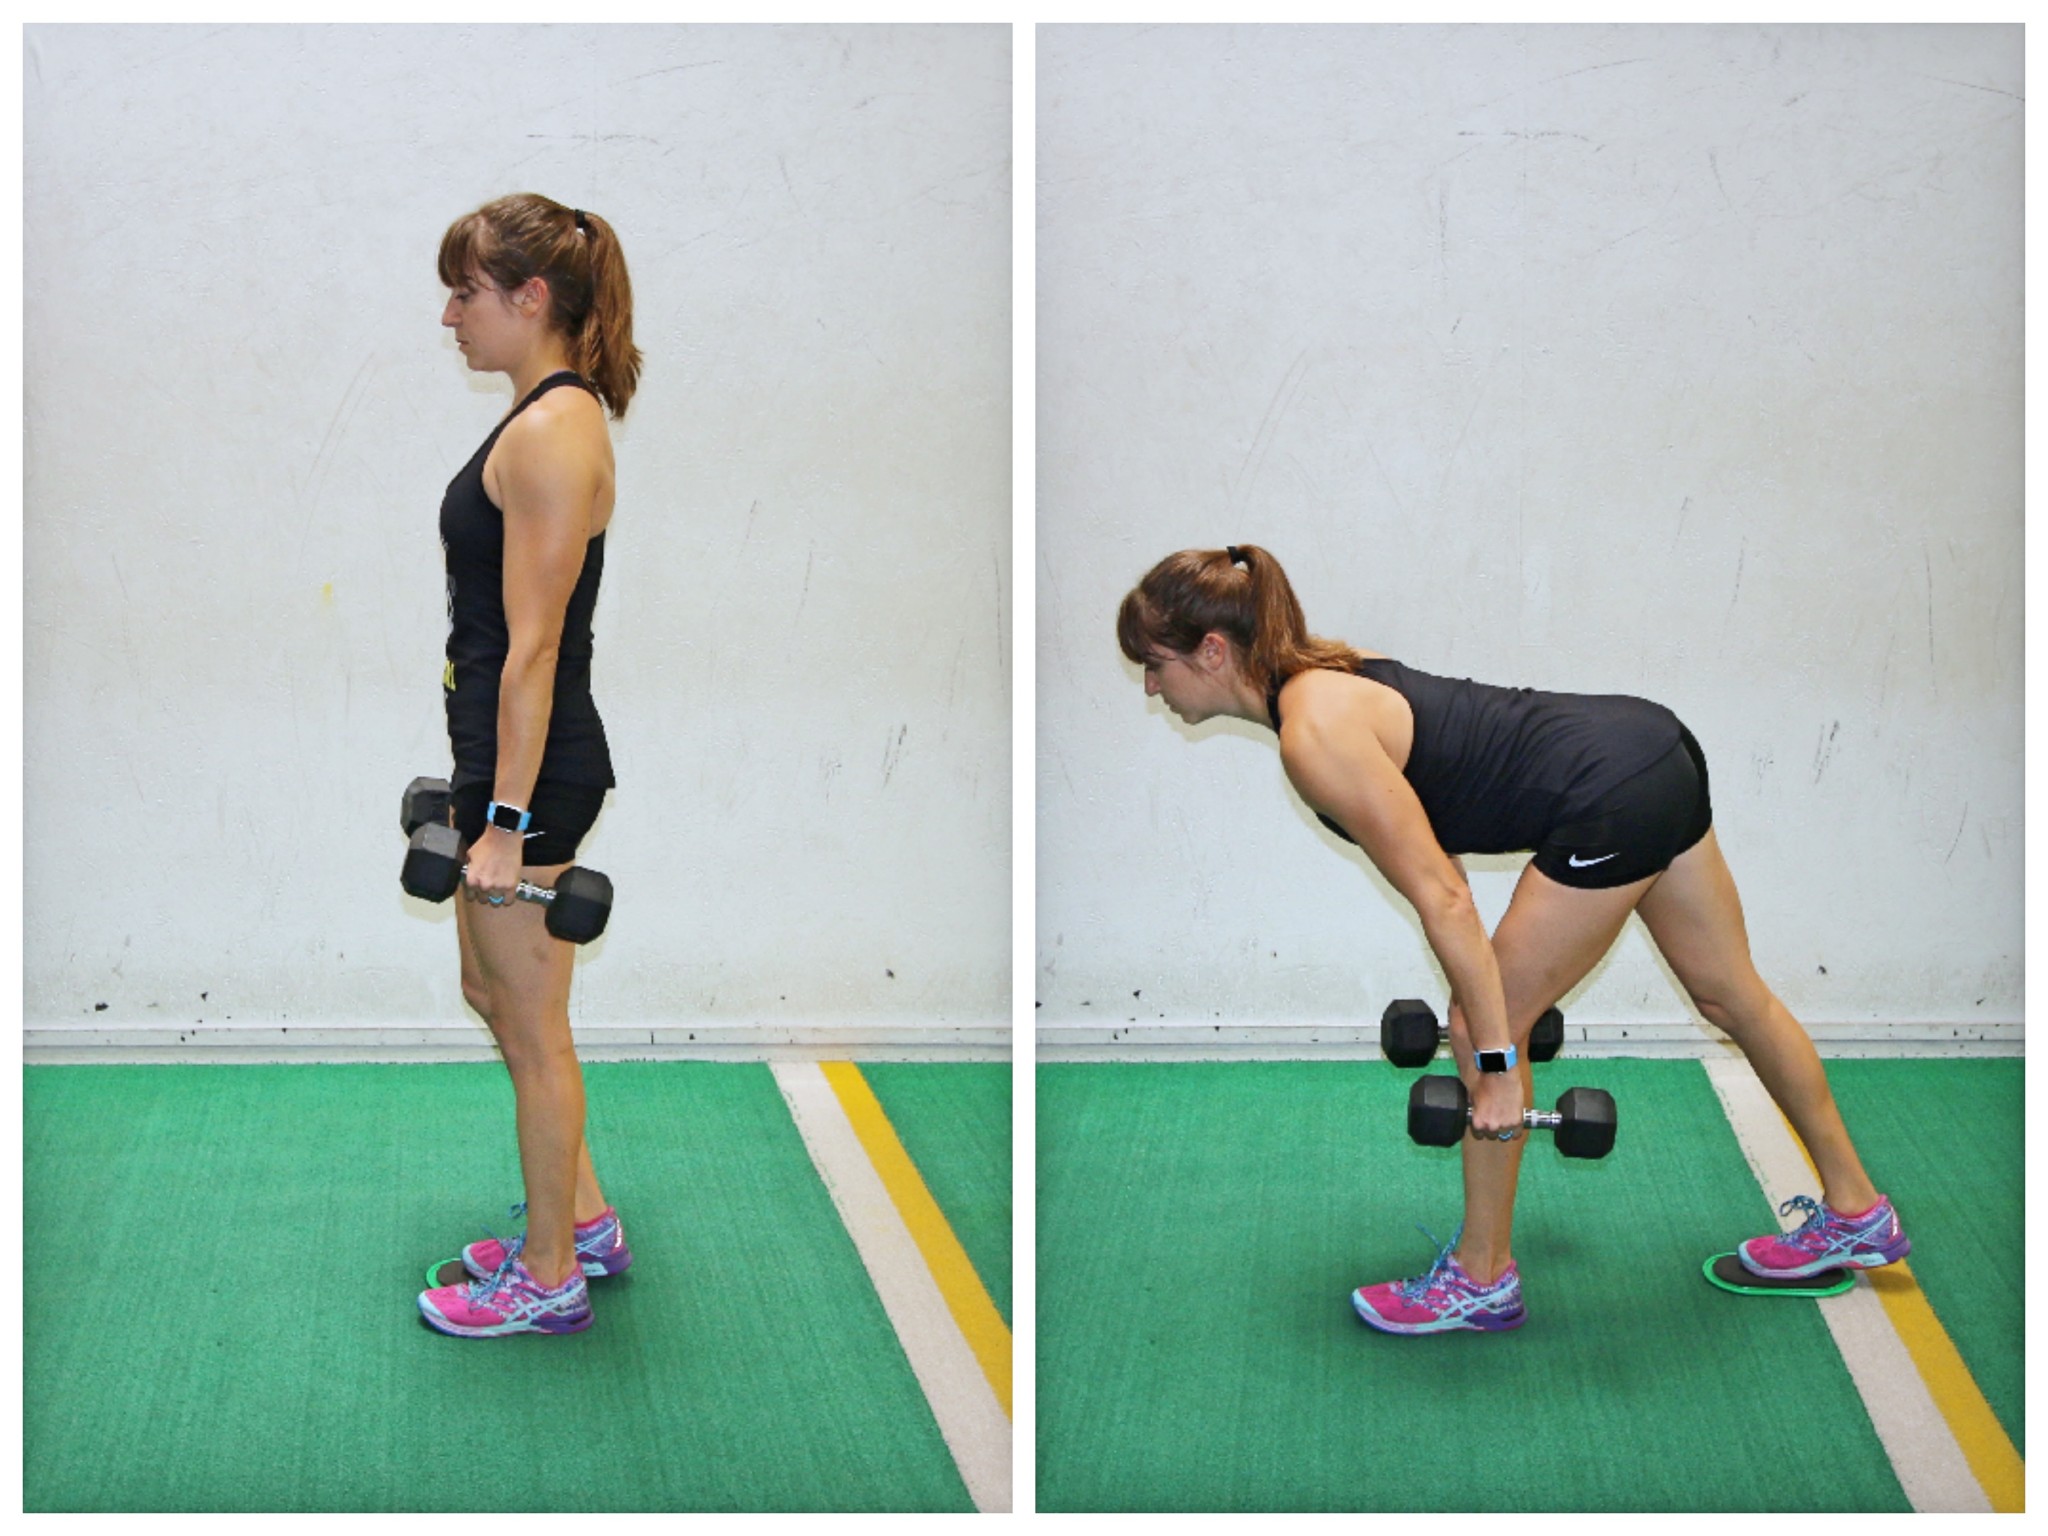
To do the Slider Single Leg Deadlift, you can hold a weight at your chest or down by your sides OR even unilaterally loaded aka in one hand. The unilateral load can challenge your core even more BUT don’t add this if you can’t perform the basic move correctly…This is a way to advance this move. Place the ball of one foot on a slider and stand nice and tall.
Then, hinging at the hips, push your butt back with your knees soft. As you hinge, your foot will slide back on the slider. Do not think about sliding back though. Your focus is not on how far you can slide back. You want to keep your weight centered on that front leg and only lightly on the slider.
You want to feel a stretch down the hamstring of your standing leg as you sit back and load your glute. Keep your back flat as you hinge over.
Then driving through the standing foot, come back up to standing, sliding your back foot back in as you stand up. Squeeze your glute at the top. Remember you are focused on that standing leg and using the foot on the slider only to stay balanced.
For even more tips on improving your deadlift, click here –> Proper Deadlift Form and Variations.
Want guidance and coaching to help you dial in your workouts AND your diet to match your needs and goals? Schedule a call with Redefining Strength to chat about program options!

