The Most Underrated Back Exercise

The Most Underrated Back Exercise

If you’re looking for an amazing exercise to strengthen your back while helping you avoid neck, shoulder and even lower back aches and pains, then you’re going to love this video!

In this video, I’ll go over how to do this amazing exercise, how it can help you avoid overloading your lower back if you feel it often during bent over rows and even some variations you can try to target your back in different ways and make use of any tools that you have! 

Hey guys it’s Cori from Redefining Strength where we help you feel, look and move your best at any and every age.

Having a strong back not only looks amazing but it can help us avoid neck, shoulder and upper back aches and pains as we get older. It can help us maintain amazing posture as well. 

But often when we do back exercises, we feel our lower back becoming achy during bent over rows or we simply feel our biceps fatiguing over our back being worked. 

Our back is not getting the full benefit.

That’s why I wanted to share this amazing move, the chest supported row, to help you really isolate and focus on building a stronger back!

First, I’m going to go over how to do this move and how it can help you really target your back before I go over how to adjust it to hit the muscles of your back to different extents even using the tools you may have available.

And at the end I’ll share two bonus tips to help you make sure you’re using this move to build muscle!

To do the Chest Supported Row, set an incline bench up at a 45-60 degree angle. 

I love using an EZ bar for this move to target the upper back and rear delts and also slightly restrict the range of motion so we don’t end up rowing back further than we are truly engaging our back. 

Grab the EZ bar in both hands with an overhand grip, pushing through your feet to drive your entire upper body really firmly into the bench. This will support your lower back. 

Making sure to keep your chest pressed into the bench, row the weight up toward the bench. Feel your shoulder blades move together toward your spine to pull the weight up. 

Do not let yourself arch away from the bench or start to curl the weight. 

Focus on that scapular movement without shrugging. 

Row the weight up then fully lower back down. Do not stop short of full extension. 

Now why is this variation so amazing for targeting your back while helping you avoid compensating or overusing your biceps or lower back?

Because the EZ bar will be stopped at the bench, this is a great way to make sure you stop the row before you start to extend the range of motion through only shoulder movement.

Too often when we row we will see our shoulders only rounding forward at the end as we try to make the row movement bigger pulling the weight past our side. 

The bench also helps reduce any “cheating” during the row. 

The bench supports your upper body, this variation forces you to really isolate your back over bouncing the weight or getting to cheat in any way. 

It also can help you avoid arching your lower back, which is often when we feel our lower back becoming achy during the bent over row.

Just be conscious to really push into the bench over trying to pull back off of it as you row. 

And off of this basic variation, you can play around with different variations, not only based on the tools you have available but also the muscles you want to activate or focus on more.

Not only can you simply use an underhand grip on the EZ bar to engage your biceps and lats more over your upper back and rear delts, but you can also mix things up using dumbbells. 

With dumbbells, you can even include a narrow grip variation, great for really getting those lats working!

And if you do have any imbalances, you can do a unilateral variation as well. 

It’s key we recognize the opportunity in small adjustments to moves to make them ideal for what we personally need and then even see the other variations as progression through the same but different.

Bonus Tips:

And two bonus tips…

This move is a great exercise to build muscle when included in your routine for about 8-12 reps. Especially starting out so that you focus on really isolating your upper back, this allows you to go heavy enough without starting to max out and find ways to cheat. 

The second tip is if you don’t have an incline bench, you can create space to row off a flat bench by stacking a few plate weights underneath.

For more tips to help you strengthen your back, and an amazing exercise to work on that scapular retraction, check out THIS BACK VIDEO next.

Want A Strong Back? (Do This Back Exercise!)

Want A Strong Back? (Do This Back Exercise!)

Too often we waste exercises by not actually working the muscles intended.

And then we wonder why we aren’t seeing the results we want.

But we have to remember that if we don’t feel the correct muscles working, those muscles aren’t reaping the benefits.

For example, if you feel your lower back during ab work, your lower back is what is being worked, not your abs. So all of that ab work isn’t going to pay off the way you’d like.

And it may even result in injury as your lower back becomes overworked and overloaded. This can even lead to your lower back engaging when it shouldn’t in other compound moves and lifts.

So not only is the muscle group we want benefiting NOT benefiting, but we may be creating recruitment patterns that can lead to other issues and injury.

The same thing goes for those back exercises you’re including in your workouts.

Tend to feel your neck or shoulders or even your biceps working instead of your upper back during rows or pull ups?

Struggling to feel like all of that back strengthening work is leading to the results you want, like improving your pull ups so you can do that first full one?

Then you need to make sure your back is actually what is powering your pulling moves.

And if it isn’t, you need to potentially modify so your arms can’t compensate.

You need to start by addressing your scapular mobility and stability to actually get your back powering the pull!

That’s why I love this amazing move – The Back Shrug.

While we need to include mobility work and that full prehab process of foam rolling, stretching and activation in our warm up routine, we can’t out mobility work improper movement and recruitment patterns when we lift.

It’s why we need to be intentional with moves and see every exercise as a a chance to assess.

And it’s why, when the correct muscles aren’t working, we sometimes need to modify moves and even try other variations to improve that mind-body connection.

It’s why if you struggle with with using your back during rowing, you may want to switch to the Back Shrug to start focusing on that scapular retraction to engage your back and power the pull.

How Do You Do The Back Shrug:

This move boils the row down to just that initial scapular movement to learn to control that back engagement.

When you row, the movement should start because you’re you’re drawing your shoulder blade toward your spine to use your back to pull.

This movement isolates just this component of the row, removing any elbow flexion that may lead to us compensating and using our bicep instead.

Too often with rows, we end up performing a bicep curl, curling our wrist in toward our chest over driving the elbow down and back as our shoulder blade moves toward our spine.

That’s why focusing on just that scapular movement to start can be key.

To do the Back Shrug, hold a dumbbell in each hand and hinge over standing with your feet about hip-width apart.

Let your arms hang down and unshrug your shoulders while keeping a neutral spine. Make sure you’ve hinged over to load your glutes while keeping your knees soft.

From this bent over position, you are going to try to pinch your shoulder blades together while letting your arms hang down.

Draw your shoulder blades toward your spine. Don’t just shrug your shoulders. Focus on that scapular movement.

Do not bend your elbows or start to row.

Just pinch the shoulder blades together, pausing, then relaxing the weights back toward the ground. Do not shrug your shoulders up toward your ears as you retract!

You will be able to add weight as you can fully control and feel the movement on both sides.

This is a small movement. Don’t try to make it bigger by standing up or bending your arms. Make sure to keep your neck long. Your only focus is on drawing the shoulder blades toward your spine then relaxing them away. Even pause as you do the pinch over rushing.

Variations:

There are so many ways you can then vary this move based on the types of rows you general include in your training and even the other muscles you want to target and tools you have available.

You could do this with a band instead of dumbbells. Or even off a suspension trainer. All of these are great to include to prep your body to row using these different tools and postures.

Because we can struggle with that scapular retraction in different positions, it can be key to include a diversity to make sure we’re initiating those rows with our back.

And if you find you struggle even with proper mobility and strength on one side, you can even make this movement a unilateral exercise, working only one side at a time or even doing rounds or reps on only one side.

If you don’t have any equipment, you can even do a unilateral variation called the Single Arm Scapular Push Up. This is great as an activation move in your warm up before any strength work even.

But as you really work to translate that activation to the full row with weight, consider the these variations to prep the body to initial that pull with that proper scapular movement.

SUMMARY:

Moves are only as good as their implementation. And if we want to get the full benefit of an exercise, we need to make sure we’re actually engaging the correct muscles to power the movement.

If you’ve struggled with feeling your back during rowing exercises, try this scapular retraction focused back exercise to really isolate and work on that initial back engagement.

It can easily be included as part of your accessory work for a few rounds of 10-15 reps! Focus on that scapular movement over just going heavy, but don’t be afraid to progress the movement by adding loads as you can truly control that retraction!

For more amazing videos and tips, subscribe to my YouTube:

–> Redefining Strength On YouTube

Why Posterior Chain Work AKA Working Your Backside Is ESSENTIAL!

Why Posterior Chain Work AKA Working Your Backside Is ESSENTIAL!

So if you’ve read or watched any of my videos on pain and injury prevention, you’ve probably heard me talk about how we spend way too much time in flexion. We spend way to much time rounded and hunched over. We spend long hours seated at a desk, in a car, watching TV with our hips, elbows, spine, knees, wrists…even our fingers…bent in flexion.

Even if you don’t have a desk job, you’re probably spending way too much time hunched over driving in your car, watching TV or texting on your phone.

We can’t seem to avoid it even though we all know that the constant forward flexion is bad.

(more…)

Thoracic Extension Exercises – The Thoracic Bridge And More!

Thoracic Extension Exercises – The Thoracic Bridge And More!

Most of us sit in flexion all day hunched over a computer screen or slouched in our car. This causes poor posture and often poor extension, which can lead to improper movement patterns, compensations and eventually pain and injury.

That is why it is important to include Extension Exercises in our workouts. These exercises open us up after sitting in flexion all day.

And one of the more important areas to include Extension Exercises for is our Spine. Proper Thoracic Extension is important not only for proper posture, but also to prevent neck, shoulder, upper back, lower back and even hip pain.

If you don’t have proper Thoracic Extension, your body is going to take the path of least resistance and seek out extra extension from other areas – areas that may not have the ability to provide the extension needed and therefore become overworked and injured. This compensation can lead to injuries up and down your body.

That is why it is important that you included exercises to improve your Thoracic Extension in your workouts.

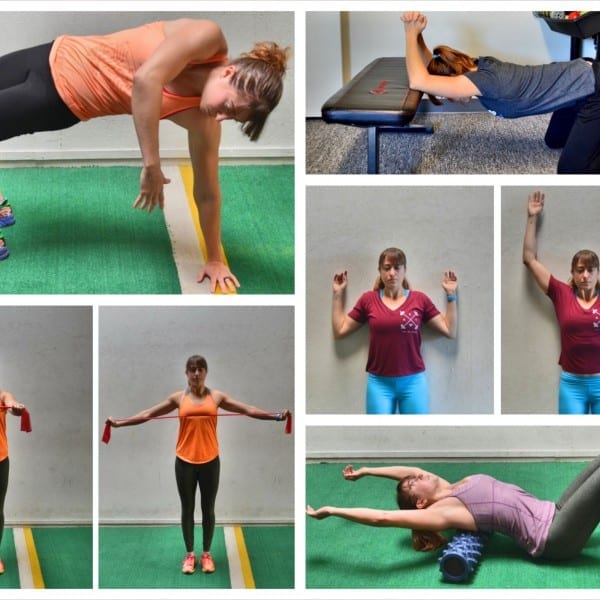
Below are some great Thoracic Extension Exercises, including the Thoracic Bridge. Include these in your workouts, warm ups or even throughout the day at your desk.

(more…)

How to do an Inverted Row |The Pull Up Vs. The Inverted Row

How to do an Inverted Row |The Pull Up Vs. The Inverted Row

To work your back, you need to include Pulling Exercises in your workout routine.

However, not all Pulling Exercises are exactly the same because there are a lot of different muscles that make up your back that are worked to different degrees by different movements.

The two most basic types of Pulling Exercises you need to include in your workout routine though are the Vertical Pull and the Horizontal Pull.

Both work the muscles of your back differently and activate and target different muscles.

The most common bodyweight Vertical Pull is the Pull Up/Chin Up while the most common bodyweight Horizontal Pull is the Inverted Row.

Both moves need to be included in your workout routine and activate different muscles of your back to different degrees.

And while the Inverted Row is often used to help beginners work up to the Pull Up, you need to be aware that these two moves are very different and that the Inverted Row is still a very important movement for even the advanced lifter to include. (The Inverted Row alone also won’t get you to that first full Pull Up because it is a different movement.)

Below we will discuss the differences between the Pull Up and the Inverted Row and even some fun variations of each move you should be including in your workout routine.

(more…)