10 DUMBBELL CORE Exercises You’re Not Doing

10 DUMBBELL CORE Exercises You’re Not Doing

Looking to spice up your core training routine? Then these dumbbell core moves will help! Whether you want to target your abs, obliques or glutes, there is a move here to help. And these exercises will help you improve both your rotational and anti-rotational core strength. Plus they can be done from a variety of different postures, whether you want to do something standing or get down on the ground.

Pick a few of these moves to start implementing into your programming based on your needs and goals!
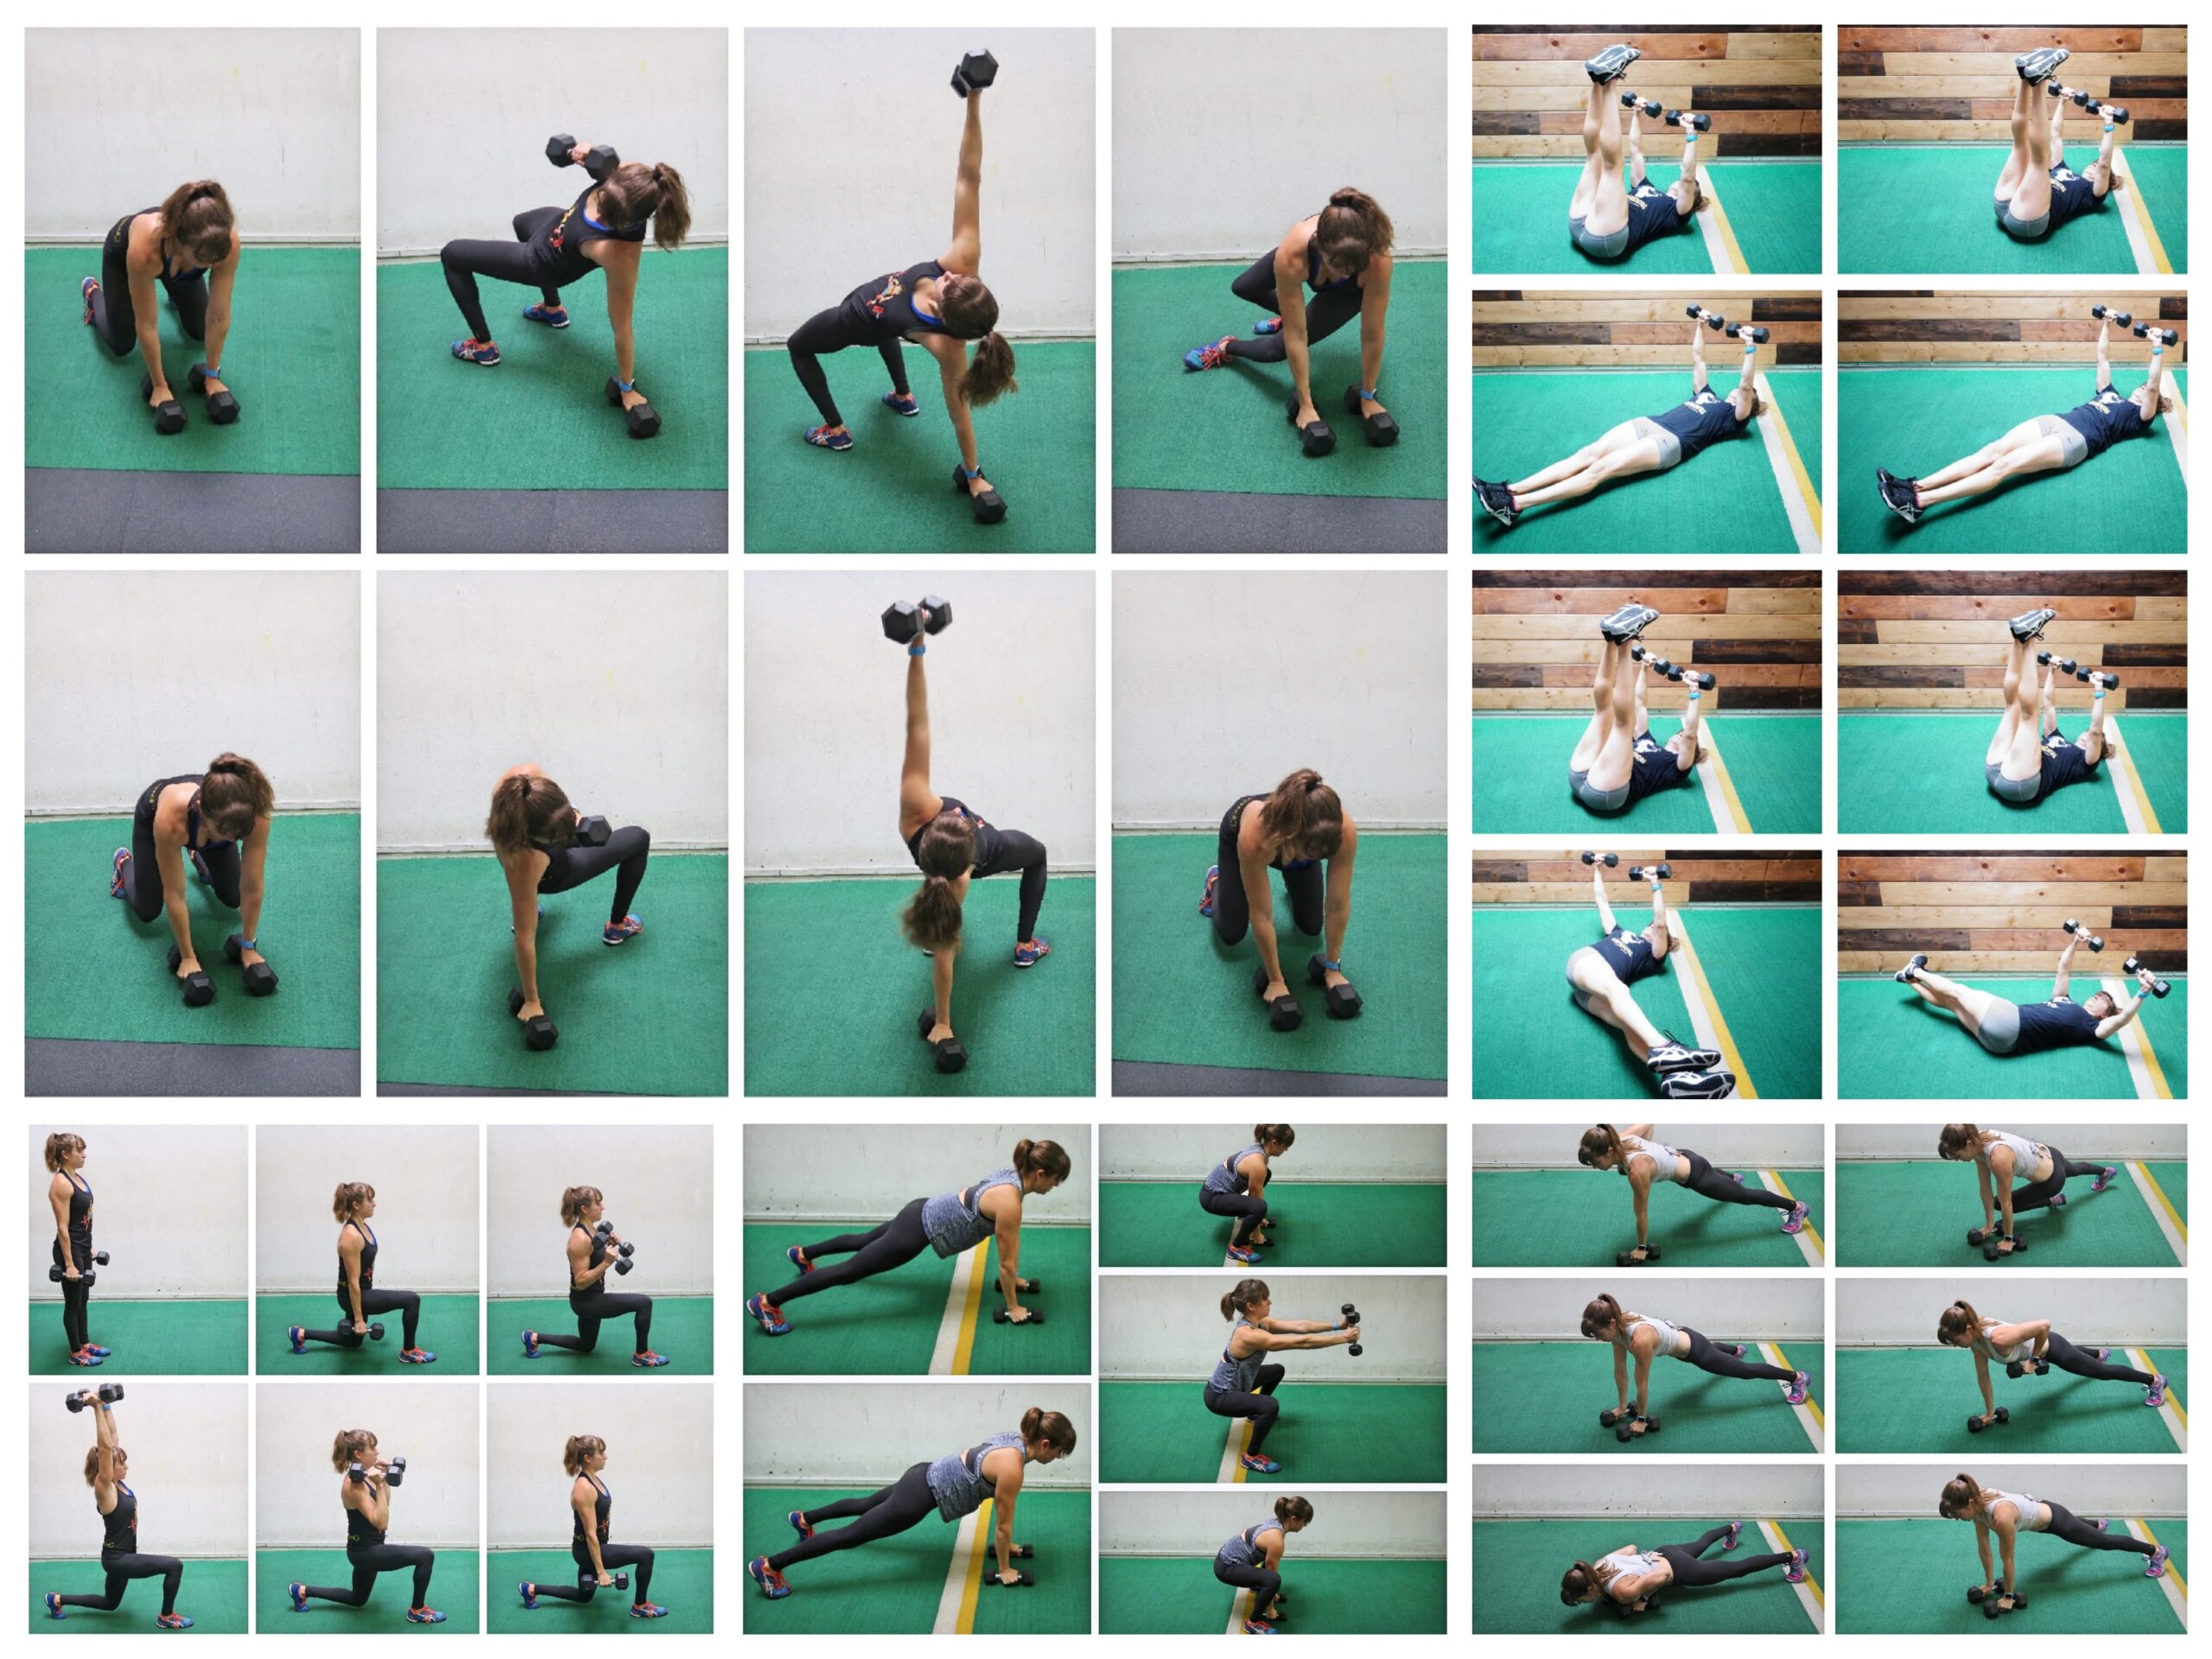
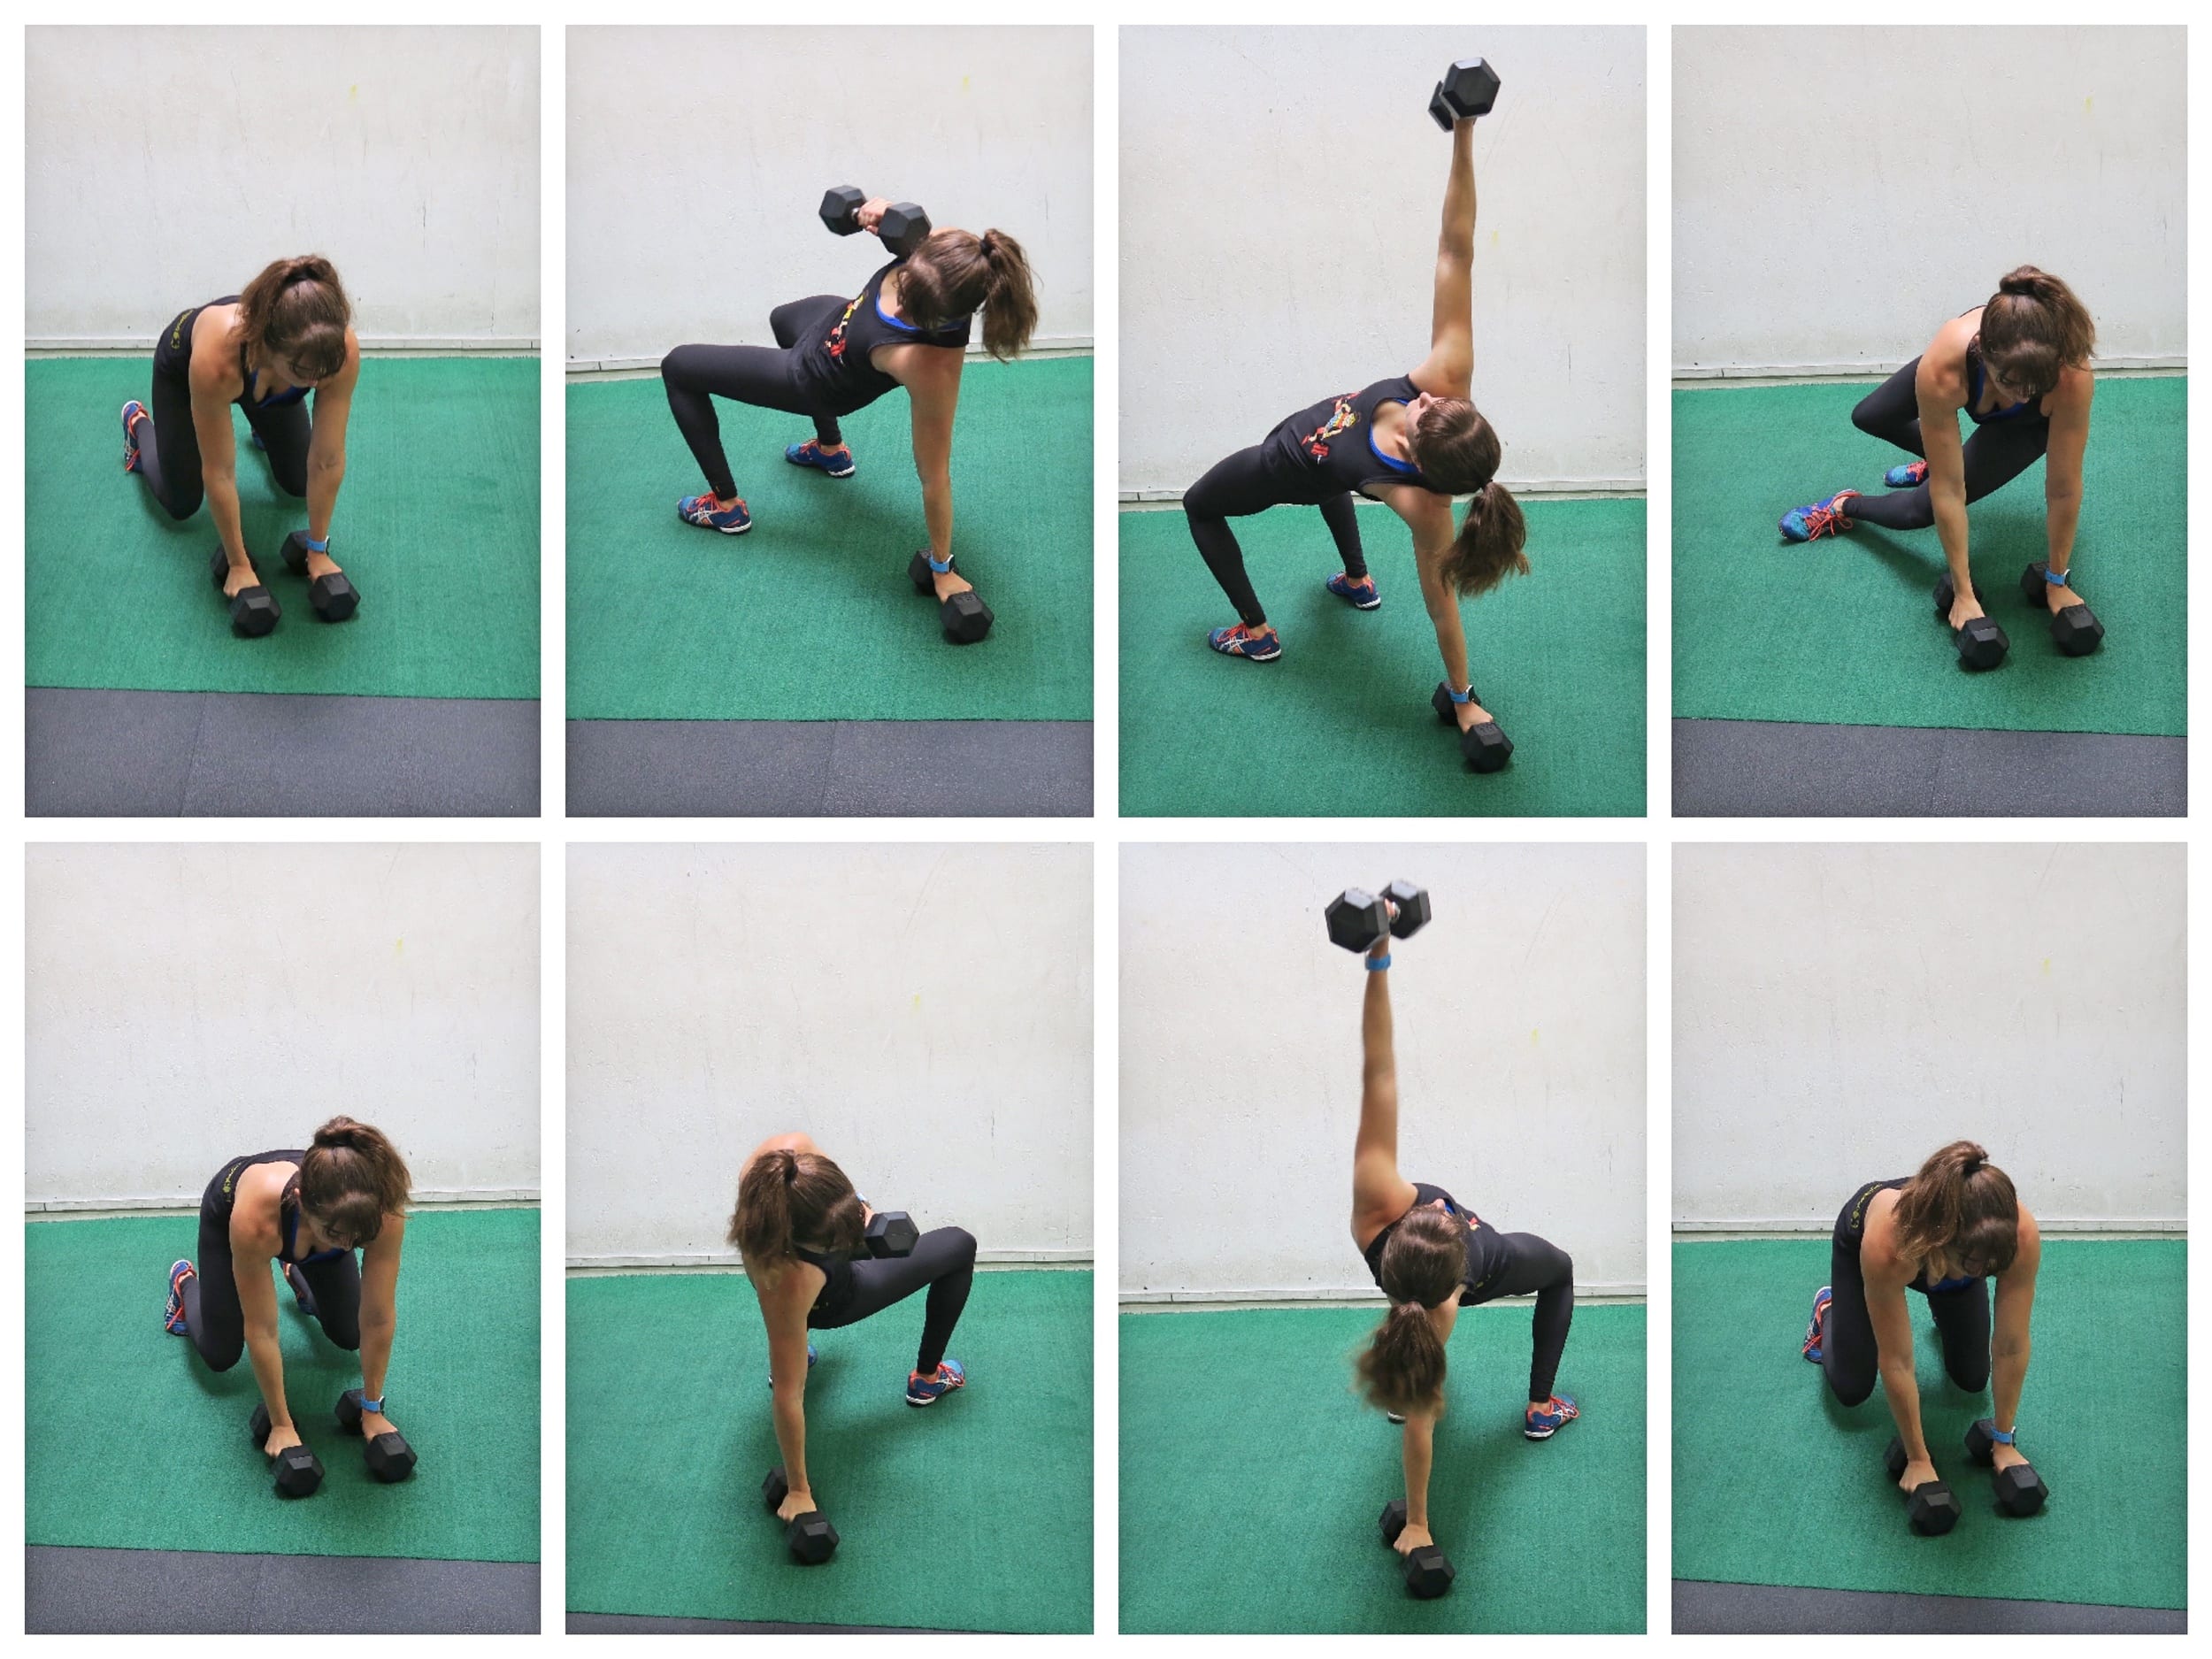
1: Turkish Hinge:

This core move is based off of one step in the full Turkish Get Up and is a great way to improve your hip and shoulder stability. It is an amazing way to target those obliques and especially that glute medius.

When you do this exercise, you want to focus on that lateral hinge, really pushing your butt to the side. This allows you to load and use that glute to hinge and come back up to half kneeling. It also helps you keep your weight centered so you could technically hinge over without having to put any weight on that hand on the ground until you’re ready.

If you simply just lean over, you’ll lose your balance and really struggle with stabilizing that raised shoulder. So focus on loading that glute as you hinge over then using that glute and your oblique to pull you back up!

Make sure as you set your hand down to the side as well that you aren’t reaching out wide but setting it closer to your body.

If you can’t kneel on the ground, you can do a similar move called the Windmill standing. Just make sure to start with a light weight for both to focus on stabilizing that raised weight!

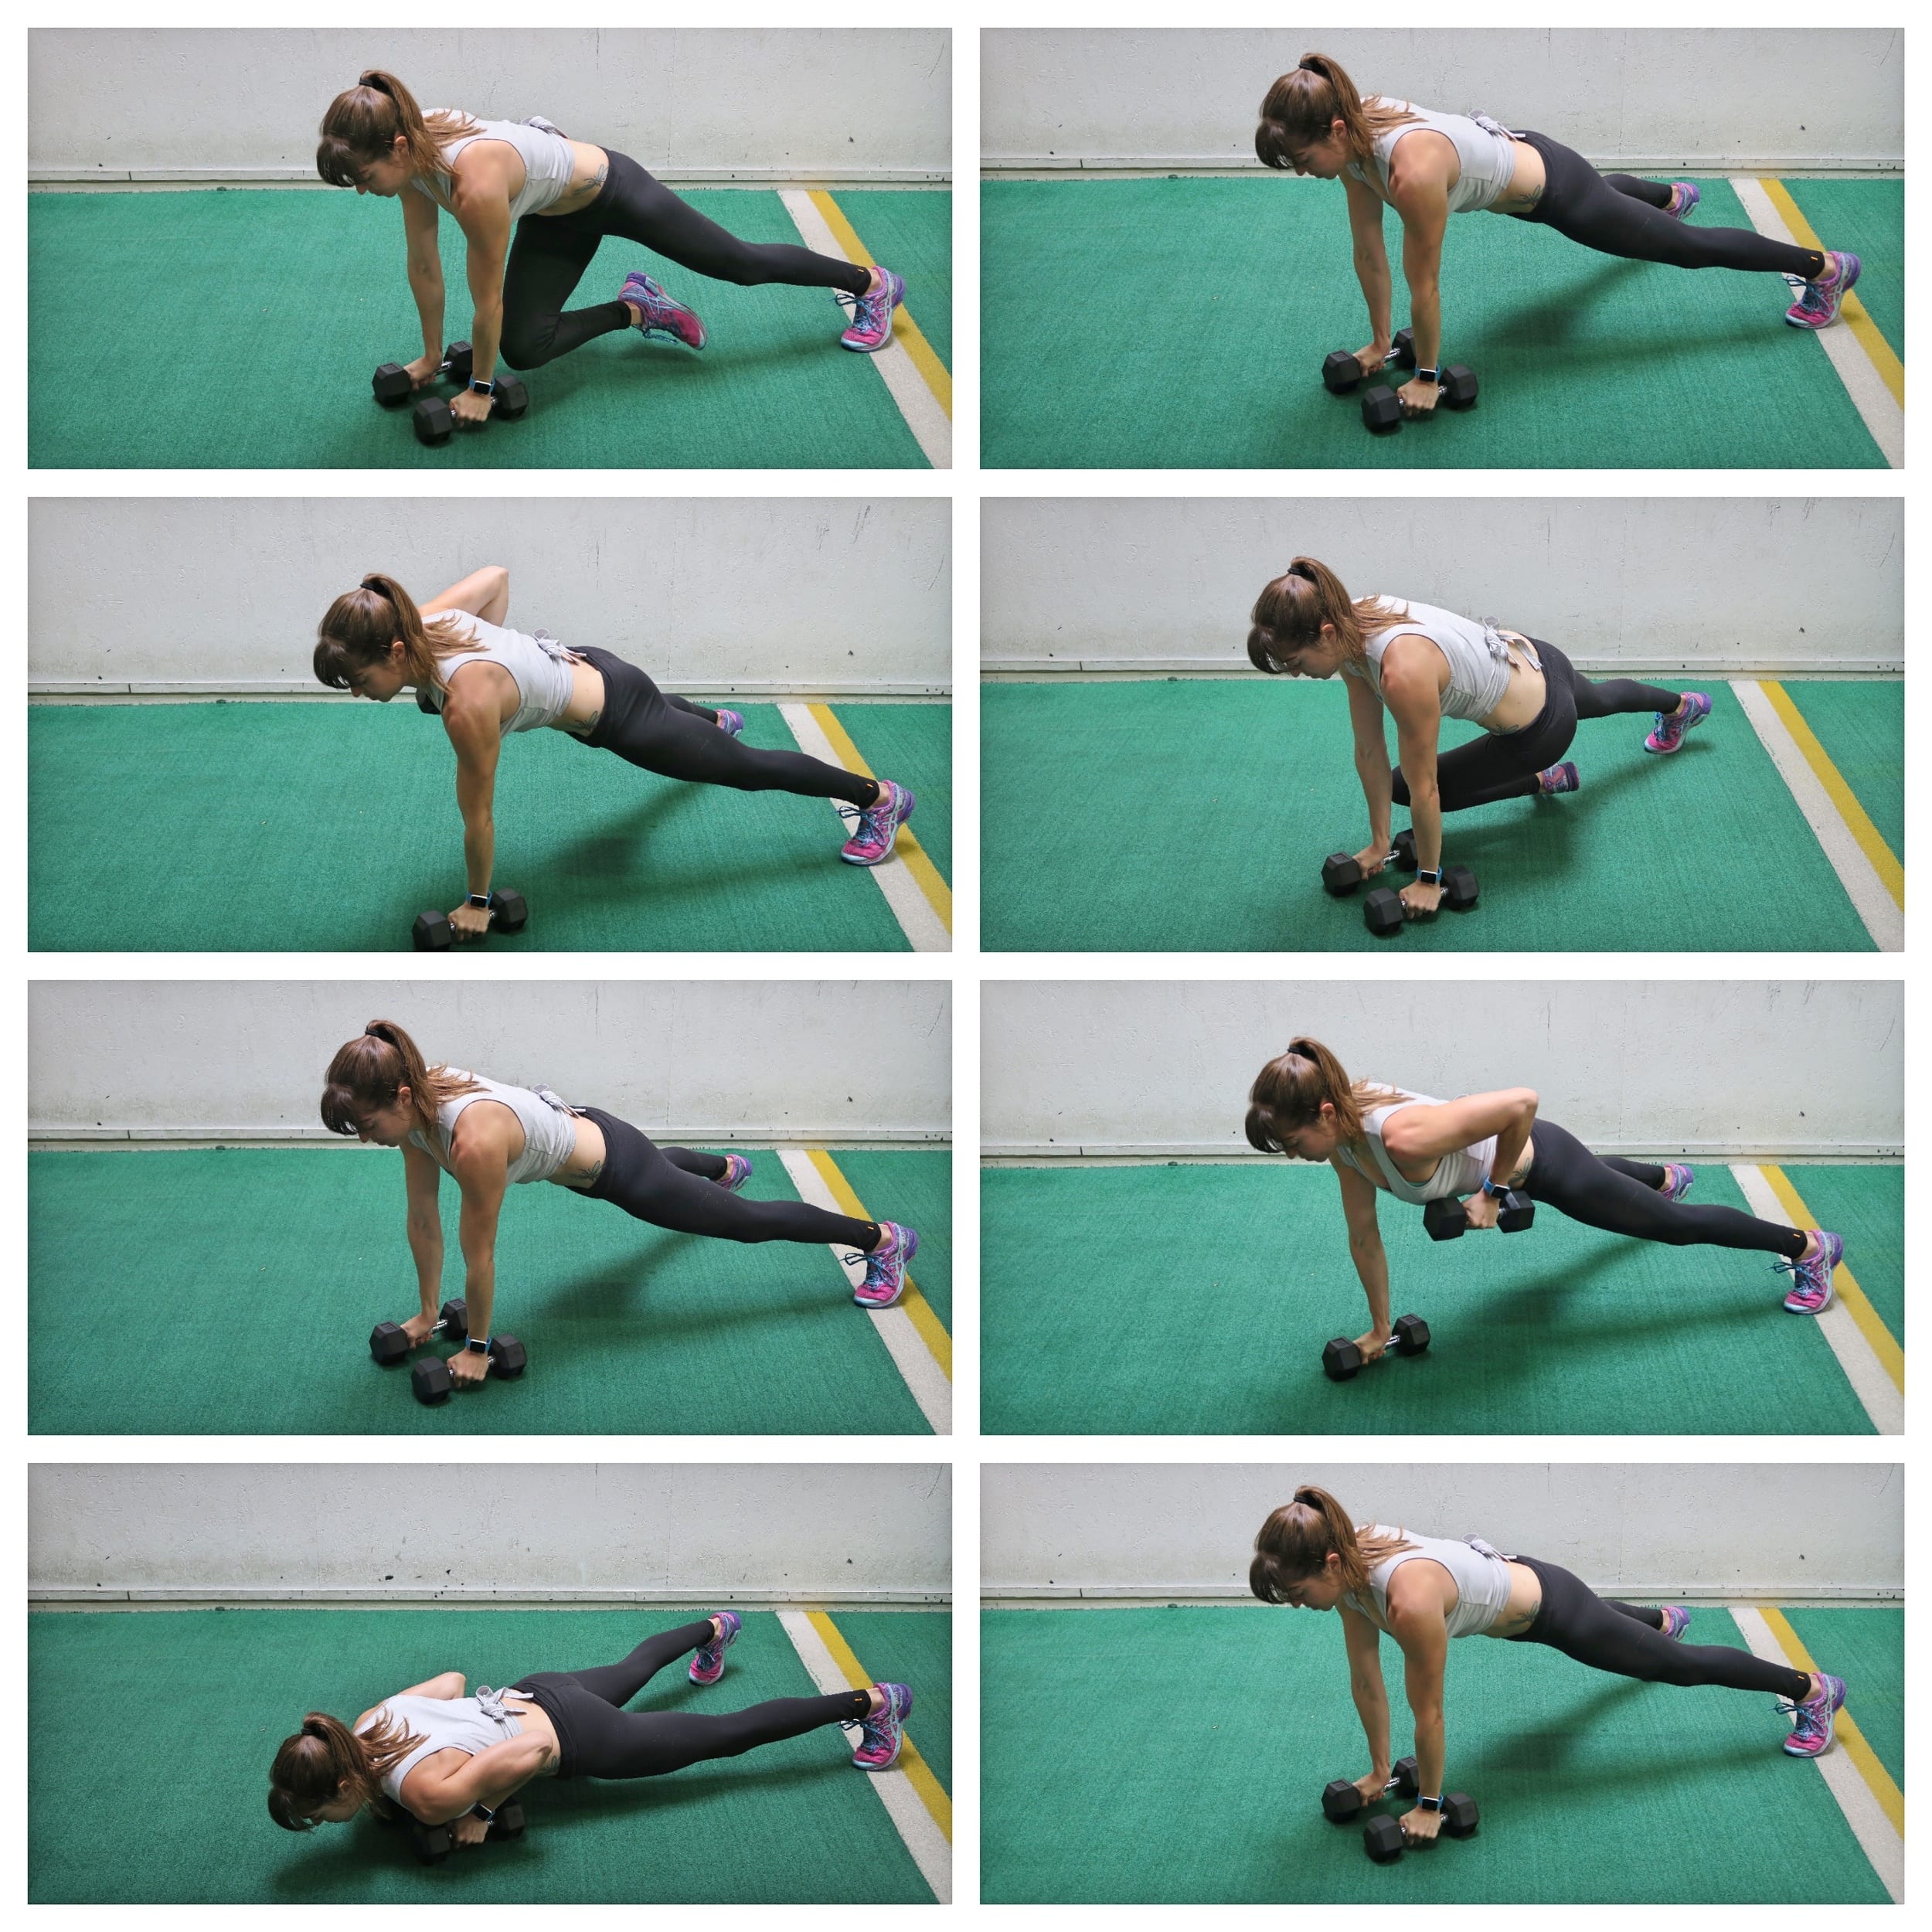
2: Plank Pull Throughs:

This anti-rotational core move is a must-do plank variation. It is a great way to really work everything from your shoulders to your knees down not only your frontside but also your backside!

As you do this move, you want to focus on keeping your core still and your hips level. You want to pull the weight fully across without rotating. Don’t rotate just to pull it further. And make sure to brace those abs and glutes to fight that rotation! It’s key you also make sure your hands are under your shoulders as you set up. This will help you avoid overloading your neck and shoulders to better engage your back to support your shoulders and fight that rotation as well.

Move slowly. While it is tempting to rush if you feel unbalanced, DON’T!

To modify this move, you can start with a reach over pulling a weight. You can also place your hands on an incline and pull the weight on the bench or stair.

–> VIDEO OF ALL 10 MOVES BELOW <–

3: Glute Bridge with Cross Body Chops:

Our lats and glutes must work together efficiently if we want a proper transfer of force and power through our core. This keeps not only our shoulders and hips healthy but also promotes better pelvic stability.

That’s why this move is an amazing one to include in your routine!

Holding the dumbbell in both hands you want to reach overhead to one side then chop the dumbbell across your body down outside your other hip. And you want to maintain that solid bridge hold as you perform the chop. Make sure as you hold the bridge, your glutes are powering the hold. Use that posterior pelvic tilt to avoid overloading your lower back. And focus on driving your knees toward your toes so you aren’t just pushing yourself backward as you hold, which can lead to your hamstrings taking over for your glutes.

As you do the chop, across to your hip, really feel your lat pulling the weight down from overhead. Move slowly with this move!

To progress this exercise, you could even do an 80/20 or single leg variation!

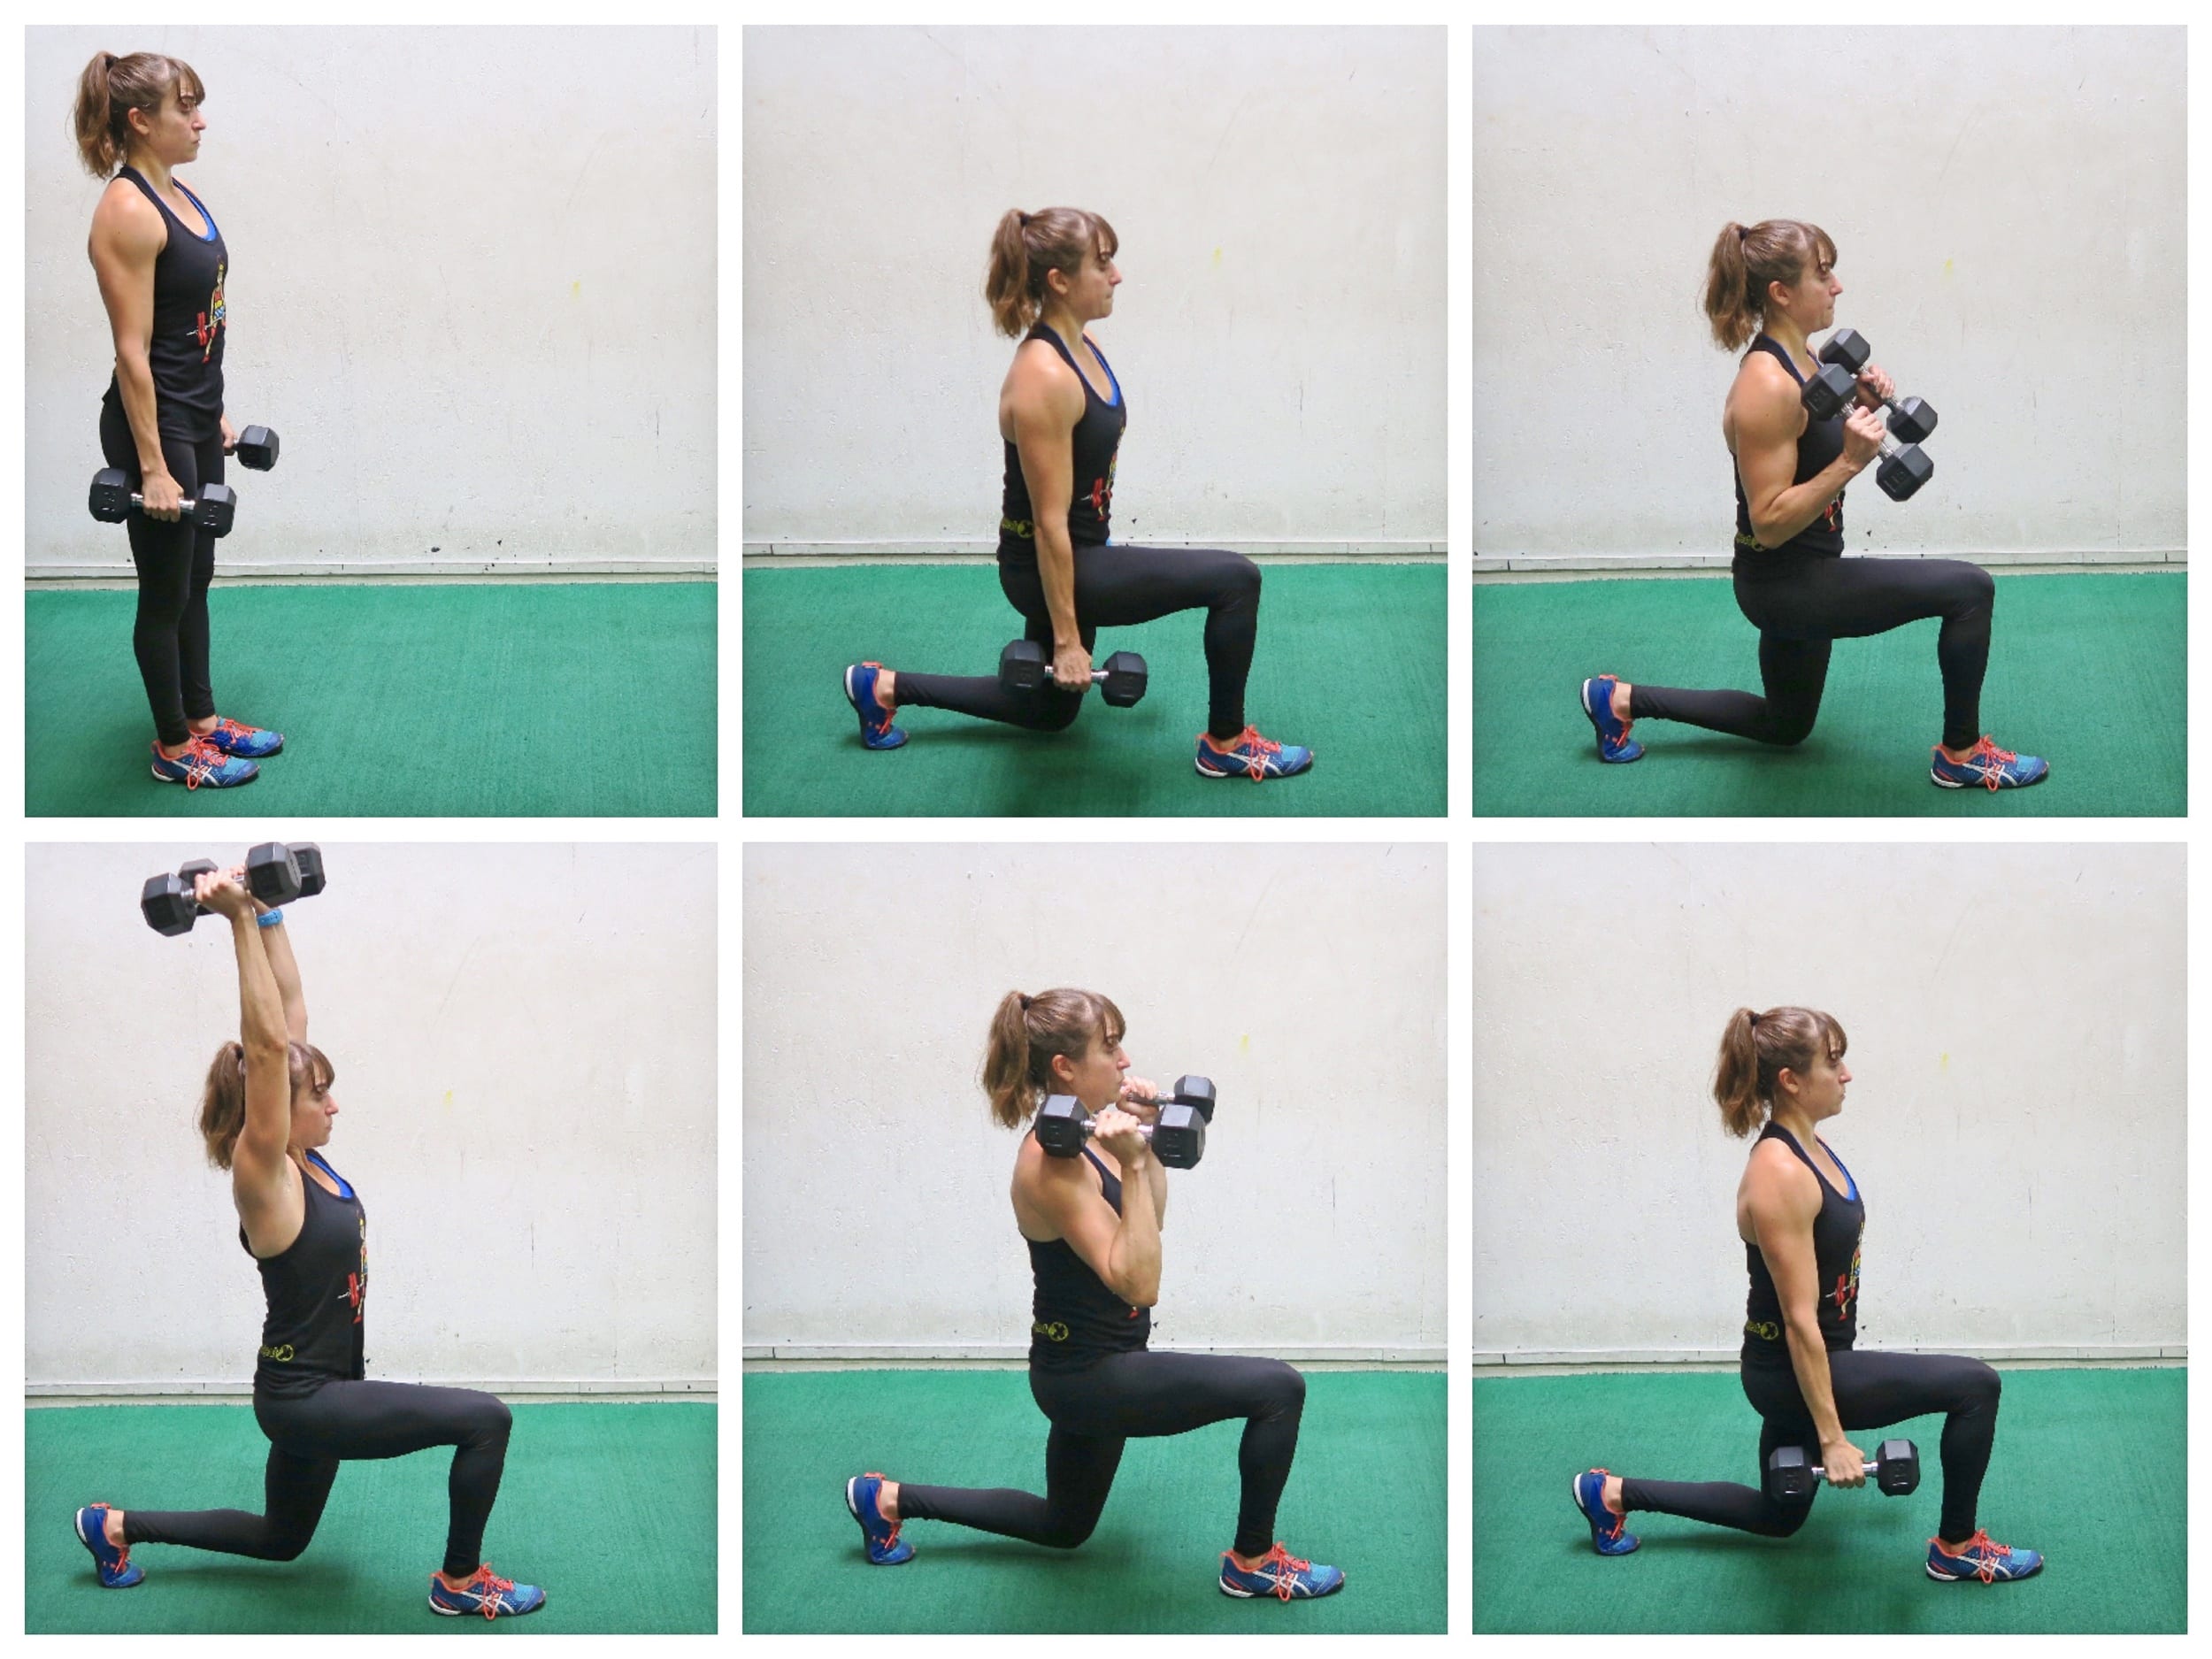
4: Rotational Lunge:

Don’t want to get down on the ground to work your core? Want an amazing rotational move you can do to target those abs, obliques and glutes? Then try the Rotational Lunge

This move is a great way to work on that rotational core strength and learn to not only accelerate and power rotation, but decelerate and control that rotation.

When you do this move, you want to treat the lunge as more of a hip hinge than focusing on sinking that back knee toward the ground. You really want to load that front glute so you can drive off that foot to power the rotation and come back up to standing before lunging back on the other side.

Even focus on that exhale as you drive out of the lunge to help you brace those abs and protect your back. Make sure to focus on loading that glute so you don’t twist too far and load your lower back. Make sure too that you’re not caving or rounding over to try to reach back further, but really only hinging at the hips.

To modify, you can adjust the amount of knee flexion you include, especially if you have knee issues. Do not step or lunge back as far to start!

Speed up the movement too as you feel ready over moving at a slower pace to start.

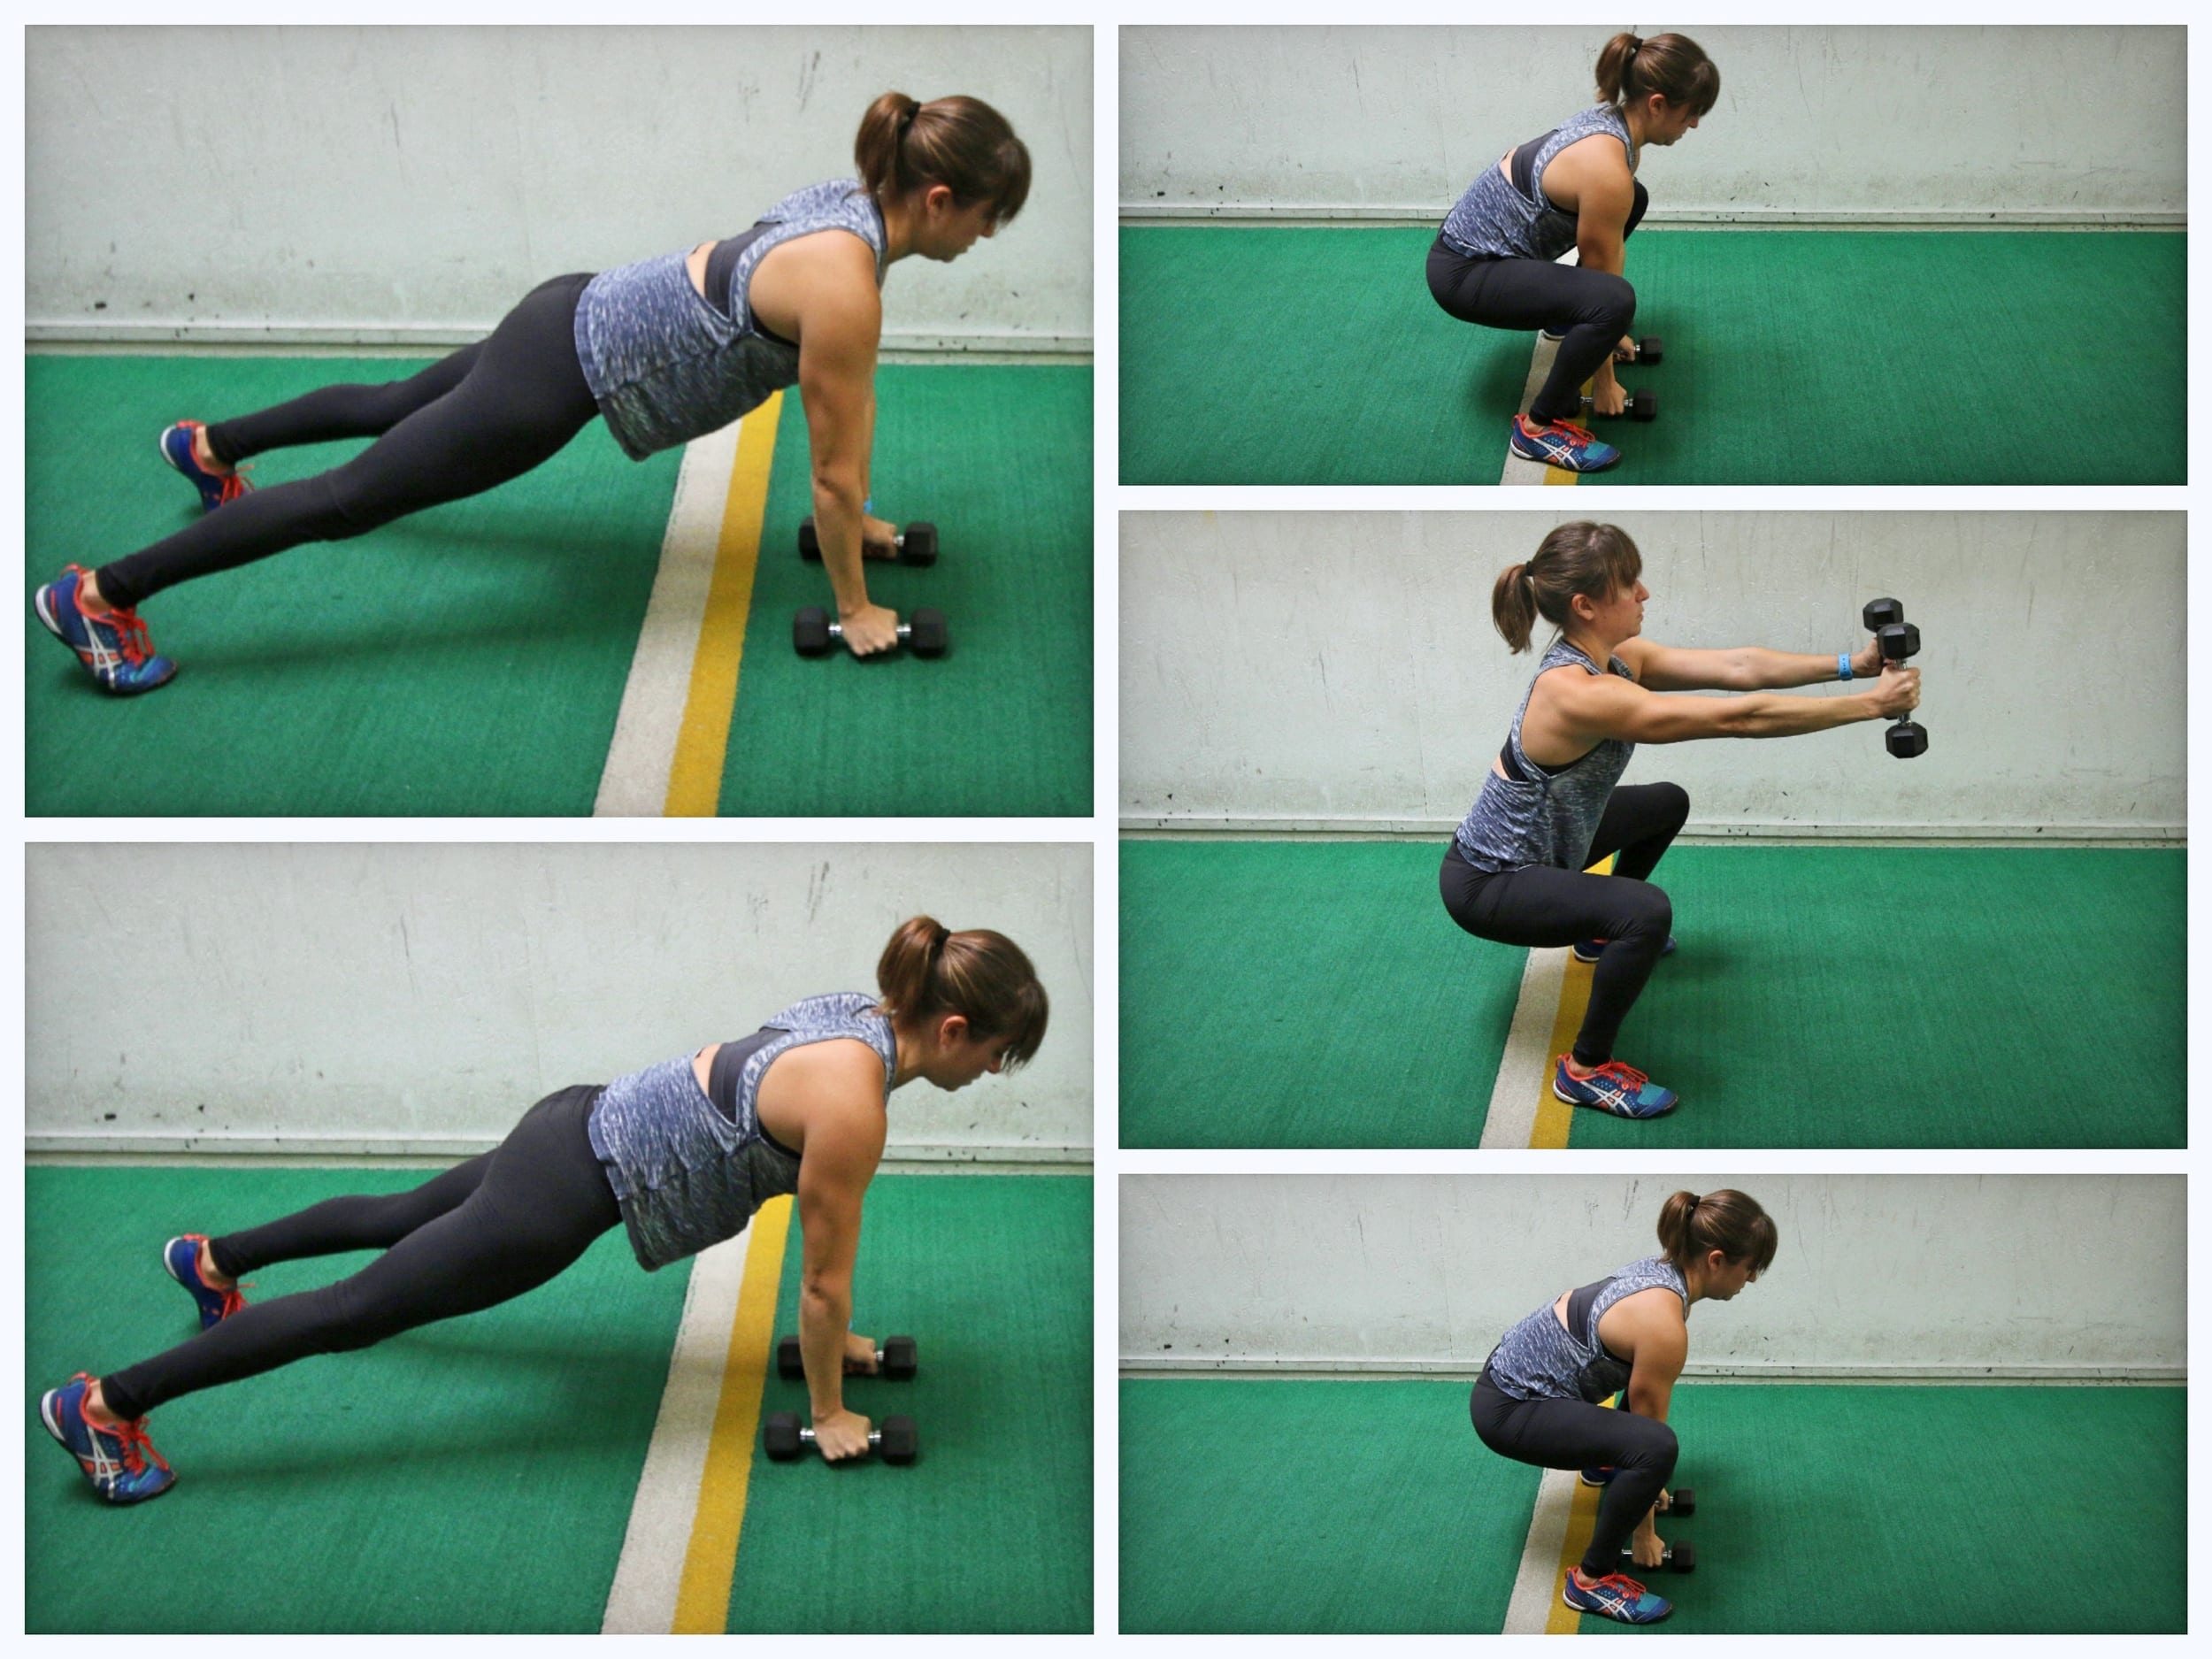
5: Seated Ab Presses:

This move is deceptively hard and a great way to work your abs and shoulders. You will also feel your hips working as well as you hinge but do not solely rely on your hip flexors. Focus on that c-sit curve as you lean back, rounding through your spine.

This rounding helps you brace and use those abs over just making this a hinge at the hips, which can lead to you only feeling your hip flexors.

Press the weight out as you hinge back to work your shoulders and even counterbalance the movement.

To modify this move, or if you can’t get down on the ground, you can do this move off a bench.

You can also vary this movement by performing a unilateral press over holding the weight in both hands!

6: Two-Way Raises:

This is another great anti-rotational plank variation to really improve your shoulder health and core stability. Because this is really targeting that shoulder, start with light weights.

While holding the plank position, you will raise one weight straight out overhead. Lower down, then fly the arm out to the side. Keep your elbow soft but your arm straight. And really fight the urge to rotate as you perform the two raises on one side.

You can then make the move harder by alternating sides where you have to fight rotation as you stabilize to raise the other arm out both ways. Or you can modify slightly to start by sticking with all reps on one side.

You can modify the plank position further if you find your hips sagging or butt going up in the air by performing this move off a bench or incline. You can also start with a raise without the weight.

Just make sure you don’t rush or shrug your shoulders as you do this move. Make sure to really engage your back to support the shoulder of the hand that is down to keep that shoulder unshrugged.

And if you feel unstable or uncomfortable on the weights while holding the plank, place your hand down on the ground instead while performing all reps on one side.

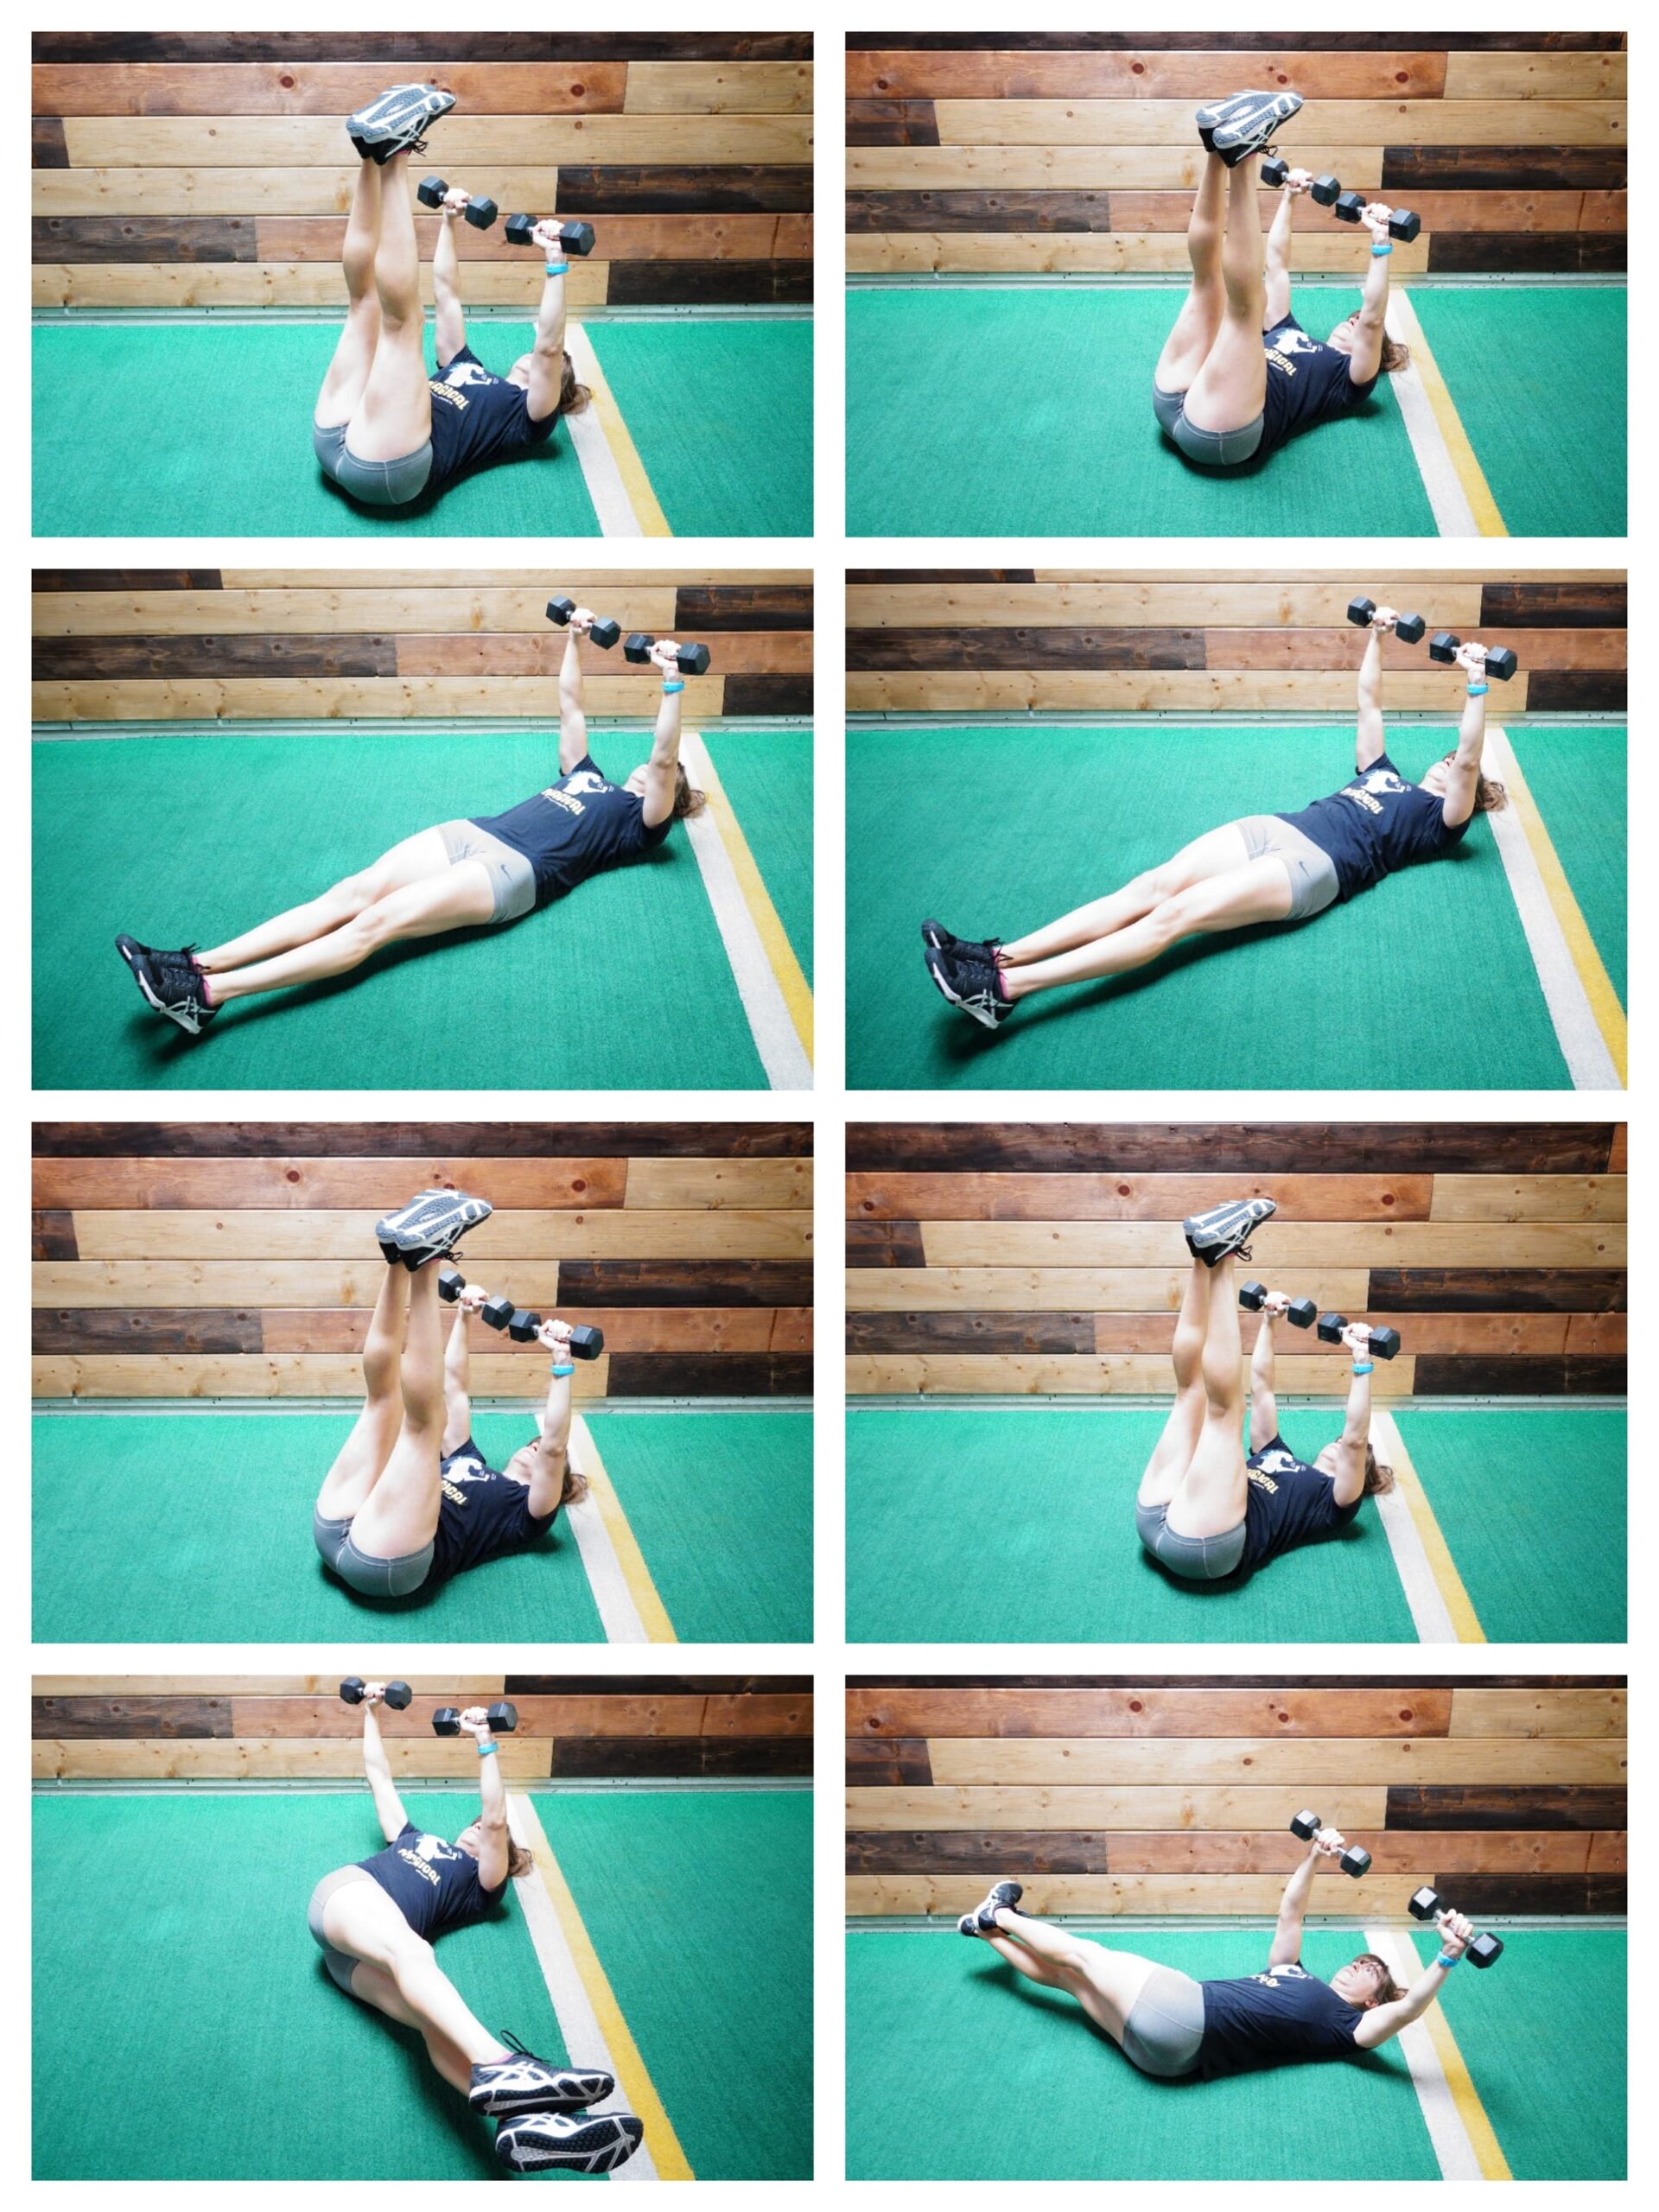
7: Pull Over Crunches:

This is a killer crunch variation that will work your abs, quads, lats, triceps, chest and serratus anterior. But it is also deceptively hard because of the weighted extension overhead. Make sure your lower back down not arch and ultimately become overloaded. Focus on that posterior pelvic tilt to brace your abs as you do this move.

When you perform the reach overhead, your elbows will be slightly bent but do not turn this into just flexion and extension at your elbows. You want the movement to come from your shoulders, reaching overhead to then pull the weight down over your body and in front of your knees.

Focus on feeling your lats and the muscles around your ribs really working over the course of the reach overhead and pull down.

As you extend your legs out, you can kick out higher to modify. Just make sure you engage your abs and even your glutes as you fully kick out.

To modify this move further, you can perform a bent knee tuck instead of a straight leg kick out. Or you can even keep your feet on the ground to start.

8: Extended ROM Lying Lateral Raise:

Changing the range of motion on an exercise is a great way to progress a movement.

In this case, the extended range of motion allows you to put the glute medius under more stretch during the exercise while also adding load with the dumbbell to advance it.

With this move, you want to make sure you’re really focusing on that glute medius and not letting the TFL compensate. If you struggle with feeling that TFL, which is also a hip flexor, taking over for your glutes, turn your toe down toward the ground as you perform the lateral raise. You can also slightly kick back as well. And then don’t rotate open to try to increase the range of motion and lift up higher.

Also, make sure to fully lower your leg down to get that extra stretch on the muscle at the bottom.

If you don’t have a bench, you can do this movement from the side plank position as well to still get that bigger range of motion and even the oblique work bonus.

9: Standing Dumbbell Chop:

This standing unilateral, or one sided, exercise is a great way to work on your rotational core strength and glute power. If you’re a tennis player, baseball player, golfer or any athlete wanting a powerful rotational swing, you want to include this move in your strength work!

It’s key with this move, you work on that powerful drive from your glute to power the swing up and across. And you want to make sure to brace your abs to prevent rotating too far as you swing the weight up and over your shoulder.

To load your glutes to power the rotation, you will sit back slightly and to the side the weight is on. It’s a very small hip hinge. As you drive forward to propel the weight up and across, pivot that foot. Don’t simply just come up on your toes, really rotate as if squashing a bug under the ball of your foot to better power the swing and use your glute.

Focus on that exhale as you rotate to brace your abs and avoid twisting too far!

Your elbows will bend more as you twist the weight over your shoulder.

10: Side Plank Row:

Target your obliques, abs, glutes, back and biceps with this great side plank variation.

By adding in the row, you not only work your back and bicep but also really force your core to work hard to stabilize as you hold that plank position.

Make sure that as you lower the weight toward the ground in front of you that you keep your back engaged to support the standing hand. You will rotate slightly toward the ground to protract that shoulder blade, bringing it away from your spine, before you row the weight up and retract your shoulder blade, or bring it back toward your spine.

You want to focus on the row not just coming from your arm, but instead focus on that scapular movement to really use your back.

Do not let your hips drop toward the ground as you row in that side plank position.

To modify, you can do this move with your hand up on a bench to start, even off of your forearm if you do have wrist issues!

SUMMARY:

Use these moves based on your needs and goals. You can combine a few into a quick finisher to a workout or even just select one to include in your circuits or trisets based on what you’re trying to target!

Love my workouts and exercises?

Subscribe to my YouTube!

–> Redefining Strength On YouTube

Want A Strong Back? (Do This Back Exercise!)

Want A Strong Back? (Do This Back Exercise!)

Too often we waste exercises by not actually working the muscles intended.

And then we wonder why we aren’t seeing the results we want.

But we have to remember that if we don’t feel the correct muscles working, those muscles aren’t reaping the benefits.

For example, if you feel your lower back during ab work, your lower back is what is being worked, not your abs. So all of that ab work isn’t going to pay off the way you’d like.

And it may even result in injury as your lower back becomes overworked and overloaded. This can even lead to your lower back engaging when it shouldn’t in other compound moves and lifts.

So not only is the muscle group we want benefiting NOT benefiting, but we may be creating recruitment patterns that can lead to other issues and injury.

The same thing goes for those back exercises you’re including in your workouts.

Tend to feel your neck or shoulders or even your biceps working instead of your upper back during rows or pull ups?

Struggling to feel like all of that back strengthening work is leading to the results you want, like improving your pull ups so you can do that first full one?

Then you need to make sure your back is actually what is powering your pulling moves.

And if it isn’t, you need to potentially modify so your arms can’t compensate.

You need to start by addressing your scapular mobility and stability to actually get your back powering the pull!

That’s why I love this amazing move – The Back Shrug.

While we need to include mobility work and that full prehab process of foam rolling, stretching and activation in our warm up routine, we can’t out mobility work improper movement and recruitment patterns when we lift.

It’s why we need to be intentional with moves and see every exercise as a a chance to assess.

And it’s why, when the correct muscles aren’t working, we sometimes need to modify moves and even try other variations to improve that mind-body connection.

It’s why if you struggle with with using your back during rowing, you may want to switch to the Back Shrug to start focusing on that scapular retraction to engage your back and power the pull.

How Do You Do The Back Shrug:

This move boils the row down to just that initial scapular movement to learn to control that back engagement.

When you row, the movement should start because you’re you’re drawing your shoulder blade toward your spine to use your back to pull.

This movement isolates just this component of the row, removing any elbow flexion that may lead to us compensating and using our bicep instead.

Too often with rows, we end up performing a bicep curl, curling our wrist in toward our chest over driving the elbow down and back as our shoulder blade moves toward our spine.

That’s why focusing on just that scapular movement to start can be key.

To do the Back Shrug, hold a dumbbell in each hand and hinge over standing with your feet about hip-width apart.

Let your arms hang down and unshrug your shoulders while keeping a neutral spine. Make sure you’ve hinged over to load your glutes while keeping your knees soft.

From this bent over position, you are going to try to pinch your shoulder blades together while letting your arms hang down.

Draw your shoulder blades toward your spine. Don’t just shrug your shoulders. Focus on that scapular movement.

Do not bend your elbows or start to row.

Just pinch the shoulder blades together, pausing, then relaxing the weights back toward the ground. Do not shrug your shoulders up toward your ears as you retract!

You will be able to add weight as you can fully control and feel the movement on both sides.

This is a small movement. Don’t try to make it bigger by standing up or bending your arms. Make sure to keep your neck long. Your only focus is on drawing the shoulder blades toward your spine then relaxing them away. Even pause as you do the pinch over rushing.

Variations:

There are so many ways you can then vary this move based on the types of rows you general include in your training and even the other muscles you want to target and tools you have available.

You could do this with a band instead of dumbbells. Or even off a suspension trainer. All of these are great to include to prep your body to row using these different tools and postures.

Because we can struggle with that scapular retraction in different positions, it can be key to include a diversity to make sure we’re initiating those rows with our back.

And if you find you struggle even with proper mobility and strength on one side, you can even make this movement a unilateral exercise, working only one side at a time or even doing rounds or reps on only one side.

If you don’t have any equipment, you can even do a unilateral variation called the Single Arm Scapular Push Up. This is great as an activation move in your warm up before any strength work even.

But as you really work to translate that activation to the full row with weight, consider the these variations to prep the body to initial that pull with that proper scapular movement.

SUMMARY:

Moves are only as good as their implementation. And if we want to get the full benefit of an exercise, we need to make sure we’re actually engaging the correct muscles to power the movement.

If you’ve struggled with feeling your back during rowing exercises, try this scapular retraction focused back exercise to really isolate and work on that initial back engagement.

It can easily be included as part of your accessory work for a few rounds of 10-15 reps! Focus on that scapular movement over just going heavy, but don’t be afraid to progress the movement by adding loads as you can truly control that retraction!

For more amazing videos and tips, subscribe to my YouTube:

–> Redefining Strength On YouTube

The Best Chest Exercise (You’re Not Doing)

The Best Chest Exercise (You’re Not Doing)

If it challenges you, it will change you.

Progression can be created in so many different ways, from increasing loads to changing tempos, postures of movements, ranges of motion and even by changing the types of tools we use.

For example the basic dumbbell chest fly is a staple of many chest or pec building hypertrophy workout routines.

But I find often people, in an attempt to keep progressing the move, start to compensate in terms of their form.

They end up turning the move into a straight press over a true fly as they try to increase weights past a point they can truly control.

Or if they realize they can’t control the heavier weight they start to add reps instead to progress the movement. This isn’t a bad way to create progression when you’re stuck not able to truly move to the next weight.

But what if you’re finding your ego is getting in the way and you’ve hit a point there isn’t really a clear progression?

What can you do?

This is where you can implement different techniques, including simply adding in another training tool to the equation.

You could simply swap to a banded chest fly to progress through the same but different because bands apply tension in a different way to the same movement pattern OR you could actually combine both tools.

And combining both tools is a great way to progress that standard dumbbell chest fly and even create resistance throughout the movement in a new way.

It’s why I love the Banded Dumbbell Chest Fly!

The band makes it deceptively hard, forcing you to really slow down the movement and control it.

It creates resistance in a new way while still allowing you to get the benefits of the basic dumbbell fly.

It may be that little tweak you need when you can’t just keep adding reps and aren’t truly able to move up yet with dumbbells.

It may even simply be a great way to challenge your body in a new way and bust through that strength plateau and even mix up your training just to keep things interesting!

So How Do You Do The Banded Dumbbell Chest Fly?

To do the Banded Dumbbell Chest Fly, you will need a larger loop band to hold with your dumbbells. Start light as this move is deceptively challenging.

You will want to go lighter with the dumbbells than what you use for just the dumbbell chest fly especially to start!

Hold the band in one hand and pull it across your back as you grab it in the other hand. I recommend having your weights propped up on the bench in front of you or on a rack where you can easily grab them.

Grab a weight then in each hand and lie back on the bench with the band across your upper back and weights in at your chest.

Then press the band and weights straight up from your chest toward the ceiling with the weights together.

Moving slowly fly your arms out and open at about chest height, keeping your elbows soft. However, do not turn this into a bench press. You aren’t bending and extending at the elbows but allowing yourself to move from your shoulder as you lower your arms to about parallel to the ground.

Make sure you do not shrug as you fly your arms open.

Open up your chest so your upper arms are about parallel to the ground. Move slowly to really control the band, then feel your chest muscles work to pull your hands back up and overhead toward the ceiling.

Focus on contract the pecs to really pull the weights back over the center of your chest.

Feel the band working against you as you fly your arms back together.

Then repeat the move. You want to feel a slight pec stretch as you open up your arms, while not locking out the elbows. And then you want to feel your chest really working to bring your hands back together.

Really start light to focus on a slow tempo and that control. You’ll be surprised by how much the band makes this more challenging.

Make sure as you do this move as well that you’re even aware of engaging your back to support your shoulders.

To modify you can always use just one tool instead of both combined or even do a standing chest band fly to really work on that scapular control if you struggle with engaging your back to support your shoulders!

SUMMARY:

Just remember weights and going heavier with loads is not the only way to progress a move! And sometimes small changes like using two types of resistance can be the variation we need to keep seeing results from our programming!

Want more amazing moves, workouts and tips?

Join my FREE daily newsletter:

–> Join The Newsletter


The Most Underrated Dumbbell Glute Exercise

The Most Underrated Dumbbell Glute Exercise

I’ve never been a fan of the whole squat for a better butt thing. I think squats are honestly overrated as a glute move, but that’s a video for another day.

And while I do think you need a diversity of movements to really get the best results for any muscle group, I wanted to share one of my favorite dumbbell glute exercises that I think is often forgotten about and overlooked.

It’s the Dumbbell Skier Swing.

The kettlebell swing is an amazing hip hinge exercise to work on that explosive glute power or even your strength endurance based on how you implement it.

It’s not only a great move to improve your conditioning but also your strength.

But if we don’t have a kettlebell, we often then don’t think about utilizing this amazing move.

That’s why I wanted to share a great way to use dumbbells to perform a swing and include this great move in your routine!

However I do just want to mention, before breaking down this movement, how key it is we learn to hip hinge correctly first.

Often swings are blamed for lower back pain. And while swings are NOT bad for your back, they do require core control and proper recruitment patterns during hip hinging to make sure they don’t result in overload or injury.

Because of the fact that they are a more explosive, faster paced movement, you do want to make sure you can properly load those glutes and hamstrings and brace your abs during hip hinging before you included this exercise.

Remember that when you are performing a hip hinge, you are NOT simply leaning forward.

The hinge should be initiated by sitting your butt back as if reaching your butt back toward a wall behind you.

And then, while your knees may soften, you aren’t focused on active knee flexion. You do not want to turn this into a squat.

Feel those glutes and hamstrings load and avoid arching your lower back in an attempt to keep your chest up. Brace your abs and think a nice neutral back.

Focus on this hip hinge as you introduce the swing and do not let your arms try to take over or the speed cause you to shift your weight forward so you aren’t properly loading your posterior chain.

How Do You Do The Dumbbell Skier Swing?

To do Dumbbell Skier Swings, stand with your feet about hip-width apart. Hold a dumbbell in each hand down by your sides.

Start by slightly swinging your arms back toward the wall behind you. As you do, hinge over in response to help balance and build up that spring to propel the weights forward as you stand up.

You will lean forward as you push your butt back to swing the weights up outside your hips. You are leaning forward only in response to help counterbalance your weight.

As you hinge over, your knees should be soft. Focus on pushing your butt back, but not on squatting down.

Then drive the ground away as you squeeze your glutes to explosively come back up to standing, propelling the weights forward and up.

Focus on that exhale as you propel the weights up to further help you brace your abs.

Straighten your legs as you stand tall at the top, squeezing your glutes to extend your hips. Watch your urge to lean back at the top as this can load your lower back.

Let the weights swing up propelled by your legs. Do not try to pull them up higher with your arms. They may come to shoulder height or slightly below but do not focus on the height.

To protect your back and control the move, be patient and wait for the weights to come back down and force you to hinge back over and sit your butt back.

You do not want to hinge over before the weights truly lower down as this can cause overload of your lower back.

As you hinge back over with the weights swinging back outside your hips, your torso will lean forward to counterbalance.

Think about being explosive with each drive back up to standing to propel those weights up as you are patient with the hinge back over to reload. You aren’t slowing the weights down with your arms, you just are only hinging over in response to the weights.

If you’re struggling with the explosive hip hinge and controlling both weights, you may start with a single dumbbell even held between your legs in both hands. This will more closely mimic the basic kettlebell swing.

Using two dumbbells in this skier style swing can be a great way to go heavier though if limited by the weights you have especially.

If you find you struggle with loading your glutes and the weights get too far away from your body causing your lower back to become overloaded as you hinge, you can also start with a Band Hip Hinge.

This move is a great way to learn how to explosively perform the hip hinge while really targeting those glutes.

The pull of the band backward will also help you control that hip hinge to load your glutes while teaching you to truly sit back!

SUMMARY:

If you’ve been looking for a great strength and conditioning move to target those glutes, and even your hamstrings, but don’t have a kettlebell, give this Dumbbell Skier Swing a try!

Just remember to focus on what you feel working so you get the full benefit of every exercise you include!

Learn to train according to YOUR needs and goals.

Book a call to learn how Redefining Strength can help you dial in your workouts and your nutrition for better results faster…

–> Book A Call

The Dumbbell Hybrid Burner

The Dumbbell Hybrid Burner

Short on time?

Or maybe you just need a quick burner to end your workout to torch some extra calories or completely burnout the muscle groups you were working.

Either way, having a few BURNERS on hand, like this Dumbbell Hybrid Burner from my Arm Burner cards, is key!

Quick burners like this one are even a great way to create a little extra training volume during the week to increase your training frequency and improve your results without you having to do a full workout.

So try this Dumbbell Hybrid Burner as a quick standalone routine when you are short on time or as a finisher after your upper body or lower body lifting session!

The Dumbbell Hybrid Burner

Complete 2-4 rounds of the circuit below without resting. Modify moves as needed so that you don’t have to rest during the 30 seconds of work. Better to regress than to rest if it is more than a very brief pause.

CIRCUIT:
30 seconds Squat Burpee with Front Raise
30 seconds Lunge Curl Press
30 seconds Mountain Climber Row Push Up
30 seconds Sit Thru Bridge and Press
30 seconds Leg Raise Wipers

EXERCISE DESCRIPTIONS:

Squat Burpee with Front Raise:

To do the Squat Burpee with Front Raise, start in the plank position with a light dumbbell in each hand. You can also use a single dumbbell if you don’t have a weight pair light enough although you’ll then want to set it between your hands. Then jump your feet up and outside your hands or as close as you can get. Jump your feet out wider as you so that you can come into a squat position. As you do, lift your arms up straight in front of you to about shoulder height, holding the dumbbells. If you use a single dumbbell, you will pick it up in both hands as you lift your chest and come into the squat. Use jumping into the squat to help you raise the weights up to shoulder height with your arms straight. Lower your hands back down as you stay in the squat then jump your feet back and repeat! Make sure the weights are challenging but light enough you can fully control the movement. Beginners can also step back instead of jumping.

Lunge Curl Press:

To do the Lunge, Curl and Press, start standing tall with a dumbbell in each hand down by your side. You can choose to have your palms facing forward or even in toward each other to perform both the curl and the press. Lunge forward with your arms down by your sides. Holding the lunge, perform a bicep curl, curling the weights up to your shoulders. Keep your chest up as you curl to maintain good form. Once you curl up to your shoulders, press the weights overhead, staying nice and low in the lunge with your abs engaged. Press all the way up, then bring them back down to your shoulders and reverse the curl. Once the weights are back by your sides, push back up to standing in one movement. Beginners may not lunge out as far or as deep. They may also choose to lunge then perform the curl and press while standing. You can stay on the same side or perform lunges alternating sides.

Mountain Climber Row Push Up:

To do the Mountain Climber Row Push Up, set up in a high plank position with a dumbbell in each hand. Your feet will be wider apart to help stabilize and your hands should be under your shoulders. Then from this high plank position, draw one knee in and across toward your opposite shoulder. Perform a cross body mountain climber, moving slowly. Straighten the leg back out and then row the weight in the hand on the same side as the leg you tucked in up to your side. Perform the row without rotating or letting your butt go up in the air. After rowing the weight up to your side, feeling your back work to row it up, lower it back down so you’re back in the high plank. Then perform a push-up (you can do this from your knees too). Come back to a plank then perform a mountain climber cross body on the other side and a row before another push up. Keep alternating sides.

Sit Thru Bridge and Press:

To do the Sit Thru Bridge and Press, start on your hands and knees with a dumbbell under each hand. Then flex your feet and lift up onto your hands and feet with your knees under your hips and your hands under your shoulders. From this position, step your right foot under your body as you raise your right hand and dumbbell up toward the ceiling. As you step through and put your foot flat on the ground, rotate your hips open to the ceiling as you press the weight up overhead. Really squeeze your glutes as you bridge up and press. Then rotate your right leg back under your body as you bring the weight back down to the ground. Come back into that bulldog front position then step your left leg under to lift your right hand up and press the weight overhead as you bridge up. Really bridge up and squeeze your glutes at the top. Keep your abs engaged and do not hyperextend your low back. Keep alternating sides.

Leg Raise Wipers:

To do Leg Raise Wipers, hold a dumbbell in each hand as you lie on your back with your legs out straight in front of you. Press the weights up toward the ceiling at about chest height. Full straighten your arms and don’t let the weights fall out to the sides. Brace your abs and lift your legs straight up toward the ceiling together. Then, keeping your abs engaged, lower your legs straight down to hover an inch off the ground. You want to lower as close to the ground as you can without your lower back taking over. Beginners may not lower as low. Raise your legs back up toward the ceiling then lower them both down to the right. Try not to let your legs drift away from you as you lower to the side. Keep the weights pressed up toward the ceiling as you twist and lower. You want to lower about 6 inches from the ground. Do not touch down or release the engagement by going to low. Then use your abs to pull your legs straight up toward the ceiling. Perform another straight leg lower down the center. Once your legs are back up toward the ceiling, lower to the other side. Feel your abs working to lower to the side but make sure you don’t go too low and either disengage or need to use your lower back to pull your legs back up toward the ceiling. Keep the weights pressed up toward the ceiling the entire time. Beginners can bend their knees to 90 degrees to start and tap their toes down center for the leg raise.

Want a killer Upper Body and Core program with some great cardio finishers like this one?

Check out my Arm Burner Cards!