A good workout program should make you move in every direction – forward, backward, sideways and even rotationally.
We need to be strong in every plane of motion to help us prevent injury when moving in everyday life.
But sometimes strengthening ourselves so we can move better in everyday life and prevent injury means performing Anti-Rotational Exercises.
Anti-Rotational Exercises are exercises that build stability and strength to prevent rotation. “Preventing rotation” means that your body is able to resist forces acting upon it that may try to rotate or move it in a way and direction that it can’t move safely.
If you are shoved, trip, slide on ice or are simply carrying something that is an uneven weight and awkward, Anti-Rotational Exercise can make your body strong so that your core can handle the torque without leading to pain and injury.
Below are some great Anti-Rotational Moves to help you build your core strength and stability to prevent injury so you can move better in everyday life.
These Anti-Rotational Movements are either unilateral moves, moves unilaterally loaded or movements with an outside force trying to rotate and twist you while you resist.
Start light with these moves and make sure that you maintain proper form throughout as improper form could cause you to twist and compensate, leading to the exact thing you are trying to prevent!
10 Anti-Rotational Exercises
These 10 Anti-Rotational Exercises are important to add into your workout routine to not only build core stability and strength, but also, in many cases, correct imbalances because each side is working independently.
Unilateral movements (aka single limb or side movements) force each side to carry the load while also forcing your core to stabilize to prevent rotation.
Start slowly with these moves and make sure to really focus on engaging and activating the correct muscles.
Single Leg Deadlifts – Single Leg Deadlifts or Single Leg Squats and Single Leg Lunges, for that matter, all require your core to stabilize to help you balance and prevent falling over.
They are also unilateral movements that force each side to work independently to correct imbalances and prevent injury.
Single Leg Deadlifts are a great Anti-Rotational Movement because your core has to work to keep your hips level and your body balanced as you hinge over and stand back up. You should not rotate when doing this movement, which requires core strength and stability, especially as you add weight.
Plus this move works one of the biggest muscles in your body and an important muscle of your core – your glutes! Strong glutes can help protect your low back from pain when you do rotate and even help you rotate correctly.

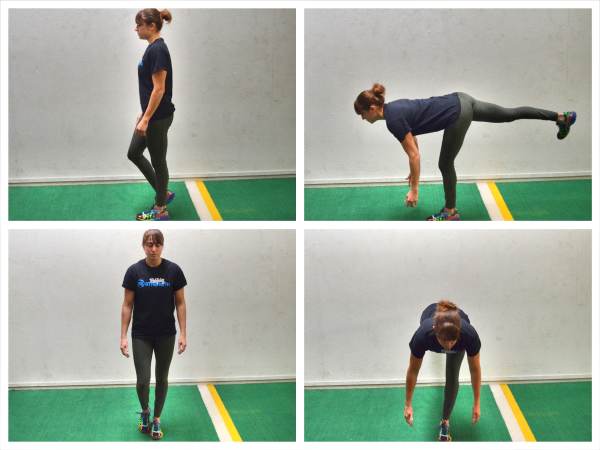
To do the Basic Single Leg Deadlifts, start standing up nice and tall. Then shift your weight so that you are balancing on your right leg with the knee slightly bent and your left toe is lightly touching the ground. Let your arms hang down by your sides.
Then hinge over at the hips, sitting your butt back as you lift your left leg back toward the wall behind you. Keep your back flat as you hinge over and you can extend your arms down toward the ground.
Make sure to sit your butt back as you hinge over and not simply lean forward. Think about reaching your butt back to the wall behind you. This will mean you may need to keep your knee soft. Do not actively bend your knee but bend it enough you can load your glutes. Also, keep your hips square as you hinge over.
Do not let the hip of the raised leg rotate open toward the ceiling. Also, do not reach your arms toward the ground and let your back round. It doesn’t matter if you touch the ground, just extend your arms down toward it as far as you can without rounding.
Hinge over as far as you can with good form and then drive through that standing heel to come back up to standing. Feel your glutes work to bring you back up nice and tall. Even squeeze your glutes at the top before repeating, hinging back over on the same leg.
Only tap your other foot down at the top if you need to. Try to stay balanced. If you tap the toe down, only do so once you come fully up to standing. Do not use the other foot to help you come back up to standing. Slow down the tempo of the movement to make it harder or add weight to the movement.
You can even up the anti-rotational challenge by unilaterally loading down the movement.
Unilaterally-Loaded Deadlifts – You can unilaterally load down Deadlifts as well as Squats and even Lunges. The unilateral load, forces your core to work to stabilize so that you don’t rotate or lean as you perform the movement.
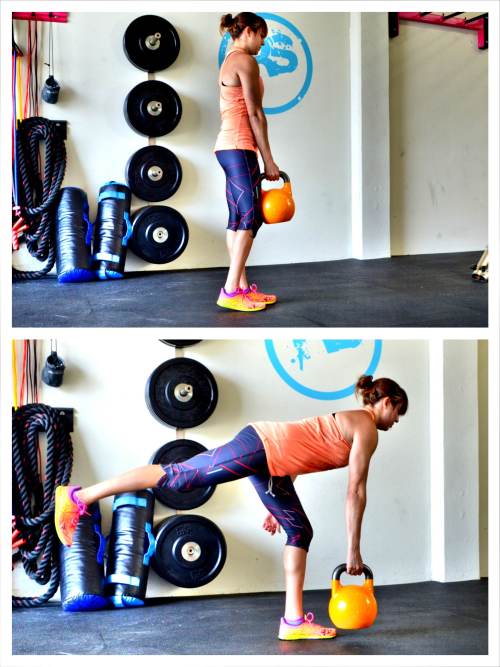
Like I mentioned above, you can unilaterally load down the Single Leg Deadlift by holding a kettlebell or dumbbell in one hand.
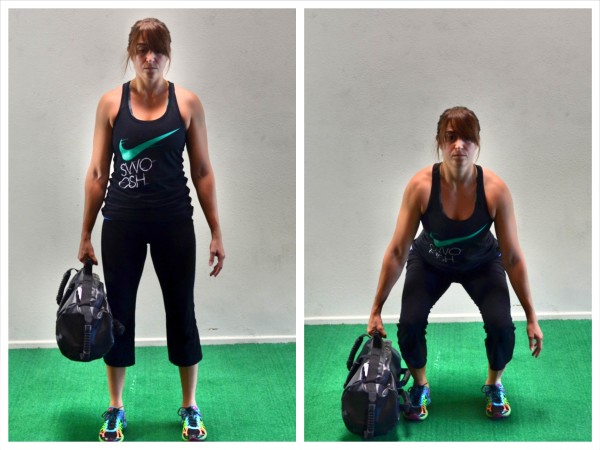
You can also unilaterally load down the Basic Conventional Deadlift, by holding a weight only in one hand, on one side.
To do the Unilaterally-Loaded Deadlift, you can hold a dumbbell, kettlebell or even a sandbag. Hold the weight in one hand and hold it at your side like a briefcase.
With the weight by your side, stand nice and tall with your feet about hip-width to shoulder-width apart. Then, hinge over at the hips as you sit your butt back and lean forward. Bend your knees as you hinge and lower the weight down to the ground. Keep your chest pressed out and your back flat as you hinge over.
Drop the sandbag to the ground without allowing your body to rotate or lean. Hinge straight back and don’t shift to one side. Your Deadlift should look like you are holding weights in both hands.
Really sit your butt back as you hinge and keep the abs engaged. Then drive straight back up to standing and squeeze your glutes at the top. Repeat, holding the weight on the same side. Again, do not let your back round as you lower down or let yourself lean or rotate.
Once you’ve completed all reps on one side, switch the weight to the other hand.
Start light so you can get proper form and make sure that you don’t shift or rotate. You should really feel your core working to keep your body in alignment.
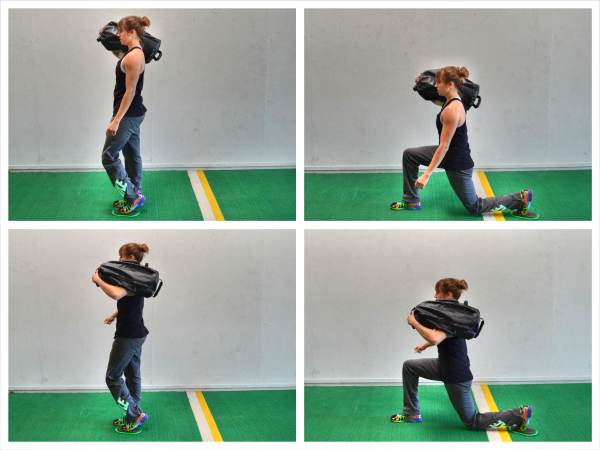
You can also unilaterally load down a squat or a lunge by placing a weight over your shoulder or by doing a unilateral rack with the kettlebell.
Anti-Rotational Single-Arm Inverted Row – With Single-Arm Rows and Presses, you can do both a Rotational and an Anti-Rotational Variation. Both of which can help strengthen your core and even correct imbalances.
The Anti-Rotational Movement, though, is great to build core stability as you work each side individually.
The Anti-Rotational Single-Arm Inverted Row is a great way to make sure that both sides of your back are activated and strong to prevent neck and shoulder pain. It can also help strengthen your weaker side to improve your Pull Ups.
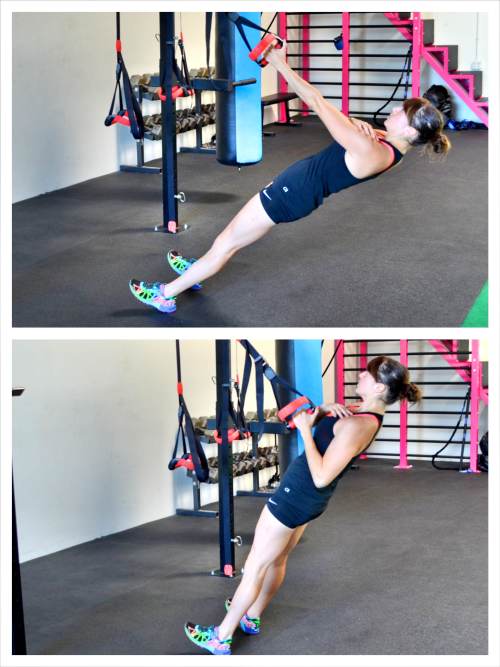
To do the Anti-Rotational Single-Arm Inverted Row, a Suspension Trainer works best. Grab one handle of the trainer in one hand and place the other hand across your chest. You can also reach the free arm up as if holding a strap if that will help remind you to keep your shoulders square. Set up with your body in a nice straight line, squeezing your quads, glutes and core and pressing your chest out. Make sure to relax your shoulder down and back and not shrug up.
Walk your feet forward to an appropriate incline. The closer to parallel you are to the ground, the harder the move will be. Make sure that you choose an incline that allows you to row with proper form and feel your back working. You do not want your shoulder to shrug.
Square up your body and then row up. Do not let the side not holding the strap rotate toward the strap as you row up or the shoulder of the arm not holding a strap to drop open. You want to row up as if you are pulling with both arms. That means your body shouldn’t close toward the strap or your shoulder shouldn’t open toward the ground.
Drive your elbow down and back as you row up and row your chest all the way up to the handle. Do not shrug your shoulder as you row.
Then lower back down. Do not let your back round or your body open up toward the ground as you lower. Repeat rowing back up, making sure that you don’t bounce off the bottom or rotate as you repeat.
Anti-Rotational Single-Arm Press – The Anti-Rotational Single-Arm Press can be done as a dumbbell bench press or as a standing press with a resistance band or cable machine.
The point is to make each side work independently and to force your core to have to stabilize so you don’t rotate as you press.
You are isolating each side with this movement and not allowing your core, and rotation, to help you press.
To do the Standing Anti-Rotational Single-Arm Press with a resistance band, anchor the band behind you at about chest height. Hold one handle in one hand and step away from the anchor point so that there is tension in the band when your hand is in at your chest.
You can stand in a staggered stance or with both feet even. Standing with your feet even will make the move more challenging and force your core to work harder to stabilize. If you stand with your feet even, the wider apart your feet are, the more stable your base will be. To challenge your core further, stand with your feet even and close together.
Then with your hand up at your chest and your shoulder relaxed down and back, press your arm straight out from your chest. Do not rotate as you press and do not let the shoulder shrug or the hand press up and out. You want to press straight out from the chest, keeping your chest pressed out and your shoulders down.
Then once you press all the way out without letting your core rotate, bring the hand back. You want your body to move as if you were pressing both hands, aka with your chest and hips staying square instead of rotating.
Complete all reps on one side before switching. You can place the hand that isn’t working across your chest, by your side or on your hip. Do whichever helps you fight the urge to rotate.
Anti-Rotational Plank Pulls – There are Plank Variations where you rotate your hips and core and there are variations where you try to keep your core still and stable as you perform other movements.
The Anti-Rotational Plank Pull is one of those moves where you try not to allow your core to move even as you pull a weight across and under your body.
You will want to rotate to power the pull and even simply because it is challenging to stay still as you perform a movement, but you should not rotate your hips as you do this move. This is a more challenging and advanced movement if you fight the rotation.
You want to engage your core and really squeeze your glutes to feel your entire core working as your back works to pull the weight across.
We generally use the Sandbag for our plank pulls although any weight will do as long as you can grab it to pull it across. You could even do this with a cable or resistance band and simply complete all reps on one side first.
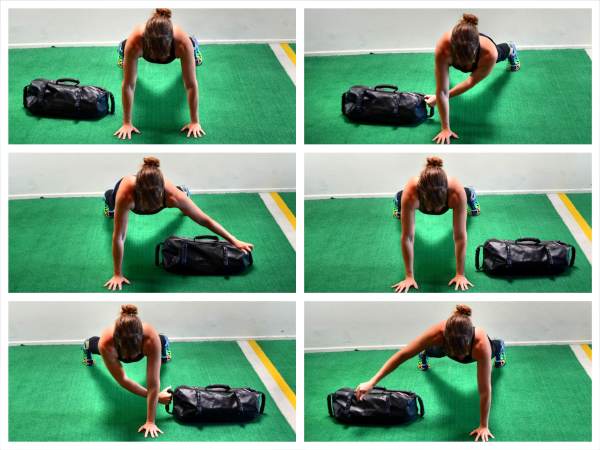
To do the Anti-Rotational Plank Pulls, set up in a plank position from your hands and toes (advanced) or hands and knees (beginner) and place the weight on the ground to one side of your body just outside and below your shoulder.
Make sure your hands are under your shoulders and then place your feet or knees wider apart to give you more stability. The closer together your feet are, the harder the move will be because you won’t have as wide or stable a base. If you feel your hips rocking side to side, widen your feet out or regress down to your knees. The weight may also be too heavy so try lightening it if you are really rotating. If the move is too easy, bring your feet closer together or use a heavier weight.
Then, while holding the plank position, reach one hand under your body and across to grab the weight. Squeeze your glutes and, without rotating your hips, pull the sandbag through and across to the other side of your body. Make sure your body stays in a nice straight line with your abs engaged as you pull the weight across. Do not let your hips go up in the air or sag toward the ground as you pull.
Pull the weight all the way across and outside the other shoulder. If you can’t pull the sandbag all the way across or at least close to outside your shoulder, it may be too heavy.
Then reach through with the other hand to pull it back.
To fight your body’s desire to rotate, engage your core and really squeeze your glutes. You do not want to feel this move in your low back either. Make sure your hips are not sagging and your butt is not up in the air.
Keep alternating reaches until all reps are complete. Your goal is to keep a nice straight line from your head to your heels the entire time.
Renegade Row – Renegade Rows are another great Anti-Rotational Plank Exercise that also work your back. This move will also build shoulder as well as core stability and strength.
With Renegade Rows, your core will want to rotate as you row up. Your goal is to fight it and to force your back to work to row as your core and shoulder stabilize. This isn’t a heavy lift for your back. It is more about building core stability so you can fight rotation while your body is moving.
You can do this movement using dumbbells or even kettlebells. Kettlebells will require even more strength to stabilize.
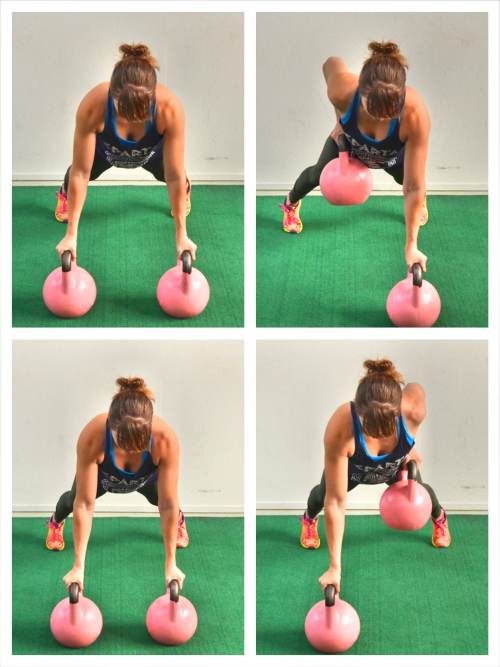
To do the Renegade Row, you will need two weights. Set them on the ground under your shoulders. If you place your hands and the weights closer together, it will make the movement easier and help you balance.
Then set up in a high plank position with each hand on a weight. Beginners may need to do this from their knees while more advanced exercisers will do this on their toes. If you are doing this on your toes, set your feet between hip-width and shoulder-width apart. You can also widen out your knees if doing this from your knees. A wider stance will make the move easier by providing you with a more stable base.
In the plank position, engage your core and squeeze your glutes so that your body is in a nice straight line. Then row one weight up toward your chest, driving your elbow down and back. You want to drive it back toward the ceiling, but also down toward your hip.
As you row up, fight your body’s urge to rotate. Keep your hips and chest square to the ground. Row the weight all the way up to your chest just below your pec. Keep your core tight and squeeze your glutes. Do not let your butt go up toward the ceiling or your hips sag.
After rowing the weight up to your chest, lower the weight back down and then row up on the other side. Keep alternating until all reps are complete. Keep your core braced and fight the rotation as you alternate rows.
Do not rush the movement.
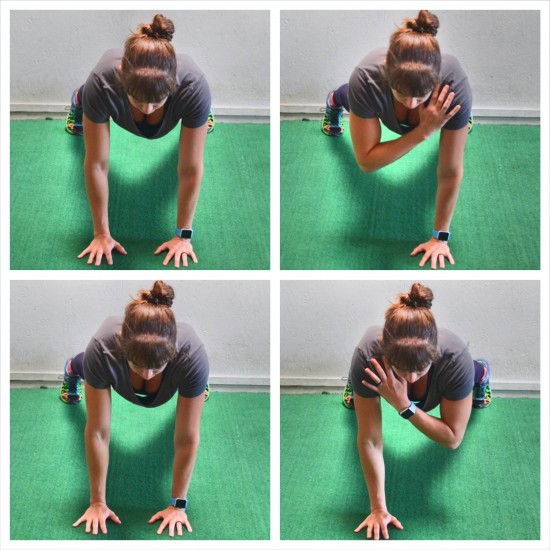
Shoulder Taps – If you’ve ever had a shoulder injury and want to rebuild your shoulder stability while also strengthening your core, then you need to include Shoulder Taps in your routine.
This looks like an easy movement, but if you really fight the urge to rotate and move slowly, it is incredibly challenging.
It is another great Anti-Rotational Plank Variation.
To do Shoulder Taps, set up in a high plank position from your hands and toes (advanced) or hands and knees (beginner). You want your hands to be under your shoulders but closer together and your feet or knees should be wider apart to provide a more stable base. Bring your feet or knees together as the move becomes easier. Also, by having your hands closer together and more centered under your chest, you will provide yourself with a more stable base.
It is very important that you remain stable with this move or you can stress your shoulder. Brace your abs and engage your glutes so that your body is in a nice straight line.
Then from this plank position, lift one hand up off the ground, moving it slowly to touch the opposite shoulder. Keep your hips square to the ground and do not rotate. Also, do not let your butt go up in the air or your hips sag toward the ground.
Touch your opposite shoulder than slowly place your hand back down on the ground. You want to move at a very controlled pace.
Then lift the other hand and tap your other shoulder.
Do not rotate as you lift. Try to keep your body still and simply lift the hand to touch the opposite shoulder.
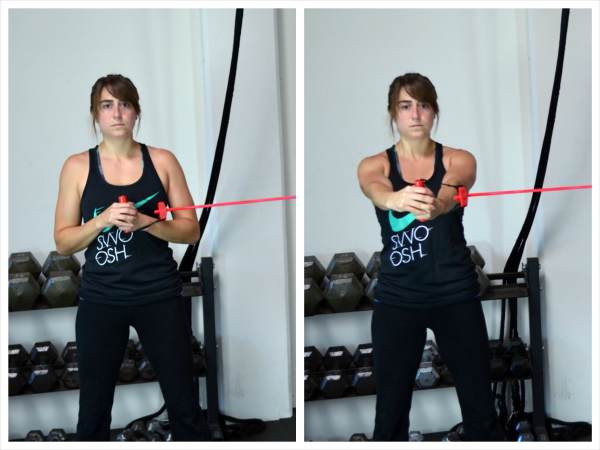
Stability Press – This is a must-do Anti-Rotational Exercise. It may seem easy, but it is far from it. The Stability Press will activate and strengthen your glutes while also working your obliques and even your back and shoulders.
If you’ve ever had low back, hip or knee pain, then this is a must-do move!
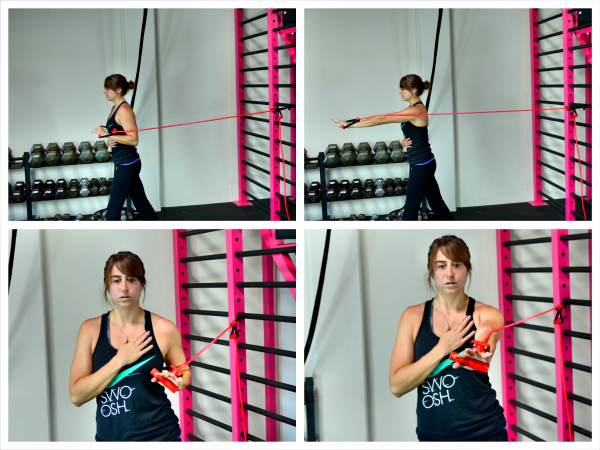
To do the Stability Press, you can use a resistance band or cable. If you are using a band, anchor the band and then hold one handle in both hands. Turn to the side so you are sideways to the anchor point and step away from the anchor point so that there is tension in the band. You want to make sure there is tension or the move won’t be challenging.
Stand with your feet no more than shoulder-width apart. The closer your feet are together, the harder the move will be. Choose a stance though that challenges you while allowing you to maintain good form and not lean away. As you become stronger, bring your feet closer together and then even try a heavier band or walk further from the anchor point.
Bring your hands into the center of your chest and squeeze your glutes while you brace your abs. Standing up nice and tall with your chest pressed out, slowly push the band straight out from the center of your chest until your arms are straight out. It should be a struggle to press the arms straight out because the band is trying to rotate you back toward the anchor point. Your core should have to work to stabilize and press straight out from your chest.
Do not let your arms rotate open and go back toward the anchor. You want to press straight out from the center of your chest without shrugging your shoulders. Maintain a nice tall posture with your shoulder blades drawn down and back and your core engaged. Make sure you also don’t lean away.
Then slowly bring your arms back in and repeat. Move slowly to really have to fight the band. If you move too quickly, you won’t get as much out of the move and you’ll probably get sloppy and let yourself rotate toward the anchor point or even shift open and push away.
Also, if you allow your stance to rotate open or if you lean away, it will make the movement easier and won’t force that inside side (the side closest to the anchor point) to really work to stabilize.
Complete all reps on one side before turning and facing the other way to work the other side. Really consciously engage your glutes before starting to press.
This move looks easy, but when you try it, you realize how much your entire body fights rotating back toward the anchor point. Use a heavier band, play around with your stance or step further away from the anchor point to make the move harder.
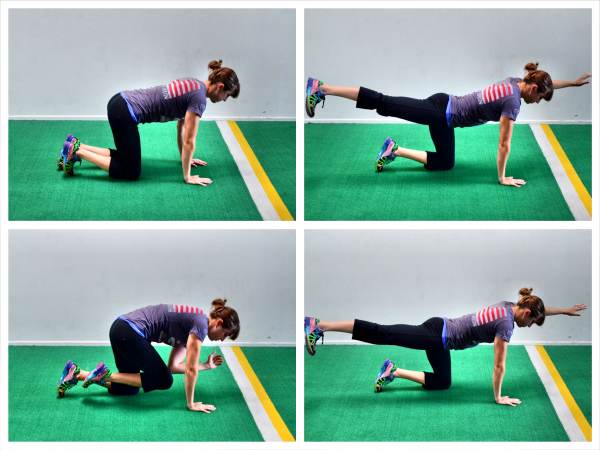
Bird Dogs – This is a great quadruped exercise to build core stability and strength. It will teach you how to brace your abs while activating your glutes and improving your shoulder stability.
It is important that you don’t rush through this movement, but instead move nice and slow.
To do the Quadruped Bird Dog, start on your hands and knees with your hands under your shoulders and your knees under your hips. Do not let your hands get way out in front of you or your knees shift backward to make the move easier. Flex your feet.
Then, keeping your foot flexed, kick your right leg back behind you as you raise your left arm out toward the wall in front of you. Brace your abs and keep your hips and chest square to the ground as you lift your arm and your leg. Do not rotate open as you lift.
Focus on kicking your leg straight out behind you as if driving your heel into the wall behind you while you reach the other arm out straight toward the wall in front of your head. Don’t worry about lifting your leg or arm up super high. You want to keep your hips and body square to the ground as you brace your abs and use your glutes to lift. Do not let your low back engage or hyperextend just to lift up higher.
Really try to drive your arm and leg toward opposite walls as you keep your core engaged and squeeze your glutes. Hold for a second at the top and then bring your arm and leg back down, but instead of putting them back down on the ground, bend them and bring them together under your body. Try to touch your elbow to your knee before extending back out.
Move slowly so you can stay balanced and don’t need to touch down or let your body rotate. Don’t rush through just to get them done. Move slowly to make it more challenging. Also, make sure to feel your abs as you tuck. Do not simply bring your elbow back toward your knee. Draw them in with your abs.
Complete all reps on one side before switching to the other side.
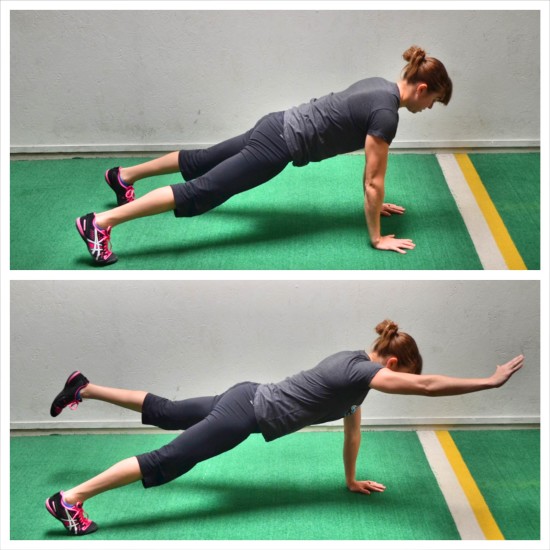
Advanced exercisers can do a Plank Bird Dog.
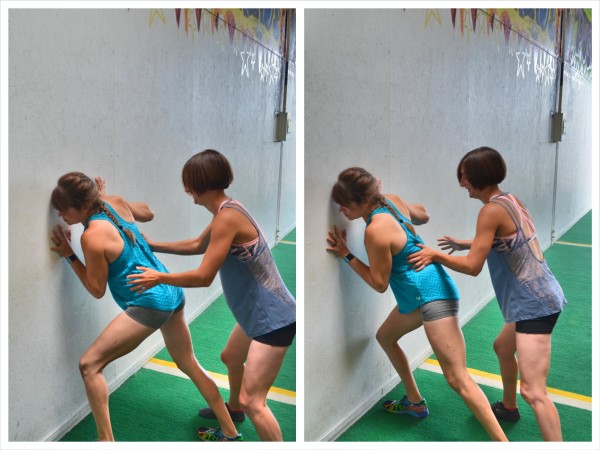
Wall Push – This is a great Anti-Rotational Exercise that uses a partner as the force trying to make you rotate as you engage your core to resist.
The harder your partner pushes, the harder your are going to have to brace to resist falling over or rotating. This is a great exercise with an uneven, unexpected force being applied (aka very functional!) to build your core stability.
To do the Wall Push, stand a foot or two from a wall with your hands on the wall.
Stagger your feet and make sure you are close enough to the wall that you can bend your elbows and lean in. Push into the wall with your arms bent (the closer you get to the wall, aka the more your arms are bent, the stronger your position will be). Also, the wider your stance, the stronger your base.
Push as hard as you can against the wall as if you are trying to move it. Keep everything engaged as you drive into the wall.
Once you are set have your partner push and pull you. Have them push and pull from every direction with no warning. The partner wants to push hard enough to make you work, but not so hard they push you over.
You can switch and stagger your feet the other way after holding for awhile.
You can also do a variation of this move holding a Bull Dog position as your partner pushes you.


It’s been about three or four weeks now, but the glute/hip/lower back pain of the past four or five years seems gone because of these exercises. I’ve tried everything previously–personal training, tons of PT, message, looking on the internet, five orthopedic surgeons, etc., but the bird-dog and the unilateral deadlift exercises seemed to be the winners. Doing the latter I had the usual far lateral weakness, and then suddenly, half way up some muscle kicked in and I’ve been feeling better ever since. My wife is very thankful, too–maybe no more complaining about my hip! Thank you so much!
Aw yay! So glad the core stability work has helped Ronald!
Great article! Thank you!
Thanks! Glad it helps!