Your body is a chain, which means that dysfunction in one area of your body can lead to pain and injury in other areas of your body.
That is why you need to take care of your feet and ankles – they are your foundation and without a strong foundation, there are going to be problems with the rest of the structure.
So if you are suffering from foot or ankle pain, or have in the past, the best way to keep your foundation strong is by following these four prehab/rehab steps – foam rolling, stretching, activation and strengthening.
Below are tips and exercises to help you implement these four steps to Prevent and Alleviate Foot and Ankle pain as well as pain and injury further up your body!
Tips To Prevent And Alleviate Foot And Ankle Pain and Injury
Foam Rolling Moves:
Any good pain prevention and rehab program should start with some form of massage. And a great way to give yourself a massage at home is by foam rolling.
Foam rolling helps you relax overactive muscles so that you can stretch the muscles and return them to their proper length tension relationships.
When muscles are overactive, they tend to create imbalances and try to do work they can’t handle instead of allowing the proper muscles to work. They can also be pulled tight causing improper posture and movement patterns.
Using just a simple tennis ball, you can roll out your feet and lower legs to help loosen up tight muscles.
Below are 4 foam rolling moves to help you alleviate aches and pains in your feet and lower legs, including Plantar Fasciitis and Shin Splints.
While a foam roller and other trigger point tools are great to have to really dig in to specific areas, below we’ve only used a tennis ball so even if you don’t have any special tools, you can still take steps to alleviate and prevent pain.
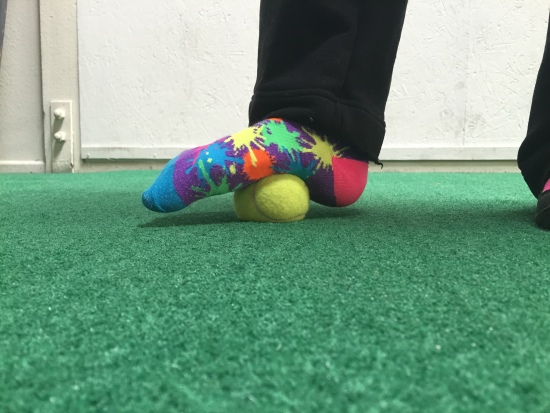
Foot Foam Rolling:
If you run a lot, wear dress shoes (especially high heels) or have developed Plantar Fasciitis, you need to roll out the bottom of your foot.
A great way to roll out your foot is with a tennis ball.

To roll out your foot, place a ball on the ground and step on top of it. Roll it along the length of the bottom of your foot. Hold on any tight spots.
If you have other balls available and would like to dig into your foot a little bit harder, try a smaller, harder ball. The smaller and harder the ball, the more pressure you will be able to apply.
You can also use a frozen water bottle to roll out your foot and ice at the same time. To do this, place a water bottle full of water in the freezer until it freezes. Then take it out and roll it under your foot like you would the tennis ball. (This works best with a thinner and round bottle).
(Fun Fact: To see just how connected everything is, try a standing hamstring stretch before you roll out your feet. See how close to the ground you can get. Then take a minute and roll out your feet really well and try the stretch again. Did you get lower? Most people do! Shows you just how connected everything really is and how release one part of your body can help improve mobility all over!)
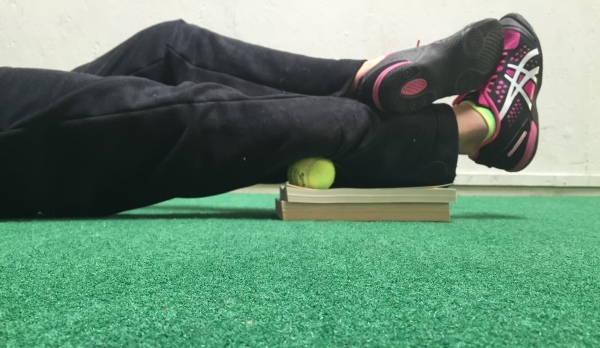
Calf Foam Rolling:
Runners and high-heel wearers are especially prone to having tight calves. Even if you simply sit at a desk all day, your calves may be tight, which can lead to (and perpetuate) foot, Achilles and even knee pain. And if you’ve rolled your ankle in the past, you need to take extra care to keep your calves loose and everything in the proper length-tension relationships.
To roll our your calf using a tennis ball, place a ball on some books or a yoga block and then put one calf on top of the ball. Start with the ball at the bottom part of the meat of your calf.
Cross the other leg on top to help apply more pressure if needed.
Rock very slightly from right to left or side-to-side a couple of times and then move the ball to another spot on your calf, working over the entire meaty part of the muscle. Keep rocking side to side as you work your way around your calf.
Hold on any tight spots. If you find a super tight spot, make 10 circles with your foot and then tense and relax your calf (flexing and dropping your foot) 5 times before you move to the next spot. This will help the muscle relax itself and help the knot to release.
Don’t spend any time on areas that aren’t tight. Repeat all the way up and around both calves.
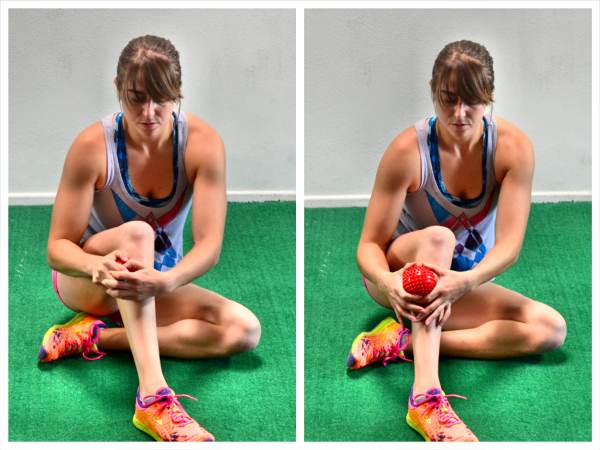
Shin Foam Rolling:
If you have Shin Splints, then you need to roll out your shins, the fronts of your lower legs. Rolling the muscles will help them relax and can even help stimulate some blood flow to aid the muscles in repairing and recovering.
While you may need to take time off especially if your injury is due to overuse, taking time off doesn’t mean not doing anything. Rolling out while you recover may speed your recovery. And if you roll out before the pain gets bad, you may even prevent yourself from having to take time off at all!
To roll out your shin, sit on your butt with one knee bent in front of you and the foot flat on the ground. Relax the leg and take a tennis ball in both hands.
With the ball in both hands, press it into the outside of your shin bone. Start digging it in to the muscle on the outside/front of your lower leg under your knee. Do not dig it into the bone.
Make small circles both ways with the ball, pressing as hard as you can into the muscle. Then move the tennis ball down your shin and again make small circles as you press the ball into the muscle. Make extra circles and even just simply hold the ball on any especially tight spots. You can also flex and relax your foot to tense and relax the muscle to help the muscle relax the knot.
Work your way down your shin to your ankle.
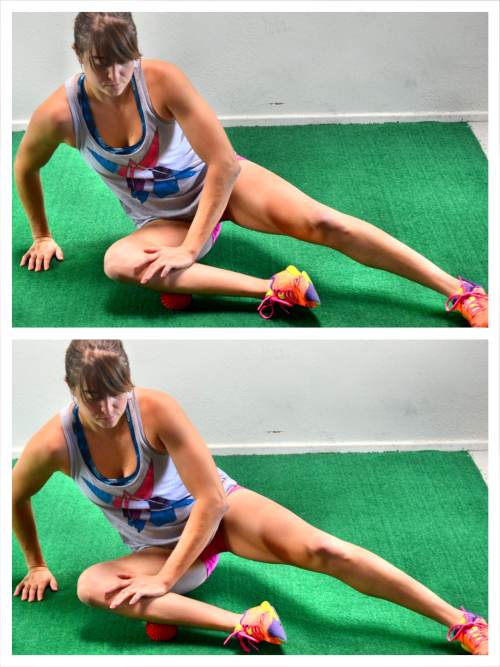
Peroneal Foam Rolling:
Many people don’t realize it, but they pronate when they walk or run or even squat. Pronating means that they are rocking toward the inside of their feet and that their knees may even be caving in. This can not only cause foot and ankle problems, but also knee, hip and even low back problems.
To help correct the pronation, you often need to roll out the outside of your shins, especially the Peroneal muscle.
To roll out your Peroneal, place a ball on the ground in front of you and then bend your knee and place the side of your lower leg on top of the ball with the ball to the side below your knee. Press down on your lower leg with your hand to apply more pressure so that the ball digs in.
Then move your leg so that you make small circles on top of the ball. Work your way down the length of the side of your lower leg, pressing your lower leg firmly down into the ball. (You may even put a book under the ball to help you apply more pressure and get a better angle.)
Hold on any tight spots and even flex and relax your foot to help dig into any tender areas. You can also circle the ankle while holding on any tight spots to dig in more to any knots.
To hit slightly different angles along the side of your shins, rock forward a bit (toward your shin) or backward (toward you calf).
Work your way along the length of your lower leg from just below your knee down to a few inches above the anklebone. Do not go right up to the anklebone.
Stretching Moves:
After you’ve rolled out and gotten the muscles loose, you need to stretch to help restore everything to its proper length-tension relationships so that you can next get the correct muscles activated and working.
All too often when people stretch their lower legs they only stretch their calves. Below are 4 Stretching Exercises to help you loosen up your lower legs and feet.
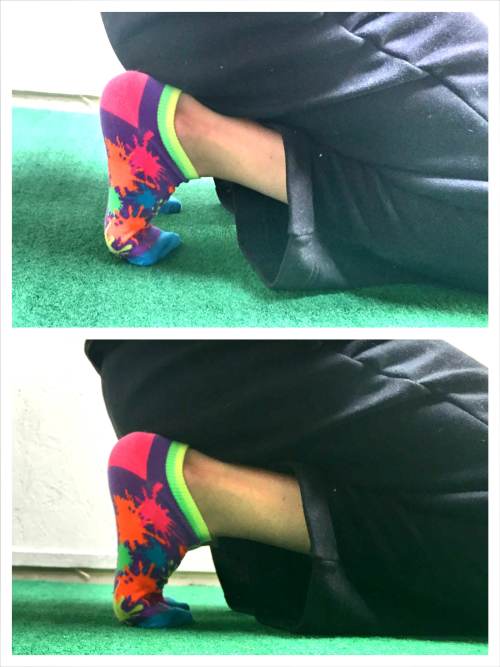
Kneeling Foot Stretch:
This Kneeling Foot Stretch is especially important if you’ve had any foot pain or injuries and wear dress shoes all day at work. This stretch is also best done barefoot and may be limited by your quad flexibility so you may need to stretch your quads a bit too in order to get the most out of this stretch.
To do the Foot Stretch, kneel on the ground and flex your feet, tucking your toes under. Then sit back on your heels and feel a stretch down your feet and toes. Rock a little side to side as you hold in the stretch.
You can then release and move into the Bear Squat Stretch listed below or you can simply relax out of the stretch and repeat, sitting back on your heels and gently rocking side to side.
If your quad flexibility is really restricting you from sitting back on your heels and feeling this stretch, you can instead stand up and place the ball of your foot on the wall and lean forward against the wall to stretch your foot and even your calf.
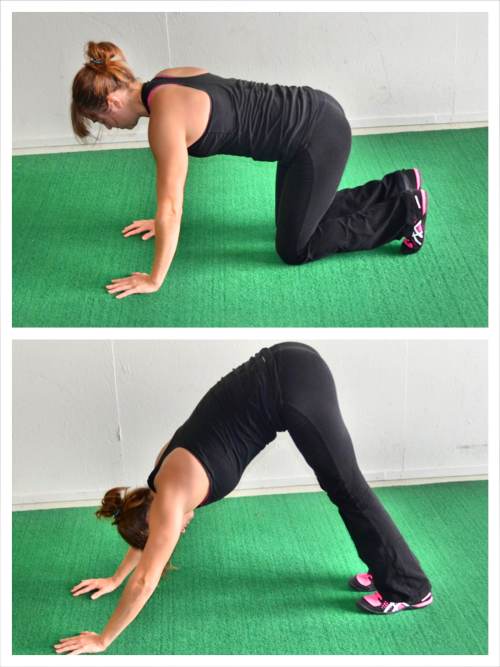
Bear Squat – Calf Stretch:
The Bear Squat is a great stretch to use as part of your warm up because it not only stretches your calves, but also gets your entire core working and warmed up.
To do the Bear Squat, start in the quadruped position with your hands under your shoulders and your knees on the ground under your hips.
Then press your butt up into the air, driving your heels down to the ground. Relax your calves and try to get your heels down to the ground. Feel a nice stretch down your calves and even up into your hamstrings. Hold for 1-2 seconds and then drop back down to your knees.
With the Bear Squat stretch, as mentioned above, you can add in the Kneeling Foot Stretch. You can start with the Kneeling Foot Stretch and then place your hands down on the ground and go into the Bear Squat.
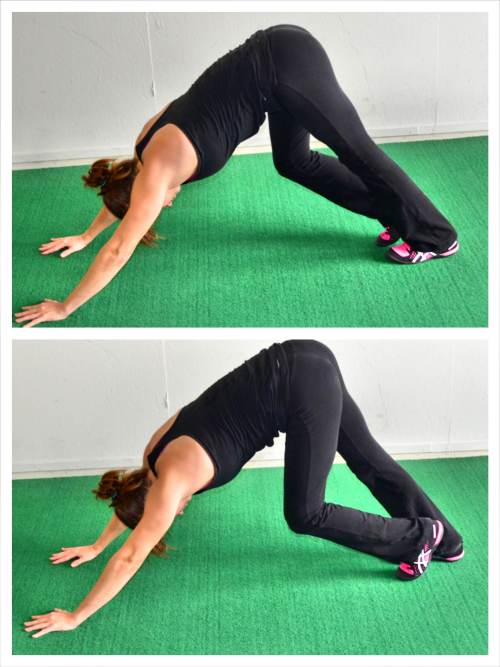
You can also add in a simple foot pedal at the top of the Bear Squat to isolate and stretch each calf more.
To do the Bear Squat with Calf Pedal, do the Bear Squat and then, after driving both heels down for a second or two, focus on driving one heel down toward the ground while you relax the other. Then switch and drive the other heel down. Then drive both heels down before returning to the quadruped position and repeating. You can perform a few heel pedals while in the Bear Squat before relaxing and repeating.
3-Way Shin Stretch:
If you are prone to Shin Splints, this is a super important stretch to do before and after your run. It targets the muscles all along the front, and even into the outside, of your lower leg.
To do the 3-Way Shin Stretch, stand facing a wall or something else you can use for a bit of support and balance if needed. Place your hands on the wall in front of you with one foot back.
Point the toe of the foot that is back and rock forward on the foot so that the top of your foot is facing, or even on, the ground.
Then bend your knee back and feel a stretch up your shin. Stand back up.
Complete 10 reps. Then change the angle of your toes to hit a different aspect of your lower leg.
You can point your toes straight back, in toward your other foot or outward. To point them outward, you will rock more onto your big toe.
With your toes pointing each of the three ways, bend your knee forward to feel a stretch down your shin and then relax back out. Complete 10 knee bends in each position.
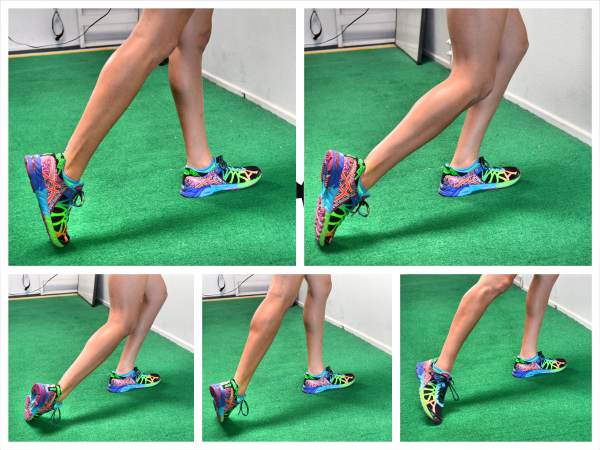
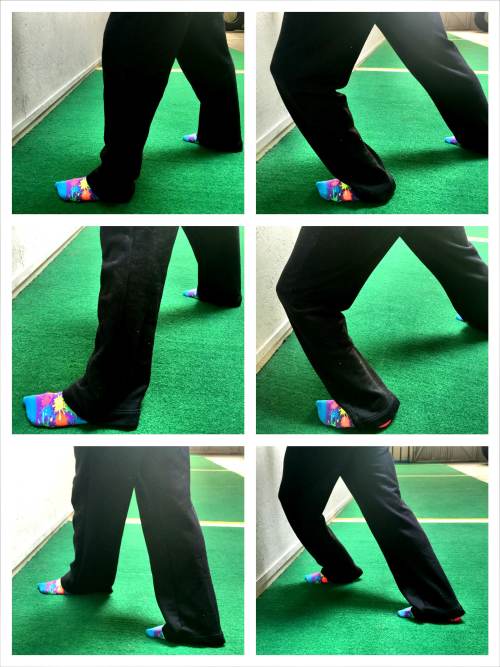
3-Way Ankle Mobility Stretch:
Especially after an ankle injury, you need to work to restore full ankle mobility. Limited ankle mobility can lead to pain and injury further up your body if you aren’t careful. It can also be the reason why you aren’t able to squat as low as you would like.
To do the 3-Way Ankle Mobility Stretch, stand facing a wall with your hands on the wall for balance or support.
Stand in a staggered stance with one foot slightly in front, but your knee at least a few inches from the wall. This front foot is the ankle that is being worked on.
Then try to drive the front knee straight forward over the toe and into the wall while keeping your heel on the ground. Do not worry if your back heel comes up. Focus on that front foot and driving the knee into the wall while keeping the heel down.
Do that 10 times and then take a step out a bit wider to the side and repeat (second set or line of photos in the picture above). The foot should be pointing straight toward the wall and you want to drive the knee forward over the toe while keeping the heel down. Complete 10 reps, driving the knee forward into the wall then relaxing out of the stretch.
Then step your foot across in front (shown at the bottom of the photo) and repeat 10 more knee drives. Make sure that your toe is always pointing directly toward the wall and that you are keeping the heel down as you drive your knee forward.
All three positions will hit the lower leg and ankle from different directions to improve your ankle mobility and dorsiflexion (aka how much you can pull your toes up toward your shins).
Activation Exercises:
While stretching and foam rolling are important pieces of the rehab/prehab puzzle to preventing and alleviating aches and pains, they are not the only pieces. If you simply stretch and roll, but never get the correct muscles activated and working, you will never fully correct the problem.
Activation is the third step and an important one to get the correct muscles working so that weaker, smaller muscles don’t try and carry a load they aren’t meant to handle.
When it comes to activation and lower leg pain and injury that often means working on balance. Below are two of our favorite moves to improve your balance. One is an isometric hold and the other is a dynamic movement. Both will strengthen your feet, ankles and lower legs while even improving your mobility up your leg to your hips.
The other Activation Exercises we’ve included help improve the mind-body connection between your feet and lower legs and your brain. Often when we suffer an injury, we lose that mind-body connection. Part of activation is restoring that through consciously focusing on the proper muscles working in the correct way.
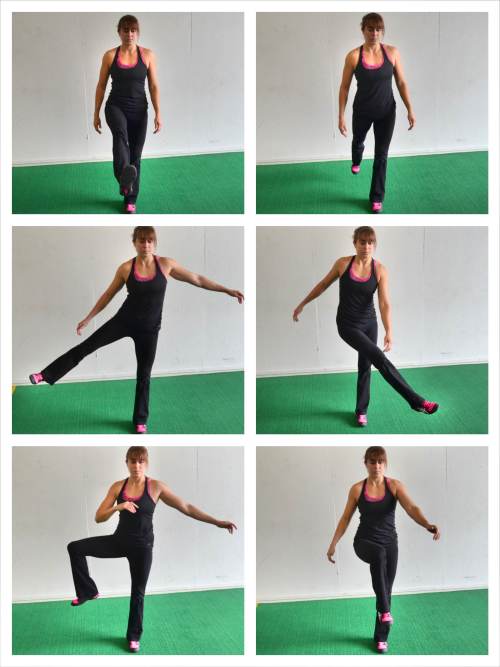
3-Way Leg Swings:
This is a great balancing exercises that forces your foot and lower leg to work to stabilize while you are moving. It is also a great dynamic warm up move to get your entire leg, including your hips, ready to work.
To do the 3-Way Leg Swings, start standing on one foot. Keeping both legs fairly straight, but not locked out, swing the other leg forward and backward. Swing from the hip. The bigger your swings are, the more your standing leg will have to work to balance.
Do not hold on to anything as you do this move. If you need to at the beginning, just perform smaller swings and tap your foot down as needed to reset and stabilize.
Perform 10-20 forward/backward swings. Then, still balancing on the same leg, before 10-20 lateral swings. Swing the raised leg right to left in front of your standing leg. The bigger your swing, the more you will open up your hip and force your standing leg to work hard to balance.
After performing the lateral swings, try a rotational swing while still standing on the same leg. Bend the raised knee to 90 degrees with the leg out in front of you. Then open the knee out to the side, keeping the knee bent.
Bring the bent leg back in front of you and repeat. Complete 10-20 swings here before performing all three swings on the other leg.
If you are short on time, you can do this while brushing your teeth or even do one of the swings when you get up from your desk to go the bathroom!
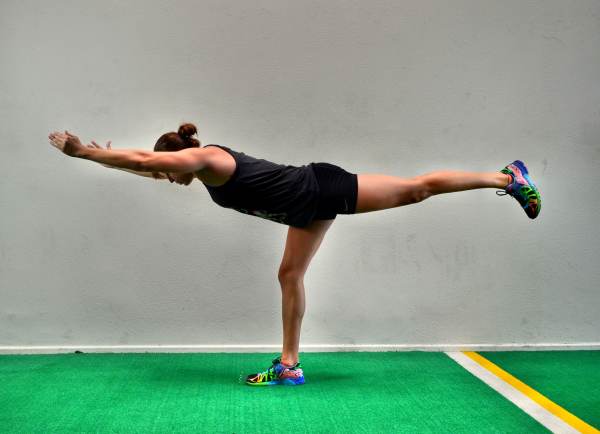
Warrior III:
The Warrior III is a great isometric exercise to work on your balance as well as improve the flexibility of your calf and even your hamstring. This move also will help improve your core strength.
With all balancing moves, it is also best if you can do them barefoot.
To do the Warrior III, balance on one foot with your knee slightly bent. The straighter your standing leg is, the harder the move will be and the more flexibility you will need.
Then hinge over at your hips, lifting your back leg toward the wall behind you as you lean your chest over. Pretend you are driving your foot straight back into the wall behind you. As you hold this pose, you can reach your hands overhead, out to the side or back behind you.
Make sure to keep your back flat and your core tight. Hold here and breathe. Try to straighten the leg more as you relax into the pose. Do not hold your breath!
Also, do not let your back round or your other foot touch down. You want a nice straight line from the bottom of your lifted heel to the top of your head. Also make sure your hips don’t rotate open up as you hold. Squeeze your glutes to keep your hips level. If your hips are tight, you may not be able to lift your back leg as high in order to keep your hips level.
Beginners may need need to use the wall behind them to help them balance. Stand with a wall behind you and when you hinge over have the lifted foot lightly touch the wall behind you to help you balance. Beginners may also bend the standing leg more or not lift the raised leg up as high.
Reaching overhead also generally makes this move harder and more core intensive. Beginners may want to reach back toward their feet as they hold.
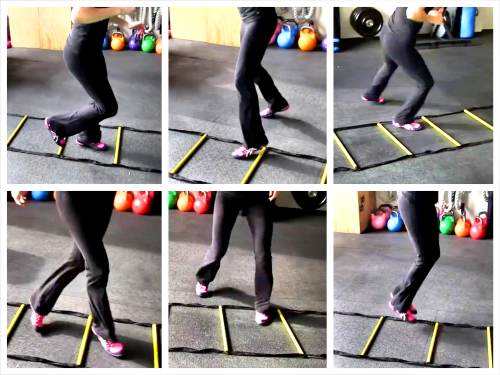
Agility Ladder Drills:
One of the best tools to improve your mind-body connection and coordination while working your feet and lower legs is the Agility Ladder.
Check out these 30 Agility Ladder Drills broken down by difficulty.
Do not simply rush through these drills. You get the most benefit out of breaking them down and doing them perfectly and then speeding up the pace and going as fast as you can.
While doing them quickly is the goal, you do not benefit from doing them quickly but incorrectly.
Strengthening Exercises:
The final step is to strengthen those weak muscles so that they can carry the load the should be carrying.
When doing your strengthening, you also need to consider muscles that may have been inhibited because of the injury that aren’t directly resulting from the injury.
And while there are a ton of Ankle Exercises that should be included in your routine if you’ve rolled your ankle in the past (such as ABCs), in this section, we would like to focus on compound movements that not only strengthen your lower leg and feet but also get other muscles activated and working that may have been affected and inhibited by your injury.
If you have rolled your ankle or have had Plantar Fasciitis, make sure to include strengthening moves for those specific injuries such as the ABCs or towel scrunches with your toes. Many of these moves should even be included before the balancing exercises in the Activation portion if your injury is more recent. For more drills, and even a few more ankle mobility stretches, check out this post on Restoring Your Ankle Mobility!
The strengthening moves below are glute focused and most of them are single leg movements to continue working on your balance. Often when you have a foot, ankle or even lower leg injury, your glutes stop firing properly so any good program to alleviate aches and pains should include glute activation. For more glute activation exercises, you may want to check out these 50 Glute Exercises!
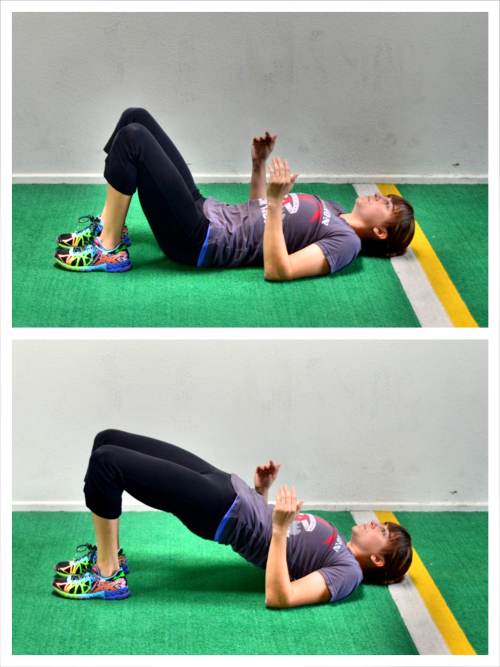
Glute Bridge:
The Glute Bridge is one of the best glute activation exercises out there because it allows you to really concentrate on working your glutes without other muscles taking over.
While there are a ton of Glute Bridge Variations (check out 20 Bridge Variations here!), if you are really focused on strengthening and activation, you need to start with the Basic Glute Bridge.
To do the Basic Glute Bridge for reps, bend your knees and put your feet flat on the ground just close enough that you can graze your heels with your fingertips when you stretch your arms down by your side. Your feet should be about hip-width apart.
If you put your feet further away from your glutes, you will engage more hamstring than if you keep your heels in closer to your glutes. You can also place your feet together, but then make sure to squeeze your legs together. You want your feet, knees and hips to be in line with each other.
Bend your elbows to 90 degrees so that only your upper arms are on the ground.
Then drive up through your heels and upper back to lift your glutes off the ground. Squeeze your glutes and drive your hips up as high as possible. Do not hyperextend your low back to get your hips up higher. Keep your belly button drawn in and focus on consciously squeezing your glutes at the top.
Do not push backward off your heels. Make sure that you are driving your hips straight up, pushing through your upper back and heels. Also make sure that your knees aren’t caving in or falling open.
Squeeze your glutes for second or two at the top and then lower all the way back down to the ground before repeating.
Do not rush through the move. To make the move harder, hold longer at the top or even slow down the lower back down to the ground. A slower tempo means more time under tension and more work for your glutes.
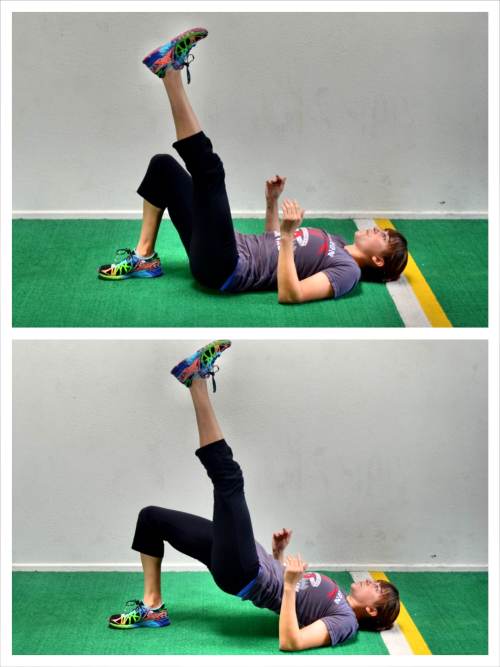
You can also raise one leg and do a Single Leg Glute Bridge to isolate each leg and help correct any imbalances. However, only attempt this move if you can fully extend your hips in the glute bridge without hyperextending your low back!
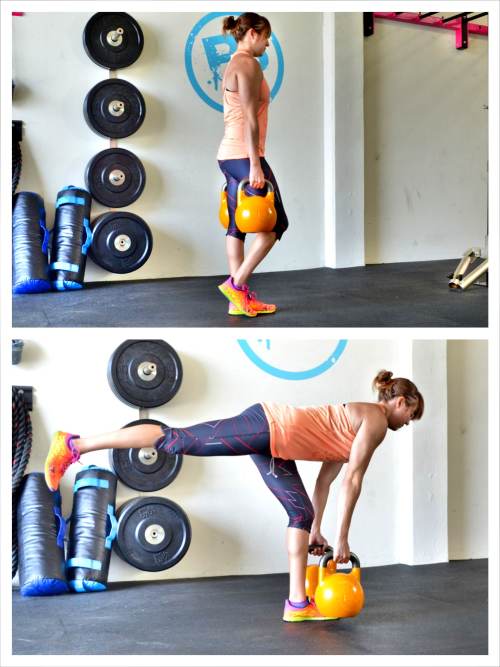
Single Leg Deadlift:
The Single Leg Deadlift is a great unilateral posterior chain move to work your glutes, correct imbalances and even improve your balance.
Beginners will want to start with bodyweight while more advanced lifters can use a barbell, sandbag or kettlebells to weight the move down and make it more challenging.
To do the kettlebell Single Leg Deadlift, hold a kettlebell in each hand down by your sides. Stand up nice and tall, balancing on your right leg with your knee slightly bent and your left toe lightly touching the ground.
Then lift your left leg back toward the wall behind you as you hinge over, keeping your back flat. As you hinge over, drop the kettlebells down and back.
Make sure to sit your butt back as you hinge over and not simply lean forward. Your weight should shift slightly toward the heel of your standing leg although you do not want to complete rock backward or you will lose your balance.
Do not reach the kettlebells toward the ground and let your back round. Only lower them as far as you can without rounding or “squatting.” Your standing knee should be soft but isn’t going to bend extra as you hinge over.
Once you’ve hinged over, drive through that standing heel to come back up to standing. Feel your glute work to bring you up nice and tall. Squeeze your glute at the top and repeat, hinging back over on the same leg.
Only tap your other foot down at the top if you need to. Also, do not use the other foot to help you come back up to standing. If you need to touch the other toe down before you are standing up nice and tall, you may need to lessen the weight. You want to make each leg work independently without the assistance of the other leg.
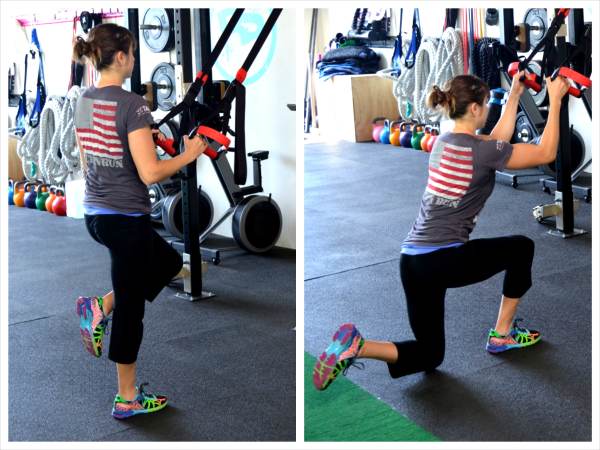
Suspension Trainer Balance Lunges and Single Leg Lunges:
The Suspension Trainer is another great tool to help you improve your balance while strengthening your legs. Check out these 5 Suspension Trainer Glute Exercises to help you improve your balance while strengthening your glutes and legs.
Follow The 4 Steps:
Following the 4 Steps and exercises listed above, you can help prevent and alleviate foot, ankle and lower leg pain and injury.
And the best rehab program is a prehab program. Do these exercises as part of your warm up, or even your workouts, before you have pain, especially if you have had an injury or pain in the past.
Whether you are a runner looking to up their mileage or a simple desk job worker, you need to take care of your feet, ankles and lower legs. If your foundation isn’t healthy, you are risking problems further up your body!
[call_to_action_small title=”Get More Injury Prevention Tips!” excerpt=”Check out our Foam Rolling to Prevent and Alleviate Injuries Video Course and E-Book! This course has over 33 foam rolling moves as well as stretches to help you keep your body healthy and strong.” buttonText=”Get The Course Now” buttonUrl=”https://www.udemy.com/learn-how-to-foam-roll-to-prevent-and-alleviate-injury/?couponCode=FootAndAnklePost” buttonNewWindow=”true” /]


These are some great exercises for relieving foot and ankle pain! Patients who do not have success with non-surgical methods of treating foot and ankle pain may require surgery, but preventing injury is a good step towards overall health.
My husband and I are pretty big runners and we have been training for a marathon that will be happening in the Spring. A few weeks ago, I started to have this very sharp pain in my heels whenever I would take a step. It has made running and even walking very difficult at times. I have never really had any issues before but I think that it might be time to see a doctor. Hopefully doing some of these exercises will prevent any injury in the future.
Always good to see a doctor. Sounds like you could use to roll out your foot and lower leg lots because of the increased mileage. May also be good to get fitted for better shoes! Good luck!
My husband’s foot has been bothering him lately. It is especially bad when we are hiking downhill. it is good to know that there are ways to prevent and alleviate foot and ankle pain. I am glad to learn that using a tennis ball, one can roll out feet and lower legs to help loosen up tight muscles. We will have to try this method as soon as we can get our hands on a tennis ball.
Hi Jade. Even after a hike, he should try to roll out his foot and lower leg with a frozen water bottle. 🙂