If you want to tone and strengthen your glutes so they not only look perkier but also keep low back pain at bay, you need to work them more than once a week.
However, not every glute workout needs, or even should be, an hour-long session with the heaviest weights you’ve ever used.
Actually simply doing a quick “Burner” on a day off or before or after an upper body or cardio workout 3-4 days a week along with your glute workout, may be all you need to build a better booty.
You could even simply do these Burners 4-6 days a week and not only get stronger, but also build sexier glutes. These are a great way to maintain your glutes shape and strength while you travel or workout at home without having weights.
Check below for 5 Quick Booty Burners you can easily add into your current workout routine to get even better booty building results! (And remember, if you are traveling and need a great way to maintain your glute strength and shape without a gym, these are great workouts to keep your butt strong and perky!)

5 Quick Booty Burners To Build A Better Booty
A “Burner” is basically a quick circuit that “burns out” the muscle being used. These burners will activate and strengthen your glutes from every angle with a quick series of exercises done back-to-back.
The point is to go from one exercise to another and quickly fatigue your glutes and even push through the burn into they are completely worked and pumped.
And once they are pumped and fatigued, you stop. You don’t do any heavy lifts after or before.
You simply do the Burner and then move onto another body part or call it a day.
Below are 5 different Booty Burners you can alternate or you can even pick one to include for a week or so and then switch. If you don’t have any equipment, you can also simply stick with the bodyweight one and add rounds, reps or even slow down the tempo to advance it.
All burners should be done with lighter weights or no weights at all. It is very important you don’t rest unless otherwise specified but instead power through the initial burn to completely burn out and pump the glutes.
If you really need a break, take like 5 seconds to quickly stretch and get right back to it.
Also, make sure you actually feel your glutes, abductors and external rotators working depending on the moves. Do not let your quads or hamstrings take over.
If you don’t feel your glutes working, you won’t get as much out of the move.
That may mean slowing down a few of the moves, resting between sets and holding the glute contraction until you really build the mind-body connection.
Booty Burner #1 – The Mini Band Booty Burner
The Mini Band is a great way to activate and burn out your glutes from every angle. Using the Mini Band, you can target all three glute muscles and build your upper and lower glutes.
These moves will get your glutes firing to help tone your glutes while also strengthening them to help you prevent low back pain.
Complete 2-4 rounds of the following circuit. Do not rest between exercises or rounds. Beginners may need to start with fewer rounds while more advanced exercisers, or exercisers who’ve done this before, will want to do more rounds.
However, you should not need more than 4 rounds or you didn’t do a hard enough variation. More than 4 rounds is overkill and will probably lead to you compensating.
CIRCUIT:
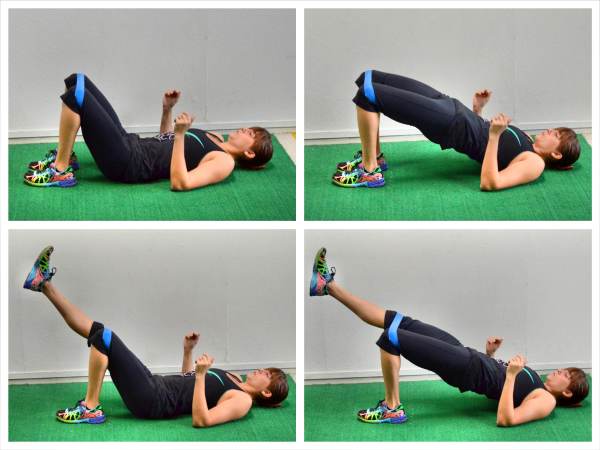
20 reps Mini Band Glute Bridge
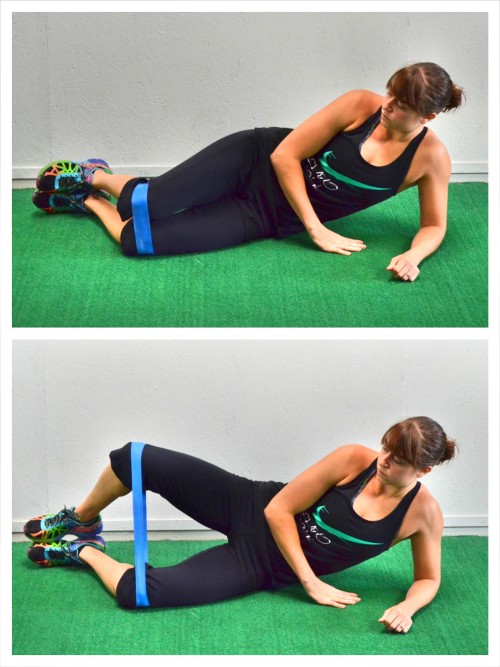
15 reps per side Mini Band Clams
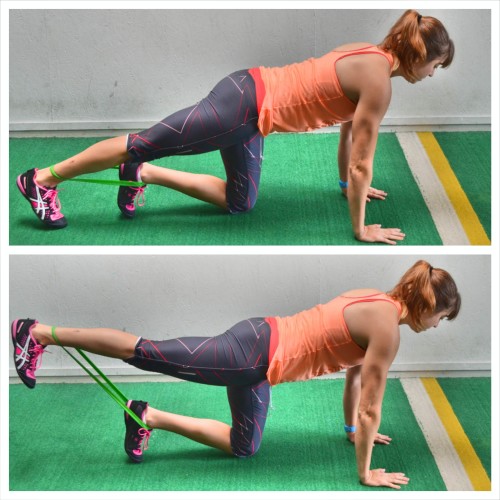
15 reps per side Mini Band Quadruped Straight Leg Lifts
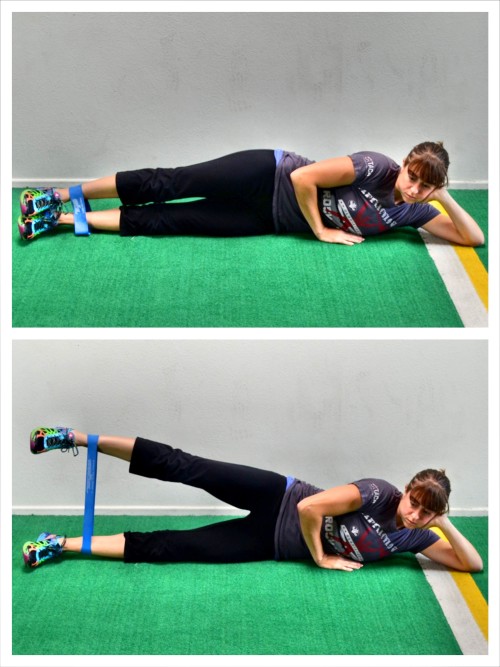
15 reps per side Mini Band Lying Lateral Raises
Booty Burner #2 – The Bodyweight Booty Burner
This is a great burner that requires no equipment; however, it only really works if you focus on contracting your glutes and extending your hips. If you really want to, you can add a band or ankle weight to these moves.
Do not rush these moves, but instead add in a little hold to contract the glutes. Especially with the Bird Dog and Side Plank, moves slowly and feel your core work. This Booty Burner also really works your abs!
Complete 2-4 rounds of each superset. Complete one superset before moving on to the next superset. Do not rest between exercises. Do both moves on one side then switch to the other side. Go back and forth between sides until all rounds are complete. Rest 1 minute and then do the second superset. Complete both moves on one side then switch to the other side. Beginners may need to start with fewer rounds while more advanced exercisers, or exercisers who’ve done this before, will want to do more rounds.
However, you should not need more than 4 rounds or you didn’t do a hard enough variation. Really focus on contracting your glutes with these moves and extending your hip not your low back.
#1:
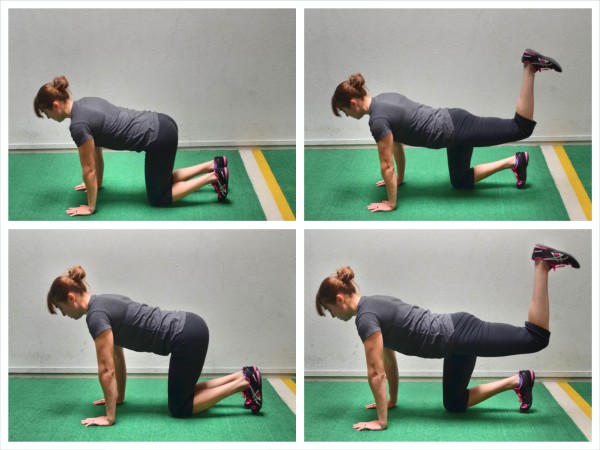
15 reps per side Donkey Kicks
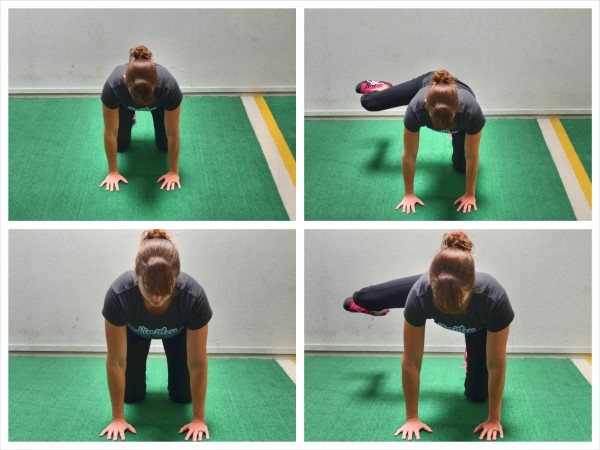
15 reps per side Bent-Knee Fire Hydrants
#2:
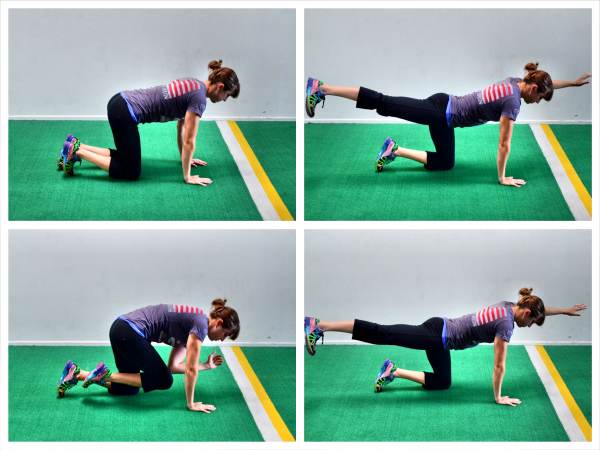
10 reps per side Bird Dogs
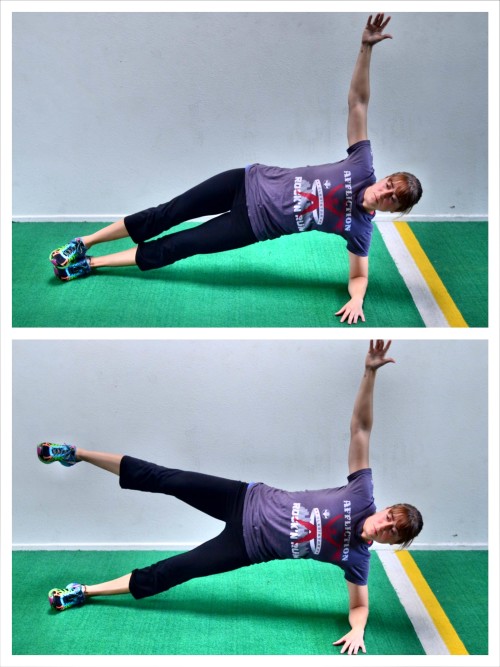
10 reps per side Side Plank with Leg Raises
Booty Burner #3 – The Resistance Band Booty Burner
This is a great way to burn out your glutes using a resistance band. You can also really strengthen all three glute muscles and work on both your abduction and external rotation with this Booty Burner. Use a heavier resistance only if you can feel your glutes working and you can maintain proper form and not rest extra between exercises and rounds.
Complete 2-4 rounds of the following circuit. Do not rest between exercises or rounds. Beginners may need to start with fewer rounds while more advanced exercisers, or exercisers who’ve done this before, will want to do more rounds.
However, you should not need more than 4 rounds or you didn’t do a hard enough variation or truly focus on your glutes. Really focus on contracting your glutes with these moves and not just rushing through the movements.
CIRCUIT:
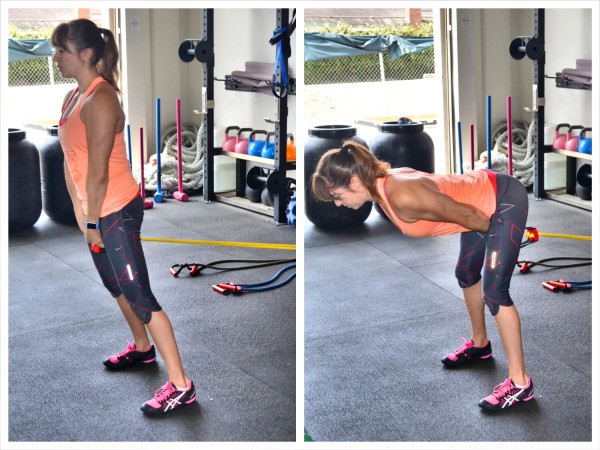
20 reps Band Pull Through
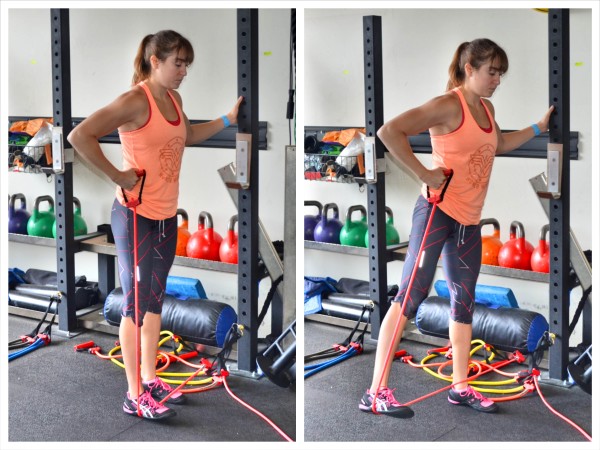
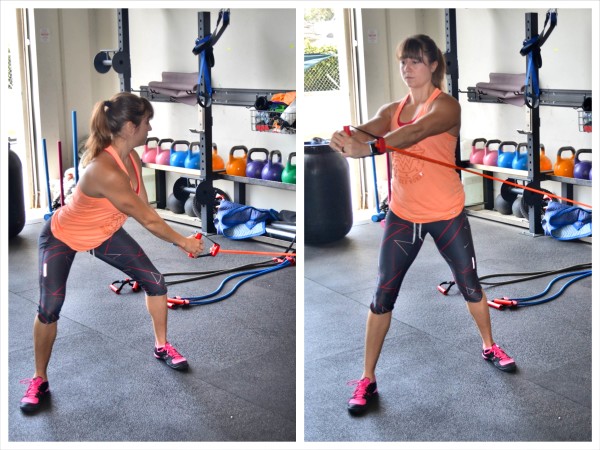
15 reps per side Standing Lateral Raise
10 reps per side Band Hip Rotations
Booty Burner #4 – The Bench Booty Burner
This great Booty Burner uses just a bench although if you are traveling you can use a table, ottoman or even a bed or chair. Make sure that as you do these moves you don’t engage your low back just to get a bigger range of motion.
Don’t worry about the range of motion as long as you feel your glutes activating. Yes you do want to get your hips up higher on the glute bridge, but not at the expense of using your low back instead of extending at your hips and using your glutes. (You can work on your mobility though with these stretches if you are tight!)
Complete 2-4 rounds of the following circuit. Do not rest between exercises or rounds. Beginners may need to start with fewer rounds while more advanced exercisers, or exercisers who’ve done this before, will want to do more rounds.
Slow down the tempo of these moves to make them harder, but do not do more than 4 rounds. If you don’t rest and do each move correctly, you won’t need extra rounds to get your glutes pumped and fatigued.
CIRCUIT:
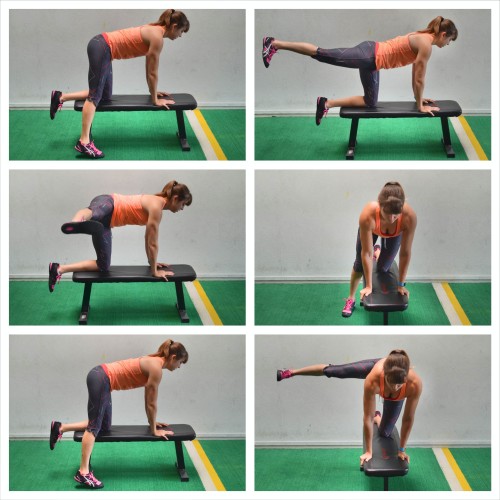
10 reps each way Bench Two-Way Leg Swings
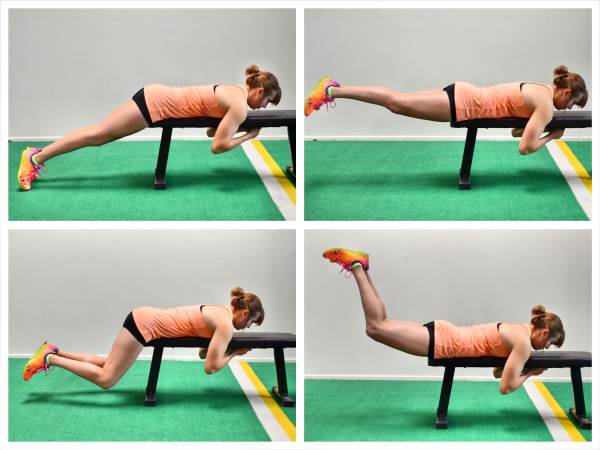
20 reps Reverse Hypers
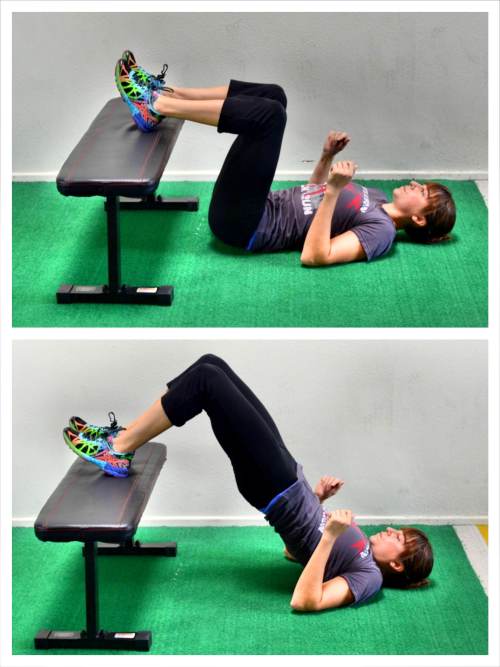
15 reps Glute Bridges Off Bench
Booty Burner #5 – The Yoga Booty Burner
If you want to improve your mobility, stability and balance all while making your booty work, you need to include this Booty Burner in your workout routine. These moves will increase your strength through a fuller range of motion by also stretching you as you work.
This could even be a great burner to include on your recovery day.
Complete 2-4 rounds of the following circuit. Do not rest between exercises or rounds. Beginners may need to start with fewer rounds while more advanced exercisers, or exercisers who’ve done this before, will want to do more rounds.
Complete all exercises on one side before switching. Burn out one side and then switch.
CIRCUIT:
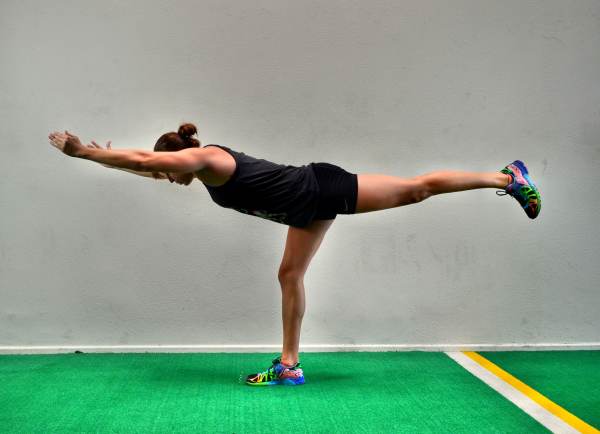
20-30 seconds Warrior III
20-30 seconds Warrior III Squats
20-30 seconds Standing Splits
20-30 seconds Half Moon
20-30 seconds Twisting Half Moon
Do not go overboard and do these on top of hard workouts or never take a day off. Your glutes grow stronger and perkier when they also have some time off to rebuild.
Work them hard with these burners and then give them a couple of days to rebuild stronger and sexier!
For descriptions of all of the moves in these burners, see below.
For the complete 28-Day Booty Burner Challenge, click here!
Exercise Descriptions:
Mini Band Glute Bridge – If you do the Two-Leg variation, do the bridge then alternate sides as you go through the rest of the circuit. If you do the Single-Leg, you may want to experiment with going through all of the exercises on one side before switching and completing all the moves on the other side.
To do the Two-Leg Mini Band Glute Bridge, place the band around your knees or right above your knees.Lie flat on your back with your knees bent and feet flat on the ground. Bring your heels in toward your butt. Your feet should be close enough to your glutes, but far enough away that you feel your glutes and not your hamstrings or low back taking over and working. Then bend your elbows to 90 degrees and, driving through your heels and upper back and arms, bridge up. Fully extend your hips and squeeze your glutes. Think about driving your knees forward over your toes so that, as you bridge up, you aren’t simply pushing yourself backward. Lower back down and repeat. Do not let your knees cave in. Press out on the band as you bridge up. You want to keep your knees, ankles and hips all in line.Hold for a second or two at the top with your glutes and abs engaged and then lower back down and repeat.
To do the Single-Leg Mini Band Glute Bridge, set up like you would for the two-leg variation. Then lift one foot up off the ground and extend the leg in front of you so that your quads are next to each other. Keep tension on the band as you bridge, driving through your heel on the ground and your upper back. Do not let your knee cave in as you bridge up. Hold for a second or two at the top and fully extend your hips, squeezing your glutes. Lower back down and repeat. Make sure you do not feel either bridge variation in your low back. Only progress to the Single-Leg variation if you can get your hips up just as high without engaging your low back.
Mini Band Clams – To do the Clam exercise, place the Mini Band right up above your knees. Lie on your side propped up on your forearm with your knees bent and your feet together. You can place your other hand on the ground in front of you or on your side. Steady yourself so you don’t rock when you lift. You may even want to set up with a wall behind you so that you don’t rock back when you lift and open your hips up. We tend to rock back to try to get the leg up higher, but that doesn’t force our glute medius to work as hard. So don’t worry about range of motion. Simply focus on working your glute and the outside of your hip. Without rocking back, lift your top knee up as high as you can, squeezing your glutes as you lift. Hold at the top then lower back down. Complete all reps on that side before switching.
Mini Band Quadruped Straight Leg Lifts – To do the Quadruped Straight Leg Lifts, place a mini band around the foot you will keep flexed on the ground and the ankle of the leg you are going to work. Set up on your hands and knees with your knees under your hips and your hands under your shoulders. Your feet should be flexed. Straighten the leg with the mini band around the ankle out behind you. Keeping your foot flexed, lift your straight leg up toward the ceiling. Squeeze your glute and lift your leg until it is parallel to the ground. Only lift higher if you feel your glute working and not your low back. Lower the leg back down to the ground and repeat. Lift the leg straight up and squeeze the glute at the top. Hold for a second or two and repeat. Complete all reps on one side before switching. Make sure to keep your hips square to the ground as you lift. Also, do not bend your arms.
Mini Band Lying Lateral Raises – To do the Mini Band Lying Lateral Raises, place the band around your ankle and lie on your side on the ground. The higher up your leg you place the band, the easier the move will be. You can support your head in your hand while lying on your side or relax all the way down on your arm. Stack your feet on top of each other and then lift your top leg up as high as you can, keeping your top foot parallel to your bottom foot. Keep the leg straight as you lift and do not lean or rock forward or backward. Keep your core engaged as you lift. Lift up and hold for a second or two before lowering back down. Keep your legs straight as you lift and only rotate the toe up if you want to work on external rotation.
Donkey Kicks – To do the Donkey Kick, start on your hands and knees with your hands under your shoulders and your knees under your hips. Flex your feet. Then, keeping your arms straight and your right knee bent, drive your right foot up and back toward the ceiling. Keep your core braced and squeeze your glutes as you kick your heel up and back. Do not let your right knee flare out as you lift. Make sure to really drive your heel up toward the ceiling. You may want to kick out a little bit if you are struggling to feel your glute engage. Hold for a second or two at the top and lower back down. You can add weight to this move or slow down the temp to make it more challenging. Complete all reps on one side before switching. If you also really struggle to get your glutes activated, you may want to try this move from your forearms.
Bent-Knee Fire Hydrants – To do Bent-Knee Fire Hydrants, start on your hands and knees with your hands under your shoulders and your knees under your hips. Flex your feet. Then, keeping your arms straight and your feet flexed, raise your right leg out to the side with the knee bent to 90 degrees. As you raise your leg out to the side, keep your ankle in line with your knee. Do not let your foot get above your knee or your knee go up above your foot. You want to try to raise your lower leg parallel to the ground. Also, don’t simply lean away to get your leg up higher. Keep your core tight and lift from the hip using your glute. Hold at the top then lower back down. Make sure to hold for 1-2 seconds. Do not rush through the lift. Make sure you do not bend your arms to get your leg up higher. Squeeze your butt and make sure you feel it activate. Range of motion isn’t important as long as you feel your glute working. You may even feel this in the glute of the leg down because it is working to stabilize. Complete all reps on one side before switching. More advanced exercisers, or if you are short on time and want to burn out your glutes faster and can perform the Bent-Knee Variation well, may want to try the Straight-Leg Variation.
Bird Dogs – To do the Basic Bird Dog, start on your hands and knees on the ground with your hands under your shoulders and your knees under your hips. Flex your feet. Kick your right leg back and drive your heel into the wall behind you as you raise your left arm out toward the wall in front of you. Try to get your leg and arm to about parallel to the ground but don’t worry about lifting your leg or arm up super high. There is no need to go past parallel. Really try to drive your arm and leg toward opposite walls as you keep your core engaged and squeeze your glutes. You do not want to hyperextend or arch your low back just to reach your arm or leg up higher. Also make sure to keep your chest and hips square to the ground as you reach out. You do not want to rotate open. Hold for a second or two at the top then, as you lower your arm and leg back down, bend them and bring them together under your body. Try to touch your elbow to your opposite knee before extending back out. Complete all reps on one side before switching to the other side. All reps should be done in a slow and controlled manner. You should even hold for a second or two at the top of the move. A longer hold at the top will make this move even more challenging. You can also add an ankle weight or resistance band to this move to make it more challenging. Really focus though on contracting the glutes as you extend the leg.
Side Plank with Leg Raises – To do the Basic Side Plank from your forearm, set up on your side and prop yourself up on your forearm with your elbow right below your shoulder. Your legs should be out straight. You can either stack your feet or place your top foot on the ground in front of your bottom foot. Beginners may need to place their bottom knee down on the ground. Then, driving through your forearm and the sides of your feet, lift your bottom hip up off the ground as high as possible while keeping your body in a nice straight line. Squeeze your belly button in toward your spine and keep your glutes tight. Do not let your chest rotate forward toward the ground or your top hand touch the ground. Keep your top hand on your hip or reach it up toward the ceiling. Holding this Side Plank position, lift and lower your top leg up and down. Do not let your hips drop toward the ground as you lift the leg. Keep your legs straight and that perfect Plank position as you lift and lower that top leg. If this lift is too much, try it from your knee.
Band Pull Through – To do Resistance Band Pull Throughs, anchor the band around a pole, furniture or in a doorway. Step over the band and reach down between your legs to grab the handles. Walk away from the anchor point with your back to it, holding the handles between your legs. Then hinge over, keeping your knees soft. Push your butt back toward the anchor point as you lean forward and reach your hands with the bands back between your legs. Then squeeze your glutes and push your hips forward to come back up to standing. Keep your arms relaxed and straight down, holding the handles between your legs. Stand up nice and tall, fully extending your hips and squeezing your glutes. Don’t hyperextend your low back as you extend your hips and squeeze your glutes or lean back too much at the top. Almost tuck your hips up forward as you squeeze and contract your glutes. Then hinge back over, pushing your butt back toward the anchor point. Keep your core tight so that you don’t feel this move in your low back. Also, do not pull the bands with your arms. Your glutes should do all the work. And make sure to keep your back flat. Do not round over as you hinge over and stand up tall at the top of the move. To make the move harder, use a heavier band or walk further from the anchor point.
Standing Lateral Raise – If you have a Resistance Band that has handles that can be changed out for an ankle strap, use that ankle strap. You can also do this with a band you can tie into a circle and then step instead to perform lateral raises. If your band simply has handles, you can either place your foot through the handle or loop the band around the anchor point and connect the handles.
To do the Standing Lateral Raise, place the band around your ankle and stand sideways to the anchor point. You may want a wall, chair or pole close by to help you balance. The band should be around the ankle furthest from the anchor point. Then with both toes pointing straight ahead, lift the leg with the band straight out to the side. Try not to lean away too much as you lift. Really focus on squeezing your glutes as you lift to the side. You will feel your standing leg working as well to help you balance and stay up nice and tall. Lower the leg back down and repeat. Keep your feet parallel as you lift and lower. Feel the sides of your glutes and outside your hips working. Complete all reps on one side before switching.
Band Hip Rotations – To do Band Hip Rotations, anchor the band and grab one end in both hands or both handles if you want to increase tension without using a heavier band. Stand with your side to the anchor point and your front toe slightly open. Squat down very slightly, pushing your butt back as you reach your arms back toward the anchor point. Make sure there is tension in the band even as you reach back. Brace your abs and keep your chest up nice and tall. Do not shrug your shoulders. Then keeping your arms fairly straight. Bring the band across your body and outside your far shoulder. Feel the glute of the leg closest the anchor point power the rotation. Do not turn it into an arm movement. Your back glute should power the rotation. Control the band across your body and then back to the starting position. Do not rotate or pivot your feet as you perform the move. Complete all reps on one side before switching. Focus on squeezing the glutes and bracing your abs. Do not shrug or round over. If you struggle to feel your glute working, you may want to start with a Stability Press.
Bench Two-Way Leg Swings – To do the Bench Two-Way Leg Swings, place your knee and hands on the bench with your knee under your hips and your hands under your shoulders. One leg should be straight with your foot on the ground. Then, with your arms straight and core engaged, lift the leg off the bench straight up to the side. Keep the leg straight as you lift and don’t lean away as you lift. Lower back down and then lift the same leg straight back behind your. Squeeze the glute and extend your hips as you lift. Do not hyperextend your low back to get up higher. Lower back down and repeat the side lift (much like a Straight Leg Fire Hydrant). Repeat the Straight Leg Lift back. Complete all reps on one side before switching. Make sure to feel your glutes working to lift both ways. Hold for a second or two at the top or add an ankle weight to the leg lift to make the move harder.
Reverse Hypers – You can include either the Bent-Knee Reverse Hypers or the Straight-Leg Reverse Hypers. In general, the straight leg will engage a bit more hamstring, so if you struggle to engage your glutes, you may want to start with the Bent-Knee.
To do the Bent-Knee Reverse Hypers (bottom), lie face down on a bench, box or table. Place your hips right on the edge of the bench and hold on to the bench or something in front of you. If your hips are too far on the bench, you are more likely to hyperextend your low back in an attempt to get your hips up higher. Place your heels together and bend your knees to about 90 degrees. Flex your feet. You can choose to turn your toes out to hit a slightly different aspect of your glutes as well. Then, with your knees bent, kick your heels up and slightly out toward the ceiling, squeezing your glutes to lift. You can sort of drive up and out a bit to really get your glutes to work. Make sure that you squeeze your glutes as you lift and don’t hyperextend your low back just to get up higher. Press your pubic bone down into the bench as you lift. Lift so that your quads are about parallel to the ground and lower back down. Only lift higher if you don’t feel your lower back take over. You want to focus on your glutes working to lift NOT your low back. The most important part is that you feel your glutes tighten. Hold at the top for a second or two to feel your glutes work and then lower back down. You can also add weight to make this move harder.
To do a Straight-Leg Reverse Hyper (top), you will set up like you are going to do the Bent-Knee Variation, however, you will keep your legs out straight. Still place your heels together. And you can also choose to turn your toes out to hit a slightly different aspect of your glutes. Then, keeping your legs straight, raise your heels up toward the ceiling. Squeeze your glutes as you lift and press your pubic bone down into the bench. Lift till your legs are about parallel to the ground and lower back down. Only lift higher if you don’t feel your lower back take over. You want to focus on and make sure your glutes are working to lift NOT your low back. You should be extending your hips not your back to lift your legs. If you do feel your low back, make sure you are pressing your pelvic down into the bench as you squeeze your glutes to lift. Hold at the top and lower back down. Slow down the tempo or add weight to make the move more challenging.
Glute Bridges Off Bench – To do the Glute Bridge Off Box, place your heels up on the box. You want your knees bent to 90 degrees and your butt closer to the box. Do not let your butt get too far away from the box. Bend your arms to 90 degrees with just your upper arms on the ground. Then driving through your heels on top of the box and your upper back, press your hips up as high as you can. Squeeze your glutes and keep your core tight as you bridge up so that you don’t hyperextend your low back. Make sure to extend your hips and even think about driving your knees forward toward your toes. Do not let your knees fall in or out as you lift up. Keep your knees in line with your hips and ankles. Hold for a second or two and then lower down. You can advance this move by making it a Single Leg Glute Bridge Off Box. Beginners may also need to regress it by using a lower box or by even doing the move from the ground.
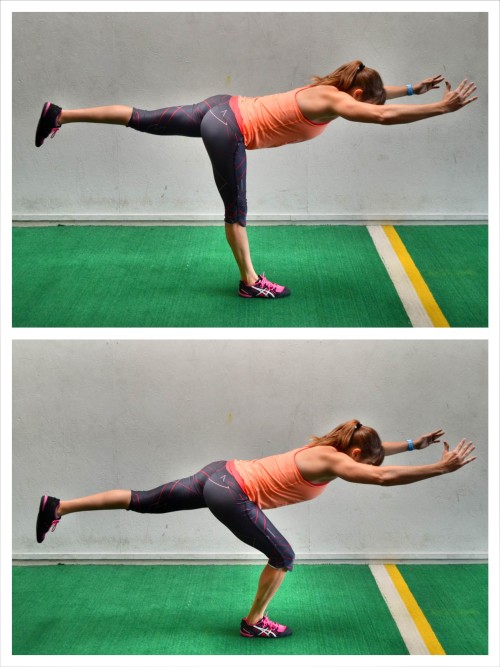
Warrior III – To do Warrior III, balance on one foot with the knee slightly bent. Hinge over lifting your back leg toward the wall behind you. Pretend you are driving the foot straight back into the wall behind you. Lean your torso over, keeping your back flat and your core tight. Make sure your hips are square to the ground. You can then reach your hands overhead in front of you or out to the side or even back behind you. The hardest variation is reaching your hands out overhead. Hold in this position. Do not let your back round or your other foot touch down. Keep your arms in line with your body. You want a nice straight line from the bottom of your lifted heel to the end of your finger tips or head depending on where you reach your hands. Straighten your standing leg more to make the move harder if you have the flexibility. But do not let your back round or hips open up as you do. Using a wall can help beginners. Stand with a wall behind you and when you hinge over have the lifted foot lightly touch the wall behind you to help you balance.
Warrior III Squats – Holding the Warrior III position above, bend your standing leg to squat slightly. Make sure to keep your other leg up and stay in that hinged over position as you squat. Straighten the leg back out and repeat. The lower you squat as you maintain that Warrior III position, the harder the move will be. Complete all reps on one side before switching. Do not let your hips open up as you squat. Also, do not go forward onto your toe or round your back. The move doesn’t have to be super big to have benefit!
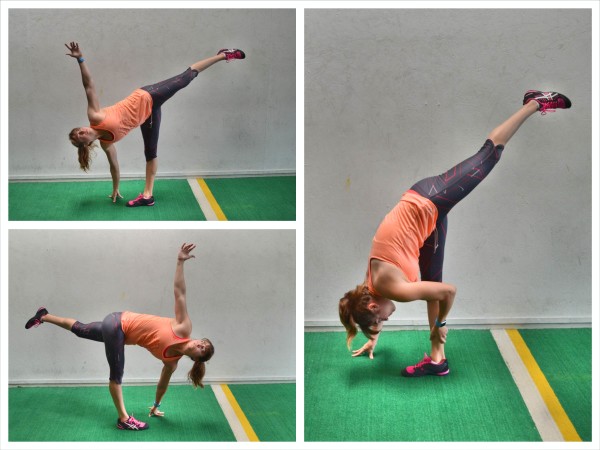
Standing Splits – From that Warrior III position, staying on the same leg, straighten your standing leg and hinge over, dropping your hands to the ground. If you can’t reach the ground have a block or stack of books there you can place your hands on. Try to straighten your standing leg as much as you can as you drive your nose back toward your knee and lift your raised leg up higher toward the ceiling. Breathe and relax into the stretch and try to bring your head toward your standing leg. (large right photo)
Half Moon – From the Standing Splits position, staying on the same leg, keep the same hand as the standing leg down on the ground as you lift your opposite hand up toward the ceiling and rotate your chest open. Try to get your chest and hips open. If you struggle to keep your hand on the ground and rotate open, place your hand up on a block or stack of books. Breathe and try to straighten your standing leg as you raise your raised leg up and rotate open. (top left photo)
Twisting Half Moon – From the Half Moon position, staying on the same leg, rotate back forward and place both hands on the ground. Then, keeping the opposite hand from the standing leg down on the ground, rotate toward your standing leg. Reach the same hand as your standing leg up toward the ceiling as you rotate your chest toward your standing leg. Don’t be afraid to drop the hip of the raised leg down a bit so you feel a stretch outside the hip of your standing leg. Breathe and try to rotate toward your standing leg more as you keep the standing leg straight. If you struggle to rotate and keep your hand on the ground, you can place your hand up on a stack of books or on a block. (bottom left photo)


You mention doing a burner 5 – 6 times a week. But we are usually told to skip a day between workout out the same muscle groups. When should we do which?
These are all activation series and, in general not full workouts. They are more like “rehab/prehab” so can be done more often. Also, for short periods of time, if you want to create change, you can beat down a muscle a little bit more.
However, if you don’t ever REST, you won’t allow the muscle to repair.
So while I wouldn’t lift heavy for your glutes, or any other muscle for that matter, that many times a week, activation like this can be very very handy to create change.
Does that clarify a bit?
I would love to see these workouts in video form
Thanks 🙂
Yea we have a few filmed in our membership area. Gotta save something special for the members! 😉
As a trainer I will say that these exercises are fine to wake up and activate the glutes but if you really want to build a better butt there really is no getting away from squats and lunges with incrementally increased resistance.
Hi Alana. I agree that those moves are important. And would add deadlifts and hip thrusters to that list; HOWEVER, these workouts combined with those big lifts are what I’ve found have created the best results. I’ve also found that if people are new to working out, have pain and injury or simply workout at home, these workouts can produce impressive results without being able to lunge or squat…especially if knee pain is an issue. 🙂 Thanks for reading and commenting!
I would agree, many don’t exicut the squat or lunge properly, without a mirror or a spotter, it is difficult.(especially with knee/back pain and balance issues considered)I love adding leg weights and bands to these! Thanks!
Yes. Form can be an issue. But using these we can help get those glutes activated even to help people get more out of those amazing compound moves! And definitely! Weights and bands are a great way to advance!
These look great, but are they safe for someone who has anteriolesthesis at L5-S1 with facet during and both hips replaced? I’m struggling with safe, pain free flute exercises.
Hi Janis. In your case, I would hope you are seeing a PT to work with you specifically. You will NEED to do lots of core stability training and glute activation. You may want to start with more standing moves though. Many of these here are NOT right for you at all. If you want to email me at [email protected] we can chat more. But I wouldn’t recommend you take these on. Cori
Great workout information .well explained. Thank-you
Thanks!
I have very little boot material, and want to get a larger booty. would you suggest doing 1-2 burners and then add weight (say hip thrusts, and glute bridges heavy)? thanks
I would use these as a warm up to a glute lifting day. Higher volume is key as well as eating to support muscle growth.
I cannot do a side plank leg lift. If I keep doing the lower knee on the ground version, will I progress? Why can’t I do the full version? Where am I missing strength?
Your glute medius and obliques need to build up. I’d recommend first knee down combined with some feet stacked planks from your toes and slowly working to lift that leg. Even the knee down with a mini band can help.
Hi!
Just did workout #1 today! I really did feel it in my glutes . My next workout will be using the these to activate then lifting heavy.
Thanks so much for posting the circuits and pictures of the exercises. Professional and well-done!
Lynette
Thanks! So glad they helped!
Thanks for sharing the exercises with the descriptions. Fantastic! So helpful!
Glad they help!
Would I need to do ALL of those Glute exercises 4-6 times a week or can I pick out certain ones to do? How many repetitions of each?
What would you say are the ones that give the best results pls?
Hi Jo. These are just a few options. You may use one workout or all of them based on your needs and goals. If you’re looking for a program laid out to help with hip mobility and stability, my Booty Burner is fabulous. I’m biased of course 😉 https://bootyburner.redefiningstrength.com/the-28-day-booty-burner-challenge?sl=blogcomment
Awesome! Thank you!
Glad it helps!
Any suggestions for someone with a weight limit, substitute for deadlifts?
Like no extra tools? I love doing single leg over two leg to add instability or change up tempos or even add two types of resistance using bands and weights. But what other swaps you would make depends on the goal of the deadlift being included in your routine.