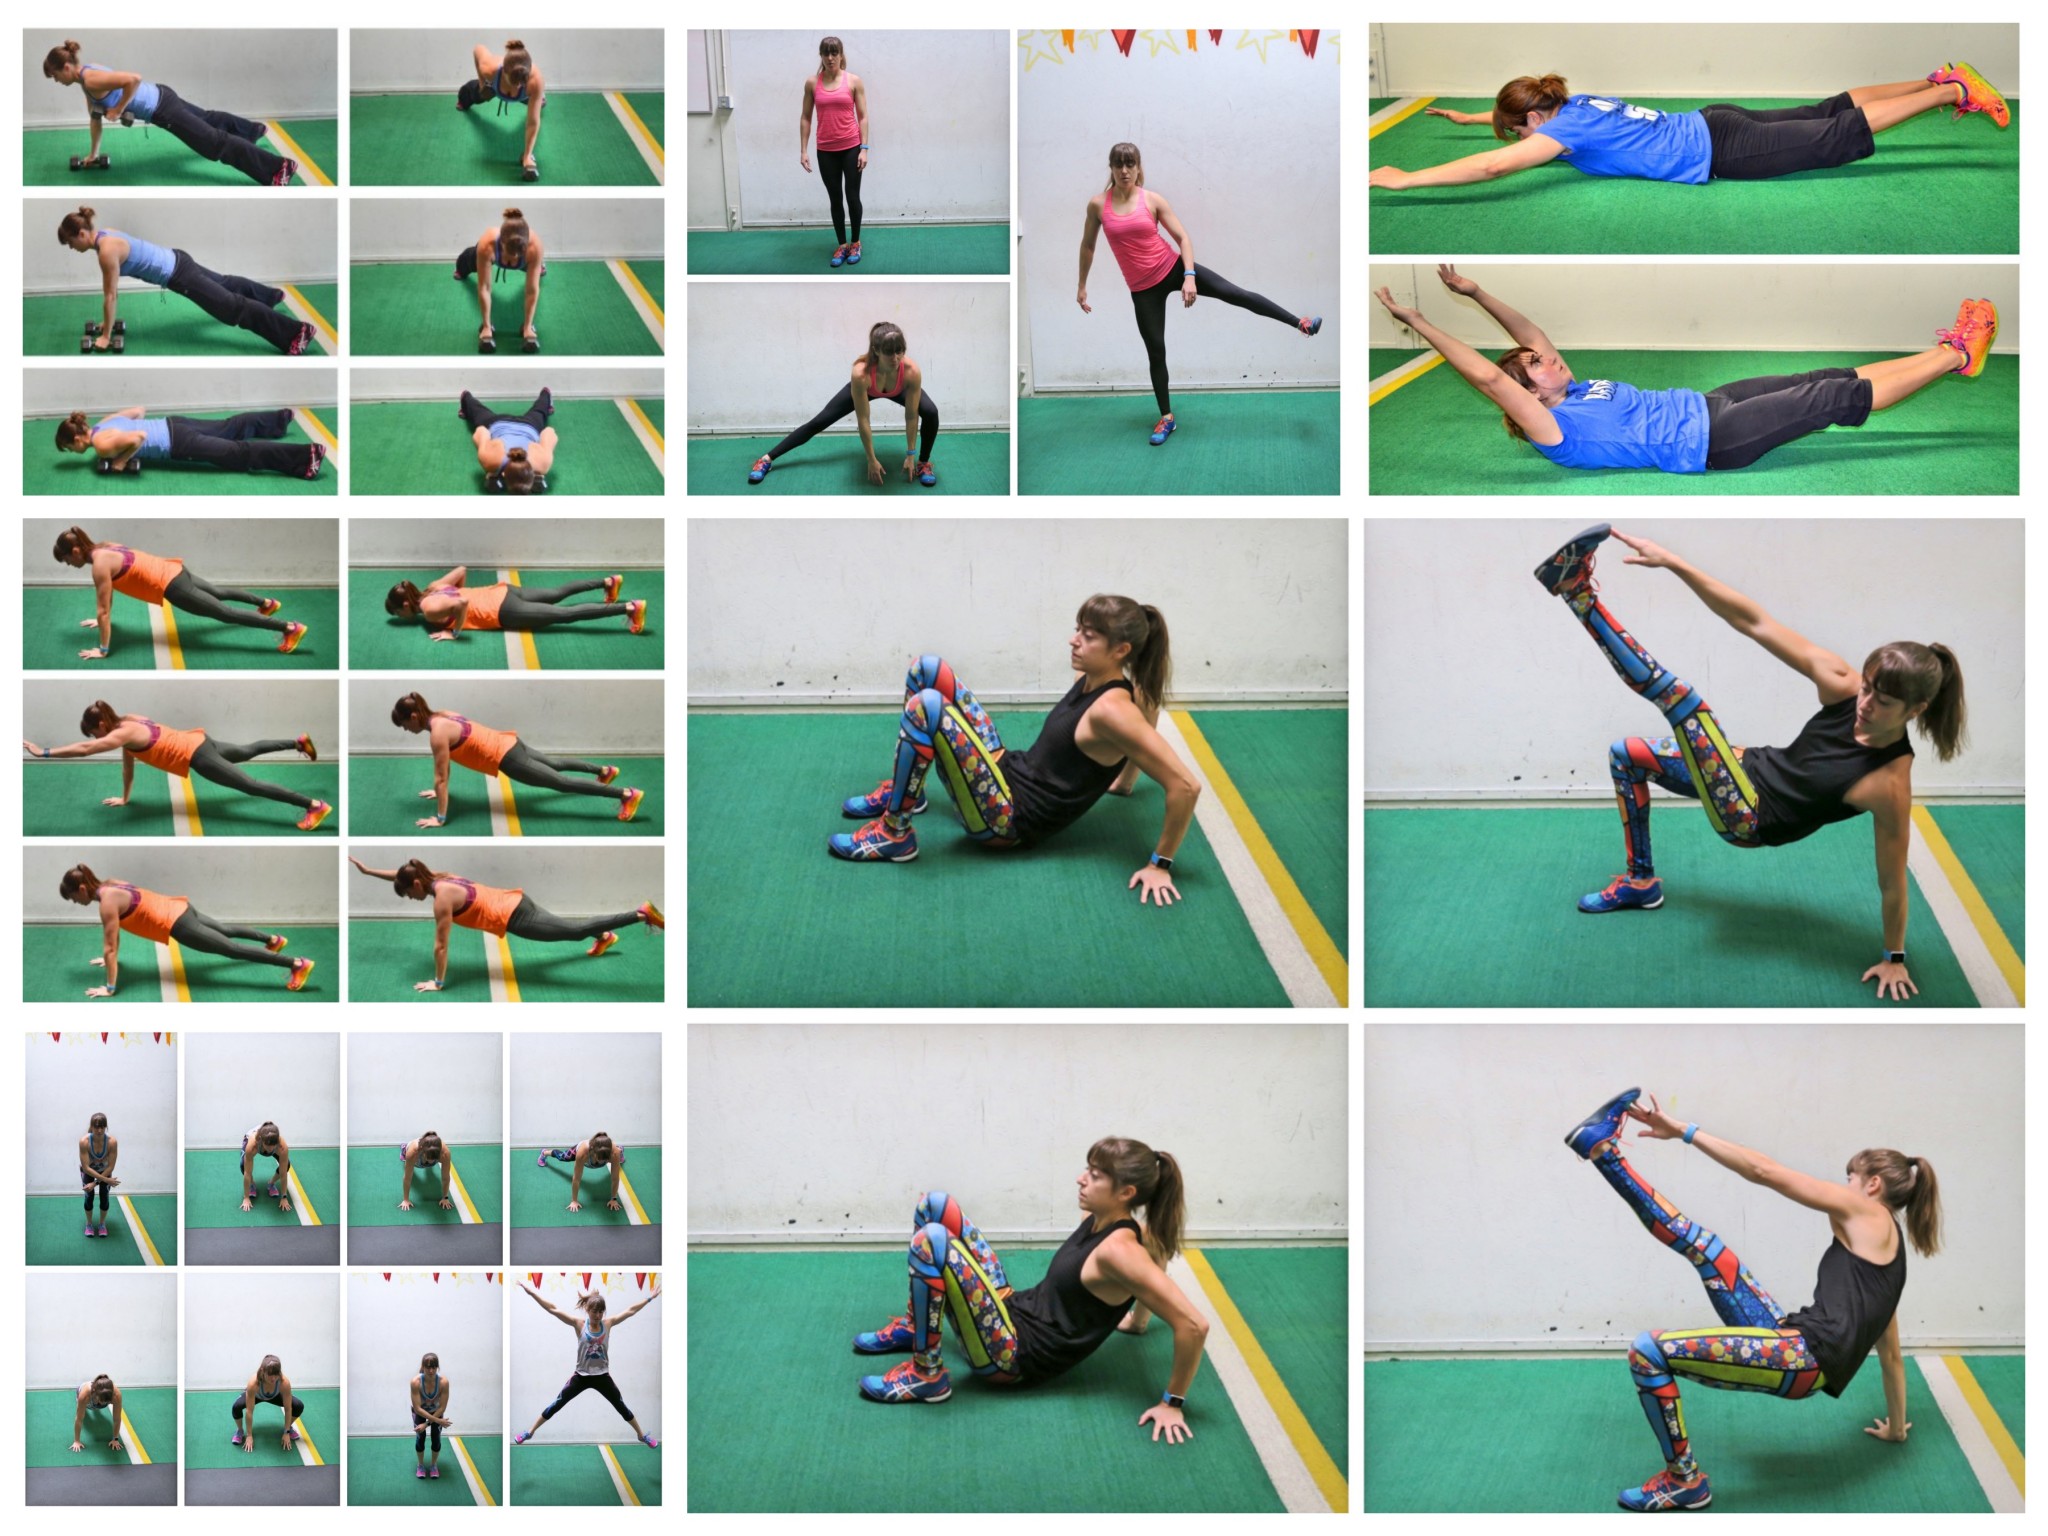
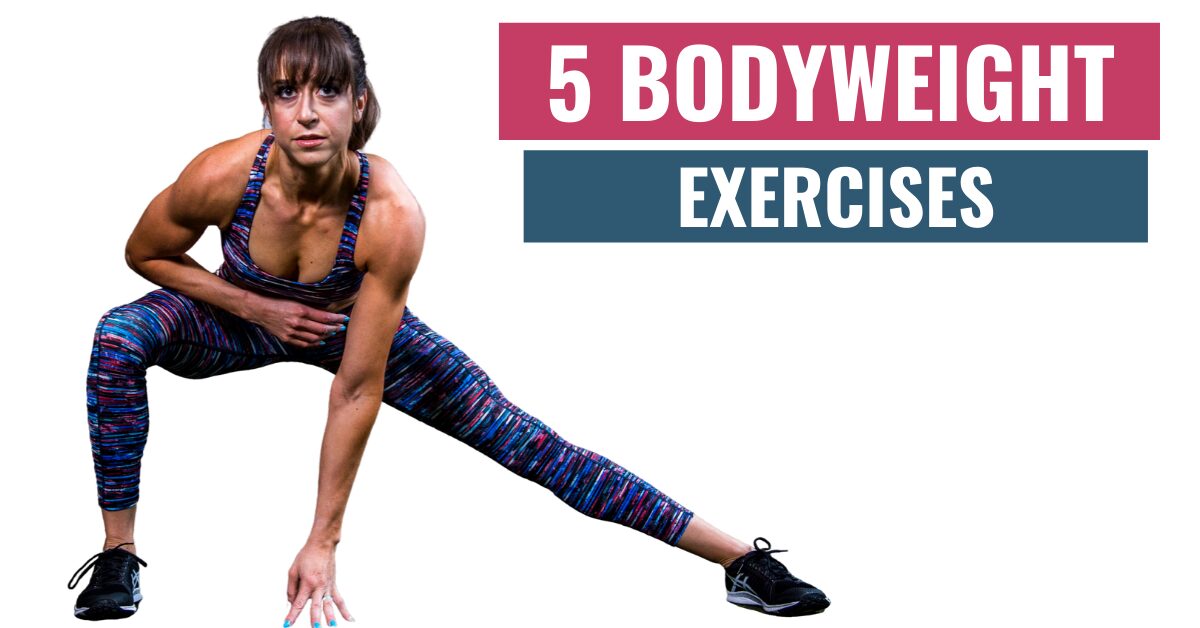
5 Bodyweight Exercises For A Full-Body Workout – Try these 2 Home Workouts!
I love giving clients no excuse to skip their workouts. Even if you have very little space and just your own bodyweight, you can get in an amazing full body routine. Below are 5 moves that can be combined for a killer full-body workout and I’ll share a few ways to...Loads, Variations And Tempos – Changing Up How Exercises Challenge You
It all comes down to CHALLENGE.
If it challenges you, it will change you.
Now that doesn’t mean go make every exercise as hard as humanly possible. Or constantly change up moves every workout without any clear progression.
It just means that to create change, aka RESULTS, you need to force your body to have to adapt and grow stronger.
And that means using moves that challenge you!
The most common way we make exercises more challenging is by adding weight.
While heavier weights can be a great way to force your body to have to adapt and grow stronger, it’s all too often the only tool we rely on.
There are four other very basic ways to mix things up and make moves more challenging including changing up:
- The TYPE of load used
- HOW you load the move down
- The variation of the exercise used
- The tempo of the movement
By varying how we even challenge our body, instead of always just focusing on more weight, we can strengthen weak points and avoid hitting a plateau.
(This article is an excerpt from my Training Black Book). The Black Book is all about workout design – whether you are looking to improve your own workouts or create workouts for clients, classes or small group training sessions. It even comes with over 50 workout templates and CEUs for Trainers!)
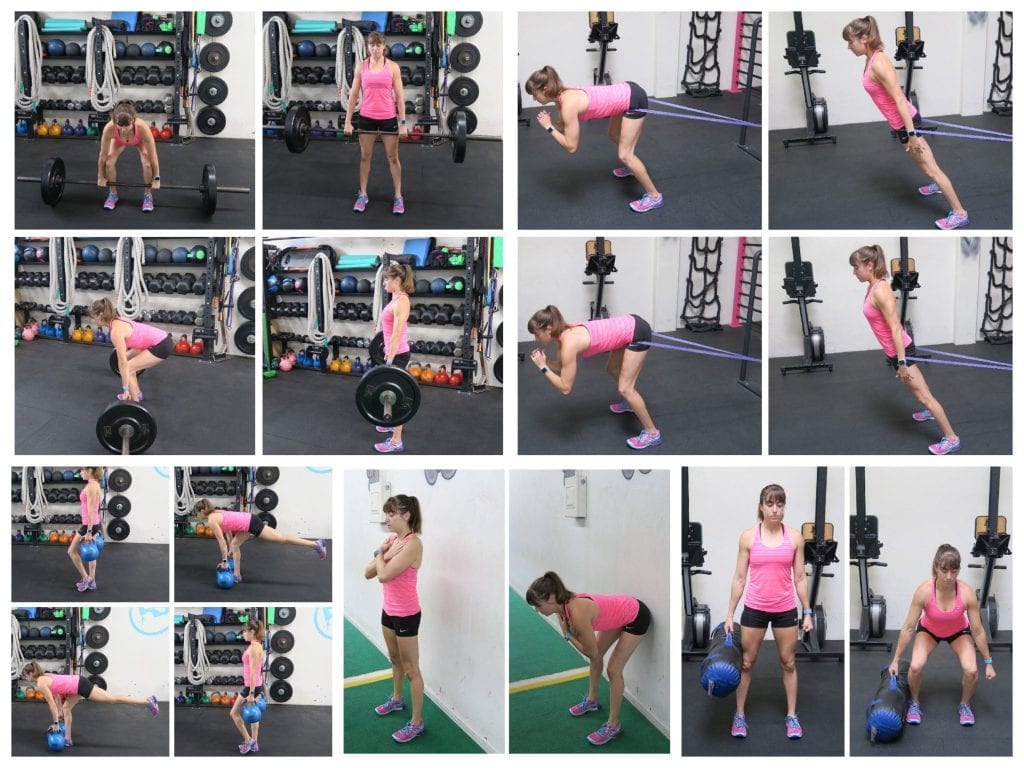
Using Loads aka Weights:
When it comes to using weights, it isn’t just about always going heavier.
You do need to use a weight that challenges your body if you want to gain lean muscle mass.
Using light weights over and over again is going to do absolutely nothing, except waste time.
Now exactly what is “light” and what is “heavy” though will depend on a few things:
- Your fitness level
- The exercise being performed
- The volume you’ll perform
- The muscles being used
- The type of weight equipment being used
- Where you hold or place the load
Sometimes going LIGHTER may be needed if we use different types of loads or change where we place or hold the load.
This is why becoming only focused on going heavier may not always lead to the best results.
Actually often our obsession with lifting heavier, and I know I’m guilty of this too, will prevent us from using these other options because we have to reduce loads to do the movements correctly.
But by changing up the type of equipment we use and where we hold the loads we can challenge our bodies in different ways, which may be just what we need to avoid injury and avoid plateauing.
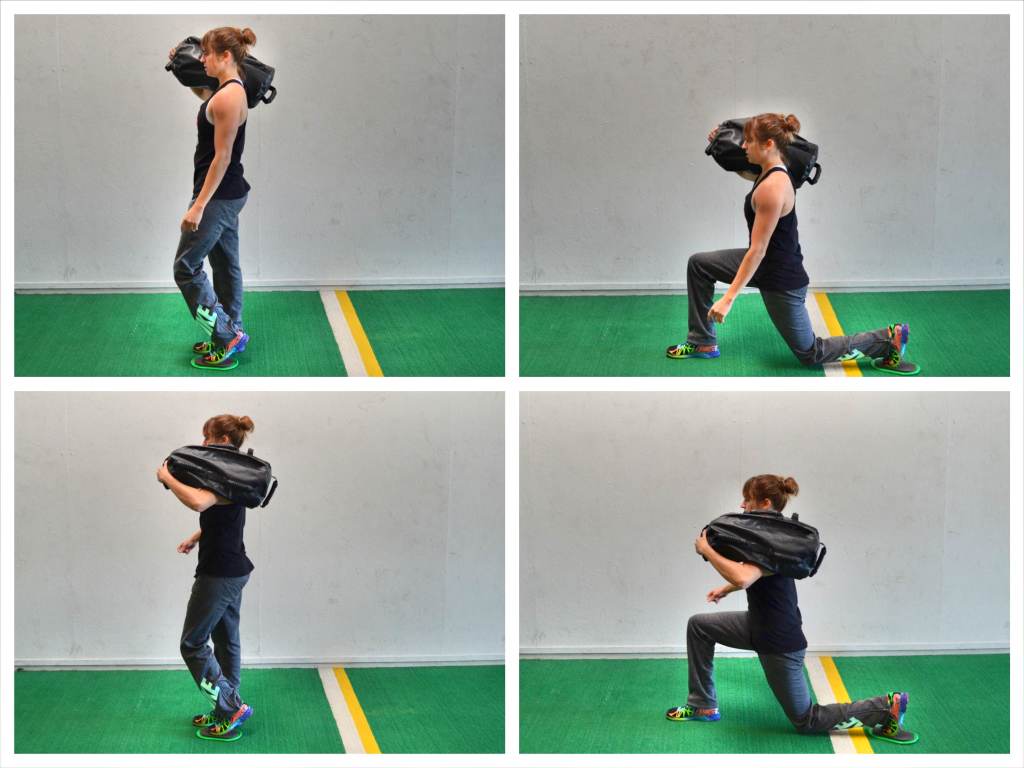
By changing the type of equipment used we can create more instability.
For instance, the weight in a sandbag will shift while the weight of a barbell won’t.
Or we could choose to use a resistance band instead of a dumbbell. The resistance band applies more resistance at the point in an exercise where we are strongest so that we challenge ourselves more throughout the entire move.
By changing where we hold the weights, we can also challenge our bodies in different ways, making moves even more core intensive.
For instance, front-loading a lunge, holding a weight up at your chest, will make it more core intensive than holding two dumbbells down by your sides.
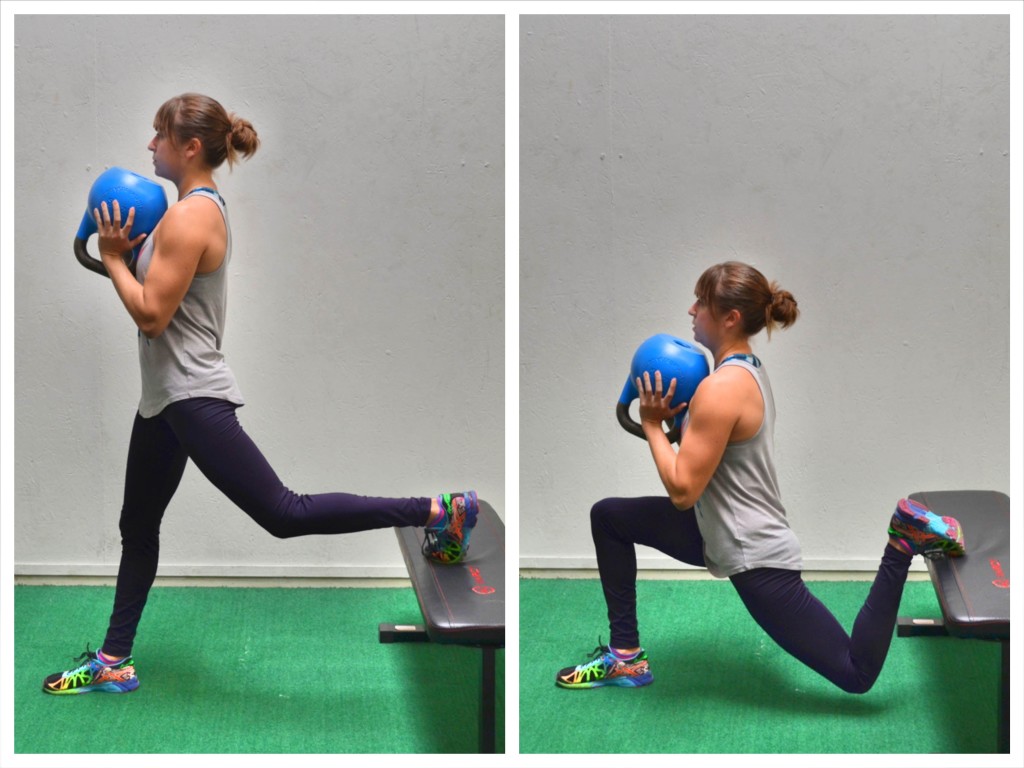
However, if you want to use heavier weights to challenge your legs more, you will need to hold dumbbells down by each side. Holding dumbbells down by each side will also work your grip more.
So it’s not that you always want to use lighter weights. It’s just important to remember this is just one option!
You could also simply hold one dumbbell on one side when you lunge, either up at your chest or down by your side.
By unilaterally loading a move and holding a weight on only one side, you can work on core stability and anti-rotational strength.
You can also use unilateral loading to help you correct imbalances between both sides and even different muscle groups.
And another variation of unilateral loading you can use is called uneven loading.
You could use two different weights on each side to force your core to have to work hard to maintain proper alignment with uneven loads on each side.
With all of these different ways to load, you can change the benefits you get from the same basic moves.
And even if you are really focused on lifting more, sometimes using these variations in loading during your accessory lifts can help you strengthen your weak points to not only help you improve your overall strength but also avoid injury.
Plus, it is important to remember that, while we may have specific fitness goals we want to achieve, EVERYONE also wants to move and feel better in every day life.
And most of the weights we pick up and lift in every day life aren’t stable or easy to grip – they are awkward.
So the more variety in the loads we use during our workouts, the more prepared we are to take on any challenge life throws at us!
Using Exercise Variations:
Too often when we need a new challenge, we start looking for “new” moves, instead of considering how we can make tweaks to the current ones to create change.
By changing up even how we do the exercises themselves, we can challenge our body.
I’ve already mentioned the importance of Unilateral Exercises, but they can be one of the simplest ways to create a new challenge for your body.
You can also vary exercises by:
- Increasing range of motion
- Creating more instability
- Slightly adjusting alignment and form
- Combining with other moves to create hybrids
Each of these will change how the exercises benefit you so you can choose variations that work for your specific needs and goals.
For instance, you may increase range of motion, especially if you really want to strengthen and gain mobility.
The bigger the range of motion you work through, often the harder the move will be.
To increase your range of motion, you may perform a Get Up Lunge where you actually move to fully kneeling on the ground before standing back up.
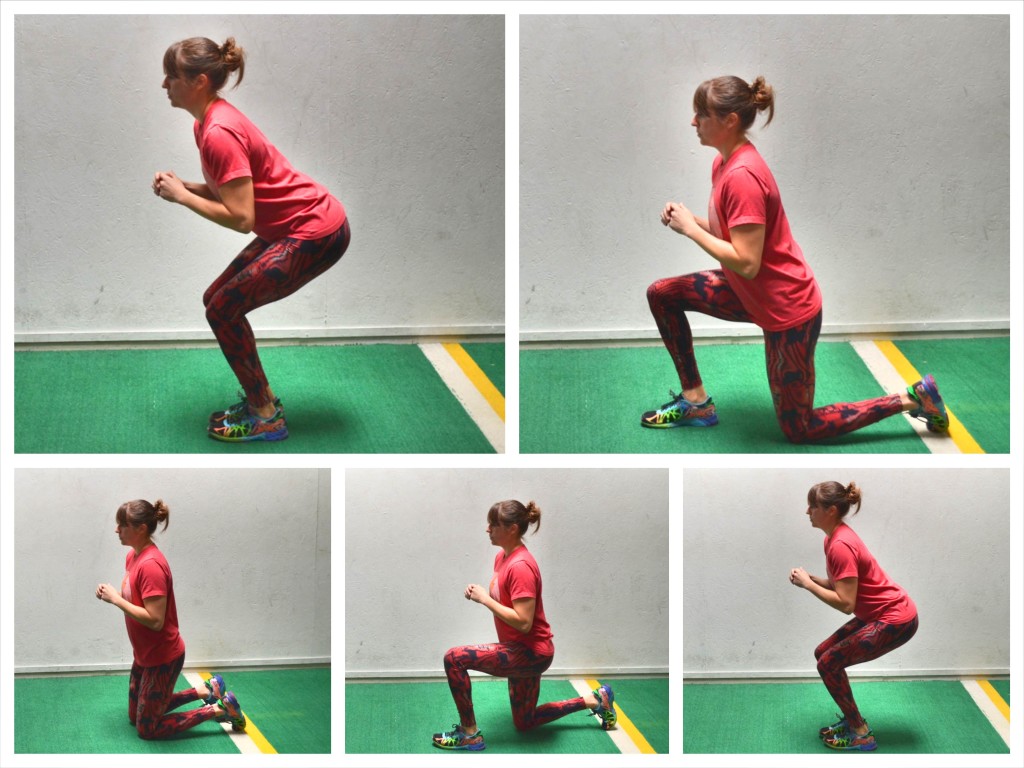
This not only makes you lunge all the way down, but even takes out any momentum you may have as you have to come to “rest” while kneeling before standing back up.
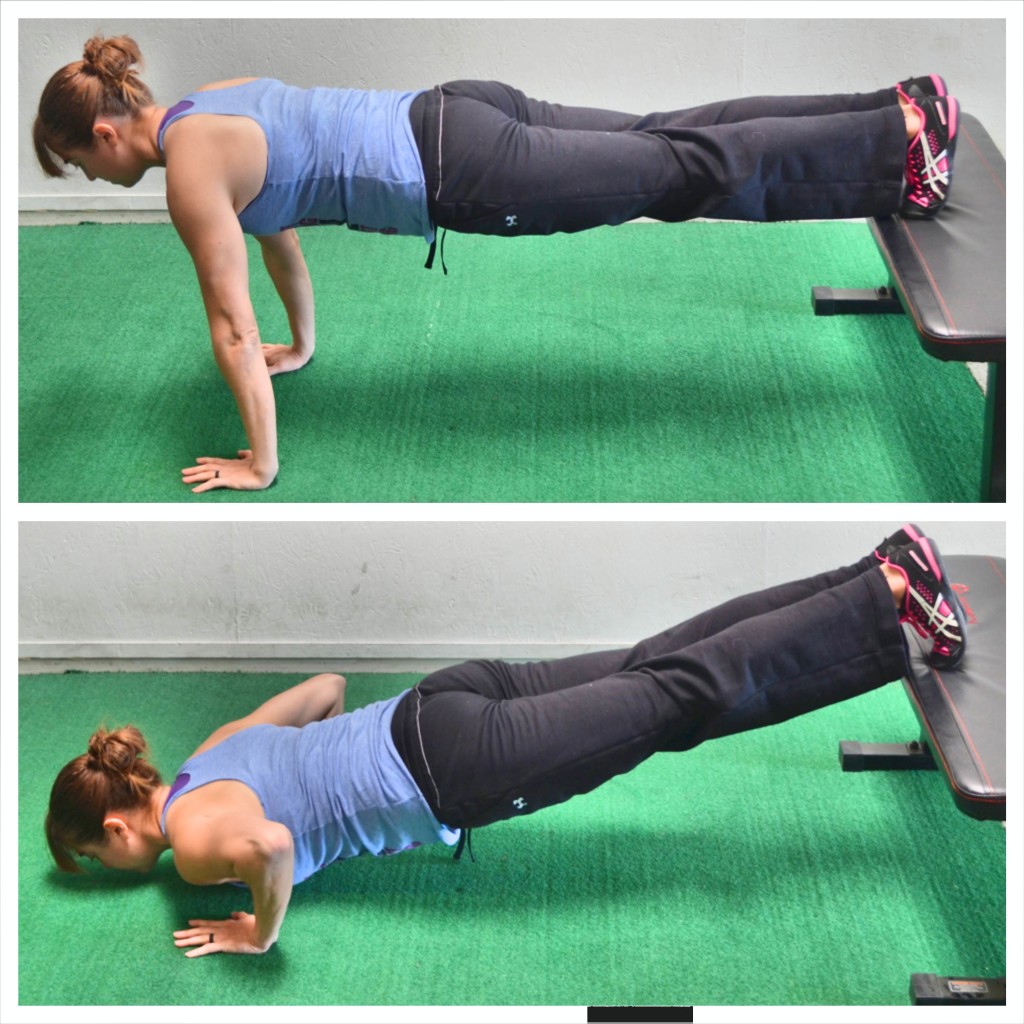
Another way to increase range of motion is to place your hands or feet up on something.
For instance a Decline Push Up. Because your feet are raised, the push up will be more challenging.
Or you could do a Deficit Lunge, standing on a plate weight or box. When you lunge back, you will have to sink deeper to touch your knee down than you would if both feet were on the ground. This forces your legs to work through a bigger range of motion and can even improve your hip mobility.
Increasing the range of motion is a great way to make sure you build strength through the full range of motion you’ve work so hard to create with your foam rolling and stretching.
Another way to use range of motion is also to limit it.
You can work on only part of a full range of motion to target muscles in different ways OR even prevent yourself from “relaxing” at any point, and stay within a “working” range, to increase your time under tension.
For instance, with a Band Hip Rotation, you may rotate back toward the anchor point, BUT still keep tension on the band so even at the “end” of the move your abs are working instead of fully relaxing and releasing.
Same goes for Inverted Rows.
You could choose to protract and relax out at the bottom of each row to work on that initial engagement OR you could maintain the engagement even at the bottom of the row to force your back to work without getting to relax during the reps.
Along with changing the range of motion, you can also create more instability in exercises to make them more challenging while also forcing your core to work harder.
Creating instability can mean both adding in equipment or more unstable surfaces or even changing your “base” for the movements.
For instance, adding in a foam pad can be a common way to add instability and force all of those little muscles to work from the ground up.
If you wanted to create instability in your push ups, you could also change your “base.”
You could raise one leg up off the ground. Or stagger your hands. These little tweaks force your body to work harder to stabilize and can even target slightly different muscles.
All of these little tweaks can use the same basic moves just in different ways to help you really focus in on what is important for you and your goals.
Even exact form is variable and making tweaks to our form can help us, not only challenge our body more, but work muscles in different ways.
A little chin tuck and flexion of your spine during Barbell Hip Thrusters may help you engage your glutes better.
Or when doing a walking lunge, stepping out at a slight angle, can work your glutes more.
Or rounding your upper/mid back during hyperextensions can help you focus in on your glutes.
All of these slight adjustments to form can help you challenge your body in different ways.
This even relates back to the type of grips you use on moves – neutral, palms facing in, underhand, palms facing you, or overhand, palms facing away.
When you change your grip with pull ups or rows, not only can it make it “harder” but it can also change the specific muscles you recruit and which carry more of the load.
The point is, if you’ve adapted or want to accomplish a specific goal, you can tweak moves to work for you!
And if you find you really want to challenge your body in a new way, or work on those weak points, sometimes even combining moves together into a Hybrid Exercise is key.
With Hybrid Exercises, you can take basic compound moves and not only work more muscles at once, but also work your body in multiple planes of motion.
By working more muscles at once, and even working in different planes of motion, you can challenge your body in new ways. And you don’t even need weights at all!
You can also use these hybrid moves to combine compound and isolation exercises to focus in more on those weak points.
Hybrid moves like this are a great way to create challenging bodyweight workouts for both cardio routines and even full-body strength. They also make great accessory lifts to help us build functional strength!
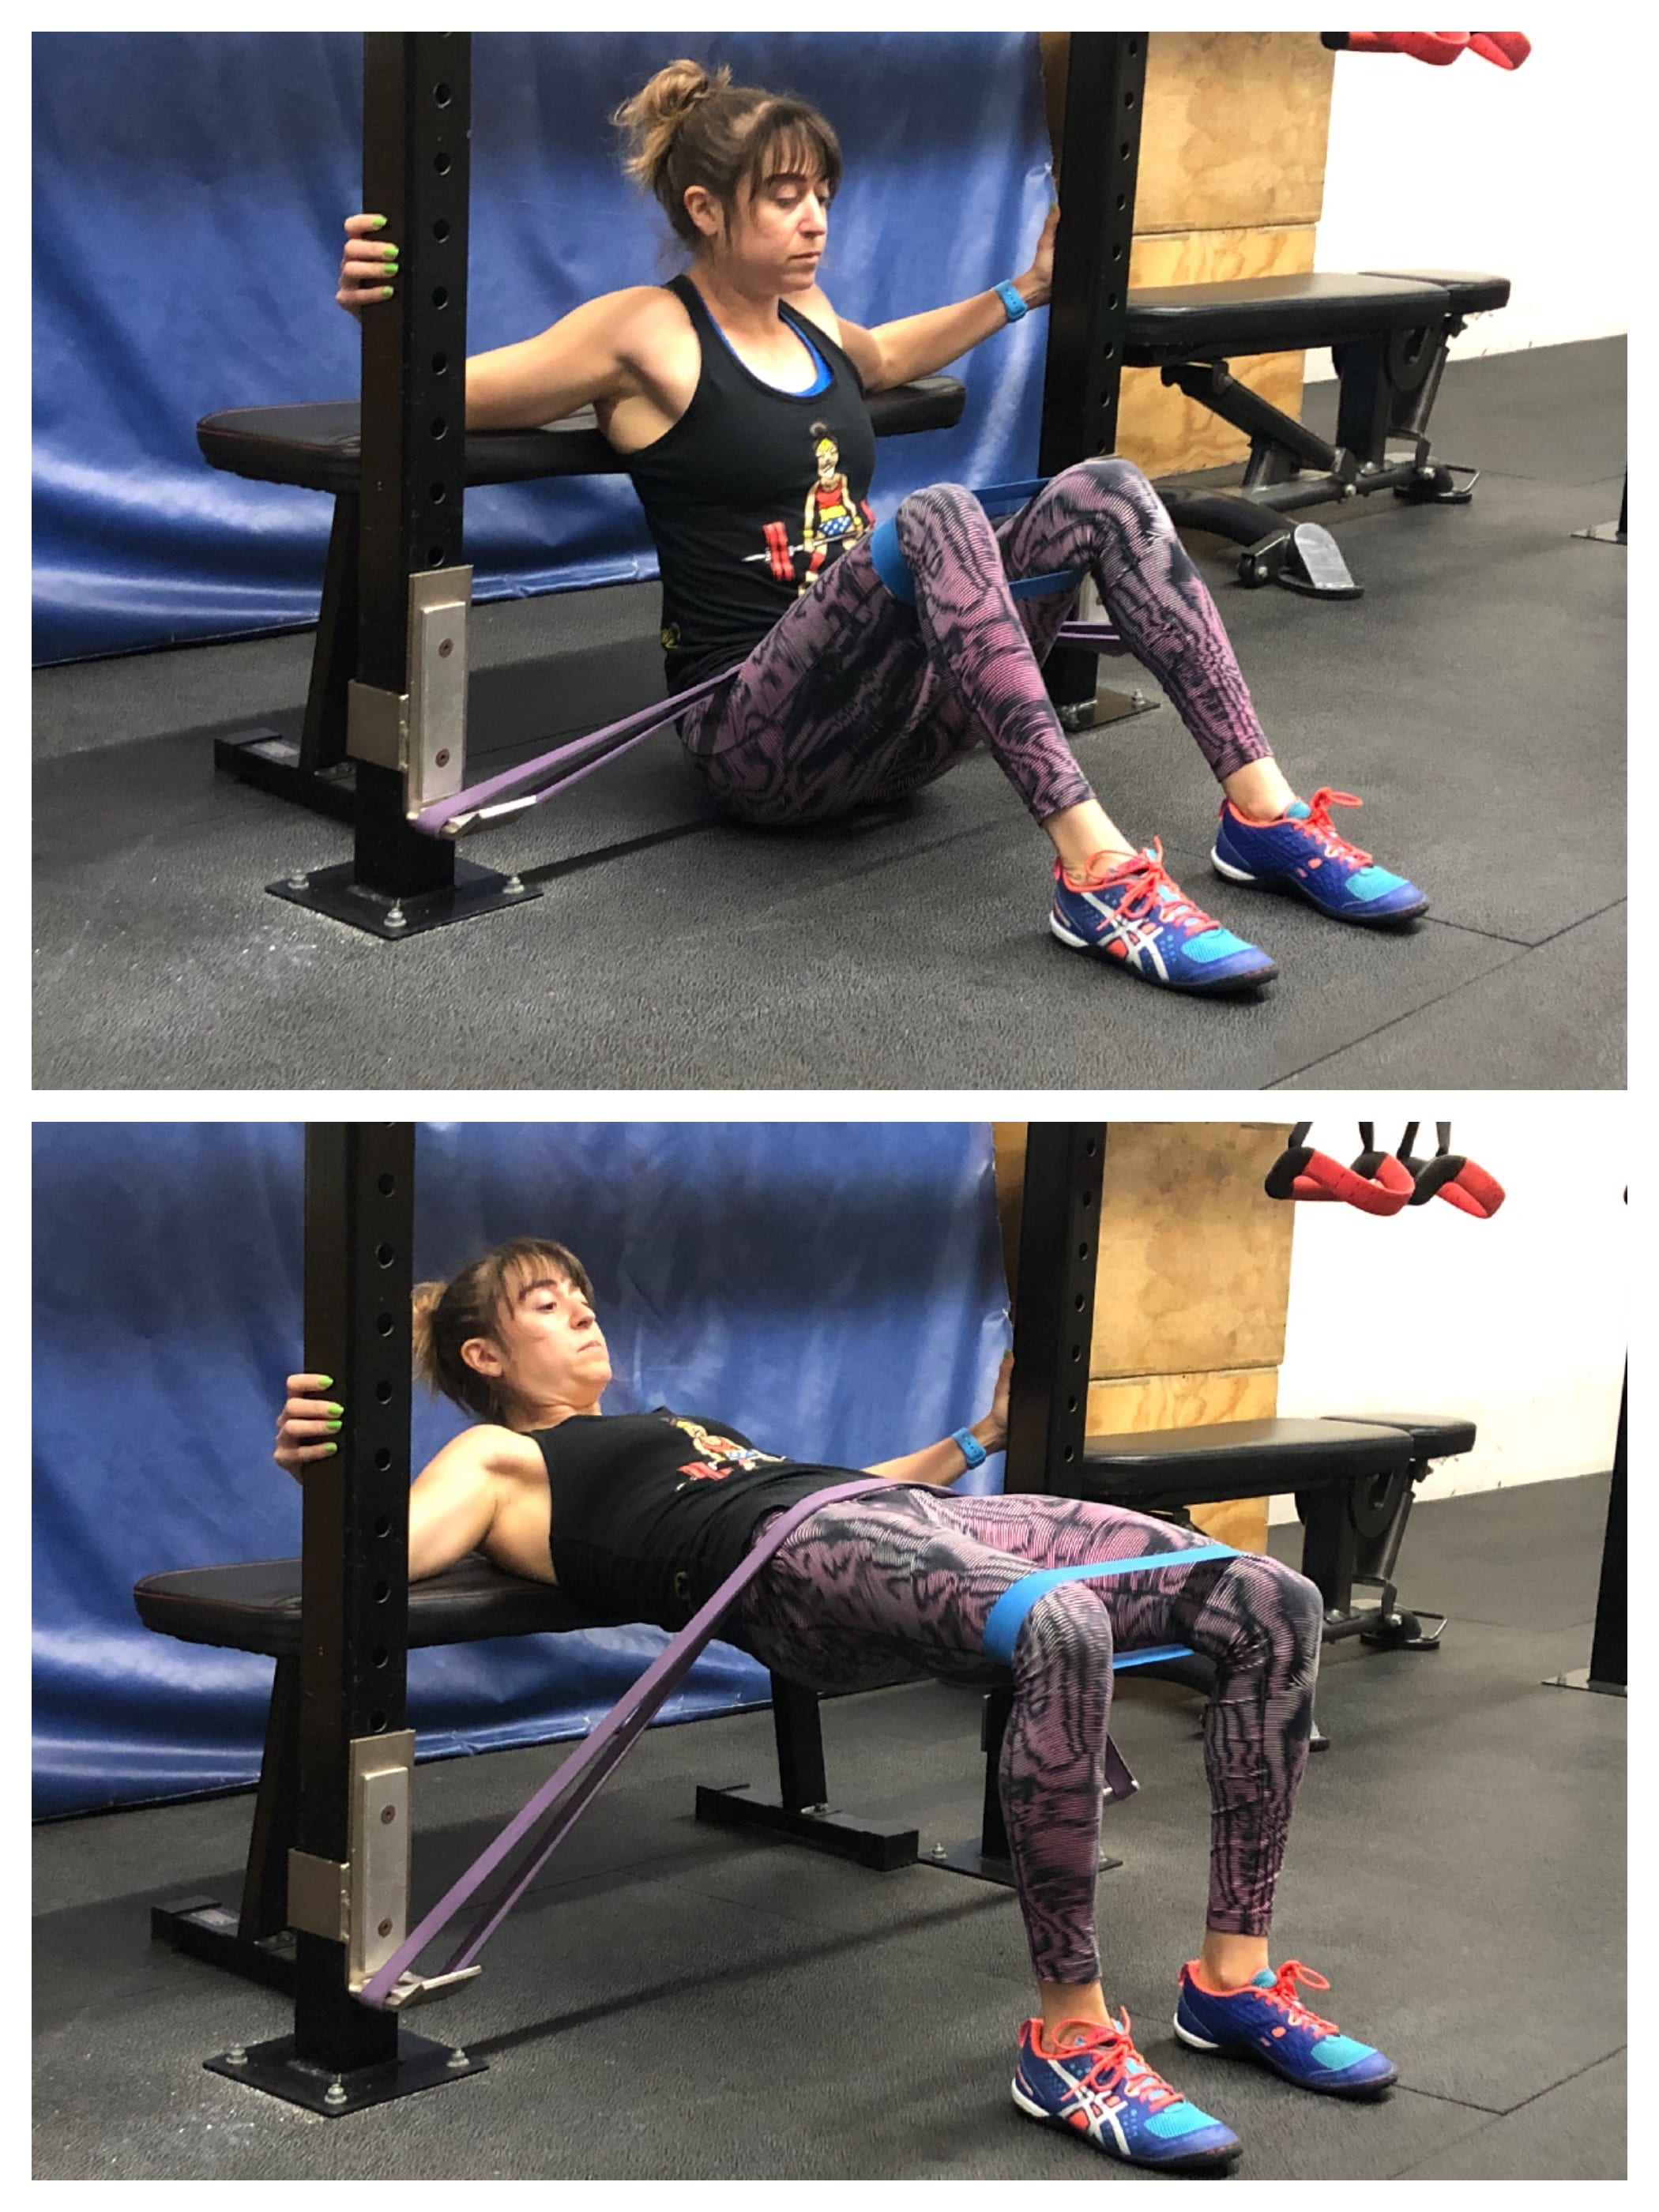
Using Tempos:
When we change up the tempo of moves in our workouts, it is most often to make them faster and more explosive, especially for our cardio routines.
And that is a great way to challenge our bodies.
Not to mention we can even use concentric only lifts sometimes to help us build strength WITHOUT creating as much muscle tissue damage so we need less time to recover and can actually train more frequently.
But slowing down movements or even using holds, can also help us make great strength gains and build stability.
Actually spending more time under tension can help improve our strength and build lean muscle mass, especially when we slow down the eccentric portion of the lift.
Changing up the tempo of moves is one of the best way to build strength when using only bodyweight exercises.
Increasing our time under tension and even slowing down the eccentric portion of the lift can cause more muscle tissue damage. And this increase in damage means our body has to repair and grow stronger!
We also can’t forget about holds.
When we are talking about tempo, there are three parts of the move we can change up – the concentric, eccentric and ISOMETRIC.
We can also add in pauses to movements to increase time under tension!
These pauses can be a great way to help us get over stick points in movements, where we tend to fail.
For instance, holding right at the point you usually fail to move past in a pull up.
Or the pauses can be used to improve our mobility.
By performing an isometric exercise, or pausing at that end range of motion, we can help build strength at that position to maintain the mobility we’ve created.
An isometric hold can also be a great way to establish the mind-body connection and create a better pump in muscles.
Remember there are three portions to every lift and changing up the tempo can mean speeding up or slowing down any, or all, of those pieces!
Using These Tools:
There are so many ways you can adapt exercises to meet your needs and challenge your body in ways that will be tailored toward your specific needs and goals.
Challenging yourself isn’t only about adding weight.
You can even combine many of these together to get killer results without adding an ounce of extra load.
For instance, you could do a Balance Lunge (back foot up to increase range of motion) with a 3 count eccentric lower down (to slow down the tempo) to challenge yourself.
Or you could choose to use loads but place a sandbag over one shoulder as you do a Step Up. The weight may be lighter than you would use if you held dumbbells down by your sides.
But because you would be using an unstable weight, and unilaterally-loaded weight, your core will have to work harder. And instead of going heavier, you could also increase the box height to not only make the move harder, but even target your glutes more.
There are endless ways you can combine these different tools. But the key is to pick ones that address your needs, your areas of weakness and your goals.
Remember, you don’t always need to, or shouldn’t always even, just add weight!
Design Workouts That Work!
Learn more about my Training Black Book!
12 Slider Exercises For A Full-Body Workout
If you don’t have access to a ton of space or equipment, but you want to add some variety and a little extra challenge to your bodyweight workouts, a pair of sliders is a great tool to have on hand!
They are easy to use at home and take with you when you travel so that you can advance basic bodyweight moves. (And if you have hardwood floors, towels can even work instead!)
They can also reduce impact on moves like burpees while still giving you a killer cardio workout!
Below are 12 fun slider exercises you can use to get in a great full body cardio and strength workout!
And if you need a set of sliders, and also an amazing BOOTY BAND, check out this RS TriSlide and Booty Band Bundle!
12 Slider Exercises For A Full-Body Workout
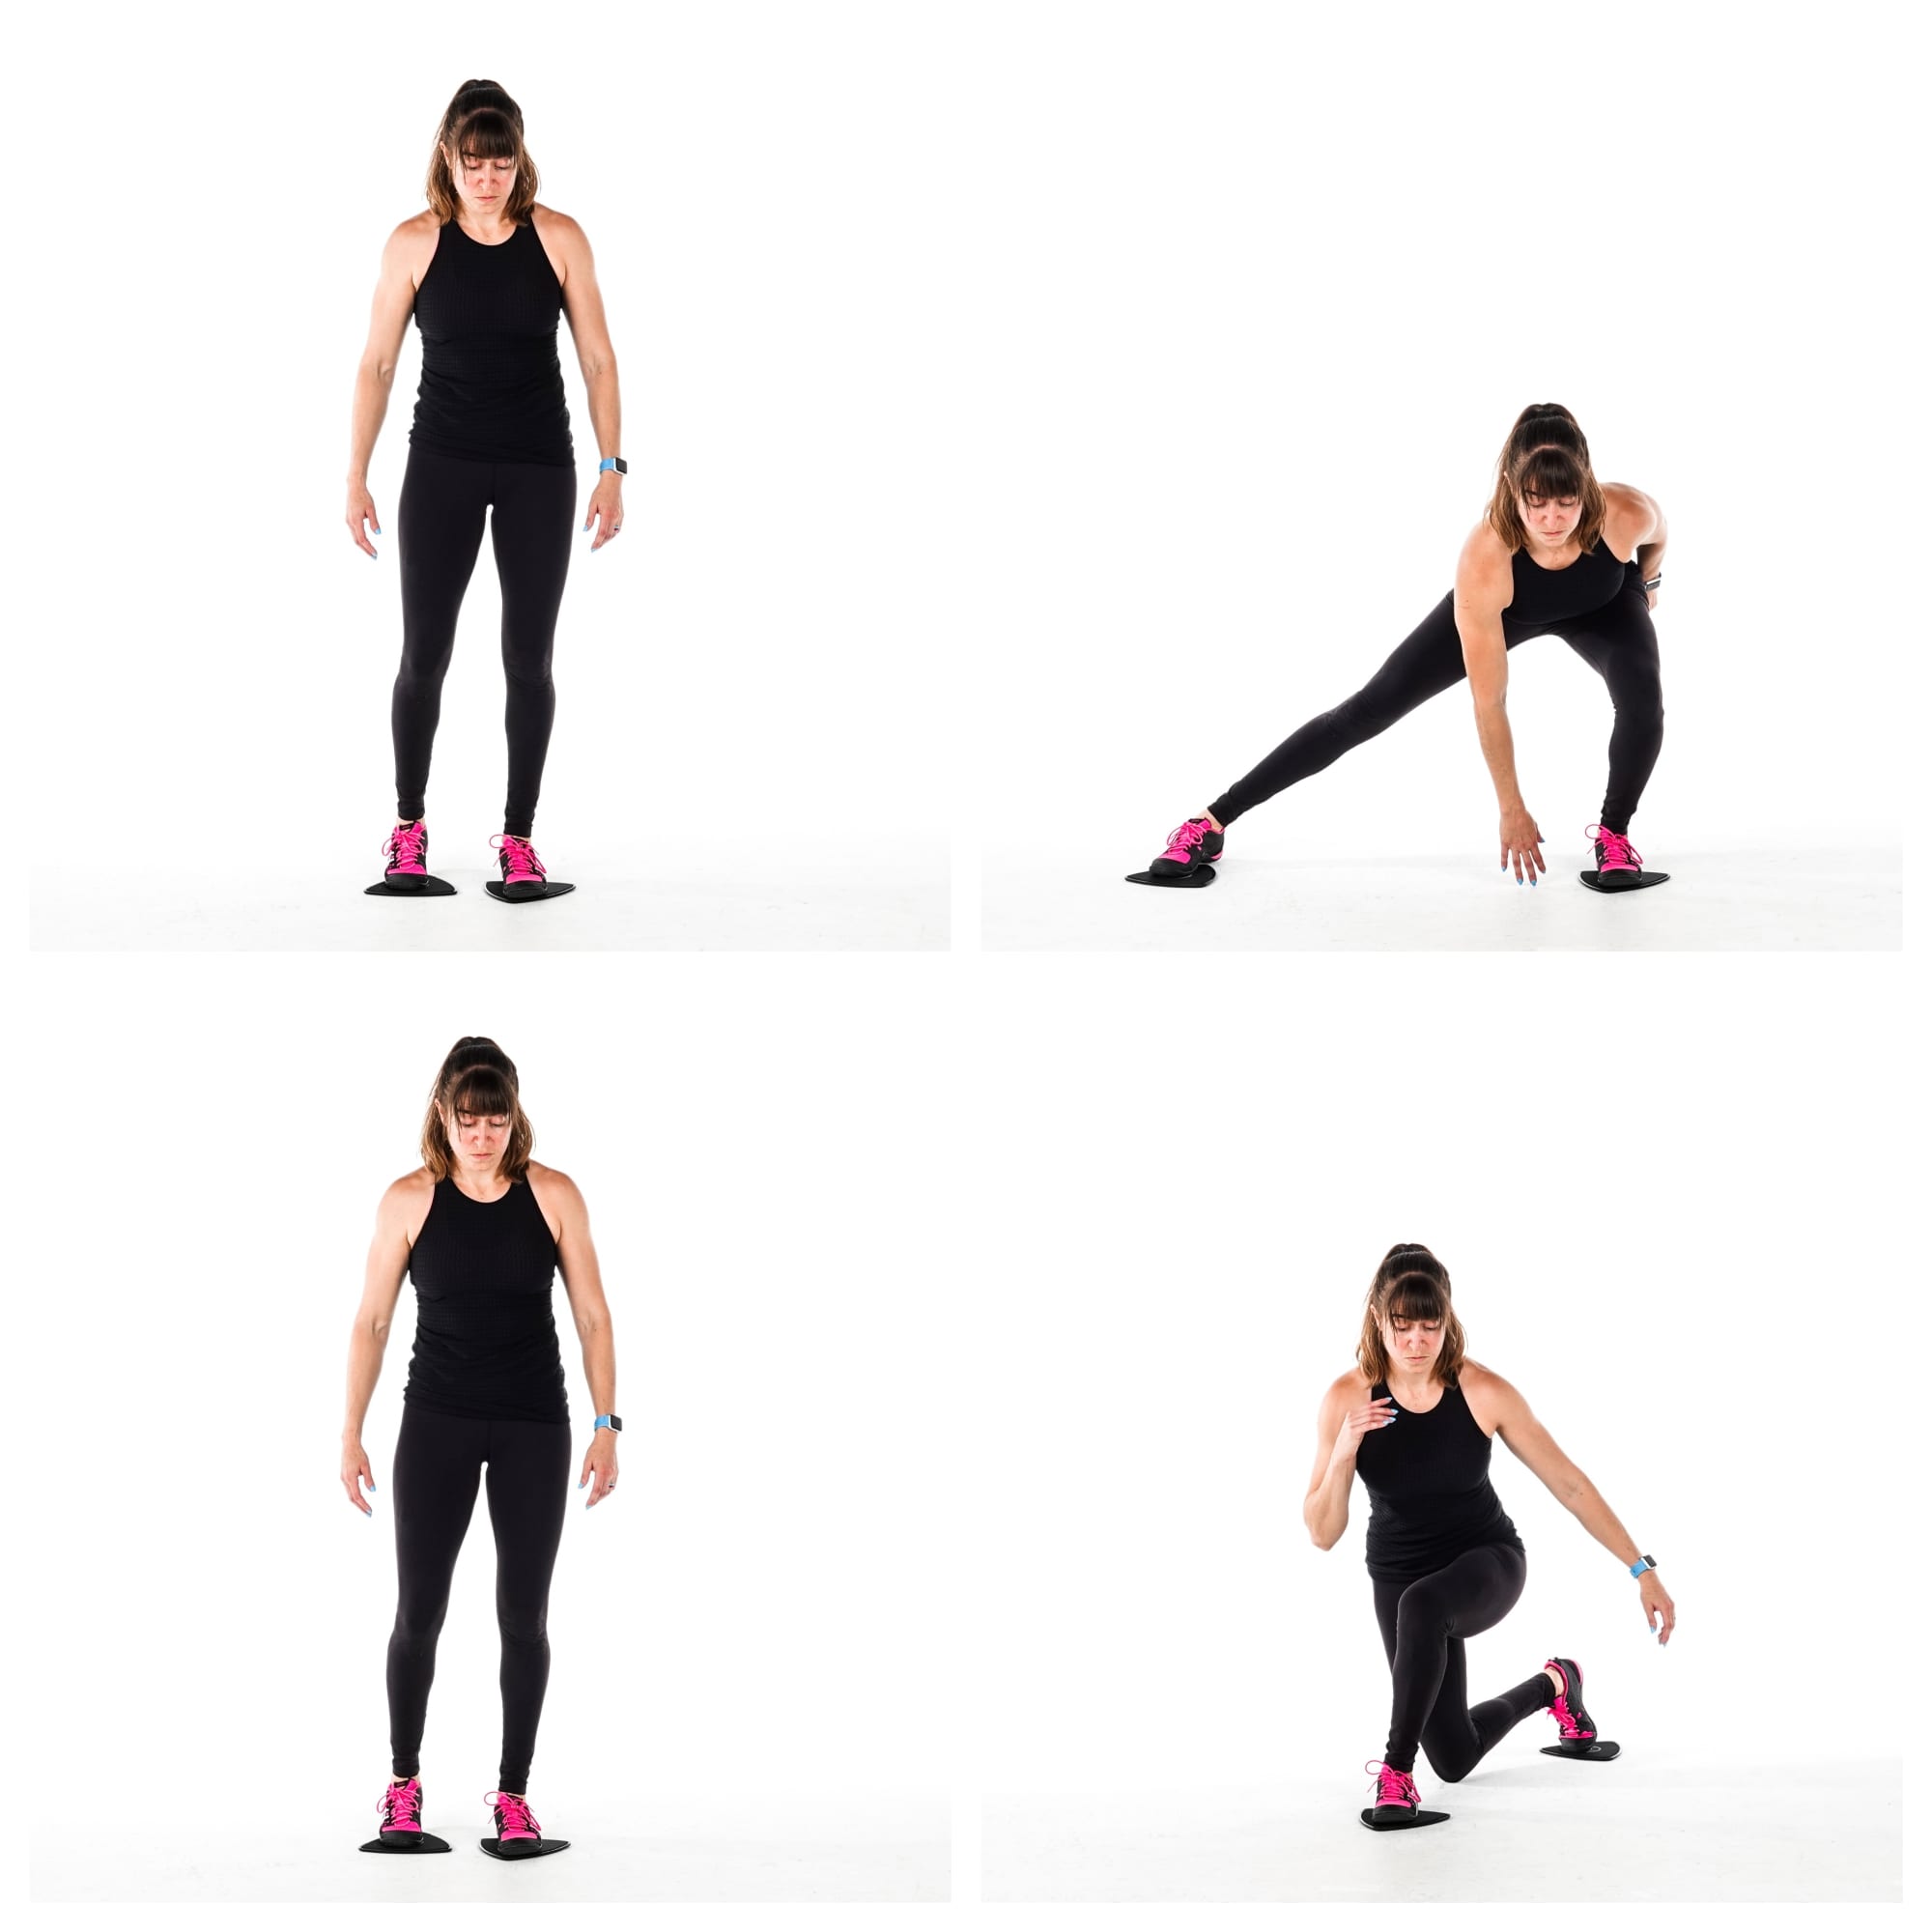
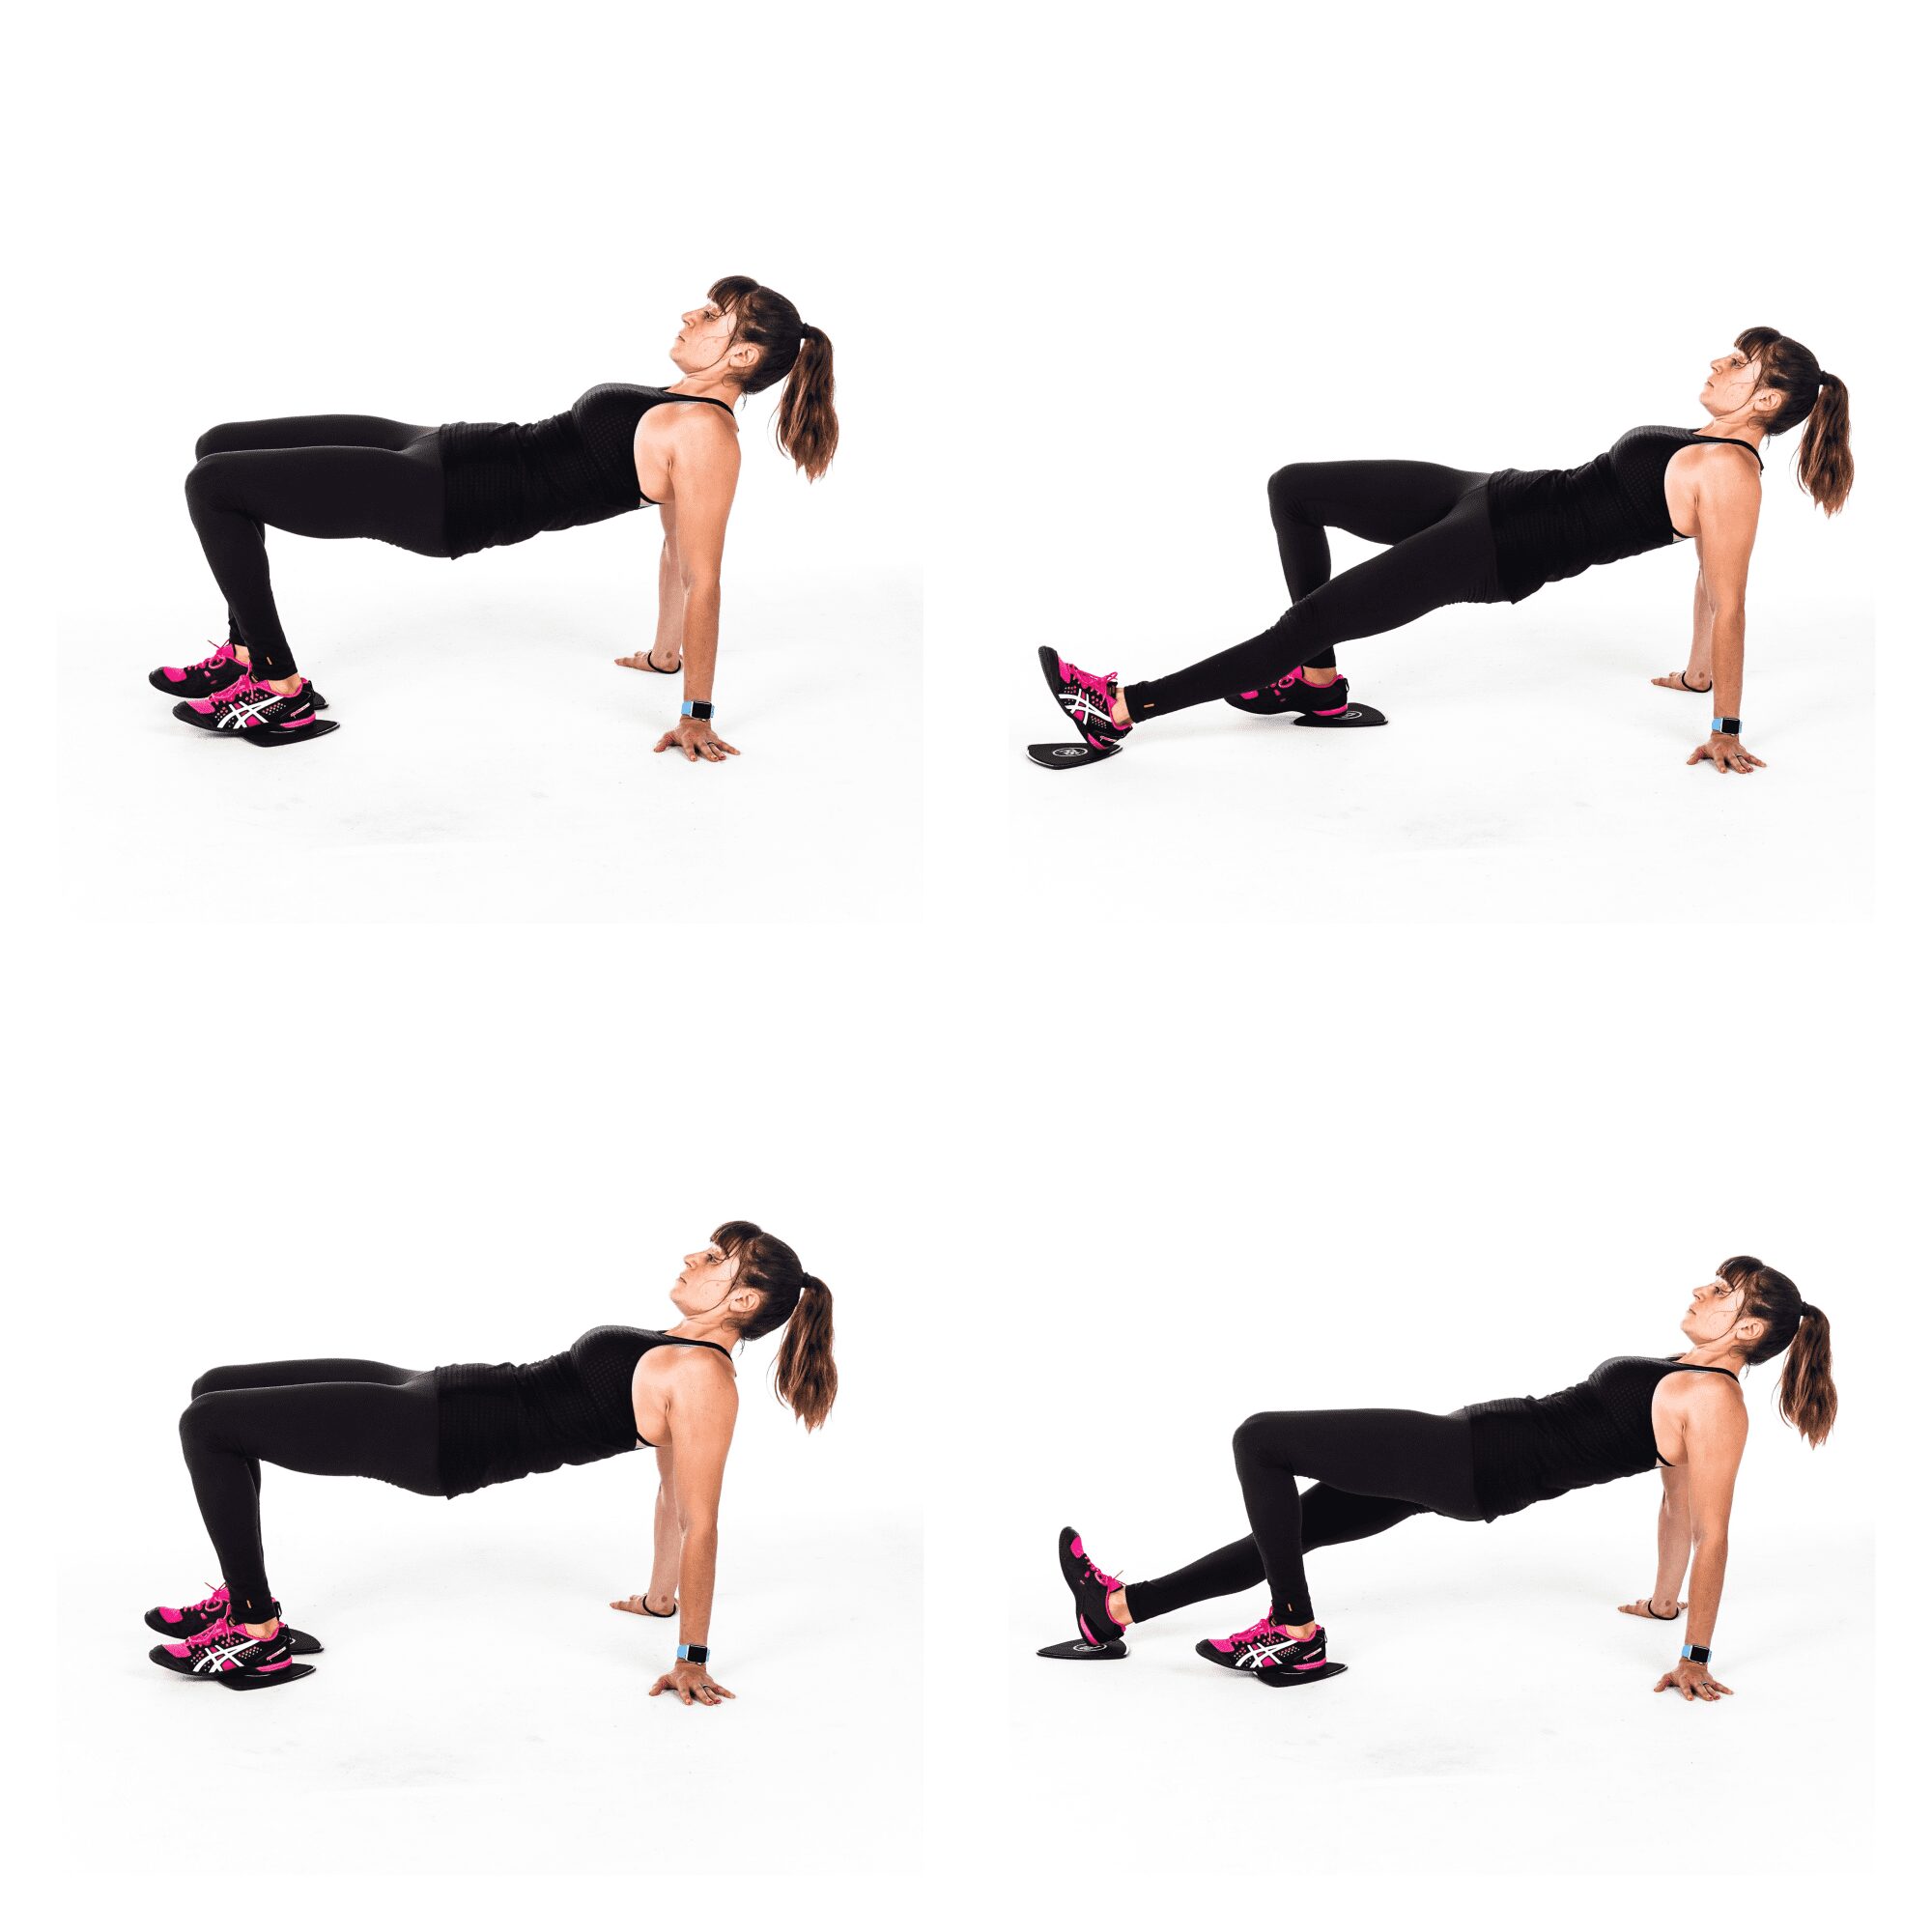
Slider Mountain Climber Burpee:
Want a core-intensive but low impact burpee variation to use in your cardio workouts?
Then the Slider Mountain Climber Burpee is a great variation to include!
To do the Slider Mountain Climber Burpee, start standing tall with a slider under each foot. Make sure the ball of your foot is about in the middle of the slider for the most control.
Then bend your knees to sink down and place your hands on the ground as you slide your legs back into that high plank position.
With your legs out straight behind you and your hands about outside your chest, perform a push up, dropping your chest to the ground. Do not let your elbows flare way up. Create an arrow shape with your body.
Press back up and then at the top of the push up, tuck one knee in toward your chest. Do not let your hips sag or butt go up in the air. Also, make sure your hands stay outside your chest or below your shoulders.
Straighten your leg back out and perform another push up and then another knee tuck on the other side.
Perform one final push up then slide both feet back in and stand up. Raise your arms up overhead then bend back over and place your hands on the ground to slide your feet back into the high plank position.
To modify this move, you can remove the push ups completely or even eliminate just one or two. You can also go down to your knees for the push ups and come back up to your feet for the mountain climber knee tucks.
Adjust as you need so you can maintain good form and move quickly to get your blood pumping!
Skater Lunges:
Want to work your legs, especially your glutes and inner thighs, with a low impact movement?
Then try these Skater Lunges!
They are a great cardio lunge variation that is a low impact option instead of doing skater hops. Plus they work your inner thighs more!

To do Skater Lunges, stand tall with your feet together and a slider under each foot. Make sure your foot is centered on the slider, with the ball of your foot firmly on the slider for control.
Slide one foot out to the side with that leg staying straight as you hinge to sit your butt back and bend that standing knee to sink into a side lunge.
You can reach the opposite hand down toward the heel of your standing leg (the leg you bend to sink into the lunge). Make sure your weight is more centered on this leg so you don’t end up sliding out into the splits.
Then use your inner thigh to help pull the slider back in and drive back up to standing using the glute of the standing leg.
Move quickly to pop up and then slide out and sink into a lunge on the other side. Again reach the other hand down and back toward your heel to help you hinge properly and really sit back.
You don’t need to reach down and back but it can help if you struggle to hinge correctly and load your glutes.
Move quickly popping back up before sliding into a lunge on that starting side.
Move as quickly as you can while staying in control!

Low Reverse Lunge Slides:
Want a killer leg move? One that will really burn?
With Low Reverse Lunge Slides, you’ll keep your legs under constant tension so you’ll feel those quads and glutes burn!
To do Low Reverse Lunge Slides, you can place a slider under each foot or simply under the moving leg as you will complete all reps on one side before switching.
Stand tall with your feet together then sink into a little squat and slide your foot back a few inches so you are in a staggered stance holding just above parallel in that squat.
The more mobile you are, the closer to parallel you will sink.
Keeping the foot in front, which would be the foot on the ground if you’re using one slider, firmly planted, slide your other leg back. Do not stand up out of the squat as you slide back.
Simply extend that leg back into a nice reverse lunge position, keeping your front leg bent.
Then slide that leg back forward into the staggered squat stance without standing up.
Move at a controlled pace and slowly extend the leg back out before sliding back in.
Do not stand up until all reps are complete. Beginners may not sink as low or slide back as far in the lunge.
Slider Side to Curtsy Lunge:
This hybrid lunge exercise is a great way to work your entire leg and even improve your hip mobility and stability. You will really target your glutes and your inner thighs too with this Side to Curtsy Lunge variation!
This lunge combo is a great way to challenge your legs without adding weights!
To do the Slider Side to Curtsy Lunge, start standing tall with a slider under each foot. You can also use just one slider under one foot if you plan to complete all reps on one side and want a more stable base.
Then slide one foot out with a straight leg as you bend that other leg to sink down into a side lunge. Hinge at your hips and sit your butt back but do not round your chest toward the ground.
Make sure to sit back in that standing heel. Then drive back up to standing, pulling the slider back in using your inner thigh.
As you stand up, slide that foot back in and quickly move it back behind you to sink into a curtsy lunge.
Slide the same foot that went out into the side lunge back and across behind your standing leg as you bend that front knee to about 90 degrees.
Sink into a lunge, loading that front glute. Do not rotate open but keep your chest square forward.
Drive through your standing leg and pull the slider back up to stand up tall before repeating the side lunge.
Push Up Wiper:
This killer upper body and core move will target your chest, shoulders, triceps and obliques.
It is a super challenging movement, especially if you perform the wiper at the bottom of the push up. To modify, you can do the push up from your knees then perform the wiper at the top of the push up.
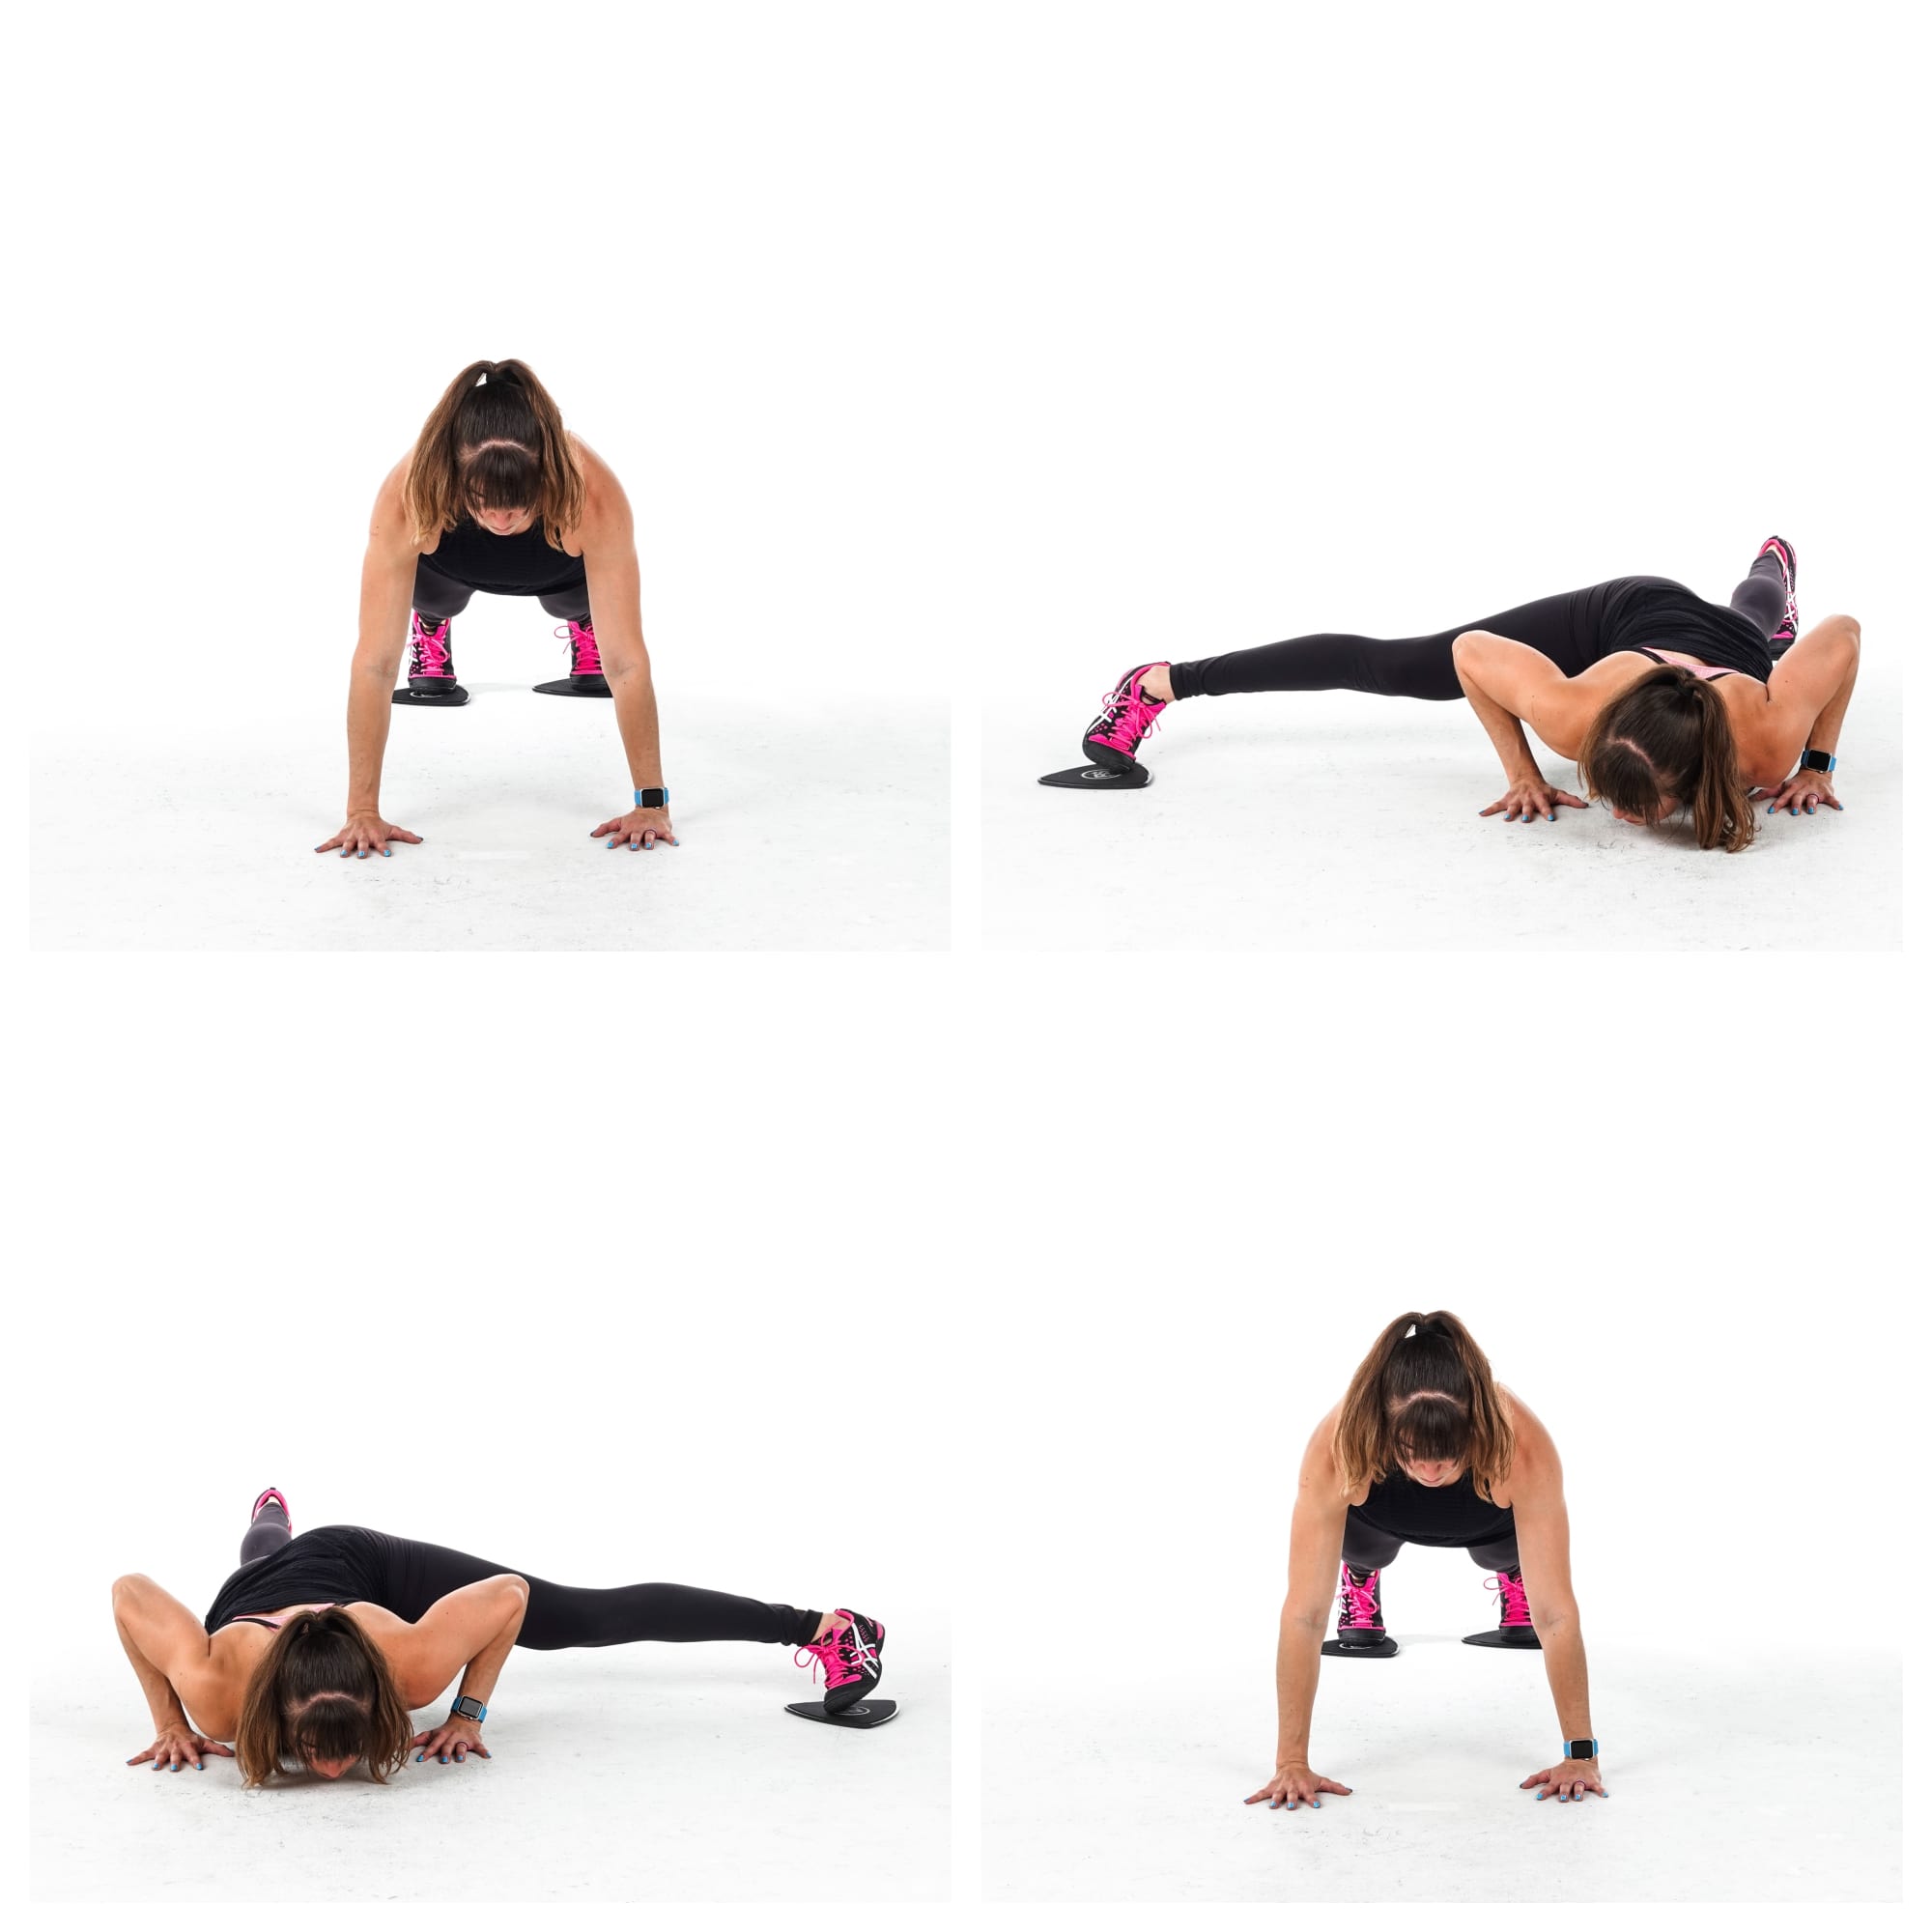
To do the Push Up Wiper, place a foot on each slider so the ball of your foot is about in the middle of the slider for the best control. Set up in the high plank position with your hands outside your chest.
Your body should be in a nice straight line down to your feet with your feet close together.
Perform a push up, dropping your chest to a few inches off the ground. Make sure your body moves as one unit as you lower. Do not let your hips sag or butt go up in the air.
Your upper arms should create an arrow shape with your body. They shouldn’t flare way out and up by your shoulders nor do they have to be against your body unless you want to make the push up harder and more tricep intensive.
As you lower you will slide one leg up and out to the side. You can also wait until at the bottom of the push up to perform the wiper, sweeping one leg out to the side and up toward your shoulder.
Slide it out as far as your mobility and control allow. You can rotate your hips slightly as you slide the leg up.
Sweep the leg back down and press back up. To make it slightly easier, slide the leg back before you press back up. To make it slightly harder and a bit more of a coordination challenge, sweep the leg back as you press up.
After coming back to the high plank position, do another push up and perform a wiper with the other leg.
To make the move a bit easier, do the wiper at the top of the push up and even perform the push up from your knees. You can also remove a push up and do a wiper to each side between push ups.
Slider Plank Circles:
This is a great move to improve your anti-rotational core strength and shoulder stability.
It is one of my favorite moves to include if people want to work on improving their push ups while preventing shoulder, neck and lower back aches and pains.
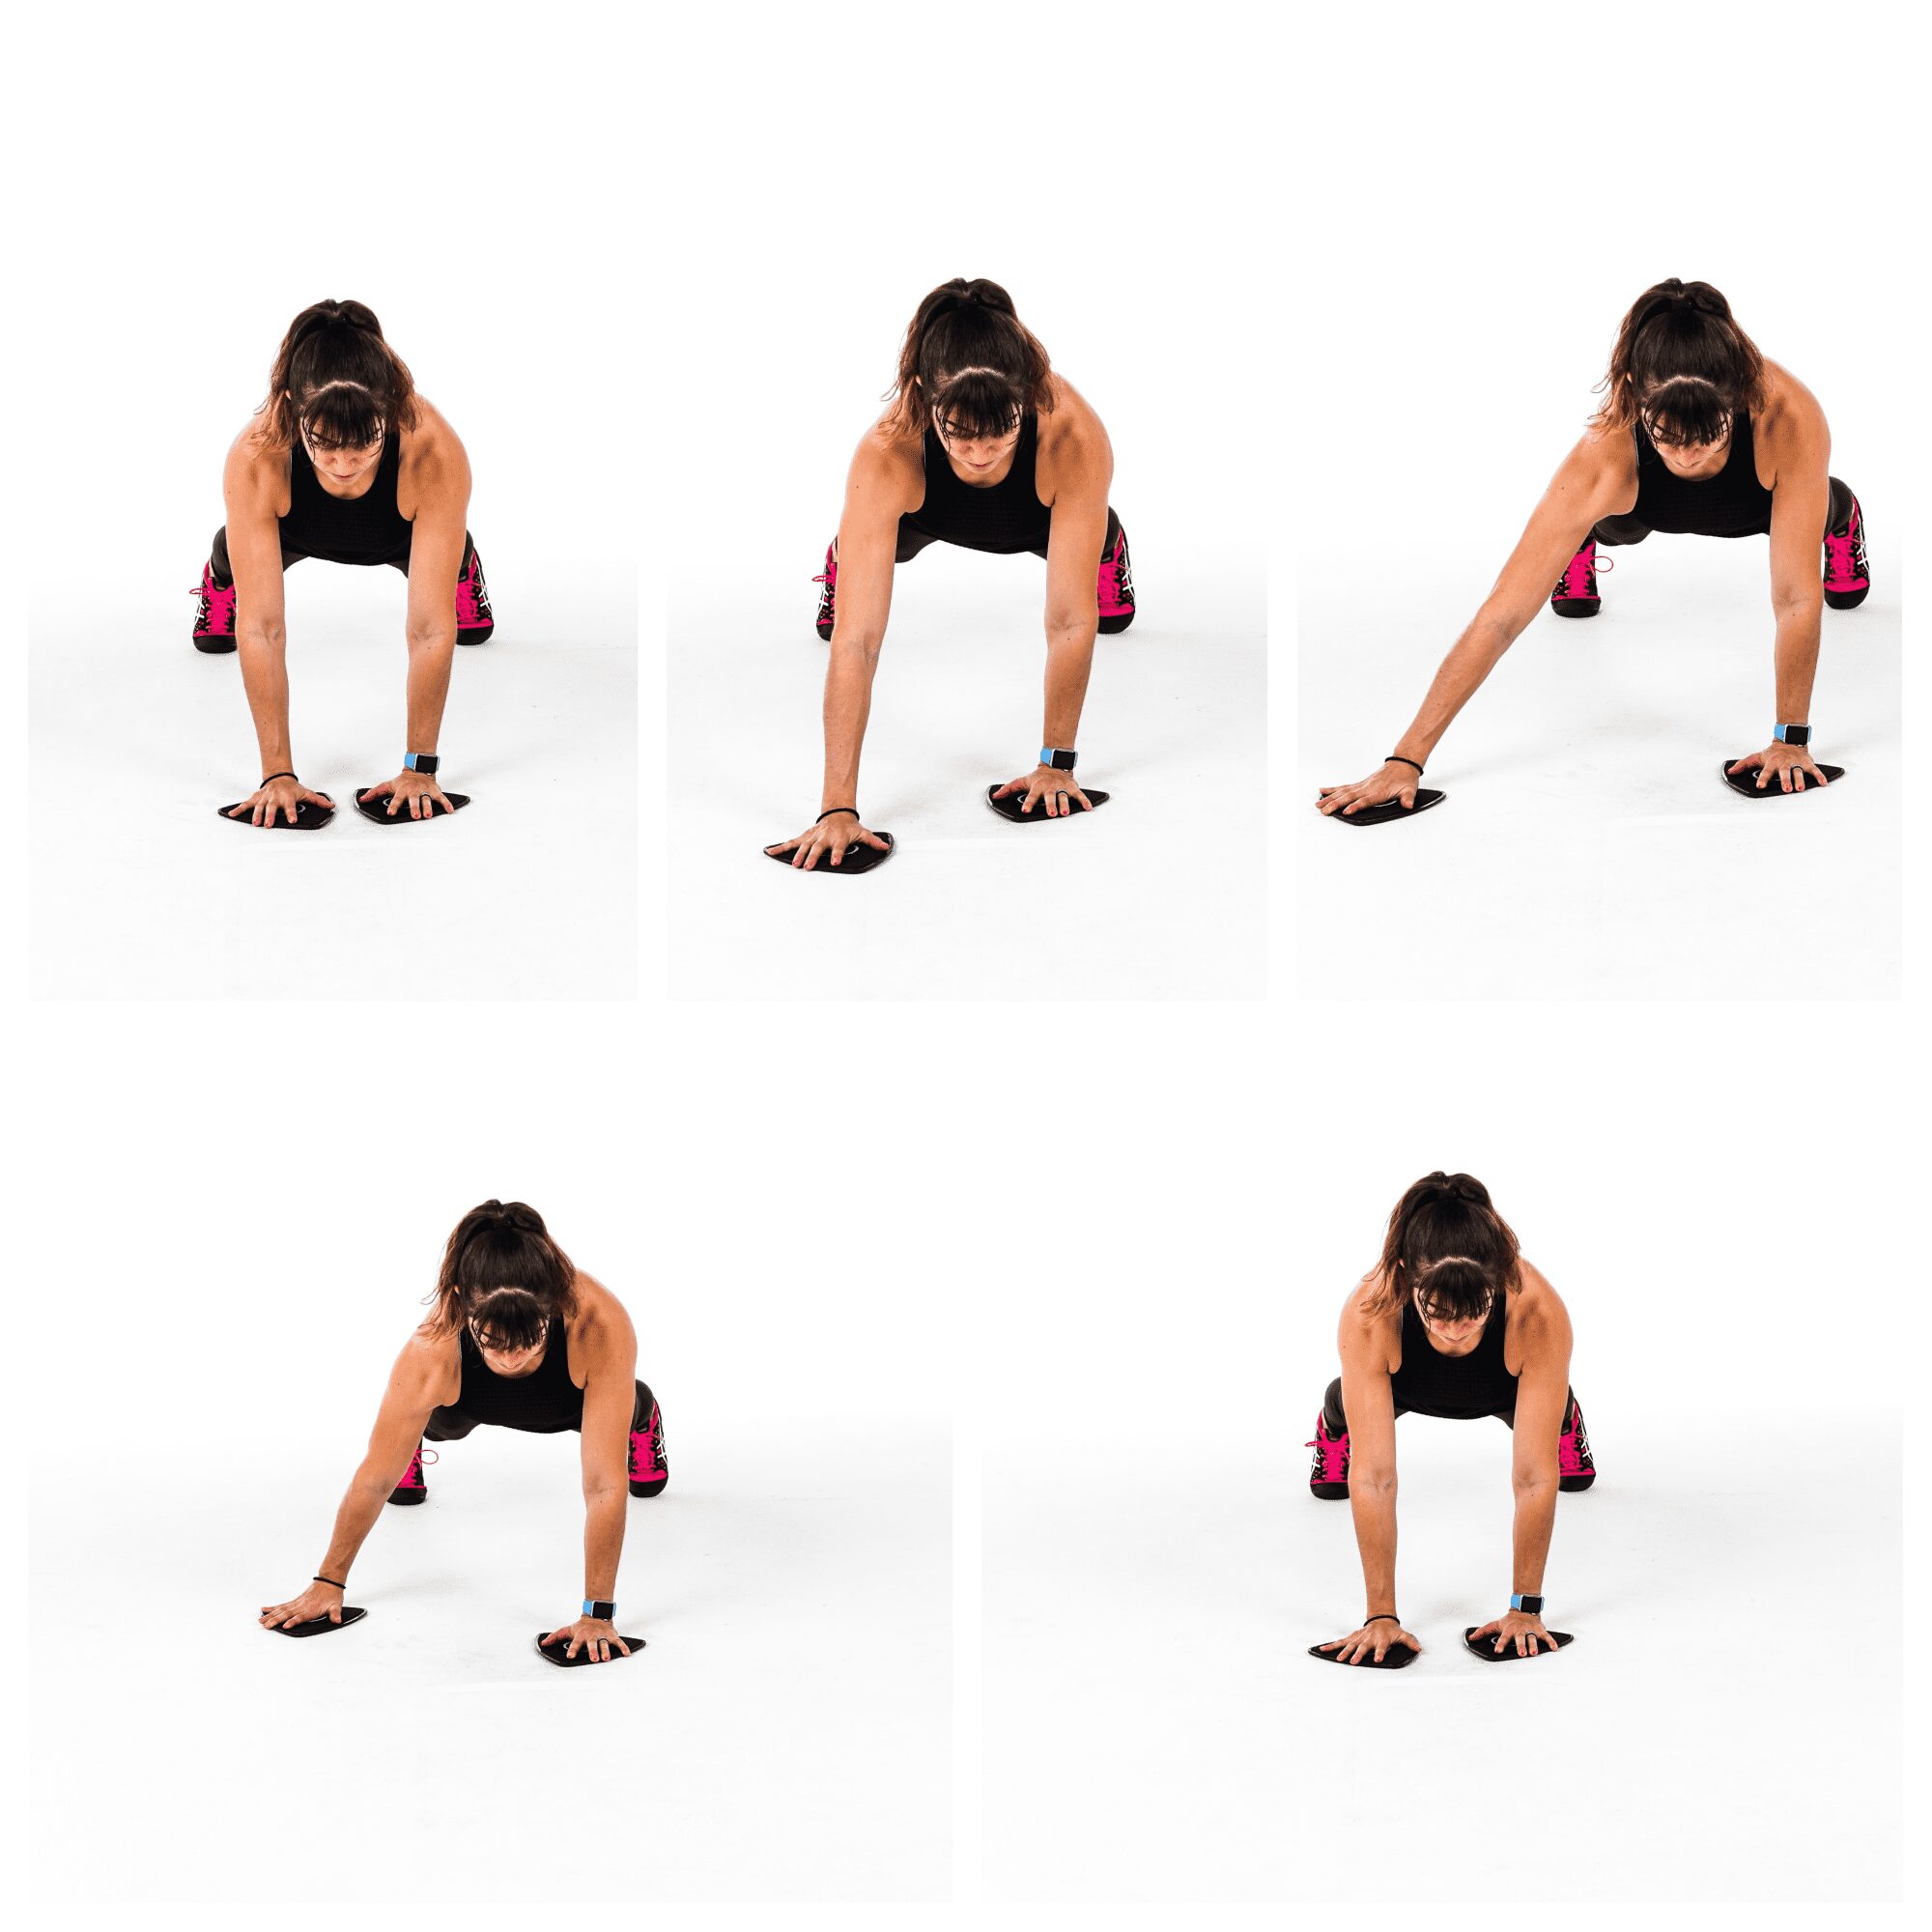
To do Slider Plank Circles, place a slider under each and with your hands under your chest and below your shoulders. You can place them slightly closer together so that you’ll create more of a tripod position with your feet to help you fight rotation.
Set up at the top of a push up, or in the high plank position, with your feet about shoulder-width apart.
Then slide one hand out in front of you, up and out to the side and then down and back around under your chest. You want to draw a circle up, around, down and back under.
Do not let your hips rotate as you circle. Squeeze your butt, flex your quads and drive back through your heels to help create tension through your entire body.
Keep your shoulders down and back so you aren’t shrugging. Then circle your other hand up around down and back under.
Alternate slow circles as you maintain that nice plank. Make sure to feel around your rib cage working as you pull the slider down, around and back under.
Do not let your shoulders shrug and feel your back engage to support your shoulders as you hold.
To modify, you can do this from your knees or even do taps instead of using the sliders. You can also stay on one side with the slider only under your moving hand. By not alternating it can be easier to fight your body’s desire to rotate.
Slider Sit Thru:
This move is a great way to improve your shoulder stability while also really challenging it so be careful if you’re returning from shoulder injury.
It is also a great move to work your entire core, especially your obliques.
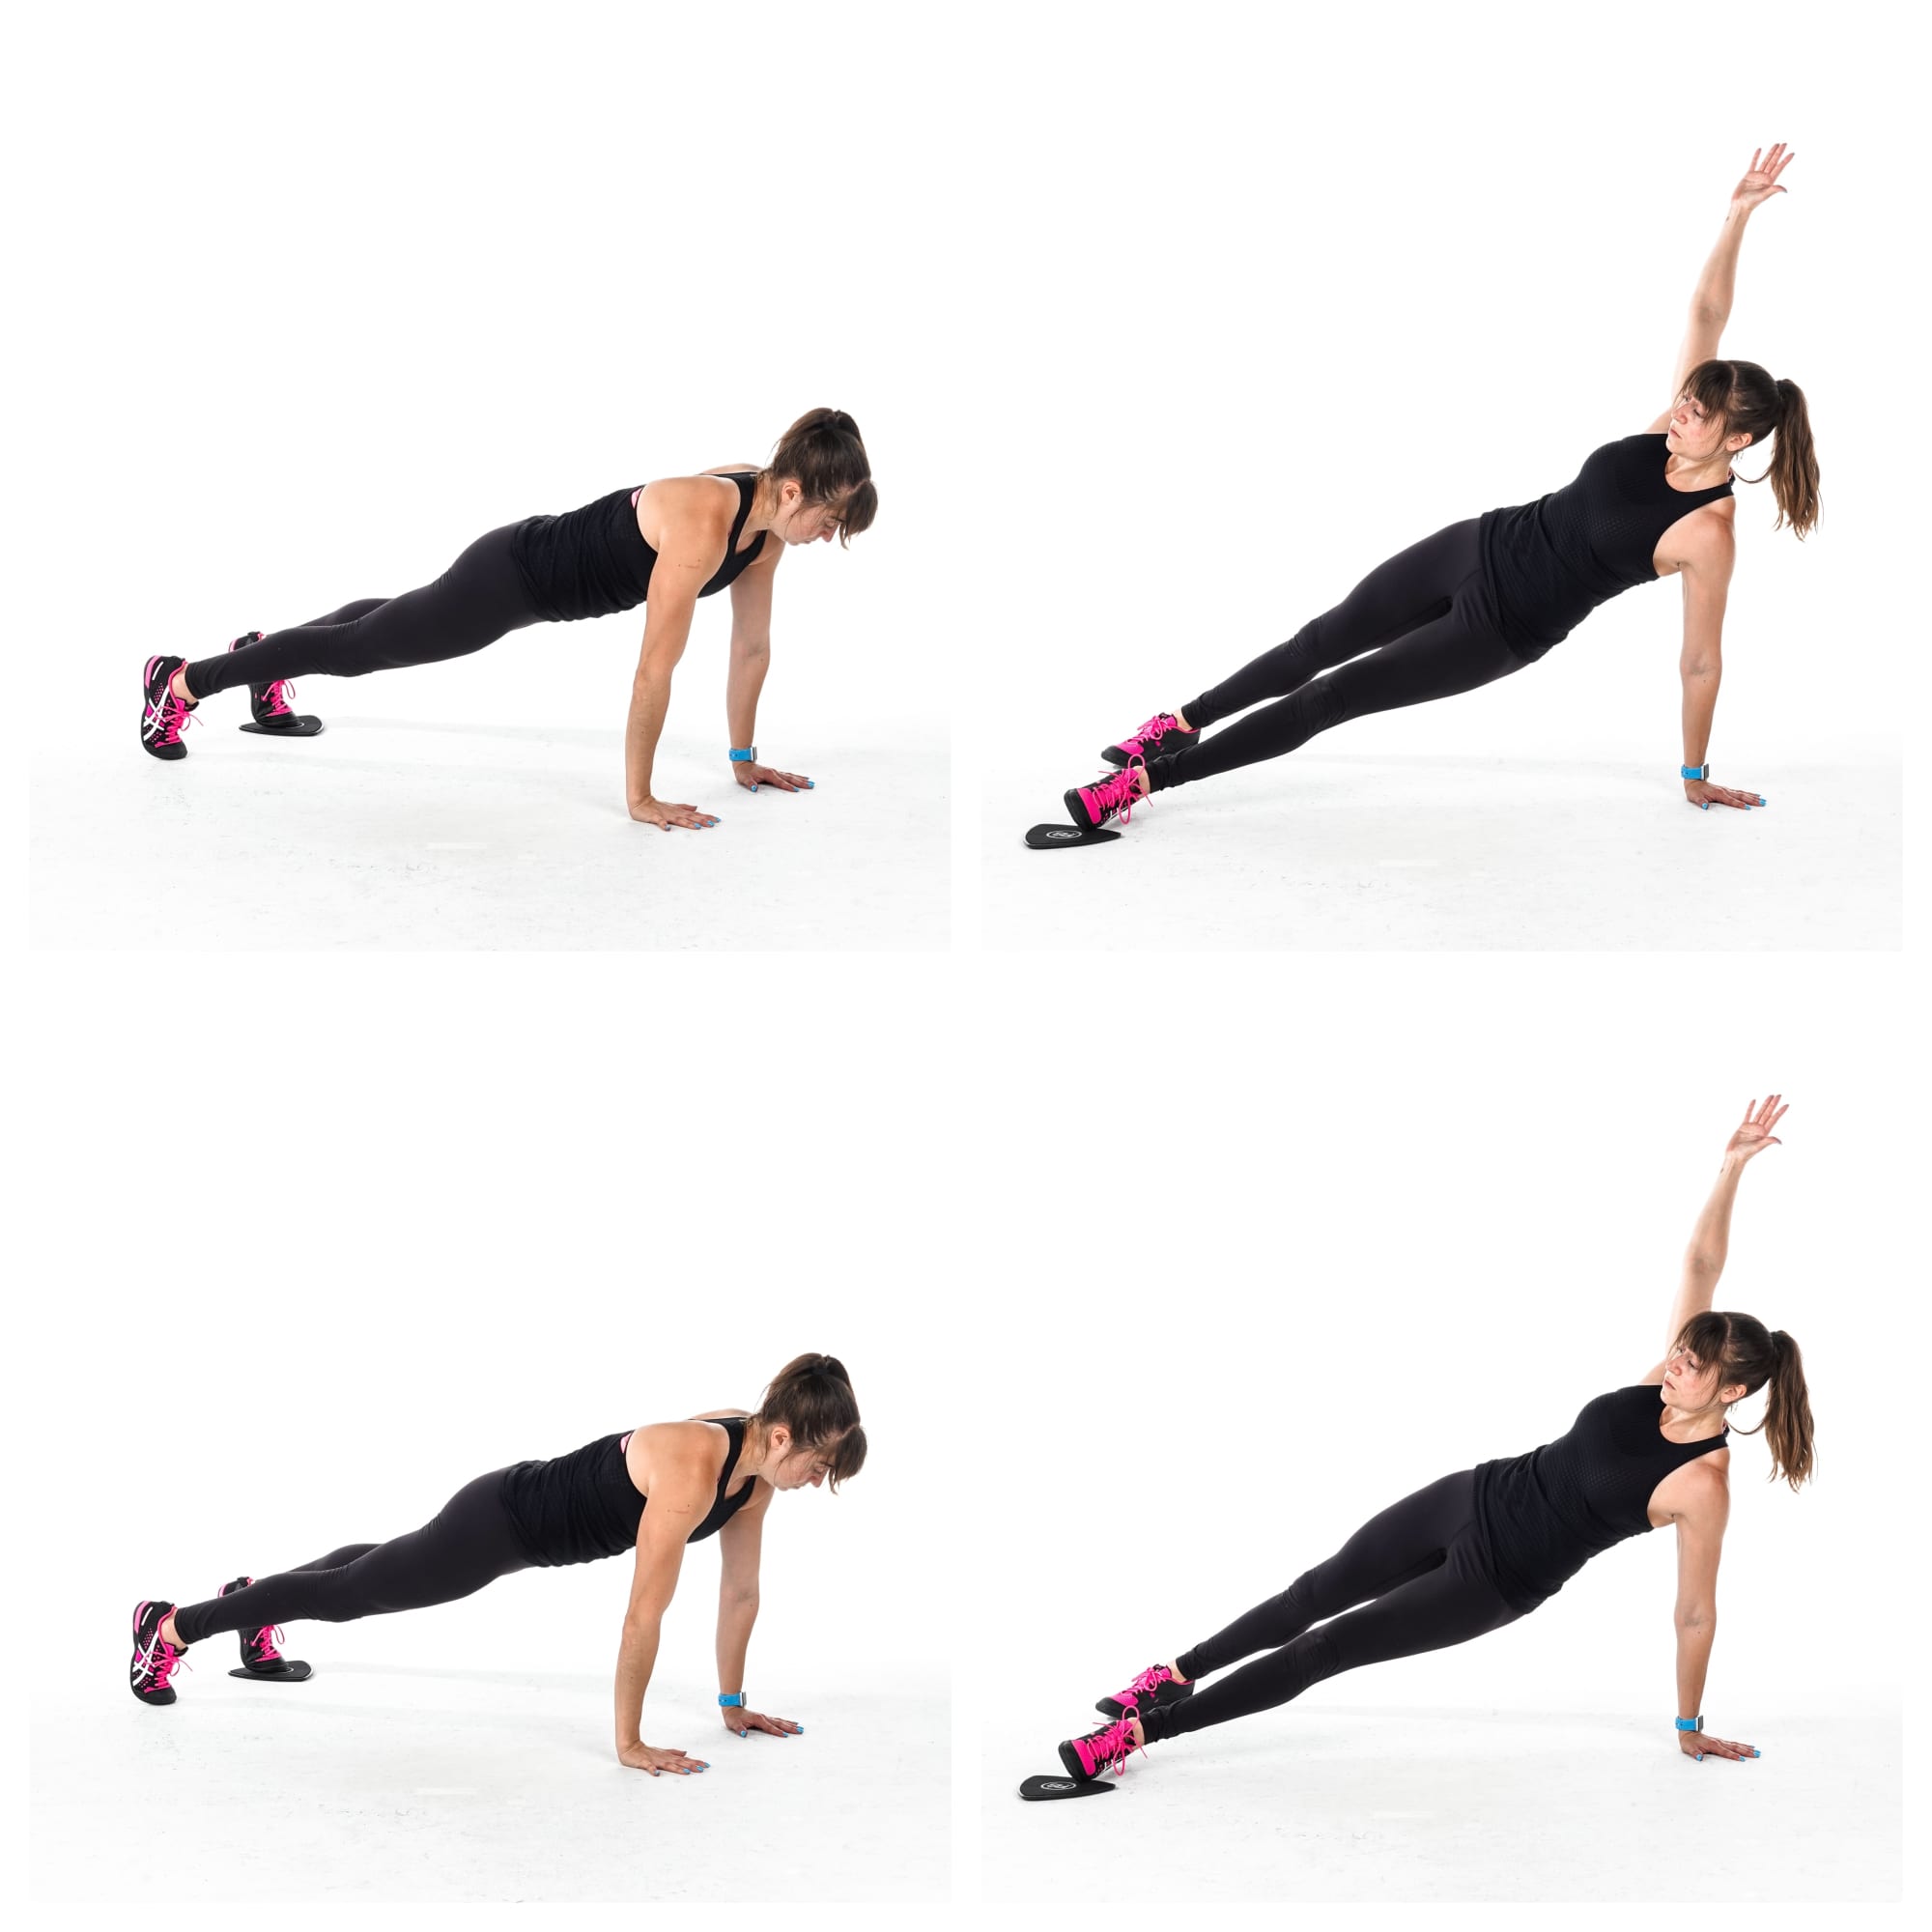
To do the Slider Sit Thru, place a slider under one foot with the ball of your foot in the middle of the slider. Because your foot will rotate onto the side, you may want to put your foot slightly toward the side of the slider you’ll be sliding toward.
Set up in the high plank position with your hands about under your shoulders and your legs out straight behind you about hip-width to shoulder-width apart.
Then slightly tuck the foot on the slider forward as you kick it under and across your body. As you rotate, lift the hand on the side you are kicking toward to open your body up toward the ceiling.
Extend the leg all the way across and through as you rotate open, reaching your hand up. Make sure your hand on the ground is positioned under your shoulder.
The leg of the foot on the ground may bend slightly as you rotate and pivot slightly onto the inside of your foot.
Slide the leg through then pull it back to the starting position as you rotate your body back to face the ground and put your hand back down.
Then repeat, kicking that same leg back across as you rotate open. Move quickly to get your blood pumping, but no so quickly you aren’t fully in control. Just don’t really pause in that plank position more than to fully return to it.
To modify this move, you may take out the slider or even keep both hands down the entire time, performing a smaller reach across with the foot on the slider.
Alternating Slider Tabletop Curls:
If you sit all day hunched over a computer, this is a must-do move.
It will open up your chest and hips while activating your entire backside. It will work your hamstrings, glutes, back and arms as well as your abs even!
To do Alternating Slider Tabletop Curls, place a slider under each foot and sit on the ground with your heels on the sliders and hands behind you on the ground. Turn your hands out or back as you place your hands on the ground behind your butt.
Bend your knees and bring your heels back close to you so you can bridge up into a tabletop bridge. Squeeze your glutes as you lift your butt up and press your chest out.
You can perform a posterior pelvic tilt to help engage your abs as you hold this tabletop position and even slightly tuck your chin to look out beyond your knees.
The slowly extend one leg out before using your hamstring to pull your heel on the slider back in. Then extend the other leg out, pulling the heel back in again with your hamstring.
As you pull the slider back in, really even think about driving the slider down into the ground to help work your hamstring more.
Do not let your hips drop toward the ground as you extend. You want to keep your abs and butt engaged the entire time as you slowly alternate sides.
Slider Prone Snow Angels:
Because we spend so much time hunched over, it is key we include moves to work our back and even improve our scapular mobility and spinal extension.
One great move to include as activation to help you do just that is the Slider Prone Snow Angels. It is one of my favorite moves to include during warm up or even as “active rest” during a core or upper body series!
To do Slider Prone Snow Angels, place a hand on each slider and lie face down on the ground with your body in a nice straight line and your hands reaching overhead on the ground.
Keeping your arms straight, sweep your arms out and down toward your sides, lifting your chest up off the ground as you sweep you arms all the way down and back toward your hips.
Squeeze your butt and lift your chest up as much as possible, lifting it higher as your arms sweep all the way down.
Then lower back down as you sweep your arms back overhead.
Lift and lower as you slide your arms down and out to the sides and back overhead.
Move slowly and even pause for a second at the top to hold and feel your entire upper back and even the backs of your shoulders working.
Make sure you don’t just feel your lower back arching or your neck straining.

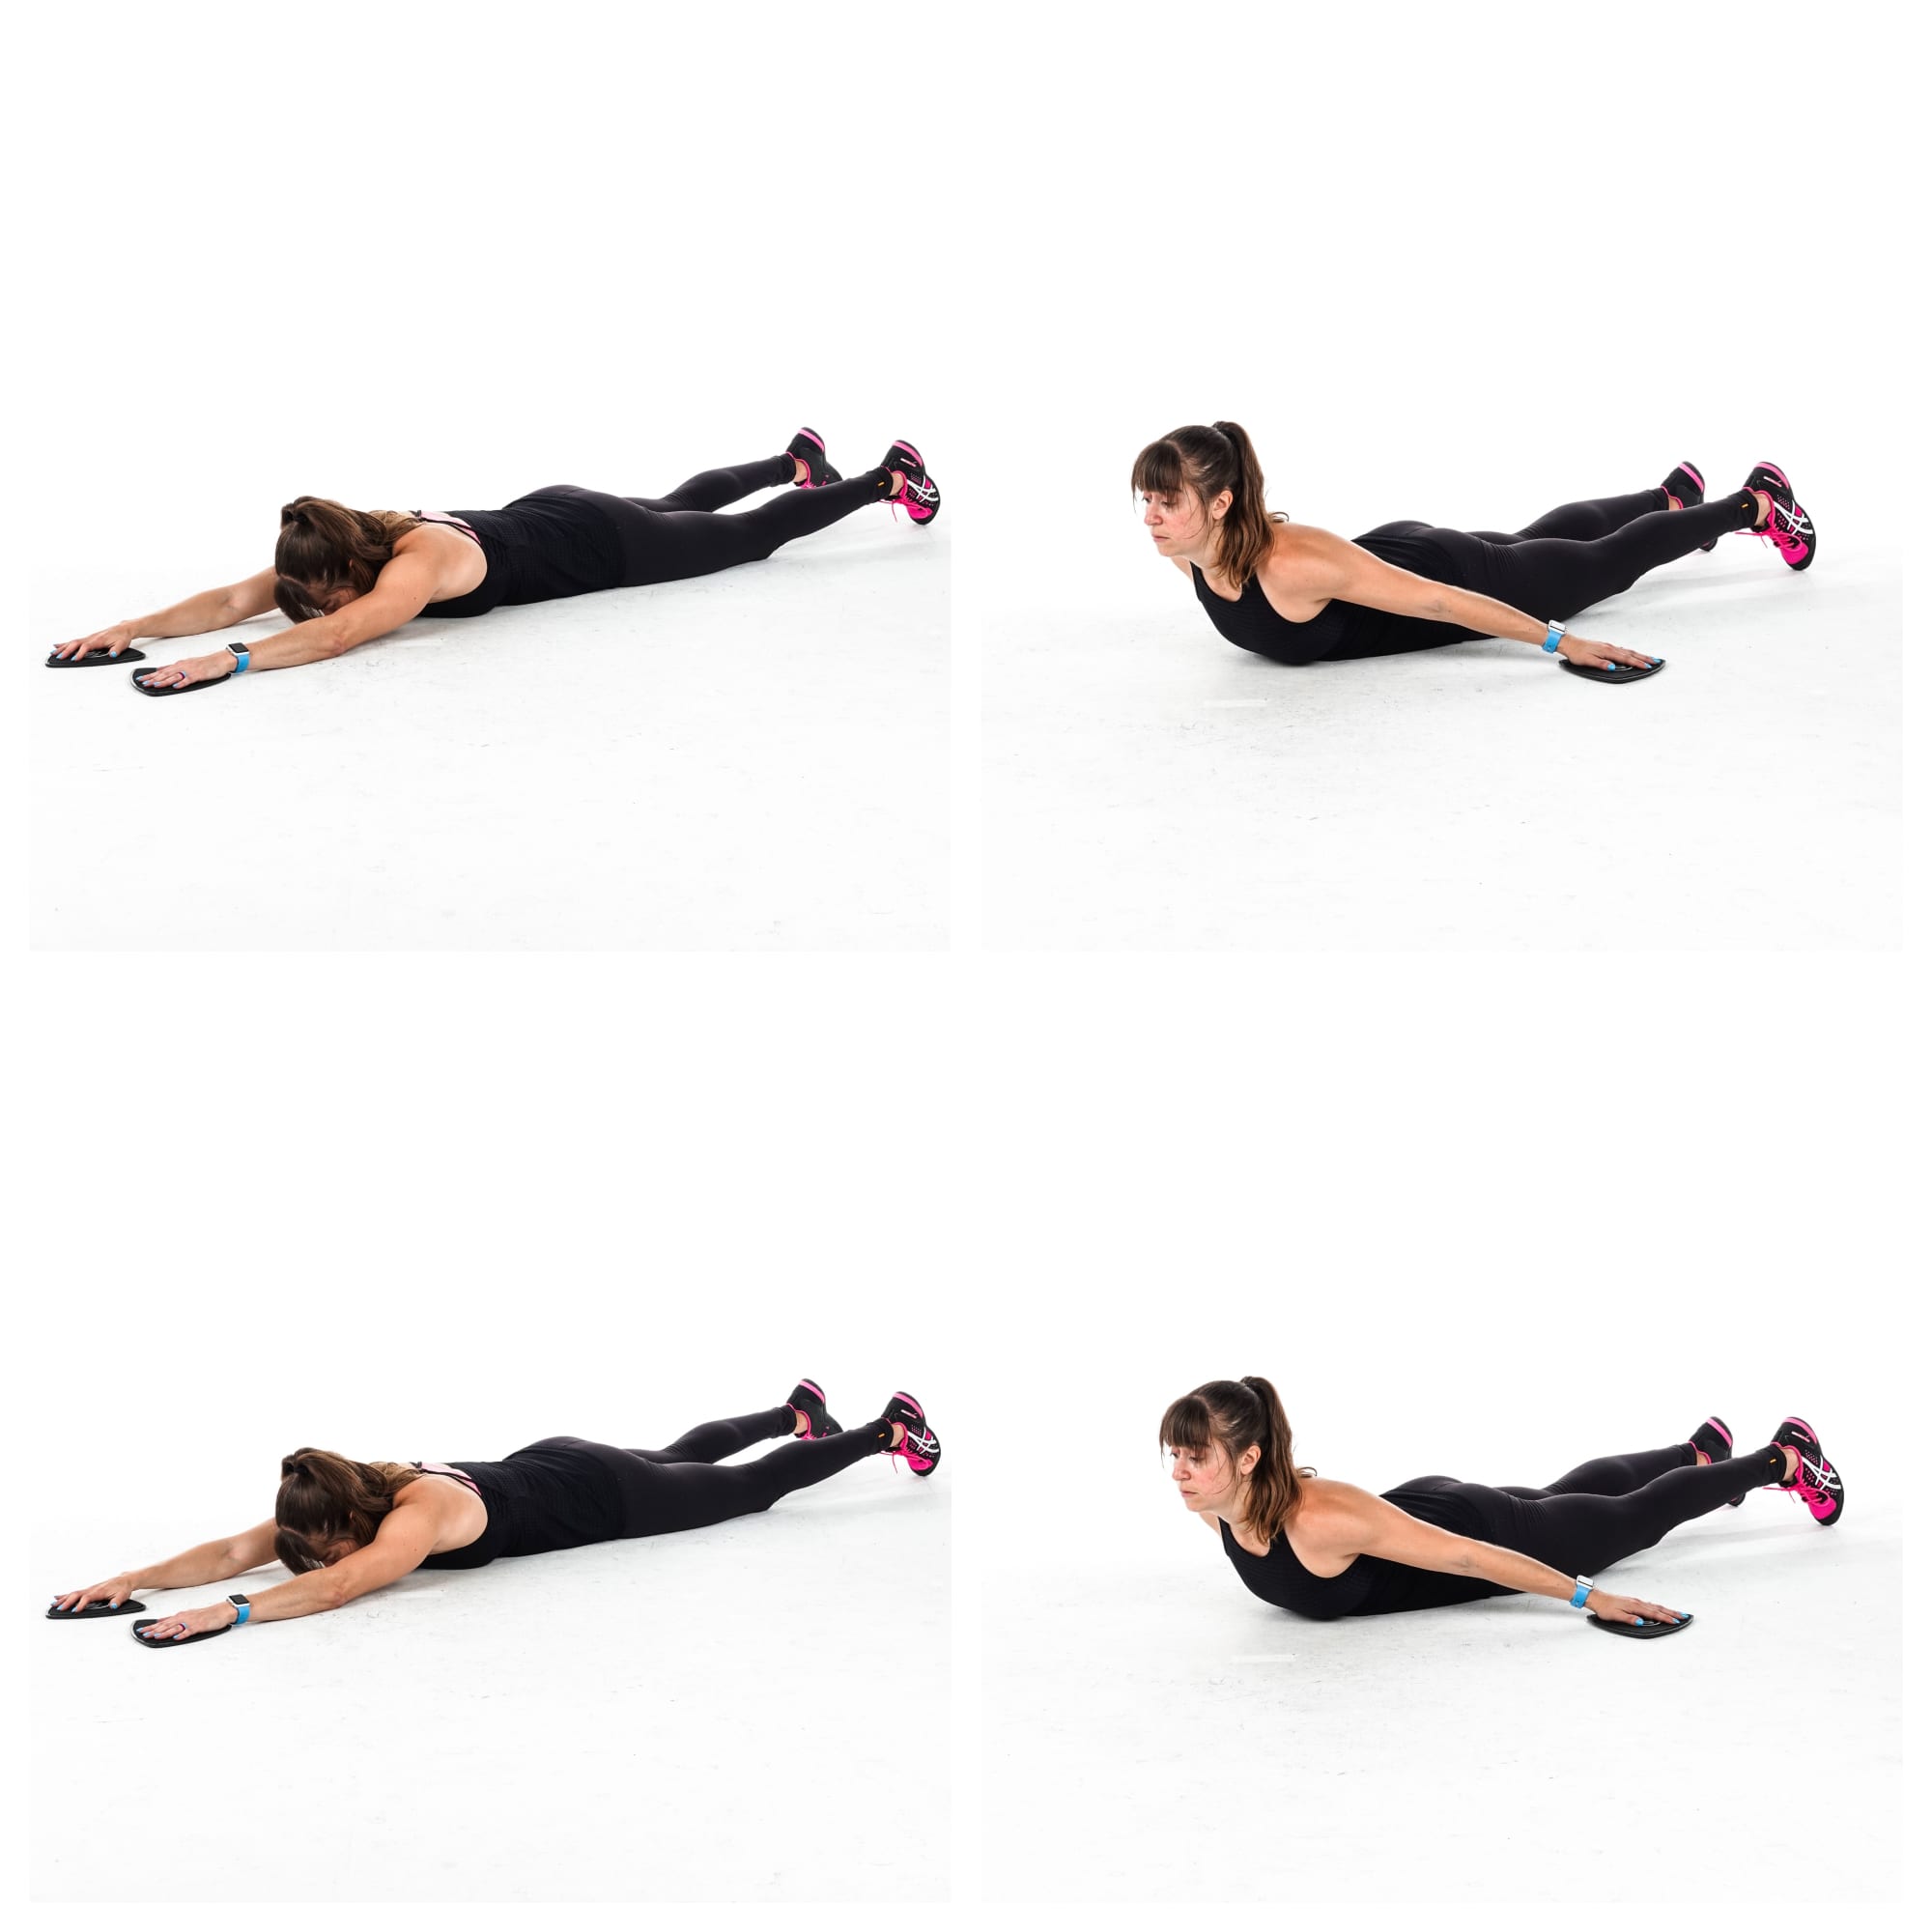
Slider Body Saw:
This is a VERY challenging core move that will work your triceps, lats, pec minor, abs and quads. You will feel your entire core shaking and working to protect your lower back.
Because of the extended plank position, your abs have to work hard to protect your lower back. If you aren’t yet ready for this move, you will feel your lower back taking over and working, which means you need to regress.
If this is the case, walk back instead of sliding back or limit range of motion to start. You don’t want your lower back compensating or you won’t get the full benefit!
To do the Slider Body Saw, set up in a plank position on your forearms with your feet on the sliders. Elbows should be under your shoulders and your feet should be together or no wider than hip-width apart.
With your body in a nice straight line from your head to your heels, slide your feet back and lengthen through your arms. As you slide back you should extend your body down to your elbows, shifting your shoulders back behind your elbows. Do not let your hips sag as you slide back. You are extending your triceps as you slide back.
Then, using your lats and core, pull your feet back in to the plank position. When you come back into the plank position, do not let your butt go up in the air. Make sure your hips don’t sag either.
Then slide back out, lengthening your body out as much as you can. Again do not let your low back take over. Make sure that you also aren’t simply sliding forward and then back to the start but are actually sliding back and lengthening through your arms.
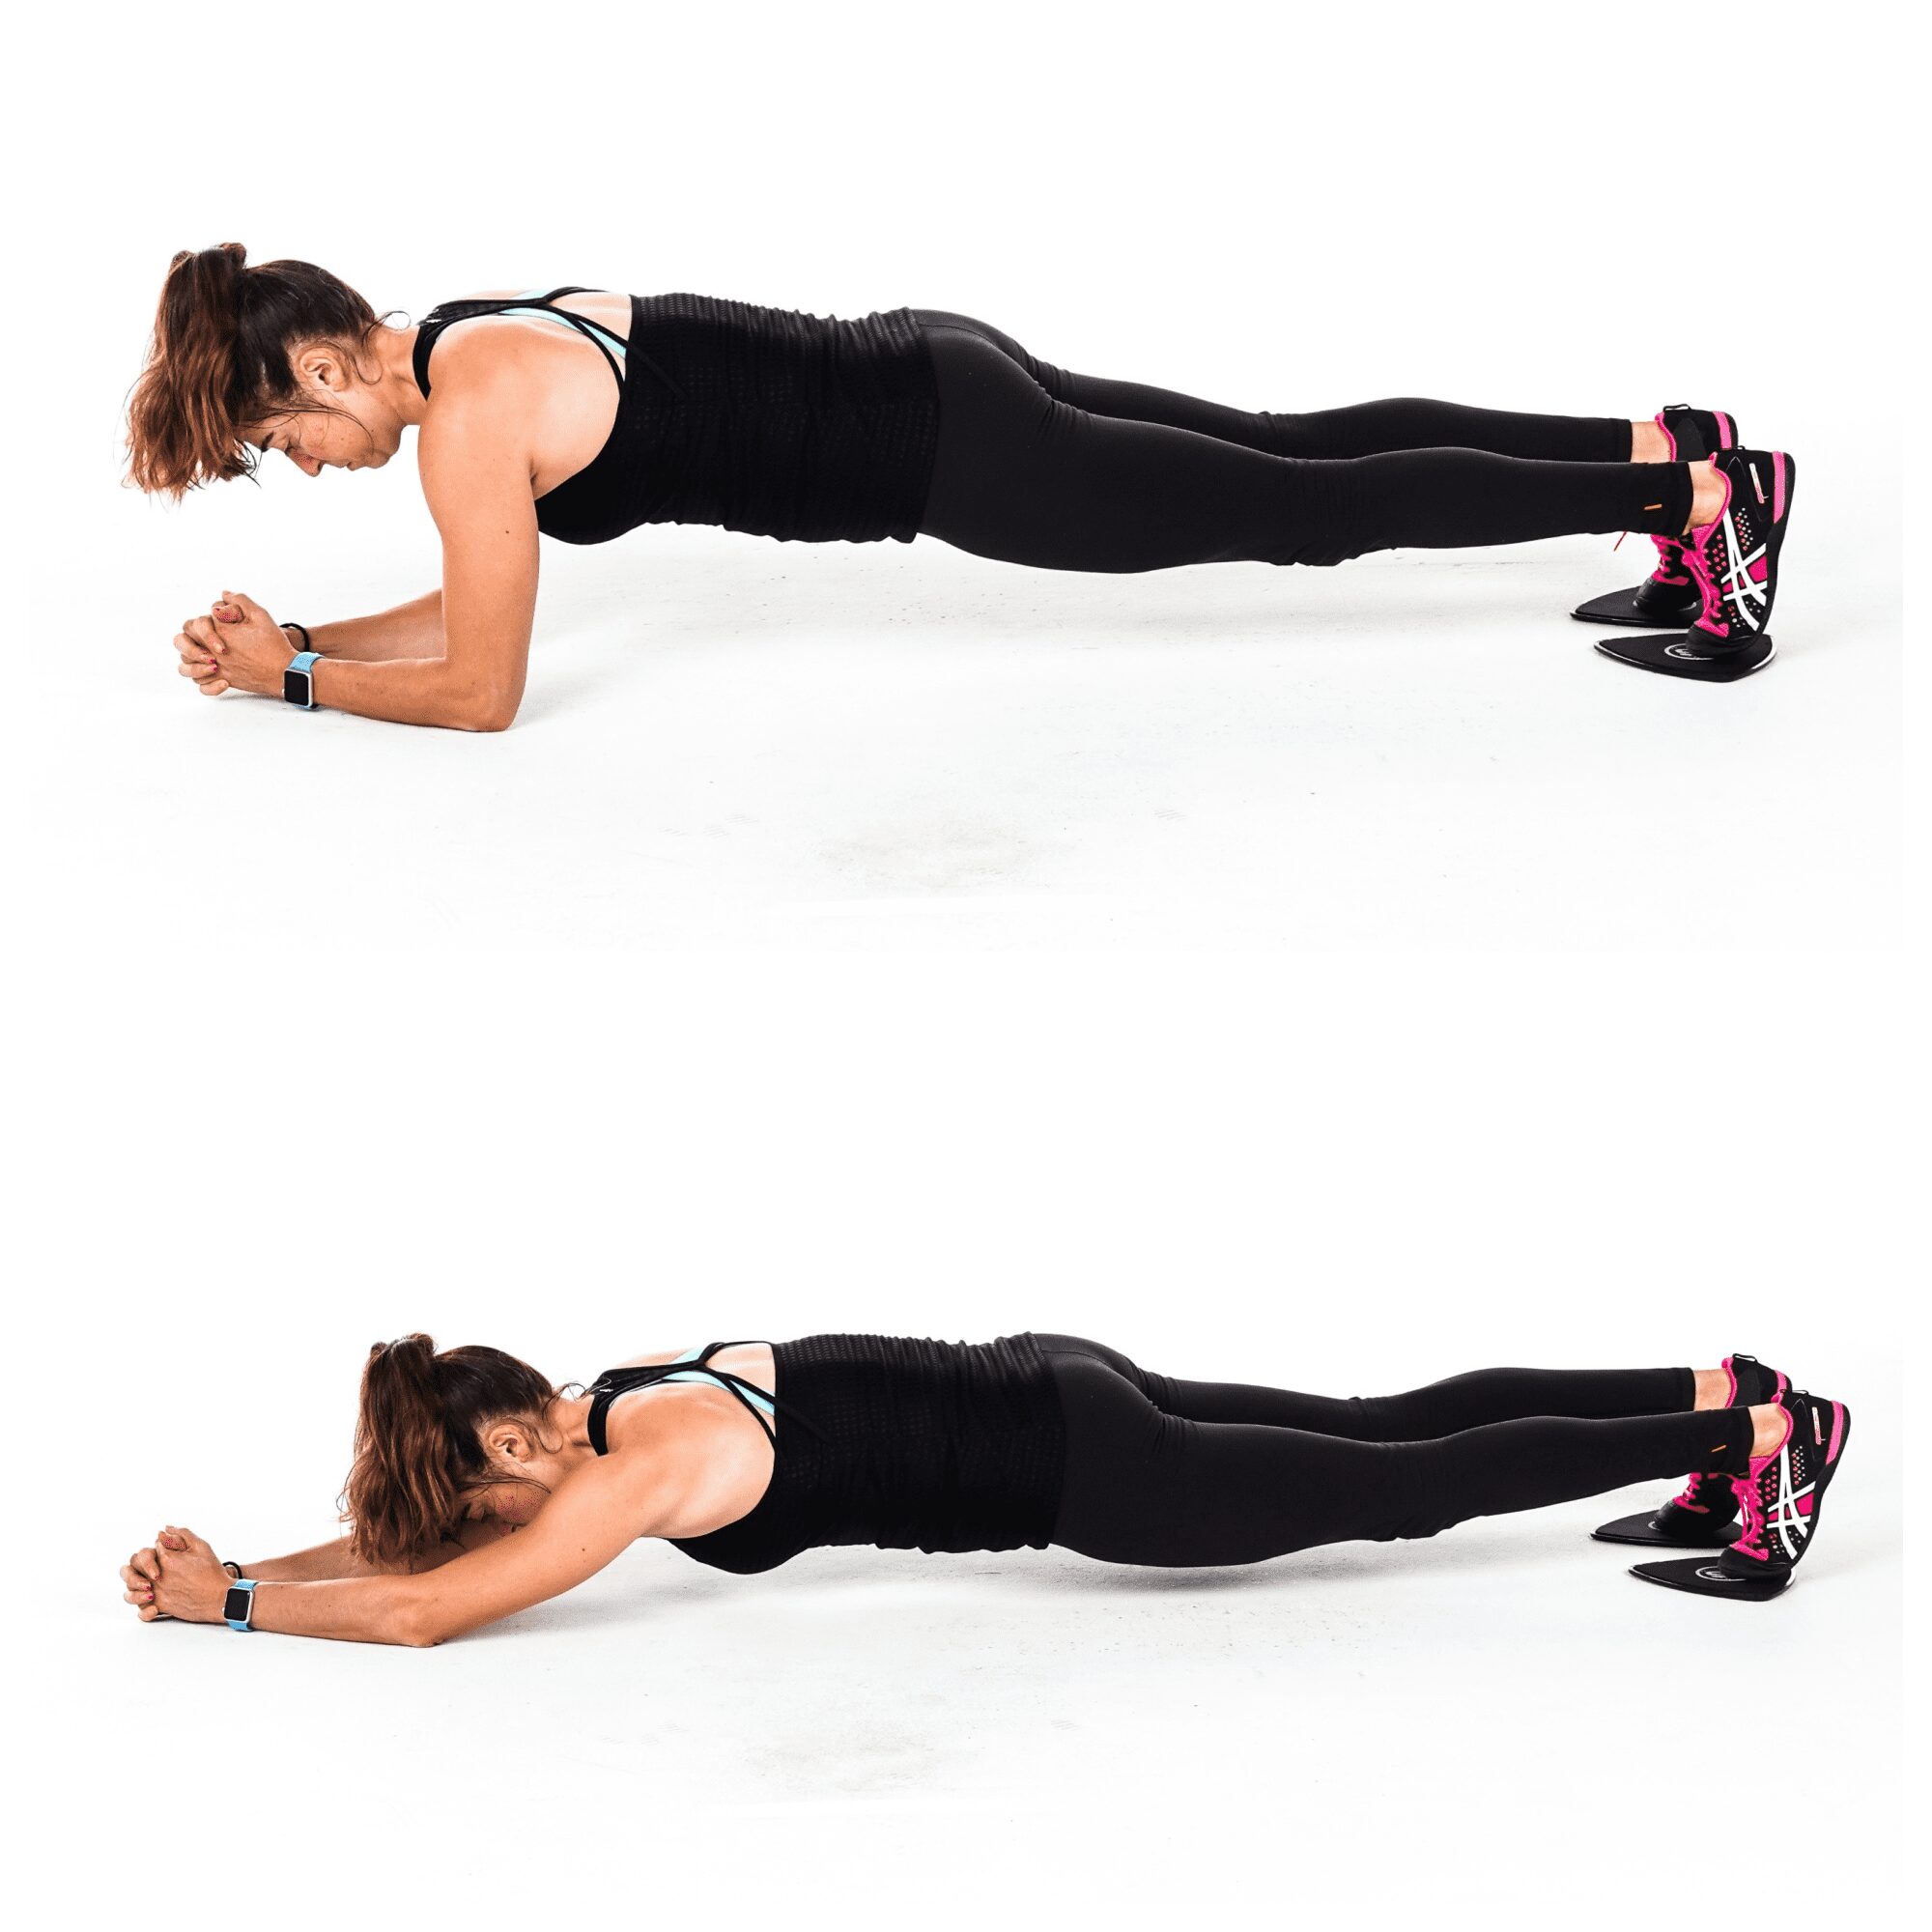
Ab Extension:
Work your lats, abs and even your glutes with this great move! You’ll feel all around your rib cage working and even your arms too!
Like the body saw though, be careful that your lower back doesn’t take over. And if you have shoulder issues, watch how far you extend out to start!
To do Slider Ab Extensions, place a slider under each hand and set up as if you’re doing a push up from your knees.
You want to have your hands under your shoulders and your body in a nice straight line from your head to your knees. Brace your abs and squeeze your glutes.
Slide both hands out as far as you can, lowering your body toward the ground. Extend out, if you can, until you’re hovering just above the ground.
Then pull the sliders back under your shoulders without bending your arms as your body moves back into the plank position. By sliding your hands back under, pulling with your back to bring your hands back in, your body will move back into the plank position.
Do not sit your butt back or let your lower back engage as you extend out or pull your hands back in. You want to brace your abs and keep your body in a nice straight line the entire time.
Once back in that knee plank position, repeat the slide back out. Do not let your hips sag, lower back arch or butt go up in the air. Also, make sure you don’t sit your butt back to help pull your arms back in. You only “rise up” because your hands come back under your shoulders.
Beginners may not slide out as far or they may extend one hand, then the other, then pull one in at a time.
T Sit Up:
Work your abs, hips, arms and upper back with this sit up variation that will also work to improve your posture!
It’s a great way to advance the basic sit up and target different areas than you may normally work!
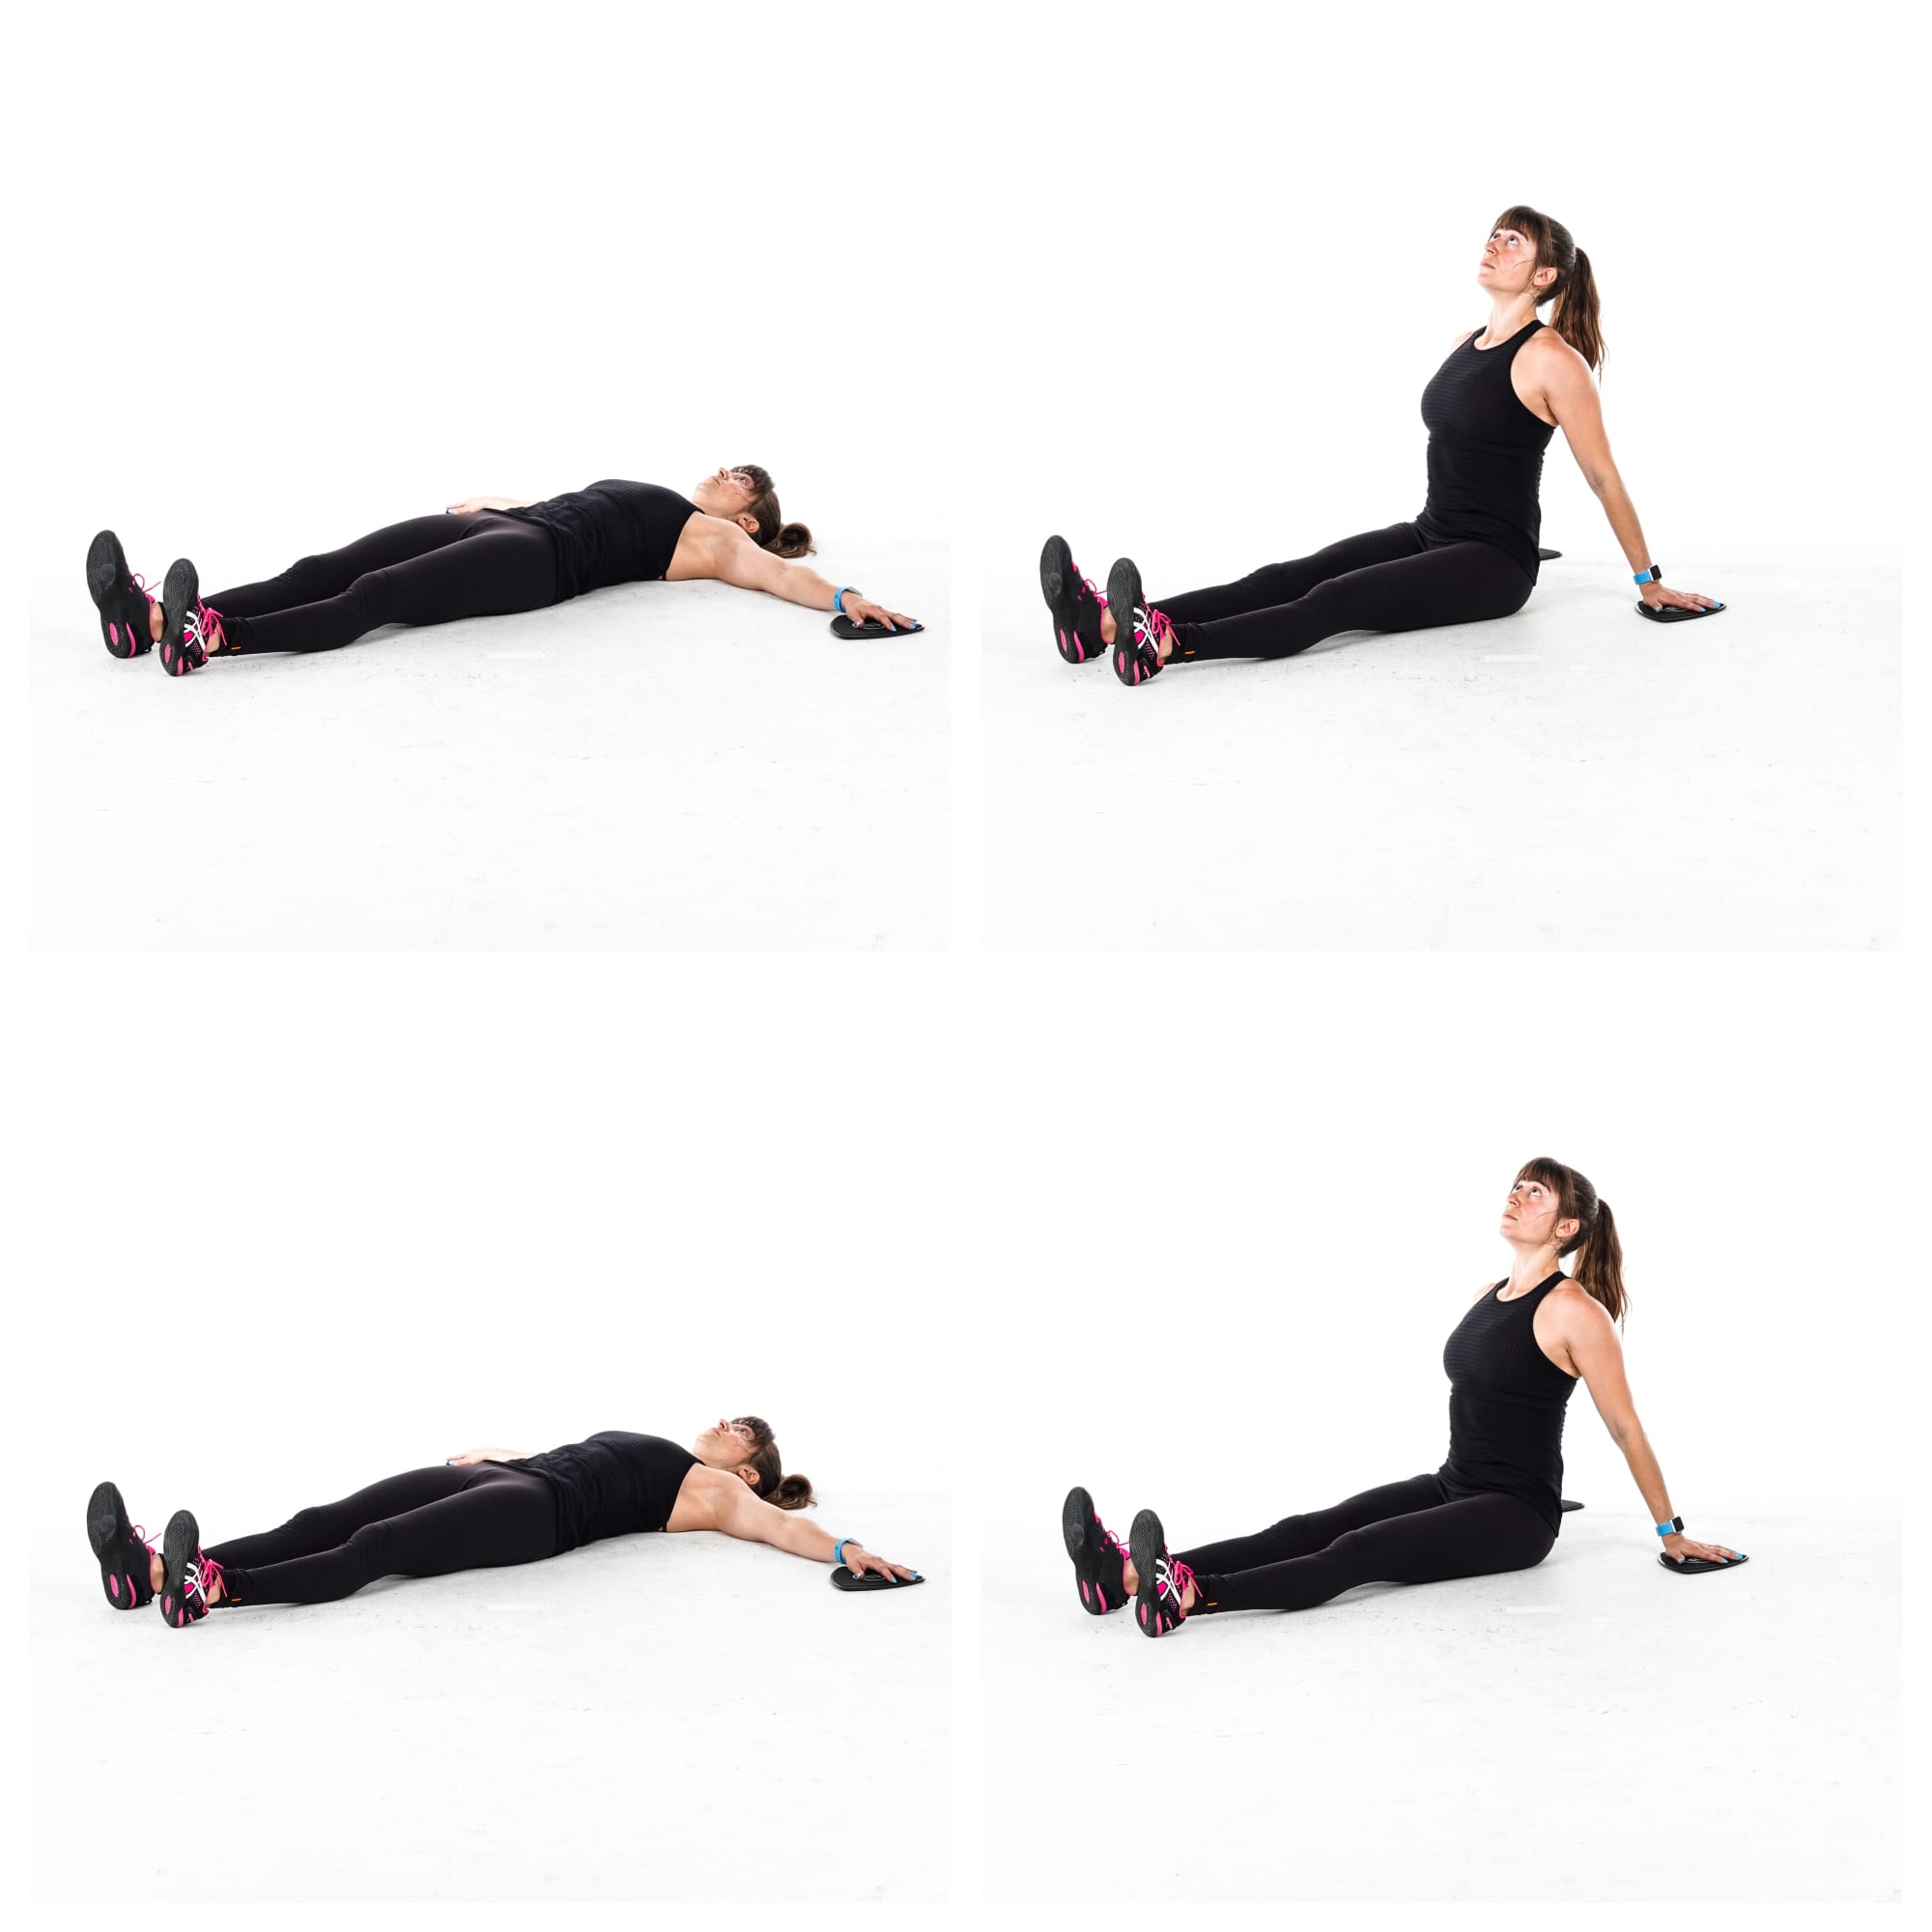
To do the T Sit Up, place a slider under each hand and lie on your back with your arms out straight from your body at about shoulder height. Your legs should be out straight in front of you although you can slightly bend your knees if it helps you to drive your heels into the ground and keep your legs from lifting up as you sit up.
Then sit up, pressing your lower back into the ground as your round up. By slightly rounding your spine as you sit up, you can better use your abs over just depending on your hip flexors.
As you sit up, pull the sliders in toward your butt, keeping your arms straight.
Sit up tall at the top, making sure your shoulders aren’t shrugged. You want to have pulled your hands in toward your butt and have pinched your shoulder blades together to help bring your hands in.
Then slowly round your back to lower yourself back down. You can even think about lowering one vertebrae at a time if that helps to start.
As you lower down, extend your arms back out straight at shoulder height. Do not bend your arms as you sit up or lower down.
Repeat, sitting back up.
Creating A Workout:
To create a workout using these moves, you can choose to use all 12 or even just select 4-6 for a great circuit workout. Intervals are a great option with these moves although they can also be done for reps based on your goals.
For a great interval workout design using these, select 4-6 moves based on what you want to work that day and set a timer for 30 seconds on, 15 seconds off. Move from one exercise to the next, resting only the 15 seconds between moves. Complete 4-6 rounds through the circuit of moves. Beginners may rest an extra 30 seconds between rounds if needed.
Need a great travel workout kit so you can get in a challenging workout wherever you go? Check out my TriSlides and Booty Band Bundle!
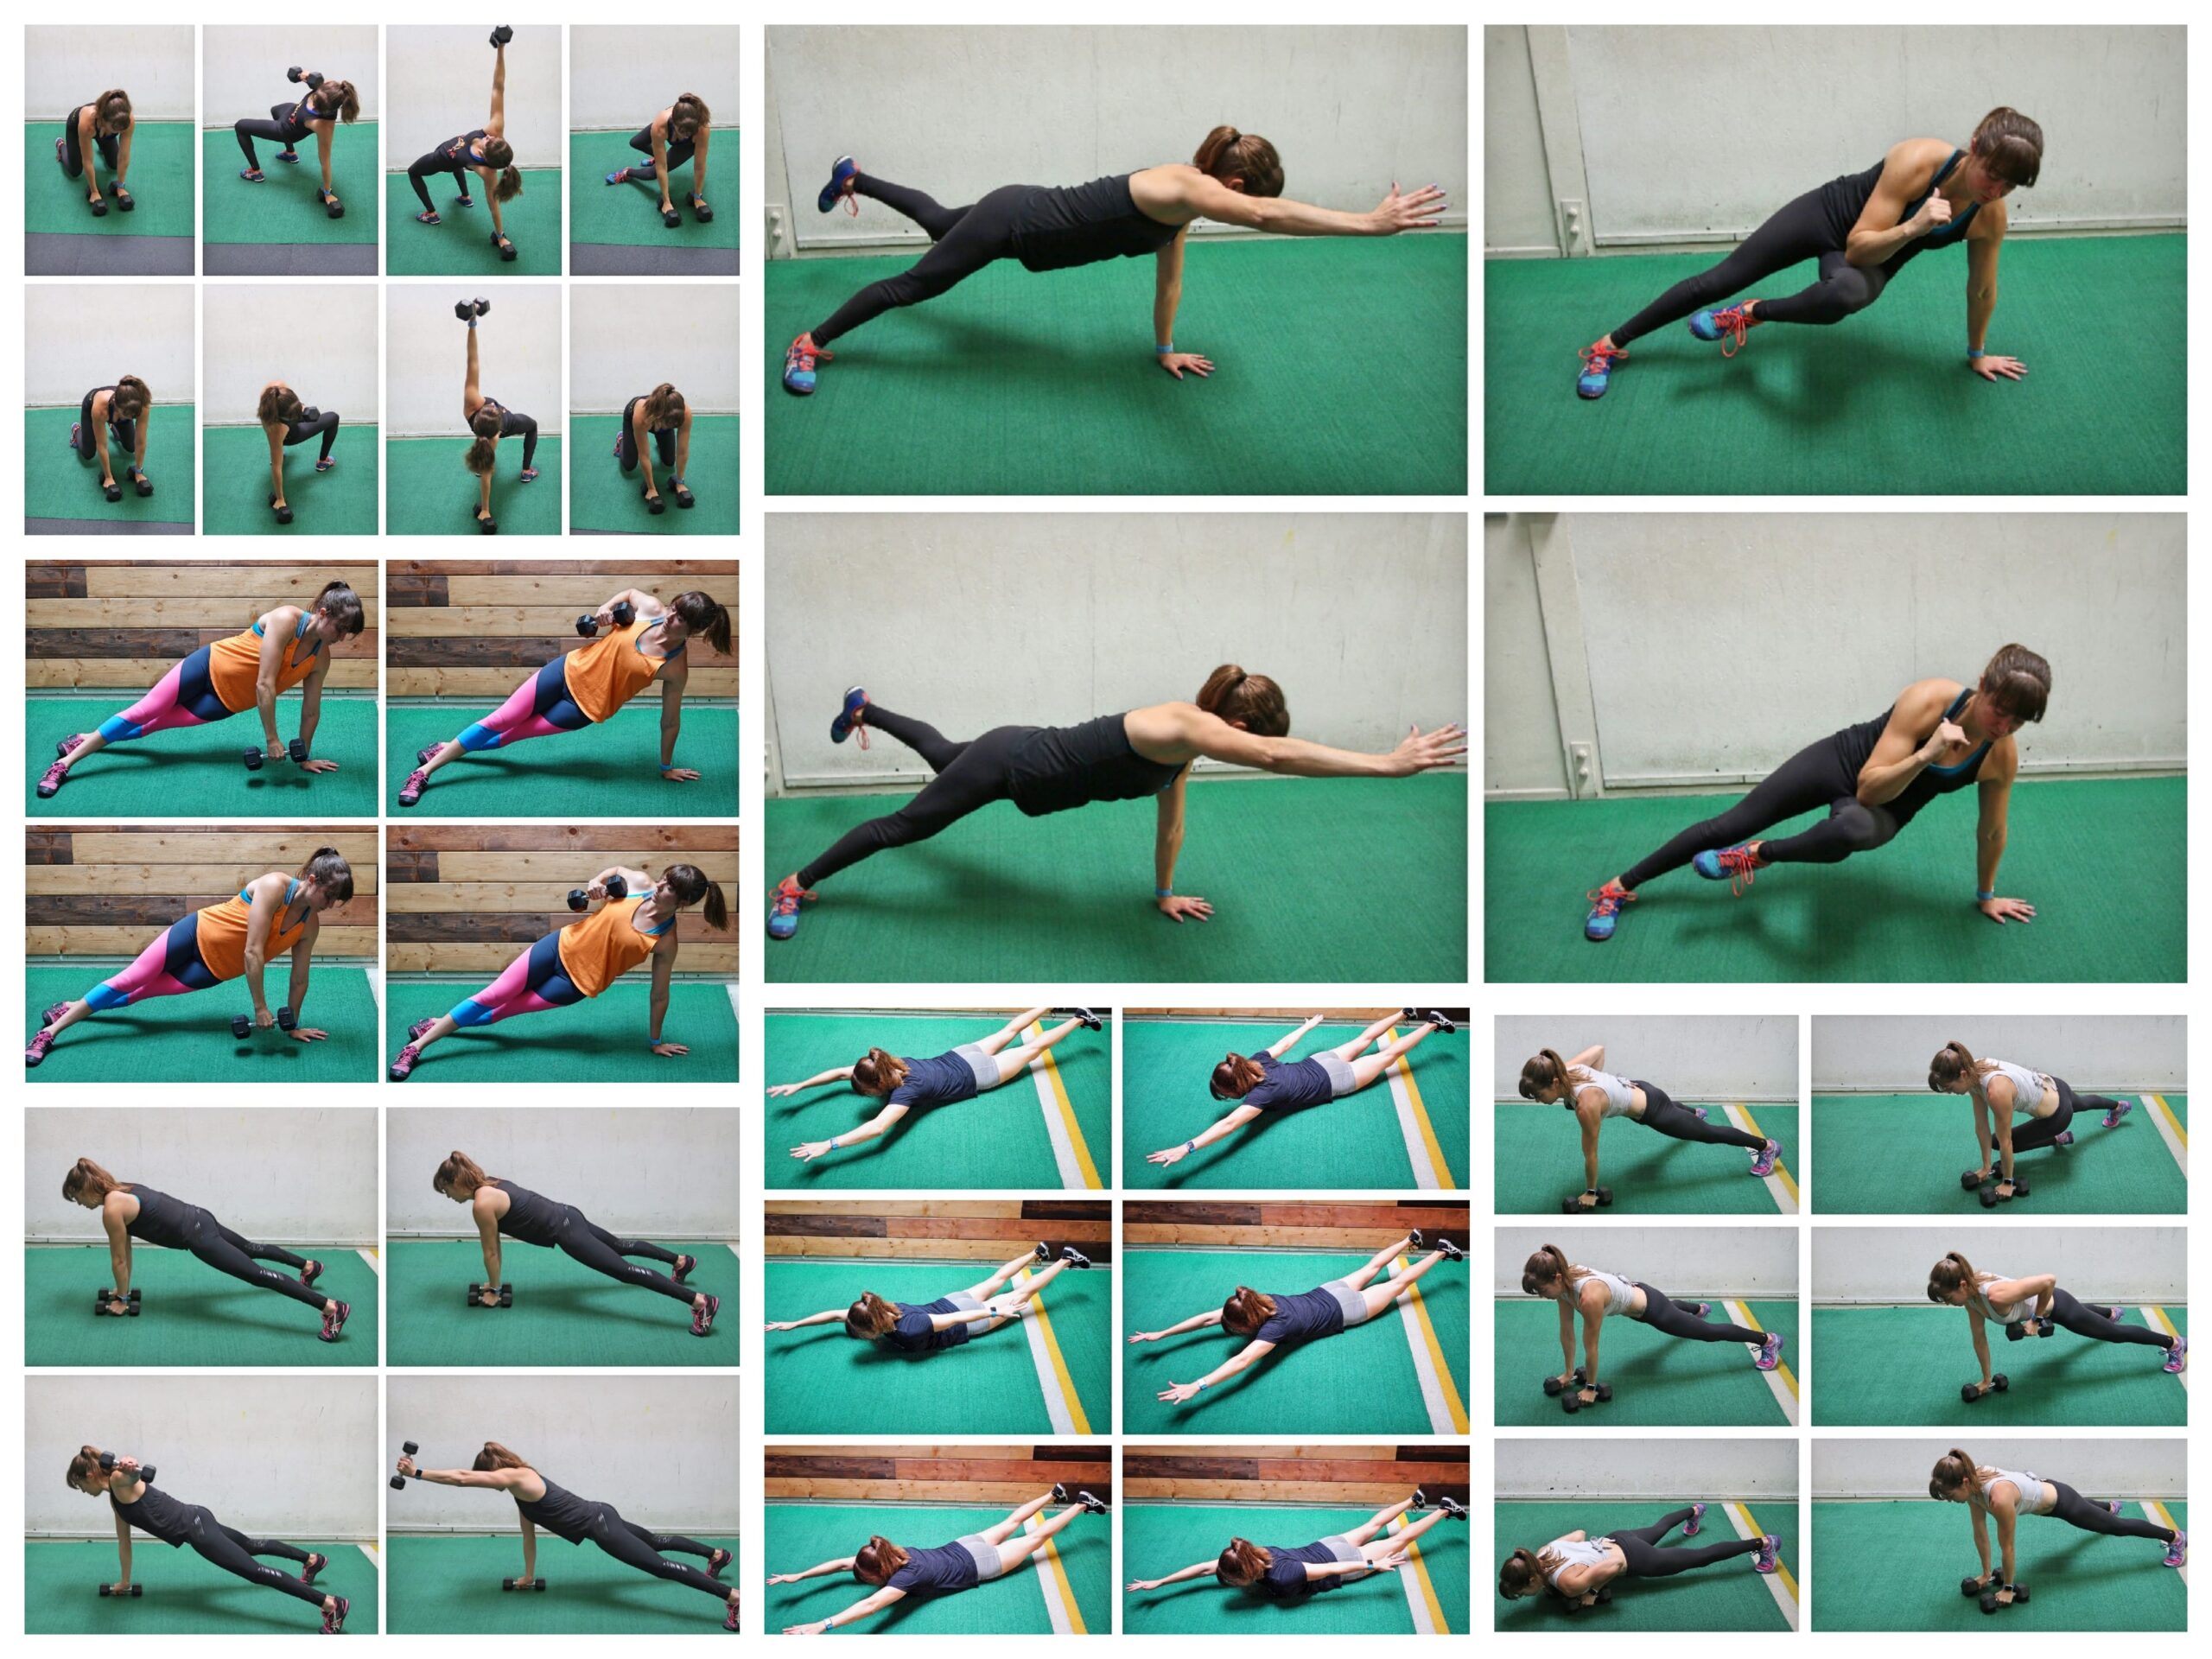
12 Hybrid Upper Body Moves To Build Killer Upper Body And Core Strength
Hybrid exercises are a great way to target those “trouble zones” while working more muscles in less time so you can be efficient with your workouts and not have to spend hours in the gym.
These hybrid exercises will help you work your arms, shoulders, chest and back while also improving your core strength and stability.
If you’re looking for a great way to work your entire upper body and core in under 30 minutes, heck even in under 20, try including some of these hybrid moves!

12 Hybrid Upper Body Moves To Build Lean Strong Arms And Killer Core Strength
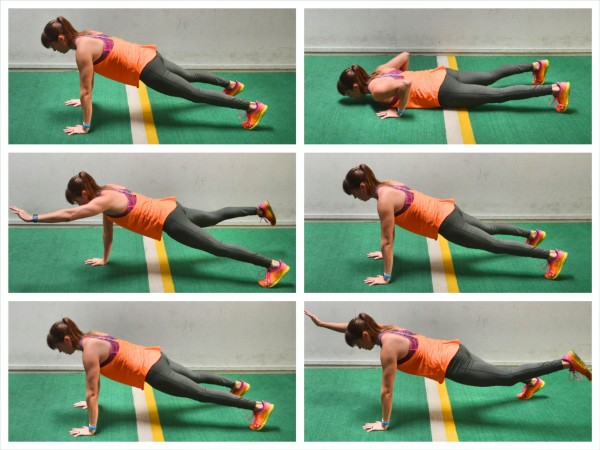
Inchworm Push Ups:
The Inchworm Push Up is a great move to improve your mobility while targeting your core, shoulders, triceps and chest. It will also get your blood pumping, which is an added bonus if you want to blast some fat!
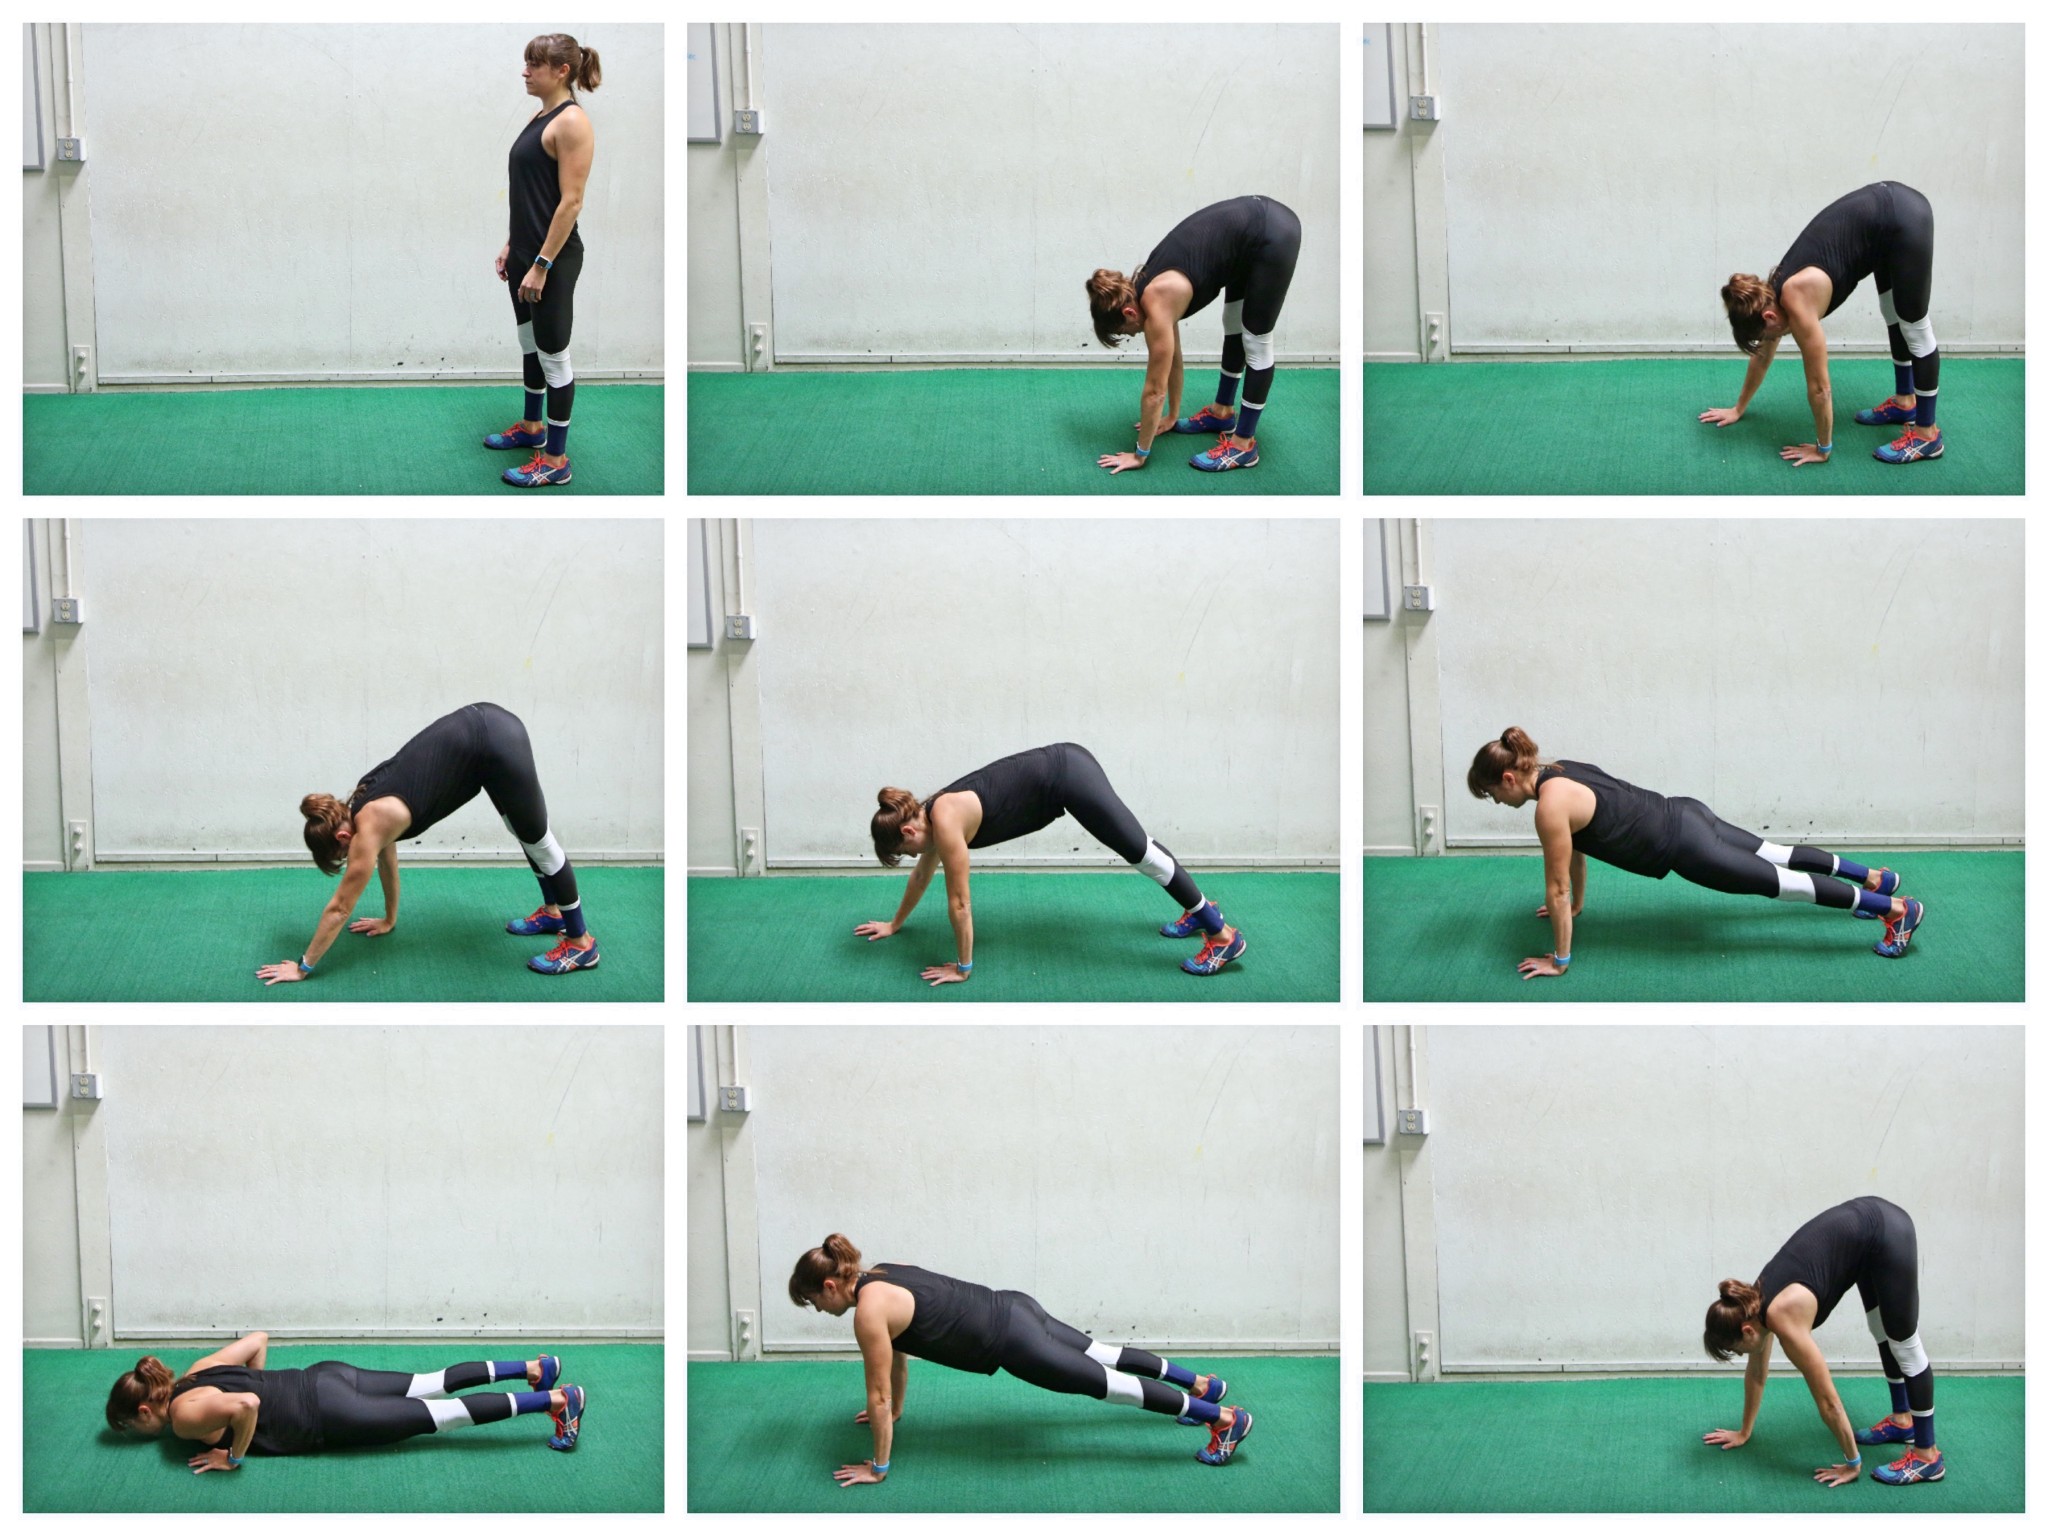
To do Inchworm Push Ups, start standing tall. Then place your hands down on the ground, keeping your legs as straight as possible. Then walk your hands out to move into a plank position.
When you reach the high plank position, you will perform a push up. Keep your core engaged and make sure your body moves in one straight line. Do not sag your hips. Beginners can drop to their knees for the push up.
Press back up to the top of the push up and then, from the plank position, walk back in. Keep your legs as straight as possible as you walk in and out.
Fly Leg Lowers:
If you want to work your chest as well as your abs, you’ll want to include Fly Leg Lowers.
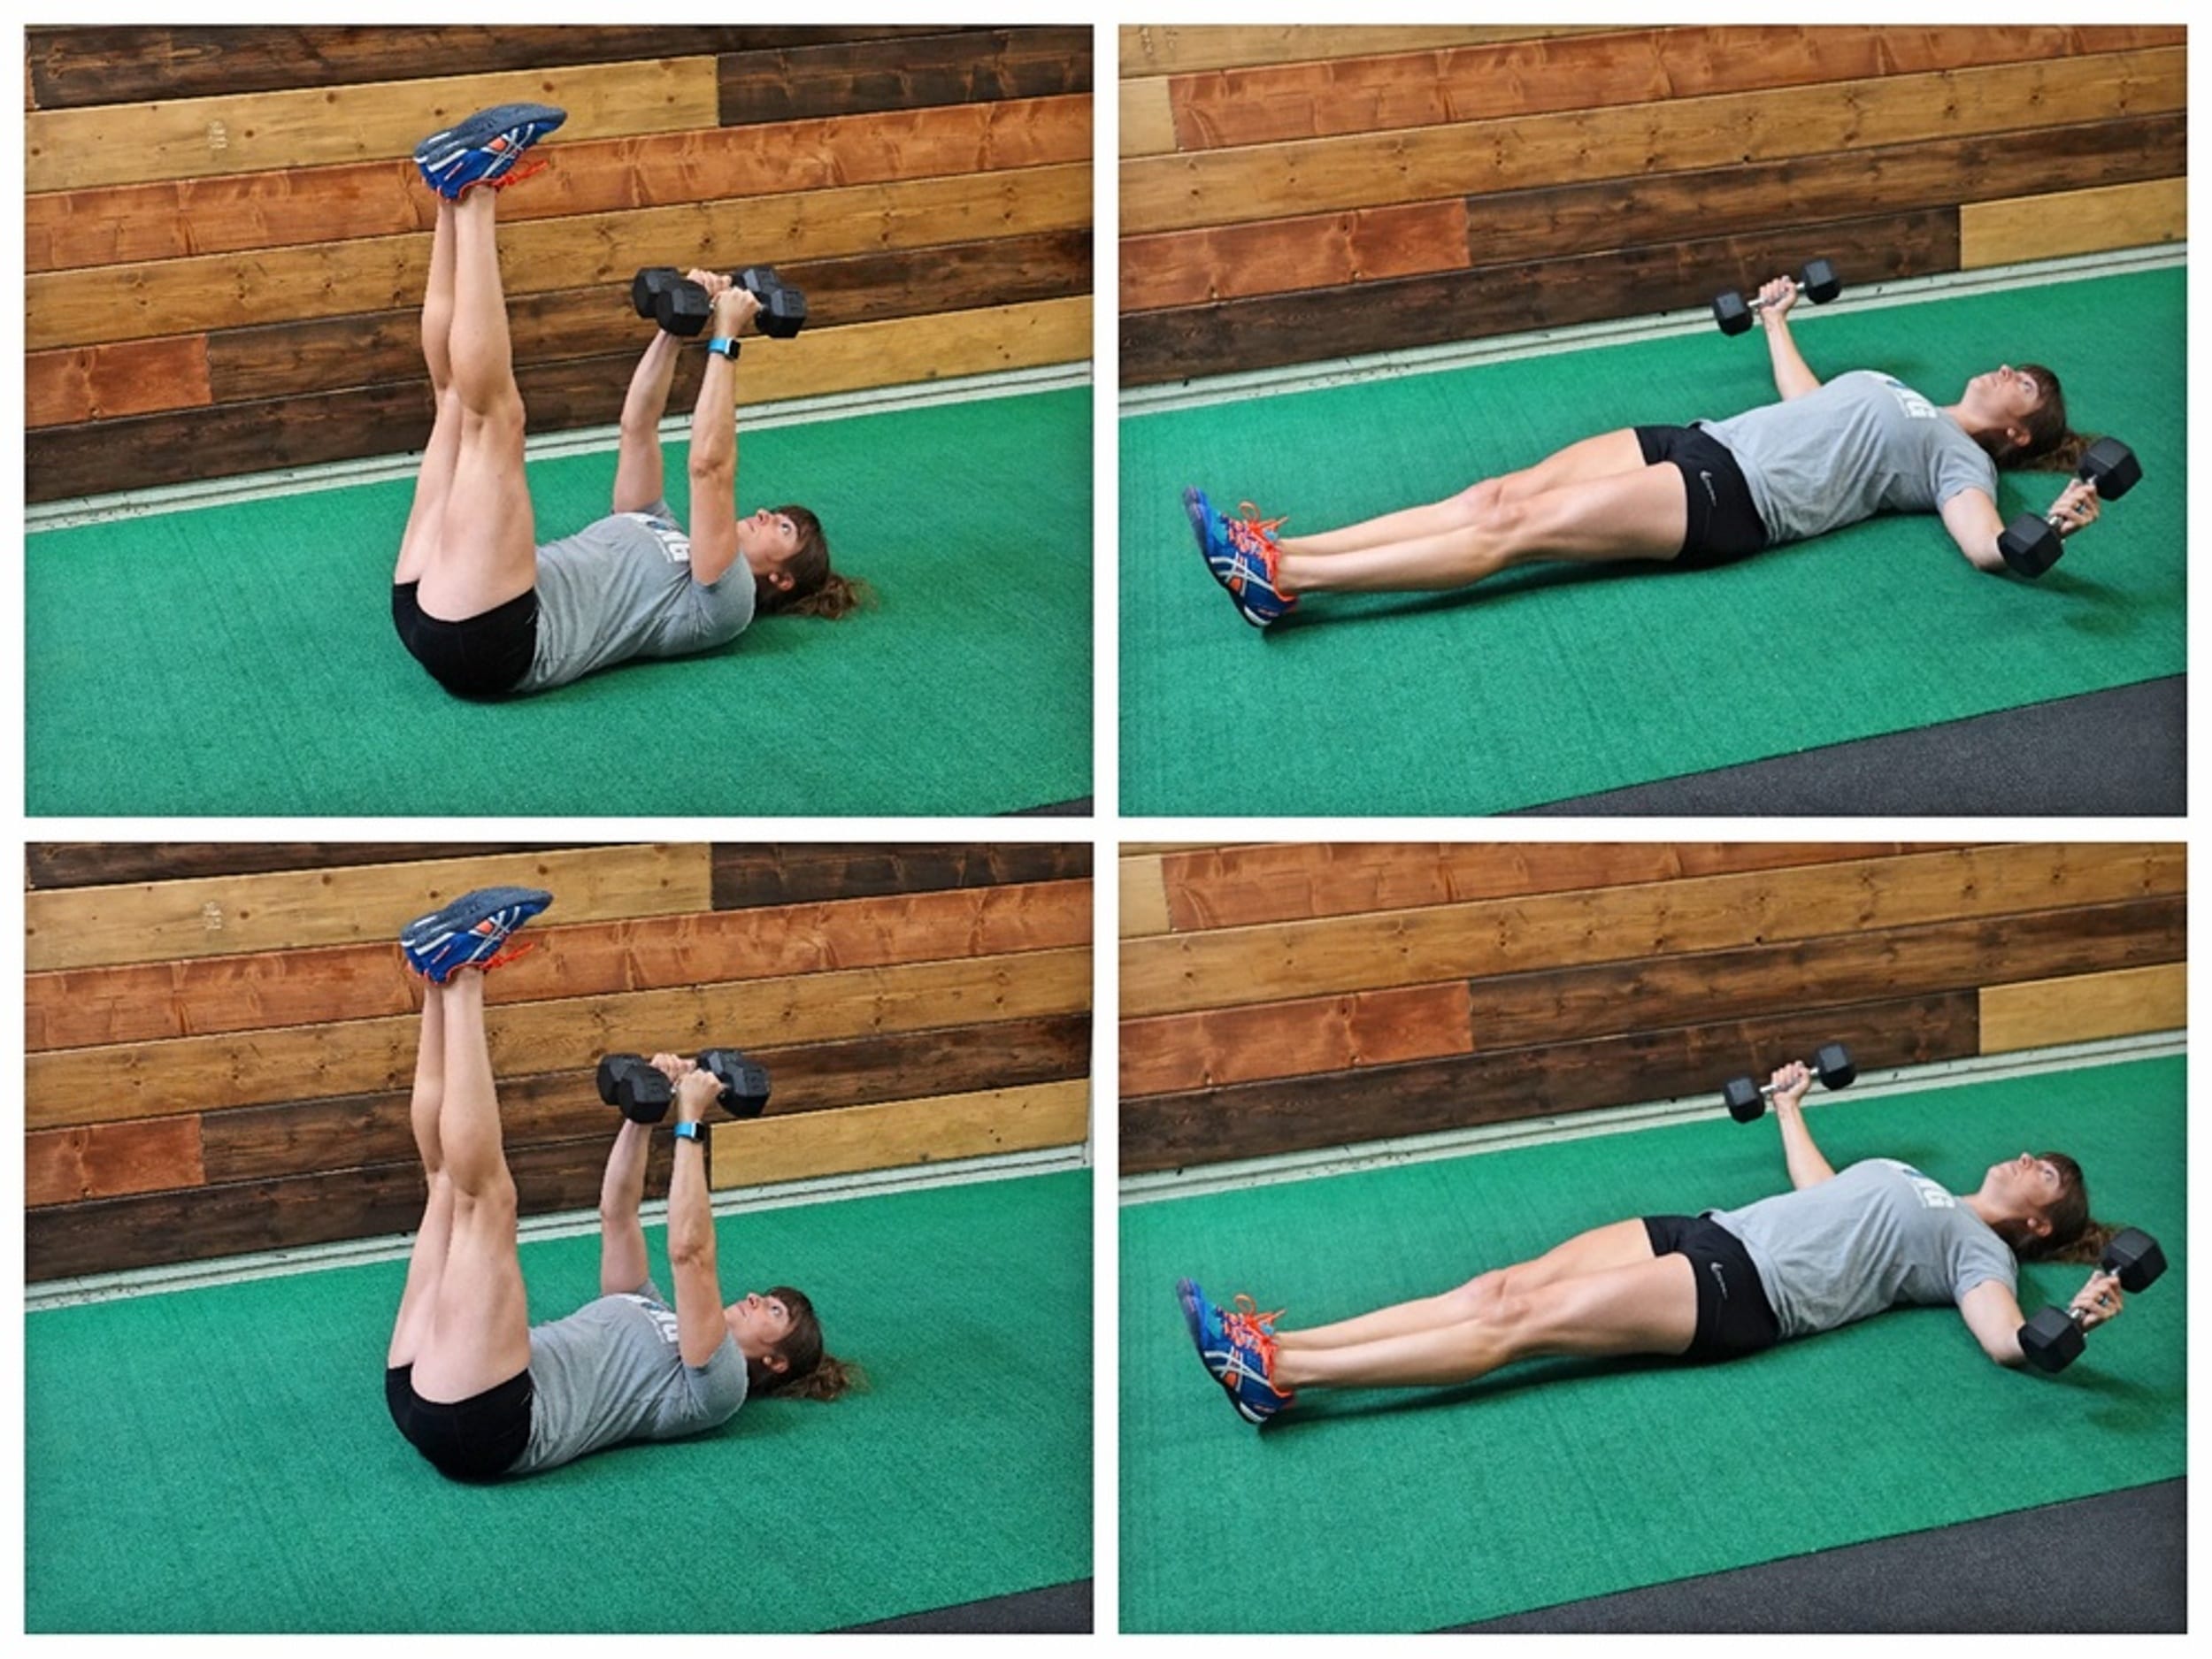
To do the Flys with Leg Lowers, hold a dumbbell in each hand and lie on your back on the ground. Press the dumbbells up toward the ceiling and hold them parallel at your chest height with your legs straight up toward the ceiling.
Then fly your arms open toward the ground with the backs of your hands facing the ground as you lower your legs as close to the ground as possible. Do not let your lower back take over.
Lower down only as far as your abs can handle or even do single leg lowers or even bent knee foot taps. Then fly your arms back together as you lift your legs back up toward the ceiling.
Each time open your arms up as wide as possible. Keep your elbows soft but don’t think about bending or extending at your elbows.
Every time you fly your arms open, you will lower your legs. As you fly your arms back together, you will lift your legs back up.
Mountain Climber Row Push Ups:
This push up works not only your chest, shoulders and triceps, but also your back and your abs. Talk about a full upper body workout all in one move! (Plus the mountain climber is a great way to get in a ton of extra ab work!)
To do the Mountain Climber Row Push Up, set up in a high plank position with a dumbbell in each hand. Your feet will be wider apart to help stabilize and your hands should be under your shoulders. Then from this high plank position, draw one knee in and across toward your opposite shoulder.
Perform a cross body mountain climber, moving slowly. Straighten the leg back out and then row the weight in the hand on the same side as the leg you tucked in up to your side. Perform the row without rotating or letting your butt go up in the air.
After rowing the weight up to your side, feeling your back work to row it up, lower it back down so you’re back in the high plank. Then perform a push-up (you can do this from your knees too). Come back to a plank then perform a mountain climber cross body on the other side and a row before another push up. Keep alternating sides.
Superman Wave:
Improve your shoulder stability, scapular mobility and upper back strength with the Superman Wave. We always want to include some posterior chain work with all of the sitting, especially hunched over, that we do!
To do Superman Waves, lie face down on the ground with you arms reaching overhead and your legs out straight behind you.
Then lift your arms and legs off the ground, engaging your glutes and back to lift. Try to lift your chest up as high as you can and get your quads off the ground as much as possible.
Holding here, sweep one arm out and down toward your side, keeping your arms straight. Keep the other arm reaching straight out overhead as you wave the other arm down.
As you lower one arm down by your side, keep it as high off the ground as possible to work the back of your shoulder.
Wave the arm back overhead then sweep the other arm out and down to your side. Keep alternating sides as you engage your back and butt to stay up in the superman position. Move at a controlled pace.
Sit Thru Bridge and Press:
This move looks more intimidating than it actually is although it will challenge your coordination. The Sit Thru Bridge and Press is a great full core exercise.
It will work on your shoulder stability, ab strength and even glute activation.
It is a mobility AND stability exercise!
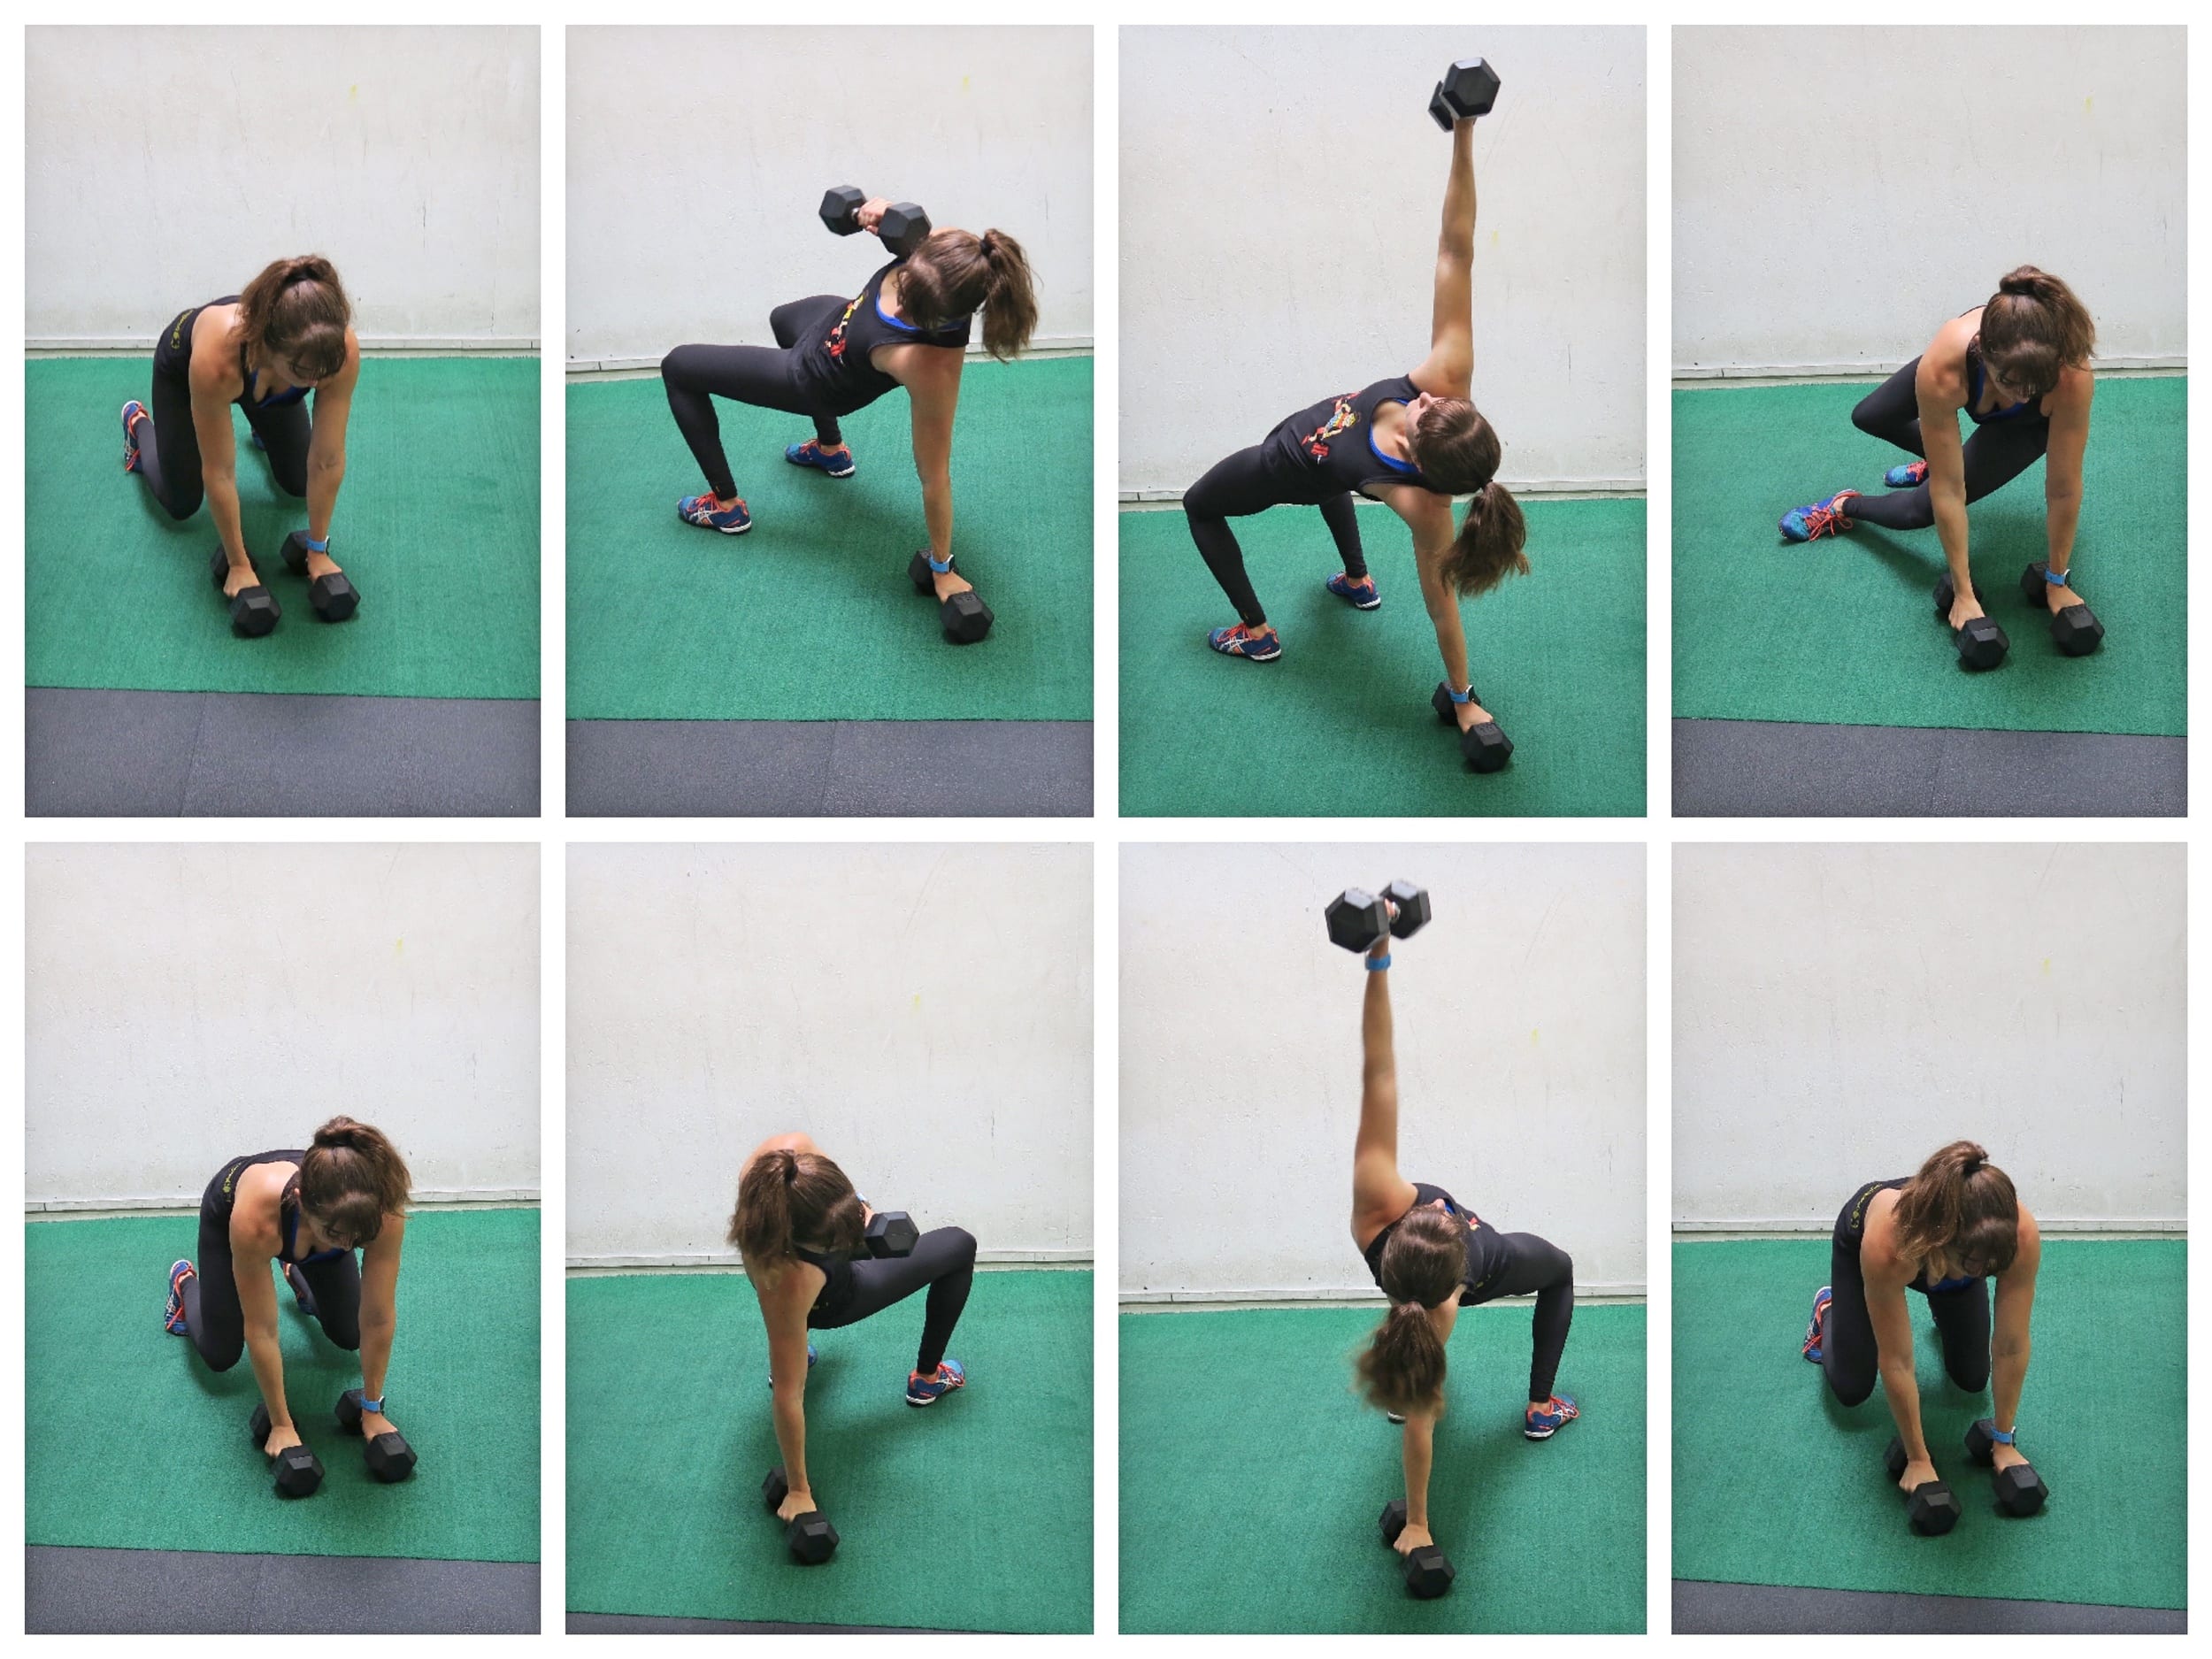
To do the Sit Thru Bridge and Press, start on your hands and knees with a dumbbell under each hand. Then flex your feet and lift up onto your hands and feet with your knees under your hips and your hands under your shoulders. From this position, step your right foot under your body as you raise your right hand and dumbbell up toward the ceiling.
As you step through and put your foot flat on the ground, rotate your hips open to the ceiling as you press the weight up overhead. Really squeeze your glutes as you bridge up and press. Then rotate your right leg back under your body as you bring the weight back down to the ground. Come back into that bulldog front position then step your left leg under to lift your right hand up and press the weight overhead as you bridge up.
Really bridge up and squeeze your glutes at the top. Keep your abs engaged and do not hyperextend your low back. Keep alternating sides.
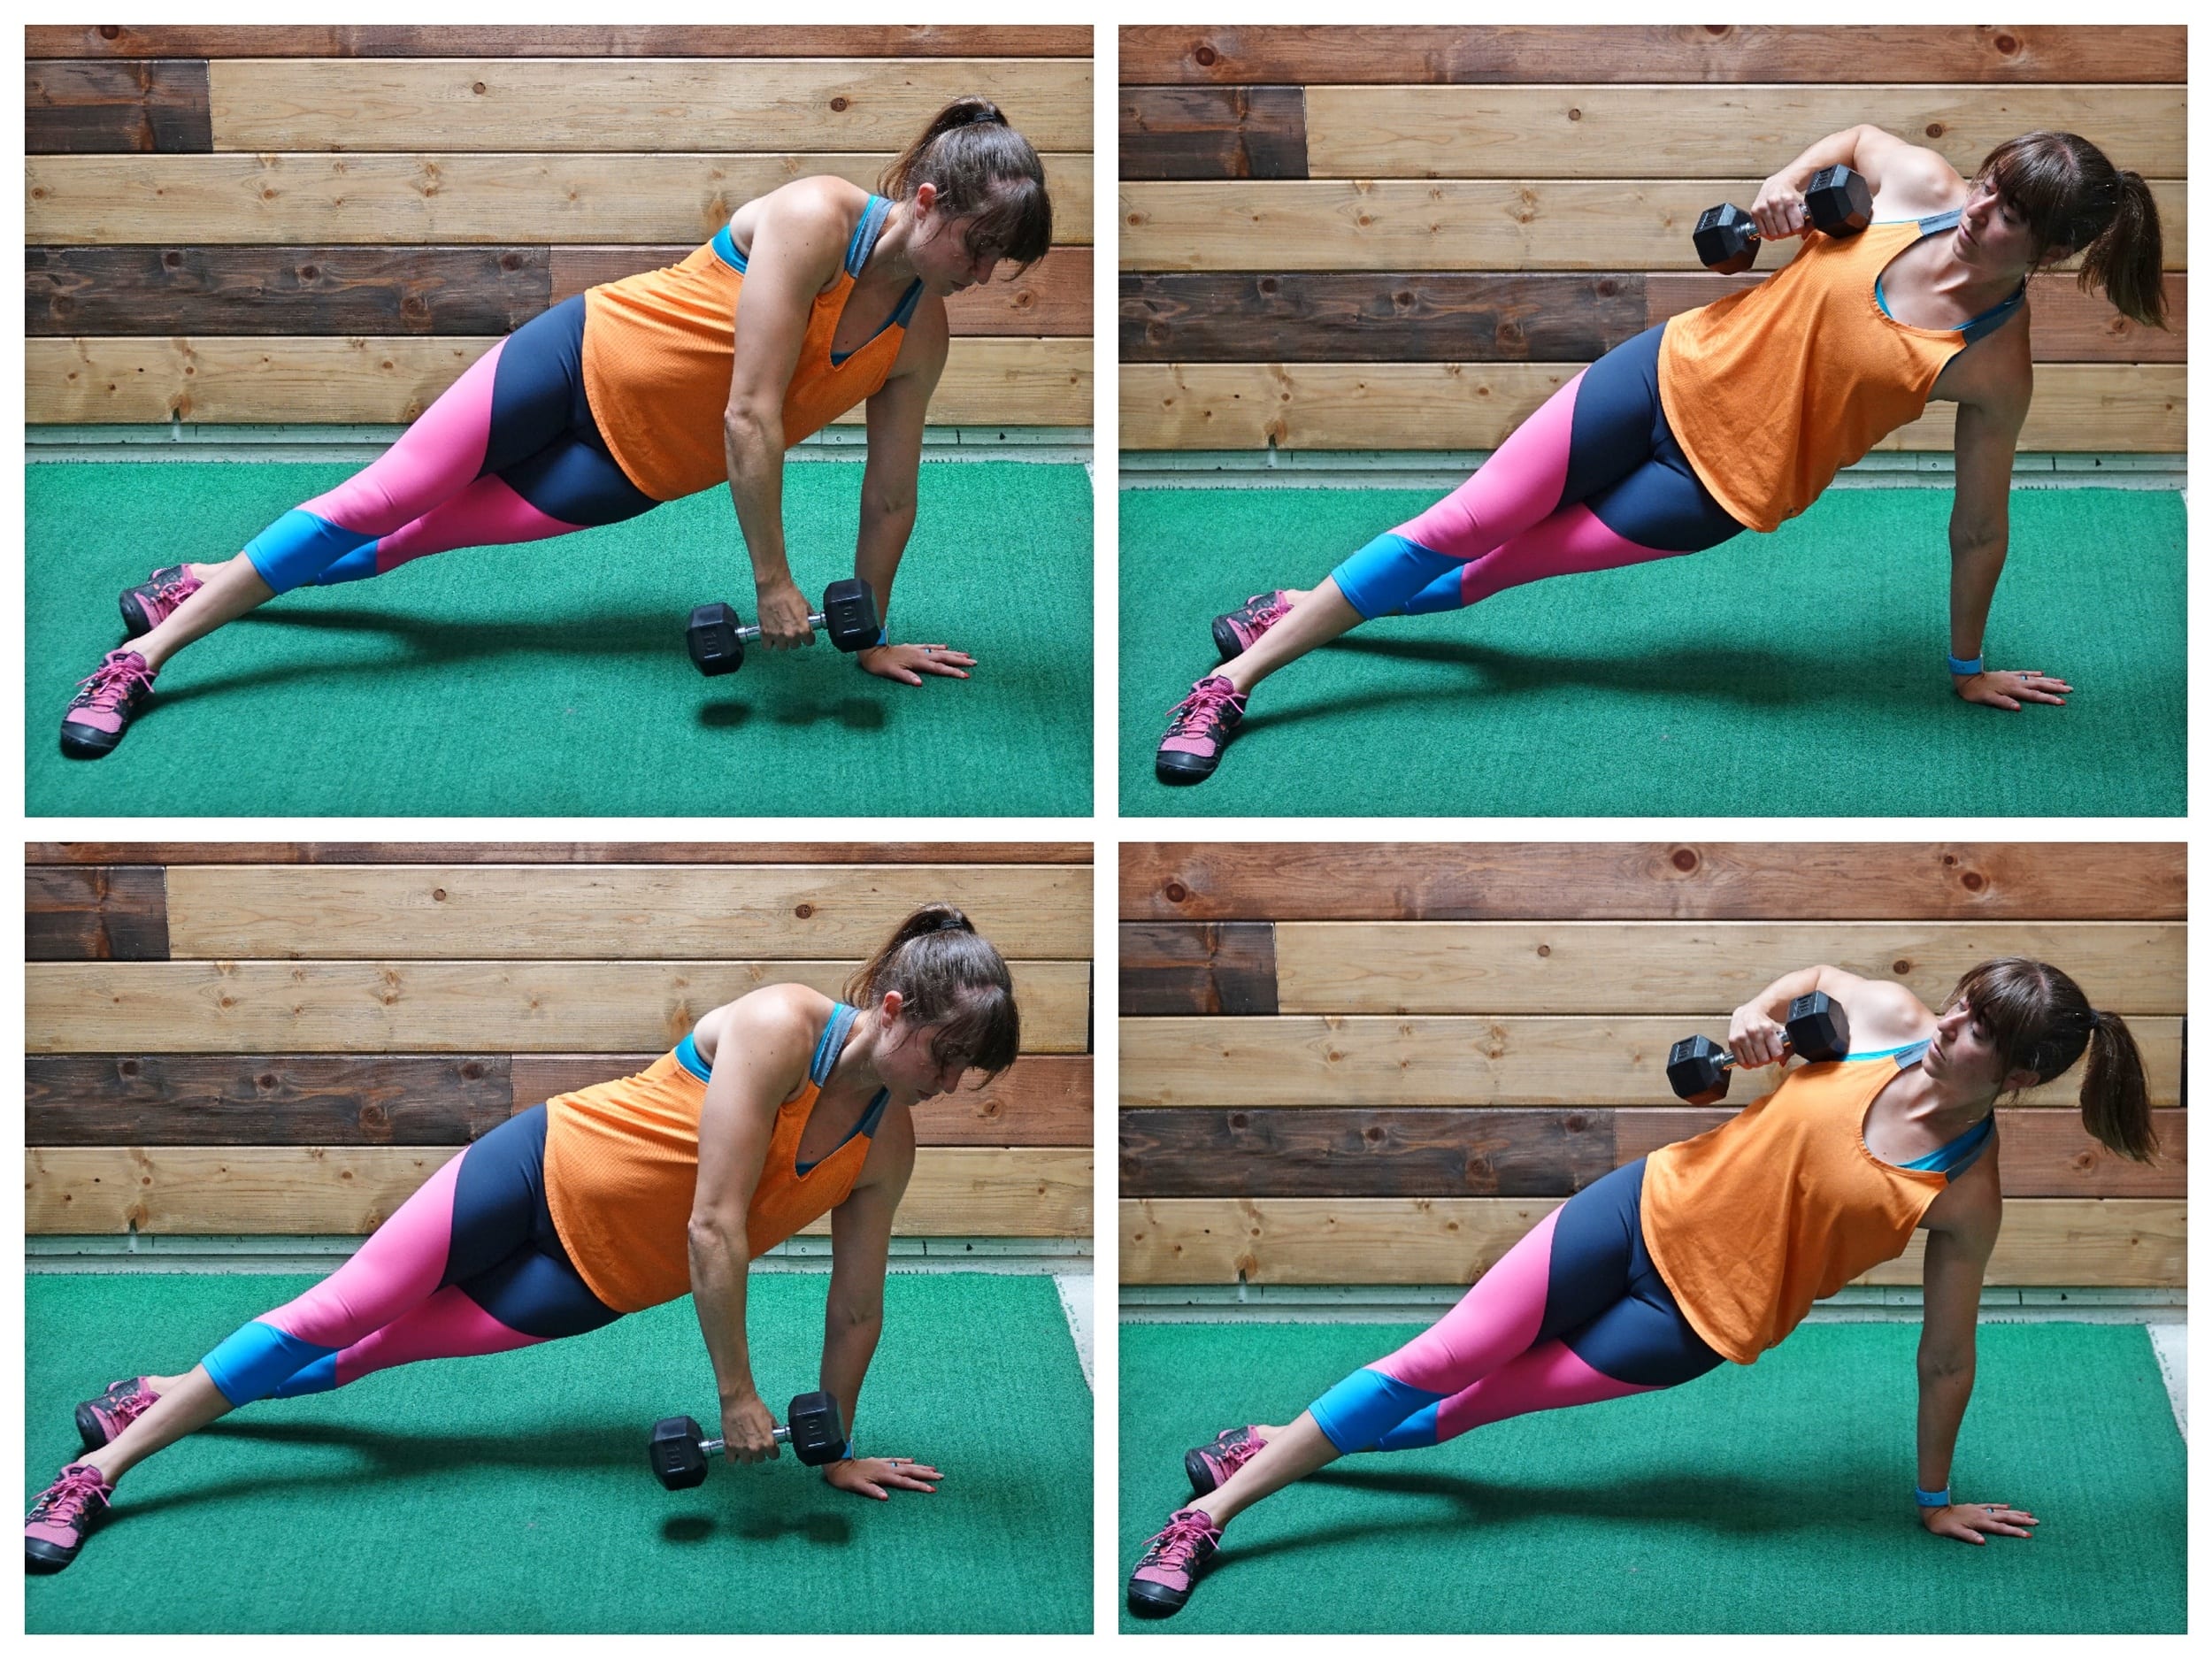
Single Arm Plank Rotation with Knee:
The Single arm Plank Rotation with Knee is an advanced move that will work your entire core, including your adductors. It is the perfect way to improve your shoulder stability while also working your abs and obliques.
You’ll even feel this move all around your rib cage and in your upper back.
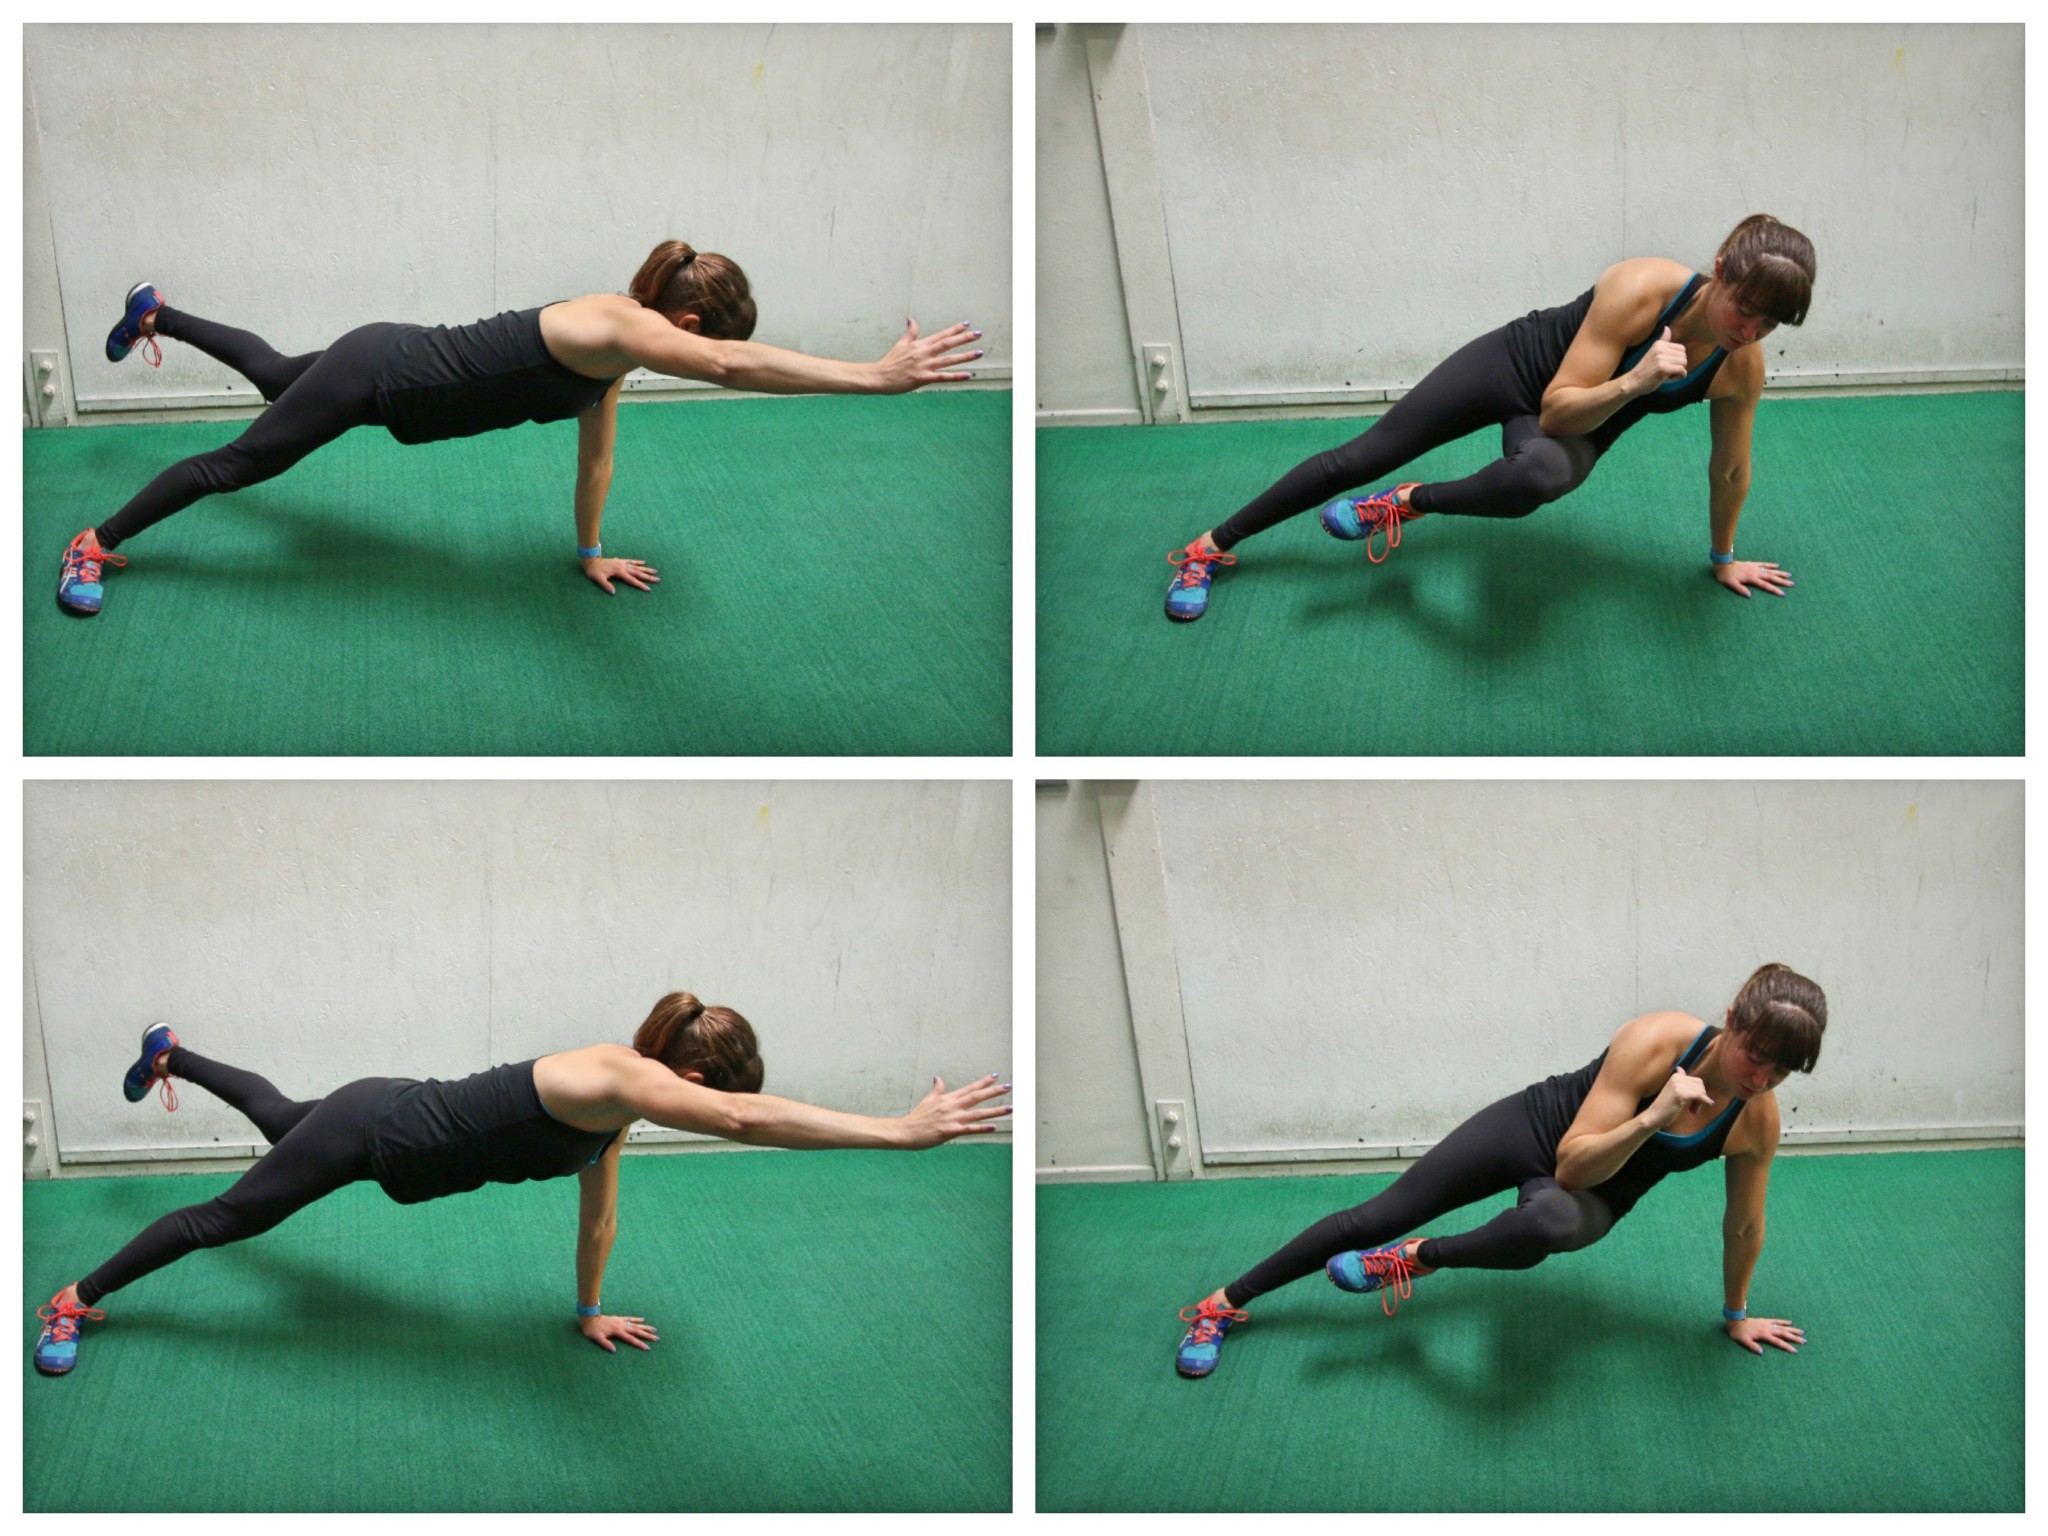
To do the Single Arm Plank Rotation With Knee, set up in a side plank position from your hand with your bottom leg in back of your top leg.
Then lift that back leg as if kicking it back and up toward the ceiling slightly. Reach your top hand out in front of you and overhead. Your chest will rotate toward the ground as you lift up into this side plank position with your opposite arm and leg raised.
Rotate your chest back open as you tuck your raised leg under and forward, driving your knee forward as you tuck your raised arm down to meet it. Try to touch your knee to your elbow as you rotate your chest back open and away from the ground.
After slowly tucking the knee to the elbow and feeling yourself pivot around that shoulder. The muscles around your rib cage should really be working. Then kick the leg back out and reach back out and overhead with your hand.
Move slowly to stay balanced and try to keep your hand on the ground under your shoulder.
Beginners can tap the toe down behind them or even just do the knee tuck without the kick out.
Side Plank Row:
While heavy rowing exercises are great to build back strength, we want to include rows that make us work in other planes of motion.
This Side Plank Row adds in some rotation to the pulling movement and forces us to work on our shoulder stability as well as our oblique and even glute medius strength.
To do the Side Plank Row, set up in a high side plank from your hand with your feet staggered (your top foot will be in front). You will hold a dumbbell just off the ground down in front of you with your top hand.
Keeping that nice side plank position, row that weight up and across your body, driving your elbow back toward the wall behind you. You will slightly rotate open as you row. Feel your back pulling the weight up and across as your bottom side works to keep your bottom hip up for that nice plank position.
Lower the weight back down and across toward the ground and repeat the row.
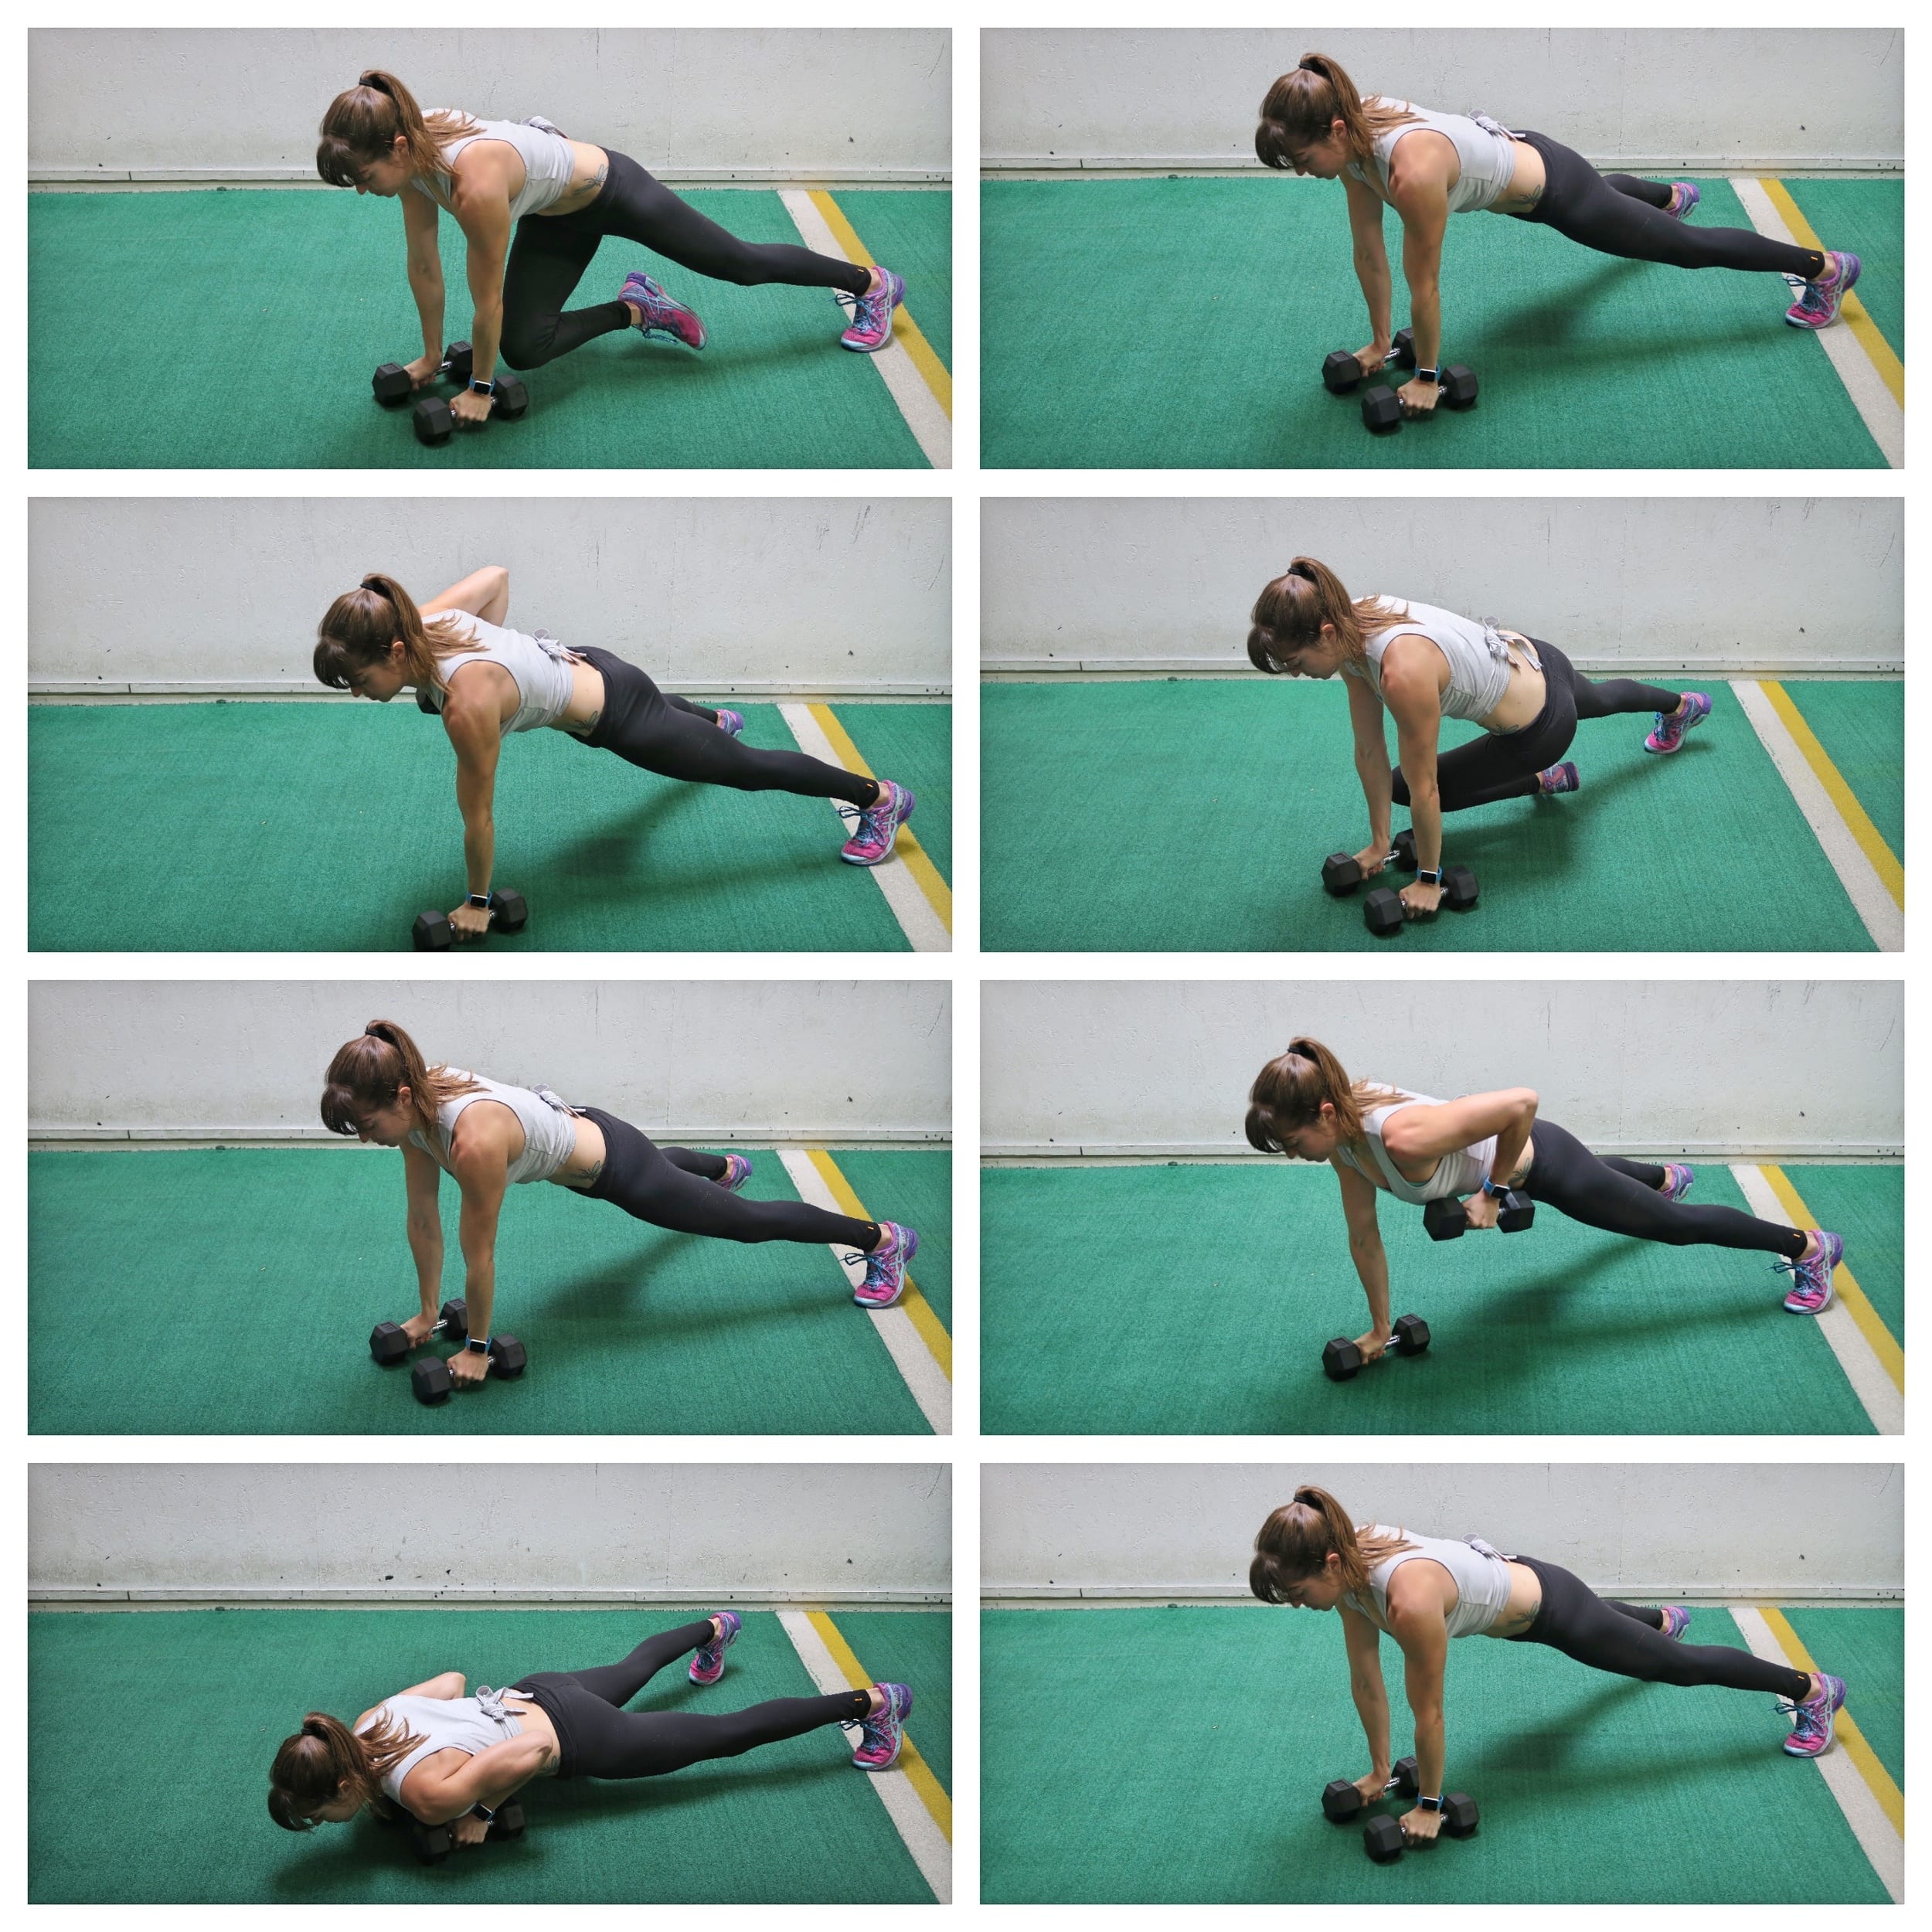
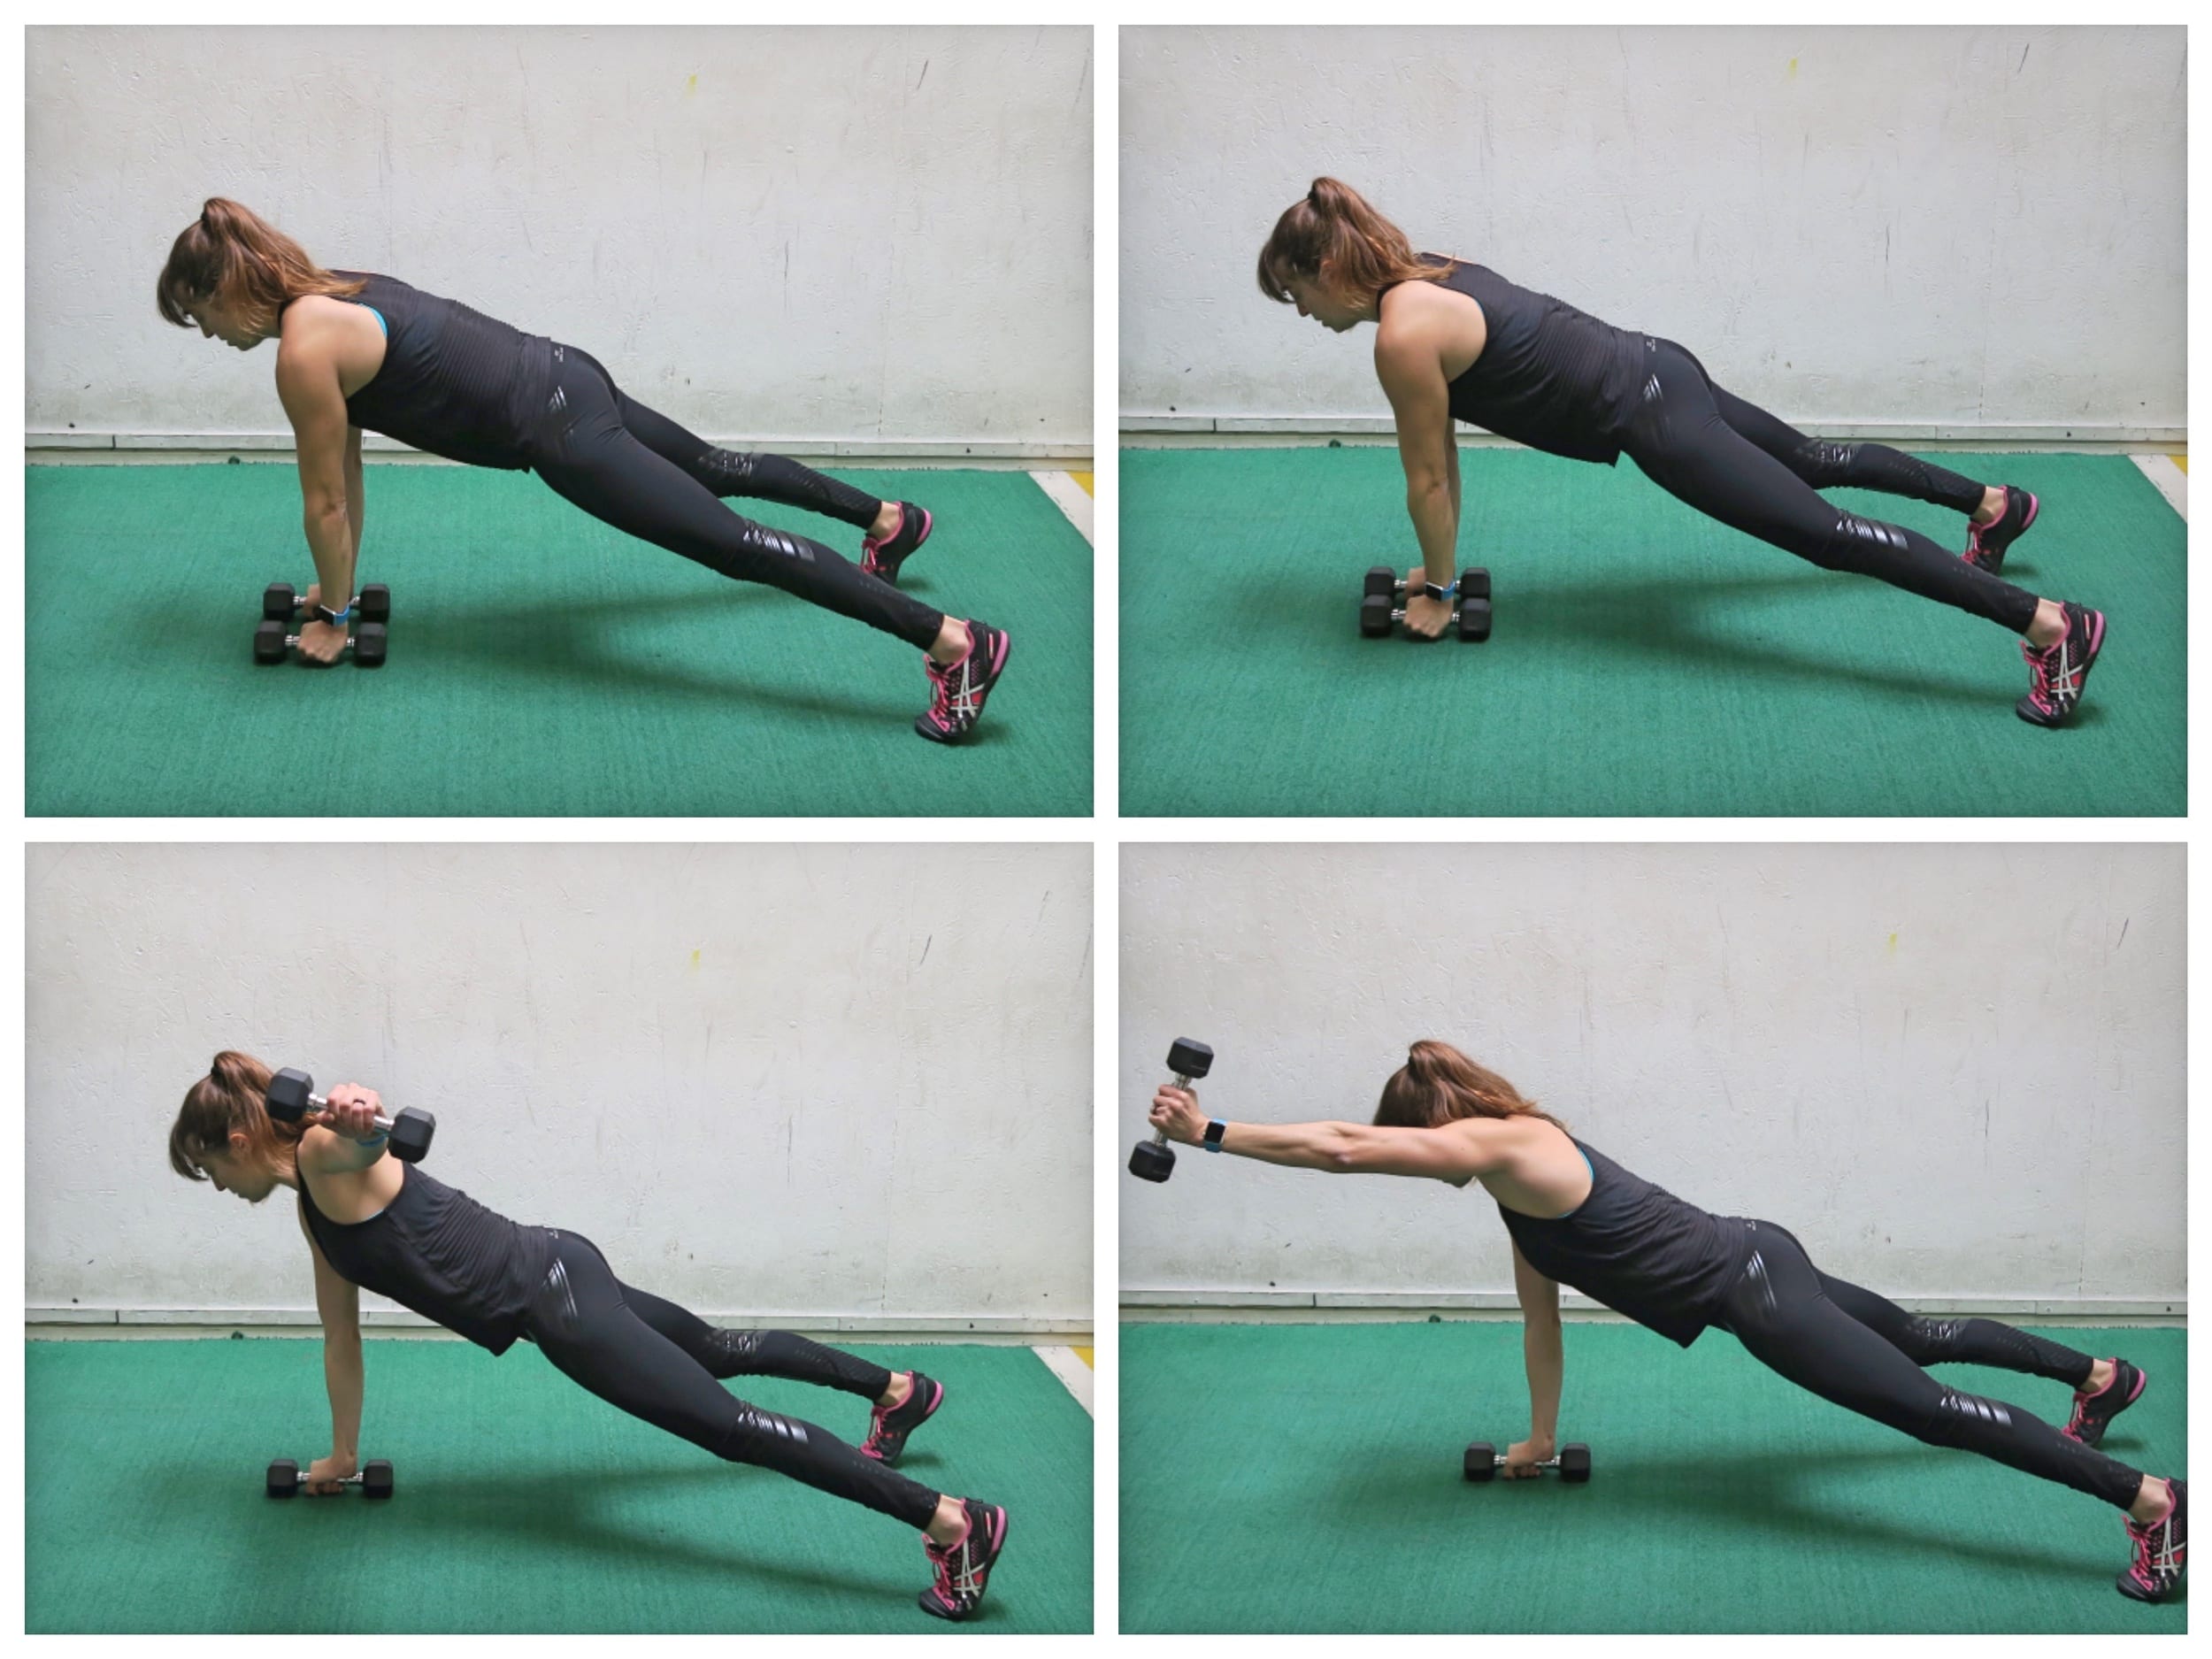
Bird Dog Push Ups:
This Bird Dog Push Up is a more challenging push up variation that works not only your chest, shoulders and triceps, but also your core as it requires a great deal of stability to prevent rotation when you come up into the bird dog at the top!
To do the Bird Dog Push Up, set up in the high plank position from your hands and toes with your hands under your shoulders and your feet about hip-width apart. If you bring your feet closer together, it will make the move more challenging. Make sure your core is braced and your body is in a nice straight line from your head to your heels.
Then, with your body moving as one unit, perform a push up, dropping your chest to the ground. Do not let your elbows flare way up by your shoulders. You do not want your arms and body to create a “T” shape. Press back up to the high plank position. Make sure to keep your core engaged and drive back through your heels so your body stays in a nice straight line. Do not let your hips sag or your butt go up in the air.
At the top of the push up, lift your opposite leg and arm up, reaching your arm out straight toward the wall in front of you as you lift your foot back toward the wall behind you. Keep your core engaged and squeeze your glutes as you lift the leg and arm. Do not let your body rotate open or your hips sag toward the ground. Do not let your butt go up toward the ceiling as you lift and pause to hold.
You do not need to lift super high. It is more about lifting toward opposite walls and engaging your core and glutes to stay balanced. Hold for a second or two at the top and then lower back down and repeat the push up. Make sure your body moves as one unit. Do not tuck your chin or let your hips sag.
Then perform a Bird Dog on the other side, lifting the opposite arm and leg up. Keep performing a push up then a Bird Dog, alternating sides.
Beginners can do the move from their knees or even simply lift either their leg or their arm instead of lifting both. It is better to regress and perform the movement properly than to do the full Bird Dog Push Up with your butt up in the air.
Plank with Two-Way Raise:
The Plank with Two-Way Raise is a great way to work your arms and shoulders while also improving your anti-rotational core strength.
When you’re short on time, this allows you to get in some extra targeted shoulder work while also building ab strength!
To do the Plank with Two-Way Raise, place a dumbbell in each hand and set up in a high plank position with your feet about hip-width to shoulder-width apart. These should be light dumbbells as we are working small muscles.
Then, keeping your core stable, lift your arm straight out to the side, feeling the back of your shoulder and even in between your shoulder blades work. Bring it back down then lift it forward out in front. When you lift to the side, the back of your hand will be facing the ceiling. As you lift out in front, your thumb will be up.
Then repeat, lifting out to the side then down the raising to the front and down. Keep your core stable the entire time.
Lunge Curl Press:
When we’re short on time, the more muscles we can work at once, often the better – especially if fat loss is part of our goal!
This hybrid exercise will help you torch calories by using a lunge to work the big muscles of your legs and get your blood pumping as you target your biceps and shoulders with a curl and press!
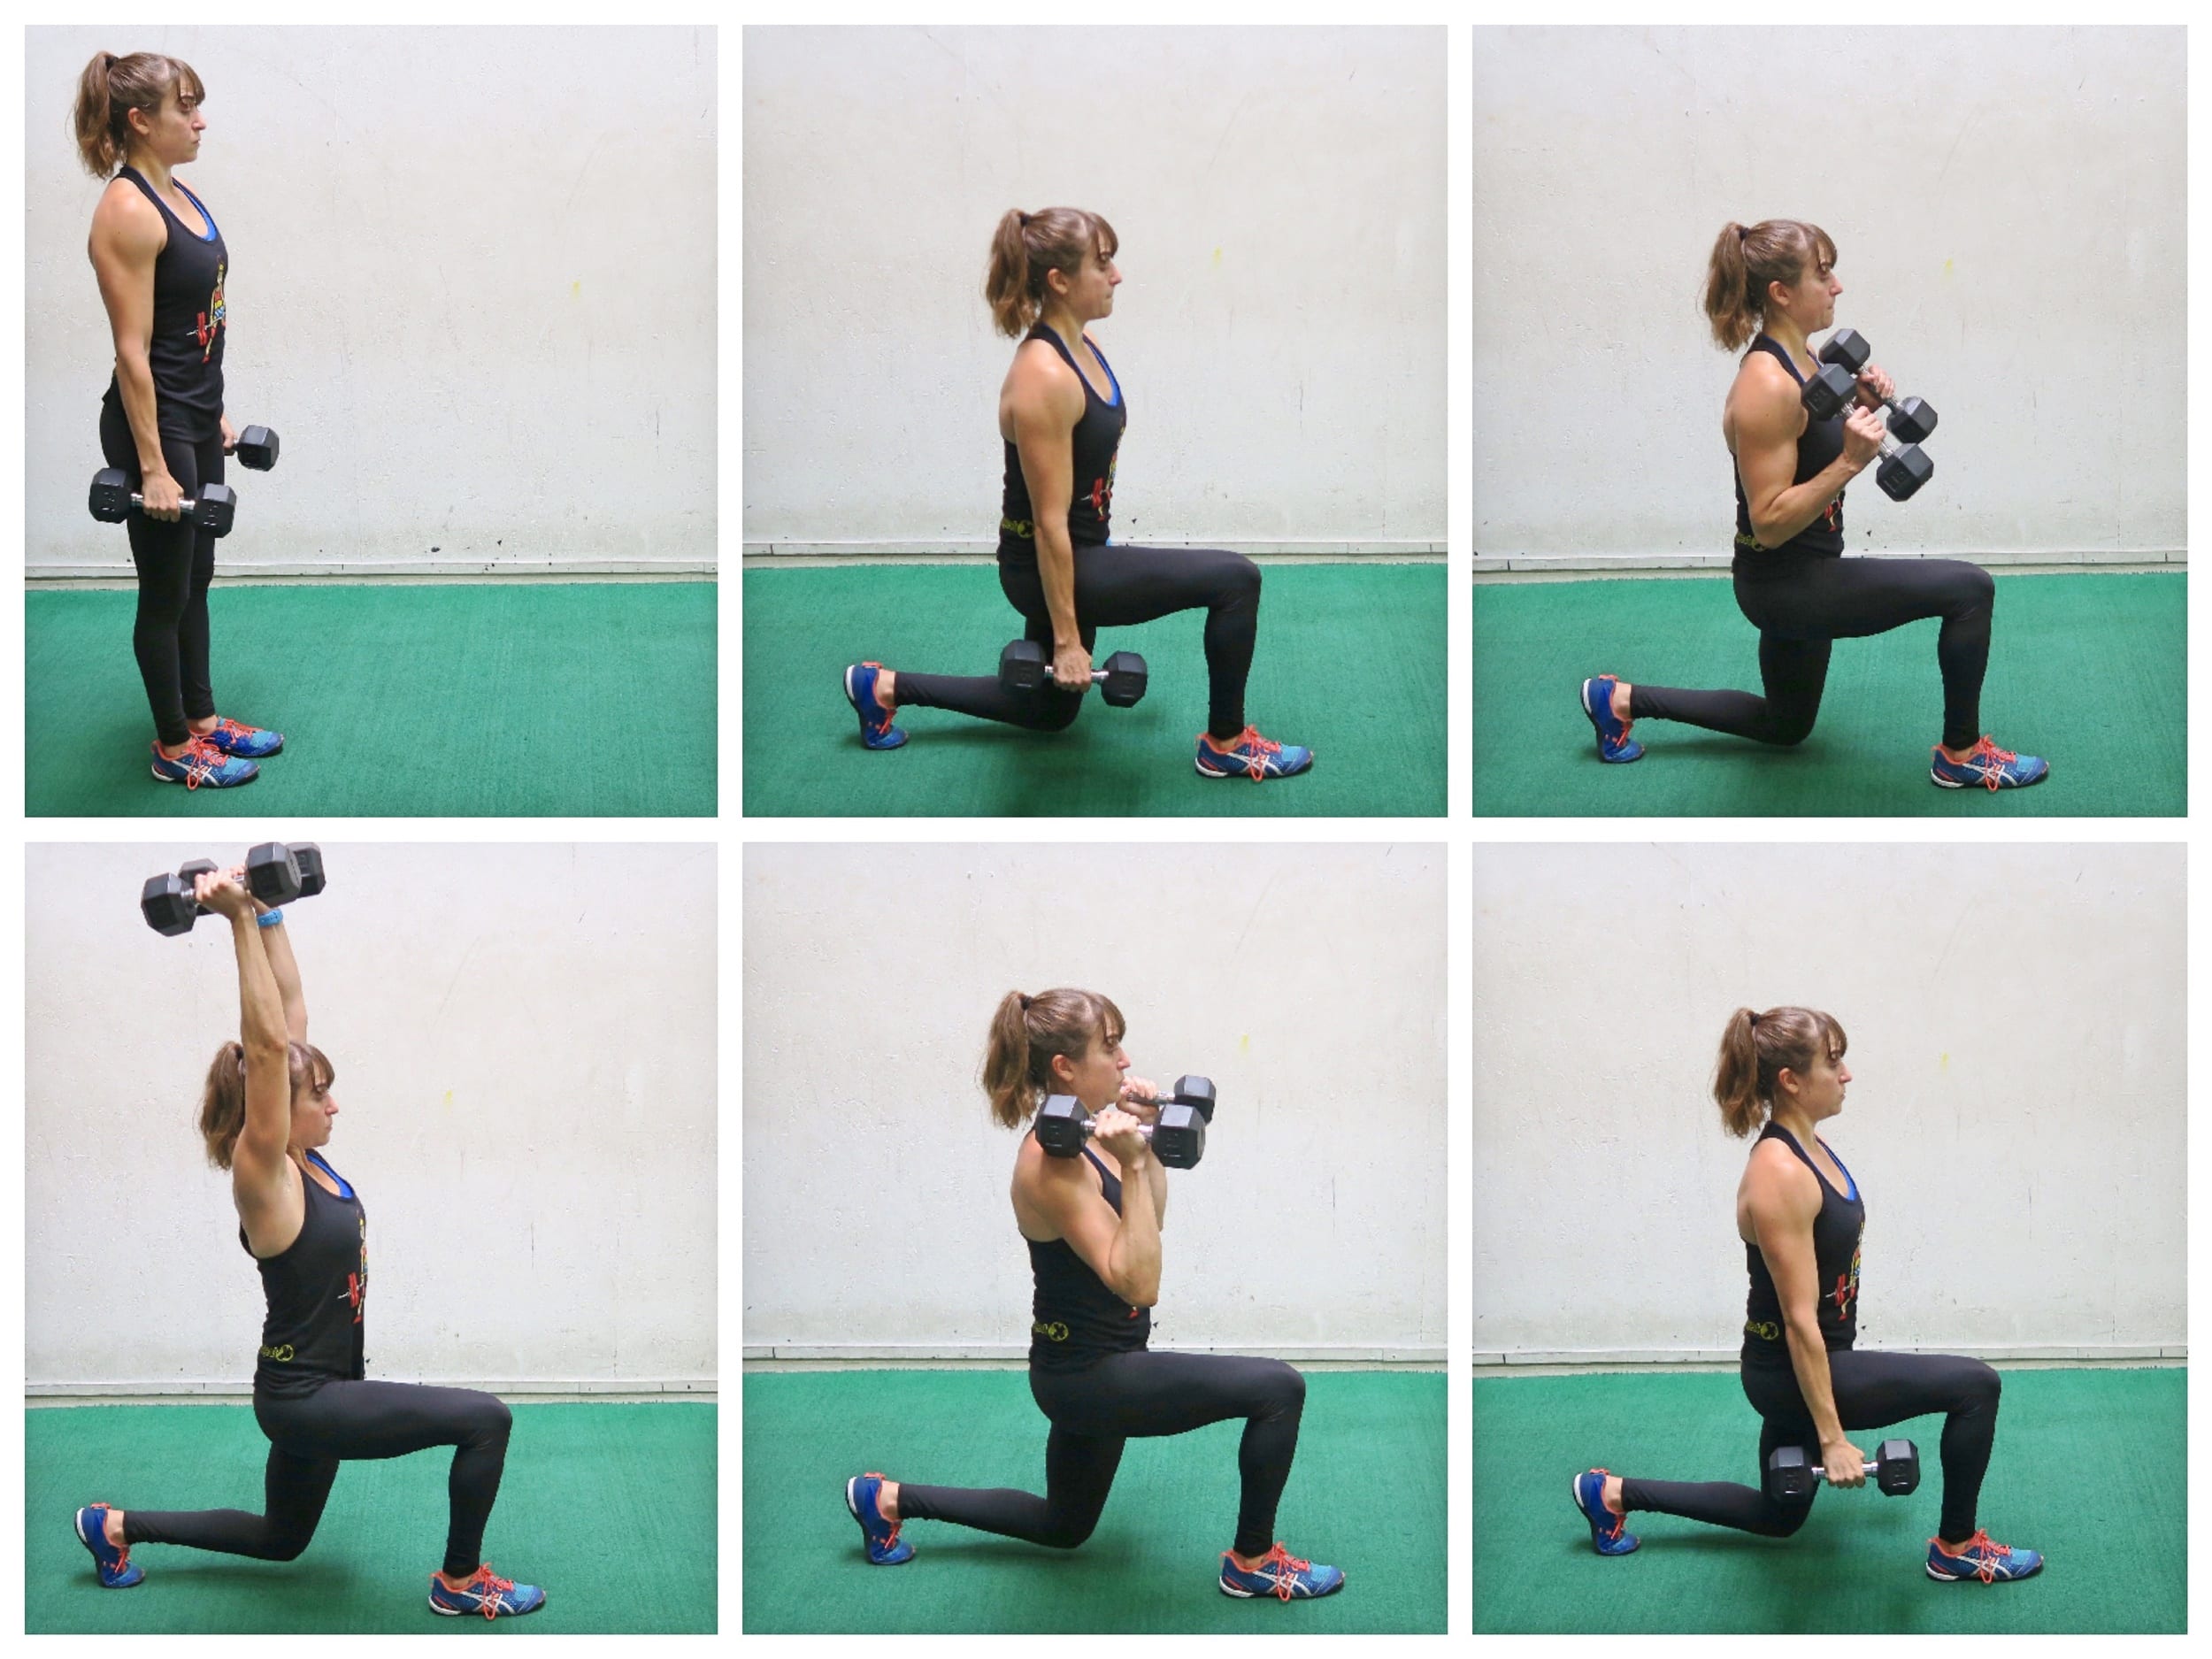
To do the Lunge, Curl and Press, start standing tall with a dumbbell in each hand down by your side. You can choose to have your palms facing forward or even in toward each other to perform both the curl and the press. Lunge forward with your arms down by your sides. Holding the lunge, perform a bicep curl, curling the weights up to your shoulders. Keep your chest up as you curl to maintain good form.
Once you curl up to your shoulders, press the weights overhead, staying nice and low in the lunge with your abs engaged. Press all the way up, then bring them back down to your shoulders and reverse the curl. Once the weights are back by your sides, push back up to standing in one movement.
Beginners may not lunge out as far or as deep. They may also choose to lunge then perform the curl and press while standing. You can stay on the same side or perform lunges alternating sides.
Glute Bridge Skull Crushers:
When you want to use isolation exercises to target those trouble zones, you can help yourself get even more “bang for your buck” in less time by combining that isolation move with an exercise to work a different area.
That’s why the Glute Bridge Skull Crushers are a great hybrid move to include when you’re short on time! You’ll work your glutes and core as you target those triceps!
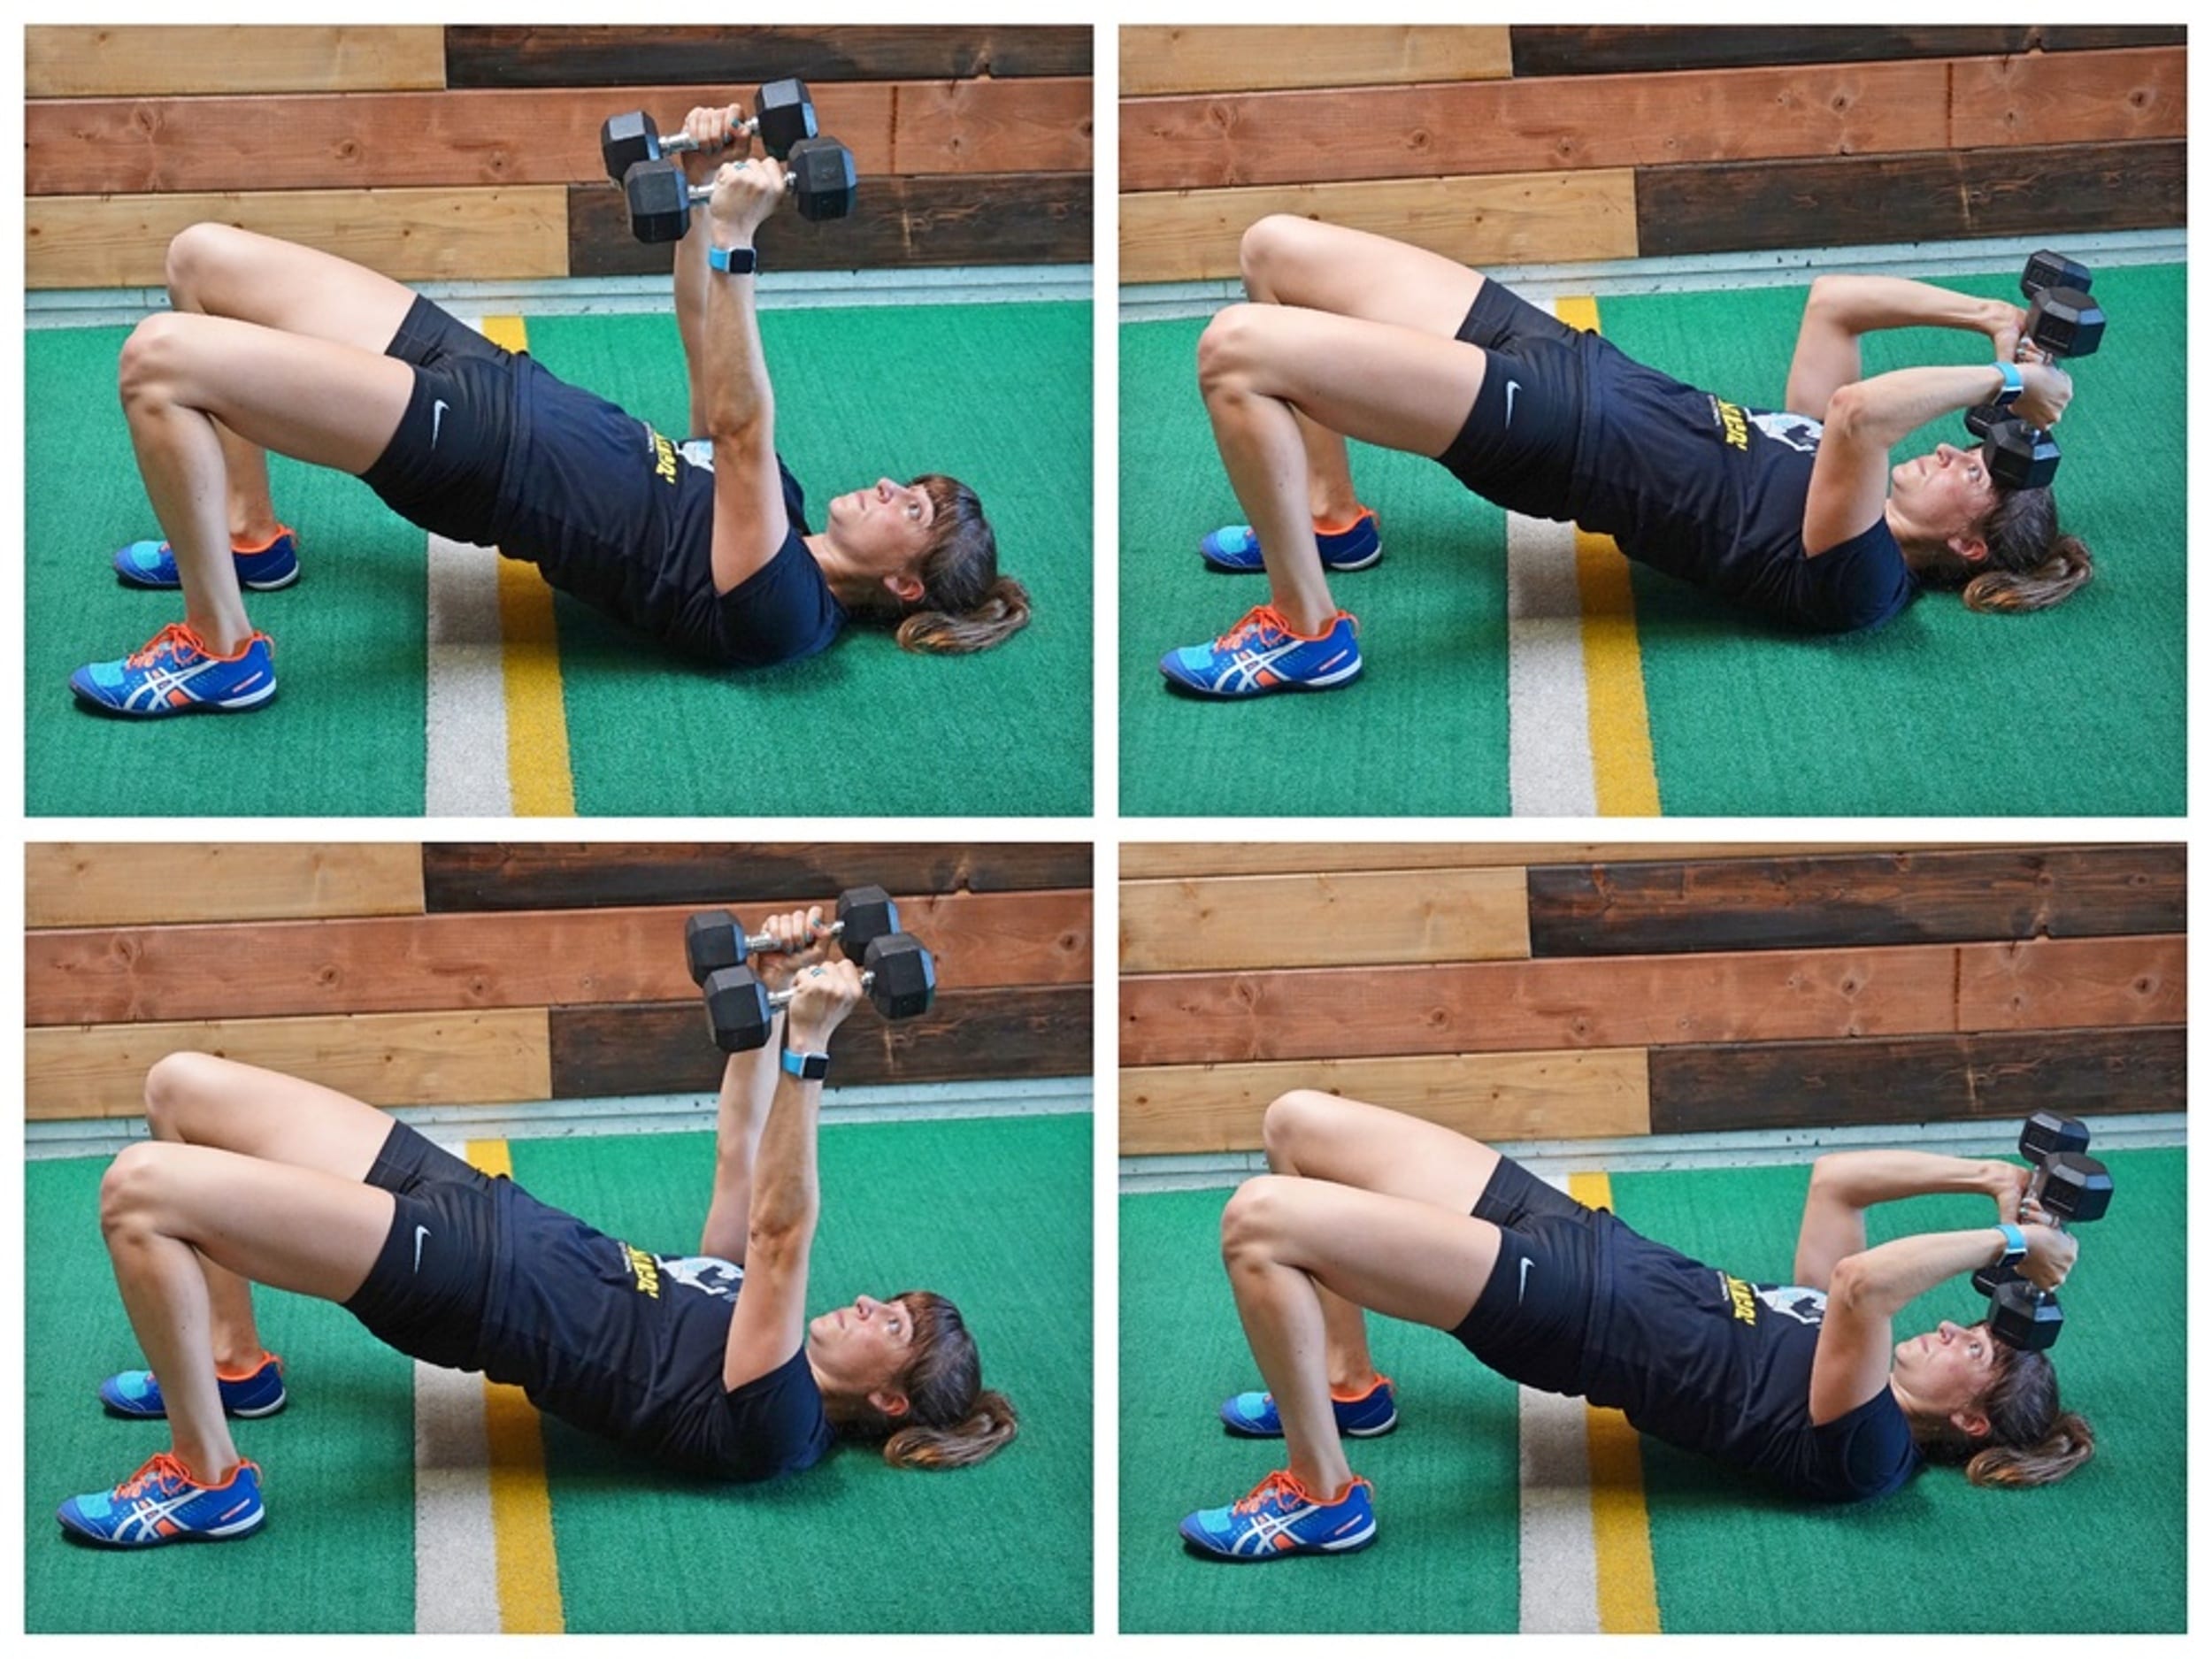
To do Glute Bridge Skull Crushers, hold either a kettlebell or weight(s) in your hands and lie on your back. Set up in the bridge position with your knees bent and feet flat on the ground. Press the weights or weight up at shoulder height toward the ceiling.
Then bridge up. Holding this bridged position, curl the weights back toward your forehead just bending at the elbows. Your palms should be facing in toward each other. Then extend your arms back out. Move at a controlled pace and stay up in the bridge the whole time.
When you lower the weights down toward your forehead, think about just bending at the elbows so your elbows stay right over your shoulders. And as you extended the straighten but still stay aligned.
Keep your abs braced in that bridge too and don’t hyperextend your lower back just to bridge up higher.
Bi’s And Tri’s Series:
When you’re short on time, it can be hard to use some of your workout time to target those specific areas you want to tone and strengthen with isolation moves because they don’t give you as much bang for your buck.
But if you really want to target those areas, you can get killer results by combining isolation moves into a hybrid series! This way you can pack more into less time!

To do Dumbbell Bi’s and Tri’s Series, hold a dumbbell in each hand with your arms down by your side. Have your palms facing in.
Then perform a bicep curl, curling the weights up to your chest. Do not swing, but fully curl them up.
From here, press them straight overhead, keeping your arms facing toward each other.
With your arms pressed straight up, drop the weights down and back toward your back. You want to think you are bending at the elbows to lower the weights back behind you.
Then, feel your triceps working to raise the weights back up overhead. Bring them back down to your chest and slowly lower them back down to your sides. Stay in control of the weights as you perform the entire move.
After lowering them back down, repeat the curl, press overhead and overhead tricep extension!
Love these moves? Want to build a killer strong and lean upper body?
Check out my Arm Burner Cards –>

