Exercises For Hip Pain RELIEF (5 Daily Hip Pain Moves)

Exercises For Hip Pain RELIEF (5 Daily Hip Pain Moves)

Unfortunately hip pain is an all too common complaint.

And the best rehab is prehab – preventing those injuries before they really build up by recognizing and addressing those “minor” aches and pains.

Too often we simply try to push through a sore hip. We accept a limited range of motion.

We just keep training hard because it “loosens up” as we go or “only hurts at specific times.”

But those little nagging aches and pains are what end up resulting in injuries.

That’s why I wanted to share 5 moves you could include in your warm ups and weekly routine to prevent those annoying little aches and pains from ever resulting in an injury!

Best to act BEFORE the problems really occur!

So what are those 5 prehab moves?


5 Exercises For Hip Pain:

Rectus Femoris Foam Rolling:

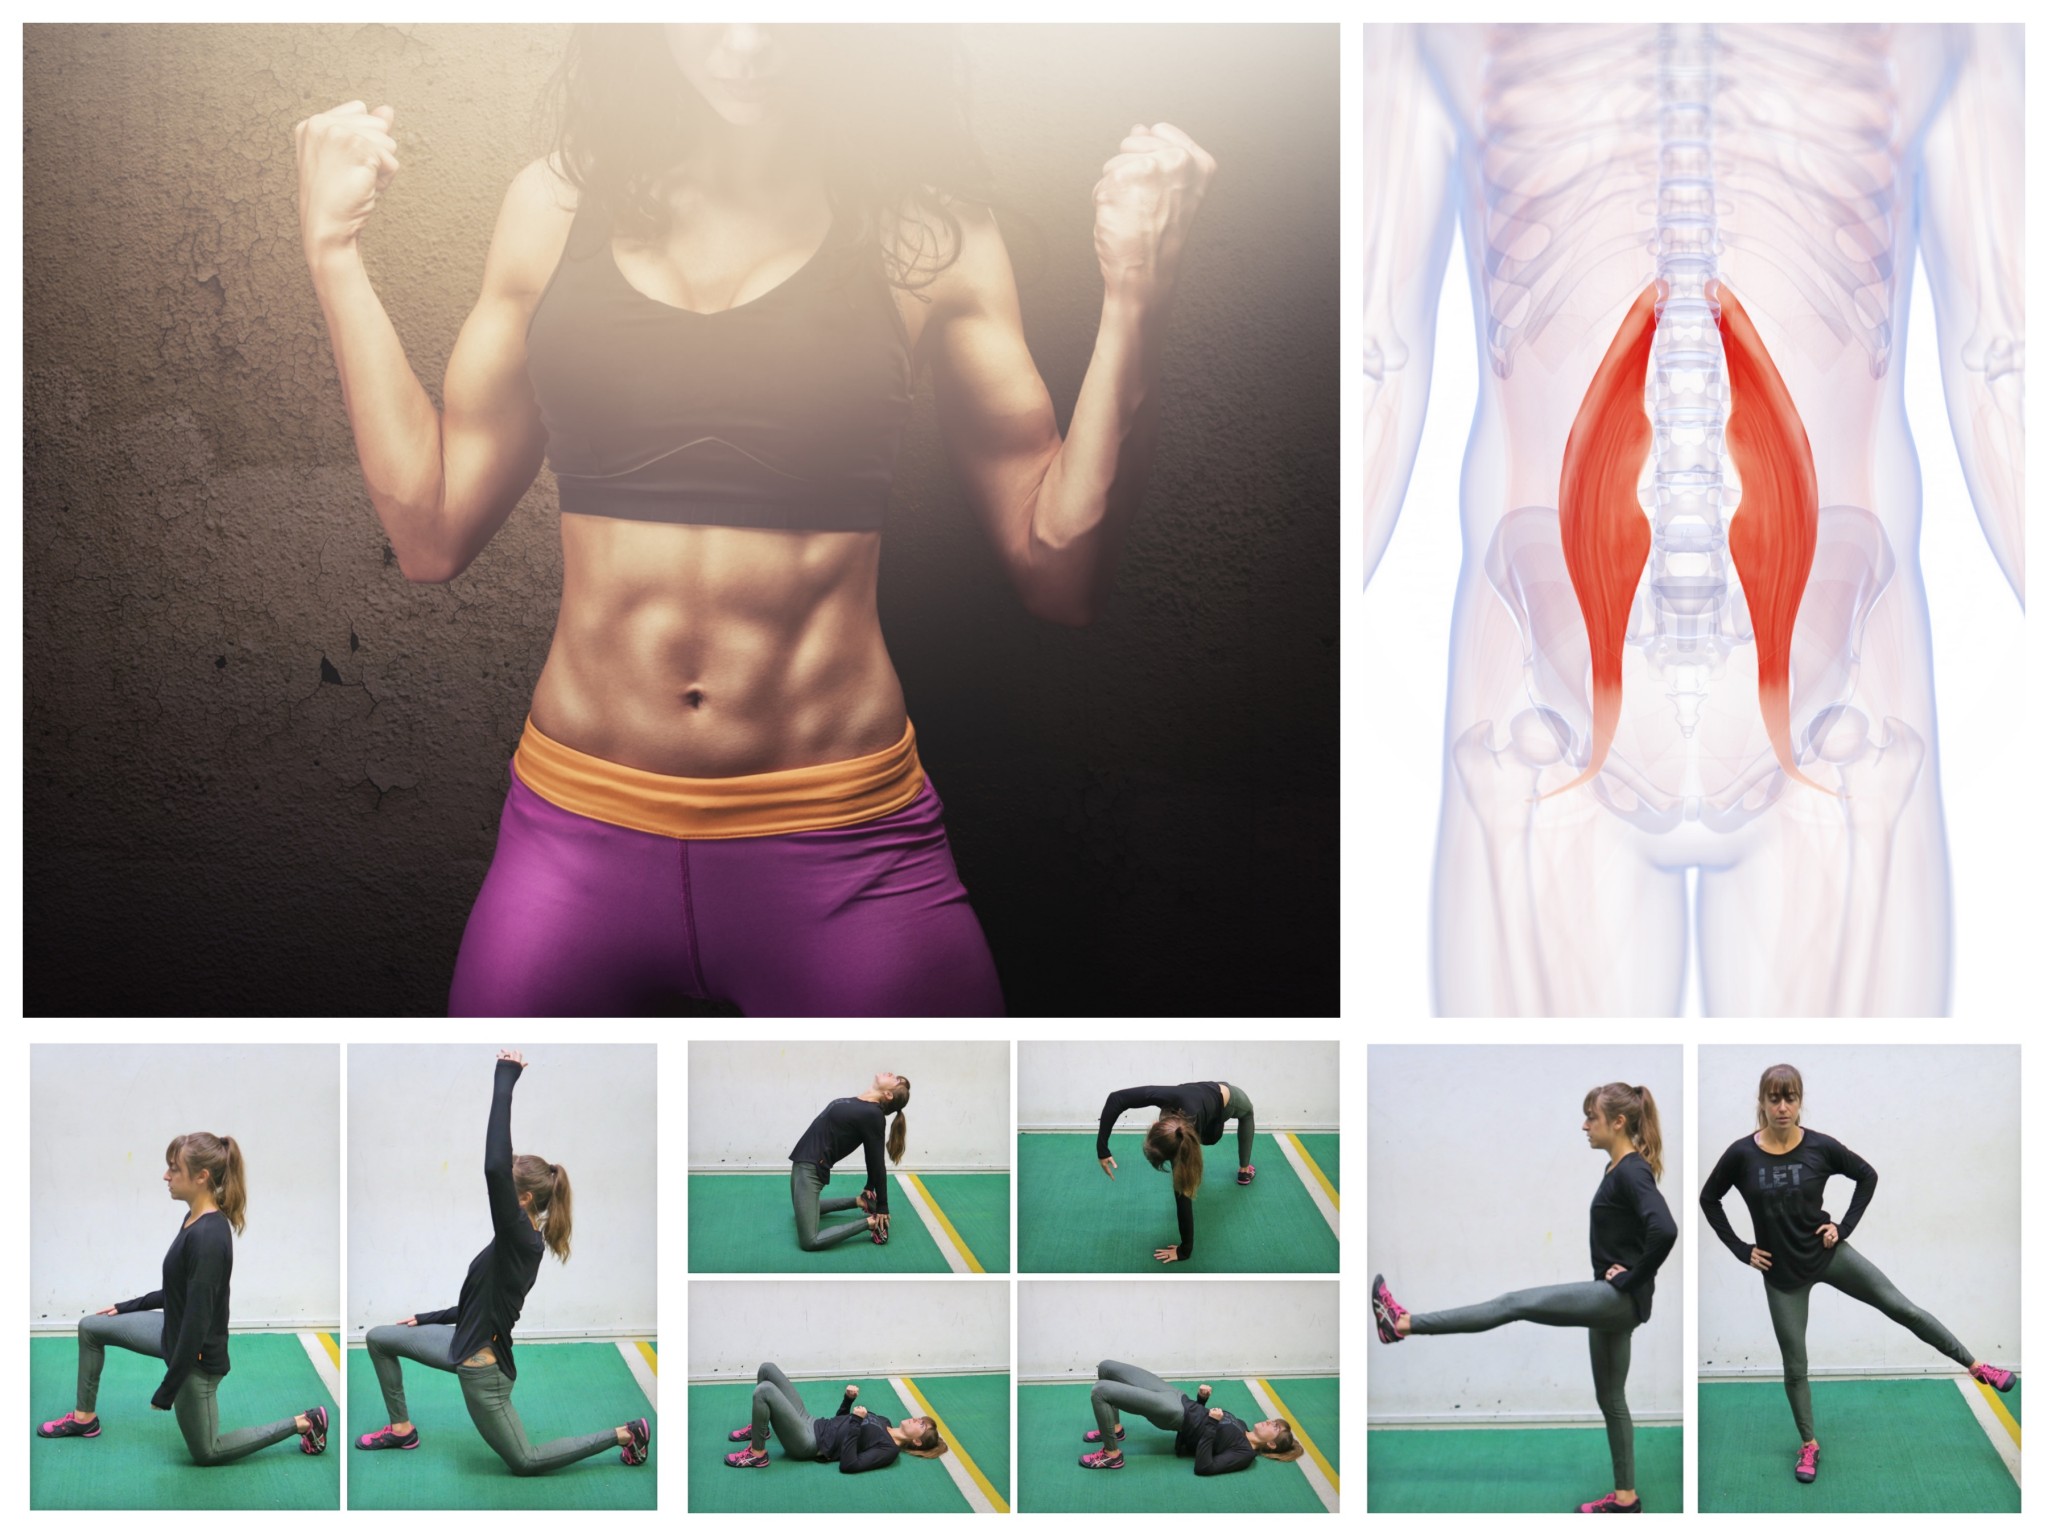
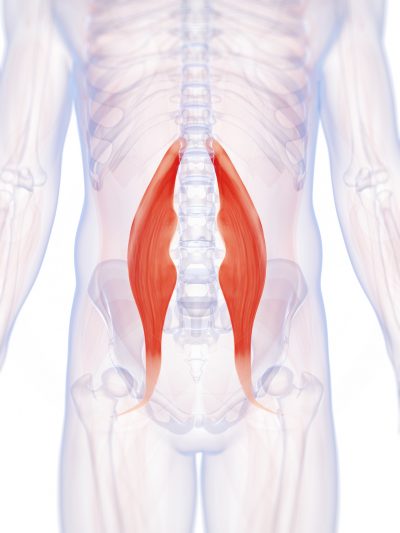
The psoas is the sexy hip flexor muscle to talk about, but this hip flexor muscle, which is also a quad muscle, can directly impact both the hip AND the knee so it is a key muscle to pay attention to – it’s the Rectus Femoris.

Tightness of this muscle will not only hinder proper glute activation but lead to lower back, hip and knee issues.

It may be why you had a knee issue on one side and now have hip pain!

So because of the impact this muscle has on multiple joints it is a key muscle to include in your prehab routine.

Usually this muscle becomes short and overactive, which is why it is key you start by relaxing and releasing it through foam rolling.

That will then allow you to better activate your glutes and improve your hip extension and mobility.

If you have had issues or injuries on only one side, you may find you only need to address tightness on one side.

To roll out the Rectus Femoris, place a ball in the middle of your quad. You can also use a roller to reduce the pressure on the muscle. While you want to apply pressure to help the muscle relax as you hold, if the pressure is too much and you tense against it, you won’t benefit. So start with a softer ball or foam roller instead.

Hold and then even tense the muscle and relax as you hold to help it release.

Spend at least 30 seconds on any tight spots you find and hold up to 1 minute.

Piriformis Foam Rolling:

Piriformis issues are all too common these days and are often linked with the fact that we simply spend far too much time seated. Not to mention many of us even choose to do exercise activities, like cycling that still keep us in that seated position!

So it is key we address the fact that this muscle can become tight and shortened and then lead to issues like hip pain and even sciatic compression BEFORE the problems really occur.

That’s why I like to include some foam rolling for the piriformis in my prehab or warm up routines.

A ball works best to really apply more pressure, but you can use a roller especially starting out. You want to find the spot where the top of your back jean pocket would be.

If you use a roller, cross one ankle over the other knee to really help address tightness of the muscle as you lean into that side.

You can then push your knee open and relax out as you hold on the spot.

If you’re using a ball, you may find it helpful to lift and lower the leg as you hold.

Just make sure you breathe and relax as you hold.

Single Leg Hip Thruster:

After starting to relax overactive muscles, you want to start to stretch and work the hip through a full range of motion.

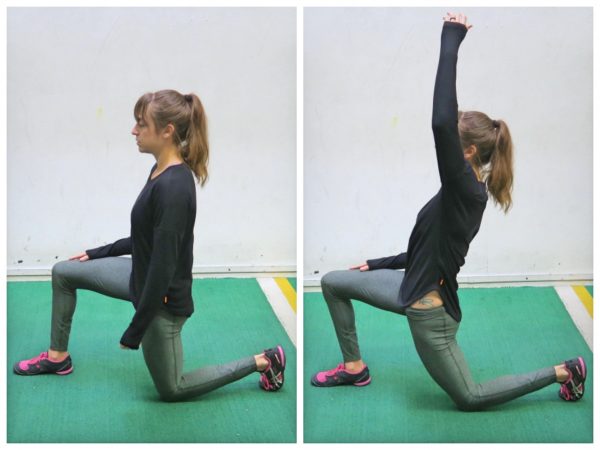
And a great way to do this while also activating our glutes, which are commonly UNDERACTIVE is through activation moves like the Single Leg Hip Thruster with Knee Hug!

Activation moves like this stretch out tight hip flexors through a process called reciprocal inhibition. Basically by engaging your glute to drive your hip into extension you stretch out that shortened hip flexor.

So especially if you’re short on time, you can use this move to stretch and activate all in one!

To do this move, you’ll hug one knee in toward your chest as you set up with your back on a bench. You can look down slightly toward your knees. This cervical flexion can actually help with glute engagement and can help you avoid arching your back.

Use that posterior pelvic tilt to brace your abs as you drive up. Squeeze your glute to extend your hip and avoid arching your lower back to get up higher.

Relax back down and repeat.

Unilateral moves like this are key if you have one side that is weaker or tighter; however, it also makes the exercise harder.

You may find you start with the glute bridge variation of this OR even an 80/20 hip thruster so that you reduce the resistance on that single leg.

You want to make sure your glute is the prime mover and that you don’t feel your hamstrings or quads compensating instead.

Hinged 3-Way Hip Circles:

It’s key we not only work on hip extension but also abduction and even flexion. Basically we want to make sure we mobilize our hip through a full range of motion while building stability through that full ROM.

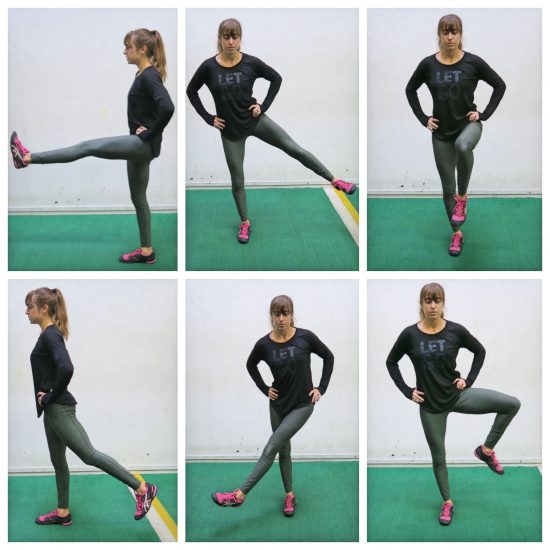
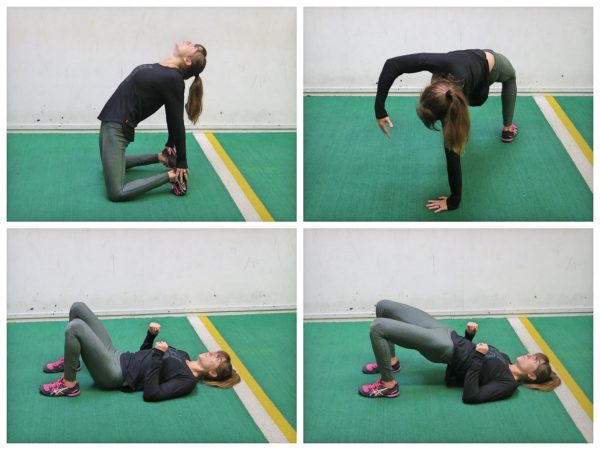
That’s why this Hinged 3-Way Hip Circle move is so amazing.

You can do a version of this move fully standing and balancing, which is a great option IF you really want to focus on that balance element. You can also do it quadruped.

Even implementing all three over a progression can help you get the best results.

I find using the balance assist and slightly hinged position though really helps to better activate the glute through both the extension and even abduction for most people.

Lean forward against a wall or on a chair or bar for support.

Drive your leg back first. Think less about how high you kick up and almost think about stopping the lift with your glute. Feel yourself squeeze your glute.

Then bend your knee as you lift your leg out to the side. Focus on really feeling that glute lift over rotating away to lift up higher.

Fight to keep your lower leg parallel to the ground. We tend to either want to raise our foot up higher and internally rotate our hip (use the TFL) or externally rotate our hip (which can utilize more piriformis) so really focus on that glute medius.

Then with the knee bent, drive your knee in toward your chest and even round slightly to feel your abs.

We aren’t just mobilizing the hip but also activating muscles to improve our hip stability!

With this move you’re hitting your glute max, medius and even your abs!

Side Lying Series:

The glute medius is key to improving our hip stability and even our glute max activation, which is why it’s essential we include activation exercises for it.

Strengthening this muscle will help us avoid hip pain and even help us lift more and run faster!

One of the simplest but most killer activation series for it, is the Side Lying Series. It is key though that you avoid letting your TFL take over.

Using a slight internal rotation of that lower leg, so turning the toe down toward the ground is key.

Do not let your body rotate open. AND if you’ve had piriformis issues, definitely be careful you don’t start to turn that toe open or externally rotate your hip.

So often we want to allow our TFL or piriformis to compensate for that glute medius.

You’ll then lift the leg up at least 8-10 inches off the bottom leg. This will engage the glute before you even start.

You’ll then run through all, or a combination of side lying moves on one side before switching. Do not rush through or disengage by lowering your leg.

You can do the side lying leg raise, front kicks, back kicks, front to back kicks and then even the bicycle.

All of these hit different aspects of the glute medius AND work it while in both hip flexion and extension.

This series is amazing for runner’s especially using the bicycle because it works on that hip mobility through a full gait motion.

SUMMARY:

The best way to avoid annoying chronic hip pain is to do prehab or those mobility and activation moves to address common postural distortions or previous injuries BEFORE pain adds up.

These moves can be used in your warm up to even help you get more out of your workouts by improving your range of motion and helping you prep proper recruitment patterns BEFORE you lift or run.

If you’re looking to prevent ankle, knee, hip and lower back aches and pains, check out my BOOTY BURNER program!

–> LEARN MORE


Unlock Your Hips And Activate Your Glutes

Unlock Your Hips And Activate Your Glutes

We’ve all know that we sit too much during the day and that sitting may be killing us.

And while moving more is important, your movement needs to REVERSE the effects of sitting.

You’ve got to make sure that you loosen tight muscles and get those muscles that become weak and inactive from sitting activated and working correctly again.

This is why I constant harp on improving hip mobility AND working on glute activation!

If you sit a lot during the day, your hips are tight from being in constant flexion (aka bent!). This tightness causes your glutes to often shut off, which means all of that squatting and lunging and deadlifting may not actually be working those butt cheeks!

It may mean you’re actually potentially risking pain and injury because other muscles are engaging and working so that you can squat and deadlift and lunge. Muscles that SHOULDN’T and CAN’T really handle the load!

Wonder why your low back so often hurts? Or why you only feel your quads during some of these compound moves?

It may be because your glutes aren’t actually working and engaging because they aren’t activated! And why aren’t they activated?

Because your hips are locked up!

To unlock your hips and activate your glutes, I like to do these 3 moves basically DAILY!

(And if you are looking for a complete program to unlock those hips and activate those glutes check out this AMAZING one – Unlock Your Hip Flexors!)

Half-Kneeling Hip (and Quad!) Stretch – I do this stretch as often as possible. It is the perfect way to reverse the effects of sitting and even start to activate your glutes. You can do a few different variations and hit your hips from a couple of different angles and even really stretch out your quad as well.

One HUGE key though to getting this stretch to actually work though is ENGAGING YOUR GLUTE! Too often people do this and don’t ACTUAL extend their hip because they lean forward or simply arch their low back.

If you don’t engage your glute and actually focus on extending your hip, guess what?! You don’t actually unlock your hips and you don’t really reverse all of the effects of sitting!

So no matter which version you pick, make sure to truly engage your glute and extend your hip and not simply your low back. If you are starting out, the version below is a great place to start! From there you can add in the quad stretch by grabbing your back foot or placing it up on a bench.

kneeling hip flexor stretch

To do the Basic Half-Kneeling Hip Stretch, start half kneeling on the ground. Flex your back foot and squeeze your glute as you drive your back hip forward. Reach your hand up overhead so that you feel a nice stretch down the hip of the back leg. You can reach both hands up or simply the hand on the side that is back.

Squeeze the glute of your back leg so that you are actually fully extending your back hip and not simply arching your back. If you just hyperextend your low back, you will just be perpetuating the problem. Make sure you are truly extending your hip.

Breathe as you hold and reach your hands backward overhead or turn this into a dynamic stretch by releasing and then repeating the stretch.

You can also reach your arms to the side over your front leg if you want to hit your hip from a different angle and stretch your TFL and even the muscles of your back that help you bend to the side.

Leg Swings – If you ask any of my in-person clients, they’ll tell you I make them do this one basically daily along with the Half-Kneeling Hip Stretch. I LOVE this one because it not only works on balance and activates the muscles that stabilize your feet and lower legs, but it also wakes up your core, activates your glutes AND opens up your hips.

And it does all of these things in different planes of motion, which means you’ll be mobilizing your hips so you can move well in every direction!

There are three main variations of the Leg Swing I use; however, you can really swing in any direction. Just make sure to really engage the glute of the standing leg to help you balance and even use the glute of the other legs to swing, especially on the rotational one!

3 way leg swihngs

To do the 3-Way Leg Swings, start standing on one foot. Feel your foot gripping the ground and engage the glute of the standing leg to help you balance. Brace your abs and stand up nice and tall.

Keeping both legs fairly straight, but not locked out, begin to swing the other leg forward and backward. Swing from the hip, don’t just bend your knee and kick your lower leg. The bigger your swings are, the more your standing leg will have to work to balance.

Do not hold on to anything as you do this move. If you need to at the beginning, just perform smaller swings and tap your foot down as needed to reset and stabilize. You can hold onto a wall if you want to remove the balance element and instead just focus on mobilizing the hip, but remember that you are then taking out balance work and even building some extra core stability.

Complete all reps of the forward/backward swing then, still balancing on the same leg, switch to lateral swings. For the lateral swings, swing the leg up to the right and then to the left in front of your standing leg. You may even feel the outside of that glute working to raise the leg up as you swing it. The bigger your swing, the more you will open up your hip and force your standing leg to work hard to balance.

After performing the lateral swings, bend the knee of the leg you’ve been swinging to 90 degrees and perform rotational swing.

To do rotational swings, bring the bent knee in front of you and then open it out to the side. Bring the knee back forward, keeping the leg bent the entire time. Really focus on opening from the hip with this move. You should really feel the glute of the standing leg working as you rotate. The more your rotate, the harder the move will be, but also the more you will open your hips and get your glutes activated.

Once you complete all three swings, switch to the other side and do all three swings.

If you do this move correctly, you will feel your foot, calf and even your shin muscles working to balance. You will also feel your glute and core engaging as you swing your leg to open your hip.

Again start with a more basic balancing pose if you can’t maintain balance or perform smaller swings. The whole point of this move is to improve your mind-body connection and get things activated so you can balance.

Bridging – I don’t care if you do a Camel Bridge, Tabletop Bridge, Basic Glute Bridge or any other variation of the Bridge…If you aren’t doing some sort of bridge almost daily, you are missing out on a great chance to not only improve your hip extension but also activate your glutes!

Unlocking your hip flexors and keeping them unlocked isn’t only about stretching. Because if you stretch and then go right back and sit, you’ll simply tighten everything back up.

BUT if you actually get the muscles activated and working and STRENGTHEN through the range of motion you’ve established, you can actually improve your mobility, unlock your hip flexors and prevent and alleviate low back and hip pain (as well as even knee pain among other things!).

No matter how advanced an exerciser you are, you should always include a Basic BODYWEIGHT Glute Bridge in your routine…I know I do.

A. Because it is important to always return to basics and establish/maintain your mind-body connection.

B. Because with bodyweight exercises we are often actually able to contract our glutes harder AKA really make sure they are activated and working correctly!

bridge exercises

Just a refresher on that Basic Bodyweight Glute Bridge…

To do the Basic Glute Bridge, lie on your back and bend your knees and put your feet flat on the ground. Your feet should be about hip-width apart. You may need to adjust your exact foot positioning based on how tight or mobile your hips are. You can move your feet slightly away or slightly closer to your butt, but just make sure you don’t move them so far away that you feel your hamstrings taking over.

Bend your elbows to 90 degrees so that only your upper arms are on the ground. This will help you really be able to drive down with your elbows, upper arms and back to help you bridge straight up instead of pushing yourself backward.

Then bridge up, driving through your heels and upper back and arms to lift your glutes up off the ground. Drive your hips up as high as possible, squeezing your glutes hard as you brace your abs. Keep your belly button drawn in so you don’t hyperextend your back. Focus and consciously squeeze your glutes at the top.

When you bridge, do not push backward off your heels. Make sure you are driving straight up and that your knees aren’t caving in. Even think about driving your knees forward over your toes to help extend your hips and prevent you from pushing yourself backward.

Squeeze your glutes for second or two at the top and lower all the way back down to the ground before repeating. Do not rush through the move.

OH and I also want to mention…Glute Activation and unlocking your hip flexors not only means reversing the effects of sitting so you prevent and alleviate injury and can lift more and run faster…

But it can also help with that LOWER BELLY POOCH!

Did you know that tight hip flexors can actually contribute to that hard to get rid of lower belly pooch!?! Well they can!

All the more reason to unlock those hips and get those booty cheeks working correctly.

For some essential flows and movements you NEED to be including in your workout routine, check out this program – Unlock Your Hip Flexors!

–> Click Here To Learn More About How To Unlock Your Hip Flexors! <–

3d rendered illustration of the psoas major muscle