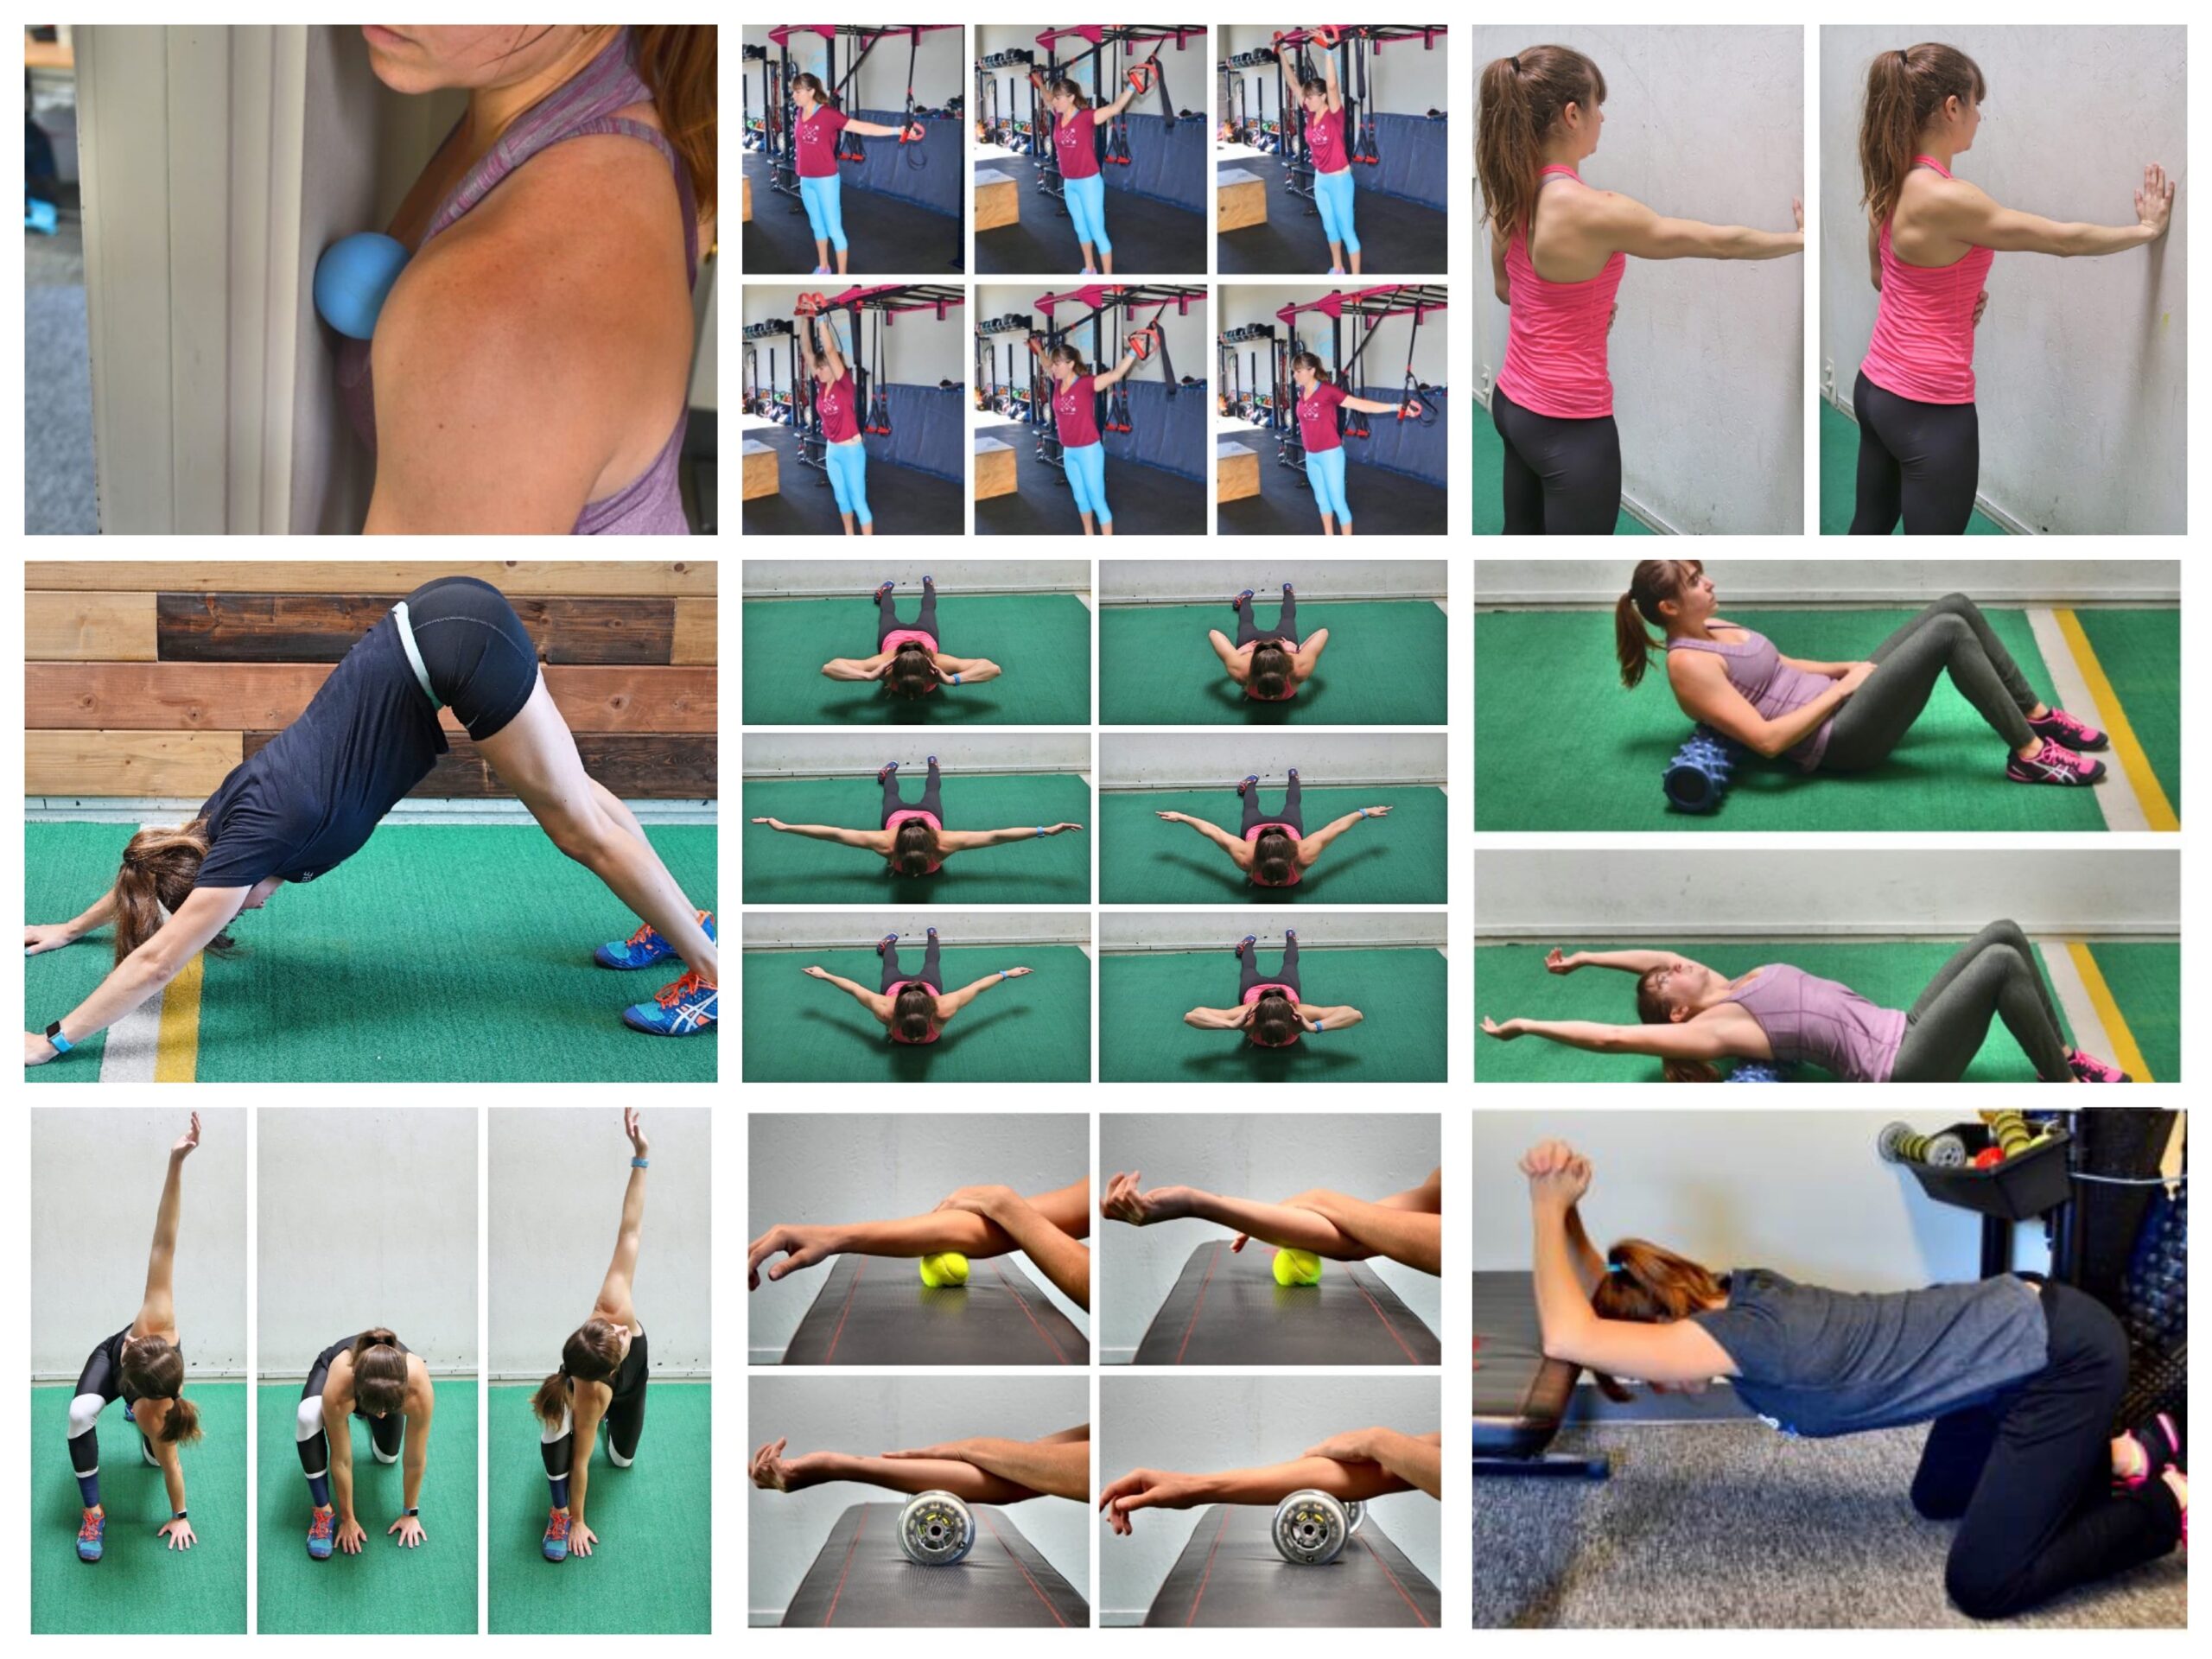
15 Moves To Improve Your Shoulder And Scapular Mobility And Stability
Often one of the first “warning signs” of potential injury can be immobility…especially when you notice a lack of mobility only during specific movements or on one SIDE of your body.
Neck pain? Shoulder pain? Upper back aches and pains?
Heck..even wrist and elbow pain!?
If a joint is restricted, it can lead to overload of other joints and overuse of muscles that aren’t meant to handle the load AKA compensations, imbalances and INJURY!
That is why it is key you address any restrictions in mobility you may have from say…YOUR DESK JOB.
Or commuting in the car. Or hunching over your phone as you text…
But improving your mobility isn’t as simple as just stretching.
Often we stretch and just feel like we tighten right back up because we keep replicating the same movement patterns and recruitment patterns that made us tight in the first place.
We may even foam roll having heard that foam rolling is like a massage and can loosen and relax tight muscles.
But again…it may feel good in the moment, but results never really seem to “stick.”
That is why you must include ACTIVATION MOVES and make your mobility work a 3-part process before you include more compound and strengthening or cardio exercises!
This doesn’t have to mean spending hours rolling, stretching and activating. Even just picking 1-2 moves of each for a quick 5-10 minute warm up can work wonders if you’re targeting your areas of tightness or weakness!
Below are 5 moves of each – Foam Rolling, Stretching and Activation – from my Arm Burner program to help you get started improving your mobility!
How To Improve Your Shoulder Mobility – Try These 15 Exercises
Foam Rolling:
Chest Foam Rolling:
Because so many of us spend so much time hunched over at a computer or seated in a car, our pecs or chest muscles can become tight and shortened.
This can lead to not only shoulder injury, but also be partly responsible for why your upper back and neck always feels tight! This can lead to the muscles of your upper back becoming over stretched and underactive.
That is why it is key that many of us start with relaxing our chest muscles!
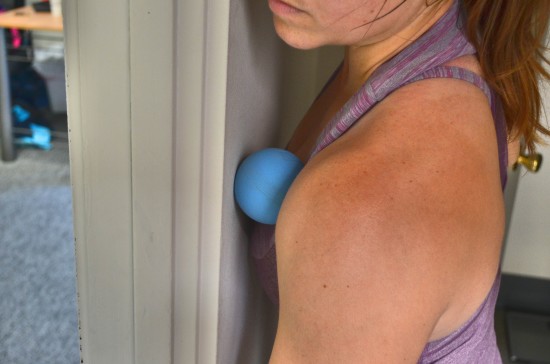
To roll out your chest, you can use a larger foam ball against the ground or a smaller ball against the wall (You can also use a smaller ball against the ground just make sure to elevate it on some books especially if you have carpet!)
If you use the ball against the wall or even on the ground, place the ball right in the side of your chest by your shoulder joint. Do not place it on your shoulder joint.
Then reach your hand up overhead and back down toward your feet. If you are using the ball against a wall in a doorway, reach your hand out in front of you, bringing it up overhead and then down toward the ground.
Roll the ball from your shoulder along the bottom of your collarbone to dig out your entire chest. Hold on any tight spots.
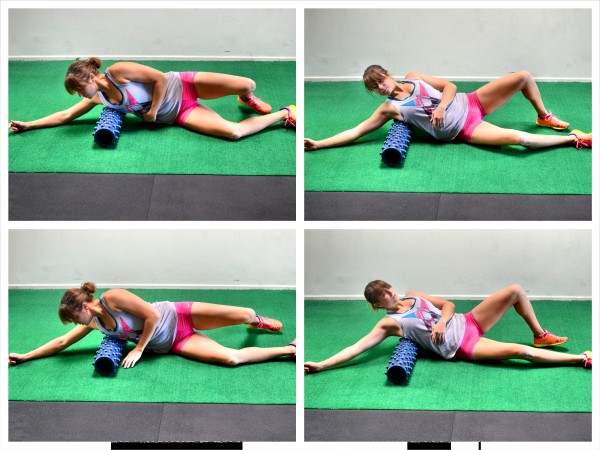
Lat Foam Rolling:
While we often think of our lats as part of our back, which they are, they can also perpetuate our hunched posture and rounded shoulders partly because of their insertion point in our upper arm.
Tight lats can not only limit your shoulder mobility, but lead to scapular pain AND even perpetuate SI Joint Dysfunction, making them an important muscle to pay attention to!
To roll out your lats a roller is best although you can use a foam ball or even a tennis ball.
Start by lying on your side with a roller under one armpit. Extend the arm on the side with the roller up above the roller. Then rock forward and backward on the roller, rotating your chest toward the ground and then up toward the ceiling as you roll on the roller so it hits toward your ribs and then toward your back.
Hold on any tight spots you find then move it lower down the side of your back. Hold on any tight spots as you go and make sure to rock forward and backward as you make your way down your side.
As you work down your side, you may want to rotate slightly more toward your back. Work all the way from your armpit to about the end of your rib cage.
Be careful when rolling lower down your back into your low back. You do not want to arch over the roller and hyperextend your low back.
Trap Foam Rolling:
Our traps are often addressed as three segments – upper, middle and lower traps – as each portion of the muscle does help with different scapular actions.
This is important to note as for many the upper traps may be tight while the lower and mid traps may be weak. (Just to throw a wrench in things though too, I do go into how the upper traps are an interesting muscle as they aren’t always overactive and tight or underactive and weak similar to the psoas in the Arm Burner program.)
But I list the “traps” as an important muscle to roll out, partly too because with this foam rolling move, you can not only address tightness in your traps, but also the other muscles of your upper back, such as your rhomboids, which can become overactive especially if your traps are weak!
This move can be key for anyone who’s suffered from tension headaches in the past.
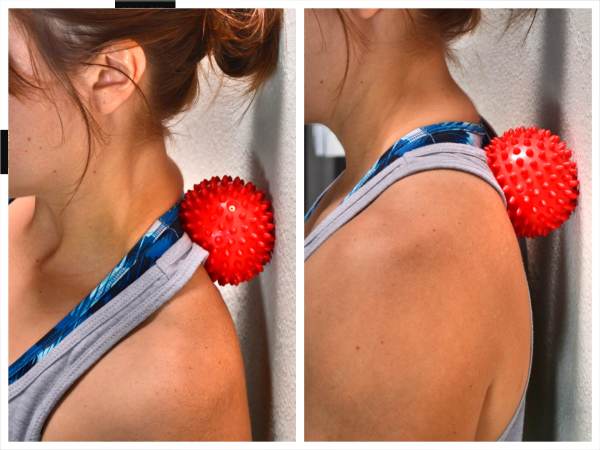
To roll out your upper back, traps and shoulders with a ball, stand with your back to a wall and place the ball to the side of the base of your neck. Press the ball into the wall and roll it down along your shoulder blade.
Hold on any tight spots. You may even want to pull your arm across your chest as you dig out under the shoulder blade.
You can also use the ball against the wall to dig out right at the top of your armpit behind your shoulder and all along your upper back from the base of your neck to the bottom of your shoulder blade.
If you want to apply more pressure with the ball, you can use a harder ball or use the ball against the ground instead of the wall.
Thoracic Extension:
This move helps relax the muscles along our spine to help us start improving our spinal, specifically thoracic, extension.
If we don’t have proper extension of our spine we will seek mobility from other areas. This can lead to not only upper body aches and pains, but also LOWER BACK pain!
A peanut is a great tool to use for this foam rolling move, or you can use a roller.
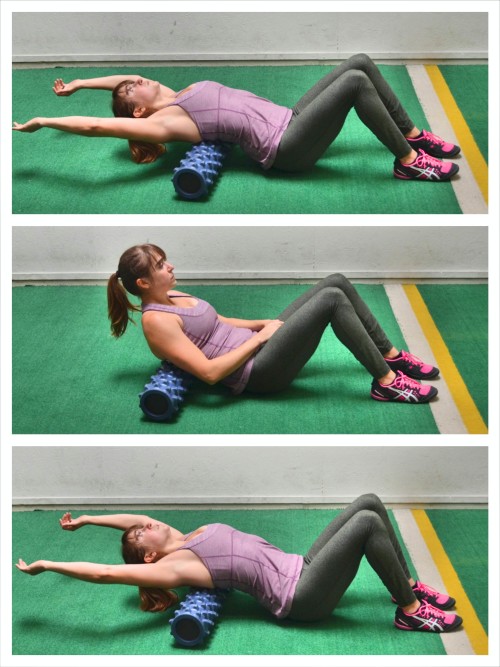
To work on your Thoracic Extension using a roller, place the roller on the ground and lie back over the roller with the roller at about your mid-back. You do not want to do this move with the roller in your low back or you could hyperextend your low back.
Cross your hands over your chest and, keeping your butt on the ground, extend your back over the roller. As you extend back over the roller, reach your hands overhead and relax your head and neck. Try to touch the backs of your hands to the ground behind you without lifting up your butt or putting the move all in your low back. Focus on extending your mid and upper back over the roller.
Sit back up and cross your hands back over your chest. You can then repeat, relaxing and extending back over as you relax your arms back overhead.
Perform the extension a few times, especially if the area feels tight, and then move the roller higher up on your back and, again with your butt on the ground, extend back over the roller. Hold for a second or two as you extend so that you can breathe and relax more over the roller.
Work all the way up your mid to upper back. Do not do this on your lower back. If you are going to work into your lower back, a peanut is a better tool that doesn’t hyperextend your lower back.
You can use a Rumble Roller, so a roller with “nobs” instead of a flat roller, if you want to dig in more.
Forearm Foam Rolling:
Our forearms are often forgotten muscles until we have to address them, whether to strengthen our grip to lift more, completely an obstacle course race or because of wrist and elbow pain and injury.
If you are spending a lot of time in the car, gripping the steering wheel or at a computer using your mouse or typing, it is a good idea to roll our your forearm, especially overactive flexors (the underside of your forearm).
However, depending on the elbow or wrist pain, it is important to note, you can also roll out your extensors.

To roll out your forearm, place a small ball or roller up on a table or desk. Place your forearm over the ball with it right below your elbow. You can start with the underside of your forearm down on the ball.
Then press down on your forearm with your other hand to press it into the ball. Start to make small circles on the ball to dig in more. Hold on any tight spots. If you find a tight spot, you can also tense and relax your forearm to help the ball dig in further. To tense and relax your forearm, you can flex and extend your wrist or even make a fist and then relax your hand.
By flexing and relaxing the muscles, you help the ball dig in and release the tight spot.
Roll the ball all along the fleshy part of the underside of your forearm. Then move to the outside of your forearm. Make sure to get the outside and inside of your forearm as there can be trigger points in both spots causing potential wrist and elbow pain.
Don’t waste time on any areas that aren’t tight or sore. Seek out and spend time on any areas of pain.
Apply as much pressure as you can handle and use as small and hard a ball or roller as you can.

Stretching:
Shoulder Flossing:
Especially if you are loosening up before a workout, you don’t want to HOLD stretches, but instead try to put the joint through a full range of motion so you can then strengthen through that full range of motion.
And shoulder flossing is a great way to start mobilizing the shoulder joint.
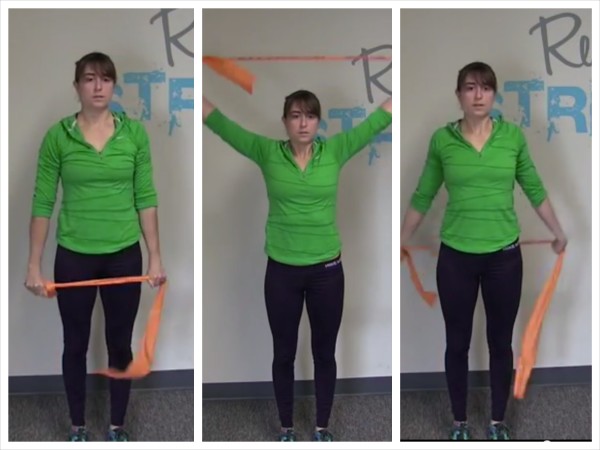
To do Shoulder Flossing, hold a band or towel in both hands with your hands about shoulder-width apart. You will adjust your hands in or out based on your mobility. Closer together requires more mobility, while further apart requires less. If you use a band, there will be some give so you can stretch the band if needed; however, with a towel there will be no give so make sure to set up correctly so that you can keep your arms straight through the full range of motion.
Stand up nice and tall with your chest pressed out as you hold the band in both hands in front of your legs.
Keeping your arms straight, lift your arms up overhead and then open them back up behind you. Reach them back toward the ground behind you, bringing them back down toward your butt. Then bring your hands back overhead and forward.
Because the band will stretch, it will give you a little play and allow you to open up wider if needed to get your arms in a full circle unlike the towel. Remember to hold in closer on the band as you gain more mobility and don’t need the band to stretch as much to allow you to complete the circle.
Half-Kneeling Thoracic Rotations:
Spinal mobility is key to helping us prevent neck and shoulder aches and pains. And we have to remember that our spine doesn’t only allow us to flex or extend but also rotate!
With Half-Kneeling Thoracic Rotations, you can improve your spinal mobility, open up your chest and even stretch your glutes a bit!
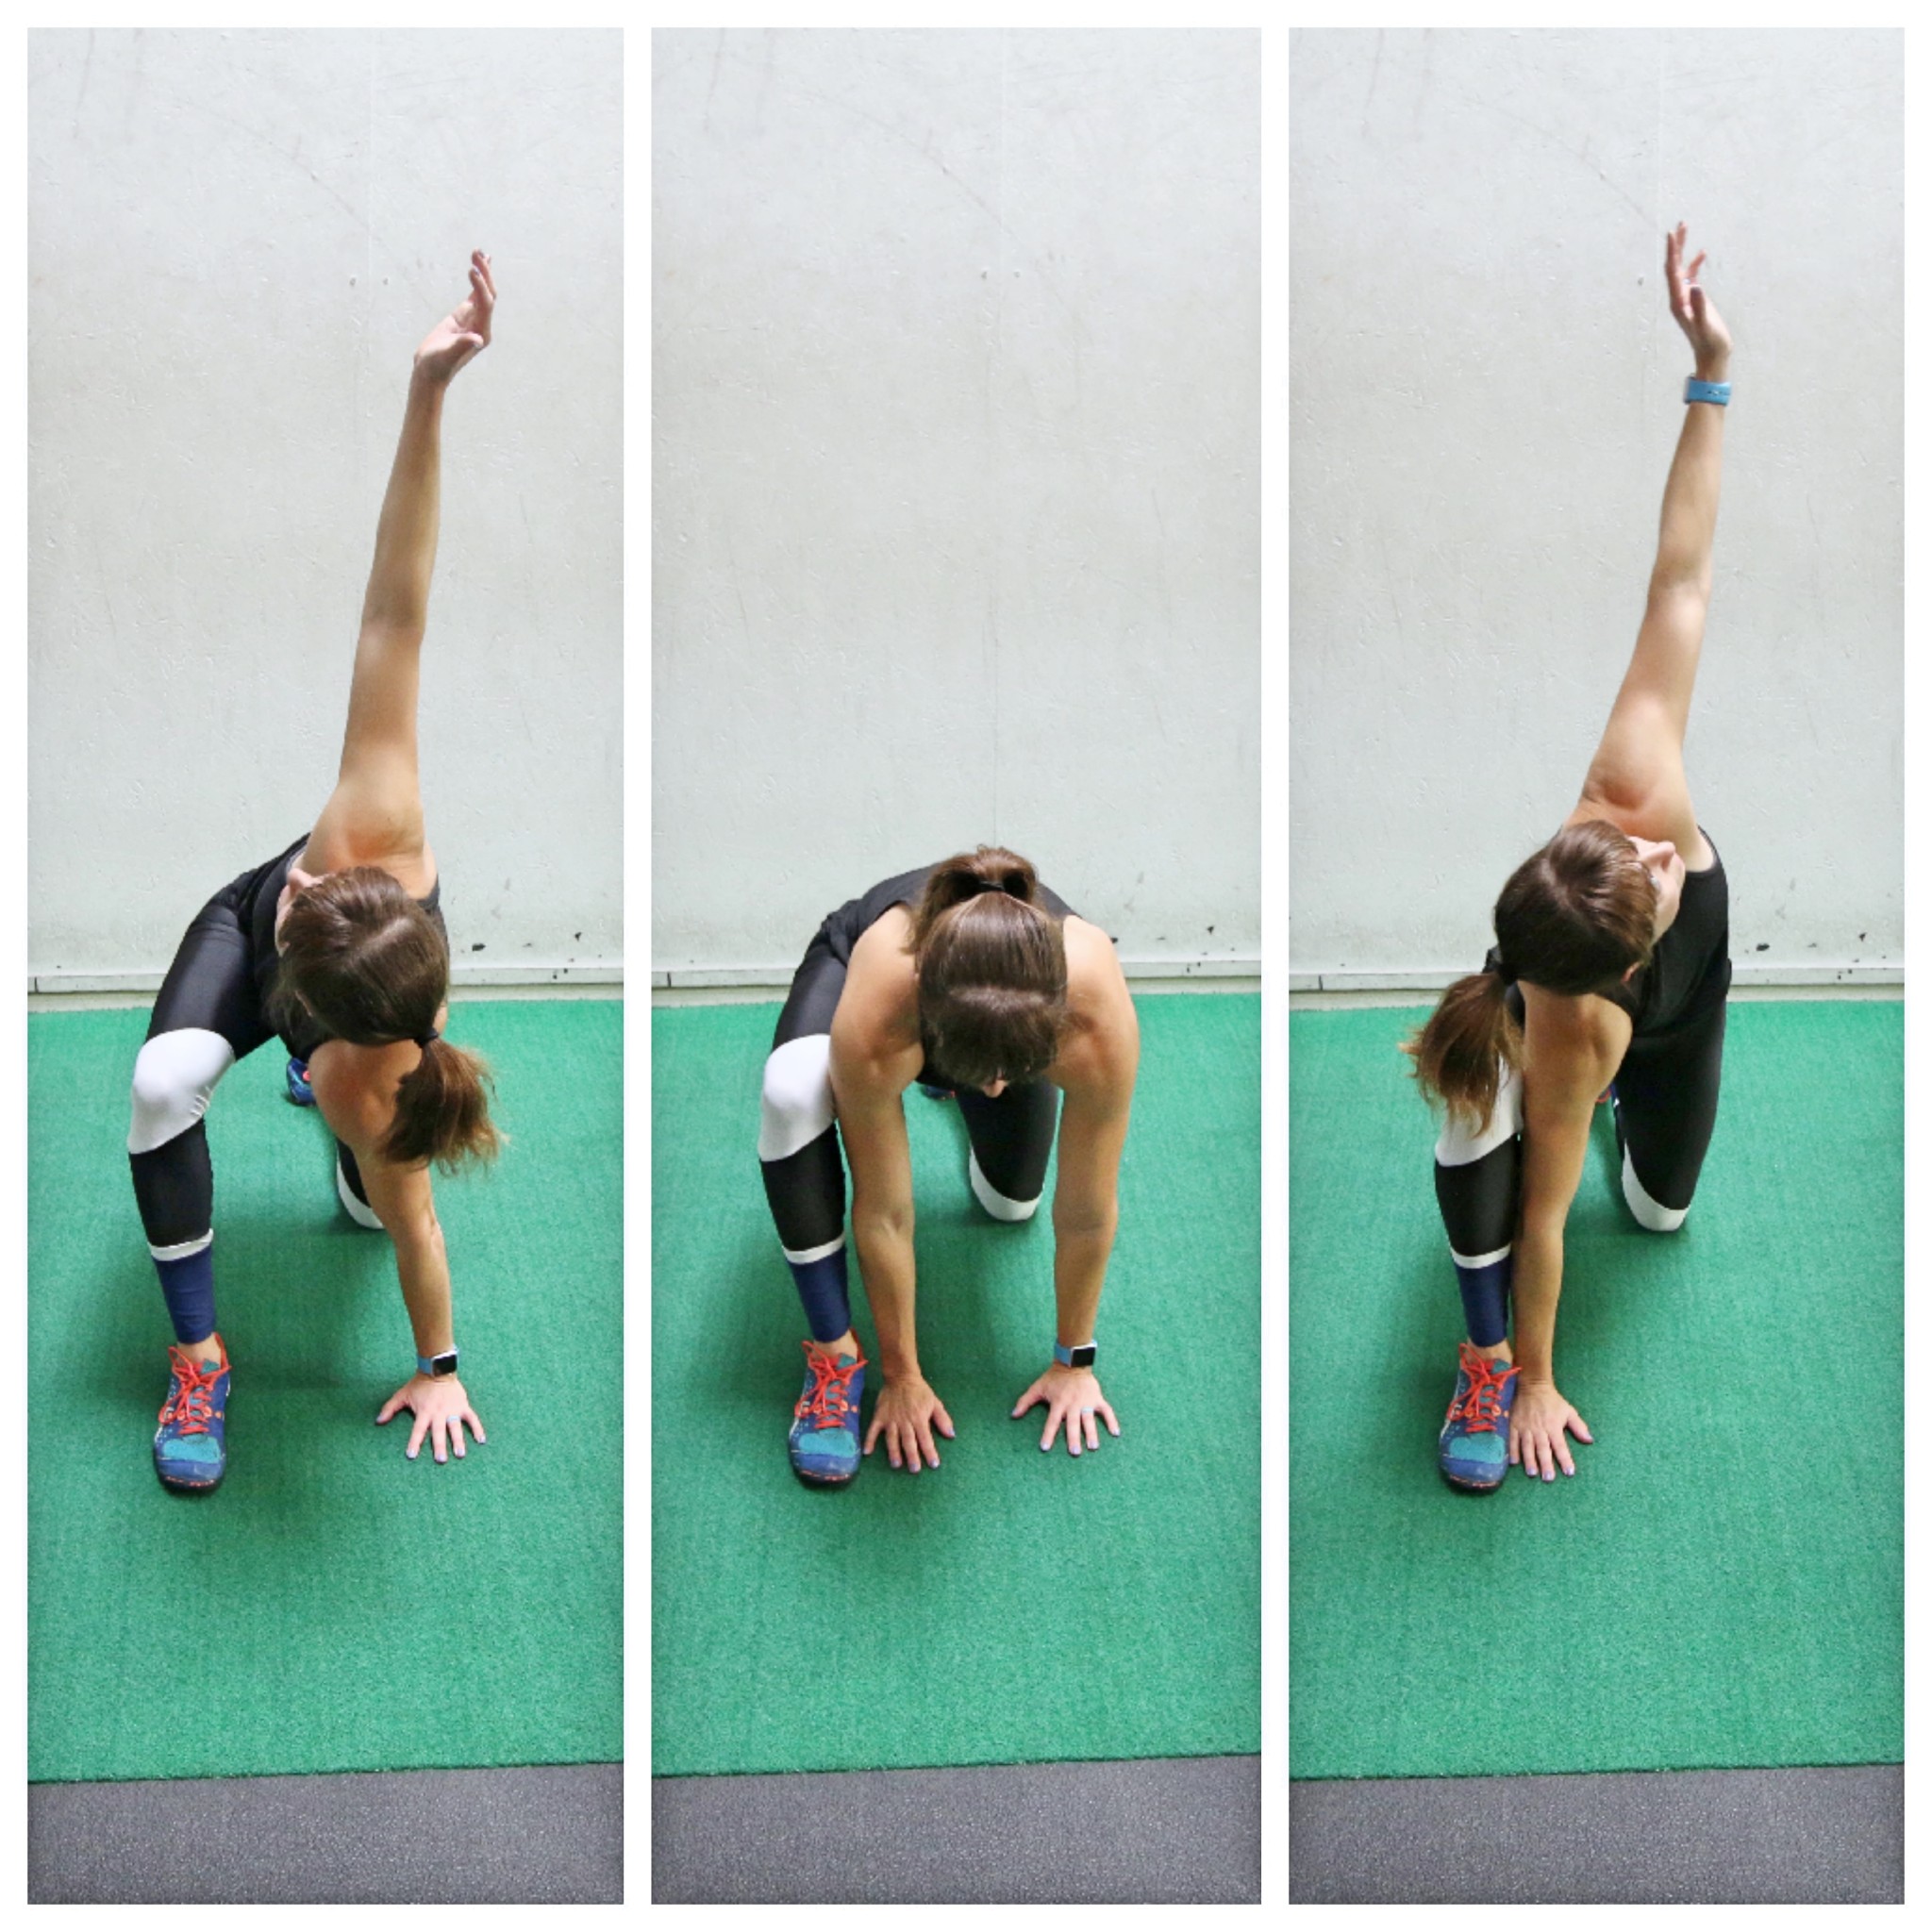
To do Half Kneeling Thoracic Rotations, set up in a half-kneeling position on the ground with both hands on the ground inside your front foot. Palms should be flat on the ground. If you are less flexible, you may need to come up a bit on your fingers as you rotate.
Then lift one hand and rotate your chest toward the front leg. Keep your front foot flat on the ground as you do it. Reach up and rotate your chest toward that front leg. Place the hand back down on the ground and then lift your other hand up toward the ceiling and rotate your chest away from the front leg. Really reach open and don’t let your front foot rock open.
You can even keep that arm against the leg to help you rotate. Place the hand back down and repeat the rotation toward your front leg. Move slowly and keep your front foot flat on the ground.
Kneeling Thoracic Extension And Lat Stretch:
This move can help improve your spinal extension aka reverse the constant forward flexion or hunched posture while also improving your shoulder mobility. It can stretch your lats and even your triceps.
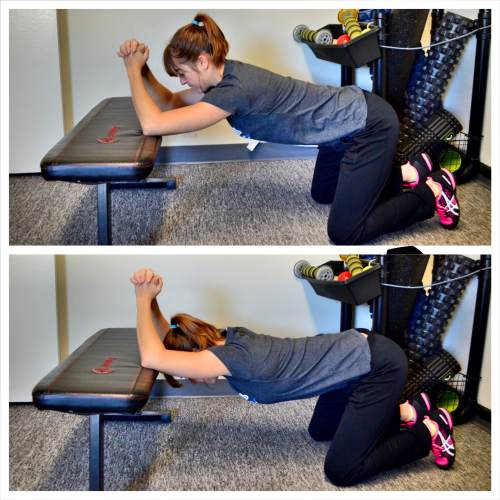
To do the Kneeling Thoracic and Lat Stretch, place your elbows up on a bench about shoulder-width apart and kneel on the ground in front of the bench. Make sure you are back far enough that you have room to lean forward and over and drop your head between your elbows.
Then with your elbows on the bench, relax your chest and head over, sitting your butt back just slightly. Press your chest toward the ground and feel a nice stretch down your triceps and lats as well as through your thoracic spine. Try to extend your back as much as possible as you press your chest toward the ground.
You can either hold here and breathe to stretch deeper or you can come out of the stretch and then relax back into it and try to get further with each rep.
Suspension Trainer Snow Angels:
Since most of us spend so much time seated hunched over, we not only want to relax the muscles of our chest with foam rolling but also stretch them out!
I love this stretch too to open up the chest and improve your posture and shoulder mobility because it can also be a unilateral move if you find one side is tighter!
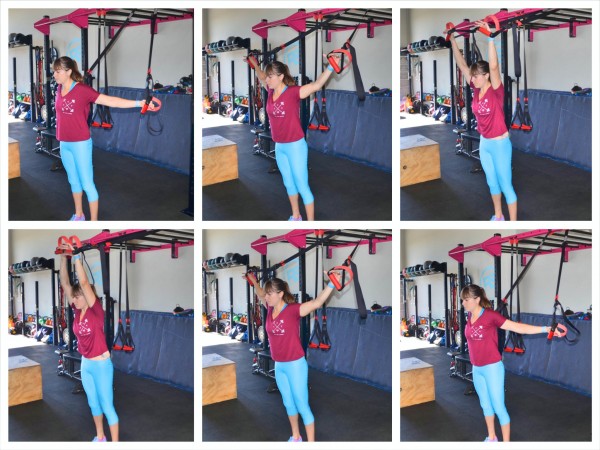
To do the Suspension Trainer Snow Angels, you will need a suspension trainer, rings or even towels or resistance bands anchored behind you.
Using a Suspension Trainer, hold a handle in each hand and walk away from the anchor point with your back to the anchor point. Extend your arms straight out to your sides at shoulder height and walk away from the anchor point so that you feel a stretch in your chest.
You may have to adjust slightly backward or forward as you begin to do the wave, depending on your mobility.
Then, standing still with your arms starting out at shoulder height, raise your arms up overhead. Keep your arms straight as you extend overhead and even lean slightly forward to increase the stretch.
Hold for a second or two and then bring your arms out and down to the side, lowering them all the way back and down toward the ground. Keep your arms straight as you bring them down.
Feel the muscles of your chest and even around your shoulder stretching as you lower your arms down.
Then bring them back up out to the side and back overhead. Move in a fluid, smooth “wave” as you lift and lower. This movement also sort of looks like you are drawing a snow angel behind you.
Move slowly to wave the arms up and down. Make sure you are far enough out and leaning slightly forward so that you feel a stretch. If it is too much and you can’t move your arms in a full wave, move back slightly or don’t lean in as much.
Hold at any point that feels extra tight for a breath or two.
Thread the Needle:
If you’re upper back and neck constantly feel tense, this can provide some more “instant” relief, even if not lasting relief.
You will feel this move all across your upper back and even gently in your neck.
While this can be a move used as part of your warm up if you alternate sides, pausing for only a breath on each side, it is also a great move to include in your cool downs or recovery workouts as a static stretch.
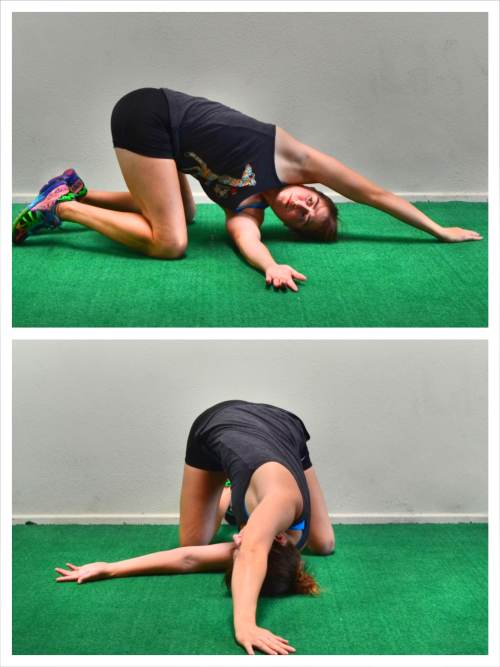
To do the Thread the Needle Stretch, kneel on the ground and then lean forward, reaching one arm overhead to place the palm on the ground as you reach the other one under your arm to relax the side of your head and body down to the ground. As you relax the side of your head and your bottom shoulder down, use the hand overhead to help rotate your chest open toward the ceiling.
You are “threading a needle” by reaching one arm through the “hole” created by the arm reaching overhead.
Breathe and relax into the stretch so that you feel a stretch down your neck and across your shoulder blades. Rotate your chest up and open. You can walk your top arm back behind your head to increase the stretch.
Hold and then thread the other arm under and through.
Hold each stretch for at least a second or two before switching. Sit back onto your heels if you can keep your head and shoulder on the ground.
Activation:
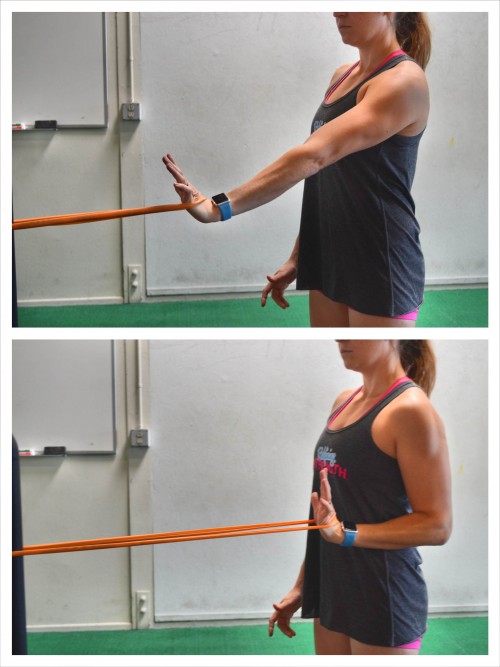
Single Arm Scapular Push Up:
Working on your scapular retraction can be key to keeping your neck, shoulders and upper back aches and pain free! It can also help you improve your pull ups as well while improving your shoulder stability.
The Single Arm Scapular Push Up is a great move to use too because it is a unilateral move that will allow you to address each side independently and correct any imbalances.
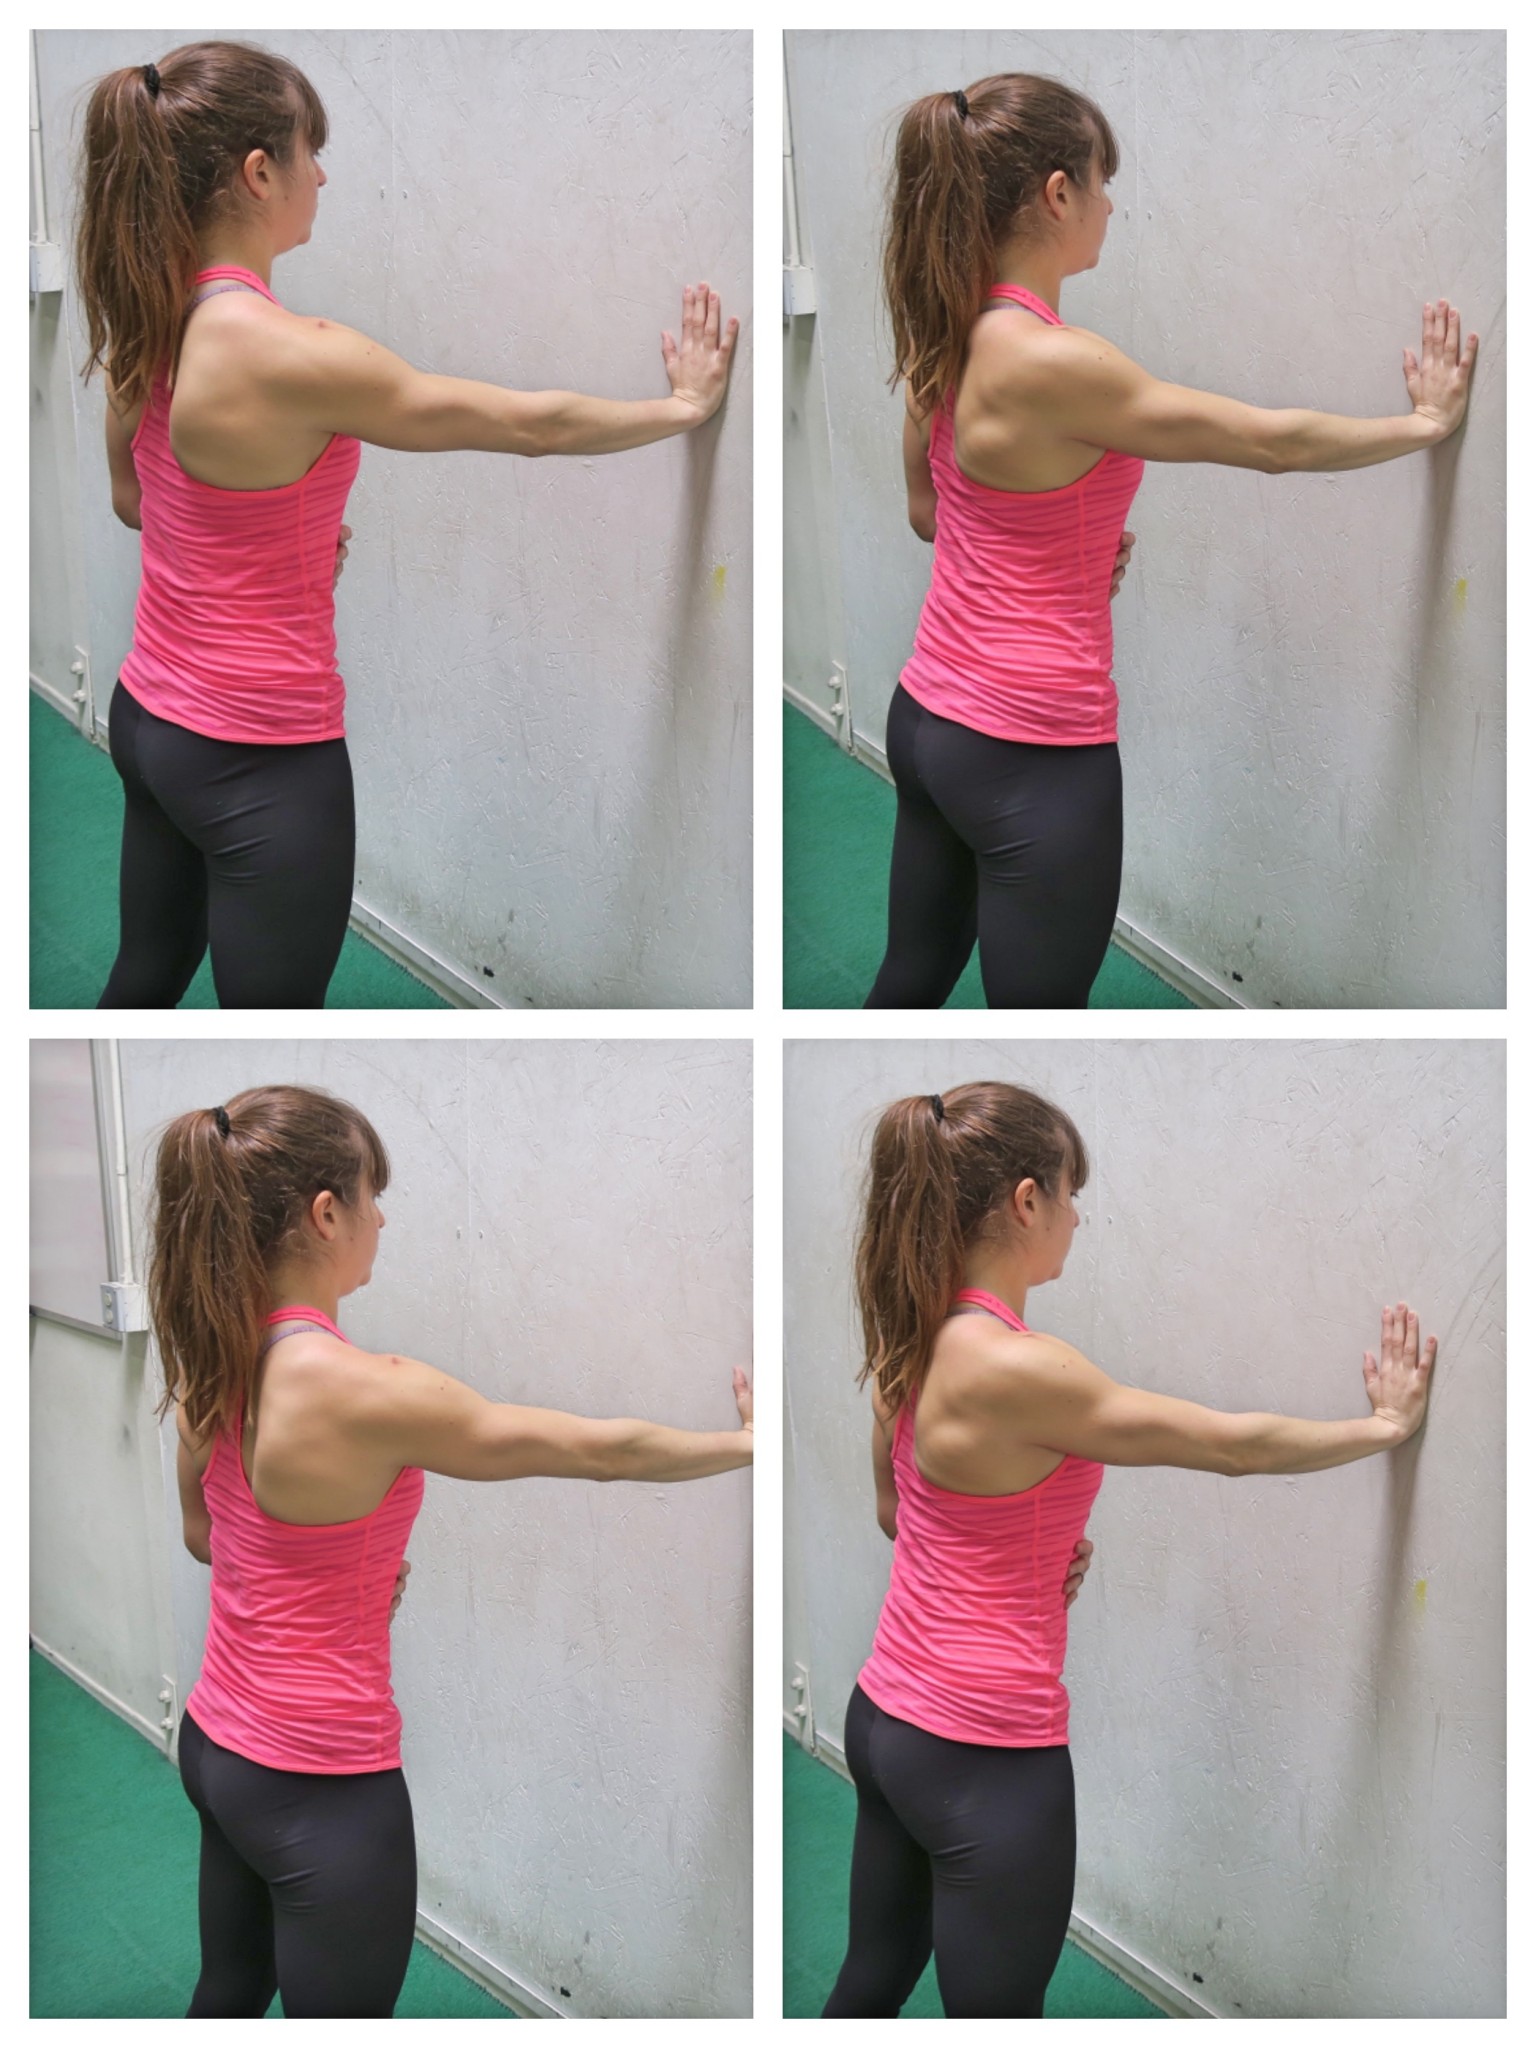
To do Single Arm Scapular Push Ups, set up facing a wall. Place one hand up on the wall at about shoulder height. Your arm should be straight, but make sure you aren’t shrugging. You can be at a slight incline to make the move harder by walking your feet back, but start standing more vertical to the wall so you can really focus on proper movement of your shoulder blade.
Then, keeping your elbow straight, press your chest toward the wall as you feel your shoulder blade retract back. You should feel your shoulder blade move toward your spine. Do not shrug your shoulder as you focus on moving the shoulder blade. Pause then relax back out.
Make sure you don’t shrug or bend your elbows or rotate to try to make the movement bigger. Keep your core tight and isolate that one side working. You will feel the muscles along the side of your back and your ribs working. You can even put the opposite hand below your armpit on the working side to feel those muscles working.
Back Of Hand Rows:
I love moves that hit a number of muscles or address a number of issues at once.
Not only is this move a great workaround if you do have elbow pain but want to continue working your back, but it is also a great activation move for your back while improving your wrist extension!
To do the Back of Hand Band Row, anchor a resistance band in front of you and either loop it or make sure it has a handle you can put your hand through. Place the band or handle around the back of your hand and point your fingers up toward the ceiling. Step away from the anchor point so that there is tension in the band with your arm extended in front of you.
Stand up nice and tall and press your chest out as you face the mini band. Your feet should be about hip-width apart. Make sure you aren’t shrugging your shoulders as you hold your arm out in front of you with the band around your hand.
Then drive the elbow down and back as you row the back of your hand and the band into right below your chest. Row low so that you don’t shrug your shoulder. Also, don’t rotate as you row.
Feel your back pull the band back. Don’t just use your arms. Also, make sure that your upper traps don’t try to take over.
Really press the chest out and drive the elbow down and back. Straighten the arm back out and repeat.
Focus on feeling your back pull the band and not just your arm. By focusing on what muscles should be working, you will improve your mind-body connection.
Also, make sure to keep your fingertips pointing up toward the ceiling to engage the extensors in your forearm.
Mini Pull Ups:
This is a more advanced activation move but one that is key if you want to be able to do your first pull up.
Often the hardest part of achieving that first pull up is that initial engagement – that initial retraction and depression of the shoulder blades.
It’s why you may not be able to go from a full dead hang to a pull up, but if you jump just a little over that initial hurdle you can pull all the way up.
The Mini Pull Up is the perfect way to really activate and strengthen your back so that you can retract and depress your shoulder blades and prevent your shoulder from becoming overworked and injured.
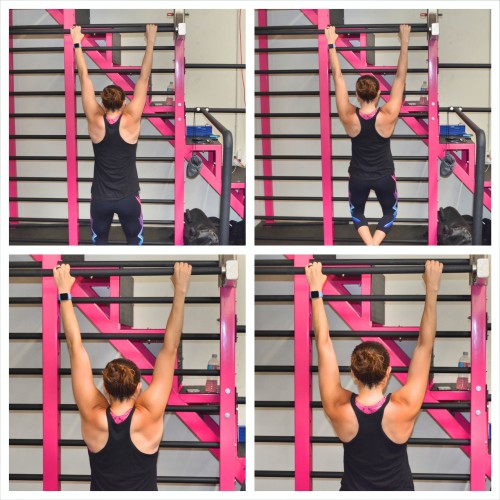
To do Mini Pull Ups, start hanging from the bar with your palms facing away from you and your hands about shoulder-width apart.
From this dead hang position, press your chest out and up toward the bar as you draw your shoulder blades down and together. Feel your back engage as you draw your shoulder blades together and press your chest up toward the bar. You will feel your shoulders “unshrugging.”
Don’t bend your elbows and turn this into a pull up. You are simply working on that initial retraction and engagement. Really press your chest out and retract your shoulder blades, bringing them down and together.
Again, do not bend your arms to pull up. Use your back and feel your back engage. You should also feel your shoulders go down as your chest lifts up.
Pause at the top then relax back down to a full dead hang and repeat. Remember, you are not bending your elbows to make this movement bigger.
Because this is an advanced activation move, beginners may need to keep their feet down for assistance.
Prone Snow Angels:
Improve your shoulder mobility and activate the muscles of your upper back as well as your rotator cuff with this move. It is also a great move to start working on your scapular mobility.
Clients with less mobility may even need to start with this move standing facing a wall.
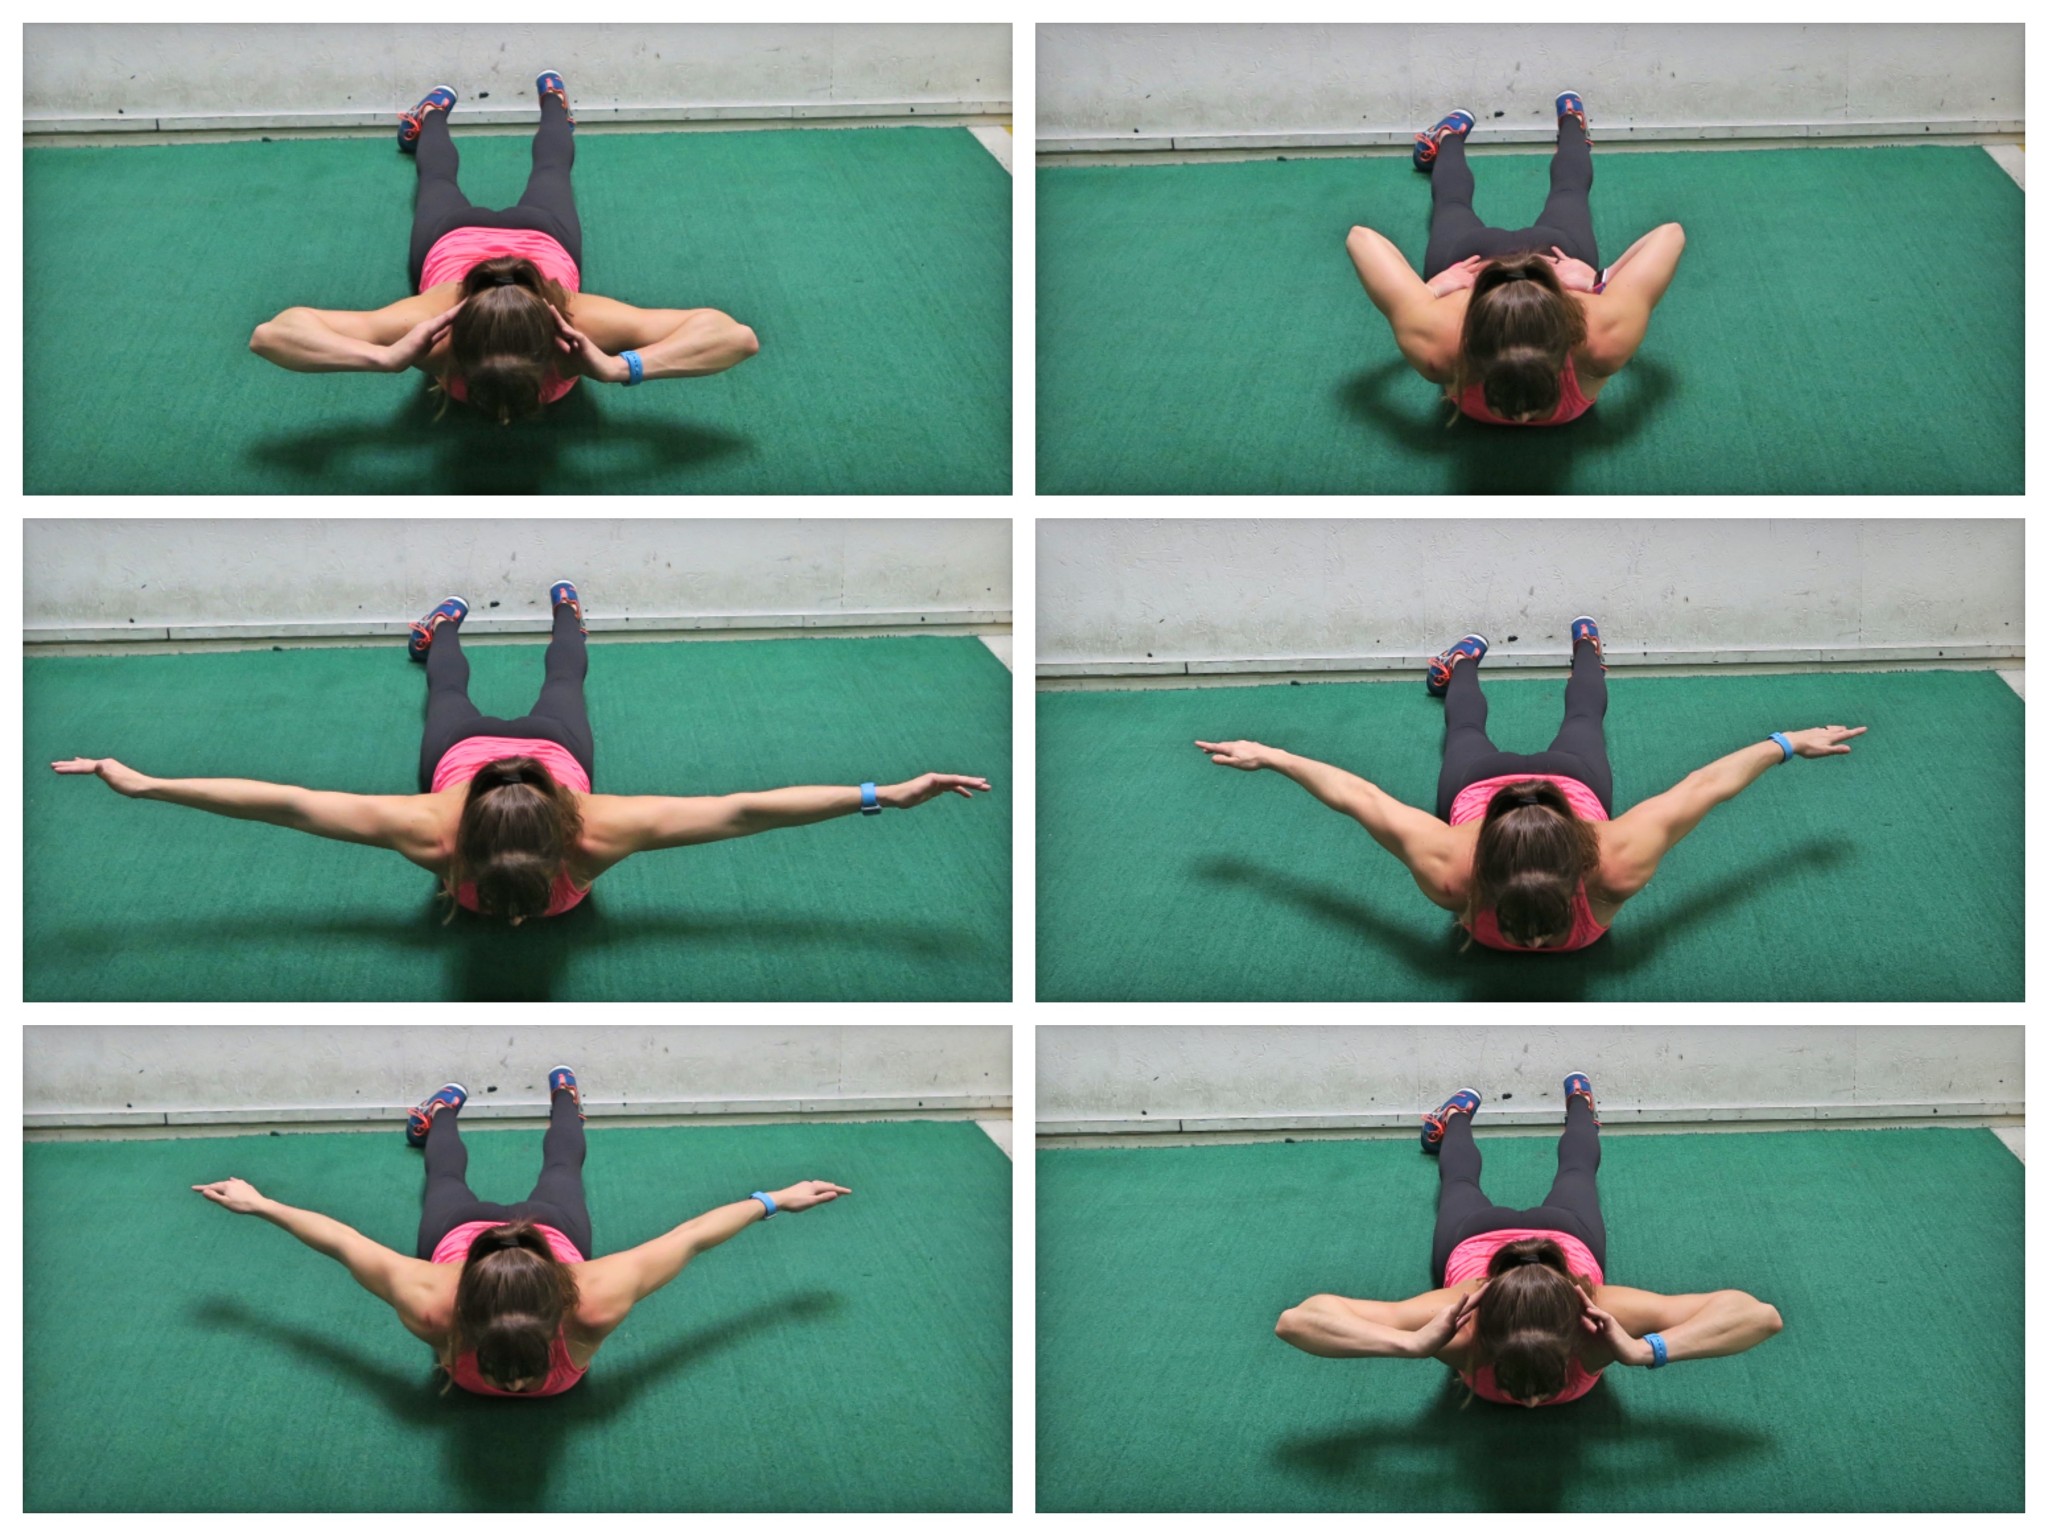
To do Prone Snow Angels, lie face down on the ground with your legs relaxed. Place your hands behind your head and then lift your chest up slightly off the ground as with the cobra. Do not arch so much to start using your low back back but just enough to engage your upper back.
Then begin to straighten your arms up and out overhead before slowly moving them out to the side as if creating a snow angel.
As you bring your hands back and down toward your butt, flip your hands over, rotating your shoulders as you bend your elbows to bring the backs of your hands to your low back.
Then reverse the motion, bringing your hands back out to the sides then back behind your head. Make sure to keep your chest slightly up, but do not let your low back take over. Keep your neck also relaxed as you do this and really feel your upper back and the backs of your shoulders working to keep your arms off the ground as you perform the move.
Downward Dog Scapular Presses:
Work on your spinal extension, shoulder stability and the elevation and depression of your shoulder blades with these scapular presses. It can also help activate and strengthen your serratus anterior which is a key muscle for scapular stability and even shoulder health.
Especially if you want to improve your stability with overhead pressing moves, this is a key activation exercise to include!
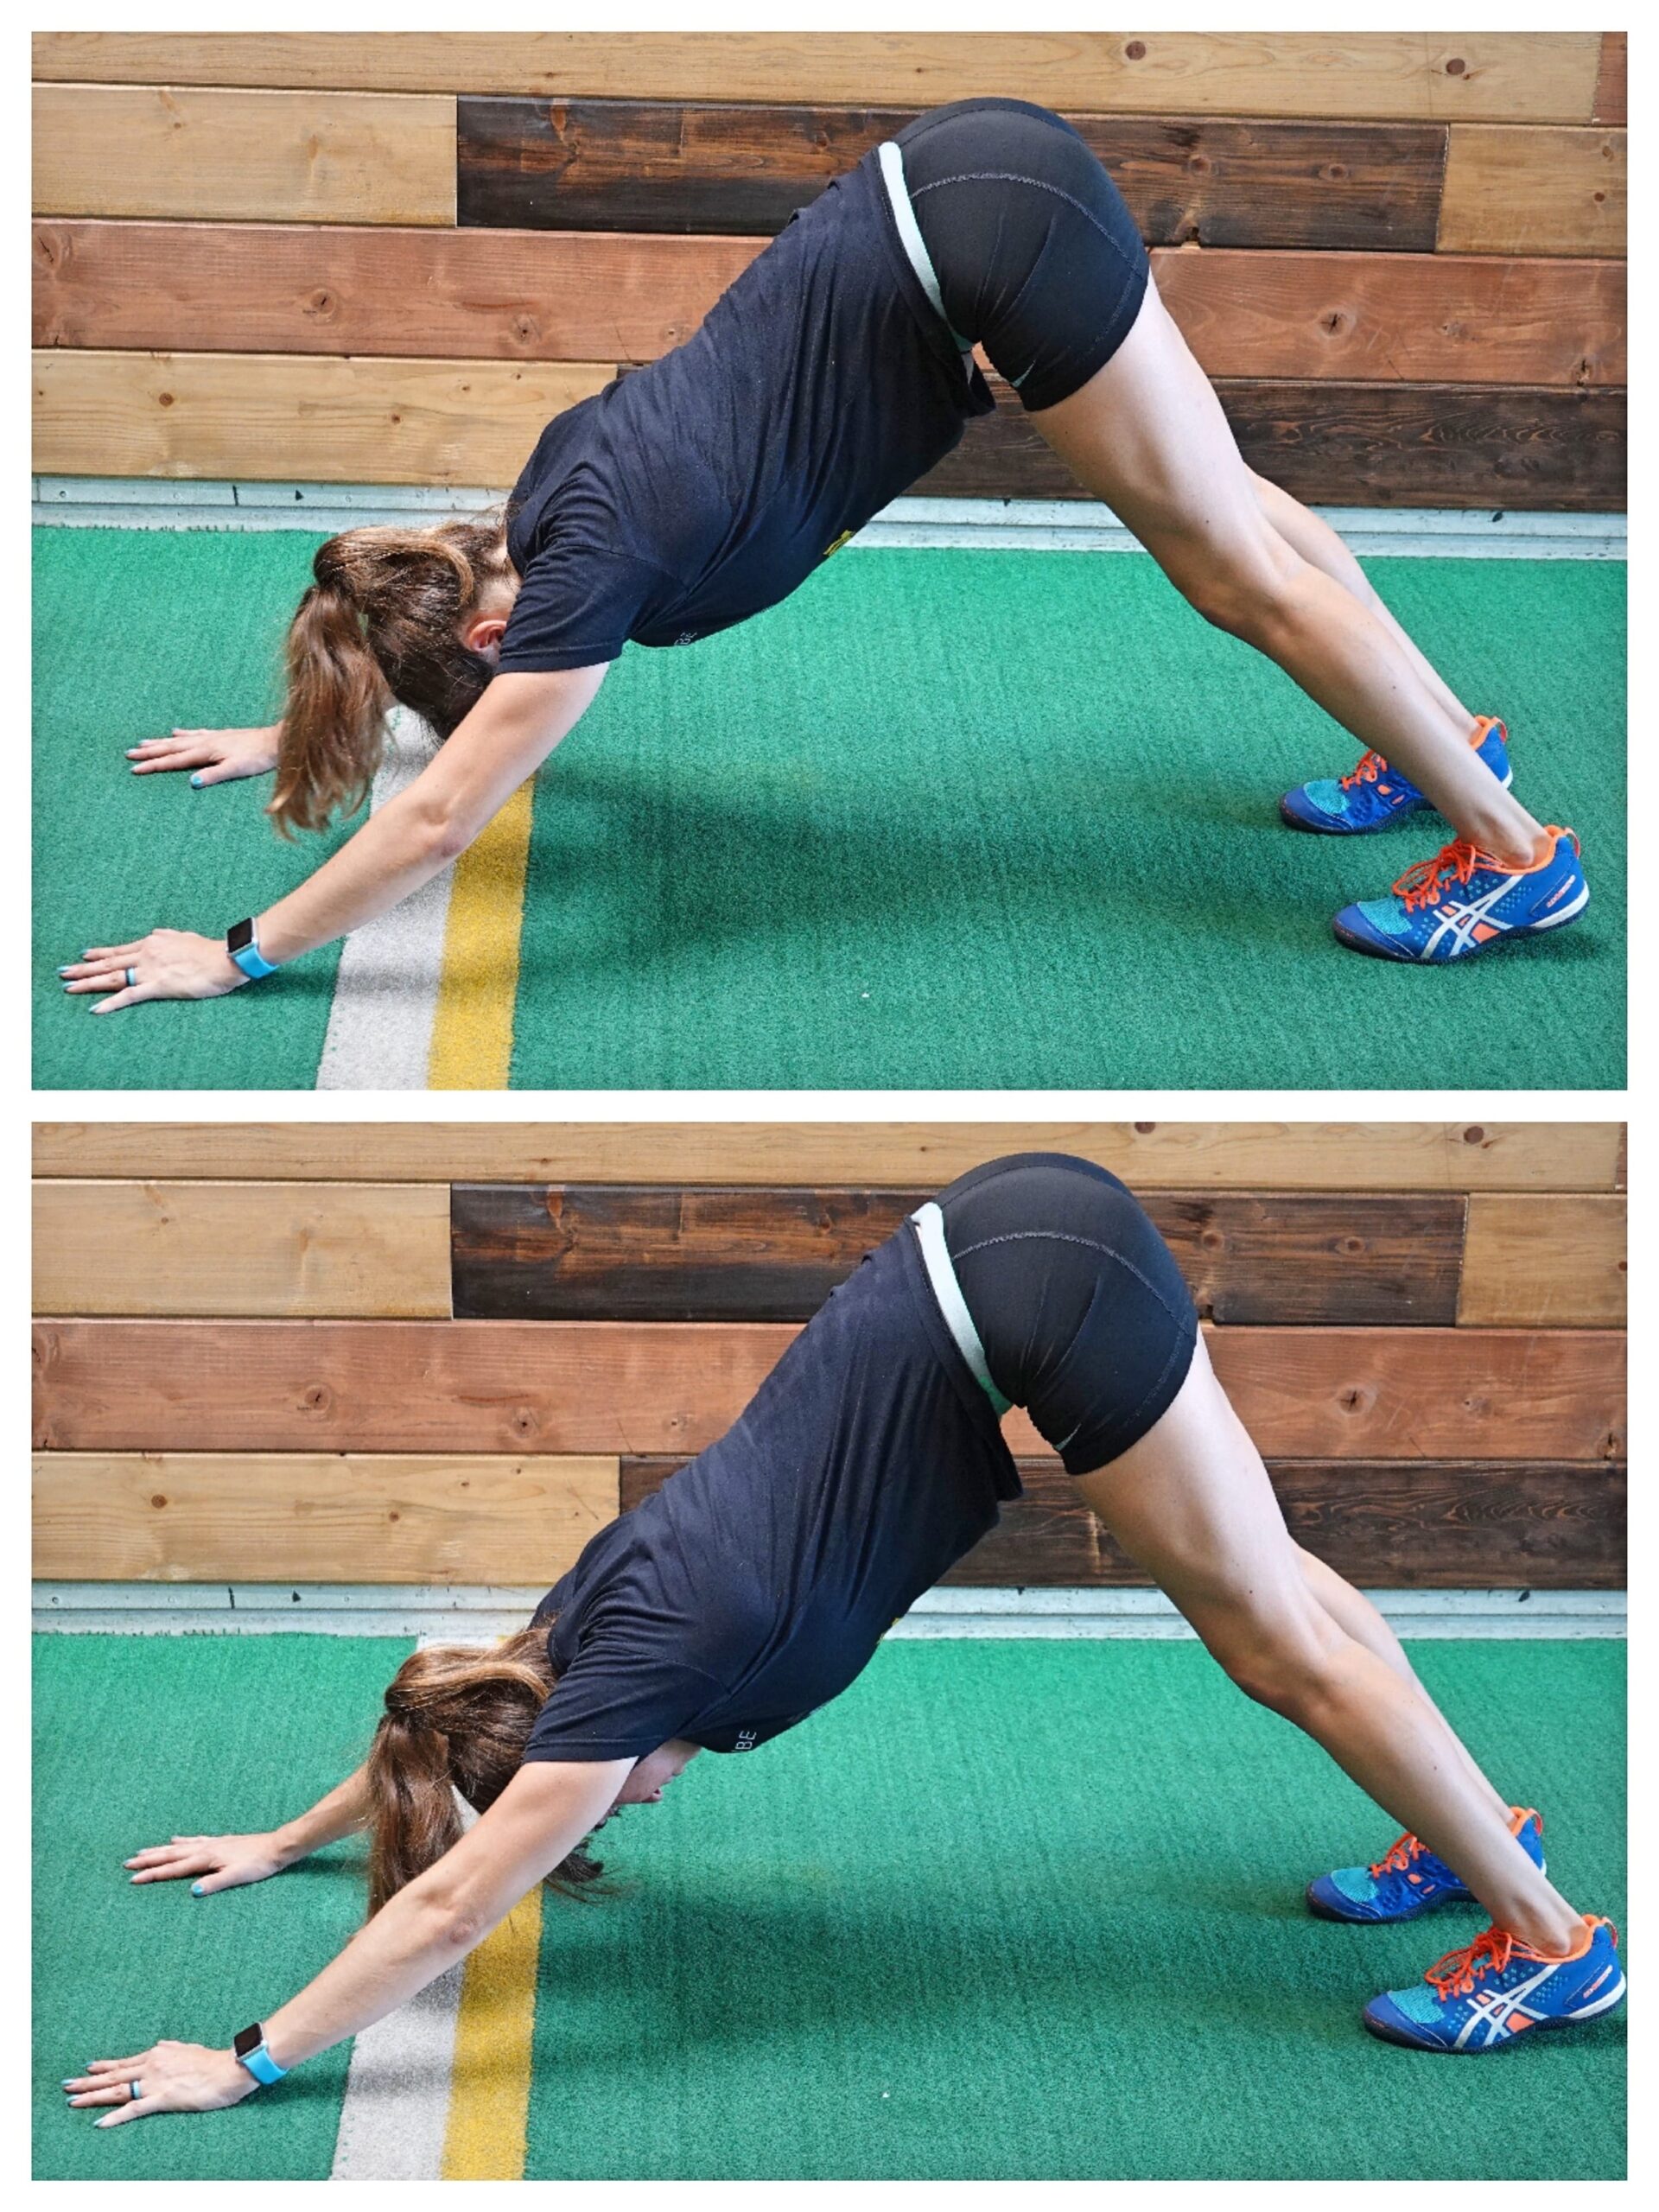
To do the Downward Dog Scapular Presses, start in a high plank position from your feet and hands with your hands under your shoulders and your feet about hip-width apart. Then drive your chest back toward your legs as you push your butt up in the air. Drive your heels down toward the ground as you try to get your biceps by your ears and extend your spine.
Do not walk your hands back and try to really drive through all of your fingers as well as your palm. Do not rock to the outside of your hands. Pause in this Downward Dog position.
Then push the ground away to elevate your shoulders while staying in this downward dog position. Then relax back into the normal downward dog. You are trying to elevate and relax your shoulders. Do not come back forward into plank until all reps are complete.
It will be a small range of motion. Focus on moving your shoulder blades.
Need workouts and a program to get you on track and consistently working to improve your shoulder and scapular mobility snd stability? Then check out my Arm Burner program.
The Arm Burner Program – Avoid aches and pains, strengthen your upper body and improve your pull ups and push ups! LEARN MORE –>

