Planks are a must-do core move. And while you should always include the Basic Planks in your workouts, it can be fun to add some variety in every once in awhile.
All of these Plank Variations will continue to build your core strength and stability and help you prevent and alleviate low back and hip pain.
Unlike the Basic Planks, though, most of these aren’t isometric holds. Many of these Plank Variations involve movements that emphasis one area of your core, such as your shoulders, glutes, abs, obliques or quads.
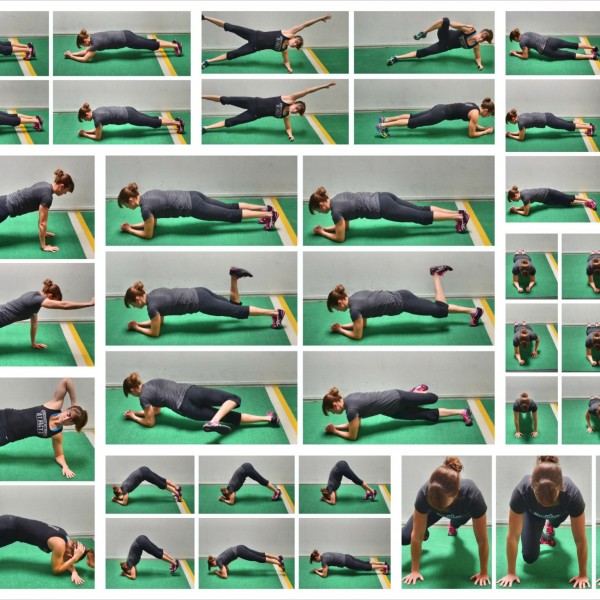
Check out these 15 Plank Variations to include in your Core Training Program.

15 Plank Variations
Before moving on to these Plank Variations, you want to make sure that you’ve mastered the Basic Plank with Pelvic Tilt.
If you haven’t master these basic movements, you may not recruit and engage the muscles of your core properly, which may cause your low back to do work it can’t handle.
To get the most out of these 15 Plank Variations (and some bonus in the video!), make sure your low back isn’t taking over and that you can engage your glutes and abs properly. For tips to help you master the Pelvic Tilt and Basic Plank, check out these Pelvic Tilt Progression and Perfect Plank Form posts.
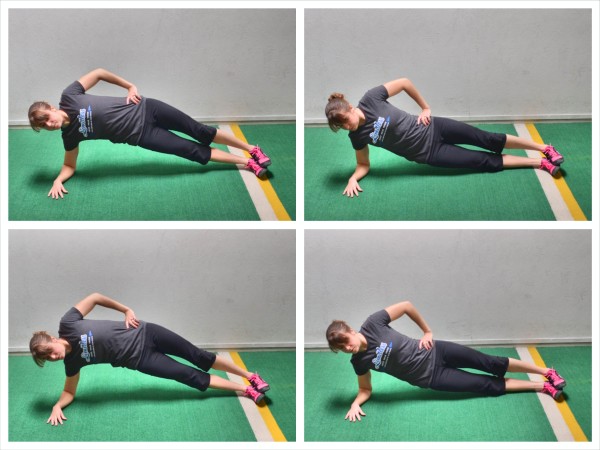
Side Plank Oblique Twists:
Side Planks are a great way to strengthen your shoulders, back, obliques, glute medius and abduction muscles. And when you add in the Oblique Twist, you make the move more challenging, not only strength-wise, but also simply in terms of engaging the proper muscles to stay balanced.
To do Side Plank Oblique Twists, set up in a side plank from your forearm with your elbow right under your shoulder. Do not let your elbow get way out beyond your shoulder or you will place more strain on your shoulder. By keeping the elbow “stacked” under the shoulder, you allow your back and lat to help support your weight.
You can then either stack your feet and lift up onto the side of your bottom foot or you can place the top foot in front on the ground and lift up onto the sides of both feet. Unstacking your feet will make it a bit easier to balance. Beginners may need to place their bottom knee down on the ground.
Lift up into a Side Plank, squeezing your glutes and keeping your chest open toward the ceiling as you drive your bottom hip up.
Place your other hand behind your head or neck to create a “chicken wing” aka your elbow up toward the ceiling.
Then, keeping your bottom hip up, rotate your top elbow down toward the ground and even back toward your elbow on the ground. Keep your hips up. Your butt may hike up a bit as you rotate. Don’t just flap your arm or let your butt go way up in the air.
Make sure to actually rotate your core to drop your elbow down toward the ground. You want your chest to rotate toward the ground and feel your core working to twist.
Then rotate back open and repeat. Feel your body working to stabilize as you twist.
Complete all reps on one side before switching.
Plank Scorpions:
Plank Scorpions are another great rotational exercise to work your entire core and really blast your obliques. This move also really works your legs, even your inner thighs, and shoulders to allow you to twist while not rotating all the way over.
To do Plank Scorpions, set up in a plank position from your forearms. You can do this from either your knees or your toes. Whichever you do, make sure your body is in a nice straight line from your head to your heels or knees. Engage your core and line up your elbows under your shoulders.
Bend one leg to 90 degrees with your foot up toward the ceiling. Then kick your foot back over yourself toward the ground on your other side. Rotate your foot over with your core while keeping your hips up and your elbows on the ground. Do not let your butt go way up in the air as you rotate either.
Then come back to a front plank and place that foot back down onto the ground. Bend the other knee to 90 degrees with your foot up toward the ceiling. With the knee bent, twist the other foot back over behind you.
Alternate kicks behind you until all reps are complete. Feel your abs working to help you twist and kick the foot behind you. You do not actually need to touch your foot down behind. Just focus on rotating without your hips sagging or your butt going up in the air.
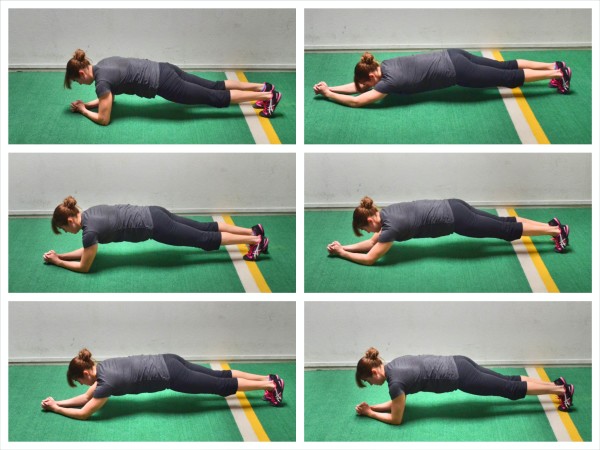
Plank with Oblique Twists (Hip Dips):
Work your obliques while holding this Front Plank Variation from your forearms. This is a great move to work your entire core and build stability.
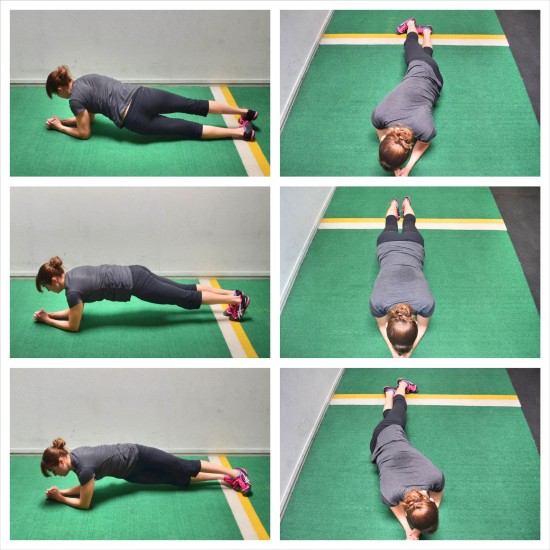
To do the Plank with Oblique Twists (or Hip Dips), set up on your forearms and either your knees (beginner) or toes (advanced). Your elbows should be under your shoulders and your body should be in a nice straight line from your head to your heels or knees. Squeeze your glutes and keep your core tight with your belly button drawn in toward your spine. Do not let your hips sag or your butt go up toward the ceiling.
Then rotate, dropping your hips toward one side. Try to touch the ground as you rotate without your hips sagging or butt going up in the air. Also, do not let your elbows come up off the ground.
Come back center then drop your hip to the other side. Alternate hip touches until all reps are complete.
You will feel everything twisting even down to your feet or knees. Do not let yourself go all the way over. Make sure to control the twists and just touch the hip down before twisting to the other side.
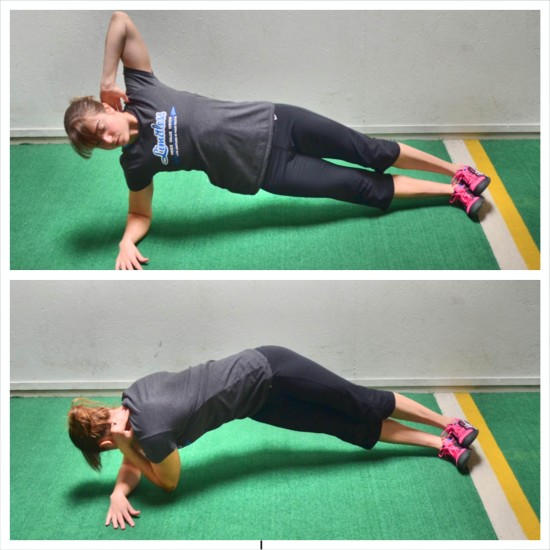
Side Plank Hip Dips:
Adding in a Hip Dip to the Side Plank forces your shoulders, back, obliques, glute medius and abduction muscles to work even harder. Many people want to tone their sides (aka their love handles) and this is a great move to do it!
To do the Side Plank Hip Dips, set up in a side plank from your forearm with your elbow right under your shoulder. Do not let your elbow get way out beyond your shoulder or you will place more strain on your shoulder. By keeping the elbow “stacked” under the shoulder, you allow your back and lat to help support your weight.
You can then either stack your feet and lift up onto the side of your bottom foot or you can place the top foot in front on the ground and lift up onto the sides of both feet. Unstacking your feet will make it a bit easier to balance. Beginners may need to place their bottom knee down on the ground.
Keeping your body in a straight line and your chest open and not rotated toward the ground, drop your hips down toward the ground and then lift them back up into the Side Plank.
Repeat making sure your body doesn’t collapse forward and your chest doesn’t rotate toward the ground. Your top hand can be raised toward the ceiling or on your hip.
Complete all reps on one side before switching.
Lower Ab Plank:
The Lower Ab Plank is a great Isometric Plank to build core stability and strength. It will also really work your quads and hips.
However, this is a very tough move. It is a variation of the toughest move in the Pelvic Tilt Progression so do not attempt this move if you haven’t mastered the other levels of the Pelvic Tilt.
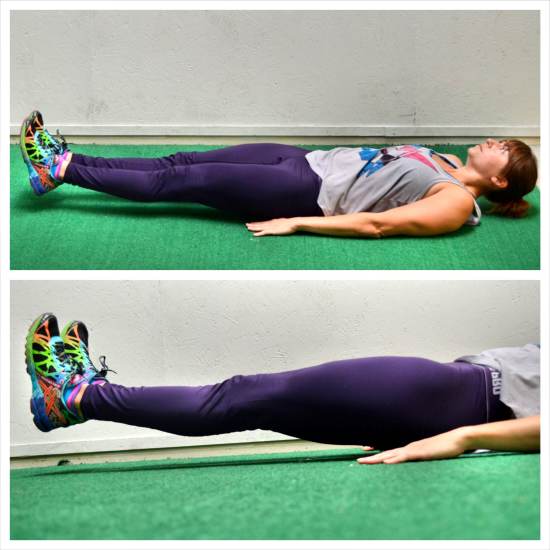
To do the Lower Ab Plank, lie on your back with your legs together and up straight toward the ceiling. Your hands should be down by your side.
Press your low back into the ground and engage your abs. Lower your legs down toward the ground, keeping them straight while keeping your low back against the ground. Hold with your legs as close to the ground as possible.
Only lower down as far as you can while keeping the Pelvic Tilt and your abs engaged.
Keep your legs straight and breathe as you hold. Do not place your hands behind your low back/butt to help prevent your low back from taking over. Instead regress to a bent knee or even Basic Pelvic Tilt.
If your low back comes up off the ground or you start to feel the move in your low back, please regress and do another variation of the Pelvic Tilt Progression.
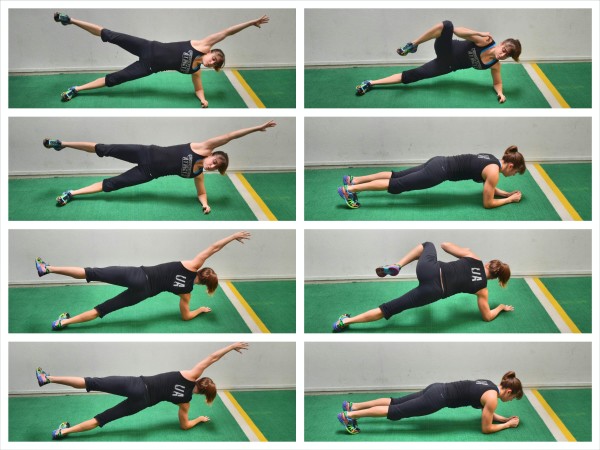
Side Plank with Rotational Reach:
The Side Plank with Rotational Reach is another great rotational Plank and a variation of the Side Plank with Oblique Twist.
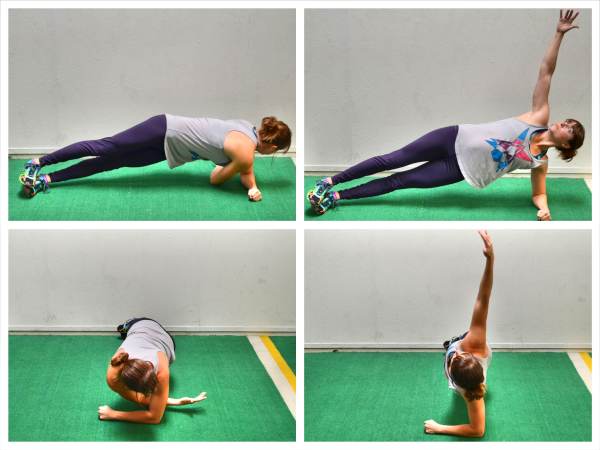
To do the Side Plank with Rotational Reach, set up in a Side Plank from your forearms and toes (advanced) or forearms and knees (beginner). Make sure your elbow is underneath your shoulder. Lift your hips up off the ground and create a nice straight line with your body. Make sure to engage your glutes.
Reach your top hand up toward the ceiling. Then reach that top hand under your armpit as if reaching for the wall behind you.
Rotate your chest toward the ground as you keep your hips up. Reach as far as you can under your armpit. Don’t simply swing your arm up and down.
Then rotate back open, reaching your hand up toward the ceiling. Do not let your butt go way up in the air as you rotate or your hips drop toward the ground.
Repeat, reaching back under and through then back up toward the ceiling. Complete all reps on one side before switching.
Inchworm Plank:
The Inchworm Plank is a great Plank Variation to improve your mobility while also working on your core strength. It can stretch your, triceps, lats and back as well as your hamstrings while also strengthening your abs, shoulders and legs.
Because there is no variation from your knees, this is a more challenging Plank exercise.
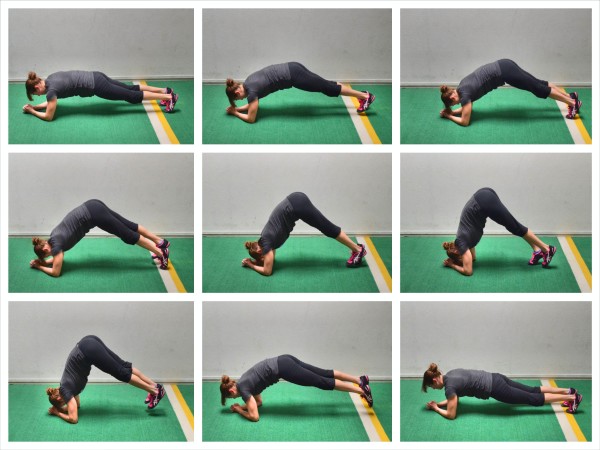
To do the Inchworm Plank, set up in a Plank on your forearms and toes with your elbows under your shoulders and your body in a nice straight line down to your heels. Your feet should be only an inch or two apart.
Begin to walk your feet in toward your head, keeping your legs straight as you take very small steps forward. Your butt should go up in the air as you walk your feet in and you should feel a stretch down your triceps and lats as you pike up. Try not to round your back as you walk your feet in.
Walk in as far as you mobility allows.
Beginners will then walk back out, taking small steps while keeping their legs straight. Walking their feet back out, they will return to a Forearm Front Plank with their shoulders over their elbows.
More advanced exercisers will jump both feet back out instead of walking back out. If you jump back out, do not let your hips sag toward the ground as you return to the forearm plank. Also make sure that when you jump back out, you return to a perfect Forearm Front Plank
Keep your core engaged as you walk in and out.
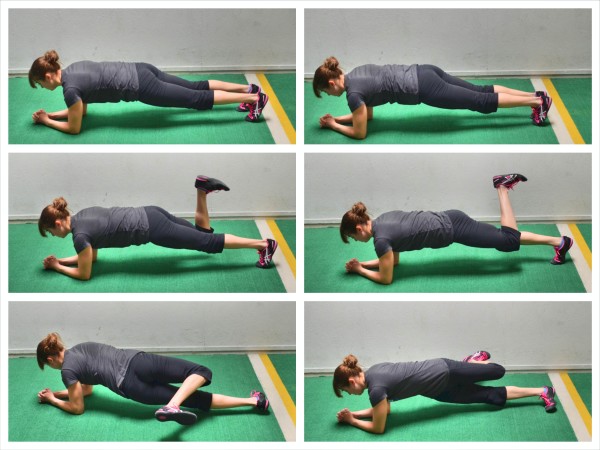
Plank with Oblique Knee Tucks:
The Plank with Oblique Knee Tuck improves your balance while targeting your obliques. This move also combines the Basic Forearm Front Plank with the Forearm Side Planks. Talk about a balance challenge!
From the Front Plank, rotate into a right Side Plank. Keep your bottom hip up and your shoulder stacked above your elbow. As you move into the Side Plank, reach your left hand up and forward over your head. Lift your top leg up and then bring your elbow and knee together. Stay balanced and keep your bottom hip up. Reach both back out again and then rotate back forward into a Front Plank.
Switch to a Side Plank on the other side. Again reach the leg and hand out and then bring them together. Keep alternating sides until all reps are complete.
Make sure you keep your hips up, but also don’t let your butt go up in the air as you move through the series.
Advanced Bird Dogs:
The Advanced Bird Dog is an advanced Plank Variation and a more challenging variation of the Beginner Bird Dog.
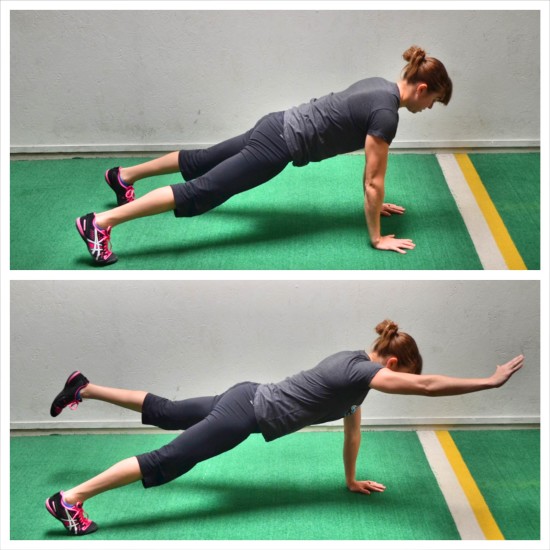
To do the Advanced Bird Dog, set up in the high plank position from your hands and toes with your hands under your shoulders and your feet about hip-width apart. If you bring your feet closer together, you will make the move more challenging.
Lift your opposite leg and arm up as if you are reaching forward and backward toward each wall. Keep your core engaged and squeeze your glutes as you lift the leg and arm. Do not let your body rotate open or your hips sag toward the ground. Do not let your butt go up toward the ceiling. Keep a nice straight line as you lift.
Hold for a second or two at the top and then lower back down and repeat on the same side or alternate sides. You can also perform a longer hold to make the move more challenging. To regress the move, you can do the Basic Bird Dog from your knees or you can simply lift only your arm or your leg instead of raising the arm and the leg at the same time.
Body Saw:
The longer your Plank, the harder your core has to work to maintain a nice straight line with your body. When you do the Body Saw and lengthen your body, you force your abs to work harder to protect your low back. The Body Saw without a towel or sliders, is a slightly easier variation.
However, the further out you walk, the more challenging it will be. Even the Basic Body Saw is challenging and should only be attempted if you can really hold a Plank from your toes.
To do the Basic Body Saw, set up in a Plank position from your forearms and toes with your feet close together. Your forearms should be right under your shoulders and your body should be in a nice straight line from your head to your heels.
Then begin to walk your feet backward, taking small steps. Keep your body in a nice straight line and don’t let your hips sag toward the ground. Lengthen through your triceps and lats as you walk back. Walk back as far as you can while keeping your core engaged.
Then walk your feet back forward until you are back in the Forearm Front Plank. Do not let your butt go up in the air as you walk your feet back in. Repeat, walking your feet back out. Only walk out as far as you can without your low back engaging.
If your low back feels this move, don’t walk out as far. Start with only a few steps.
To advance the Body Saw, you can place towels or sliders (Valslides) under your feet. This reduces the traction and makes the move harder.
To do the Body Saw with Sliders, set up in a Plank position on your forearms with your feet on the Sliders. With your body in a nice straight line from your head to your heels, slide your feet back and lengthen through your arms and back.
As you slide back, you should extend your body down to your elbows, shifting your shoulders back behind your elbows. Do not let your hips sag as you slide back.
Then pull your feet back in so your elbows are again under your shoulders and your body is in a nice straight line. When you come back into the Plank position, do not let your butt go up in the air.
Repeat, sliding back out on the Sliders, lengthening your body out as much as you can. Then pull straight back in. Again, do not let your hips sag toward the ground or your butt go up in the air. You should not feel this at all in your low back.
If you don’t have sliders, towels or even paper plates can work!
For a video of this move, click here.
Plank Jacks:
Plank Jacks are a great Plank move with a little lateral movement. They help build your core stability and strength and teach you to keep your core engaged while you add in extra movement. Plus they can get your blood pumping and heart rate up!
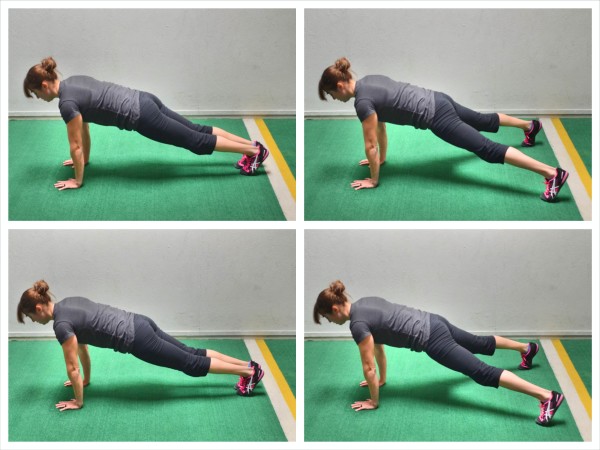
To do Plank Jacks, start at the top of a push up with your hands under your shoulders and your feet together. Your body should be in a nice straight line from your head to your heels.
Brace your abs then jump your feet out wide to each side as if doing a Jumping Jack. Quickly jump them back in together. Repeat, jumping them back out.
Keep your core engaged as you jump your feet in and out. Do not let your butt go up in the air or your hips sag as you jump your feet out wide and then back together.
Beginners may need to start by stepping one foot at a time out wide and then back together.
Plank Climbers:
Work your core and shoulders at the same time with Plank Climbers. This is also a great anti-rotational exercise. When you do the Climbers, try to keep your hips as still as you can to help build core strength and stability.
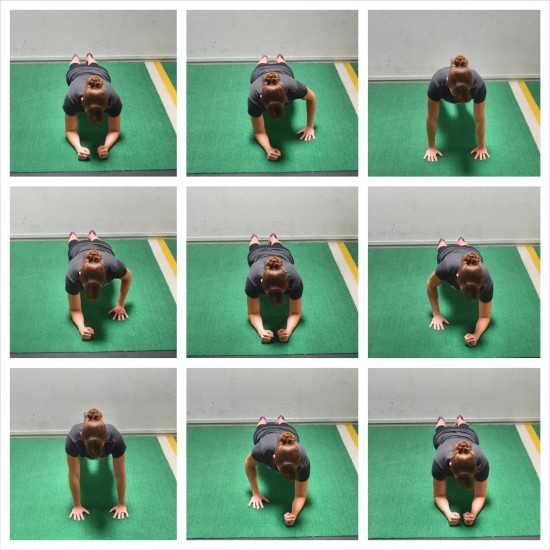
To do Plank Climbers, set up in a Forearm Plank with your elbows under your shoulders and your body in a nice straight line from your head to your toes. Beginners may do this from their knees. Set your feet out wider to give yourself more stability. Bring your feet closer together to make the move harder.
Then, engaging your quads, glutes and abs to keep your body in a nice straight line, place one hand on the ground to start to push yourself up. Place your hand right below your shoulder. Do not let your hands get way out in front of your shoulders as you climb up.
Then place the other hand down to climb into a High Plank position from your hands and toes. Try to keep your hips from rotating a lot as you climb up.
Once in a Plank position from your hands, climb back down one forearm at a time, placing your elbow back below your shoulder.
Keep your core engaged and wiggle your hips as little as possible as you climb up and down. Make sure that both hands lead the climb up and down. You can alternate which hand leads each rep or you can switch after a certain number of reps.
To make Plank Climbers more challenging, you can do a variation called the Suspension Trainer Plank Climber!
Plank with Knee Drives:
Work your abs, quads and shoulders with a Plank with Knee Drives. By changing up the direction of the Knee Drives, you can hit different muscles in your core, including your obliques.
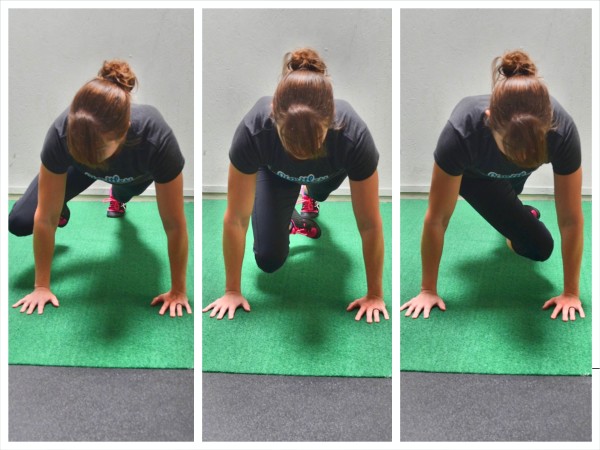
To do the Plank with Knee Drives, set up in a High Plank Position with your hands under your shoulders and your body in a nice straight line down to your toes. Because you must do a Plank from your toes, beginners may not be able to do this movement. Beginners may want to work up to this move by first starting with the Downward Dog Abs.
Holding this Plank position, pick your right foot up off the ground and drive your knee in toward your chest. You can drive the knee straight in, toward the outside of the same elbow or under and across your body to the opposite elbow. Changing the direction of your knee drive will change exactly what muscles in your core are worked.
Drive the knee in and then extend the leg back out. You can then alternate legs or perform a few Knee Drives on the same side before switching.
You can also change the tempo of the move to make it more cardio or more strength oriented. Speed up the move to make it more cardio or slow down and hold each Knee Drive for a few seconds to make it more strength oriented.
Make sure that as you drive your knees, your butt doesn’t go up in the air.
Plank with Reach Out and Back:
Your glutes are an important part of your core. And they are often underactive because we sit with our hips in flexion all day at a desk. To work on your hip extension and get your glutes firing, you need to include moves like the Plank with Reach Back and Out in your workout routine.

To do the Plank with Reach Back and Out, set up in a Front Plank from your hands and toes with your hands under your shoulders and your feet about hip-width to shoulder-width apart. The wider your feet are, the more stable your base will be. To make the move harder, bring your feet in closer together. Beginners can do this move from their knees.
From this Plank position, reach one hand back and across toward the opposite ankle, pushing your butt back and up toward the ceiling as you reach.
After reaching back, come back forward, dropping your hips back into the Plank position as you reach forward and out toward the wall in front of you. Do not drop your hips too low and feel your low back engage. Keep your core tight and squeeze your glutes to protect your low back as you come back forward and reach out. You want to fully extend your hips and engage your glutes so you aren’t hyperextending your low back.
Reach back and across again with the same hand before reaching back forward. Complete all reps on one side before switching.
If you do this from your knees, sit back on your heels and reach back through your legs instead of toward one ankle. Then come back forward into the Plank position from your hands and knees, extending your hips forward as you reach out.
Plank with Rotational Reach:
The Plank with Rotational Reach is another rotational Plank Variation to build rotational strength and core stability. Because it also forces us to balance on one hand at a time, it can also help correct imbalances.
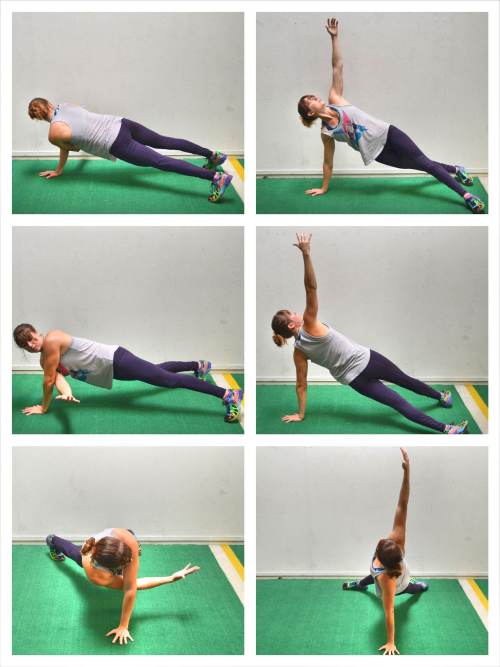
To do the Plank with Rotational Reach, set up in the High Plank position on your hands and knees (beginner) or toes (advanced). Make sure your hands are under your shoulders. You can also set your feet wider apart to create a more stable base.
From this Plank position, reach one hand under your body and armpit toward the wall beyond your side. You aren’t just reaching under your armpit to pat yourself on the back. You want to really reach toward the wall and rotate your chest and hips toward the ground.
As you reach, make sure your hips stay down (aka your butt shouldn’t go up in the air).
Then pivot open, rotating into a Side Plank as you reach your hand up toward the ceiling. You will reach the hand that reached under your armpit up toward the ceiling, keeping your hips up as you move into a Side Plank.
Repeat the move, reaching your hand back down and under your armpit as you rotate your hips back down toward the ground. Open back up, reaching up toward the ceiling as you open into a Side Plank.
Complete all reps on one side before switching and reaching the other way. Do not let your butt go up in the air or your hips sag toward the ground as you rotate and reach.
More Plank Variations
For some Plank Variations using the Sliders, check out these Slider Core Exercises. And for Plank Variations (as well as some other great Core Moves) using the Sandbag, check out these Sandbag Exercises.
And if you have a Suspension Trainer, you can also advance basic planks by using that. Check out these Suspension Trainer Core Exercises.


These are the old but best exercises that are tried and true. I taught all these when I was in my twenties when we had the Y.W.C.A.! Then an hous of water exercises! Great results.
Tried and true!:-)
Thnx for al the exercises from holland, love them
Thanks!
Incredible amount of info!! Realized not doing plank moves before mastering pelvic tilt is not good! Thank you. I’m interested in program, but want to know if I can order what I would like, when I need it. Or, do I receive monthly DVDS that automatically get shipped and my card is charged. Thank you for your tips and taking time to read my comment!
Hi Jen. Glad to help in any way I can. So the Core program you mean? It is a 30-Day program that you get lifetime access to for a one-time fee. It is also all digital and you can use it whenever you want. Hope that answers your question! – Cori
How many reps of each variation are recomended and how many sets of rach variation.
I recommend you only pick a few to include in a workout. These tips may help – https://redefiningstrength.com/how-many-reps-how-many-sets/
How many reps per exercise ?
Hi Rory. This article may help you design a workout – https://redefiningstrength.com/how-many-reps-how-many-sets/
With the lower ab plank by keeping your lower back on the floor does this not take your back out of neutral alignment . I thought ideas were changing in this now and the neutral spine was more important and maybe pushing the lower ribs to the floor but keeping the pelvis neutral .
Hi Sue! Great question! So neutral spine is key for lots of moves and the push to maintain that neutral position came from great research done by Stuart McGill. However, there are benefits in this case to learning how to brace correctly using the posterior pelvic tilt. With ab moves such as these, the posterior pelvic tilt actually also engages the glute max and helps clients not rely only on their hip flexors during leg lower movements (since they automatically work already to lift and lower so you don’t want them working extra because your abs aren’t doing their part to stabilize).
Would you discuss the differences between planks on the forearms vs hands?
Hi Angela. There are many reasons to use both. If you have wrist pain or shoulder issues forearm planks may be better. High planks require more wrist mobility and shoulder stability. But you may also find forearm planks at times to be more challenging for the abs. I think both should be used even as progression through the same but different.