If you sit at a desk all day hunched over a computer, odds are you’ve suffered from neck pain….all too many of us have.
And you may even have gone to get massages and done stretches and gotten a new pillow and tried changing your desk set up to alleviate the pain.
All without lasting results. All without alleviating the annoying ache.
That is because often our neck, and where we actually feel the pain, isn’t where the “true” problem is.
Often there are other imbalances elsewhere that are contributing to the pain and perpetuating our compensations.
Problems that aren’t corrected by only massaging our neck and changing our desk set up.
Problems that we may actually be making worse during our workouts by continually overusing the incorrect muscles because of postural distortions caused by sitting hunched over all day.
That is why we need to focus on adjusting our overall posture and not only loosening up tight muscles but also activating underactive ones!
Foam Roll + Stretch + Activate!
Below are 10 Quick Exercises to Alleviate Neck Pain.
These moves will alleviate your neck pain by loosening up tight muscles and activating the big muscles of your back. They will improve your spinal and shoulder mobility and get the correct muscles working to not only alleviate your neck pain, but also improve your posture.
And because these tips will improve your posture and get the correct muscles activated, they will also improve your strength so that you can lift more during your workouts.
Check out the 10 Tips below and start feeling better today!

10 Quick Tips To Alleviate Neck Pain
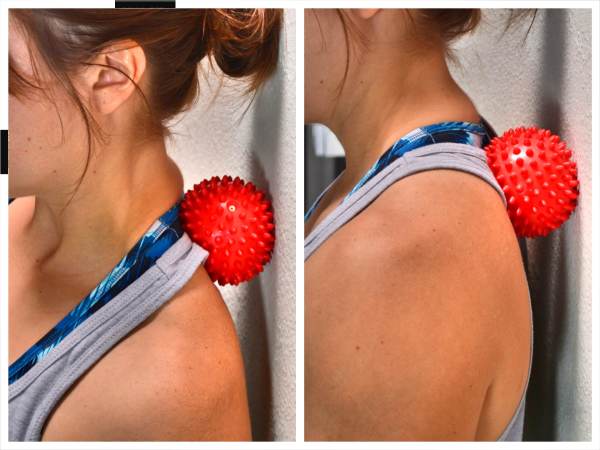
1. Levator Scapulae/Upper Trap Foam Rolling – When we sit all day hunched over a computer screen, we often shrug our shoulders. When we shrug our shoulders, our levator scapulae, or even our upper traps, can become overactive. When this happens, we can suffer from neck, shoulder and even upper back pain and injury.
If you want to prevent neck pain, and help improve your shoulder and scapular mobility, you need to make sure to loosen up and roll out your levator scapulae and upper traps so that you can then get the big muscles of your back activated.
To roll out your levator scapulae and then even your upper traps with a ball, stand with your back to a wall and place the ball to the side of the base of your neck. You want to put it right above that inside top point of your shoulder blade. Press the ball into the wall and hold there. You can then roll it down toward your shoulder blades.
Hold on any tight spots. Do not shrug your shoulders as you roll. You can work lightly up your neck and all along the bottom of your neck and top of your shoulder blades. You can work all the way from your spine out to your shoulder.
If you want to apply more pressure with the ball, you can use a harder ball or use the ball against the ground instead of the wall. You can even then bridge up when pressing into it on the ground for added pressure.
Do not roll over your spine or press to hard when working up your neck.
As you hold, you may even want to rotate your head to look toward that shoulder and then up and away. You can also bring your arm across your chest to get a bit more under your shoulder blade.
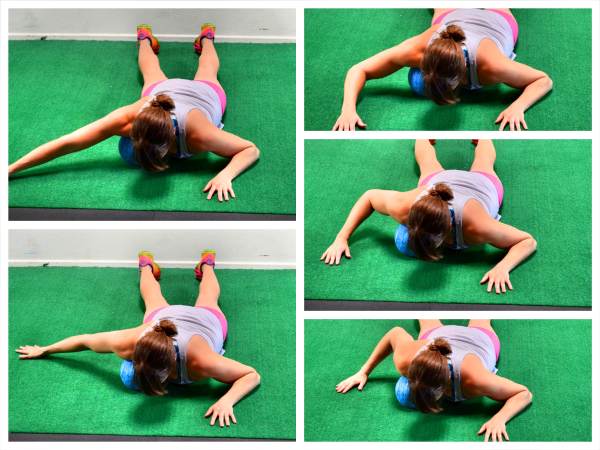
2. Chest Foam Rolling – When we sit hunched over, our chest becomes tight, which can lead to neck, shoulder and back pain and perpetuate that hunched posture. A tight chest can cause the muscles stabilizing our shoulders to become overworked and can prevent the big muscles of our back from working. Both of which can lead to neck pain.
That is why you need to roll out your chest.
To roll out your chest, a blue foam posture ball is a great tool. You can use a smaller ball but then you will either need to place it up on books or against a wall to truly be able to dig into your chest.
If you have a bigger ball or a foam posture ball, place the ball on the ground and lie face down on top of it with the ball right in your chest beside your shoulder joint. Do not place the ball on your shoulder, but instead in the muscles of your chest near your shoulder.
Then with the ball right to the inside of your shoulder, move your hand overhead and then back down toward your legs.
Move your arms slowly up and down to change exactly how the ball digs into your chest muscles. Hold and relax on any tight spots.
3. Shoulder U With Posterior Focus – Often when we are tight from sitting, we feel like our back has a ton of knots that need to be massaged out. And while our back can be tight, it is often actually from being overstretched because our chest is tight and pulling us into a rounded posture.
This rounded shoulder posture can also be caused by our lats being tight. That is why this Shoulder U move can be such a key one to include when you’re short on time. It hits both your lats AND your chest to improve your shoulder mobility.
To do the Shoulder “U,” lie face down on the ground with the ball under your chest. Roll it right along the shoulder joint and then under your armpit to hit the side of your back.
As you roll on your side, you may want to work it up and down your side to above your armpit, right where your arm and back meet, to down a bit along the back of your ribs.
Then roll it around under your armpit to back between your shoulder blades. Work up and down the shoulder blade then roll it back around front.
Hold on any tight spots as you roll. You may make a few “U’s” around your shoulder, holding on a few tight spots. Then switch the ball to the other side. Again, make sure to hit your chest, your upper back and your sides.
Once you’ve rolled out one side and made a few circles, switch the ball to the other side and complete the “U” around your other shoulder and shoulder blade.
If you find any spots that are especially tight, you may want to use a smaller ball on them after.
4. 3-Way Neck Stretch – After you’ve loosened up the tight areas, you need to stretch to help return muscles to their optimal length-tension relationships. This 3-Way Neck Stretch is a great way to loosen up your upper traps and neck after you’ve rolled out.
To do the 3-Way Neck Stretch, reach one hand behind your back and then grab that wrist with the other hand.
Pull the arm across your back and then lean your head to the side you are pulling toward. One arm should sort of be making a “chicken wing” and you should be leaning your head toward that side.
Do not tense your shoulders and shrug them up toward you ears. Relax into the stretch and breathe.
As you relax your head to the side, change the direction of your gaze. Look up and tilt your head up. Hold for a second or two.
Then look straight ahead. And then look down, tilting your head down.
Make sure when you look up or down that you move your chin and not just your eyes. Changing the direction of where you look, will change exactly which muscles in your neck and upper back that you stretch.
Make sure to keep your shoulders relaxed as you stretch. Switch sides after looking all three ways a couple of times.
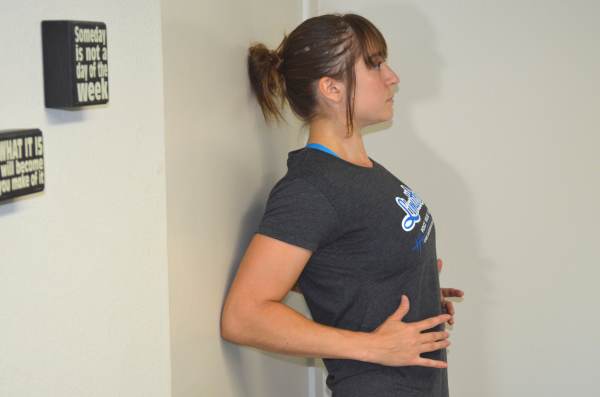
5. Standing Chest Stretch – A tight chest can be a major cause of your pain that is why you need to roll it out and then stretch it.
Using the Standing Chest Stretch, you can stretch your chest basically any time you get up from your desk and walk through a doorway.
And the more you stretch your chest, the easier it will be to improve your posture and the quicker you will help get rid of your pain.
Challenge yourself to do this stretch every time you get up and walk through a door!
To do the Standing Chest Stretch, place one hand back on the wall or doorway and turn away from the hand on the wall or door with your arm going slightly behind you. You should feel a nice stretch on that side of your chest.
Make sure you don’t shrug your shoulder as you stretch. Your arm can be bent or straight behind you. You can point your thumb up toward the ceiling or back behind you to change exactly where the stretch hits.
Hold and breathe as you relax into the stretch.
To target your pec minor more, move your hand up to about forehead height on the pole or doorway or wall behind you.
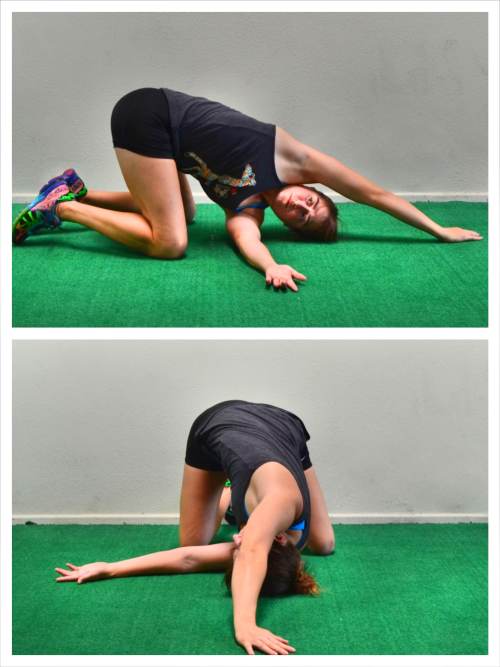
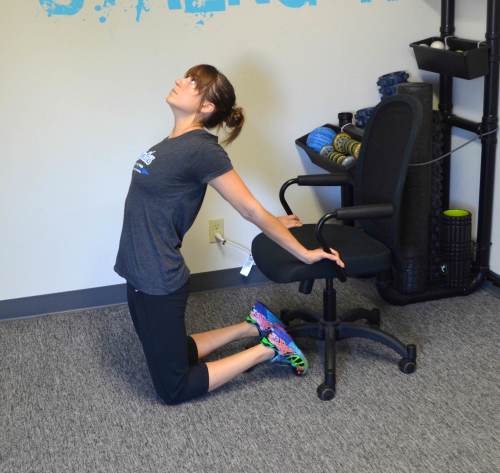
6. Thread The Needle – This is a great stretch to open up your upper back and improve your spinal mobility. It will stretch your neck and upper back especially. It is a great stretch to do after a long day of sitting hunched over a computer screen all day.
To do this stretch, kneel on the ground and lean forward, reaching one arm out overhead.
Relax the side of your head and your shoulder down onto the ground as you reach the other arm under your body and toward the direction you are facing as if “threading a needle.”
Breathe and relax into the stretch so that you feel a stretch down your neck and across your shoulder blades. Rotate your chest up and open. You can walk your top arm back behind your head. Hold and then thread the other arm under and through.
Hold each stretch for at least second or two before switching. Sit back onto your heels if you can keep your head and shoulder on the ground.
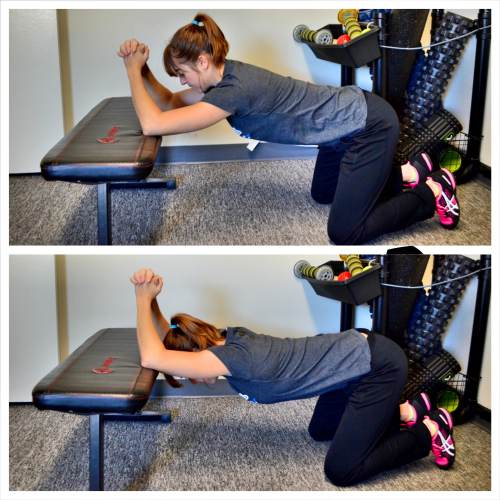
7. Kneeling Thoracic and Lat Stretch – A lack of thoracic mobility and lat tightness can put us at risk for not only neck and shoulder pain, but even lower back aches and pains.
The Kneeling Thoracic and Lat Stretch is a great way to stretch your upper back and lats while also working on Thoracic Extension.
To do this stretch, place your elbows up on a bench about shoulder-width apart and kneel on the ground in front of the bench. Make sure you are back far enough that you have room to lean forward and over.
Then with your elbows on the bench, relax your chest and head over. Press your chest toward the ground and feel a nice stretch down your triceps and lats as well as through your thoracic spine.
You can either hold here and breathe to stretch deeper or you can come out of the stretch and then relax back into it and try to get further with each rep.
You can also do this stretch standing against a wall. Check out the Half Wall Hang and other Desk Exercises here!
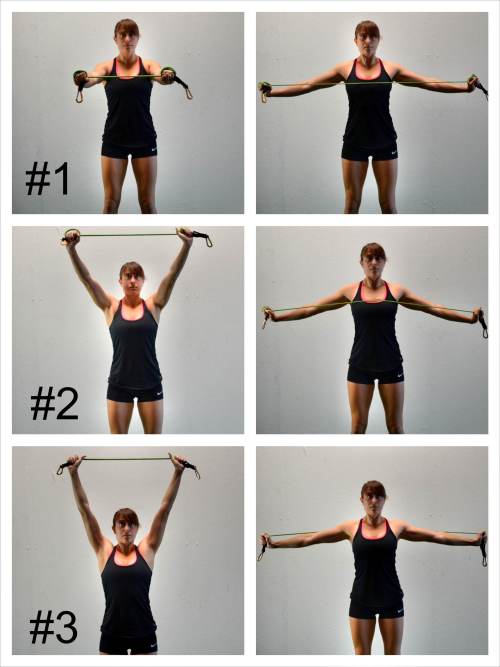
8. Scapular Band Flyes – Once you’ve stretched and rolled to loosen up tight muscles, you need to get the proper muscles activated and working.
If you skip this step, you will just continue to have neck pain no matter how much you stretch and roll. Because, if the proper muscles don’t start working and pulling their weight, you’ll just keep overworking those smaller, weaker muscles, which can lead to further aches and pains.
The Scapular Band Flyes are a great exercise to get your lower and mid traps working to take strain off your upper traps, neck and shoulders.
There are three variations of the Fly you can do. Especially when starting out, pick the variation that allows you to feel your lower traps working without aggravating your upper traps.
To do the straight on Scapular Band Fly, hold the resistance band with your hands about shoulder-width apart and press your chest out so you are standing nice and tall. Keep your neck and shoulders relaxed. Do not shrug. Raise your arms up straight in front of you at about shoulder height or right below. Keeping your arms straight, pull out on the band to open your arms out to the sides. Pinch your shoulder blades down and together as you open and bring the band in to your chest. Do not let your shoulders shrug up as you pull the band. Hold with your arms open for a second or two and feel your back working. After holding to feel your back working, bring your arms back together so your arms are about shoulder-width apart again and there is no slack in the band. Repeat the fly. Do not let the band pull you. Move slowly. If you have to bend your arms to do the fly or if your shoulders shrug up, you may want to go lighter.
To do the overhead angled Scapular Band Fly, you will hold the band overhead in front of you with your hands about shoulder-width apart. Then pull your arms straight out and down as you draw your shoulder blades down and together. Your arms should stay straight the entire time as you bring the band down to your chest. Press your chest out and make sure you keep your shoulders and neck relaxed.
The third Band Fly is an overhead move in which you pull the band down behind your head. Hold the band with your hands about shoulder-width apart and start with your hands up overhead. Then pull your arms straight down and out to pull the band down toward the back of your shoulders. Keep your chest pressed out and draw your shoulder blades down and back as you pull the band down. Pull it behind your head and bring your arms straight out to the side at about shoulder height. Once the band reaches your shoulders, slowly bring it back overhead.
9. Scapular Wall Hold – If you need a bodyweight move to activate your back and stretch your chest that you can easily do at your desk, you need to learn the Scapular Wall Hold.
This is one of our FAVORITE moves of all time. It is a great way to work on scapular retraction for pull ups and it will improve your posture and lessen your neck pain!
To do the Scapular Wall Hold, check out this post. There are some great variations of the Scapular Wall Hold included in this post as well!
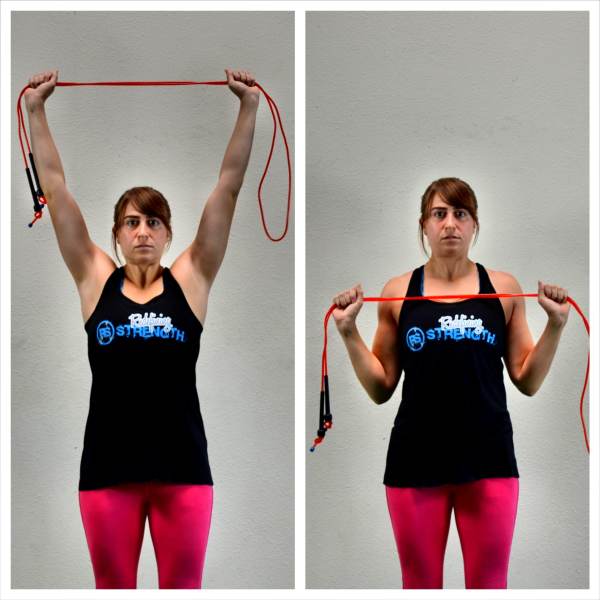
10. Towel Pulldown – Another great move to improve your posture, alleviate your neck pain and improve your pull ups is the Towel Pulldown. And the best part is, all you need is a normal bath towel!
This move helps work on your scapular retraction and depression.
To do the Towel Pulldown, grab a towel with both hands about shoulder-width apart and pull your hands away from each other so there is tension on the towel. Extend your arms and the towel overhead, keeping tension on the towel.
Press your chest out and pull the towel down to your chest, pinching your shoulder blades down and back as if you were pulling yourself up to a bar to do a pull up. Drive your elbows down toward the ground as you pull the towel down keeping it tight between your hands.
Concentrate on feeling this move between your shoulder blades.
You can either hold at the bottom of the pull or complete repetitions. If you do repetitions, move slowly and make sure to maintain tension on the towel the entire time.
If you don’t have a towel, you can do this with just your bodyweight, a jump rope or even a resistance or mini band.
BONUS: Bridging!
Bridging exercises are a great way to reverse the effects of sitting all day and help alleviate your neck pain. The Camel, Posterior Plank, Table Top Bridge and Sit Thru to Thoracic Bridge, are all must-do bridge variations for anyone with neck pain.
Check out these 20 Bridge Variations to learn how to do those bridge variations above as well as others that can even help alleviate your low back, hip and knee pain!
And for more moves you can use to improve your posture while sitting at your desk, check out these 10 Desk Exercises.
Want 10 Minutes Mobility Series You Can Do Daily?


My neck pain switches from side to side
That means I would work on foam rolling, stretching and activation for both sides. Have you had an injury to your upper body or just sitting too much?
I know this is an older article, but I have been suffering for a long time with neck and shoulder pain. I have a tight”band” down the right side of my spine and a knot about the middle of my shoulder about an inch below the top. This has been like this for a couple of years now. I have gone to the chiropractor and seen his massage therapists in office. My husband tries to rub them out, but to no avail. Any suggestions?
“
Hi Shari. Ok A. You will want to make sure your glutes are firing properly and your hips are loose. I know it sounds weird, but problems there will lead to our upper back having issues. Also, stretch and roll your chest. And then ACTIVATION! You are rolling everything out, the problem is, your daily habits and movements cause everything to tighten back up. The only thing to prevent this is getting the right muscles working. You need to activate your glutes, abs and upper back and lats properly. Doing this will be key. This post may help and you may want to checkout my 21-Day Posture Fix. It is 10 minute workouts that include foam rolling, stretching AND activation moves. https://redefiningstrength.com/activation-exercises/ If you want to email me too at [email protected], I can even help more 🙂 – Cori
When I stretch my neck from side
To side I can feel my lat pull up opposite to the way I stretch. Does this make sense? Just wondering what it is and what I can do?
Thank you!
Hi Ben. I’m not sure I understand what you are asking? If you are tight throughout your upper body, you may want to start with some foam rolling too. Chest, lats, upper back. And chest and lat stretching. – Cori
I have problem with my neck when getting up in the morning a few days ago & the pain is worse now. I will try your exercises. Many thanks for sharing!
Hope they helped!
I have cervical disc prolapse c6-7 with episodes of cervical and left limb mild pain and numbness .Do you think that your exercise will help me?.
Thank you
I would tell you to see a physio if you haven’t to start to address weak muscles to help you create stability while preventing overuse. Then use unilateral moves to correct any imbalances.