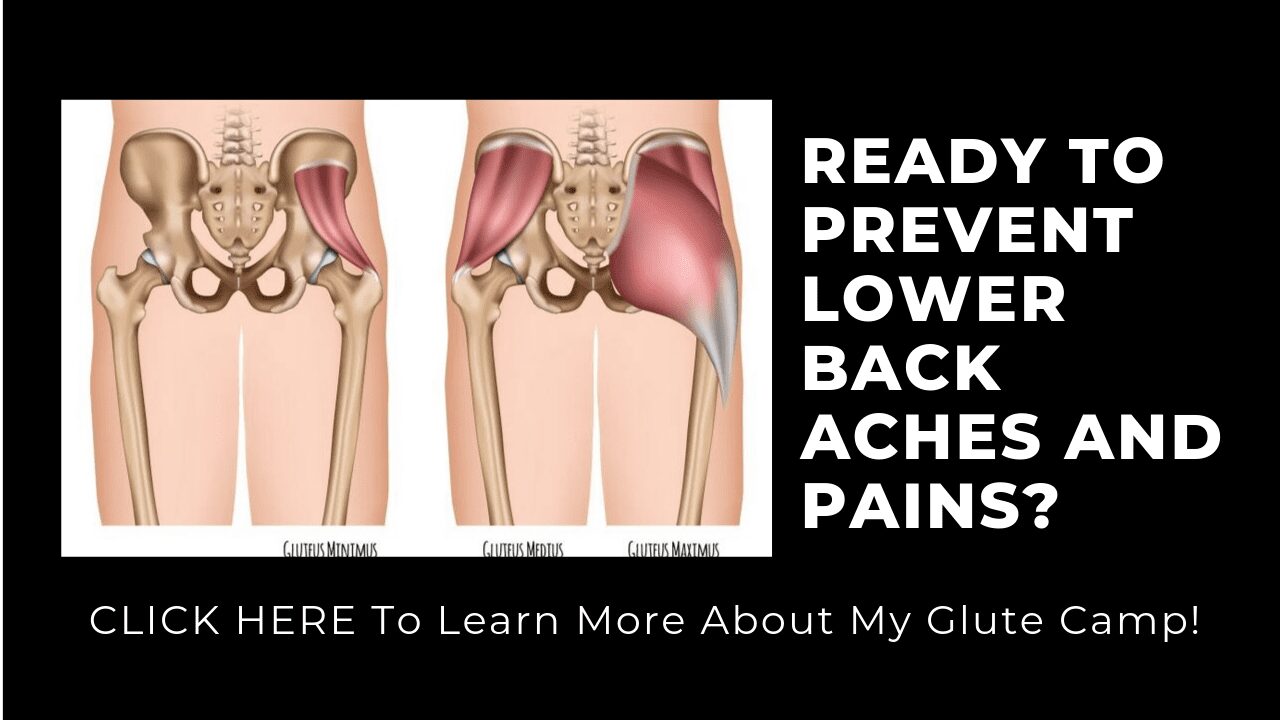
Low back and hip pain are common problems especially for anyone with a desk job. However, some foam rolling (or a back massage) and stretching of your low back won’t be enough to really relieve your pain.
Because sometimes where you feel the pain, isn’t the place causing the problem, especially when it comes to low back pain.
Often to relieve your low back and hip pain, you need to focus on foam rolling, stretching, activating and strengthening your entire core.
Because overly tight muscles in your core (such as your hips and lats) and underactive muscles in your core (such as your glutes and deep intrinsic core stabilizers) can all be contributing to your hip and back pain.
Follow our 4 Step Program below to Relieve Your Low Back and Hip Pain.
Relieve Your Low Back And Hip Pain With These Moves
Many of us suffer from low back and hip pain because we sit in flexion for 9 hours a day at a computer. Being seated at a computer puts just about our entire body into flexion – it causes our hips to be tight and our glutes and core to be weak.
And because we sit in this flexed position all day, we often develop imbalances that lead to dysfunctional movement patterns. These dysfunctional movement patterns often cause us to overuse muscles that can’t handle the load (aka our low back) instead of using the correct muscles for the job (aka our abs and glutes).
That is why we need to start by loosening up all the muscles that are tight from our desk job and our improper movement patterns.

Foam Rolling
Because everything in your body is connected, even foot problems, ankle problems, knee problems could all lead to low back and hip pain. Even upper body dysfunction could then lead down to low back and hip pain.
That means that you’ve got to make sure to loosen up muscles throughout your body to restore proper functioning to your core.
Below are foam rolling moves to correct some common areas of tightness that could lead to, or contribute to, low back and hip pain. If you are unsure of what areas are tight for you, experiment with rolling out all of the areas below. Once you figure out, which spots are tight for you, focus on releasing the trigger points in those areas.
You may even find that in certain muscles you only have knots and trigger points on one side. Make note of these areas. If only one side has an issue, this is a sign of an imbalance. Imbalances between sides can lead to pain and injury and need to be corrected.
Do not waste time rolling out areas that aren’t problematic for you. You may want to revisit these areas at times, but focus on areas of tightness that contain knots or trigger points.
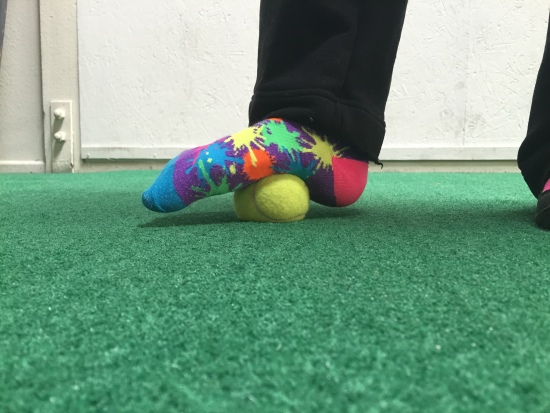
Foot Foam Rolling:
Tightness in the fascia underneath your feet can lead to overpronation, calf tightness, knee valgus and then even hip and back pain.
To roll out your feet, a tennis ball works really well. If you have a harder and smaller ball though, you can dig in even more. A lacrosse ball and golf ball are alternatives to the tennis ball that dig in even more.
Whichever ball you choose to use, place the ball on the ground and step on top of it. Roll it along the length of the bottom of your foot. Hold on any tight spots.
Try to apply as much weight as you can. Ease into it though and don’t just stomp on the ball.
You can also use a frozen water bottle to roll out your foot and ice at the same time. Take a water bottle that you’ve filled with water and frozen in the freezer and roll it under your foot to dig out any knots while also icing to reduce inflammation. This is a great move to do if you’ve had Plantar Fasciitis in the past and are starting to up your running mileage and don’t want to re-injury yourself.
For more moves to prevent and alleviate foot pain, check out our Prevent Foot and Ankle Pain post.
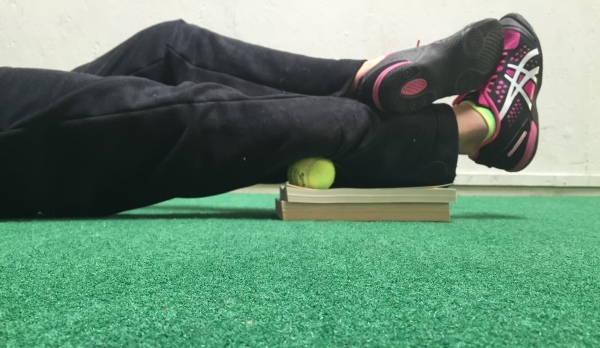
Calf Foam Rolling:
Tight calves can contribute to dysfunction at the foot and knee, which can in turn lead to hip and back pain. Therefore, you need to make sure to roll out your calves, especially if you sit at a desk all day, wear high heels and/or run or cycle often.
To roll out your calves, a tennis ball works great especially if you have a yoga block or books to place the ball up on.
Using the tennis ball, place it up on some books or a yoga block and then put one calf on top of the ball. Start with the ball at the bottom part of the meat of your calf.
Cross the other leg on top to help apply more pressure if needed.
Rock very slightly from right to left or side-to-side a couple of times and then move the ball to another spot on your calf, working over the entire meaty part of the muscle right up to below the back of your knee. Keep rocking side to side as you work your way around your calf.
Hold on any tight spots. If you find a super tight spot, make 10 circles with your foot and then tense and relax your calf (flexing and dropping your foot) 5 times before you move to the next spot. This will help the muscle relax itself and help the knot to release.
Don’t spend any time on areas that aren’t tight. Repeat all the way up and around both calves. You can also use a harder ball or a spiky ball to dig in more.
If you have a foam roller or even a trigger point quad roller, you can also use those to dig into your calves.
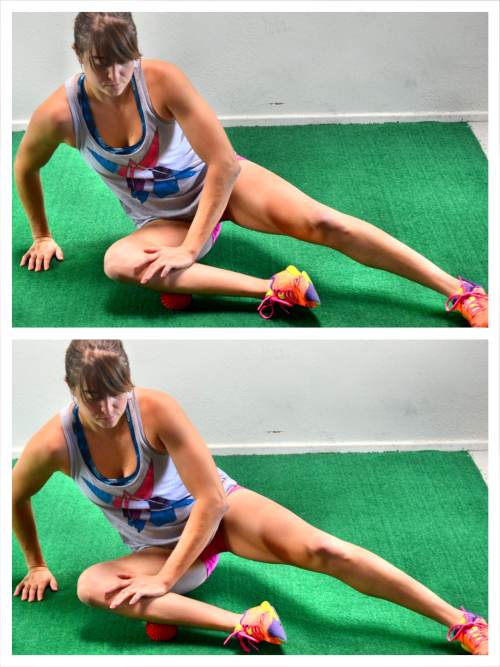
Peroneals Foam Rolling:
Another tight muscle group that can contribute to overpronation and therefore hip and back pain, is the Peroneals or muscles down the outside of your lower legs.
A ball is a great way to dig out the outside of your lower leg.
To roll out your Peroneals, place a ball on the ground in front of you and then bend your knee and place the side of your lower leg on top of the ball, starting with the ball below and outside your knee. Press down on your lower leg with your hand to apply more pressure so that the ball digs in.
Then move your leg so that you make small circles on top of the ball. Work your way down the length of the side of your lower leg, pressing your lower leg firmly down into the ball. (You may even put a book under the ball to help you apply more pressure and get a better angle.)
Hold on any tight spots and, as you hold, flex and relax your foot to help dig into any knots or trigger points. To dig in more, you can also circle the ankle while holding on any tight spots instead of flexing and relaxing the foot.
To hit slightly different angles along the side of your shins, rock forward on the ball a bit (toward your shin) or backward (toward you calf).
Work your way along the length of your lower leg from just below your knee down to a few inches above the anklebone. Do not go right up to the anklebone or roll over bone.
You can also use the quad roller to roll out the outside of your shin or a harder or spiky ball.
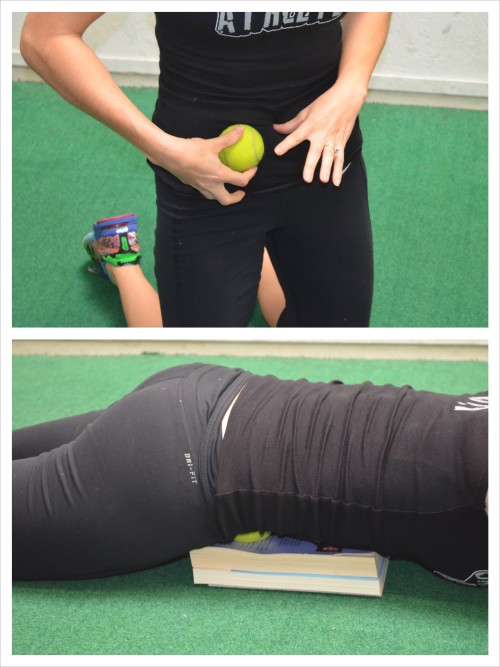
Quad/Rectus Femoris Foam Rolling:
When you sit in flexion all day, your hips get tight. And one hip muscle that can get tight is the rectus femoris (also known as a quad muscle).
When your hips are tight, you risk not only hip pain but also low back pain. Plus your glutes are likely to be inactive.
To target your Rectus Femoris when rolling out, place the tennis ball on the ground and lie face down supported on your forearms with the ball at the top of your quad to the front and inside of your hip bone.
Hold there for a second or two, flexing and relaxing your quad to help the ball dig in more if there are any knots. Then roll the ball straight down your quad to a new spot. Hold there. Again you can flex and relax your quad to help the muscle release the knot.
Work your way straight down your quad to right above your kneecap.
You can also use a roller instead of a ball.
You may also want to roll out the other muscles of your quads to make sure they aren’t tight to cause poor movement mechanics that could contribute to low back and hip pain.
To roll out the entire quad muscle group, place the tennis ball on the ground and lie on your belly supported on your forearms with the ball below your hip in the front of your quad.
Rock the leg side-to-side and let the ball roll along the top of your quad under your hip bone. You can roll it from your inner thigh to out to your IT Band.
Hold on any tight spots and even flex and relax your quad to help the ball dig in more..
Work your way down your quad to right above your knee. As you work your way down, make sure to work over the entire quad, rolling the ball from just about your inner thigh to in front of your IT Band.
Don’t spend time on areas of your quad that aren’t tight. Hold and focus on areas that are tight. You can even flex and relax your quad to help the knot release.
Using the tennis ball may take more time than a roller or even a rolling pin. If you have a foam roller, it is a quicker way to roll out your quads although you won’t dig into specific spots as much. You can also use a rolling pin or hand-held roller if you have one.
Hamstring Foam Rolling:
Your hamstrings can feel tight for two reasons – one they are shortened and two they are actually lengthened. If they are shortened, you will want to stretch them. If they are lengthened, you will actually want to stretch your hips because you may be suffering from anterior pelvic tilt, which is actually lengthening your hamstring and probably contributing to your hip and low back pain.
But either way if your hamstrings are tight and not functioning correctly, your hips and low back mechanics will be off, which can lead to pain and injury. And even if your “tightness” is caused by lengthened hamstrings, you need to foam roll the hamstrings to help them relax so you can get your glutes activated and working.
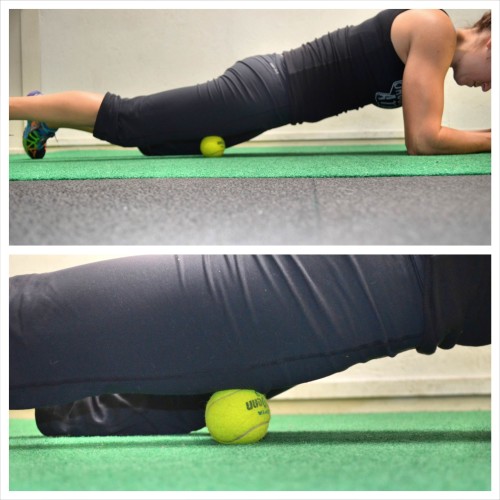
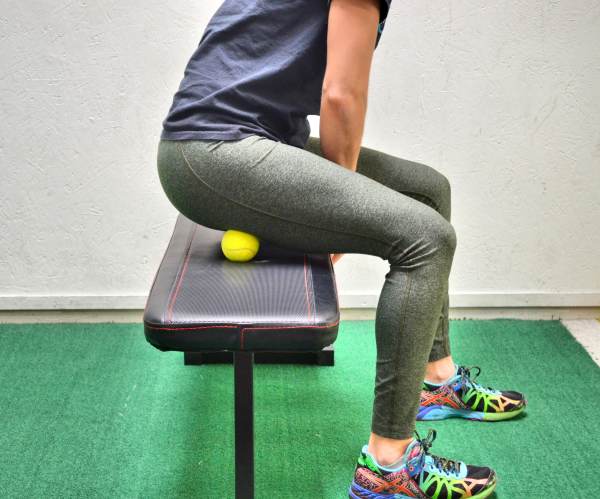
To roll out your hamstrings, a ball is actually best as long as you can sit on the ball while sitting up on something like a chair, table or box. The pressure you can apply even when isolating one leg on a roller on the ground is limited so using a ball when seated up on something allows you to dig into your hamstring more.
Take the ball and place it at the top of your hamstring right under the bottom of your butt while you are seated up on a chair. Rock side to side on the ball and roll it from your inner thigh out toward the outside of your leg.
Hold on any tight spot and perform small rocks side to side to help you dig into the knot further. You can even flex and relax your hamstring by straightening your leg out and then relaxing your foot back down to the ground to help the muscle release the knot.
Work your way down your hamstring toward your knee. Work all along the hamstring, moving toward your inner thigh and out toward your IT Band.
Make sure to hold on any tight spots. Do not spend time on areas of your hamstring that aren’t tight.
If you have a roller, you can also use a roller while seated on a box or chair. The point is to be elevated so you can truly dig into the muscle.
If the pressure is too much when you sit on a ball on the chair, you can do this move from the ground and even simply place the ball up on a book so you can get a little more leverage to dig in, but not as much as up on the bench. You can also use a roller.
Adductor Foam Rolling:
Tight Adductor muscles can lead to limited hip mobility and hip pain. And if your hip isn’t fully functioning, your body is going to compensate and try to get the range of motion to complete the movements from somewhere else.
For instance, if your adductors become tight, you may have limited internal rotation, which will put more rotational demands on your SI Joint – aka a part of your low back not well equipped to handle rotation.
This will lead to low back pain and injury.
So you must foam roll your adductors to make sure that your Lumbo Pelvic Hip Complex functions properly.
To roll out your adductors a bigger ball or roller works best. You can even use a hand-held roller or rolling pin.
However, if you only have a tennis ball or lacrosse ball, you can use that.
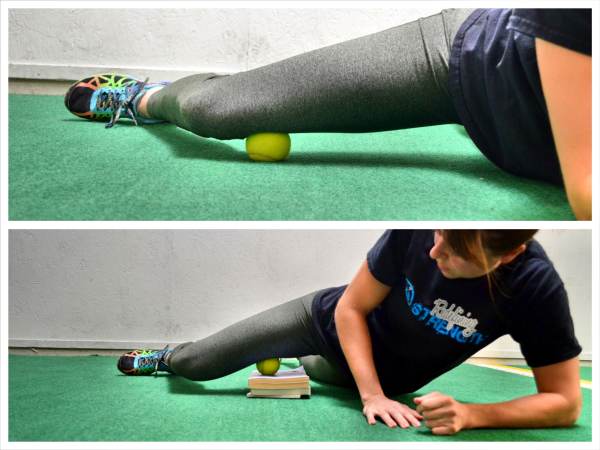
To use a ball to roll out your adductors, lie face down on the ground. Bend one knee out to the side at about 90 degrees and place the ball under the inside of your knee.
Resting on your forearms, rock your leg forward over the ball toward your quad and then back toward your hamstring. Hold on any tight spots.
Then move the ball up your inner thigh toward your crotch. Rock forward and backward again and remember to hold on any tight spots. You can even make small circles with the ball while holding.
As you move up your adductor, you may find it helpful to place the ball up on a book or two to help you dig in depending on your flexibility.
As you move up toward your hip, you will also want to work around the front of your leg into your quad a bit to make sure you hit all of the potential Adductor trigger points.
Remember to spend more time on the areas that feel tight. Hold on those spots and make sure to revisit them whenever you roll out.
IT Band/TFL Foam Rolling:
A tight IT Band can lead to hip pain and problems such as Snapping Hip Syndrome. When you roll out your IT Band, you aren’t only focused on the IT Band but all of the muscles on the outside of your leg, including your TFL and lateral quad muscle. Your TFL is another hip muscle that can become tight and create hip and low back dysfunction.
To roll out your IT Band, a hand-held roller or a foam roller is best and easiest to use. However, if you only have a ball, you can use that as well.
To roll out using a ball, lie on your side with your top leg bent and the foot flat on the ground in front of you. Start the ball to the outside or your leg right above your knee.
Hold the ball there and very slightly rock forward and backward on the ball. Then move it up the side of your leg, working both up the front of the outside of your quads and your hamstrings.
Hold on any tight spots and lightly rock as you move the ball up toward your hip. When you reach your hip, rock forward so you are digging in right below your hip near the top of your quad. Hit the muscle below your hip in front of your IT Band aka your TFL.
Make sure to go over the tight spots a couple of times. Do not spend time on areas that aren’t tight.
Again, if you have a roller, it is easier to cover the entire expanse of your leg quickly. It also won’t dig in as much as the ball.
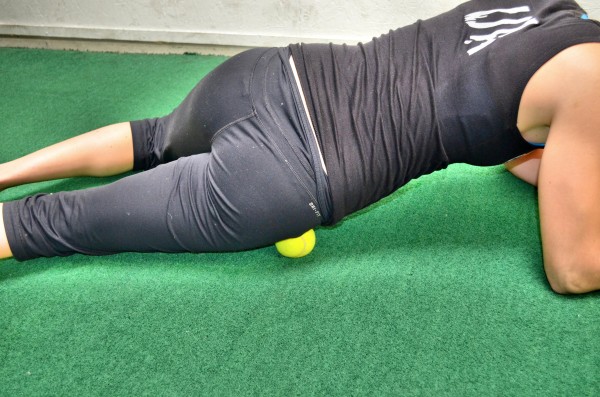
Glute Foam Rolling:
A tight Glute Medius and Minimus as well as certain trigger points in your Piriformis and Glute Maximus can cause low back pain and tightness. They can even lead to hip pain and cause referred pain down your leg.
To release the knots in your glutes, a ball is best. A smaller and harder ball will allow you to dig into the knots more. If you can’t deal with the pressure of a smaller ball, use a big foam ball or roller.
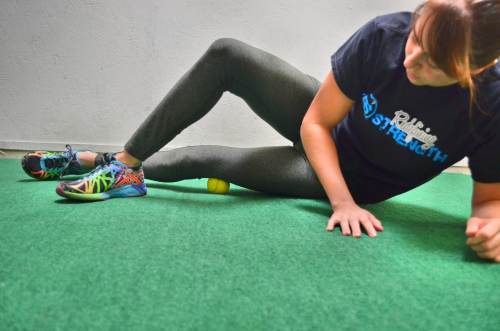
To roll out your glutes, lie on your side on the ground propped up on your forearm. Place the ball under one side right behind your hip at the top of your glute. Hold on any tight spots.
To dig in more, lift and lower your bottom leg up and down off the ground. You can also tuck your knee in toward your chest and then straighten your leg back out. Perform a few reps of each then move the ball down the outside of your glute.
After working down the side of your glute, move it back toward the fleshy part of your butt.
Roll it around under your glute, searching for any tight spots.
You can work all around the fleshy part of your butt – from the outside of your hip to your tailbone, from under your SI Joint to the top of your hamstring.
Again when you find a tight spot hold there and bend your knee in toward your chest and then straighten the leg back out. You can also lift and lower the leg when the ball is on the tender area to help the muscle release. Try 5-10 of each movement and then move on to the next spot.
Search all around your glute and focus on the areas of tightness. Really make sure to work from your tailbone out to the side of your hip.
Hold on any knots and breathe to give them time to release. Make sure to relax as you hold.
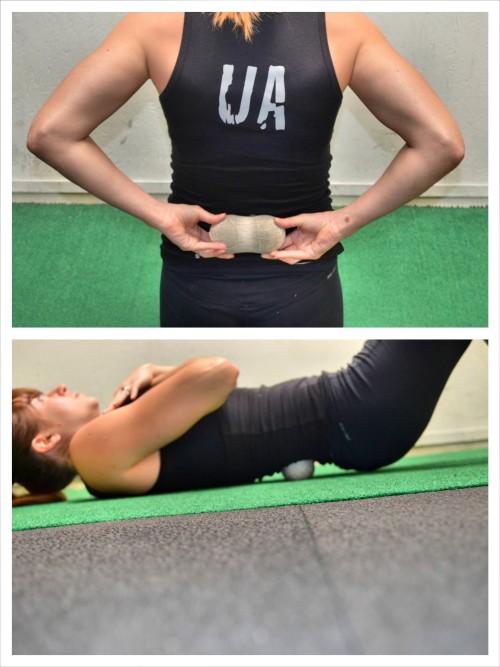
Low Back and Spine Foam Rolling:
Tight and even overused muscles along your low back and spine (caused by sitting in flexion all day and weak ab musculature) can be released by foam rolling. If these muscles remain tight and overactive, you will have a tendency to overuse these muscles in your low back when bending and lifting, which can lead to pain and injury.
And often when your low back is tight, your glutes aren’t firing properly.
However, you want to be careful when rolling out your back as it is easy to hyperextend it. If you use a roller be careful to not extend fully back over it.
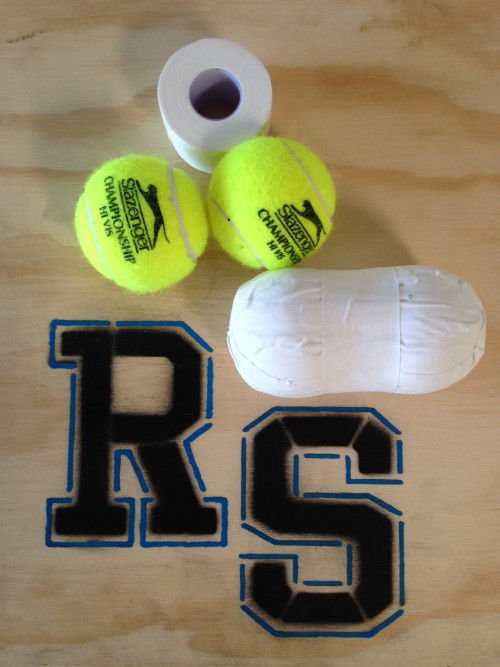
The best tool to roll out your back is the peanut, which can easily be made at home using some tape and tennis balls.
To make your own peanut and roll out your entire low back and spine using it, check out this post – The Peanut: Alleviate Back Pain with this Simple Trigger Point Tool.
Ab/Psoas Release:
When you sit in flexion all day your hips and abdominal muscles can become tight, causing your low back to become overworked.
To release your abs and a hip flexor muscle known as the Psoas, a big foam ball is best; however, you can use a roller or a smaller ball.
If you only have a tennis ball, you will also need some books to help you dig in.
To roll out your Psoas, lie face down on the ground with a ball on some books. Place the ball on the books in your abs above your hip to one side of your belly button.
Relax over the ball and lie face down on the ground. Breathe.
Then move the ball, working your way around the side of your lower abs between your belly button and hip. After you move the ball, relax completely back over it.
You can also roll out your upper abs, with the ball. Place the ball on the books and lie over it so the ball is in your abs right below your rib cage.
Relax over the ball and work along the bottom of your rib cage, relaxing over the ball and breathing every time you change the position of the ball.
If you have a posture ball, this tool works best. You will do the exact same thing as with the smaller ball; however, you won’t need the books.
Lat Foam Rolling:
If your Lats are tight, you may compensate during movements and exercises, especially overhead pressing exercises, by arching and straining your low back. This can lead to low back and hip pain because it overuses muscles that aren’t supposed to handle the load and puts your low back in unnatural extension, even leading to anterior pelvic tilt and tight hip flexors.
To roll out your lats a roller or big foam ball is best, but you can use a tennis ball or a lacrosse ball.
To use a tennis ball or lacrosse ball, lie on your side with the ball under your side at the top of your armpit where your back and shoulder connect. You can stretch your arm with the ball under it slightly out in front and overhead.
Rock forward and backward on the ball slightly and then move it lower down the side of your back. Hold on any tight spots as you go and make sure to rock forward and backward as you make your way down the side of your back.
Work all the way from your armpit to almost the end of your rib cage.
With the ball, you can also work back up to the outside of your shoulder and even under your shoulder blades as well as down your lat.
If you use a ball, it is going to apply more pressure than a roller so if you can’t handle the pressure against the ground, use the ball against the wall.
Stretching:
Once you’ve started loosening up the knots, you then need to stretch the muscles to help everything return to its proper length-tension relationships so that you make sure you are using the correct muscles when you move and lift.
When you suffer from low back and hip pain, you need to make sure that you stretch to return full mobility to your hips so that your glutes and abs work properly and your low back doesn’t compensate and take over.
Use the stretches below to loosen up your body and start correcting imbalances and dysfunction. Spend more time on the stretches that target your areas of tightness.
You do not need to do all of these stretches. Pick the ones that target your specific imbalances and areas of immobility and tightness.
Foot and Ankle Stretches:
If you’ve suffered from foot or ankle injuries in the past, they could lead to hip and low back problems. See these Tips to Prevent and Alleviate Foot and Ankle Pain, for more stretches to help you loosen up your feet and ankles.
Below is an important foot and ankle stretch for anyone with low back and hip pain. This is an ankle mobility stretch because limited ankle mobility can lead to you compensating and using your low back more. If one area of your body isn’t mobile, you will try to make up for that lack of mobility by overusing something else and requiring it to move in a way it can’t.
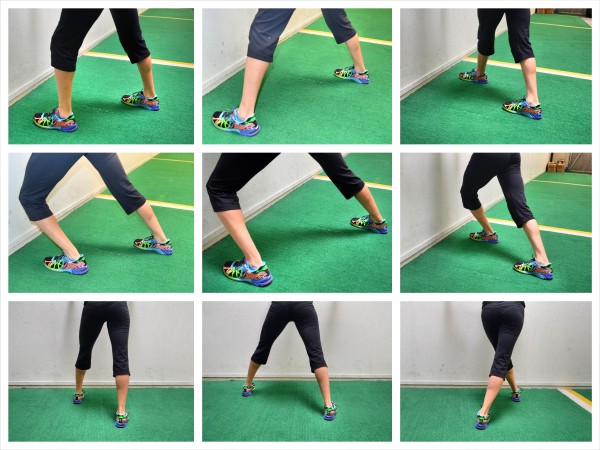
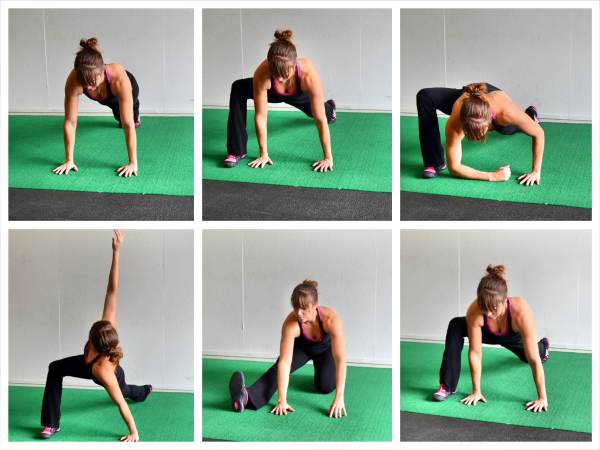
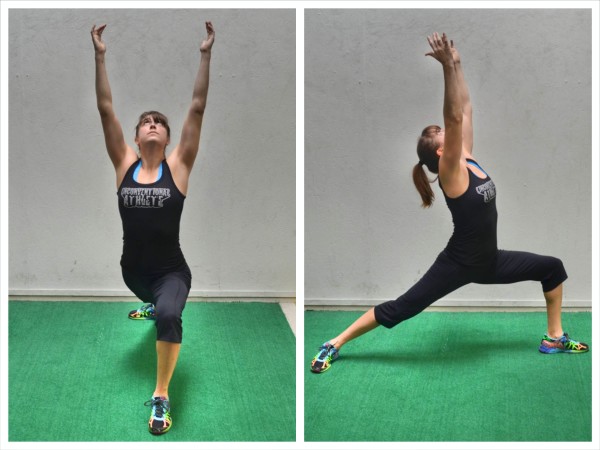
To do the 3-Way Ankle Mobility Stretch, stand facing a wall with your hands on the wall for balance or support.
Stand in a staggered stance with one foot slightly in front closer to the wall and your feet no wider than hip-width apart. Make sure your front knee is at least a few inches from the wall. This front foot is the ankle that is being worked on.
Standing in this staggered stance, drive the front knee straight forward over the toe and into the wall while keeping your heel on the ground. Do not worry if your back heel comes up. Focus on that front foot and driving the knee into the wall while keeping the heel down.
Do that 10 times and then take a step out a bit wider to the side and repeat so that your feet are about shoulder-width or wider (second set or line of photos in the picture above). The foot should be pointing straight toward the wall and you want to drive the knee forward over the toe while keeping the heel down. Complete 10 reps, driving the knee forward into the wall then relaxing out of the stretch.
Then step your foot across in front of your back leg (shown at the bottom of the photo) and repeat 10 more knee drives. Make sure that your toe is always pointing directly toward the wall and that you are keeping the heel down as you drive your knee forward.
By making sure that your toe is pointing straight into the wall in front of you, you will hit different aspects of your lower leg to loosen it up.
All three positions will hit the lower leg and ankle from different directions to improve your ankle mobility and dorsiflexion (aka how much you can pull your toes up toward your shins).
Half-Kneeling Quad and Hip Stretch:
If you sit all day, your hips are tight which may be causing your back to engage and work when it shouldn’t. Tight hips may also be preventing your glutes from firing.
A great stretch to loosen up your hips is the Half-Kneeling Quad and Hip Stretch. There are a few different variations of this stretch you can do to target your quads and hips from slightly different angles. And when you reach back overhead with these first few variations, you can also stretch out your Psoas, which is an important hip flexor muscle to open up to help prevent low back and hip pain.
Beginners will want to start with the Basic Half-Kneeling Hip Stretch or use a towel to do the other variations. If you are at your desk, you may want to do the Step and Reach Hip Stretch instead of kneeling on the ground.
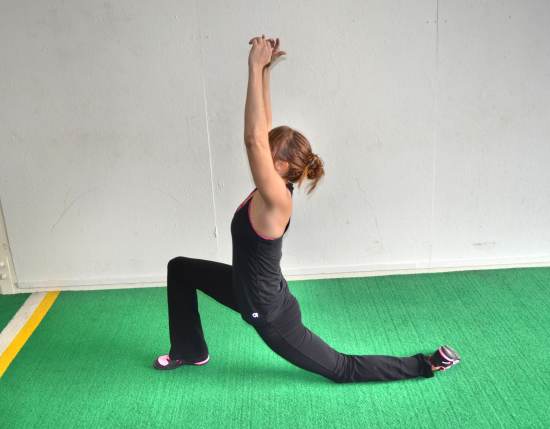
To do the Basic Half-Kneeling Hip Stretch, start half kneeling on the ground. Then press your hips forward as you reach your hands up overhead so that you feel a nice stretch down the hip and even into the quad of the back leg.
Squeeze the glute of your back leg so that you are actually fully extending your back hip and not simply arching your back. If you just hyperextend your low back, you will just be perpetuating the problem. Make sure you are truly extending your hip.
Breathe as you hold and reach your hands backward overhead or turn this into a dynamic stretch by releasing and then repeating the stretch.
You can also reach your arms to the side over your front leg if you want to hit your hip from a different angle and stretch your TFL and even the muscles of your back that help you bend to the side..
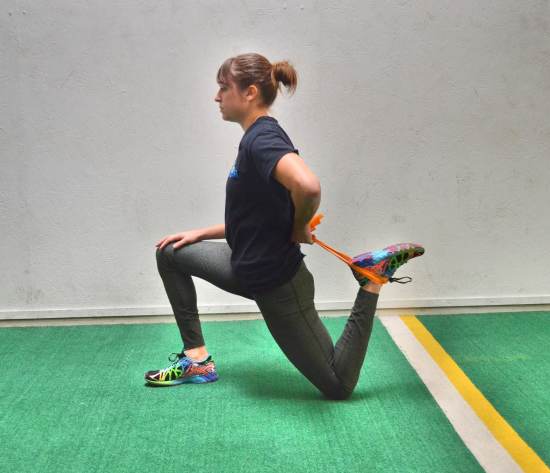
Beginners may need to stay with this variation or grab a towel or stretch strap to do these next variations. The second variation of the Half-Kneeling Hip Stretch will stretch your quad more as well; however, it requires more flexibility to be able to grab your back foot and pull it into your butt.
To do the Half-Kneeling Hip and Quad Stretch, set up half-kneeling with your right leg back. It is best to do this with a wall or bench in front of you to help you balance.
Then reach back and grab your right foot/ankle with your right hand and pull it in toward your butt. In the half-kneeling position with your heel pulled in and the wall to balance you, rock forward and backward, pressing the hip forward to increase the stretch down your quad. Then relax back out of it and repeat. Complete all reps then switch sides.
Make sure to squeeze your glute as you press your hips forward to stretch your right hip and quad. Do not simply hyperextend your low back as you rock forward.
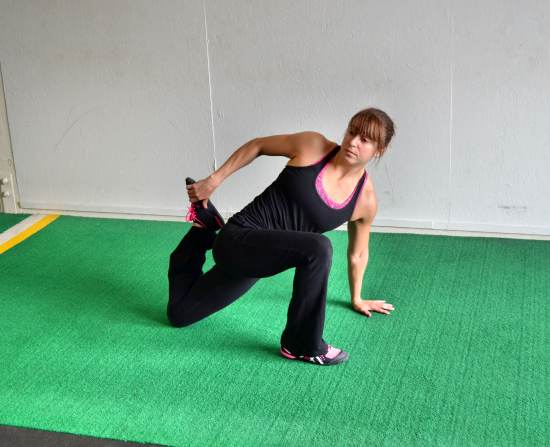
If you would like to stretch your spine as well as the outside of your hip and glute as you stretch your quad and hip, then you should try the Rotational Half-Kneeling Hip and Quad Stretch.
To do this variation, set up in a half kneeling position with your right leg forward. Then place your left hand on the ground and lean forward.
Reach back with your right hand and grab your left foot. Pull your foot in toward your butt as you drive your hip forward. Feel a stretch down your hip and quad.
As you press your hip forward, rotate your chest open toward your front leg. You may also feel a stretch through your spine and down the outside of that front leg. Hold here and breathe as you relax deeper into the stretch. You can also open your knee outward to stretch into your adductor or rotate your knee inward to hit your TFL.
Beginners may need a towel or stretch strap to help them do this stretch as it requires more flexibility to reach around and grab the leg with the rotation.
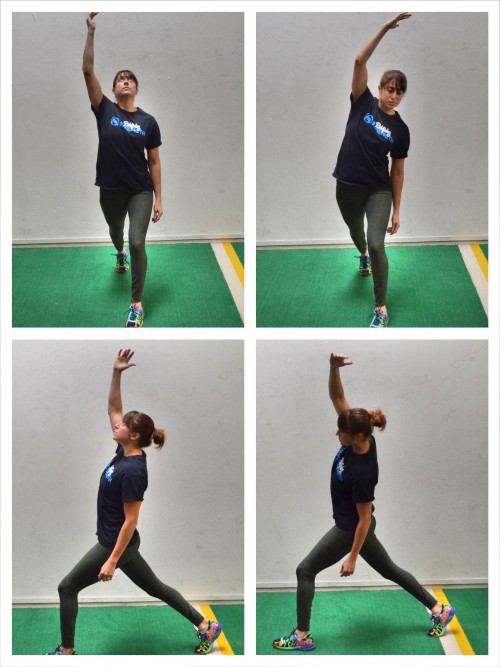
And if you are stuck at work and can’t kneel down, try this standing Hip and TFL stretch – the Step and Reach Hip Stretch.
To do the Step and Reach Hip Stretch, start standing with your feet together. Step one foot forward as if you are going to lunge, however, only slightly bend the front knee while keeping the back leg straight. You can come up onto the ball of your back foot as you step forward.
Then reach the same arm as the leg that is back overhead. Reach toward the ceiling behind you. Press your hip forward as you reach and feel a nice stretch down that back hip. Hold there.
You can also reach up and over the front leg to hit your hips from a slightly different angle and also stretch your TFL and even your back. Make sure to squeeze your glutes and drive your hips forward so that you feel this in your hips and you are not just hyperextending your low back.
To use a towel with any of these moves, simply wrap it around your foot and grab it with one hand to pull your heel in toward your butt. You can also use a jump rope or a towel, whatever you have on hand to help you pull your heel in toward your butt.
World’s Greatest Stretch:
The World’s Greatest Stretch is one of the best stretches to hit your hips, glutes, hamstrings, calves, quads and even your spine and chest, this is a must-do move if you have low back or hip pain and sit at a desk all day.
Click here for How to do the World’s Greatest Stretch.
Lying Glute Stretch:
This is a great stretch to release your glutes, hips, inner thighs and even your low back. Because it is a static stretch, you may want to use it more after your workout and even when you are feeling tight at home.
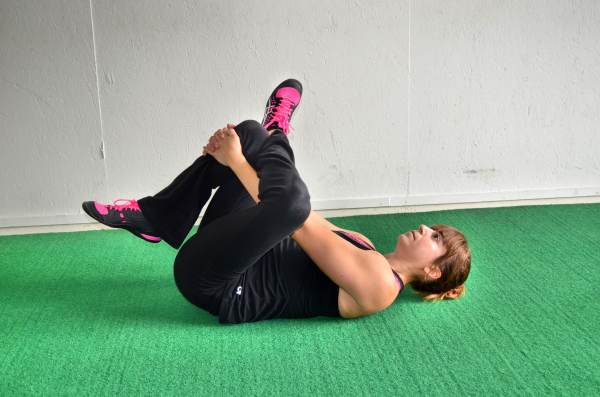
To do the Lying Glute Stretch, lie on your back and bend one knee in and place your foot flat on the ground. Then cross the ankle of your other leg over your bent knee.
Lift the bent knee with the foot on the ground up toward your chest and reach one hand through your legs and the other around the outside of the leg you just lifted to grab behind your hamstring or in front of your lower leg. If you are less flexible, grab behind the hamstring. If you are more flexible, grab in front of your shin.
Pull that leg in toward your chest as you relax your head and upper back onto the ground and let the knee with the ankle crossed over relax open. Relax and hold as you breathe into the stretch. Then switch to the other side.
You can also straighten the leg you are holding to hit your hamstring as well.
If you feel this in the knee of the leg you crossed over, make sure to flex that foot. Flexing the foot will help protect the knee.
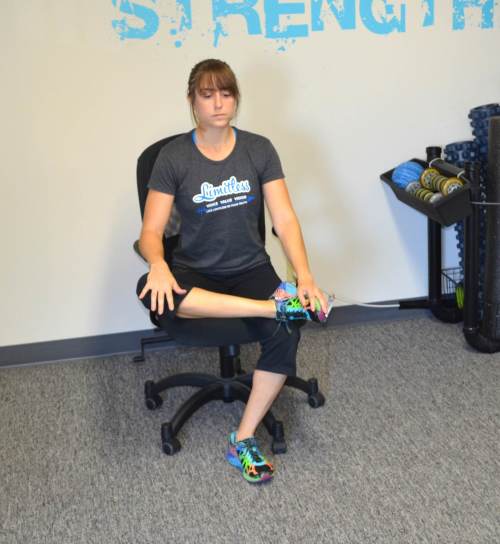
You can also do a variation of this stretch if you are at work and can’t lie on the ground – the Seated Pigeon Pose Stretch.
To do the Seated Pigeon Pose stretch, sit toward the front of your chair and sit up nice and tall with your feet flat on the ground. Bend one knee to place the ankle on top of your other leg just above the knee. Flex the foot of the leg you just crossed over to protect your knee.
Sitting tall, press down on your knee to open up your hip. You can also place your foot on the ground up on the base of your chair to help stretch the glute more by bringing your leg in toward your chest.
Breathe and relax as you press down on the leg to feel a nice stretch in the outside of your hip and glute. Pay attention to how the stretch feels on each side. Make sure to stay seated up nice and tall.
With both versions of this stretch (and any other stretch for that matter) make note of any imbalance. If you notice one side is tighter, make note because imbalances can lead to injury more so than even if both sides are just super tight. You will then want to focus on releasing the tighter side and figuring out what may be causing the imbalance so it doesn’t lead to knee pain.
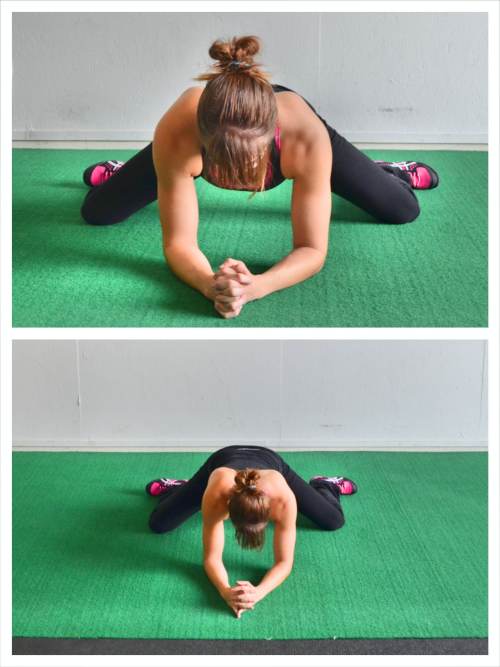
Frog Stretch:
It is important to stretch your adductors to help restore proper functioning to your hip and SI joint. And the Frog Stretch is one of the best stretches for your inner thighs.
To do the Frog Stretch, kneel on the ground and spread your knees as wide as possible while also supporting yourself on your forearms.
Turn your toes out as you open your knees as wide as possible. Do not let your heels come together behind your butt. You want your feet wide apart so that your ankles are in line with your knees if possible.
Bringing your heels together reduces the stretch.
Then sit your butt back toward your heels as much as possible while keeping your knees wide. You may not be able to sit back much, but just push back as far as you can.
Breathe as you sit back and feel the stretch. Hold for a second or two and then release out of the stretch, coming back forward for a second before pressing your butt back as far as you can toward your heels again.
If you want to hit the front of your hip a bit too, you can add in a rotational move as you come forward out of the Frog Stretch.
As you come back forward, lower your hips forward onto the ground and rotate one of your lower legs up and forward, bringing your foot forward toward the same shoulder (you are going to rotate your hip inward). Then sit back again and repeat the Frog Stretch before relaxing back forward and rotating the other hip inward. Keep alternating sides until all reps are complete.
You can also make the Frog Stretch a static stretch by simply sitting your butt back toward your heels and holding instead of rocking slowly in and out of the stretch. A static stretch is a great option for after your workout. Just sit and breathe and relax deeper into the stretch, adjusting your knees out further as you relax.
If you are at work and your inner thighs feel tight, you can stretch them a bit with the Extended Triangle Poses or even with a little Side to Side Lunge as long as your work attire allows. See the Extended Triangle Poses below or check out the Side to Side Lunge in this post on Stretches For Runners.
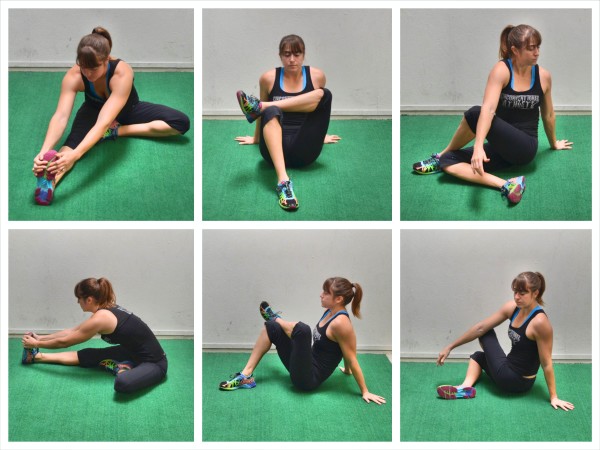
Seated Hamstring, Glute and Spinal Twist Complex:
Because there are so many muscles that connect right at your Lumbo-Pelvic-Hip Complex, you want to make sure to stretch as many of those muscles as you can to make sure your hips are loose and have full mobility.
The Seated Hamstring, Glute and Spinal Twist Complex is a great static stretch combination to really improve the flexibility of many of the muscles that connect around your hips and low back.
To do the Seated Hamstring, Glute and Spinal Twist Complex, sit on the ground with one leg out straight in front of you. Pull the foot of the other leg in to your inner thigh so that your knee is pointing out to about 3 or 9, depending on which leg is out straight. Relax that bent leg as you fold over at the hips and reach toward the foot of the straight leg.
Keep that leg straight to stretch your calf and hamstring. If you can’t reach your foot while keeping your leg straight, grab a towel or jump rope and wrap it around your foot so that you can use that to pull yourself over and stretch your hamstring.
Hold here and breathe for 15-20 seconds. Then release and cross the ankle of the bent leg over your straight leg right above your knee. Place your hands on the ground behind your butt and bend the straight leg to bring your quad and the leg crossed over in toward your chest.
Sit up nice and tall and press your leg and chest closer together to feel a stretch in the outside of your glute. Breathe and hold, trying to get your legs and chest closer together. Flex your foot to protect your knee.
Hold for 15-20 seconds. Then allow the foot of the leg crossed over to lower down to the side while keeping your bottom leg bent. Place the foot flat on the ground as you lay your bottom leg down on its side. Then lift the hand on the side you lowered your foot down to and place that arm on the outside of your knee pointing up toward the ceiling. Press off that knee to rotate your chest toward the leg.
Sit nice and tall and feel a stretch down your spine. Breathe and hold for 15-20 seconds.
If you are less flexible, you may need to straighten the bottom leg instead of keeping it bent like it was from the glute stretch.
After holding in the Spinal Twist, release and straighten the other leg out and start on the other side with the Seated Hamstring Stretch.
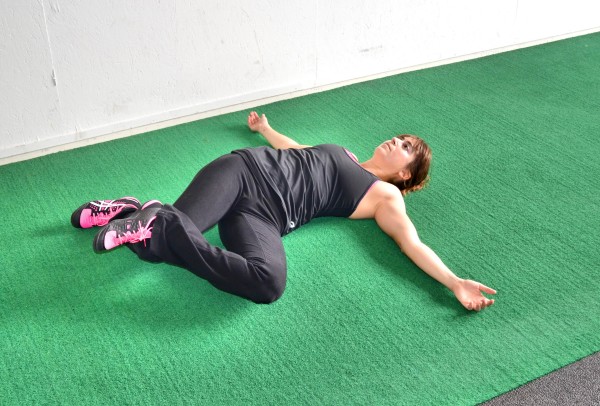
Lying Quadratus Lumborum Stretch:
This is another great static stretch to release the muscles of your low back and even of your hips.
To do the Lying Quadratus Lumborum Stretch, lie on your back with your arms out to your sides. Bend one knee and place the foot flat on the ground. Then cross the ankle of the other foot over your quad right above your knee.
Let your knees then fall toward the side of the ankle you just crossed over. Use that crossed over leg to pull the other knee down to the side.
Keep your upper back flat against the ground as you let your legs fall to the side. Feel a nice stretch in your low back and even your hips.
Breathe and relax your knees toward the ground. Hold for 15-20 seconds and then switch sides, crossing the other leg over and letting your knees relax to the ground on the other side.
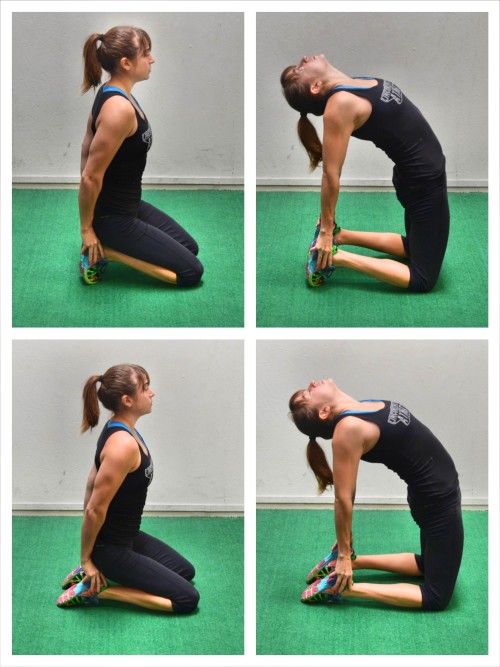
Camel:
The Camel is a must-do move for anyone with a desk job because it is the exact opposite of what you do all day seated at a desk hunched over a computer screen. It is an essential stretch to prevent and alleviate pain and injury up and down your body.
The Camel stretch is a great pose for anyone with low back and hip pain because it stretches your hips, quads and abs while also helping to get your back activated and even your glutes engaged.
To do the Camel, start kneeling with your knees about hip-width apart and your feet flexed. Sit back on your heels and place your hands on your heels.
Then arch your hips up and away, lifting your glutes up off your heels and pressing your chest out. Keep your hands on your heels as you arch away and squeeze your glutes to fully extend your hips.
Relax your head back and arch as much as you can, getting a nice stretch down your chest, core, hips and quads. Do not let your shoulders shrug.
Hold for 1-2 seconds and relax back down. Repeat, arching back up. You can also make this a static stretch by simply holding the pose for 15-20 seconds.
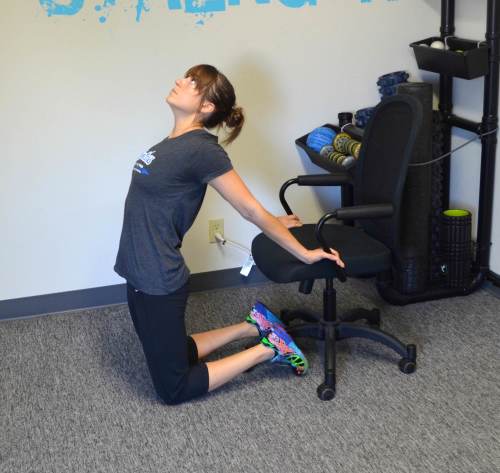
If you are less flexible, do this stretch with a couch, chair or table behind you. Kneel down and place your hands back behind you on the couch or table. If you are at your desk, you can use your desk or chair. Then press your chest out and arch away as much as possible away from the piece behind you while leaning your head back.
If you want to make the stretch more challenging, point your toes and place your hands on your heels instead of flexing your feet.
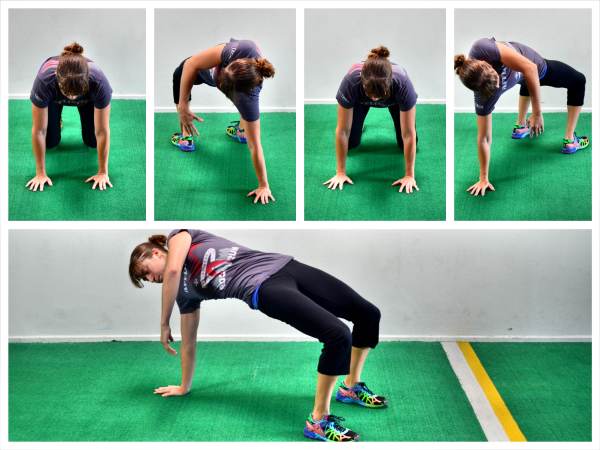
Thoracic Bridge with Sit Thru:
Like the Camel, the Thoracic Bridge with Sit Thru is another must-do bridge variation for anyone with a desk job that suffers from hip and low back pain (if you have knee or even upper back pain as well, this is a must-do move!). This is also a great move for cyclists who spend lots of miles hunched over on the bike!
To do Sit Thru to Thoracic Bridge, set up on your hands and knees with your hands under your shoulders and your knees under your hips. Flex your feet and lift up onto your hands and toes.
Then lift your right hand and bring your left leg under your body and through so you rotate your hips open toward the ceiling as you place your left foot flat on the ground.
As you rotate your hips up toward the ceiling and squeeze your glutes to lift them up as high as you can, reach your right hand down toward the ground, rotating your chest toward the floor.
Feel your glutes working to keep BOTH hips up, while you reach your hand down. We have a tendency when we rotate to drop the hip on the side we are rotating toward. Make sure both hips stay up as high as possible so you feel a nice rotation and stretch through your spine. You are twisting almost like someone wringing out a towel.
Then drop your hips and step your foot back through while placing your hand back down on the ground.
Step through and rotate to the other side, bridging your hips up as high as you can as you reach toward the ground. You want to feel your glutes working as you feel your spine stretching.
Beginners may need to start in a Table Top Bridge position and then simply raise one hand and reach it across their body as they bridge up instead of including the Sit Thru.
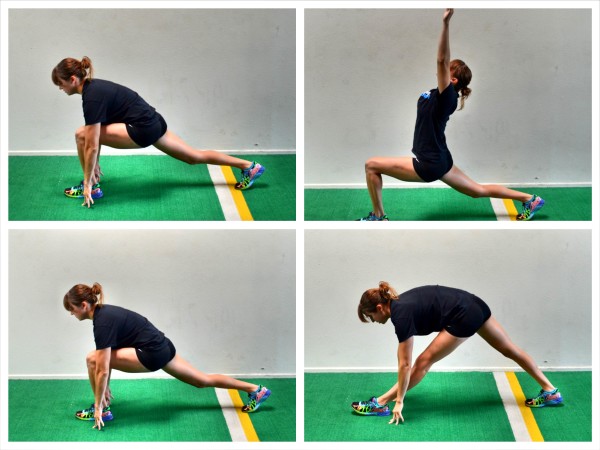
Crescent to Hamstring Stretch:
This is a great move to work a little on balance as you stretch your hips, quads, hamstrings, calves and even your abs and lats a bit.
To do the Crescent to Hamstring Stretch, step one foot back into a nice wide lunge stance with the back heel up. Bend your front knee and place your hands on the ground on either side of your foot in a nice low runner’s lunge. Keep your back leg straight in the low lunge.
Then, staying in a nice low lunge, reach your hands up and back overhead to move into Crescent Pose.
Hold for a second or two, reaching your arms back overhead as you squeeze your glute to press your hip forward. Then place your hands back down on the ground.
With your hands down on the ground, straighten your front leg and lean forward over your leg to stretch your hamstring. As you straighten your front leg, you will want to drop your back heel down to the ground. If you can’t reach the ground, you can also place your hands on your shin. Just focus on straightening that front leg.
Beginners may even need to drop their back knee down to the ground to help them balance as they straighten their front leg.
After stretching your hamstring, raise your back heel back up and bend the front knee to move back into the low runner’s lunge before reaching your hands back up into Crescent.
Complete all reps on one side before switching.
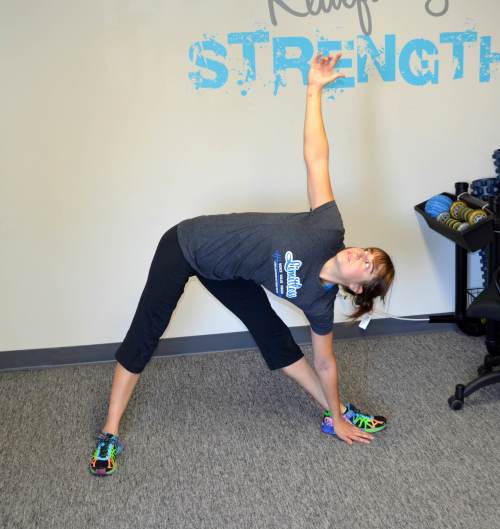
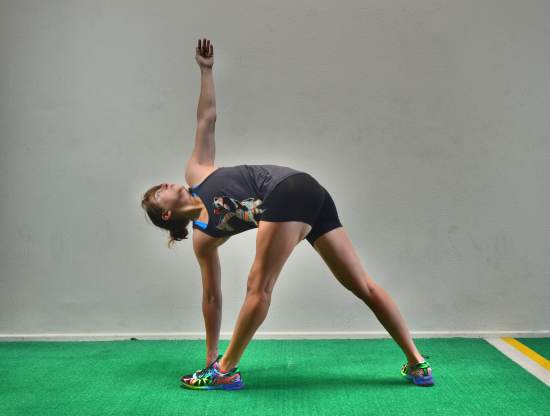
Extended Triangle and Extended Twisting Triangle:
The Extended Triangle Poses are two great isometric moves to improve not only the flexibility, but also the mobility of your hips. By stretching all of the muscles around your Lumbo-Pelvic-Hip Complex while holding in a pose that also requires some stability and strength, you can help alleviate and prevent hip and low back pain.
Each pose targets slightly different muscles but both hit muscles that are common causes of low back pain, including the Quadratus Lumborum, Glute Medius, Adductors, Hamstrings, IT Band and Hips.
To do the Extended Triangle Pose, step up as if you were going to do the Warrior II pose, stepping one foot forward into a nice wide stance (with your feet about 4 feet apart) with your front foot pointing straight ahead and your back foot turned out.
Your feet should be almost perpendicular. Also, make sure that your front foot is about at the instep of your back foot if you look back from your front heel to your back foot.
Pushing your butt back and hinging at the hips, reach the same hand as the leg that is forward down to the ground. Make sure to keep your legs straight as you hinge. If your legs start to bend, do not reach lower.
Place your hand on the ground inside your foot. You can also place your hand on a block, your foot, your shin or your ankle if you can’t reach the ground while keeping your legs straight.
Extend your opposite arm up toward the ceiling, opening your chest up toward the ceiling. If you can’t really open your chest up toward the ceiling, you may want to place your hand up higher. You can then keep looking at the ground to help you balance or look up toward the ceiling to make the move harder.
Hold that pose and relax and breathe. As you breathe, try to stretch further. Then switch and repeat on the other side. Hold on each side for 15-30 seconds.
You can also do a Twisting Variation of the Extended Triangle Pose called the Twisting Triangle Pose. By twisting, you really get the outside of your hip and even your IT Band. For this variation, you will simple reach the opposite hand from the front leg down to the ground and rotate your chest open toward your front leg. You may also find you need to bring your feet in a bit closer together for this variation.
Still make sure to push your butt back and keep both legs straight as you hinge over and rotate.
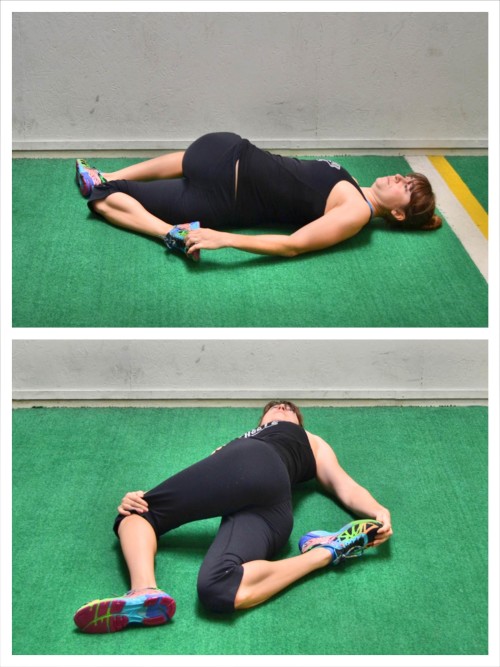
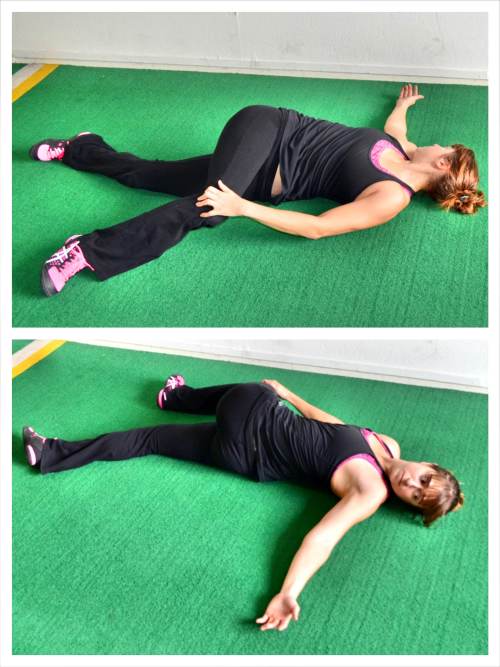
Star Stretch with Quad Stretch:
This is another great all-in-one stretch especially if you are short on time but want to stretch out after your workout. This stretch is a great release for the low back while also stretching your quads and hips.
To do the Star Stretch with Quad Stretch, lie on your back with your arms out straight to each side at about shoulder height. Then bend your left knee to about 90 degrees and pull it across your body.
Place your right hand on top of your knee to press it toward the ground.
Then bend your right knee, bringing your heel back up toward your butt. Grab that heel with your left hand to stretch your quad.
As you stretch your quad and push your left knee down toward the ground, try to open up your chest as much as possible, letting both shoulders relax back on the ground.
Hold and breathe, relaxing deeper into the stretch. Then switch sides and bring the other knee across as you stretch your other quad.
Feel your low back and even your chest loosen up as you hold.
If you can’t reach your foot to stretch your quad, you can either use a towel or do the basic Star Stretch without the Quad Stretch.
Downward Dog:
Downward Dog is a great way to stretch out your lats while also stretching your calves and even your hamstrings. The move also can help improve your Thoracic Extension to help you alleviate upper back pain as well as low back pain.
To do Downward Dog, start in the high plank position. Then push your butt back and up toward the ceiling as you press your chest back toward your legs between your straight arms.
Focus on getting your back flat and a nice straight line from the heels of your hands up to your tailbone. You want your arms to be in line with your torso (aka your biceps by the ears).
Push your butt back and up as you hold the downward dog position and try to drive your heels down toward the ground. Do not walk your hands in too close to your feet as you hold just to try to get your heels down.
You want to basically push right back from the high plank position into the downward dog. Breathe and try to get your back flatter and your heels onto the ground.
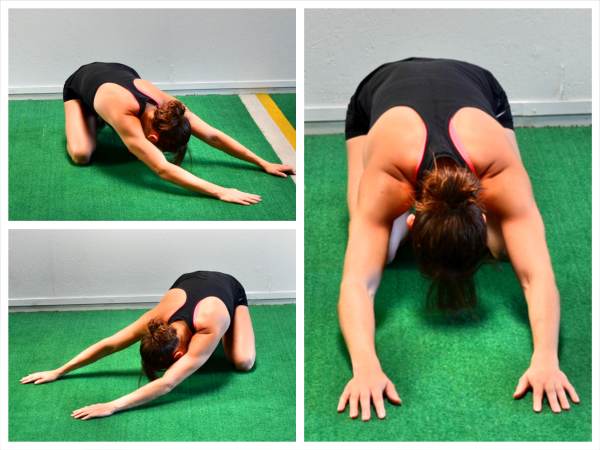
Child’s Pose with Reaches:
This is one of the most relaxing stretches and one that everyone can easily do. Child’s Pose with Reaches is a great stretch for your low back, hips, lats and QL muscle.
To do the Child’s Pose with Reaches, point your toes and sit back on your heels as you reach your arms out straight in front of you on the ground. Relax and reach out as far as you can with your hands as you try to keep your butt all the way back on your heels.
Then walk your hands to one side. Breathe and feel a stretch down your side and into your low back. Then walk your hands back center and to the other side.
Hold to each side for a breath or two.
To focus this stretch more on your low back, you can even reach your hands back toward your heels and relax your head forward onto the ground.
Activation
Once you’ve gotten everything ready so that the correct muscles can engage, you’ve actually got to get those muscles working. And that doesn’t mean just jumping into your workout and lifting heavy.
With low back and hip pain, often your glutes and core are weak and underactive if not almost completely dormant. And you don’t automatically engage them when you workout even if you are doing glute exercises such as squats or deadlifts.
Often instead with these compound moves, you recruit muscles that shouldn’t be handling the load to lift – like your low back and even your quads.
That is why you need to get those muscles activated before you start doing your workout.
With the Activation Exercise below, you will wake up your glutes and core so that they do work when you do your heavy lifts. These exercises will not only make those underactive and weak muscles active and strong but they will also help improve your mind-body connection so that you can recruit them when needed quickly and efficiently.
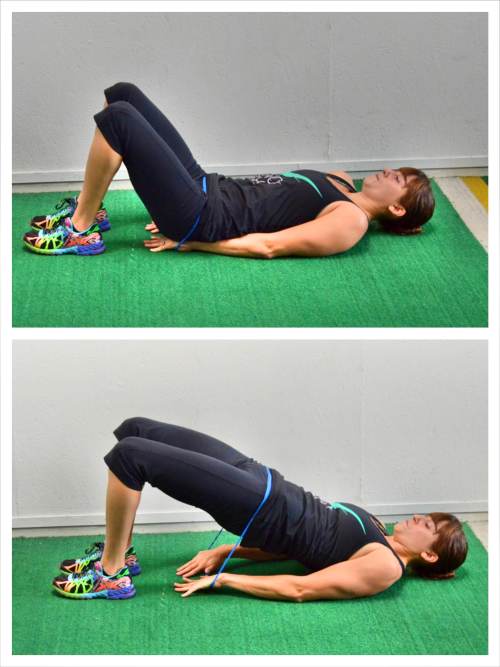
Glute Bridge:
One of the most important Activation moves for anyone with low back and hip pain to do is the Glute Bridge, especially if you sit at a desk all day.
The Basic Glute Bridge is a great way to get your glutes activated while learning how to engage your core to protect your low back. The move also works on hip extension to help open up your hips after sitting all day at a desk.
You can do the Basic Glute Bridge as a hold or for reps. Doing a Glute Bridge as a hold is a great way to start activating those glutes while being able to easily concentrate on everything engaging.
With the Glute Bridge, you don’t just want to go through the motions of bridging, you actually want to think about, and focus on, your glutes engaging and working. You want to make sure that other muscles don’t take over and work for your glutes to perpetuate your improper movement patterns and imbalances.
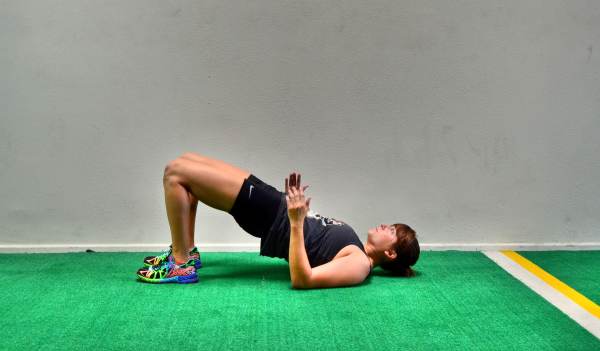
To do the Isometric Glute Bridge, bend your knees and put your feet flat on the ground just close enough that you can graze your heels with your fingertips when you stretch your arms down by your side. Your feet should be about hip-width apart. You can change up how far your heels are from your butt. Just make sure you feel your glutes working as the prime mover of the bridge.
Then bend your elbows to 90 degrees so that only your upper arms are on the ground. Drive up through your heels and upper back and arm to lift your glutes up off the ground. Drive your hips up as high as possible, squeezing the glutes hard. Keep your belly button drawn in so you don’t hyperextend your back.
Do not push backward off your heels. Make sure you are driving straight up almost as if driving your knees forward over your toes. You want to fully extend your hips NOT your low back. Also, make sure that your knees aren’t caving in or falling open as you bridge up.
Squeeze your glutes and hold at the top. Concentrate on feeling your glutes work. Don’t just go through the motions. Actually think about the muscles that should be working as you hold and try to squeeze your glutes harder and extend your hips without arching your low back.
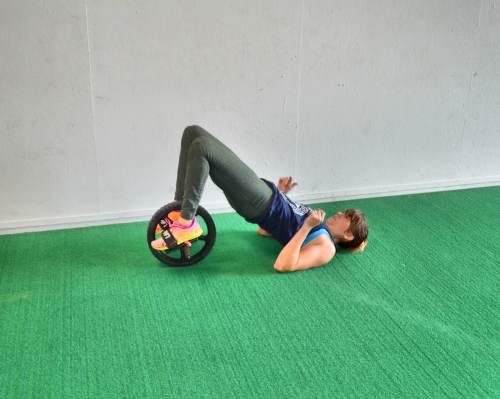
To make the Isometric Glute Bridge more challenging, you could hold in a Suspension Trainer, on a Power Wheel or even simply do a Single Leg Isometric Glute Bridge.
The benefit of doing the Single Leg Variation is that you isolate each side so that your stronger leg can’t compensate for your weaker leg. However, using only one leg is way more challenging. Do not do this variation if you feel the basic bridge hold in your low back. Also do not attempt this variation if you can’t get your hips up just as high as with the two-leg variation.
The point is to work your glutes and get them activated. If you don’t feel them working with this Single Leg Variation, regress the movement.
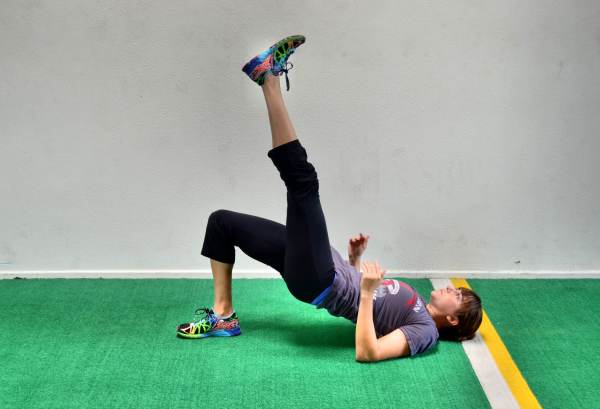
To do the Single Leg Isometric Glute Bridge, set up like you would for the Basic Isometric Glute Bridge and then raise one leg up off the ground. You can bend the raised leg to 90 degrees or you can straighten the leg up straight toward the ceiling. Either is fine. Just make sure you don’t swing the raised leg to help you bridge up.
Then drive your hips up, pressing through your heel and upper back. As you bridge up, fully extend your hips and remember to drive your knee forward over your toe and not push yourself backward.
Hold at the top. Keep your abs engaged so you don’t feel it in your low back. Like with all the bridge exercises, focus on feeling your glutes work and not just going through the motions of bridging up.
Here are some other Glute Bridge Variations you can also use to get your glutes activated.
Fire Hydrant Variations:
A weak Glute Medius can be a main cause of not only low back and hip pain but also knee pain, which means you need to get it activated and working before you workout.
A great move to get your Glute Medius working is the Fire Hydrant.
To do the Basic Bent-Knee Fire Hydrant, start on your hands and knees with your hands under your shoulders and your knees under your hips. Flex your feet.
Then, keeping your arms straight and your foot flexed, raise your right leg out to the side. Keep your knee bent to 90 degrees as you raise and your ankle in line with your knee. Do not let your foot get above your knee or your knee go up above your foot. Your lower leg should stay in line and be parallel to the ground.
Hold at the top then lower back down. Make sure to hold for 1-2 seconds. Do not rush through the lift.
Make sure you do not bend your arms or lean away from the leg being raised just to get the leg up higher. Squeeze your butt and make sure you feel it activate. Range of motion isn’t important. Feeling the glute raise the leg and hold is all that matters.
Complete all reps on one side before switching.
Another variation of the Fire Hydrant that is even more challenging is the Straight-Leg Fire Hydrant. Do not attempt this variation if your range of motion is very limited with the Bent-Knee Variation.
To do the Straight-Leg Fire Hydrant, set up like you would for the Bent-Knee Fire Hydrant. Start quadruped on the ground with your hands under your shoulders and your knees under your hips. Flex your feet.
Straighten your left leg out to the side in line with your hip. Then, keeping your arms straight, lift your straight left leg up toward the ceiling. Squeeze your glute as you lift. Also, make sure to keep your arms straight. Do not bend your arms and lean away just to get your leg higher up.
Hold for a second or two at the top then lower back down. Tap your foot down and repeat. Keep your leg straight as you lift and do not let it start to float back behind you.
You want to make sure you are lifting basically straight up to the side. Complete all reps on one side before switching.
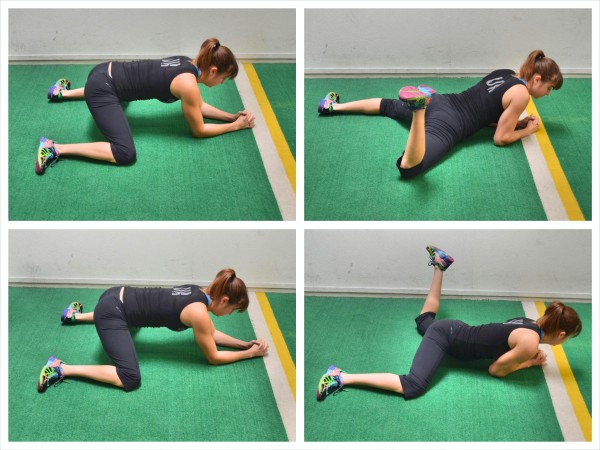
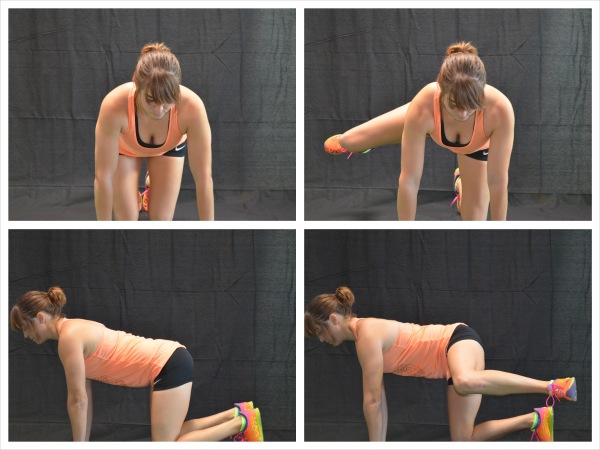
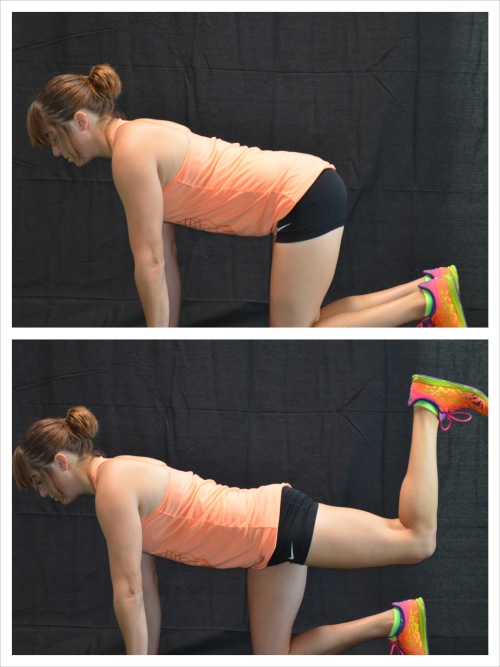
Donkey Kick:
The Donkey Kickback is a great exercise to work on core stability while focusing on activating your glute maximus.
To do the Donkey Kick, start on your hands and knees with your hands under your shoulders and your knees under your hips. Flex your feet.
Keeping your arms straight and your core engaged, drive your right foot up and back toward the ceiling, keeping your right knee bent to 90 degrees and your foot flexed.
Keep your core braced and squeeze your glutes as you kick your heel up and back. Do not let your right knee flare out as you lift or your low back arch. Try to get your quad to about parallel to the ground. Only kick up higher if you are extending from the hip. You do not want to hyperextend your low back just to kick up higher otherwise you will start working your back instead of your glutes.
Hold for a second or two at the top and lower back down. To make the move more challenging, hold for a bit longer at the top.
You can also add weight to this move to make it more challenging by putting on an ankle weight or even using a resistance band.
Complete all reps on one side before switching. Make sure you don’t rock forward and bend your arms just to kick up higher as you perform the move.
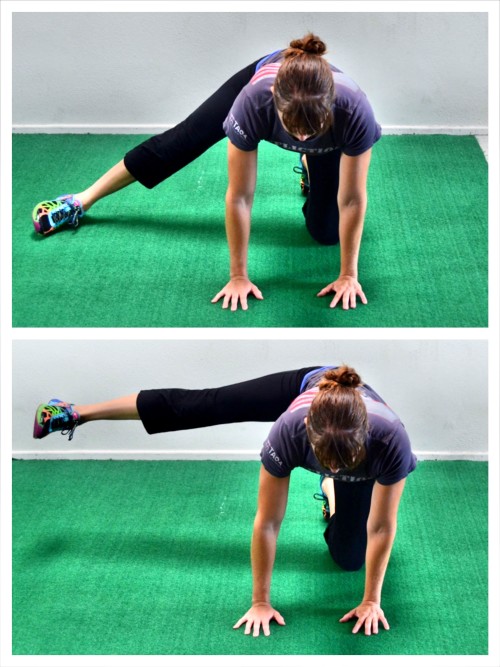
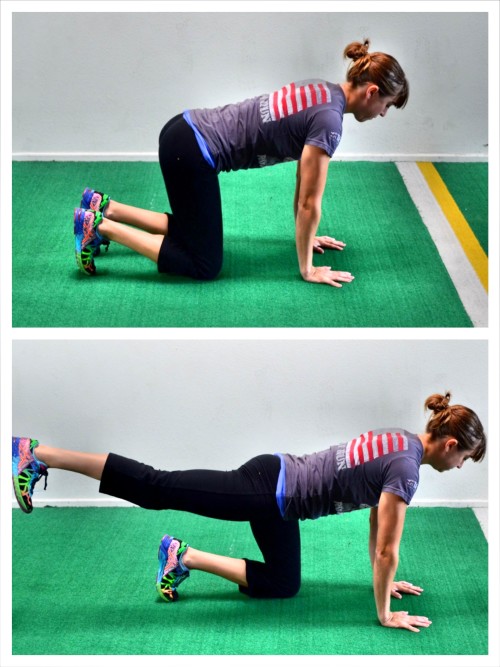
Straight Leg Kickback:
Like the Donkey Kick, the Straight Leg Kickback also works your core and glute maximus; however, because the leg is straight it also engages your hamstrings a bit more.
To do the Straight Leg Kickback, set up on your hands and knees with your hands under your shoulders and your knees under your hips. Flex your feet.
Then kick one leg back, driving your heel straight back into the wall behind you. Squeeze the glute as you lift the leg and drive the heel toward the wall behind you.
Make sure to keep your arms straight as you kick back and your abs engaged. Don’t arch your low back just to try to kick your leg back higher. Try to get your quad to about parallel to the ground.
Also make sure to keep your hips square to the ground. Do not rotate open as you kick back. The height of the kickback doesn’t matter as long as you feel your hips extend and your glutes engage. You do not want to feel this move in your low back.
Hold for a second or two at the top and really contract your glutes before lowering back down. Don’t rush the movement. The slower you go and the longer you hold, the harder the move will be.
Complete all reps on one side before switching.
If this move is easy, you can add weights or even use some sort of resistance band.
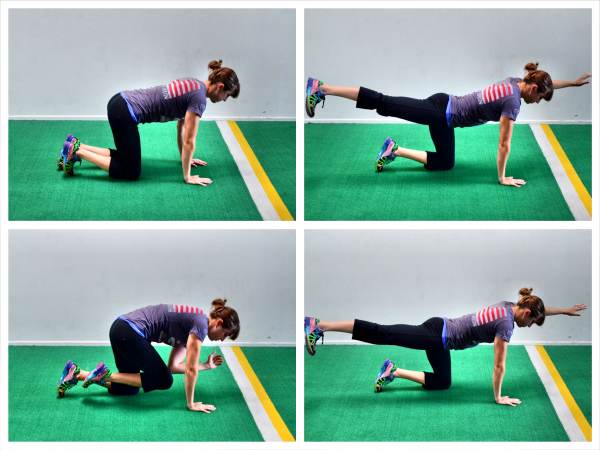
Bird Dog:
The Bird Dog is one of the best exercises to develop core stability especially for beginners or anyone who’s struggled with back pain in the past. It is a great exercise to help you learn how to engage your core and glutes.
Beginners may need to start with the Straight Leg Kickback above before adding in the arm movement. You can also do this as a hold instead of for repetitions.
To do the Basic Bird Dog, start on your hands and knees on the ground with your hands under your shoulders and your knees under your hips. Flex your feet.
From here you are going to kick your right leg back as if doing the Straight Leg Kickback as you raise your left arm out toward the wall in front of you. Kick your leg straight out behind you as if kicking it into the wall while you reach the other arm out straight toward the wall in front of your head. Don’t worry about lifting your leg or arm up high.
Really try to drive your arm and leg toward opposite walls as you keep your core engaged and squeeze your glutes. You do not want to hyperextend or arch your low back just to reach your arm or leg up higher. Also make sure to keep your chest and hips square to the ground as you reach out.
Hold for a second or two at the top then, as you lower your arm and leg back down, bend them and bring them together under your body. Try to touch your elbow to your knee before extending back out.
Complete all reps on one side before switching to the other side. All reps should be done in a slow and controlled manner. You should even hold for a second or two at the top of the move. A longer hold at the top will make this move even more challenging.
You can also advance this move by adding a resistance band around your leg and opposite arm. If you have the resistance band connecting your arm and your leg, as you kick out you will lengthen the resistance band, which will create tension and try to pull your arm and leg back down. Resisting the tension will make the move harder.
You can also do the Bird Dog from your hands and toes instead of your hands and knees to make the move more challenging.
To do the Advanced Bird Dog, set up in the high plank position from your hands and toes with your hands under your shoulders and your feet about hip-width apart.
Then lift your opposite leg and arm up as if you are doing the Basic Bird Dog. Keep your core engaged and squeeze your glutes as you lift the leg and arm. Do not let your body rotate open or your hips sag toward the ground. Do not let your butt go up toward the ceiling.
Hold for a second or two at the top and then lower back down and repeat on the same side. You can also perform a longer hold to make the move more challenging.
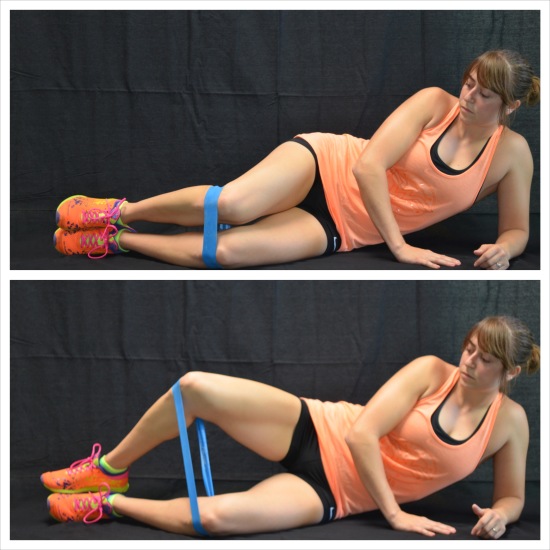
Mini Band Moves:
The Mini Band is the best glute activation tool out there. Plus it is only $3 and can be stored anywhere and even taken with you when you travel.
With the Mini Band you can work your glutes from every angle. Here are 10 Mini Band Moves to activate your glutes. You can pick one or two of these to include in your warm up to get your glutes ready to work before you squat or deadlift.
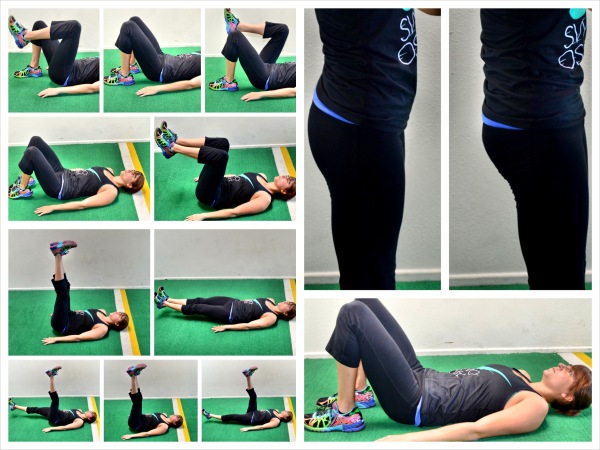
Pelvic Tilt Progression:
The Pelvic Tilt is a great way to strengthen your deep intrinsic core stabilizers to help you protect against low back and hip pain. Many people skip right through the progression and jump straight to Double Leg Lowers.
And then they wonder why their low backs are working and not their abs. Most of the time to solve this problem, people simply place their hands beneath their low back/butt.
However, this is only a short-term solution. This doesn’t actually teach them how to engage their abs. That is why it is important to progress through the steps of the Pelvic Tilt Progression.
Check out the full Pelvic Tilt Progression here.
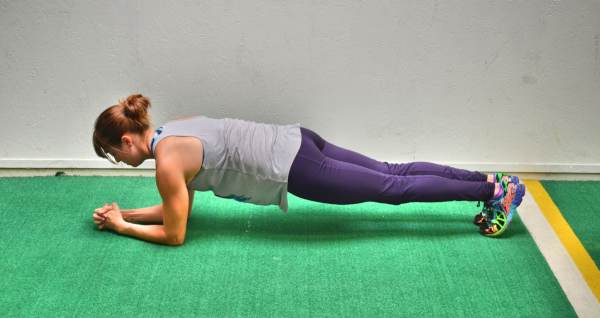
Planks:
Once you’ve mastered the Pelvic Tilt, you can then put it to use during Planks. Planks are a great core exercise to work everything from your shoulders to your knees.
And while there are a ton of great Plank Variations you can do, the Basic Forearm Front Plank is a must-do move for anyone looking to develop core stability and strength to prevent and alleviate low back and hip pain.
To do the Basic Forearm Front Plank, set up on your forearms with your elbows under your shoulders and your legs out straight behind you with your feet together. Flex your feet and lift up onto your forearms and toes.
Maintain a nice straight line with your body from your head to your heels and make sure that you are concentrating on tucking your pelvic to engage your abs. You also want to squeeze your glutes and quads to keep your legs straight while squeezing your legs together as you hold and driving back through your heels. Do not push forward onto your toes.
Also, do not let your chest sag toward the ground or your upper back round. You want a nice flat upper back.
Hold in this position. If you feel this in your low back, assess whether or not you are performing a proper Pelvic Tilt.
Beginners will want to start with a Plank from their knees or even off an incline to make the move easier.
Check out this post for more Plank Variations.
Warrior Poses I, II and III:
The Warrior Poses develop great leg and core strength and stability, which can help keep your hips and low back functioning properly. These moves also improve your mobility while activating your glutes and cores.
Warrior I will strengthen your core and legs while also improving your mind-body connection. Warrior I will stretch your hip flexors, abs and even your ankles. And if you suffer from Sciatica, this can be a great pose to help alleviate the pain.
To do Warrior I, set up in a nice wide lunge stance with one foot forward and one foot back. Turn the back toe out so your feet are about perpendicular. Your front foot should be at the instep of your back foot when you turn it out. Sink down into a lunge, keeping the back leg straight and the front heel firmly planted.
Try to get your front knee bent to 90 degrees and your quad parallel to the ground. You may find you need to step your front foot forward a bit more to sit comfortably in the lunge and keep the front heel down. The lower you sink in the lunge, the harder the move will be. Do not let your front knee cave inward. Make sure to squeeze your glutes and keep the knee in line with your hip and your ankle.
While in the low lunge, reach your hands up toward the ceiling, squaring your hips forward as much as you can. Breathe and relax into the lunge. Make sure you keep both feet flat on the ground and your back knee straight.
As you reach up, do not hyperextend your low back. Make sure to squeeze your glutes and stretch through your hips.
Hold then switch to the other side.
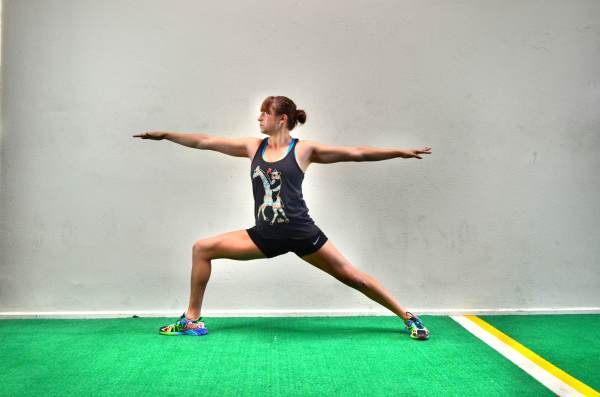
Another great Warrior Variation to strengthen your legs and core while improving your hip mobility is Warrior II.
To do the Warrior II, step forward into a nice wide lunge stance with your feet about 4 feet apart to start. Keeping the front foot pointing straight ahead, turn the back toe out so your feet are about perpendicular. The back of your front heel should be in line with the instep of your back foot.
Then sink down into a lunge, bending your front knee while keeping the back leg straight and the front heel firmly planted. Try to get your front knee bent to 90 degrees and your quad parallel to the ground. You may find you need to step your front foot forward a bit more to sit comfortably in the lunge and keep the front heel down.
The lower you sink in the lunge, the harder the move will be.
Do not let your front knee cave in or your back leg bend. Squeeze your glutes and keep your front knee in line with your hip and your ankle. Squeezing your glutes will also help open up your hips.
Also make sure that while you hold the low lunge, your back foot stays flat on the ground. Do not rock in on your back foot as you hold. Also make sure the heel of the front foot stays down.
While in the low lunge, open your arms out at shoulder height. Reach one forward over the front leg and the other back over the back leg. Keep the chest open and do not lean forward. Keep your weight centered in the lunge.
Hold and breathe relaxing into the pose. Then switch to the other side.
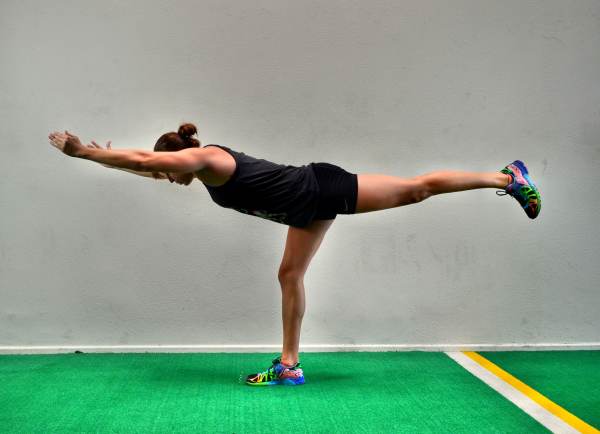
Warrior III is also a great pose to prevent and alleviate low back and hip pain because it stretches the entire backside of your leg and glute while also activating and building strength through your feet, legs and core. Plus, because this is a unilateral move, each side must work independently, which can help correct imbalances.
To do the Warrior III pose, start standing tall with your feet together. Then shift your weight so you are balancing on one foot with the knee slightly bent.
Hinge over at the hips, leaning your torso forward as you push your butt back and lift your back leg straight toward the wall behind you. Pretend you are driving the foot of the lifted leg straight back into the wall behind you as you reach your head toward the wall in front of you.
You want a nice straight line from your head to your raised heel, making sure to keep your back flat and your core tight as you hold this hinged over position. You can then reach your hands overhead in front of you, out to your sides or back toward your heels.
Hold in this position and feel your foot working to grip the ground. Try to straighten your standing leg as much as possible to work on improving your mobility while your glutes and core work to keep you balanced. Make sure you do not lock the standing leg out though as you hold. Also make sure your hips don’t rotate open. Squeeze the glute of the lifted leg to keep your hips level.
Do not let your back round or your other foot touch down as you hold.
Beginners may need to reach back toward their foot instead of out in front of them or they may even not be able to hinge over as far and raise their back leg as high.
Using a wall can also help beginners. Stand with a wall behind you and when you hinge over have the lifted foot lightly touch the wall behind you to help you balance.
Strengthening
Once you’ve gotten everything loose and your glutes and core ready to work, you are then ready to move onto your workout. Because you’ve foam rolled, stretched and activated the correct muscles, your low back now shouldn’t take over during lifts and your hips should be mobile so your movement patterns are correct.
The exercises below will continue to strengthen your glutes and core. If, at any point, you begin to feel your low back taking over, you may want to foam roll and go through a few activation moves. You may also need to try a different variation of the move, regressing it until a point where you can maintain proper form and core engagement.
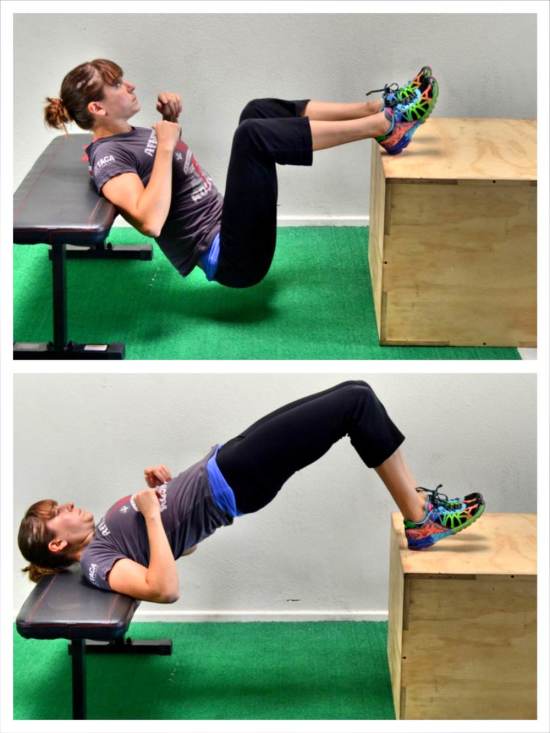
Reverse Hypers:
Reverse Hypers are a great way to strengthen your glutes; however, it is a very easy move to turn into a low back exercise if you aren’t super conscious of your glutes working. While your back will engage, it shouldn’t be the prime mover.
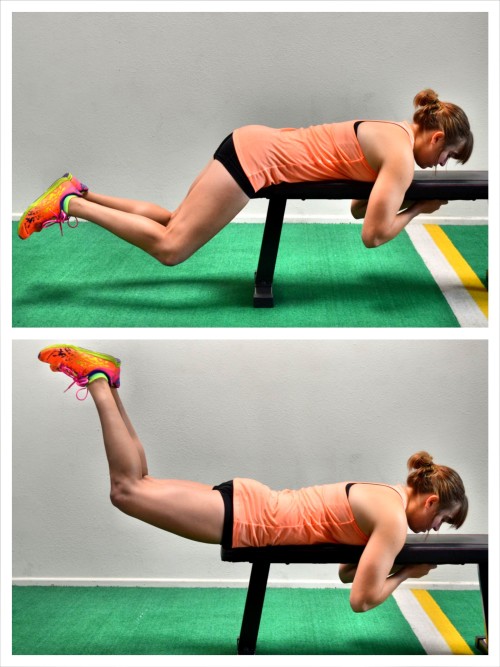
There are two great types of Reverse Hypers – one is done with a bent knee to really isolate the glutes while the other is done with a straight leg to engage the hamstrings a bit.
To continue to really focus on working the glutes, focus on the Bent-Knee Reverse Hyper.
To do the Bent-Knee Reverse Hypers, lie face down on a bench, box or table. Place your hips right on the edge of the bench and hold on to the bench or something in front of you. Keep your upper body relaxed as you hold.
If your hips are too far on the bench, you are more likely to hyperextend your low back in an attempt to get your hips up higher so make sure your hips are on the edge of the bench.
Place your heels together and bend your knees to about 90 degrees. Flex your feet. You can choose to turn your toes out to hit a slightly different aspect of your glutes as well.
Then, with your knees bent, kick your heels back and up toward the ceiling, squeezing your glutes to lift. You can sort of drive up and out a bit to really get your glutes to work. Make sure to press your pubic bone down into the bench as you squeeze your glutes to help you brace your core.
Focus on squeezing your glutes as you lift and don’t hyperextend your low back just to get up higher. Lift so that your quads are about parallel to the ground and lower back down.
Only lift higher if you don’t feel your lower back take over. You want to focus on and make sure your glutes are working to lift NOT your low back. The most important part is that you feel your glutes tighten.
Hold at the top for a second or two and then lower back down. You can also add weight to make this move harder.
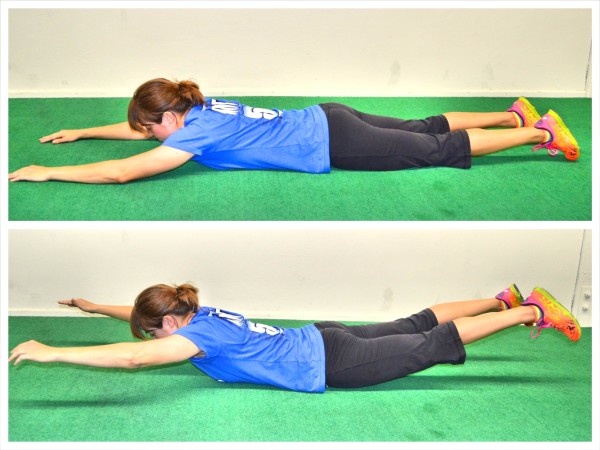
Superman Variations:
When people suffer from low back pain, many of them turn right to the Superman Exercise because it is meant to strengthen your low back.
And while this move can be beneficial to strengthen the backside of your core, you need to do it along with the foam rolling, stretching and activation moves to get your abs and glutes working also.
When doing the Superman, and it’s variations, make sure to also use your glutes to help you lift up and not just your low back. You want to feel your backside from your shoulders to your glutes working to lift.
For tips on how to perform the Superman Exercise and variations of the move, check out our Superman Exercise post.
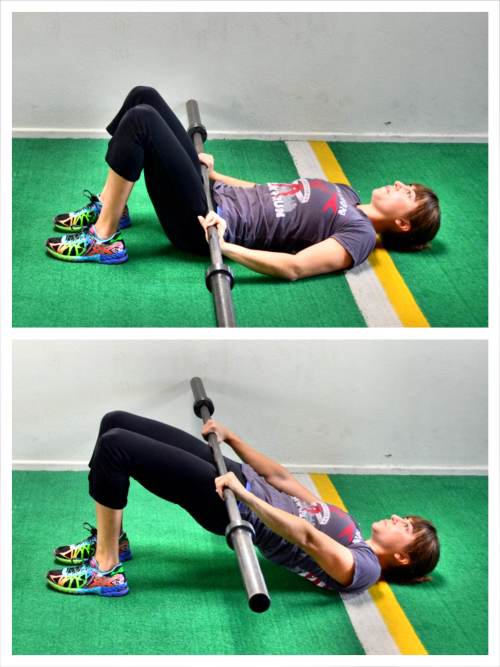
Weighted Glute Bridges:
Once you’ve learned to engage your glutes with the Basic Glute Bridge, you can then add weight to really strengthen your glutes. Start light and focus on extending your hips, contracting your glutes and keeping your low back from doing all the work. Add weight as long as you can maintain good form and even hold for a second or two at the top.
To do the Weighted Glute Bridge, sit on the ground and roll or place the barbell over your hips. Lie back and bend your knees with your heels close to your butt and feet flat on the ground.
Pressing the barbell down toward your legs, drive your hips up and squeeze your glutes. Make sure you drive through your heels and upper back to lift straight up. Think about keeping your heels down as you drive your knees forward over your toes. Do not let your knees fall open or cave in. Also do not hyperextend your low back as you squeeze your glutes at the top.
Hold for a second or two and lower back down. As you lift, you may find you want to press the barbell down and away onto your thighs to help you squeeze your glutes at the top and keep your core engaged.
Thrusters:
Thrusters are another great Glute Bridge Variation to include in your workouts. And while you can do Barbell Hip Thrusters, Bodyweight Hip Thrusters are a great way to advance the Basic Glute Bridge without adding weight.
For instructions on how to do the Bodyweight and Barbell Hip Thrusters, check out this post on the Hip Thruster.
Another great Hip Thruster variation is the Mini Band Hip Thruster. To do the Mini Band Hip Thruster, place the mini band around your hips and lie on your back on the ground with your feet flat on the ground.
The closer your heels are to your glutes, the more the move will isolate your butt. The farther from your glutes your heels are, the more your hamstrings will be involved. Make sure that no matter how close or far your heels are from your butt, your heels stay down as you bridge up.
Then reach your arms down through the band behind your back and, pressing the band down into the ground, bridge your hips up toward the ceiling, driving through your heels and upper back.
Bridge your hips up as high as you can, pressing against the band; however, do not hyperextend your low back just to bridge up higher. Hold for a second and then lower back down.
Slow down the tempo of the move to make it harder or use a heavier resistance. You can also make the Thruster more challenging by doing a single leg variation.
Also, make sure to keep the mini band against the ground as you bridge up. If you can’t get your hips as high up using the band as you can with a basic glute bridge, regress the movement. Try a single leg bridge first without the band before adding the band in.
Front Squats:
Front Squats are a great squat variation to strengthen your core while strengthening your legs. You will need to work on your hip mobility and core engagement before doing this move. But to prevent future back pain, this is a great way to keep your core and hips strong.
To do Front Squats, you can use barbells, sandbags or even kettlebells.
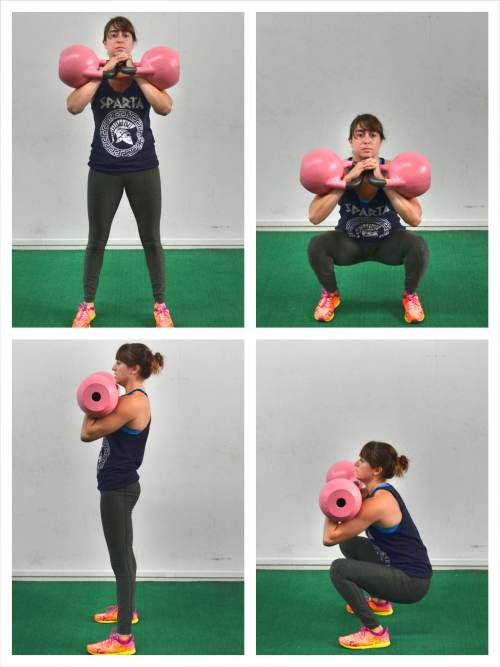
A Kettlebell Front Squat can be done with one kettlebell (a Goblet Squat) or with two Kettlebells (Racked Squat).
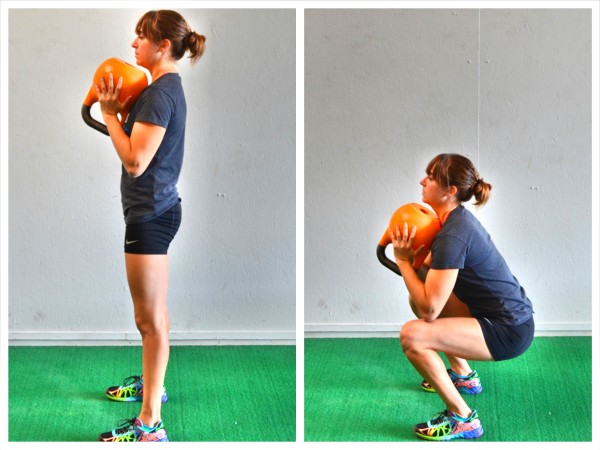
To do the Kettlebell Goblet Squat, take one kettlebell and turn it upside down, holding it in both hands on the bell. Set your feet between hip-width and shoulder-width apart. Keep the kettlebell in at your chest. Brace your abs.
Then sit your butt back and down, keeping your weight toward your heels as you squat down. Keep your chest up and don’t let your back round forward with the weight.
Sink your butt down as low as you can, keeping your heels on the ground. Do not let your hips tuck under as you squat. Go only as low as you can while maintaining good form.
Then, driving through your heels, come back to standing. Do not lean or rock forward as you stand up. Come all the way up and squeeze your glutes at the top then sink back down.
You may also do a Double Racked Kettlebell Front Squat to make the weight heavier if you don’t have a single bell heavy enough or simply to change up exactly how you load down the Front Squat.
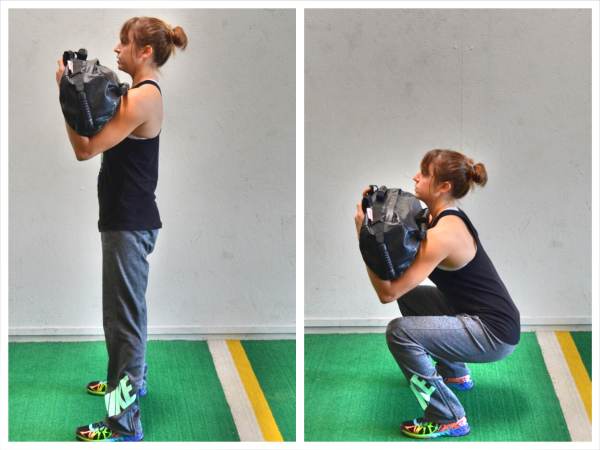
You can also do a variation of the Front Squat with a sandbag called the Sandbag Zercher Squat.
To do the Sandbag Zercher Squat, stand with your feet between hip-width and shoulder-width apart and hold the sandbag up at your chest with your arms wrapped around the bag. Do not let the sandbag sink down toward your belly button.
Keeping the bag up at your chest, squat down as low as possible, sitting your butt back and down while keeping your chest up. Make sure to sit back as you squat down. Only go as low as you can with good form. Do not lean forward or let your back round.
Then drive back up to standing and squeeze your glutes at the top. Make sure to drive up through your heels and keep your chest up as you come to standing.
Brace your abs as you squat to support the sandbag. You do not want to feel this move in your low back.
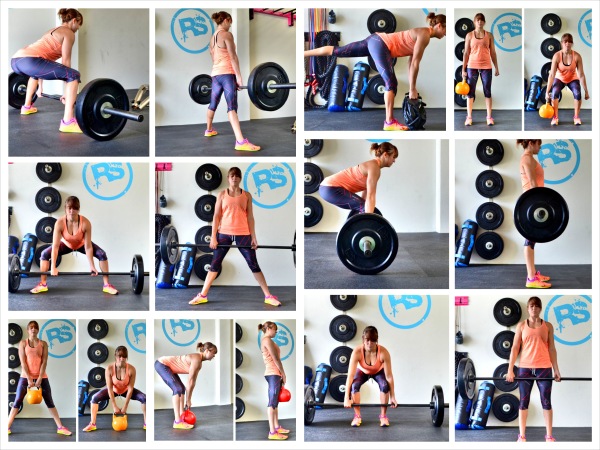
Single Leg Deadlifts:
Deadlifts are a great posterior chain exercise to strengthen the entire backside of your core, especially your glutes and back. And the Single Leg Deadlift is a great Deadlift Variation that not only works your backside but will also improve your foot and ankle strength and therefore your balance.
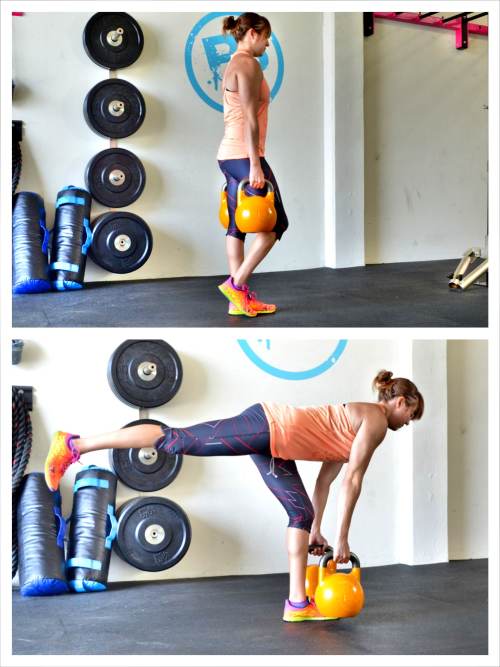
To do the Single Leg Deadlift, kettlebells are a great tool. Using kettlebells, hold a kettlebell in each hand down by your sides as you stand nice and tall. Shift your weight slightly to your right leg with your knee slightly bent and your left toe lightly touching the ground.
Then lift your left leg back toward the wall behind you as you hinge over, keeping your back flat. As you hinge over, drop the kettlebells down and back toward your standing foot.
Do not reach them toward the ground and let your back round. Only lower them as far as you can without rounding or “squatting.” Your standing knee should be soft but isn’t going to bend extra as you hinge over.
As you hinge over, sit your butt back, shifting your weight just slightly into your heel.
Then drive through your heel to come back up to standing. You want to feel your hamstring and glute work.
For some other great Deadlift variations, check out this post on The Deadlift.
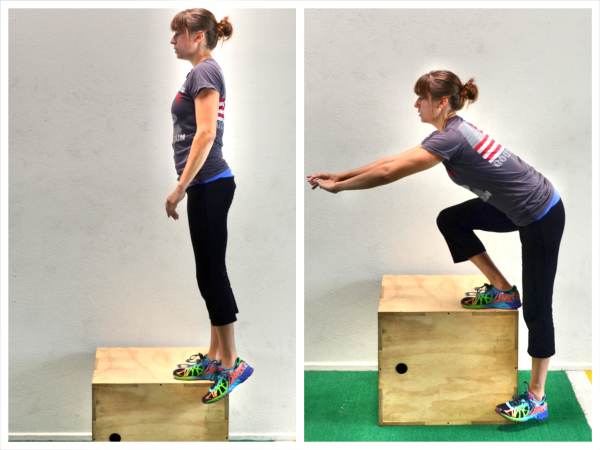
Step Downs:
The Step Down is a Step Up variation that allows you to really isolate the glutes as you work on your balance and improve your hip mobility. Unlike with Step Ups where you can push off with the bottom foot to help you step up, Step Downs completely isolate the leg doing the work to help you correct imbalances and force the glute to work. It is also very safe for your knees!
To do the Step Down, start standing on a bench, step or box so that you can step off of it to the side with your left foot. Your right foot will be near the edge of the bench or step.
Then slowly begin to bend your right knee and sit your butt back as you hinge over and lower your left foot down to the ground. Do not round your back as you hinge.
Lower your left foot down as close to the ground as possible. Do not put the foot fully on the ground. You do not want to be able to push off the ground with your left foot to help you come back up to standing.
Once you’ve lowered your left foot down as far as you can, drive through your right foot to come back up to standing. Feel your right glute working to push you back up to standing.
If you feel this in your low back, do not go as deep in the Step Down. Also, make sure you are slightly back in your standing heel. You really want to load your glutes and not your knees with this movement.
And because this move is very challenging for the balance, you may want something in front of you to help you balance or you may not want to go as low in the Step Down to start.
Complete all reps on one side before switching. To make the move harder, get a higher step or box or add weight.
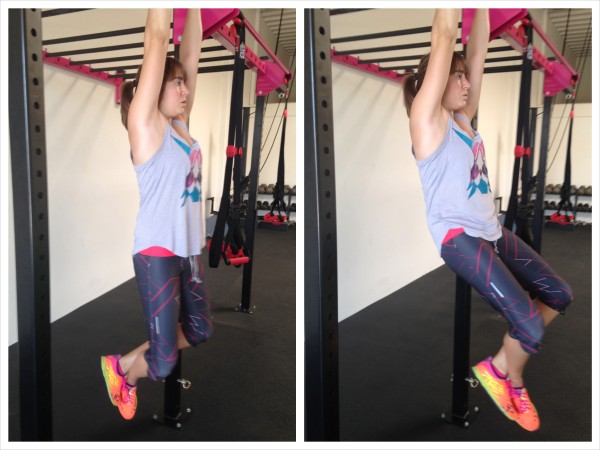
Hanging Abs:
Hanging Abs are a great way to strengthen your entire core, especially your abs to help you prevent low back pain. And they give you more bang for your buck than regular crunches because they also work your grip, lats, abs and even your quads.
For Hanging Ab Exercises to include in your workouts, check out this post with 10 Hanging Core Moves!
For anyone suffering from low back and hip pain, the Hanging Pelvic Tilt is an especially important one to include. The Hanging Pelvic Tilt is a great way to progress the basic Pelvic Tilt while also learning how to engage your abs when not just lying still on the ground.
If you are suffering from low back and hip pain, you need to integrate a few of these foam rolling, stretching, activation and strength training moves into your weekly workout routine.


Wow. This is so comprehensive! I don’t think I’ve ever seen such a complete program for lower back pain. I’ve done yoga for years and it always helps, but sometimes the relief doesn’t last long enough. I hadn’t considered the importance of foam-rolling for every part of the body. I should ask my sister what techniques they use in physical therapy.
Daelin
Very very impressed of the comprehensive approch, soft tissue teqniques, stretching and strenght training. Very good
Thanks! If you have any questions about any of the info, don’t hesitate to message us!
This site is great. My question is when i roll out my quads/upper front of my legs it is more painful than any other part. Is that normal or does it suggest those muscles are tightest?
Thanks,
Brian
Hi Brian
Thanks! It does sound like your quads and hips are tight. I would suggest you not only roll but also do the half kneeling hip and quad stretch. Crescent Pose and Warrior I may be good too. If you want to email me (Cori) at [email protected], we can even chat more.
Cori
This is probably one of the best summaries I have ever seen….a great synthesis of yoga and strength training info, thank you. There is enough here to keep me working for the next 5 years or more….
Thanks William! If you have any questions about specific issues, don’t hesitate to message me at [email protected] 🙂
– Cori
hi with a labrum tear of the hip, in later stages of recovery, no pain just weakness in abductors, which weight exercises would your recommend
Hi Ema. You’ve done PT correct? You may want to actually start with the glute bridge with squeeze and some foam rolling. You want to slowly make sure you’re maintaining mobility as you start to get glutes activated and working and slowly strengthen adductors. It is important that you very slowly start building and making sure you maintain proper mobility of your hips!
When you are cleared some of these articles and videos below could be helpful too:
https://www.youtube.com/watch?v=IUYW2AwDLFU
https://www.youtube.com/watch?v=1DCHTHo7SxE
https://www.youtube.com/watch?v=O9j_DU_4KXs
Thank you, very useful clear advise, can I ask at what stage would use the sliders while dealing with an injury it worries me to over extend?
whats Pt Correct?
warm wishes
Ema
PT is physical therapy. And I would start with simply the more Jane Fonda, side lying adductor lift and the glute bridge with squeeze. The sliders shouldn’t be done until you are back to full workouts.
You can also use some of the crunch/adductor combos as well. 🙂
Brilliant and informative post I drive for 10 hours a day 13 years physio says extremely weak glutes weak core and short hamstrings, I have been following a programme for 2 months with no effect other than more flexibility my qlmuscle is beyond tender and hamstrings which I stretch a lot are constantly aching I was told to do the programme 3 times a day for 40 minutes includes stretching and core work is this to much? and also how often should ql be rolled out thanks
Thanks! So honestly I can’t give you much advice without really understanding what you are currently doing. Stretching is great BUT if you aren’t activating and strengthening through the range of motion you are building, you may not be keeping the mobility you are working so hard for. Plus, if you are sitting in flexion, you will also want to stretch and roll your hips as well.
If you are overworking areas without restoring full mobility to your hips, you may be making the problem worse. You can email me if you want to chat more at [email protected]. – Cori
Wow! This covers virtually everything- so well done and easy to emulate
Thank you so much!!
No problem! Glad you like it and find it helpful 🙂
This information could literally last a lifetime, so generous. Thank you.
Thank you!
Thank you so much for sharing!
My pleasure! 🙂 Hope it helps!
I am a male cheerleader who has extremely tight hamstrings to where it affects my jumps and I cannot even touch my toes. I can do big tricks but over time it has caused issues. It’s caused hip and lower back pain… chiro, pt, massage therapy nothing fixes it… I’ve been told if I overstretch my hamstrings could snap…..It’s starting to affect my cheer and I want to cheer college what can I do?
Do you have hypermobile joints? Any official diagnosis of any injury by a doctor? If you are hypermobile at your joints, you may need some activation. Learning and slowly strengthening through a full range of motion can be key. It may even be hip instability and underactive glutes causing your hamstrings to constantly feel tight and creating the imbalances leading to your pain.
This is an extremely helpful and thorough guide. Thank you so much for taking the time to write this, I am so very excited to begin utilizing all of this information.
Thanks Jonny! Hope it helps!
As others have said, this is a brilliant and clear article. Thank you very much. Great help for my lower back pain.
Happy to help! 🙂
9 years of physio and chiropractors and finally found someone that makes more sense and explains whats going on better then all them expensive appointments. Thank you, I look forward to a pain free lower back ????
Glad the moves help Rob!
I’m really struggling to know which stretches and activation to do. It takes me over an hour to do foam rolling and stretching then I barely get any activation done, all of the foam rolling and seems to be needed. Any suggestions?
Hi Ruth. I would set a specific routine and target only specific areas. And while foam rolling is a key starting piece, if you’re constantly rolling and feel like nothing is adding up, you need to make sure you’re addressing where the true compensation is occurring. If you need a set routine too, I’d highly recommend you check out my Glute Camp as I lay out series there to guide you based on specific goals 🙂
this is EXCELLENT! would love a follow along video that covers all this. the video being 3 parts: warmup & foam/floor rolling, core routine for hip and spine stability, and full body gentle mobility.
Hi Steve. If you’d like some follow alongs, check out my Booty Burner. https://bootyburner.redefiningstrength.com/the-28-day-booty-burner-challenge?sl=blogcomment
Hi Cori!
Echoing everyone here that this is amazing. My question is about my calves. They are tight and hard and have been most of my life. They’re also very painful to roll out or work on. Any suggestions? I have low back pain, though it’s better than in past years, and very tight hip flexors and wondering if my calves are contributing to some of this.
Ankle mobility for sure can be part of the issue as we work on glute activation too if we have lower back pain – https://redefiningstrength.com/the-ankle-butt-connection/
Hi. I m interested in getting your rstoration programming. Is there a way i could get a sample of what it consists?, thanks
Hi Louise. Sorry all of my content on my site is really a “sample” 🙂 You can see my moves and mobility work. They are just put into follow along videos in the program.
This is the best and most complete workout I have come across. I suffer from chronic pain from both injury and degeneration. Although I am unable to do some of these the ones I was able to add in to my regular routine helped tremendously. Thank you
So glad it helps!