FHP 652- Balancing Blood Sugar Through Nutrition and Workouts
LISTEN HERE 7 WATCH HERE 7 TRANSCRIPT 7 OPEN TRANSCRIPT Cori (00:00):Hey guys, this is Cori from Redefining Strength. Welcome to the Fitness Hacks podcast. This is a show where I share all my free work, workout, and nutrition tips. I’m not going to ever fill...
FHP 603 – Happy National Quitter’s Day
LISTEN HERE 7 WATCH HERE 7 TRANSCRIPT 7 OPEN TRANSCRIPT Hey guys, this Cori from from Redefining Strength. Welcome to the Fitness Hacks podcast. This is a show where I share all my free work on the nutrition tips. I’m not going to ever fill this episode with...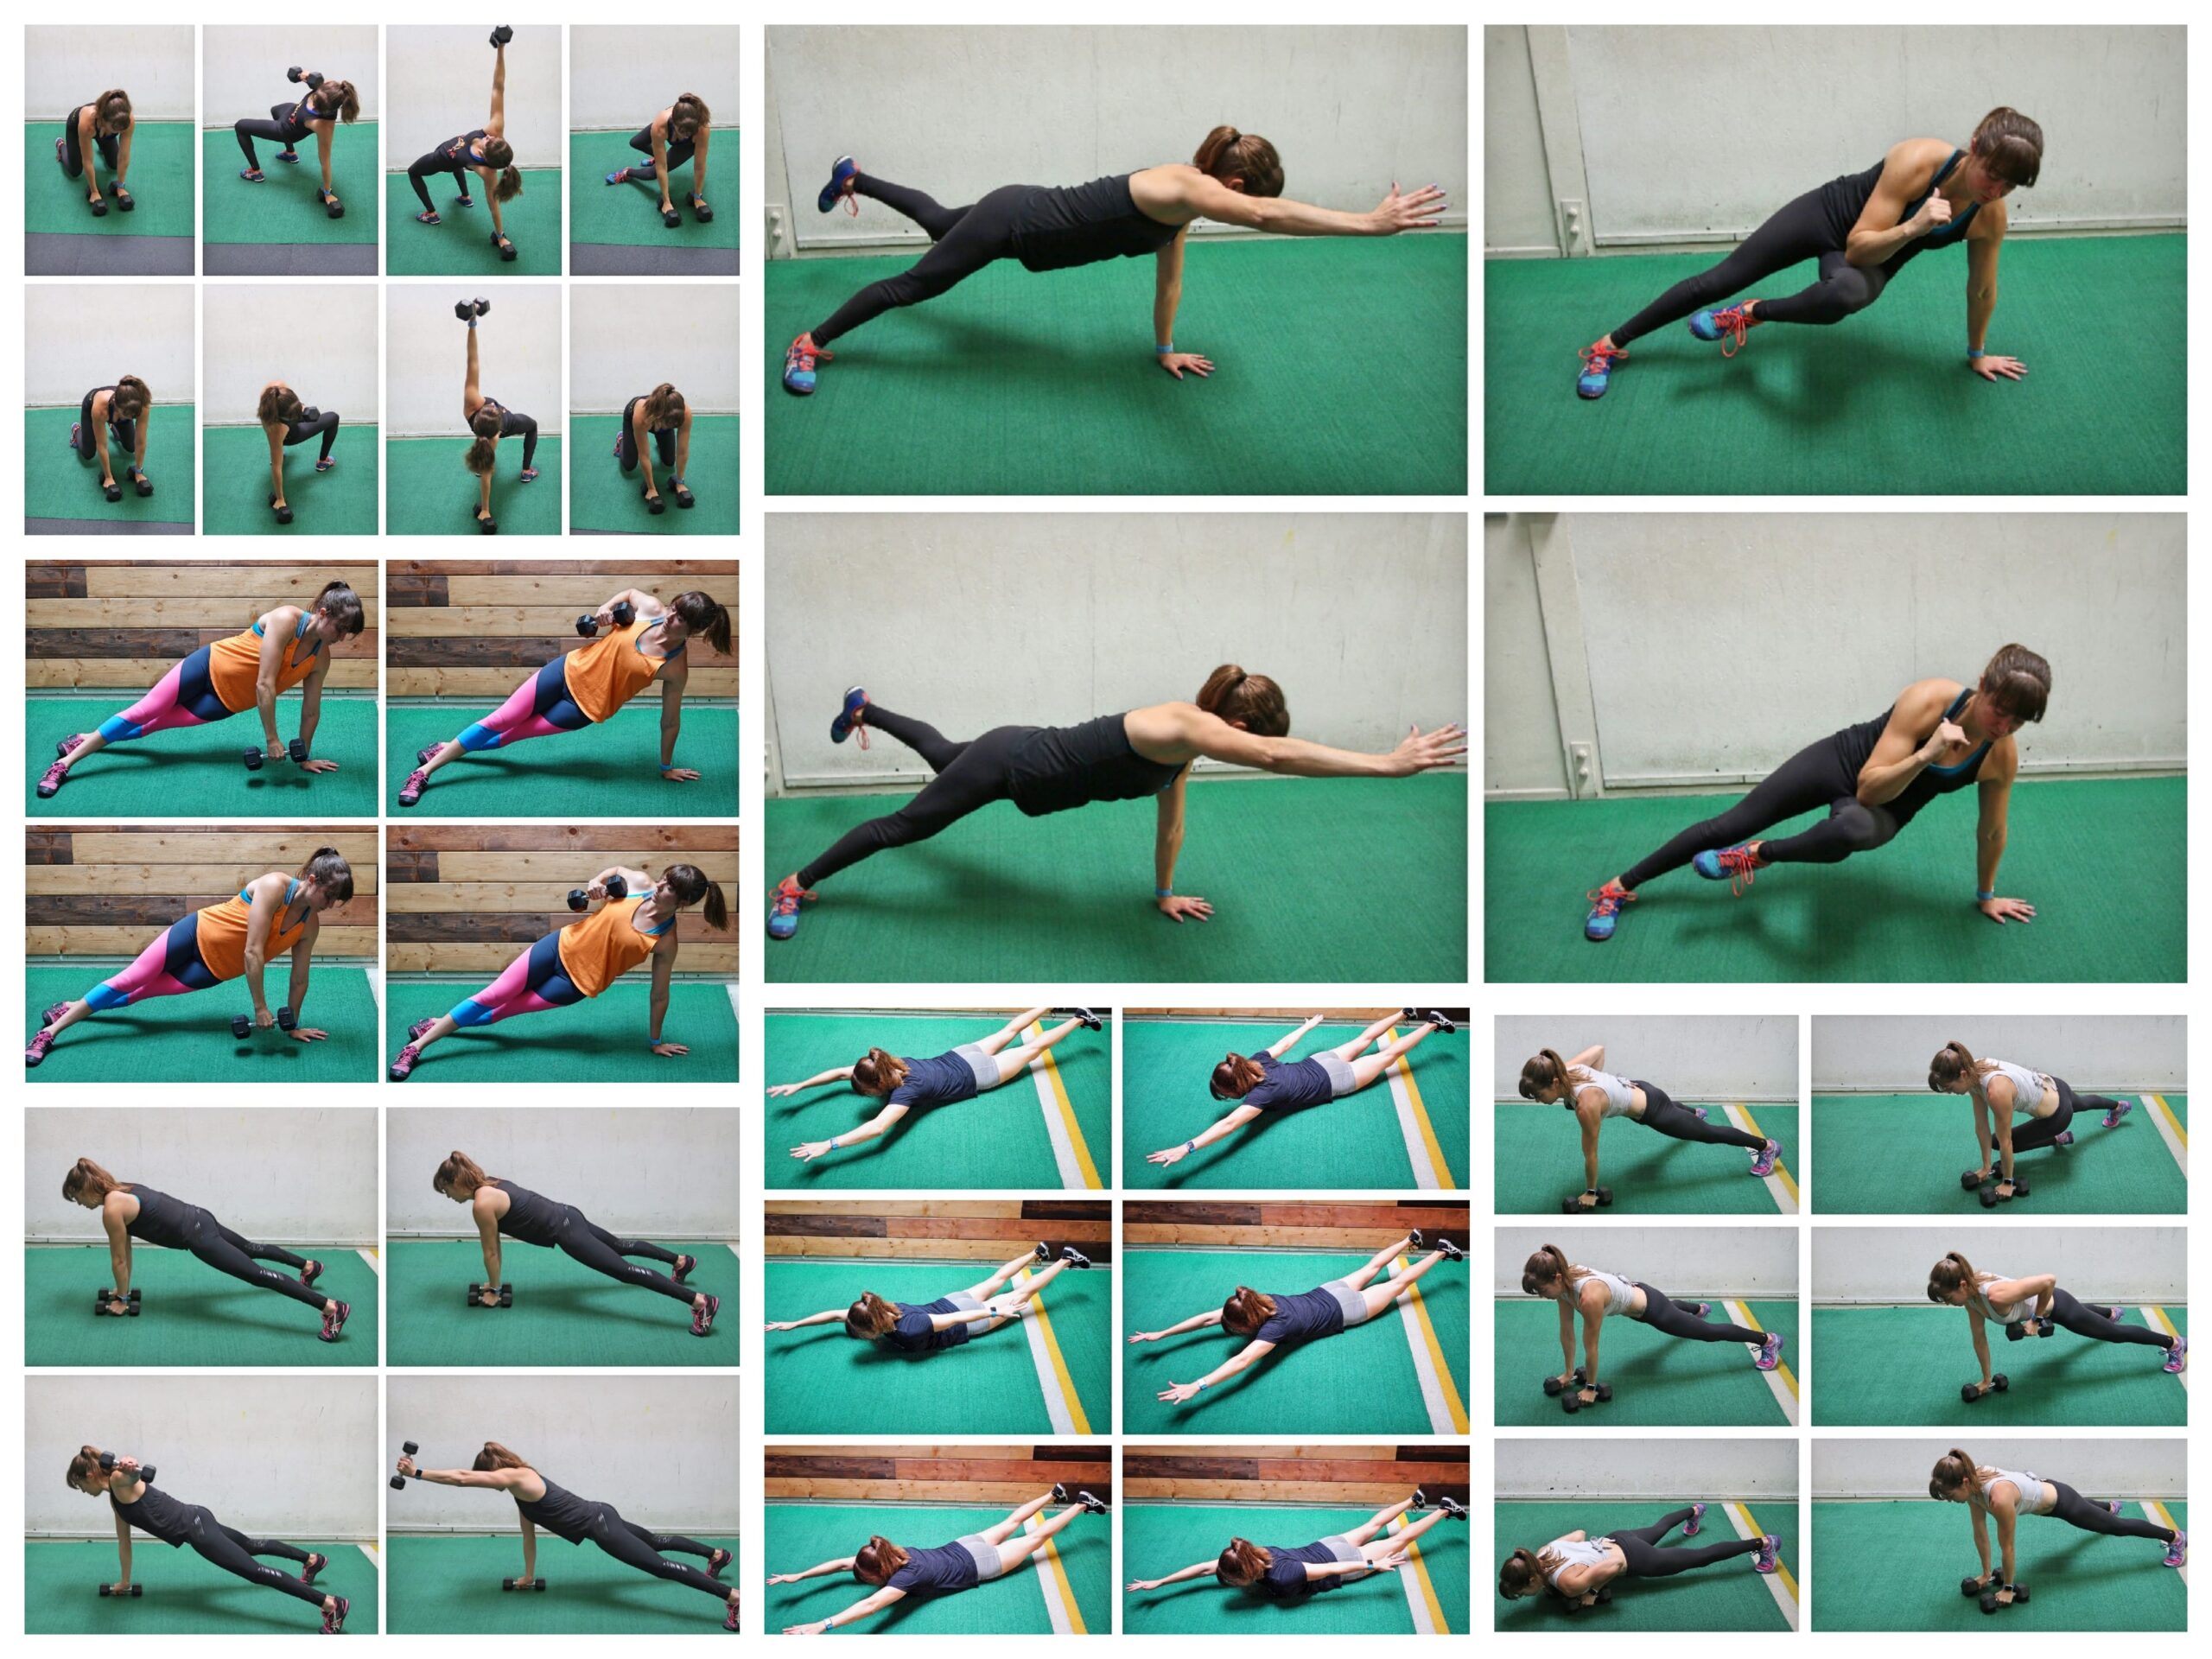
12 Hybrid Upper Body Moves To Build Killer Upper Body And Core Strength
Hybrid exercises are a great way to target those “trouble zones” while working more muscles in less time so you can be efficient with your workouts and not have to spend hours in the gym.
These hybrid exercises will help you work your arms, shoulders, chest and back while also improving your core strength and stability.
If you’re looking for a great way to work your entire upper body and core in under 30 minutes, heck even in under 20, try including some of these hybrid moves!

12 Hybrid Upper Body Moves To Build Lean Strong Arms And Killer Core Strength
Inchworm Push Ups:
The Inchworm Push Up is a great move to improve your mobility while targeting your core, shoulders, triceps and chest. It will also get your blood pumping, which is an added bonus if you want to blast some fat!
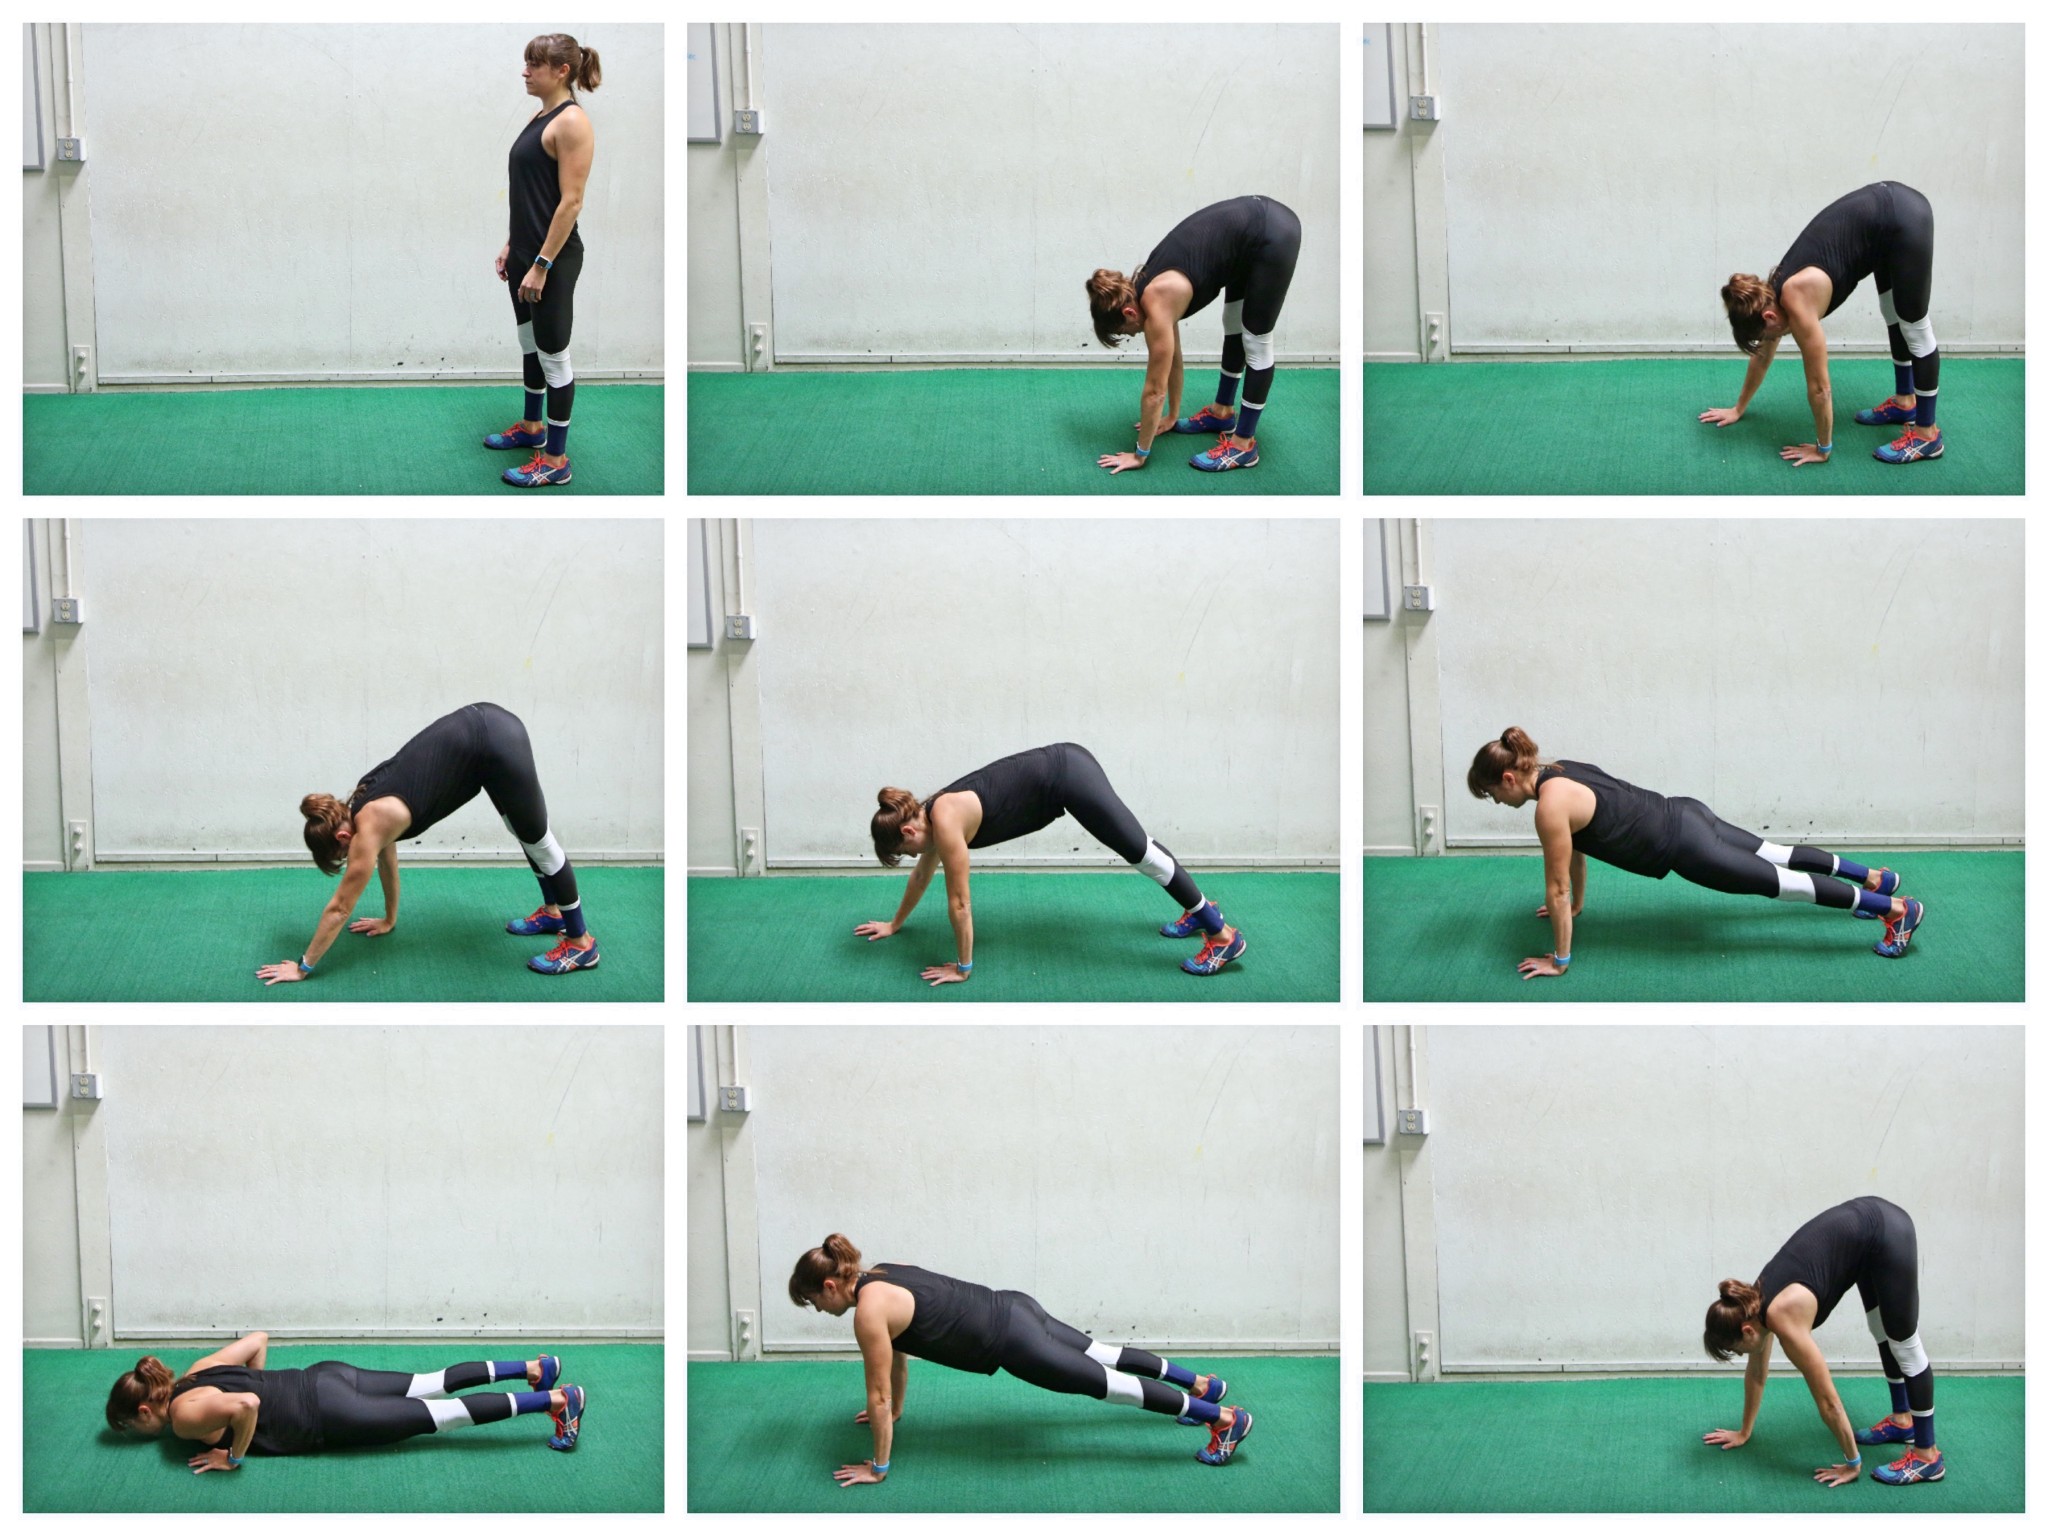
To do Inchworm Push Ups, start standing tall. Then place your hands down on the ground, keeping your legs as straight as possible. Then walk your hands out to move into a plank position.
When you reach the high plank position, you will perform a push up. Keep your core engaged and make sure your body moves in one straight line. Do not sag your hips. Beginners can drop to their knees for the push up.
Press back up to the top of the push up and then, from the plank position, walk back in. Keep your legs as straight as possible as you walk in and out.
Fly Leg Lowers:
If you want to work your chest as well as your abs, you’ll want to include Fly Leg Lowers.
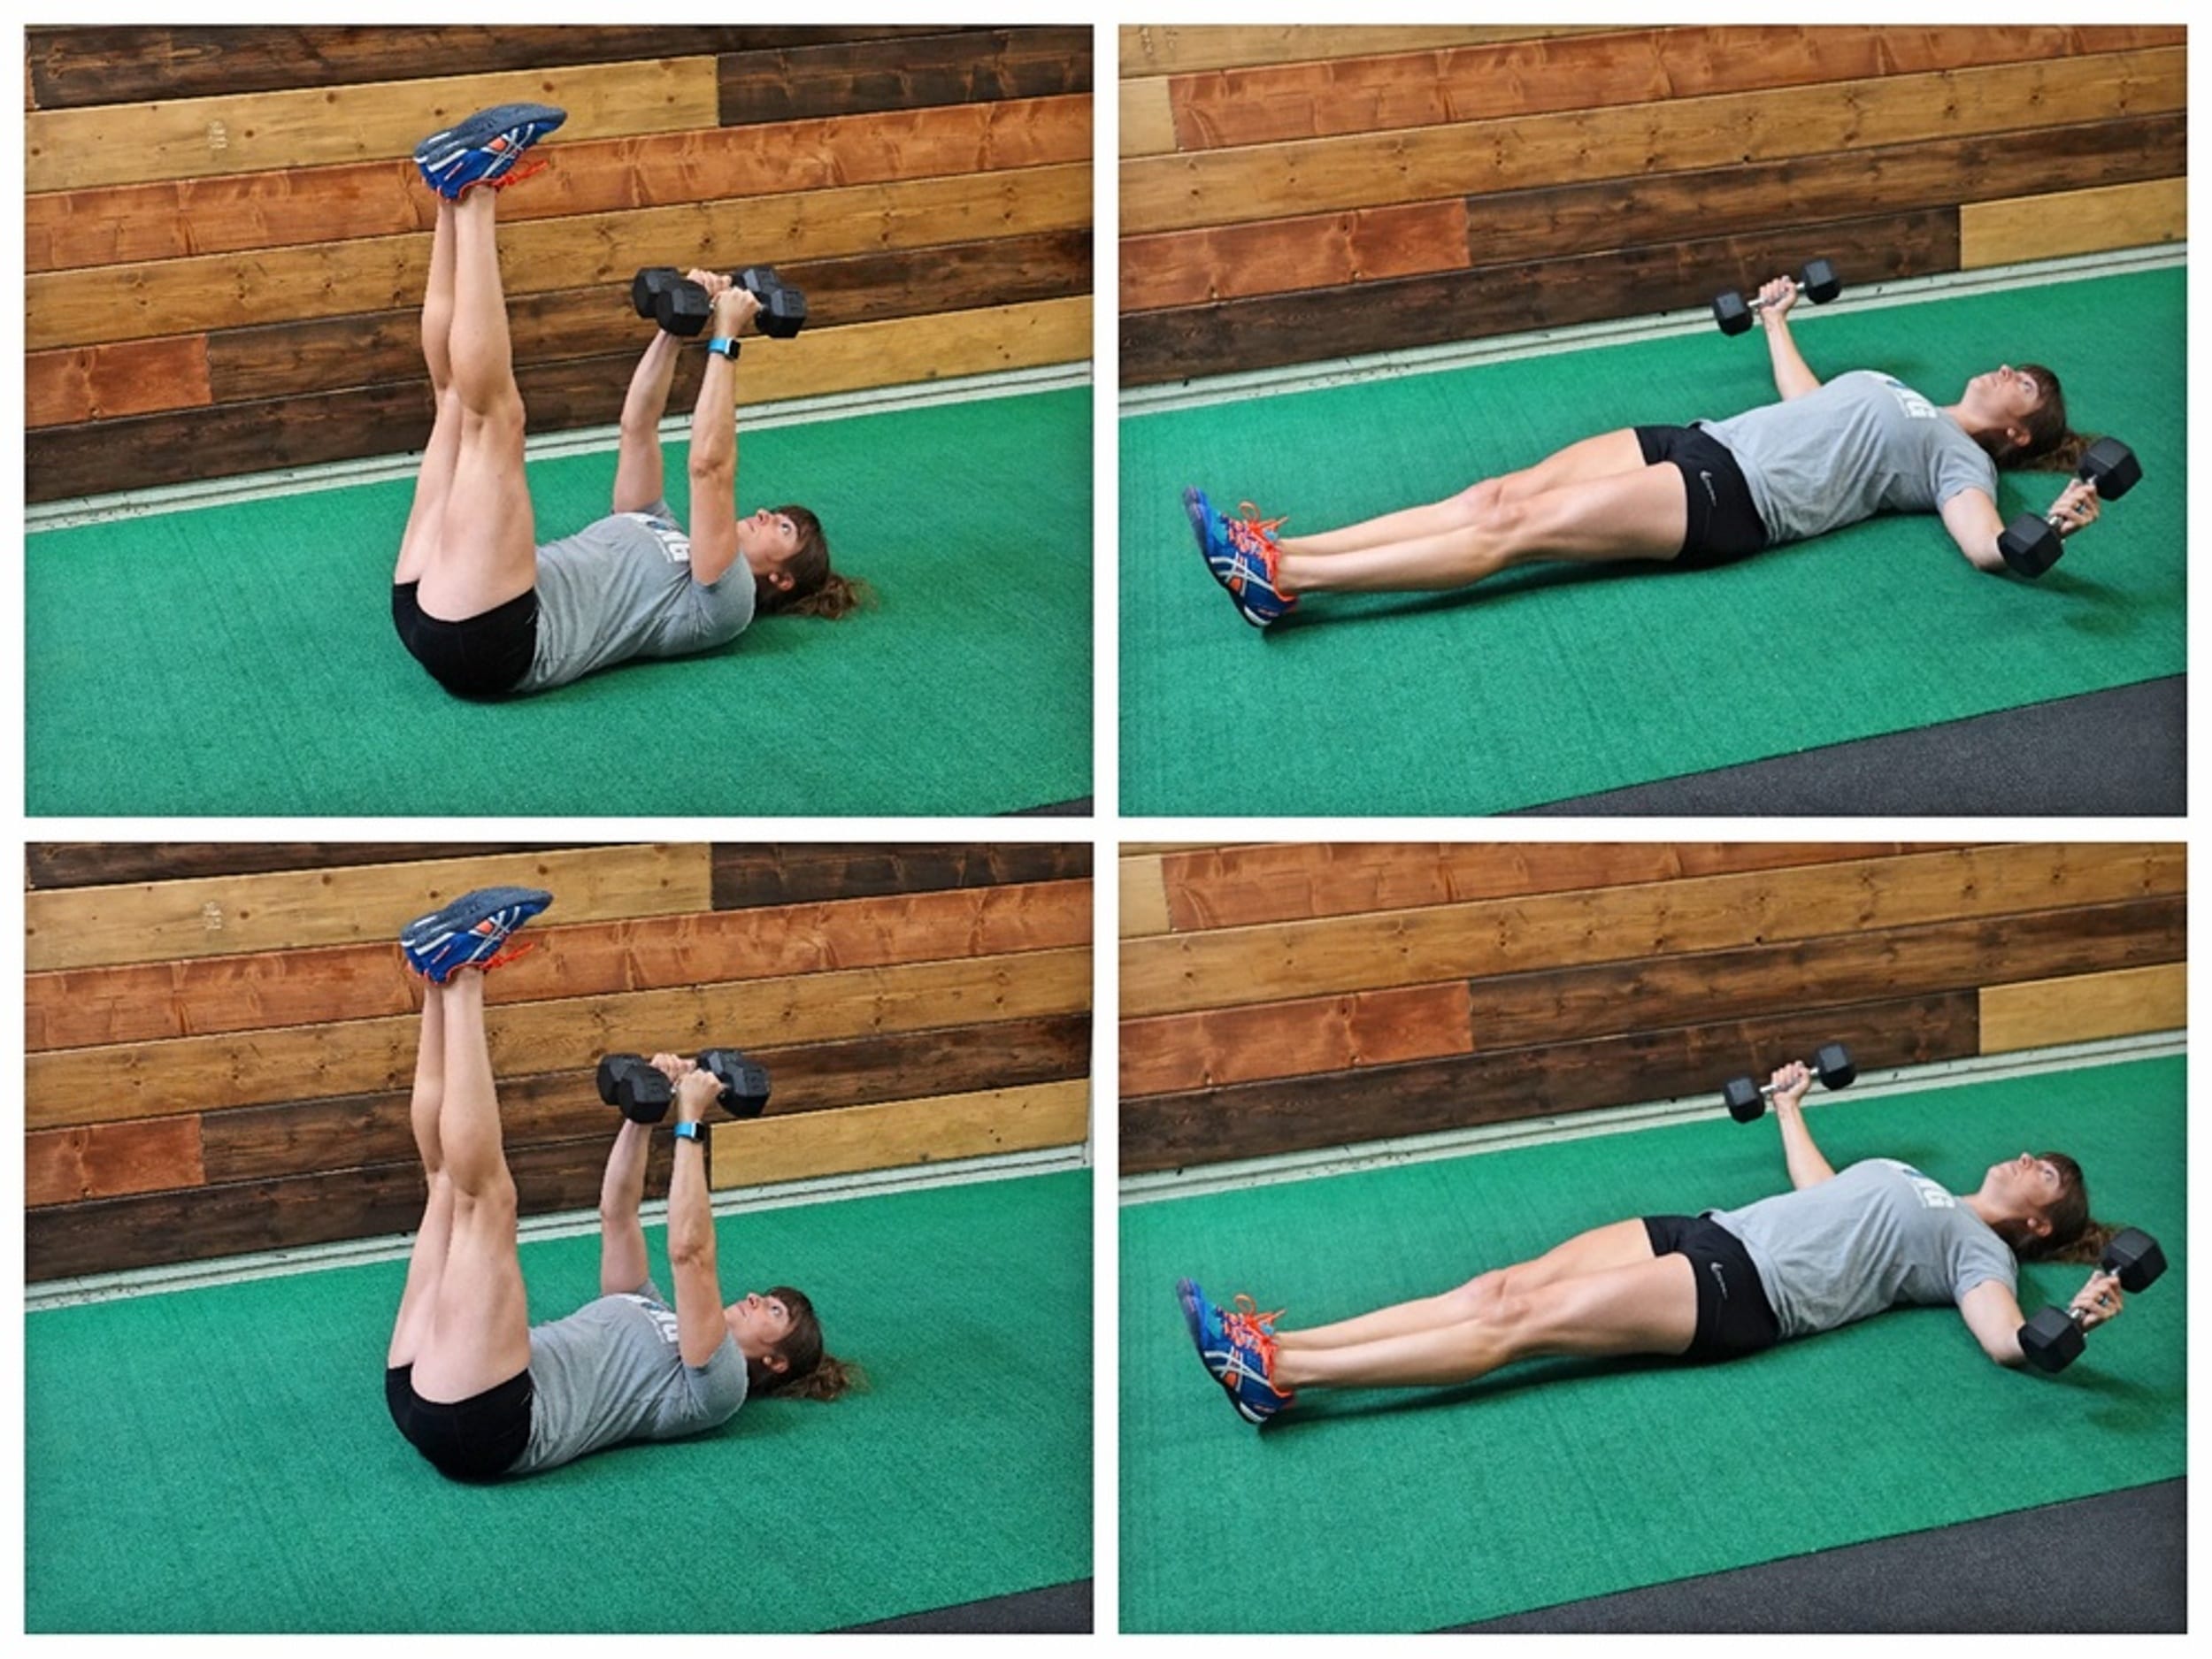
To do the Flys with Leg Lowers, hold a dumbbell in each hand and lie on your back on the ground. Press the dumbbells up toward the ceiling and hold them parallel at your chest height with your legs straight up toward the ceiling.
Then fly your arms open toward the ground with the backs of your hands facing the ground as you lower your legs as close to the ground as possible. Do not let your lower back take over.
Lower down only as far as your abs can handle or even do single leg lowers or even bent knee foot taps. Then fly your arms back together as you lift your legs back up toward the ceiling.
Each time open your arms up as wide as possible. Keep your elbows soft but don’t think about bending or extending at your elbows.
Every time you fly your arms open, you will lower your legs. As you fly your arms back together, you will lift your legs back up.
Mountain Climber Row Push Ups:
This push up works not only your chest, shoulders and triceps, but also your back and your abs. Talk about a full upper body workout all in one move! (Plus the mountain climber is a great way to get in a ton of extra ab work!)
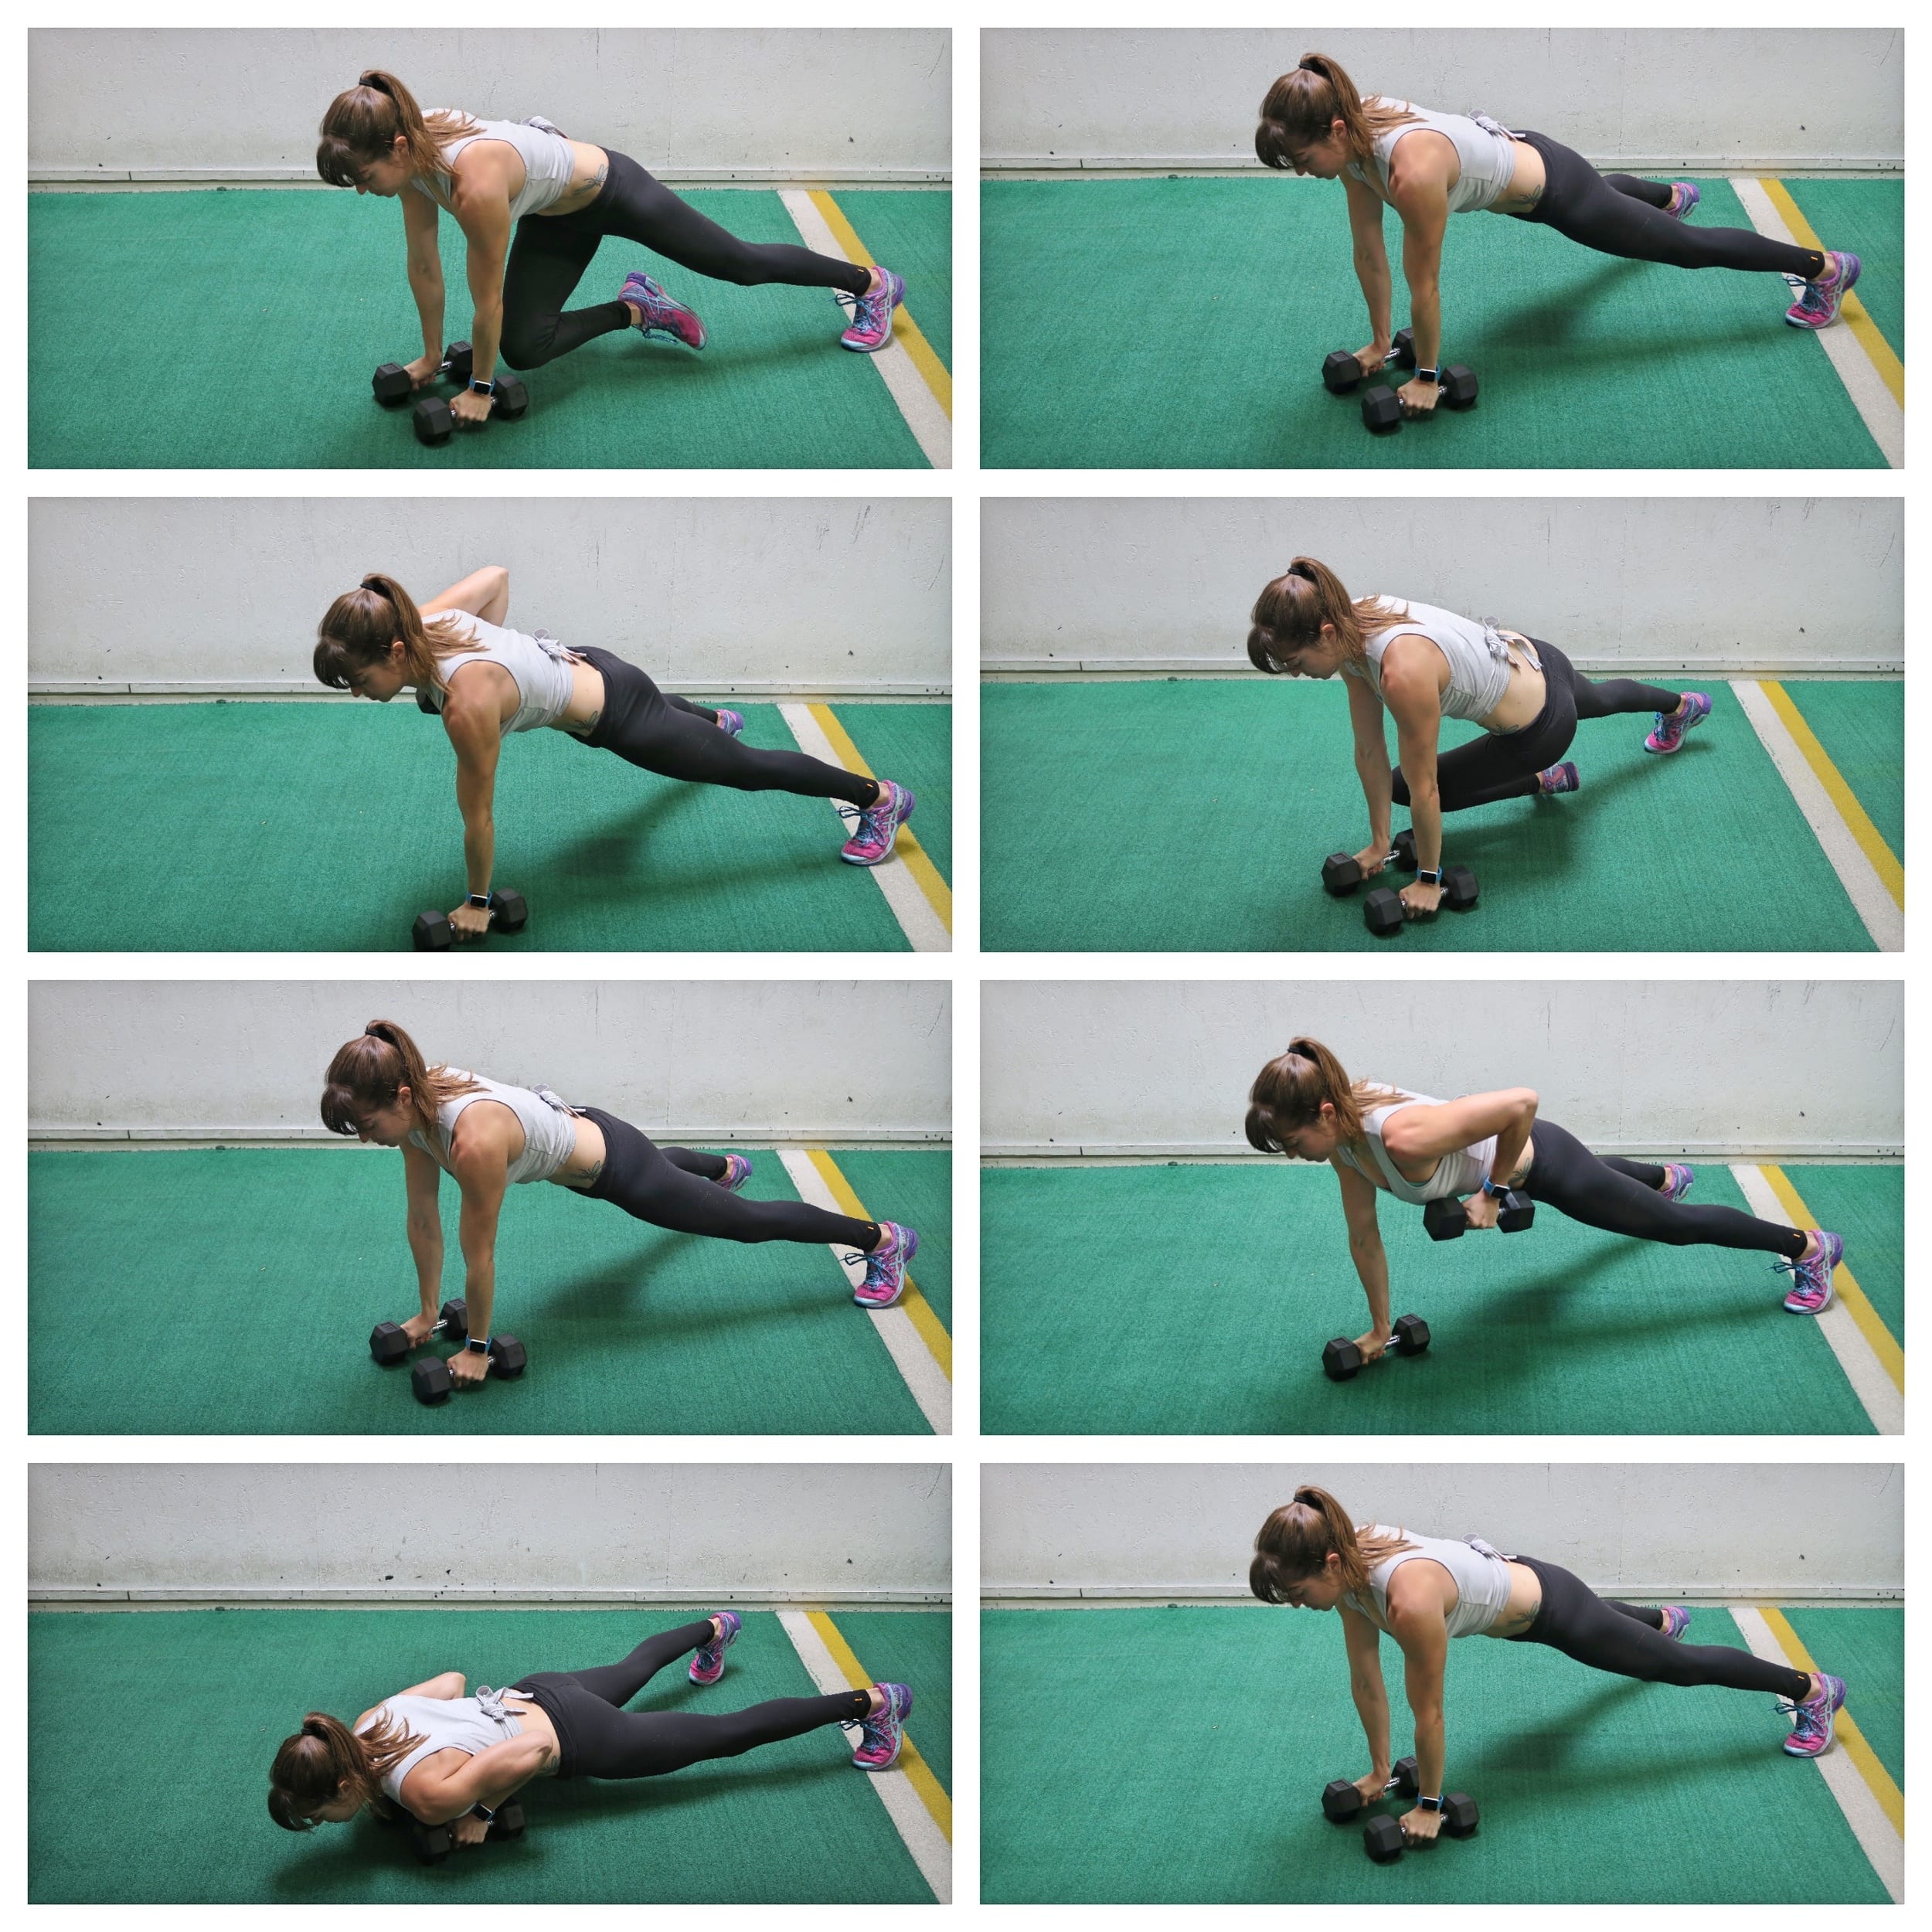
To do the Mountain Climber Row Push Up, set up in a high plank position with a dumbbell in each hand. Your feet will be wider apart to help stabilize and your hands should be under your shoulders. Then from this high plank position, draw one knee in and across toward your opposite shoulder.
Perform a cross body mountain climber, moving slowly. Straighten the leg back out and then row the weight in the hand on the same side as the leg you tucked in up to your side. Perform the row without rotating or letting your butt go up in the air.
After rowing the weight up to your side, feeling your back work to row it up, lower it back down so you’re back in the high plank. Then perform a push-up (you can do this from your knees too). Come back to a plank then perform a mountain climber cross body on the other side and a row before another push up. Keep alternating sides.
Superman Wave:
Improve your shoulder stability, scapular mobility and upper back strength with the Superman Wave. We always want to include some posterior chain work with all of the sitting, especially hunched over, that we do!
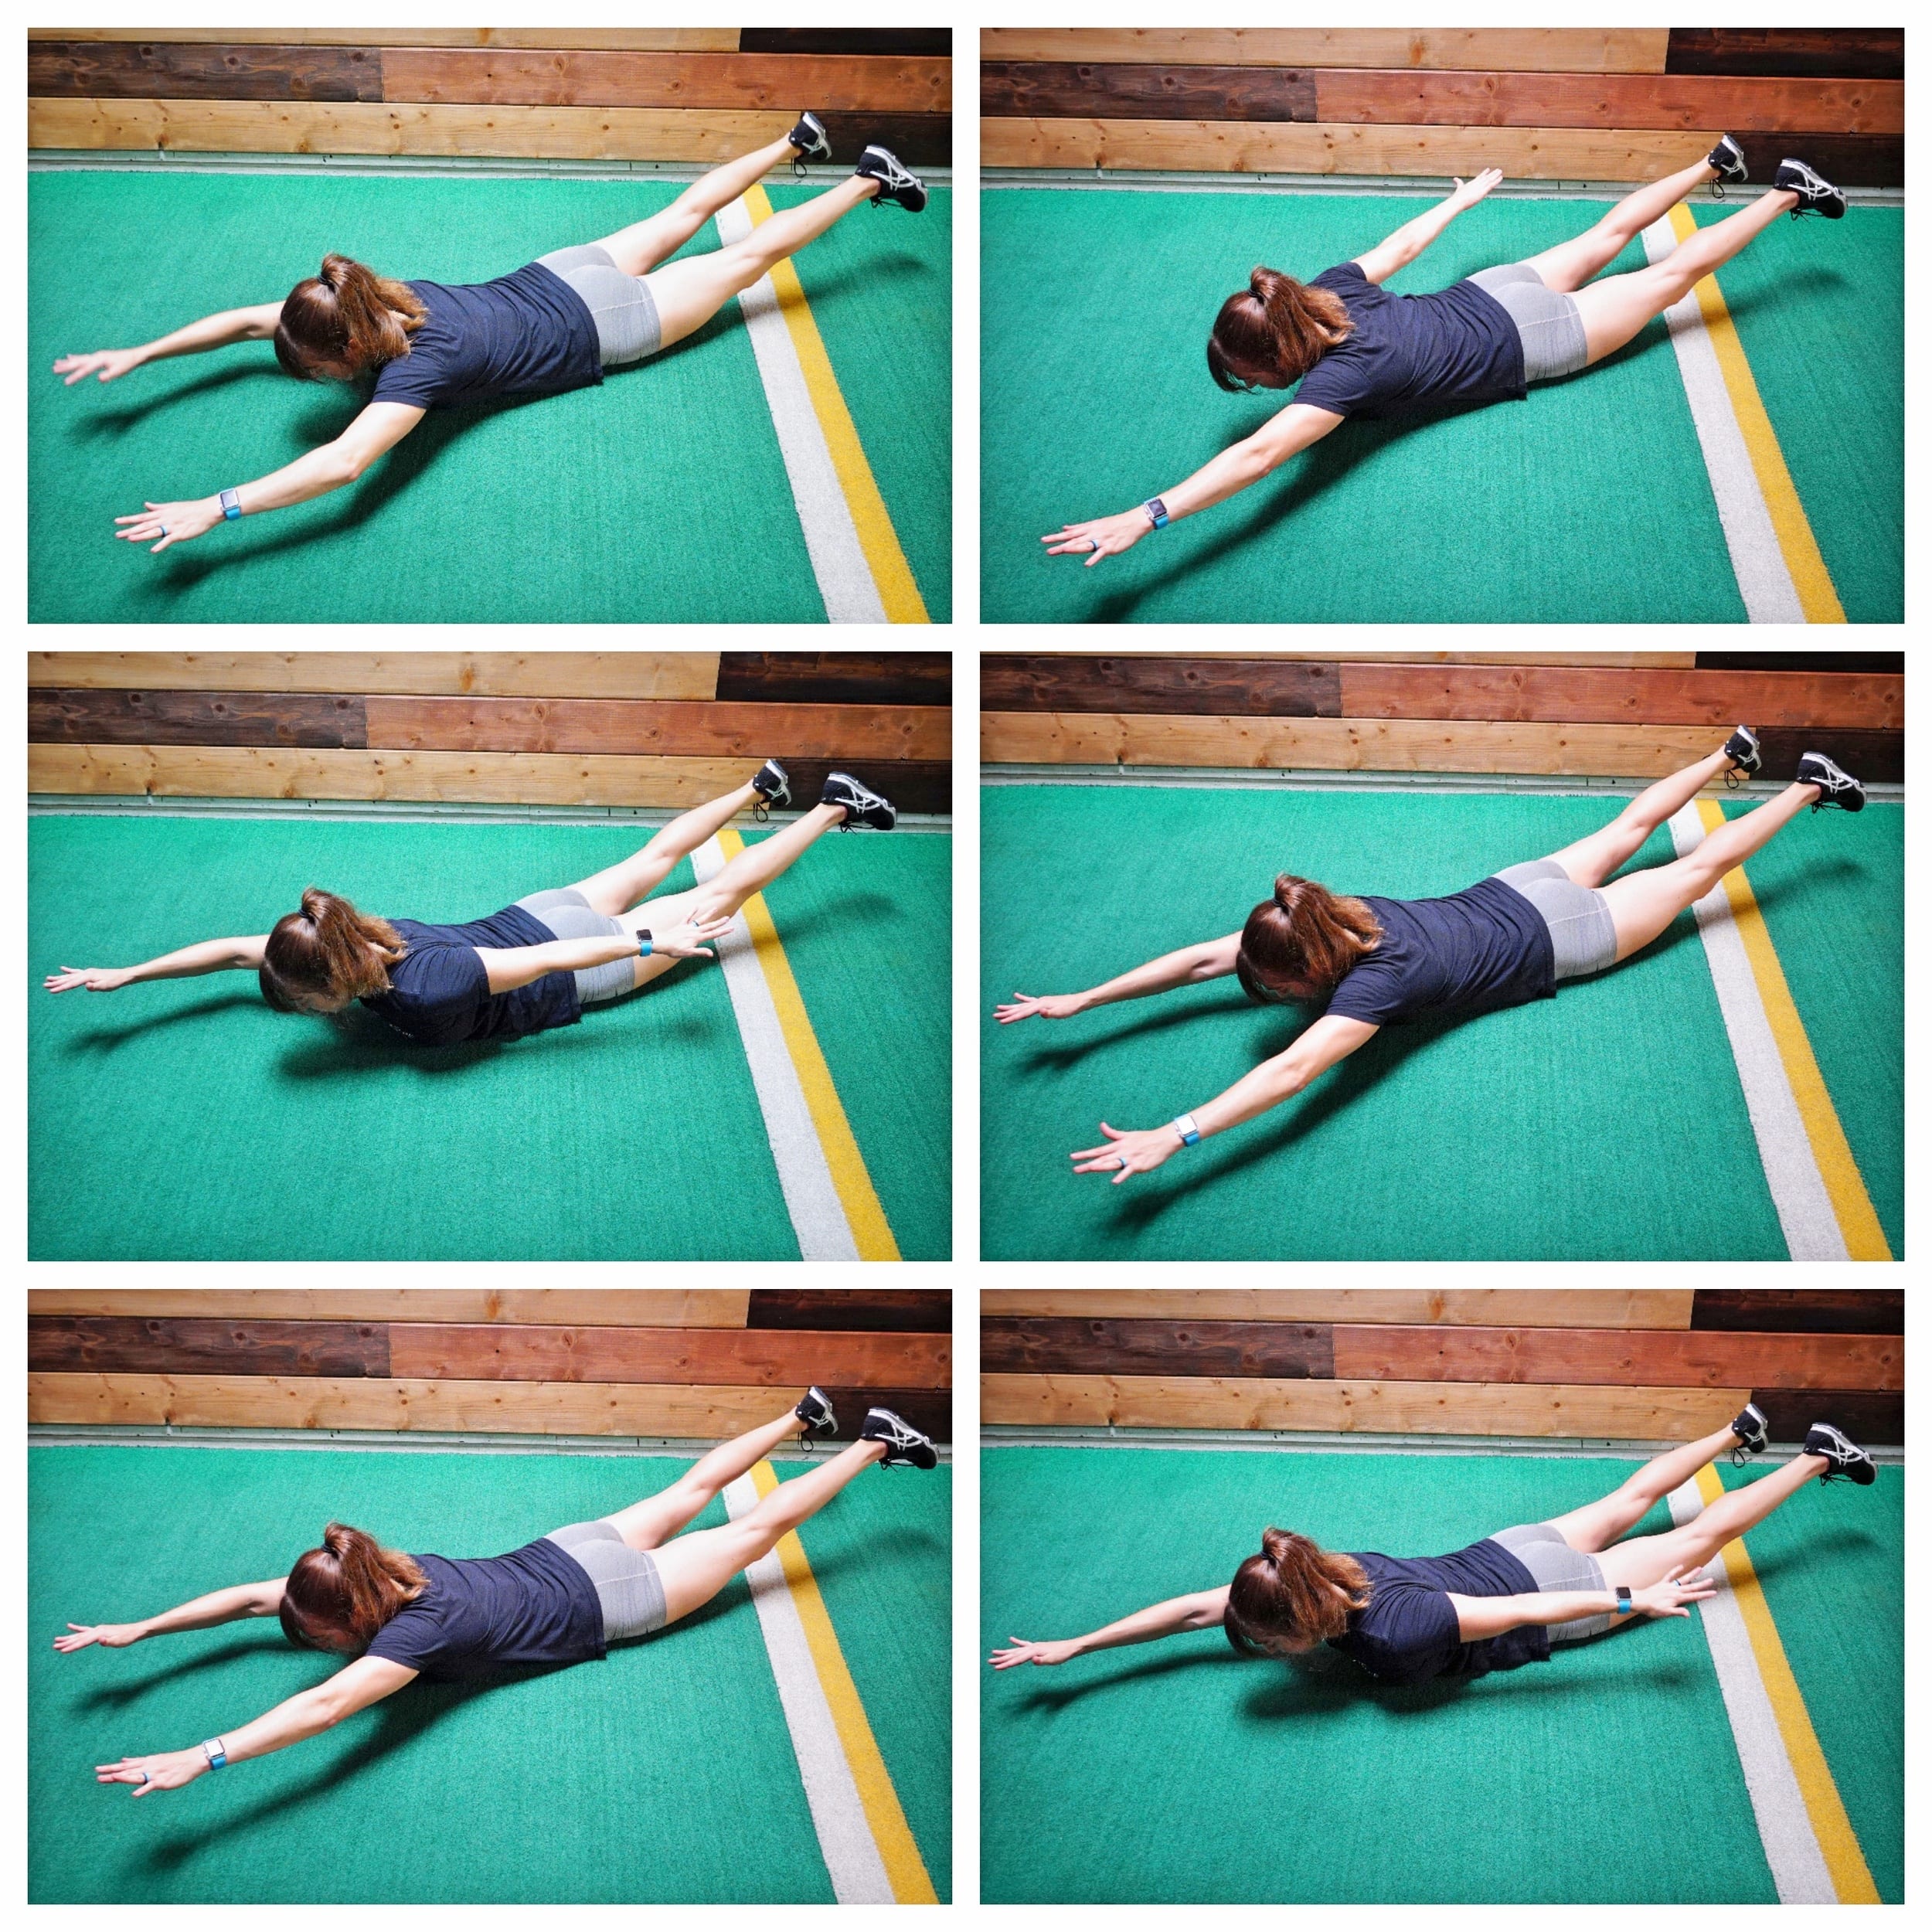
To do Superman Waves, lie face down on the ground with you arms reaching overhead and your legs out straight behind you.
Then lift your arms and legs off the ground, engaging your glutes and back to lift. Try to lift your chest up as high as you can and get your quads off the ground as much as possible.
Holding here, sweep one arm out and down toward your side, keeping your arms straight. Keep the other arm reaching straight out overhead as you wave the other arm down.
As you lower one arm down by your side, keep it as high off the ground as possible to work the back of your shoulder.
Wave the arm back overhead then sweep the other arm out and down to your side. Keep alternating sides as you engage your back and butt to stay up in the superman position. Move at a controlled pace.
Sit Thru Bridge and Press:
This move looks more intimidating than it actually is although it will challenge your coordination. The Sit Thru Bridge and Press is a great full core exercise.
It will work on your shoulder stability, ab strength and even glute activation.
It is a mobility AND stability exercise!
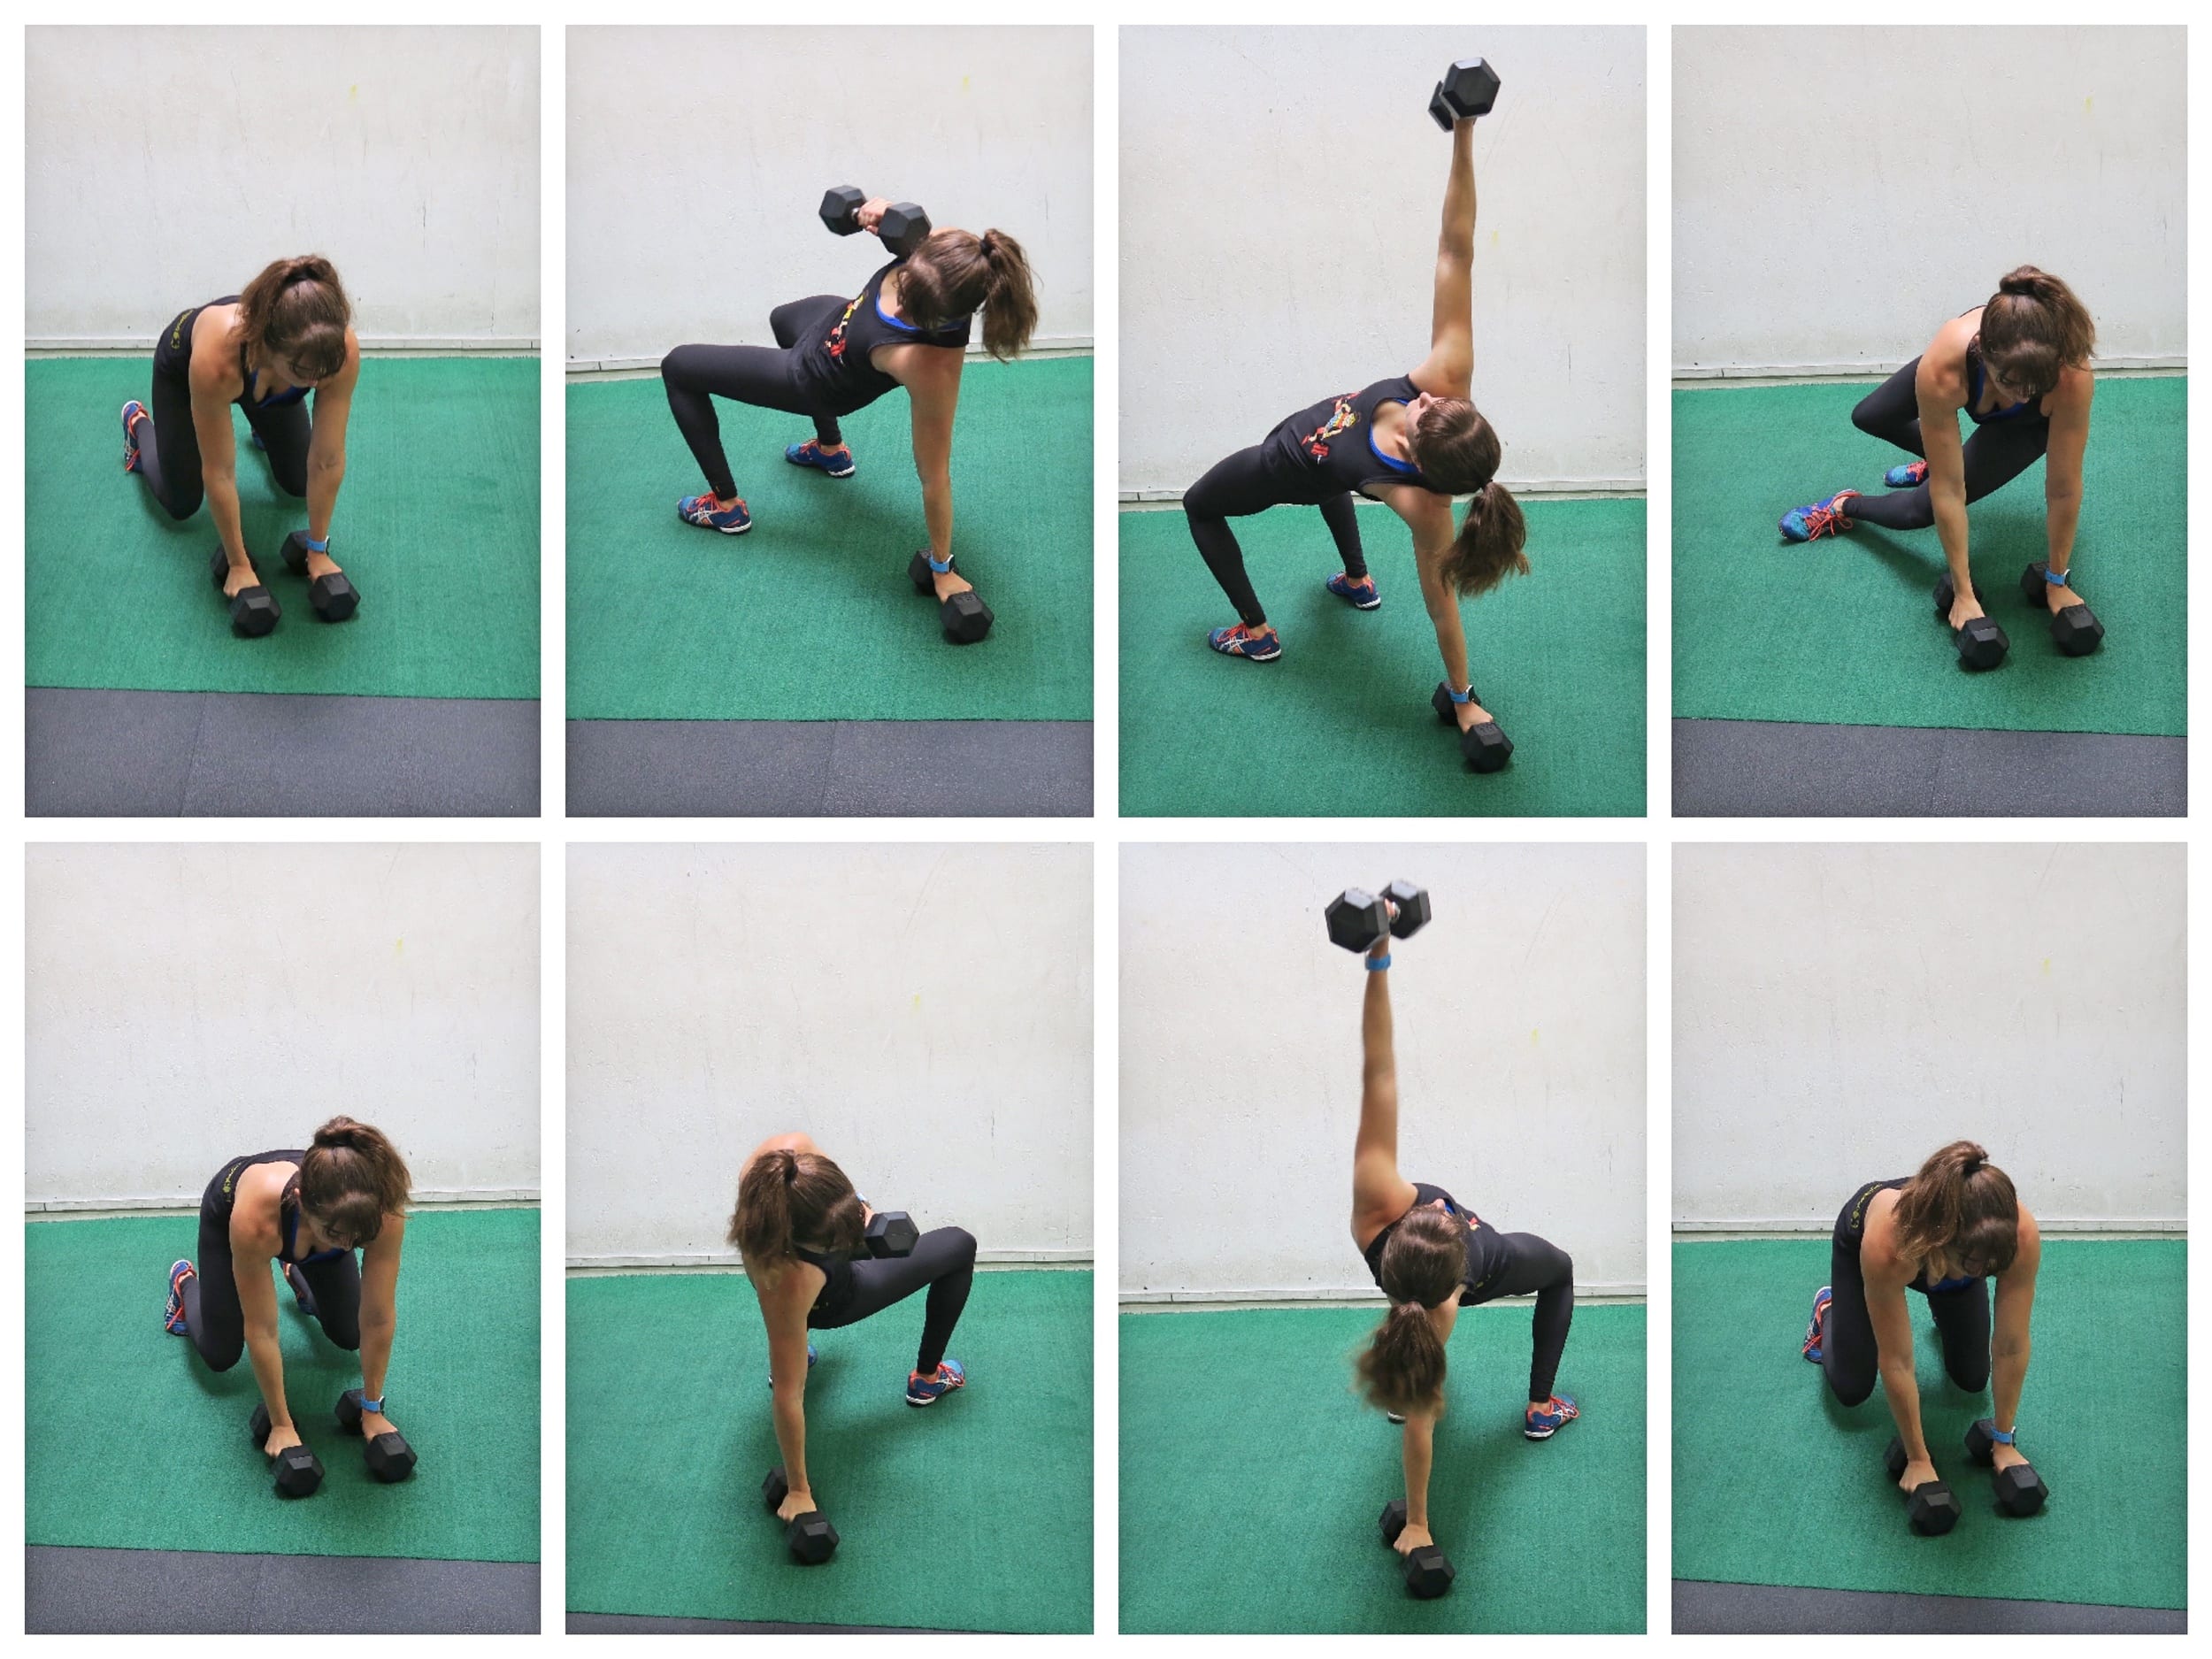
To do the Sit Thru Bridge and Press, start on your hands and knees with a dumbbell under each hand. Then flex your feet and lift up onto your hands and feet with your knees under your hips and your hands under your shoulders. From this position, step your right foot under your body as you raise your right hand and dumbbell up toward the ceiling.
As you step through and put your foot flat on the ground, rotate your hips open to the ceiling as you press the weight up overhead. Really squeeze your glutes as you bridge up and press. Then rotate your right leg back under your body as you bring the weight back down to the ground. Come back into that bulldog front position then step your left leg under to lift your right hand up and press the weight overhead as you bridge up.
Really bridge up and squeeze your glutes at the top. Keep your abs engaged and do not hyperextend your low back. Keep alternating sides.
Single Arm Plank Rotation with Knee:
The Single arm Plank Rotation with Knee is an advanced move that will work your entire core, including your adductors. It is the perfect way to improve your shoulder stability while also working your abs and obliques.
You’ll even feel this move all around your rib cage and in your upper back.
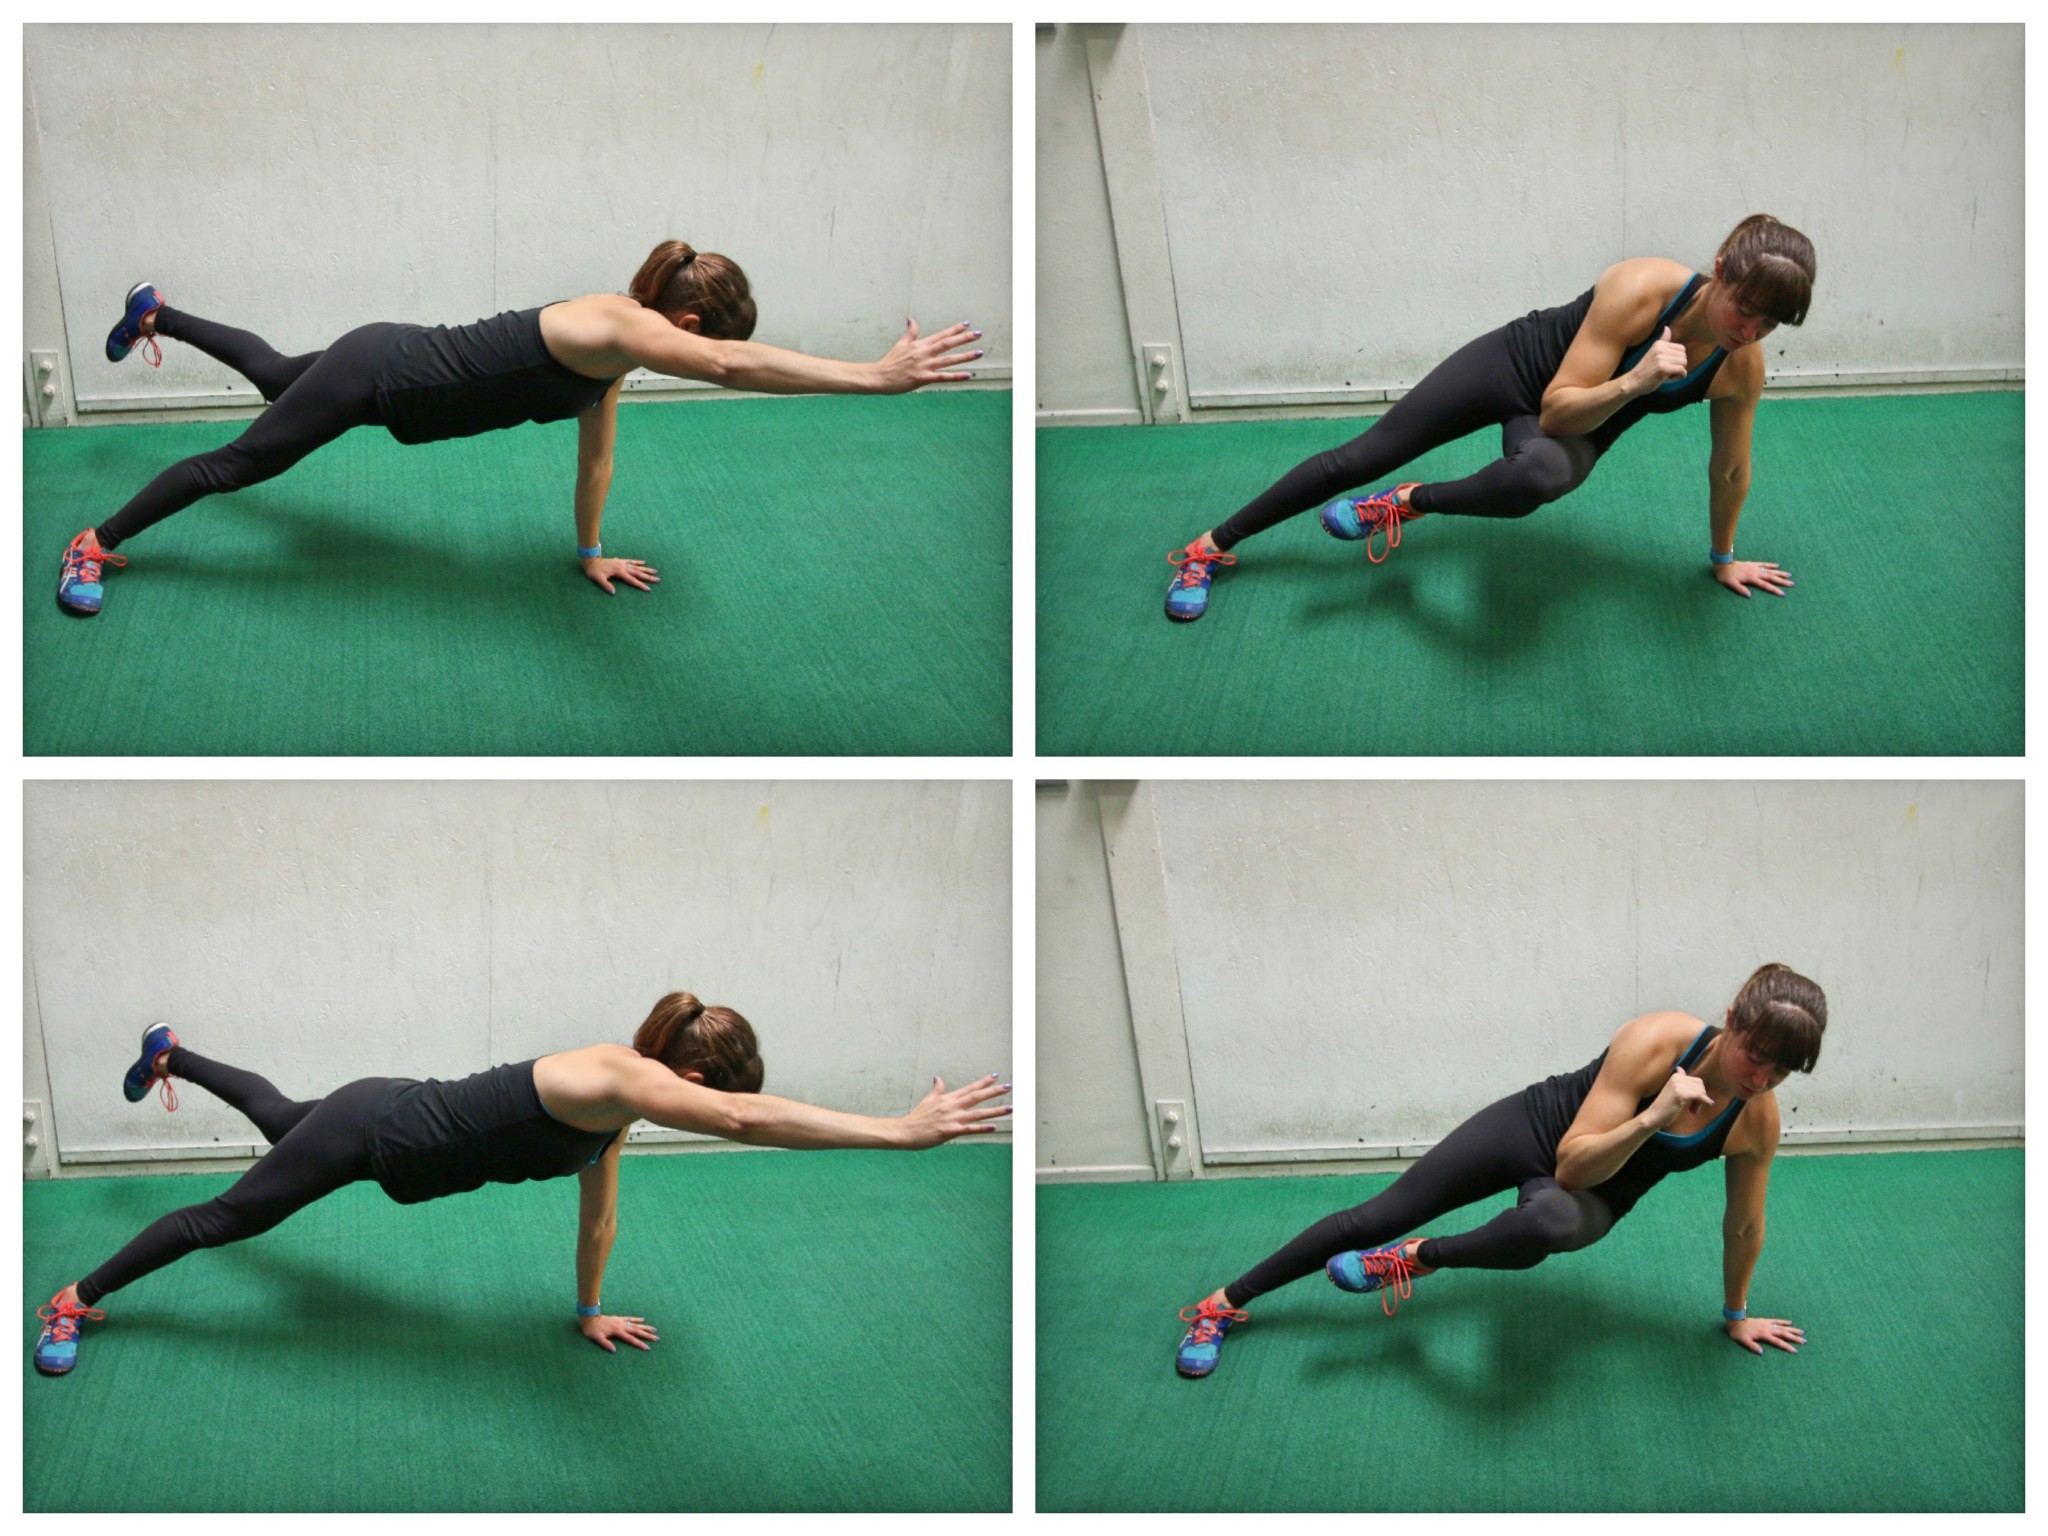
To do the Single Arm Plank Rotation With Knee, set up in a side plank position from your hand with your bottom leg in back of your top leg.
Then lift that back leg as if kicking it back and up toward the ceiling slightly. Reach your top hand out in front of you and overhead. Your chest will rotate toward the ground as you lift up into this side plank position with your opposite arm and leg raised.
Rotate your chest back open as you tuck your raised leg under and forward, driving your knee forward as you tuck your raised arm down to meet it. Try to touch your knee to your elbow as you rotate your chest back open and away from the ground.
After slowly tucking the knee to the elbow and feeling yourself pivot around that shoulder. The muscles around your rib cage should really be working. Then kick the leg back out and reach back out and overhead with your hand.
Move slowly to stay balanced and try to keep your hand on the ground under your shoulder.
Beginners can tap the toe down behind them or even just do the knee tuck without the kick out.
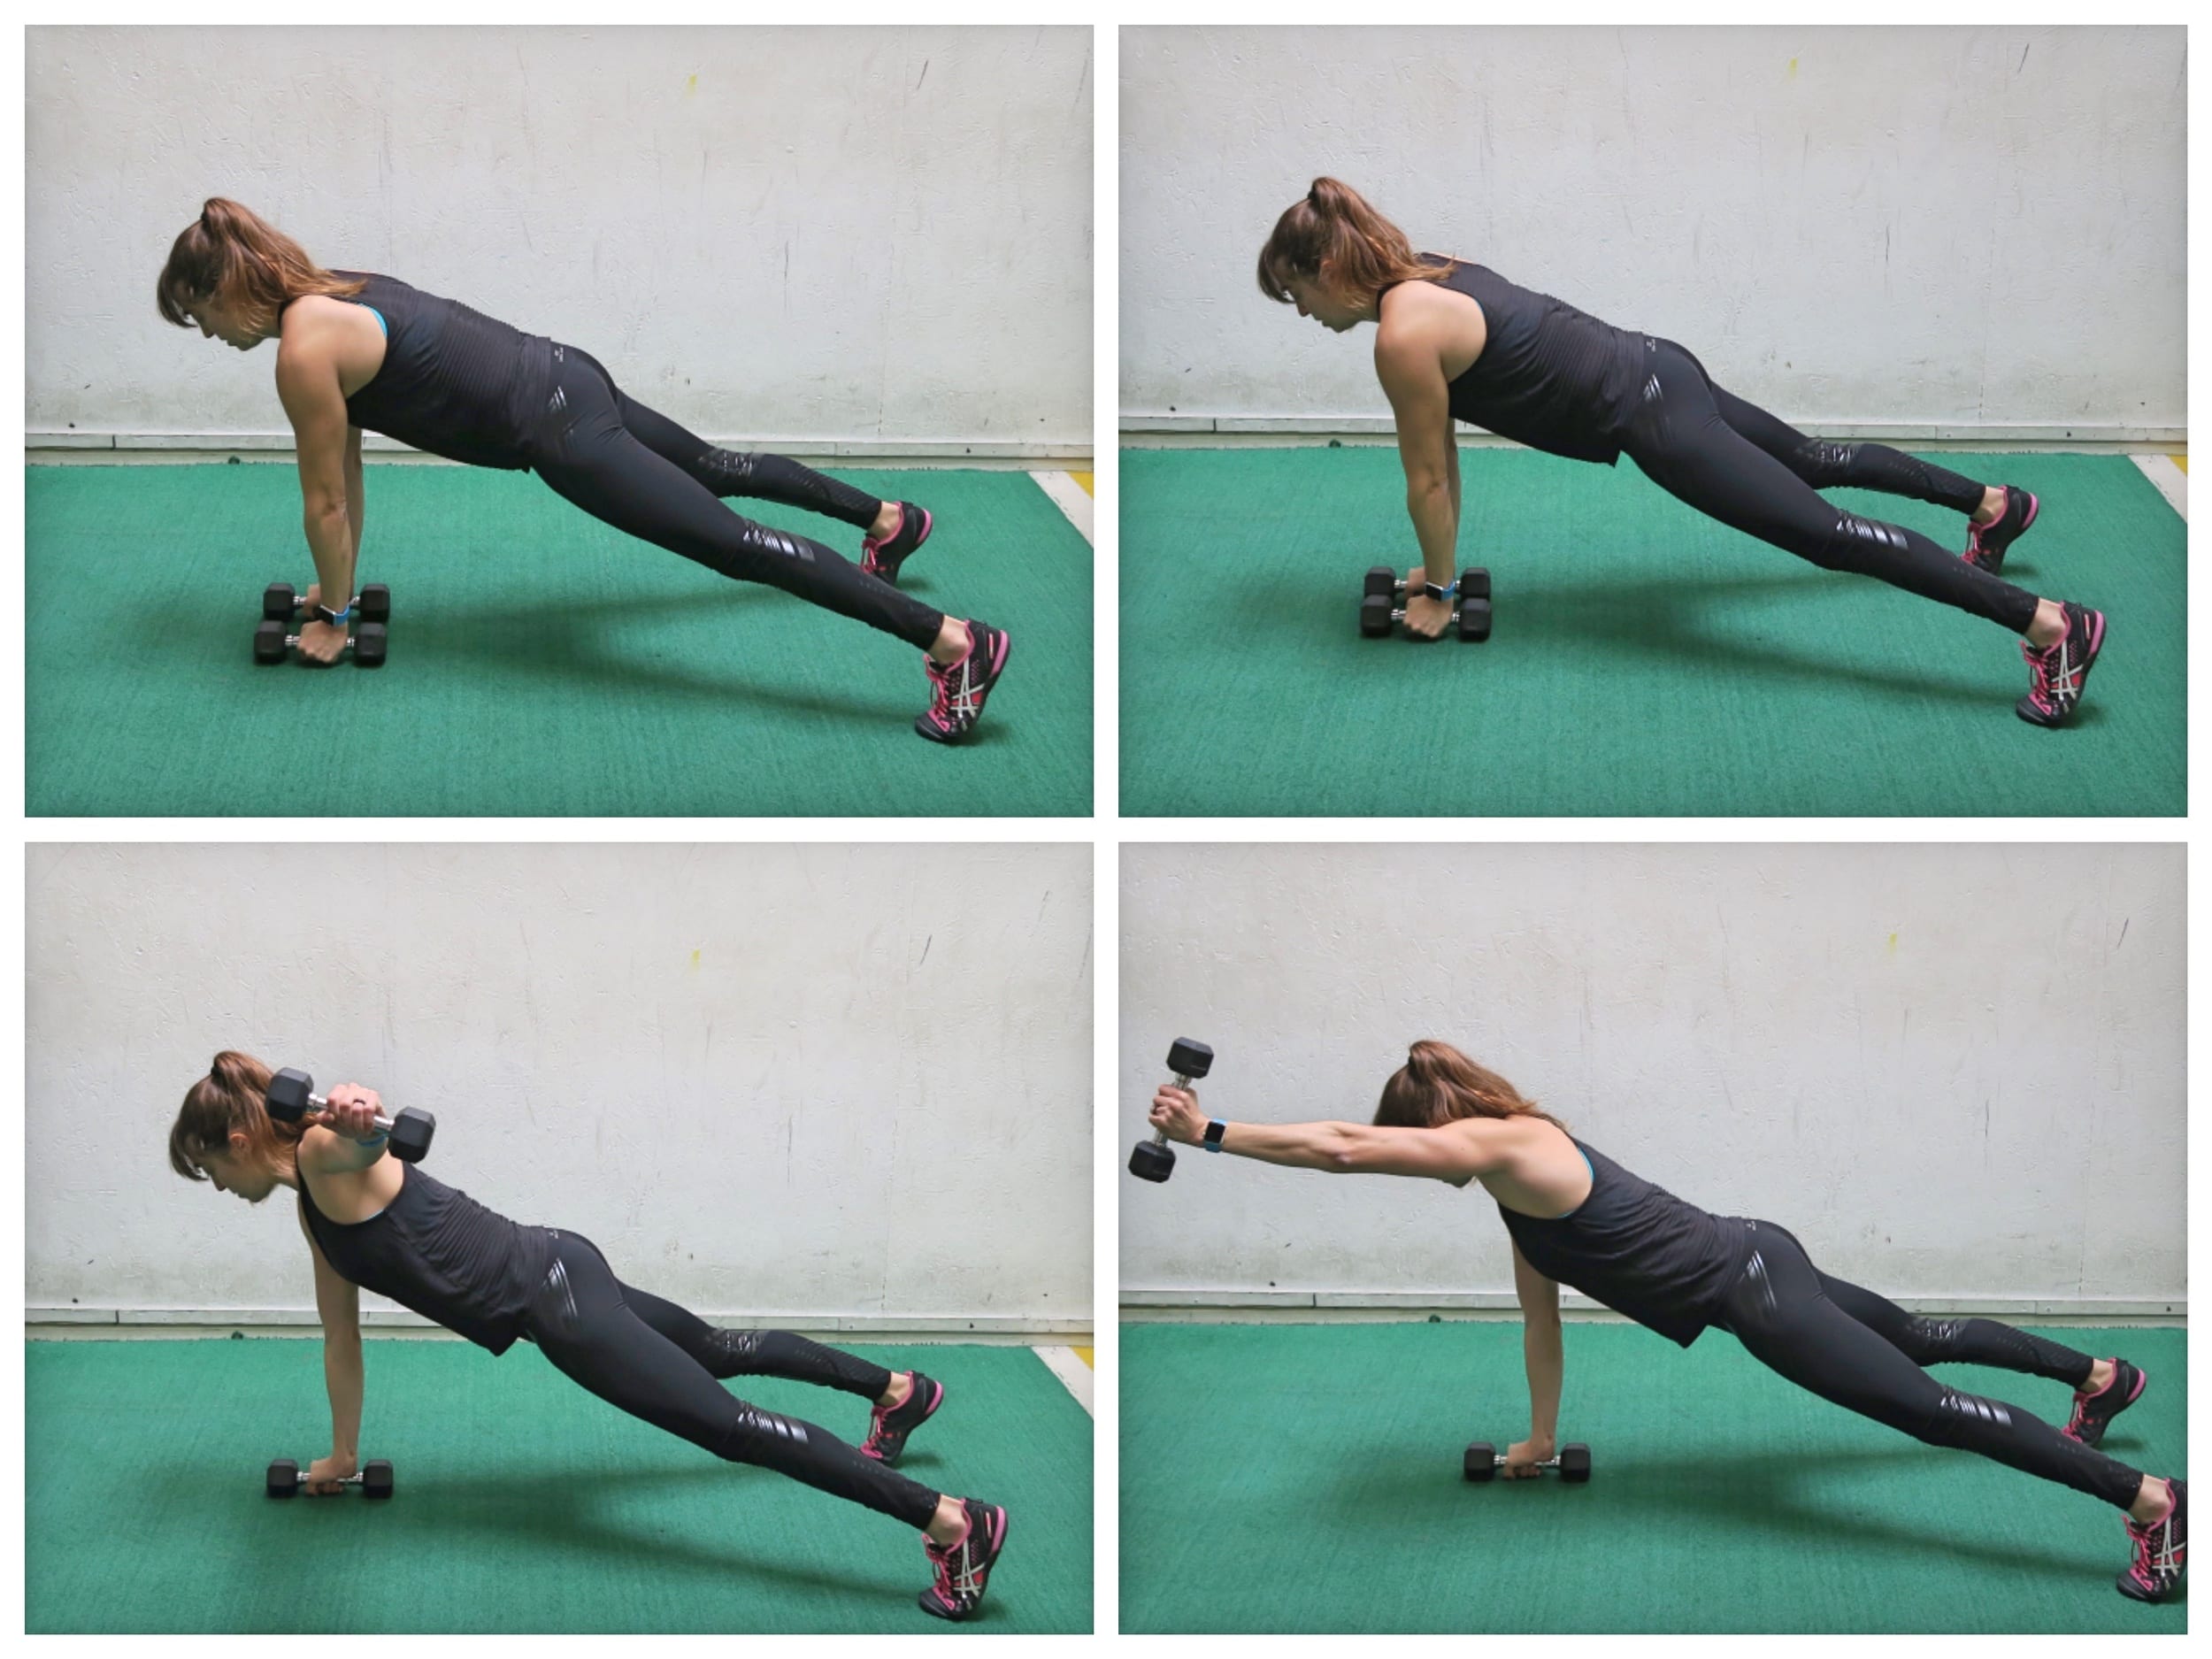
Side Plank Row:
While heavy rowing exercises are great to build back strength, we want to include rows that make us work in other planes of motion.
This Side Plank Row adds in some rotation to the pulling movement and forces us to work on our shoulder stability as well as our oblique and even glute medius strength.
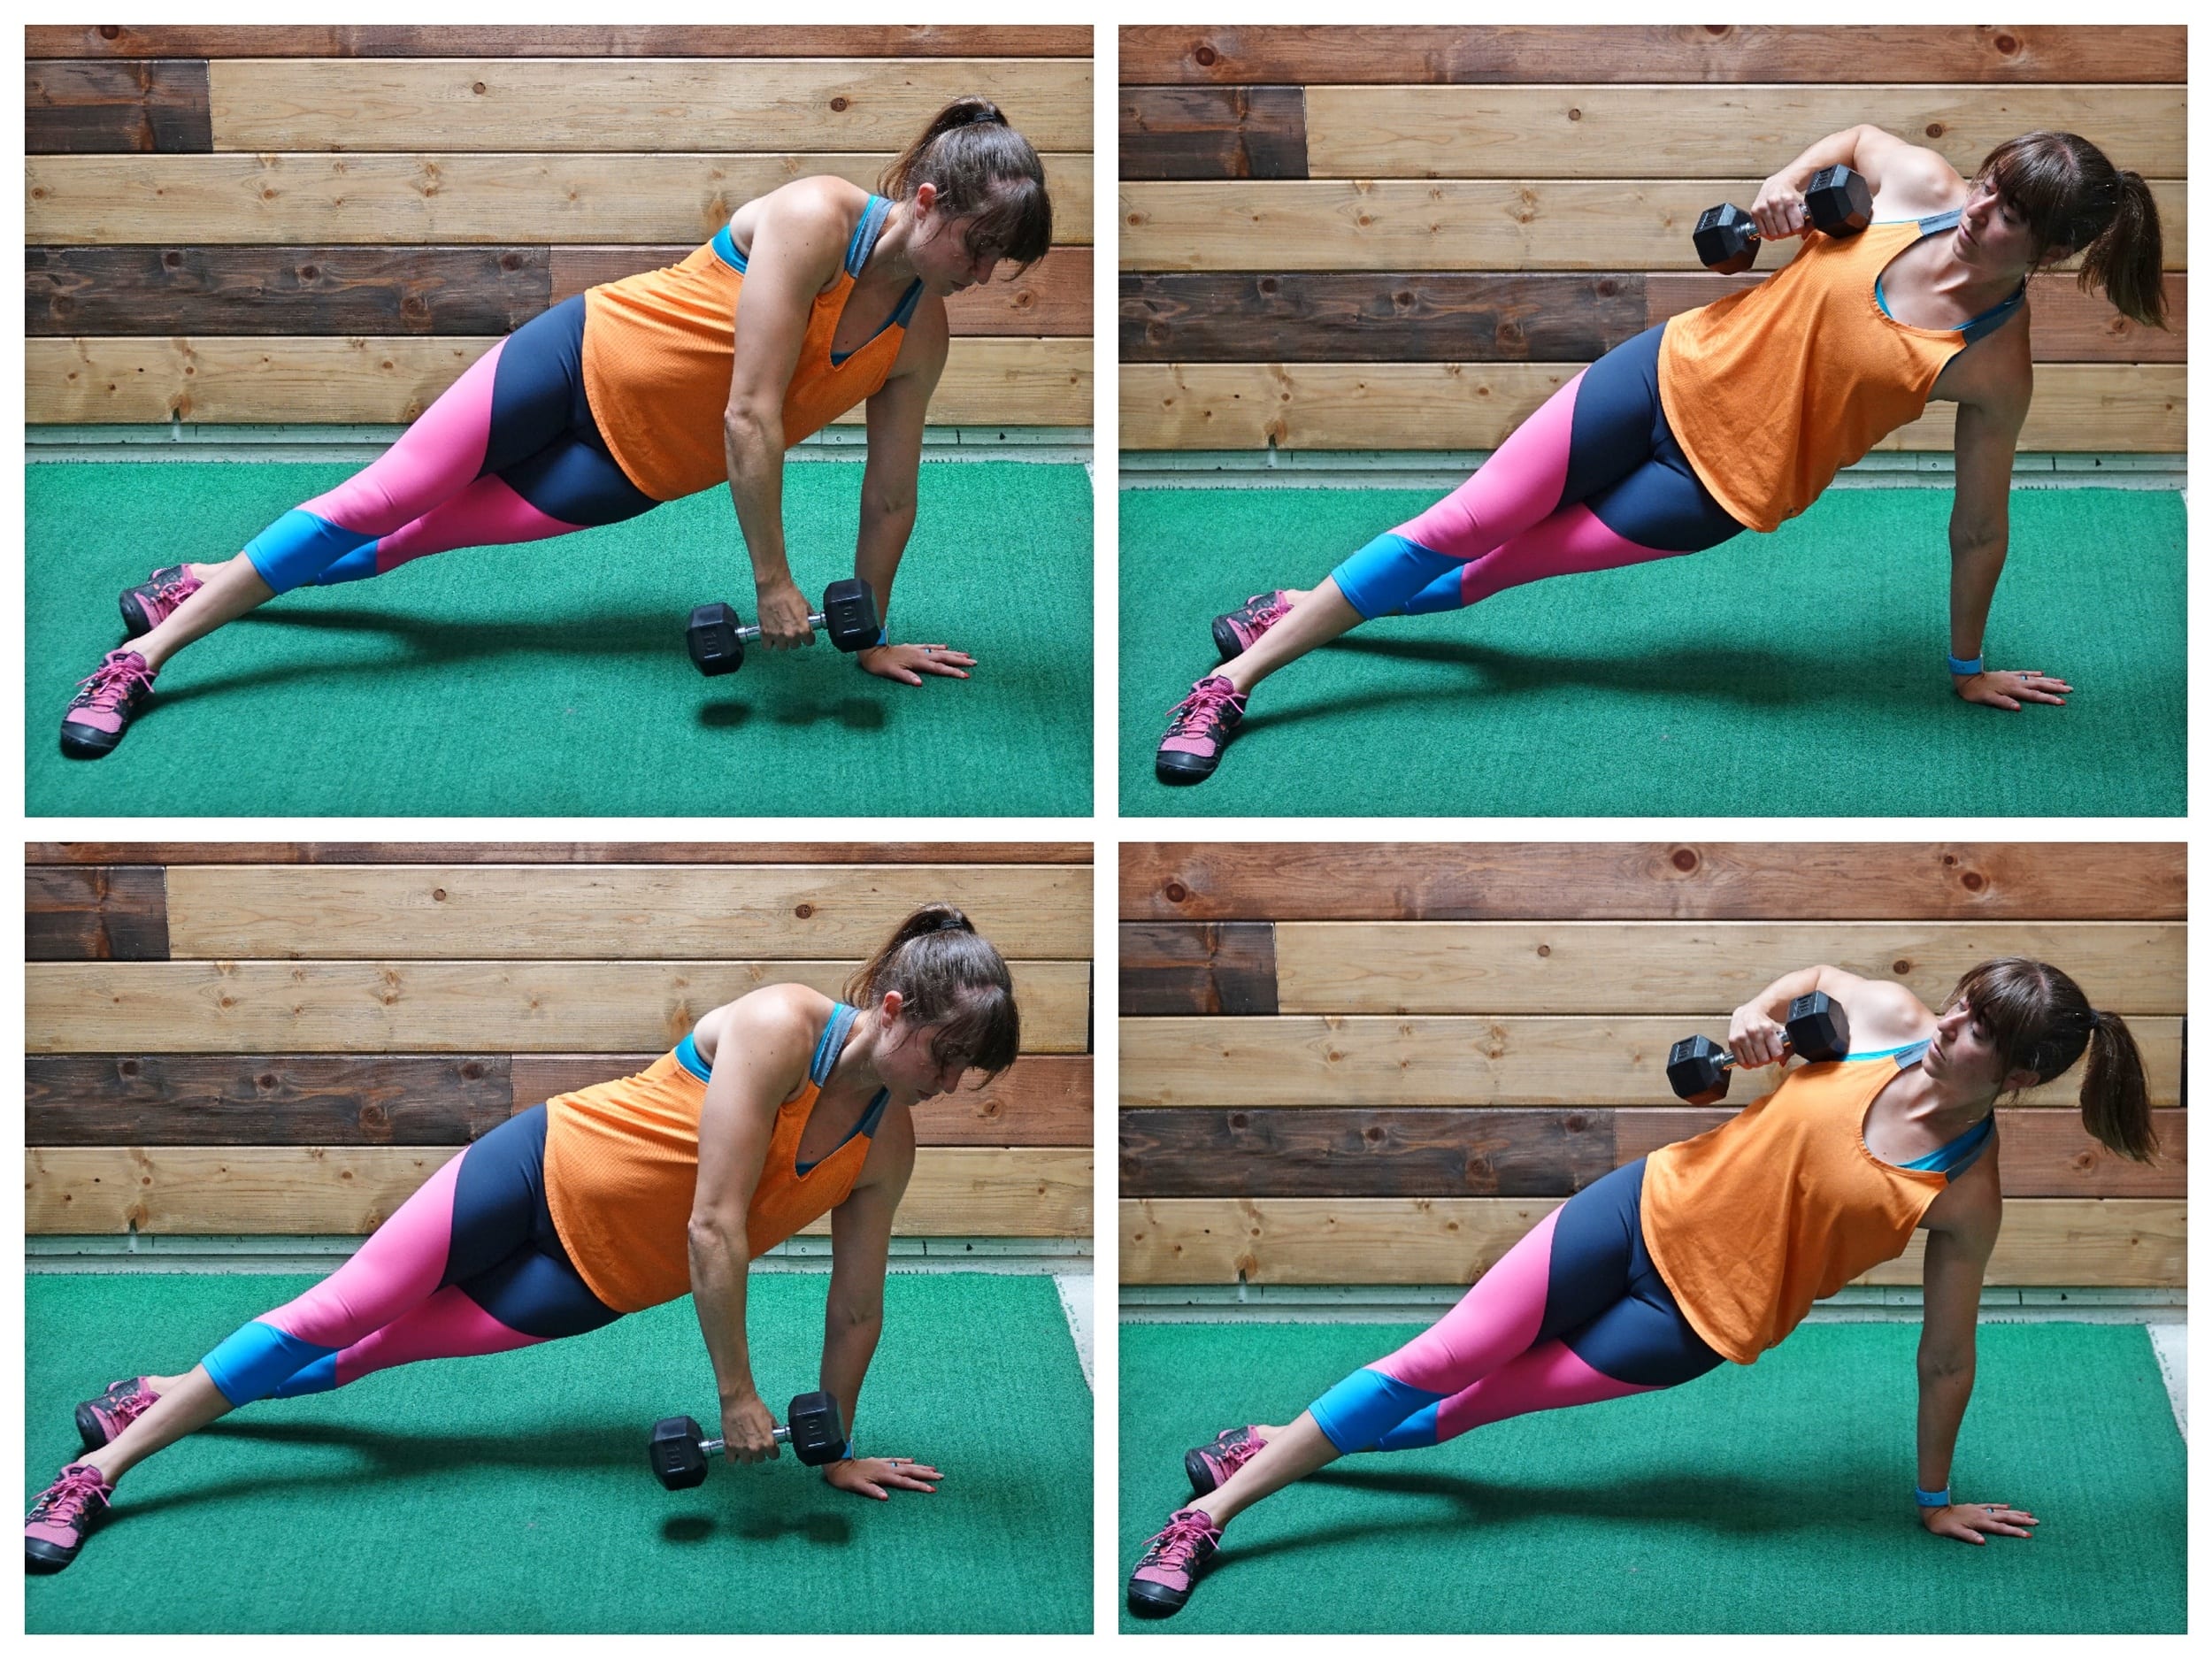
To do the Side Plank Row, set up in a high side plank from your hand with your feet staggered (your top foot will be in front). You will hold a dumbbell just off the ground down in front of you with your top hand.
Keeping that nice side plank position, row that weight up and across your body, driving your elbow back toward the wall behind you. You will slightly rotate open as you row. Feel your back pulling the weight up and across as your bottom side works to keep your bottom hip up for that nice plank position.
Lower the weight back down and across toward the ground and repeat the row.
Bird Dog Push Ups:
This Bird Dog Push Up is a more challenging push up variation that works not only your chest, shoulders and triceps, but also your core as it requires a great deal of stability to prevent rotation when you come up into the bird dog at the top!
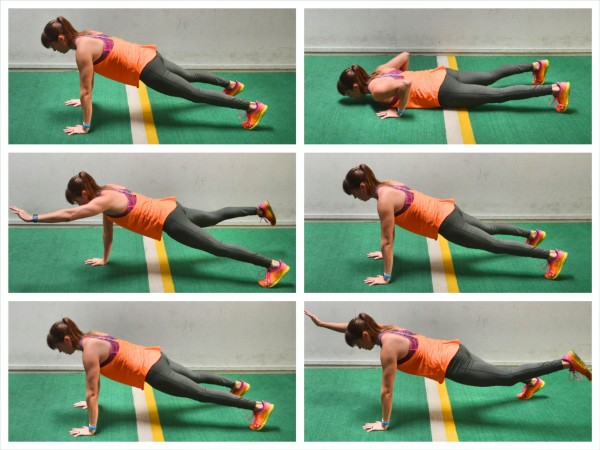
To do the Bird Dog Push Up, set up in the high plank position from your hands and toes with your hands under your shoulders and your feet about hip-width apart. If you bring your feet closer together, it will make the move more challenging. Make sure your core is braced and your body is in a nice straight line from your head to your heels.
Then, with your body moving as one unit, perform a push up, dropping your chest to the ground. Do not let your elbows flare way up by your shoulders. You do not want your arms and body to create a “T” shape. Press back up to the high plank position. Make sure to keep your core engaged and drive back through your heels so your body stays in a nice straight line. Do not let your hips sag or your butt go up in the air.
At the top of the push up, lift your opposite leg and arm up, reaching your arm out straight toward the wall in front of you as you lift your foot back toward the wall behind you. Keep your core engaged and squeeze your glutes as you lift the leg and arm. Do not let your body rotate open or your hips sag toward the ground. Do not let your butt go up toward the ceiling as you lift and pause to hold.
You do not need to lift super high. It is more about lifting toward opposite walls and engaging your core and glutes to stay balanced. Hold for a second or two at the top and then lower back down and repeat the push up. Make sure your body moves as one unit. Do not tuck your chin or let your hips sag.
Then perform a Bird Dog on the other side, lifting the opposite arm and leg up. Keep performing a push up then a Bird Dog, alternating sides.
Beginners can do the move from their knees or even simply lift either their leg or their arm instead of lifting both. It is better to regress and perform the movement properly than to do the full Bird Dog Push Up with your butt up in the air.
Plank with Two-Way Raise:
The Plank with Two-Way Raise is a great way to work your arms and shoulders while also improving your anti-rotational core strength.
When you’re short on time, this allows you to get in some extra targeted shoulder work while also building ab strength!
To do the Plank with Two-Way Raise, place a dumbbell in each hand and set up in a high plank position with your feet about hip-width to shoulder-width apart. These should be light dumbbells as we are working small muscles.
Then, keeping your core stable, lift your arm straight out to the side, feeling the back of your shoulder and even in between your shoulder blades work. Bring it back down then lift it forward out in front. When you lift to the side, the back of your hand will be facing the ceiling. As you lift out in front, your thumb will be up.
Then repeat, lifting out to the side then down the raising to the front and down. Keep your core stable the entire time.
Lunge Curl Press:
When we’re short on time, the more muscles we can work at once, often the better – especially if fat loss is part of our goal!
This hybrid exercise will help you torch calories by using a lunge to work the big muscles of your legs and get your blood pumping as you target your biceps and shoulders with a curl and press!
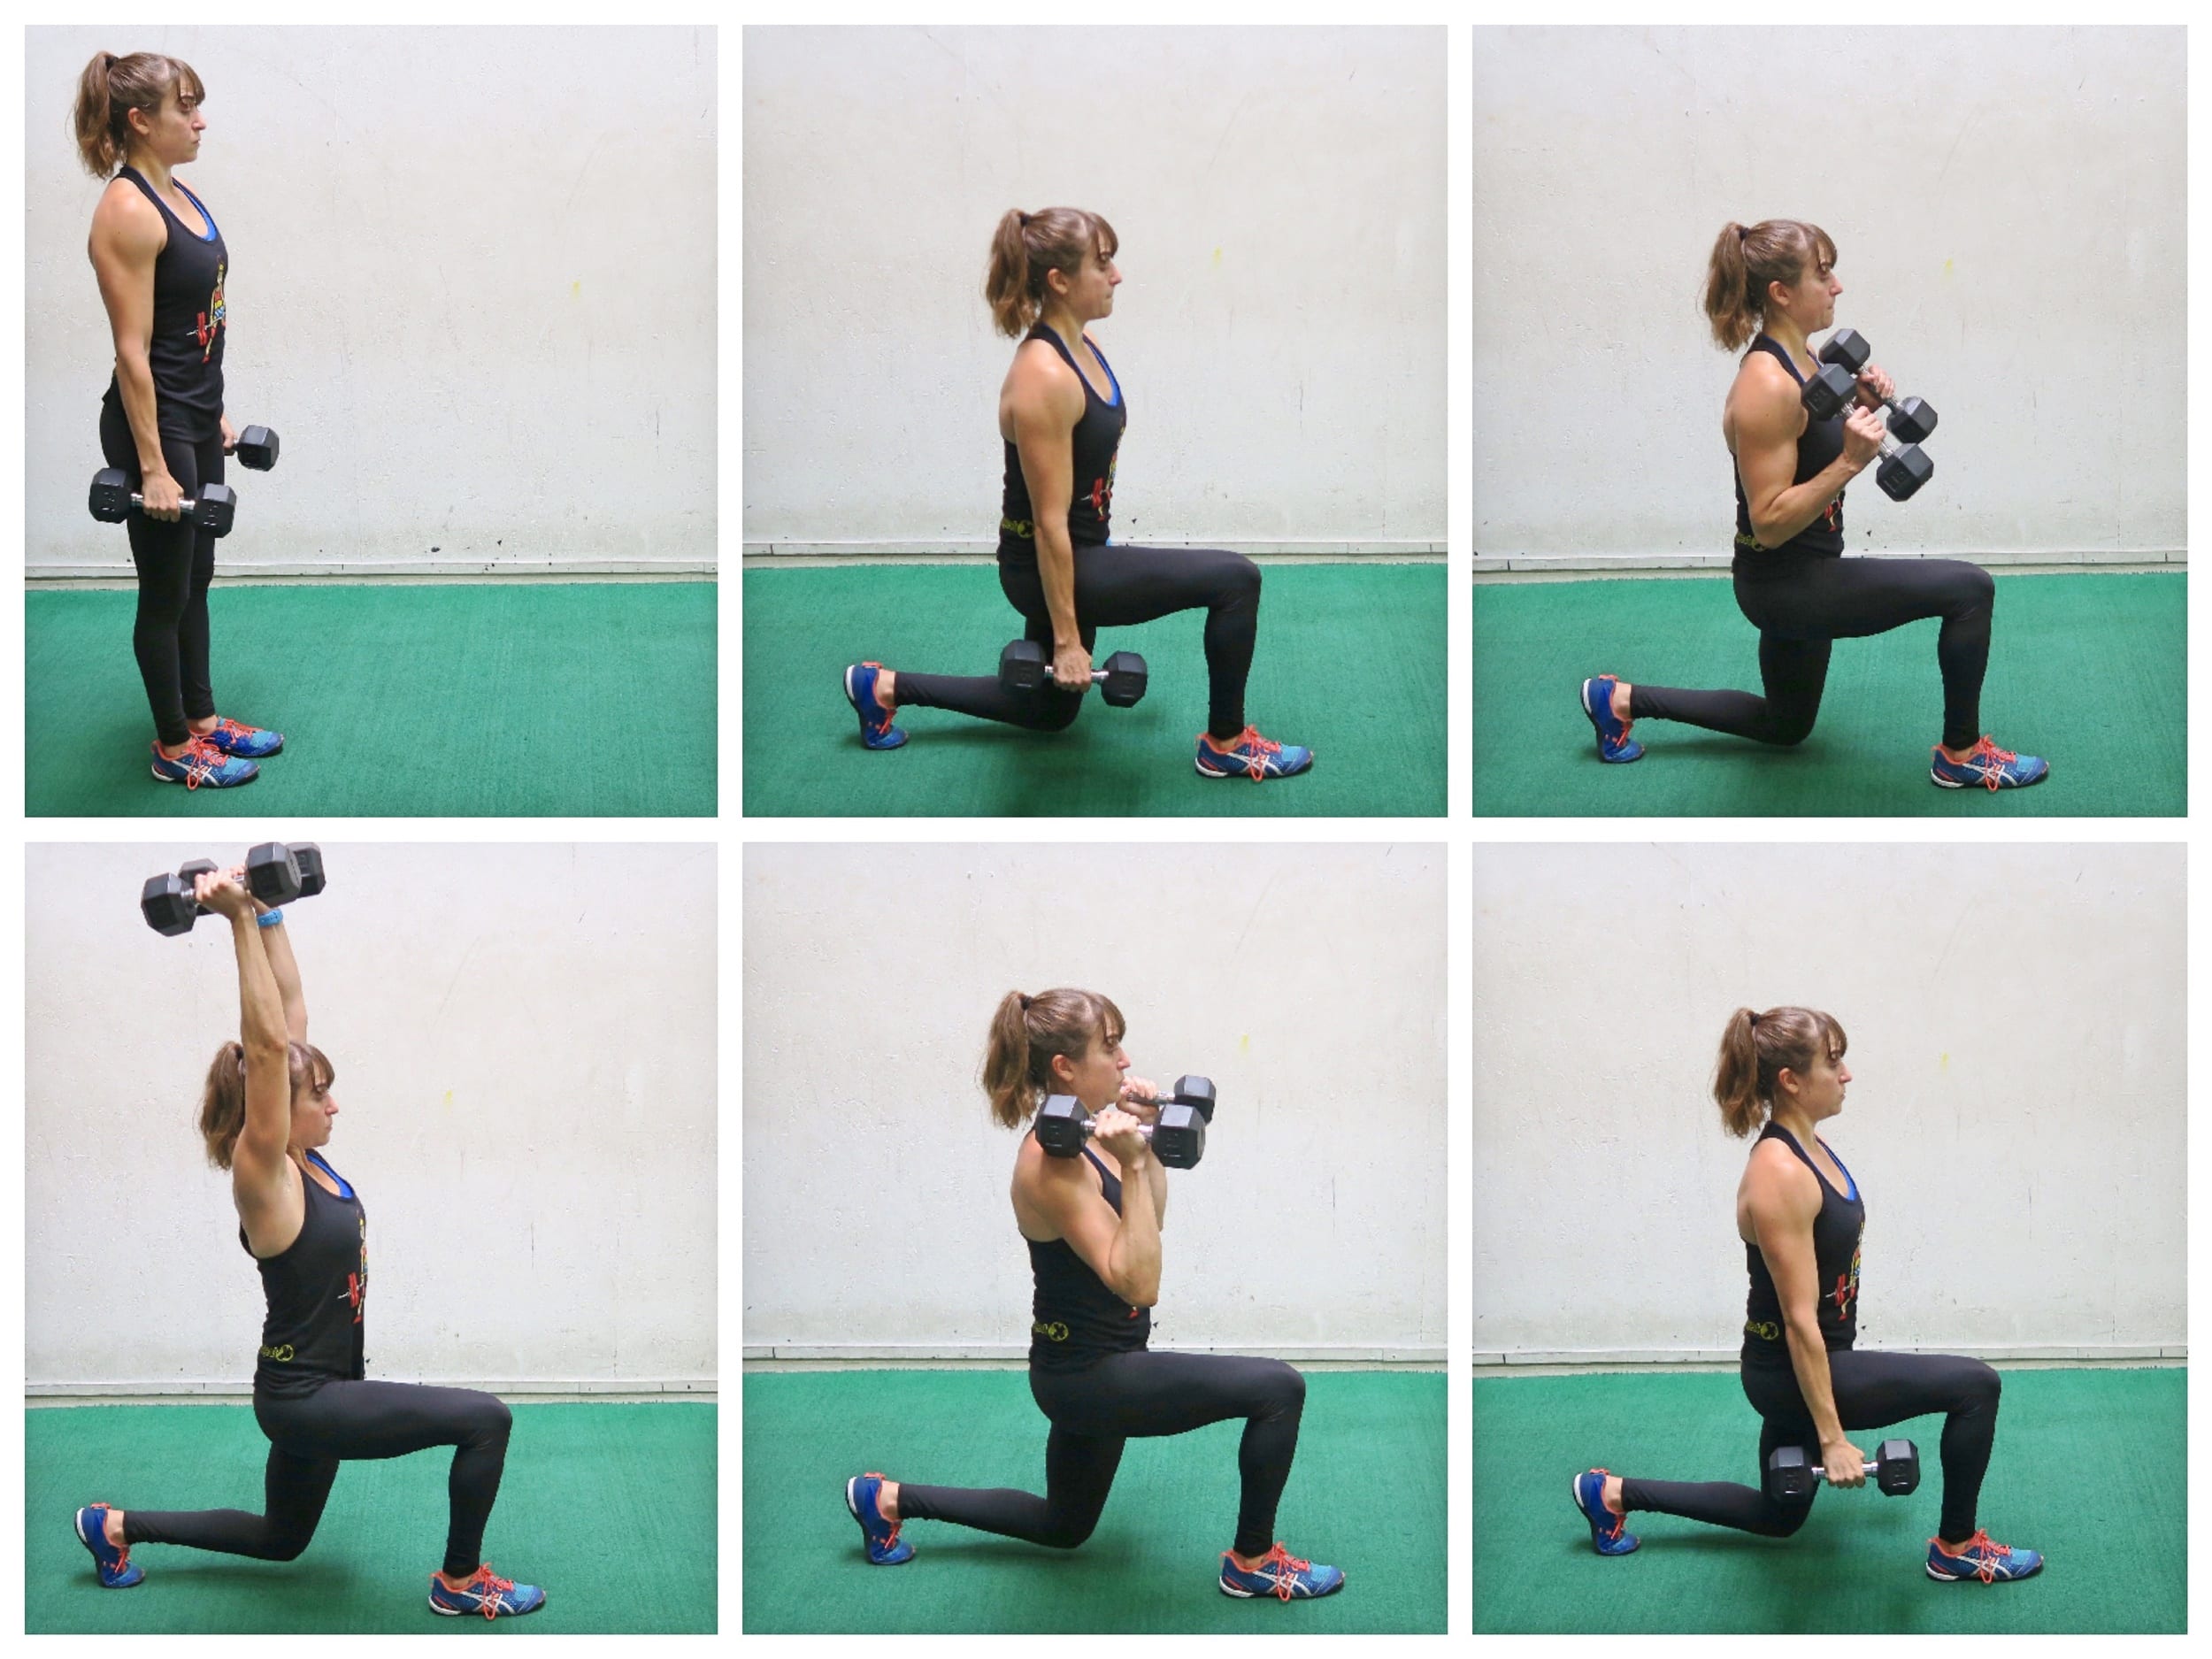
To do the Lunge, Curl and Press, start standing tall with a dumbbell in each hand down by your side. You can choose to have your palms facing forward or even in toward each other to perform both the curl and the press. Lunge forward with your arms down by your sides. Holding the lunge, perform a bicep curl, curling the weights up to your shoulders. Keep your chest up as you curl to maintain good form.
Once you curl up to your shoulders, press the weights overhead, staying nice and low in the lunge with your abs engaged. Press all the way up, then bring them back down to your shoulders and reverse the curl. Once the weights are back by your sides, push back up to standing in one movement.
Beginners may not lunge out as far or as deep. They may also choose to lunge then perform the curl and press while standing. You can stay on the same side or perform lunges alternating sides.
Glute Bridge Skull Crushers:
When you want to use isolation exercises to target those trouble zones, you can help yourself get even more “bang for your buck” in less time by combining that isolation move with an exercise to work a different area.
That’s why the Glute Bridge Skull Crushers are a great hybrid move to include when you’re short on time! You’ll work your glutes and core as you target those triceps!
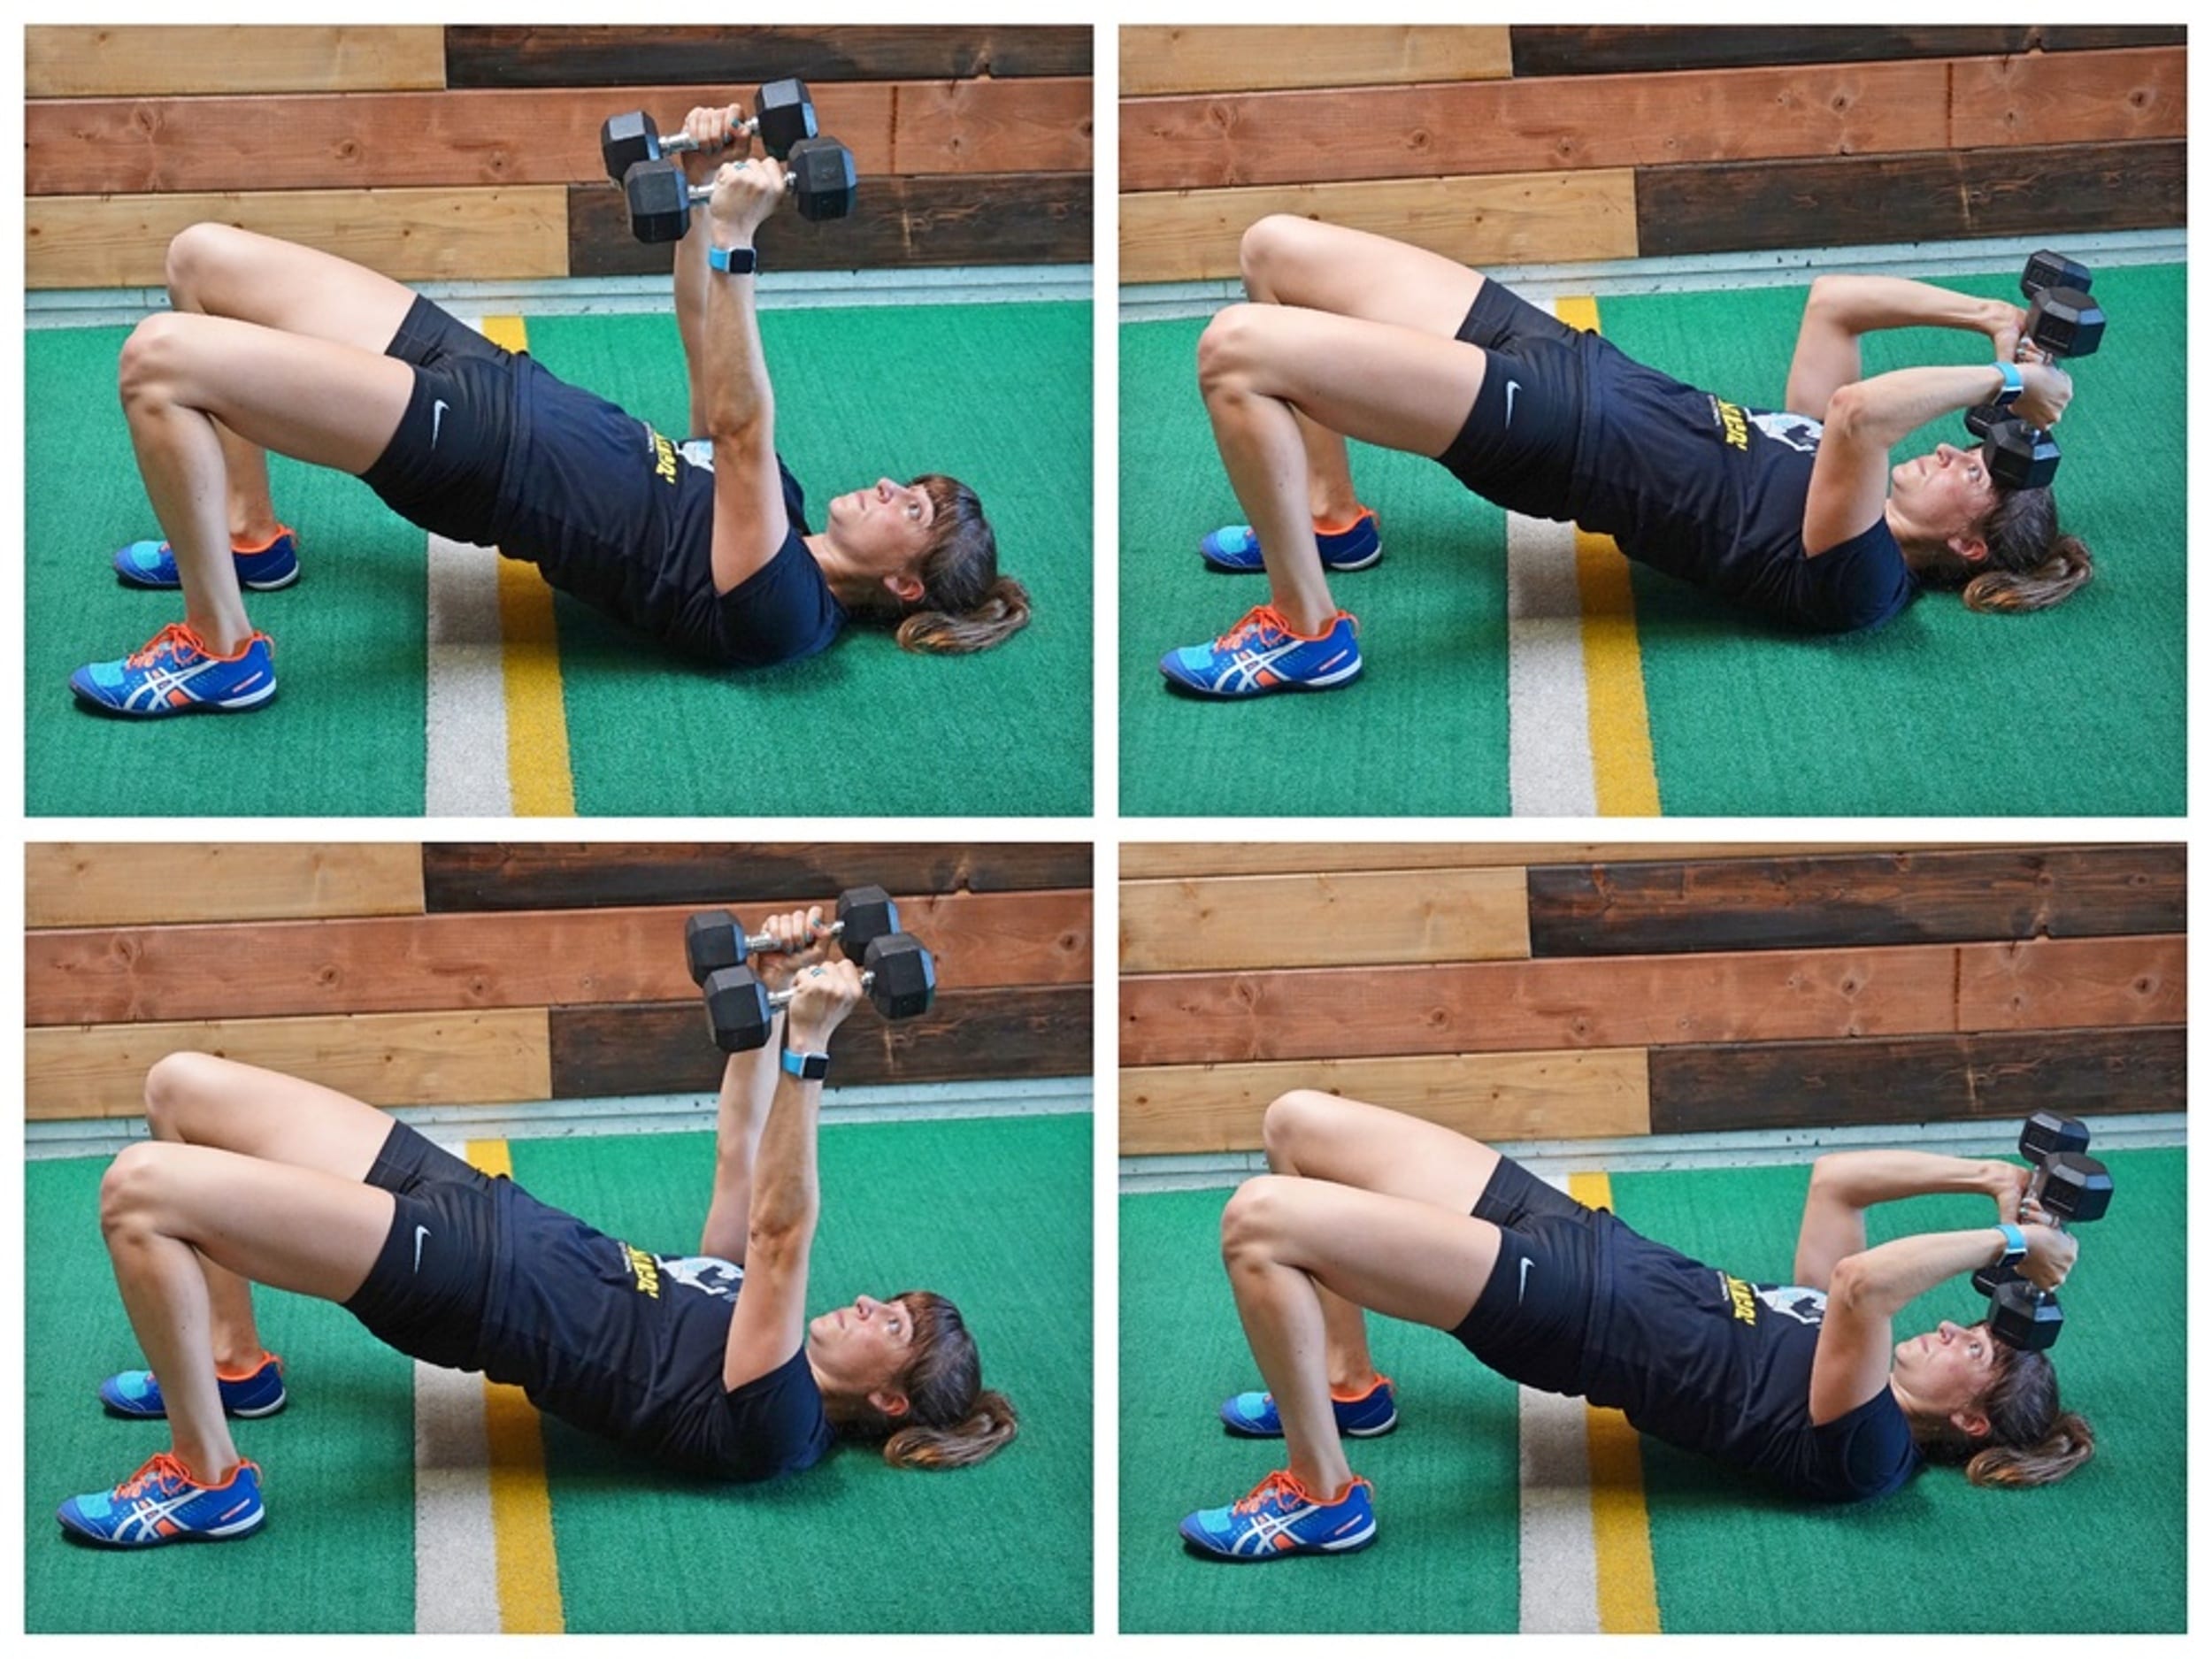
To do Glute Bridge Skull Crushers, hold either a kettlebell or weight(s) in your hands and lie on your back. Set up in the bridge position with your knees bent and feet flat on the ground. Press the weights or weight up at shoulder height toward the ceiling.
Then bridge up. Holding this bridged position, curl the weights back toward your forehead just bending at the elbows. Your palms should be facing in toward each other. Then extend your arms back out. Move at a controlled pace and stay up in the bridge the whole time.
When you lower the weights down toward your forehead, think about just bending at the elbows so your elbows stay right over your shoulders. And as you extended the straighten but still stay aligned.
Keep your abs braced in that bridge too and don’t hyperextend your lower back just to bridge up higher.
Bi’s And Tri’s Series:
When you’re short on time, it can be hard to use some of your workout time to target those specific areas you want to tone and strengthen with isolation moves because they don’t give you as much bang for your buck.
But if you really want to target those areas, you can get killer results by combining isolation moves into a hybrid series! This way you can pack more into less time!

To do Dumbbell Bi’s and Tri’s Series, hold a dumbbell in each hand with your arms down by your side. Have your palms facing in.
Then perform a bicep curl, curling the weights up to your chest. Do not swing, but fully curl them up.
From here, press them straight overhead, keeping your arms facing toward each other.
With your arms pressed straight up, drop the weights down and back toward your back. You want to think you are bending at the elbows to lower the weights back behind you.
Then, feel your triceps working to raise the weights back up overhead. Bring them back down to your chest and slowly lower them back down to your sides. Stay in control of the weights as you perform the entire move.
After lowering them back down, repeat the curl, press overhead and overhead tricep extension!
Love these moves? Want to build a killer strong and lean upper body?
Check out my Arm Burner Cards –>
Do You Have Dead Butt Syndrome!?!
Ok…So your butt is not technically “dead” but Dead Butt Syndrome is a very common name for an all too common problem – underactive glutes!
So what does “dead butt” and “underactive glutes” mean?
Dead Butt Syndrome is when your glutes aren’t firing as efficiently or effectively as they should be and therefore other muscles may be compensating to handle the load, leading to aches, pains, overuse and injury.
Because your glutes aren’t working as they should, people have starting saying they are “dead.”
Another term you may hear is that your glutes aren’t “waking up” or activating properly during movements.
This has led to our glutes often also being called the “Sleeping Giant!”
So…why are there all these terms for underactive glutes? And why is it so important we address this problem?
Because, all too many of us end up INJURED because we aren’t performing proper recruitment patterns.
We may even perform movements that “look” correct aka have ideal form and a proper movement pattern, but we may be OVERLOADING muscles not meant to carry the load to perform that movement.
We are COMPENSATING! And the more athletic we are, the more we can often hide these imbalances by overusing other muscles.
Now the question I often get asked is “Well if you’re glutes aren’t working, how can you walk or stand from a chair!?”
Let’s clarify one thing first…Your glutes ARE working. The point though is they aren’t always working as effectively as they should.
Think about a hose with a small kink in it. Water may still come out but it may not be as strong a flow as it should be. Fix the kink and the water pressure improves.
Water is still flowing both ways BUT one way allows the hose to work much better.
The same thing can be said about your glutes!
Improve your hip mobility and your mind-body connection and your glutes work more effectively, allowing you to be stronger and avoid overuse!
So why don’t our glutes fire as effectively or efficiently?
The main reason? Our modern lifestyle!
We’ve heard sitting is killing us, and while that is a bit dramatic, it IS leading to tight hip flexors, which leads to changes in our recruitment patterns during basic daily tasks and movements.
Tight hip flexors can INHIBIT our glutes from firing as effectively. They are that kink in the hose.
And if we don’t address tightness there, we can end up with lower back pain, hip pain and knee pain.
If you aren’t mobile in one area, you may seek out mobility from other.
So if you can’t properly fully extend your hip, guess where you’ll try and get that extension from often?
Your lower back!
Ever feel like you’re constantly arching your lower back to try to replicate the movement you see…say to keep your chest up?
It may be because your hips are tight!
And if your hips are tight and not allowing proper extension, your glutes can’t fire properly.
If you’re glutes aren’t able to fire, you’ll need to use other muscles to lift the load. This is when you may feel your quads taking over. Or your hamstrings. Or even your lower back working.
And when these muscles are asked to do more than their fair share, they can become injured.
High hamstring tendinopathy is all too common these days. So are knee injuries and hip injuries.
And it all relates back to a lack of proper mobility and a lack of glute activation.
AKA DEAD BUTT SYNDROME!
So if you take time to relax overactive hip flexors and activate your glutes, you can help prevent injury and even help yourself run faster and lift more!
Now you may be thinking, “Well I stretch my hips all the time and nothing helps long term.”
This may be because stretching, while it may help to improve your flexibility momentarily, does NOT change how your mind wants to use muscles.
It doesn’t get those underactive muscles ACTIVATED to change your recruitment patterns!
So instead of then using your glutes, you keep overusing those other muscles, which just perpetuates the same muscles becoming tight!
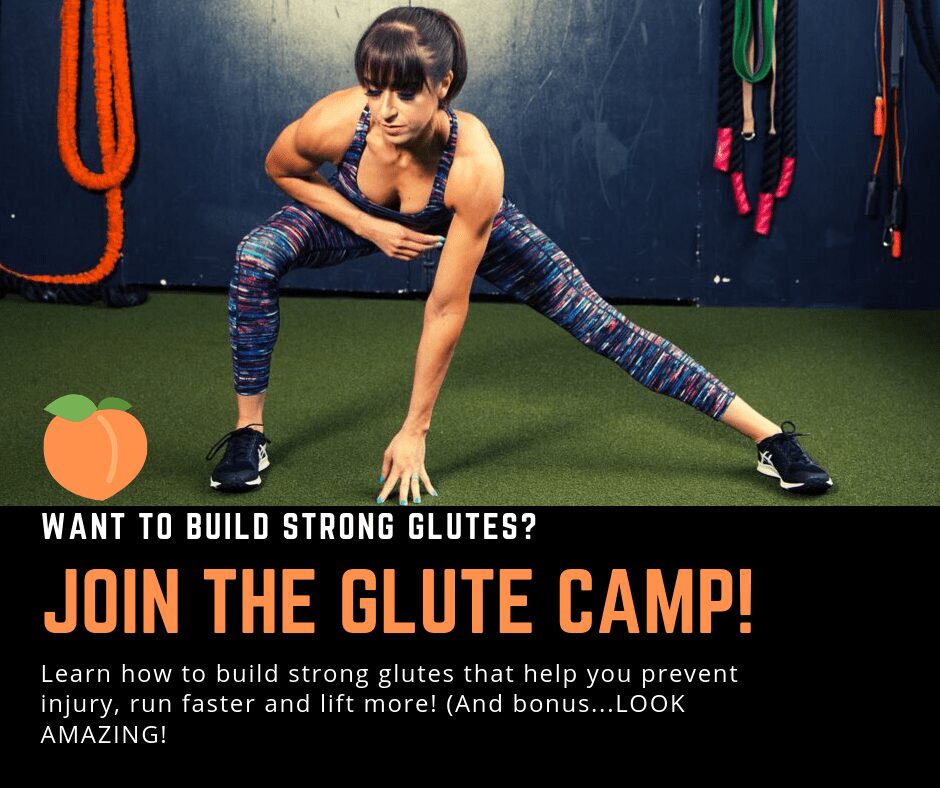
This is why you need a 3 step process to relax overactive muscles and wake up those dead glutes.
You need to foam roll, stretch, activate and then follow that processed with focused strength work or even your runs or rides (want workouts to help you do that? Check out my Glute Camp!).
Below are 3 moves you can do daily to relax tight hip flexors and activate your glutes BEFORE you run or lift.
3 Moves To Relax Tight Hip Flexors And Activate Your Glutes
TFL Foam Rolling:
The TFL or tensor fasciae latae works with the hip flexor muscles to flex the hip and the glute medius to abduct the hip. However, it often inhibits the glute medius from firing correctly when it tries to “take over” which can lead to IT Band, hip and knee pain.
Rolling this muscle can help you properly strengthen your glute medius while improving your glute maximus functioning.
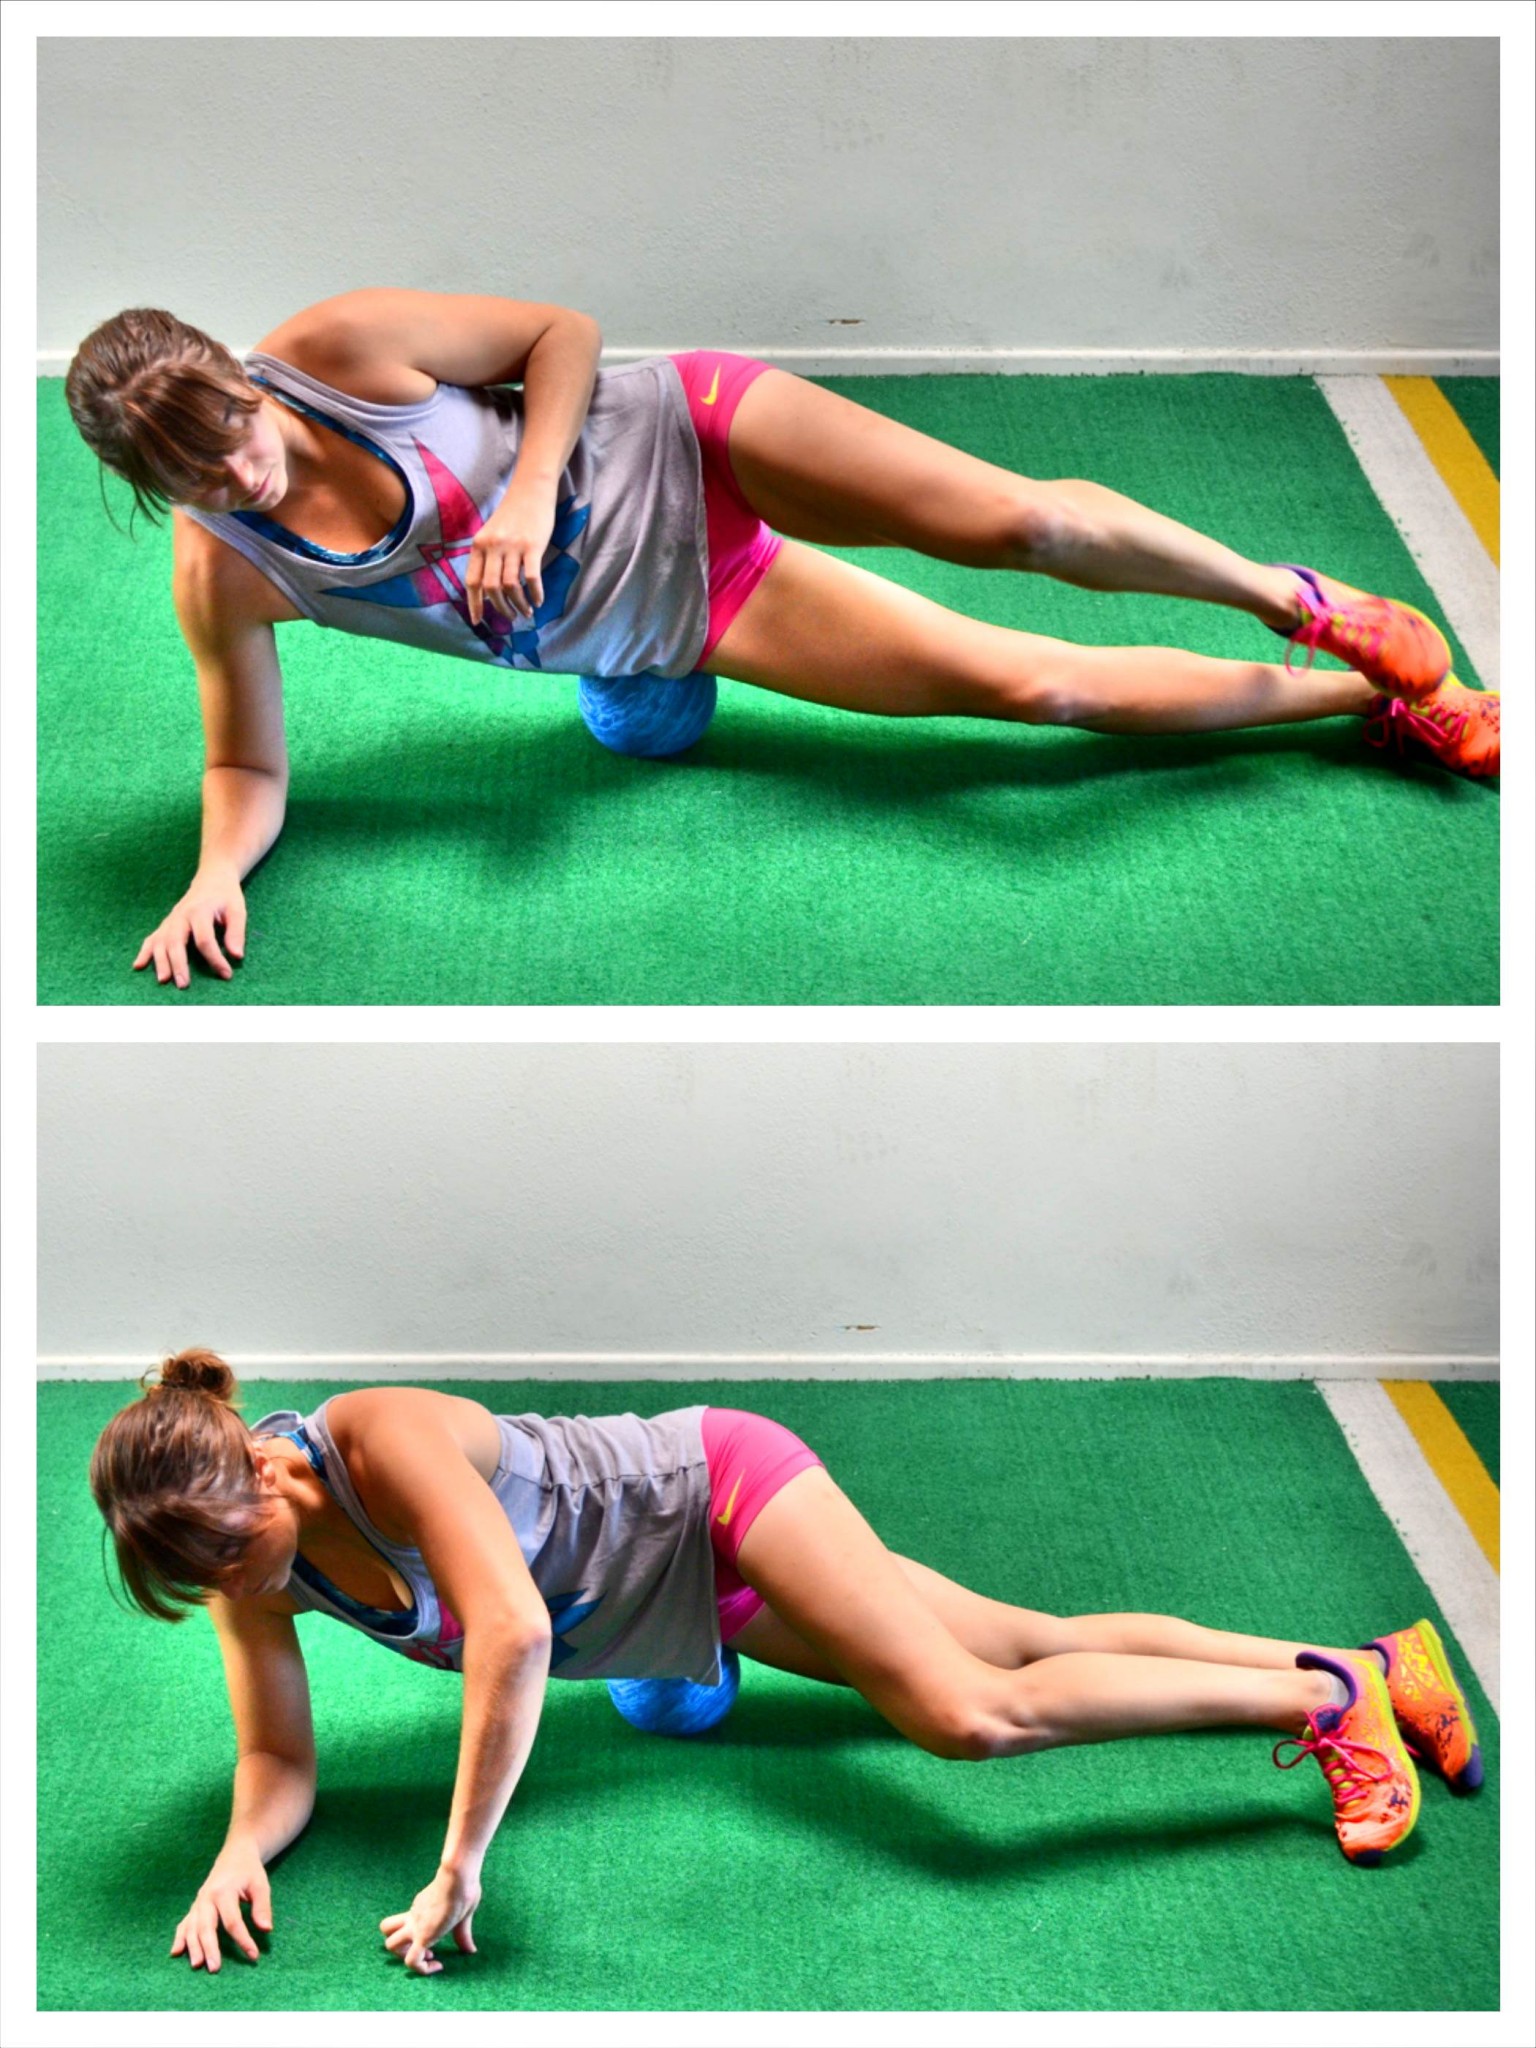
To roll out your TFL, and even your hips, place a ball on the ground then position your body so the ball is just below and outside, or back, from your hip bone. Roll the ball around slowly to find a tight spot and then hold on any tight spots.
If you find a tight spot, hold on that spot and lift and lower your leg up and down. By lifting and lower the leg, you are flexing and relaxing the muscle, which will help loosen everything up as you hold.
As you seek out tight spots in your hip, bring the ball around front and right to the side under your hip bone. Again hold on any tight spots and even flex and relax your leg to help dig in.
You can work your way back out to the side of your hip, and even your glutes as well, if you found any sore or tight spots.
Half Kneeling Hip to Hamstring Stretch:
Especially if you spend a lot of time seated, working at a computer or driving in a car, you want to stretch your your hip flexors.
And if you’re stretching before you workout, it is better to do stretches that move you through a range of motion instead of HOLDING, like a static stretch.
A great stretch to start mobilizing your hip and relaxing your hip flexors, plus stretching your hamstring, is the Half-Kneeling Hip to Hamstring Stretch.
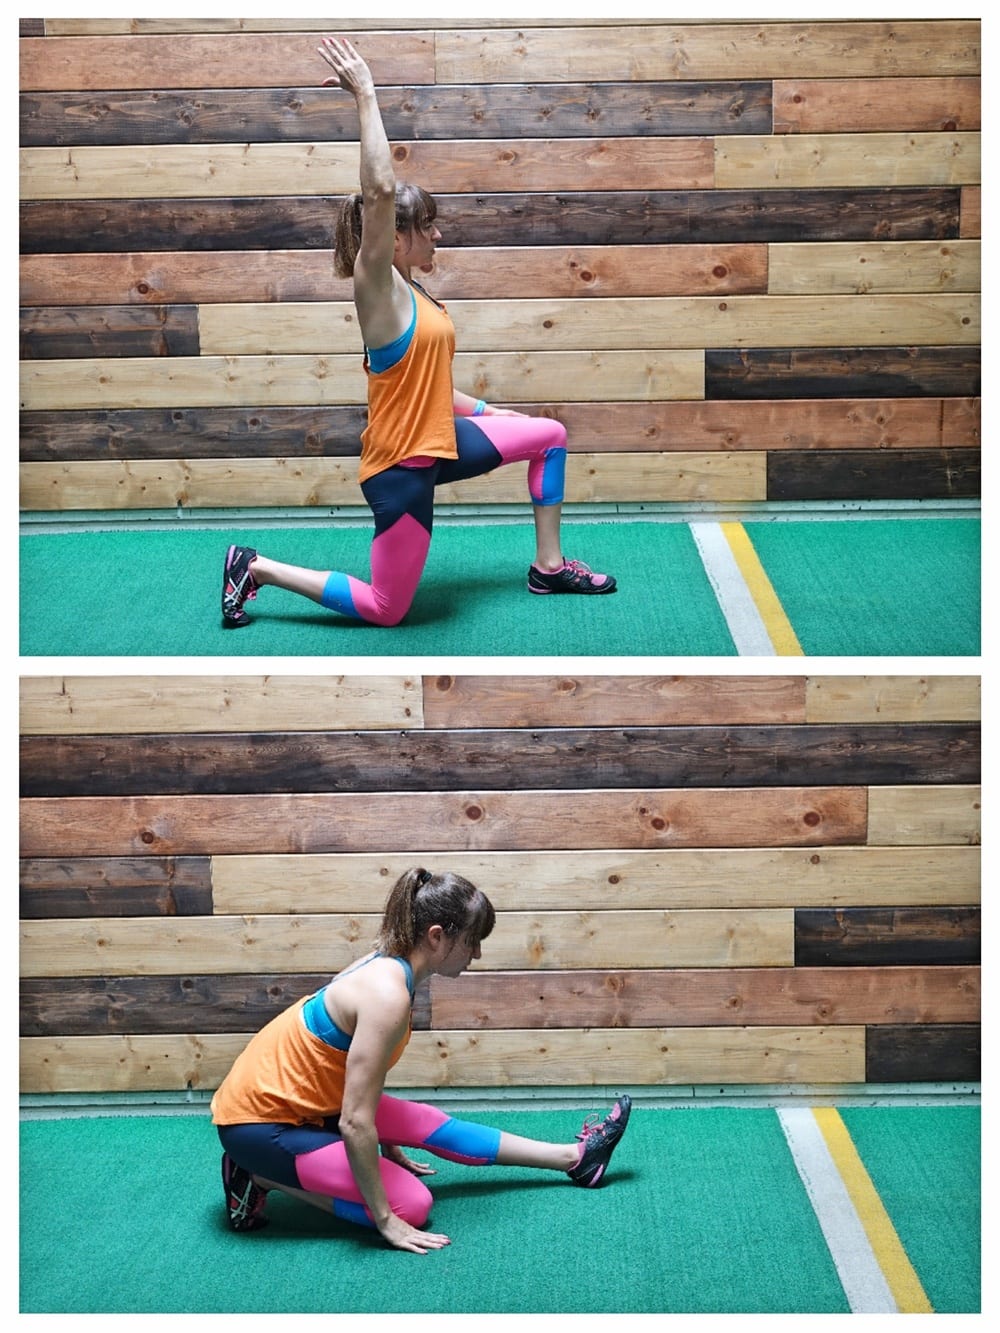
To do the Half Kneeling Hip to Hamstring Stretch, start half kneeling with your back knee about under your hip. Squeeze your glute on that side to drive your hip forward as you reach overhead. This will help you make sure you are getting extension from your HIP and not your lower back. Pause for a second as you squeeze.
Then sit back, lowering your arm as you extend your front leg. Hinge at the hips as you sit back and lean over that leg to feel your hamstring stretch. Then move back to half kneeling and repeat.
Do not arch your lower back as you stretch your hip. Really brace your abs.
And when you sit back in the hamstring stretch, don’t just sit back, actually push your butt back to hinge at the hips and stretch that hamstring.
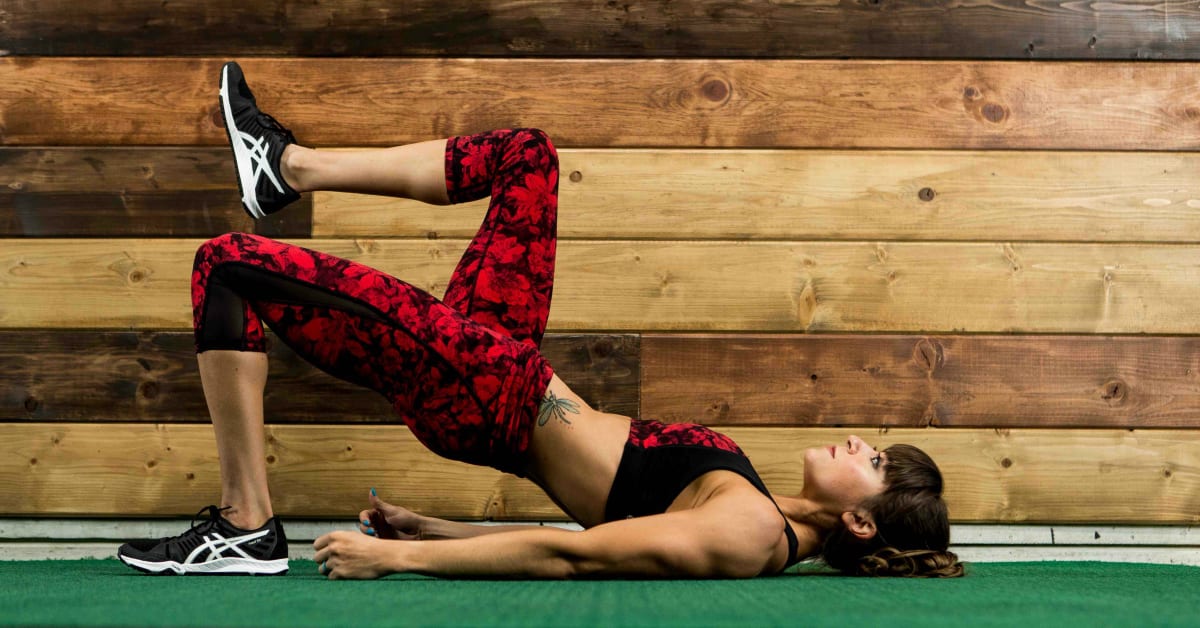
Mini Band Glute Bridge:
After stretching and rolling, you want to activate those glutes and a great exercise to do that is the Glute Bridge.
Because many of us though also struggle with a weak glute medius, and glute medius weakness can hinder our glute maximus from functioning optimally, a great glute bridge variation to use is the Mini Band Glute Bridge.
By using the mini band, you can help activate your glute medius to improve your hip and knee stability while also working on hip extension and glute maximus activation.
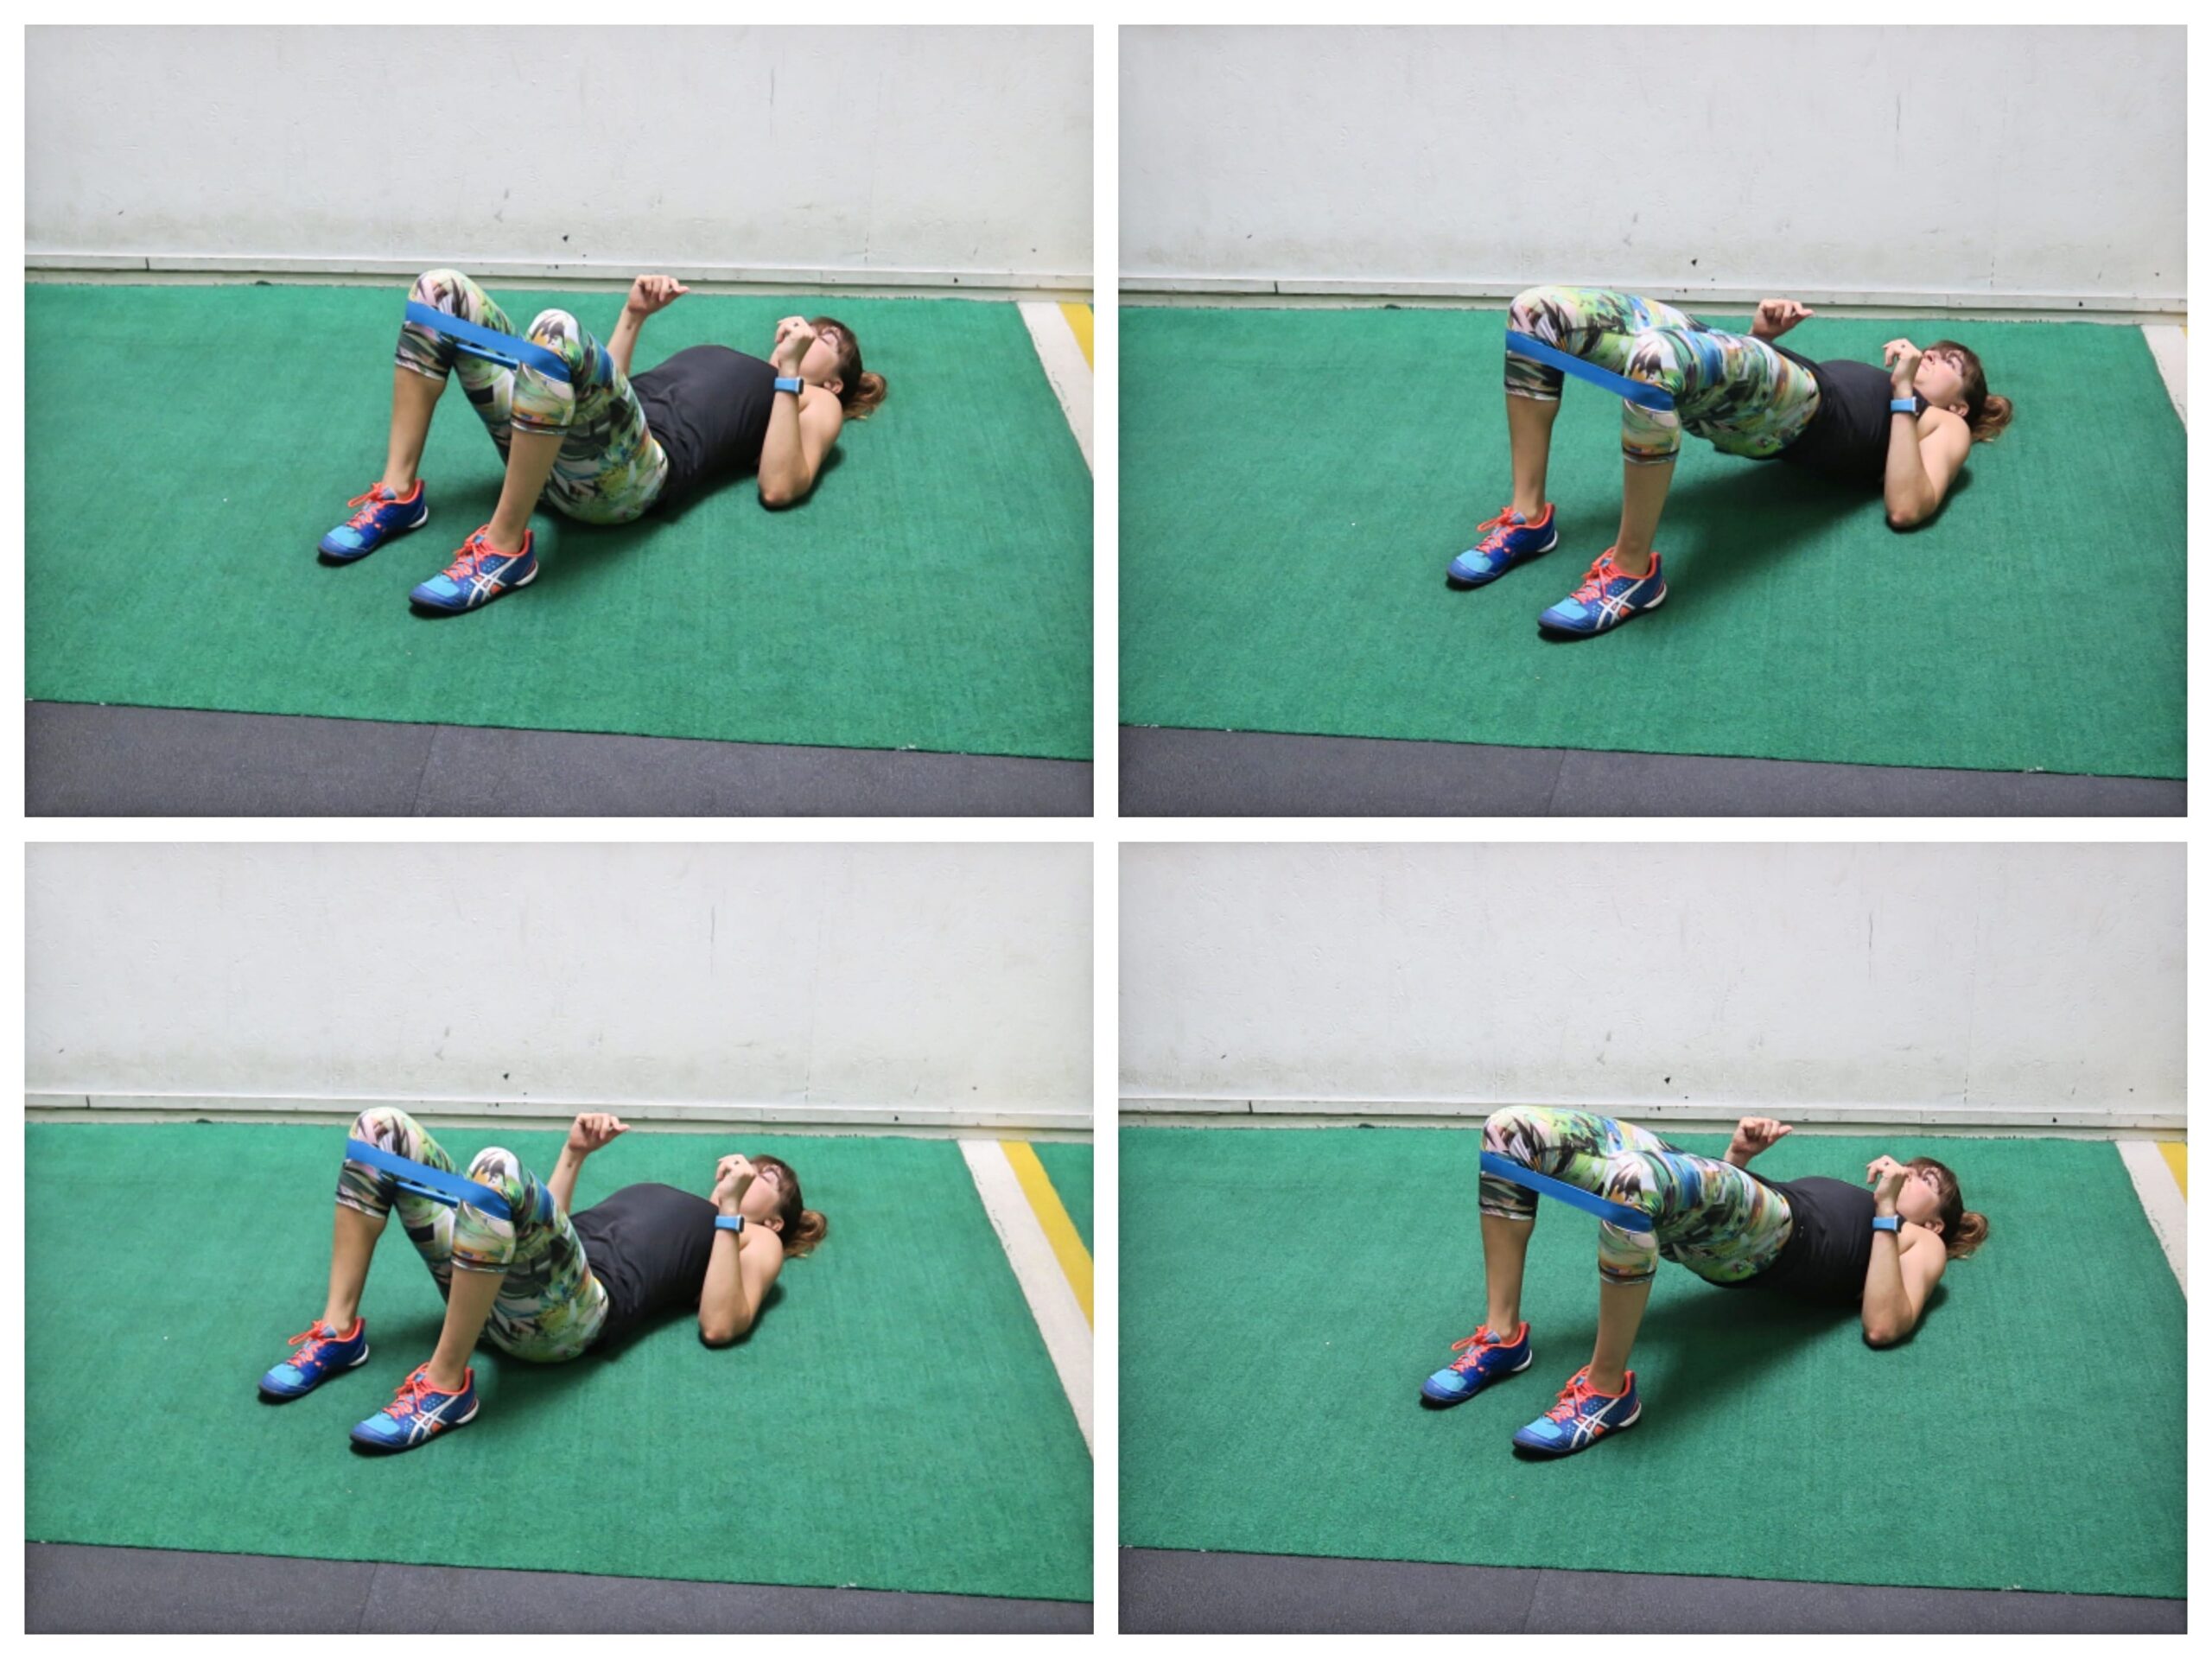
To do the Basic Mini Band Glute Bridge, you will perform a two-leg bridge with the band around your knees. To set up, place the band right above, below or at your knees. Below will be a bit more challenging than above. Make sure though that wherever you place the band, you feel your glutes working. Above the knee can help if you struggle to feel your glutes activating and instead feel your quads taking over.
With the band around your knees, lie flat on your back with your feet flat on the ground about hip-width to shoulder-width apart. Make sure your feet are just beyond your fingertips when your arms are down by your sides. You can move your feet slightly further away if your hips are tight. Make sure that your feet are at least about hip-width apart so that you are forced to press your knees out and open against the band to keep them in line with your ankles and hips.
Bend your elbows to 90 degrees and press your knees out against the band. Then, driving through your heels and upper back and arms, bridge up. Keep pressing out against the band as you bridge up. Do not let your knees cave in. Fully extend your hips and squeeze your glutes at the top. Do not hyperextend your low back at the top. Keep your abs engaged, even maintaining a posterior pelvic tilt.
Hold for a second or two at the top then lower back down and repeat. Do not let your knees cave in as you lower back down. Keep pressing out against the band the entire time!
Looking for even more moves and workouts to prevent injury and activate and strengthen your glutes?
Love learning the WHY behind what a proper training routine looks like?
Then you’ll love my Glute Camp!

