To keep your body healthy and strong, you need to correct the imbalances caused by sitting all day at a desk and performing repetitive movements.
To correct these imbalances and truly help prevent and alleviate injuries, you can’t just simply go and workout. You can’t just simply lift weight and expect to get stronger.
Because even if you have seemingly perfect form, you may not be activating and using the correct muscles to lift the weight – and this could lead to injury instead of you getting stronger and fitter.
In order to make sure you are using the correct muscles when you lift, you must implement all four training elements – foam rolling, stretching, activation and strength training – in your workout routine.
You can’t simply skip to strength training and expect your body to work correctly and remain injury-free.
Before you start your workout and your strength training routine, you must first start to work on restoring your flexibility and joint mobility by foam rolling tight areas. When you foam roll, you help release knots so that muscles can become loose and ready to work.
By starting your workout program with foam rolling, you can start restoring muscles to their proper length-tension relationships. When muscles are at their proper length tension relationship, they can contract properly allowing us to lift more weight and engage the correct muscles to do the work.
Also, by loosening up knots, you can help improve your joint mobility. When a muscle is tight and shortened, it can change how your joint operates. It can limit your range of motion around a joint, leading to improper movement patterns and compensations
But foam rolling alone won’t restore your flexibility and joint mobility.
Once you’ve foam rolled to start getting the tight, overactive muscles loose, you then need to stretch to help elongate shortened muscles.
Below are 35 Stretches that stretch everything from your feet to your neck and wrists. These moves will help you improve your flexibility and mobility so that you can move better and feel better.
And then once you’ve stretched out using a few of these moves, make sure to get those underactive muscles working with some activation exercises before you move onto your strength training!

35 Stretches to Stretch Out From Head to Toe
These 35 Stretches target common areas of tightness, areas that are especially tight for anyone with a desk job. And many of these you can even do at your desk to try to stay loose during the day.
After looking at the stretches below, you may want to try out all of these stretches to figure out which ones meet your specific needs; however, you will not want to do all of these every day.
Depending on your workout and your specific imbalances and pains and injuries, you may only need to include a few of these in your warm up. For a few sample warm up routines, check out below the stretches.
Make sure to focus on the stretches that target your tight areas. You do not need to include stretches that you don’t feel loosening up your problem areas.
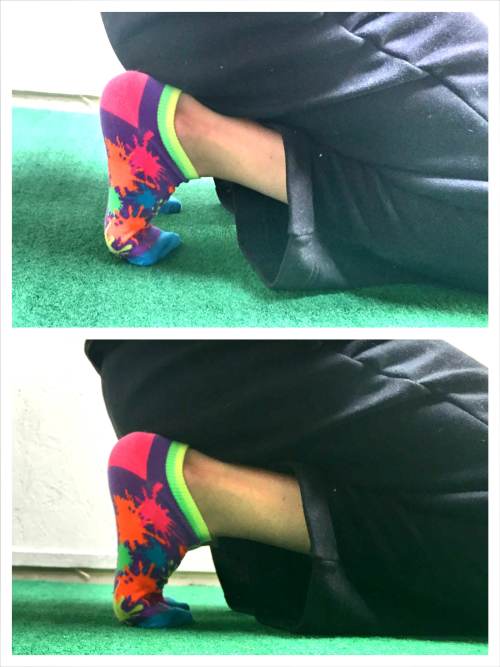
1. Kneeling Foot Stretch:
If you wear high heels or dress shoes, if you run a lot or have suffered from Plantar Fasciitis and even Achilles pain and injury, you need to make sure to take care of your feet. Tightness of the muscles under your feet can lead to pain and injury further up your body. And a great stretch to loosen up the fascia under your feet is the Kneeling Foot Stretch.
To do the Kneeling Foot Stretch, kneel on the ground and flex your feet, tucking your toes under. Then sit back on your heels and feel a stretch down your feet and toes. Rock a little side to side as you hold in the stretch.
You can then release and move into the Bear Squat Stretch listed below or you can simply relax out of the stretch and repeat, sitting back on your heels and gently rocking side to side.
If your quad flexibility is really restricting you from sitting back on your heels and feeling this stretch, you can instead stand up and place the ball of your foot on the wall and lean forward against the wall to stretch your foot and even your calf.
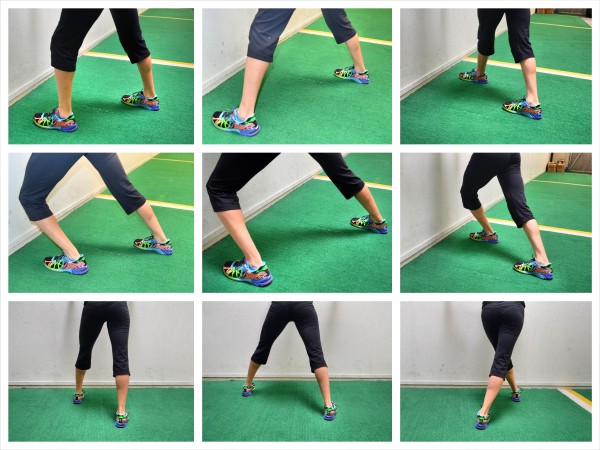
2. 3-Way Ankle Mobility:
Your feet and ankles are your foundation. Problems there can cause improper movement patterns and compensations all the way up your body. Therfore, you need to take care of your ankles and make sure you have good ankle mobility. Limited ankle mobility can lead to knee, hip and even low back pain. It can hinder you from squatting lower and even engaging your glutes properly.
To do the 3-Way Ankle Mobility Stretch, stand facing a wall with your hands on the wall for balance or support. You can also use a chair or pole.
Stand in a staggered stance with one foot slightly in front closer to the wall and your feet no wider than hip-width apart. Make sure your front knee is at least a few inches from the wall so that when you drive it forward you can complete as big a range of motion as possible. This front foot is the ankle that is being worked on.
Standing in this staggered stance, drive the front knee straight forward over the toe and into the wall while keeping your heel on the ground. Do not worry if the heel of your back foot comes up. Focus on that front foot and driving the knee into the wall while keeping the heel down.
Do that 10 times and then take a step out a bit wider to the side and repeat so that your feet are about shoulder-width or wider. The foot should be pointing straight toward the wall and you want to drive the knee forward over the toe while keeping the heel down. Complete 10 reps, driving the knee forward into the wall then relaxing out of the stretch.
Then step your foot across in front of your back leg and repeat 10 more knee drives. Make sure that your toe is always pointing directly toward the wall and that you are keeping the heel down as you drive your knee forward.
By making sure that with each variation your toe is pointing straight into the wall in front of you. This will help you hit different aspects of your lower leg to loosen it up.
All three positions will hit the lower leg and ankle from different directions to improve your ankle mobility and dorsiflexion (aka how much you can pull your toes up toward your shins).
If you suffer from knee pain and injury, you may find this move irritates your knee. Instead of driving your knee forward into a wall, try placing the ball of your foot up on a book or plate weight with your heel on the ground. The object should be about an inch or two thick.
Then drive your knee “forward,” bringing your shin and toes closer together. Keep your heel on the ground. This range of motion should be easier on your knees.
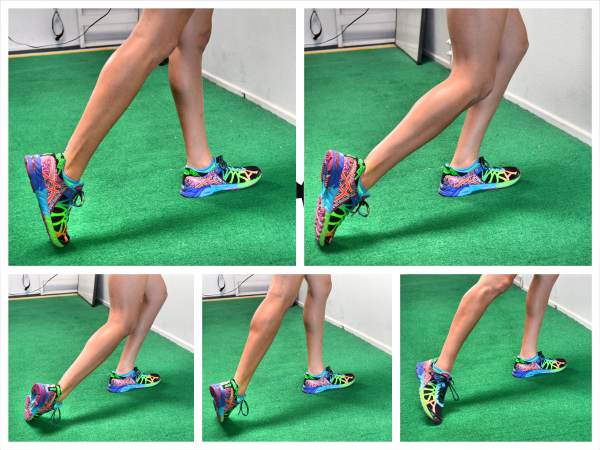
3. 3-Way Shin Stretch:
If you run a lot or have suffered from Shin Splints or Ankle injuries in the past, you need to make sure to stretch out your Shins. This stretch can help keep your foundation strong (aka your feet and ankles) as well as prevent knee and hip pain.
To do the 3-Way Shin Stretch, stand facing a wall or something else you can use for a bit of support and balance if needed. Place your hands on the wall in front of you with one foot back.
Point the toe of the foot that is back and place the top of your toes down on the ground so that the top of your foot is facing, or even on, the ground.
Then, using the wall to help you balance, bend your knee back, pressing the top of your foot down toward the ground, and feel a stretch up your shin. Straighten your leg back up and repeat. These may be very small knee bends. Just bend enough to feel a stretch.
Complete 10 reps. Then change the angle of your toes to hit a different aspect of your lower leg.
You can point your toes straight back, in toward your other foot or outward. To point them outward, you will rock more onto your big toe.
With your toes pointing each of the three ways, bend your knee to feel a stretch down your shin and then relax back out. Complete 10 knee bends in each position then switch sides.
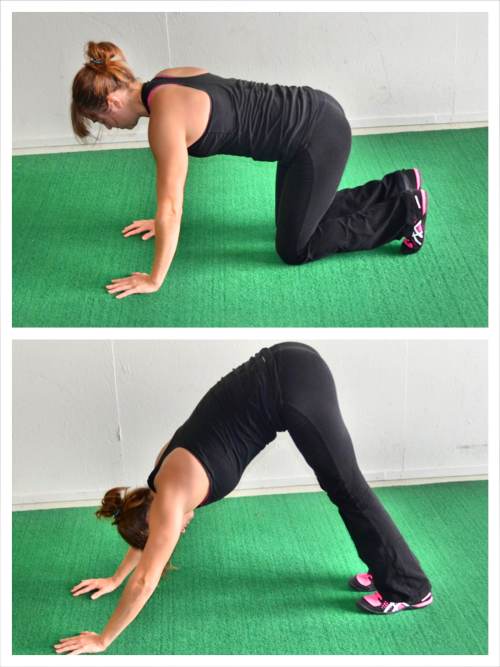
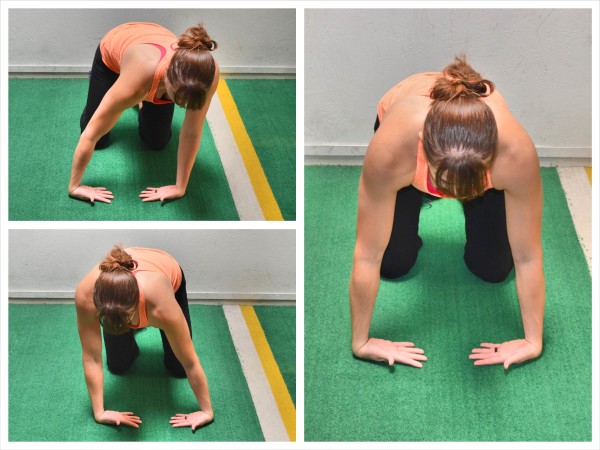
4. Bear Squat:
The Bear Squat is another great stretch for your lower leg, especially your calf. This stretch may even hit your hamstring and the stabilizing muscles around your knees.
To do the Bear Squat, start on your hands and knees on the ground with your hands under your shoulders and your knees under your hips.
Then press your butt up into the air, driving your heels down to the ground. Relax your calves and try to get your heels down to the ground. Feel a nice stretch down your calves and even up into your hamstrings. Hold for 1-2 seconds and then drop back down to your knees.
Make sure that as you drive your butt up, you are pressing yourself back so that your driving your heels down. Don’t simply pike up and lower back down. Actually drive back and feel the stretch down your calves.
You can walk your hands in just a little bit closer to your knees to help you feel the stretch a little bit more, but do not walk them in too close.
With the Bear Squat stretch, you can also add in the Kneeling Foot Stretch. To add in the Foot Stretch, start kneeling on the ground with your feet flexed. Sit back on your heels. Then place your hands down on the ground and go into the Bear Squat. Come back down and go back to kneeling to stretch your feet.
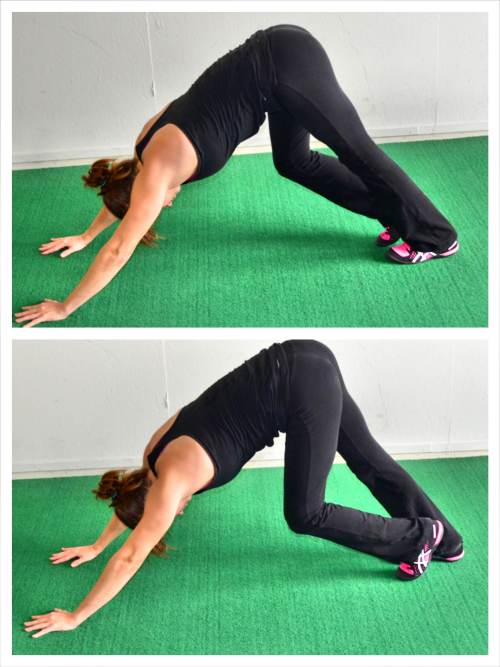
You can also add in a simple foot pedal at the top of the Bear Squat to isolate and stretch each calf more.
To do the Bear Squat with Calf Pedal, do the Bear Squat and then, at the top, start to pedal your feet. Focus on driving one heel down toward the ground while you relax the other.
Then switch and drive the other heel down. Then drive both heels down before returning to your hands and knees on the ground. You can perform a few heel pedals while in the Bear Squat before relaxing and repeating. Make sure that as you pedal your feet, you are driving your butt up and back to really feel a nice stretch down your calves and even your hamstrings.
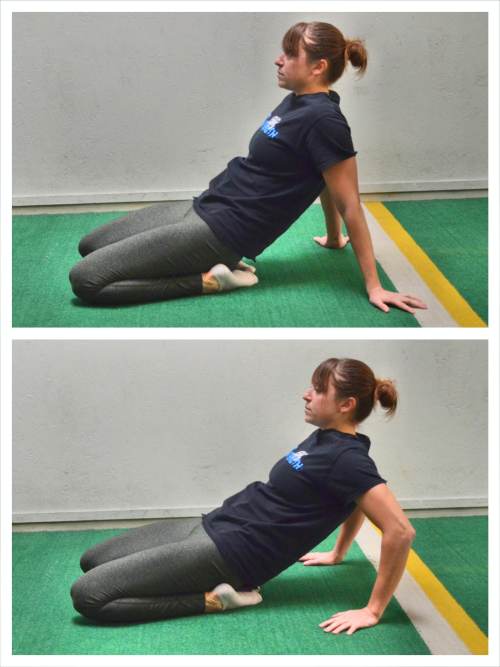
5. Kneeling Peroneal Stretch:
If you find you tend to walk on the inside of your feet and shoes, if you find your toes tend to turn out when you run, if you suffer from knee, hip and low back pain, you may need to stretch out your Peroneals (as well as strengthen your glute!). This Kneeling Peroneal Stretch is a great way to loosen up the outside of your shins. However, be careful with this kneeling position if you are currently suffering from knee pain.
You may also feel this stretch in your quads, especially if they tend to be tight.
To do the Peroneal (and Quad) Stretch, start kneeling on the ground with your toes turned in toward each other. Then lean back and relax your butt down onto your feet with your hands behind you on the ground to help support your weight and keep you balanced.
Only sit back as far as you can and relax into the stretch. The more you sit back, the more you’ll feel the stretch. You want to almost set the outside of your foot on the ground and turn your toes in as much as you can while kneeling and leaning back.
Depending on your flexibility, you may want to have a wall or chair behind you if you can’t reach back and touch the ground.
If you can easily touch the ground and lean back, you can even rock back and allow your knees to come up a bit. You can then work to relax them back onto the ground in that rocked back position.
After doing this stretch, you can even then come back to kneeling and flex your feet, tucking your toes under, to stretch out the bottom of your feet and toes and do the Kneeling Foot Stretch.
Make sure to breathe as you stretch to help yourself stretch further.
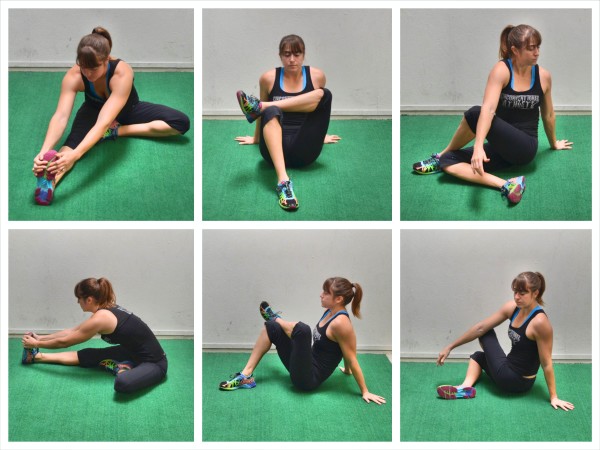
6. Kneeling Quad Stretch Variations:
If you sit at a desk all day, or simply sit a lot in general or even run often, you need to make sure to stretch out your hips and quads. Tight hips and quads can cause knee, hip and low back pain.
Plus tight hips often mean you aren’t able to engage your core or your glutes as much as you should be, which means you may not be getting as much out of your workouts as you would hope!
Below are some variations of the Half-Kneeling Quad Stretch. These variations will stretch not only your quads, but also your hips and even in some cases your back. Plus, the standing variation is a great way to stretch your hips and quads while at your desk.
And when you reach back overhead with these a few of these variations, you can also stretch out your Psoas, which is an important hip flexor muscle to open up to help prevent low back and hip pain.
Beginners will want to start with the Basic Half-Kneeling Hip Stretch or use a towel to do the other variations. The Basic Half-Kneeling Hip Stretch, targets your hips much more than your quads.
To do the Basic Half-Kneeling Hip Stretch, start half kneeling on the ground. Then press your hips forward as you reach your hands up overhead so that you feel a nice stretch down the hip and even into the quad of the back leg.
Squeeze the glute of your back leg so that you are actually fully extending your back hip and not simply arching your back. If you just hyperextend your low back, you will just be perpetuating the problem. Make sure you are truly extending your hip.
Breathe as you hold and reach your hands backward overhead or turn this into a dynamic stretch by releasing and then repeating the stretch.
You can also reach your arms to the side over your front leg if you want to hit your hip from a different angle and stretch your TFL and even the muscles of your back that help you bend to the side..
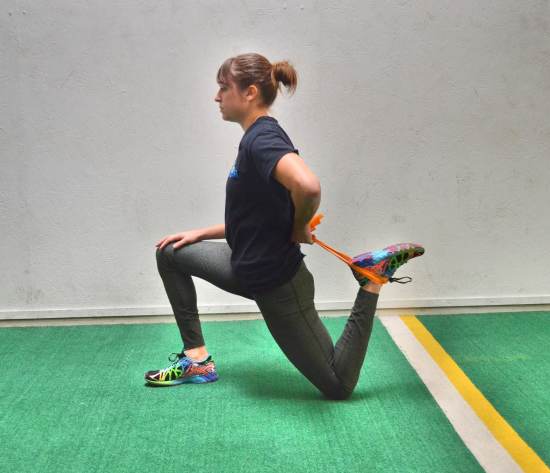
Beginners may need to stay with this variation or grab a towel or stretch strap to do these next variations. The second variation of the Half-Kneeling Hip Stretch will stretch your quad more as well; however, it requires more flexibility to be able to grab your back foot and pull it into your butt.
To do the Half-Kneeling Hip and Quad Stretch, set up half-kneeling with your right leg back. It is best to do this with a wall or bench in front of you to help you balance.
Then reach back and grab your right foot/ankle with your right hand and pull it in toward your butt. In the half-kneeling position with your heel pulled in and the wall to balance you, rock forward and backward, pressing the hip forward to increase the stretch down your quad. Then relax back out of it and repeat. Complete all reps then switch sides.
Make sure to squeeze your glute as you press your hips forward to stretch your right hip and quad. Do not simply hyperextend your low back as you rock forward.
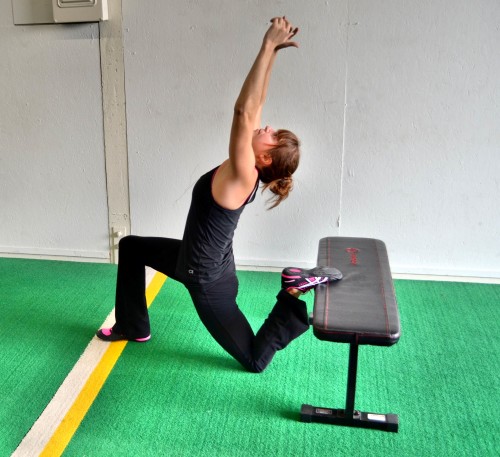
To advance the Half-Kneeling Hip and Quad Stretch, you can also place your back foot up on a bench behind you instead of pulling it in toward your glute – this is called the Half-Kneeling Bench Quad Stretch.
With this variation, you can reach back and overhead to stretch your Psoas more instead of using the wall to balance as you stretch your quad. While the Half-Kneeling Hip and Quad Stretch can be a dynamic stretch, the Half-Kneeling Bench Quad Stretch is best done as a static stretch.
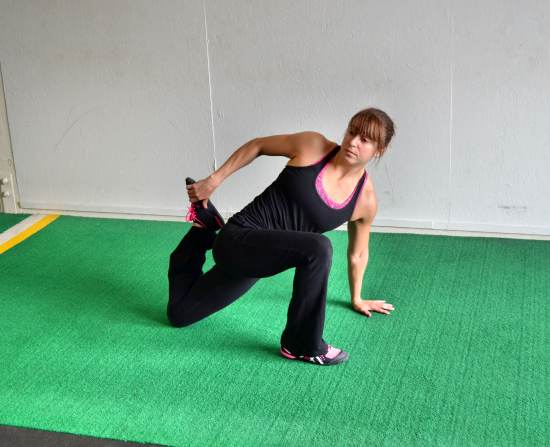
If you would like to stretch your spine as well as the outside of your hip and glute as you stretch your quad and hip, then you should try the Rotational Half-Kneeling Hip and Quad Stretch.
To do this variation, set up in a half kneeling position with your right leg forward. Then place your left hand on the ground and lean forward.
Reach back with your right hand and grab your left foot. Pull your foot in toward your butt as you drive your hip forward. Feel a stretch down your hip and quad.
As you press your hip forward, rotate your chest open toward your front leg. You may also feel a stretch through your spine and down the outside of that front leg. Hold here and breathe as you relax deeper into the stretch. You can also open your knee outward to stretch into your adductor or rotate your knee inward to hit your TFL.
Beginners may need a towel or stretch strap to help them do this stretch as it requires more flexibility to reach around and grab the leg with the rotation.
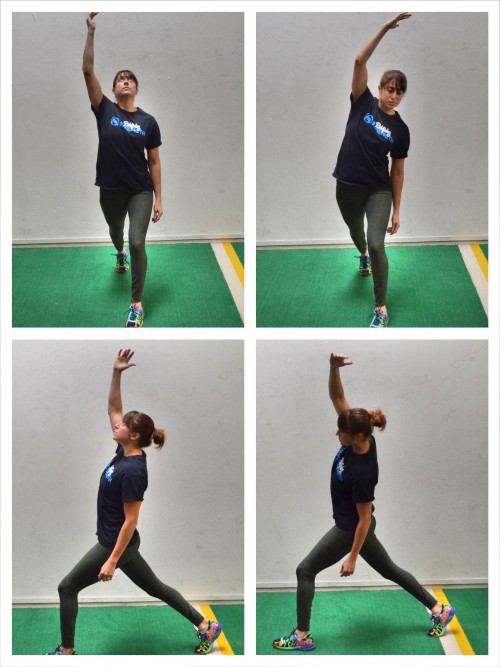
And if you are stuck at work and can’t kneel down, try this standing Hip and TFL stretch – the Step and Reach Hip Stretch.
To do the Step and Reach Hip Stretch, start standing with your feet together. Step one foot forward as if you are going to lunge, however, only slightly bend the front knee while keeping the back leg straight. You can come up onto the ball of your back foot as you step forward.
Then reach the same arm as the leg that is back overhead. Reach toward the ceiling behind you. Press your hip forward as you reach and feel a nice stretch down that back hip. Hold there.
You can also reach up and over the front leg to hit your hips from a slightly different angle and also stretch your TFL and even your back. Make sure to squeeze your glutes and drive your hips forward so that you feel this in your hips and you are not just hyperextending your low back.
To use a towel with any of these moves, simply wrap it around your foot and grab it with one hand to pull your heel in toward your butt. You can also use a jump rope or a towel, whatever you have on hand to help you pull your heel in toward your butt.
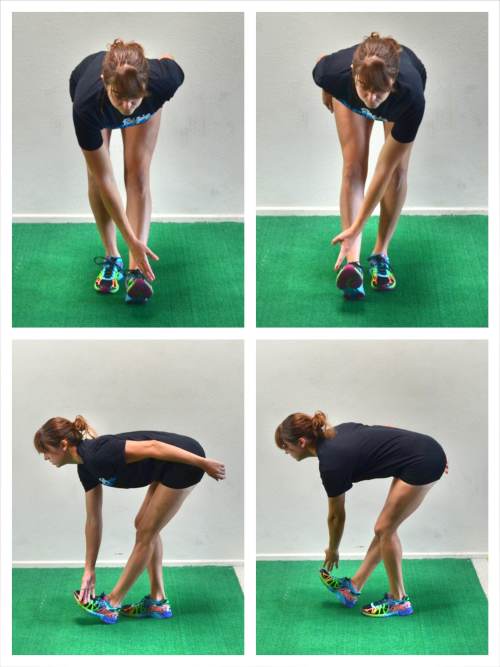
7. Standing Hamstring and Calf Stretch:
If you are looking for a stretch to do before you run to prevent foot, ankle, calf, Achilles, knee and even hamstring pulls and injury, then you need to try the Standing Hamstring and Calf Stretch. This is also a great stretch to do at your desk after you’ve been sitting for awhile to loosen up your back, hamstrings and calves.
To do the Standing Calf and Hamstring Stretch, stand tall with your feet together. Then step one foot a few inches forward and rock back on your heel with that leg straight.
Keeping that front leg straight, hinge over, leaning forward at the hips, as you sit your butt back and reach your opposite hand down and outside your front foot. Hold for a second then step the foot back and switch to the other side.
Make sure you keep that front leg straight and sit your butt back as you reach the hand toward the outside of the foot. Only reach as low as you can without bending that front knee. Feel a nice stretch down that calf and hamstring and even into your low back.
Keep alternating sides until all reps are complete. Do not rush this move.
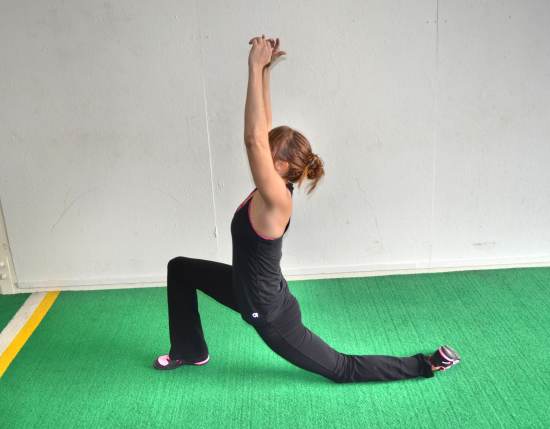
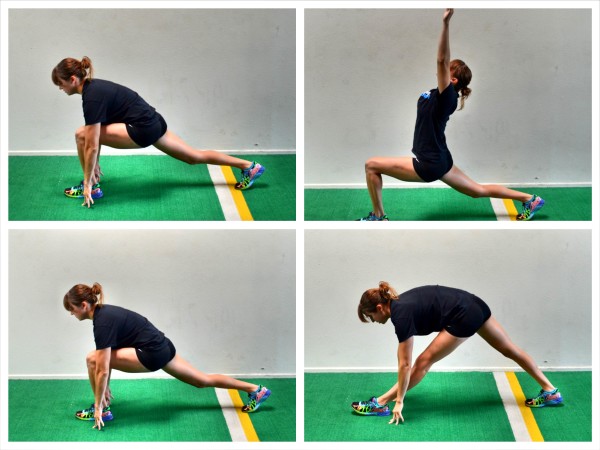
8. Crescent to Hamstring Stretch:
This is another great stretch to do before you run as it not only stretches out your hips and hamstrings, but also gets your legs warm and ready to work.
This is also a great stretch for anyone who sits all day as it will not only open up your hips, but will also build mobility and stability to help you prevent injury. This more, while not a single leg move, requires a good deal of balance.
To do the Crescent to Hamstring Stretch, step one foot back into a nice wide lunge stance with the back heel up. Bend your front knee and place your hands on the ground on either side of your foot in a nice low runner’s lunge. Keep your back leg straight in the low lunge. Your back heel doesn’t need to be down, but you should be driving back through your heel not coming up onto your toe.
Then, staying in a nice low lunge, reach your hands up and back overhead to move into Crescent Pose.
Hold for a second or two, reaching your arms back overhead as you squeeze your glute to press your hip forward. Then lower your arms back down and place your hands back down on the ground.
With your hands down on the ground, straighten your front leg and lean forward over your front leg to stretch your hamstring. As you straighten your front leg, you will want to drop your back heel down to the ground. If you can’t reach the ground while keeping your leg straight, you can also place your hands on your shin. Just focus on straightening that front leg.
Beginners may even need to drop their back knee down to the ground to help them balance as they straighten their front leg and stretch their hamstring.
After stretching your hamstring, raise your back heel back up and bend the front knee to move back into the low runner’s lunge before reaching your hands back up into Crescent.
Complete all reps on one side before switching.
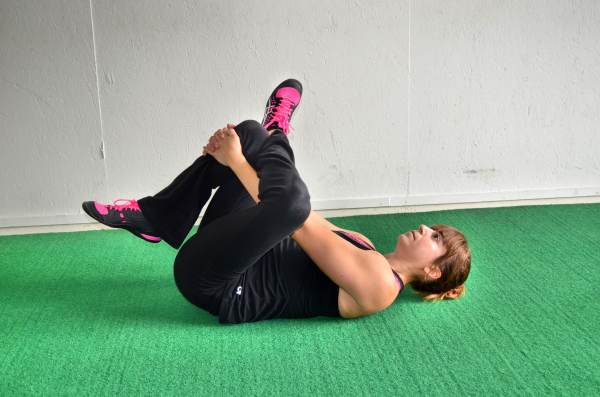
9. Lying Glute Stretch:
This is a great stretch to do after your workout or even at the end of a long day to loosen up your glutes, especially outside your hips, and your low back.
To do the Lying Glute Stretch, lie on your back and bend one knee in and place your foot flat on the ground. Then cross the ankle of your other leg over your bent knee. Flex the foot of the ankle crossed over the knee.
Lift the bent knee with the foot on the ground up toward your chest and reach one hand through your legs and the other around the outside of the leg you just lifted to grab behind your hamstring or in front of your lower leg. If you are less flexible, grab behind the hamstring. If you are more flexible, grab in front of your shin.
Pick one that allows you to relax your upper back and head onto the ground as you pull that knee in toward your chest.
As you lie back on the ground with the leg pulled in as close as you can, let the knee with the ankle crossed over relax open. Relax and hold as you breathe into the stretch. Then switch to the other side.
You can also straighten the leg you are holding to hit your hamstring as well. You may want to use a towel for this variation so you can wrap it around your calf and pull from their instead of behind your hamstring.
If you feel this stretch in the knee of the leg you crossed over, make sure your foot is flexed while crossed over. Flexing the foot will help protect the knee.
10. Pigeon Pose:
The Pigeon Pose is a variation of the Lying Glute Stretch and a great way to stretch all around your hips, including your glutes, low back and even your TFL. This is a great move for anyone that has suffered from Piriformis Syndrome or even Sciatica.
To do the Pigeon Pose, sit on the ground and bring your right foot forward. Angle your right knee toward about “2” on a clock to start. The closer to 90 degrees you bring your front knee, the harder the stretch will be so start with the “2” o’ clock position until you are ready to progress.
If you feel this a lot in the outside of your front knee, make sure you are flexing that right foot.
Then extend your left leg out behind you as much as you can. Turn that back leg slightly inward so you aren’t sitting right on top of your knee cap. By turning your leg in, you will also help square your hips to the ground and you will increase the stretch in both hips.
Holding this position, relax over your front leg. Make sure your hips are facing the ground. Do not move the front leg closer to 90 degrees if your hips aren’t both square to the ground or you will put more pressure on your back.
You can either hold here or make “circles” on the ground with your arms.
If you choose to add in the circles, walk your hands toward the outside of your front hip and then back toward your feet. Feel a nice stretch in your hips as you circle. Try to make as big a circle as you can while leaning forward over that leg and reaching out as far as you can.
Then switch to a Pigeon Pose on the other side and either hold or walk circles with your arms.
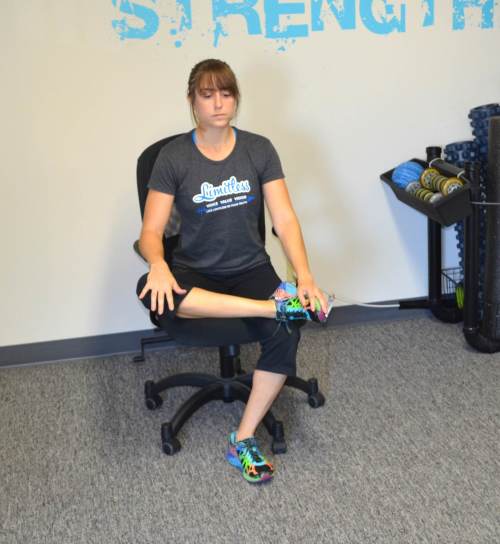
A great variation of the Pigeon Pose is the Seated Pigeon Pose. As long as you aren’t wearing a skirt, this is a great stretch you can do right at your desk!
To do the Seated Pigeon Pose stretch, sit up nice and tall in your chair and bend one knee to place the ankle on top of your other leg just above the knee.
Sitting tall, press down on your knee to open up your hip. You may even lean away just slightly as you press down.
Flex the foot of the leg crossed over if you feel too much pressure on the outside of your knee.
Breathe and relax as you press down on the leg to feel a nice stretch in the outside of your hip and glute. Pay attention to how the stretch feels on each side. Make sure to stay seated up nice and tall.
Make note of any imbalance. If you notice one side is tighter, make note. Imbalances can lead to injury more so than even if both sides are just super tight.
You will then want to focus on releasing the tighter side and figuring out what may be causing the imbalance so it doesn’t lead to knee, hip or even low back pain.
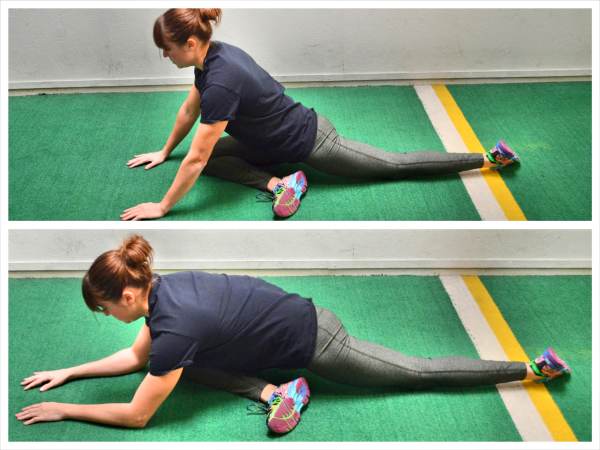
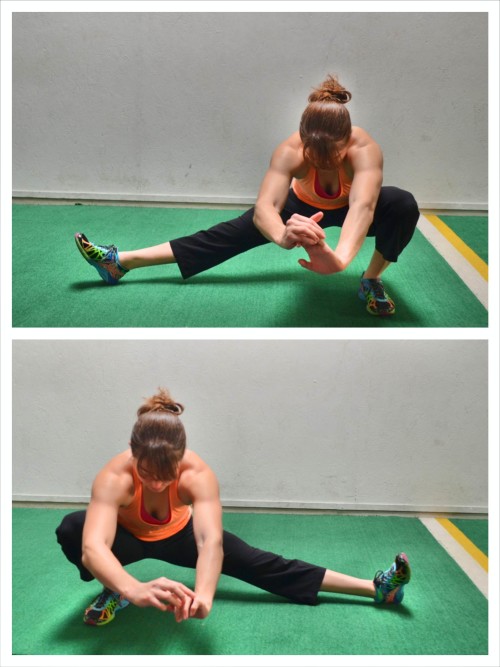
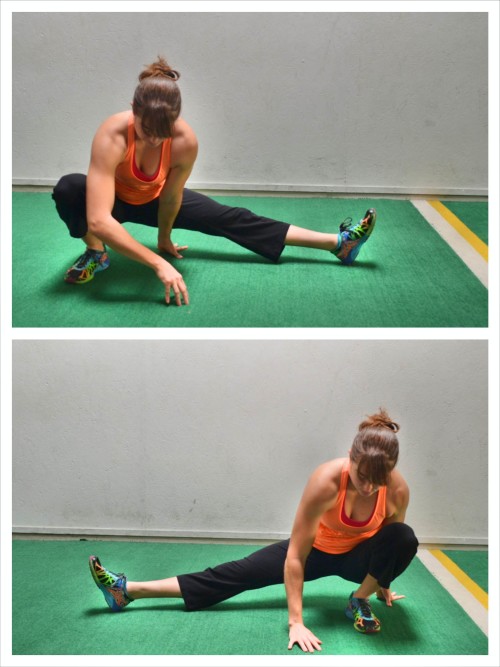
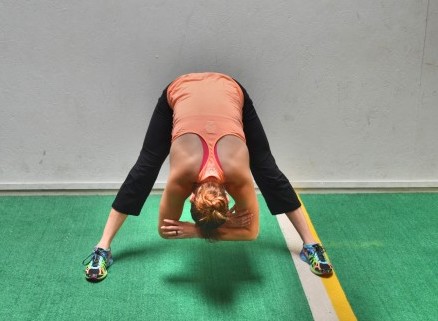
11. Cossack Squat:
The Cossack Squat is a great mobility exercise for the hips, adductors and hamstrings that can also help you develop both leg and core strength. This move will really stretch your entire leg while helping you increase the mobility of your hips.
Plus because most people have tight and even weak adductors, this is an especially important stretch for everyone to do to prevent knee, hip and back pain.
To do the Cossack Squat, stand with your feet nice and wide apart as if you are going to do a Side Lunge (feet will be wider than shoulder-width). Shift your weight to one side, bending that knee and sinking down into a side lunge as you rotate the toe of your straight leg up toward the ceiling.
Sink as low to the side as you can, dropping your butt down to the ground while keeping your heel on the ground. You will feel like you are sinking into a deep squat on one side as your other legs stays out straight with the toe up.
Then push back up out of the squat and shift to a squat on the other side, sitting down as low as you can while keeping your heels down.
Beginners may not be able to sink as low in the squat. Do not try to sink lower by squatting down and letting your heel come up. Sink only as low as you can while keeping your heels down.
Also, beginners may not have the core and adductor strength to move from one lunge to the other smoothly without using their hands to balance. If you need assistance, you can place your hands on the ground or on a wall or bench in front of you while shifting from squat to squat.
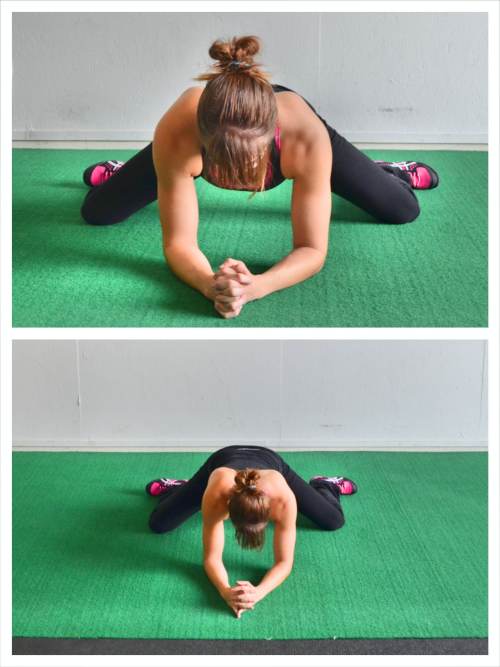
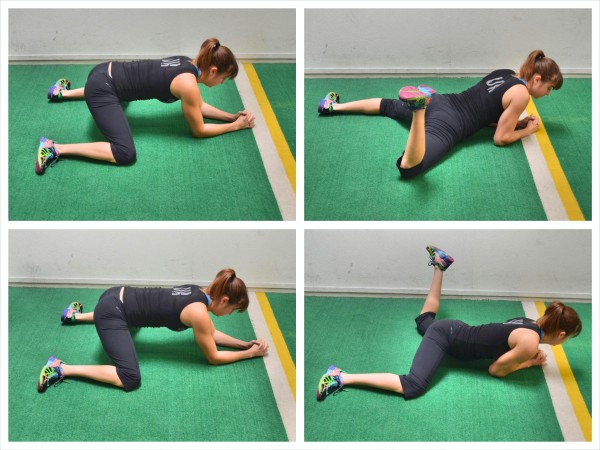
12. Frog Stretch (with Rotation):
Before you do the Cossack Squat, you may want to open up your adductors with the Frog Stretch. By stretching your adductors, you can help restore proper functioning to your SI joint to help prevent low back and hip pain. Tight adductors can also lead to knee pain so stretching them will help keep your legs and knees happy!
To do the Frog Stretch, kneel on the ground and spread your knees as wide as possible while also supporting yourself on your forearms.
Turn your toes out as you open your knees as wide as possible and lay the inside of your feet against the ground. Do not let your heels come together behind your butt. You want your feet wide apart so that your ankles are in line with your knees if possible.
Bringing your heels together reduces the stretch.
Then sit your butt back toward your heels as much as possible while keeping your knees wide. You may not be able to sit back much, but just push back as far as you can. Feel a nice stretch in your inner thighs and even around the back of your legs.
Breathe as you sit back and feel the stretch. Hold for a second or two and then release out of the stretch, coming back forward for a second before pressing your butt back as far as you can toward your heels again.
As you rock back and forth, you can also work to open your knees up further.
If you want to hit the front of your hip a bit too, you can add in a rotational move as you come forward out of the Frog Stretch.
As you come back forward, lower your hips forward onto the ground and rotate one of your lower legs up and forward, bringing your foot forward toward the same shoulder (you are going to rotate your hip inward). Then sit back again and repeat the Frog Stretch before relaxing back forward and rotating the other hip inward. Keep alternating sides until all reps are complete.
You can also make the Frog Stretch a static stretch by simply sitting your butt back toward your heels and holding instead of rocking slowly in and out of the stretch. A static stretch is a great option for after your workout. Just sit and breathe and relax deeper into the stretch, adjusting your knees out further as you relax.
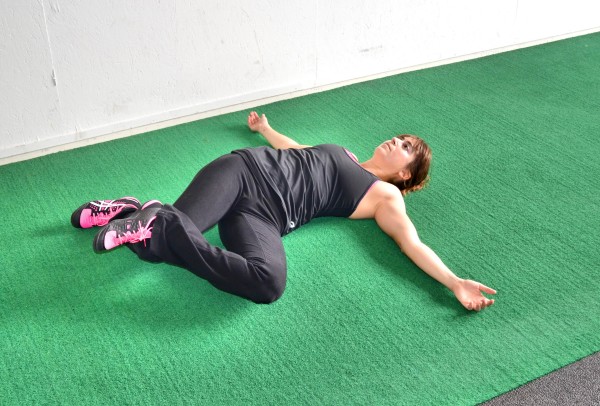
13. Quadratus Lumborum Stretch:
Tightness of the Quadratus Lumborum muscle can lead to low back and hip pain. That is why it is important to stretch out this muscle as well as your hips.
The Lying Quadratus Lumborum Stretch is a great static stretch to do at the end of a long work day after you’ve been sitting hunched over a computer for awhile.
To do the Lying Quadratus Lumborum Stretch, lie on your back with your arms out to your sides. Bend one knee and place the foot flat on the ground. Then cross the ankle of the other foot over your quad right above your knee.
Let your knees then fall toward the side of the ankle you just crossed over. Use that crossed over leg to pull the other knee down to the side.
Keep your upper back and arms flat against the ground as you let your legs fall to the side. Feel a nice stretch in your low back and even your hips.
Breathe and relax your knees toward the ground. Hold for 15-20 seconds and then switch sides, crossing the other leg over and letting your knees relax to the ground on the other side.
14. Standing IT Band Stretch:
Tightness in the outside of your hip and down your IT Band can cause hip as well as knee pain. And Runners are especially at risk for IT Band issues; therefore, they need to make sure to stretch your IT Band and abductors.
To do the Standing IT Band Stretch, start standing with your feet together. Then cross your left leg over your right leg. Bring the left foot over and back across until the big toe is even with the big toe of the right foot. You want your feet even so that your front leg (the left leg) is pressing the back leg (right leg) straight during the stretch.
If you struggle to balance or it is too much pressure on your knees to have your legs so tightly crossed, place the front foot a bit out in front, but make sure that you don’t bend that back knee as you hinge over to stretch.
Then reach your arms up overhead for a nice big stretch. After reaching up, hang over, reaching your arms down toward the instep of the back foot (right foot). Push your hips out to the right as you reach toward your right foot so you feel a stretch down the outside of that right hip and side. You may even feel it down your right hamstring and calf.
Hold for a breath or two. Then reach back up overhead and cross your legs the other way so your left foot is back. Again reach up overhead then reach down toward your left instep, pushing your hips out to the left. Keep alternating sides with a reach up overhead in between every time.
Try to touch the ground as you reach down while making sure to keep your legs straight.
If you really struggle to balance, you may need to stand with your feet together and not crossed over as you reach toward the outside of each foot while pushing your hips away.
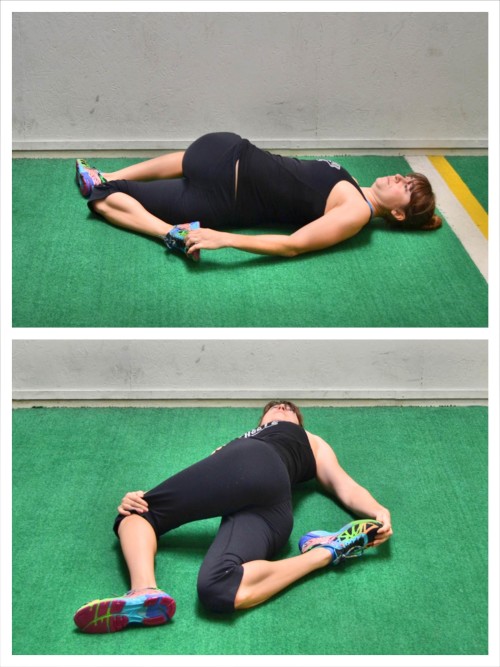
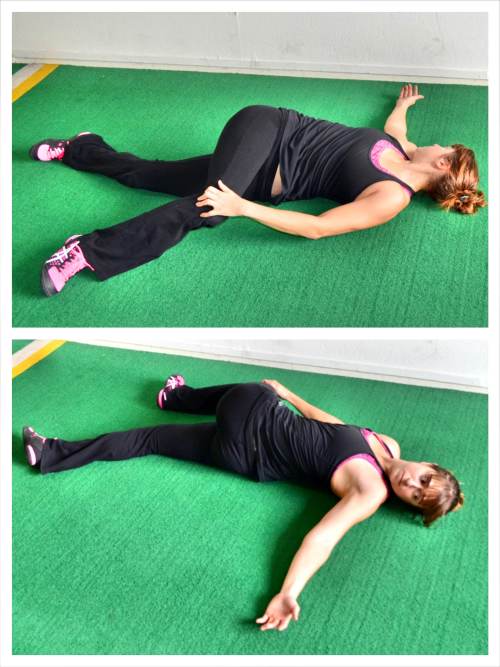
15. Star Stretch with Quad Stretch:
This is a great full-body stretch for anyone that sits at a desk all day. It will stretch your chest, spine, low back, hips, quads and even glutes. The Star Stretch with Quad Stretch is a great move for after your workout or even after a long day of sitting.
If you cycle a lot, this is a must-do stretch.
To do the Star Stretch with Quad Stretch, lie on your back with your arms out straight to each side at about shoulder height. Then bend your left knee to about 90 degrees and pull it across your body.
Place your right hand on top of your knee to press it toward the ground. You can also place a yoga block or foam roller on the ground below you knee if you can’t get your knee anywhere close to the ground.
Then bend your right knee, bringing your right heel back up behind you toward your butt. Grab that heel with your left hand to stretch your quad.
As you stretch your quad and push your left knee down toward the ground, try to open up your chest as much as possible, letting both shoulders relax back on the ground.
Hold and breathe, relaxing deeper into the stretch. Then switch sides and bring the other knee across as you stretch your other quad.
Feel your low back and even your chest loosen up as you hold.
If you can’t reach your foot to stretch your quad, you can either use a towel to help you pull your heel toward your glute or do the basic Star Stretch without the Quad Stretch.
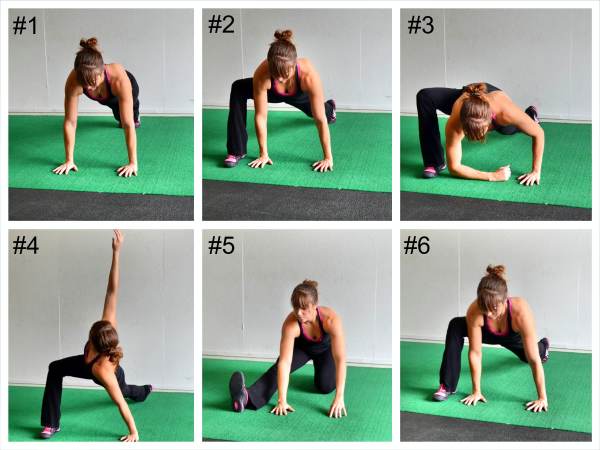
16. World’s Greatest Stretch:
If you only have time for one stretch every day or need a quick full-body warm up, then you’ve got to do the World’s Greatest Stretch.
This move stretches our your hips, glutes, hamstrings, spine and even your chest while warming up your core and legs.
Check out this post on the World’s Greatest Stretch for a breakdown of the move.
Another great thing about this stretch is that you can take out and add in pieces to the flow to target your specific problem areas. It is very easy to add in a squat or even a Cossack Squat to the flow of this stretch.
You can even make it target your thoracic spine more by rotating toward the front knee as well as away from the front knee.
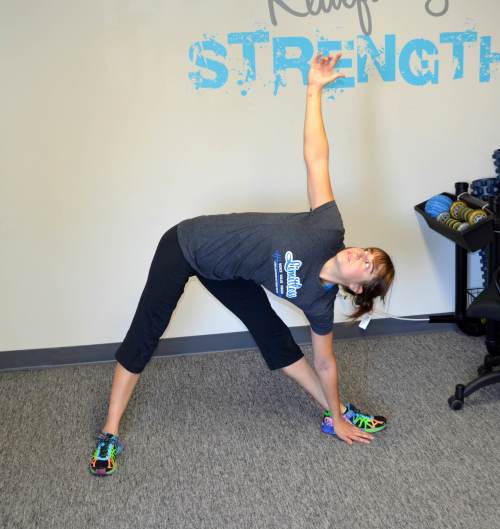
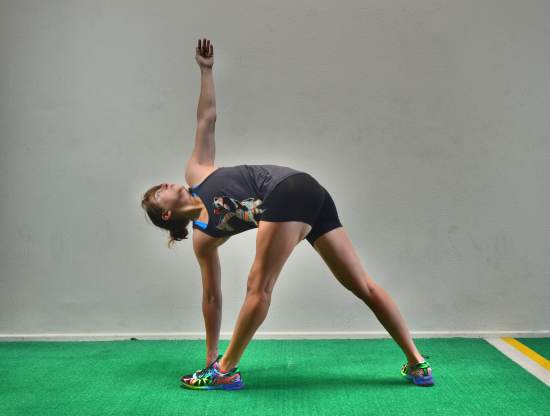
17. Extended Triangle Poses:
The Extended Triangle Pose and Twisting Extended Triangle Pose are two great moves to stretch your legs, hips and spine while helping you develop full-body stability. These moves will improve your flexibility as well as your joint mobility and help you prevent injury because they will also strengthen the muscles of your core.
If you suffer from knee, hip or low back pain or sit at a desk all day, these are two more must-do moves!
To do the Extended Triangle Pose, step up as if you were going to do the Warrior II pose, stepping one foot forward into a nice wide stance (with your feet about 4 feet apart) with your front foot pointing straight ahead and your back foot turned out.
Your feet should be almost perpendicular. Also, make sure that your front foot is about at the instep of your back foot if you look back from your front heel to your back foot.
Pushing your butt back and hinging at the hips, reach the same hand as the leg that is forward down to the ground. Make sure to keep your legs straight as you hinge. If your legs start to bend, do not reach lower or make sure you are pushing your butt back. You may also find you need to bring your back foot in so your stance isn’t quite as wide.
Place your hand on the ground inside your foot. You can also place your hand on a block, your foot, your shin or your ankle if you can’t reach the ground while keeping your legs straight.
Extend your opposite arm up toward the ceiling, opening your chest up toward the ceiling. If you can’t really open your chest up toward the ceiling, you may want to place your hand up higher. You can then keep looking at the ground to help you balance or look up toward the ceiling to make the move harder.
Hold that pose and relax and breathe. As you breathe, try to stretch further, making sure to keep both legs straight as you push your butt back and reach toward the ceiling.
Switch and repeat on the other side after holding for at least 15-30 seconds.
You can also do a Twisting Variation of the Extended Triangle Pose called the Twisting Extended Triangle Pose.
By twisting, you really get the outside of your hip and even your IT Band. For this variation, you will simple reach the opposite hand from the front leg down to the ground, instead of the same hand, and rotate your chest open toward your front leg. You may also find you need to bring your feet in a bit closer together for this variation. Make sure to keep both legs straight as you push your butt back and open your chest up toward the ceiling.
Breathe and hold for at least 15-30 seconds per side.
18. Seated Hamstring, Glute and Spinal Twist Complex:
This is a great static stretch series to hit the backside of your hip complex and stretch out your hamstrings, glutes and low back to help prevent low back and hip pain. After a hard deadlift or glute workout, this is a great stretch to include.
To do the Seated Hamstring, Glute and Spinal Twist Complex, sit on the ground with one leg out straight in front of you. Pull the foot of the other leg in to your inner thigh so that your knee is pointing out to about 3 or 9, depending on which leg is out straight. Relax that bent leg and let the outside of the leg relax to the ground as you fold over at the hips and reach toward the foot of the straight leg.
Keep that leg straight to stretch your calf and hamstring as you reach and grab your foot. If you can’t reach your foot while keeping your leg straight, grab a towel or jump rope and wrap it around your foot so that you can use that to pull yourself over and stretch your hamstring.
Hold here and breathe for 15-20 seconds and try to relax further into the stretch.
Then release and cross the ankle of the bent leg over your straight leg right above your knee. Place your hands on the ground behind your butt and bend the straight leg to bring your quad and the leg crossed over in toward your chest.
Sit up nice and tall and press your leg and chest closer together to feel a stretch in the outside of your glute. Breathe and hold, trying to get your legs and chest closer together. You can walk your hands forward toward your glutes to help push you up taller. You can also move your foot on the ground in closer to your glutes to bring your leg in closer. Flex the foot of the leg crossed over to protect your knee.
Hold for 15-20 seconds.
Then allow the foot of the leg crossed over to lower down to the side while keeping your bottom leg bent. Place the foot flat on the ground as you lay your bottom leg down on its side. Then lift the hand on the side you lowered your foot down to and place that arm on the outside of your knee pointing up toward the ceiling. Press off that knee to rotate your chest toward the leg.
Sit nice and tall and feel a stretch down your spine. Breathe and hold for 15-20 seconds.
If you are less flexible, you may need to straighten the bottom leg out instead of keeping it bent like it was from the glute stretch.
After holding in the Spinal Twist, release and straighten the other leg out and start on the other side with the Seated Hamstring Stretch.
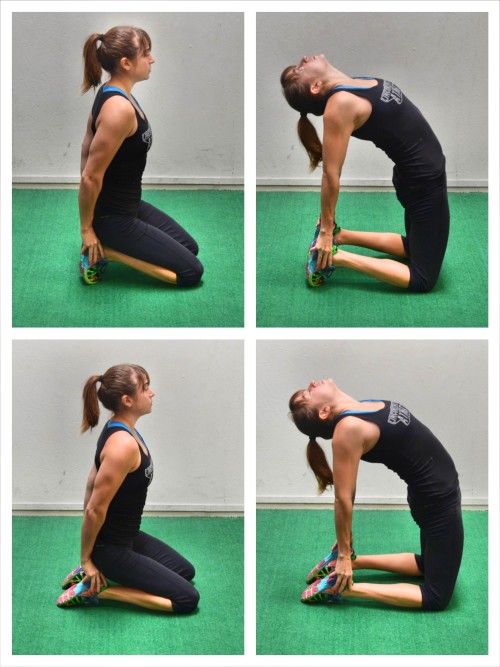
19. Camel:
If you sit all day at a desk or spend hours cycling, you are spending a ton of time with your back and hips in flexion. Sitting in flexion all day can lead to neck, shoulder, back, hip and even knee pain.
That is why the Camel Stretch needs to be included in your daily stretching routine. The Camel Stretch is the exact opposite of what you do for hours each day – it is extension. It is extension of your spine and your hips and it even stretches your chest, shoulders, hips and quads.
To do the Camel, start kneeling with your knees about hip-width apart and your feet flexed. Sit back on your heels and place your hands on your heels.
Then arch your hips up and away, lifting your glutes up off your heels and pressing your chest out. Keep your hands on your heels as you arch away and squeeze your glutes to fully extend your hips.
Relax your head back and arch as much as you can, getting a nice stretch down your chest, core, hips and quads. Do not let your shoulders shrug. Also make sure to squeeze your glutes so you don’t just feel this stretch straining your low back.
Hold for 1-2 seconds and relax back down. Repeat, arching back up. You can also make this a static stretch by simply holding the pose for 15-20 seconds.
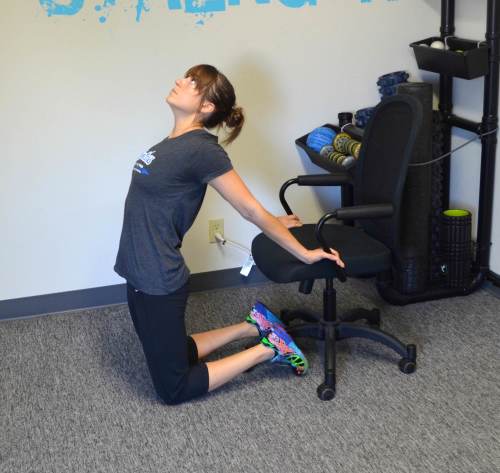
If you want to make the stretch more challenging, point your toes and place your hands on your heels instead of flexing your feet (the two bottom photos).
If you are less flexible, do this stretch with a couch, chair or table behind you. Kneel down and place your hands back behind you on the couch or table. If you are at your desk, you can use your desk or chair. Keeping your arms straight behind you, press your chest out and arch away as much as possible away from the piece behind you while leaning your head back.
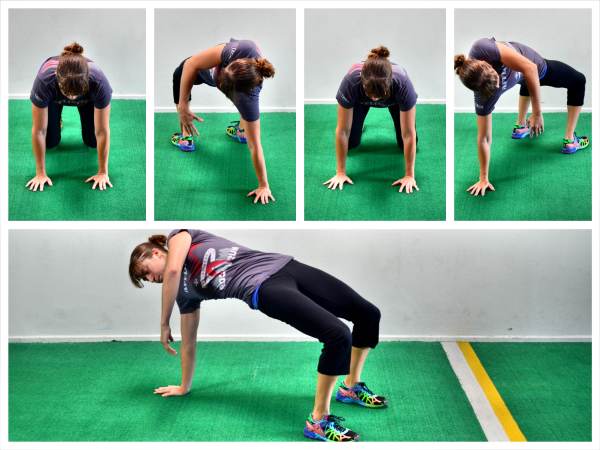
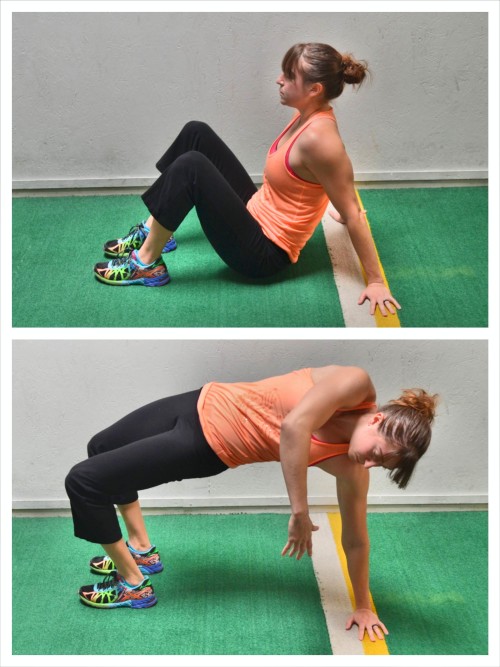
20. Sit Thru to Thoracic Bridge:
This is a great move to warm up your core while also stretching out your back and hips after sitting all day hunched over a computer. And because of the bridge in this move, you will also get your glutes activated and working to help you lift more during your workout while also protecting you against low back, hip and knee pain.
To do Sit Thru to Thoracic Bridge, set up on your hands and knees with your hands under your shoulders and your knees under your hips. Flex your feet and lift up onto your hands and toes.
Then lift your right hand and bring your left leg under your body and through so you rotate your hips open toward the ceiling as you place your left foot flat on the ground.
As you rotate your hips up toward the ceiling and squeeze your glutes to lift them up as high as you can, reach your right hand down toward the ground, rotating your chest toward the floor.
Feel your glutes working to keep BOTH hips up, while you reach your hand down. We have a tendency to drop the hip on the side we are rotating toward. Make sure both hips stay up as high as possible so you feel a nice rotation and stretch through your spine. You are twisting almost like someone wringing out a towel.
Make sure to squeeze your glutes at the top though to extend your hips. Don’t simply try to get up higher by hyperextending your low back.
Then drop your hips and step your foot back through while placing your hand back down on the ground.
Then perform a Sit Thru to the other side. Step through and rotate to the other side, bridging your hips up as high as you can as you reach toward the ground. You want to feel your glutes working as you feel your spine stretching.
Beginners may not be able to do the Sit Thru to Thoracic Bridge because they may not have the mobility to stay in close enough with the Sit Thru. To regress the movement, they may need to cut out the Sit Thru and just do the Thoracic Bridge or they may even simply need to start with the Table Top Bridge (explained below).
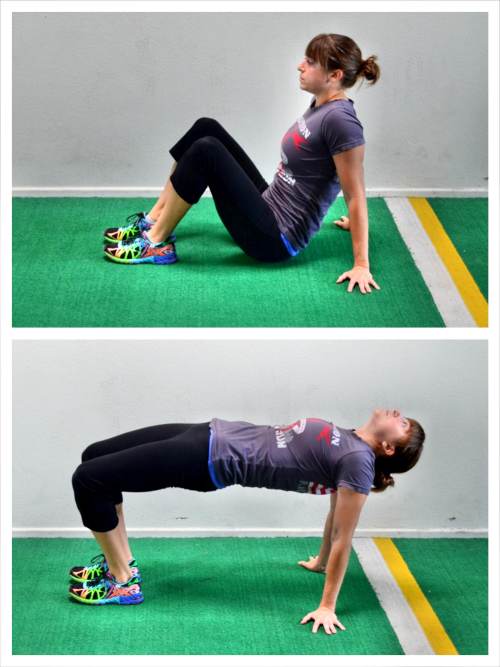
21. Table Top Bridge:
The Table Top Bridge is another great bridge variation to work on hip extension and glute activation. This move also stretches your chest and works your shoulders.
Like the Camel and Sit Thru to Thoracic Bridge, the Table Top Bridge is a great move to include in your warm up that not only stretches, but also activates (which is the third training element before strength training).
To do the Table Top Bridge, start seated on the ground with your knees bent and feet flat on the ground in front of you and your hands on the ground behind you.
Squeeze your glutes and lift your hips up as high as you can. Lean your head back and press your chest out as you bridge up. Feel a nice stretch across your chest and shoulders as well as down your hips. You should also feel your glutes working to bridge you up.
Keep your core tight as you bridge up. Try to create a “table” with your body.
Drive your hips up as high as you can without hyperextending your low back. Squeeze your glutes at the top. While you want to fully extend your hips, you don’t want to engage your low back just to bridge up higher.
Hold for a few seconds at the top then lower back down and repeat.
Keep the core engaged and even do a pelvic tilt at the top so that you engage your glutes without hyperextending your low back.
If your chest is super tight and you can barely lift your butt up off the ground, you may need to regress this bridge to the Basic Glute Bridge and then do a separate chest stretch like the Standing Chest Stretch below.
22. Downward Dog:
This is a great move to work on Thoracic Extension after sitting all day hunched over a computer or a bike as well as stretch your lats, calves and even your hamstrings.
You can include the Downward Dog in your yoga flow or do it as an isometric hold during your warm up. While a great stretch, the Downward Dog also gets your shoulders and core working and can be a great starting spot to help you work up to the full handstand.
To do Downward Dog, start in the high plank position with your hands under your shoulders and your legs out straight behind you and your feet about hip-width to shoulder-width apart.
Then push your butt back and up toward the ceiling as you press your chest back toward your legs between your straight arms.
Focus on getting your back flat and a nice straight line from the heels of your hands up to your tailbone. You want your arms to be in line with your torso (aka your biceps by the ears). As you press through your hands, make sure that you don’t rock to the outside of your hands.
Push your butt back and up as you hold the downward dog position and try to drive your heels down toward the ground. Do not walk your hands in too close to your feet as you hold just to try to get your heels down.
You want to focus on extending your back as you stretch your calves and even your hamstrings.
Breathe and try to get your back flatter and your heels onto the ground.
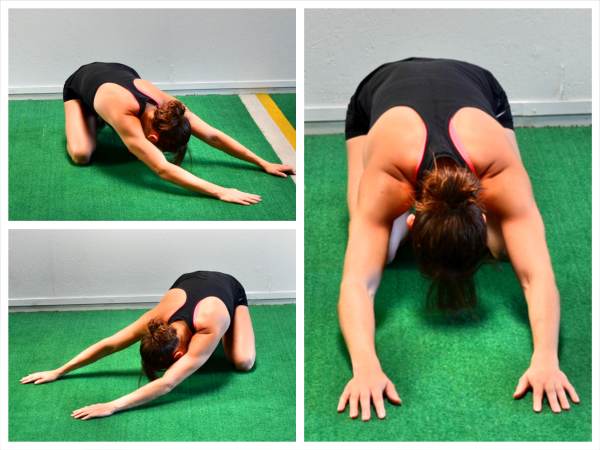
23. Child’s Pose with Reaches:
If you sit all day or have ever suffered from low back pain or injury, you need to include the Child’s Pose with Reaches in your stretching routine. This stretch will release your low back, lats and sides as well as help improve your hip, and even your ankle. mobility.
To do the Child’s Pose with Reaches, point your toes and sit back on your heels as much as you can as you reach your arms out straight in front of you on the ground. Relax and reach out as far as you can with your hands as you try to keep your butt all the way back on your heels.
Then walk your hands to one side. Breathe and feel a stretch down your side and into your low back. Then walk your hands back center and to the other side.
Hold to each side for a breath or two. Repeat walking your hands back to the first side.
24. Quadruped Thoracic Rotation:
Open up your spine, lats and low back with this Quadruped Thoracic Rotation Stretch. This is a great way to open up your upper back after sitting hunched over a computer or a bike.
To do the Quadruped Thoracic Rotation, start on your hands and knees with your knees under your hips and your hands under your shoulders.
Then reach one hand down your neck and spine. With your hand behind your head, rotate your elbow down under your body toward your opposite knee, sitting your butt back slightly as you tuck.
Then rotate the elbow up toward the ceiling as much as you can, opening your chest up toward the ceiling and pushing your hips slightly forward. Feel a nice stretch down your back and even into the outside of your hips.
Repeat, rotating your elbow back under before twisting open. Complete all reps on one side before switching.
Make sure to really rotate open as much as you can each time.
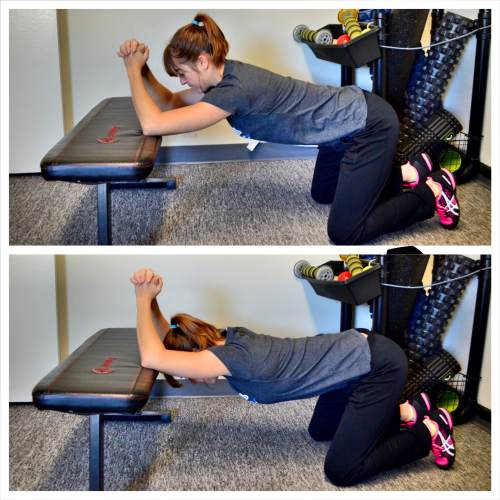
25. Kneeling Thoracic Extension and Lat Stretch:
The Kneeling Thoracic Extension and Lat Stretch is a great way to improve your Thoracic extension and Lat mobility. Our upper back and lats often get locked up after sitting hunched over a computer all day. And when we lack thoracic extension and our lats are tight, we risk neck, shoulder and back pain and injury.
To do the Kneeling Thoracic Extension and Lat Stretch, place your elbows up on a bench about shoulder-width apart and kneel on the ground in front of the bench. Make sure you are back far enough that you have room to lean forward and over and drop your head between your elbows.
Then with your elbows on the bench, relax your chest and head over, sitting your butt back just slightly. Press your chest toward the ground and feel a nice stretch down your triceps and lats as well as through your thoracic spine. Try to extend your back as much as possible as you press your chest toward the ground.
You can either hold here and breathe to stretch deeper or you can come out of the stretch and then relax back into it and try to get further with each rep.
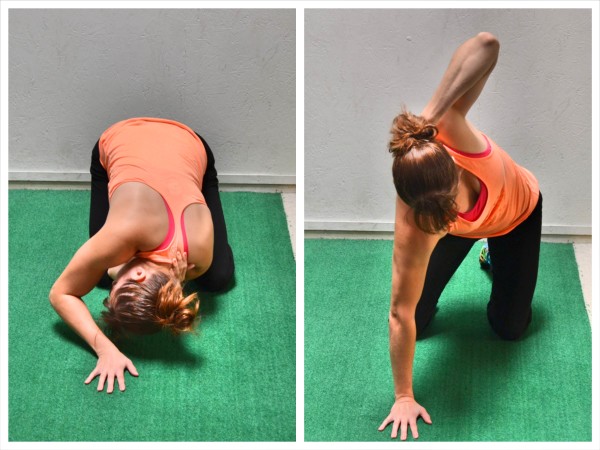
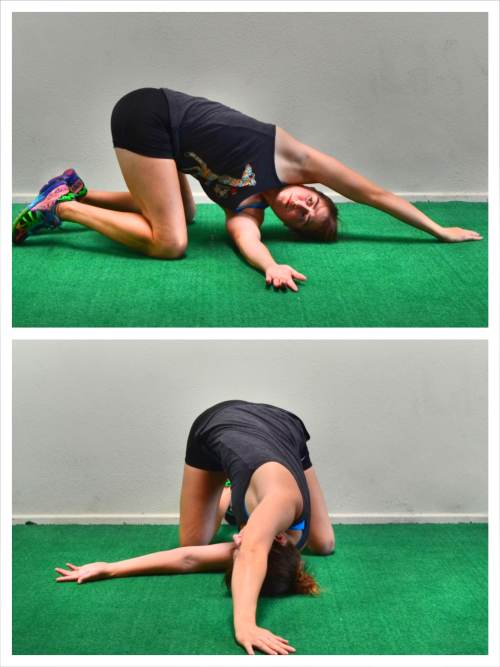
26. Thread the Needle:
This is a great stretch to loosen up both your upper and lower back as well as your shoulders, chest and even your neck.
To do the Thread the Needle Stretch, kneel on the ground and lean forward, reaching one arm out overhead on the ground as you drop the other shoulder to the ground to face toward the arm overhead.
Relax the side of your head and your shoulder down onto the ground as you reach the other arm under your body and out at about shoulder height. You will be reaching your arm under the arm reaching overhead on the ground and rotating your chest open toward the ceiling.
You are “threading a needle” by reaching one arm through the “hole” created by the arm reaching overhead.
Breathe and relax into the stretch so that you feel a stretch down your neck and across your shoulder blades. Rotate your chest up and open. You can walk your top arm back behind your head to increase the stretch.
Hold and then thread the other arm under and through.
Hold each stretch for at least a second or two before switching. Sit back onto your heels if you can keep your head and shoulder on the ground.
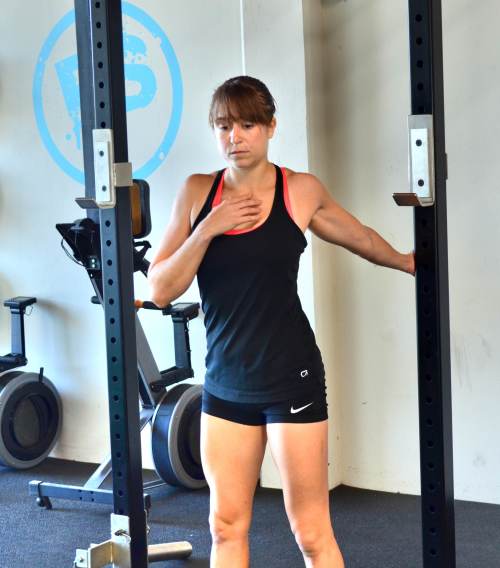
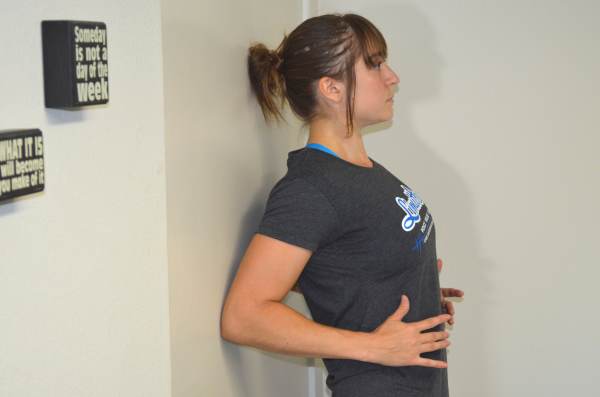
27. Standing Chest Stretch:
If you have a desk job, you need to stretch out your chest. While your upper back may feel like it has tons of knots and is tight, it may actually be overstretched and knotted because your chest is tight. Therefore, if you stretch your chest, your back may also start to feel a bit better.
Plus, by loosening up your chest, you can also help prevent shoulder and neck pain.
To do the Standing Chest Stretch, you can use a doorway, wall or pole. Place one hand back on the wall or doorway and walk past it, turning away from the hand on the wall or door.
As you rotate open and away from your hand, do not shrug your shoulder. Relax and breathe. Feel a nice stretch in your chest and shoulder.
You can also change the direction your thumb is pointing to hit a slightly different angle of your chest and shoulder. If you rotate your thumb to face backward (palm up toward the ceiling), you will hit your chest from a different angle than if your palm is facing the wall (thumb up toward the ceiling).
Hold the stretch for at least 15-30 seconds each side.
This is a great stretch to do any time you walk through a doorway (even if you don’t do a long hold)!
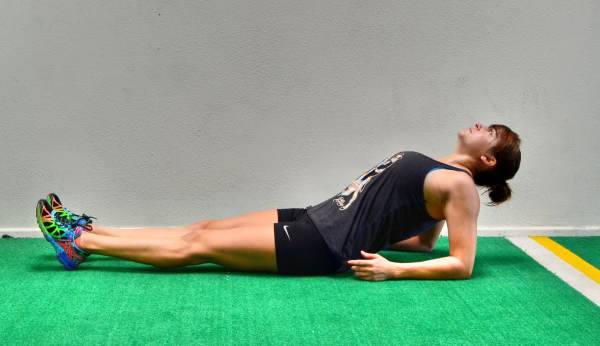
28. Fish Pose:
Stretch out your chest and shoulders with this Fish Pose Stretch. This is a great way to open up your chest after sitting hunched over at a computer all day.
To do the Fish pose, lie on your back on the ground with your legs together and feet straight out in front of you. Your arms should be down by your sides.
Then prop yourself up on your forearms and drive your chest up and out toward the ceiling. Feel a nice stretch across your chest and shoulders.
Relax your head back and breathe, trying to open your chest up more and more toward the ceiling.
29. Scapular Wall Hold:
If you want a move to improve your posture, lessen your neck, shoulder and upper back pain while also helping to strengthen your back so you can do more pull ups, you need to start doing the Scapular Wall Hold.
The Scapular Wall Hold will activate your lower traps and rhomboids as it also stretches your chest and shoulders.
Check out this post for a complete guide to the Scapular Wall Hold.
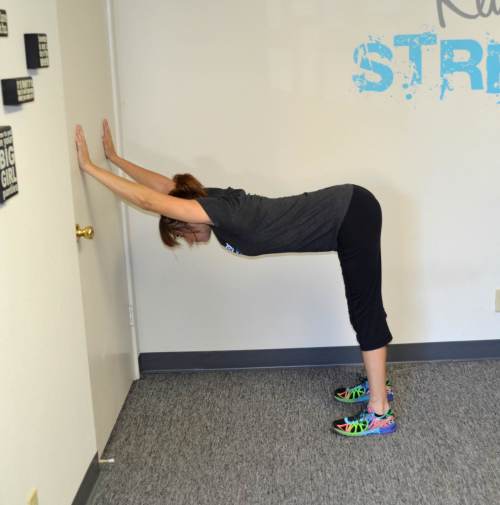
30. Half Wall Hang Stretch:
The Half Wall Hang Stretch is a great variation of the Kneeling Thoracic Extension and Lat Stretch that you can do anywhere, even at your desk.
This stretch will loosen up your lats and chest while also improving your Thoracic extension. If you plan to do a lot of overhead pressing in your workouts, you need to do this stretch beforehand to help prevent shoulder, neck and upper back pain and injury.
To do the Half Wall Hang, place your hands on the wall and walk them down until your chest is parallel to the ground. You can also adjust the stretch by walking your feet back so that you are hinging over with your hips bent to about 90 degrees and your legs straight.
Your back and arms should be straight with your arms by your ears. You want a nice straight line from your hands on the wall to your tailbone.
Press your chest out through your arms and feel a nice stretch through your chest and down the sides of your back. You may even feel a stretch down your hamstrings as you lean over against the wall and slightly push your butt back. Keep your core engaged and don’t hyperextend your low back.
Hold and breathe. Try to press your chest through toward the ground more as you breathe and relax into the stretch.
Beginners may need to start with their hands higher up on the wall and their feet closer in so that they aren’t leaning over as much.
Make sure your back is flat and not at all rounded as you hold. Also make sure that you don’t simply hyperextend your lower back to press your chest through. Keep your core engaged so that you actually work on your thoracic extension instead of compensating by arching your low back.
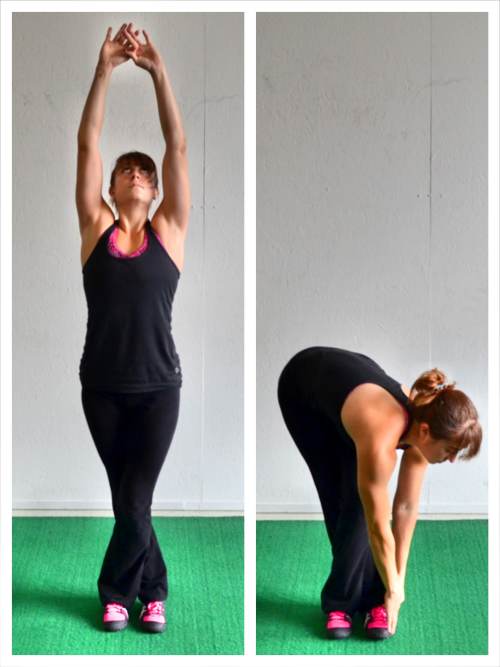
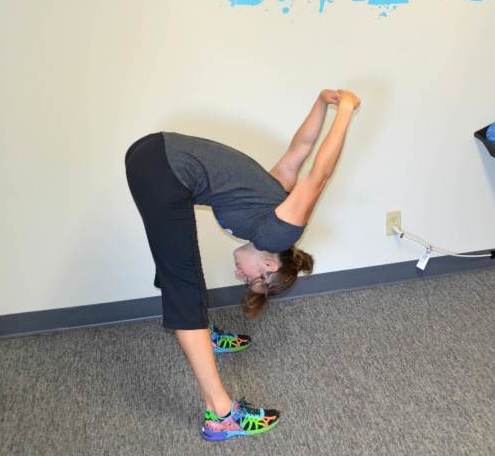
31. Standing Forward Bend:
This is a another great move for anyone with a desk job. The Standing Forward Bend stretches your hamstrings, hips, chest and shoulders. It is also a slightly more advanced stretch that requires a bit more chest flexibility.
To do the Standing Forward Bend, stand with your feet shoulder-width apart or wider. Clasp your hands behind your back with your arms straight and palms together.
Then lean forward, keeping your legs straight as you bend over, hinging at the hips.
As you bend over, let your hands fall away from your back toward your head. Try to keep your palms together as you let your arms fall forward toward the ground.
Breathe as you relax over, trying to get your hands as far from your back as possible and your legs straight.
Beginners may not be able to keep their palms together or may find they can’t get their arms very far off their back.
They may also want to turn this into two stretches and do a Standing Chest Stretch and then simply hang over with their legs straight to stretch their hamstrings and hips.
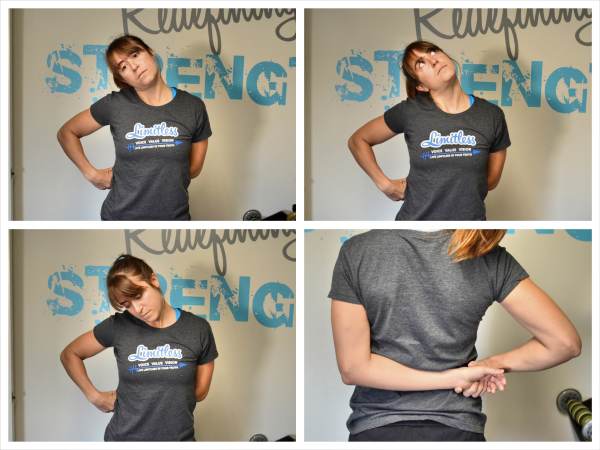
32. 3-Way Neck Stretch:
After sitting all day hunched over a computer, your neck and upper traps may be tight, which can not only cause neck pain but also cause shoulder pain and injury.
A great way to stretch your neck and upper traps is with the 3-Way Neck Stretch, which you can do while seated at your desk even!
To do the 3-Way Neck Stretch, reach one hand behind your back and then grab that wrist with the other hand.
Pull the arm across your back and then lean your head to the side you are pulling toward. The arm pulling the other wrist behind your back should be making a “chicken wing” and you should be leaning your head toward that side.
Do not tense your shoulders and shrug them up toward you ears. Relax into the stretch and breathe.
As you relax your head to the side, change the direction of your gaze. Look up and tilt your head up. Hold for a second or two.
Then look straight ahead. And then look down, tilting your head down.
Make sure when you look up or down that you move your chin and not just your eyes. Changing the direction of where you look, will change exactly which muscles in your neck and upper back that you stretch.
Make sure to keep your shoulders relaxed as you stretch. Switch sides after looking all three ways a couple of times.
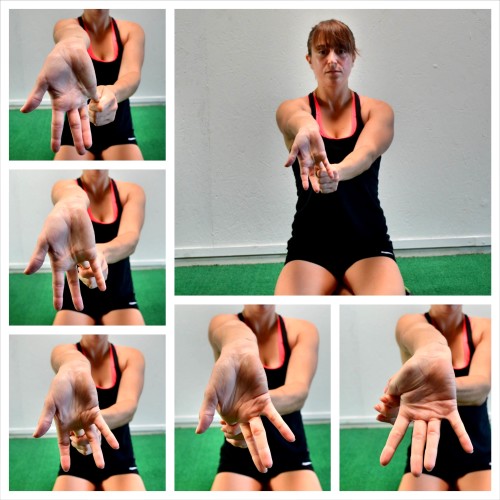
33. Wrist Release Stretch:
If you are having any wrist pain or elbow pain (especially anything similar to Tennis Elbow), you will want to do this Wrist Release move.
This stretch works on extension and releasing your extensors one at a time.
It is a great stretch to do after sitting for hours typing because it will open up your wrists and alleviate the trigger point below your elbow that can lead to elbow pain.
It will also work on your wrist extension so your wrists hurt less when you do exercises on your hands like downward dog or even dips. Plus it is a great stretch because you can easily do it while seated at your desk.
To do the Wrist Release, stretch your arm out in front of you with the palm facing away and the fingertips pointing down.
With your other hand press one finger at a time down and back while keeping your arm out straight in front of you. Do not let your hand or fingers tighten as you do this. Keep your hand relaxed.
Hold the stretch on each finger for a second or two. Work your way from thumb to pinky, holding on each finger. Go back and repeat the stretch on any fingers that feel tighter.
You can do this stretch standing or seated. Make sure to sit or stand up tall as you stretch. Take any time you can to improve your posture after sitting all day at a desk!!
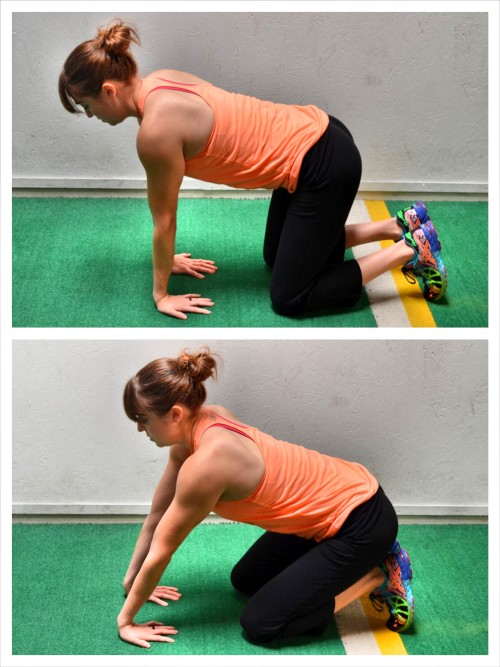
34. Kneeling Wrist Extension Stretch:
Because we sit most of the day with our wrists in flexion over a computer keyboard, we need to stretch out our flexors with a Wrist Extension Stretch.
By doing a Wrist Extension Stretch, we also lessen our risk for pain and injury in the gym. Working on your push ups and handstands, but your wrists get sore and tired?
You may need to stretch out your flexors and make your wrists accustom to extension.
To do the Wrist Extension Stretch, kneel on the ground and place your hands down on the ground in front of you, palms down. Turn your fingertips out and back toward your knees.
Then rock back, sitting on your heels, keeping the heels of your palms down on the ground as you sit back. Come back out of the stretch then sit back again, stretching down the inside of your forearms.
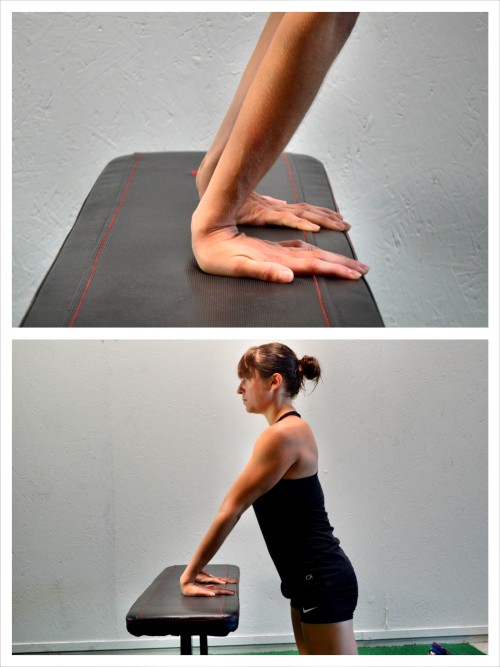
You can also do this at your desk.
To do a Desk Wrist Extension Stretch, stand at your desk and place your hands near the edge of your desk with your fingertips just touching the edge. Then rock back as you press the heels of your palms into the desk.
Feel a nice stretch down the inside of your forearm as you hold.
You can also stay seated and do an extension stretch one arm at a time by straightening your arm out in front of you with your inner forearm facing up. Then press your fingertips down and back toward the ground with the other hand.
Make sure you breathe as you hold either stretch.
35. Kneeling Wrist Flexion Stretch
Although our wrists are in flexion most of the day typing and gripping different things, after a hard workout where our wrists are in extension from push ups and handstands, it is a good idea to do this Wrist Flexion Stretch.
This stretch will release your wrists and your extensors after forcing them to do a movement they aren’t as accustom to.
To do the Kneeling Wrist Flexion Stretch, start kneeling on the ground. Place your hands down on the ground in front of you with the backs of your hands on the ground and your fingertips pointing in toward each other.
Rock side to side slowly, holding slightly to each side so that you feel a stretch down the outside of your forearms.
Using these 35 stretches, you can stretch out from head to toe to help you prevent and alleviate aches and pains. Once you’ve stretched out, it is then time to get activated!
For some great warm up/stretching routines using many of these stretches, check these out:
- A Quick Full-Body Yoga Warm Up Sequence – This stretching sequence combines Downward Dog with the World’s Greatest Stretch and even a Cossack Squat.
- The Full-Body Warm Up – This warm up routine includes stretches, activation exercises and locomotion to get you warm and ready to work.
- The Full-Body Cool Down – Stretch out and relax with this full body cool down. You can do it after your workout or simply after a long day of sitting hunched over a computer!


I want to thank you so much for these amazing informative posts you deliver daily. Your posts have helped me so much to further knowledge and understanding of moves. I feel I can better break these moves down in my classes. Thank you again
Narelle
Hi Narelle. No problem! Glad you find them helpful 🙂 If you ever have any questions, don’t hesitate to reach out! Cori
Hi Cori I was just wondering how long should a stretch be held for because I happen too be someone who suffers with tight hamstrings, hips and glutes (e.g) I’m unable too touch my toes, could I use some of those stretches “mainly the ones for runners” as both dynamic and static stretches and which ones would be the best for me too begin with (e.g) after a run or gym workout ???
Thanks 🙂
Hi Conor. So a few questions…Do you have any imbalances? Are you more flexible on one side? Do you find your hamstrings are way tighter or your hips? Hamstrings can “feel” tight for one of two reasons. A. The muscles are shortened and tight and do need stretching. B. The muscles feel tight because they are actually overly lengthened because your hips are tight, your core is unstable and you have an anterior pelvic tilt. Another question would be about whether or not your glutes are activating correctly.
So…Those are some things you may want to think about as you up your stretching. I would also add in foam rolling to improve your mobility and keep things healthy for running.
In answer to your question though…I would do dynamic stretches targeting your tight areas before you run. 5 minutes is enough. Picking like 3-6 exercises and doing about 10 reps. Then after you run you can roll and do some static stretching. You don’t need to hold a stretch for more than 30 seconds at max. You just want to hold and relax and breathe into it.
Definitely use dynamic BEFORE and then static after. But don’t forget foam rolling. And if you’re a runner, I would also think about doing some glute activation and even core strengthening. Running is a contralateral movement and getting your core working correctly can help you gain even more speed and endurance (as well as activating your glutes). Here is another article you may find interesting if you haven’t seen it already – https://redefiningstrength.com/why-imbalances-are-worse-than-inflexibility/
If you need anything else, let me know! – Cori
Hi Cori thanks for that information you gave me on the stretching…it turns out I do have many imbalances, many areas are tighter than others and I’m currently trying to fix the problem by dynamically stretching before workouts and statically stretching after workouts as well as doing plenty of core, glute and hip work. Anyways thanks for your help it really meant a lot.
Just two final questions (1) are there any stretches I should avoid that may have no effect or cause me injury in my training e.g stretches where one muscle expands and another contracts thus having no effect during stretching ???
(2) should I dynamically or statically stretch on my rest days ???
Thanks 🙂
Sorry just saw these! Uh off of the information I know of you I can’t tell you if there is a move you shouldn’t be doing. I would recommend that you focus on muscles that address your specifically tight areas. And you can actually do either on rest days. I like doing Isometrics on rest days as they stretch, activate and build stability through the range of motion.
Wow. I tried most of these and must admit I was a little humbled. I am by no means a super flexible person but these really showed where I am defficient. Now I have a better idea of where to concentrate. Some of these will definitely in my repertoire. Thank you.
Glad to provide some new ones to help out!
Thanks for these stretches!
Hi Cori
Please could you recommend good stretches for after being at work on my feet all day. I get very tight glutes hamstrings and a sore lower back
Do you have my RStoration by chance? The foot and ankle schedule would be great to start!
hi Cori
I have weak glutes right side and my ql takes the brunt of it ,is there any advice you could give me to help both
Have you checked out my booty burners? Are you foam rolling tight muscles, activating weak muscles and doing so with unilateral moves?