5 Moves To Avoid The Dreaded “Pancake Butt”

5 Moves To Avoid The Dreaded “Pancake Butt”

Are you suffering from PANCAKE BUTT?!! hehe

Ok I’d never heard this term before a Facebook Live “Ask Me Anything” when I got asked about the best moves for a “pancake butt.”

I found the expression incredibly amusing, but it also got me to thinking about the science behind developing shapely, strong glutes.

How could you best develop them and create the perky shape you wanted?

A. You would need to create a program implementing all 3 drivers of muscle growth.

B. You would need to combine movements in a variety of planes of motion to not only target all three glute muscles, but even different aspects of those muscles.

And C. You would need to focus on not only adding loads or weight but different types of resistances and a variety of reps and set schemes.

First let’s go over the different drivers of muscle growth and the different ways to target different aspects of the glutes.

Then I’ll share 5 Must-Do Moves To Avoid The Dreaded Pancake Butt!

The 3 Drivers Of Muscle Growth:

Too often we think the only way to “grow” a muscle or promote muscle hypertrophy is through using heavier loads and creating a ton of muscle tissue damage aka lifting heavy and making ourselves really sore with moves like the squat and deadlift.

BUT muscle tissue damage is only ONE driver of muscle growth.

And SORENESS? Well soreness isn’t an indicator of progress or results.

Soreness can simply even mean you did something new (or even that your hydration or sleep aka your recovery is off). So stop using soreness as your indicator that you worked hard enough!

And especially as you utilize metabolic stress, and potentially even more moves that create mechanical tension, to get results, you may even find there are workouts you feel a huge pump DURING the actual workout and NOTHING after. No soreness. NOTHING.

That’s not a bad thing!

We don’t always need to use heavy loads and compound moves with huge ranges of motion to get results. They are just one piece of the puzzle.

So what are the 3 drivers of muscle growth?

  1. Muscle Tissue Damage
  2. Mechanical Tension
  3. Metabolic Stress

Let’s start by reviewing what moves create the most muscle tissue damage as these are the moves we tend to think are most important for results.

Muscle Tissue Damage:

If you’ve ever heard “Squat for a better butt,” you may have fallen victim to the belief that if you just squat, you’ll get rid of your pancake butt.

However, squats alone may NOT get you the results you were hoping for.

Neither may deadlifts or lunges even.

While these compound moves are ESSENTIAL to include in your routine, there is no “one best move” out there that alone will get you results.

And thinking there is, will only hold you back from using every tool in your toolbox to get the best results as fast as possible.

These compound moves, done with challenging loads, create more muscle tissue damage, which can drive muscle growth.

If you break down muscle tissue and recover proper, your muscles should grow stronger and bigger in response.

HOWEVER, the more muscle tissue damage you create, the longer you have to rest before working the muscle again so that it actually recovers and rebuilds.

If you don’t let the muscle rebuild and recover, you’re constantly just tearing it down which will fight against all of your hard work.

If you’re constantly only doing heavy lifts and the volume is adding up with those, you probably are only able to train that muscle effectively once a week. And this isn’t ideal.

Studies have shown that the optimal training frequency for muscle hypertrophy may actually be 2 to even 3 times a week. So if you want to shape up that pancake butt, adding in a second glute day each week may be the answer!

You can’t increase your training frequently though if you’re constantly creating extreme amounts of muscle damage.

While controlling overall volume can definitely help, so can using moves that drive growth in other ways.

But first, what moves create more muscle tissue damage?

Moves that will create more muscle tissue damage:

  • Have moderate glute activity
  • Big ranges of motion
  • Peak tension when the glutes are lengthened
  • Emphasize the eccentric

These are most often those big compound lifts like squats, deadlifts, and lunges that we tend to load down.

Many of these moves focus primarily on the glute max, working that lower glute max just slightly more.

These moves can be included in your workouts as some of your primary lifts, using moves that may create less damage and be done with lighter loads for slightly higher reps after.

Or you may even include them on your leg day with a separate “glute day” each week that focuses on those glutes with moves that create less muscle damage.

With these compound moves, you may work on maximal strength in the 1-5 rep range or even work in the more traditional hypertrophy range of about 6-12 reps.

You want to make sure to use a weight that challenges you though for whatever reps you select!

And you can even create more muscle damage by not only increasing the loads, but by changing the tempo of your reps.

Especially if you slow down the ECCENTRIC portion of the move, you can create more damage. (This would mean slowing down the lower down in the squat or the lunge for example.)

More time under tension, and especially more of a focus on the eccentric, means more work for those muscles.

This can be another great way to advance movements if you don’t necessarily have heavier loads or want to do more reps!

Mechanical Tension:

If you do a chest exercise and expect your glutes to grow, you’re going to be waiting a long time.

Why? Because you placed no tension on the muscle you wanted to work!

Seems sort of silly and obviously, right?

But that is what mechanical tension is…placing more tension on the muscle you want to work!

So if you want to work your glutes, the more tension you place on that muscle, the more you can drive growth.

Now all too often we simply try to “add weight” to create more tension.

But with our glutes, this can backfire.

Using our “mind-body connection” to better recruit the muscle, while using moves that place the most tension on the muscle when shortened, may actually allow us to create more tension with LIGHTER loads!

Now this doesn’t mean you shouldn’t still CHALLENGE yourself.

But it does means that instead of depending on the LOAD to challenge the muscle, you need to focus on the muscle you FEEL working and try to activate it as much as possible with your MIND.

You want to THINK about it contracting hard.

The reason for this is that, with the glutes specifically, simply going heavier with some moves may actually lead to synergists doing more work to lift instead of the glutes coming under more tension.

So if you do that barbell hip thruster and start to feel your quads and hamstrings working more as you increase loads, you may actually be going “too heavy” to create the optimal amount of muscle tension in your glutes!

Basically, adding a heavier load only works to an extent and there is a point for each of us when going heavier fights against us optimally engaging and recruiting the muscle we want.

What glute moves create the most mechanical tension?

Moves that:

  • Have high glute activity
  • Moderate ranges of motion
  • Peak tension when the glutes are shortened
  • Can emphasize the eccentric

These moves can be more isolated or still compound lifts.

They are moves like the barbell hip thruster, the back extension, high step ups, ankle weight abductions and cable kickbacks.

The variety of moves that create mechanical tension allow you to work not only your entire glute max, but also really target your glute medius. And many of the abduction movements even allow you to hit that upper glute max a bit more, which can help get rid of that “pancakedness.”

These moves generally don’t take as long to recover from (usually about 2-3 days), which can make them great to include to really perkify that butt while increasing your training frequency.

Most often these moves will be done for about 5-15 reps. Some moves like the barbell hip thrusters may be done with heavier weights so you may work down in reps; however, just make sure this isn’t necessarily at the expense of FEELING the correct muscle driving the movement. (Make note of your personal set point where synergists may start to dominate.)

Because lighter loads may allow for you to focus more on your glutes working, you may find you often work between 10-15 reps with these moves.

NOTE: Range of motion is still important and so are even the TOOLS used with these moves. Start to shrink the range of motion on some of these moves and you get into creating more metabolic stress territory!

Metabolic Stress:

You know that feeling when you’ve done a band move and you stand up and grab your butt and think “Holy butt cheeks batman!?”

That feeling right there, that “burning sensation,” is called metabolic stress.

These moves make great activation exercises prior to your heavy lifts and runs to help you make sure your glutes are working.

Because you can do a few to create that “pump” and establish that mind-body connection, without wearing yourself out, they can help you make sure your recruitment patterns are correct when you go into more compound movements.

That makes many of these moves great rehab/prehab movements to avoid injury!

However, ONLY using these moves as activation exercises doesn’t allow you to take full advantage of their metabolic stress benefit!

Following a compound movement with a more isolated exercise to create a pump can help you further burnout a muscle.

They also make great burnouts to target those glutes even at the end of a leg day with compound moves!

You may even find that doing full circuits or workouts with these moves can allow you to dramatically increase your training frequency without the need for extended recovery.

Most of these moves you will feel a lot at the time yet the next day feel like you could train again. Their recovery cycle is much shorter, making them a key piece to include to maximize your results.

And they can be a great way to really utilize that mind-body connection to build and tone your glutes.

Especially for runners or cyclists who don’t want to risk the “soreness” or “fatigue” of heavy lifting affecting their training, these are a great way to build and strengthen their glutes!

Moves that will create metabolic stress:

  • Have LOW glute activity
  • Small ranges of motion
  • Peak tension when the glutes are shortened
  • Varied tension on the muscle

Wait…LOW glute activity?!

You may now be thinking, “Then why are they great as activation moves to establish that mind-body connection if they have LOW glute activity!? And why the heck do I feel them burn so much!?”

The reason these moves are AMAZING activation exercises all comes down to the fact that they DO create that PUMP and that BURN.

Even think about it in terms of your biceps after curls. When you feel that muscle with a PUMP, your brain is much more aware of that muscle with every other move, right!?

By using these moves to create that pump and burn, you help your brain to really FEEL the muscle, which is what establishes that mind-body connection.

And while it may seem strange they have lower glute activity, the pump you feel isn’t so much due to the activation of the muscle, but the fact that you restrict blood flow out of the muscle.

By keeping the glutes under constant tension with quick back to back reps you prevent blood from leaving the muscle aka your cells swell, you get pumped and create metabolic stress.

And that “burn?” Well that is due to the build up of certain metabolites that happens due to the constant tension for that higher volume!

So what moves create metabolic stress?

Think about all of those amazing band moves!

Band monster walks, band side shuffles, band glute bridges, frog bridges, clams, fire hydrants…all are great moves to create that pump!

With most of these moves, you will want to focus less on increasing the resistance and more on the VOLUME. Reps for these will usually be in that 15-30 rep range.

Yup…30 reps even.

Beginners may find it even takes more reps at first to establish that mind-body connection while more advanced exercisers can engage from that first rep and really build up that burn!

These moves are also a great way to target your glute medius especially while working your entire glute max. And by using some of the abduction moves, you can even target that upper glute max more if needed.

And if you want to focus a bit more on that lower glute max?

Why not try creating metabolic stress with some of those moves that usually create more muscle tissue damage….

Wait…How can you do that?!

Change The Resistance, Change The ROM, Change The Driver?!

If we want results, we need to progress our workouts. We need to progress our movements.

To do this, we usually add more weight or do more reps.

But sometimes using slightly different VARIATIONS of movements is actually the key to progressing our workouts so that we can keep moving forward.

By using the “same but different,” or variations of moves we usually love even with “LESS” weight, we can also change how they drive muscle growth.

For instance, a barbell hip thruster will create more mechanical tension.

But what if you used a band instead of a bar AND added a mini band or booty band around your legs?

If you changed the equipment in this way, you could take a move that usually would create more muscle tension and use it to create more metabolic stress!

It’s the same move, but by changing the resistance, you change how the move drives growth.

By replacing the barbell with bands, you place less of a focus on the eccentric portion as the band reduces tension as you come back toward the anchor point.

And by using the mini band, you put the glute medius under constant tension, which then helps build more of a pump!

But it’s not just a change in tools that can take a move from creating a ton of muscle tissue damage to more metabolic stress.

You can also change the range of motion!

Take that basic squat.

You can load it down and create a ton of muscle damage.

OR you can place a band around your legs and shrink the range of motion, pulsing only at the bottom or even coming just short of lockout.

By changing the squat so the range of motion is smaller and you’re CONSTANTLY under tension, you will create that pump instead!

Using different variations of the squat may not be a clear “progression” but this same but different movement may just be what you need to keep progressing and challenging your body!

Sometimes it can even simply be a slightly different body position during the movement that will keep you moving forward.

Take for instance the mini band seated abduction. You can do these seated on the ground or off a bench. While seated on the bench, you can lean forward or backward or sit up nice and tall.

All of these involve slightly different angles of hip flexion which can affect not only where you feel it but how much you target the anterior or posterior fibers of your glute medius!

This seemingly slight difference can be a way to progress movements so you are really working those glutes from every angle for the best results possible!

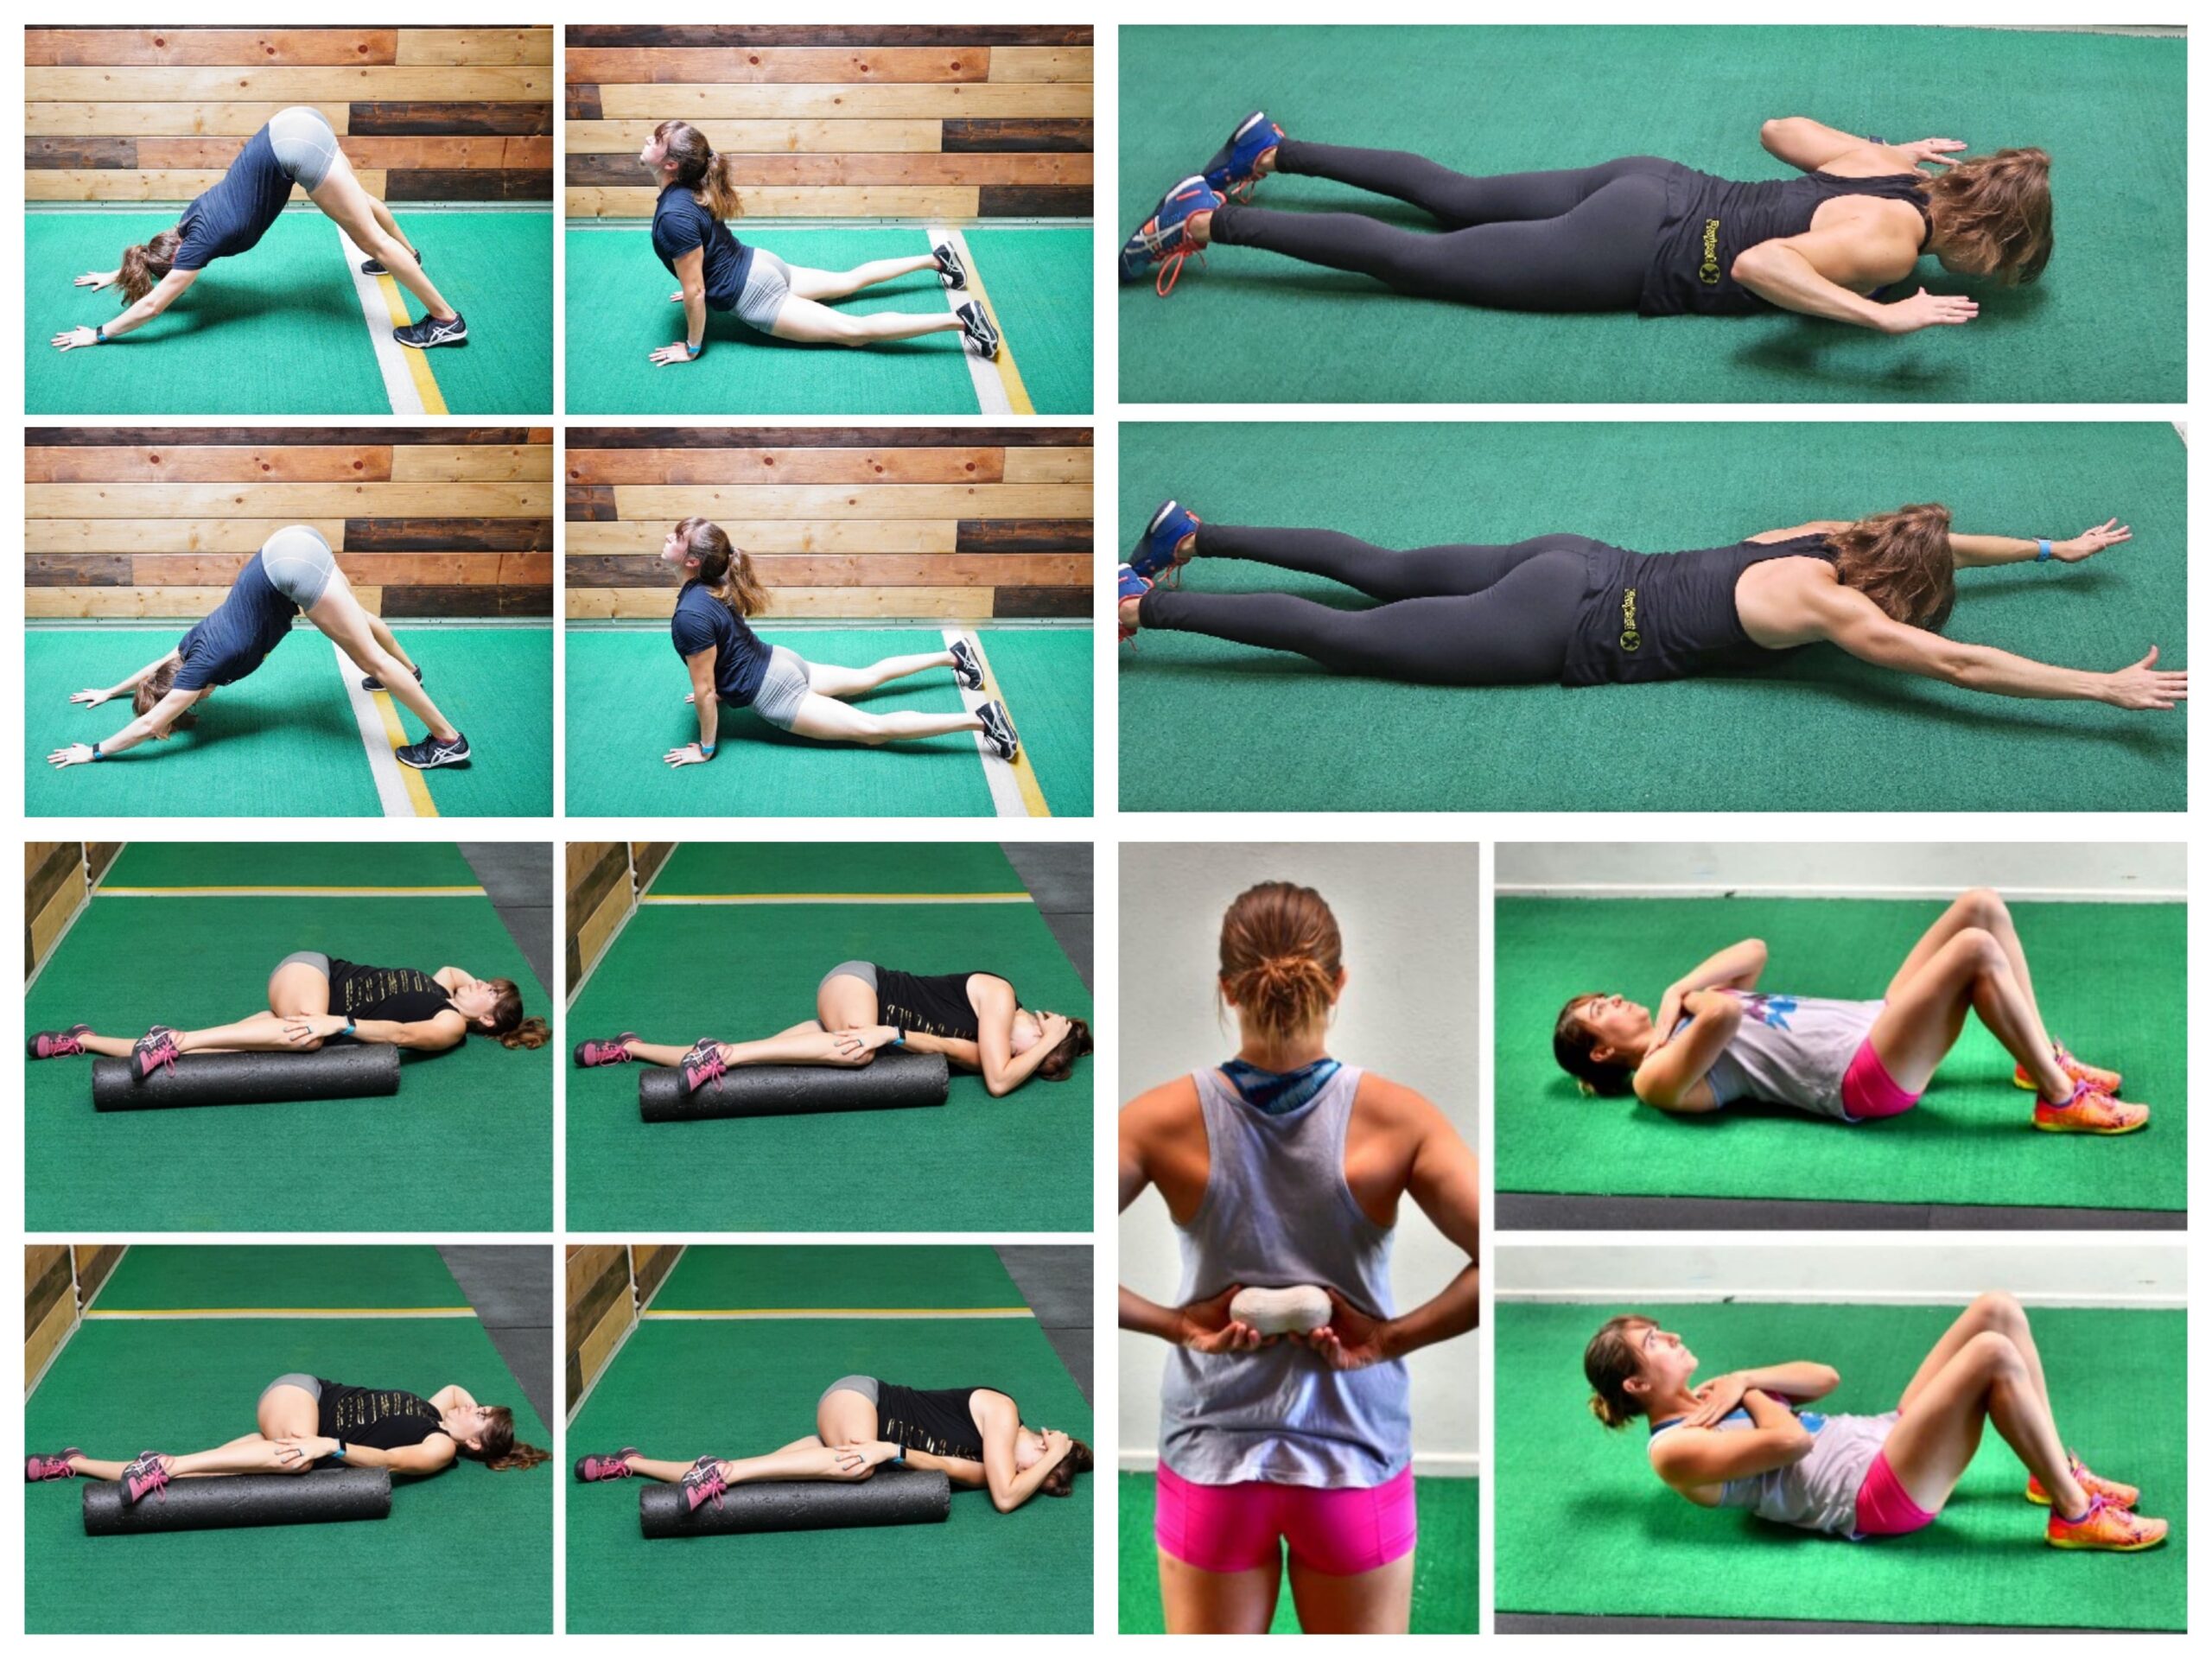
5 Must-Do Moves To Avoid The Dreaded Pancake Butt:

Now the fun stuff hehe

These 5 moves cover all 3 drivers of muscle growth and work your glutes from every angle.

They will target not only your entire glute max, but also your glute medius.

And if you need to focus more on your upper glute max or lower glute max to build that round, perky butt, these will also help you out!
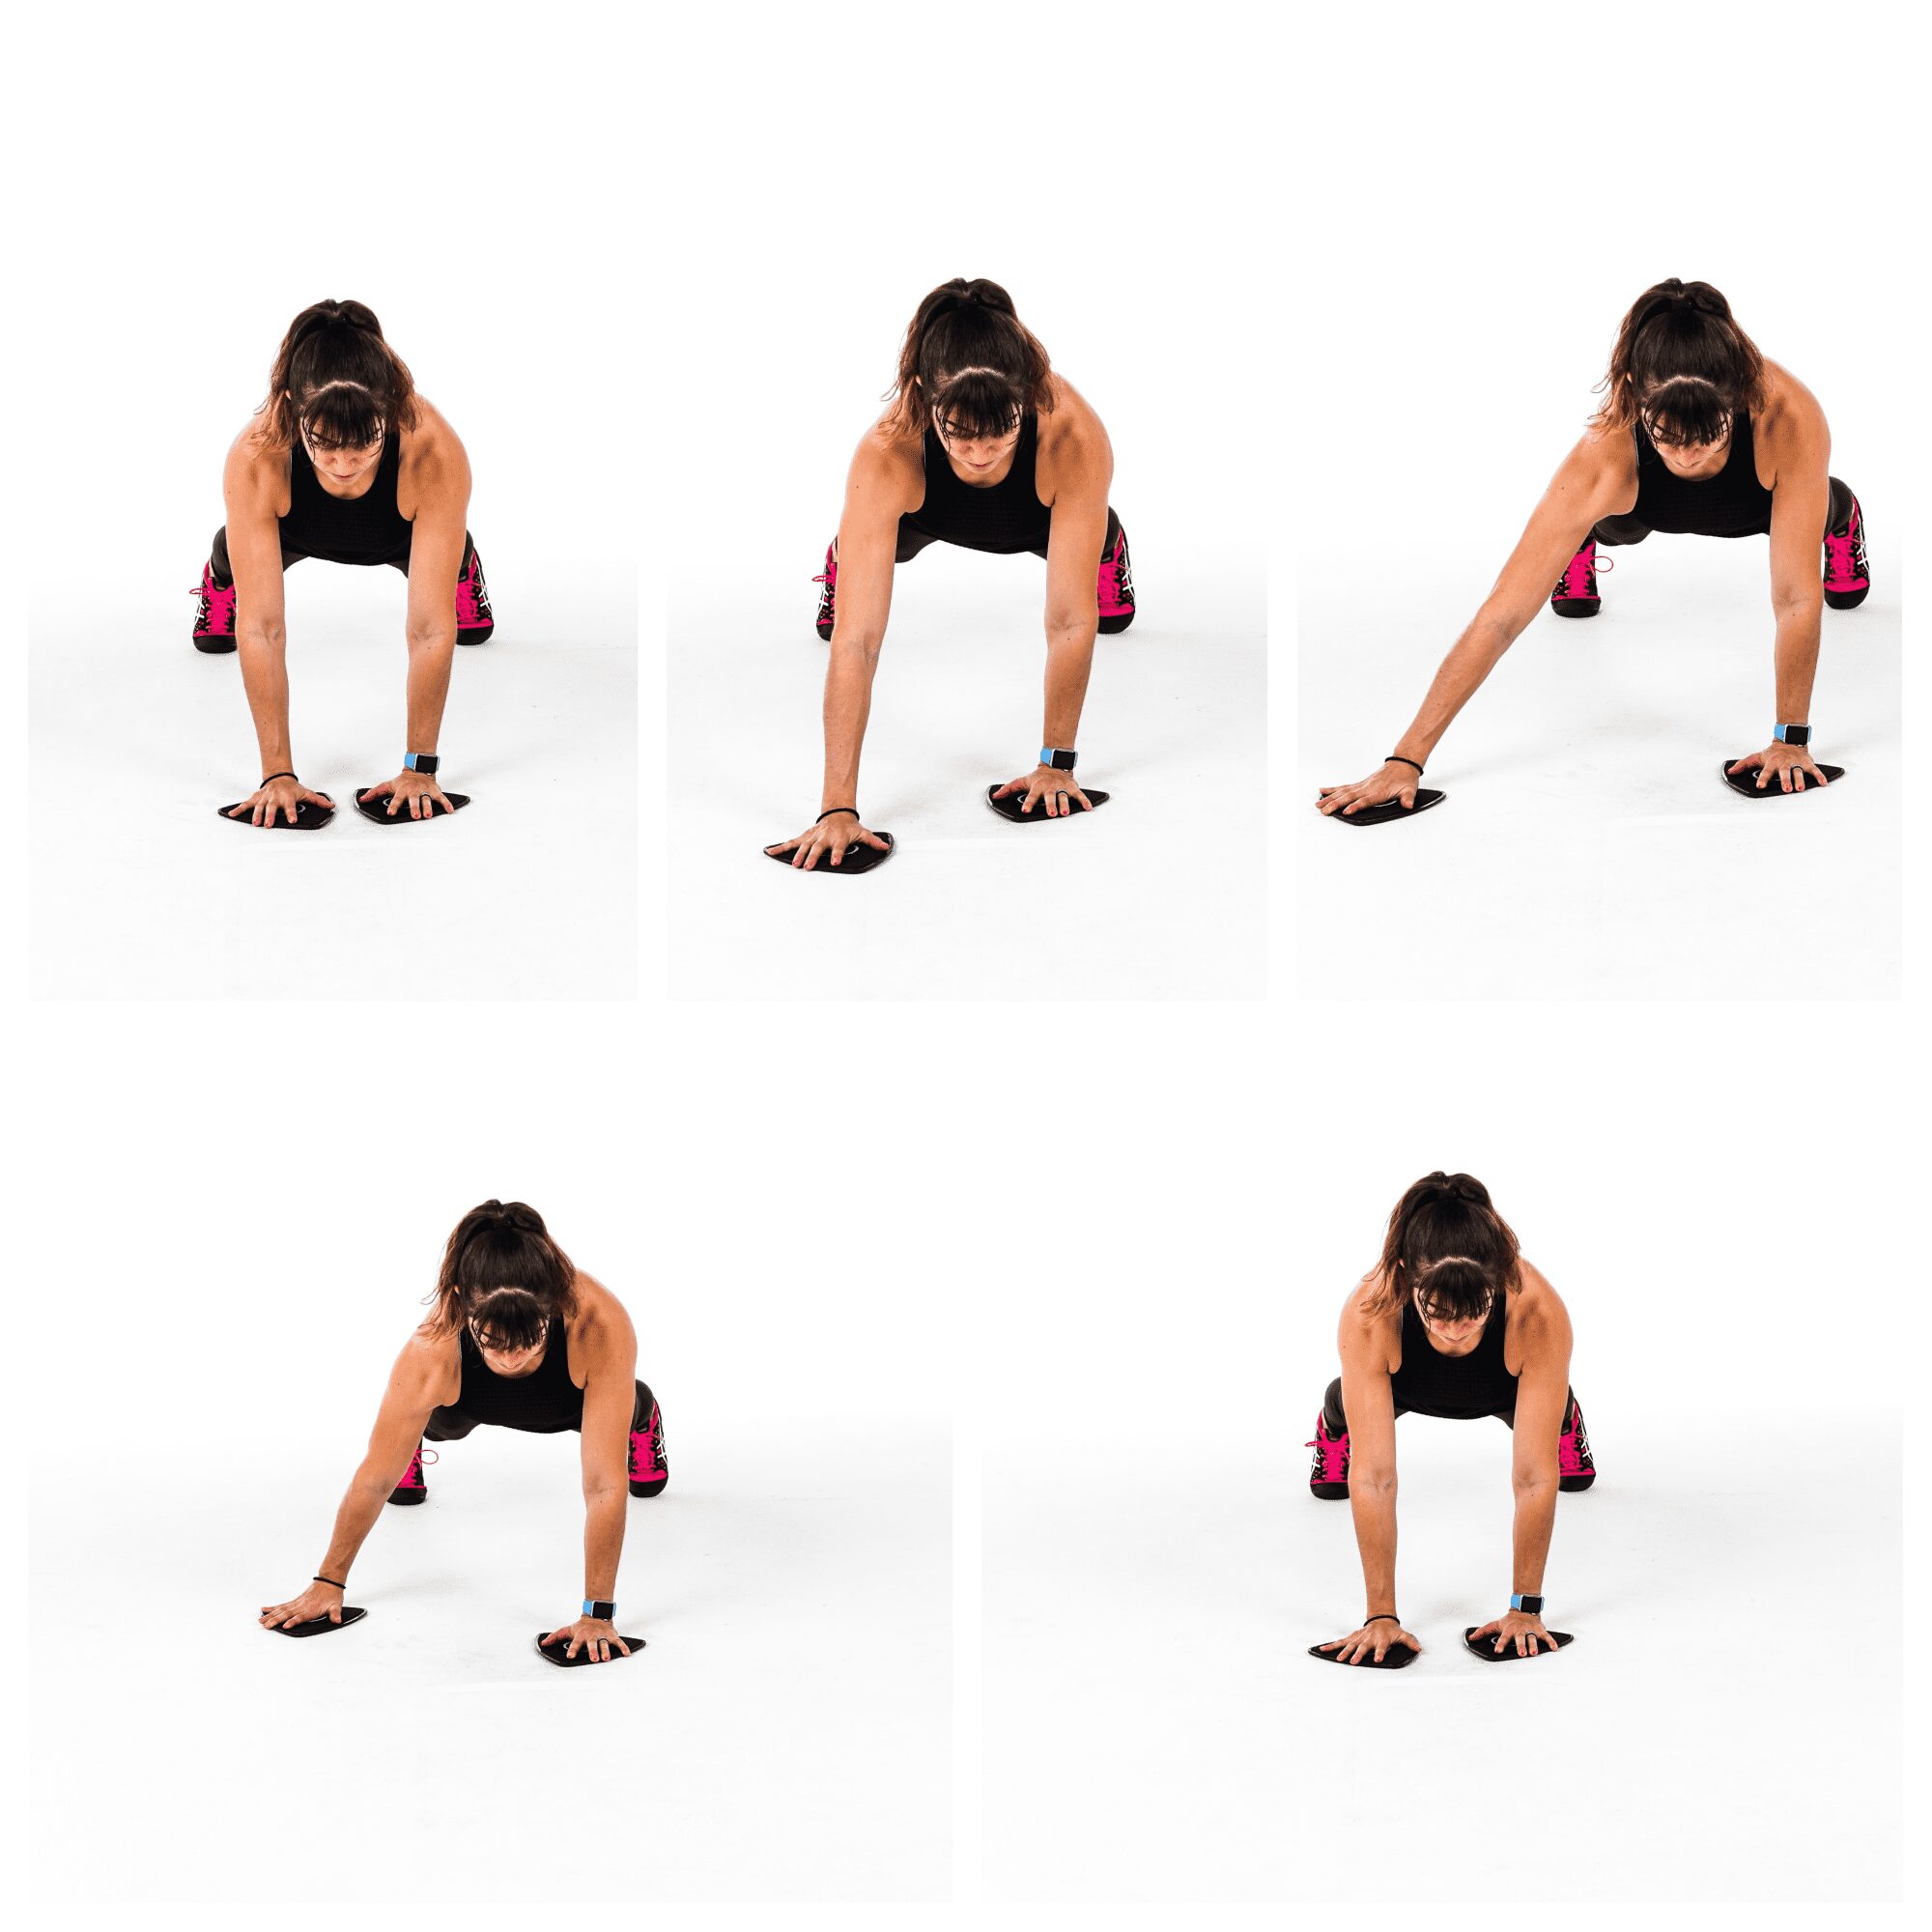
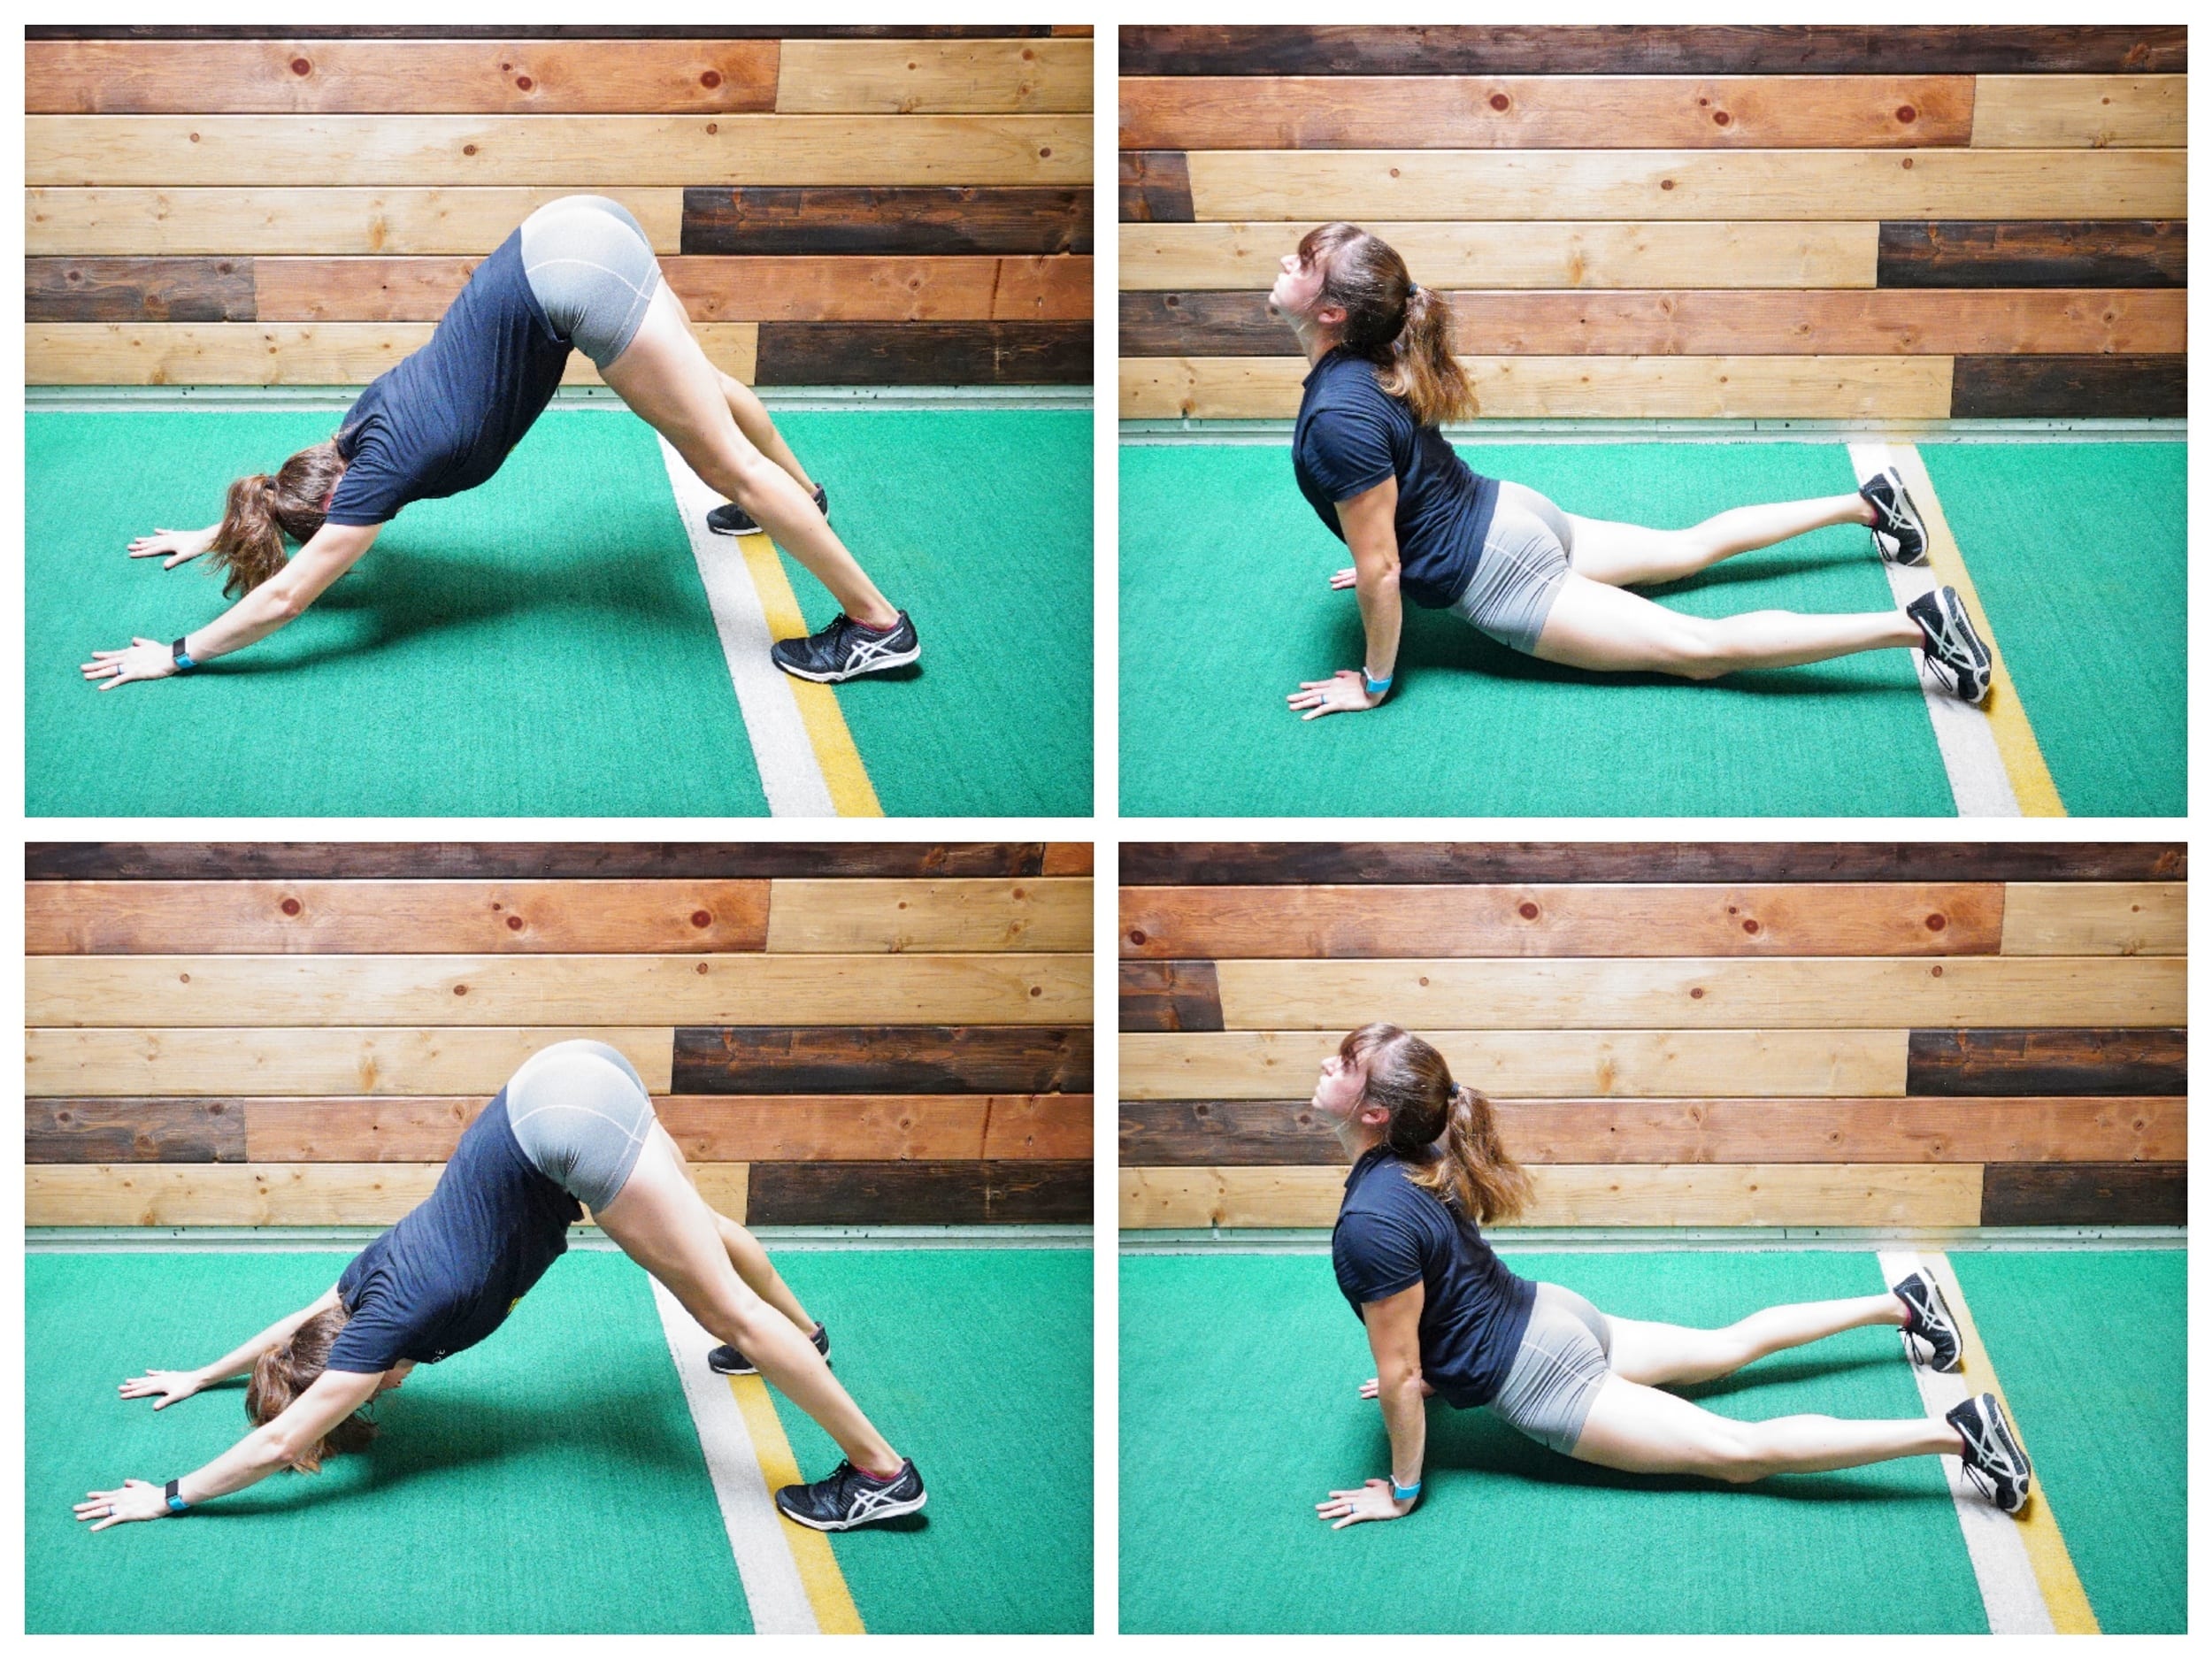
Band Squat Pulses:

If you want to use metabolic stress to build those glutes, this is a great version of the squat to include. You will want to use it for between 15-30 reps aka a higher rep range without focusing on upping the resistance.

The Band Squat Pulse will target your glute medius as well as your entire glute max.

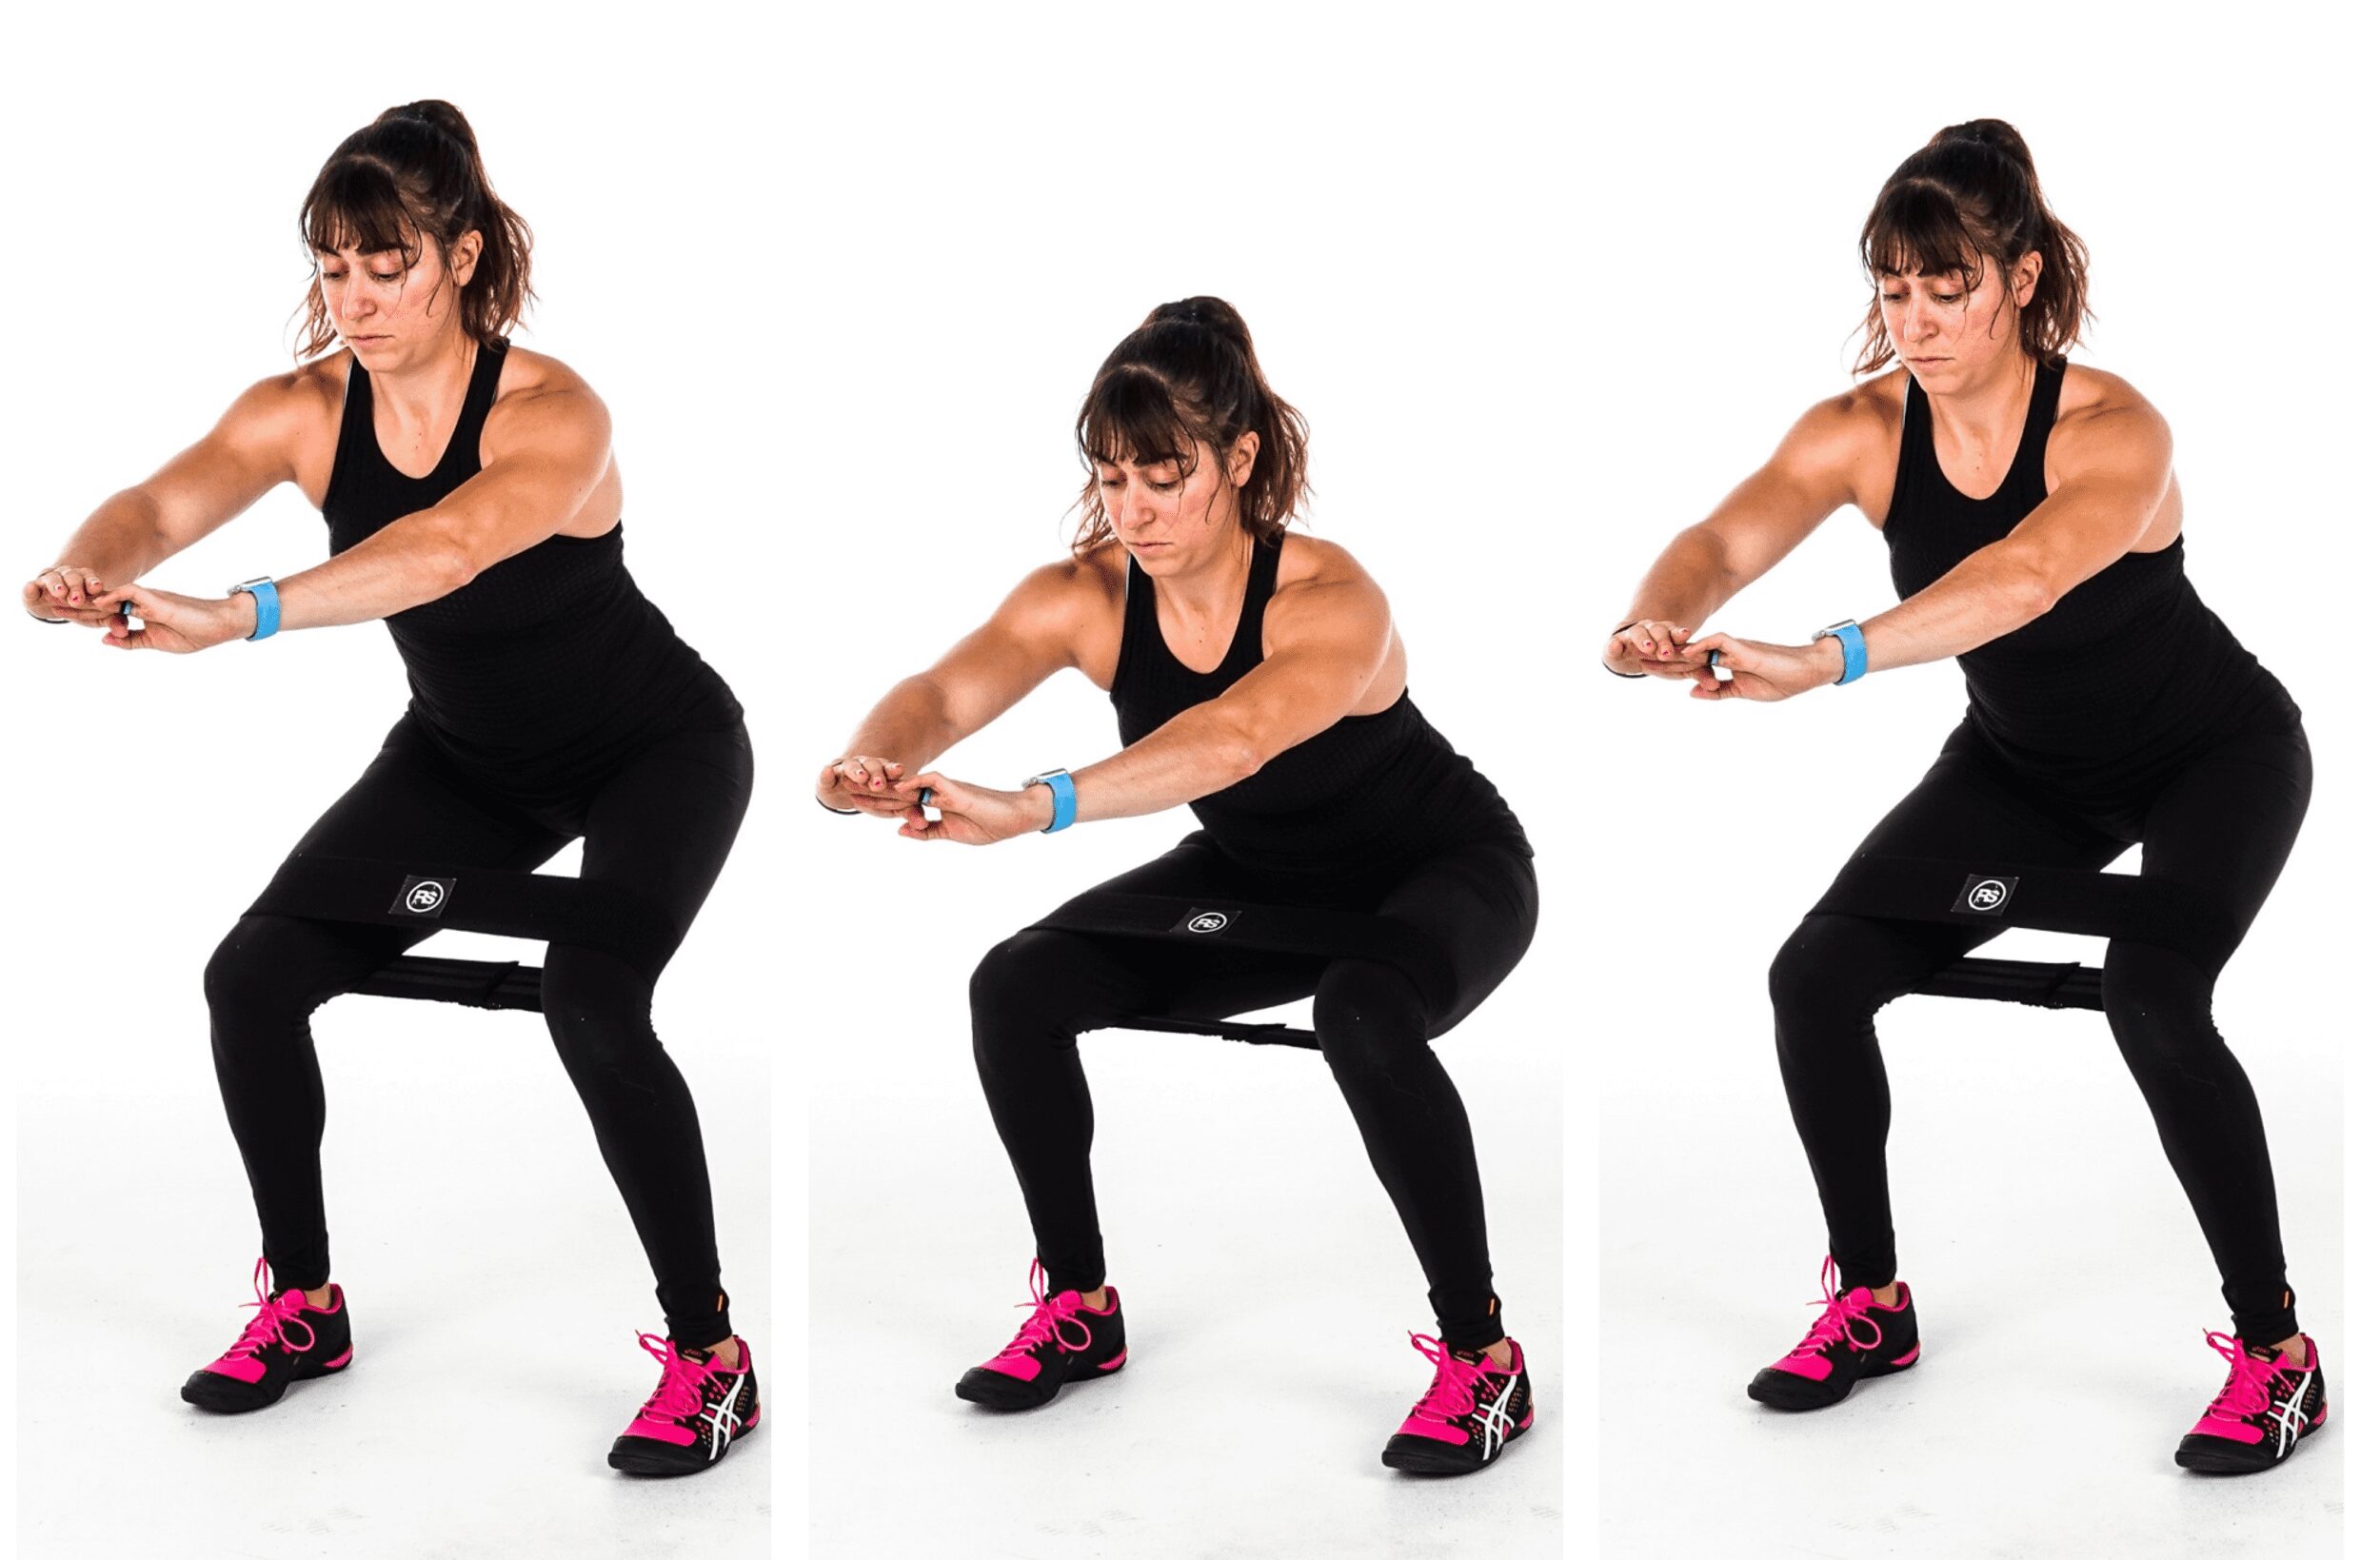
To do Band Squat Pulses, place the booty band or mini band around your legs above your knees (or if using a mini band, below your knees even) and stand with your feet about hip-width apart.

Sit back and down, pressing your knees out against the band so your ankles, knees and hips stay in line. You do not want your knees to cave in.

Sink to about parallel to the ground and then pulse a few inches up and down from here. You do not want to start below parallel and you don’t want to stand fully up as you pulse. You want the range of motion to be about 6 inches around that parallel position.

Once all pulses are complete, stand up.

Make sure your knees don’t cave in as you pulse and that your heels stay down and feet are flat on the ground. Do not round over. Make sure to keep your back flat and chest up.

Beginners may pulse over a bench or even hold on to help them balance. You can also stay up higher in the pulse squat instead of sinking as low.

You can also even vary this movement by performing a GOBLET band pulse squat, holding a dumbbell or kettlebell up at your chest. Or by changing the exact range of motion performed!

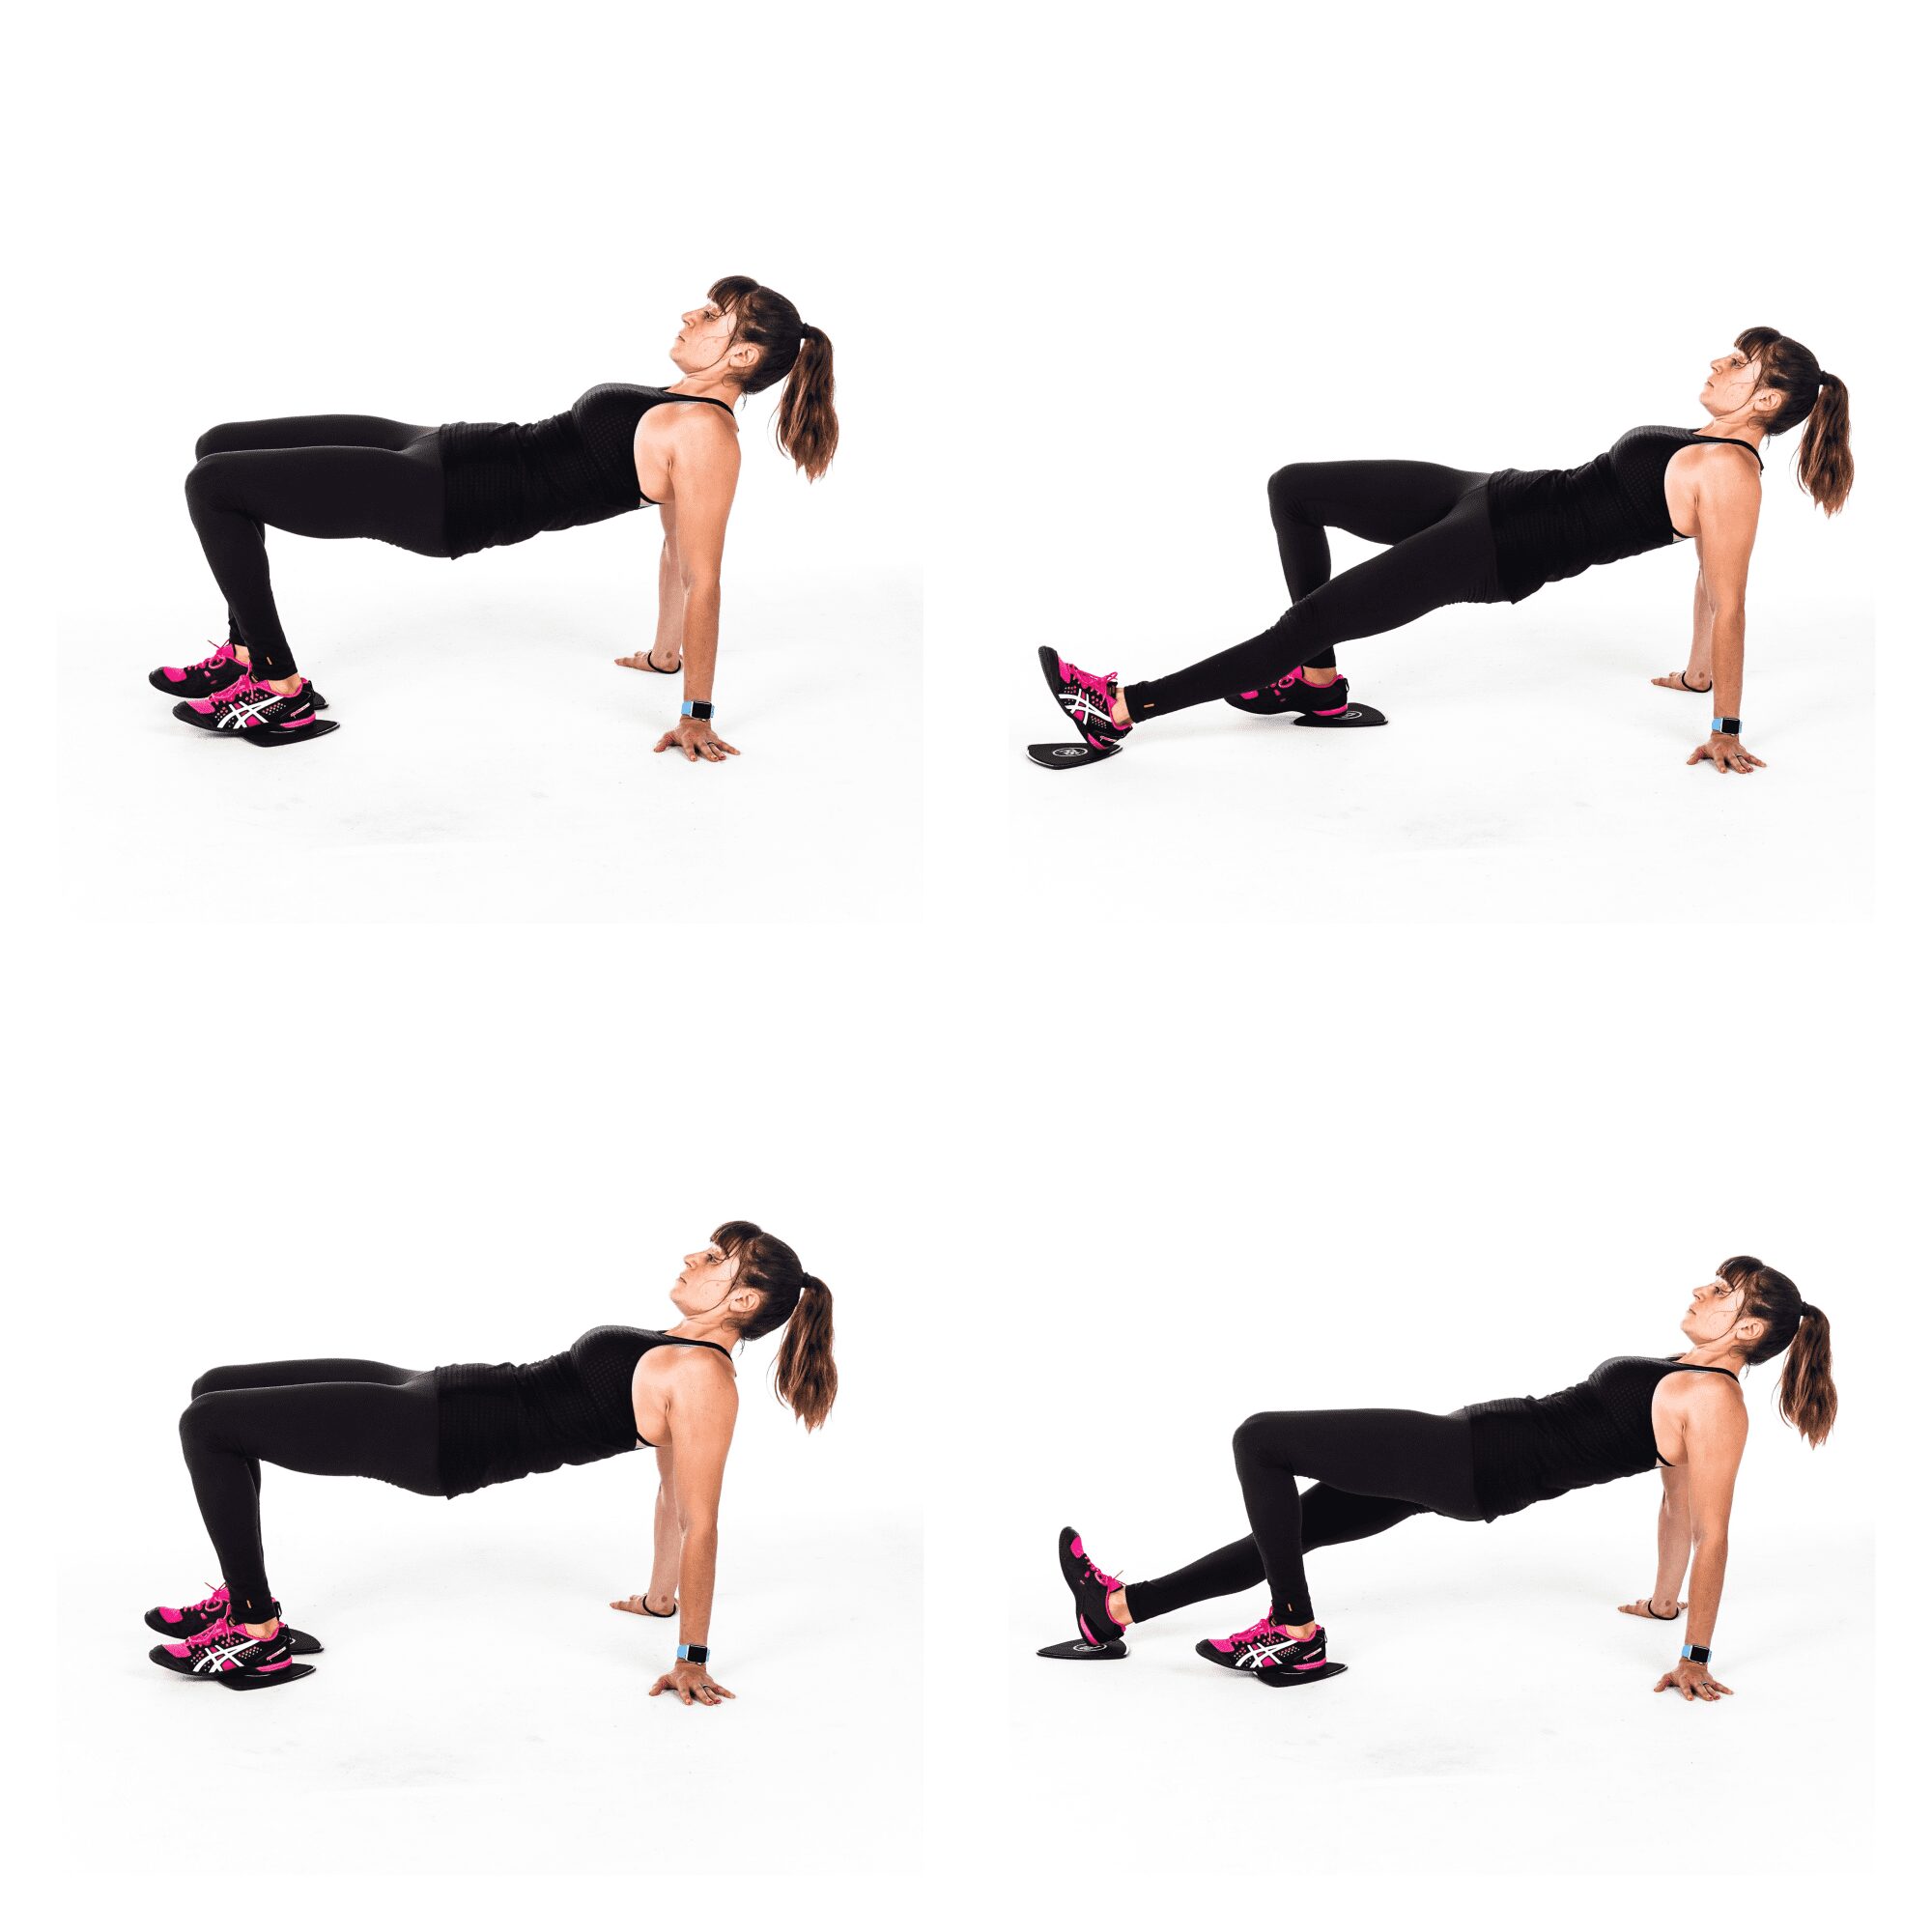
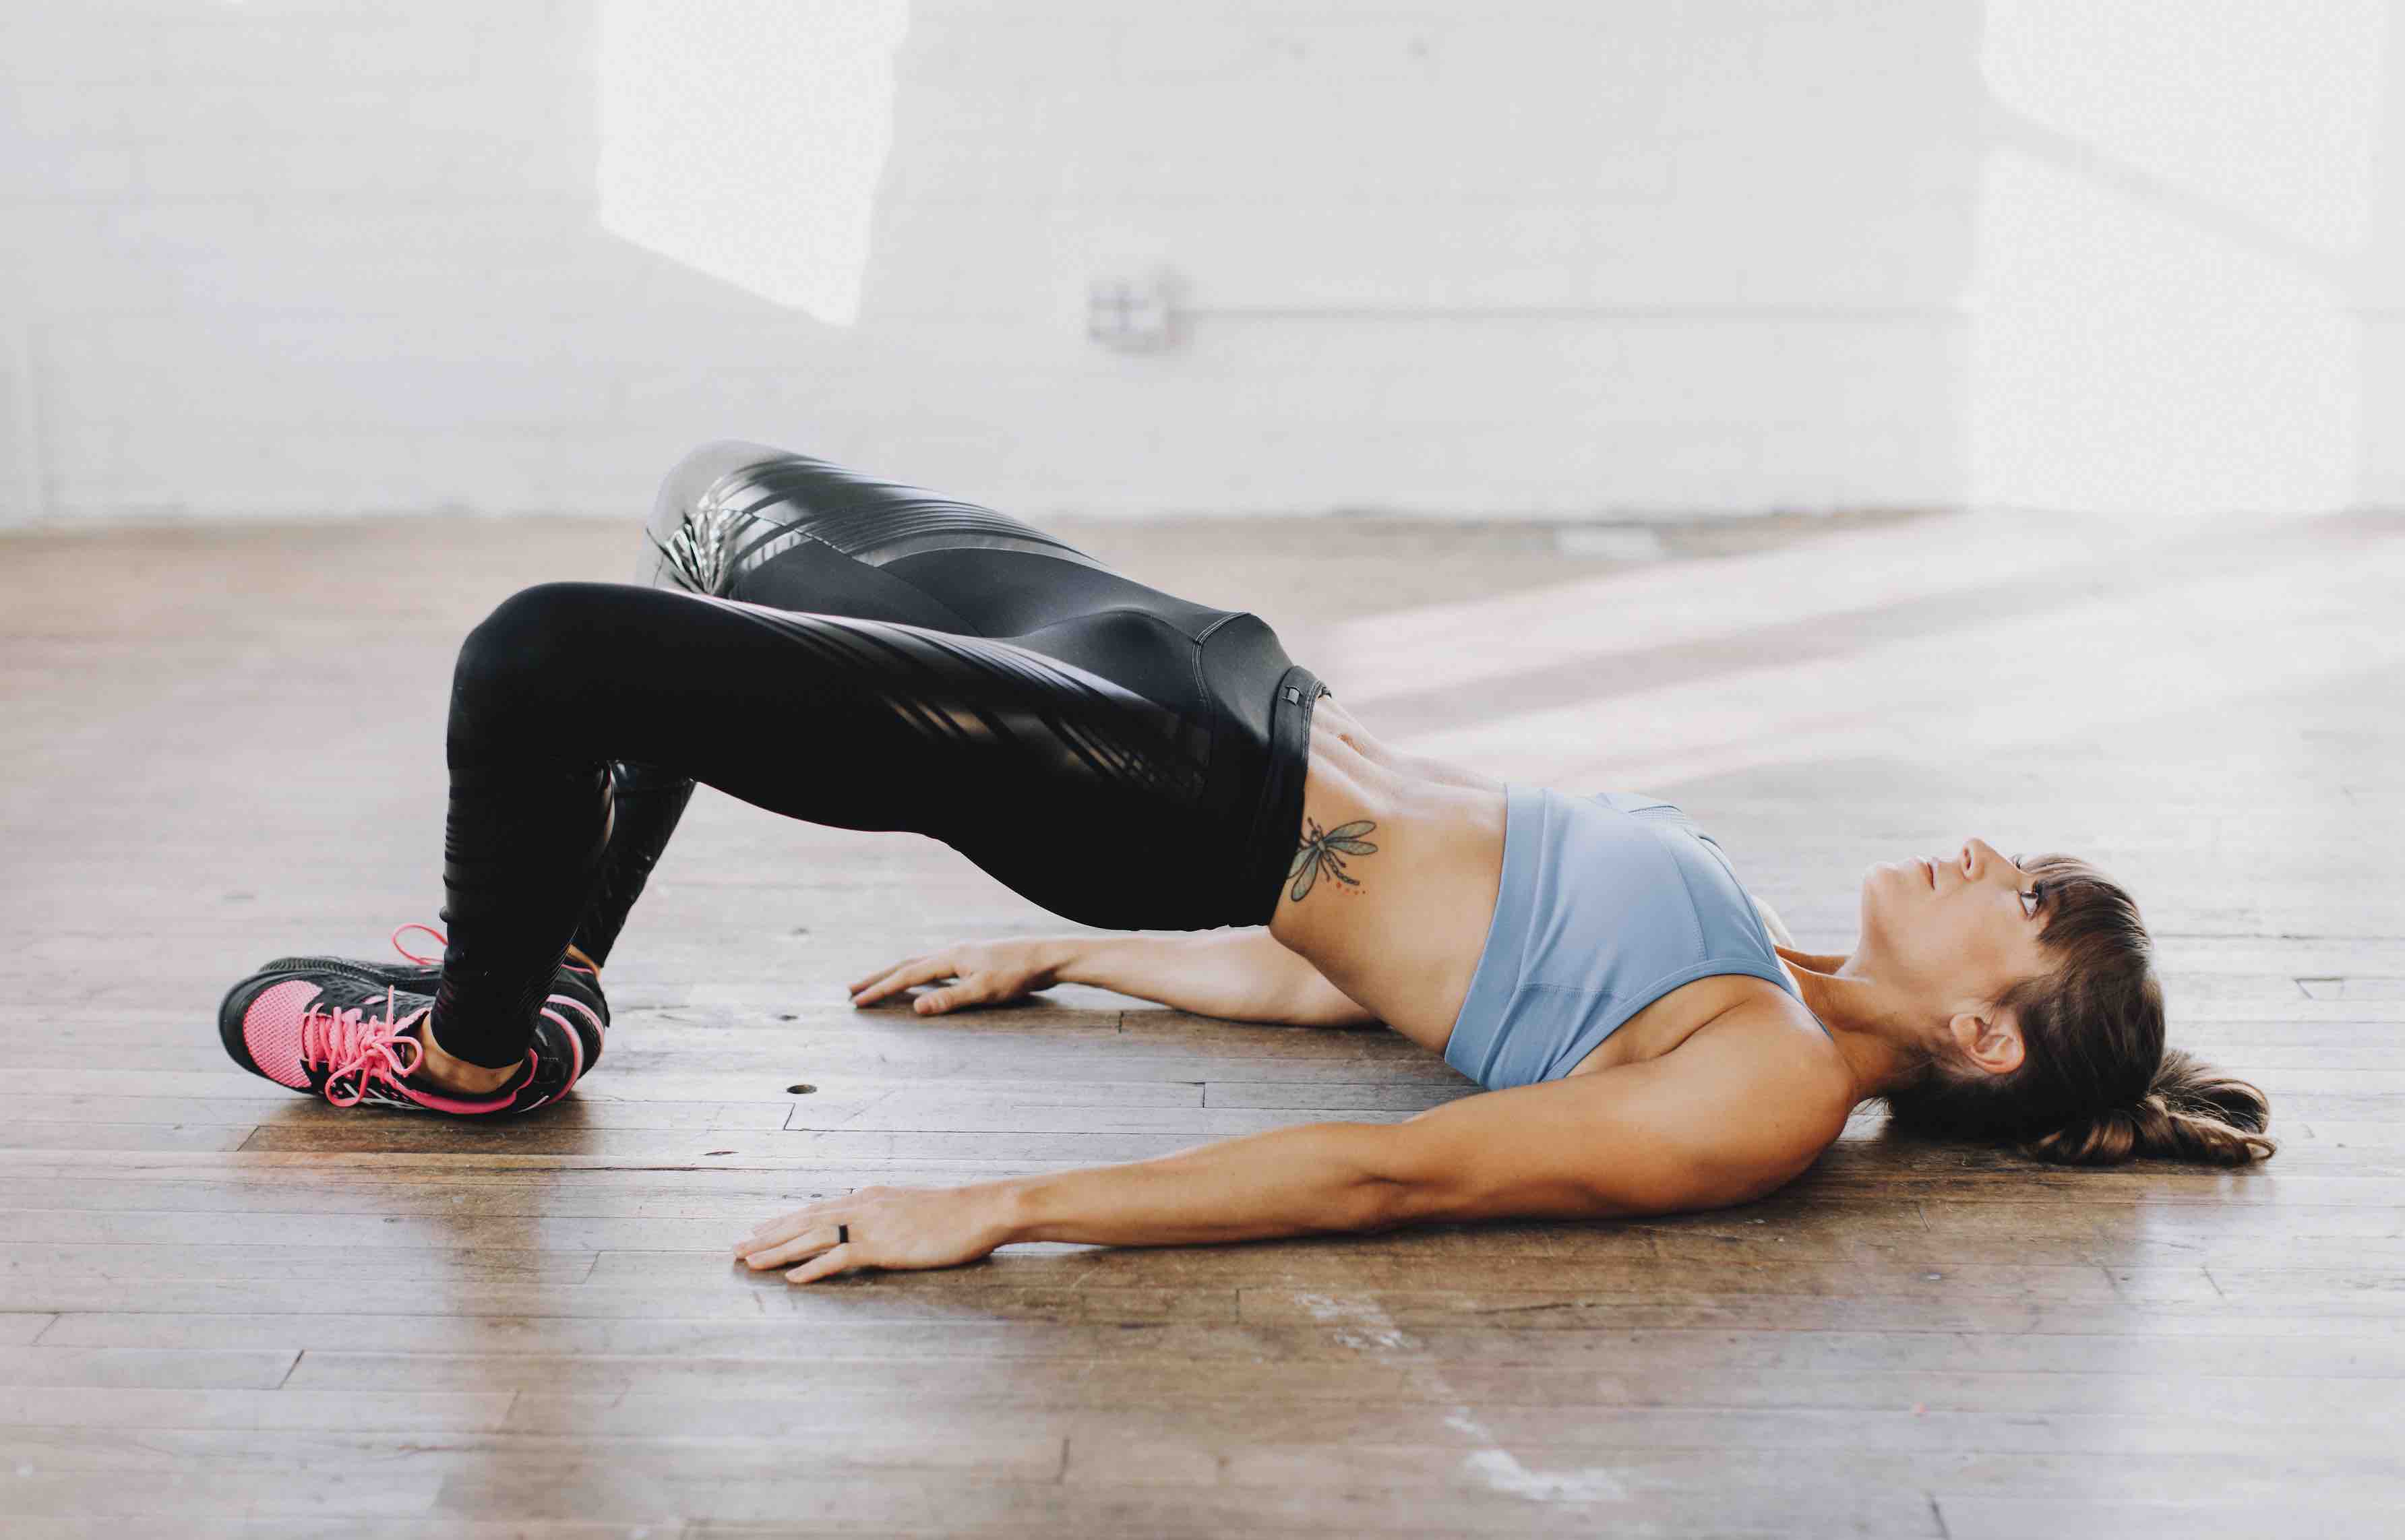
Barbell Hip Thrusters:

This move will create muscle tension to work those glutes and target the entire glute max.

As you progress, you will want to add loads, just be careful that you don’t start allowing your hamstrings and quads to take over just so you can go heavier.

Advanced exercisers able to go heavier may work down toward 5 reps while beginners or anyone really wanting to focus on that mind-body connection may find they need to stay in that 10-15 or even 20 rep range!

hip-thruster-glute-exercise

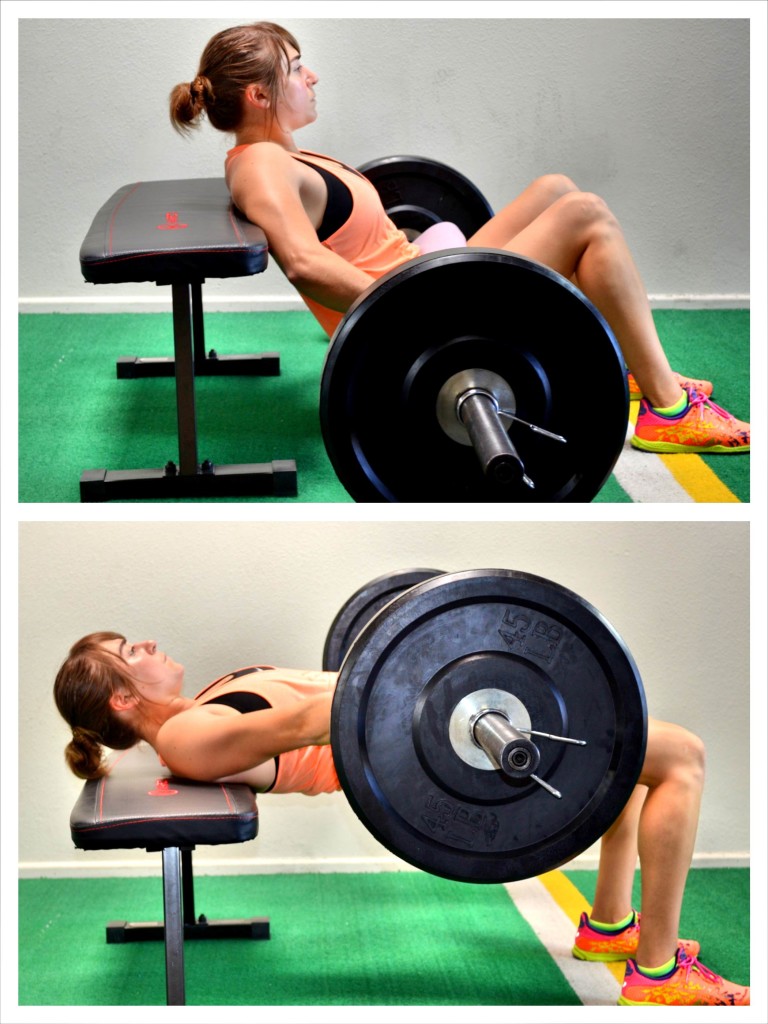
To do the Barbell Hip Thruster, set up a bench and make sure it won’t move as you bridge up with your back on it. Take a barbell and put some padding around it so that it won’t dig into your hips as you perform the move.

Place your upper back against the bench and sit with your butt on the ground and your legs out straight. Roll the barbell up over your hips and then bend your knees and plant your feet firmly on the ground and close to your butt. Your mobility may dictate the exact placement of your feet.

Holding the bar firmly, drive up through your heels and your upper back on the bench, to lift your butt up off the ground and drive your hips, and the barbell, up toward the ceiling.

Squeeze your glutes and press your hips up as high as possible, driving the barbell up and off the ground. Hold a second or two at the top and then lower back down and repeat.

Do not hyperextend your back at the top. Really squeeze your glutes at the top and even posteriorly tilt your pelvis. Make sure you are driving straight up through your heels. Do not push yourself backward over the bench.

You may find that as you bridge up you want to “push” the barbell down toward your thighs to help you drive up and squeeze your glutes.

You can also slightly keep your chin tucked so you’re looking up but out past your legs instead of relaxing your head back to look straight up at the ceiling. This little flexion of your neck can help with your glute engagement.

Lower your butt back down toward the ground and repeat.

You do not fully need to touch the weight down, but you do want to complete a full range of motion. Make sure to sit back forward as you lower down instead of trying to keep your upper back up on the bench so that you don’t hyperextend your back by simply lowering your butt.

Then repeat, driving your hips back up.

Do not rush the movement. While you can add weight to make the movement harder, you may also want to adjust the tempo!

Slowing down the lower down can create more tension on that muscle too! It’s not always about adding loads!

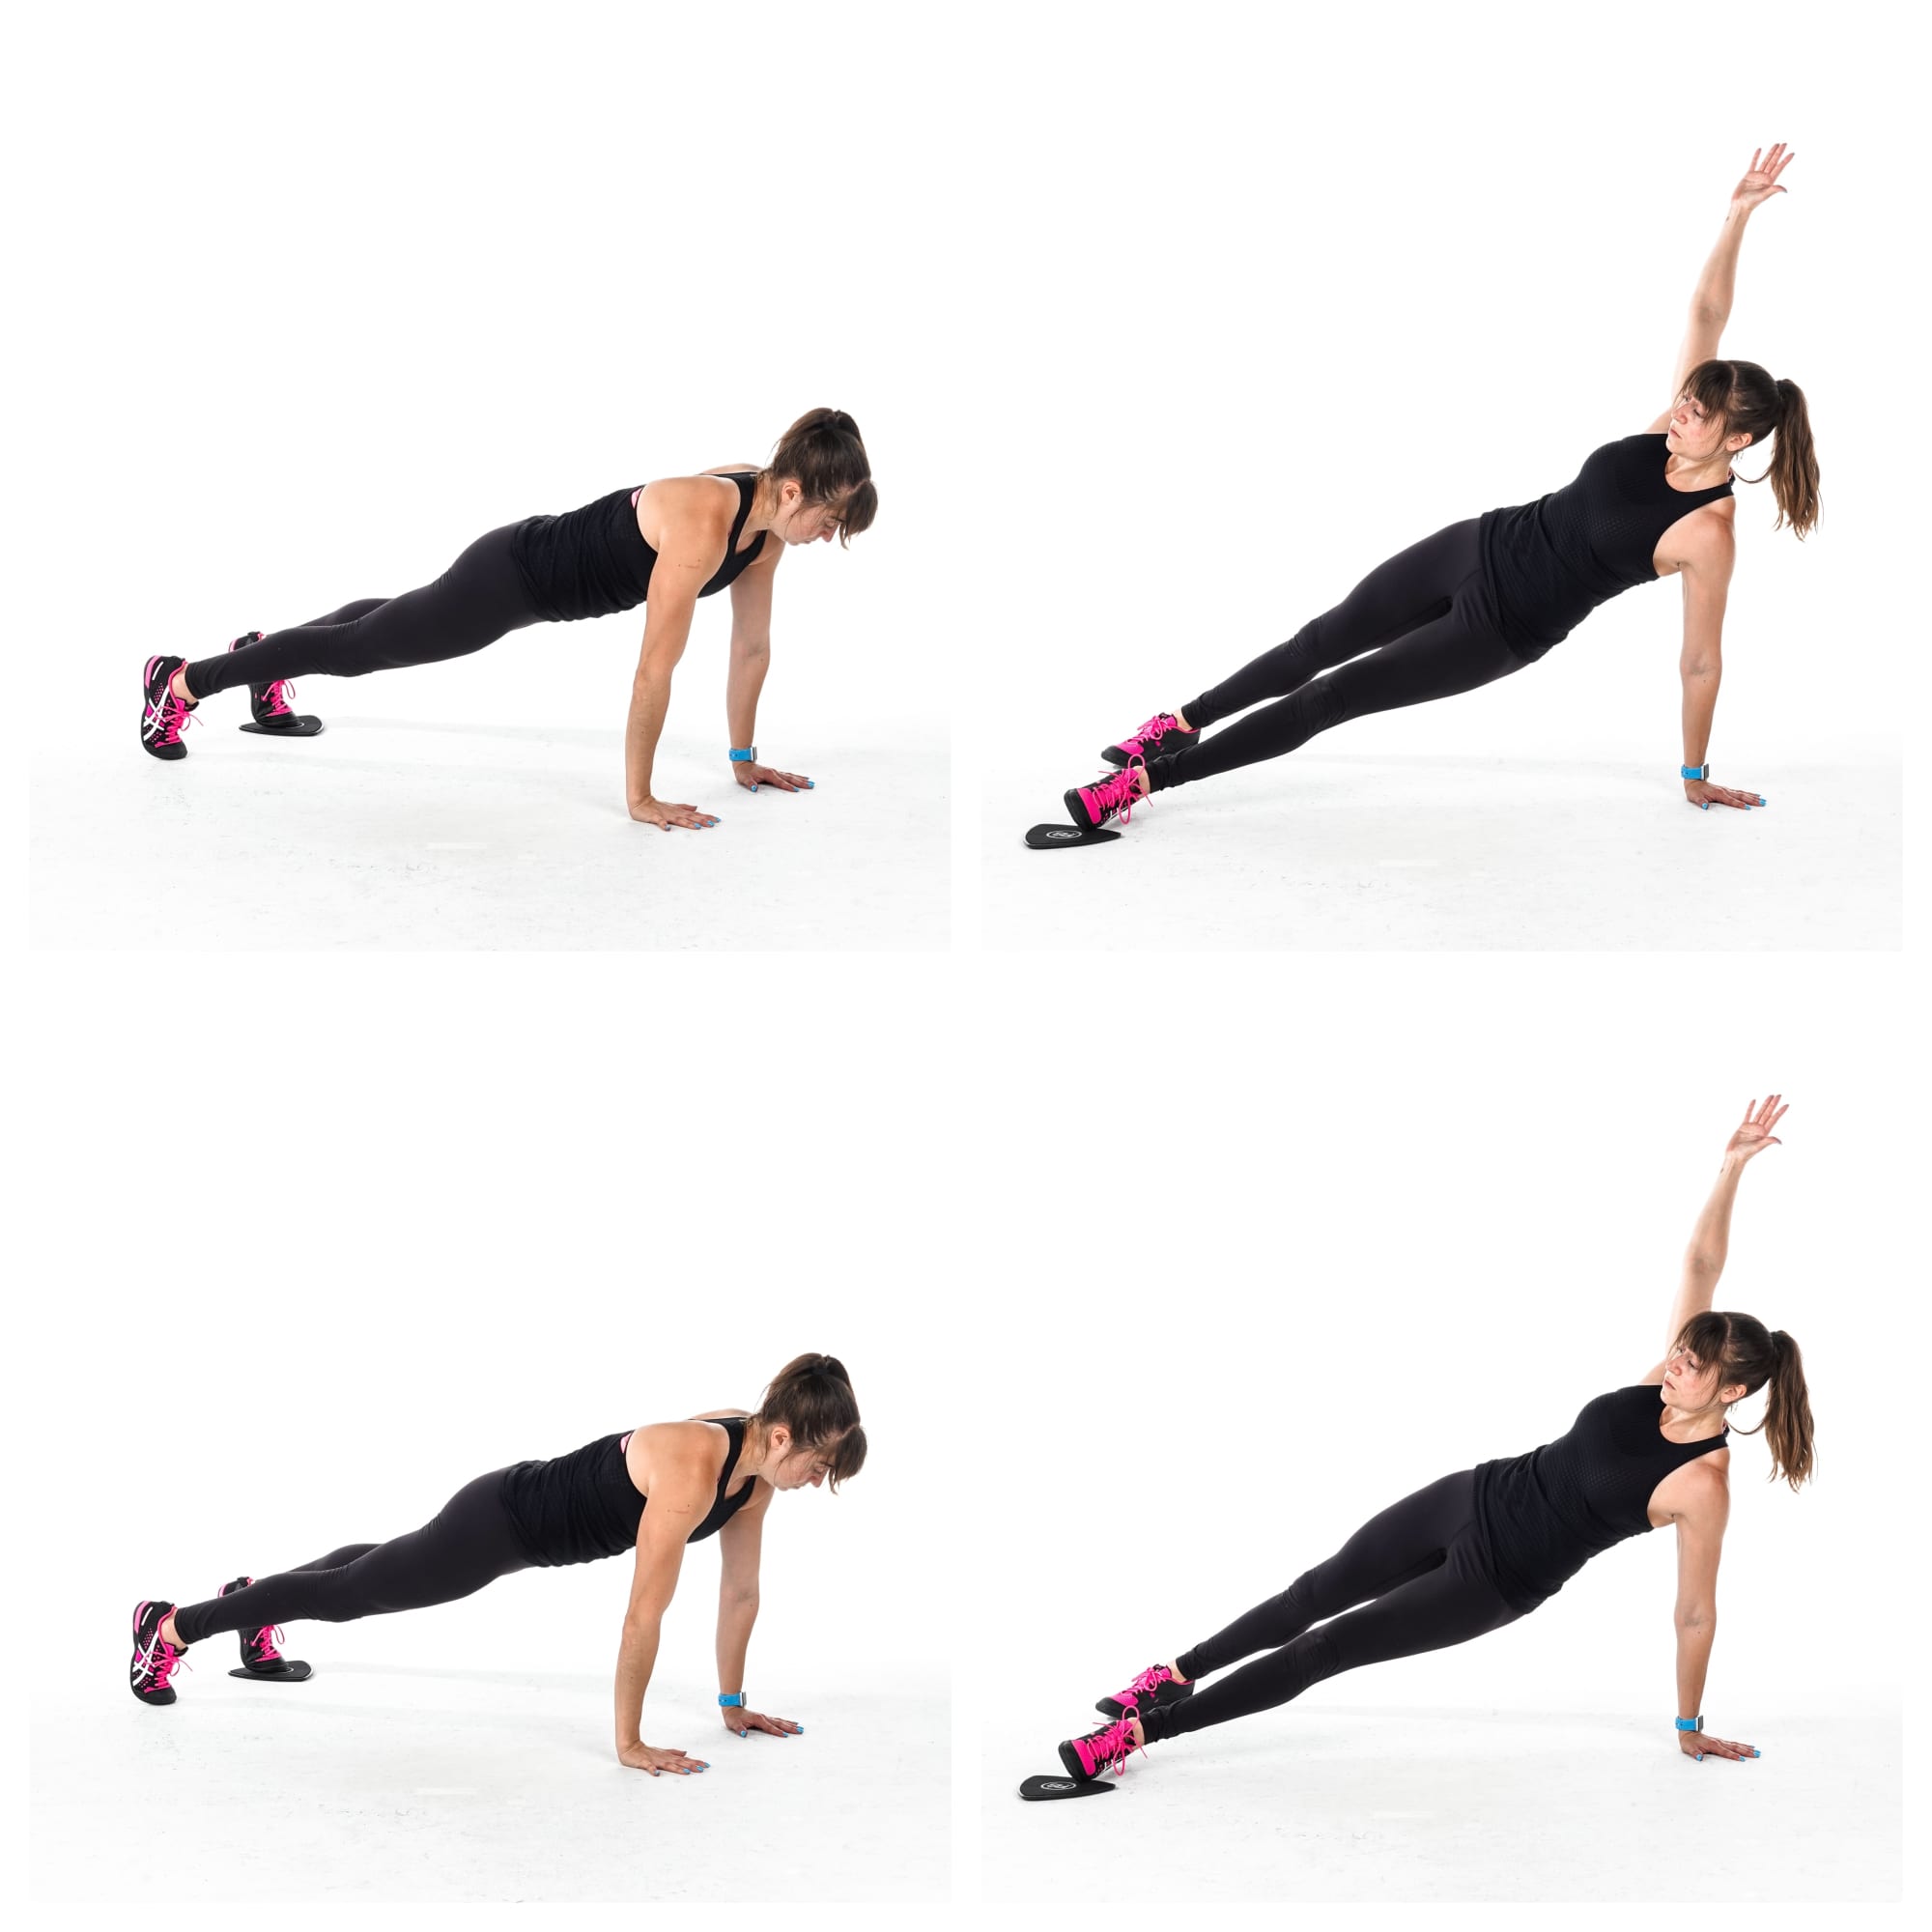
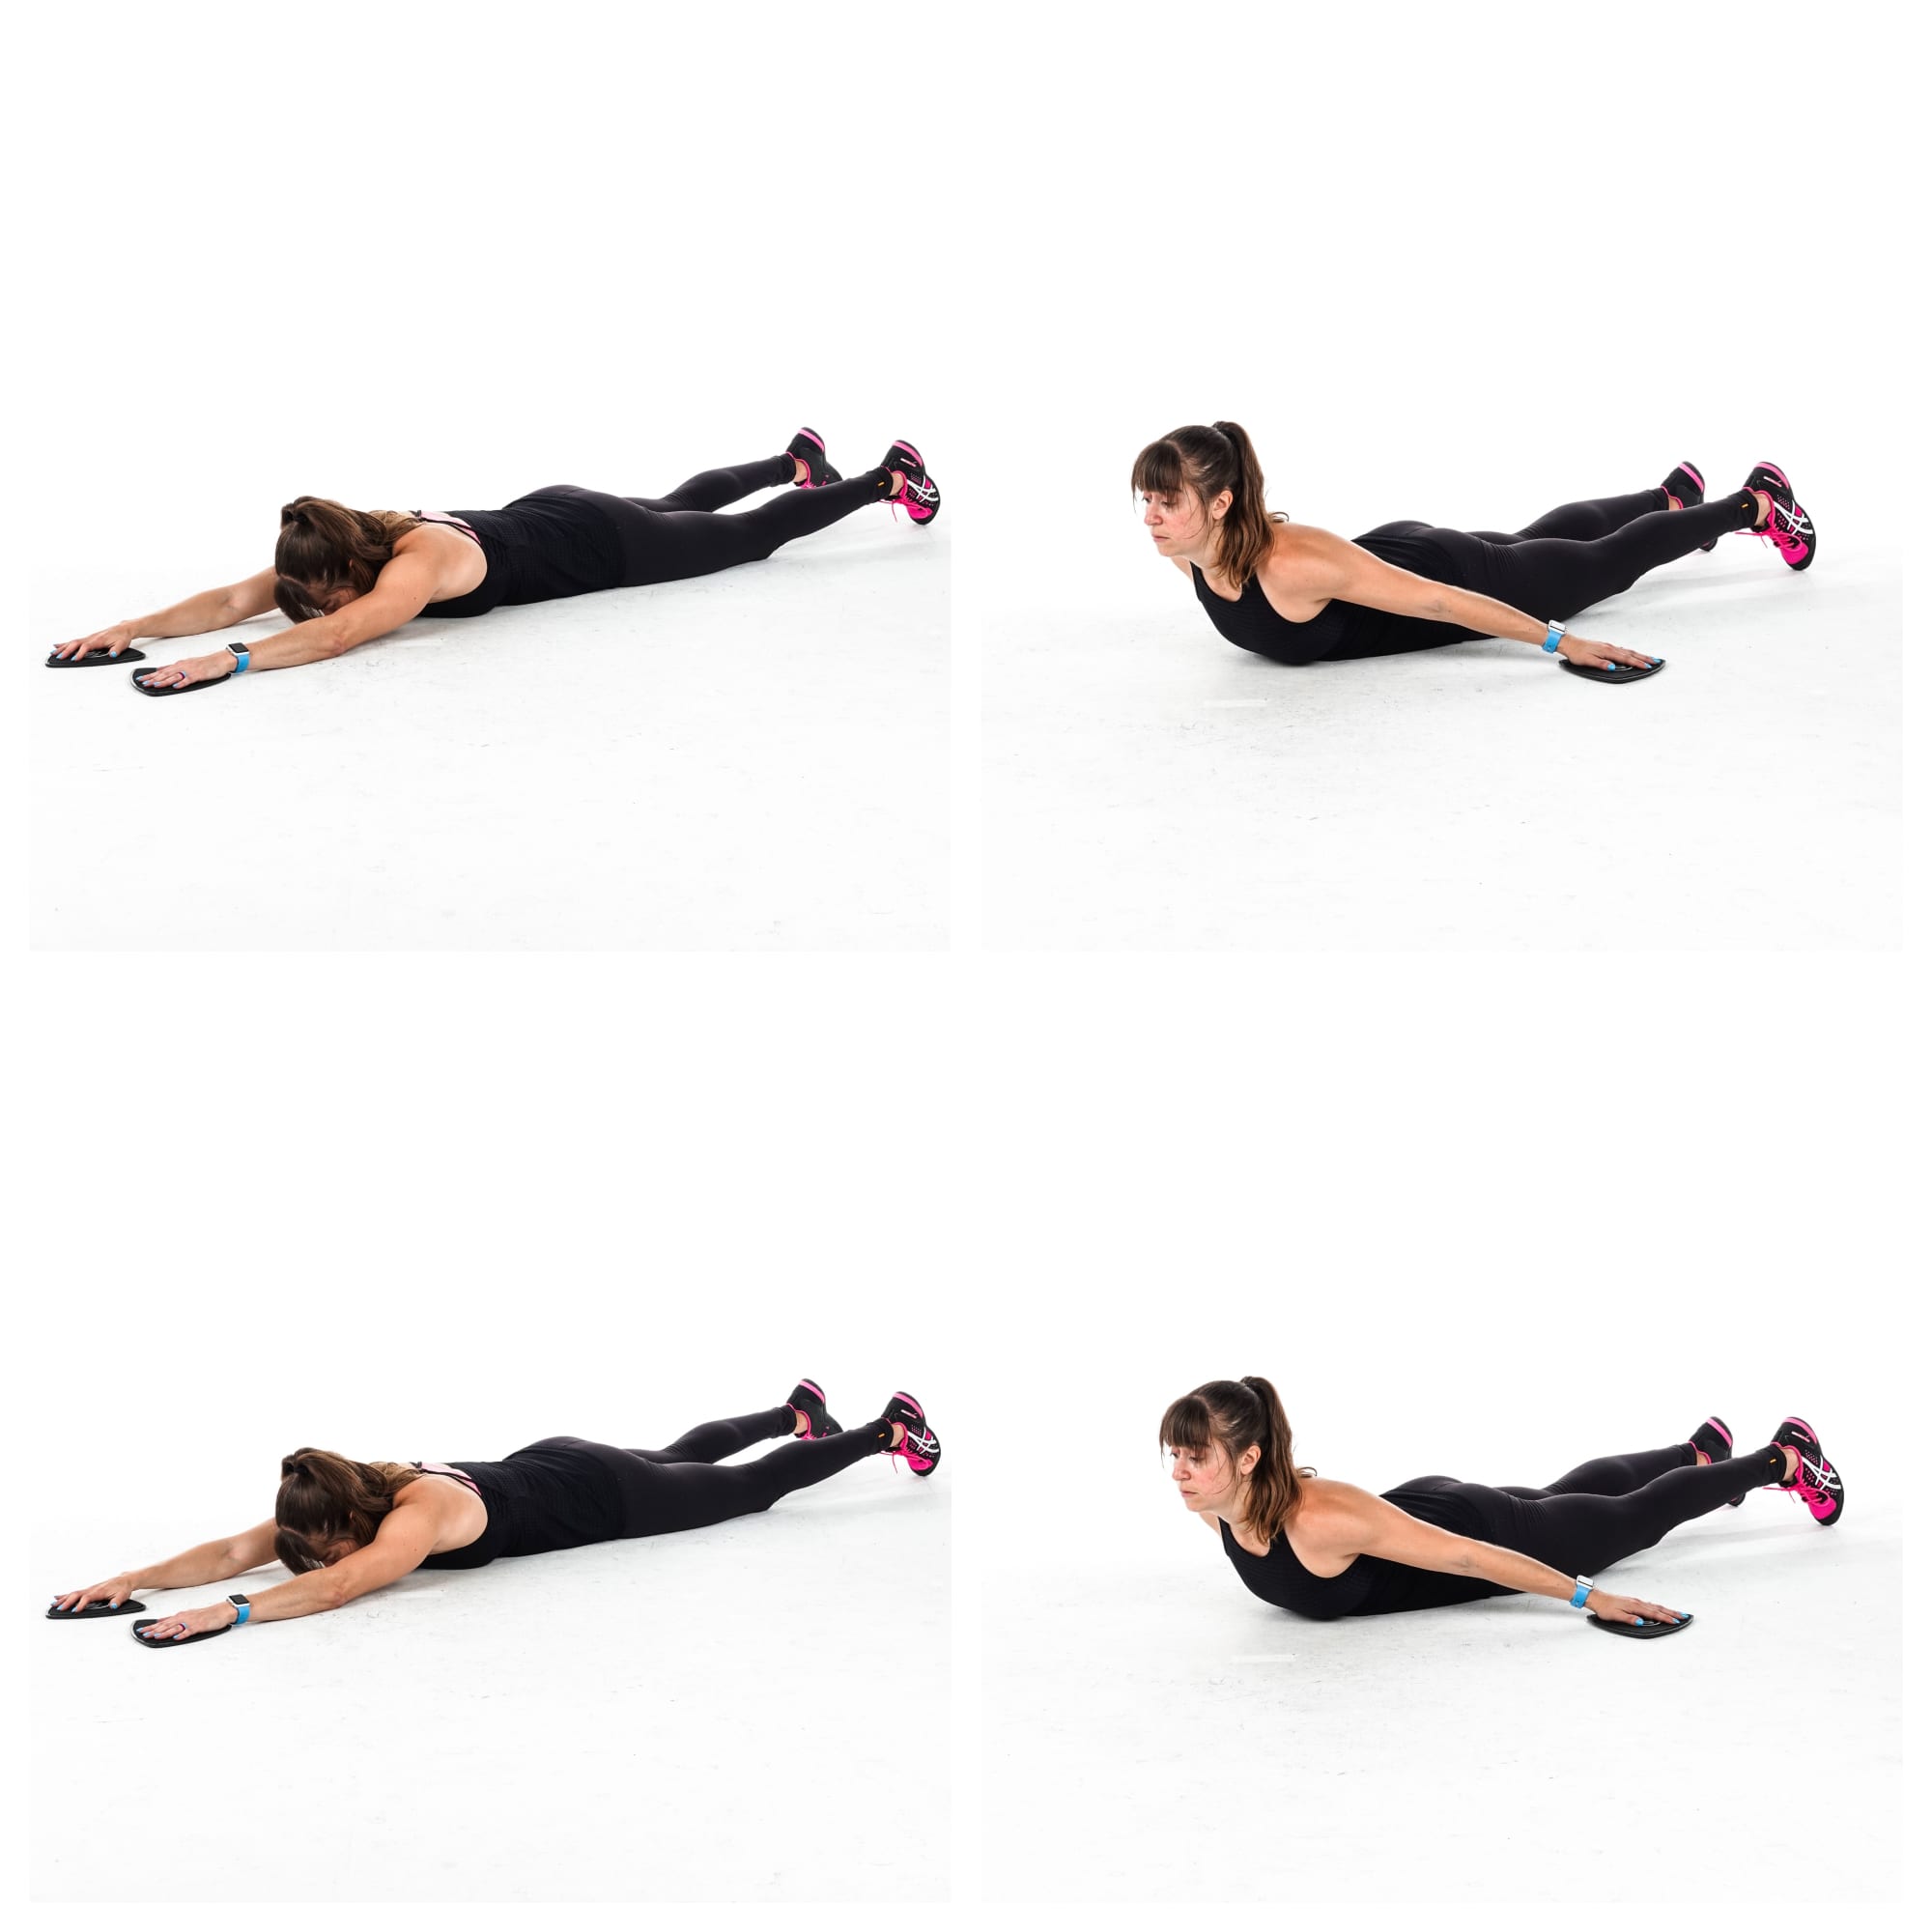
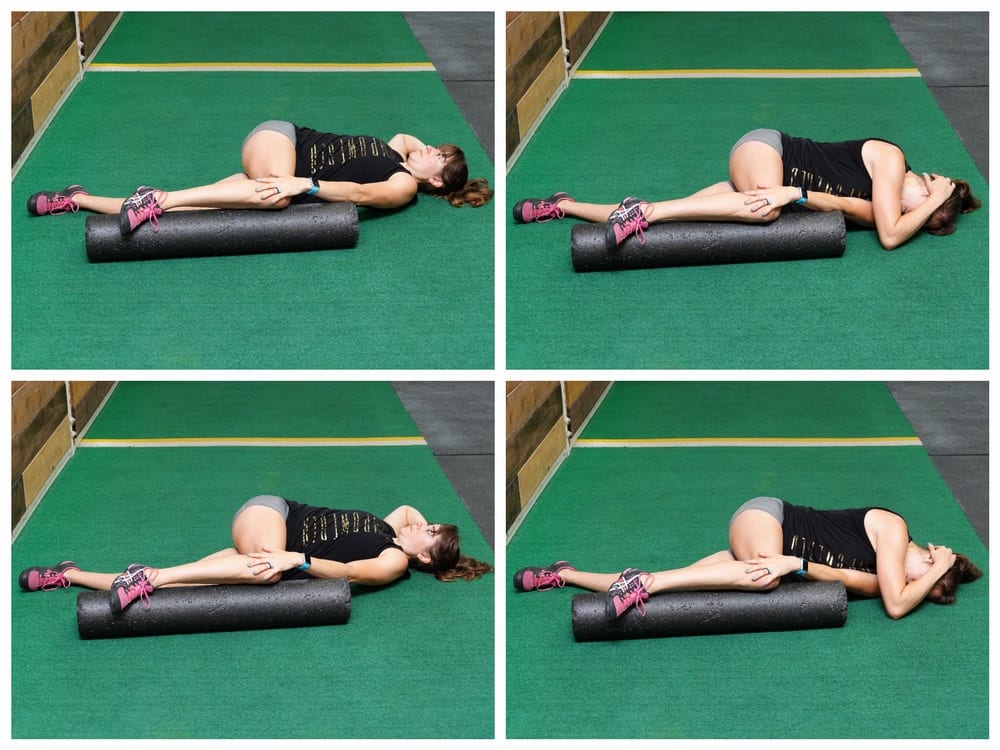
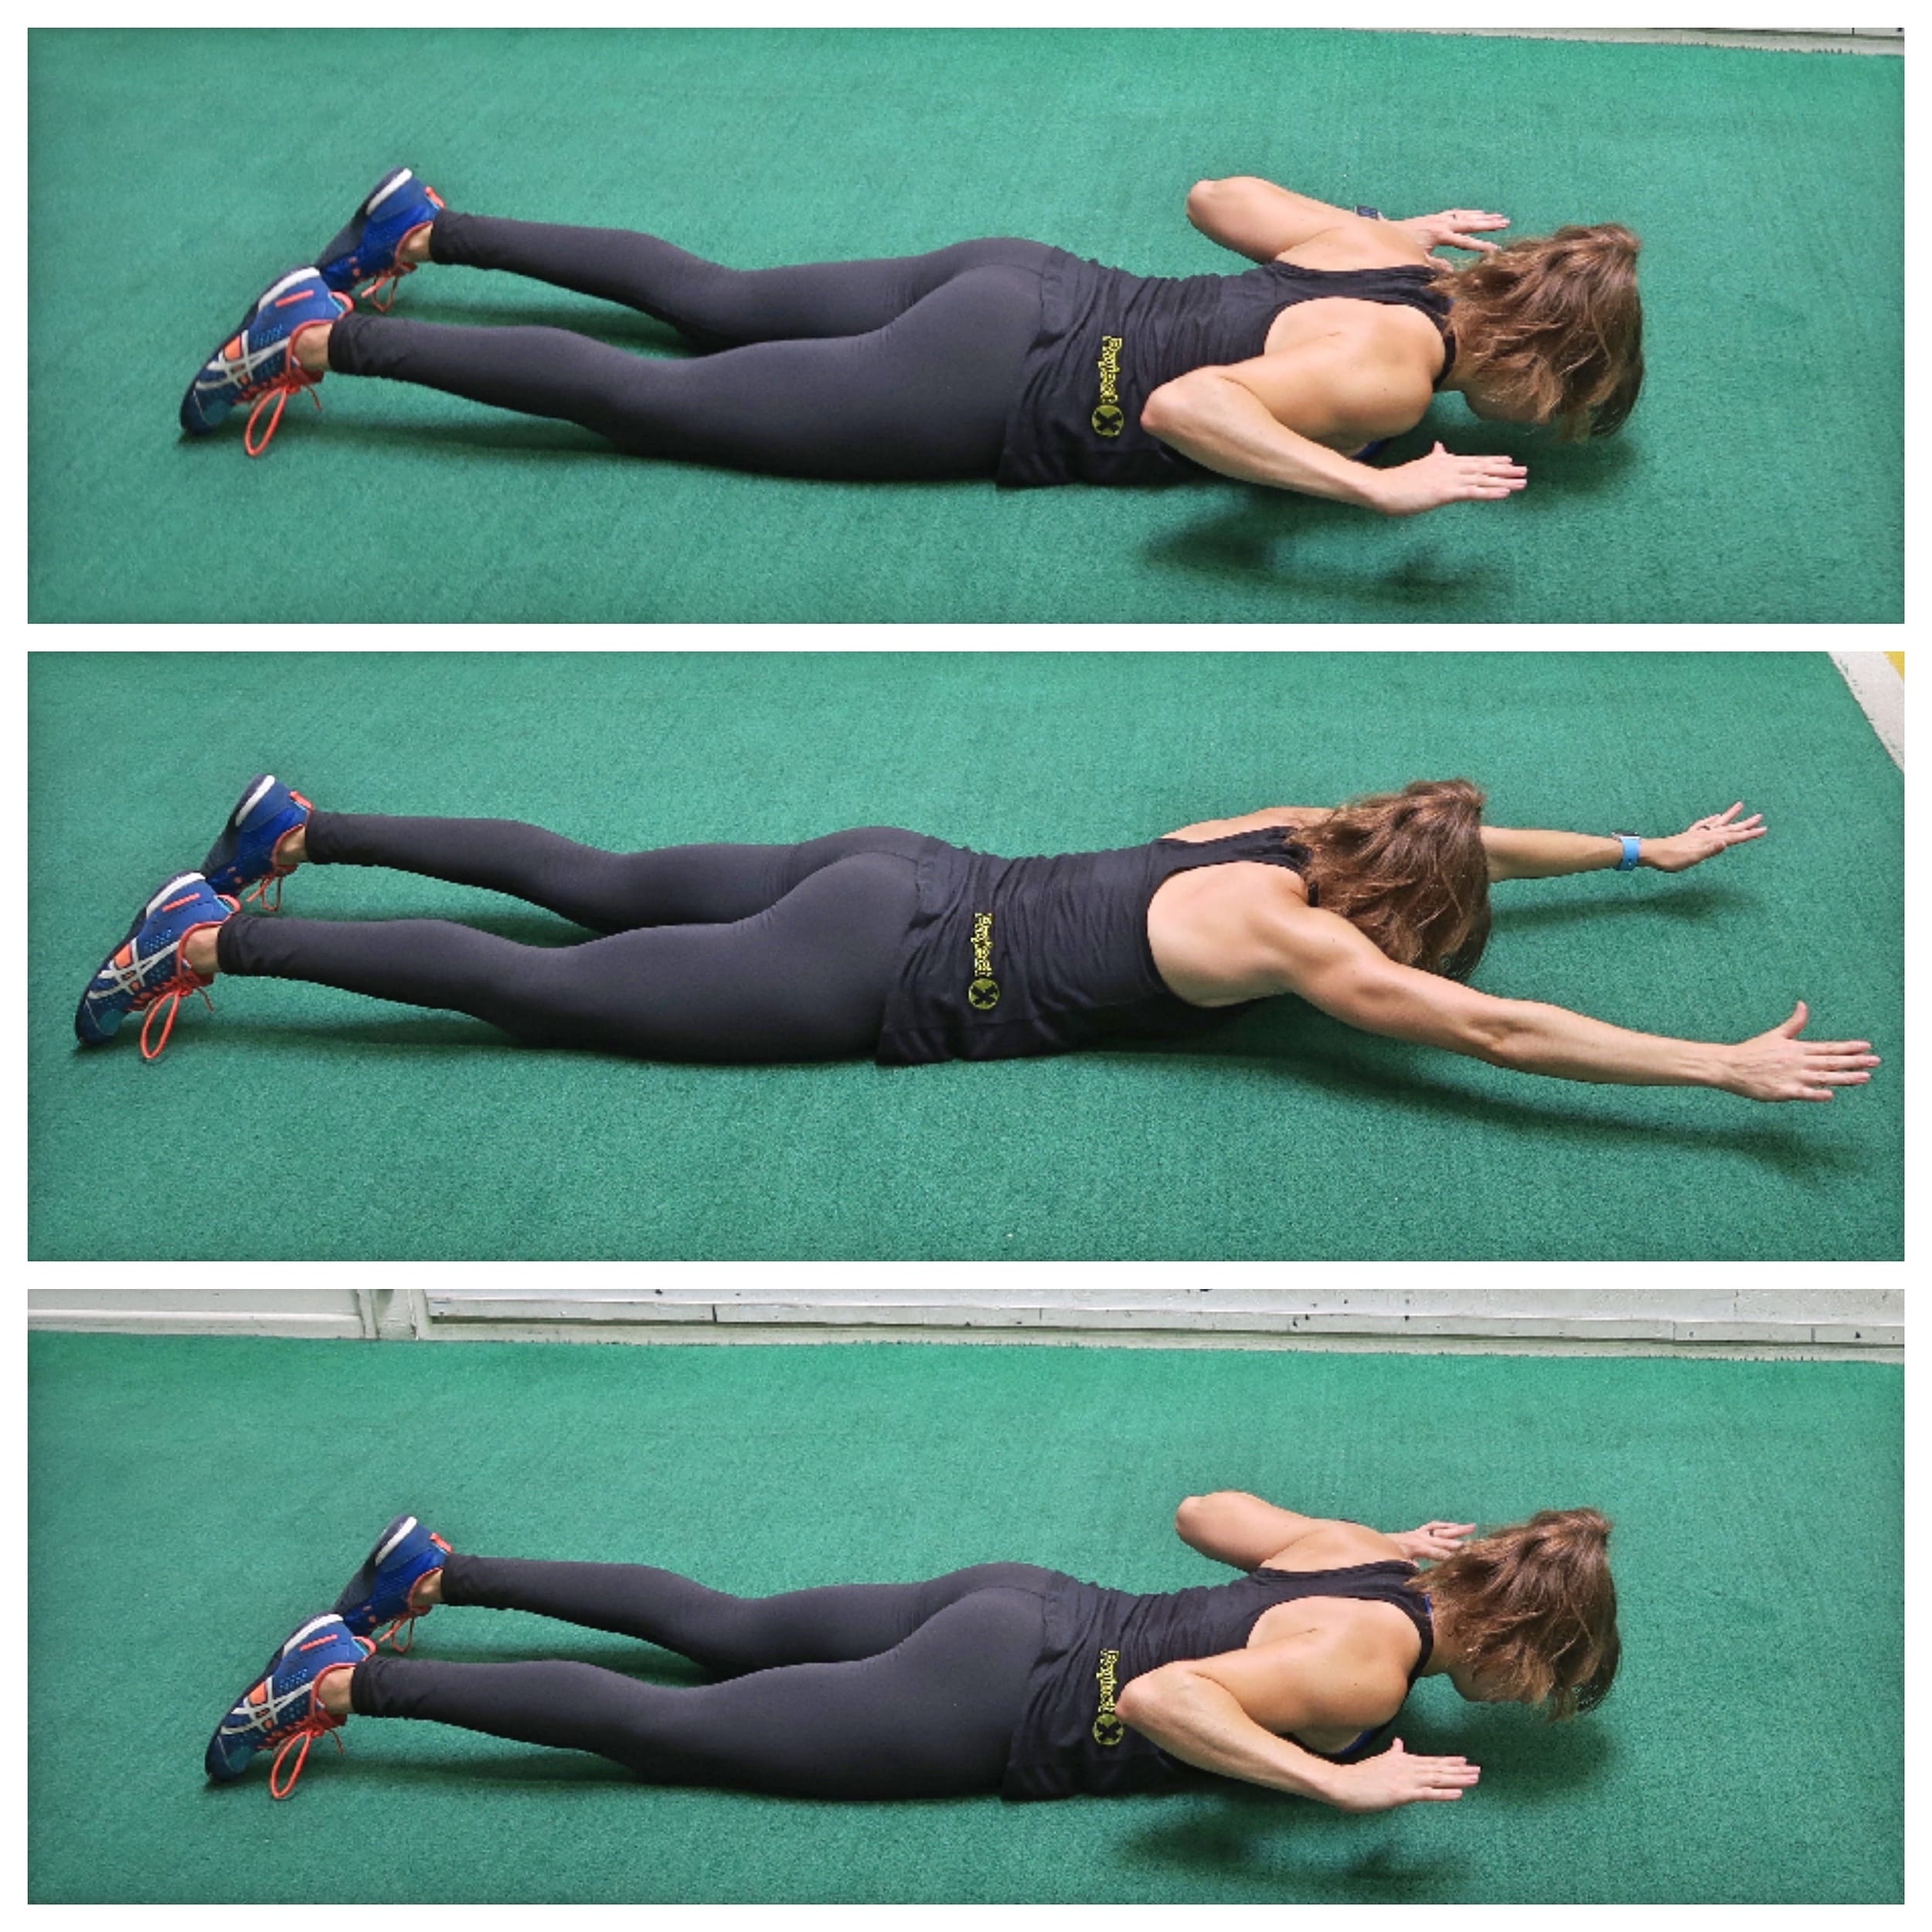
Band Lying Lateral Raises:

This is a great move to create metabolic stress, strengthen your glute medius and even target your upper glute max more!

Especially if you’re a runner, this is a must-do move for hip stability and a great way to “perkify” your butt while not creating fatigue for your running!

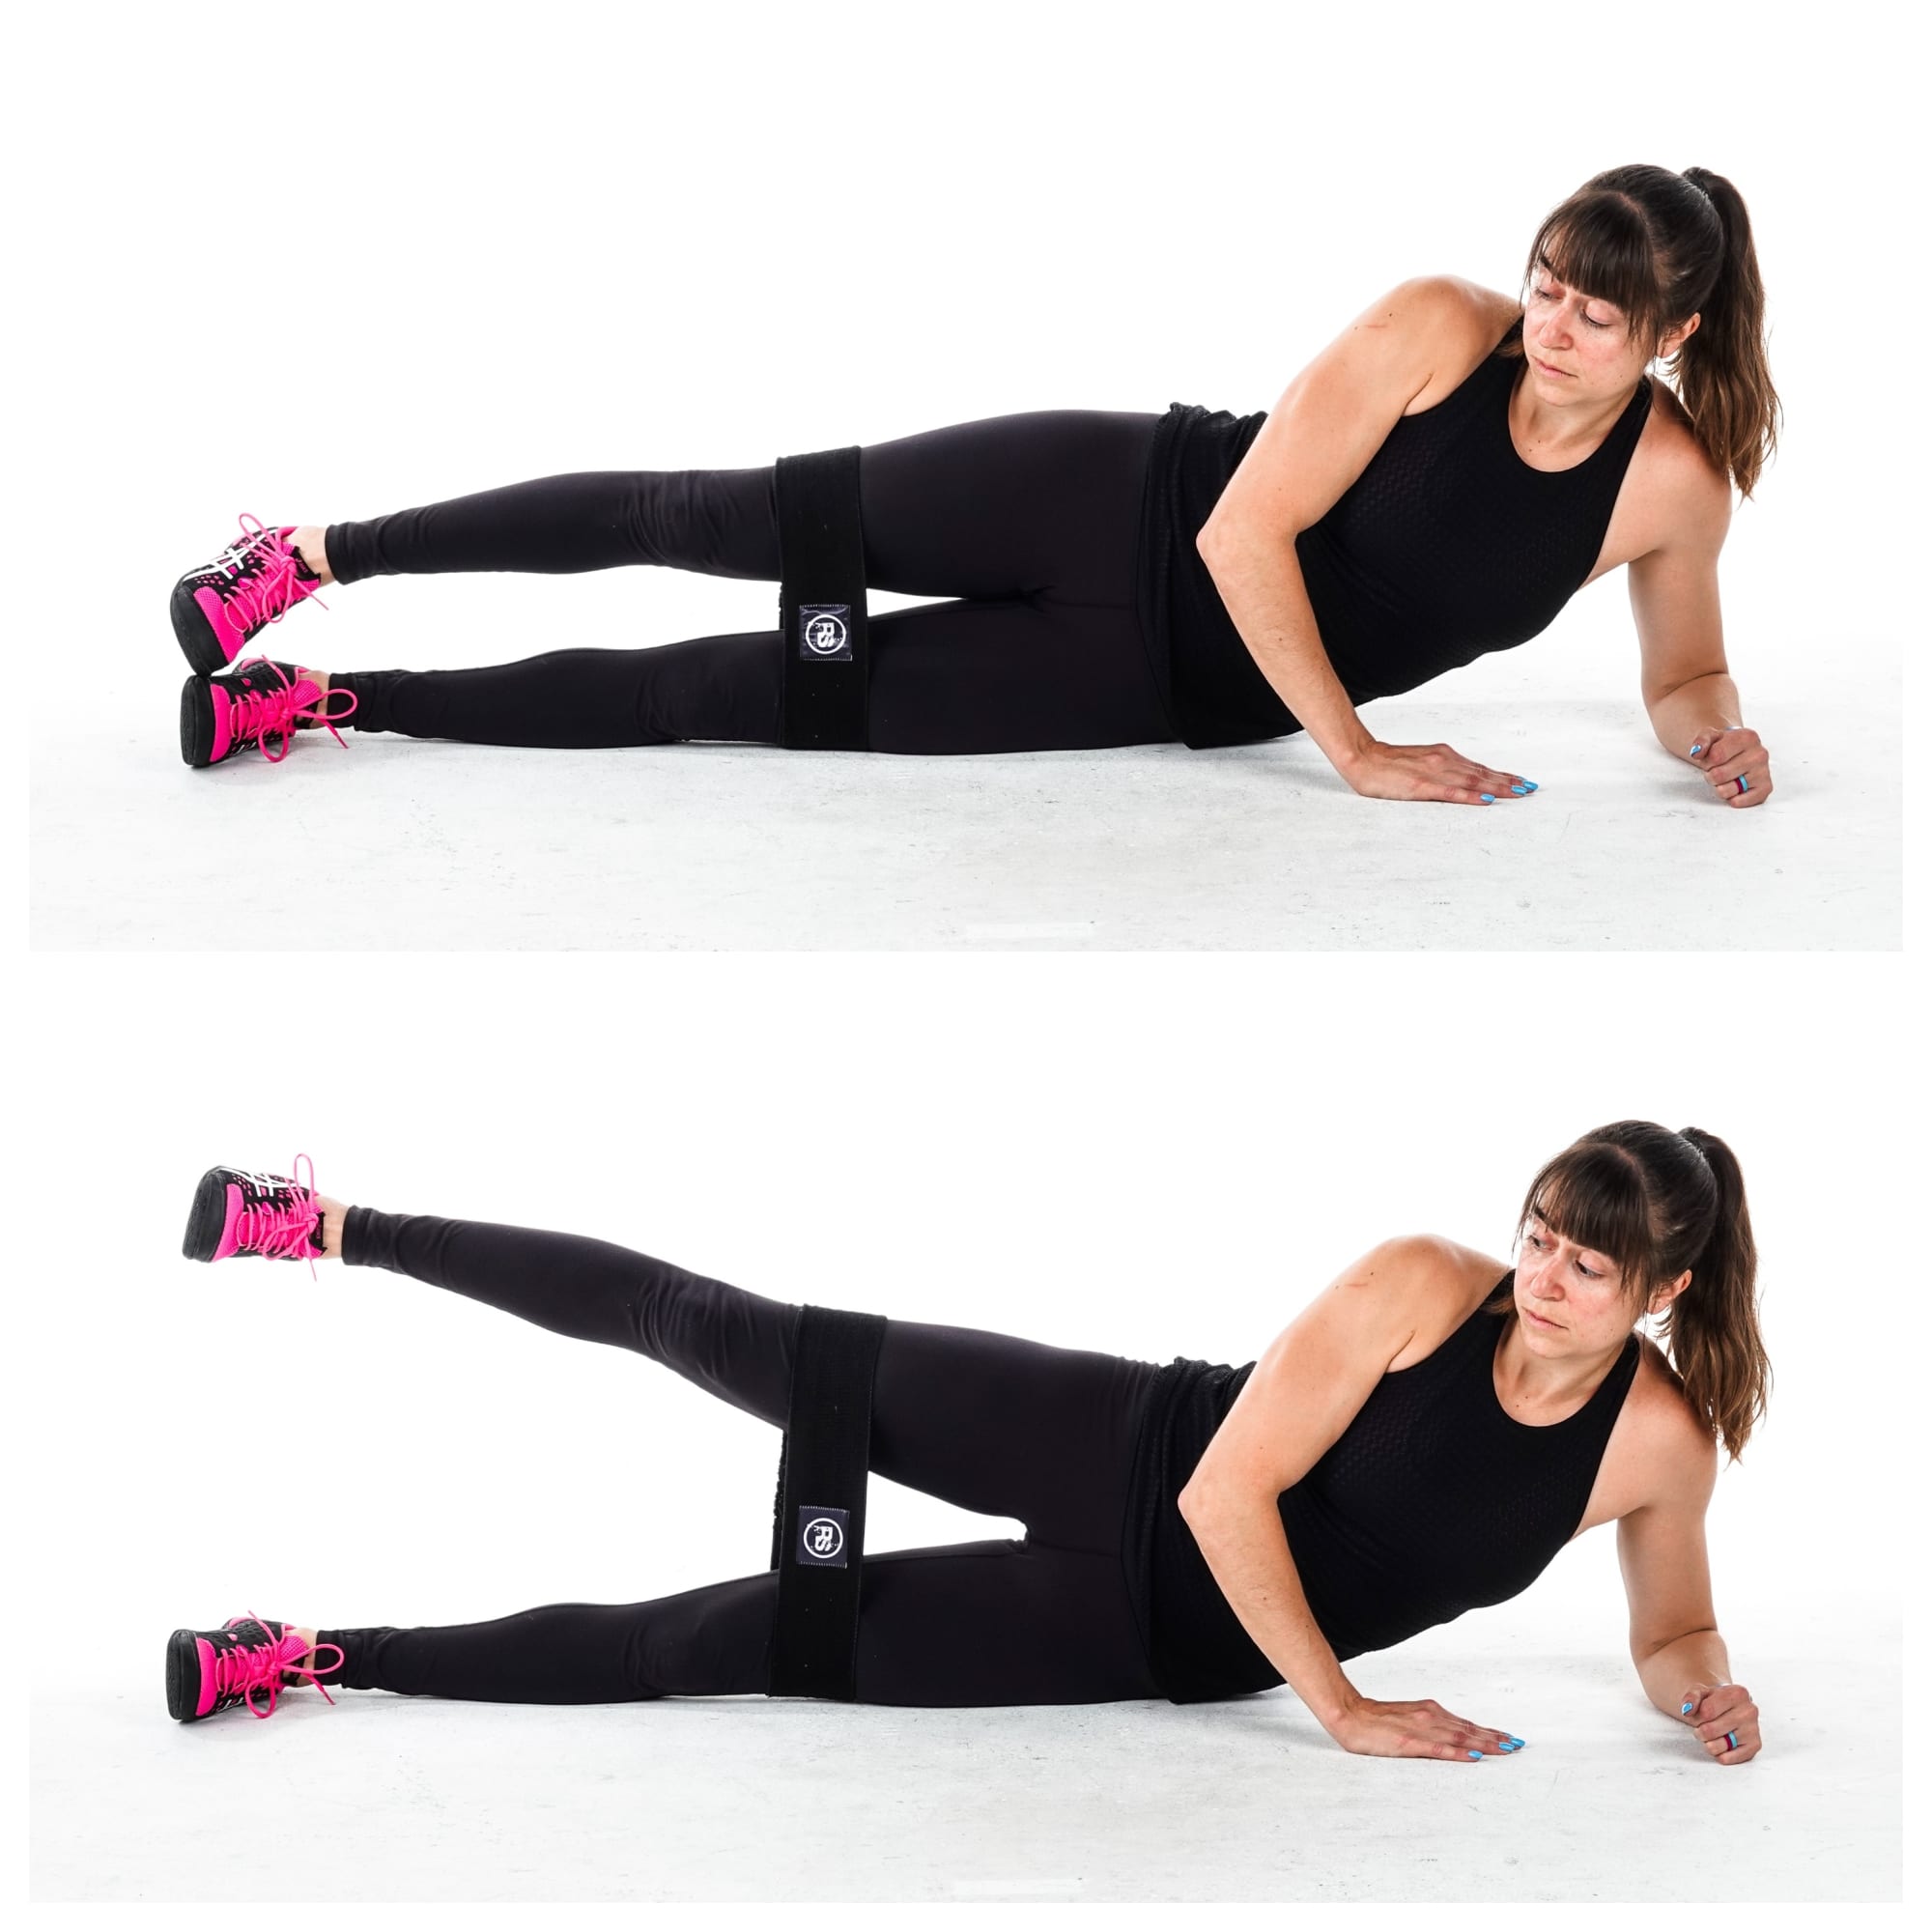
To do Band Lying Lateral Raise, place the band around your legs. The placement depends on the band and how well you can engage your glutes. Put it above your knees if you’re using a booty band or heavier mini band or below your knees to progress the movement using a mini band. You can even move the band down around your ankles if you don’t feel other muscles compensating.

Then lie on your side on the ground. You can support your head in your hand while lying on your side or relax fully onto your side. Place your top hand on the ground in front of you to help you stabilize.

Stack your feet on top of each other and then lift your top leg up so there is just a very little bit of tension on the band. If you have a booty band, you may not really have to lift it, but just make sure there is tension and you keep this tension throughout!

Then lift your leg straight up toward the ceiling as high as you can without rotating your toe up. Do not rock or swing to lift up higher. If you can only lift a few inches up higher that is fine. It’s better to do the range of motion you can control.

If you struggle to feel your glutes and instead feel your hips, kick slightly back as you lift up or turn your toe down toward the ground to internally rotate your hip.

Quickly perform reps, keeping tension in the band the entire time.

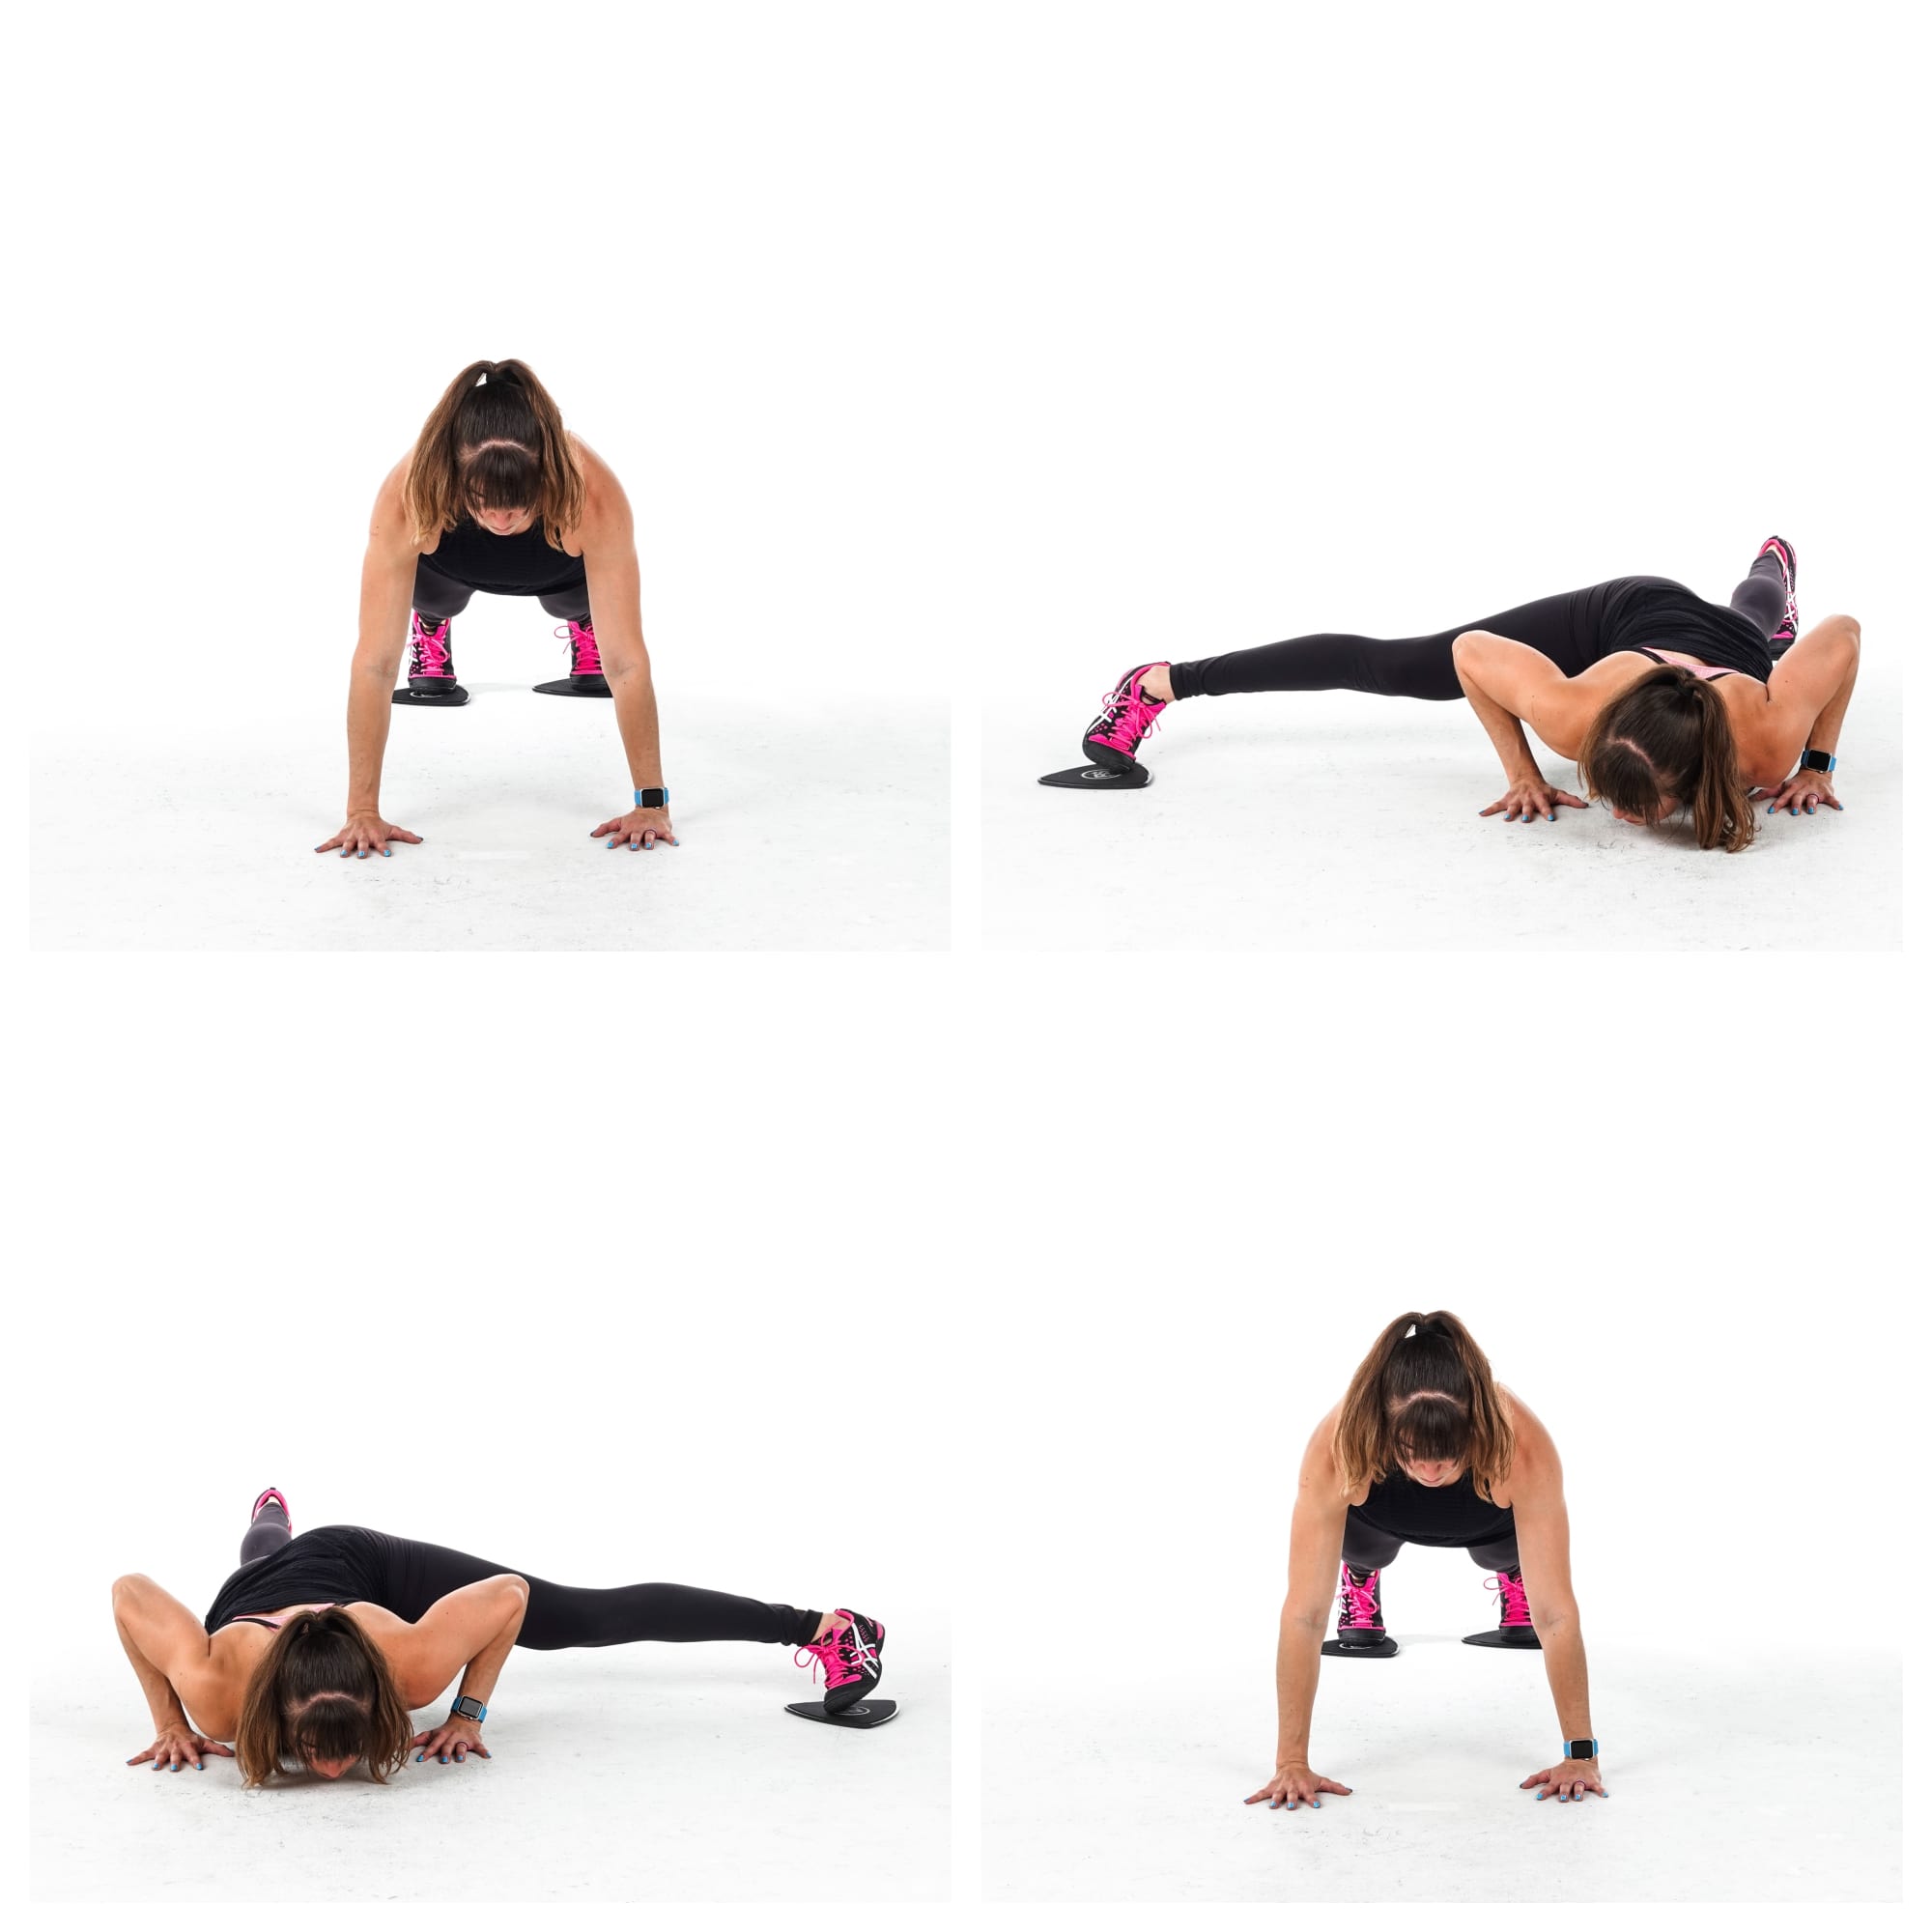
Deficit Reverse Lunge:

One way to progress a movement is by adding load. Another is by changing up the tempo.

A third is to INCREASE the range of motion.

Not only will this help you create more muscle tissue damage but it will also help you strengthen through a bigger range of motion to improve your mobility.

However, this only works if you ACTUALLY work through the increased range of motion. If you can’t lunge all the way to the ground with a standard reverse lunge, you aren’t ready for the deficit version.

While this move will work your entire glute maximus, it will hit that lower glute max harder!

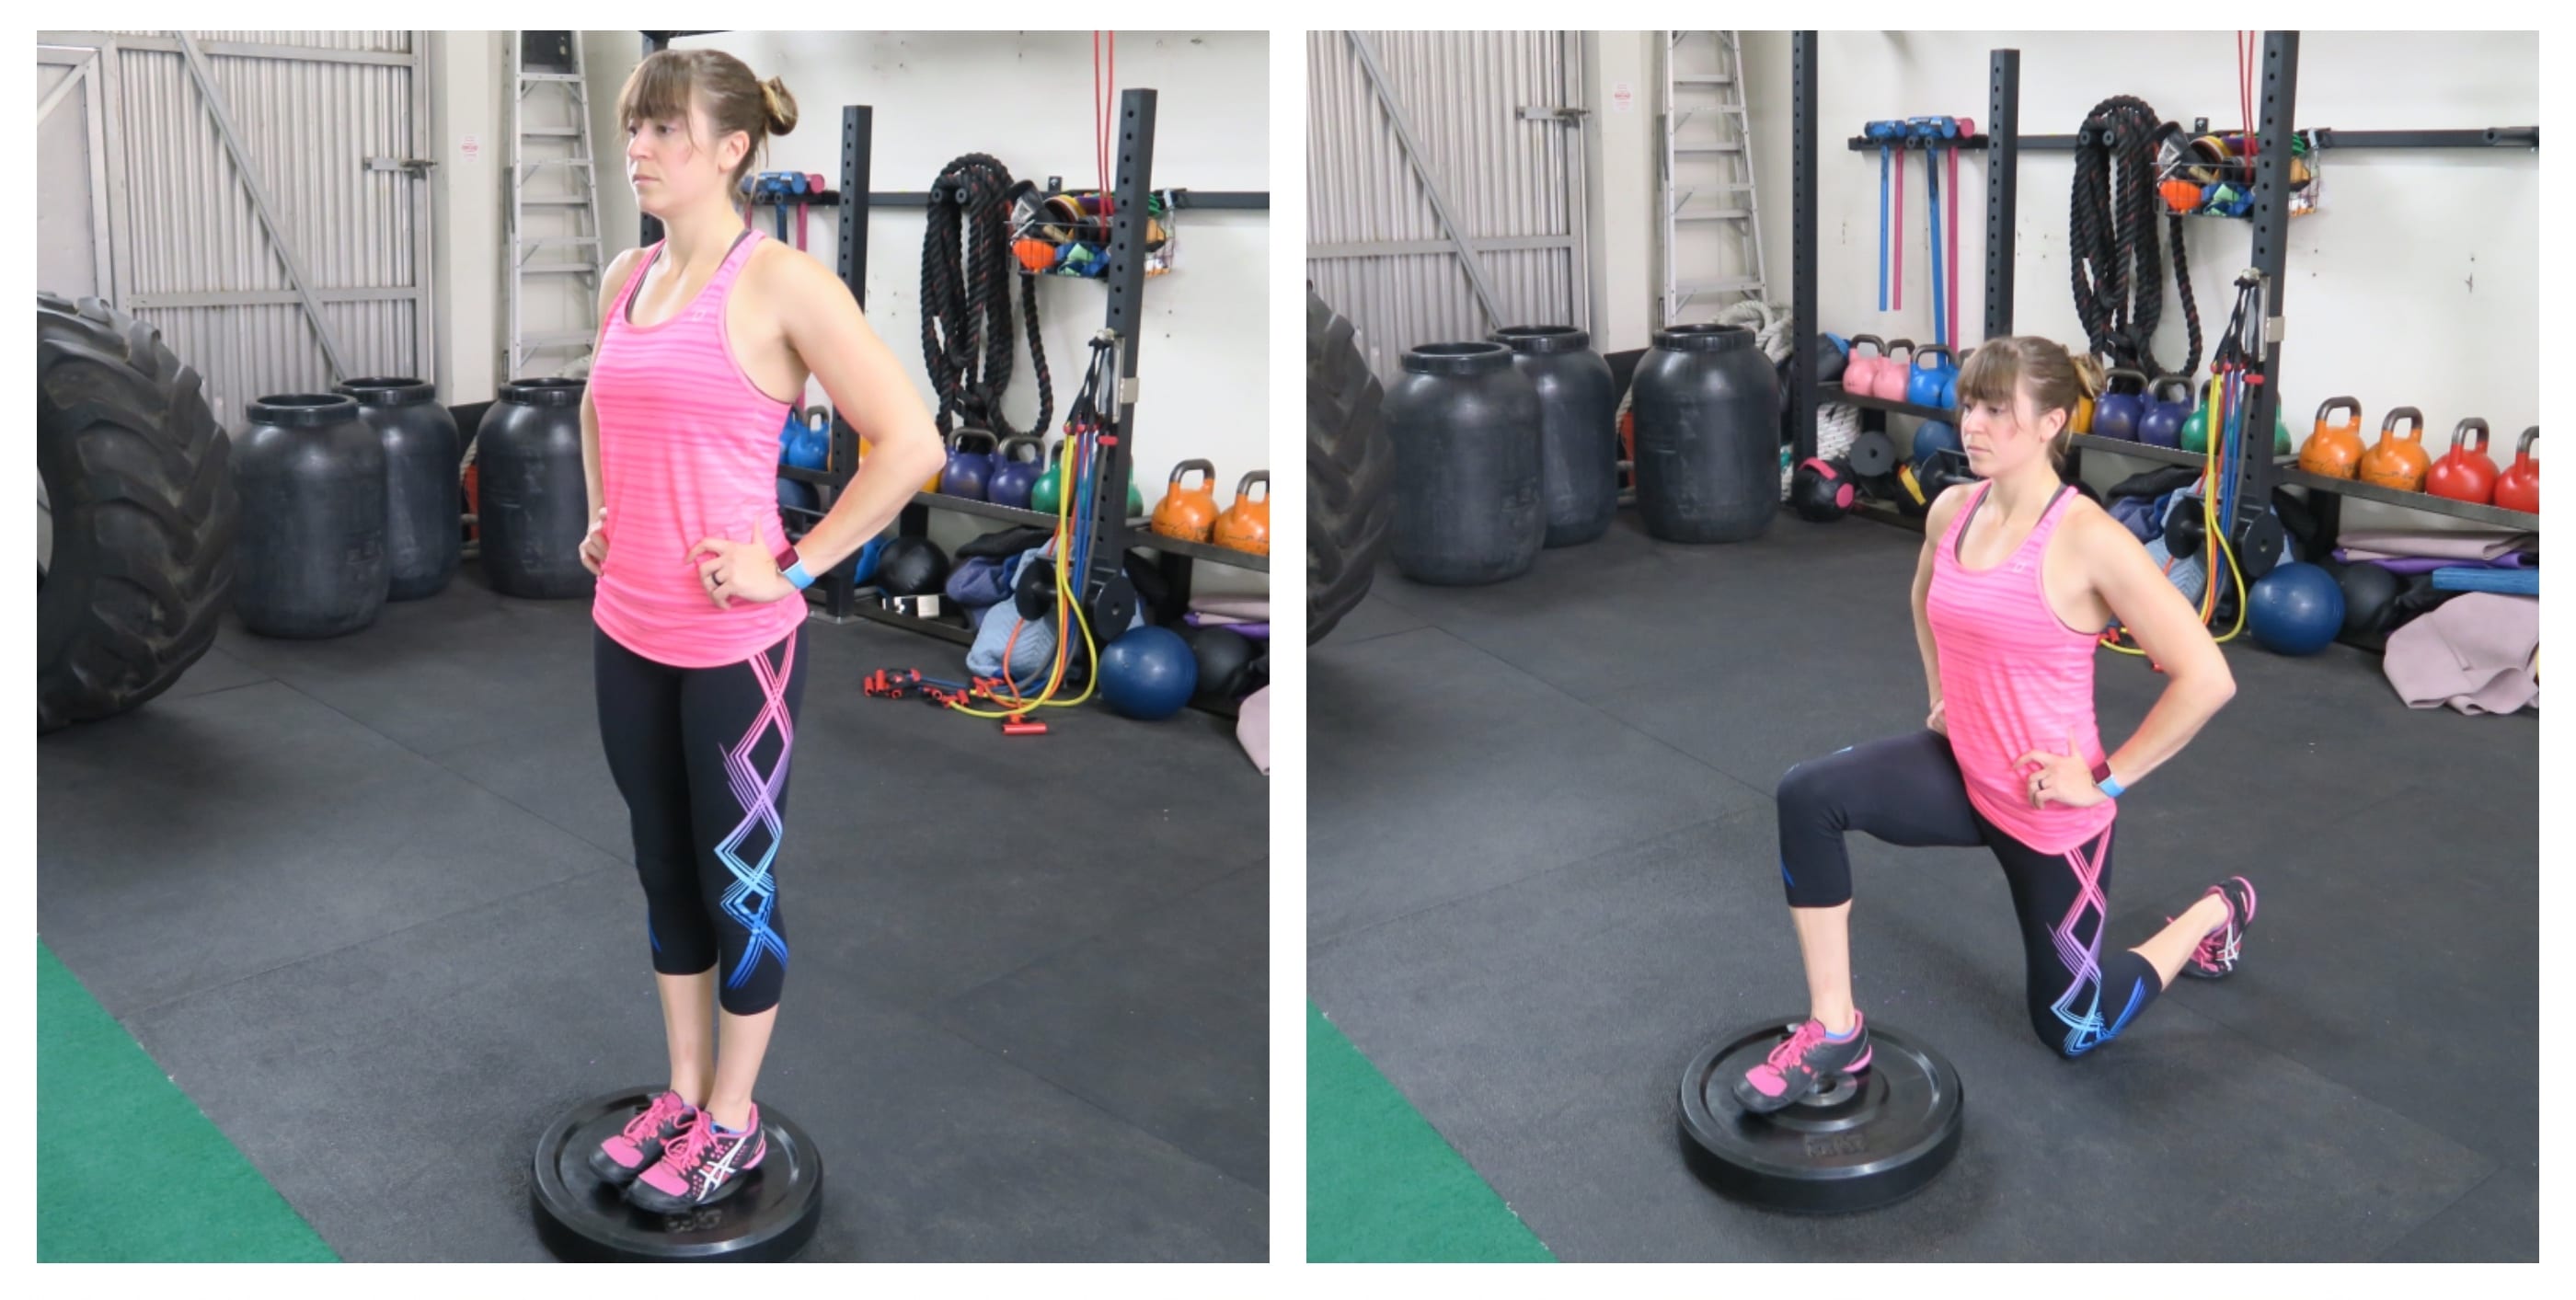
To do Deficit Reverse Lunges, set a small box or stack of stable plate weights on the ground. Even just starting with a single 45lbs bumper plate is enough to make a difference.

If you’re ready, add weights but start with making sure you can complete the full range of motion.

Stand tall and then step back off the box or weight, bending your front knee to about 90 degrees as you drop your back knee down to lightly touch the ground or hover right over it.

Really sit back in that front heel as you sink down.

Keep your chest up and do not hunch or round over. While you may hinge slightly at your hips to sit back and load the glute, you should maintain a nice neutral spine.

Then drive back up to standing on the box by pushing through that front heel.

Don’t lean or rock forward but think about driving straight up to standing. Then lunge back again.

If you can’t get your knee down past the platform and close to the ground, you aren’t yet ready for the increased range of motion.

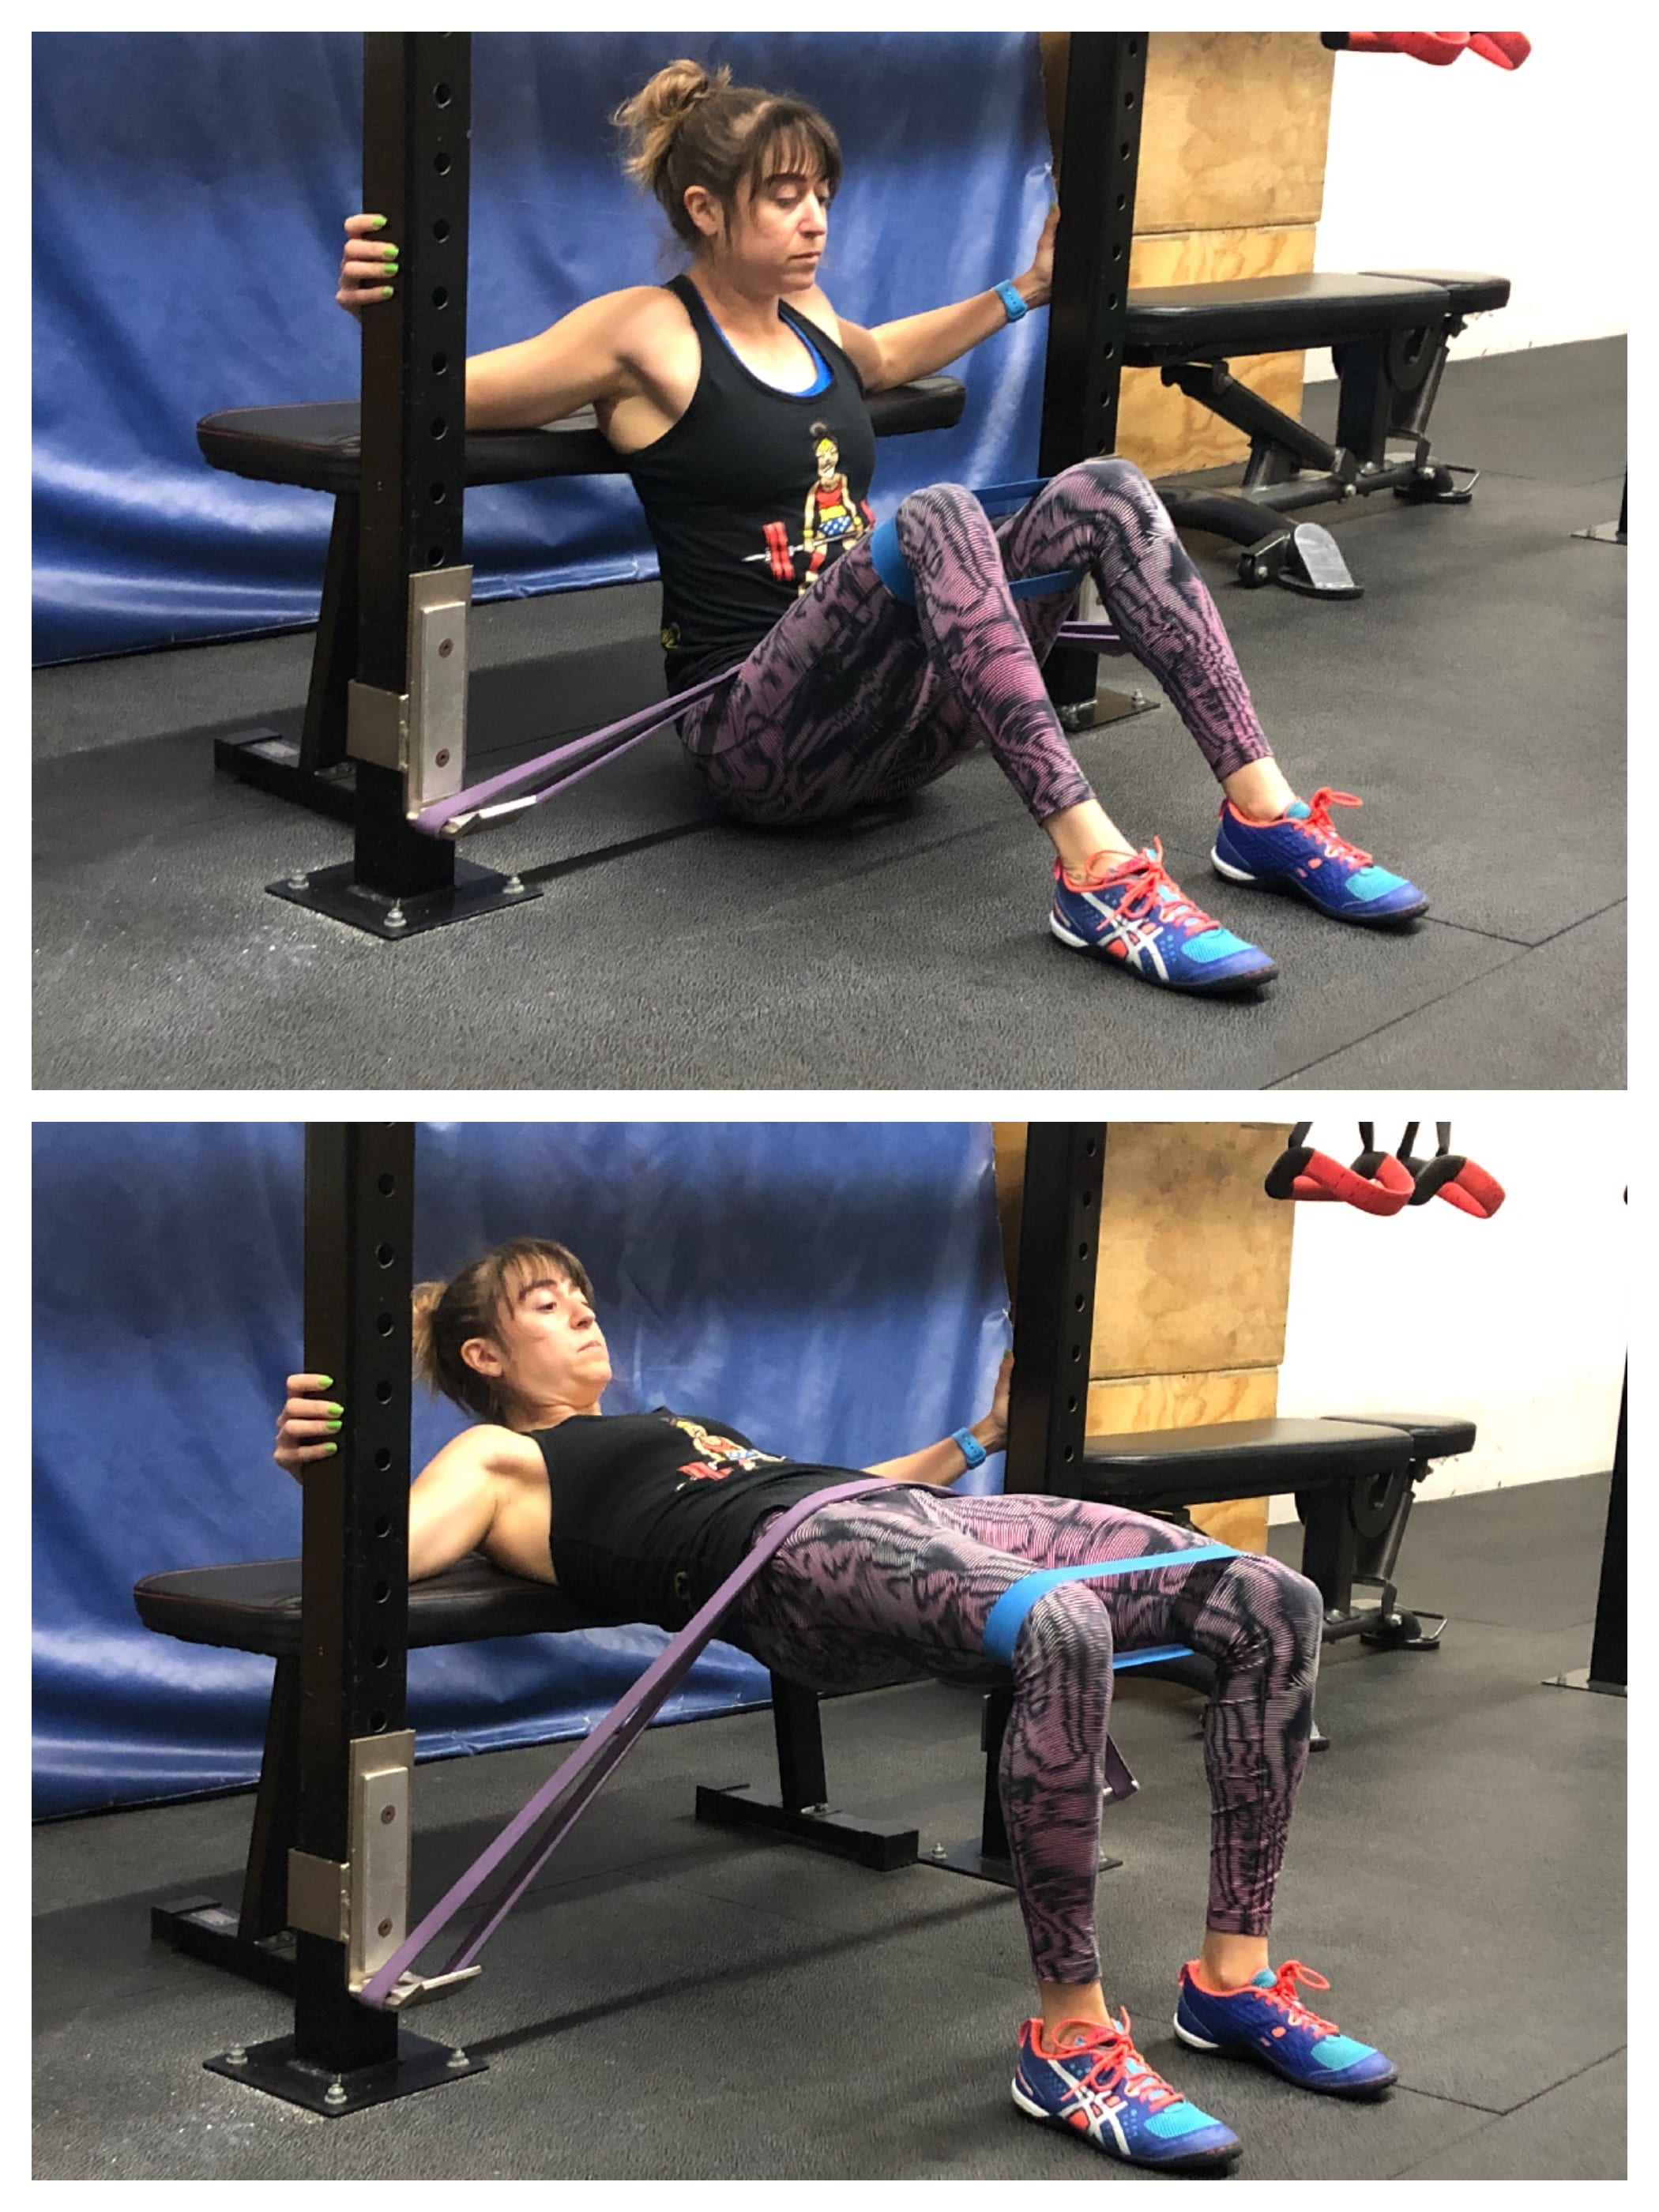
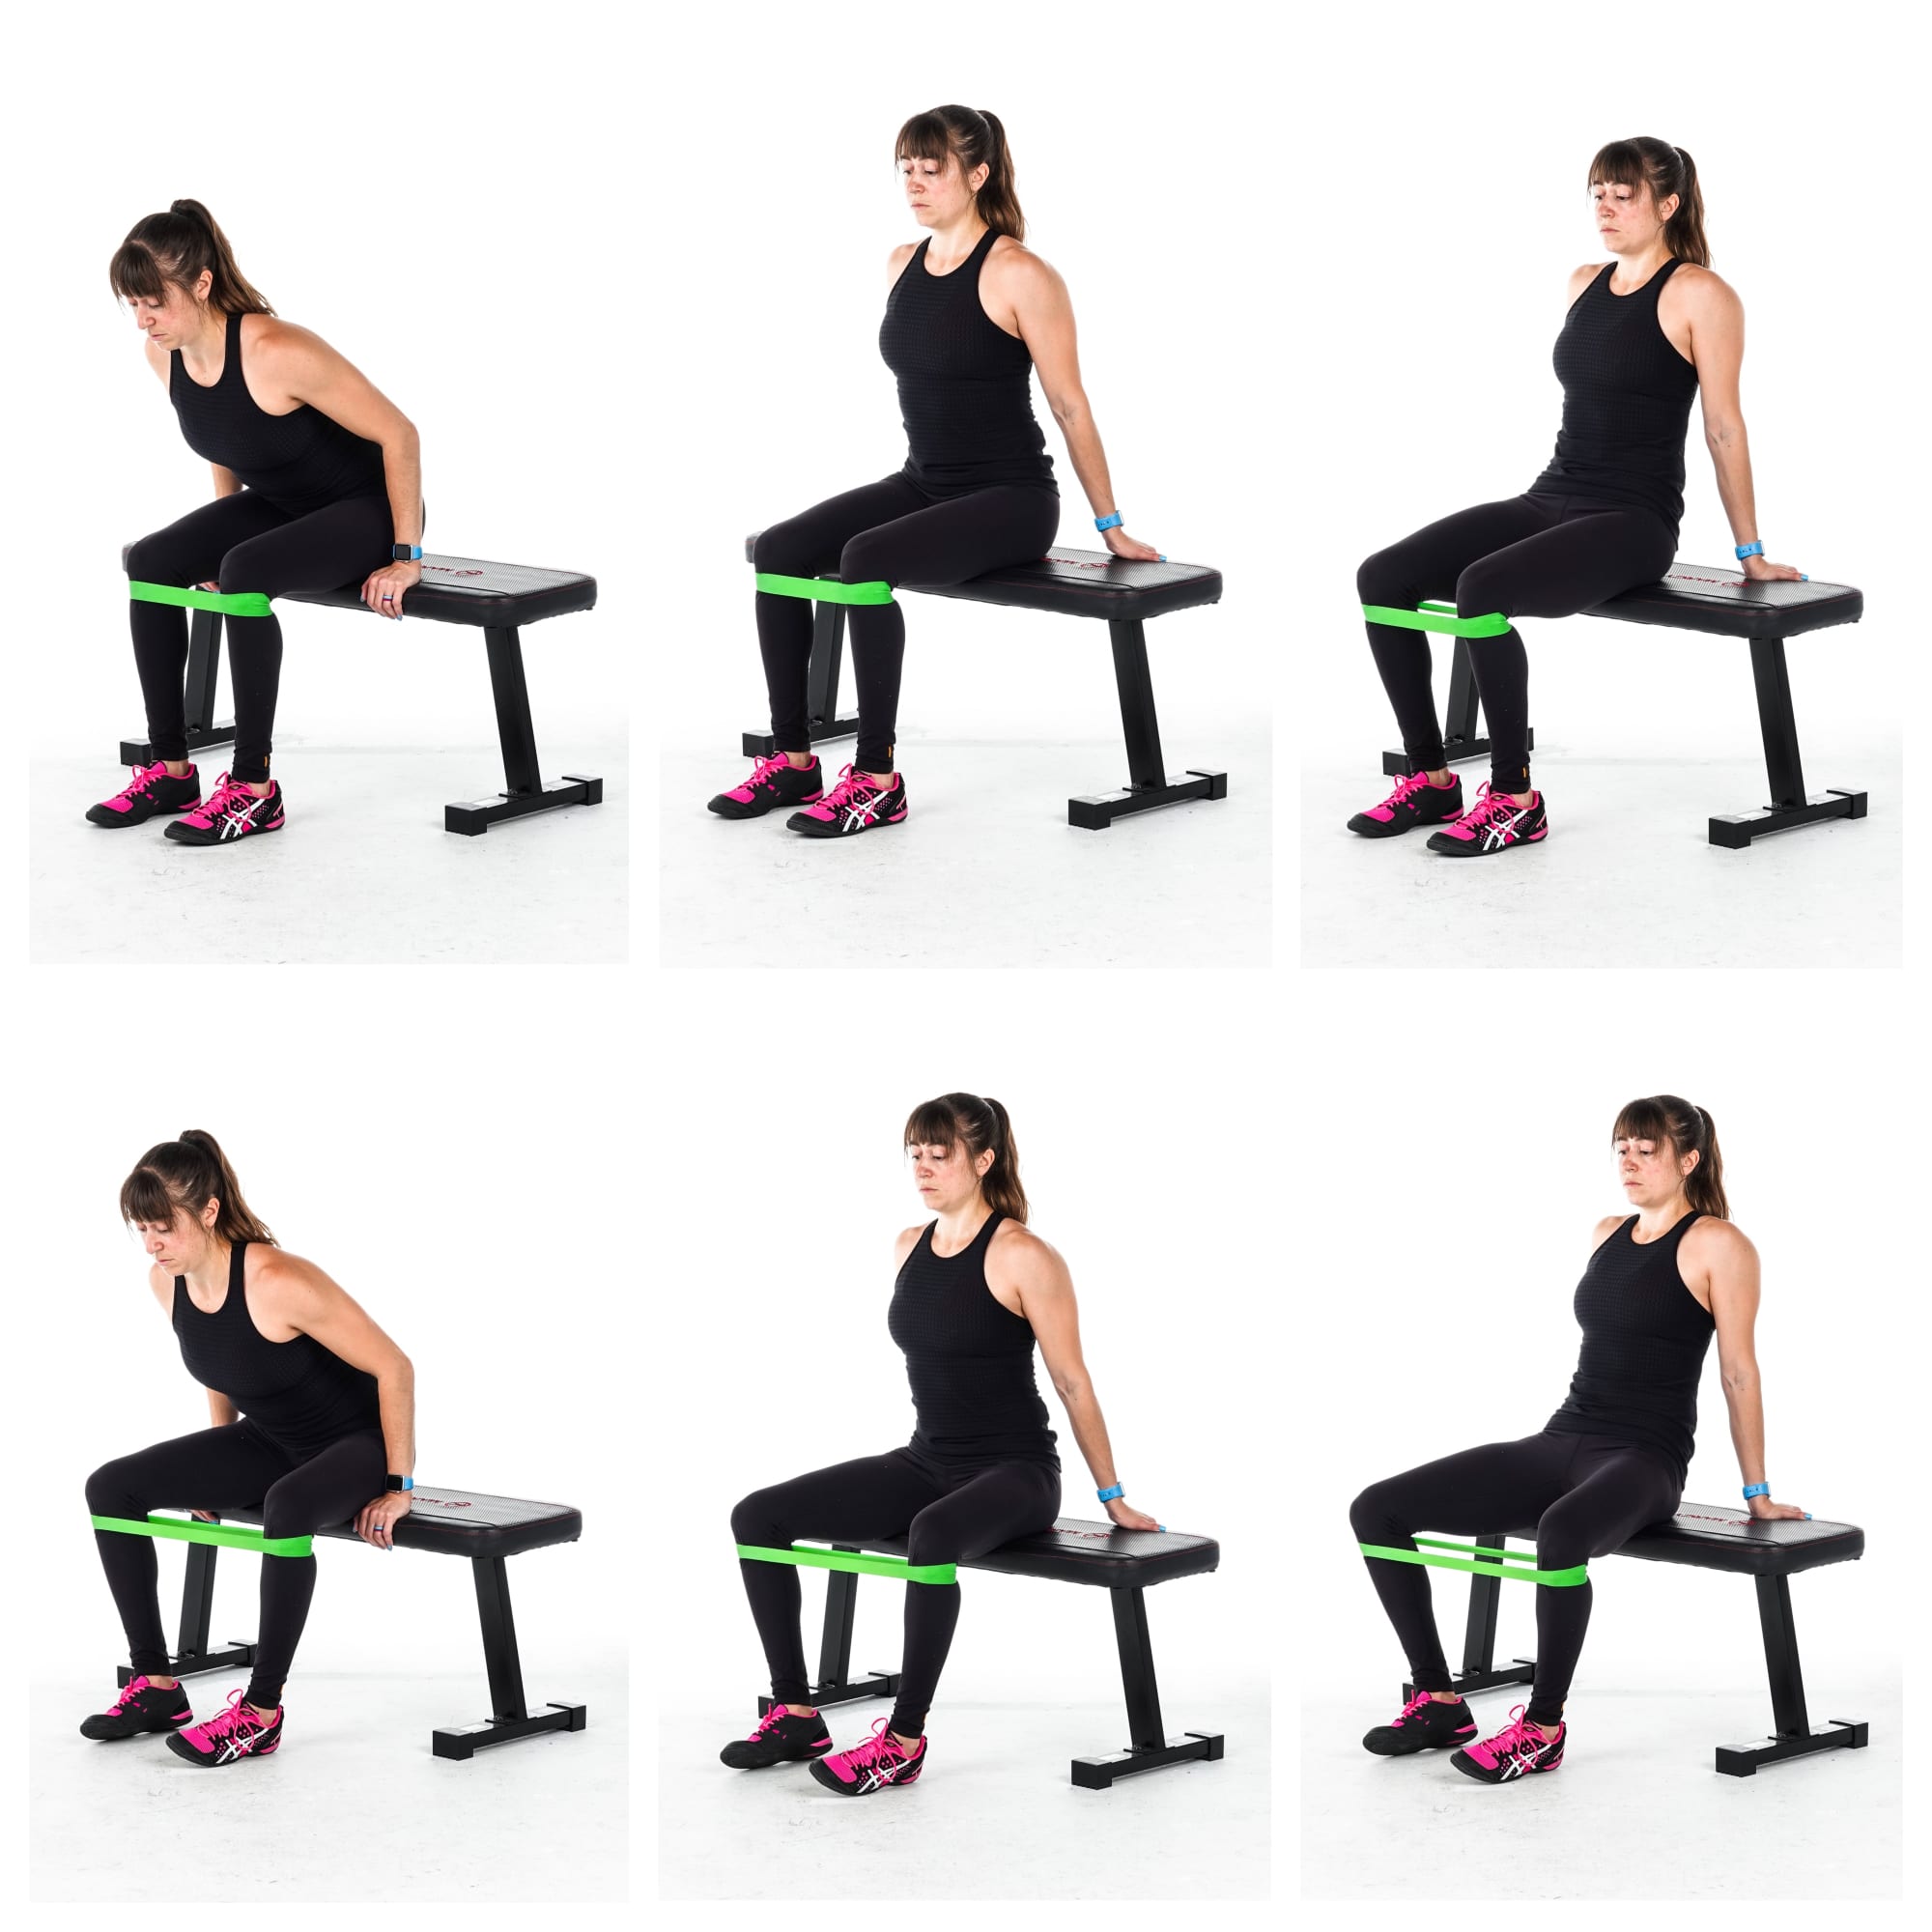
Band Seated Abductions:

This is a great move to work your glute max and medius with a slight bit more “love” for that upper glute max.

This move is a great way to create that glute pump.

And there are so many little tweaks you can make to this move to implement that “same but different” rule to help you progress!

You can change your body positioning from standing to seated. You can even change how much you lean backward or forward while seated to work those glutes in different ways!

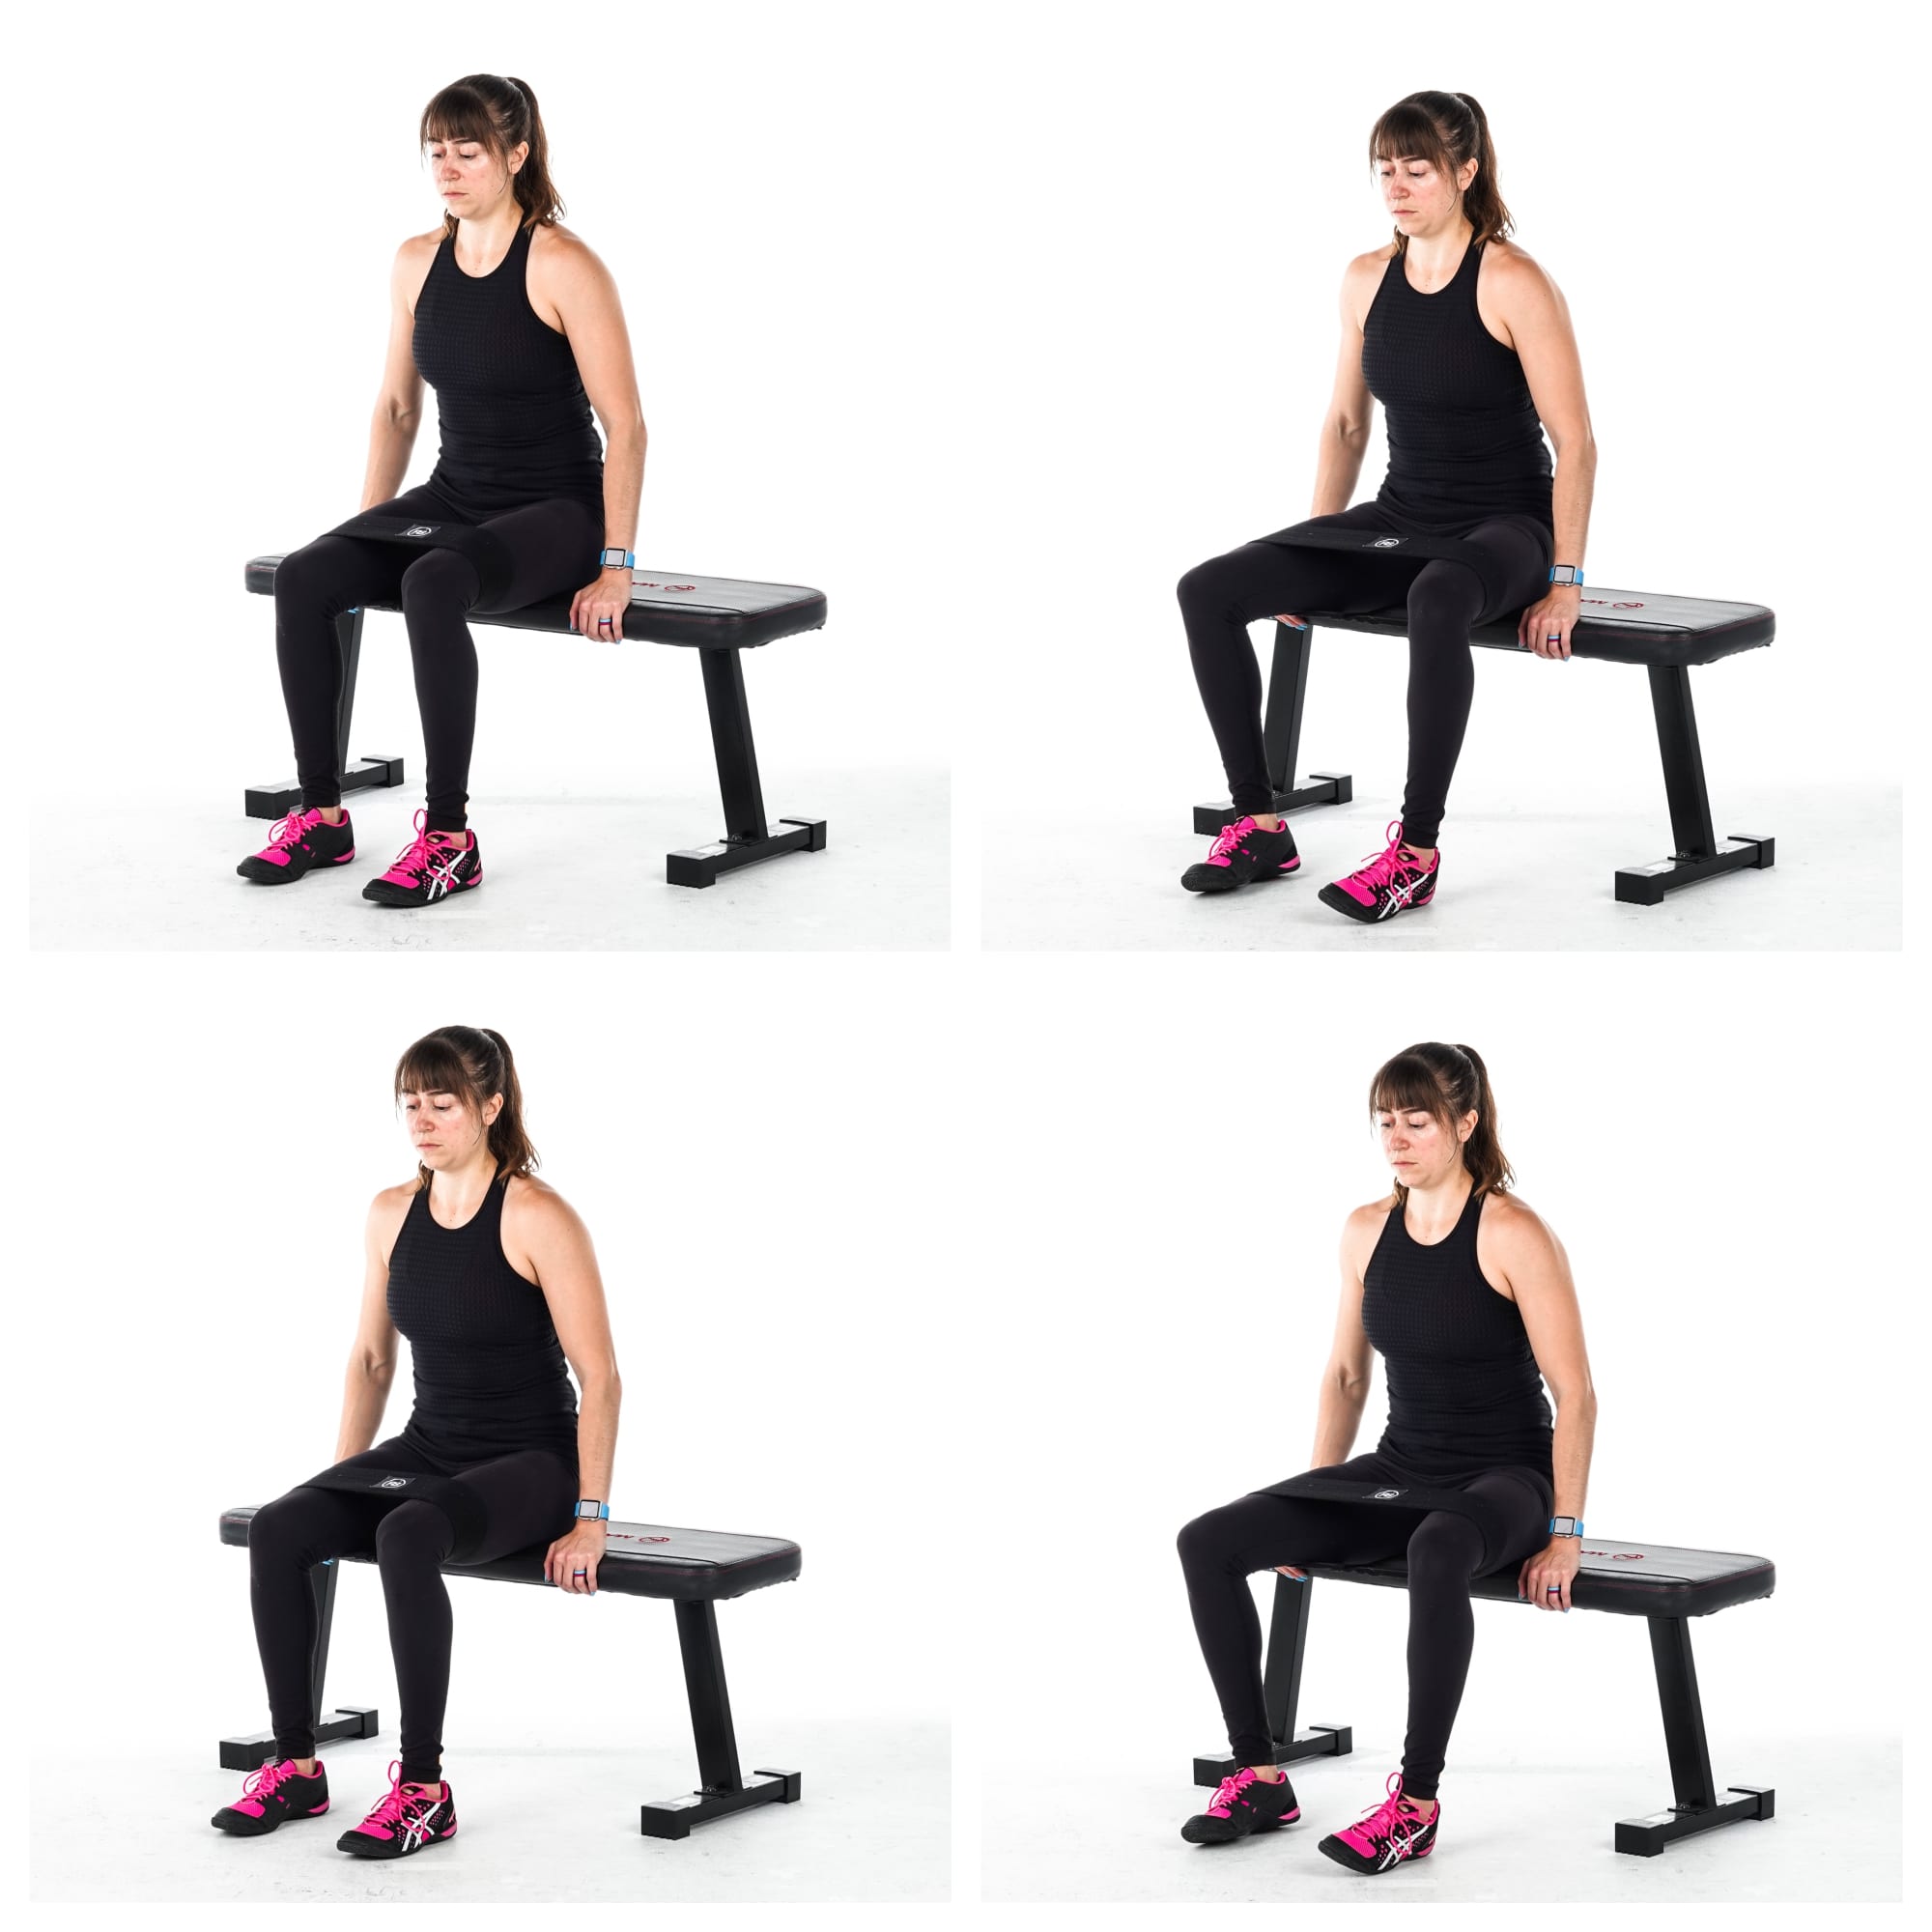
To do the standard Band Seated Abductions off a bench, place the mini band right below (more advanced) or right above (a bit easier) your knees. If you’re using a booty band, place it above your knees. Whichever place you choose or whatever weight mini band you use, just make sure you feel your glutes and outside your hips actually working.

Sit up nice and tall with your hands on the edge of the bench and your feet about hip-width apart. Then press your knees open against the band as you sit up tall. Really use your glutes to press the band open.

Do not slouch or rock back. Press your hips forward as you press your knees open. You may rock open on your feet, but don’t simply rock and bend your ankles. Really press the band open with your knees.

You MAY lean back or forward just make sure this is a CONSCIOUS change in placement instead of swinging as you do the move!

Using these tips and 5 moves, you can build a round, perky booty and reverse that pancake butt!

If you want even more booty building workouts that will also help you improve your running and lifting while avoiding injury, join my Glute Camp!

–> Say Good Bye To Pancake Butt With The Glute Camp!

A Carb Is A Carb Is A Carb

A Carb Is A Carb Is A Carb

That carb…well…it’s just a carb!

Ok before you start getting all mad that I’m saying all carbs are created equal….hear me out.

And I could have said all fats are created equal or proteins…but it probably wouldn’t have made you as mad or as curious 😛 (Just kidding….but seriously…)

Sooo….how can I claim all carbs are created equal?

Because guess what?

If you dial in your macro ratios correctly, and according to your goals, as long as you stay within those ratios, you’ll get results regardless of whether your carbs are all fruits and vegetables or they’re only sugar and white bread.

Yup…weight loss and body composition goals are really all about calories and macros.

Quality…well it doesn’t really matter.

Now I’m not giving you an excuse to just eat crap. BUT…

If your macros are off, you may not see the results you want no matter how “healthy” your diet is or how high a “quality” the foods you are eating are.

Now I’m not saying focusing on whole, natural foods…more NUTRIENT DENSE foods…isn’t important.

They 100% are for your health.

And I do think you function better and feel fuller when your diet is made up of foods that give your body the nutrients it needs.

Focusing on whole, natural foods only helps you get better results faster.

BUT I also think sometimes we get so focused on depriving ourselves of the foods we enjoy, stressing over QUALITY, that we sabotage ourselves.

While we are killing ourselves eating “well,” our macro ratio and calorie intake aren’t in line with our goals so we don’t end up seeing the results we want.

No wonder we get frustrated and give up, feeling like nothing will ever work!

So what am I telling you?

Basically, if your macro ratios are out of whack, it doesn’t matter that you’re eating nutrient dense foods.

That sweet potato…well those calories and CARBS are still going to count as much toward your calories and carbs as that white bread will.

Basically, that carb is just that…a carb.

Eat too much of either type of carb and you’re not going to get the results you want.

So stop stressing over “clean” eating.

(Honestly….”clean” is going to be soooo dependent on your dietary preference and 9 different people will tell you different foods are evil that you could drive yourself insane obsessing over this….)

Stop depriving yourself of all of the foods you love so you end up binging each and every weekend after being worn out from the constant restriction (hmm just thinking about how maybe this happened this week, huh!?).

Find a BALANCE where you focus on nutrient dense foods, but also still enjoy the foods you love.

Because if you want to change your body composition and lose weight or even gain muscle?

It’s really all about FOCUSING ON THOSE MACROS!

(And guess what? When you dial in your macro ratios, often we do overall dial in the whole, natural foods more but in a way that is less restrictive so we end up being more consistent which is TRULY the key to overall wellbeing!)

Need a macro ratio you can use to track and log with?

Take my Macro Cycling Quiz to help you get started!

–> Take The Macro Cycling Quiz

P.S. Yes, the quiz is free and you can plug in that ratio to My Fitness Pal or any other food tracker to help guide you this week!

12 Slider Exercises For A Full-Body Workout

12 Slider Exercises For A Full-Body Workout

If you don’t have access to a ton of space or equipment, but you want to add some variety and a little extra challenge to your bodyweight workouts, a pair of sliders is a great tool to have on hand!

They are easy to use at home and take with you when you travel so that you can advance basic bodyweight moves. (And if you have hardwood floors, towels can even work instead!)

They can also reduce impact on moves like burpees while still giving you a killer cardio workout!

Below are 12 fun slider exercises you can use to get in a great full body cardio and strength workout!

And if you need a set of sliders, and also an amazing BOOTY BAND, check out this RS TriSlide and Booty Band Bundle!

12 Slider Exercises For A Full-Body Workout

Slider Mountain Climber Burpee:

Want a core-intensive but low impact burpee variation to use in your cardio workouts?

Then the Slider Mountain Climber Burpee is a great variation to include!

low impact burpees

To do the Slider Mountain Climber Burpee, start standing tall with a slider under each foot. Make sure the ball of your foot is about in the middle of the slider for the most control.

Then bend your knees to sink down and place your hands on the ground as you slide your legs back into that high plank position.

With your legs out straight behind you and your hands about outside your chest, perform a push up, dropping your chest to the ground. Do not let your elbows flare way up. Create an arrow shape with your body.

Press back up and then at the top of the push up, tuck one knee in toward your chest. Do not let your hips sag or butt go up in the air. Also, make sure your hands stay outside your chest or below your shoulders.

Straighten your leg back out and perform another push up and then another knee tuck on the other side.

Perform one final push up then slide both feet back in and stand up. Raise your arms up overhead then bend back over and place your hands on the ground to slide your feet back into the high plank position.

To modify this move, you can remove the push ups completely or even eliminate just one or two. You can also go down to your knees for the push ups and come back up to your feet for the mountain climber knee tucks.

Adjust as you need so you can maintain good form and move quickly to get your blood pumping!

Skater Lunges:

Want to work your legs, especially your glutes and inner thighs, with a low impact movement?

Then try these Skater Lunges!

They are a great cardio lunge variation that is a low impact option instead of doing skater hops. Plus they work your inner thighs more!

slider side lunges

To do Skater Lunges, stand tall with your feet together and a slider under each foot. Make sure your foot is centered on the slider, with the ball of your foot firmly on the slider for control.

Slide one foot out to the side with that leg staying straight as you hinge to sit your butt back and bend that standing knee to sink into a side lunge.

You can reach the opposite hand down toward the heel of your standing leg (the leg you bend to sink into the lunge). Make sure your weight is more centered on this leg so you don’t end up sliding out into the splits.

Then use your inner thigh to help pull the slider back in and drive back up to standing using the glute of the standing leg.

Move quickly to pop up and then slide out and sink into a lunge on the other side. Again reach the other hand down and back toward your heel to help you hinge properly and really sit back.

You don’t need to reach down and back but it can help if you struggle to hinge correctly and load your glutes.

Move quickly popping back up before sliding into a lunge on that starting side.

Move as quickly as you can while staying in control!

Low Reverse Lunge Slides:

Want a killer leg move? One that will really burn?

With Low Reverse Lunge Slides, you’ll keep your legs under constant tension so you’ll feel those quads and glutes burn!

slider reverse lunges

To do Low Reverse Lunge Slides, you can place a slider under each foot or simply under the moving leg as you will complete all reps on one side before switching.

Stand tall with your feet together then sink into a little squat and slide your foot back a few inches so you are in a staggered stance holding just above parallel in that squat.

The more mobile you are, the closer to parallel you will sink.

Keeping the foot in front, which would be the foot on the ground if you’re using one slider, firmly planted, slide your other leg back. Do not stand up out of the squat as you slide back.

Simply extend that leg back into a nice reverse lunge position, keeping your front leg bent.

Then slide that leg back forward into the staggered squat stance without standing up.

Move at a controlled pace and slowly extend the leg back out before sliding back in.

Do not stand up until all reps are complete. Beginners may not sink as low or slide back as far in the lunge.

Slider Side to Curtsy Lunge:

This hybrid lunge exercise is a great way to work your entire leg and even improve your hip mobility and stability. You will really target your glutes and your inner thighs too with this Side to Curtsy Lunge variation!

This lunge combo is a great way to challenge your legs without adding weights!

slider lunges

To do the Slider Side to Curtsy Lunge, start standing tall with a slider under each foot. You can also use just one slider under one foot if you plan to complete all reps on one side and want a more stable base.

Then slide one foot out with a straight leg as you bend that other leg to sink down into a side lunge. Hinge at your hips and sit your butt back but do not round your chest toward the ground.

Make sure to sit back in that standing heel. Then drive back up to standing, pulling the slider back in using your inner thigh.

As you stand up, slide that foot back in and quickly move it back behind you to sink into a curtsy lunge.

Slide the same foot that went out into the side lunge back and across behind your standing leg as you bend that front knee to about 90 degrees.

Sink into a lunge, loading that front glute. Do not rotate open but keep your chest square forward.

Drive through your standing leg and pull the slider back up to stand up tall before repeating the side lunge.

Push Up Wiper:

This killer upper body and core move will target your chest, shoulders, triceps and obliques.

It is a super challenging movement, especially if you perform the wiper at the bottom of the push up. To modify, you can do the push up from your knees then perform the wiper at the top of the push up.

slider push ups

To do the Push Up Wiper, place a foot on each slider so the ball of your foot is about in the middle of the slider for the best control. Set up in the high plank position with your hands outside your chest.

Your body should be in a nice straight line down to your feet with your feet close together.

Perform a push up, dropping your chest to a few inches off the ground. Make sure your body moves as one unit as you lower. Do not let your hips sag or butt go up in the air.

Your upper arms should create an arrow shape with your body. They shouldn’t flare way out and up by your shoulders nor do they have to be against your body unless you want to make the push up harder and more tricep intensive.

As you lower you will slide one leg up and out to the side. You can also wait until at the bottom of the push up to perform the wiper, sweeping one leg out to the side and up toward your shoulder.

Slide it out as far as your mobility and control allow. You can rotate your hips slightly as you slide the leg up.

Sweep the leg back down and press back up. To make it slightly easier, slide the leg back before you press back up. To make it slightly harder and a bit more of a coordination challenge, sweep the leg back as you press up.

After coming back to the high plank position, do another push up and perform a wiper with the other leg.

To make the move a bit easier, do the wiper at the top of the push up and even perform the push up from your knees. You can also remove a push up and do a wiper to each side between push ups.

Slider Plank Circles:

This is a great move to improve your anti-rotational core strength and shoulder stability.

It is one of my favorite moves to include if people want to work on improving their push ups while preventing shoulder, neck and lower back aches and pains.

slider plank circles

To do Slider Plank Circles, place a slider under each and with your hands under your chest and below your shoulders. You can place them slightly closer together so that you’ll create more of a tripod position with your feet to help you fight rotation.

Set up at the top of a push up, or in the high plank position, with your feet about shoulder-width apart.

Then slide one hand out in front of you, up and out to the side and then down and back around under your chest. You want to draw a circle up, around, down and back under.

Do not let your hips rotate as you circle. Squeeze your butt, flex your quads and drive back through your heels to help create tension through your entire body.

Keep your shoulders down and back so you aren’t shrugging. Then circle your other hand up around down and back under.

Alternate slow circles as you maintain that nice plank. Make sure to feel around your rib cage working as you pull the slider down, around and back under.

Do not let your shoulders shrug and feel your back engage to support your shoulders as you hold.

To modify, you can do this from your knees or even do taps instead of using the sliders. You can also stay on one side with the slider only under your moving hand. By not alternating it can be easier to fight your body’s desire to rotate.

Slider Sit Thru:

This move is a great way to improve your shoulder stability while also really challenging it so be careful if you’re returning from shoulder injury.

It is also a great move to work your entire core, especially your obliques.

slider sit thru

To do the Slider Sit Thru, place a slider under one foot with the ball of your foot in the middle of the slider. Because your foot will rotate onto the side, you may want to put your foot slightly toward the side of the slider you’ll be sliding toward.

Set up in the high plank position with your hands about under your shoulders and your legs out straight behind you about hip-width to shoulder-width apart.

Then slightly tuck the foot on the slider forward as you kick it under and across your body. As you rotate, lift the hand on the side you are kicking toward to open your body up toward the ceiling.

Extend the leg all the way across and through as you rotate open, reaching your hand up. Make sure your hand on the ground is positioned under your shoulder.

The leg of the foot on the ground may bend slightly as you rotate and pivot slightly onto the inside of your foot.

Slide the leg through then pull it back to the starting position as you rotate your body back to face the ground and put your hand back down.

Then repeat, kicking that same leg back across as you rotate open. Move quickly to get your blood pumping, but no so quickly you aren’t fully in control. Just don’t really pause in that plank position more than to fully return to it.

To modify this move, you may take out the slider or even keep both hands down the entire time, performing a smaller reach across with the foot on the slider.

Alternating Slider Tabletop Curls:

If you sit all day hunched over a computer, this is a must-do move.

It will open up your chest and hips while activating your entire backside. It will work your hamstrings, glutes, back and arms as well as your abs even!

hamstring and glute slider exercise

To do Alternating Slider Tabletop Curls, place a slider under each foot and sit on the ground with your heels on the sliders and hands behind you on the ground. Turn your hands out or back as you place your hands on the ground behind your butt.

Bend your knees and bring your heels back close to you so you can bridge up into a tabletop bridge. Squeeze your glutes as you lift your butt up and press your chest out.

You can perform a posterior pelvic tilt to help engage your abs as you hold this tabletop position and even slightly tuck your chin to look out beyond your knees.

The slowly extend one leg out before using your hamstring to pull your heel on the slider back in. Then extend the other leg out, pulling the heel back in again with your hamstring.

As you pull the slider back in, really even think about driving the slider down into the ground to help work your hamstring more.

Do not let your hips drop toward the ground as you extend. You want to keep your abs and butt engaged the entire time as you slowly alternate sides.

Slider Prone Snow Angels:

Because we spend so much time hunched over, it is key we include moves to work our back and even improve our scapular mobility and spinal extension.

One great move to include as activation to help you do just that is the Slider Prone Snow Angels. It is one of my favorite moves to include during warm up or even as “active rest” during a core or upper body series!

slider cobra

To do Slider Prone Snow Angels, place a hand on each slider and lie face down on the ground with your body in a nice straight line and your hands reaching overhead on the ground.

Keeping your arms straight, sweep your arms out and down toward your sides, lifting your chest up off the ground as you sweep you arms all the way down and back toward your hips.

Squeeze your butt and lift your chest up as much as possible, lifting it higher as your arms sweep all the way down.

Then lower back down as you sweep your arms back overhead.

Lift and lower as you slide your arms down and out to the sides and back overhead.

Move slowly and even pause for a second at the top to hold and feel your entire upper back and even the backs of your shoulders working.

Make sure you don’t just feel your lower back arching or your neck straining.

Slider Body Saw:

This is a VERY challenging core move that will work your triceps, lats, pec minor, abs and quads. You will feel your entire core shaking and working to protect your lower back.

Because of the extended plank position, your abs have to work hard to protect your lower back. If you aren’t yet ready for this move, you will feel your lower back taking over and working, which means you need to regress.

If this is the case, walk back instead of sliding back or limit range of motion to start. You don’t want your lower back compensating or you won’t get the full benefit!

slider body saw plank exercise

To do the Slider Body Saw, set up in a plank position on your forearms with your feet on the sliders. Elbows should be under your shoulders and your feet should be together or no wider than hip-width apart.

With your body in a nice straight line from your head to your heels, slide your feet back and lengthen through your arms. As you slide back you should extend your body down to your elbows, shifting your shoulders back behind your elbows. Do not let your hips sag as you slide back. You are extending your triceps as you slide back.

Then, using your lats and core, pull your feet back in to the plank position. When you come back into the plank position, do not let your butt go up in the air. Make sure your hips don’t sag either.

Then slide back out, lengthening your body out as much as you can. Again do not let your low back take over. Make sure that you also aren’t simply sliding forward and then back to the start but are actually sliding back and lengthening through your arms.

Ab Extension:

Work your lats, abs and even your glutes with this great move! You’ll feel all around your rib cage working and even your arms too!

Like the body saw though, be careful that your lower back doesn’t take over. And if you have shoulder issues, watch how far you extend out to start!

ab extension

To do Slider Ab Extensions, place a slider under each hand and set up as if you’re doing a push up from your knees.

You want to have your hands under your shoulders and your body in a nice straight line from your head to your knees. Brace your abs and squeeze your glutes.

Slide both hands out as far as you can, lowering your body toward the ground. Extend out, if you can, until you’re hovering just above the ground.

Then pull the sliders back under your shoulders without bending your arms as your body moves back into the plank position. By sliding your hands back under, pulling with your back to bring your hands back in, your body will move back into the plank position.

Do not sit your butt back or let your lower back engage as you extend out or pull your hands back in. You want to brace your abs and keep your body in a nice straight line the entire time.

Once back in that knee plank position, repeat the slide back out. Do not let your hips sag, lower back arch or butt go up in the air. Also, make sure you don’t sit your butt back to help pull your arms back in. You only “rise up” because your hands come back under your shoulders.

Beginners may not slide out as far or they may extend one hand, then the other, then pull one in at a time.

T Sit Up:

Work your abs, hips, arms and upper back with this sit up variation that will also work to improve your posture!

It’s a great way to advance the basic sit up and target different areas than you may normally work!

slider sit up

To do the T Sit Up, place a slider under each hand and lie on your back with your arms out straight from your body at about shoulder height. Your legs should be out straight in front of you although you can slightly bend your knees if it helps you to drive your heels into the ground and keep your legs from lifting up as you sit up.

Then sit up, pressing your lower back into the ground as your round up. By slightly rounding your spine as you sit up, you can better use your abs over just depending on your hip flexors.

As you sit up, pull the sliders in toward your butt, keeping your arms straight.

Sit up tall at the top, making sure your shoulders aren’t shrugged. You want to have pulled your hands in toward your butt and have pinched your shoulder blades together to help bring your hands in.

Then slowly round your back to lower yourself back down. You can even think about lowering one vertebrae at a time if that helps to start.

As you lower down, extend your arms back out straight at shoulder height. Do not bend your arms as you sit up or lower down.

Repeat, sitting back up.

Creating A Workout:

To create a workout using these moves, you can choose to use all 12 or even just select 4-6 for a great circuit workout. Intervals are a great option with these moves although they can also be done for reps based on your goals.

For a great interval workout design using these, select 4-6 moves based on what you want to work that day and set a timer for 30 seconds on, 15 seconds off. Move from one exercise to the next, resting only the 15 seconds between moves. Complete 4-6 rounds through the circuit of moves. Beginners may rest an extra 30 seconds between rounds if needed.

Need a great travel workout kit so you can get in a challenging workout wherever you go? Check out my TriSlides and Booty Band Bundle!

4 Moves To Improve Your Thoracic Extension

We sit hunched over our computers, texting on our phones…heck even sitting in the car…

And this forward flexion can cause imbalances and compensations that lead to injury. It causes some muscles to become tight and overactive and others to become underactive, which can result in mobility restrictions.

It can cause our spinal extension to become limited, especially our thoracic extension. And this can cause neck, shoulder and even LOWER BACK aches and pains.

These 4 moves will help you loosen tight muscles, improve your thoracic extension and activate the muscles of your upper back to prevent injury!

4 Must-Do Exercises To Improve Your Thoracic Extension:

Exercise #1: Peanut Foam Rolling

A great way to reverse the constant hunch and relax tight or overactive muscles so you can get the correct muscles working is to start with foam rolling.

The peanut is the perfect tool to help you work on relaxing those muscles along your spine as you put your spine into extension. 

This move can also help you to stretch your chest and release any trigger points even in your rhomboids that may be causing neck or upper back aches and pains.

To do the Peanut Foam Rolling for your thoracic spine, you will place the Peanut in your mid-back while lying on your back on the ground with a ball of the peanut on each side of your spine.

Bend your knees and place your heels on the ground. Then cross your hands over your chest and relax back over the Peanut. Relaxing over the Peanut, extend your arms up overhead.

Swing your arms down and out to the side, as if making a snow angel, before bending them to cross them over your chest again.

Then crunch your upper body up, tensing the muscles of your back. Do not crunch up off the Peanut. You simply want to tighten the muscles before you relax back over the Peanut.

By “crunching up” and contracting the muscles, you can help the muscles release when you relax back over the Peanut.

As you work up your back, moving the peanut up toward your shoulders, perform a few crunches and extensions in each spot.

As you relax over each time, reach your hands overhead or even make “snow angels” with your arms, sweeping them along the ground and overhead before bringing them back down by your sides and finally back across your chest.

If you need to support your neck, you can simply place your hands behind your head as you extend over and think about opening your elbows at wide as you relax over.

To hit your rhomboids more, you may tuck your elbows together then open them out wide instead of crunching even while rolling out between your shoulder blades.

Exercise #2: Active Foam Roller Star Stretch

Improve your spinal mobility and relax your lower back as you also stretch your chest and glutes with this great active stretch to include prior to your workouts or as part of your cool down to prepare your body for work the next day.

It is the perfect move to include after sitting hunched over a computer all day so that you can make sure you don’t end up with neck, shoulder or lower back aches and pains!

To do the Active Foam Roller Star Stretch, grab a foam roller or block that you can place on the ground under your knee. Start by lying on your back with the roller running parallel to your body and about the middle at waist height. Bend your knee, on the side furthest from the roller, and bring it up toward your chest so that your hip is bent to about 90 degrees.

Take the hand on the same side as the roller and reach across to the outside of that knee and pull your knee across your body to place it on the roller. Hold your knee down on the roller and even relax your lower leg down on it. You will want to keep your knee on the roller even if you do roll forward or backward a bit on it. Just don’t let the knee come up off of it.

Place your other hand behind your head so your elbow is open and out. Rotate to bring that elbow down on the ground by your opposite shoulder. Don’t just flap your arm but actually rotate your body.

Then lift the elbow up and rotate your chest back open toward the ceiling as you try to touch your shoulder and that elbow back down on the ground. You are trying to rotate as open as you can, twisting through your spine without letting your knee come up off the roller. Open up, pause and then rotate back closed. Repeat all reps on one side before switching.

Exercise #3: Downward Dog to Upward Dog

This is not only a great stretch to open up your chest, lats, but will even stretch your hips while working on your spinal extension.

It’s a great way to reverse the constant sitting and perfect to include before your upper body or full body workouts.

The Downward Dog to Upward Dog will also help you improve your shoulder mobility and health!

To do Downward Dog to Upward Dog, start in the high plank position with your hands under your shoulders and feet about hip-width apart.

Then push back into downward dog. Drive your chest back toward your legs and lift your butt up toward the ceiling as you drive your heels down. Feel your hamstrings stretch as you extend your spine too. Drive through your palm and even your thumb and index finger instead of rocking out on your hand.

Then come back forward into the plank position and drop your hips toward the ground as you shift onto the tops of your feet. As you drop your hips, arch your spine, opening your chest up toward the ceiling. Do not shrug your shoulders.

Pause then come back into plank and shift back into downward dog. Like the divebomber but without focusing on the strengthe element of sneaking under to come forward.

Exercise #4: Lying W Pulldowns

Activate the muscles of your upper back and shoulder to help improve your posture and maintain the thoracic extension you’re working hard to improve with the foam rolling and stretching.

If you don’t also get the correct muscles working, you’ll keep compensating and things will continue to just tighten right back up no matter how much you stretch.

Activation is that often overlooked, but oh so essential piece if we want to make sure the correct muscles are working during our lifts!

This move is a great way to improve your scapular mobility while activating your lats and the muscles of your upper back. Plus it doesn’t allow your spine to be in flexion as you work to activate your back!

To do W Lying Pull Downs, lie face down on the ground and engage your upper back just enough so that your face isn’t flat on the ground. Pull your elbows down and in and lift your arms off the ground with your hands in by your shoulders like you’ve pulled your chest up to the bar in a pull up.

You want to make a W with your arms and your hands should be palms down at shoulder height. Feel the backs of your shoulders and your upper back lift your arms off the ground and pull your elbows down.

Then, keeping your hands off the ground, extend your arms straight out toward the wall in front of you. Reach out overhead the bring your hands back down and in. Move slowly, keeping your hands off the ground. Feel your back keep your arms off the ground as you extend and even feel your lats pull your elbows back down and in.

Prevent Injury AND Build A Strong, Sexy Upper Body…

Foam rolling, stretching, and activation are ESSENTIAL if you want to reverse the postural distortions we create with our modern lifestyle.

But they are often the pieces we skip in favor of the lifting and cardio that we feel are more “worthwhile.”

However, with a proper routine that includes those three pieces as well as the STRENGTHENING element, you can not only avoid injury, but also build strong, sexy arms and shoulders!

Learn more about my Arm Burner System!