The Full-Body Travel Workout

The Full-Body Travel Workout

WARM UP
Stretch and Roll Out:
Calves
Quads
Groin
Hamstring
Hips/Glutes
Back
Shoulders
Wrists

WORKOUT

Set a timer and work for 40 seconds on an exercise then rest 20 and move on to the next exercise. Try not to rest during the 40 seconds. Instead regress movements as needed. Rest 1 minute between rounds. Complete 3-5 rounds.

CIRCUIT:
40 seconds Snowboard Hop Burpees
20 seconds Rest
40 seconds Rotational Reach Push Ups
20 seconds Rest
40 seconds Square Lunges
20 seconds Rest
40 seconds Plank Sit Thrus
1 minute Rest

COOL DOWN
Stretch and Roll Out:
Calves
Quads
Groin
Hamstring
Hips/Glutes
Back
Shoulders

NOTES:

Take the rest between rounds to make sure you can go hard each and every round and not rest during the 40 seconds. Regress as needed but don’t rest during the work time!

Killer Quick Cardio-Core Workout

Killer Quick Cardio-Core Workout

WARM UP
Stretch and Roll Out:
Calves
Quads
Groin
Hamstring
Hips/Glutes
Back
Shoulders
Wrists

WORKOUT

Set a timer for 30 second intervals with 5 seconds of transition time. Complete 30 seconds on an exercise then take the 5 seconds to move to the next exercise. You will only have the “active rest” break between the 2 rounds of the circuit. Then rest about 30 seconds before moving on to 2 rounds of the next circuit.

CIRCUIT #1:
30 seconds Burpee Sit Thrus
30 seconds Climber Push Ups
30 seconds Banana Twists
30 seconds “Active Rest” Jumping Jacks

CIRCUIT #2:
30 seconds Mountain Climbers
30 seconds Lower Ab Plank
30 seconds Plank Jacks
30 seconds “Active Rest” Wall Sit/Squat Hold

CIRCUIT #3:
30 seconds Split Squat Jacks
30 seconds Plank with Oblique Knee Tucks
30 seconds Alternating V-Ups
30 seconds “Active Rest” Plank Shoulder Taps

COOL DOWN
Stretch and Roll Out:
Calves
Quads
Groin
Hamstring
Hips/Glutes
Back
Shoulders

NOTES:

Regress movements as needed so that you can keep moving the entire 30 seconds. It is better to regress than rest. Also, during the active rest, bring things down as much as needed. The point is to move but to bring your heart rate down a bit while still getting everything to work.

The Isometric Strength Workout

The Isometric Strength Workout

WARM UP
Stretch and Roll Out:
Calves
Quads
Groin
Hamstring
Hips/Glutes
Back
Shoulders
Wrists

WORKOUT

Complete 3-5 rounds of the circuit below. Move straight from the hold to the reps then to the next hold. If the move is unilateral like the Warrior III, do the hold then the reps on one side before switching to the other side. Rest only if needed. Rest up to 1 minute between rounds if needed and even stretch out.

CIRCUIT:
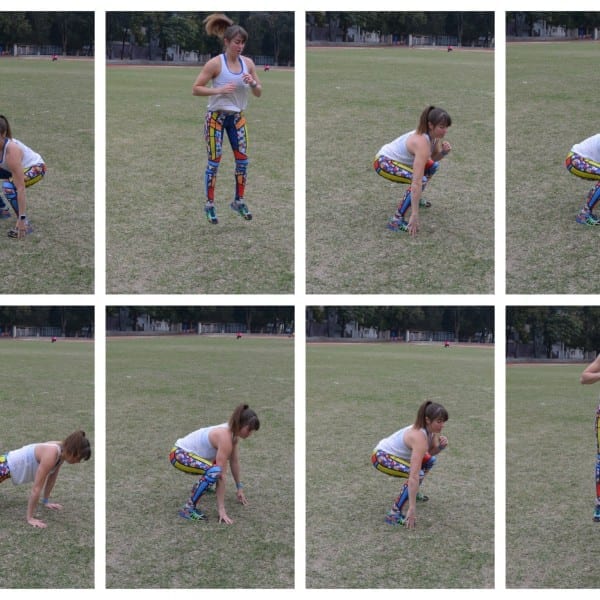
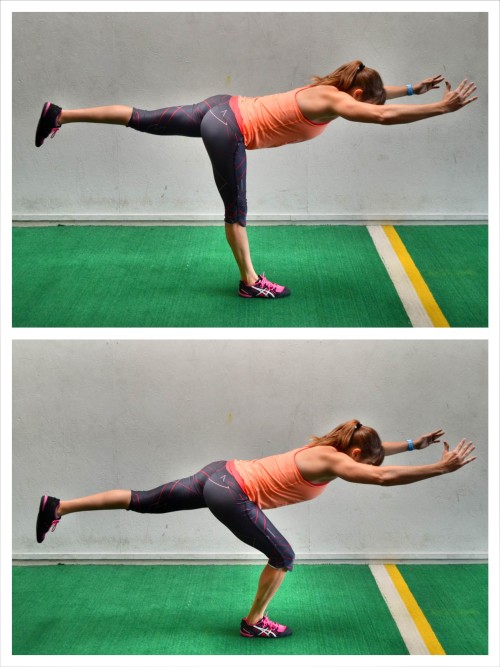
20-30 seconds each side Warrior III Hold
15-20 reps per side Warrior III Squats
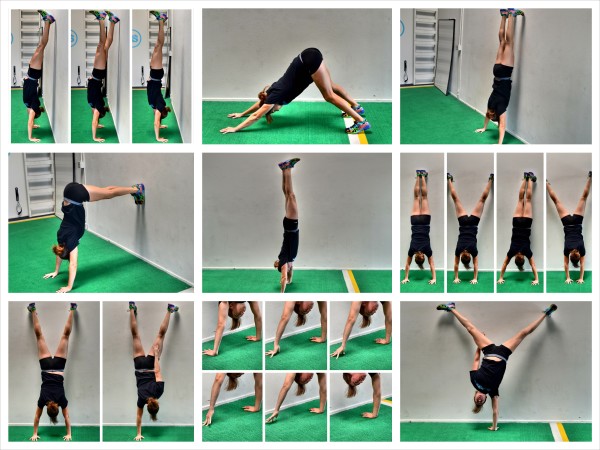
20-30 seconds Handstand Hold
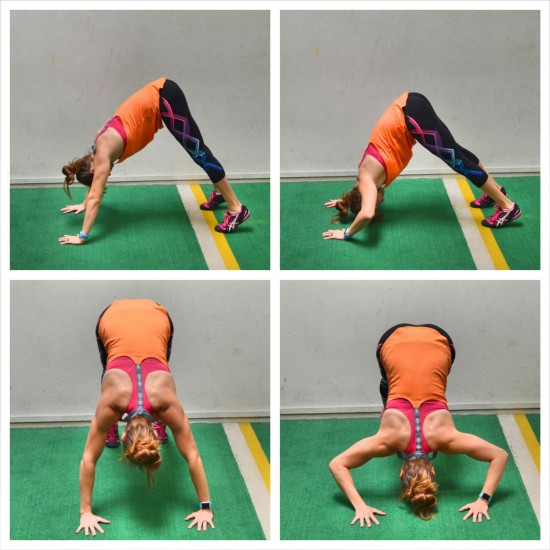
10-15 reps Pike Push Ups
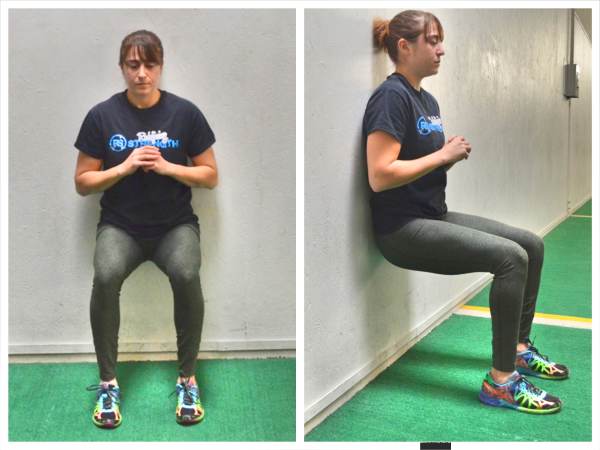
20-30 seconds Wall Sit
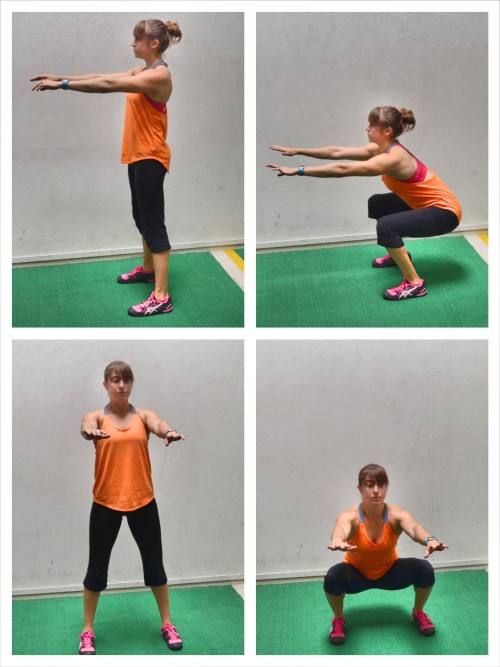
15-20 reps Squat Jumps
20-30 seconds Banana
10-15 reps TFW Sit Ups
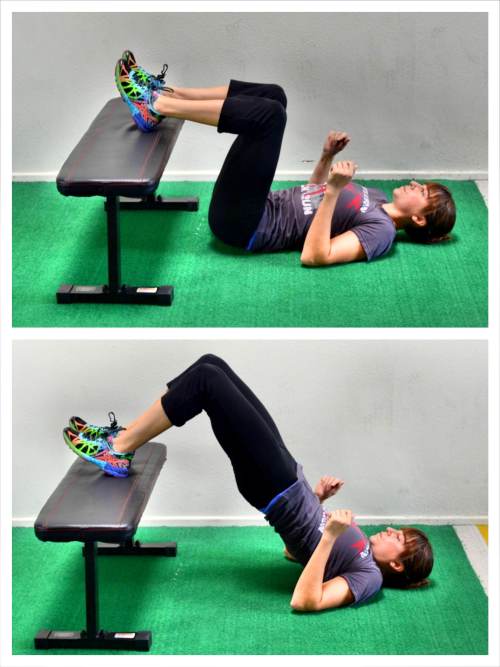
20-30 seconds Glute Bridge Hold
20 reps Glute Bridges

COOL DOWN
Stretch and Roll Out:
Calves
Quads
Groin
Hamstring
Hips/Glutes
Back
Shoulders

NOTES:

Shorten the holds or reps if needed, but try not to really rest between the holds and reps. Rest after both are complete if needed, but not between the hold and reps.

EXERCISE DESCRIPTIONS:

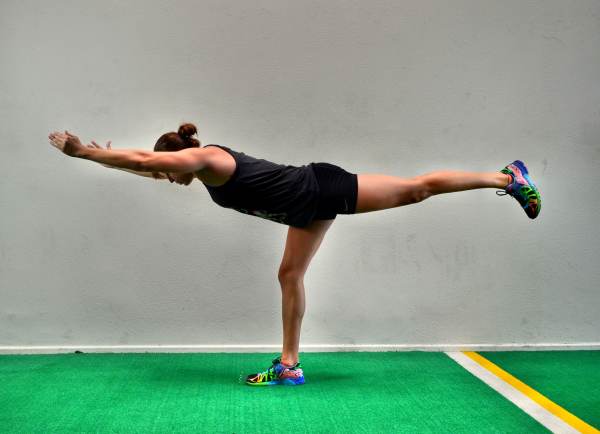
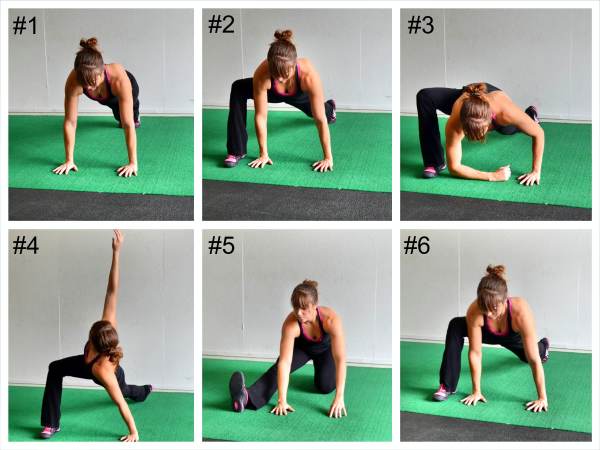
Warrior III Hold – To do Warrior III, start standing tall with your feet together. Then move to balancing on one foot and hinge over at the hips, leaning your torso forward as you push your butt back and lift your back leg straight toward the wall behind you. As you lift your leg and hinge over, make sure to keep your hips square to the ground. Do not rotate open. Also, pretend you are driving the foot of the lifted leg straight back into the wall behind you as you reach your head toward the wall in front of you. Maintain a nice straight line from your head to your raised heel, making sure to keep your back flat and your core tight as you hold this hinged over position. As you hold, reach your hands overhead in front of you, out to your sides or back toward your heels. Breathe and relax into the stretch and try to straighten your standing leg as much as you can while keeping your hips square to the ground and your body in a nice straight line. Feel your foot working to grip the ground and your leg stretching while your glutes and core work to keep you balanced. Do not let your back round or your other foot touch down as you hold. Only straighten your standing leg as much as you can while still maintaining balance and a straight line with your body. Beginners may need to reach back toward their foot instead of out in front of them or they may want to use a wall behind them to help them balance. To use a wall for slight assistance, stand with a wall behind you and when you hinge over have the lifted foot lightly touch the wall behind you to help you balance.

warrior-iii-pose
Warrior III Squats – To do Warrior III Squats, set up in the Warrior III position, balance on one leg then hinge over so that your chest is parallel to the ground. Reach your raised leg back toward the wall behind you as you keep your hips square to the ground and straighten your standing leg as much as you can. Then reach your hands overhead toward the wall in front of you or out to the sides or even back toward your feet. From this Warrior III position, bend your standing leg to perform a small squat. Make sure to keep your raised leg up and reaching toward the wall behind you as you stay in that hinged over position as you squat. Do not start to stand up as you squat. Straighten your standing leg back out and then repeat the small squat. The lower you squat as you maintain that Warrior III position, the harder the move will be. Also, the more you completely straighten your standing leg, the harder the move will be. Complete all reps on one side before switching. Do not let your hips open up as you squat. Also, do not go forward onto your toes or round your back. The move doesn’t have to be super big to have benefit!

warrior-iii-squats
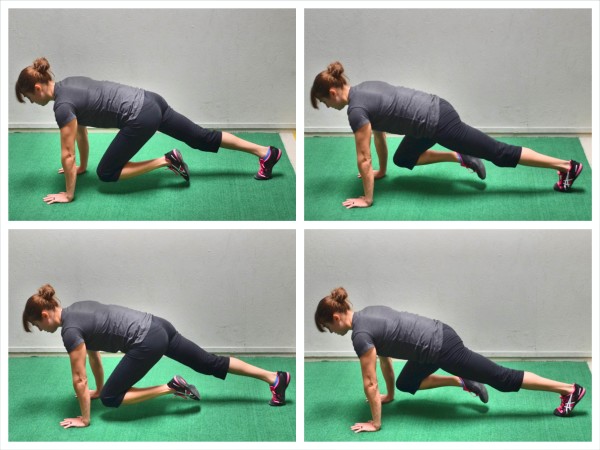
Handstand Hold – The most basic Handstand Hold is very similar to the downward dog. Start on your hands and knees. Then push back and up, raising your hips up toward the ceiling as you straighten your arms and press your chest back toward your legs. Focus on getting your back flat and a nice straight line from the heels of your hands up to your tailbone. You want your arms to be in line with your torso (aka biceps by the ears). Push your butt back and up. Do not worry about keeping your legs straight like in downward dog. Also, do not walk your feet in toward your hands. Push your butt up and create a nice straight line with your back. To advance that basic hold, place your feet up on a table. Walk your hands in toward the table and press your butt up in the air. You want to straighten your arms so your head is hanging down between your hands straight down toward the ground. Create a nice straight line from your palms up to your tailbone. Do not worry about straightening your legs. The higher the box, the harder the move. To do a Full Assisted Handstand, you can walk your feet up a wall. The closer to the wall you get, the harder the move will be. From there, you can move into a full handstand. No matter which variation you are currently able to do, you are going to create stability and strength throughout your core by doing Handstand Holds – Here are some more variations.

handstand-variations
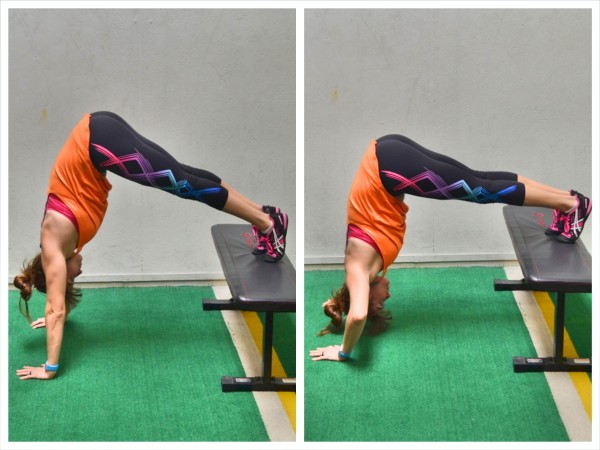
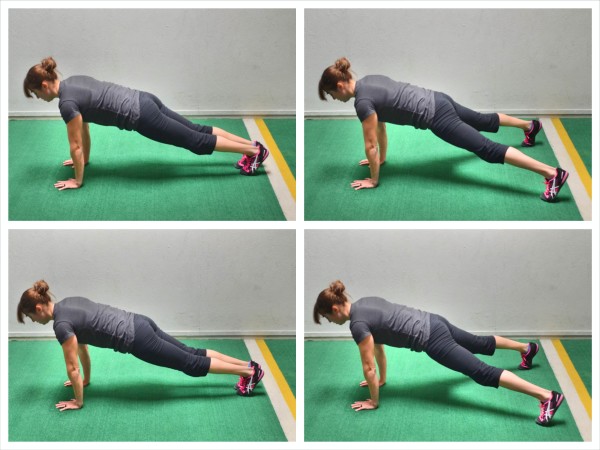
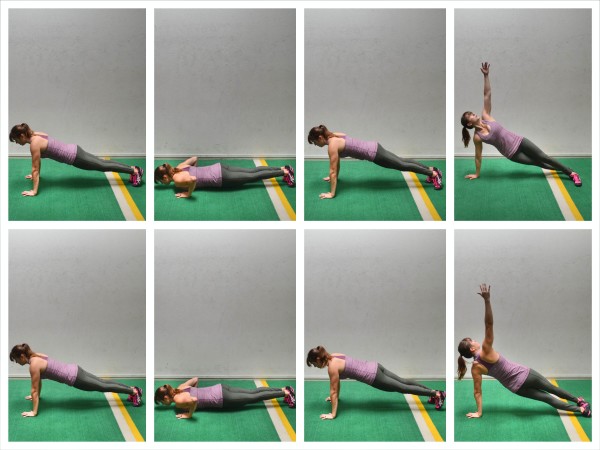
Pike Push Ups – To do the Basic Pike Push Up, start in the Downward Dog position and then slightly walk your feet in toward your hands so that you can drop your head straight down toward the ground between your hands. You can also do this move with your feet up on a bench to make it more challenging or you can even do a full handstand push up. Then in this piked position, bend your arms and drop your head straight down toward the ground between your hands. Lower down and then press back up, fully extending your arms. Make sure you are performing a vertical push and not turning this into more of a horizontal movement. If you are pressing back instead of up, try adjusting your feet or regressing the movement. You want to mimic a handstand movement even if your feet are on the ground. Repeat, dropping your head straight down between your hands.

pike-push-up
Wall Sit – To do the Wall Sit, stand with your back to a wall and your feet about hip-width apart. You can change up your exact foot position to hit slightly different aspects of your quads. Then sink down into a squat, pressing your back into the wall behind you as you try to get your quads as close to parallel to the ground as possible. When you sink into the squat, keep your ankles aligned under your knees and drive back into the wall through your entire foot. Do not rock forward onto your toes. Also, do not sink past parallel. Hold there and drive your back into the wall. If you start to feel this in your low back, make sure to brace your abs. Also, do not hunch or lean forward as you hold. Stay up nice and tall. To make this move easier, don’t sink as low in the squat or move your feet out just a bit from the wall. Do not let your ankles get too far out in front of your knees though.

wall-sit
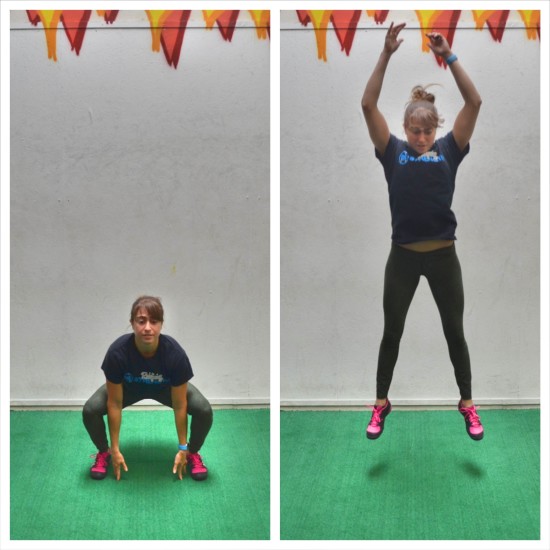
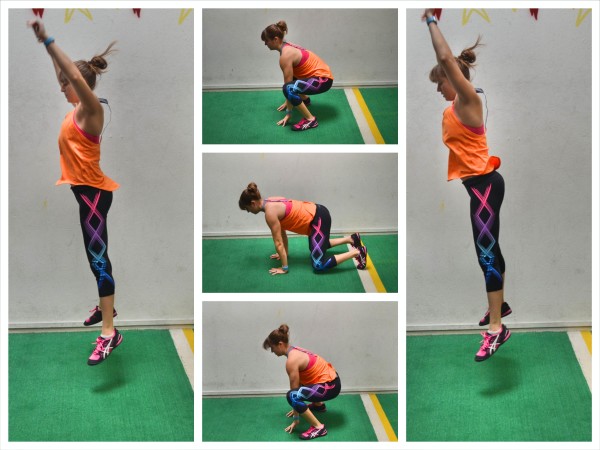
Squat Jumps – You can regress the movement and do bodyweight squats as well. To do Squat Jumps, stand with your feet between hip-width and shoulder-width apart. Sit your butt down and back into as low a squat as you can with good form (aka your heels stay down and your chest stays up and your knees don’t cave in). You can then swing your arms back as you squat or reach your hands down to touch the ground. Then explode up out of the squat and jump as high off the ground as possible. You can swing your arms and reach your hands overhead to help propel you up. As you jump, extend your body fully. As you land, sink right back into the squat so you can explode right back up. Do not land with your legs straight. Make sure to bend your knees as you land and try to land softly to protect your knees. Beginners may need to rest between each rep; however, that doesn’t mean landing with your legs straight. You should never land with your legs completely locked. Bend your knees to help you absorb the impact of landing even if you pause between jumps. To make the move harder, jump up and sink right back into the squat to repeat as quickly as possible. Really focus on a soft landing and then exploding quickly into as high a jump as you can.

squat-jump
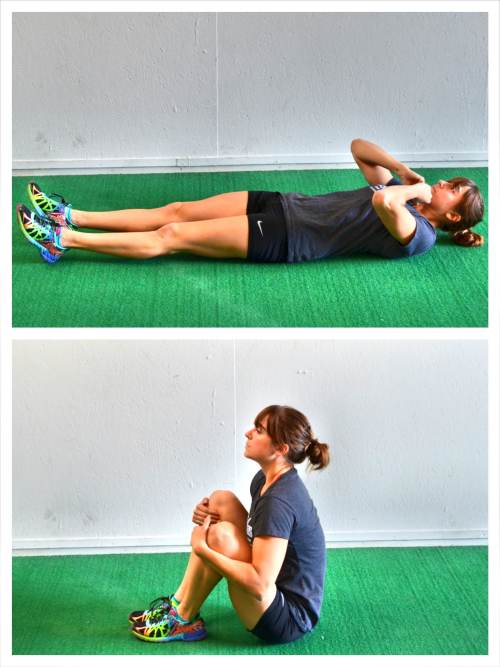
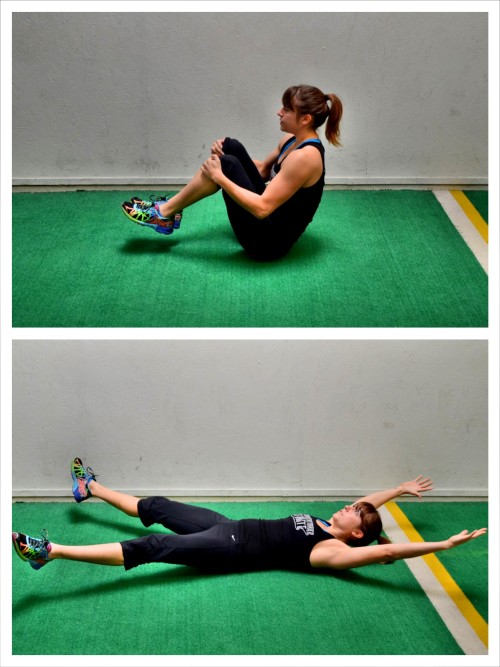
Banana – To do the Banana, and improve your mind-body connection so that you can engage your entire core (everything from your shoulders to your knees), start lying on your back with your legs out straight and your arms reaching overhead on the ground. Your legs should be together and your arms should be right by your head. Press your low back into the ground and draw your belly button in toward your spine as you lift your legs and arms up off the ground. Your neck and head should be in a neutral position between your arms and your legs should be together and out straight a few inches off the ground. Hold here, squeezing your legs together as you try to get your shoulder blades up off the ground while keeping your low back against the ground and abs engaged. Beginners may find they need to lift their legs up higher toward the ceiling or bend their knees to keep their low back against the ground and their abs engaged. Beginners can also try an easier variation of the Pelvic Tilt if they feel their low back taking over.

hollow-body-hold-variation
TFW Sit Ups – To do the TFW Sit Up, lie on your back with your legs out straight in front of you and your hands in under your chin. Then sit up, bringing your knees in as you move to place your hands on your shins. As you come to a tucked seated position, place your feet on the ground. Don’t swing your arms overhead to sit up. You can move your arms from in under your chin to around your legs at the top while you are seated. Then lie back down, straightening your legs back out in front of you as you bring your hands back in under your chin. With this Sit Up Variation, you can release at the bottom and touch your shoulders and heels down. Repeat, sitting back up as you bring your knees back in, grabbing your shins. Move as quickly as possible. As you sit up and lie back down, make sure not to arch your low back. Press it into the ground and feel your abs working. If your low back takes over, try a Basic Sit Up or even a pelvic tilt progression.

sit-up
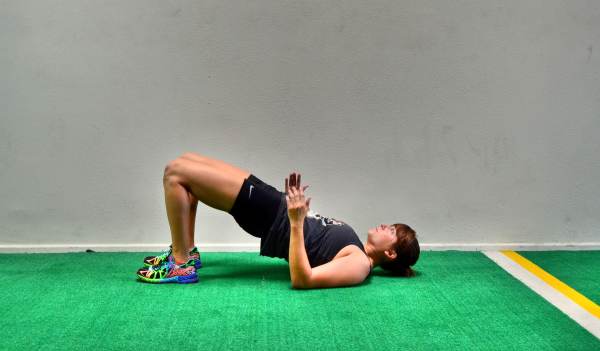
Glute Bridge Hold – 
To do the Basic Glute Bridge Hold, bend your knees and put your feet flat on the ground just close enough that you can graze your heels with your fingertips when you stretch your arms down by your side. Your feet should be about hip-width apart. You can change up how far your heels are from your butt to make sure you feel your glutes powering the bridge. If your hips are tight, you may need to move your feet further out. Just make sure you don’t feel your hamstrings taking over. Bend your elbows to 90 degrees so that only your upper arms are on the ground then drive up through your heels and upper back and arm to lift your glutes up off the ground. Drive your hips up as high as possible, squeezing the glutes hard. Brace your abs and extend your hips so that you don’t hyperextend your back. Do not push backward off your heels. Make sure you are driving straight up almost as if driving your knees forward over your toes. Also, make sure that your knees don’t cave in or fall open. Squeeze your glutes and hold at the top. Concentrate on feeling your glutes work. Don’t just go through the motions. Actually think about the muscles that should be working as you hold.

glute-bridge-activation
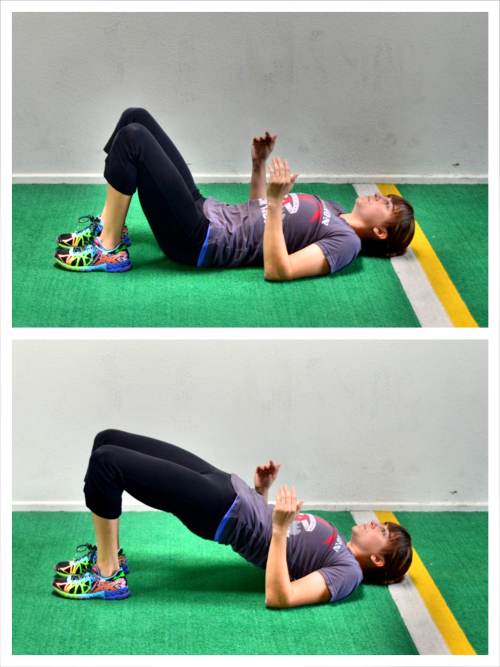
Glute Bridges – 
To do the Basic Glute Bridge, lie on your back and bend your knees and put your feet flat on the ground just close enough that you can graze your heels with your fingertips when you stretch your arms down by your side. Your feet should be about hip-width apart. You may need to adjust your exact foot positioning based on how tight or mobile your hips are. You can move your feet slightly away from your fingertips, but just make sure you don’t move them so far away that you feel your hamstrings taking over. Bend your elbows to 90 degrees so that only your upper arms are on the ground. This will help you really be able to drive down with your elbows, upper arms and back to help you bridge straight up instead of pushing yourself backward. Then bridge up, driving through your heels and upper back and arms to lift your glutes up off the ground. Drive your hips up as high as possible, squeezing your glutes hard as you brace your abs. Keep your belly button drawn in so you don’t hyperextend your back. Focus and consciously squeeze your glutes at the top. You may even want to perform the pelvic tilt before you lift to help keep your abs engaged throughout the bridge so that your low back doesn’t take over. When you bridge, do not push backward off your heels. Make sure you are driving straight up and that your knees aren’t caving in. Even think about driving your knees forward over your toes to help extend your hips and prevent you from pushing yourself backward. Squeeze your glutes for second or two at the top and lower all the way back down to the ground before repeating. Do not rush through the move. Concentrate on feeling your glutes engage and on keeping your abs braced. You do not want your low back to take over. If you do feel your low back or don’t feel your glutes, stop and reset and focus on engaging them a little extra at the top!

glute-bridge

The Cardio Kick Start Workout

The Cardio Kick Start Workout

WARM UP
Roll Out
5-8 reps per side World’s Greatest Stretch

WORKOUT

Complete 5-8 rounds of the following circuit. Rest 30 seconds between exercises and between rounds. Beginners may need to rest 1 minute between rounds. Do not rest during the 30 seconds of work. Regress movements if needed but keep moving!

CIRCUIT:
30 seconds Bulldog Burpees
30 seconds Rest
30 seconds Alternating Side Lunges with Hop
30 seconds Rest
30 seconds T Push Ups
30 seconds Rest
30 seconds Plank Jacks
30 seconds Rest
30 seconds Cherry Bombs
30 seconds Rest

COOL DOWN
Stretch and Roll Out:
Calves
Hamstrings
Quads
Hips/Glutes
Chest
Back

NOTES:

Do not rest during the 30 seconds of work. Rest more between rounds if needed or regress the movements, but do not rest during the 30 seconds. If you rest, you won’t get as much out of the workout. Keep moving!

This is a workout from our 21-Day Kick Start, which you can learn more about here.

EXERCISE DESCRIPTIONS:
World’s Greatest Stretch – 
To do the World’s Greatest Stretch: 1. Start in a high plank position with your hands under your shoulders and feet together. Your body should start in a nice straight line from your head to your heels. Do not let your hips sag or your butt go up in the air. 2. Step your right foot outside your right hand so that you are in a nice low runner’s lunge. Make sure your foot is flat on the ground. (If you are less flexible, your foot may not be right outside your hand or you may need to drop your back knee down to the ground. But do not let your front heel come up. You still want your foot to be flat on the ground.) 3. In the low runner’s lunge, drop your right elbow down to the ground near the instep of your right foot. Do not worry if you can’t touch the ground. Just drop your elbow down as low as you can. Feel a nice stretch in your hip and glute. 4. Then bring your elbow up off the ground and rotate your right arm up toward the ceiling, opening your chest up toward the ceiling to face your right leg.  Stretch your right arm up toward the ceiling and rotate your chest open to feel a nice stretch in your hips, glute, back and chest. 5. Bring the right hand back down to the ground and then drop your back knee (left knee) down to the ground. Sit back on your left heel and let your right leg straighten out in front of you. Feel a stretch down your right hamstring. Lean forward over that front leg to increase the stretch. You may even feel this stretch your low back a bit. Make sure though that you are pushing your butt back as you hinge and lean from the hips and don’t simply round over. 6. Then shift back forward into the low runner’s lunge, bending your right leg and lifting your left knee up off the ground. 7. You can then repeat the stretch on the same side or step your right foot back into the plank position and step your left foot up outside your left hand to stretch the other side. Take your time at each step to feel the stretch working. Spend a little more time on pieces of the stretch that you really feel hitting your tight spots!

spiderman-stretch
Bulldog Burpees – To do the Bull Dog Burpee, start standing with your feet together. Then squat down and place your hands down on the ground. With your hands down on the ground just in front of your feet, jump your feet back into the Bull Dog position. Jump your feet back so that your knees are an inch off the ground and about under your hips while your hands are about under your shoulders. Do not let your butt go up in the air or your low back arch. Keep your back flat in this position. Then jump your feet back in and slightly outside your hands. Lift your hands up off the ground and jump up as high as you can before squatting back down and placing your hands back on the ground to jump back into the Bull Dog position and repeat the Burpee.

bull-frog-burpees

Alternating Side Lunges with Hop – To do the Alternating Side Lunges with Hop, stand tall with your feet together. Step one foot out to the side nice and wide. Bend the knee of the leg you stepped out to the side with, keeping the other leg straight, and sit your butt back to sink into the side lunge. Don’t be afraid to slightly lean forward as you hinge at the hips to sink your butt. Keep your back flat as you sit back. Then drive back up off your outside foot to come back to standing. Do not bend the other leg as you push off to come back up to standing. When you come back to standing, jump up toward the ceiling, reaching up overhead. Then lunge out to the other side before coming back center and jumping toward the ceiling. Keep alternating lunges until all reps are complete. Make sure your heels stay down as you lunge out to the side. You want to make sure to sit your butt back and load your glutes.

side lunges with hop
T Push Ups – To do the T Push Up, start at the top of a Push Up from your knees (beginner) or toes (advanced). Your legs should be close together and your hands should be under your shoulders and outside your chest. Brace your abs and engage your glutes and quads as you drive back through your heels to make sure your body is in a nice straight line. Then drop your chest to the ground between your hands to perform a push up. Keep your body in a nice straight line. Do not let your hips sag or your butt go up in the air. Also, make sure your elbows do not flare up by your shoulders. Press back up to the top of the push up, moving as one unit, then lift one hand and rotate open into a side arm balance or side plank. Pivot your feet to rock onto the outsides of your feet as you reach your top hand up toward the ceiling and rotate your body open. Do not let your shoulder shrug as you do this. Pause for a second, then rotate the hand back down and the feet back forward. Perform another push up and then a side arm balance on the other side. Keep alternating side arm balances after each push up. Beginners can do the movement from their knees or lift up onto their toes after the push up for the balance. They can also do this move off an incline.

side-plank-push-up
Plank Jacks – To do Plank Jacks, start at the top of a push up with your hands under your shoulders and your feet together. Your body should be in a nice straight line from your head to your heels. Brace your abs then jump your feet out wide to each side as if doing a Jumping Jack. As you jump, do not let your butt go way up in the air or your hips sag way down toward the ground. Quickly jump your feet back in together, holding the nice plank position. Do not shrug your shoulders or bend your arms as you go. Also, do not let your hands move forward in front of your shoulders. Repeat, jumping them back out. Keep your core engaged as you jump your feet in and out. Do not let your butt go up in the air or your hips sag as you jump your feet out wide and then back together. Beginners may need to start by stepping one foot at a time out wide and then back together. You can also add some variety to this move and make it more challenging for your inner thighs by doing it with sliders or towels under your feet.

plank-jacks
Cherry Bombs – To do Cherry Bombs, start seated on the ground with your knees slightly bent and feet flat on the ground. Then lift your heels up off the ground and slightly rock back so that you are balanced on your butt. Draw your knees in toward your chest and wrap your arms around your shins. Then open up, lying back on the ground without fully relax down and open. Keep your abs engaged and your shoulder blades slightly up off the ground as you open your arms up and out overhead. Also, keep your legs off the ground as you straighten them out and open them up wide. You should almost look like a big X on the ground with arms and legs out and open and your low back pressed against the ground. Feel your glutes work to open your legs out wide as your abs are braced to prevent your low back from coming up off the ground. Then come back to seated, drawing your knees back in as you wrap your arms around your shins. Try to keep your feet up off the ground the entire time. Repeat, opening back up without completely relaxing back onto the ground. Beginners may need to do the tuck without the full range of motion. They may need to perform more of a crunch instead of coming all the way up to balanced on their butt. To make the move harder, open your legs up while keeping them as close to the ground as possible. Kick them up and out wider higher off the ground to make the move easier.

cherry-bombs

Lower Body Blast

Lower Body Blast

WARM UP
Stretch and Roll Out:
Calves
Quads
Hamstrings
Adductors
Hips/Glutes

WORKOUT

Set a timer for 20 minutes. Complete as many rounds of the circuit below as you can in that time. Challenge yourself with weights and variations, but make sure you can keep moving quickly and don’t have to spend a long time resting.

CIRCUIT:
5 reps per side Single Leg Squats
10 reps Leg Lowers
15 reps Glute Bridges Off Box
20 reps Kettlebell Swings

BURN OUT – The Quad Killer:
Set a timer for 20 seconds of work, 10 seconds of rest, 10 rounds. Cycle through the Wall Sit, Squat Pulses and either Squats for reps or Squat Jumps. Keep moving the entire 20 seconds and do not rest during that time. Burn out those quads!

COOL DOWN
Stretch and Roll Out:
Calves
Quads
Hamstrings
Adductors
Hips/Glutes

NOTES:
It is very important that you move quickly from one move to the next while still challenging yourself with each move. Record the rounds you complete and to try to beat it next time!

EXERCISE DESCRIPTIONS:
Single Leg Squats – 
To do the Single Leg Squat to bench, choose a bench that is as low as possible. The lower the bench, the harder the move. Stand in front of the bench and lift one leg out in front of you. Then sit back and squat to the bench. The more you completely sit and reset on the bench, the easier the move will be, especially if you lift your standing leg and then stomp it back into the ground. If you just barely touch and go, you may find that the move is harder. Also, the more you swing your arms, the more momentum you will have to help you stand back up. Make sure to keep the heel of the standing leg down as you squat and drive back up to standing.

single-leg-squat
Leg Lowers – To do Leg Lowers, lie on your back with your arms behind your head or down by your sides and brace your abs by setting up in the pelvic tilt. Then lift your legs straight up toward the ceiling, keeping them together and as straight as possible. Then with your low back firmly against the ground and your abs braced, lower both your legs down toward the ground. Lower them as close to the ground as possible without touching or without letting your low back come up off the ground. Keep your legs as straight as possible as you lower them down. Then lift them back up, keeping your low back against the ground and your legs striaght. Use your abs to lift and lower. If at any point while you lift and lower your legs, your low back comes up off the ground, stop and reset. Then either decrease your range of motion (not lowering as close to the ground) or regress to single leg lowers, lowering one leg down at a time. If you can keep your abs engaged and not let your low back take over, lower your legs down so your heels are no more than an inch off the ground before raising them back up. You should also engage your glutes as you lower down and hover just off the ground. And make sure that your legs stay as straight as possible throughout the movement.

leg-lowers
Glute Bridges Off Box – To do the Glute Bridge Off Box, place your heels up on the box or right on the edge. You want your knees bent to about 90 degrees or your butt to be even closer to the box. Do not let your butt get too far away from the box. You may need to play around with exact positioning so that you feel your glutes working and not your low back or hamstrings taking over. Bend your arms to 90 degrees with just your upper arms on the ground. Then driving through your heels on top of the box, press your hips up as high as you can. Squeeze your glutes and keep your core tight as you bridge up so that you don’t hyperextend your low back. Also, do not let your knees fall in or out as you lift up. Keep your knees in line with your hips and ankles. Hold for a second or two and then lower down.

glute-bridge-feet-on-box
Kettlebell Swings – To do the Kettlebell Swing, set the kettlebell (or bell) down on the ground and slightly in front of you. Hinge over, bending your knees slightly and pushing your butt back as you lean forward. Keep your back flat and then reach your arms out and place both hands on the handle, tilting the bell back toward you. Hike the kettlebell back between your legs like you would a football. Pull it back and up between your legs toward your butt. To power the bell up and forward, squeeze your glutes and drive your hips forward as you stand up nice and tall. Pop your hips forward and propel the kettlebell up off your hips. Do not worry about how high the bell goes. It shouldn’t go higher than your shoulders. Squeeze your glutes as you stand tall. You may lean back a little at the top, but make sure you are squeezing your glutes and not loading your low back. Then, keep your glutes tight, wait as the bell comes back down before you hinge back over. Your forearms need to connect with your hips before you hinge back over and bring the bell back down and through your legs. Do not lean forward and hinge over before the kettlebell comes back down. You want to maintain the connection between your hips and forearms to protect your low back. Also, don’t allow the kettlebell to sink low between your legs. You want the bell up close to your crotch. As your forearms connect and you hinge over, sitting your butt back, make sure to lean forward to counterbalance the kettlebell going back through your legs. Let the kettlebell reach through toward the wall behind you. If the bell comes up and taps you in the butt, it may be too light. Then squeeze your glutes again and thrust the kettlebell back up as you come back up to standing. With the swing, you may keep a straighter leg or bend your knees a little as you swing. They are both acceptable just different styles. Make sure to squeeze your glutes at the top of each swing and make sure you don’t come up onto your toes. While you may lean back a little, you don’t want to lean back and load your low back. You should not feel this move in your low back at all. Maintaining the connection between your forearms and hips as you hinge is essential for keeping your glutes working and your low back from feeling strained. Do not sit your butt back while the kettlebell is still out in front of you. You almost want the kettlebell to be pulling you back and that is why you are hinging over. The hinge is a reaction to the bell instead of you anticipating the kettlebell coming back down and hinging over before it lowers. Start small with the swing to focus on the connection. You don’t have to get the kettlebell all the way up to your chest to get a lot out of the movement.

kb-swing

Wall Sit – To do the Wall Sit, stand with your back to a wall and your feet about hip-width apart. You can change up your exact foot position to hit slightly different aspects of your quads. Then sink down into a squat, pressing your back into the wall behind you as you try to get your quads as close to parallel to the ground as possible. When you sink into the squat, keep your ankles aligned under your knees and drive back into the wall through your entire foot. Do not rock forward onto your toes. Also, do not sink past parallel. Hold there and drive your back into the wall. If you start to feel this in your low back, make sure to brace your abs. Also, do not hunch or lean forward as you hold. Stay up nice and tall. To make this move easier, don’t sink as low in the squat or move your feet out just a bit from the wall. Do not let your ankles get too far out in front of your knees though.

wall-sit
Squat Pulses – To do Squat Pulses, stand with your feet between hip-width and shoulder-width apart. Then sit your butt back and sink into a squat. Pulse up and down, coming up toward the top of the squat and then sinking back down. Stay within that working range sometimes doing bigger movements and sometimes small pulses right around the bottom of the squat.

squat-pulses
Squat Reps – To do the Basic Bodyweight Squat, stand nice and tall with your feet about hip-width to shoulder-width apart. Your feet should be parallel and pointing straight ahead. You can place your hands across your chest on your shoulders or reach your hands out in front of you. Then squat down, sitting your butt back and down as you. Bend your knees to sit back and squat as you keep your chest up. Keep your heels down as you drop your butt as close to the ground as you can. Do not let your back round or chest fall forward as you squat. Also, make sure to keep your heels down. Only squat as low as your mobility allows. Then come back up to standing, driving through your heels. Do not come forward onto your toes or lean forward as you stand back up. Squeeze your glutes at the top. If your back rounds or if you shift your weight to one side or the other as you squat, do not squat as low and work on your mobility before increasing weight. You may also need to work on correctly imbalances if you shift your weight to one side or the other. Also beware of your knees caving in or bowing out. Your hips, knees and ankles should all be in line as you squat.

basic-squat-form
Squat Jumps – To do Squat Jumps, stand with your feet between hip-width and shoulder-width apart. Sit your butt down and back into as low a squat as you can with good form (aka your heels stay down and your chest stays up and your knees don’t cave in). You can then swing your arms back as you squat or reach your hands down to touch the ground. Then explode up out of the squat and jump as high off the ground as possible. You can swing your arms and reach your hands overhead to help propel you up. As you jump, extend your body fully. As you land, sink right back into the squat so you can explode right back up. Do not land with your legs straight. Make sure to bend your knees as you land and try to land softly to protect your knees. Beginners may need to rest between each rep; however, that doesn’t mean landing with your legs straight. You should never land with your legs completely locked. Bend your knees to help you absorb the impact of landing even if you pause between jumps. Beginners can also start with a quick Basic Bodyweight Squat and even come up onto their toes as the stand up instead of completely leaving the ground. If they have good mechanics, they may want to leave the ground but not jump as high. To make the move harder, jump up and sink right back into the squat to repeat as quickly as possible. Really focus on a soft landing and then exploding quickly into as high a jump as you can.

squat-jump