At-Home Bodyweight Workout: The 20s Chest And Legs Trisets

At-Home Bodyweight Workout: The 20s Chest And Legs Trisets

Just because you can’t make it to the gym doesn’t mean you have an excuse to skip your workout!

When you don’t have access to equipment, you can still get amazing results using just your own bodyweight.

By shortening rest, increasing volume slightly and by using different tempos and hybrid movements, you can challenge yourself without any tools in a very small space.

So if you can’t hit the gym, you can stay on track with this 20s Triset Blast to torch your chest, shoulders, triceps, abs and legs!

The 20s Chest And Legs Trisets

QUICK WARM UP OPTION:
Complete 1 round through the quick stretching flow below as well as 1-2 rounds of the activation.
STRETCHING:
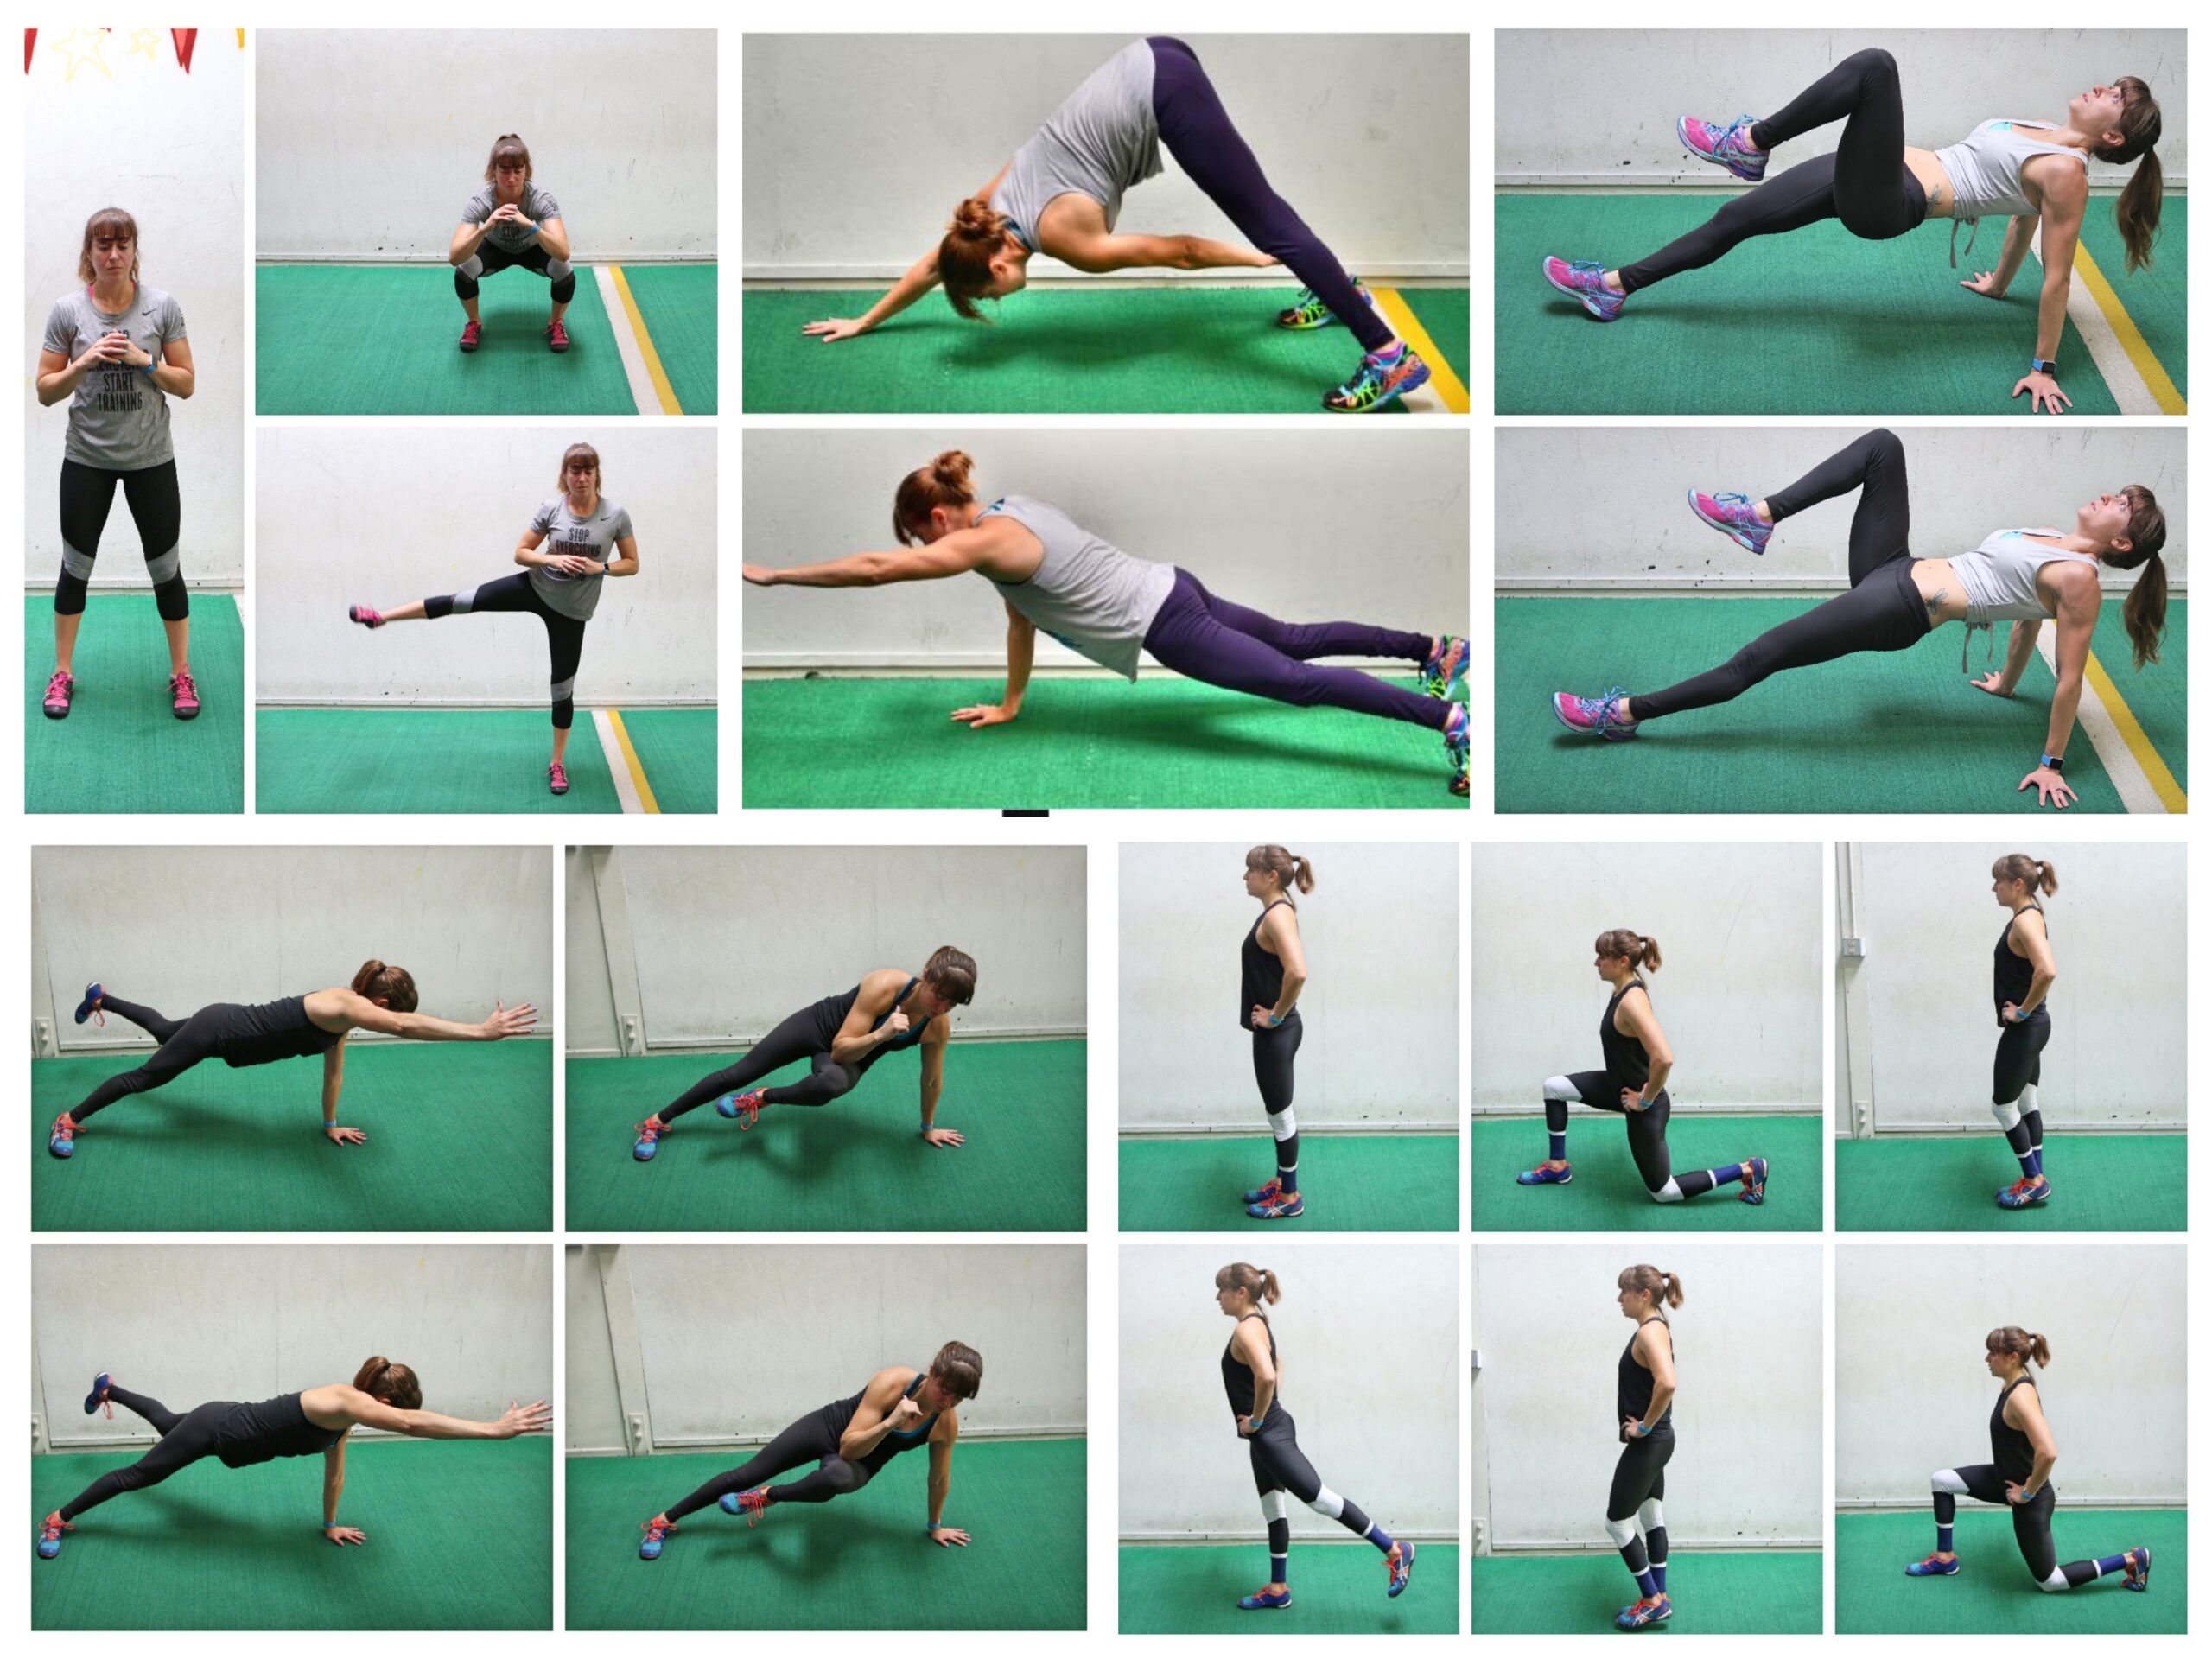
5-10 reps per side Inchworm Flow
ACTIVATION:
10-15 reps Tabletop Bridge
10-15 reps Downward Dog Scapular Presses
8-12 reps per side Bulldog Shoulder Taps

WORKOUT:
Complete 3 rounds of each triset, resting only as needed. After you complete all 3 rounds on a triset, quickly move to the next series. Time how long it takes you to complete everything and try to beat that time next week! For any unilateral or one-sided move like the Lunges or Tricep Push Ups, you can complete 10 reps per side if you’re a beginner to intermediate exerciser. If you’re more advanced and have been working out consistently, you can work up to 20 per side!

TRISET #1:
20 reps Squat with Pulse
20 reps Forward to Backward Lunge
20 reps Bulldog Ins and Outs
TRISET #2:
20 reps Wide Grip Push Ups
20 reps Tricep Push Ups
20 reps Plank Hip Dips
TRISET #3:
20 reps Sumo Squat to Calf Raise
20 reps Push Up Toe Touch
20 reps Tabletop Dip Toe Touch

EXERCISE DESCRIPTIONS:

Squat with Pulse:

squat with pulse

To do the Squat with Pulse, start standing tall with your feet between hip-width and shoulder-width apart. Sit your butt back and down, squatting through a full range of motion. Keep your chest up and don’t round over.

Sink down to about parallel while keeping your heels down. You may go slightly below parallel but don’t make this the deepest squat you’ve ever done. From the bottom of your squat, pulse up a few inches then sink quickly back down.

While you don’t want to bounce, this is a very quickly little pulse a few inches up and then back down.

 Then drive back up to standing, squeezing your glutes at the top before repeating the squat with a pulse at the bottom.

Forward to Backward Lunge:

front to back lunge

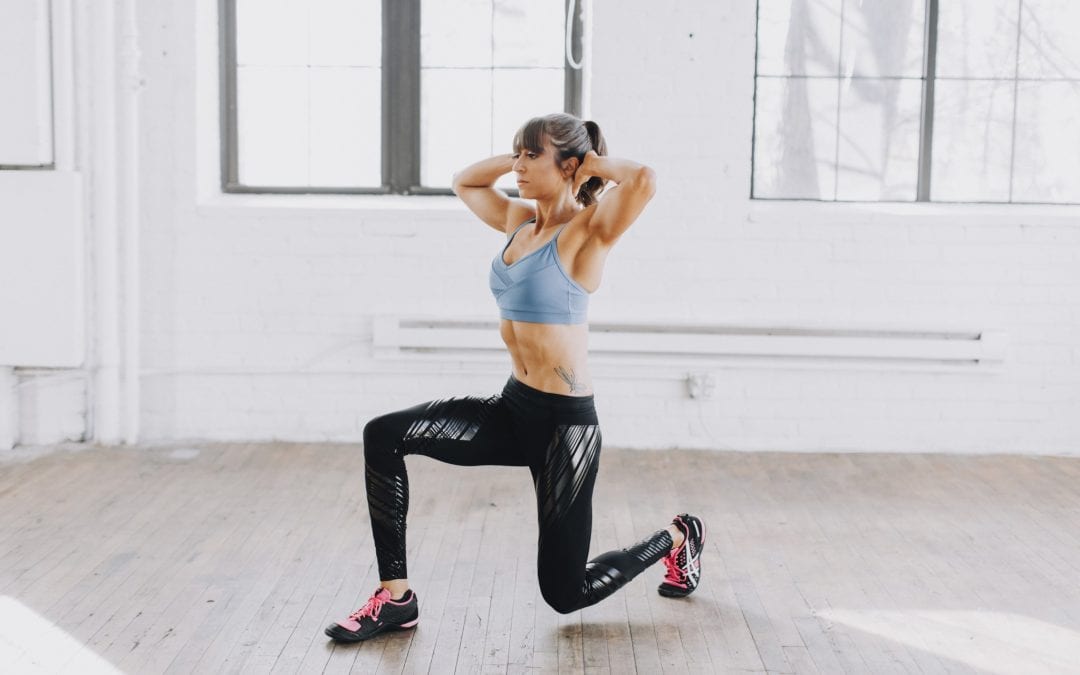
To do the Forward to Backward Lunge, start standing tall with your feet together. Then lunge forward on one side. Bend your knees as you sink down as if lowering to half kneel on the ground. Try to get your front knee bent to about 90 degrees, sitting back in your heel. Drop your back knee down toward the ground as you keep your chest up.

Then drive back through your front heel to come back up to standing. You can tap your toe down center if needed or move right into the backward lunge.

Step back with the same leg you lunged forward with and sink into a backward lunge. Keep your chest up as you sit back in your front heel and drop your back knee down toward the ground. Then drive back up to standing, driving through your front heel.

Repeat, moving right back into the forward lunge on the same side.

Bulldog Ins and Outs:

bulldog bodyweight core move

To do Bulldog Ins and Outs, set up on your hands and knees with your knees under your hips and hands under your shoulders. Flex your feet and lift up onto your hands and the balls of your feet. 

Holding this bulldog position, jump your feet out wider so that your legs move open while your knees still stay about under your hips. Don’t let your legs straighten out as you jump out wide.

Then jump your feet back in and even closer together than where you started. You can jump them all the way together even and then jump back out.

Keep jumping your feet in and out as you keep your butt down and stay in that bulldog position.

To modify the move, step one foot out wide and then the other before stepping both back in and together.

Wide Grip Push Ups:

To do the Wide Grip Push Up, set up in the high plank position with your hands out wider at chest height. A great way to figure out a width to start with is to make your hands into fists and place your knuckles together. Lean forward and lay your arms on the ground with your knuckles together. Your elbows will be pointing out and, right at the end of each elbow, you will place your hands. Make sure your hands are at chest height and not way up by your head.

Then in the high plank position with your feet close together and your body in a nice straight line from your head to your heels, lower your chest down to the ground. Do not let your hips sag or your butt go up in the air. Make sure your entire body moves as one unit.

Lower all the way down then press back up with your body moving as one unit. Full straighten your arms out at the top and repeat, lowering back down. Try to keep your entire palm firmly on the ground as you press and lower.

Beginners can do the Wide Grip Push Up from their knees or off an incline.

Tricep Push Ups:

To do Tricep Push Ups, lie on your side with your legs out straight or bottom knee bent. If you bend both legs it will make it harder. Wrap your bottom arm up and place your hand on your opposite shoulder or around your ribs. Place your top hand down on the ground at about shoulder height or right below. The more you place the hand down toward your belly button, the harder the move will be.

Then press the ground away with that hand on the ground, feeling your tricep work to push your upper body up. Press up until your arm is extended and lower back down to the ground. Keep yourself on your side as you press and lower. Your chest may slightly rotate toward the ground as you press, but make sure you really focus on the back of your arm working.

Repeat, pressing up again until your arm is fully extended. Adjust your hand placement or your legs so you can press and stay under control. Also, engage your abs so your legs aren’t flopping around as you lift. You want to keep your legs down or regress the move to make sure that you can.

Plank Hip Dips:

To do the Plank Hip Dips, set up on your forearms and either your knees (beginner) or toes (advanced). Your elbows should be under your shoulders and your body should be in a nice straight line from your head to your heels or knees. Squeeze your glutes and keep your core tight with your belly button drawn in toward your spine. Do not let your hips sag or your butt go up toward the ceiling.

Then rotate, dropping your hips toward one side. Try to touch the ground as you rotate without your hips sagging or butt going up in the air. Also, do not let your elbows come up off the ground.

Come back center then drop your hip to the other side. Alternate hip touches until all reps are complete.

You will feel everything twisting even down to your feet or knees. Do not let yourself go all the way over. Make sure to control the twists and just touch the hip down before twisting to the other side.

Sumo Squat to Calf Raise:

To do the Sumo Squat to Calf Raise, stand with your feet shoulder-width apart or slightly wider. Turn your toes out slightly. Keeping your chest up, sink down in a squat. Sit your butt back and keep your chest up. Make sure your knees stay in line with your hips and ankles. Do not let your knees cave in.

If your knees cave in, adjust your stance, bringing your feet closer together. Then drive back up to standing and squeeze your butt.

As you fully stand, push off the balls of your feet to raise your heels off the ground and perform the calf raise. Keep your toes slightly pointed out and make sure to push off the entire ball of your foot.

Lower your heels back down to the ground and repeat the sumo squat.

Push Up Toe Touch:

To do the Push Up Toe Touch, set up in the plank position on your feet and hands with your hands under your shoulders and your feet about shoulder-width apart. Putting your feet closer together can make it harder to balance and force your core to work harder. Your body should be in a nice straight line.

Then from this plank position, reach one hand back toward the opposite ankle. As you reach back, push your butt up in the air. Reach back toward the opposite ankle and then move back into the plank position, placing your hand back down on the ground.

Perform a push up, dropping your chest toward the ground with your body moving as one unit. Press back up and then reach the other hand back toward the opposite ankle.

Push your butt up into the air every time you reach back, but make sure to come back forward into the plank position before performing the push up.

Tabletop Dip Toe Touch:

To do the Tabletop Dip to Toe Touch, start with your butt on the ground and then place your hands behind you as you bend your knees and place your feet flat on the ground.

Then lift your butt up off the ground. Perform a little dip, bending your elbows as you touch your butt back down to the ground.

Then lift up, bridging your hips up a bit, as you kick your leg up and reach your opposite hand to touch your toe. Place your hand and foot back down, then repeat the dip and then kick the other leg up and reach your other hand to touch your toe.

Move quickly without rushing so much that you don’t stay balanced. Also, make sure to perform a little dip after each toe touch, bending your elbows slightly to touch your butt down.

The Bodyweight Backside Burner

The Bodyweight Backside Burner

You don’t need fancy equipment or to spend hours at the gym working out to get results.

When you’re short on time, all you need is your own bodyweight and 10 minutes.

In that time you can get in a killer workout to strengthen your ENTIRE core – everything down your frontside AND your backside.

And while this workout is called the Backside Burner it targets more than just your back, hamstrings and butt. It will also work your abs, serratus anterior, obliques, quads and shoulders!

Enjoy this bodyweight burner from my 28-Day Core Burner program!

The Backside Burner

Complete 3 rounds of each circuit, moving right from one exercise to the next. After you finish the first circuit, perform 40 seconds of active rest before moving on to the second circuit. Beginners can fully rest between circuits instead of performing the active rest. Click on each exercise below to see a video demonstration and more information!

CIRCUIT #1:
20 seconds per side Reverse Lunge to Kickback
20 seconds Forearm Plank Scapular Push Up
20 seconds Frog Bridges

20 seconds per side Single Arm Plank Rotation With Knee

CIRCUIT #2:
20 seconds Squat with Leg Raise
20 seconds per side Plank with Reach Back and Out
20 seconds Posterior Plank Mountain Climbers

The 30/30 Cardio Workout

The 30/30 Cardio Workout

Often when we think about getting in a killer cardio workout, we eliminate as much rest as possible and put in longer work intervals.

But guess what happens when you rest less?

Your power, speed, quickness, intensity all DROP.

If you don’t have as much time to recover, while you may be going “all out” every round, your output will still dip.

So sometimes including a bit MORE rest can allow you to actually work HARDER during the intervals of work and keep your output higher throughout the entire workout.

While I love workouts that shorten rest, giving you half or even just a quarter of the time you worked to recover, there is also something to be said for workouts that allow you to rest equal to the time you worked.

That equal work to rest setup allows you to go harder each and every work interval so your intensity stays higher throughout!

You may even find you include extra rest between rounds to keep your intensity higher!

But if you’re looking for a great cardio killer that gives you a bit of extra rest so you can get even MORE out of the session, try this 30/30 Bodyweight Cardio Workout.

The 30/30 Bodyweight Cardio Workout

WARM UP:
Roll out.
Stretch:
5-8 rounds World’s Greatest Stretch

WORKOUT:
Set a timer for 30 second intervals. You will work for 30 seconds then rest for 30 seconds before moving on to the next exercise. Go through the circuit, resting 30 seconds between moves. Do not rest extra between rounds although beginners can rest 1 minute if needed between rounds. Complete 3-6 rounds. If you are short on time, just complete 3 rounds.

CIRCUIT:
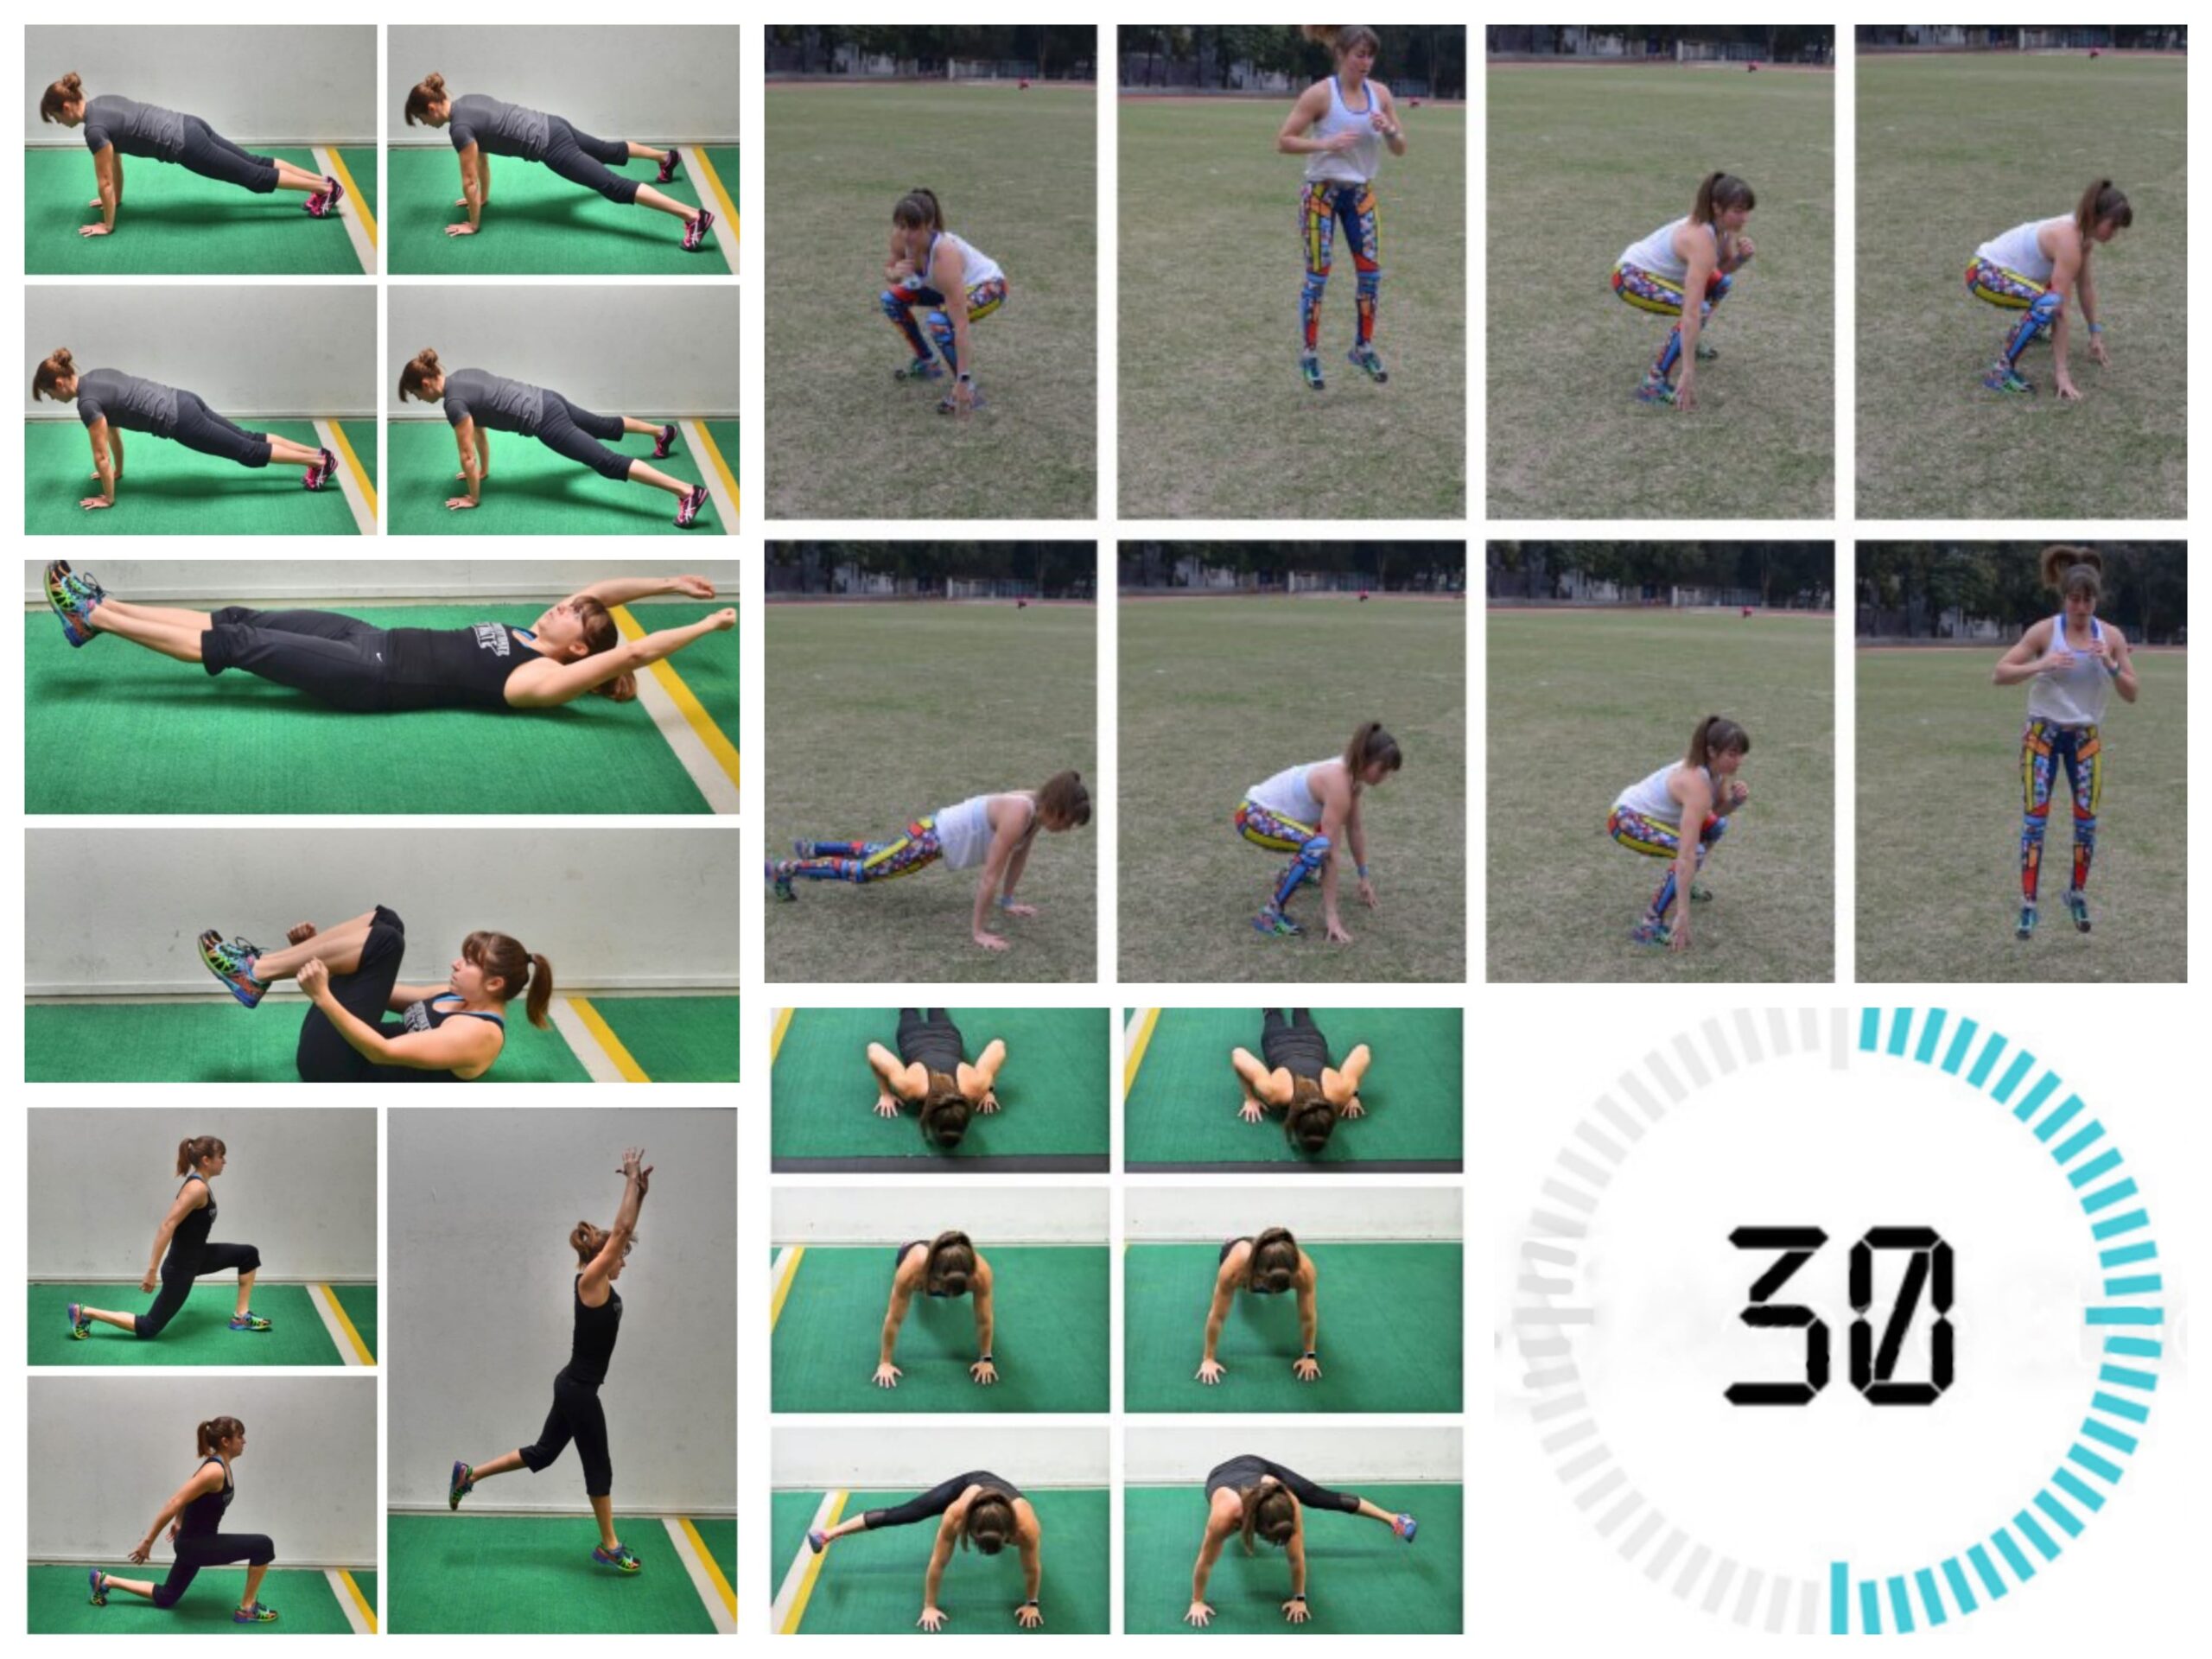
30 seconds Snowboard Hop Burpees
30 seconds Rest
30 seconds Push Up with Leg Kick
30 seconds Rest
30 seconds Split Squat Jumps
30 seconds Rest
30 seconds Plank Jacks
30 seconds Rest
30 seconds Full-Body Crunch
30 seconds Rest

COOL DOWN:
Roll out and Stretch:
Any and all tight areas
Some Recommended Stretches:
Standing Chest Stretch
Half-Kneeling Hip and Quad Stretch

NOTES:

DO NOT SHORTEN REST. Get in more reps during the intervals of work. Intensify variations. But do not shorten rest to make things harder. If it doesn’t feel hard, you need to push yourself harder during those work intervals! You should feel like you NEED the rest to fully recover whether from your muscles burning or your heart rate elevating.

Love this workout?

Check out this one and more in my 6-Week Bodyweight Shred!

Simple Doesn’t Mean Easy – Try This Density Interval Workout!

Simple Doesn’t Mean Easy – Try This Density Interval Workout!

All too often we think we need lots of jumping, burpees, and well, cardio in general, if we want to lose fat.

And while all of those moves and exercises should have a place in our routine, overdoing those things may actually be holding us back.

Sometimes those workouts that look “easy,” that seem simple, that won’t have you gasping for air, are the essential workouts we are MISSING.

They are hard in a different way and require you to establish an efficient mind-body connection to build your foundation.

They create proper recruitment patterns to keep you injury free and help your body work well so you can get even more out of all of your workouts.

And while these routines may seem easy, they will challenge your body in a new way and lead to killer results. Hey they can even burn so good!

So if you haven’t ever done a Density Interval Workout, you should try this one below!

By pairing together a basic movement and an isometric, we can not only get the correct muscles working but even build functional, full-body strength!

The Full-Body Density Interval Workout

Complete 3-4 rounds of the following circuit, resting up to 30 seconds between rounds. If the move is done on one side, do the hold then the reps on that side before switching and moving on.

After the circuit, complete 2-3 rounds of the Core Burner with 30 seconds rest between rounds. If one sided, do both moves, the hold and the reps, on that side before moving on. Then stretch and roll out.

CIRCUIT:
30 seconds each side Warrior III
30 seconds each side Warrior III Squats
30 seconds Push Up Holds
30 seconds Climber Push Ups
30 seconds Wall Sit
30 seconds Squats
30 seconds Glute Bridge Hold
30 seconds Glute Bridges

CORE BURNER:
30 seconds each side Side Plank
30 seconds each side Side Plank Oblique Twists
30 seconds Forearm Front Plank
30 seconds Plank Hip Dips

35 minutes. No equipment needed! –> The 10-Week Slim Down!

The Squat And Press 1 Minute Max Out

The Squat And Press 1 Minute Max Out

Not all workouts to build strength need to be done for reps and sets. Sometimes INTERVALS can help you build strength, especially if you need to challenge yourself with just your own bodyweight!

If you want a 30 minute workout to build your leg, chest, shoulder, arm and CORE strength, you’ll love this Squat and Press 1 Minute Max Out. It’s a great Anterior Chain workout aka you’ll feel your entire frontside working!

The Squat And Press 1 Minute Max Out

WARM UP:
Roll out.
Stretch:
5-8 rounds Dynamic Squat Flow

WORKOUT:

Set a timer for 1 minute intervals with no rest between. You have 1 minute to complete as many reps of each move as you can. Record how many you get each minute and try to beat that next time. Rest 1 minute between each round. Complete 3-5 rounds. If you are short on time, just do 3 rounds.

CIRCUIT:
1 minute Alternating Front Lunges*
1 minute T Push Up
1 minute Squat to Lunge
1 minute Plank with Punch
1 minute Sprinter Sit Up
1 minute Rest

COOL DOWN:
Roll out.
Some Recommended Stretches:
Camel Bridge
Child’s Pose with Reaches

*NOTES: If you have weights this is a great place to use them. You can also simply move faster to get more reps if you don’t have weights…Or hold your dog or child or any heavy object even up at your chest to add some more weight! 😉

Don’t have hours to spend at the gym but want to build full body strength as you lean down?

Learn more about my 6-Week Bodyweight Shred!

Bodyweight Workouts like this one that you can do anywhere and easily fit into your busy schedule!

GET STARTED WITH THE 6-WEEK BODYWEIGHT SHRED!