6 Low Impact Exercises | Exercises For Beginners

6 Low Impact Exercises | Exercises For Beginners

When you’re first starting out, or even first starting back to training, it can be so easy to jump in and end up doing moves we aren’t yet ready for.

Not only can this make us so sore we struggle to get consistent with our training, but it can also lead to injury while holding us back from achieving results.

As stinky as it is to have to sometimes go back to basics, we need to regress to progress and master those fundamental movement patterns first.

We need to make sure we’re doing everything we can to build our mind-body connection so we aren’t just going through the motions with moves but actually using the correct muscles to power the movements.

This will not only help us rebuild faster, but it can even help us build up stronger.

We have to remember that every movement is earned and built off of these basics.

That’s why I wanted to share 6 fundamental moves I not only return to myself and use as part of my workouts but use with any of my clients rebuilding after time off or just starting back.

These bodyweight moves can help you get in a full-body workout and retrain a variety of movement patterns from pressing to pulling to hip hinging and squatting!


6 Moves Beginners Should Master First:

#1: Bulldog Hold

This move looks so simple, but it is more challenging than we give it credit for. It’s a great way to vary our plank work and improve our shoulder, hip and knee stability.

Not only will this move work your arms, shoulders and abs, but you’ll also feel those quads burning.

It’s a great way to strengthen your quads if you can’t perform active knee flexion yet even.

And off of this move, you can build up to fun plank variations as well as crawling movements!

To do the Bulldog Hold, set up on your hands and knees with your hands under your shoulders and knees under your hips.

Think about engaging the side of your back as you extend your toes and lift up onto the balls of your feet and your hands.

You want your knees to be hovering just off the ground, no more than a few inches up. This makes your quads have to work harder.

Hold here, bracing your abs as if being punched in the gut.

As you fatigue, do not let your butt go up in the air.

From here you can start to add in even little movements, like foot lifts or shoulder taps before you start to fully crawl.

If you find this is too much on your shoulders, abs or quads, you can modify the movement, placing your hands up on a bench even to start!

#2: Glute Bridge

The glute bridge is honestly a key move to include no matter your fitness level.

While it may be a main exercise in your workouts starting out, and move to more of your activation series and warm up as you progress, it is a fundamental move we all need to be more intentional with.

It’s also often a move we do incorrectly, allowing our lower backs and hamstrings to compensate and work for our glutes.

But if you want to get the full benefit of this move, you need to make sure your glutes are driving the hip extension and you’re only bridging up as high as you can truly control while using your glutes.

To do the glute bridge, set up on your back with your feet flat on the ground just beyond your finger tips when your hands are down by your sides. You can play around with this positioning based on your mobility, putting them slightly further out.

Then bend your elbows to drive your upper arms down into the ground.

Tilt your pelvis up toward your ribs to perform a posterior pelvic tilt and engage your abs and glute maximus before you even lift up off the ground.

Then engage your glutes to lift up. Think about driving your knees toward your toes as you drive through your upper arms and back.

Do not lose that posterior pelvic tilt and begin to arch as you lift.

Make sure to keep your feet flat on the ground and do not let your heels come up.

Pause and squeeze your glutes as hard as you can, then lower down.

You want to make sure you aren’t arching to get up higher or driving yourself backward.

Feel those glutes and do not let your hamstrings take over.

Lower back down and repeat the move. Focus more on engaging those glutes over lifting higher.

To progress the move you can move to a unilateral bridge when ready or even increase the range of motion by placing your feet up on something.

If you struggle to engage your glutes with this bodyweight variation, you can try a frog bridge. The external rotation of your hips can help you better engage your glutes!

#3: Inverted Row

Learning to properly engage your back as you’re getting back into working out is key.

Too often, we let our biceps do the work, pulling with our arms, or end up with neck or shoulder pain because we don’t have proper scapular control.

The Inverted Row is an amazing bodyweight move to learn how to really engage your back to power the pull while having an amazing core strengthening bonus.

Just make sure as you do this row, and any other rowing movements, that you are focused not only on pulling the weight or handles toward you, but also on moving those shoulder blades toward your spine so your back is truly working!

To do the Inverted Row, you can do this move off a bar or suspension trainer. I love the suspension trainer especially when first starting out because you can use a variety of grips.

Using the suspension trainer, hold a handle in each hand with a neutral grip to start, or your palms facing in.

Walk your feet forward as you lean back. The closer to parallel to the ground you get, the harder the move will be.

Flex your feet, pulling your toes up toward your shins as you squeeze your glutes and brace your abs. You want to think about this as a plank and create tension from your feet up.

With your arms straight, make sure to unshrug your shoulders.

Draw your shoulder blades toward your spine as you pull your chest up toward the handles.

You want that initial movement to come from beginning to move your shoulder blades.

Row your chest up toward the handles but don’t try and pull so far you start to round forward just to increase the range of motion.

Stop when you’ve pulled your shoulder blades as close to your spine as you can.

Pause to feel your back then control the lower back down and full arm extension.

Based on your scapular control you can round out a bit at the bottom and protract those shoulder blades, but if you’re just starting out, you may not want to fully disengage your back.

Make sure not to shrug as you pull!

#4: Split Squat

The squat is a fundamental, knee dominant movement pattern. But is also one we often struggle to control and perform correctly through a full range of motion.

That is why, when first starting back, the split squat is a great unilateral option that will not only strengthen your legs but also help you improve your hip mobility and stability.

It’s a great way to also make sure you’re addressing any imbalances and not letting your stronger side take over and perpetuate any issues or pain.

Based on your mobility, you may choose to do this move from the ground or starting with your knee on a block.

Setting up at the bottom of this move is a great way to use this to stretch your hips while truly learning how to control the movement.

Set up kneeling on the block or ground with your front ankle under your front knee and your back knee about under your hip with toes extended so you’re on the ball of your foot.

Really press the ball of your back foot down into the ground as you squeeze that back glute to extend your hip.

Push through the ball of that back foot and your entire front foot to drive up to standing.

Once standing, slowly lower back down to come to rest on the ground.

Then repeat driving back up.

Focus on your feet and their connection to the ground.

And make sure to engage that back glute.

Working through this full range of motion will help you maintain your mobility while improving your stability!

#5: Push Up

The push ups is basically a moving plank so not only a fabulous core move but also a great exercise to work your chest, shoulders and triceps.

However, the full push up from your toes can easily turn into the worm if we don’t yet have the strength to perform it correctly which can lead to wrist, elbow and shoulder aches and pains.

When building back with the push up, an incline variation works well as even the knee push up can be more advanced than we often give it credit for!

To do the push up off an incline, you can start off a wall and slowly lower the incline you use as you progress.

With your arms out in front of you, place your hands on the wall so your hands are just outside your chest. Walk your feet a couple of feet back from the wall so you’re leaning into your hands on the wall.

Spread your fingers to create tension into your hands and drive your heels toward the ground flexing your quads.

Lower your chest toward the wall, making sure not to shrug. You want your body moving as one unit.

Make sure your elbows don’t flare up by your shoulders and create a T shape with your body. You want your upper arms and body to create an arrow shape.

Once you lower your chest toward the wall, press the wall away to fully extend your arms back out.

As you lower the incline, do not do so if you can’t still perform a full range of motion.

#6: Wall Hinge

The final amazing bodyweight basic I think you need to include as you rebuild is the Wall Hinge.

Too often when we do hip hinging movements like the deadlift, we let our lower backs take over and do all of the work instead of engaging our glutes like we should.

When we’re first rebuilding it’s key we learn to control that proper hip hinge to load our glutes and hamstrings so our lower back doesn’t end up overloaded and injured.

While you may find you quickly progress past this movement and either add loads to the hip hinge or move on to unilateral variations like the single leg deadlift, this is a great place to start to make sure you aren’t simply leaning or rounding over.

To do the Wall Hip Hinge, stand about 6 inches to a foot from the wall with your back to the wall and your feet about hip width apart.

You can cross your hands over your chest as you stand tall.

Focus on your entire foot pushing into the ground as you push your butt back toward the wall behind you.

Do not start this move by bending your knees to squat down. You are moving at the hips and then softening your knees in response to reach back.

Touch your butt to the wall and make sure to keep your back flat. Do not round toward the ground.

Then push the ground away with your feet to drive back up to standing.

Your torso will lean forward to keep you balanced as you sit back. Do not let your weight shift forward!

SUMMARY:

As you rebuild, always continue to assess how you feel with moves. Remember progress is never linear so at points you do want to step back.

We are NEVER above the basics and there is always more we can do to improve even these fundamental moves.

Slow and steady use these moves in your training to regress to progress and earn those harder variations and heavier loads!

Looking for help while rebuilding?

Check out my 3-Part RS Formula!

The Best Bodyweight Tricep Exercise (NO EQUIPMENT)

The Best Bodyweight Tricep Exercise (NO EQUIPMENT)

If you want to build muscle, you want to use a combination of compound and isolation movements in your workout routine, especially for any “stubborn” areas you really struggle to build.

Those isolation exercises can be key to create the additional stimulus we need to build muscle, especially in more advanced exercisers.

But what if you don’t have any equipment to use to help you target and challenge those areas?

How can you target muscles, like your triceps, without any tools?

Whether you’re training at home, while you travel or even if you simply want to mix up your workouts with some bodyweight moves, I want to share with you one of my favorite bodyweight exercises to target those triceps.

This exercise not only allows you to work each side independently, to correct any imbalances, but is also safer for your shoulders than traditional bench dips, which are often our go-to tricep isolation move.

While I don’t think we should just demonize dips off a bench, and there are definitely times I not only include them personally, but even with clients, I think it is also key we note their drawbacks.

When we know when and how to use a move correctly, we can not only get better results, but even avoid injury and overload.

With bench dips, if you’ve had shoulder aches and pains, this move may not be right for you especially.

While they can be a great way to target those triceps without any tools, as you can even do them off a coffee table or chair, they can put more strain on your shoulders due to the anterior humeral glide or the forward movement of your shoulder in the socket during the lower down.

That is why I love to use Tricep Push Ups as often as possible instead.

This movement is much safer for the shoulders and allows you to target each side independently to correct any imbalances between sides.

To do the Tricep Push Up, lie on your side with your legs out straight or bottom knee bent. If you bend both legs it will make it harder. 

Wrap your bottom arm up and around your so you can’t use this hand to assist. Place your top hand down on the ground at about shoulder height or right below.

The lower down toward your belly button you place your hand, the harder the move will be.

Then press the ground away with that hand on the ground, feeling your tricep work to push your upper body up and extend your elbow. Press up until your arm is extended and then lower back down to the ground.

Keep yourself on your side as you press and lower. Your chest may slightly rotate toward the ground as you press, but make sure you really focus on the back of your arm working.

Repeat, pressing up again until your arm is fully extended. Adjust your hand placement or your legs so you can press and stay under control.

Do not let your legs flop around and make sure to drive the movement with your tricep instead of just trying to use your obliques to bend to the side.

To modify this move you can push off a wall or incline, such as a bench, instead of pressing fully from the ground.

To advance the move you can also change up the tempo, slowing down tempo of the press ,even pausing briefly before touching back down to the ground.

SUMMARY:

The best muscle building results happen when we combine compound and isolation exercises together.

For a killer burner using both, try finishing your workout with a close grip push up and tricep push up compound set. Go back and forth between the two moves for 2-3 minutes, completing 5-10 reps of each back to back. If you find you can’t completely 5 reps solidly in a row, you’re done even if time isn’t up.

Push-Ups For Beginners –  5 Simple Tips To Perfect Your Push Up

Push-Ups For Beginners – 5 Simple Tips To Perfect Your Push Up

Push ups not only require a lot of upper body strength but also core strength.

They require you to properly recruit and engage everything from your shoulders to your knees so your body moves as one unit. You need to not only have amazing strength but also proper wrist, shoulder and scapular mobility and stability.

They are a much more complex movement than we often give them credit for.

That’s why I want to share 5 tips to help you not only dial in your push up form, but also strengthen all of the muscles involved in the movement so you can improve your push ups.

But first, I want to explain why it’s key we remember we may need to regress to progress to start.

And one of the best ways to do that is by using an incline over even the knee push up variation!

The knee push up variation is actually more challenging than we often give it credit for. And it doesn’t teach us to engage everything between our shoulders to our feet.

We need to train that full plank position to help us better engage everything as we build up toward that full push up from the ground.

That’s why the incline push up is a great way to modify the push up to start.

You can start off a wall and slowly lower the incline as you’re ready.

And by using an incline, we can even mix up the push up variations we include as we build up.

It can be boring feeling like you aren’t able to try some of those fun push up variations. But using an incline, you don’t have to stick with just the basic push up.

You can include other push up variations that may even be great accessory moves in and of themselves to improve your strength toward that first full push up.

Want to target your triceps more?

Try the close grip push up off an incline.

Or if you want to work on your core strength more as well as your shoulder stability?

Try the shoulder tap push up.

By mixing up your push up variations you can keep you training fun and interesting and even address your weak links to get stronger!

5 Key Tips To Help You Improve Your Push Ups

#1: Drive back through your heels.

Part of getting stronger is also about being more EFFICIENT in your movements. It’s about learning how to engage muscles correctly so it actually requires less effort to do the movement.

And one great way to make sure you have the proper tension during the push up to maintain that nice straight line from your head to your heels, is to cue yourself to drive back through your heels.

This will help you flex your quads for that nice plank position.

Because while this is an upper body move you need to have that proper full body engagement so you aren’t overloading your upper body but also making your lower body assist you in moving efficiently.

When you set up for the push up, push backward off the balls of your feet. Feel the change in how you flex your legs as you do this. Just make sure that as you drive back, you keep your hands outside your chest and don’t let them shift up above your shoulders.

Keep pushing backward off the balls of your feet as you lower down.

Feel those legs stay engaged to help you maintain that plank position!

#2: Push the ground away.

Want to engage your triceps, shoulders and pecs better while helping prevent elbow pain during push ups? Focus on your hands grip on the ground.

That tension we create through our hands down into the ground can really help us better activate the muscles of our upper body.

And it can help us prevent overuse from rocking out on our hands.

As you set up for the push up, spread your fingers with your middle finger pointing straight ahead. Grip the ground or incline with your entire hand, even pressing your thumb down into the ground.

At the top of the push up, think about pushing the ground away just slightly to even better stabilize your shoulders.

And do not lose this tension even as you lower down. Too often we just think about lowering down over maintaining that tension into the ground.

But this tension can also help us in that transition from lowering to pressing back up.

If you’ve ever felt like you struggle at the bottom to change to pushing back up?

This focus on your hands pushing down into the ground can make all of the difference. So even as you lower, push the ground away so that when you move to push back up, you’ve already created that tension.

#3: Feel your back assisting.

While yes, the push up is a move for our chest, shoulders and triceps, we can’t ignore the important role our upper back plays in this movement.

We often think about our scapular movement, or the movement of our shoulder blades, during things like rows.

But that scapular movement is essential to actually create a more powerful press.

Proper scapular movement can mean healthier, happier shoulders, elbows and even wrists. Not to mention you avoiding neck pain from push ups.

So as you perform the push up, think about your back working to support your shoulders.

Make sure that, when you set up, you very slightly pull your shoulder blades down toward your butt as you unshrug your shoulders. Think about feeling the sides of your back slightly engage to support your shoulders.

Then, as you lower down, think about your shoulder blades drawing together toward your spine.

As you press back up, focus on pulling those shoulder blades apart.

Use your back and that proper scapular movement to power your press!

#4: Use push up holds.

Push ups are basically a moving plank so often when we think push ups and improving our core strength, we turn to plank holds.

And those are great.

But you can actually work on that plank position from just about any point in the push up.

By holding even mid-way through the push up or at the bottom, you can really strengthen not only your core but also your upper body.

You can also help yourself overcome any weak points or stick points in the move.

If there is a point you feel you always get stuck at?

Hold there to strengthen everything.

When we hold, we can really focus on what we feel working because we aren’t distracted by trying to actually perform a movement.

We can stay in one position and run through the muscles that should be working to make sure we feel them. We have time to even assess our form and make small tweaks.

That time under tension can help us build strength as we work on that mind-body connection to use muscles efficiently.

So next time you include some accessory core work, try including bottom push up holds or mid push up holds instead of just doing even the high plank position to work your core!

#5: Quality over quantity.

Practice makes better. But only when you’re practicing the proper movement. If we get lazy with our reps and compensate or replicate improper movement patterns?

We are going to ingrain those bad habits through repetition.

So as you build up, make sure to focus on quality over quantity. Make every rep your best rep to really solidify those proper movement patterns.’

And focus on fewer reps of a harder variation to really challenge your body to progress.

Too often when we want to work toward that first full push up, we just make ourselves better at the modified variation by adding more reps.

Instead of doing more reps of a more modified push up, we need to think about doing fewer reps with more sets to keep attempting a more challenging variation.

So if you can do only 1 push up off a lower incline, but 5 off a higher?

It is better to include that 1 rep off the harder variation, simply resting longer between to create the volume over sets.

Because you need to use those harder variations to get better at them!

Summary:

Use the incline push up variation to help you build up toward that first full push up from your toes. You can even start off the wall and lower the incline as you feel ready.

As you build up, use these tips and cues to help you dial in your push up form and use muscles efficiently to perform the movement.

And don’t be afraid to use some fun variations off the incline to help you target those weak links and keep your training fun and interesting!

12 Hybrid Upper Body Moves To Build Killer Upper Body And Core Strength

12 Hybrid Upper Body Moves To Build Killer Upper Body And Core Strength

Hybrid exercises are a great way to target those “trouble zones” while working more muscles in less time so you can be efficient with your workouts and not have to spend hours in the gym.

These hybrid exercises will help you work your arms, shoulders, chest and back while also improving your core strength and stability.

If you’re looking for a great way to work your entire upper body and core in under 30 minutes, heck even in under 20, try including some of these hybrid moves!

12 Hybrid Upper Body Moves To Build Lean Strong Arms And Killer Core Strength

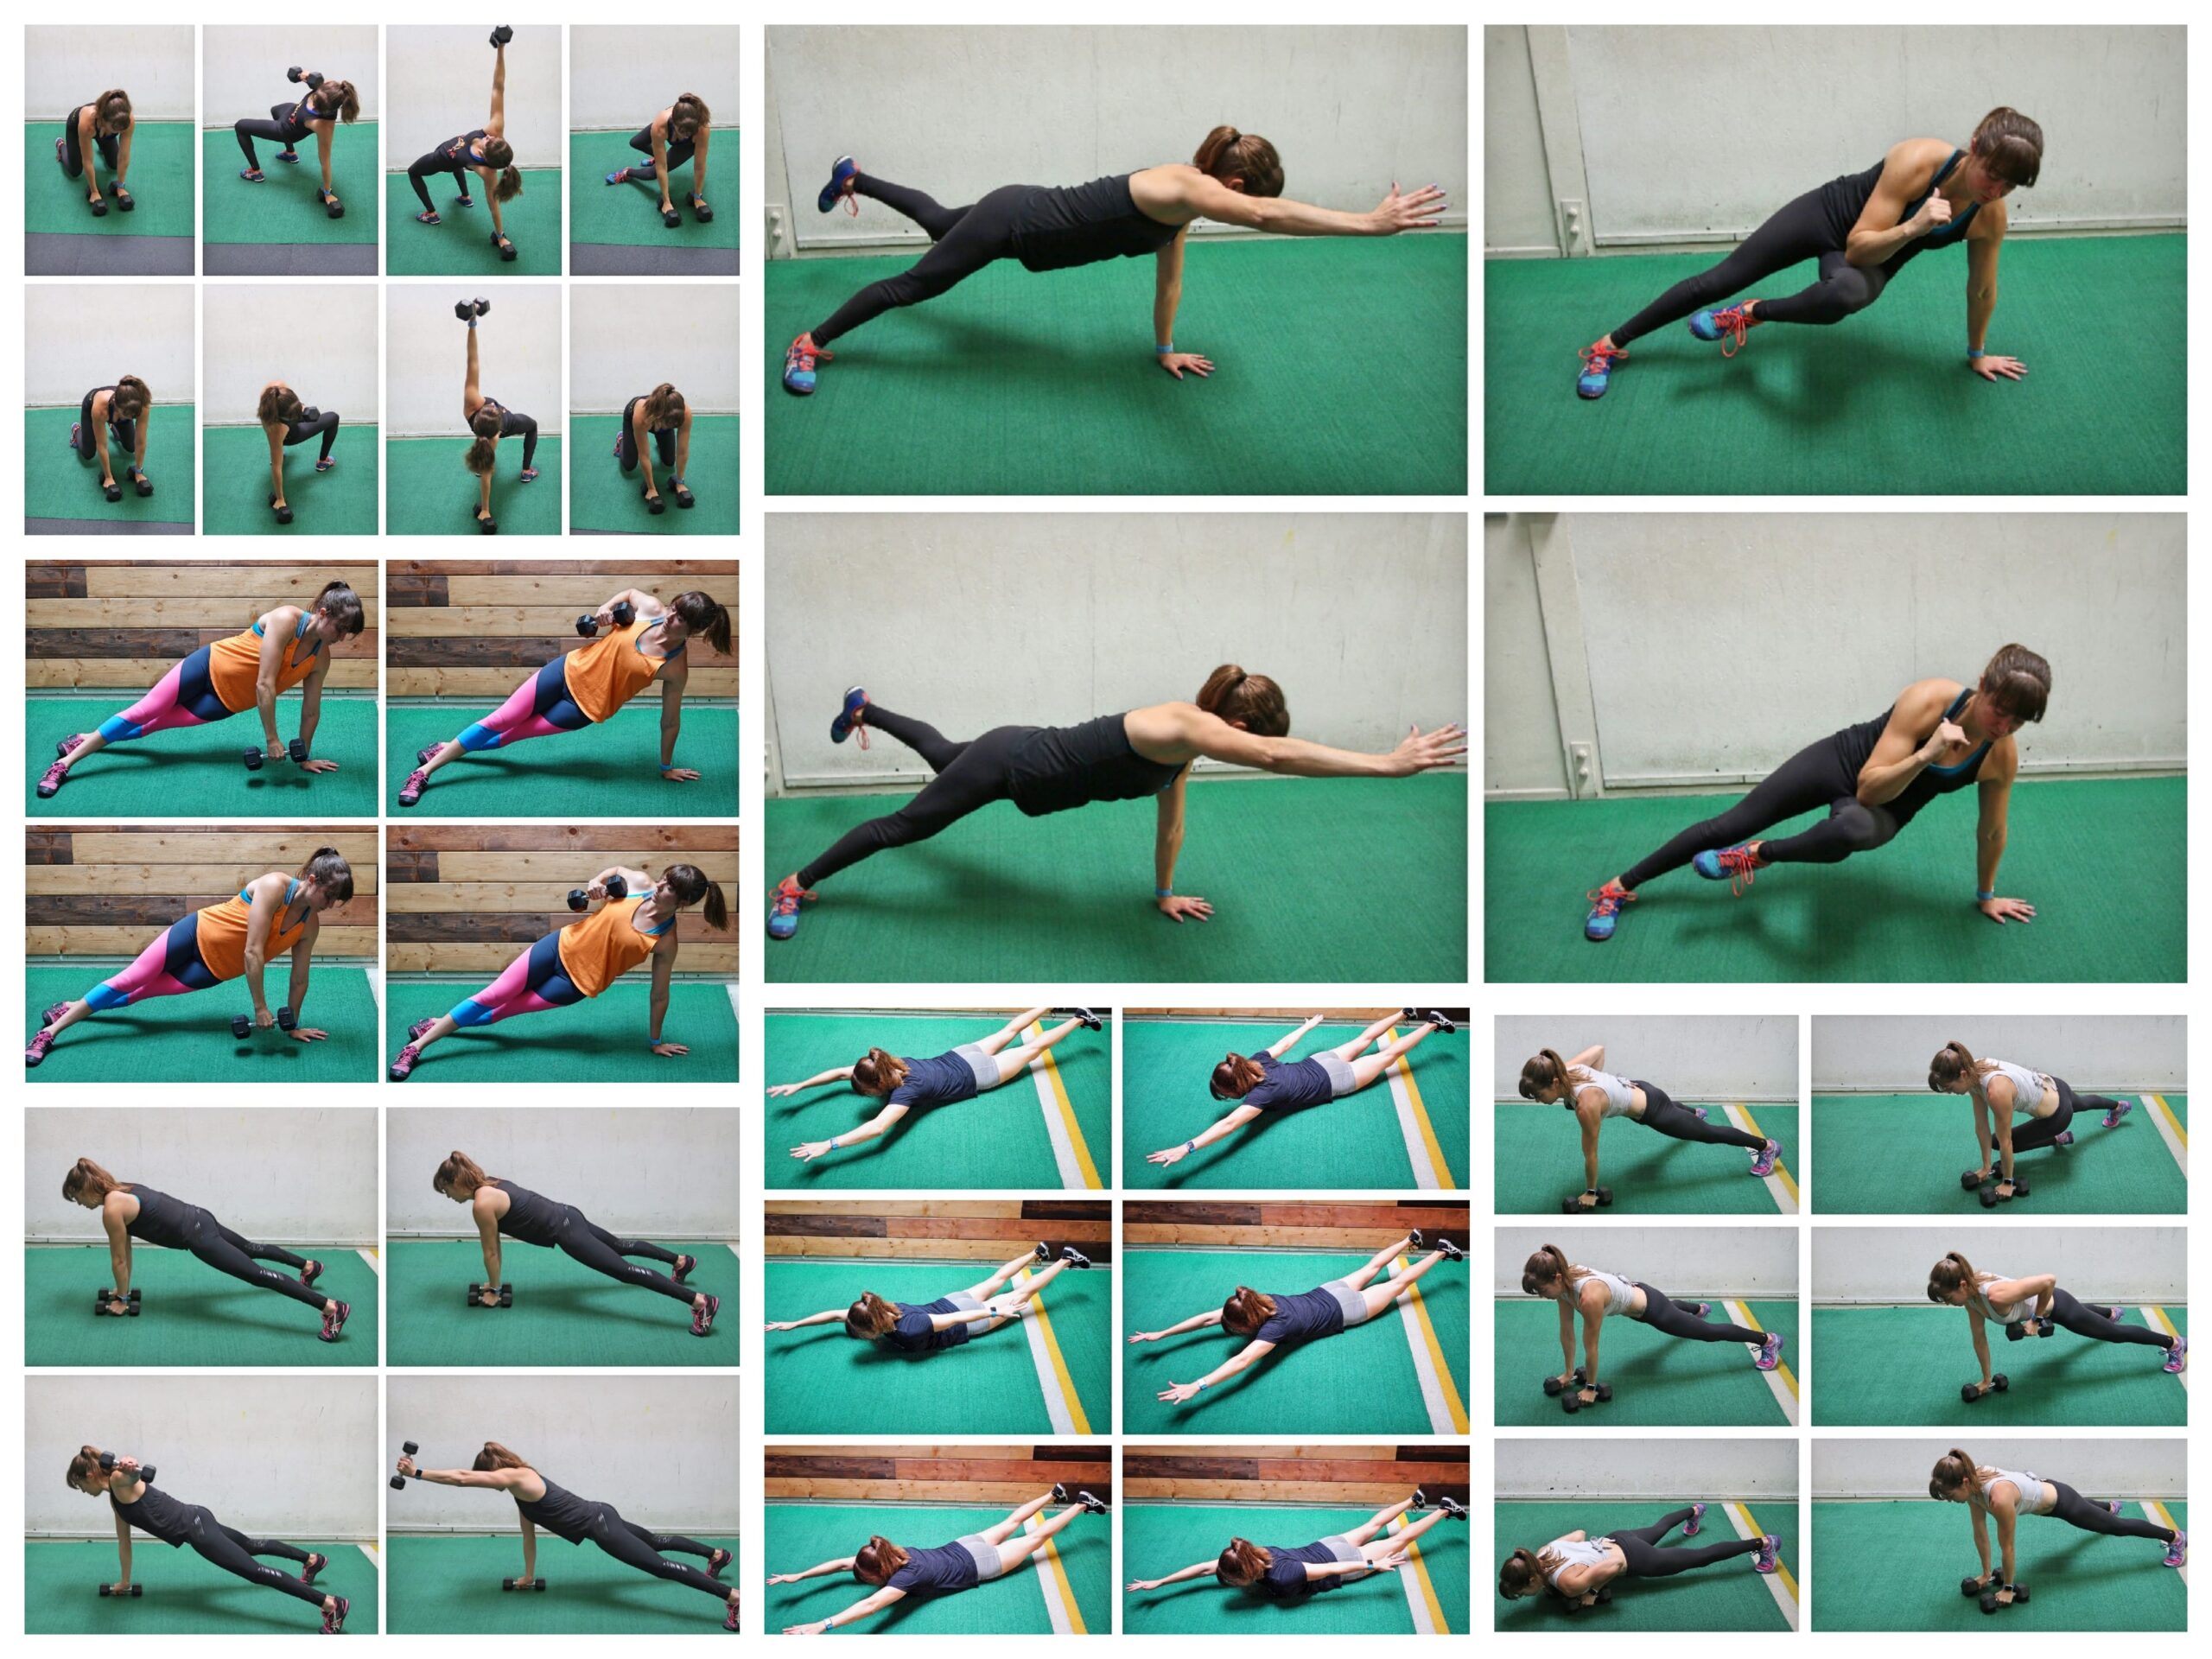
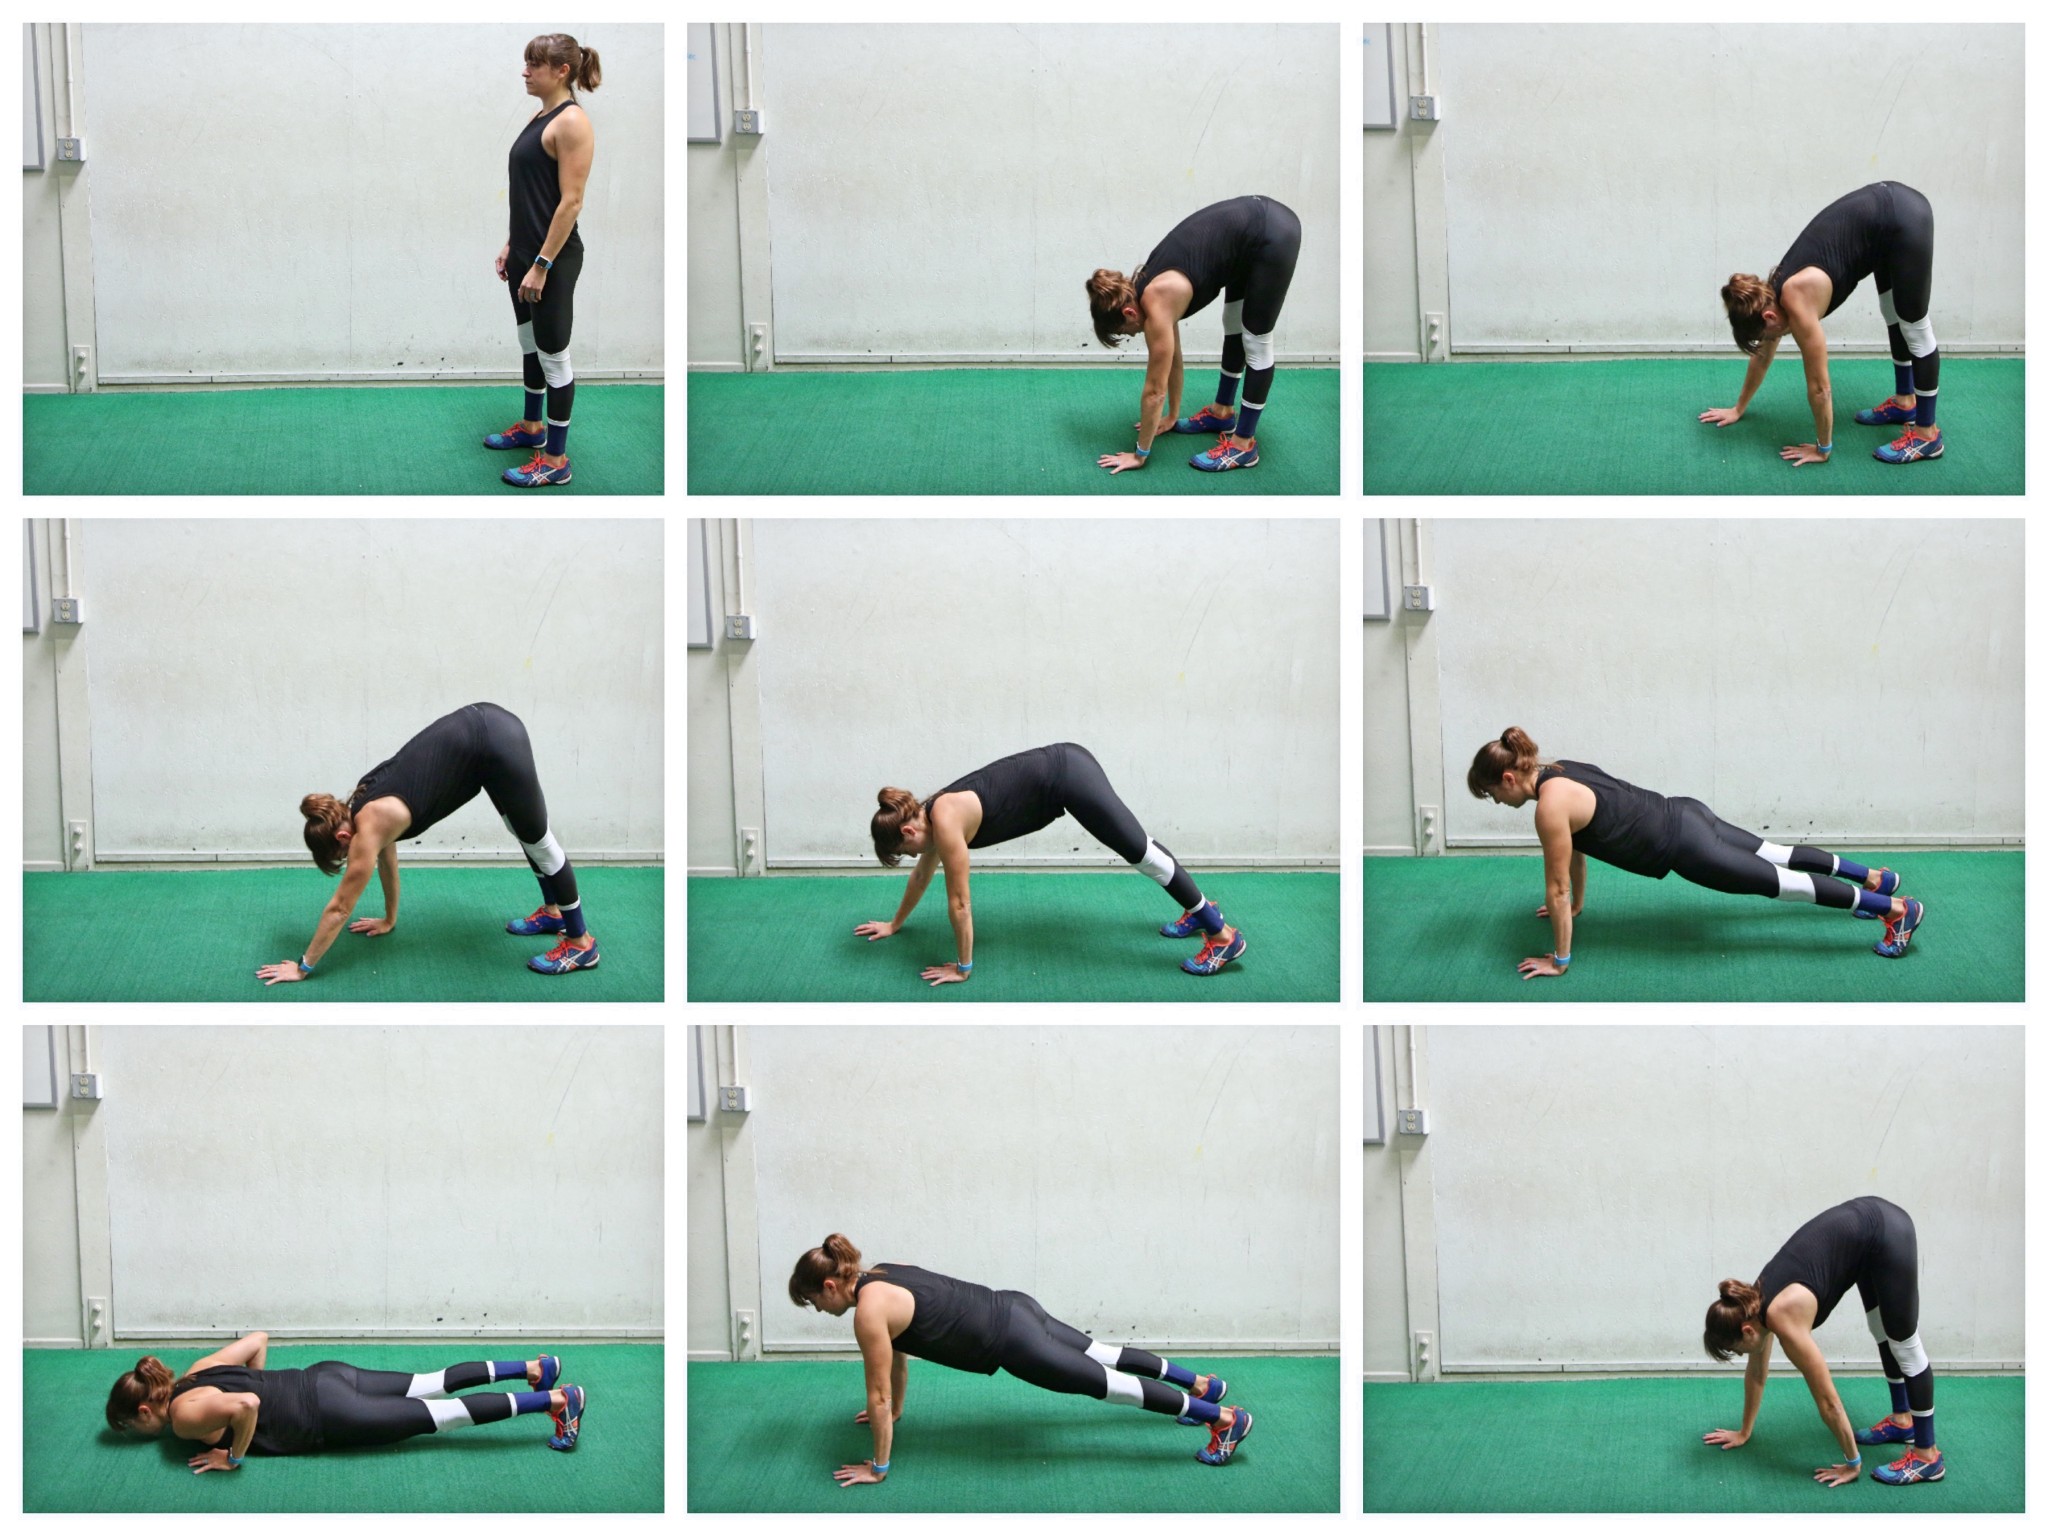
Inchworm Push Ups:

The Inchworm Push Up is a great move to improve your mobility while targeting your core, shoulders, triceps and chest. It will also get your blood pumping, which is an added bonus if you want to blast some fat!

inchworm push up

To do Inchworm Push Ups, start standing tall. Then place your hands down on the ground, keeping your legs as straight as possible. Then walk your hands out to move into a plank position.

When you reach the high plank position, you will perform a push up. Keep your core engaged and make sure your body moves in one straight line. Do not sag your hips. Beginners can drop to their knees for the push up.

Press back up to the top of the push up and then, from the plank position, walk back in. Keep your legs as straight as possible as you walk in and out.

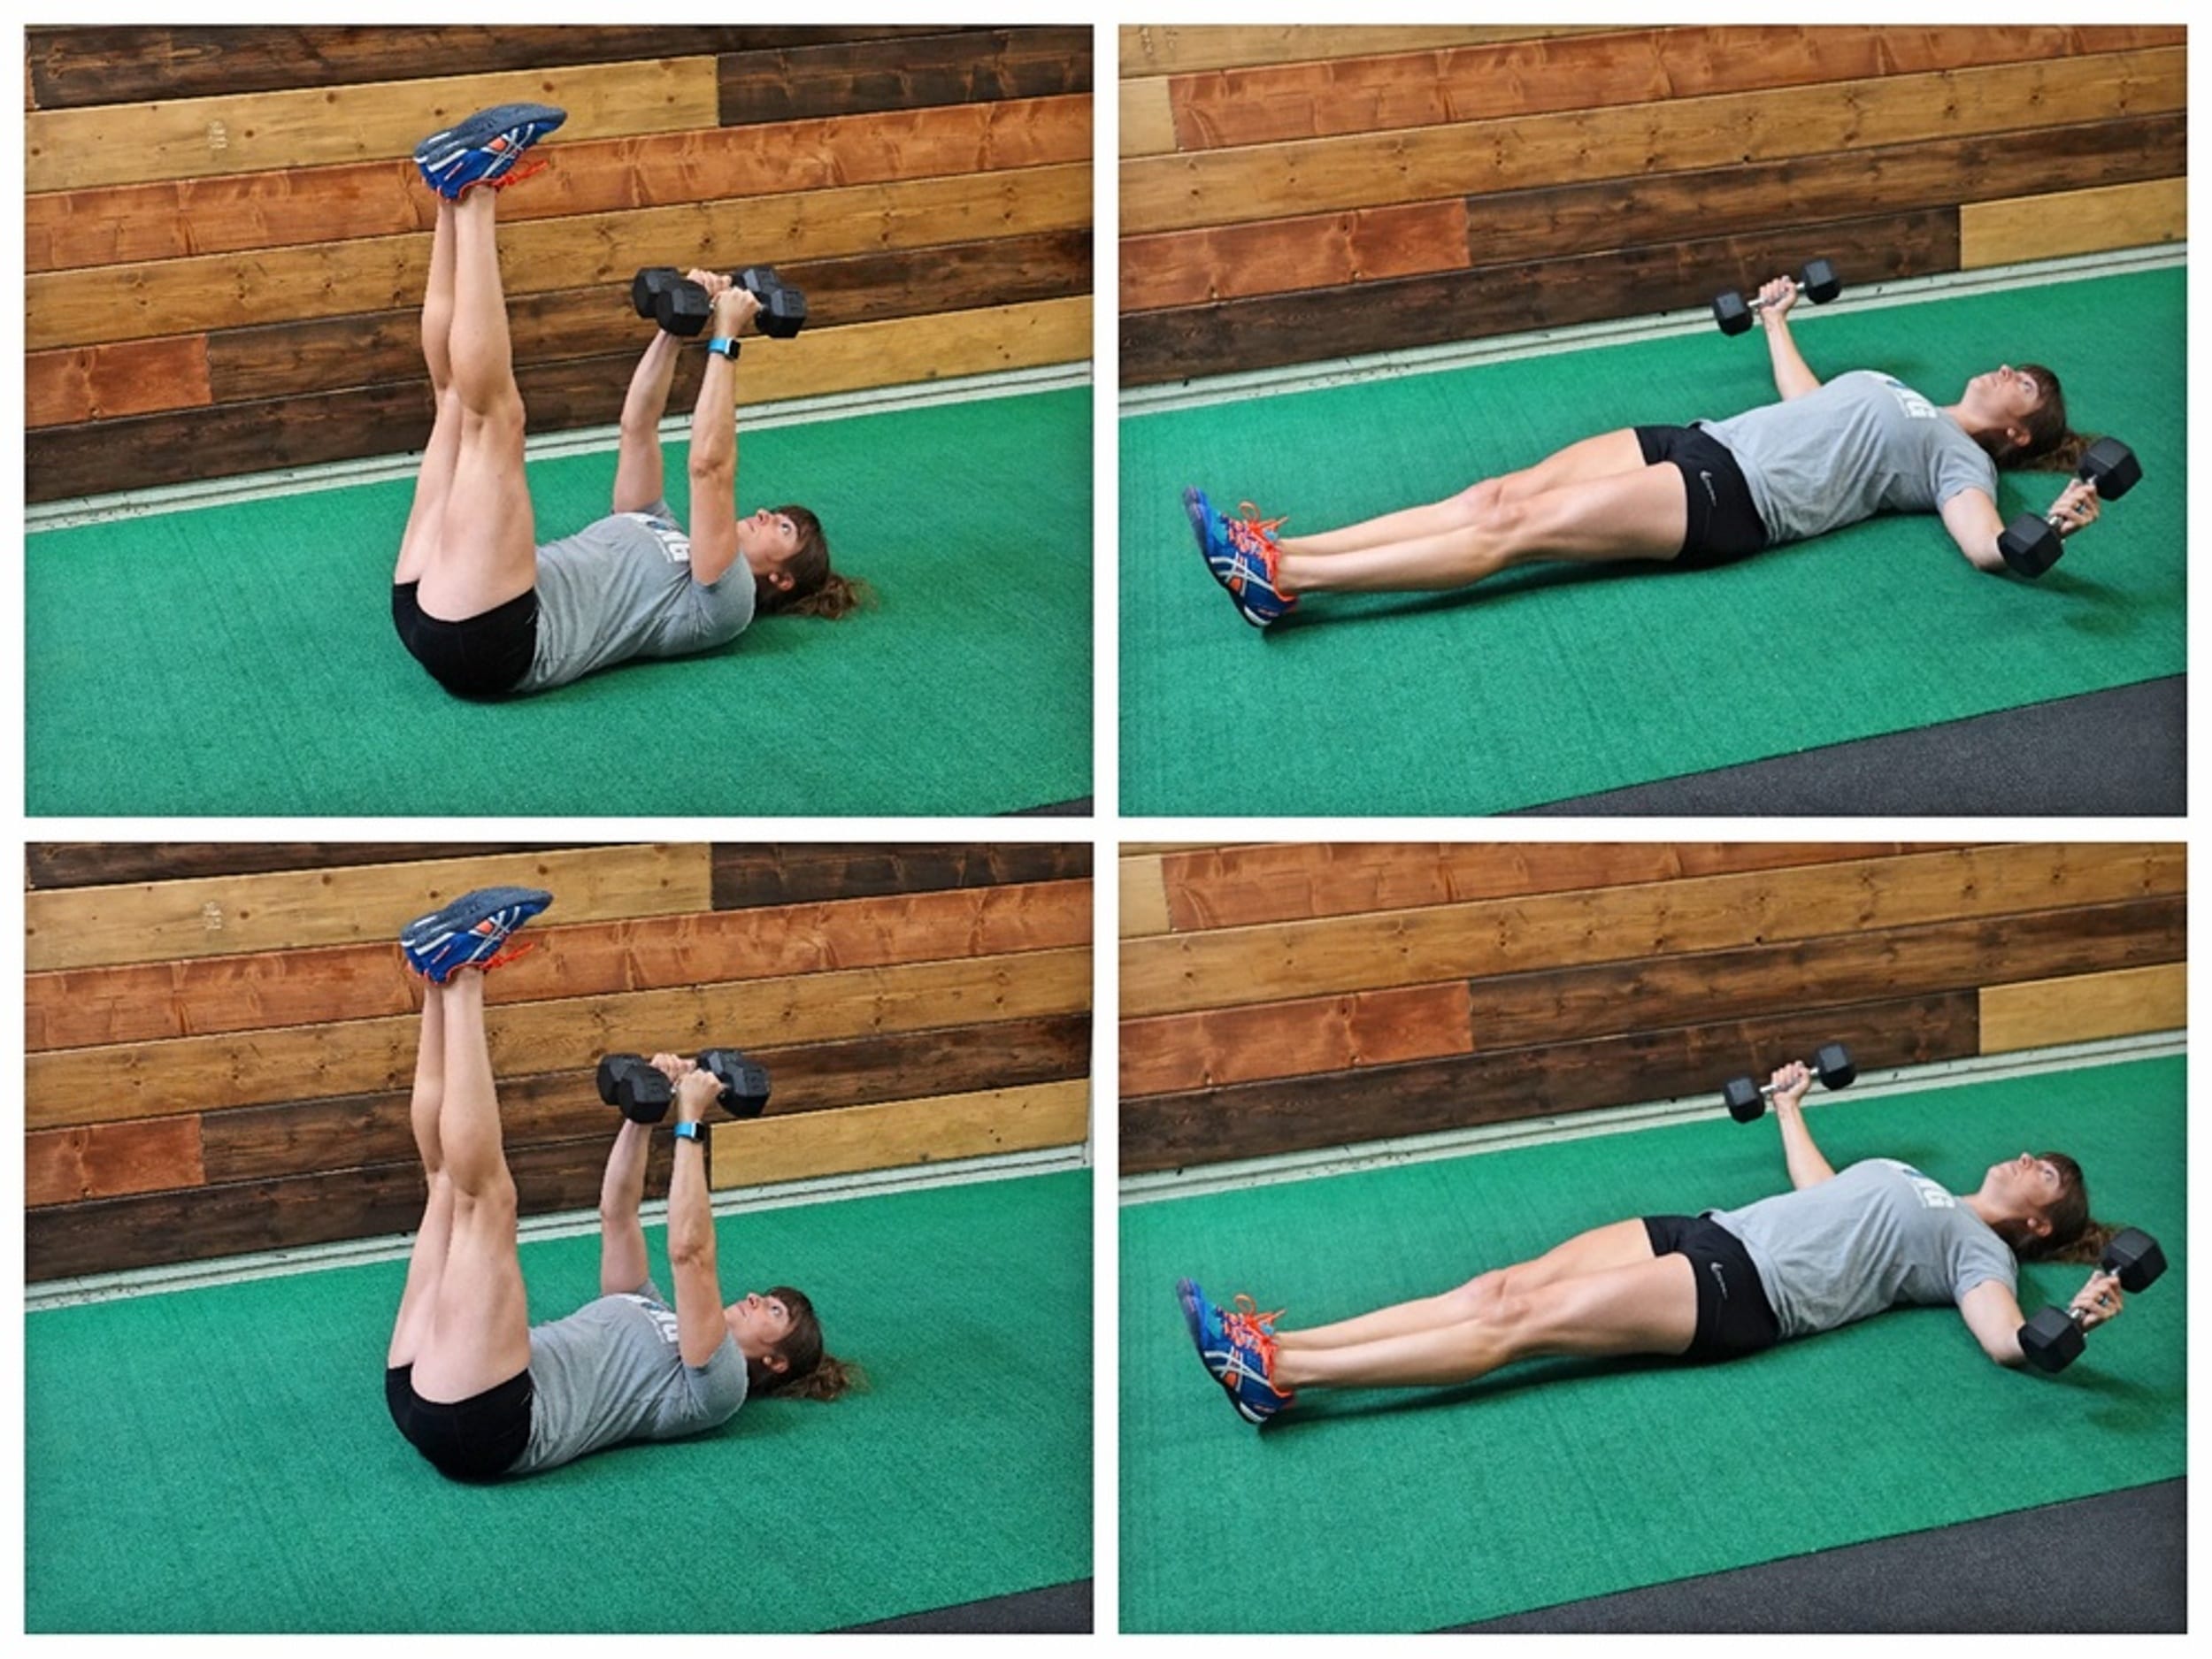
Fly Leg Lowers:

If you want to work your chest as well as your abs, you’ll want to include Fly Leg Lowers.

lower ab exercise

To do the Flys with Leg Lowers, hold a dumbbell in each hand and lie on your back on the ground. Press the dumbbells up toward the ceiling and hold them parallel at your chest height with your legs straight up toward the ceiling.

Then fly your arms open toward the ground with the backs of your hands facing the ground as you lower your legs as close to the ground as possible. Do not let your lower back take over.

Lower down only as far as your abs can handle or even do single leg lowers or even bent knee foot taps. Then fly your arms back together as you lift your legs back up toward the ceiling.

Each time open your arms up as wide as possible. Keep your elbows soft but don’t think about bending or extending at your elbows.

Every time you fly your arms open, you will lower your legs. As you fly your arms back together, you will lift your legs back up.

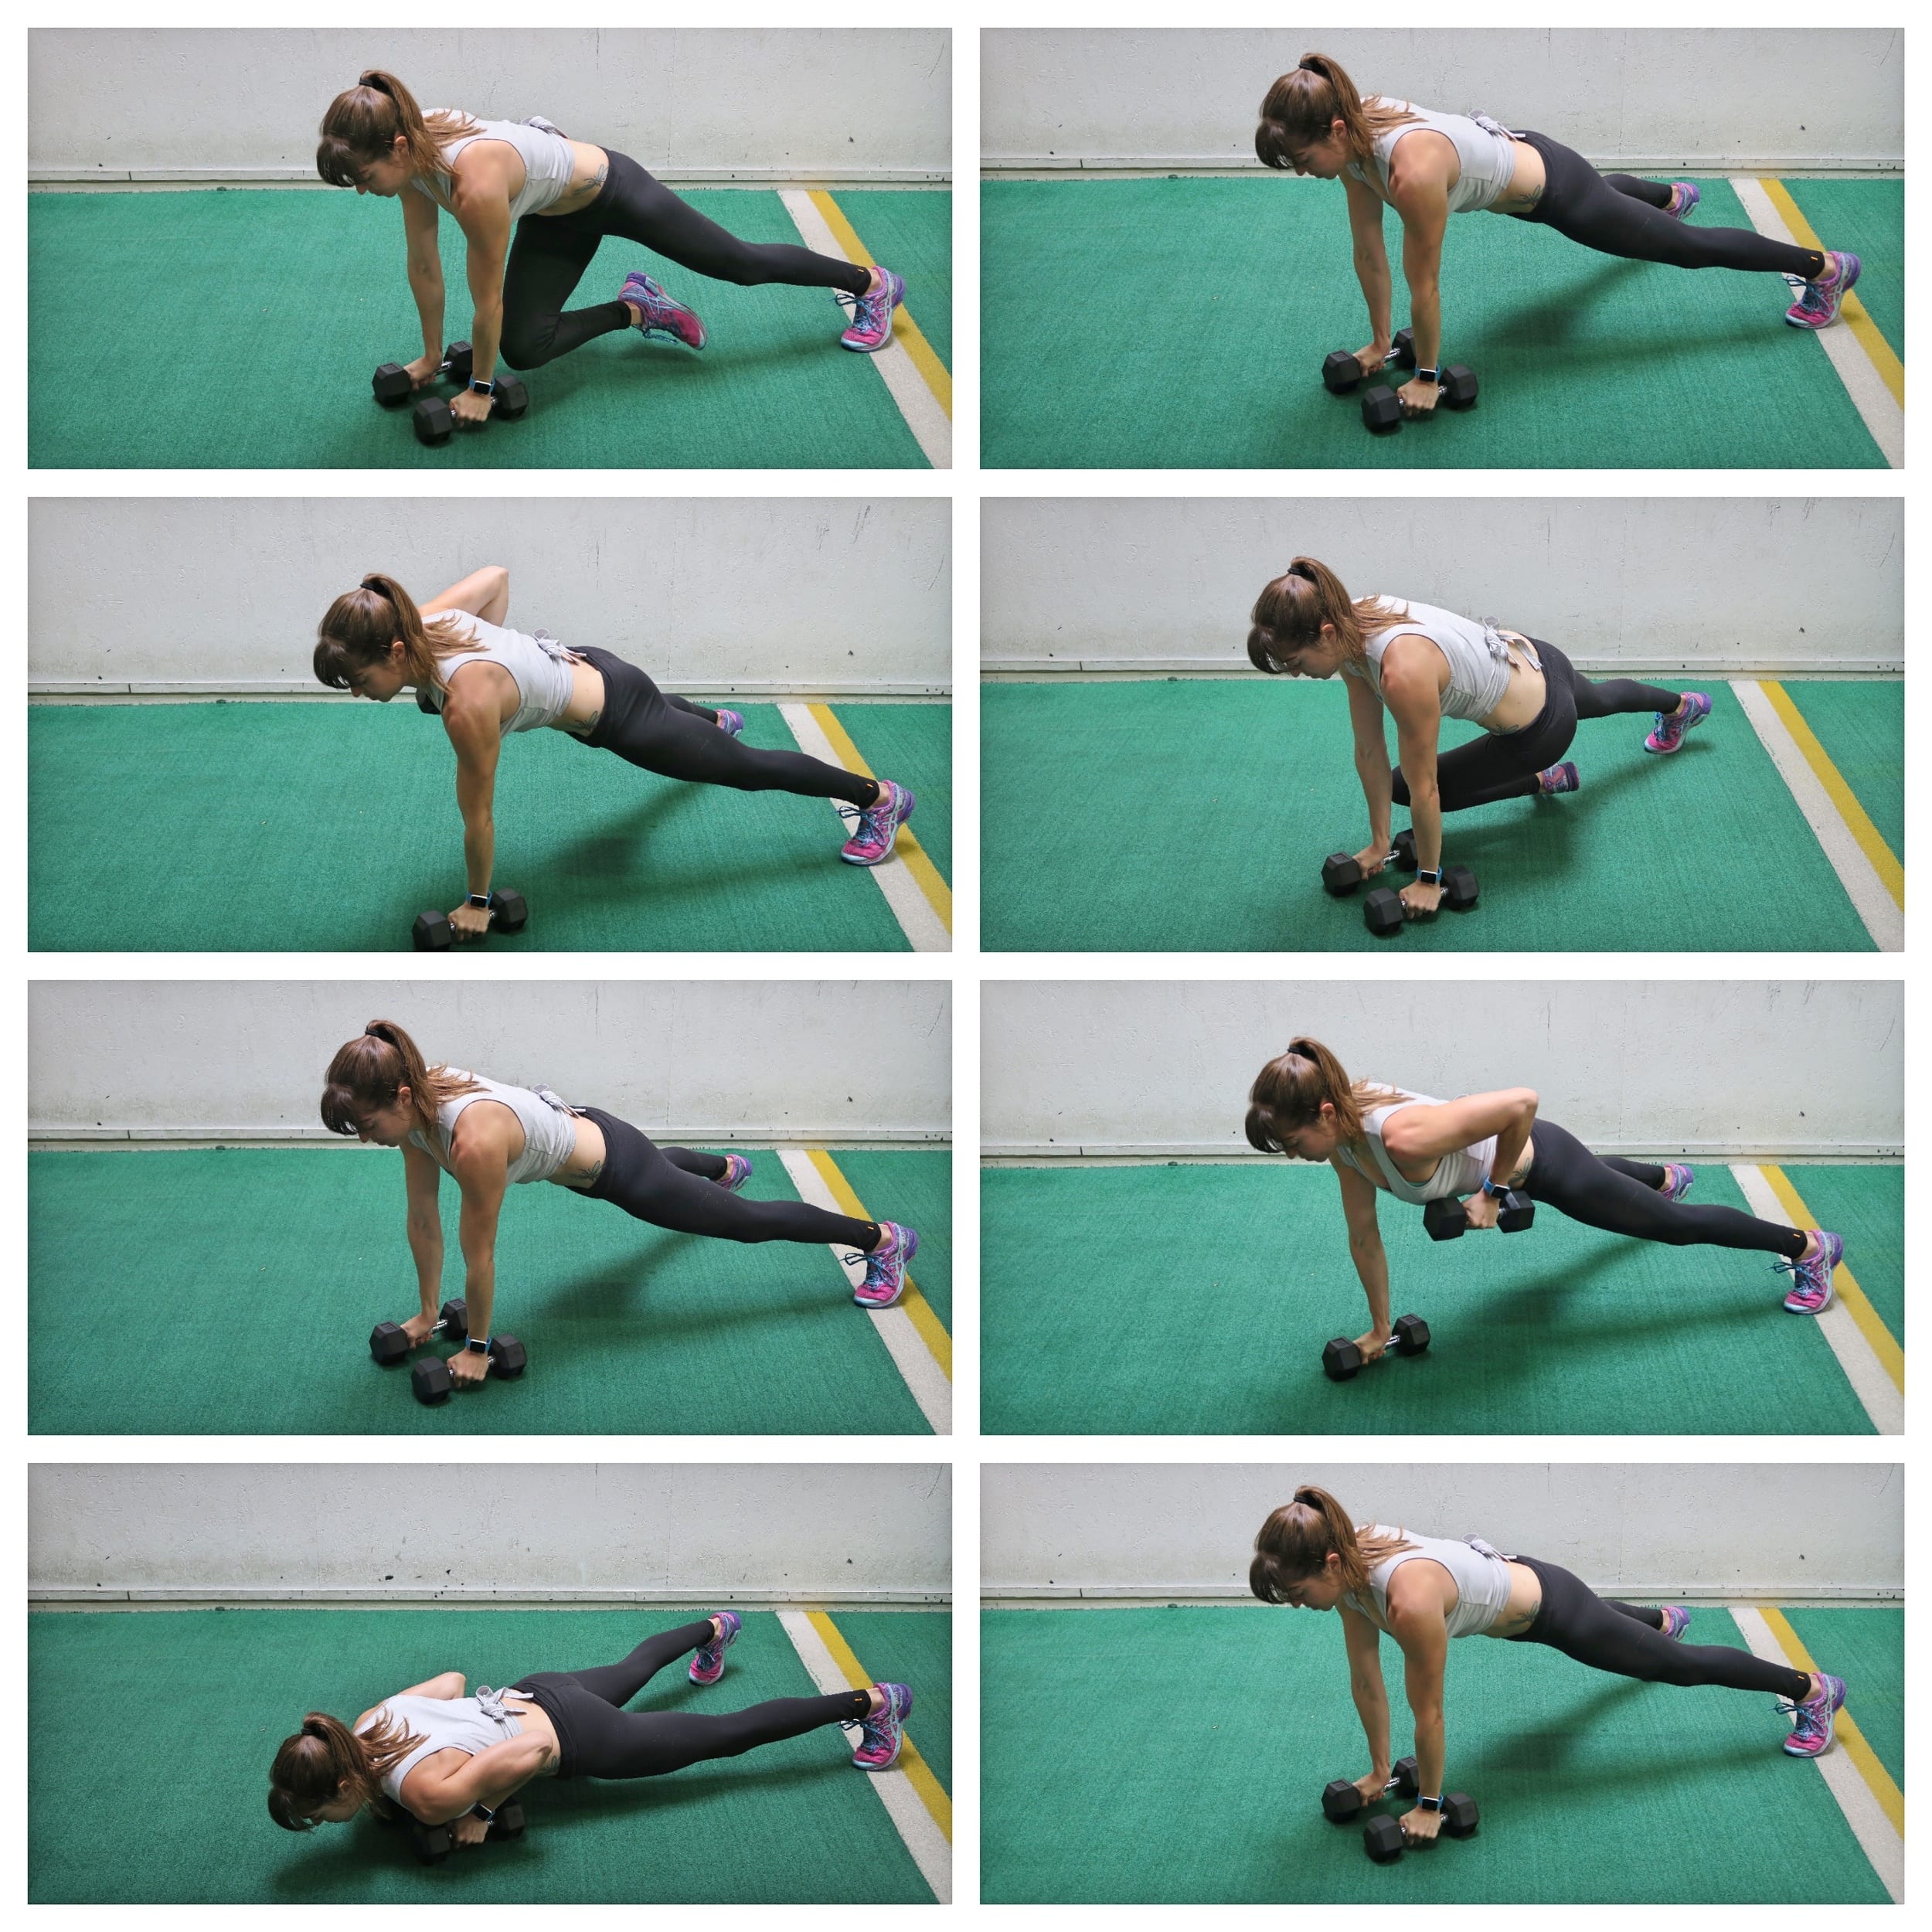
Mountain Climber Row Push Ups:

This push up works not only your chest, shoulders and triceps, but also your back and your abs. Talk about a full upper body workout all in one move! (Plus the mountain climber is a great way to get in a ton of extra ab work!)

dumbbell core exercise

To do the Mountain Climber Row Push Up, set up in a high plank position with a dumbbell in each hand. Your feet will be wider apart to help stabilize and your hands should be under your shoulders. Then from this high plank position, draw one knee in and across toward your opposite shoulder.

Perform a cross body mountain climber, moving slowly. Straighten the leg back out and then row the weight in the hand on the same side as the leg you tucked in up to your side. Perform the row without rotating or letting your butt go up in the air.

After rowing the weight up to your side, feeling your back work to row it up, lower it back down so you’re back in the high plank. Then perform a push-up (you can do this from your knees too). Come back to a plank then perform a mountain climber cross body on the other side and a row before another push up. Keep alternating sides.

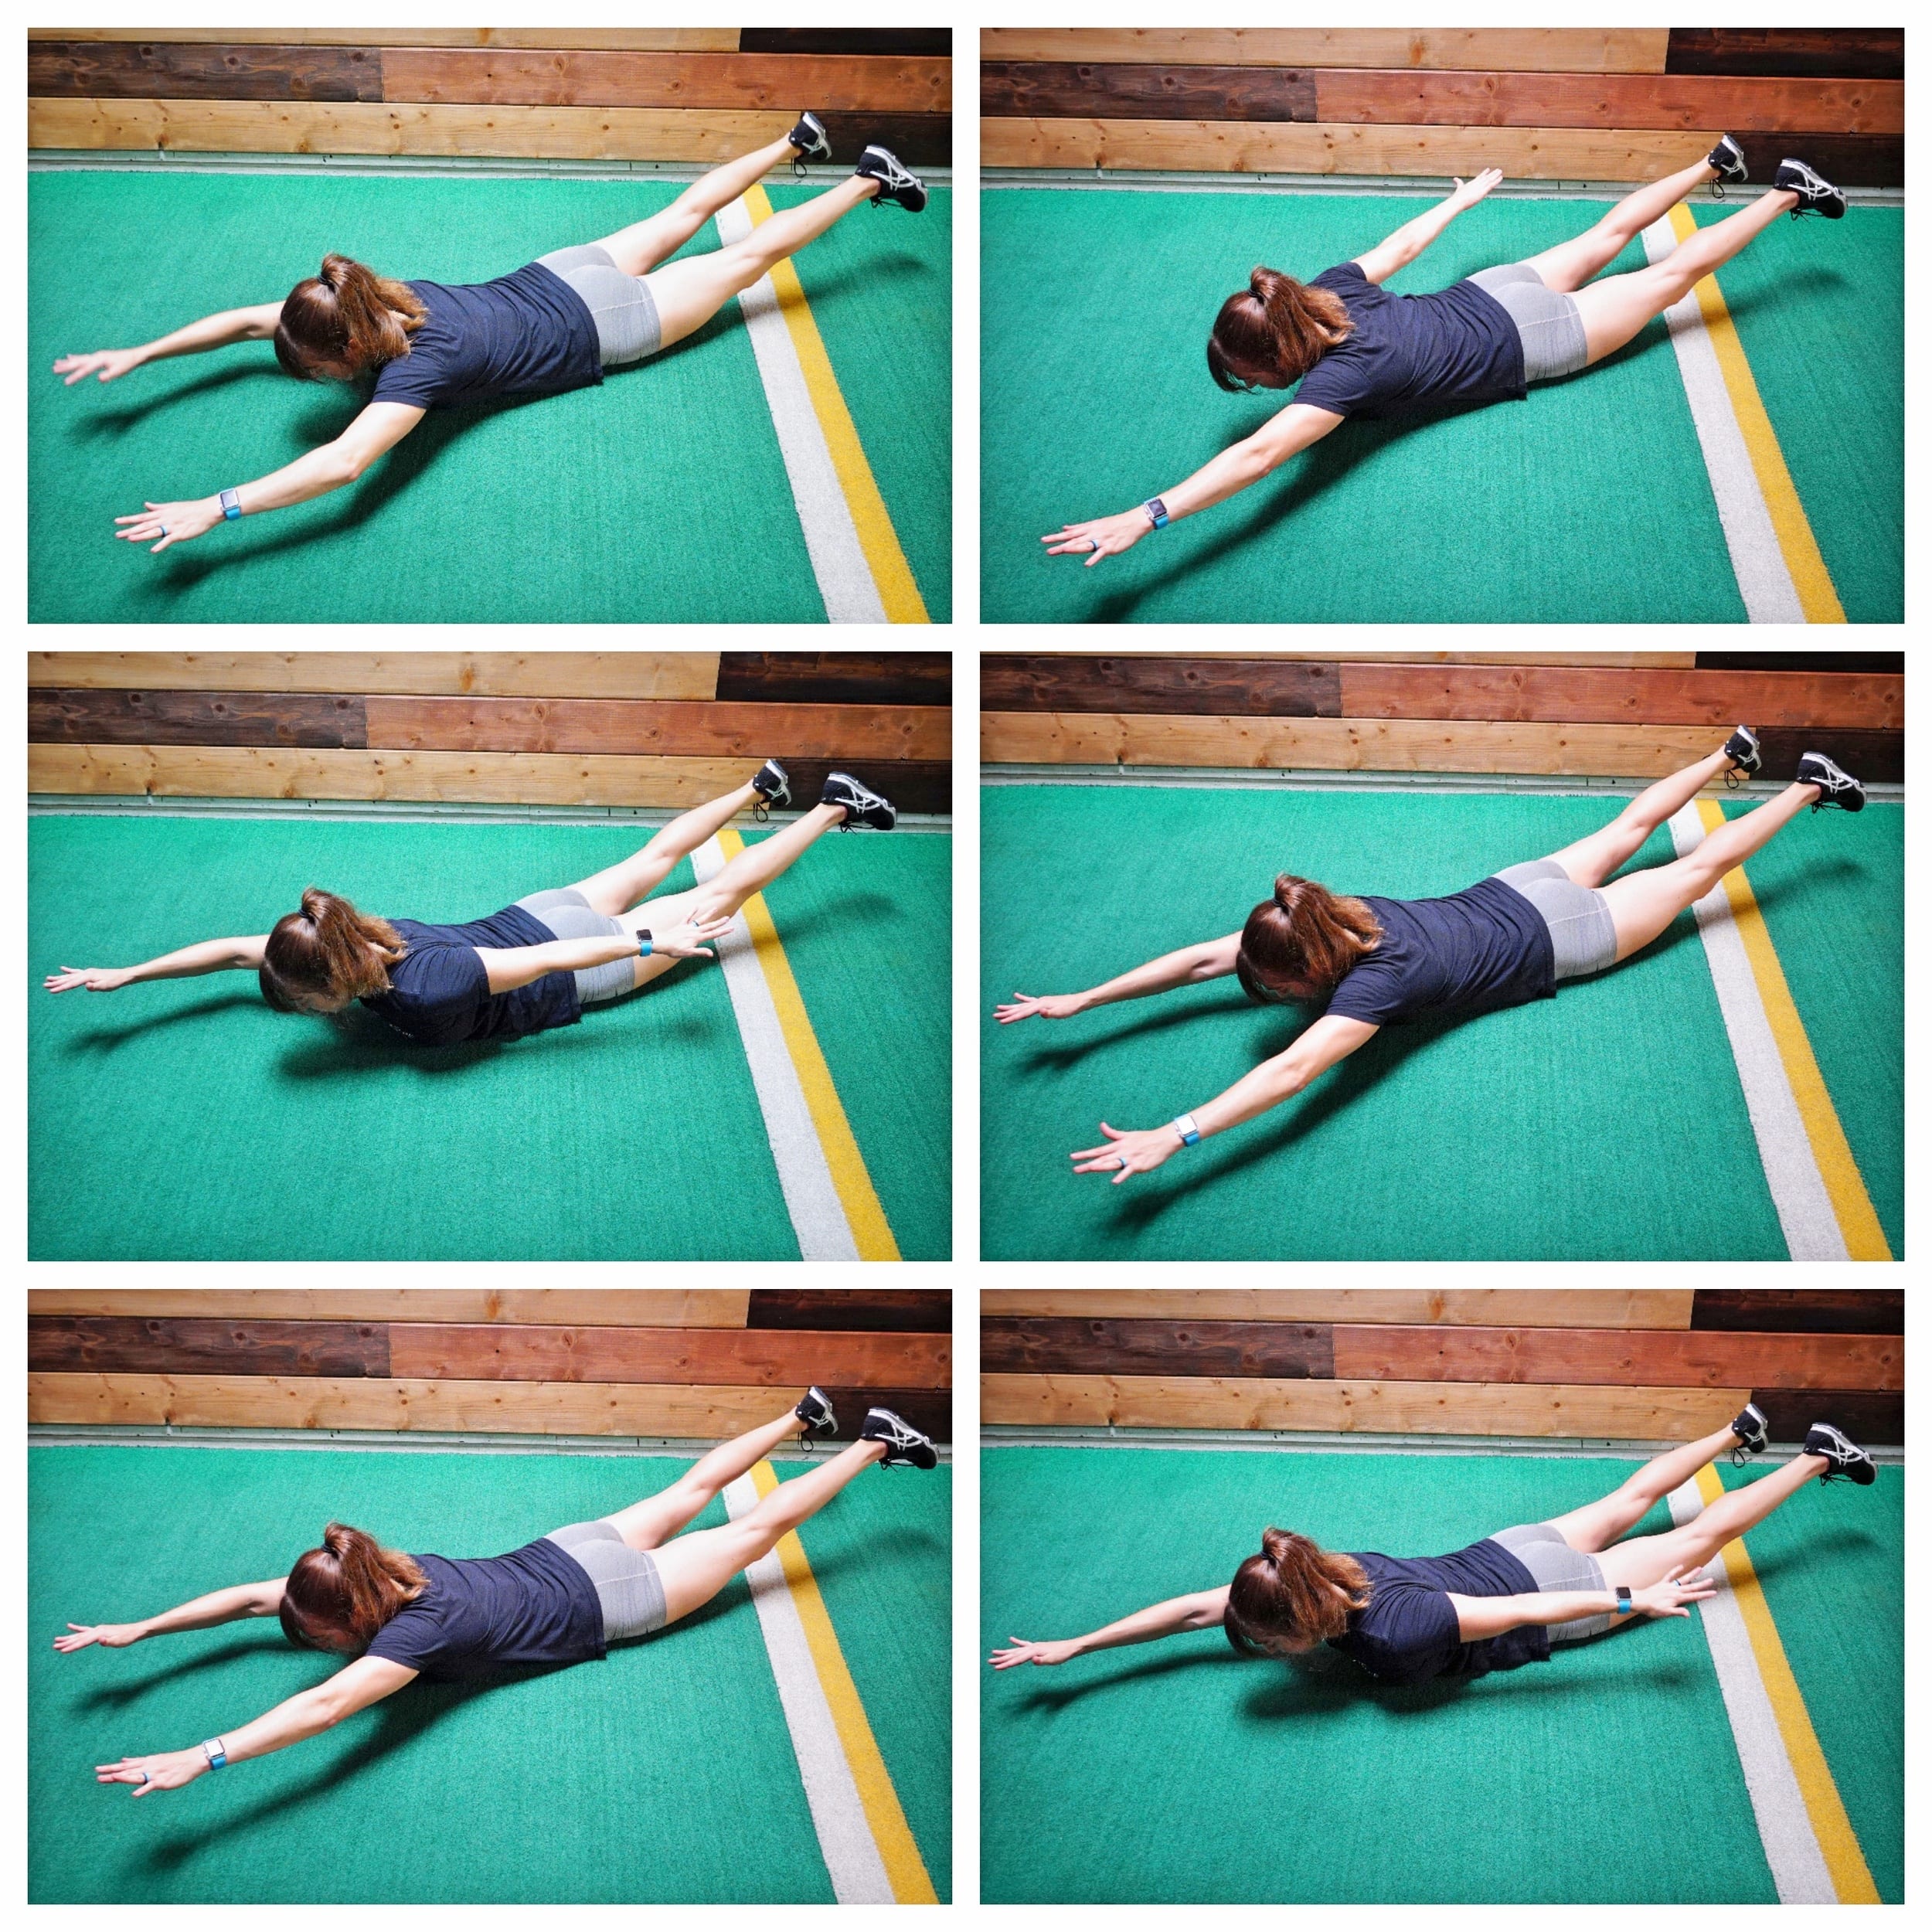
Superman Wave:

Improve your shoulder stability, scapular mobility and upper back strength with the Superman Wave. We always want to include some posterior chain work with all of the sitting, especially hunched over, that we do!

lower back exercise

To do Superman Waves, lie face down on the ground with you arms reaching overhead and your legs out straight behind you.

Then lift your arms and legs off the ground, engaging your glutes and back to lift. Try to lift your chest up as high as you can and get your quads off the ground as much as possible.

Holding here, sweep one arm out and down toward your side, keeping your arms straight. Keep the other arm reaching straight out overhead as you wave the other arm down.

As you lower one arm down by your side, keep it as high off the ground as possible to work the back of your shoulder.

Wave the arm back overhead then sweep the other arm out and down to your side. Keep alternating sides as you engage your back and butt to stay up in the superman position. Move at a controlled pace.

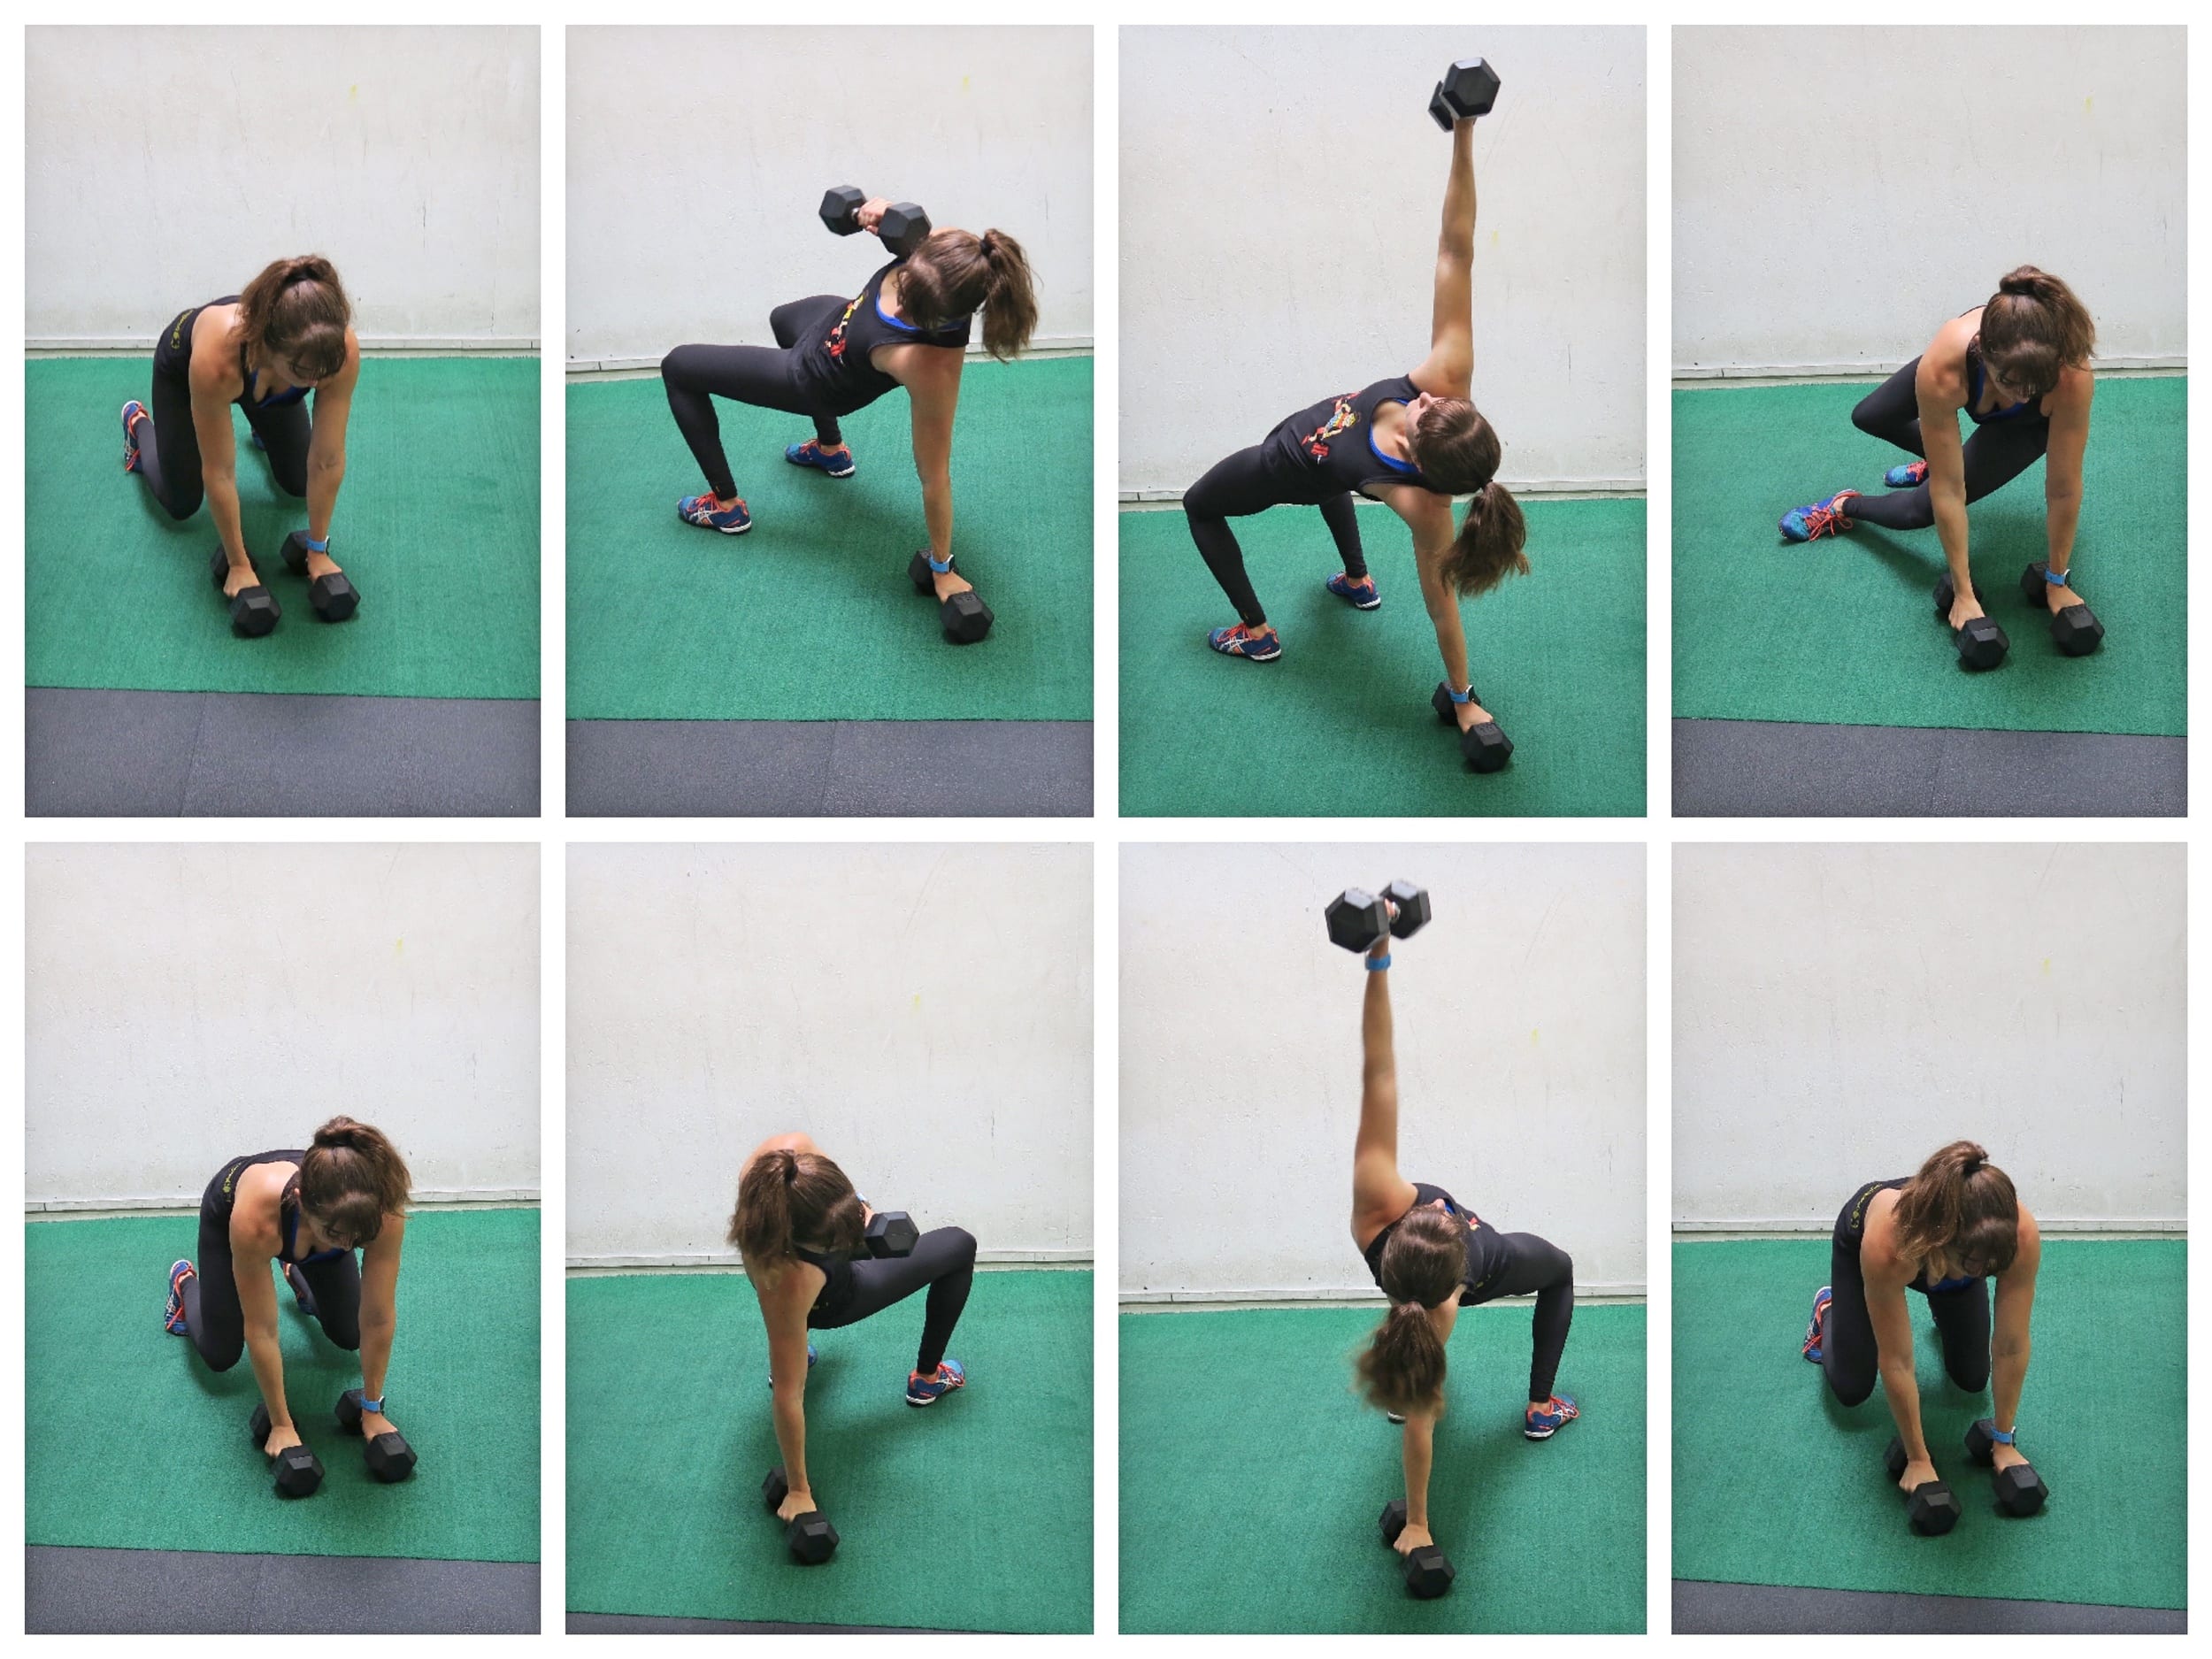
Sit Thru Bridge and Press:

This move looks  more intimidating than it actually is although it will challenge your coordination. The Sit Thru Bridge and Press is a great full core exercise.

It will work on your shoulder stability, ab strength and even glute activation.

It is a mobility AND stability exercise!

dumbbell core bridge

To do the Sit Thru Bridge and Press, start on your hands and knees with a dumbbell under each hand. Then flex your feet and lift up onto your hands and feet with your knees under your hips and your hands under your shoulders. From this position, step your right foot under your body as you raise your right hand and dumbbell up toward the ceiling.

As you step through and put your foot flat on the ground, rotate your hips open to the ceiling as you press the weight up overhead. Really squeeze your glutes as you bridge up and press. Then rotate your right leg back under your body as you bring the weight back down to the ground. Come back into that bulldog front position then step your left leg under to lift your right hand up and press the weight overhead as you bridge up.

Really bridge up and squeeze your glutes at the top. Keep your abs engaged and do not hyperextend your low back. Keep alternating sides.

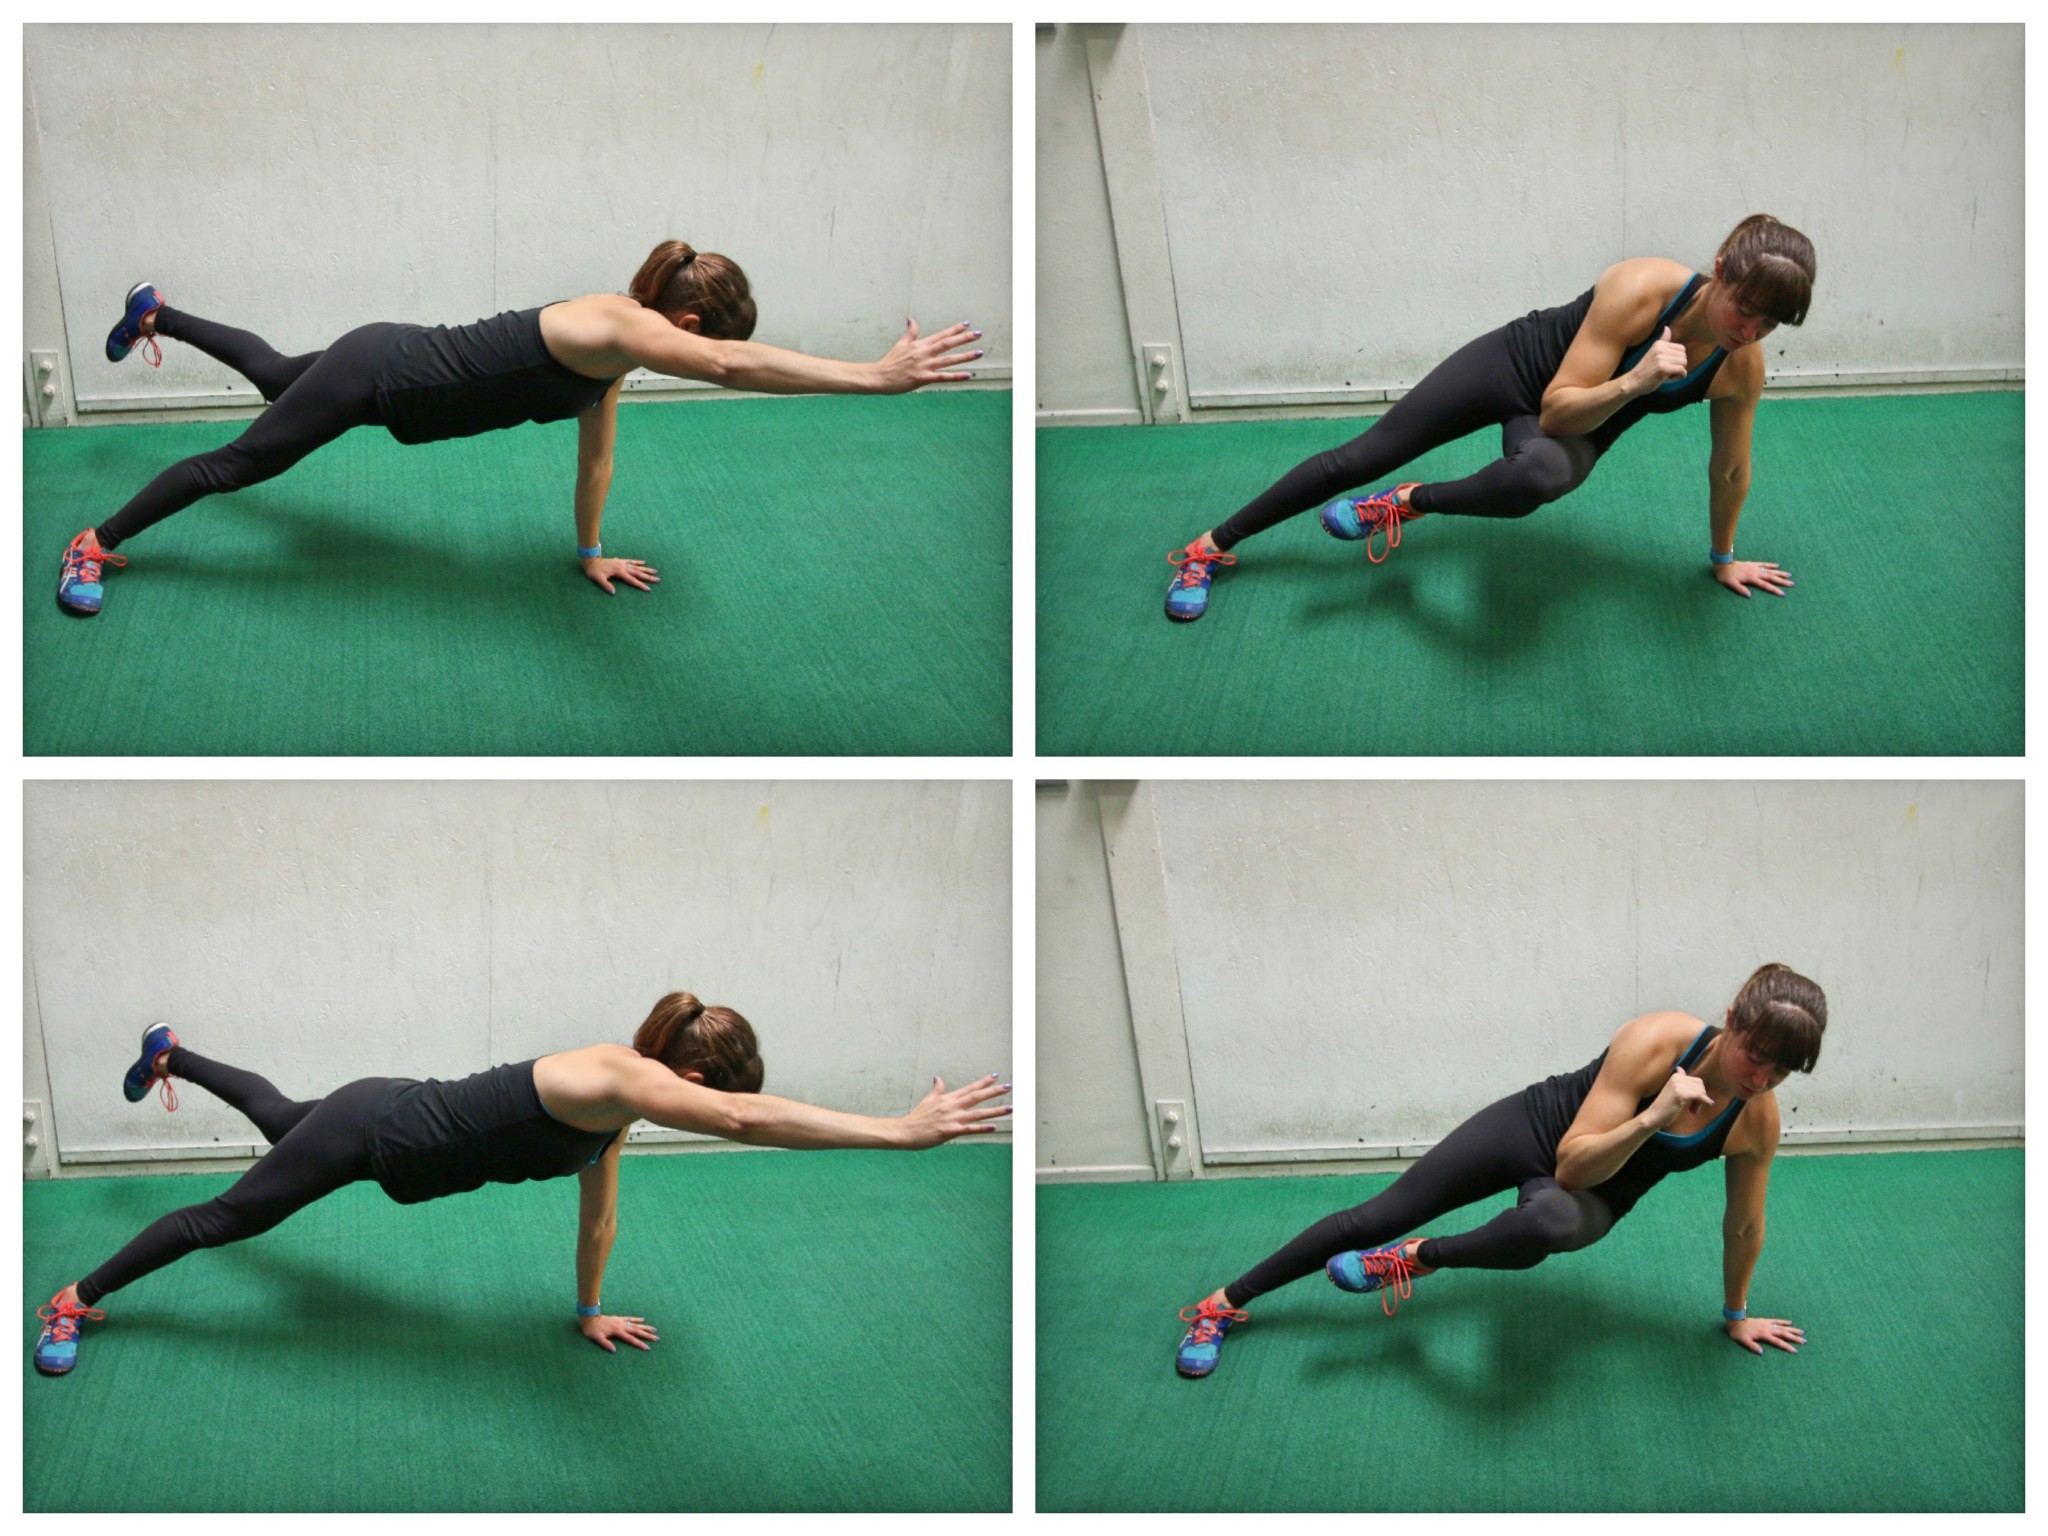
Single Arm Plank Rotation with Knee:

The Single arm Plank Rotation with Knee is an advanced move that will work your entire core, including your adductors. It is the perfect way to improve your shoulder stability while also working your abs and obliques.

You’ll even feel this move all around your rib cage and in your upper back.

rotational plank

To do the Single Arm Plank Rotation With Knee, set up in a side plank position from your hand with your bottom leg in back of your top leg.

Then lift that back leg as if kicking it back and up toward the ceiling slightly. Reach your top hand out in front of you and overhead. Your chest will rotate toward the ground as you lift up into this side plank position with your opposite arm and leg raised.

Rotate your chest back open as you tuck your raised leg under and forward, driving your knee forward as you tuck your raised arm down to meet it. Try to touch your knee to your elbow as you rotate your chest back open and away from the ground.

After slowly tucking the knee to the elbow and feeling yourself pivot around that shoulder. The muscles around your rib cage should really be working. Then kick the leg back out and reach back out and overhead with your hand.

Move slowly to stay balanced and try to keep your hand on the ground under your shoulder.

Beginners can tap the toe down behind them or even just do the knee tuck without the kick out.

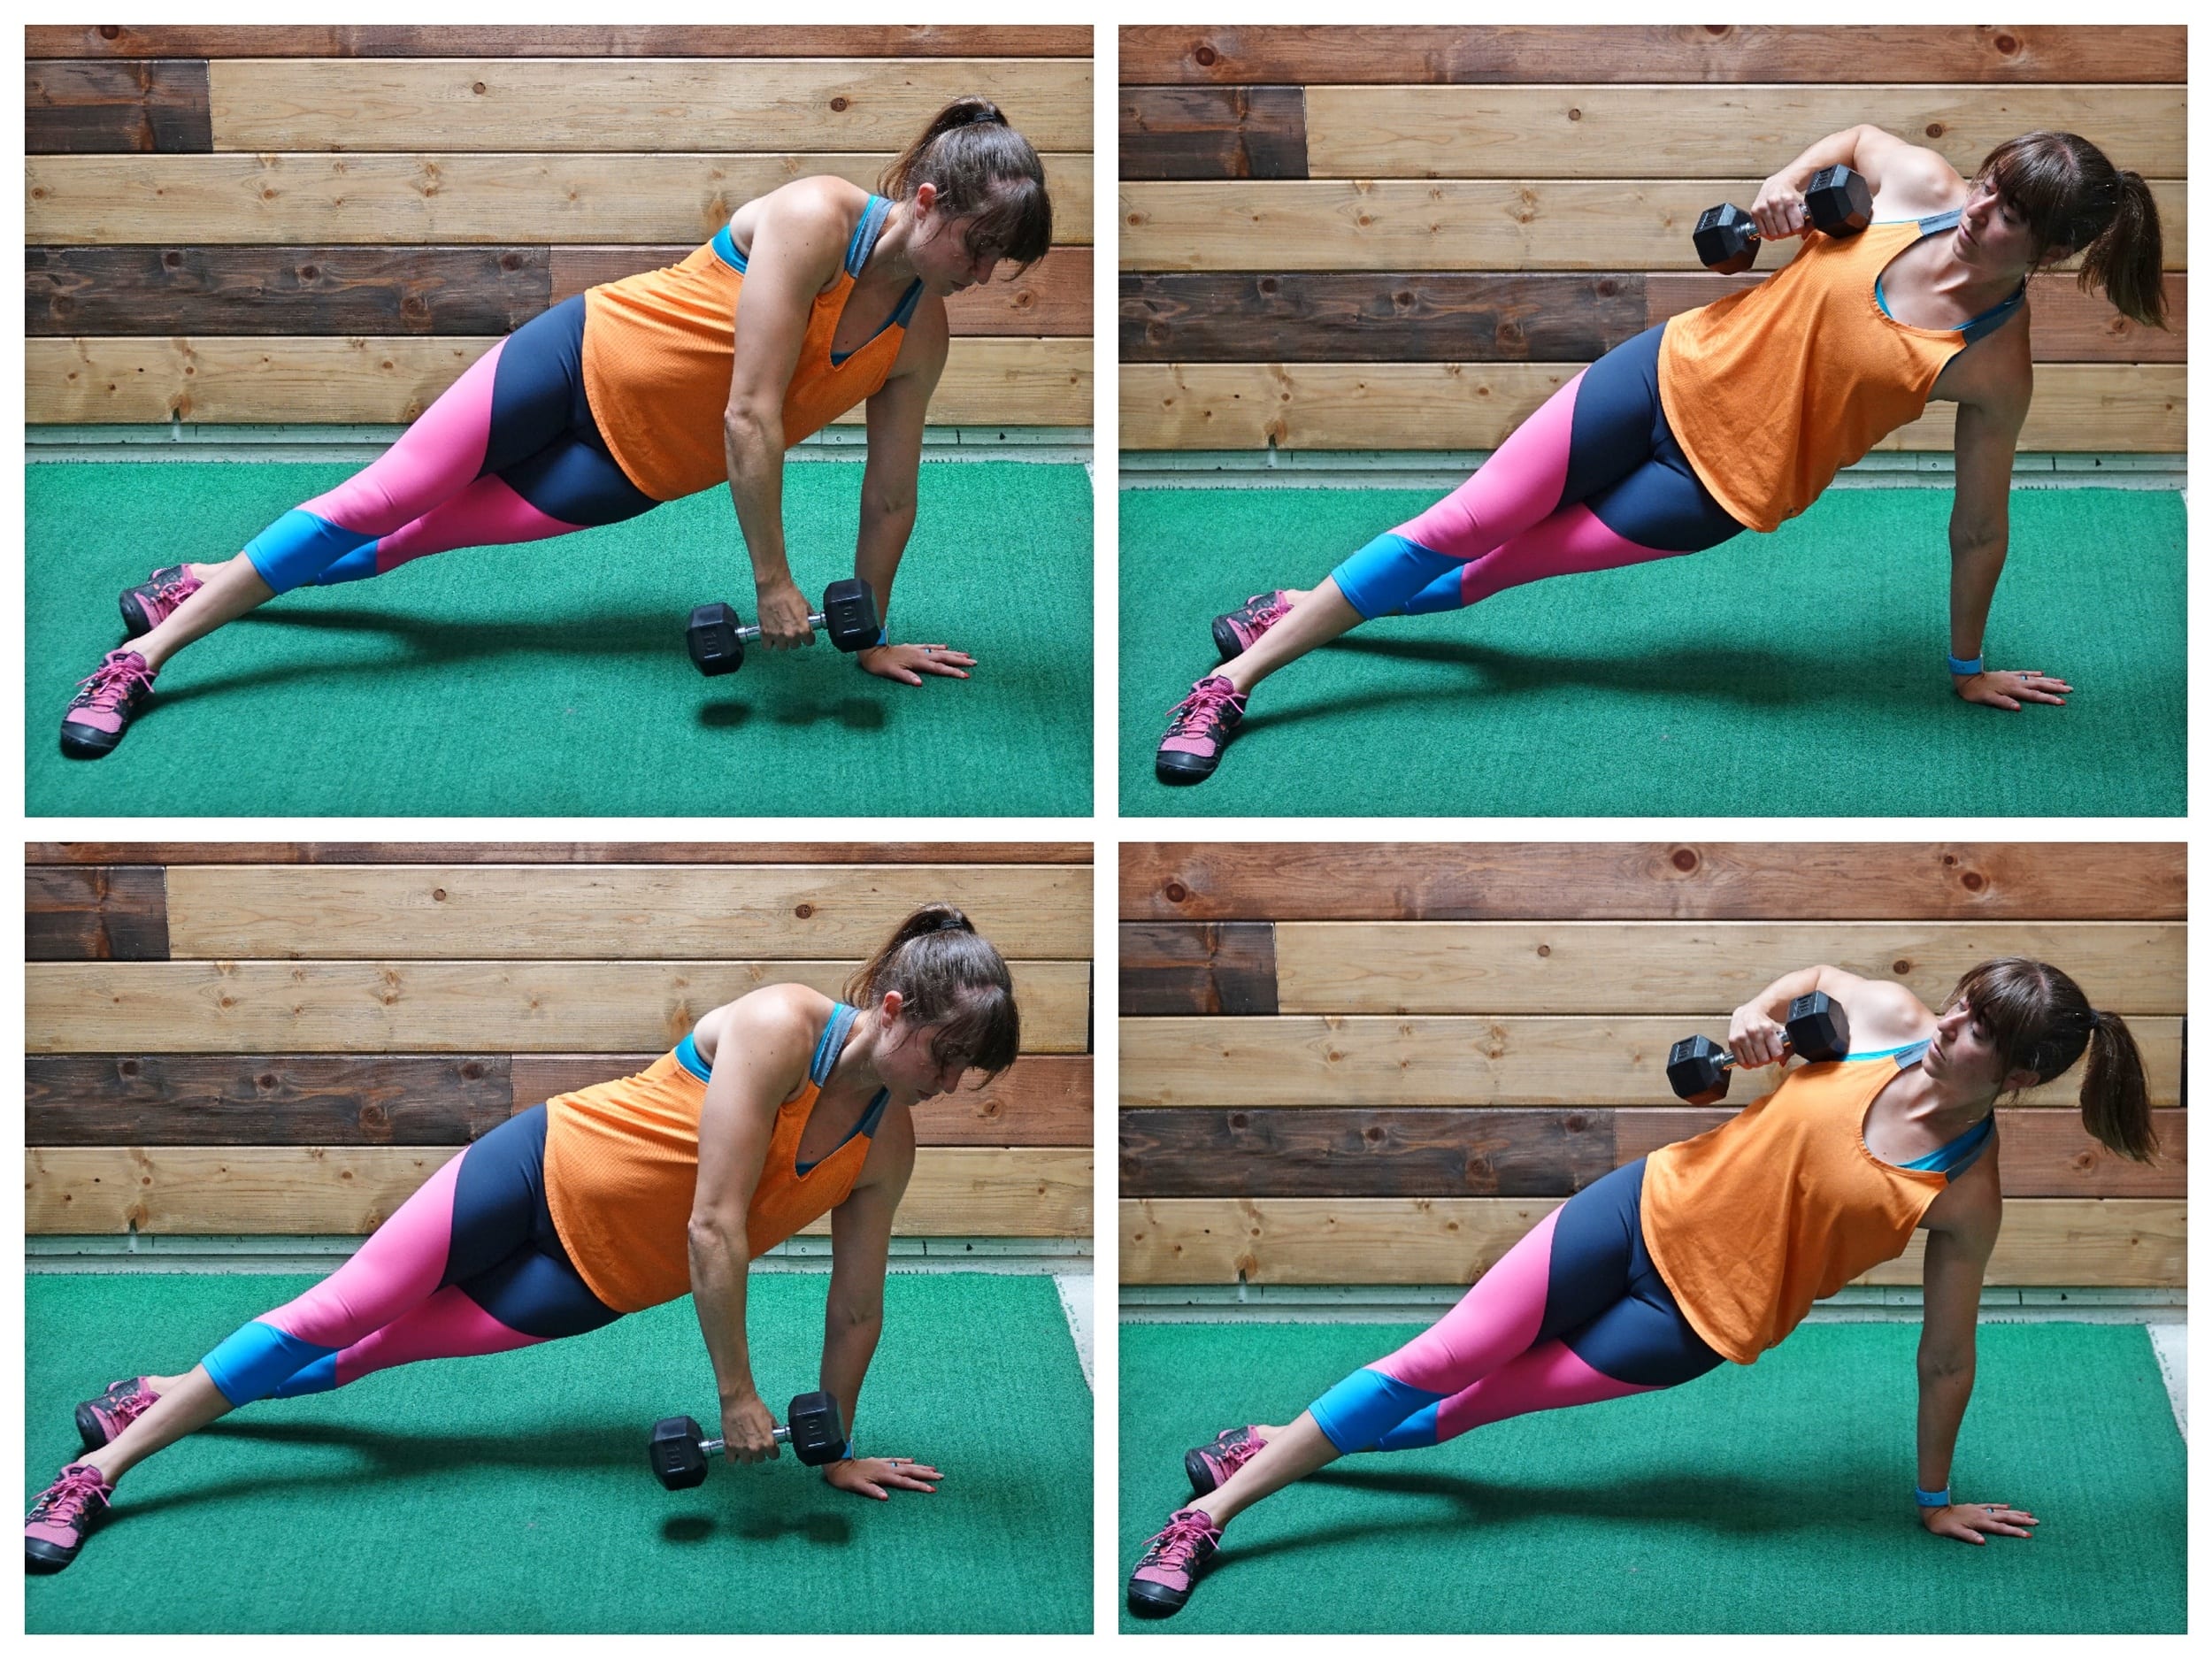
Side Plank Row:

While heavy rowing exercises are great to build back strength, we want to include rows that make us work in other planes of motion.

This Side Plank Row adds in some rotation to the pulling movement and forces us to work on our shoulder stability as well as our oblique and even glute medius strength.

side plank row

To do the Side Plank Row, set up in a high side plank from your hand with your feet staggered (your top foot will be in front). You will hold a dumbbell just off the ground down in front of you with your top hand.

Keeping that nice side plank position, row that weight up and across your body, driving your elbow back toward the wall behind you. You will slightly rotate open as you row. Feel your back pulling the weight up and across as your bottom side works to keep your bottom hip up for that nice plank position.

Lower the weight back down and across toward the ground and repeat the row.

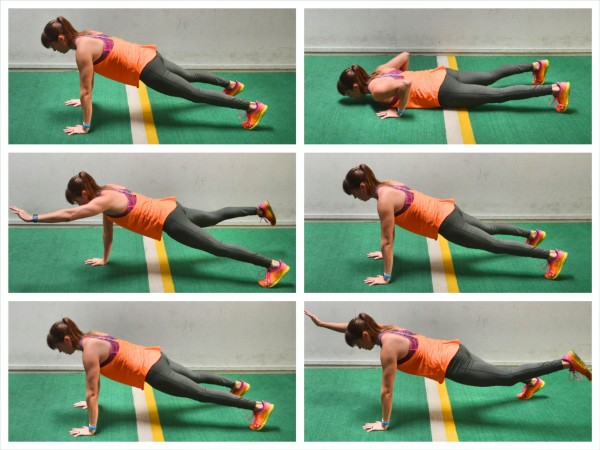
Bird Dog Push Ups:

This Bird Dog Push Up is a more challenging push up variation that works not only your chest, shoulders and triceps, but also your core as it requires a great deal of stability to prevent rotation when you come up into the bird dog at the top!

bird dog push up

To do the Bird Dog Push Up, set up in the high plank position from your hands and toes with your hands under your shoulders and your feet about hip-width apart. If you bring your feet closer together, it will make the move more challenging. Make sure your core is braced and your body is in a nice straight line from your head to your heels.

Then, with your body moving as one unit, perform a push up, dropping your chest to the ground. Do not let your elbows flare way up by your shoulders. You do not want your arms and body to create a “T” shape. Press back up to the high plank position. Make sure to keep your core engaged and drive back through your heels so your body stays in a nice straight line. Do not let your hips sag or your butt go up in the air.

At the top of the push up, lift your opposite leg and arm up, reaching your arm out straight toward the wall in front of you as you lift your foot back toward the wall behind you. Keep your core engaged and squeeze your glutes as you lift the leg and arm. Do not let your body rotate open or your hips sag toward the ground. Do not let your butt go up toward the ceiling as you lift and pause to hold.

You do not need to lift super high. It is more about lifting toward opposite walls and engaging your core and glutes to stay balanced. Hold for a second or two at the top and then lower back down and repeat the push up. Make sure your body moves as one unit. Do not tuck your chin or let your hips sag.

Then perform a Bird Dog on the other side, lifting the opposite arm and leg up. Keep performing a push up then a Bird Dog, alternating sides.

Beginners can do the move from their knees or even simply lift either their leg or their arm instead of lifting both. It is better to regress and perform the movement properly than to do the full Bird Dog Push Up with your butt up in the air.

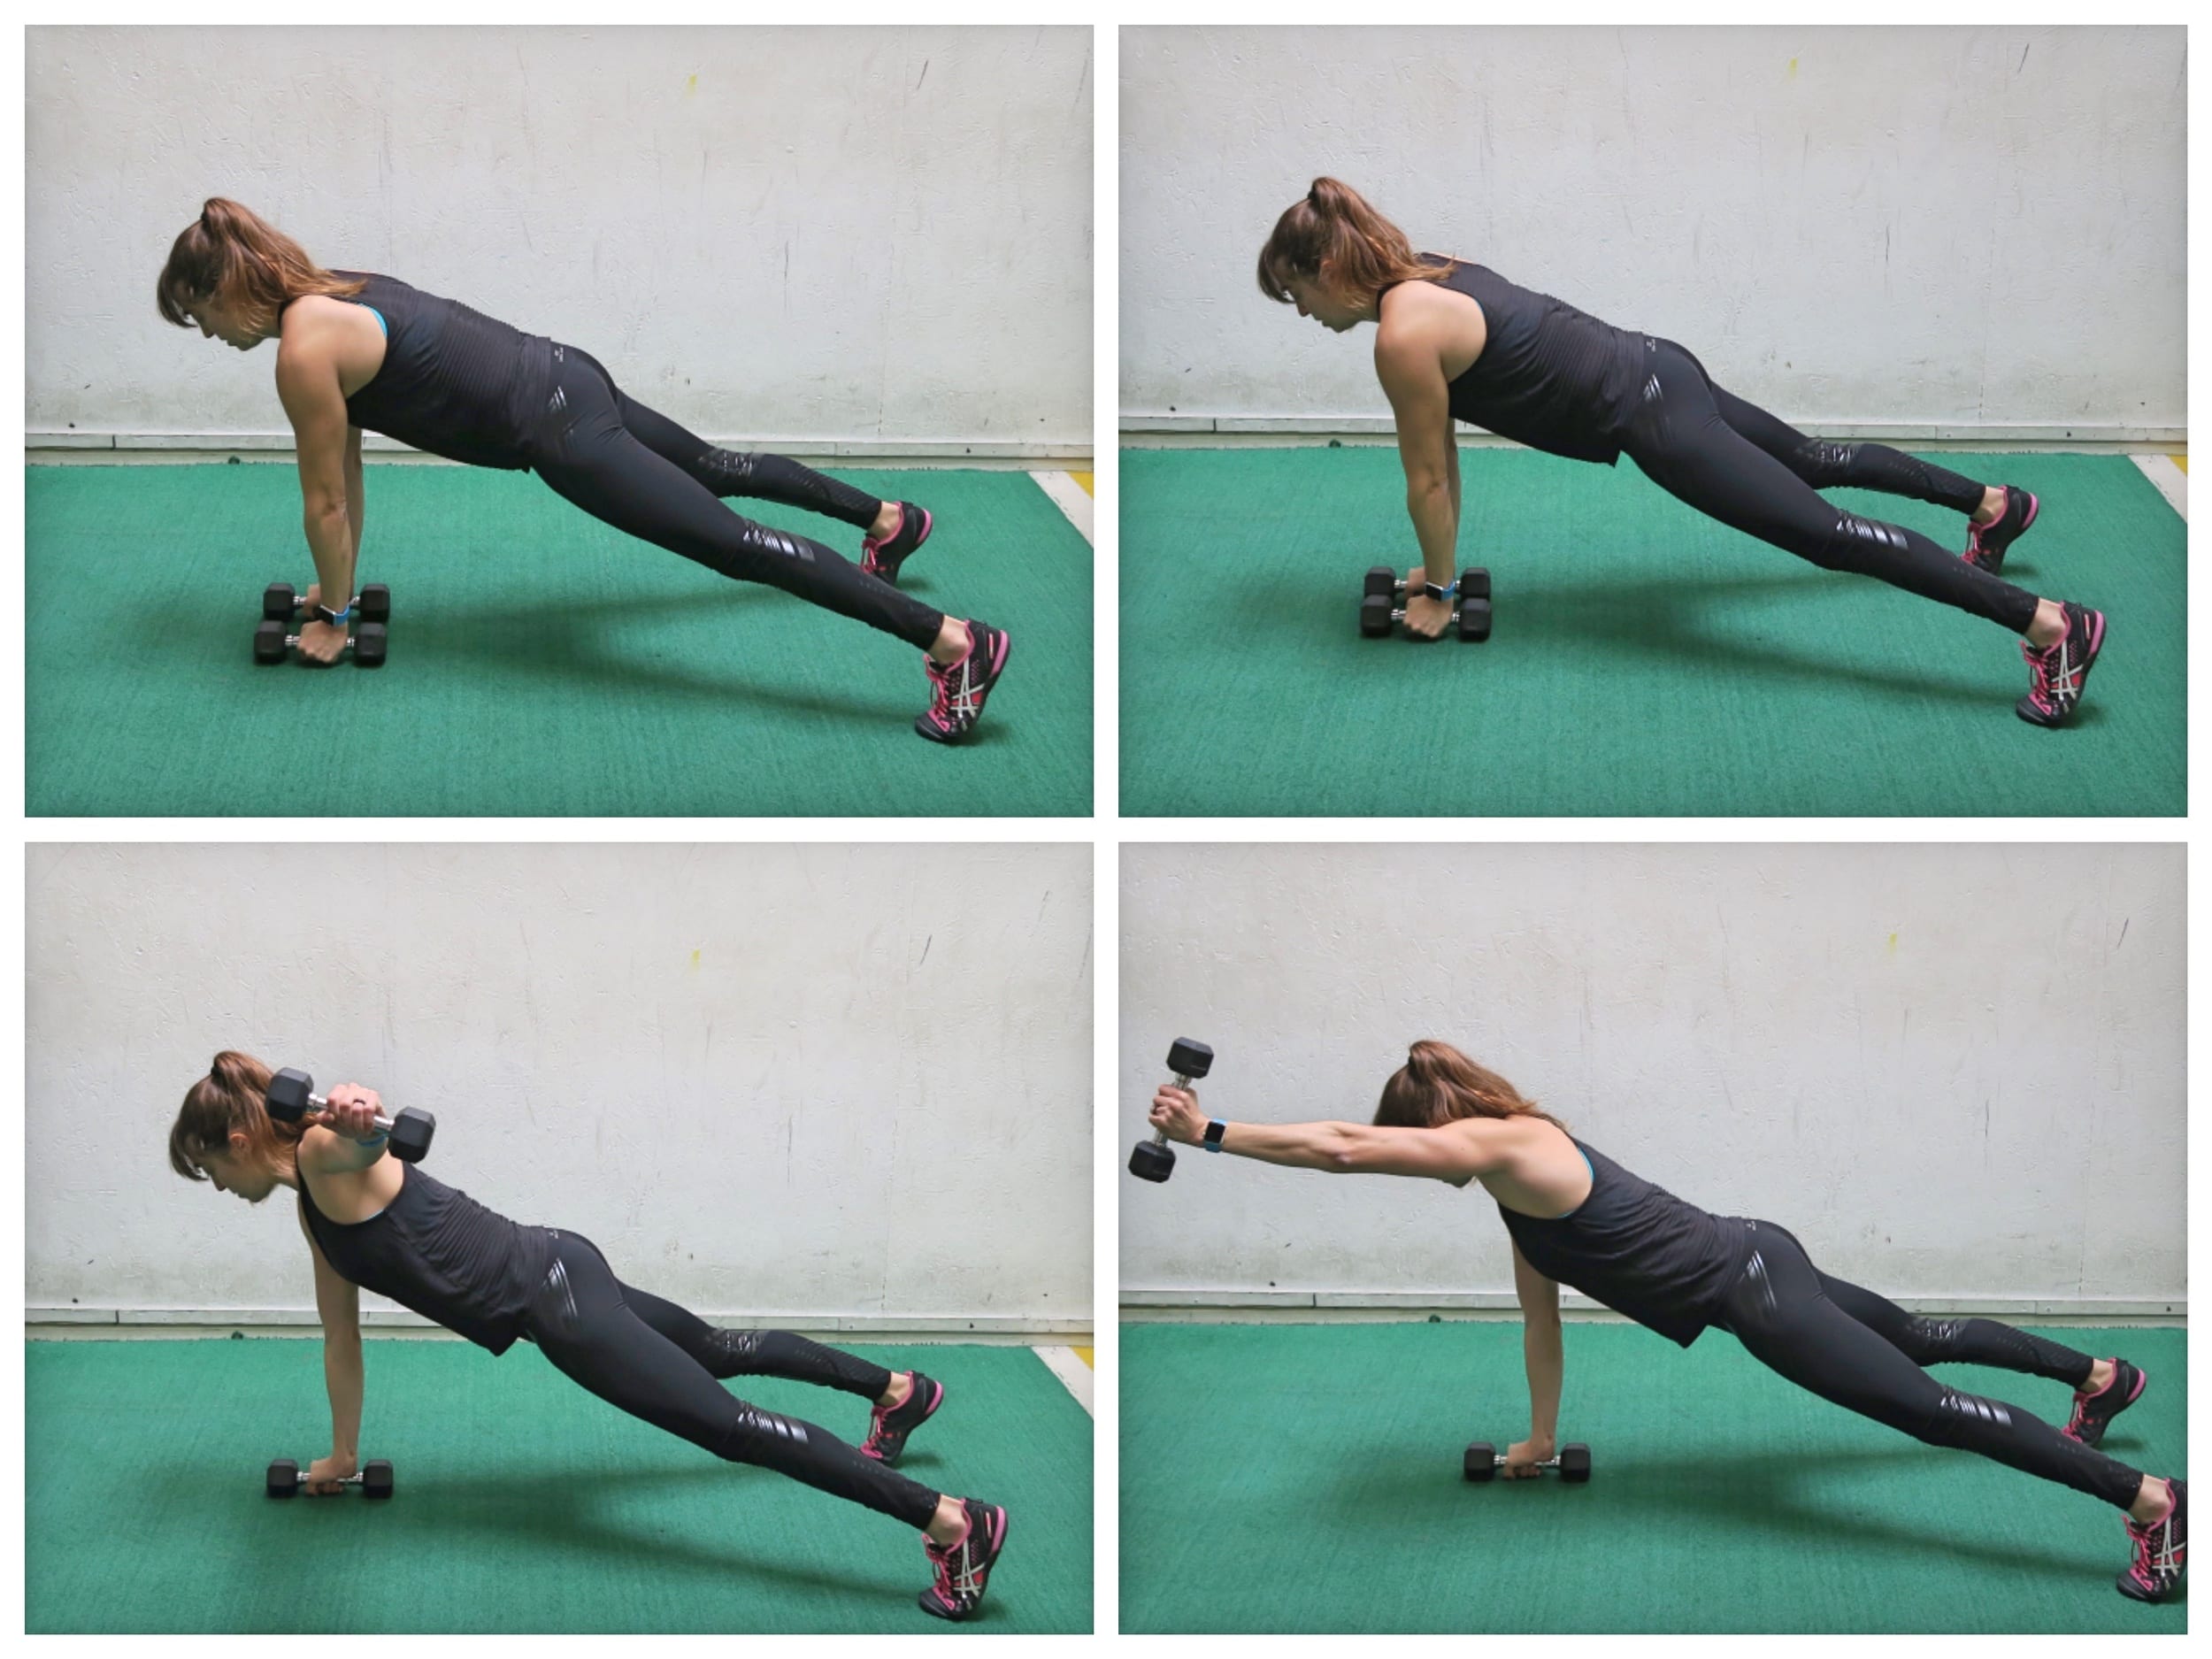
Plank with Two-Way Raise:

The Plank with Two-Way Raise is a great way to work your arms and shoulders while also improving your anti-rotational core strength.

When you’re short on time, this allows you to get in some extra targeted shoulder work while also building ab strength!

plank shoulder exercise

To do the Plank with Two-Way Raise, place a dumbbell in each hand and set up in a high plank position with your feet about hip-width to shoulder-width apart. These should be light dumbbells as we are working small muscles.

Then, keeping your core stable, lift your arm straight out to the side, feeling the back of your shoulder and even in between your shoulder blades work. Bring it back down then lift it forward out in front. When you lift to the side, the back of your hand will be facing the ceiling. As you lift out in front, your thumb will be up.

Then repeat, lifting out to the side then down the raising to the front and down. Keep your core stable the entire time.

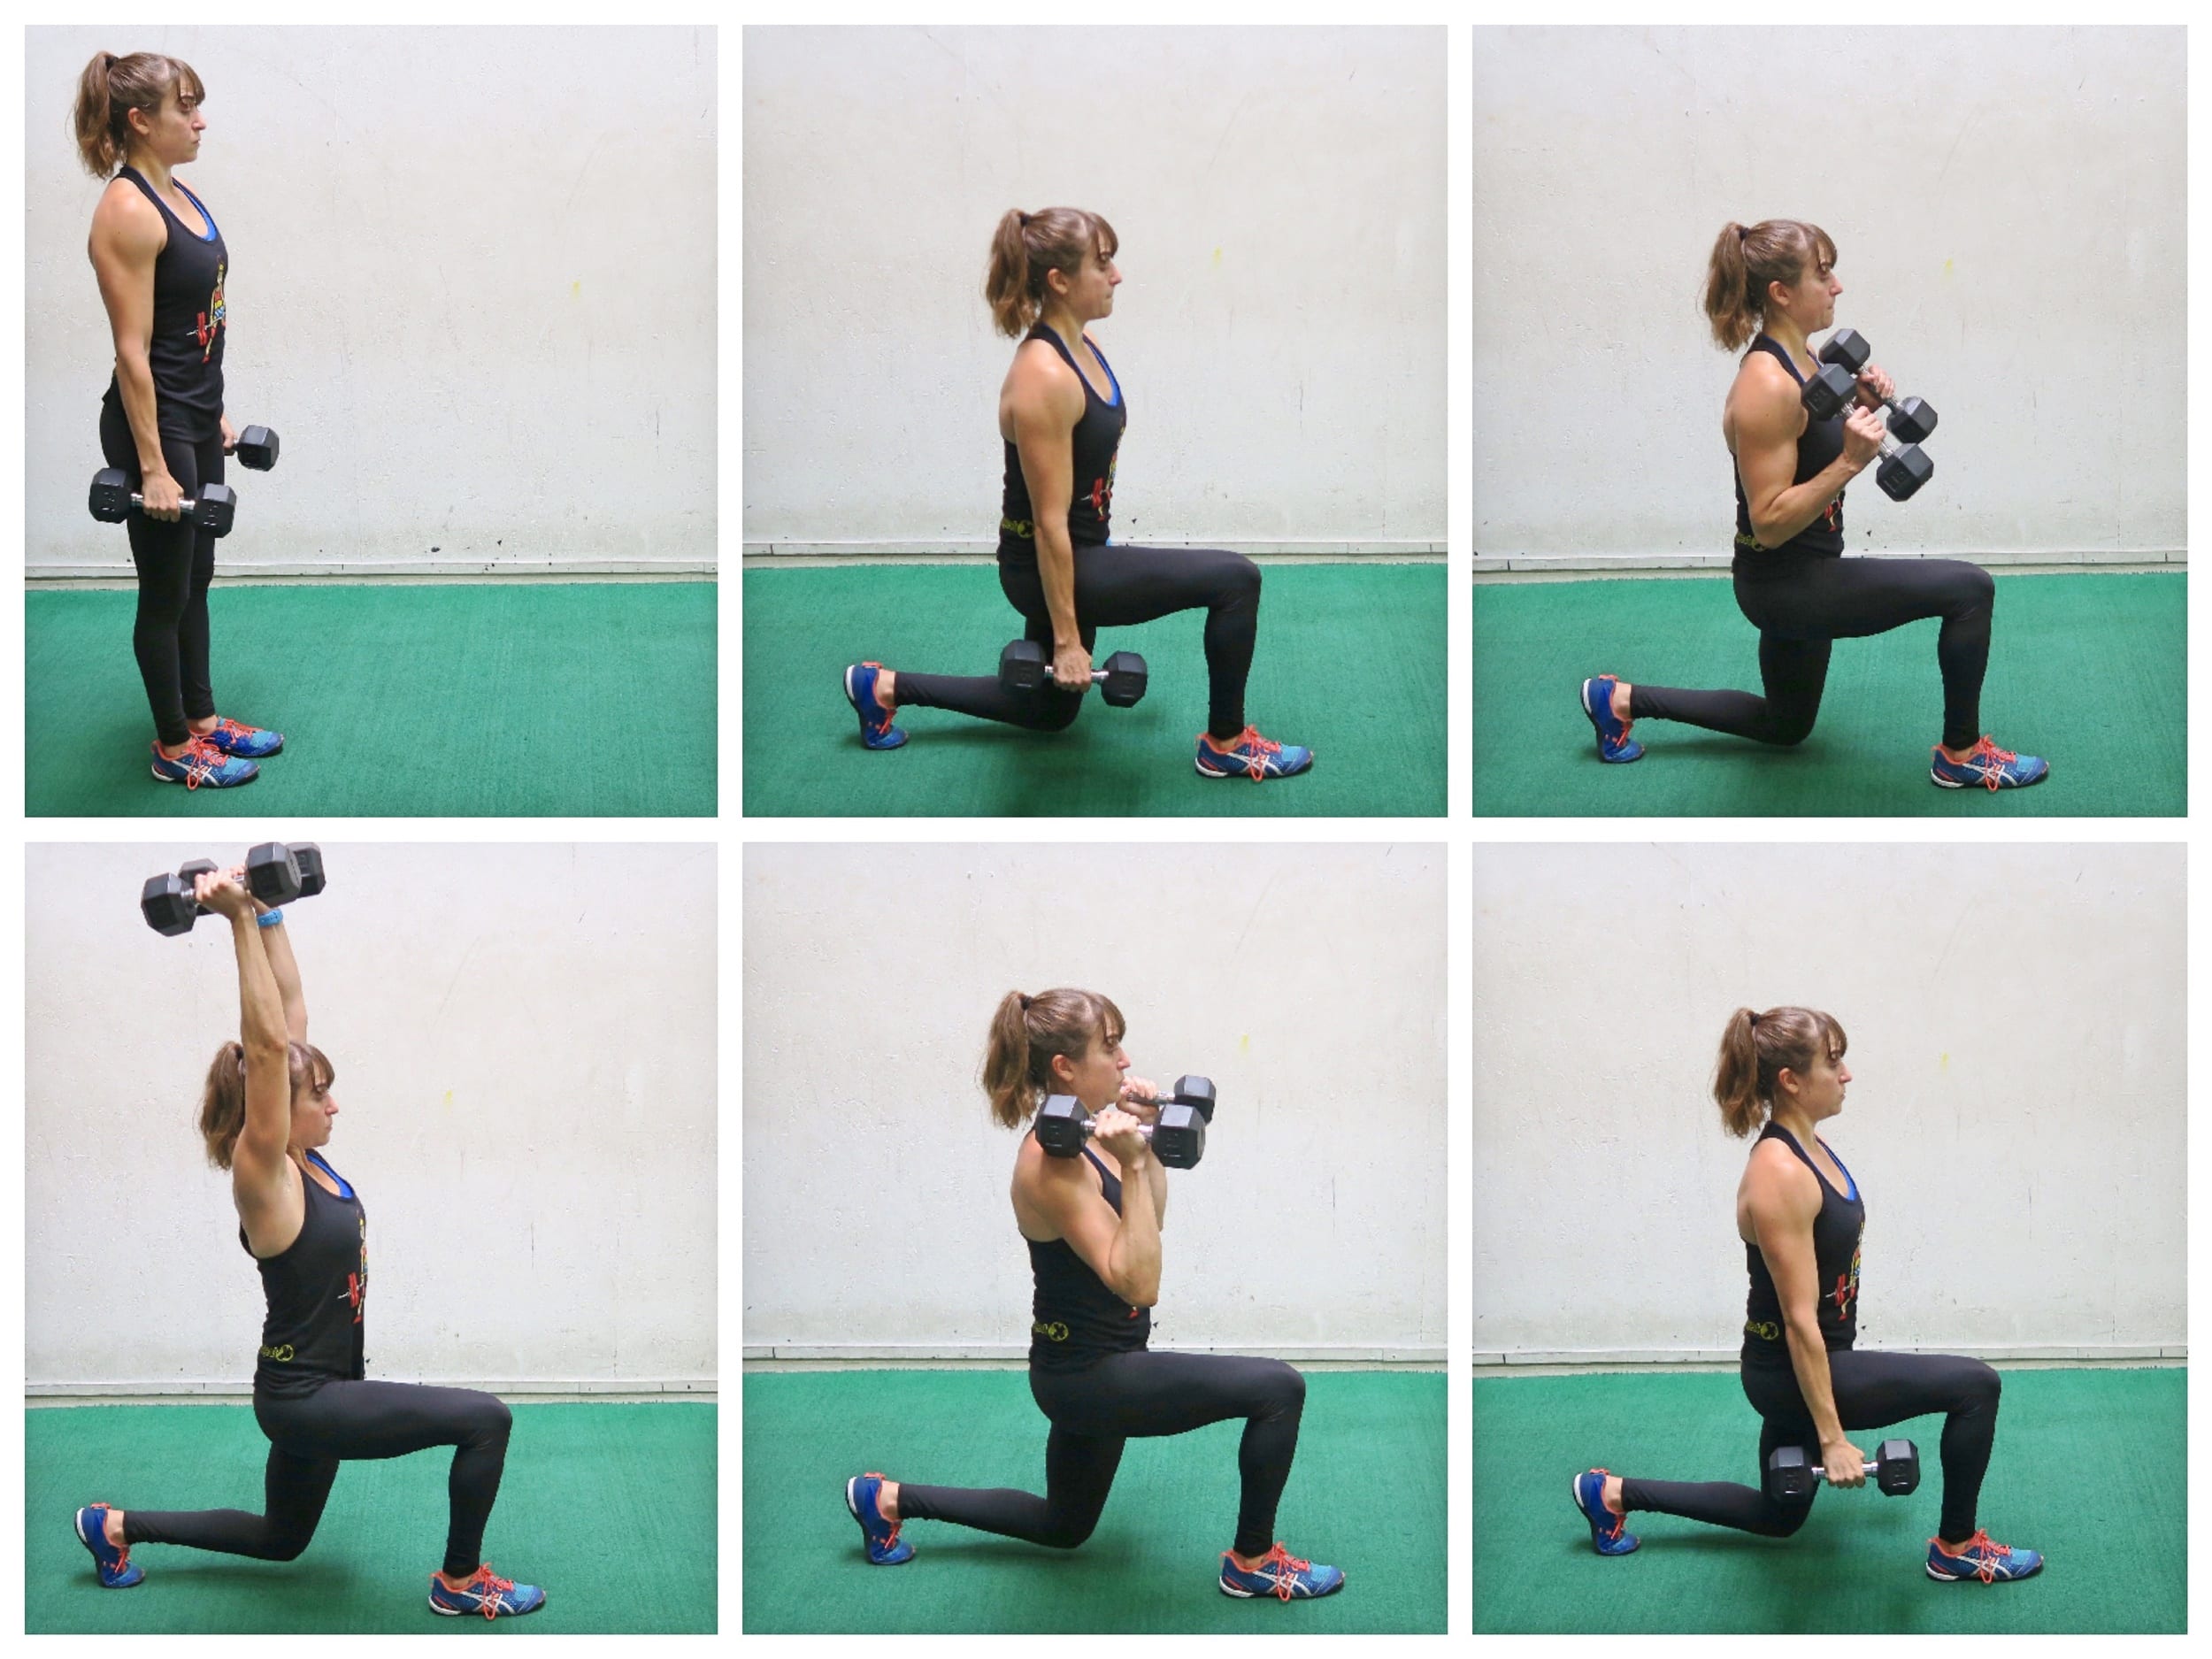
Lunge Curl Press:

When we’re short on time, the more muscles we can work at once, often the better – especially if fat loss is part of our goal!

This hybrid exercise will help you torch calories by using a lunge to work the big muscles of your legs and get your blood pumping as you target your biceps and shoulders with a curl and press!

full body dumbbell lunge curl to press

To do the Lunge, Curl and Press, start standing tall with a dumbbell in each hand down by your side. You can choose to have your palms facing forward or even in toward each other to perform both the curl and the press. Lunge forward with your arms down by your sides. Holding the lunge, perform a bicep curl, curling the weights up to your shoulders. Keep your chest up as you curl to maintain good form.

Once you curl up to your shoulders, press the weights overhead, staying nice and low in the lunge with your abs engaged. Press all the way up, then bring them back down to your shoulders and reverse the curl. Once the weights are back by your sides, push back up to standing in one movement.

Beginners may not lunge out as far or as deep. They may also choose to lunge then perform the curl and press while standing. You can stay on the same side or perform lunges alternating sides.

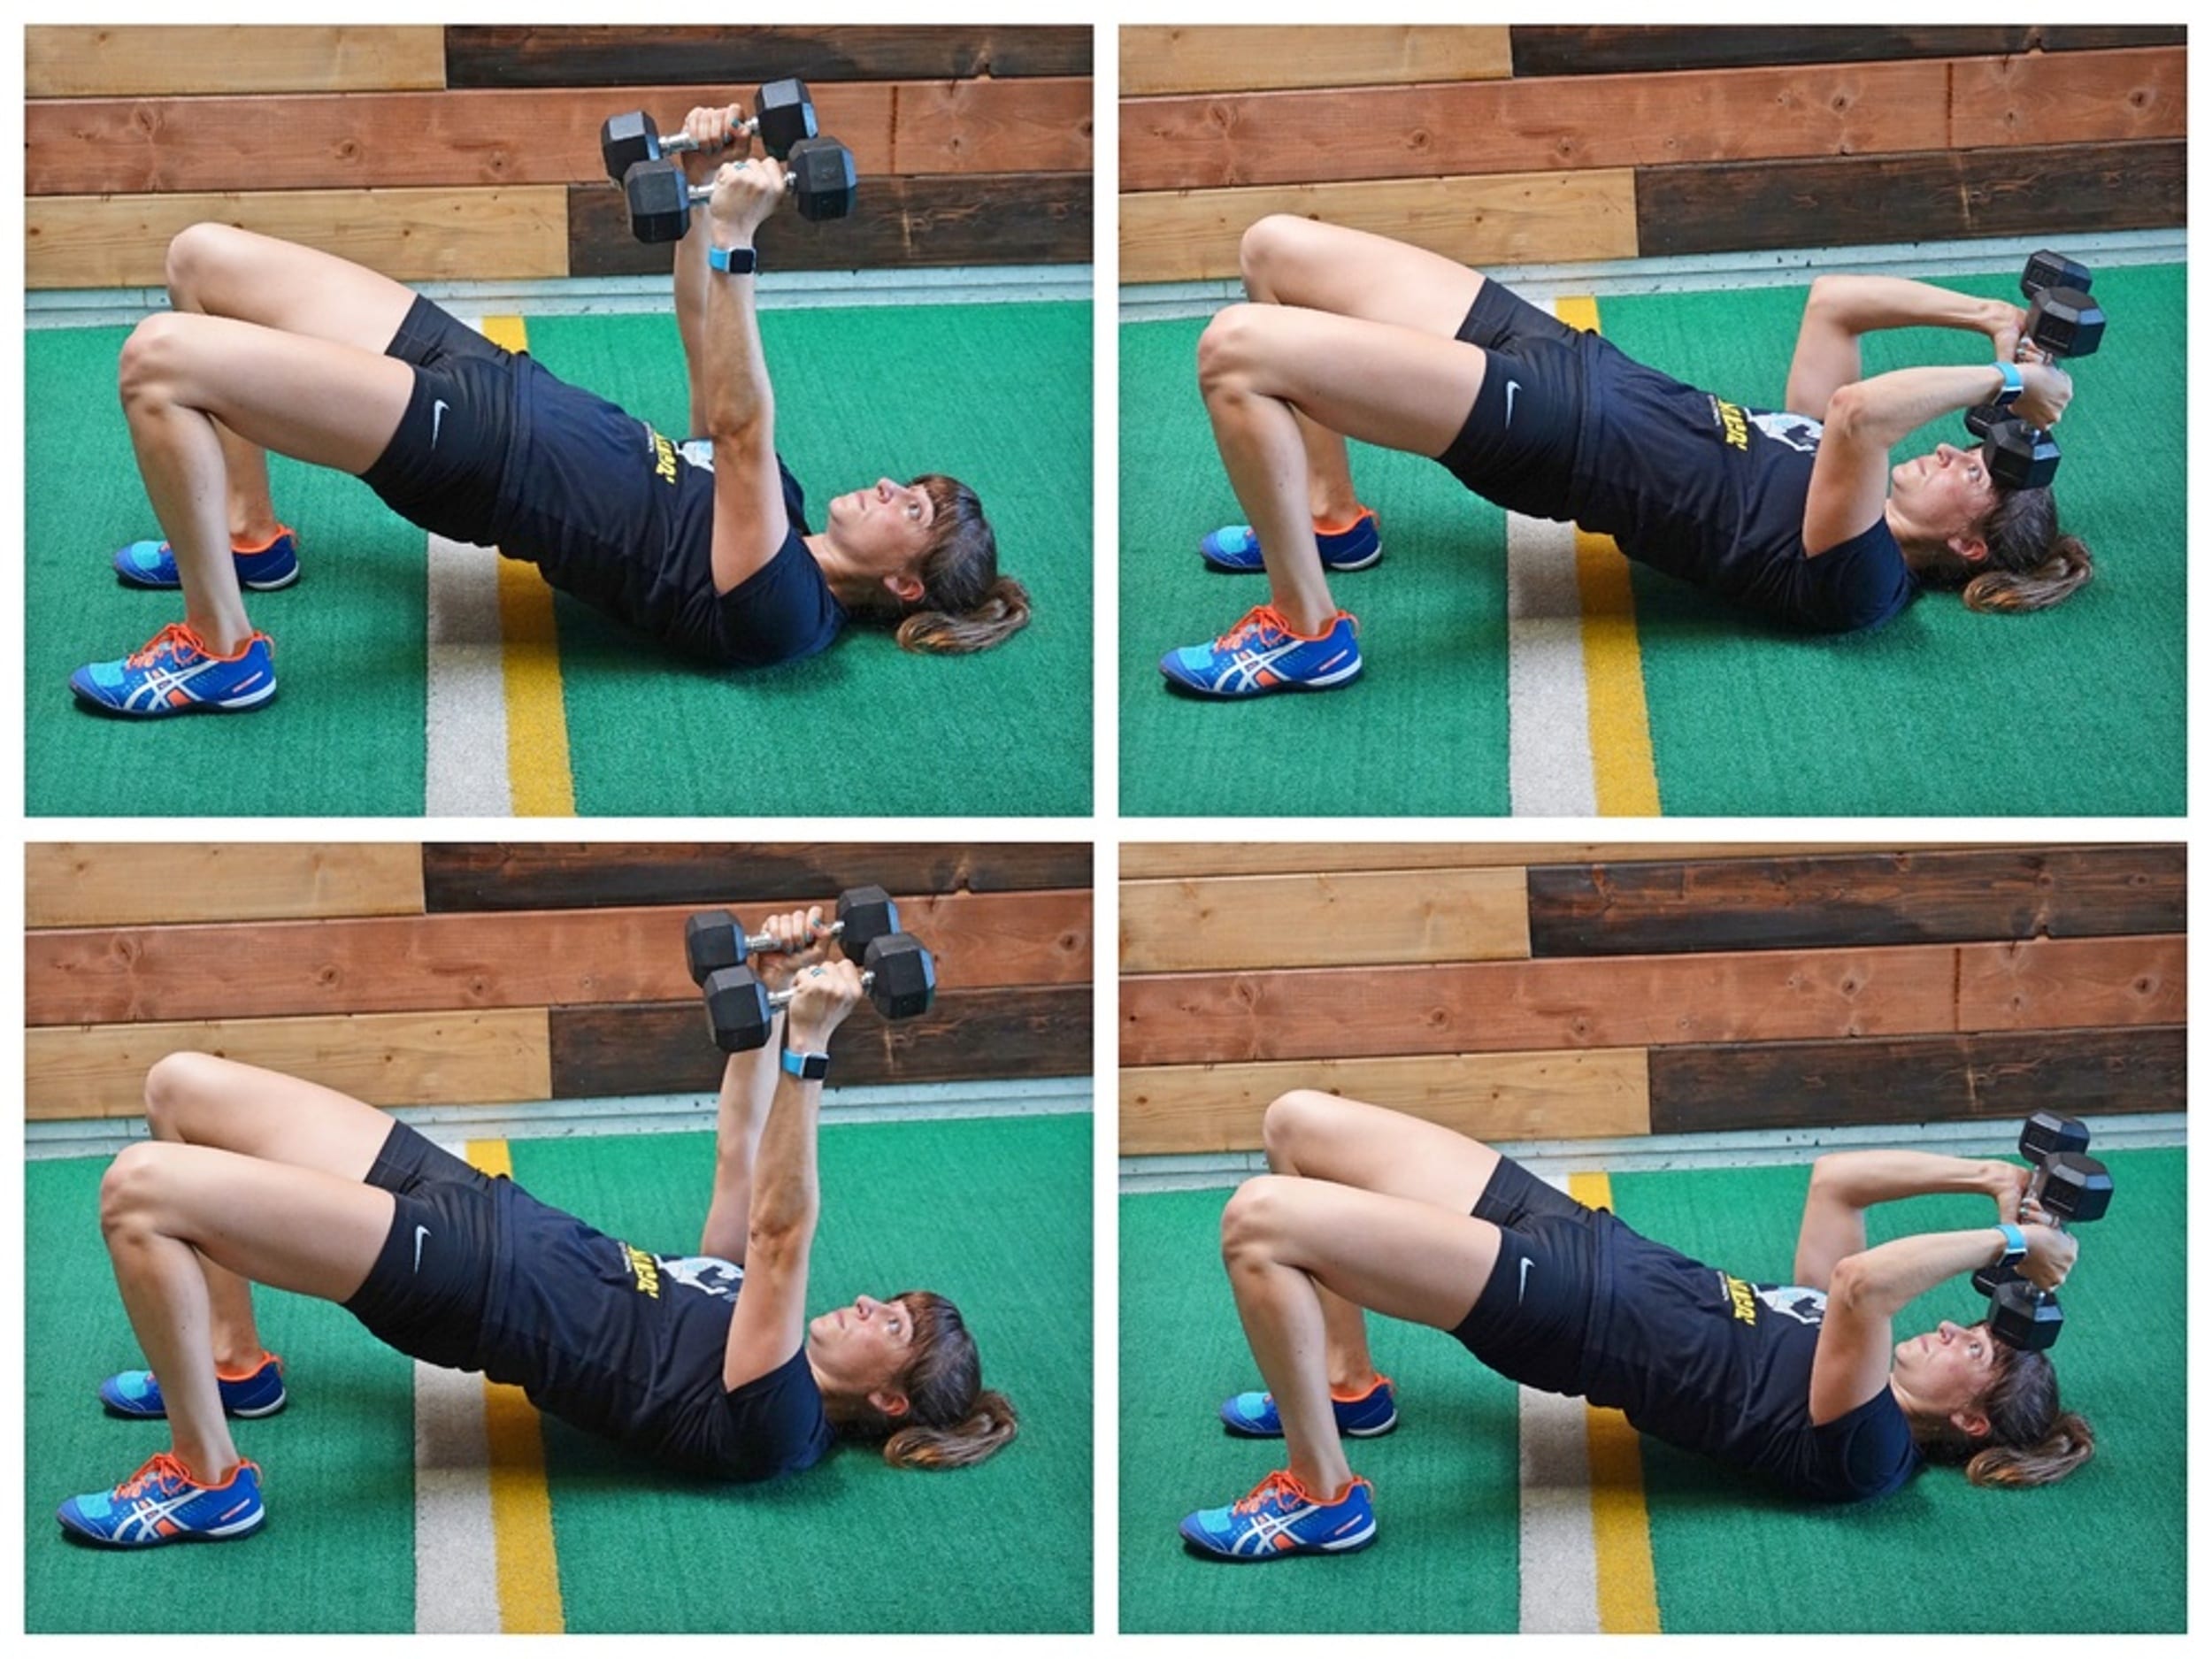
Glute Bridge Skull Crushers:

When you want to use isolation exercises to target those trouble zones, you can help yourself get even more “bang for your buck” in less time by combining that isolation move with an exercise to work a different area.

That’s why the Glute Bridge Skull Crushers are a great hybrid move to include when you’re short on time! You’ll work your glutes and core as you target those triceps!

skull crusher tricep exercise

To do Glute Bridge Skull Crushers, hold either a kettlebell or weight(s) in your hands and lie on your back. Set up in the bridge position with your knees bent and feet flat on the ground. Press the weights or weight up at shoulder height toward the ceiling.

Then bridge up. Holding this bridged position, curl the weights back toward your forehead just bending at the elbows. Your palms should be facing in toward each other. Then extend your arms back out. Move at a controlled pace and stay up in the bridge the whole time.

When you lower the weights down toward your forehead, think about just bending at the elbows so your elbows stay right over your shoulders. And as you extended the straighten but still stay aligned.

Keep your abs braced in that bridge too and don’t hyperextend your lower back just to bridge up higher.

Bi’s And Tri’s Series:

When you’re short on time, it can be hard to use some of your workout time to target those specific areas you want to tone and strengthen with isolation moves because they don’t give you as much bang for your buck.

But if you really want to target those areas, you can get killer results by combining isolation moves into a hybrid series! This way you can pack more into less time!

bicep and tricep exercise

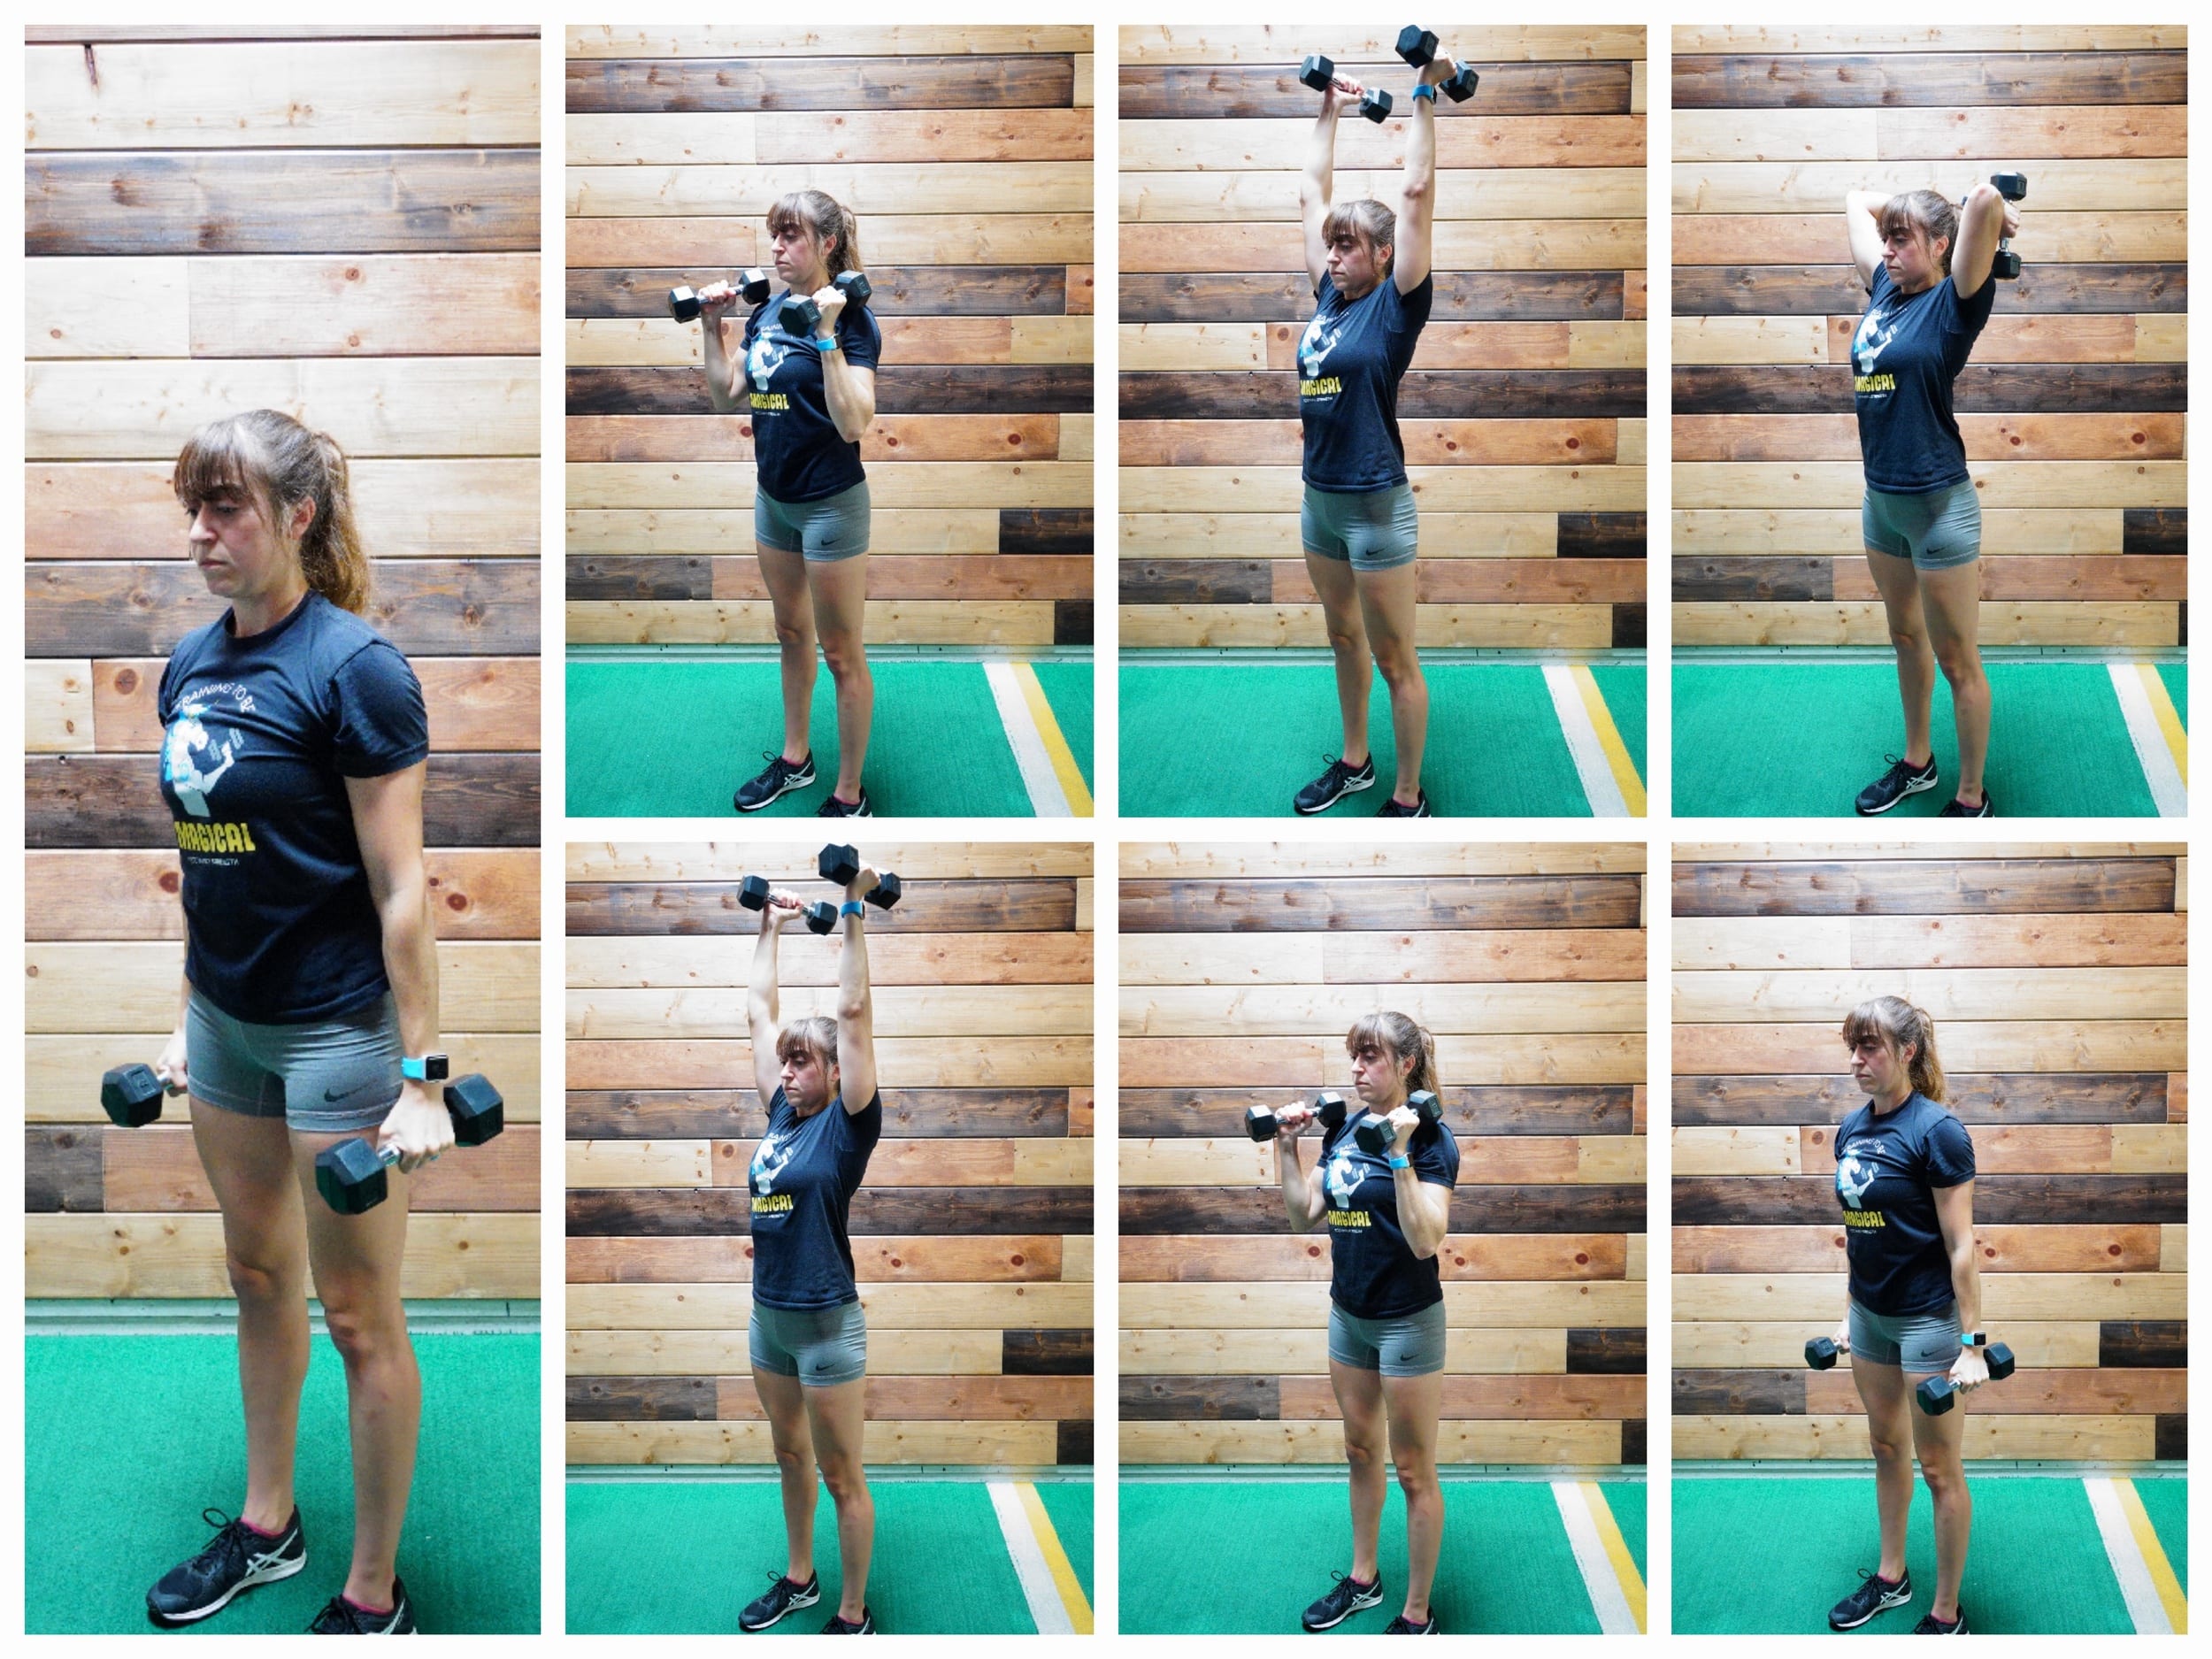
To do Dumbbell Bi’s and Tri’s Series, hold a dumbbell in each hand with your arms down by your side. Have your palms facing in.

Then perform a bicep curl, curling the weights up to your chest. Do not swing, but fully curl them up.

From here, press them straight overhead, keeping your arms facing toward each other.

With your arms pressed straight up, drop the weights down and back toward your back. You want to think you are bending at the elbows to lower the weights back behind you.

Then, feel your triceps working to raise the weights back up overhead. Bring them back down to your chest and slowly lower them back down to your sides. Stay in control of the weights as you perform the entire move.

After lowering them back down, repeat the curl, press overhead and overhead tricep extension!

Love these moves? Want to build a killer strong and lean upper body?

Check out my Arm Burner Cards –>

The Chest, Shoulders And Triceps Density Workout!

The Chest, Shoulders And Triceps Density Workout!

Want to strengthen and tone your upper body and core, but short on time?

Then Density Sets are the way to go!

With Density Sets you can not only build strength but also burn fat in less time because not only are you lifting, but you are creating a greater training density by performing a higher volume of work in less time!

And by combining hybrid exercises with even more isolated movements, you can not only work more muscles in less time but even target those problem areas, like say those “bat wings” or “bra fat” to help yourself get the best results possible.

So if you’re looking for a great workout to strengthen your upper body and tone your shoulders, triceps and abs, try this Chest, Shoulders and Triceps Density Sets Workout from my Arm Burner Workouts!

The Chest, Shoulders And Tricep Workout:

Set a timer for 15 minutes and complete as many rounds of each circuit as you can in that time. Rest 2 minutes between circuits so you can go hard each 15 minute interval. Record how many rounds you get and the reps you do to beat next time. If you’re getting tired, regress moves to keep moving or even perform fewer reps so that you can limit rest as you will start to burnout areas.

CIRCUIT #1:
4-6 reps Push Ups to Dips*
8-12 reps Front to Side Raises
8-12 reps Fly with Leg Lowers

CIRCUIT #2:
8-12 reps Slider Fly Push Ups*
8-12 reps per side Tricep Push Ups
6-8 reps per side Turkish Hinge

*2 push ups to 2 dips equals one rep.
*If you do a unilateral variation, do 4-6 reps per side.

Love this Upper Body Workout?

Learn More Of My Arm Burner “Secrets” To Help You Sculpt Strong, Sexy Arms And Shoulders!

–> My 3 Arm Burner “Secrets”

5 Bodyweight Upper Body Exercise (no equipment needed!)

5 Bodyweight Upper Body Exercise (no equipment needed!)

Stop wasting time on bicep curls and isolated tricep extensions. If you want strong, and sexy arms, it’s time you started focusing on HYBRID exercises.

These moves will get you better results in less time because they work more muscles at once, including the larger muscle groups of our upper bodies!

And as much as I love weights, you don’t even need weights to build killer functional upper body strength.

Using your own bodyweight, you can get in a great upper body workout AND even work your core! Try these 5 Hybrid Bodyweight Upper Body Exercises that you’ll be sure to feel the next day!

5 Bodyweight Upper Body Exercise (no equipment needed!)

Below are 5 Hybrid Exercises to work your arms, chest, shoulders and even back. Try including these in your next upper body workout, especially if you need something quick at home!

These are some of my favorite moves from my 6-Week Bodyweight Shred to not only work the upper body, but also the CORE!

Climber Push Ups:

This core-intensive push up variation will work not only your chest, but really target your triceps and shoulders as well!

climber push ups

To do the Climber Push Up, start in a plank from your forearms. You can set your feet wider apart if needed to create a more stable base.  Make sure your body is in a nice straight line from your head to your heels and that your shoulders are stacked over your elbows while on your forearms.

Engage your abs and, keeping your body in a nice straight line, climb one hand at a time up to a plank position from your hands. Place your hands right below your shoulders, but outside your chest as you climb up. Try to wiggle your hips as little as possible as you climb and don’t let your butt go up in the air or your hips sag toward the ground as you climb up.

Then at the top perform a push up. Keep your body in a nice straight line as you drop your chest between your hands and down toward the ground. Press all the way back up.Then climb back down, placing your elbows right below your shoulders. Repeat, climbing back up. Make sure to alternate or switch which hand leads the climb at some point.

Beginners can do the whole thing from their knees or even just drop to their knees for the push up.

Push Up Leg Kick:

This Push Up is a great way to work your obliques and really toast your entire core!

To do the Push Up Leg Kick, set up in a high plank position with your hands under your shoulders and outside your chest and your feet close together. Your body should be in a nice straight line with your abs braced and glutes and quads engaged.

Then lower down to the bottom of the push up, keeping your body in a nice straight line. Press back up and at the top, kick one leg out to the side toward your elbow. Your hips may rotate slightly as you kick, but your butt shouldn’t go up in the air.

Kick your leg up as close to your elbow as you can and then lower it back down and place your foot back on the ground. Once your foot is back down, repeat the push up then kick the other leg out to the side toward your elbow. Keep your leg as straight as you can as you kick it out. Place your foot back and repeat the push up before repeating on the first side.

You can modify the move by doing it from your knees then come up onto your toes for the kick. You can also do it with your hands up on an incline. To advance the move further, perform the kick at the BOTTOM of the push up!

Scapular Wall Hold/Reps:

This move is a must-do if you have a desk job. Whether you perform the isometric or the reps, it is a great way to work your back and open up your chest.

To do the Scapular Wall Hold Reps, stand with your back relaxing against the wall and your feet about six inches away. Bend your arms and drive your elbows back into the wall. With your body in a nice straight line, drive off the wall with your elbows, pressing your chest out and pinching your shoulder blades down and back. Brace your core and squeeze your glutes so your body moves as one unit.

Relax back into against the wall, keeping your body in a nice straight line from your head to your heels. Do not let your hips drop. Then repeat the press out, driving off your elbows. Do not arch your low back as you press out. Also, make sure not to shrug your shoulders. The further from the wall that you walk your feet out, the harder the move will be.

To do the hold, you would simply hold pressed out. That is a great activation move even before your pull up work!

Row Push Up:

This anti-rotational core move will work not only your abs, but also your chest, back, arms and shoulders. Talk about a move that works EVERYTHING!

To do the Row Push Up, set up in a high plank position with your feet about hip-width apart and your hands outside your chest (beginners can do this from their knees). Then perform a push up, lowering your chest to the ground as your body moves as one unit. Do not let your butt go up in the air or your head jut forward. Also, make sure your arms create an arrow shape (–>) with your body instead of flaring way out.

Press back up, again keeping your body in a nice straight line. At the top of the push up, row one arm up. Lift the hand off the ground as you drive your elbow down and back toward the ceiling. Feel your back work to lift your arm. Bring your hand to about chest height then place it back down and repeat the push up.

At the top of the push up, row the other hand up. Try not to let your body rotate as you row. Also, do not let your butt go up in the air. You want to keep your body square to the ground as fighting the rotation works your core more.

If you have weights and really want to use them, you may also do the Renegade Row Push Up.

Push Up Walk Back:

This push up variation is going to work your arms, shoulders and abs and get your blood pumping. It is also a great way to work on your mobility with the walk back! (Hey a little extra lower body work never hurts!)

To do the Push Up Walk Back, start standing with your feet close together. Then bend your knees and squat down slightly. Rock forward to “dive out” and extend into a push up.

As you dive out and catch yourself, bend your elbows to absorb the shock of landing. You will perform a push up as you catch yourself and lower your chest to the ground. Push back up to a plank position and then, keeping your legs straight, walk your hands back in toward your feet.

Stand all the way back up and then squat down to repeat the dive back out and push up. This is an advanced move. Beginners may need to walk out instead and go down to their knees for the push up.

Ready to build full-body strength as you burn fat WITHOUT using any equipment?

Learn more about my Bodyweight Shred!