The Common ENEMY of Your Hips and Shoulders: The Lats

The Common ENEMY of Your Hips and Shoulders: The Lats

Everything is connected.

And all too often the point of pain is NOT where the problem is.

That is why, when you have aches and pains, especially nagging ones that you can’t seem to get rid of, you need to start searching further away from the point of pain.

Take for instance SHOULDER pain.

Often the first “rehab” exercises we start to include focus on shoulder mobility and strengthening of those muscles around the joint.

And this is a great place to start!

But what if, despite you doing all of the proper rehab work, things just aren’t fully getting better?

Or what if you continue to suffer from flare ups that don’t seem to be triggered by any specific upper body exercises that you can identify?

What if the actual culprit of your shoulder pain is an issue at your lumbo-pelvic-hip complex?

That’s right…what if that lower back pain or anterior pelvic tilt or SI joint issue you’ve been having is CONNECTED to your shoulder pain?!

What if your lower back, hips and shoulders have a shared “enemy”?

And what if that shared “enemy” is your LATS or the Latissimus Dorsi!

Because BOTH of these areas are affected by that one muscle.

YUP!

While we often just think of our lats as a big back muscle, playing a role in our upper body functioning, they can also affect our SI joint via their attachment to the thoracolumbar fascia and even affect the alignment of our pelvis!

So while it may seem crazy, working to correct imbalances at your hip complex could help relax tight and overactive lats and help you alleviate your shoulder aches and pains!

So how exactly are the lats a common enemy of both your hip complex AND your shoulders and what can you do to start correcting the problem?

THE LAT CONNECTION:

Ok…your lats aren’t really your enemy…

It’s almost the case of you “blame the messenger”…or the messenger becoming more involved than they should be!

Because our lats are really a bridge between our upper and lower body.

They play a role in stabilizing our shoulders, scapulae (shoulder blades), lumbar spine, sacroiliac joint as well as our pelvis.

The lats have a far reaching impact and affect a TON of structures and movements!

They are a bridge that can perpetuate distortions and compensations from one hemisphere to the other.

They can become tight and overactive due to other muscular imbalances and weaknesses and then lead to aches and pains in the other region.

And for this reason they can be a common “enemy” of both our upper body and lumbo-pelvic-hip complex and SI joint.

Of course the real “enemy” is our rounded-shoulder, flexed posture created by sitting hunched over our technology for 9 hours a day.

A posture that leads to muscles, like the lats becoming tight and overactive, and muscles, like our glutes, becoming underactive.

Underactive glutes can lead to anterior pelvic tilt, hip hikes (if one side is underactive especially) and tight, overactive lats that perpetuate the pain and create upper body dysfunction as well.

Lat tightness can itself create a hip hike on the same side as the tight lat and anterior pelvic tilt and SI joint issues as well.

Both the glute and lat need to work together to protect us and make sure we have the proper mobility and stability.

If these muscles aren’t working well together, this distortion can show up as upper body, specifically even, shoulder aches and pains.

And the lats also can have a DIRECT impact on our shoulder health.

Tight lats can contribute to internally rotated shoulders, or that rounded shoulder posture, as well as restricted shoulder flexion aka your ability to reach overhead.

Ever wonder why you struggle to get your arms overhead to press and end up arching your lower back to compensate?

Tight lats may be part of the problem.

Tight, overactive lats can restrict proper shoulder mobility, negatively impact your shoulder stability, and even impact your scapular mobility as well (and this may be holding you back too from achieving that first full pull up not to mention a culprit of shoulder, upper back and even neck pain!)

Basically, you need to address lat tightness, both tightness of both lats and even an imbalance between the two, and then further investigate if there are distortions at your hip complex or SI joint or actually in your upper body, that may be perpetuating the tightness!

Here are 3 moves to help you get started making sure this “bridge” is functioning well!

3 MOVES TO TRY TODAY TO IMPROVE YOUR SHOULDER AND HIP HEALTH:

These 3 moves will start addressing lat tightness and overactivity while also working to engage them in a productive way to help alleviate and prevent shoulder AND hip aches and pains.

These are perfect moves to include as a restorative session after a long day at work or as part of your warm up for you upper body, or potentially even LOWER BODY, lifting session.

Exercise #1 Half-Kneeling TFL and Lat Stretch:

Want to address hip and shoulder issues in one stretch? Try this Half Kneeling TFL and Lat Stretch!

The TFL can commonly be tight as well which can further inhibit proper glute functioning. So this hip stretch with the reach across is a great way to address lat and TFL tightness in one movement.

To do this stretch set up half kneeling in front of a wall. Squeeze that back glute as you reach your hands overhead on the wall. While leaning slightly forward to reach up the wall, make sure to engage your glute to keep your hip extended.

Reach your arms away from the knee that is back and over and across that front knee. Even turn the palm of the hand in back away from the wall so your palm is facing back. This external shoulder rotation will further stretch your lat. Pause then walk your hands back center and repeat reaching across as you keep that back glute engaged.

Feel the stretch down your side and down the side of your hip.

Exercise #2 Lat Foam Rolling:

A key first step in making sure our lats are functioning correctly is relaxing them when they are overactive. A great way to do this so we can better mobilize the shoulder joint is by foam rolling. You can even include this move before the Half-Kneeling TFL and Lat Stretch. When you do, you’ll be surprised even by how much better of a stretch you get!

Place a roller to the side behind your armpit and lie on your side over the roller. Reach your hand overhead with your palm facing up to stretch your lat as you roll.

Hold on any tight spots as you reach your arm overhead then lower it down in front of your chest. Repeat the slow arm movement as you hold.

Then move the roller to another spot, working down the side of your back and shoulder blade. Then switch sides.

You can also use a ball if you know your exact trigger points and want to apply more pressure or even need to roll out against a wall because you can’t get down on the ground.

Exercise #3 Wall Hip Dips:

Wall Hip Dips are a great way to address unilateral lat issues, or issues only on one side, especially at our lumbo-pelvic-hip complex. This is a great move to help improve your pelvic alignment.

This move is a very modified version of something like the side plank hip dips and is focused on really making sure you’re activating the correct muscles, including your glute medius and obliques, while helping improve your lat flexibility and SI Joint alignment.

To do Wall Hip Dips, stand with your side to the wall and lean into the wall with your upper arm against the wall. You can bend your elbow to 90 degrees to place the back of your forearm against the wall too so you aren’t trying to cheat and rock off the wall.

Your feet should be about a foot from the wall and only a few inches apart at most.

Then drop your hip toward the wall. Do not rotate, but just move laterally.

Then engage your glute and oblique closest to the wall to raise your hip back up. Feel your oblique and glute work to move into almost a “side plank” position.
Then dip back toward the wall to almost feel a stretch down that side closest to the wall.

The further out from the wall, the more mobility you need. So start closer and move away as you can control the move without rotating or letting your shoulder come off the wall.

SUMMARY:

Remember, the point of pain isn’t always where the problem is! And overload can occur because of immobility or instability at a joint further away from our pain than we’d expect.

It’s why we need to pay attention to muscles and their different attachment points.

It’s why big muscles, like our lats, that bridge from our hips to our shoulders, need to get some extra TLC at times!

Try including these 3 moves as part of your warm up before your next workout if you’ve had shoulder or hip aches and pains you just can’t seem to get rid of!

Looking for 10 minute series to improve your mobility, flexibility and stability from head to toe?

Check out my Injury Prevention Pack:

–> LEARN MORE

the Most Underrated Glute Exercise

the Most Underrated Glute Exercise

The stronger your mind-body connection is?

The more you can lift, the faster you can run and the further you can cycle!

Basically the STRONGER YOU ARE!

Strength is not just about brute force but also about neuromuscular efficiency – how quickly can you recruit the CORRECT muscles to perform a movement and produce force.

That’s why it is key we include exercises to really improve that mind-body connection and make sure we are able to engage the correct muscles whenever we need.

Because as much as we focus on form, proper form does NOT always mean you’re engaging the correct muscles.

Actually often the more experienced a lifter you are and the more athletic you are, the more you can mimic a proper looking movement pattern while compensating and recruiting the incorrect muscles to do so.

This can not only result in injury but often holds us back from lifting as much as we truly can.

It prevents us from being as strong as possible because we aren’t using muscles efficiently together. We aren’t making the correct muscles pull their own weight.

That’s why you need to include some isolation moves to activate those underactive muscles and make sure you’re engaging the correct muscles at the proper times.

One muscle that often needs to be the focus of our activation work is our GLUTES.

Our glutes are commonly underactive due to our modern lifestyle.

So focused activation work can help us improve our mind-body connection to better recruit our glutes during compound lifts and when we run or cycle.

One of my favorite moves, and a very basic and often underutilized move, is the Single Leg Bent-Knee Reverse Hyper.

This move is fundamental if you want to improve your hip extension and focus on isolating those glutes.

And it’s a really great way to test if your hamstrings tend to want to take over and compensate for your glutes.

Often our hamstrings can become synergistically dominant for underactive glutes and that can result in hamstrings strains, lower back, hip and knee pain.

So if you tend to feel your hamstrings even during moves like glute bridges? You need to give this reverse hyper variation a try.

To first test your glute activation, lie face down on the ground. You can relax your chin on your hands as you straighten both legs out. Then bend one knee to about 90 degrees. Flex that foot. Do not curl the heel in toward your butt as this will engage your hamstrings.

Then drive your heel toward the ceiling and extend your hip.

What do you feel firing first? Do you feel your hamstring first or your glute?

Do you feel both? Or can you just isolate your glute?

If you can just isolate your glute fabulous! Do 15-20 reps and pause at the top to really establish that mind-body connection and even get a little pump going.

If you can’t feel your glutes, try adjusting how you’re cueing and performing the move.

Here are a few tweaks to try.

#1: Focus on driving your hip down into the ground as you drive the heel back so you don’t rotate open. Think about almost pushing your hip bone down into the ground instead of just lifting up.

#2: Think about STOPPING the lift with your glute over just trying to lift up higher. You want to focus on that glute engagement over the movement itself.

#3: Kick just slightly out as you lift. Remember not to curl your heel in toward your butt. Our hamstrings are worked by that knee flexion so avoiding it can help. However, going too straight with your leg can also make it harder for some to focus on their glutes.

#4: Slightly abduct your knee or move it out to the side before you lift. This can better engage the glute medius to help engage that glute max. Just be careful you don’t rotate your hip open. Just slightly move the knee out to the side.

Try one of these tweaks at a time to see what helps. You may even find you need to combine all the cues to get that glute firing without the hamstring trying to take over.

As silly as it may seem, sometimes just changing how we cue ourselves to perform a movement with a very slight adjustment can really help us better establish that mind-body connection when we’ve struggled in the past.

Just don’t rush through the movement. Pause and assess. Be intentional with the exercise over just trying to get through the reps.

Doing the “right moves” without feeling the correct muscles working won’t get you the results you want.

Focus on activating your glutes.

SUMMARY:

Use this underrated glute isolation move as both an activation exercise but also a test of hamstring compensation. It is a great way to make sure your hamstrings aren’t trying to take over and work when your glutes truly should be.

Be conscious of what you feel working during your workouts and do not simply go through the motions.

The more we can truly create proper recruitment patterns and use the correct muscles efficiently and effectively, the stronger we will be.

Sometimes we need to take things back to basics to get results.

We are never above those simple fundamentals!

Working to improve your glute activation?

Check out my Booty Burner Program!

–> LEARN MORE

The Perfect Mobility Routine (FULL BODY FIX)

The Perfect Mobility Routine (FULL BODY FIX)

What are the most common aches and pains we complain about?

Neck pain? Elbow pain? Shoulder pain? Lower back pain? Hip pain? Knee pain? Ankle pain?

Basically our entire body?!

Because of previous injuries and our very sedentary, repetitive movement lifestyle, all too many of us end up with a whole host of issues.

It can make you feel like you have to spend hours a day addressing every single area that hurts. Like you have to warm up just getting out of bed.

It can make you want to give up on mobility work because you just have to keep adding more and more things in!

That’s why I wanted to show you some short cuts to improving your mobility.

Often there are a few key culprits that, if we address immobility or weakness in those places, can really help alleviate aches and pain in other areas.

We have to remember that everything is connected and that often where the pain is, isn’t where the initial problem started!

So what are 3 key areas we need to target if we want to improve our full body mobility?

Before I dive into the key areas we want to work on, I do just want to highlight the importance of doing MORE than stretching when it comes to improving your mobility.

Part of becoming more mobile isn’t simply improving the flexibility of the muscles that act on a joint. It’s also about improving the stability of that joint.

Often if muscles are underactive or weak, they will not support the joint properly and that may then lead to overload of other muscles. This can then create mobility restrictions because the joint isn’t stable and muscles aren’t able to work together properly.

This overload can lead to tightness and a lack of mobility as the body tries to protect itself from further issues and injury.

This is also why your elbow can end up injured because of a lack of proper shoulder mobility or stability. We compensate and seek out mobility and stability from other areas.

It’s why, when addressing these 3 key areas of immobility and instability, we want to take a 3-step prehab approach of foam rolling, stretching and activation.

This way we can relax overactive and shortened muscles, mobilize joints and improve the stability of these areas so the correct muscles are pulling their weight!

For each of these 3 areas, I want to share a key foam rolling, stretching and activation move to help you start working on your mobility and stability!

3 Key Areas Of Immobility And Instability:

#1: Scapular Mobility And Stability

Elbow, neck, shoulder or even upper back aches and pains? You need to make sure you have proper scapular control and mobility!

So often we get focused on only improving our shoulder mobility and we forget how much the shoulders and shoulder blades really work together to power movements. We ignore our shoulder blades and the impact their proper movement can have on protecting and stabilizing our shoulders.

From moves like pull ups to push ups, we need to have proper scapular control if we want to use the correct muscles to power the movements and prevent overload of smaller muscles like our rotator cuff.

To improve your scapular mobility and control, try including these 3 moves before your upper body workouts. It will help improve your pressing as well as your pulling!

The first move you want to include in that prehab or warm up process is Levator Scapulae Foam Rolling.

The levator scapulae contributes to a few different scapular movements from elevating your shoulder blade to downwardly rotating the scapula to even performing anterior tipping.

This muscle becoming tight can be a key culprit of neck and shoulder aches and pains!

A great way to start relaxing it to alleviate aches and pains and start to restore proper scapular functioning is by using a ball to relax and release the muscle.

Find that top middle point of your shoulder blade by your spine and either lie on a ball with it right above that edge of the shoulder blade or stand pressing back into a ball against the wall there.

Hold on the spot even slightly looking away as you press into the ball. Breathe and relax as you hold.

The second move you want to include is a stretch to open up your chest as well as even mobilize your shoulders and shoulder blades.

The Suspension Trainer Snow Angel is a great move to include especially before your workout.

While we often feel like our upper back becomes tight from sitting hunched over, we can’t ignore that this posture puts our pec muscles in a perpetually shortened state. A tight pec minor can contribute to anterior tipping of the shoulder blade while a tight pec major can contribute to that internal shoulder rotation.

This can lead to neck, upper back, shoulder and even elbow aches and pains.

Especially if you want to improve your overhead press, this is a great move to include.

When you do the Suspension Trainer Snow Angels, you want to make sure you’re engaging your upper back to open your chest up as you raise your arms up overhead.

You want to extend your thoracic spine too.

By focusing on engaging your back to drive your chest open, you make sure you actually stretch your pecs instead of just seeking out more range of motion from your shoulders.

Feel your shoulder blades move as you raise your arms overhead and then lower them back down to your sides.

The third move you will want to include is an activation exercise – the Serratus Anterior Press.

Serratus anterior weakness has been linked to neck, shoulder and even upper back aches and pains as it is a primary scapular stabilizer. (STUDY: https://pubmed.ncbi.nlm.nih.gov/21889362/ )

If you’re experiencing scapular winging or upper body dysfunction, strengthening the serratus anterior is key as it will help posteriorly tip the shoulder blade as well as help you perform proper upward rotation of the shoulder blade.

Both of these movements are key to keeping your neck and shoulders healthy during overhead pressing (not to mention this may even help prevent overload at your elbows and even lumbar spine!)

With the Serratus Anterior Press, it is key you feel yourself pulling your shoulder blade forward around your ribs as you reach out. You aren’t just doing a unilateral chest press. You want to focus on the movement being felt around your ribs as you protract your shoulder blade or pull it away from your spine.

You want to also punch slightly up at an incline as you feel like you’re almost reaching out at the end. Focus on what you feel working over trying to simply go heavier.

#2: Hip Mobility And Stability

Lower back, hip or knee pain? Groin strains? Hamstring pulls? You need to work on your hip mobility and stability.

We’ve all been told we are spending too much time seated.

But this constant hip flexion is creating mobility restrictions at our lumbo-pelvic-hip complex that has far reaching effects. It’s not only why we can feel our lower back taking over during deadlifts by also even why we can fear knee pain from lunging!

That’s why it’s key we start by relaxing those overactive and shortened hip flexor muscles.

The first move you want to include is Rectus Femoris Foam Rolling.

This quad muscle is so key to release and lengthen because it not only flexes the hip but also extends the knee.

The direct impact it has on both joints can contribute to hip and knee pain not to mention even perpetuate quad dominance and anterior pelvic tilt, leading to lower back issues and even hamstring strains. This muscle may even impact your SI joint health and functioning because it can contribute to rotation of the pelvis.

To roll this muscle, you can use a roller or ball. The smaller and harder the trigger point tool, the more it will dig in.

Find the middle of your thigh about half way down and lie over the foam roller or ball. You can even flex and relax your quad to help the muscle relax and release.

The second move you want to include is the Side Lunge to Crescent.

Your adductors, or inner thighs, not only adduct or bring your legs together, they’re also hip flexors and hip internal rotators.

The only exception to this is the posterior fibers of the adductor magnus, which can contribute to hip external rotation and hip extension. This muscle can become overworked especially if our glutes are weak!

And all too often the adductors become tight and overworked just like your other hip flexor muscles.

Your adductors becoming overworked can potentially contribute to anterior pelvic tilt and lower back aches and pains not to mention groin strains, hip pain and even knee pain.

Specifically the gracilis can have an impact on your knee and even your lower leg!

That’s why this dynamic stretch is the perfect way to warm up your legs while working to improve your hip mobility.

Make sure that as you do the side lunge portion you aren’t turning your toes in or out. You want them to be parallel to really stretch out your adductors. Keep one leg straight as you hinge at the hips to load that other glute. Watch that your knee, ankle and hip are all in line. Also make sure your heels are down.

When you shift to the other side, pause before turning into the crescent lunge. When you come up in the crescent, focus on that front knee being in line with your hip and ankle and your back glute engaging to extend that back hip.

You want to be conscious to use your glutes to drive that hip extension and not just arch your back as you come up in the lunge.

The third move you want to include to activate your glutes and improve your hip stability is Side Shift Skaters.

All too often our glutes are underactive and not properly stabilizing our pelvis or hips. This can lead to lower back, hip, knee and even ankle and foot aches and pain. It can even create dysfunction up your trunk that can impact your shoulders.

It’s why it’s key we include glute activation moves in our routines to improve that hip stability. And it’s even better when we can include unilateral moves to correct imbalances while also working on our balance.

With Side Shift Skaters, you’re going to work on activating not only your glute max to improve hip extension, but also your glute medius to improve your hip stability and prevent unwanted movement in that frontal plane (or your pelvis shifting out to the side as you balance).

Strengthening your glute medius can not only improve glute max functioning but it can also help you improve your running gait and help you avoid knee injuries and issues from improper lunging or squatting patterns.

With this move, focus on crossing the leg behind as you hinge at the hips to push your butt back.

You want to pop the hip to the side so that as you stand up you not only extend your hip using your glute, but also then push the pelvis level using that glute medius.

While you want to be focused on working your glutes in this move, don’t ignore your foot’s connection to the ground. Think about driving the ground away as you come to balance on one leg to even create better activation up your entire leg!

#3: Ankle Mobility And Stability

Plantar Fasciitis. Ankle sprains. These issues are all too common.

Yet all too often we simply rest these injuries then jump back into what we were doing.

We never address WHY we had the problems in the first place OR even work to prevent future problems from the injuries themselves.

Injuries interrupt our natural recruitment patterns and can create mobility restrictions. We can’t ignore them!

It’s why prehab work to work on ankle mobility and stability is so key. Your feet are your foundation. Issues there can lead to compensations up your entire kinetic chain!

If you want to squat lower and have a more efficient running gait? You need to pay attention to your feet and ankles!

The first move you want to include is Peroneal Foam Rolling.

Tightness of this muscle can lead to what looks like a leg length discrepancy or even a weight shift during squatting, which can result in not only ankle issues but also knee, hip and lower back pain.

That’s why it’s key you start your mobility routine by relaxing this often shortened and overactive muscle, even focusing potentially on just one side.

A ball works best for this move although you can use a roller. You will want to press the outside of your lower leg down into the ball and hold as you even circle your foot. Don’t roll quickly but move the ball down the outside of your lower leg to target different trigger points, holding when you find one.

The second move to include is a great stretch to improve both the mobility of your feet but also your ankles – the Bear Squat to Foot Stretch.

Improving your dorsiflexion and big toe extension is more important than you think. It’s not only key to your foot and ankle health, but it can impact your gait and full hip and knee range of motion.

So often when our prehab work isn’t adding up for other areas, it’s because the culprit is actually at our foundation.

That’s why the Bear Squat to Foot Stretch is such a key move to include in your warm up routine. When you sit back on your feet, you want to extend your toes. Only sit back as far as you can while relaxing into the stretch. You can rock slightly side to side before putting your hands down on the ground to drive your heels down.

This isn’t about creating a pretty downward dog as you lift your butt up to drive your heels down.

Your hands will be in closer so you can focus on that ankle mobility. When you drive your heels down you’re working on your ankle dorsiflexion or the ability to bring your foot closer to your shin. You can pedal your feet then sit back and repeat the foot stretch.

The third move to include is a move to activate your calf but by working it through an increased range of motion.

If we don’t strengthen through the range of motion we are trying to create, we won’t maintain that new found ROM.

That’s why Plate Weight Eccentric Calf Raises are a great move to include.

Eccentric focused calf raises have been shown to be great for helping with achilles tendon issues not to mention heel pain and plantar fasciitis. And this can have a far reaching impact because studies have shown that Achilles tedinopathy may impact glute activation. (STUDY: https://europepmc.org/article/MED/24121244)

And by performing this move through a bigger range of motion than off the ground, you’ll help to really strengthen and maintain that mobility you’ve worked hard to build with the rolling and stretching. You’ll be strong through that full range of dorsiflexion to plantar flexion.

With this move make sure you don’t rock in or out on your feet.

Pause at the bottom as well to release tension and not use momentum. And make sure to very slowly lower down to spend more time under tension.

If you don’t have a plate weight, you can do it off a step or box even. If you even have an imbalance, you can do this as a unilateral variation instead too.

SUMMARY:

Whether you need to address mobility and stability issues in all 3 areas, or even simply one, you can combine the foam rolling, stretching and activation moves into a quick prehab or warm up routine.

Spending just 30-45 seconds per move, or per side, you can use all of these to get in an amazing head to toe mobility routine that’s under 11 minutes!

Want help improving your posture, getting rid of aches and pains and dialing in your overall routine to achieve freaking amazing and sustainable results?!

Uhm heck yes! OF COURSE!

I mean? Honestly? WHO DOESN’T!?

If you need help dialing in your prehab, workouts and nutrition so they all work together in one comprehensive plan?

Check out my online one on one coaching program!

I’m a corrective exercise NERD and I want to help you move and feel your best!

(I’m also a control freak so I love getting to tweak things and hold you accountability daily while actually TEACHING you what you need to attain LASTING results.)

–> Online One On One Coaching
How to FIX Low Back Pain –  Do These 4 Moves

How to FIX Low Back Pain – Do These 4 Moves

If you’ve ever suffered from lower back aches and pains?

You aren’t alone.

Lower back pain is one of the most common injuries, with at least 80% of Americans suffering from lower back pain at some point in their life.

And the worst part? All too often it becomes a continual annoyance.

However, too often in our attempt to prevent future issues, we do exactly the WRONG thing,

So what do you need to STOP doing if you want to truly keep your lower back from continually aching?

And what should you be doing instead?

First let me go over what is often actually occurring leading to nagging lower back aches and pains.

While there can be many different causes, and you always want to get checked out whenever possible to determine what is causing your pain, often our issues stem from our lower back becoming overworked and overloaded.

This occurs because of postural distortions from our modern lifestyles and even compensations and imbalances caused by previous injuries.

That ankle or knee injury you had years ago?

That can create a sequence of events that finally led to overload and your lower back suffering the effects of the build up.

But instead of addressing these others areas of immobility or weakness?

We instead only focus on the point of pain – our lower back.

And often we assume our lower back hurts because it is weak.

We believe that weakness is why it fatigues during moves and why we often feel it during core work.

So what do we do?

We find moves to strengthen it – like Supermans.

But this is often exactly what we should NOT be doing!

While supermans have their place in a proper core strengthening routine, too often we turn to moves like this when we have lower back aches and pains.

And all these moves do is further overload and overwork our already tired back.

They perpetuate the overuse instead of addressing what is actually weak and the areas that actually lack immobility.

So what moves should you be doing instead?

4 Key Moves To Fix Lower Back Pain:

When you’re suffering from lower back pain there are 4 key things you need to address, thoracic mobility, hip mobility, ab activation and glute activation.

You need to make sure you aren’t seeking out extra mobility from your lumbar spine that should be coming from your thoracic spine or hips.

You also want to make sure that your abs and glutes are strong to protect your lower back and prevent it from becoming overworked.

Here are 4 great moves to help you address these 4 keys and avoid lower back aches and pains in the future!

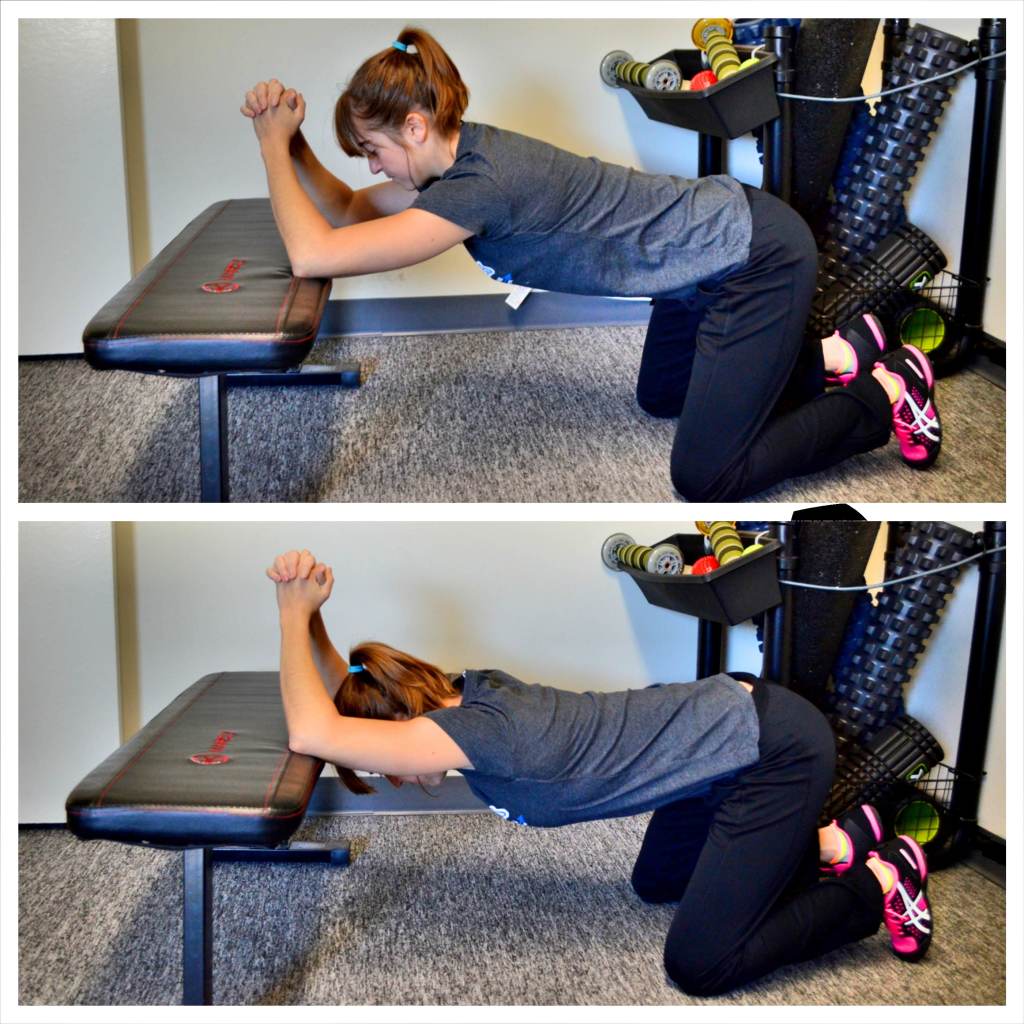
#1: Kneeling Thoracic Extension Stretch

 kneeling-lat-and-thoracic-stretch

Ever realize you’re constantly hunching over? Whether it’s over your computer, in a car or even just while sitting watching TV?

This constant flexion can lead to limited thoracic extension and thoracic mobility in general. And when our thoracic spine doesn’t extend properly, we may then seek out mobility from other areas to help us mimic proper movement during an exercise.

So if you’ve ever noticed you arch your lower back to keep your chest up as you squat or you arch your lower back to press better overhead, you may need to work on that thoracic extension!

A perfect move to do just that is the Kneeling Thoracic Extension and lat stretch.

To do the Kneeling Thoracic Extension Stretch, kneel on the ground and place your elbows up on a box or bench in front of you. Set up far enough back that you can drop your chest toward the ground, extending your shoulders, as you sit your butt back toward your heels.

Pull a towel tight between your hands to help you avoid your shoulders rotating open as you lower your chest toward the ground.

Then drop your chest toward the ground, focusing on extending your upper back. Brace your abs and make sure you aren’t just arching your lower back as you press your chest down.

You may feel a stretch down the backs of your arms and the sides of your back. Pause for a second then relax out and repeat.

If you can’t get down on the ground, you can also do this as a half wall hang, placing your hands up on a wall in front of you.

#2: Lying Bench Hip Stretch

Stretch out your hip flexors as you activate your glutes to improve your hip extension with the Lying Bench Hip Stretch.

The psoas, a hip flexor muscle, plays a key role in our posture and pelvic positioning. When this muscle becomes tight it can limit hip mobility, which can lead to underactive glutes and your lower back becoming overworked.

Often to compensate for the lack of proper hip mobility, you’ll arch your back during moves. And because your glutes are weak? You’ll try to compensate by using your lower back to lift.

That’s why this a great hip stretch to include. It can really help you relax the psoas as you activate your glutes to control that hip extension.

To do the Lying Bench Hip Stretch, lie back on a bench with your butt right at the edge of the bench. Let one leg hang down toward the ground with your knee bent around 90 degrees as you hug the other knee in toward your chest. Wrap your hands around your shin, right below your knee to hug it in.

As you hug that knee in, squeeze the glute of the leg hanging down to really drive your hip into extension almost as if you’re pressing the heel of that foot through the ground.

Pause then tuck that knee up toward your chest before extending the foot back down toward the ground.

As you extend your hip, squeeze your glute and pause before repeating.

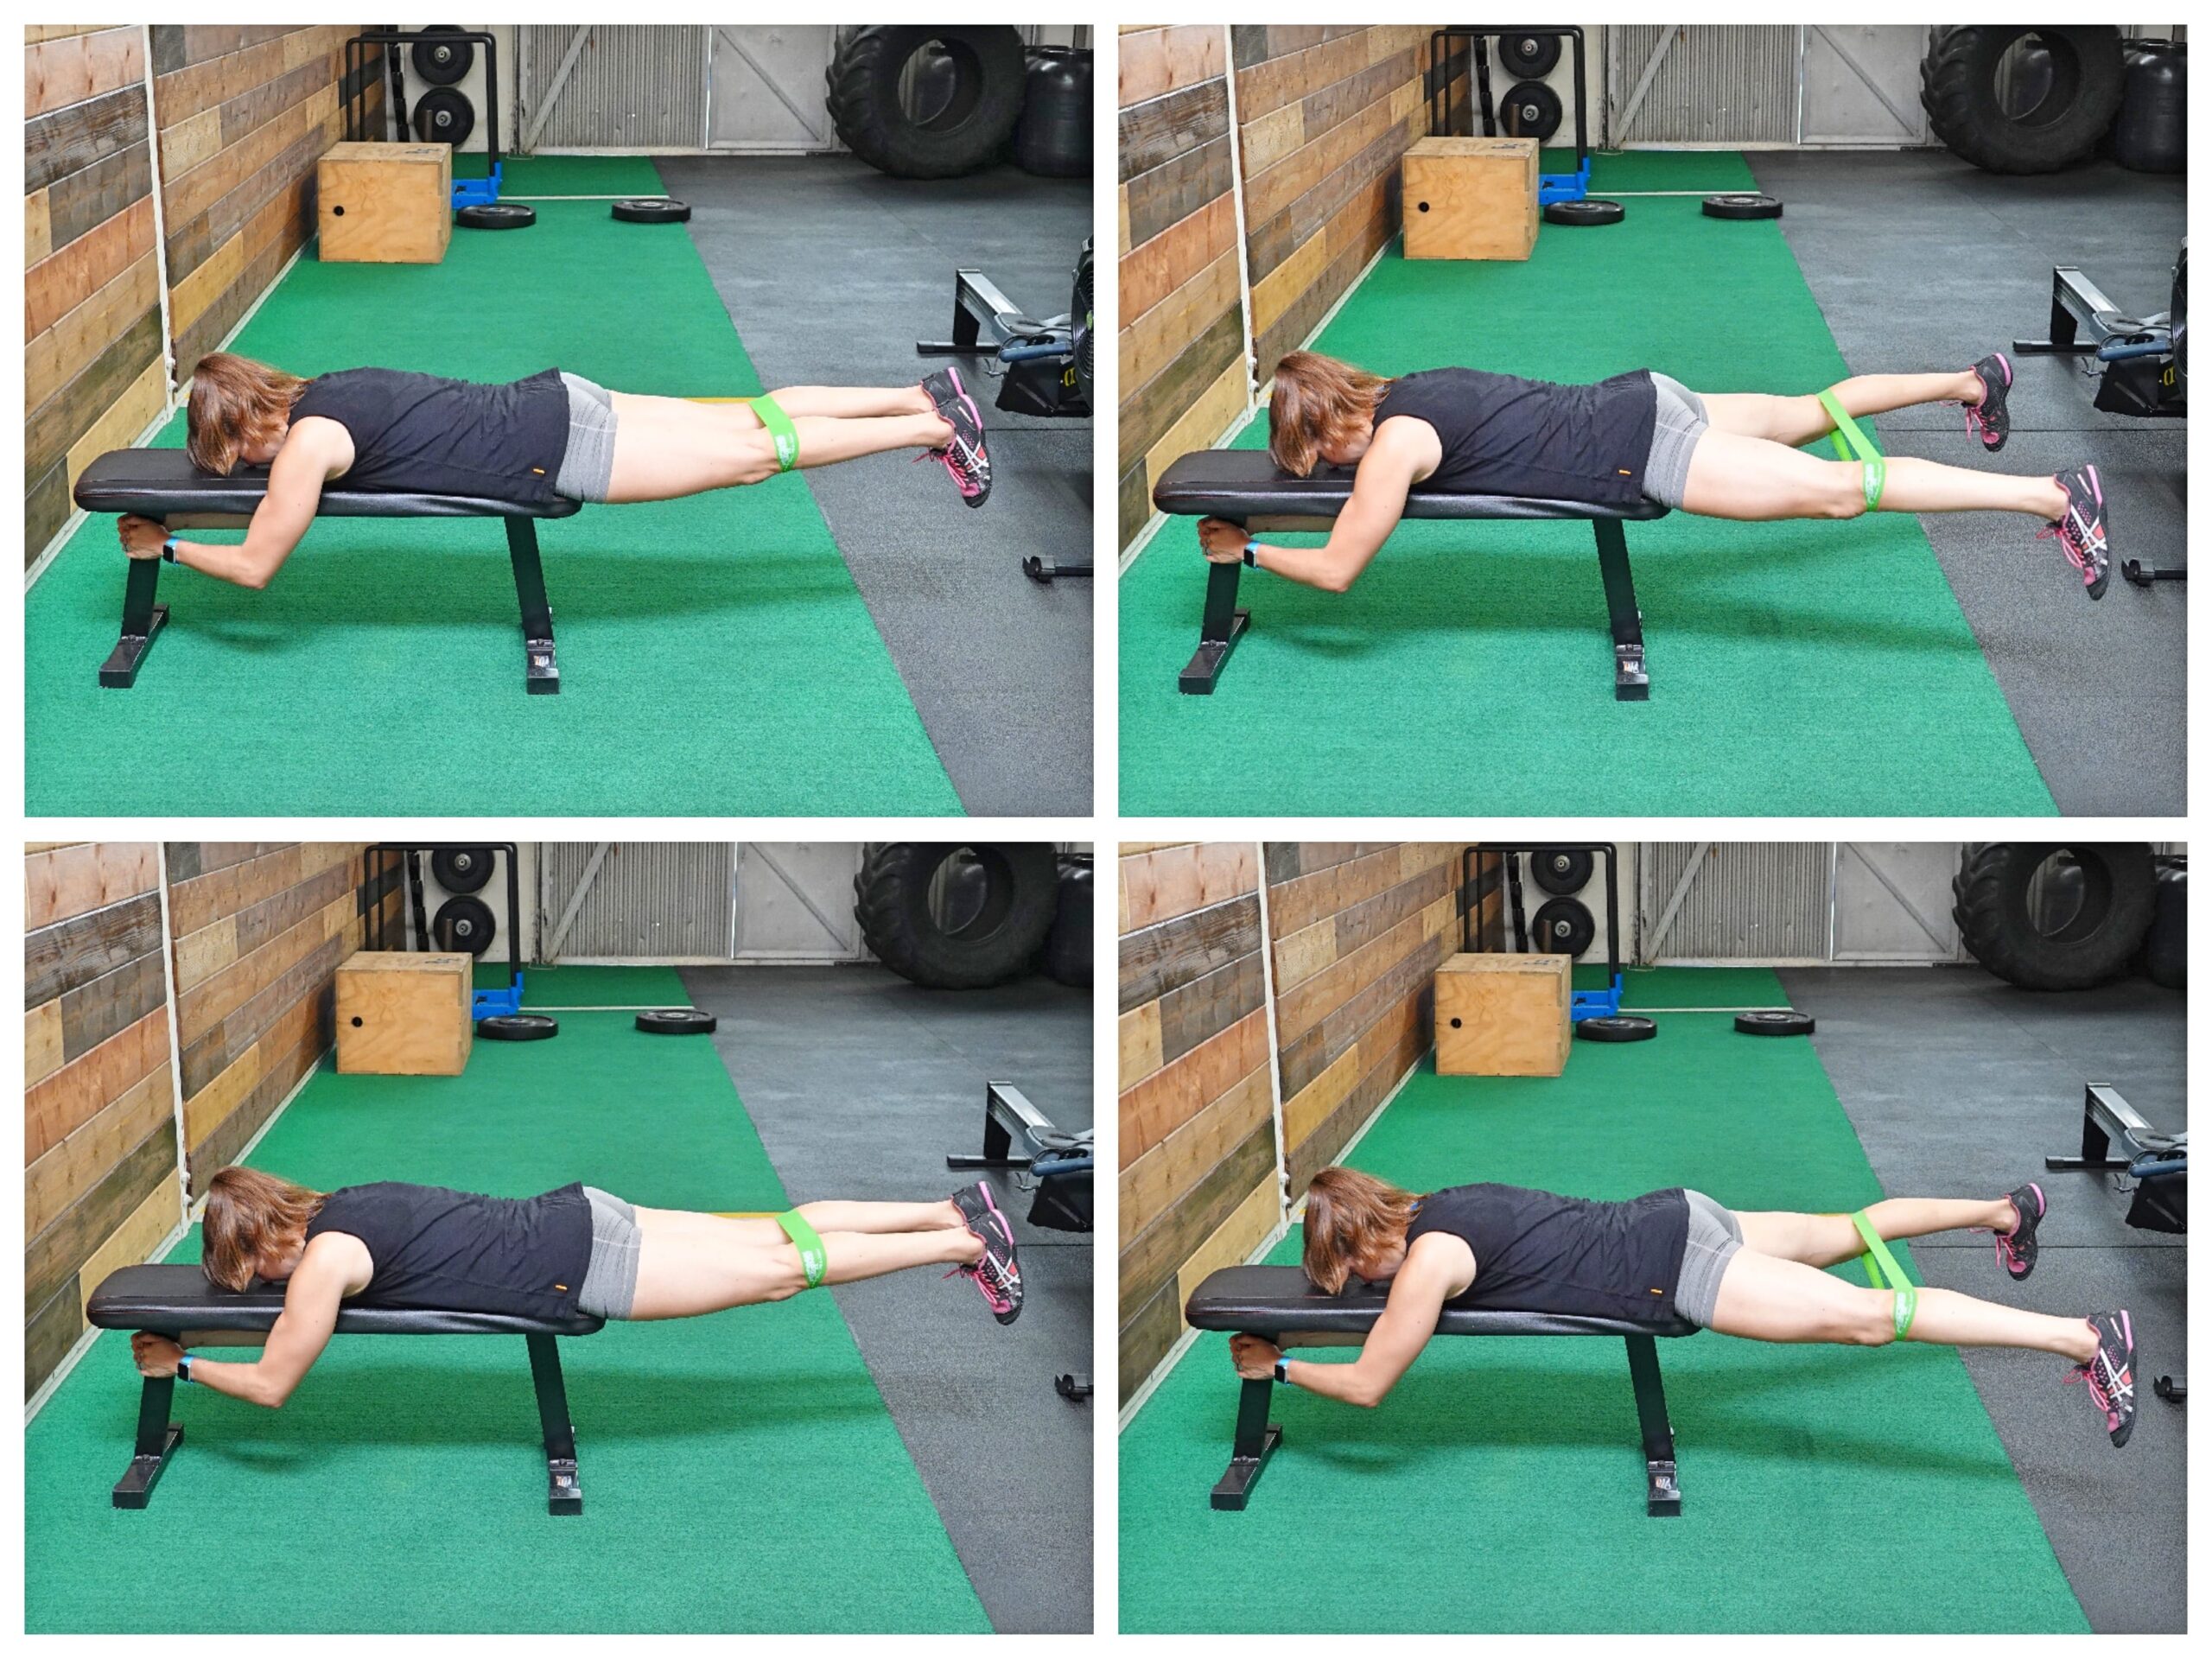
#3: Lying Jacks

If your glutes are underactive and weak, your lower back and hamstrings will try to pick up the slack and work when they shouldn’t.

And either of those muscle groups becoming overworked can perpetuate your lower back aches and pains.

That’s why it is key you activate your glutes so they engage correctly during compound lifts and when you run.

With the Lying, you’ll target not only your glute max, but also your glute medius. This will be key to improving your hip stability.

And you learn how to engage those glutes to even control hip hyperextension. Too often we allow our lower back to become the prime mover in this movement, when really our glutes should be in control.

To do this move, place a mini band around your legs above your knees. Lie on the bench and press your hips down into the bench.

Engage your glutes to lift your legs to about parallel to the ground. Make sure you’re pressing down into the bench and using your glutes over arching your back.

Holding at the top press your legs out and open against the band. Control the press open then bring your legs back together and repeat.

To modify you can do this off the ground. Just make sure you are truly lifting using those glutes and not arching your lower back just to get up higher!

#4: Anti-Rotational Dead Bugs

Being able to avoid unwanted rotation and correctly brace your abs is also key to protecting your lower back. If our abs are weak, our lower back may engage to help us perform the movement.

Anti-Rotational Dead Bugs is a key move to include to help you activate not only your abs but also your obliques to fight rotation and protect your lower back.

To do Anti-Rotational Dead Bugs, anchor a band down low and hold one handle in both hands so your side is to the anchor point. Lie flat on your back with your hands gripping the handle extended straight up toward the ceiling.

Make sure not to shrug.

Engage your abs with a posterior pelvic tilt, tucking your hips slightly up toward your ribs as you lift your feet up off the ground.

Fighting the urge to rotate toward the anchor point, keep your hands pressed out directly above the center of your chest. As you hold, extend one leg out as you keep the other knee tucked in. Slowly bicycle your legs, extending the other out as you tuck your other knee in.

Move slowly. This move is best done for time on each side!

SUMMARY:

If you’re sick of lower back aches and pains, STOP allowing it to become overworked. Improve your thoracic and hip mobility while learning how to correctly engage and recruit your abs and glutes to protect your lower back!

Ready to eliminate aches and pains?! Check out my Injury Prevention Pack.

Foam Roll + Stretch + Activate!

The Ankle-Butt Connection

The Ankle-Butt Connection

Does your foundation have cracks?

If you’ve truly been doing all of the right things CONSISTENTLY for awhile, which really means more than 4 weeks at least, and results are just not adding up like they should be, you’re missing a weak link.

Very often our first focus is near the point of pain, which is a good place to start.

Especially with SI joint, hip or lower back pain.

Because underactive glutes are an all too common culprit.

But what if you’re doing hip mobility work and glute activation, and even feeling the right muscles working, BUT things just don’t seem to be “sticking.”

What’s going on?

This is when you need to start looking at compensations and imbalances up and down your body that may be creating the perpetual overload.

It also means addressing any PREVIOUS INJURIES.

And one all too common injury people tend to forget about is the ANKLE SPRAIN.

If overload is being perpetuated, even while doing the right moves with the right recruitment patterns (assessing recruitment patterns should be one of the FIRST things you do when doing the “right moves”), you need to address previous injuries you may not have considered before…

Specifically ankle injuries when it has to do with hip, knee or lower back pain and the hip mobility and glute activation work isn’t sticking.

There is a very important ankle-butt connection we often don’t recognize (and yes…this is my very highly technical term for it hehe)

Ankle injuries are too often overlooked because…

Often we FORGET about ankle injuries because how could something years ago be affecting us now!?! (People won’t mention them to their physio or trainer).

AND…Often we don’t properly REHAB the ankle injury NOR do we continue doing PREHAB for it once it’s “better.”

We return to working out like nothing happened and often things seem absolutely fine.

But what we don’t realize is that injuries create disruptions in our mind-body connection AND that, all too often even very slight movement distortions, lead to overload and imbalances.

Sometimes when I bring up previous ankle injuries to clients, they’ll even say, “Yea but I had no issues after that…Just the knee pain or hip pain years later.”

(This is where I would make a face that combines both the eye roll emoji and that emoji with the line mouth and lines for eyes.)

Ok…IF YOU HAD A PREVIOUS INJURY YOU NEVER TOOK CARE OF AND NOW HAVE INJURIES ON THE SAME SIDE, THEY ARE PROBABLY CONNECTED.

Plain and simple.

And yes…they can finally rear their freaking ugly heads YEARS, legit YEARS, later.

So you can’t ignore that ankle injury you may have even had a decade ago.

If you never worked to restore proper mobility and strength, if you never re-establish that interrupted mind-body connection, well…it’s like leaving a crack in your foundation.

Things may not fall apart instantly, but if you don’t take care of that crack, other issues will spread throughout your structure slowly until it all collapses.

While your ankle may no longer be in pain, and it may “seem” like nothing is wrong there, a lack of pain isn’t a sign of optimal functioning.

BUT it is why, all too often, we ignore these other areas.

This is honestly why I included foam rolling, stretching and activation series in the Glute Camp for the feet and ankles. I figured including them was the best way to get people doing what they often didn’t even realize they needed to do hehe

If you’ve been ignoring your foundation, start giving it some TLC with these 3 moves to get you started.

3 Moves To Take Care Of Your Feet And Ankles

These three moves will help you start to relax commonly overactive muscles and strengthen weaker muscles to improve your foundational stability.

Peroneal Foam Rolling:

Knee, ankle and foot pain (yes this muscle can lead to flat feet even!) can all be related to this muscle. Yet it is a muscle we often ignore because…well…it isn’t exactly where the pain is!

It is an important muscle to pay attention to because if just one side becomes short and overactive, which is foam rolling is so important for this muscle, it can lead to a functional leg length discrepancy (aka you may “think” one leg is shorter when it is actually muscle tightness causing the symptoms) and a weight shift during bilateral movements.

This can perpetuate compensations and overload, leading to injuries all the way up the other side even!

side-of-shin-foam-rolling

To roll out your Peroneal, a ball or small roller works best although you can use a larger foam roller.

Take a ball and place it on the ground with the side of your lower leg on top. Press down on your lower leg with your hand to apply more pressure so that the ball digs in.

Then move your leg so that you roll the ball down the length of the side of your lower leg.

Hold on any tight spots and even make small circles on the ball with your lower leg to dig into any tender areas. You can also circle the ankle while holding on any tight spots.

To hit slightly different angles along the side of your shins, rock forward a bit (toward your shin) or backward (toward you calf).

Work your way up to just below your knee and then down to a few inches above the anklebone.

Kneeling Foot Stretch To Bear Squat:

This stretch can help if you’ve ever had plantar fasciitis or limited ankle mobility and Achilles issues.

What we often don’t realize is that even our BIG TOE can get “locked up.”

This stretch will work to relax and lengthen the muscles under your feet as well as work to improve your calf flexibility and ankle mobility, improving specifically your dorsiflexion (your ability to bring your toes closer to your shin).

This stretch can even help you SQUAT deeper if you’ve felt like your range of motion when squatting is limited.

To do the Kneeling Foot Stretch to Bear Squat, start kneeling on the ground with your feet flexed. Sit back on your heels. Rock side to side to stretch your feet.

Then place your hands down on the ground and press your butt up into the air, driving your heels down to the ground. Relax your calves and try to get your heels down to the ground.

Feel a nice stretch down your calves and even up into your hamstrings. Hold for 1-2 seconds and then drop back down to your knees and sit back on your heels again to stretch your feet.

Make sure that as you drive your butt up, you are pressing yourself back so that your driving your heels down. Don’t simply pike up and lower back down. Actually drive back and feel the stretch down your calves.

You can walk your hands in just a little bit closer to your knees to help you feel the stretch a little bit more, but do not walk them in too close.

Calf Raise Circles:

Calf Raise Circles can strengthen your feet and help you improve your ankle stability. Often when we do basic calf raises, we aren’t conscious of compensations we even perpetuate with them.

But by doing the circles, you are focusing on moving across your foot to engage all the muscles correctly and not just perpetuate patterns of overuse.

To do Circle Calf Raises, start standing with your feet about hip-width apart. You can face a wall or table if you need a little help balancing so that you can really focus on circling.

Then start to circle by rocking to the outside of your feet. Slowly come forward toward your pinky toe. Then come up onto your toes slowly circling from your pinky toe toward your big toe. Come up as high onto your toes/balls of your feet as you can. Then reach your big toe and circle in toward the inside of your feet as you come down.

Then come back up, this time starting with the big toe and circling out toward your pinky toe before coming down on the outsides of your feet. Repeat circling back up and in. Really feel yourself getting as big a circle as you can while feeling your calves work to help you come up onto your toes. In order to really circle, you may need to lightly keep your hand on the wall.

If you want even more moves to strengthen your foundation, as well as great glute activation moves to help you prevent lower back, hip and knee pain, check out my Glute Camp!