If you’ve truly been doing all of the right things CONSISTENTLY for awhile, which really means more than 4 weeks at least, and results are just not adding up like they should be, you’re missing a weak link.
Very often our first focus is near the point of pain, which is a good place to start.
Because underactive glutes are an all too common culprit.
But what if you’re doing hip mobility work and glute activation, and even feeling the right muscles working, BUT things just don’t seem to be “sticking.”
What’s going on?
This is when you need to start looking at compensations and imbalances up and down your body that may be creating the perpetual overload.
It also means addressing any PREVIOUS INJURIES.
And one all too common injury people tend to forget about is the ANKLE SPRAIN.
If overload is being perpetuated, even while doing the right moves with the right recruitment patterns (assessing recruitment patterns should be one of the FIRST things you do when doing the “right moves”), you need to address previous injuries you may not have considered before…
Specifically ankle injuries when it has to do with hip, knee or lower back pain and the hip mobility and glute activation work isn’t sticking.
There is a very important ankle-butt connection we often don’t recognize (and yes…this is my very highly technical term for it hehe)
Ankle injuries are too often overlooked because…
Often we FORGET about ankle injuries because how could something years ago be affecting us now!?! (People won’t mention them to their physio or trainer).
AND…Often we don’t properly REHAB the ankle injury NOR do we continue doing PREHAB for it once it’s “better.”
We return to working out like nothing happened and often things seem absolutely fine.
But what we don’t realize is that injuries create disruptions in our mind-body connection AND that, all too often even very slight movement distortions, lead to overload and imbalances.
Sometimes when I bring up previous ankle injuries to clients, they’ll even say, “Yea but I had no issues after that…Just the knee pain or hip pain years later.”
(This is where I would make a face that combines both the eye roll emoji and that emoji with the line mouth and lines for eyes.)
Ok…IF YOU HAD A PREVIOUS INJURY YOU NEVER TOOK CARE OF AND NOW HAVE INJURIES ON THE SAME SIDE, THEY ARE PROBABLY CONNECTED.
Plain and simple.
And yes…they can finally rear their freaking ugly heads YEARS, legit YEARS, later.
So you can’t ignore that ankle injury you may have even had a decade ago.
If you never worked to restore proper mobility and strength, if you never re-establish that interrupted mind-body connection, well…it’s like leaving a crack in your foundation.
Things may not fall apart instantly, but if you don’t take care of that crack, other issues will spread throughout your structure slowly until it all collapses.
While your ankle may no longer be in pain, and it may “seem” like nothing is wrong there, a lack of pain isn’t a sign of optimal functioning.
BUT it is why, all too often, we ignore these other areas.
If you’ve been ignoring your foundation, start giving it some TLC with these 3 moves to get you started.
3 Moves To Take Care Of Your Feet And Ankles
These three moves will help you start to relax commonly overactive muscles and strengthen weaker muscles to improve your foundational stability.
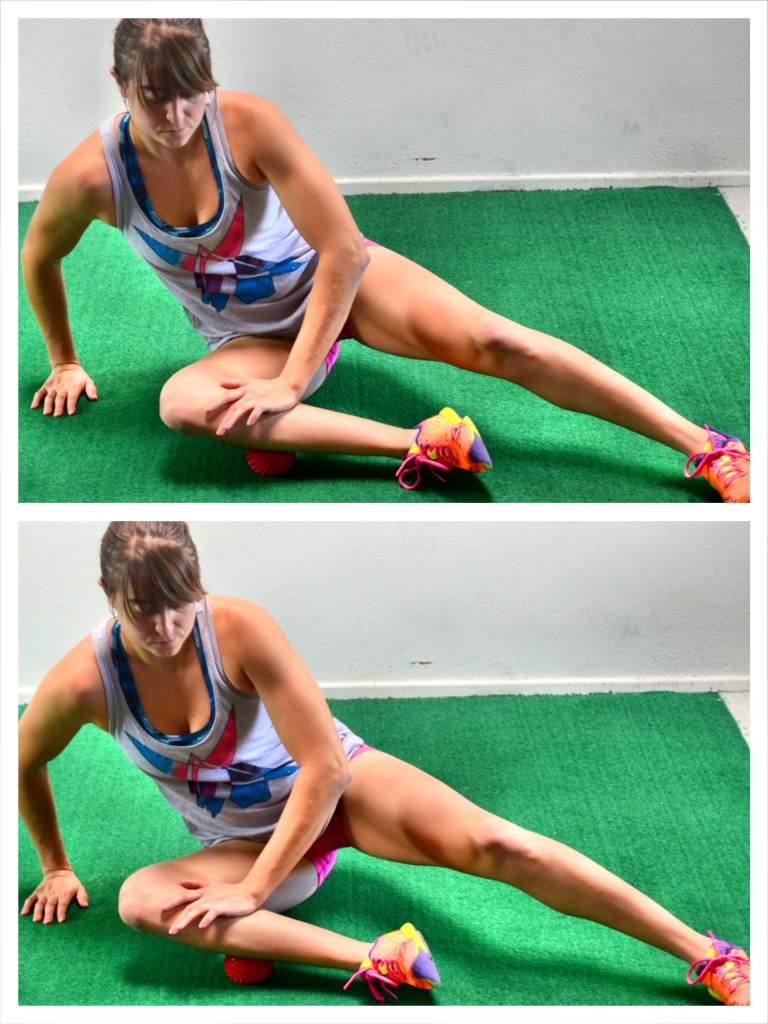
Peroneal Foam Rolling:
Knee, ankle and foot pain (yes this muscle can lead to flat feet even!) can all be related to this muscle. Yet it is a muscle we often ignore because…well…it isn’t exactly where the pain is!
It is an important muscle to pay attention to because if just one side becomes short and overactive, which is foam rolling is so important for this muscle, it can lead to a functional leg length discrepancy (aka you may “think” one leg is shorter when it is actually muscle tightness causing the symptoms) and a weight shift during bilateral movements.
This can perpetuate compensations and overload, leading to injuries all the way up the other side even!
To roll out your Peroneal, a ball or small roller works best although you can use a larger foam roller.
Take a ball and place it on the ground with the side of your lower leg on top. Press down on your lower leg with your hand to apply more pressure so that the ball digs in.
Then move your leg so that you roll the ball down the length of the side of your lower leg.
Hold on any tight spots and even make small circles on the ball with your lower leg to dig into any tender areas. You can also circle the ankle while holding on any tight spots.
To hit slightly different angles along the side of your shins, rock forward a bit (toward your shin) or backward (toward you calf).
Work your way up to just below your knee and then down to a few inches above the anklebone.
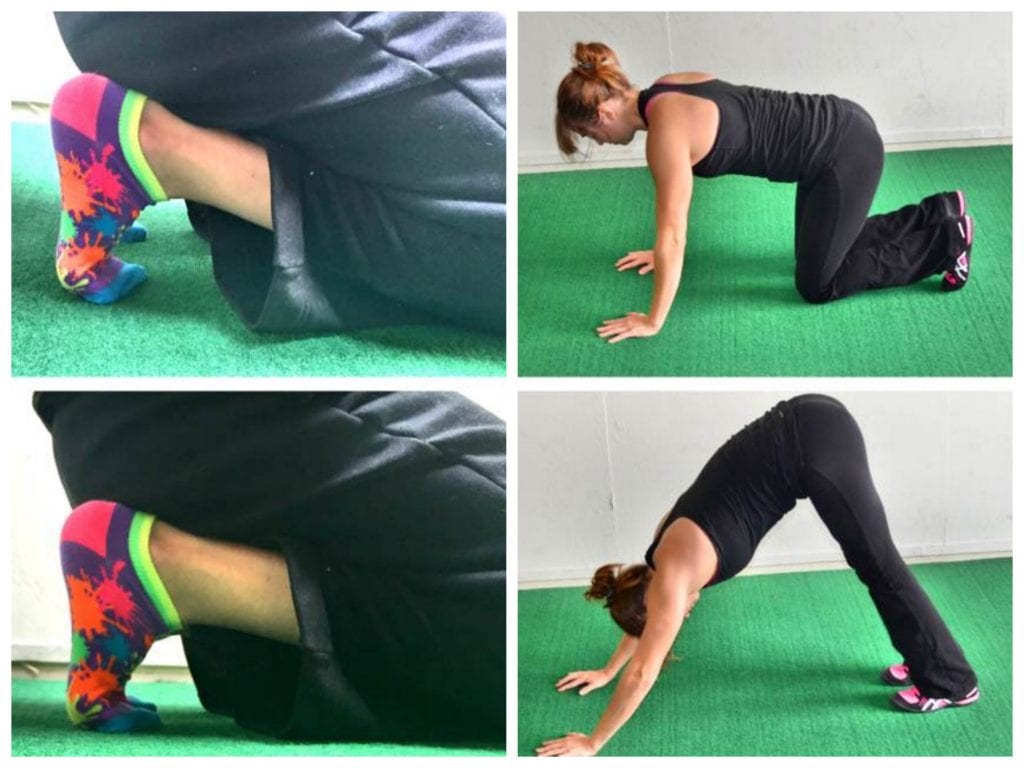
Kneeling Foot Stretch To Bear Squat:
This stretch can help if you’ve ever had plantar fasciitis or limited ankle mobility and Achilles issues.
What we often don’t realize is that even our BIG TOE can get “locked up.”
This stretch will work to relax and lengthen the muscles under your feet as well as work to improve your calf flexibility and ankle mobility, improving specifically your dorsiflexion (your ability to bring your toes closer to your shin).
This stretch can even help you SQUAT deeper if you’ve felt like your range of motion when squatting is limited.
To do the Kneeling Foot Stretch to Bear Squat, start kneeling on the ground with your feet flexed. Sit back on your heels. Rock side to side to stretch your feet.
Then place your hands down on the ground and press your butt up into the air, driving your heels down to the ground. Relax your calves and try to get your heels down to the ground.
Feel a nice stretch down your calves and even up into your hamstrings. Hold for 1-2 seconds and then drop back down to your knees and sit back on your heels again to stretch your feet.
Make sure that as you drive your butt up, you are pressing yourself back so that your driving your heels down. Don’t simply pike up and lower back down. Actually drive back and feel the stretch down your calves.
You can walk your hands in just a little bit closer to your knees to help you feel the stretch a little bit more, but do not walk them in too close.
Calf Raise Circles:
Calf Raise Circles can strengthen your feet and help you improve your ankle stability. Often when we do basic calf raises, we aren’t conscious of compensations we even perpetuate with them.
But by doing the circles, you are focusing on moving across your foot to engage all the muscles correctly and not just perpetuate patterns of overuse.
To do Circle Calf Raises, start standing with your feet about hip-width apart. You can face a wall or table if you need a little help balancing so that you can really focus on circling.
Then start to circle by rocking to the outside of your feet. Slowly come forward toward your pinky toe. Then come up onto your toes slowly circling from your pinky toe toward your big toe. Come up as high onto your toes/balls of your feet as you can. Then reach your big toe and circle in toward the inside of your feet as you come down.
Then come back up, this time starting with the big toe and circling out toward your pinky toe before coming down on the outsides of your feet. Repeat circling back up and in. Really feel yourself getting as big a circle as you can while feeling your calves work to help you come up onto your toes. In order to really circle, you may need to lightly keep your hand on the wall.
If you’re ready to move and feel your best and learn the prehab, strength and cardio combination right for you and your needs and goals, apply to my 1:1 Coaching.
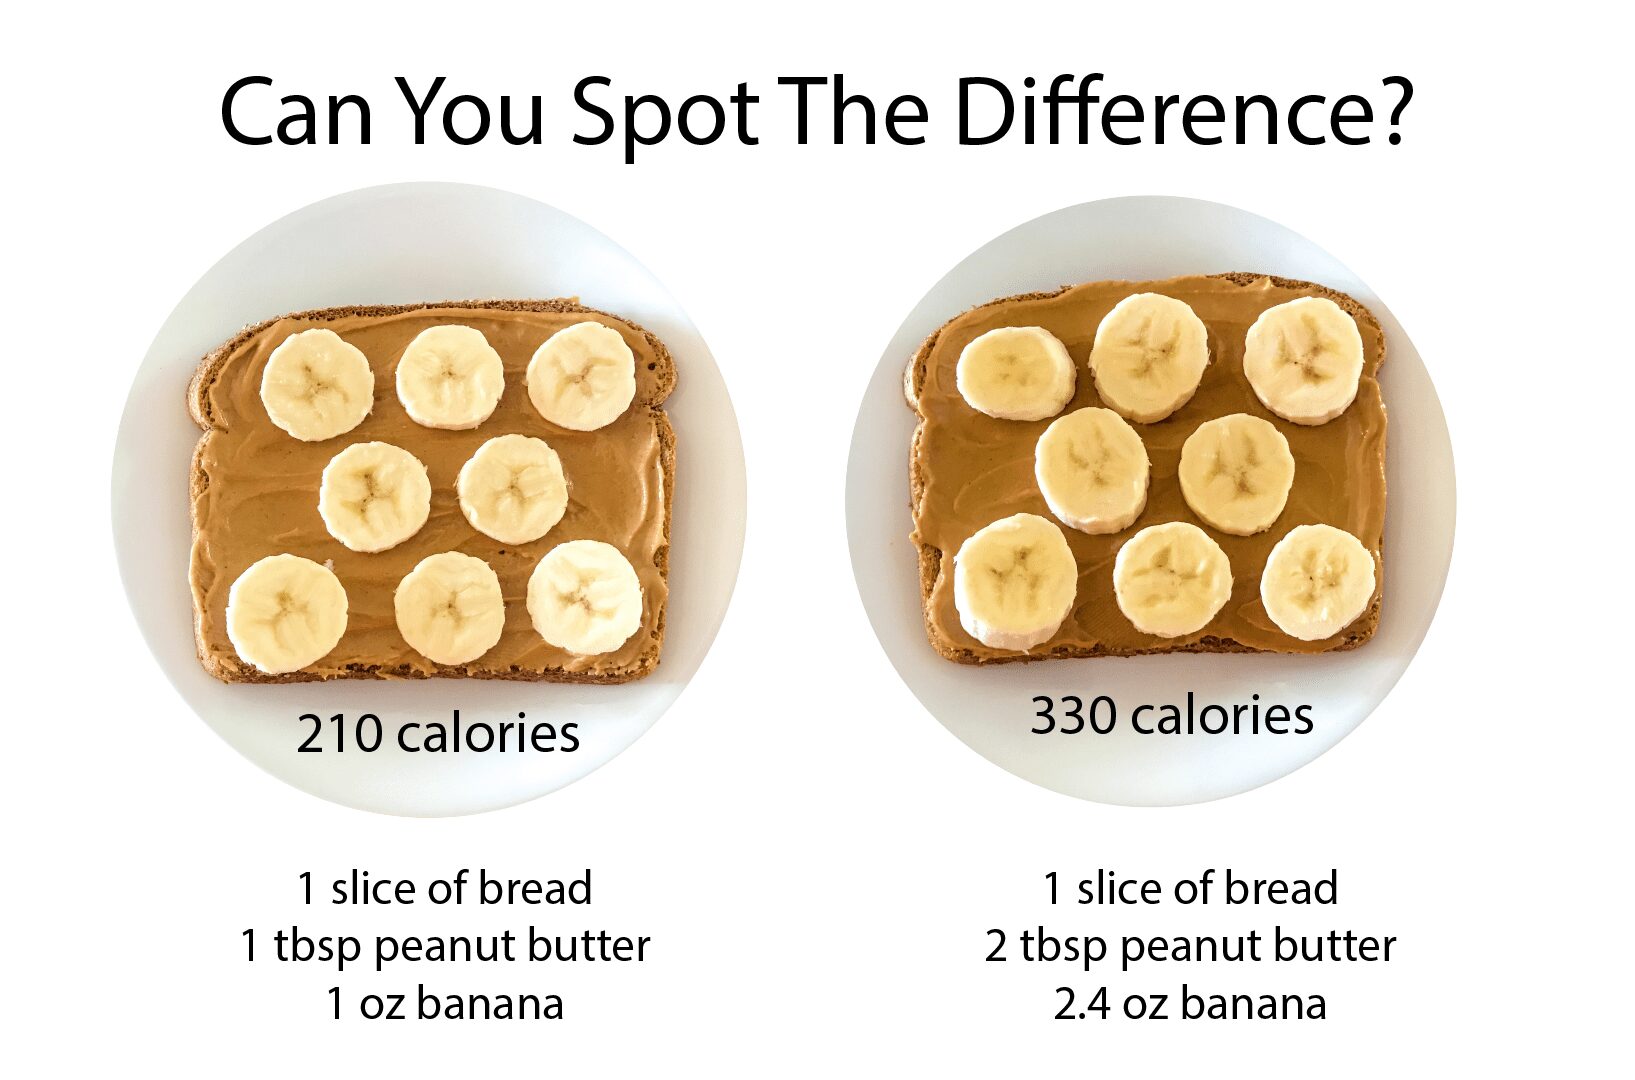
There legit looks like there is absolutely no difference between these two images above.
I mean maybe if you look really closely you can see the peanut butter is spread thinner on one…or the bananas are cut a bit thicker.
But if you were making this for yourself, you can see how it would be so easy to make the second and THINK it was the same portion size if you didn’t measure it.
And that’s EXACTLY the problem.
Most of us aren’t as good at “eyeballing” our portion sizes as we think.
And our hunger levels, as well as our stress levels, can dramatically impact exactly how big or small a portion looks….trust me.
Now with general weight loss, you may be able to “get away with” a little more deviation in your portions, especially if you’ve started your journey by cutting out specific foods.
But for fat loss…well you can’t.
We NEED to track if we have specific goals because it’s just so easy for our portions to become distorted.
Something that literally can look exactly the same can have 100 calories more and double the fat. (And heck, if you’re a nut butter fiend like me, that extra tbsp can EASILY become 2 or 3 more…)
And this is exactly why we can FEEL like we’re doing all of the right things yet not seeing the results we want.
Small portion distortions at each meal can add up.
And let’s face it too…the portions that usually become distorted aren’t generally the lean meats or even veggies….
It’s usually the nuts or the dried fruit or the crackers we have “just a couple extra of.”
It’s not that we are even eating “unclean,” whatever “clean” means to you.
But those little things we tend to want to have “extra” of are usually calorically more dense and not as “macro friendly.”
We have to remember that fat loss requires a calorie deficit AND tweaks to our macro ratios…both of which can easily become skewed by “just a few more” constantly being added in.
Tracking may be annoying. It may be tedious. Heck, you may even think it sucks.
But it not only gets easier, it’s truly key to results.
Plus, is 5 minutes of logging a day or an extra few minutes weighing out your food at each meal really worse than not reaching your goals?
When you have access to limited space and equipment, sliders are a great way to make basic bodyweight moves even more fun and challenging while being easy to take with you anywhere!
So whether you need a quick go-to option at home or a workout when you’re short on time and traveling, try this Slider Upper Body And Core Burner that’s just about 10 minutes long!
Set a timer for 30 second intervals of work and move right from one exercise to the next. The final exercise in each circuit can also be modified to be a full rest interval if needed. Complete 2 rounds through each circuit, resting up to 1 minute between circuits.
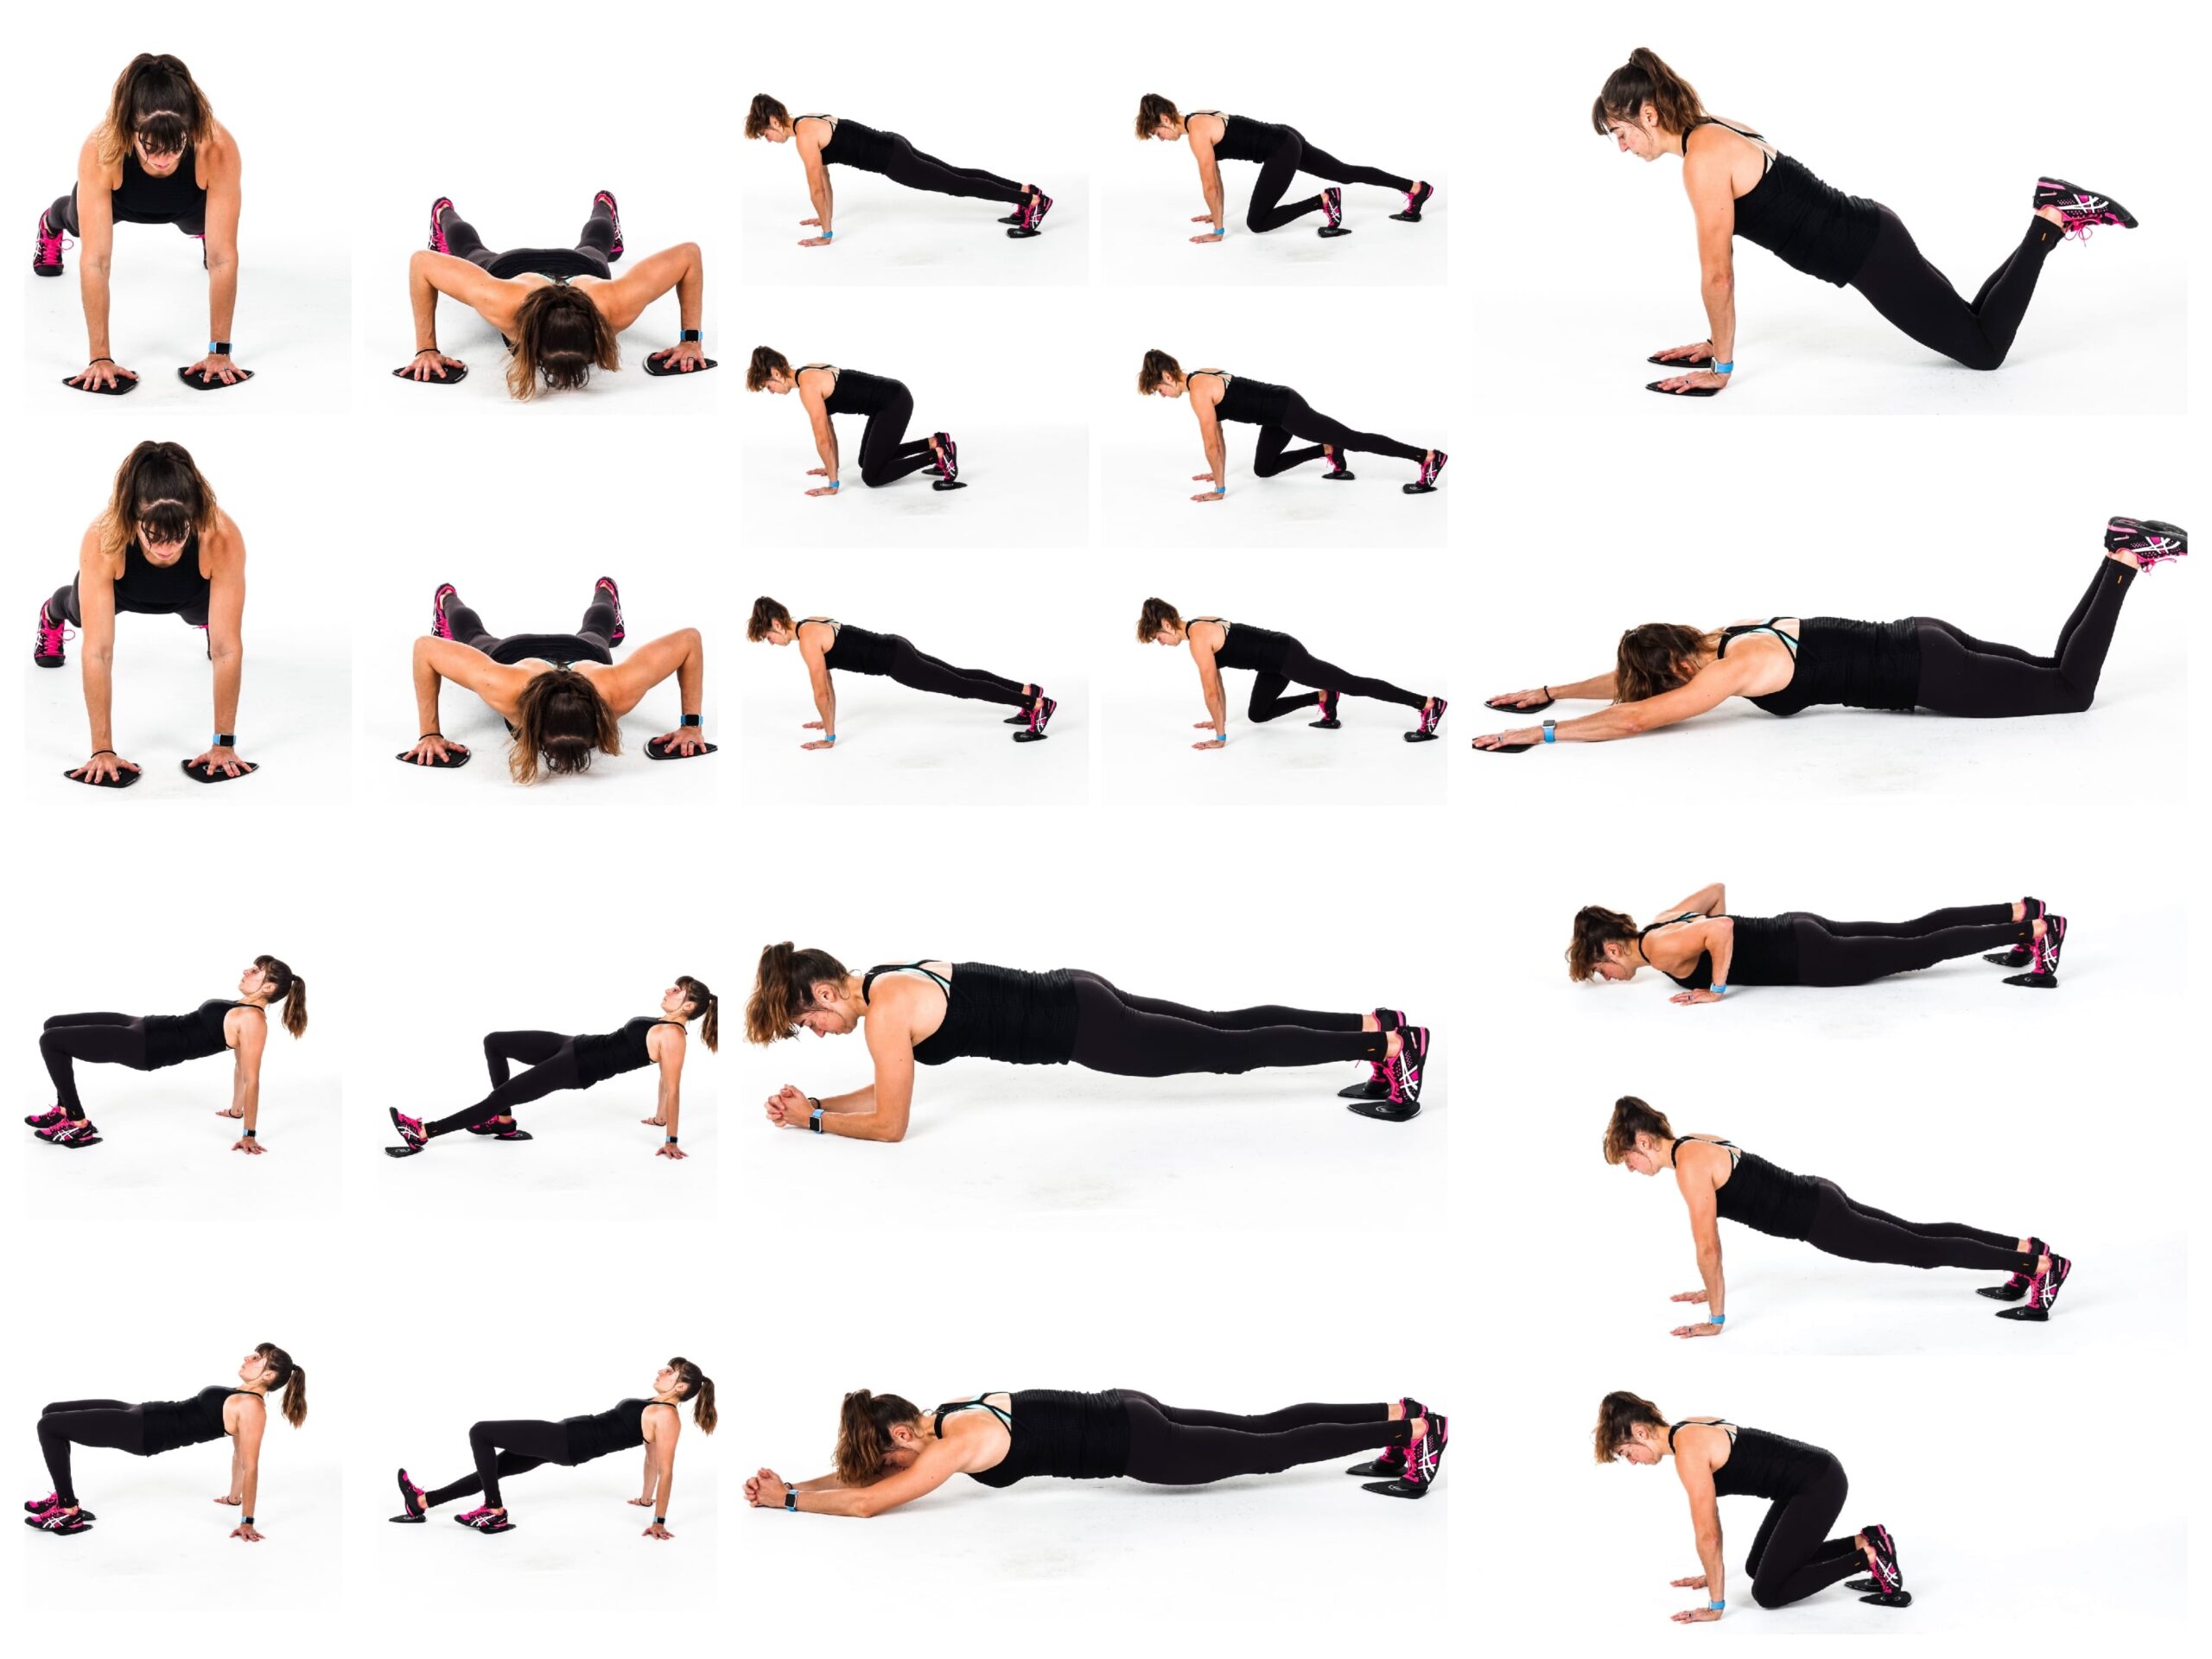
To do Knee Tuck Push Ups, place your feet on sliders and set up in a plank position with your hands under your shoulders.
Then perform a push up, keeping your body in a nice straight line as you drop your chest to the ground. Press back up with your body moving as one unit. Your arms should made an arrow shape with your body. Do not shrug or let your arms form a T.
In the high plank position, tuck your knees in. Do not let your butt go way up in the air as you tuck or use the tuck as a chance to rest. Pull your knees in using your abs and then straighten your legs right back out and repeat the push up.
As you return to the plank position, do not sag your hips or let your butt go up in the air. Also, make sure your hands stay outside your chest and don’t creep forward past your shoulders.
Beginners can do this off an incline and do a single knee tuck at a time without the sliders or they can do a push up from their knees then move to the high plank position to perform the tuck.
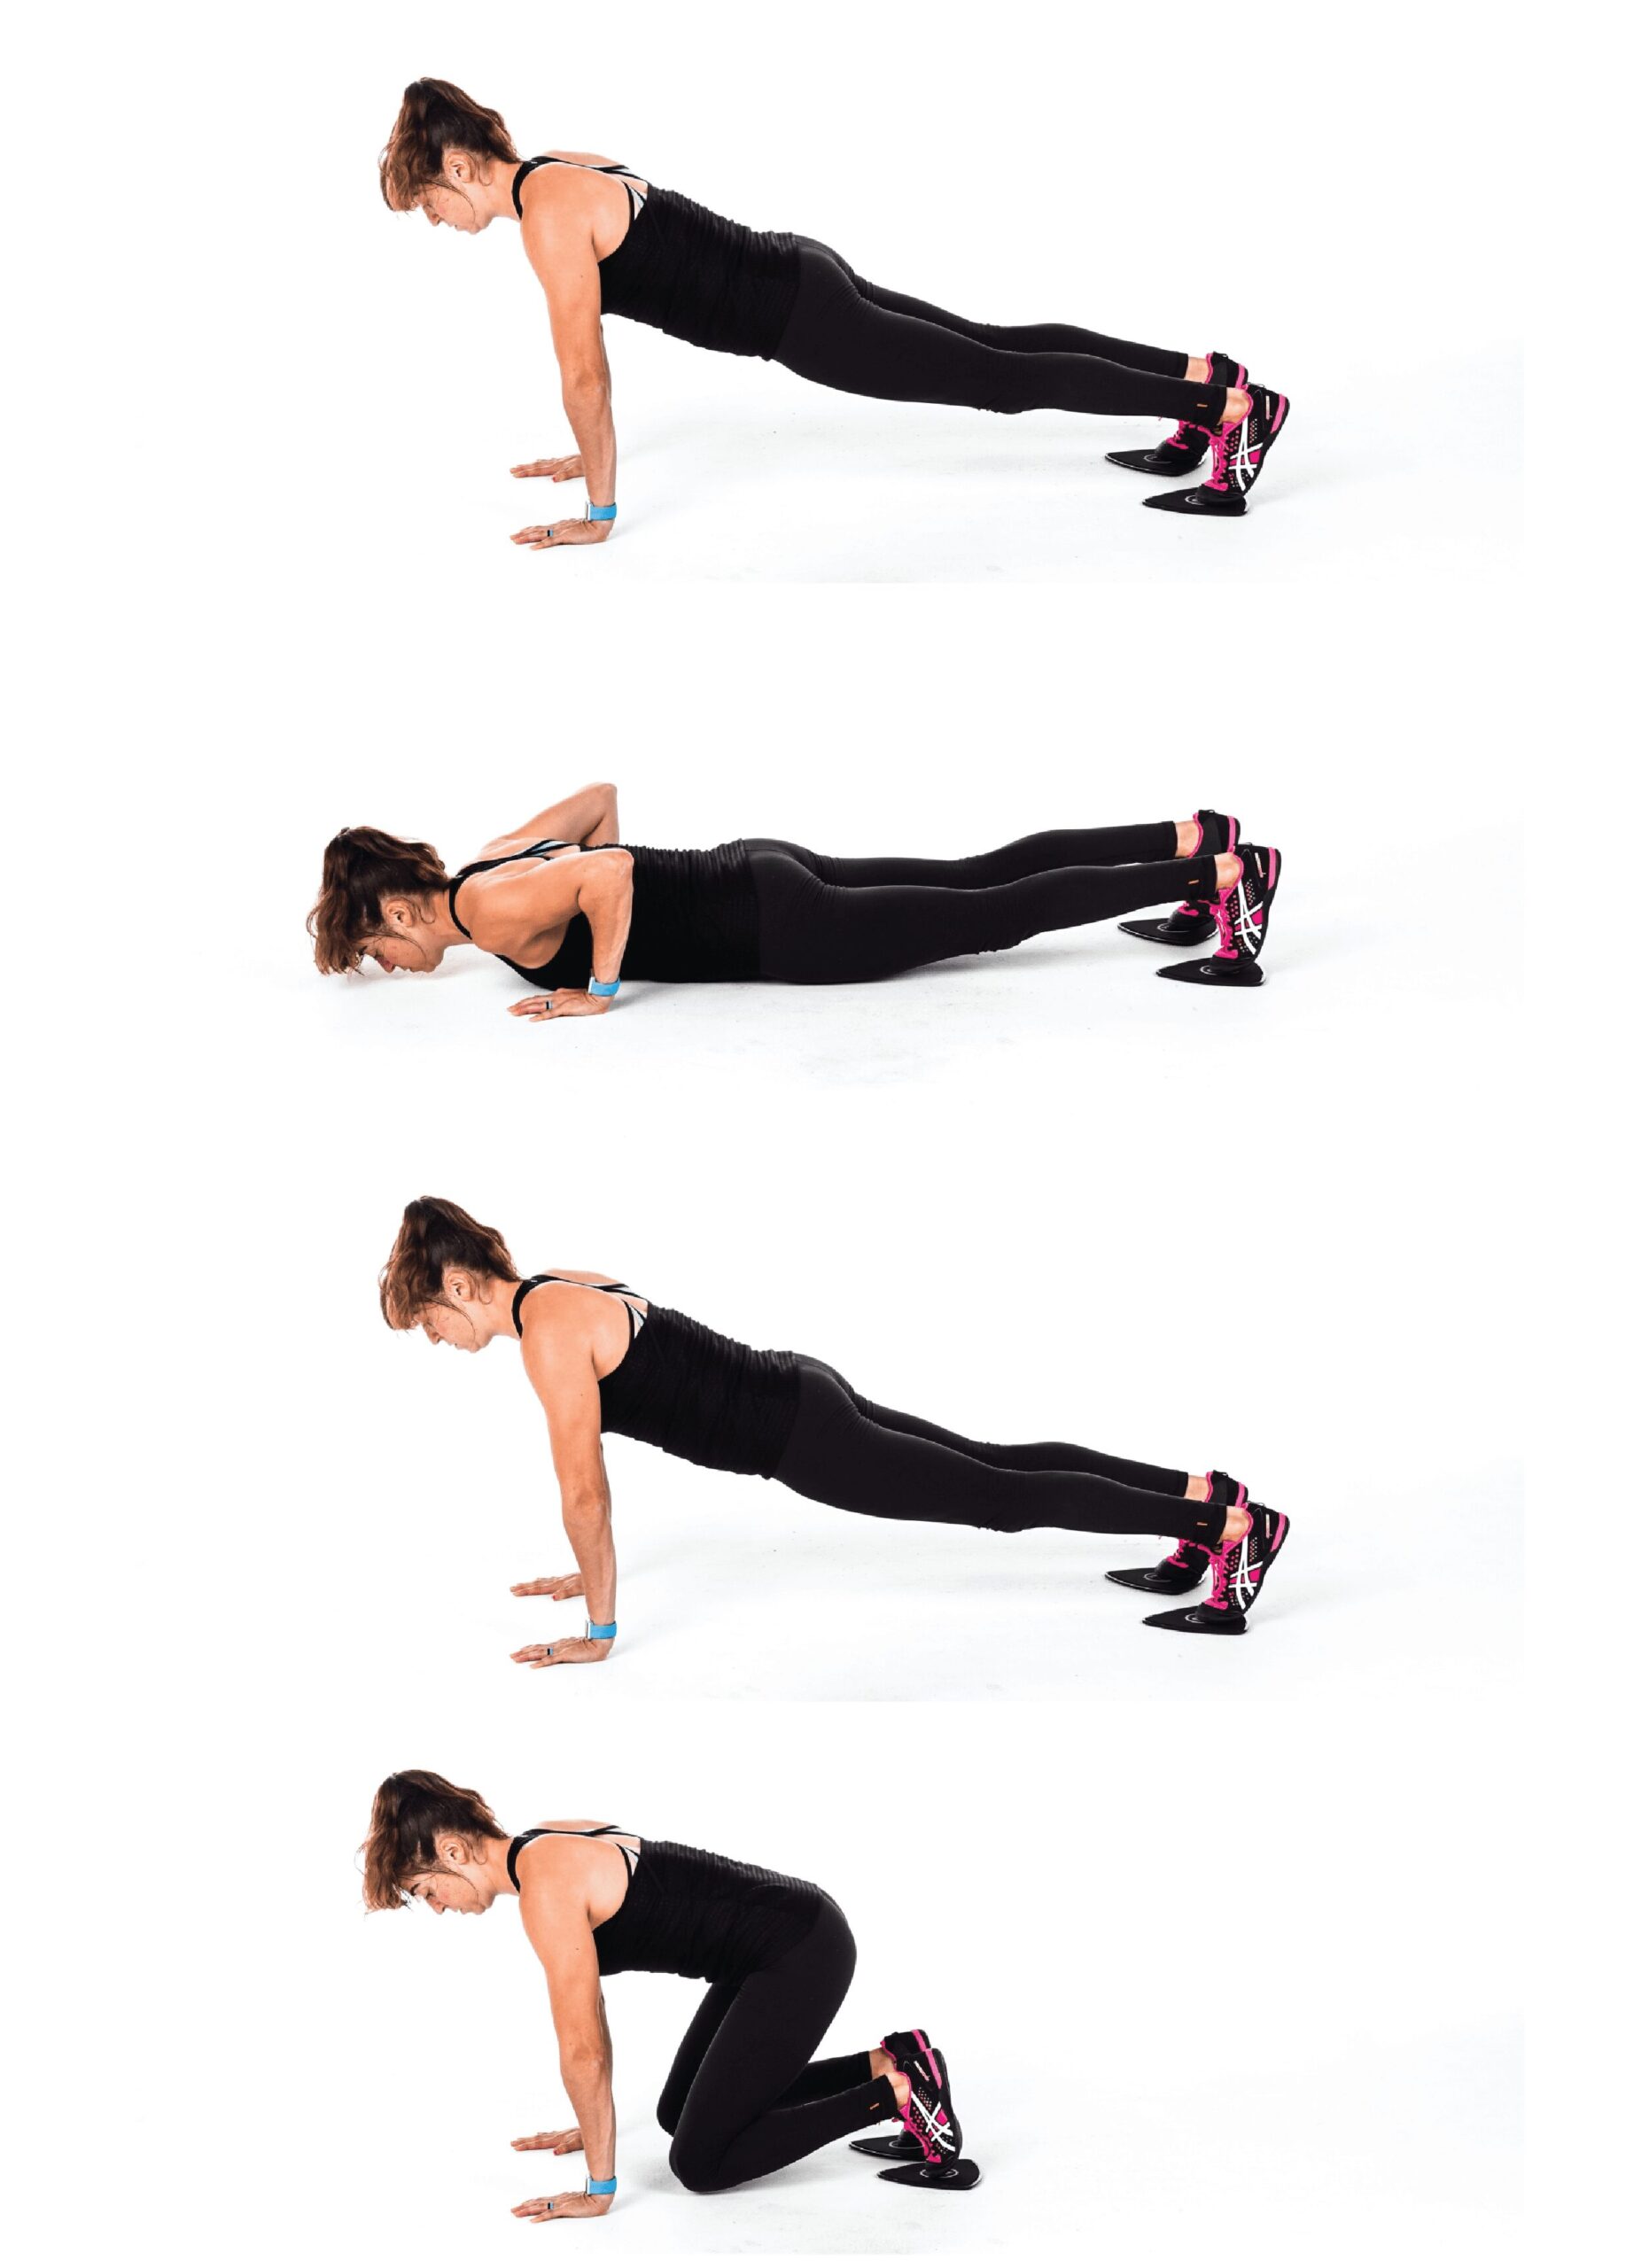
Alternating Slider Tabletop Curls:
To do Alternating Slider Tabletop Curls, place a slider under each foot and sit on the ground with your heels on the sliders and hands behind you on the ground. Turn your hands out or back as you place your hands on the ground behind your butt.
Bend your knees and bring your heels back close to you so you can bridge up into a tabletop bridge. Squeeze your glutes as you lift your butt up and press your chest out.
You can perform a posterior pelvic tilt to help engage your abs as you hold this tabletop position and even slightly tuck your chin to look out beyond your knees.
The slowly extend one leg out before using your hamstring to pull your heel on the slider back in. Then extend the other leg out, pulling the heel back in again with your hamstring.
As you pull the slider back in, really even think about driving the slider down into the ground to help work your hamstring more.
Do not let your hips drop toward the ground as you extend. You want to keep your abs and butt engaged the entire time as you slowly alternate sides.
Slider Ab Extensions:
To do Slider Ab Extensions, place a slider under each hand and set up as if you’re doing a push up from your knees.
You want to have your hands under your shoulders and your body in a nice straight line from your head to your knees. Brace your abs and squeeze your glutes.
Slide both hands out as far as you can, lowering your body toward the ground. Extend out, if you can, until you’re hovering just above the ground.
Then pull the sliders back under your shoulders without bending your arms as your body moves back into the plank position. By sliding your hands back under, pulling with your back to bring your hands back in, your body will move back into the plank position.
Do not sit your butt back or let your lower back engage as you extend out or pull your hands back in. You want to brace your abs and keep your body in a nice straight line the entire time.
Once back in that knee plank position, repeat the slide back out. Do not let your hips sag, lower back arch or butt go up in the air. Also, make sure you don’t sit your butt back to help pull your arms back in. You only “rise up” because your hands come back under your shoulders.
Beginners may not slide out as far or they may extend one hand, then the other, then pull one in at a time.
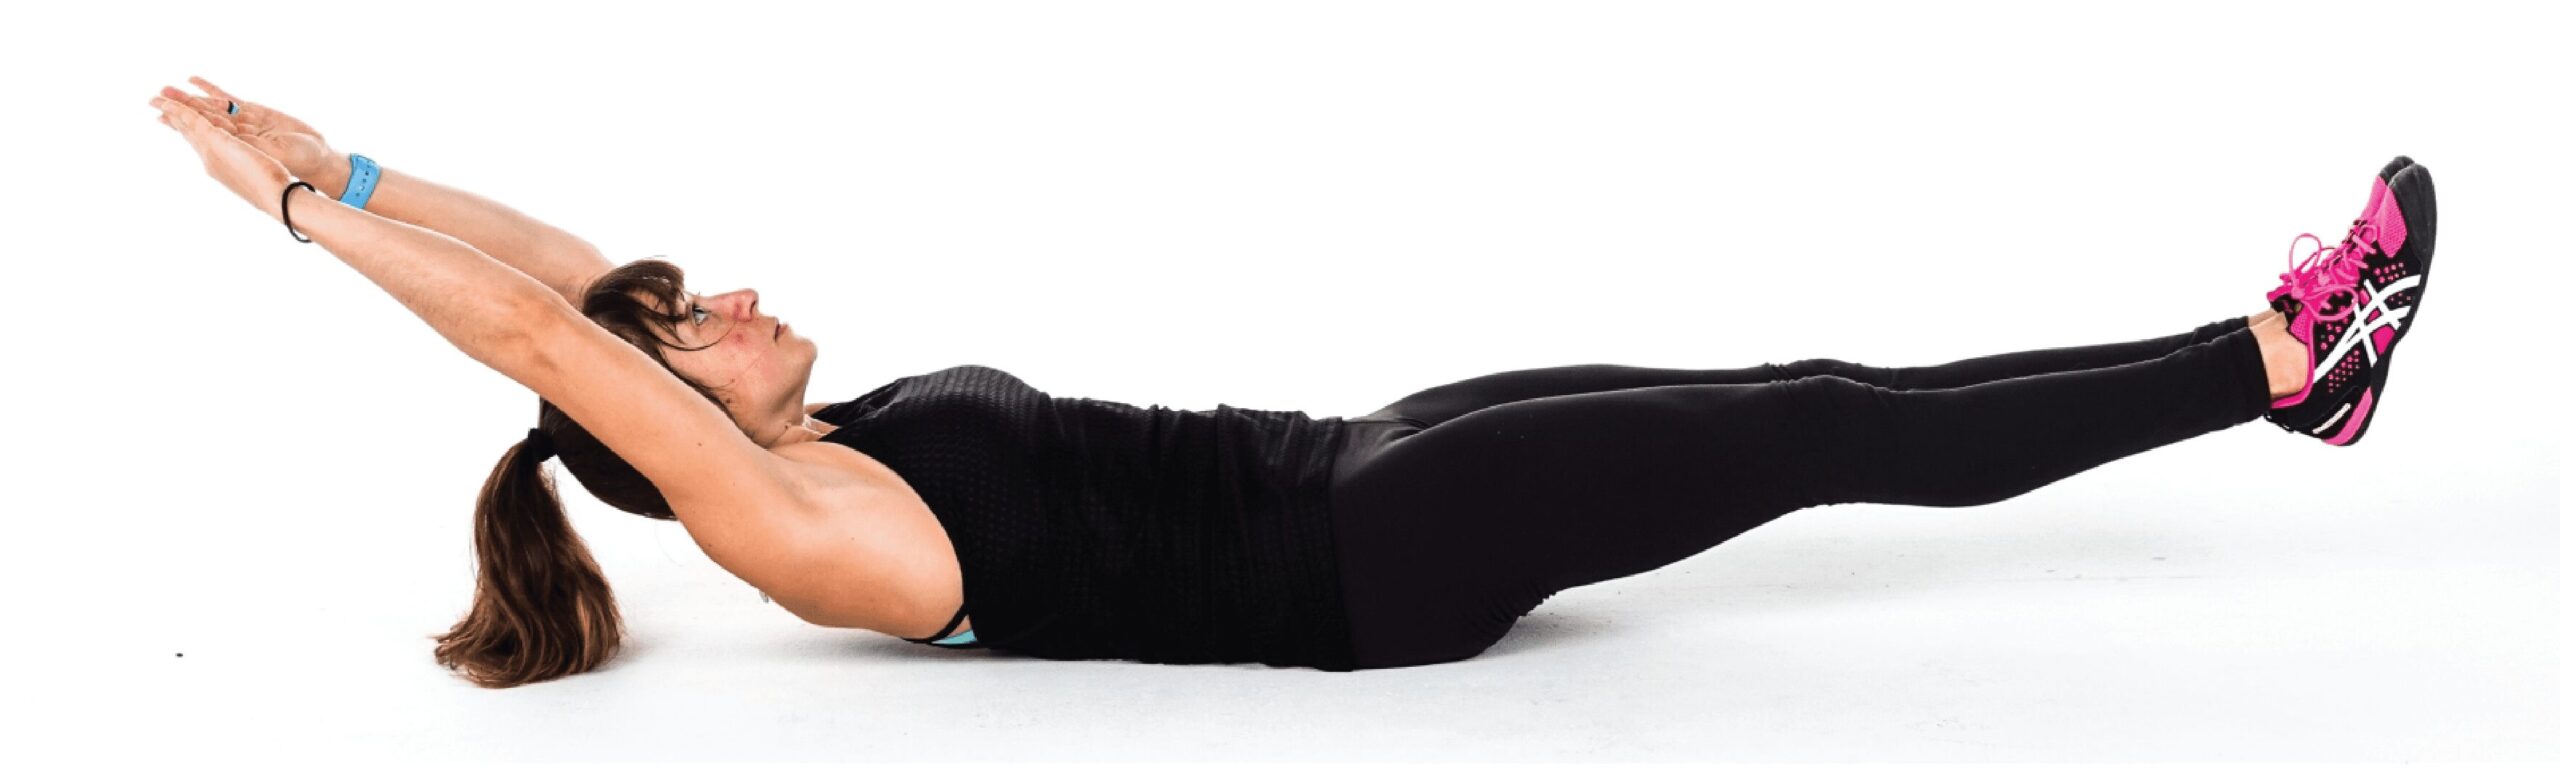
Banana Hold:
To do the Banana hold, start by lying on your back with your legs out straight and your arms reaching overhead on the ground. Your legs should be together and your arms should be right by your head.
Press your low back into the ground and draw your belly button in toward your spine as you lift your legs and arms up off the ground. Your neck and head should be in a neutral position between your arms and your legs should be together and out straight a few inches off the ground.
Hold here, squeezing your legs together as you try to get your shoulder blades up off the ground while keeping your low back against the ground and abs engaged.
Beginners may find they need to lift their legs up higher toward the ceiling or bend their knees to keep their low back against the ground and their abs engaged. Beginners can also try an easier variation of the Pelvic Tilt if they feel their low back taking over.
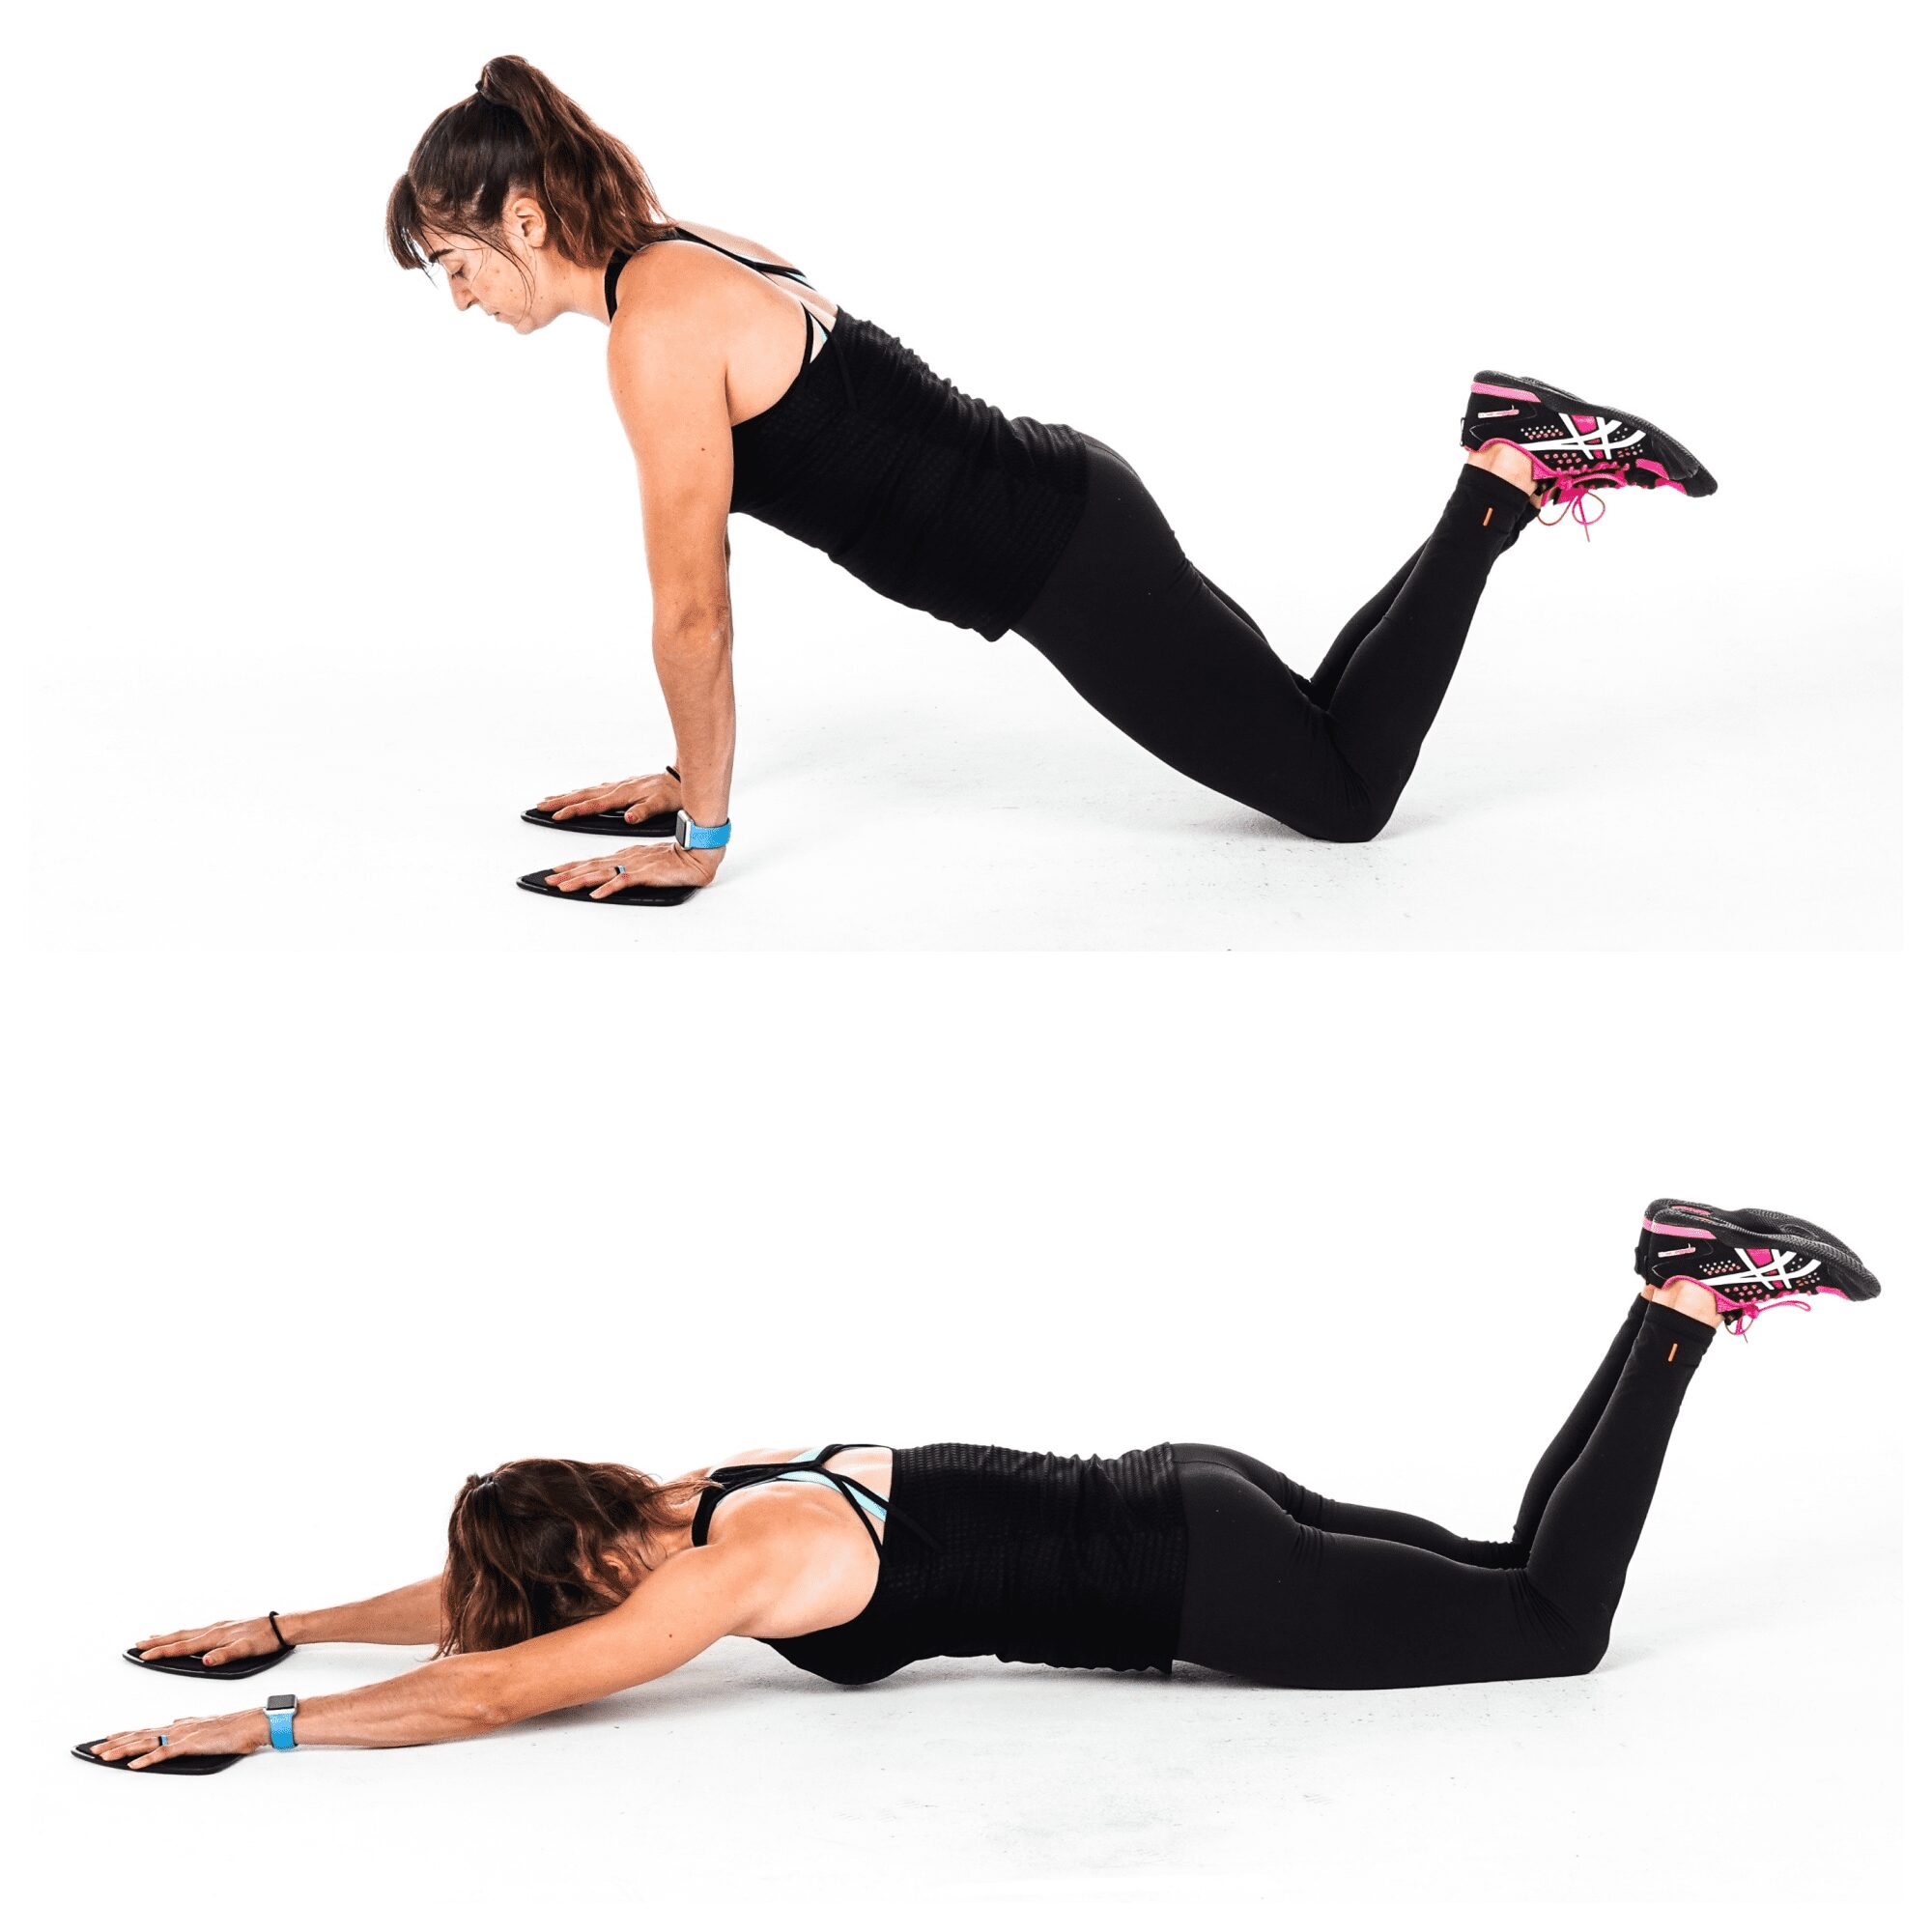
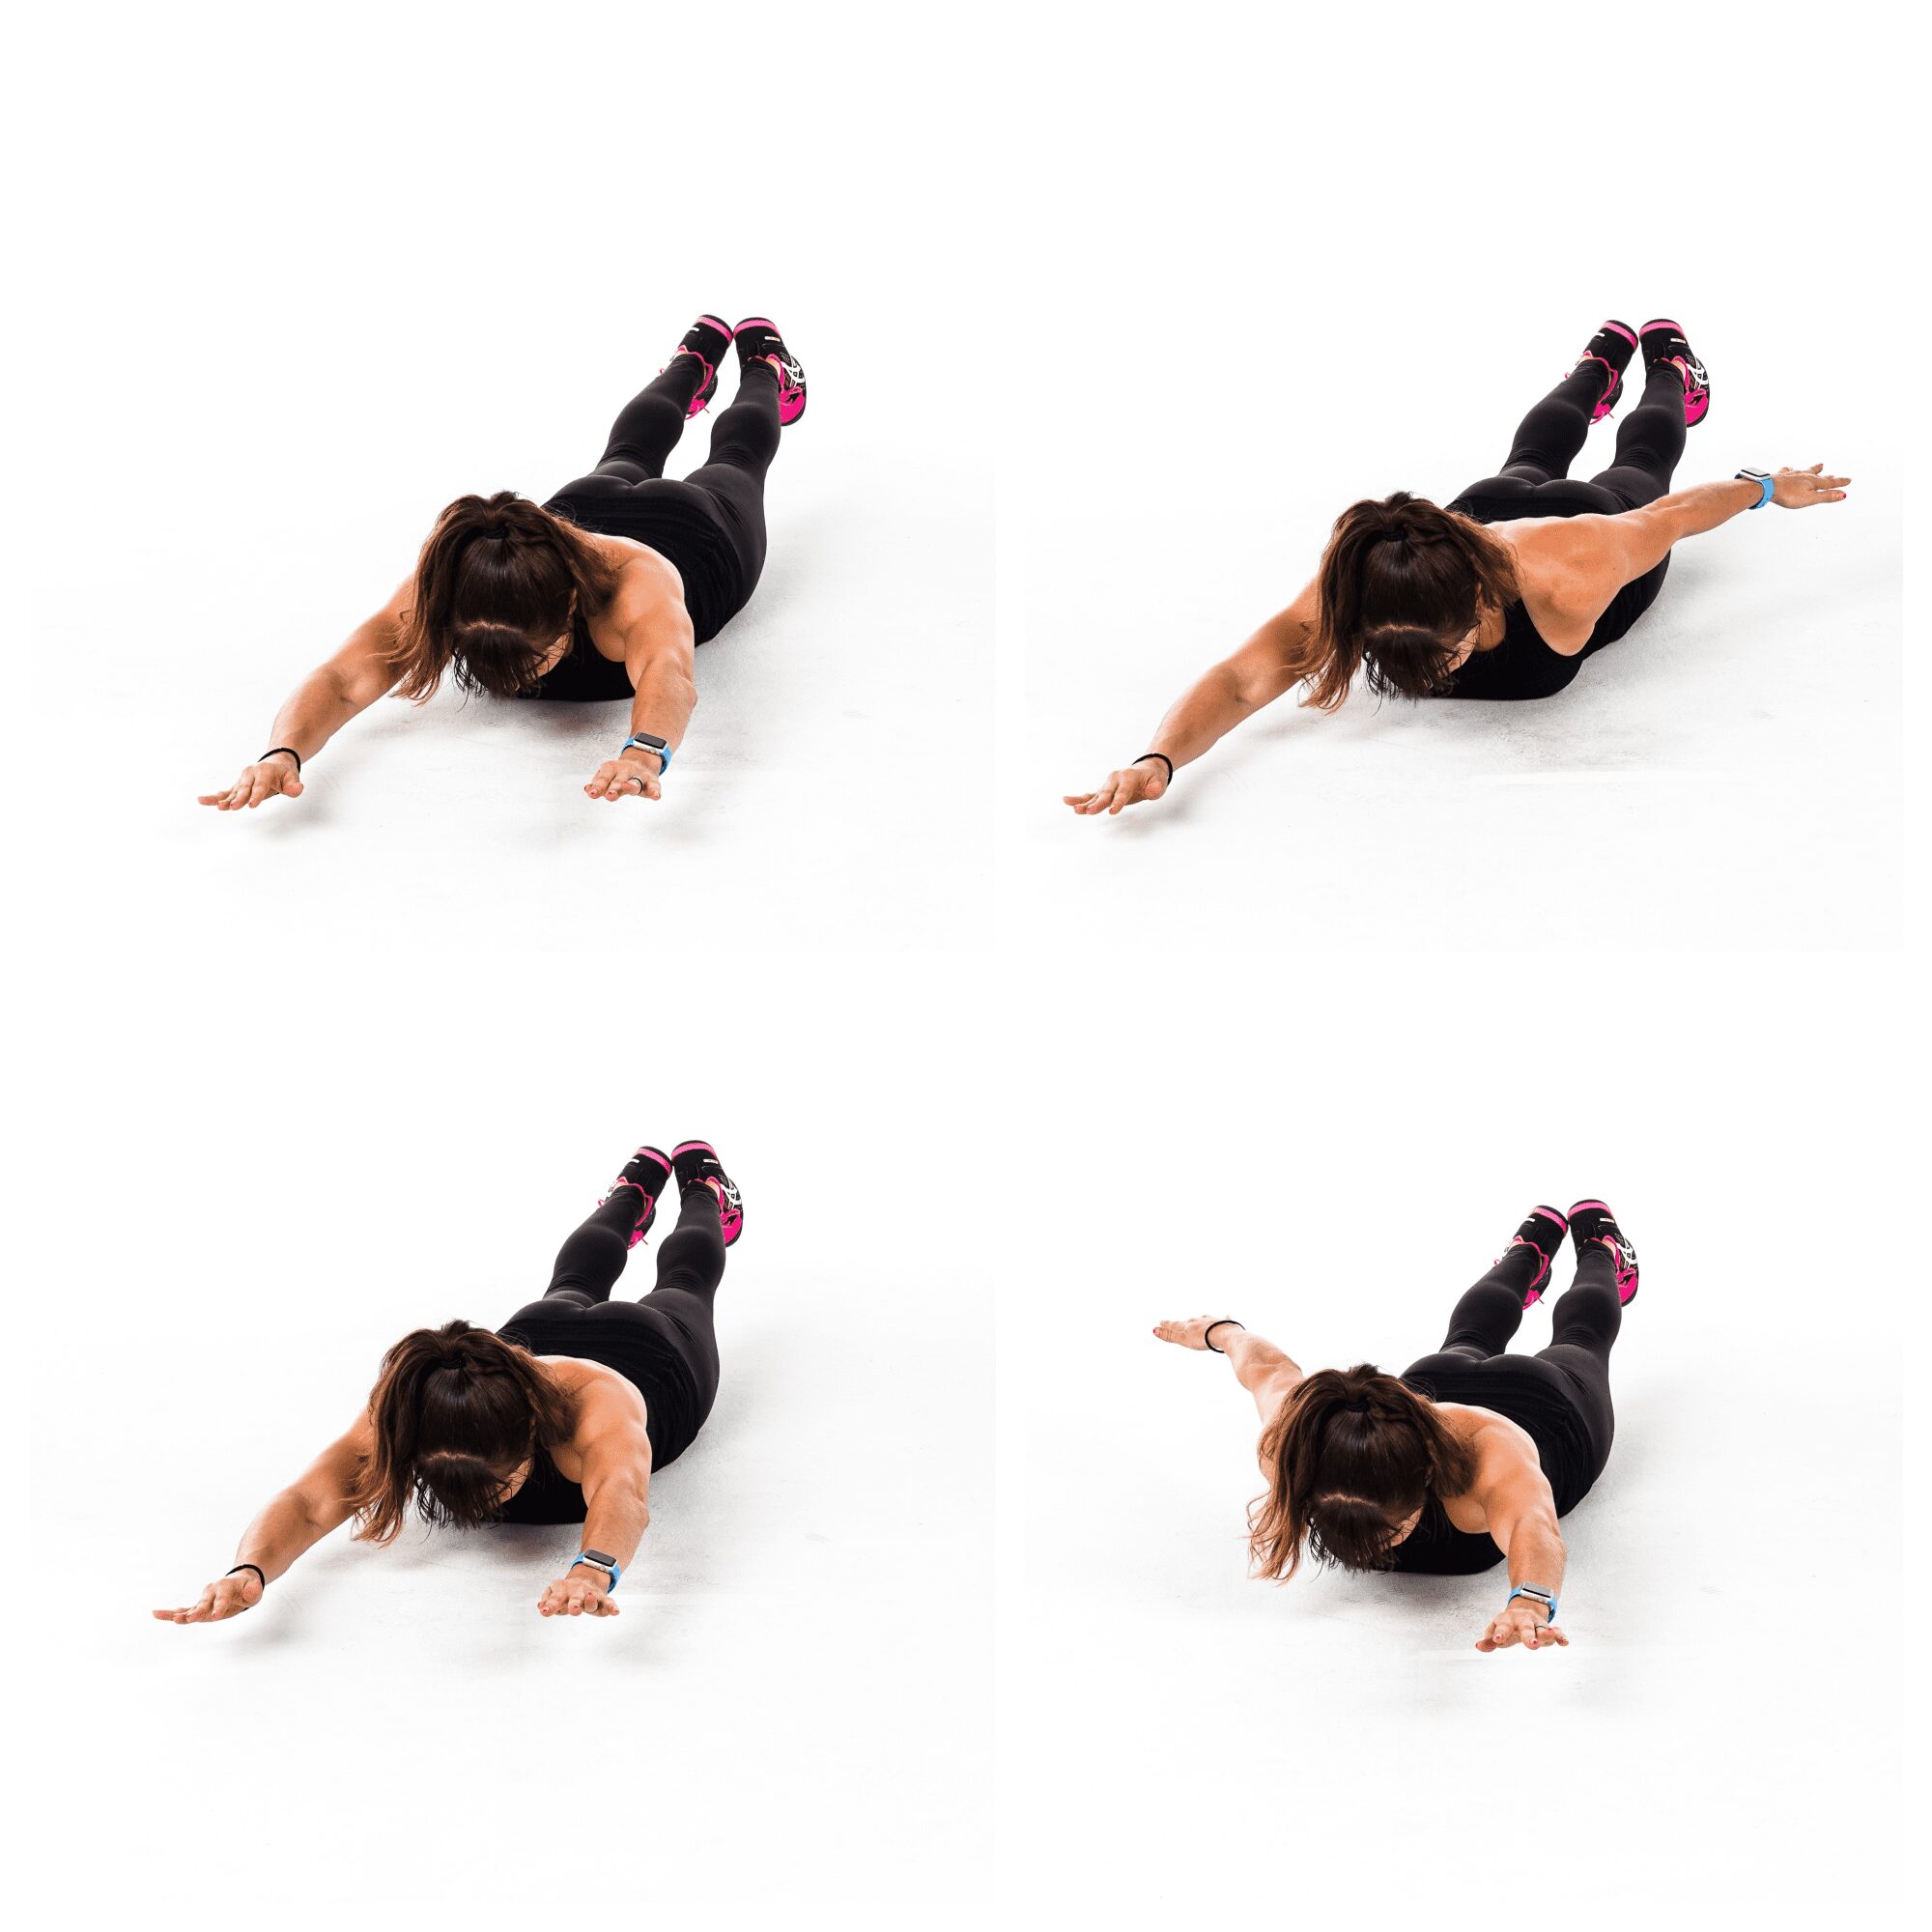
Fly Push Ups:
To do the Fly to Push Up, set up in a push up position with a towel or slider under each hand. You can do the Fly to Push Up from your knees (beginner) or toes (advanced).
Beginners may also want to start with one hand on a slider and the other hand on the ground (black frame). They will then slide the hand on the slider out to the side and perform a push up. As they push up, they will slide the hand back in toward their hand on the ground. They will complete all reps on one side before switching.
If the single slider Fly to Push Up is too much, this move can be done by just stepping the hand out to the side on the ground or even on an incline. To advance the Fly to Push Up, you will use two sliders. Start at the top of a push up and then slide one hand out to the side and perform a push up. After the push up, slide the hand back into the starting position. Even though this is a wider push up, don’t let your elbows flare way out by your ears. Then slide the other hand out on the slider and perform a push up. Keep alternating sides until all reps are complete.
If you want to do the Full Fly to Push Up, you will have a slider on each hand. You will then slide both hands out to the side as you lower into the push up and then pull them back in as you come back up out of the push up. You will perform the fly as you perform the push up instead of sliding out, doing a push up and sliding back in.
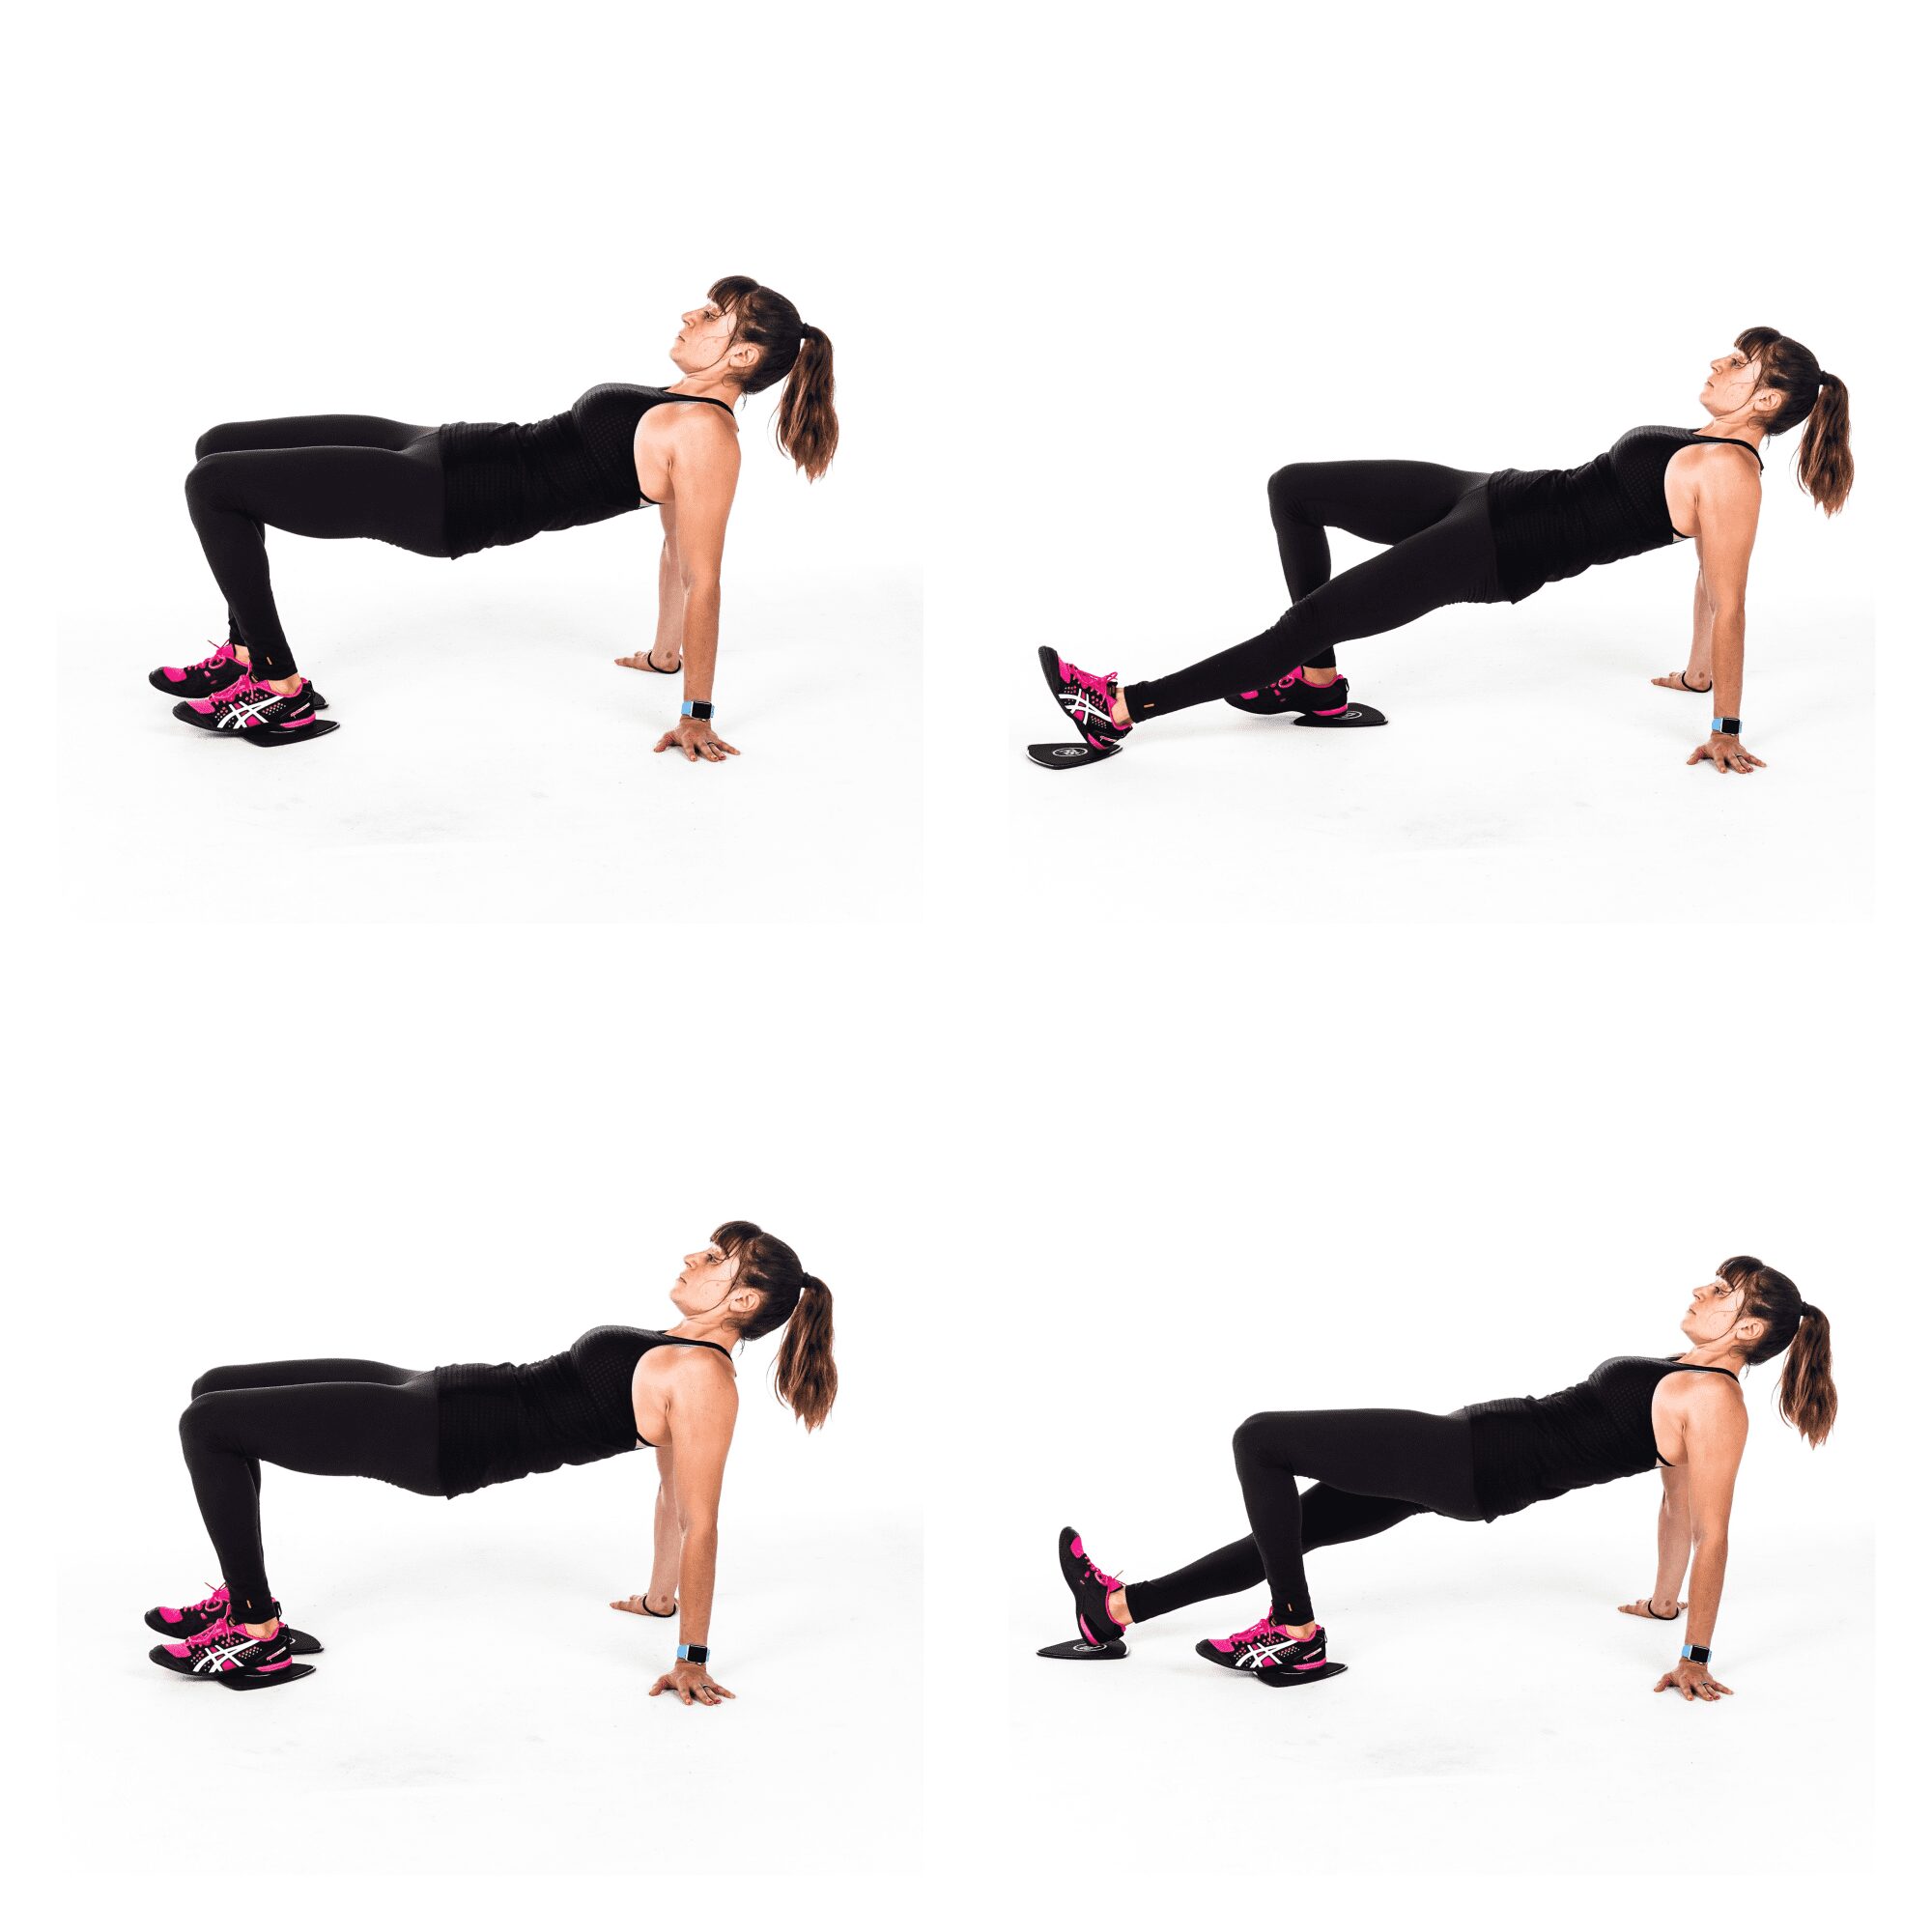
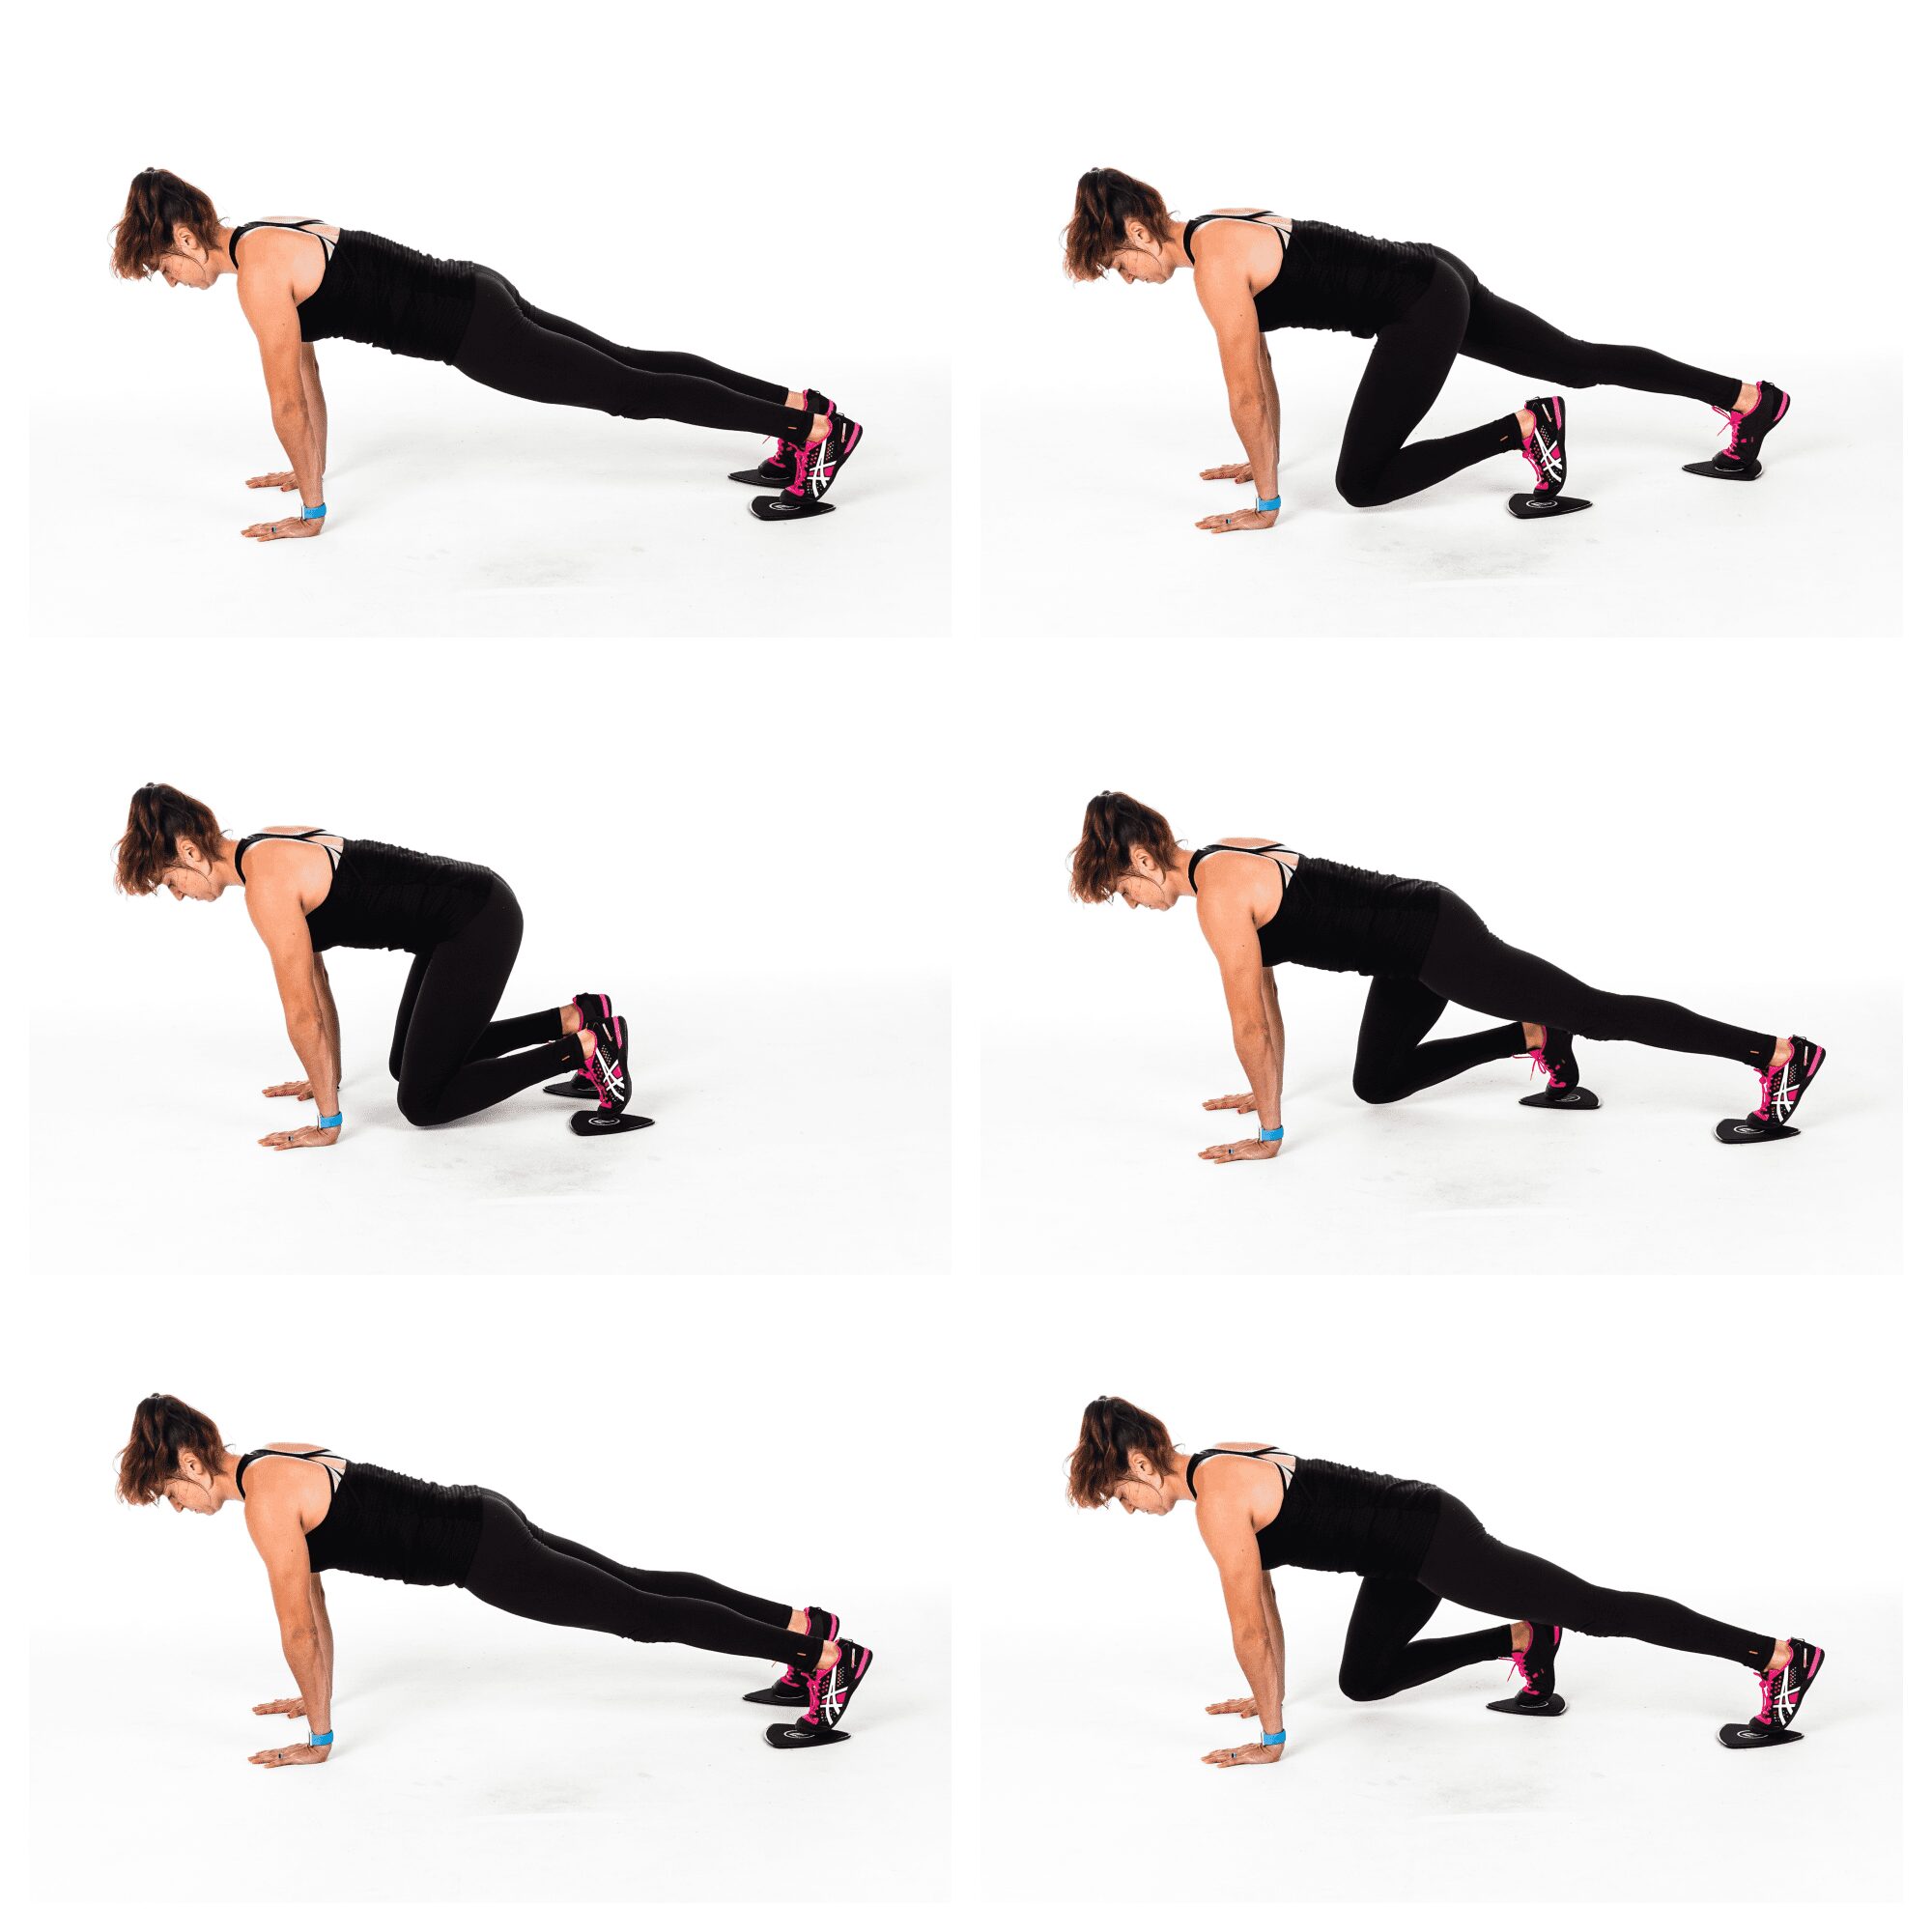
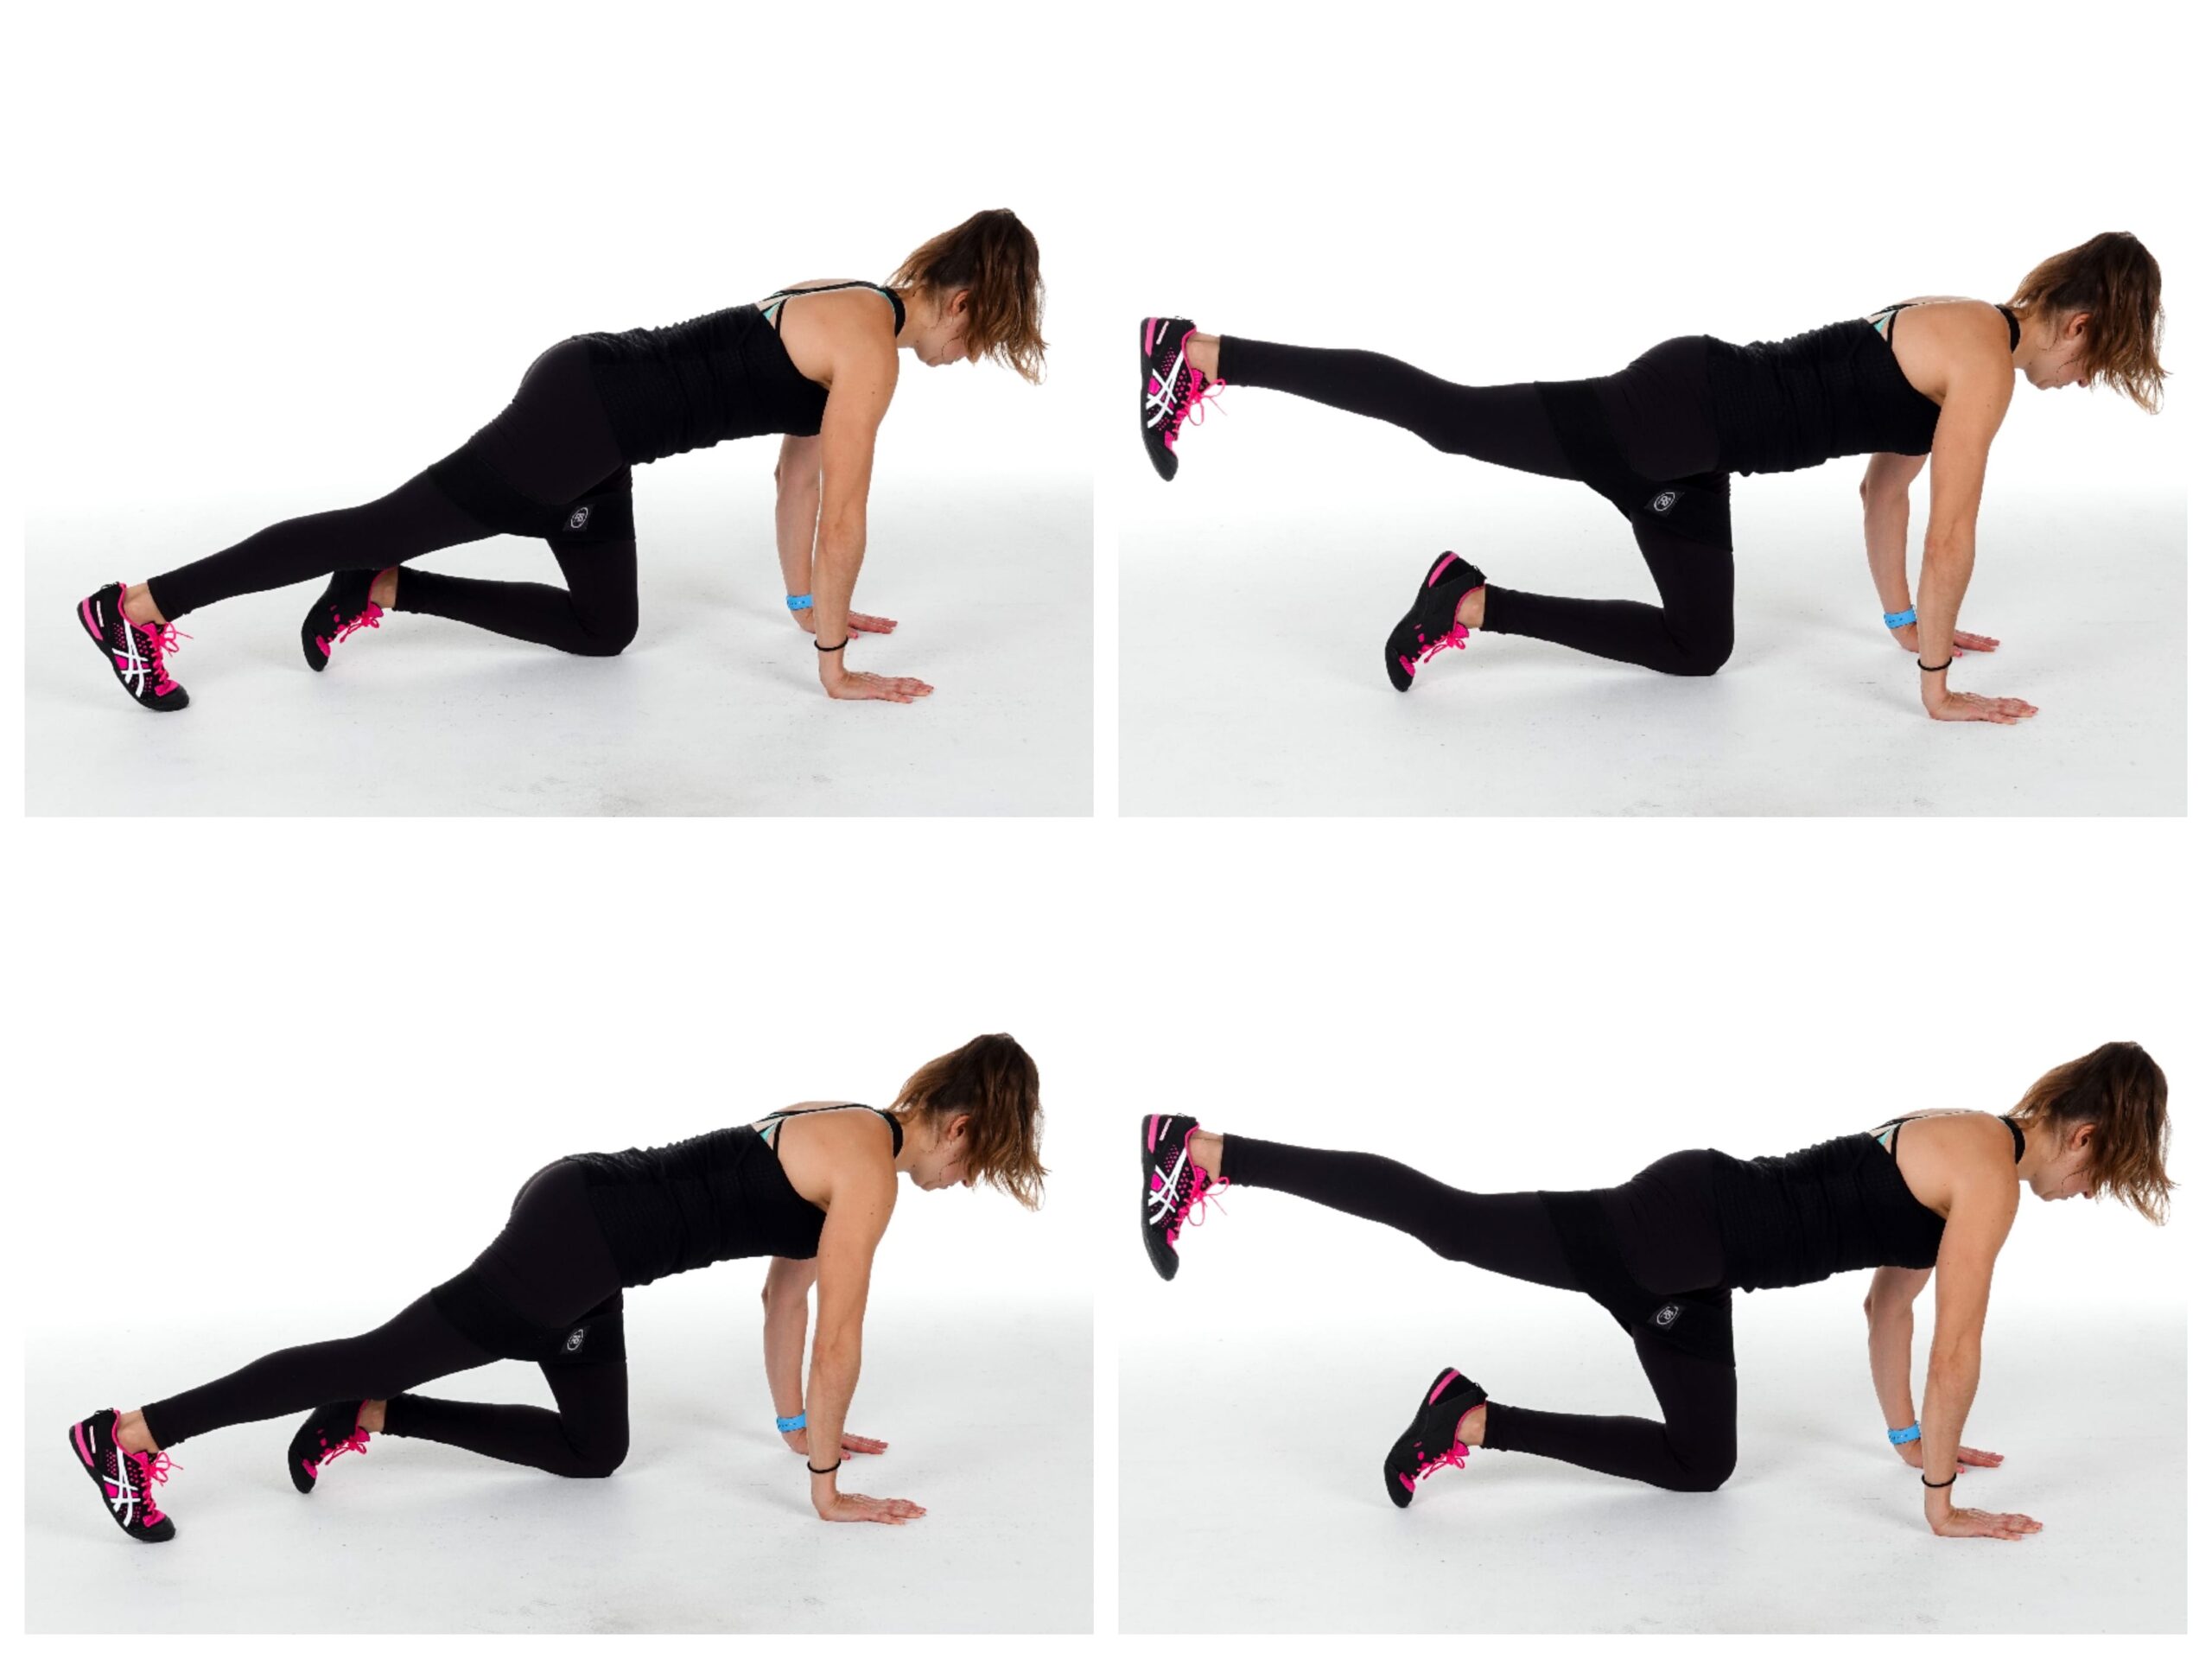
Slider Plank to Bulldog:
To do the Slider Plank to Bulldog, place a slider under each foot and set up in a high plank position with your hands under your shoulders and your body in a nice straight line down to your feet. Your feet should be no wider than hip-width apart.
Holding this plank position, use your abs to tuck one knee in and then the other to come into a bulldog position.
Your knees should be about under your hips or in slightly closer in, but do not tuck them so far in you can sit back on your heels. Really focus on using your abs to slide them in, bracing your core to keep your body in a nice straight line the entire time.
Then extend your legs back out, one at a time. Make sure your butt stays down and you don’t slide back too far, but instead keep your hands under your shoulders. Then repeat, drawing one knee in then the other.
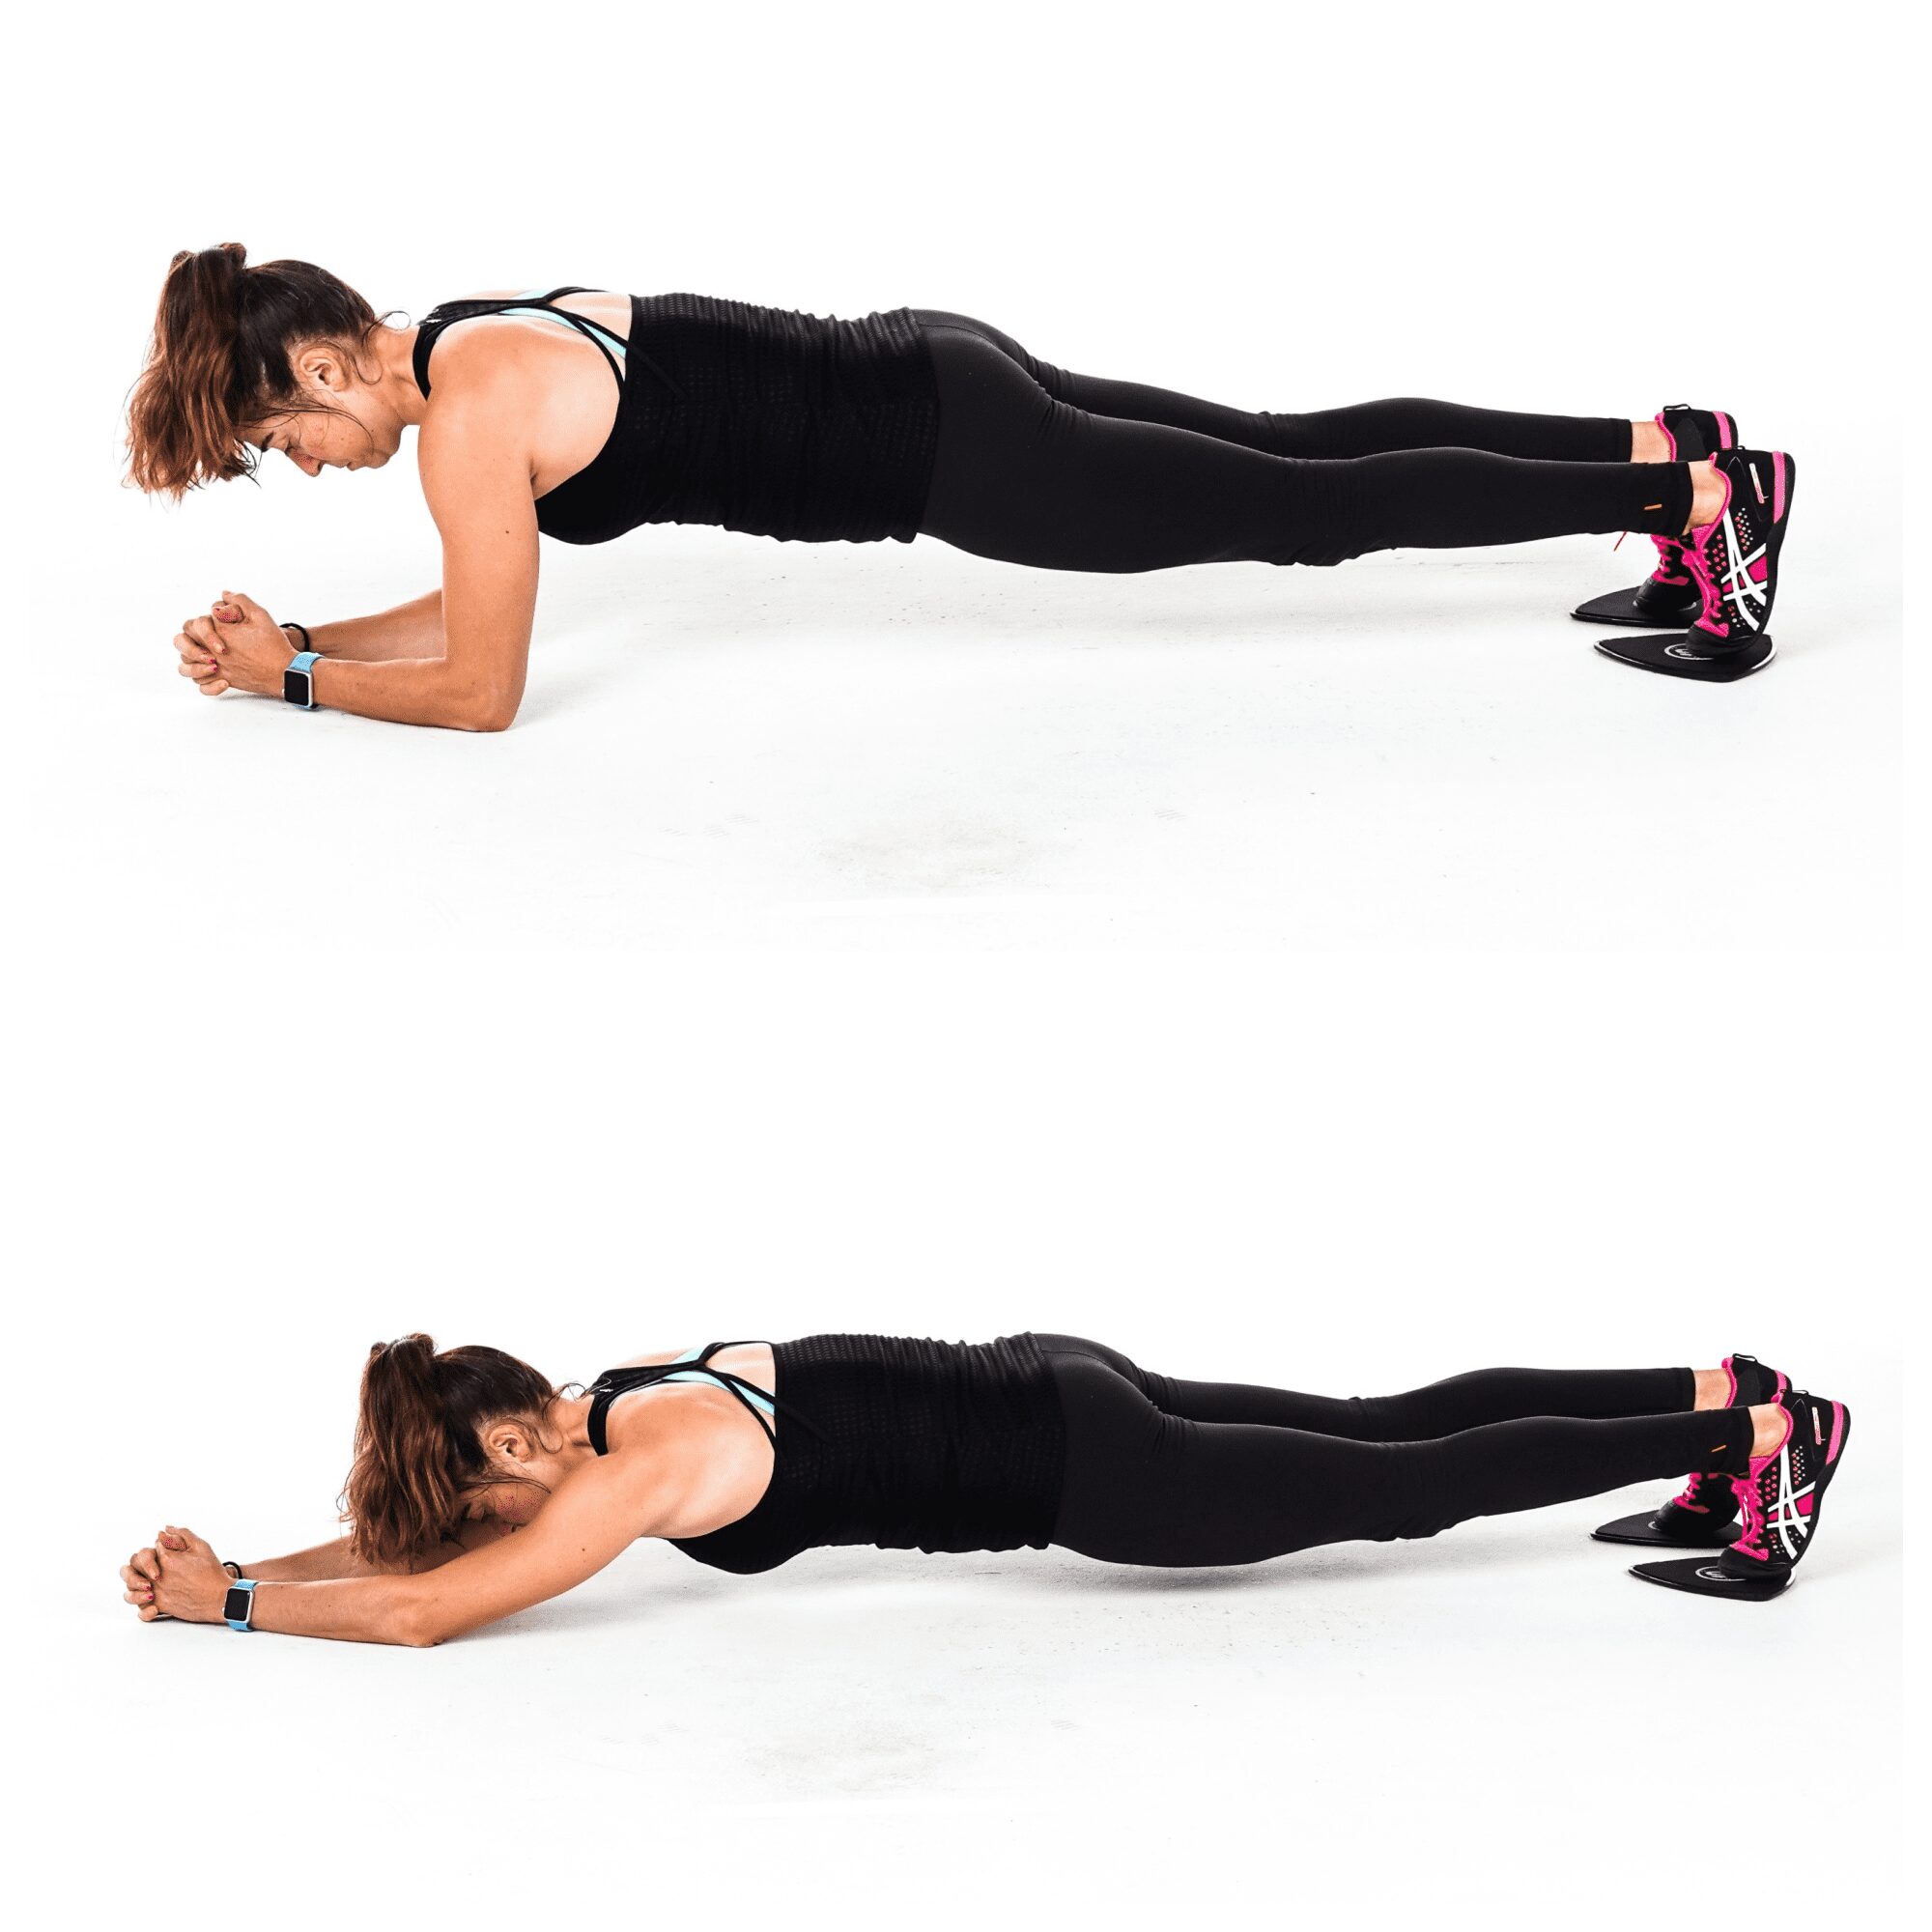
Body Saw:
To do the Body Saw, set up in a plank position on your forearms with your feet on the sliders. Elbows should be under your shoulders and your feet should be together or no wider than hip-width apart.
With your body in a nice straight line from your head to your heels, slide your feet back and lengthen through your arms. As you slide back you should extend your body down to your elbows, shifting your shoulders back behind your elbows. Do not let your hips sag as you slide back. You are extending your triceps as you slide back.
Then, using your lats and core, pull your feet back in to the plank position. When you come back into the plank position, do not let your butt go up in the air. Make sure your hips don’t sag either.
Then slide back out, lengthening your body out as much as you can. Again do not let your low back take over. Make sure that you also aren’t simply sliding forward and then back to the start but are actually sliding back and lengthening through your arms.
Superman Wave:
To do Superman Waves, lie face down on the ground with you arms reaching overhead and your legs out straight behind you.
Then lift your arms and legs off the ground, engaging your glutes and back to lift. Try to lift your chest up as high as you can and get your quads off the ground as much as possible.
Holding here, sweep one arm out and down toward your side, keeping your arms straight. Keep the other arm reaching straight out overhead as you wave the other arm down.
As you lower one arm down by your side, keep it as high off the ground as possible to work the back of your shoulder.
Wave the arm back overhead then sweep the other arm out and down to your side. Keep alternating sides as you engage your back and butt to stay up in the superman position. Move at a controlled pace.
Whether you want to prevent lower back, hip, knee or even foot and ankle pain or you want to run faster, cycle further or lift more, you’ve got to get those glutes activated and working efficiently.
And the Booty Band is the perfect tool to help you do just that!
By using a band for these moves, you help yourself engage the glute medius to stabilize your hips and this can, in turn, help the glute maximus also fire better and become stronger.
The band is great too because it applies constant pressure, even increasing pressure at the point in the movement where you are the strongest.
Because of the nature of the bands, the range of motion on many of these moves and the PUMP the band creates, it really helps you establish that mind-body connection and use metabolic stress to drive muscle growth.
10 Booty Band Moves To Activate Your Glutes
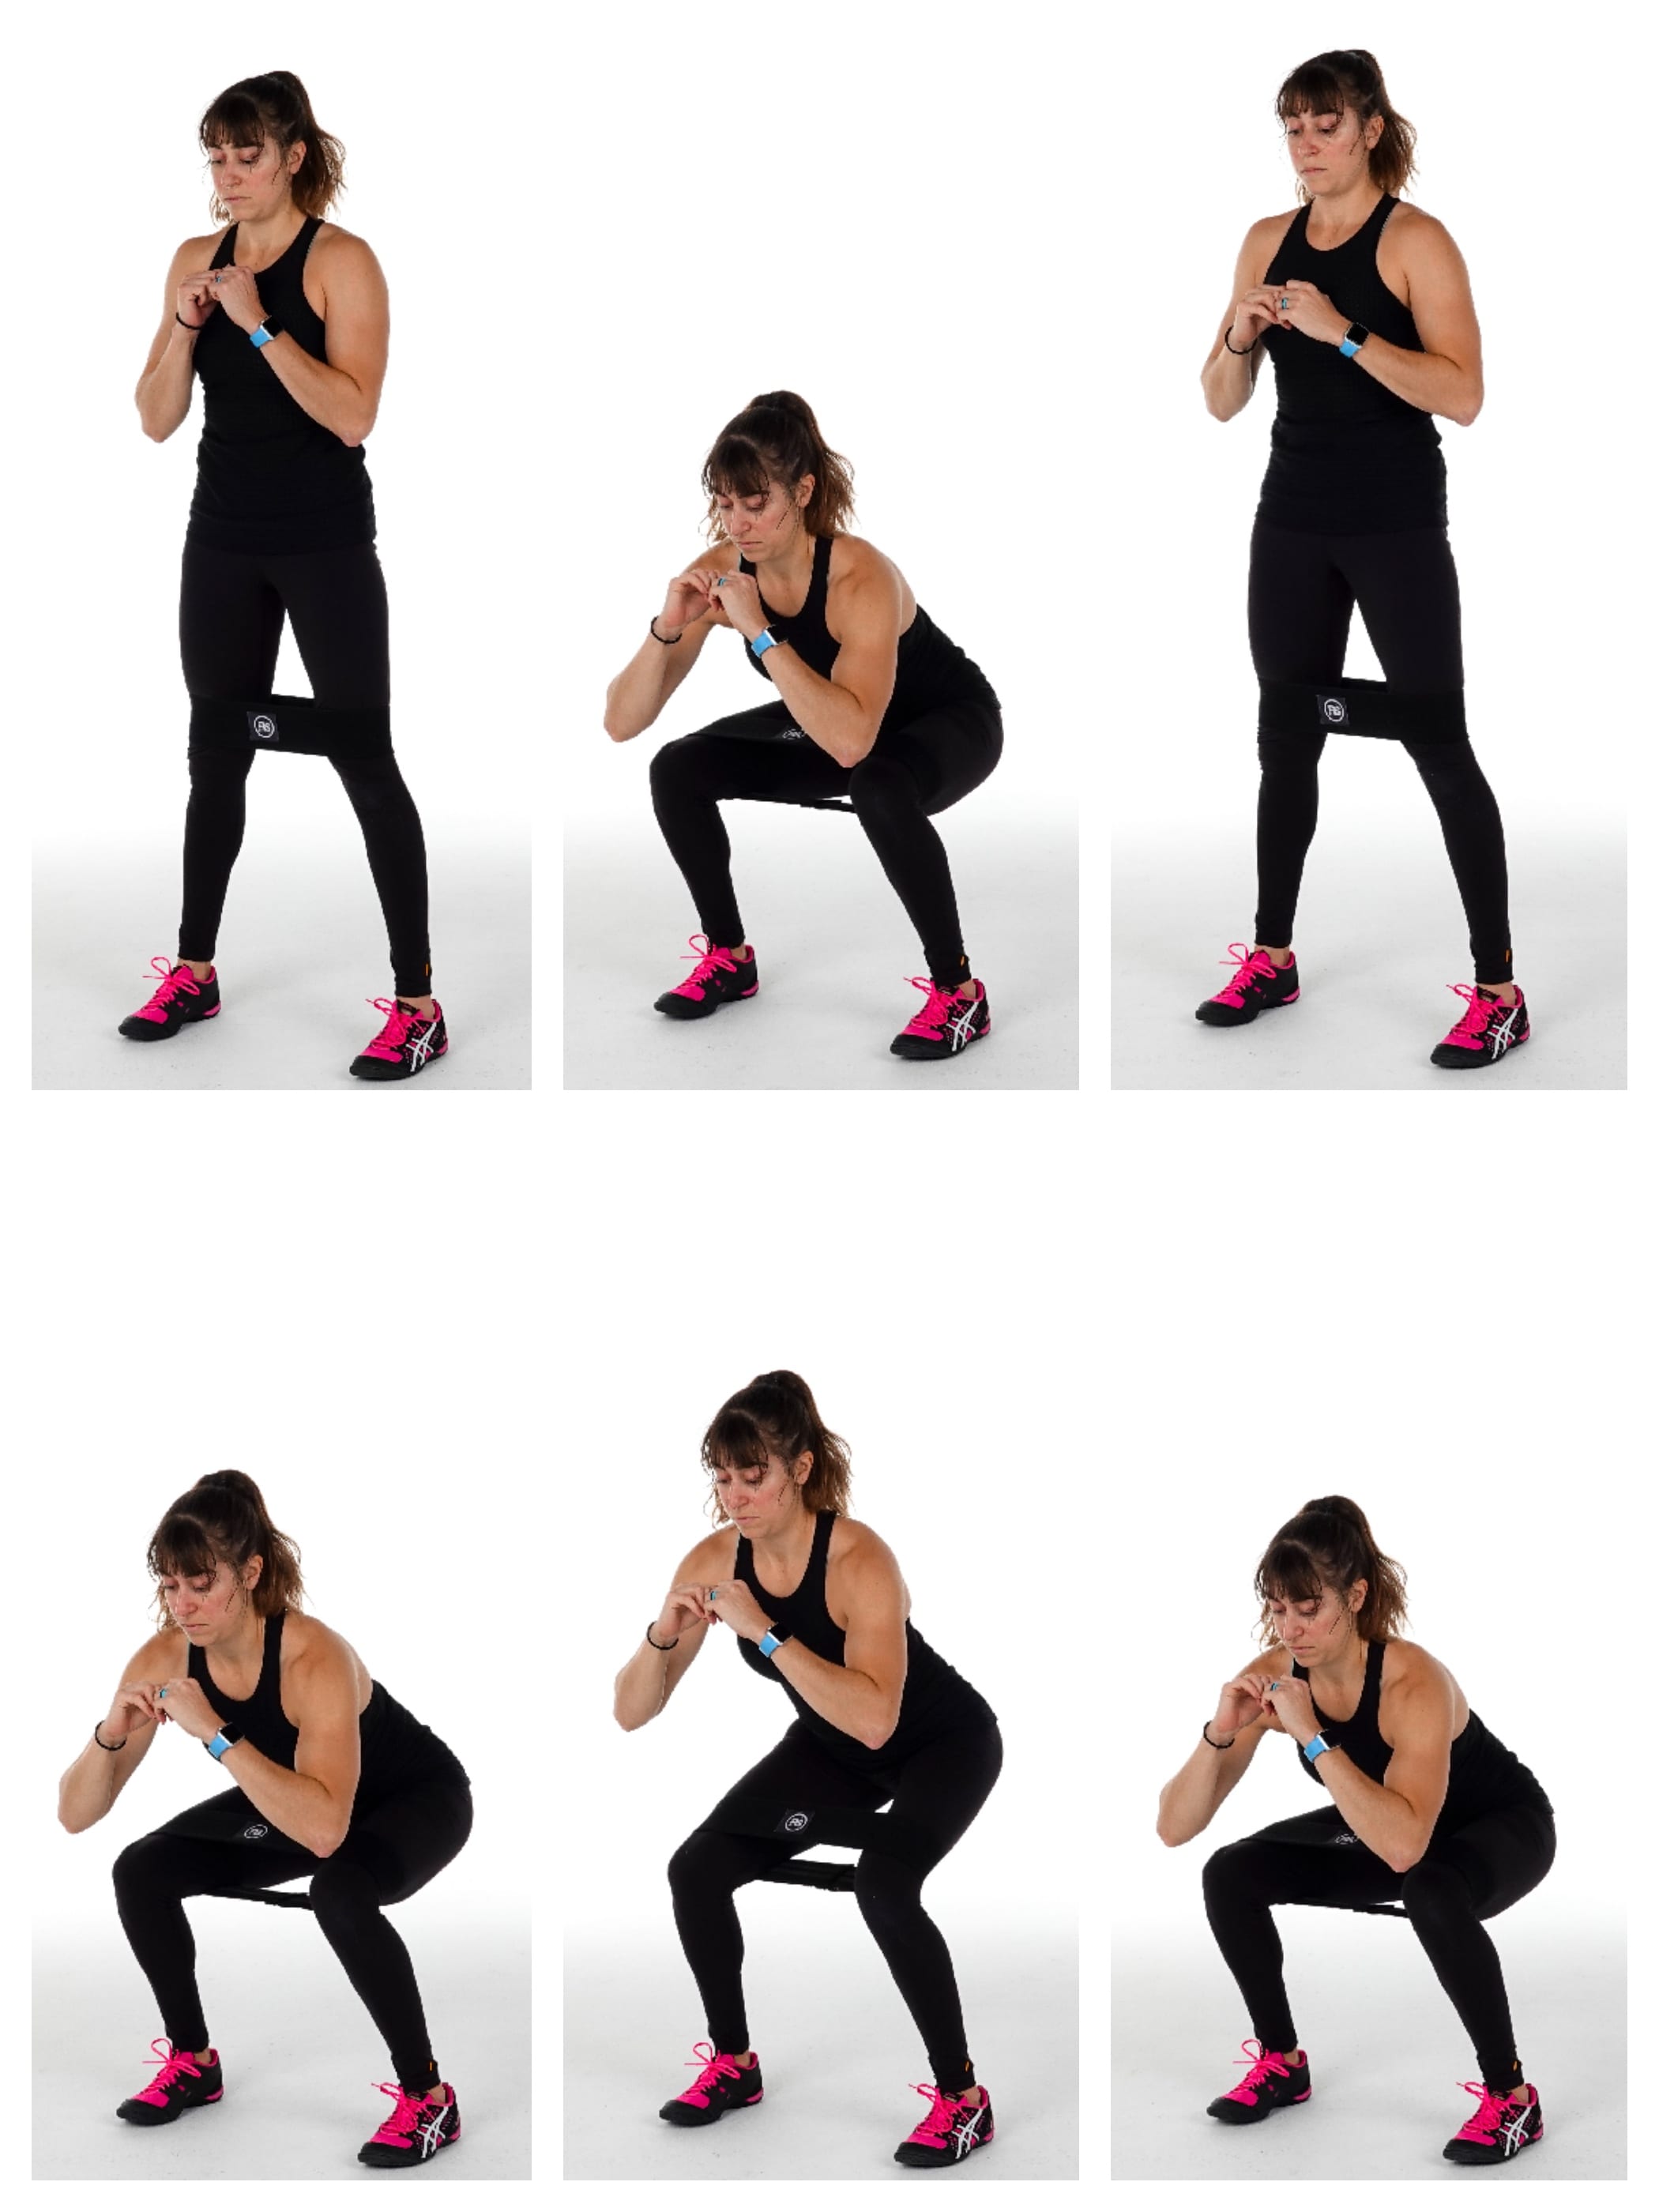
Squat to Squat Pulse:
If you’re planning to include squats in your workout, this is a great way to warm up your muscles, improve your hip mobility and activate your glutes.
To do the Squat to Squat Pulse, place the Booty Band right above your knees and stand with your feet about hip-width to shoulder-width apart.
Then squat down, sitting your butt down and back. Press out on the band as you squat to about parallel or below. Do not let your knees cave in as you lower down.
Drive back up to standing and make sure you press out against the band as you stand back up. Do not let your knees cave as you stand up. Also, make sure you aren’t rocking in on your feet. After standing back up, squat down again.
This time at the bottom, come up only a few inches to pulse up and then sink back down before standing all the way back up.
Throughout, really focus on pressing out on that band!
Repeat, performing the squat then the pulse at the bottom before another full squat.
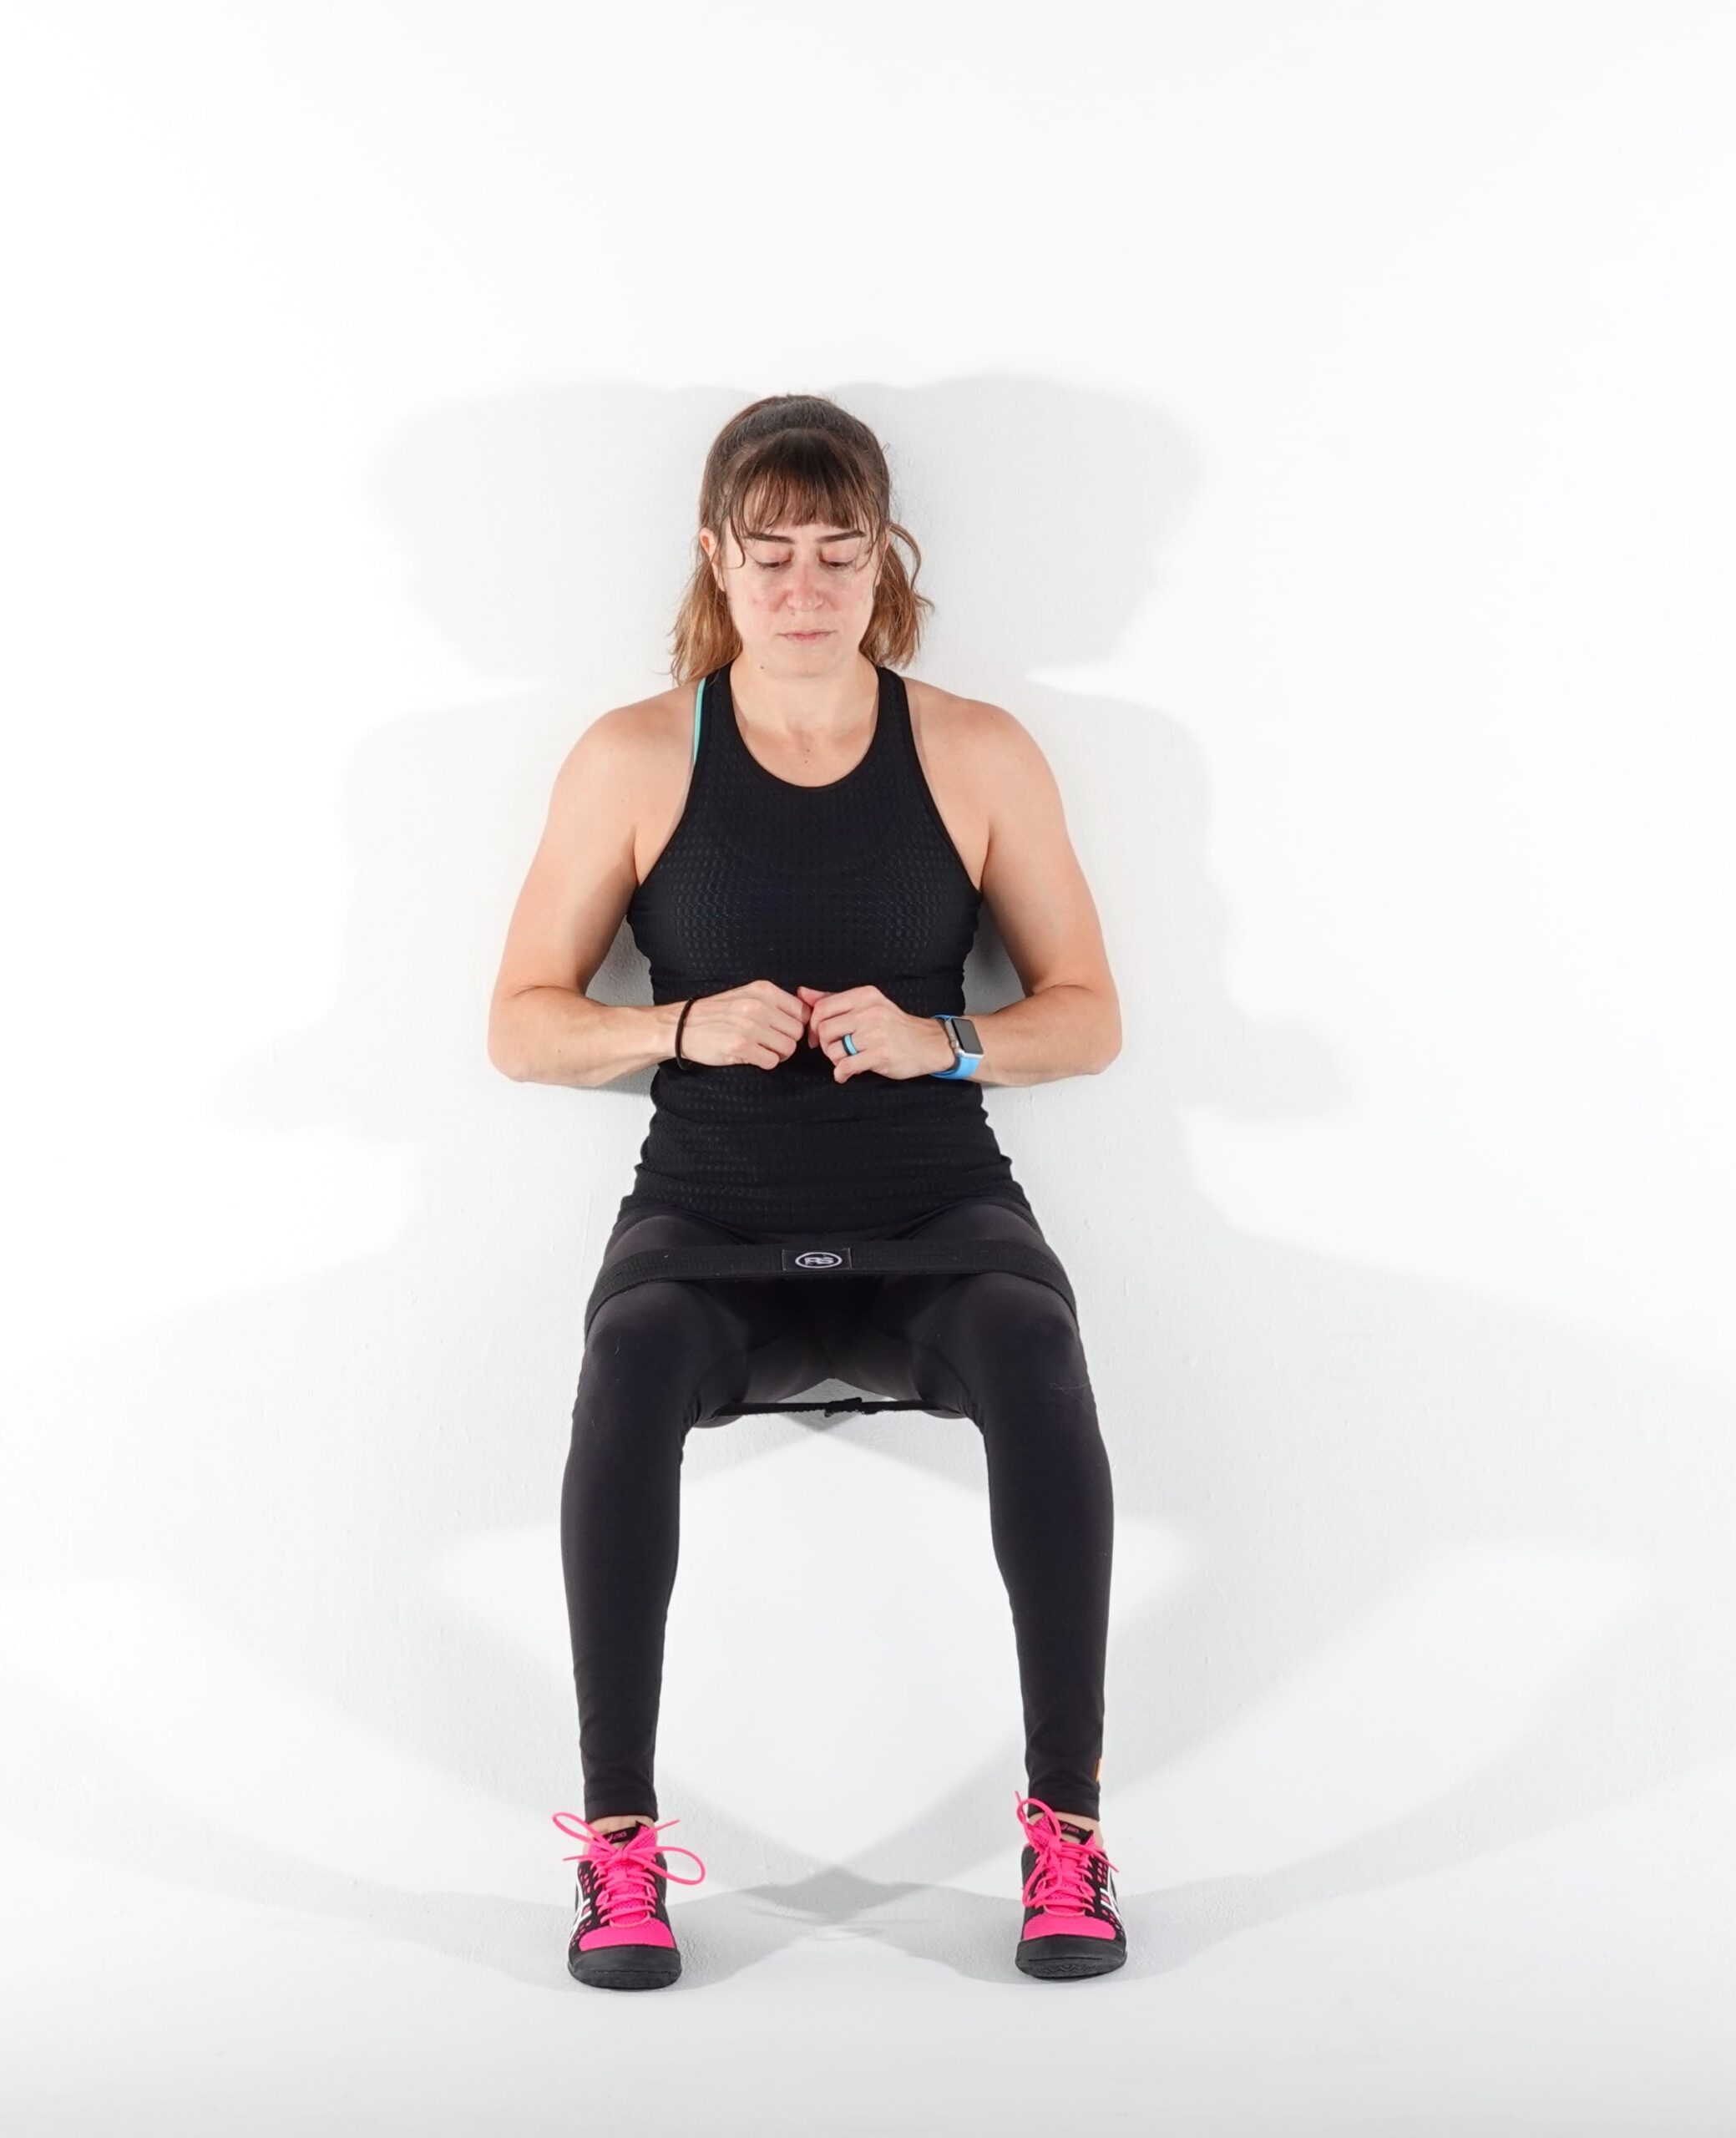
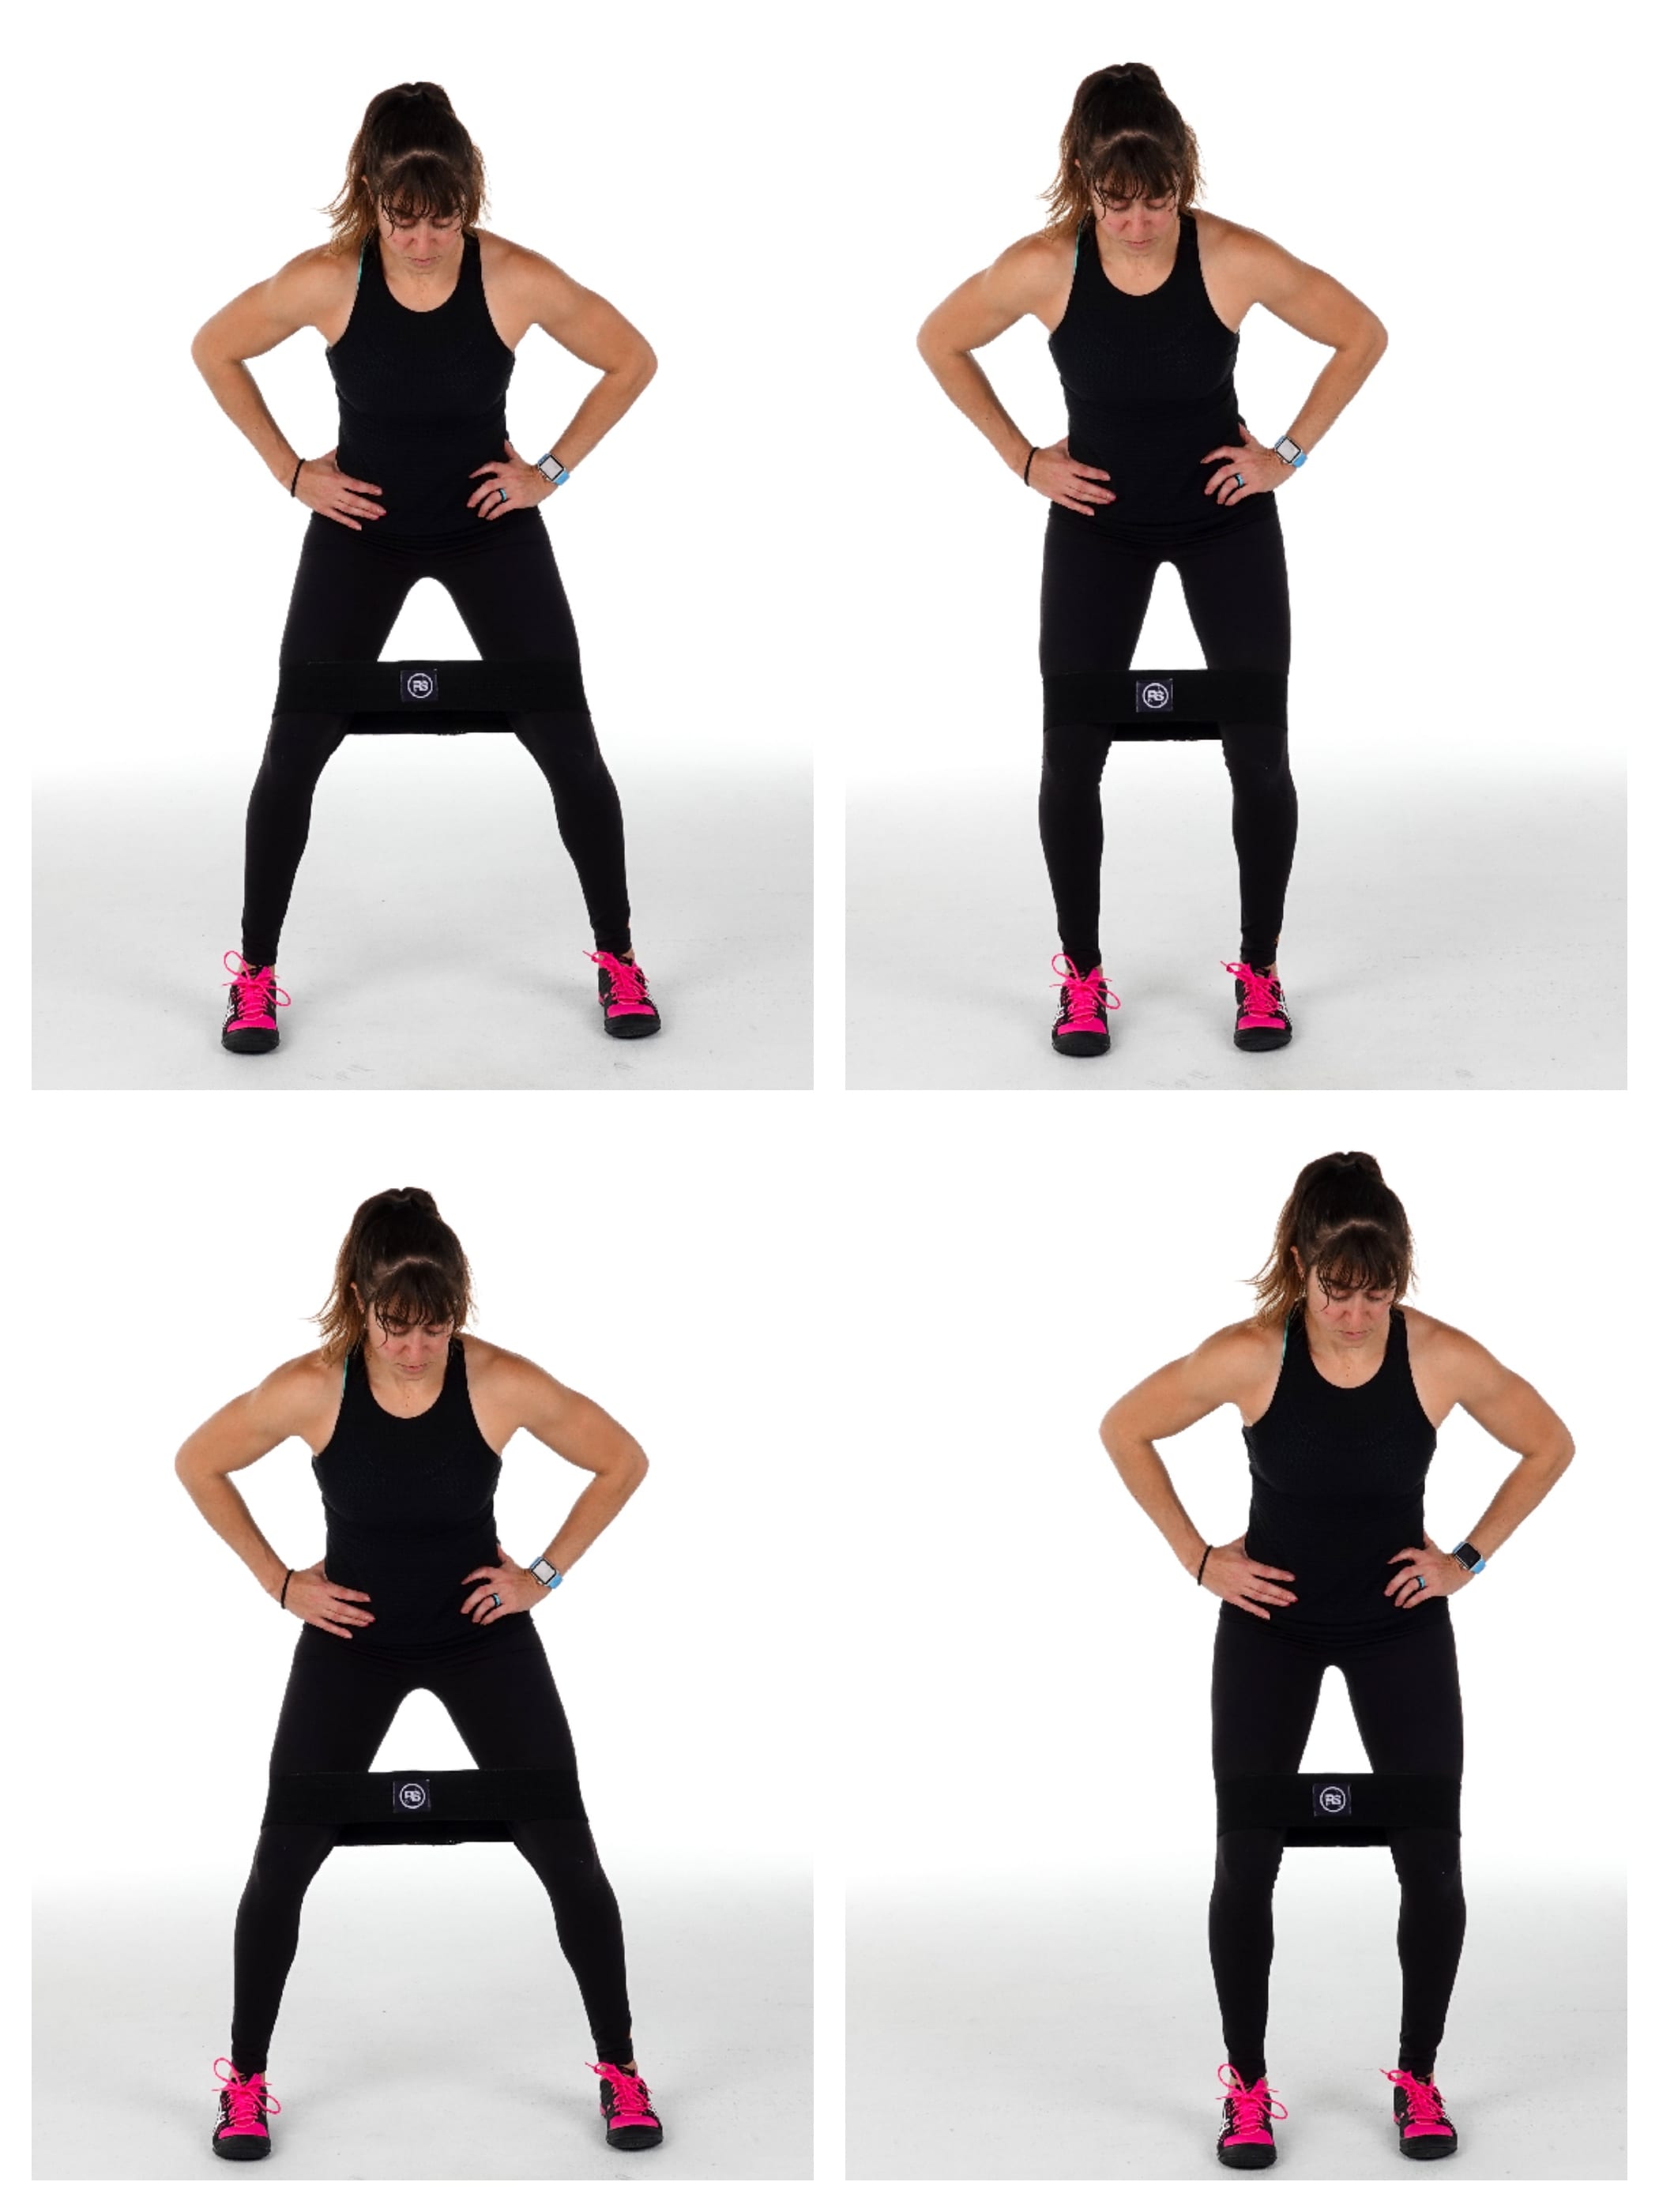
Wall Sit:
If you’ve ever had knee pain, or if you’re an avid skier, runner or cyclist, the Booty Band Wall Sit is a must-do move!
To do the Booty Band Wall Sit, place a booty band right above your knees.
Then sit back against a wall with your feet about hip-width to shoulder-width apart and your knees over your ankles. Make sure your hips, knees and feet are all in line. Don’t let the band cause your knees to cave in. Press out against the band as you stay in that wall sit with your knees and hips about at 90 degrees.
Do not drop down below that parallel squat. Beginners may be up a bit higher if needed, but try to get your quads to about parallel to the ground. Hold here and think about what you feel working. And press your back into the wall, driving through your heels.
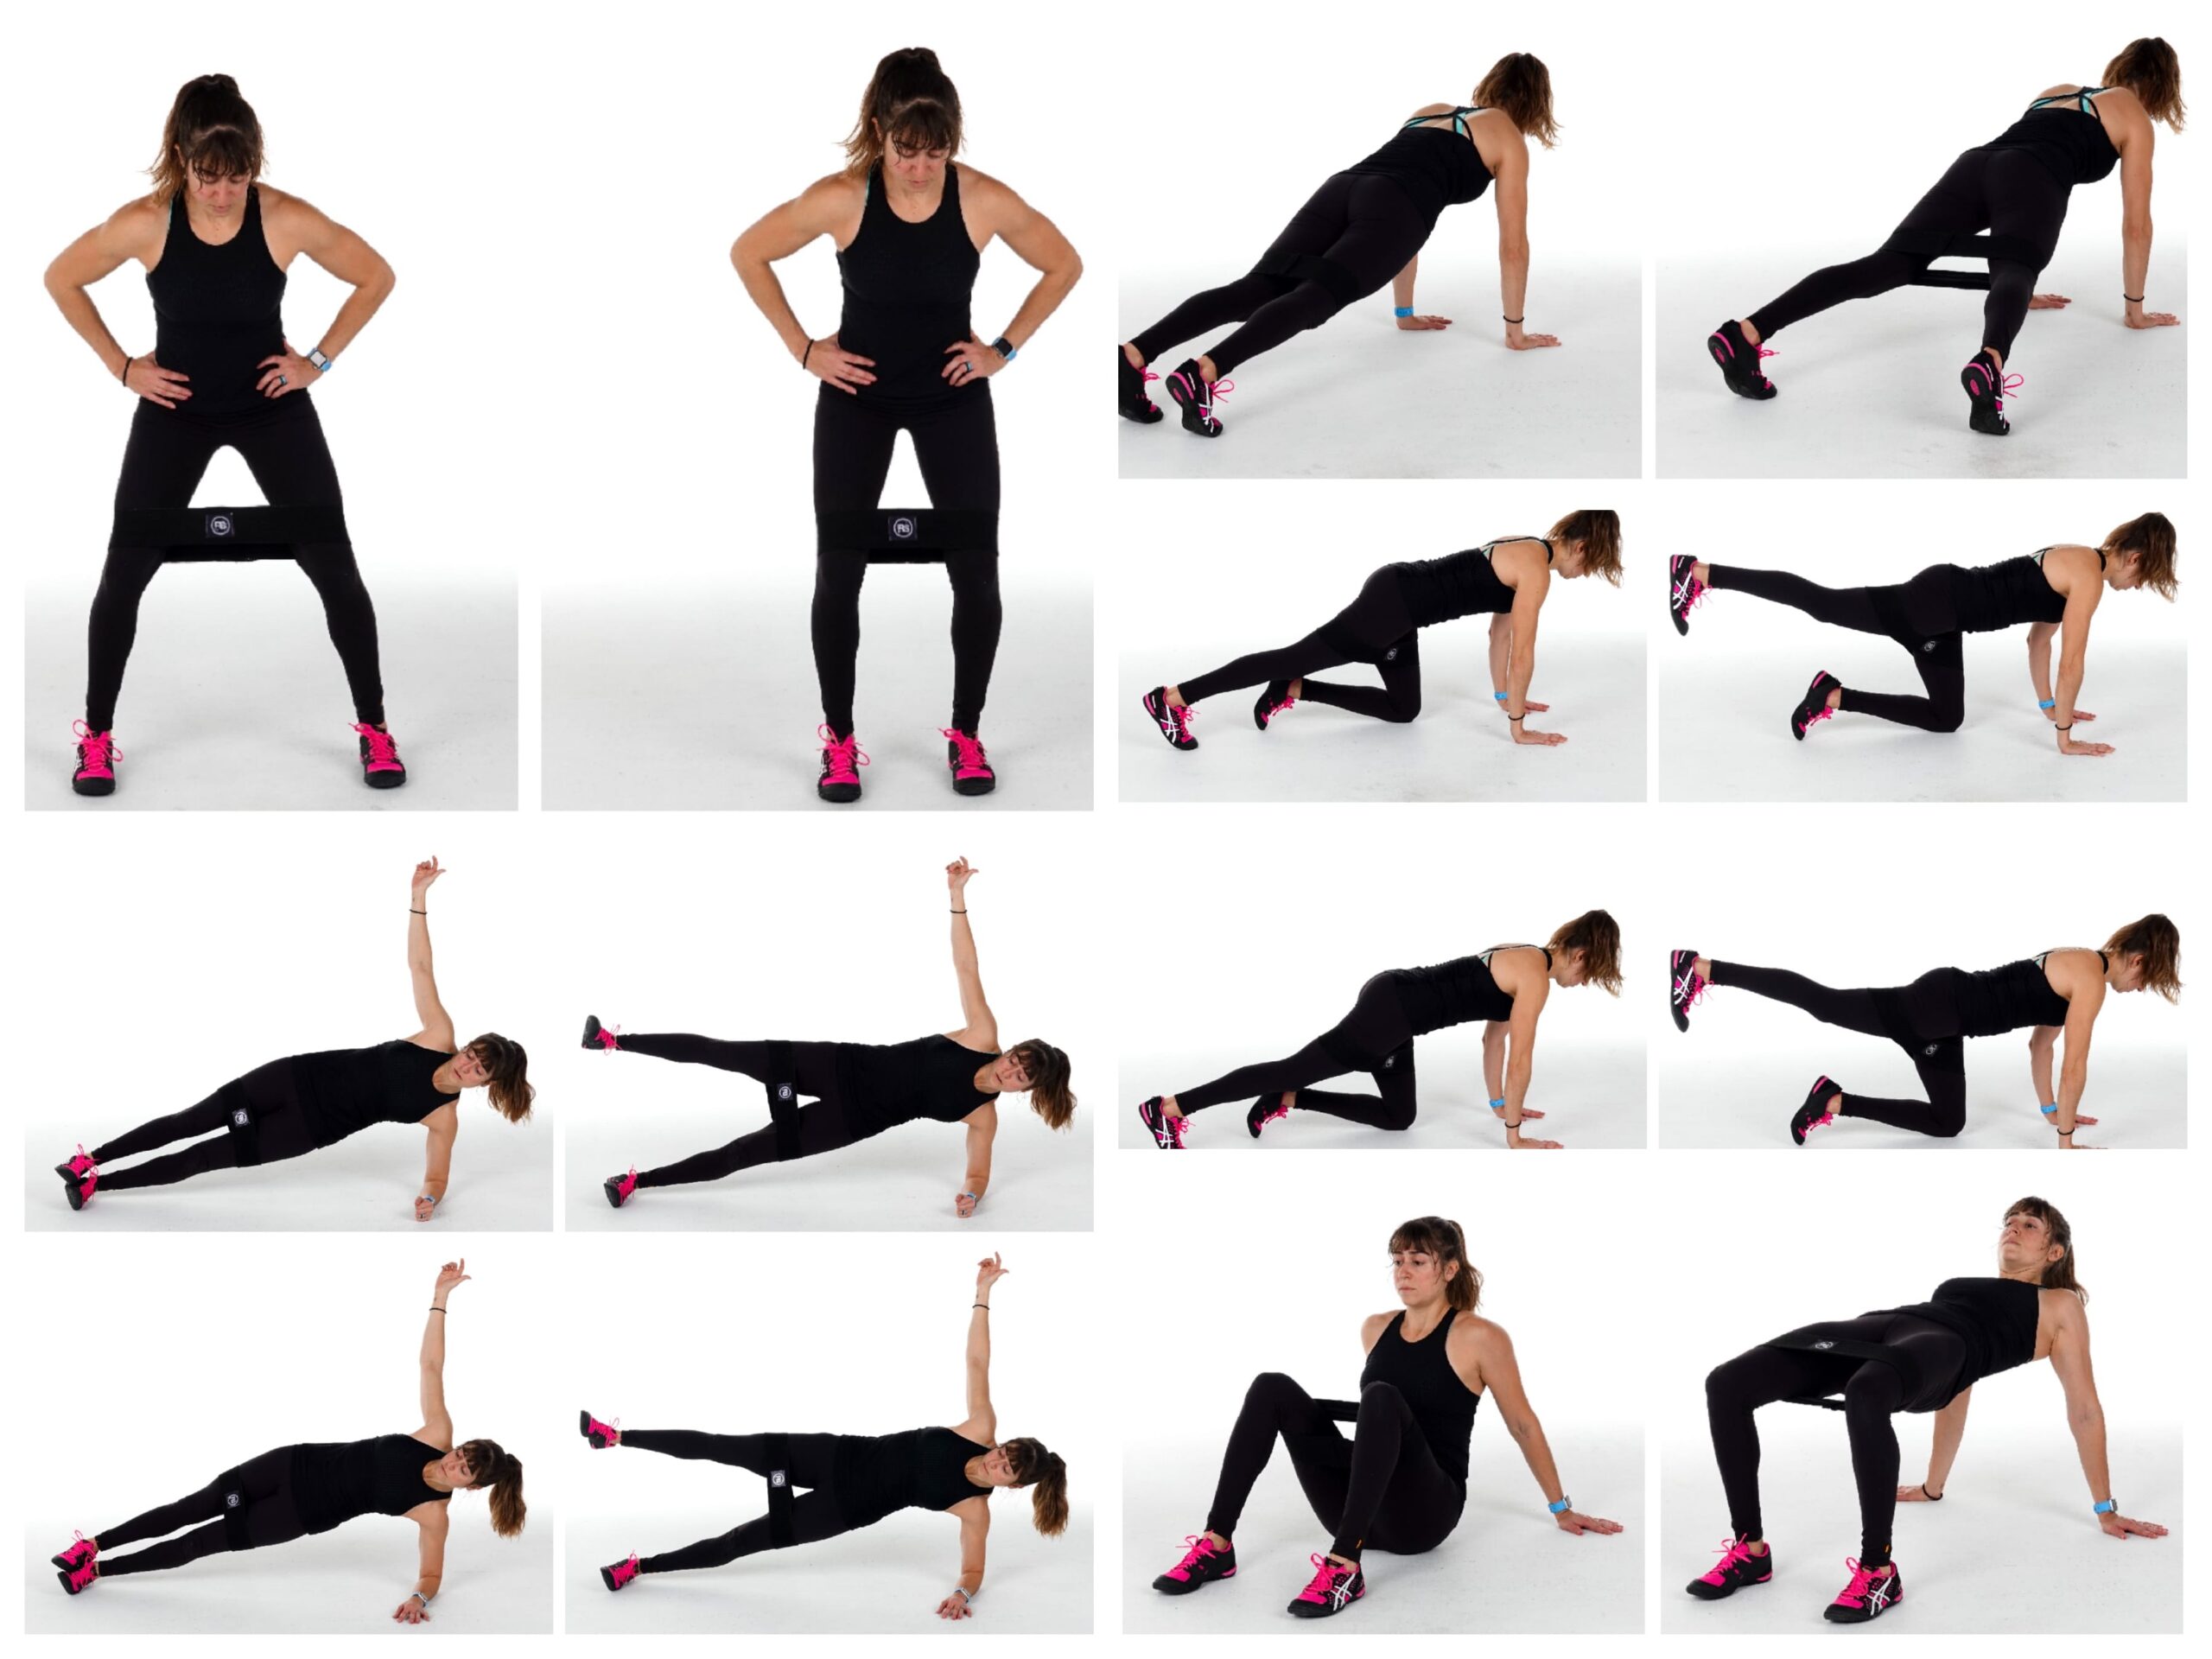
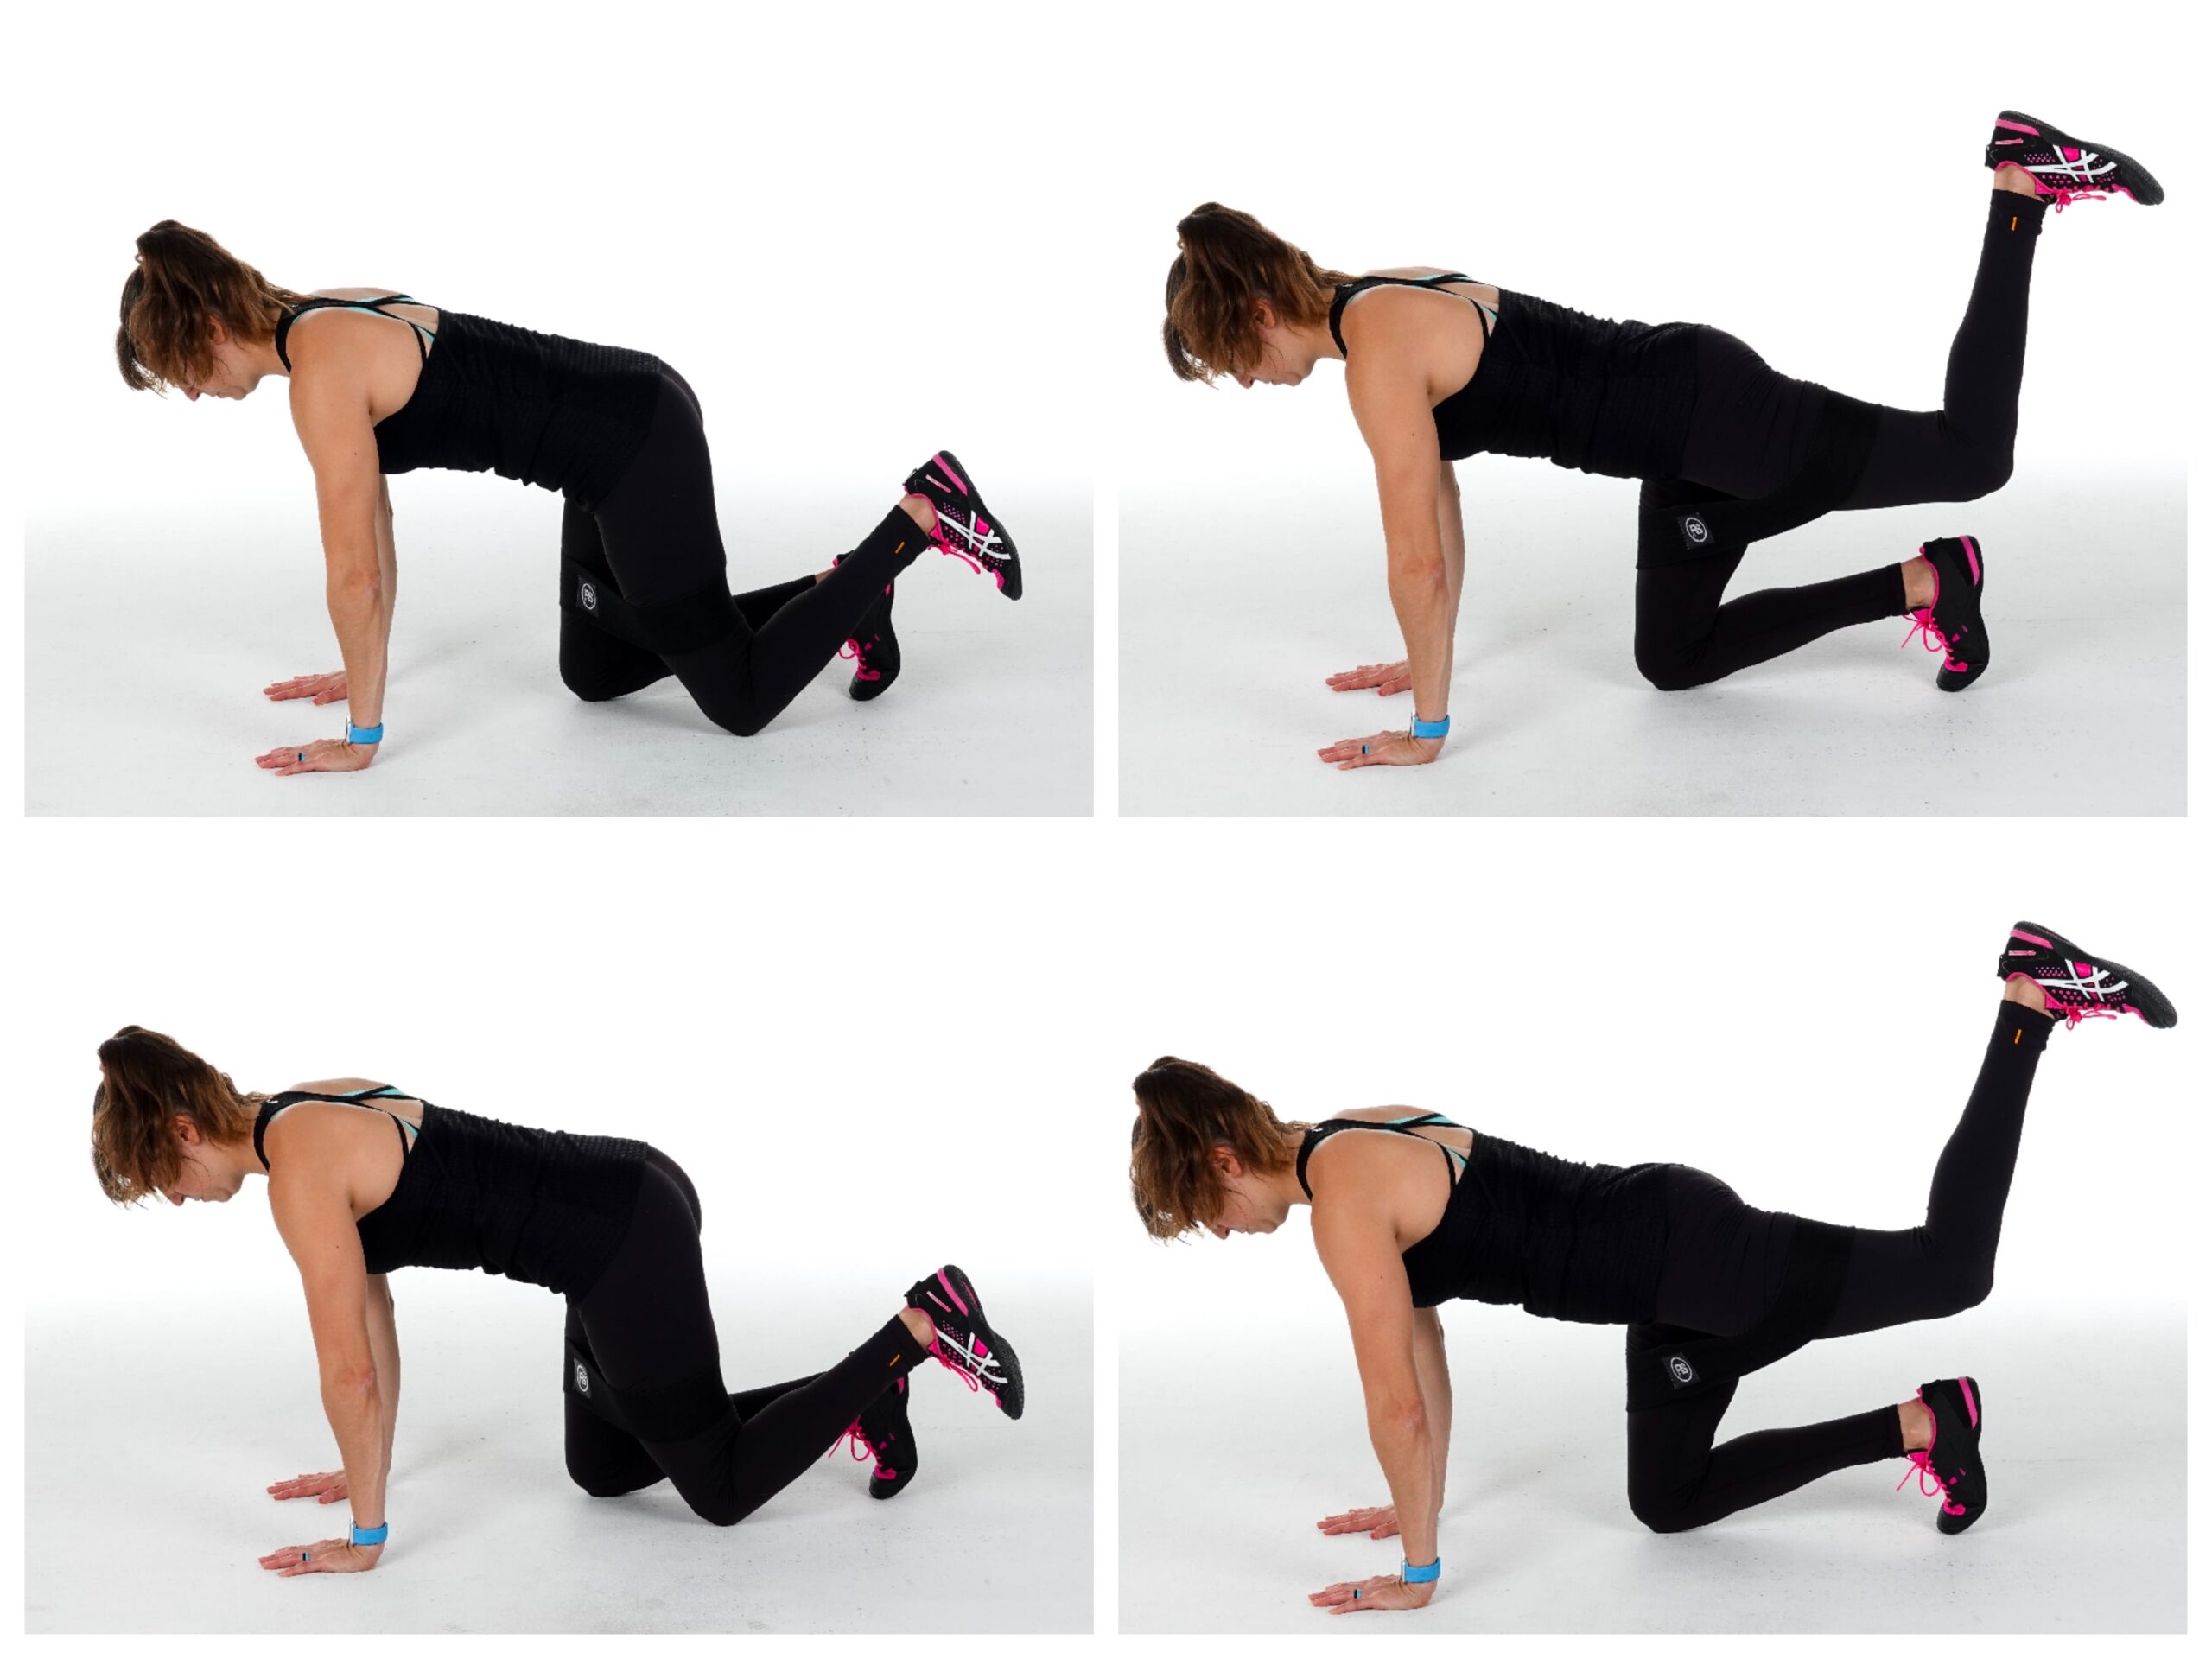
Donkey Kicks:
Correct imbalances as you activate your glutes with this unilateral move. It is also a great way to work on engaging your and activating your abs!
To do Booty Band Donkey Kick, start on your hands and knees and place a band right above your knees. You’ll be in a quadruped position with the band around your legs.
Your knees should be right under your hips and your feet should be flexed. Make sure your hands are right under your shoulders.
Then keeping one knee bent and foot flexed, drive that foot up and back toward the ceiling. Keep your core braced and squeeze your glute as you kick your heel up and back. Do not let your right knee flare out as you lift; however, you can kick slightly up and out to create more lateral tension on the band.
Make sure to really drive your heel up toward the ceiling. Extend your hip as you kick back. Don’t simply swing the leg back and up or hyperextend your low back to kick up higher. You want to squeeze your glute and feel your hip extending. Do not worry so much about height but about contracting your glute to almost “stop” yourself from kicking higher.
Hold for a second then lower back down and repeat.
You can also make it even more of a burner by pulsing at that end range of motion or create a bit more muscle tension by working through a fuller range of motion. You can also go down to your forearms if you find you want to arch your back or have wrist pain.
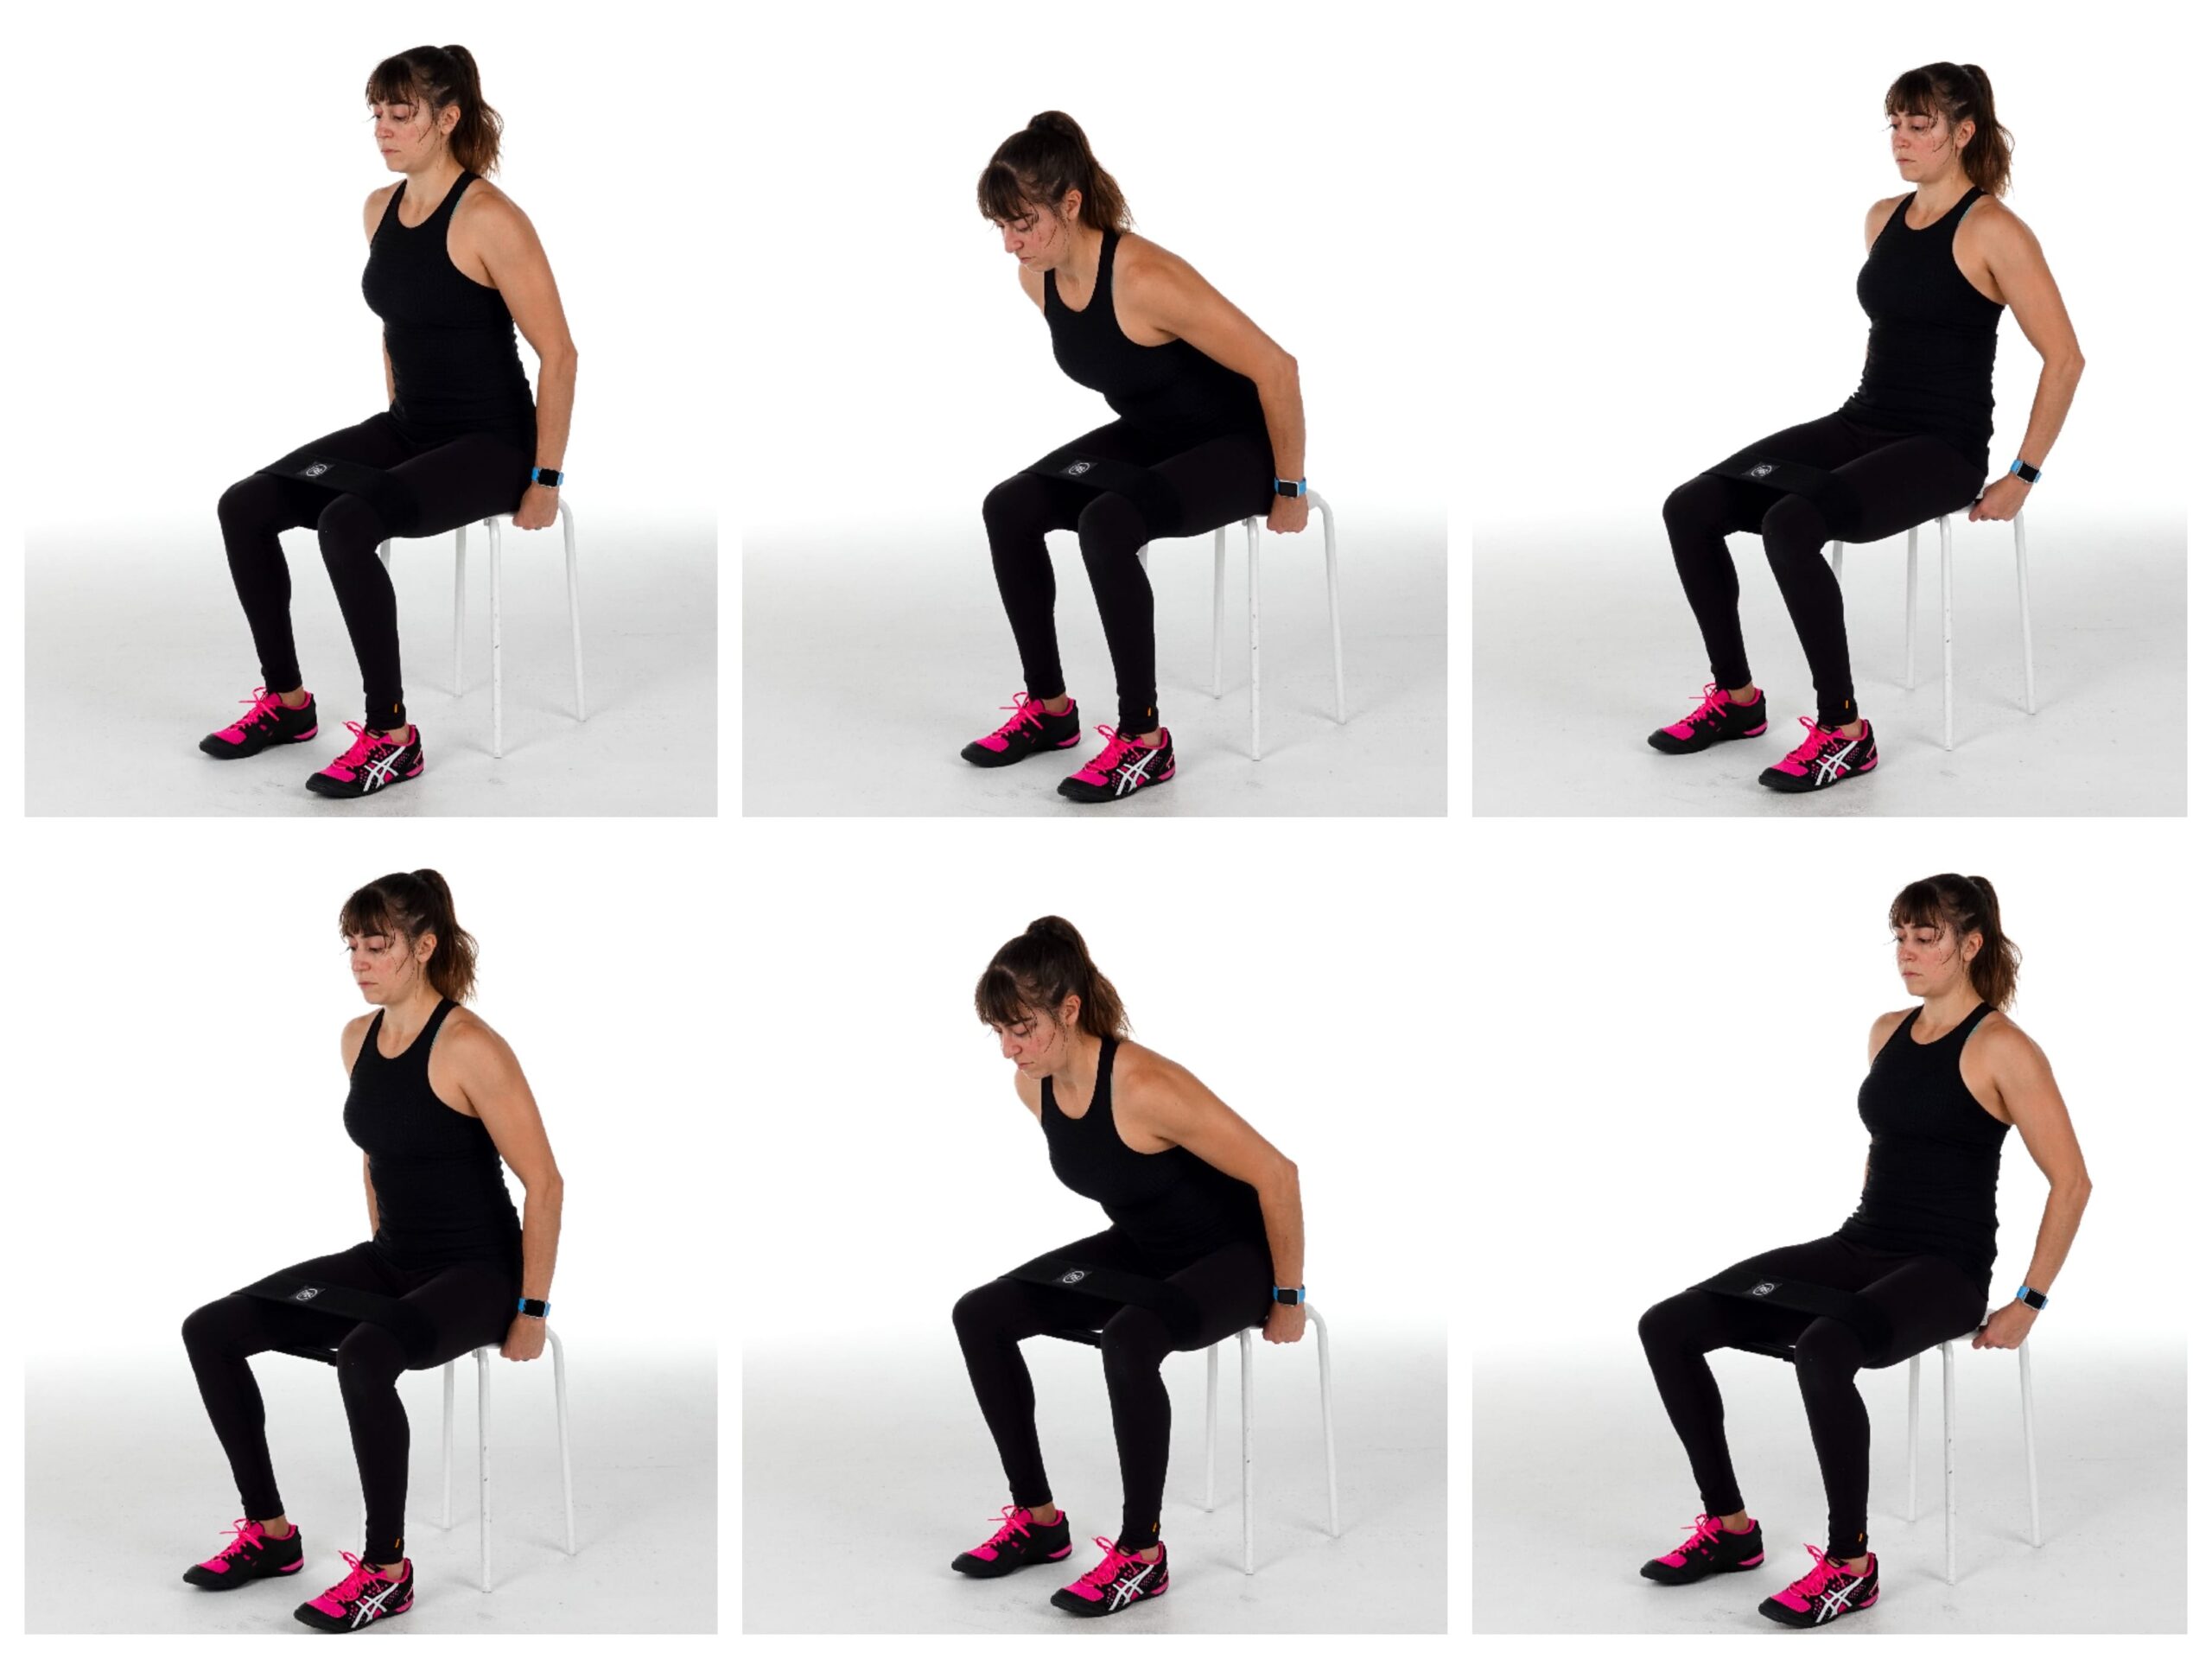
3-Way Seated Abductions:
Strengthen your glute medius from 3 different positions to activate both anterior and posterior fibers! Sometimes it isn’t about using a heavier resistance to create change, but about simply tweaks to your body position.
To do 3-Way Seated Booty Band Abductions, place the band right above your knees and sit on a bench. Start by sitting toward the front of the bench so you can lean back and put your hands on the bench behind you. Place your feet about hip-width apart.
Then press your knees open against the band as you lean back. Your feet may rock open but focus on using your glutes to press the band open with your knees. Do not let your knees cave in as you come back to the starting position. Complete all reps then move to sit up nice and tall.
Sitting nice and tall repeat, pressing out with your knees so you feel your glutes working. After completing all reps, lean forward and repeat the movement. You can hold on the bench outside your legs to lean forward or just lean over even lightly resting your arms on your legs.
Complete all reps in each of the 3 positions. Make sure you’re really focused on pressing your knees out to feel your glutes while controlling the band back in. To reduce tension, you can put your feet slightly closer together, but make sure there is tension on the band even in that starting position or the band may slip down.
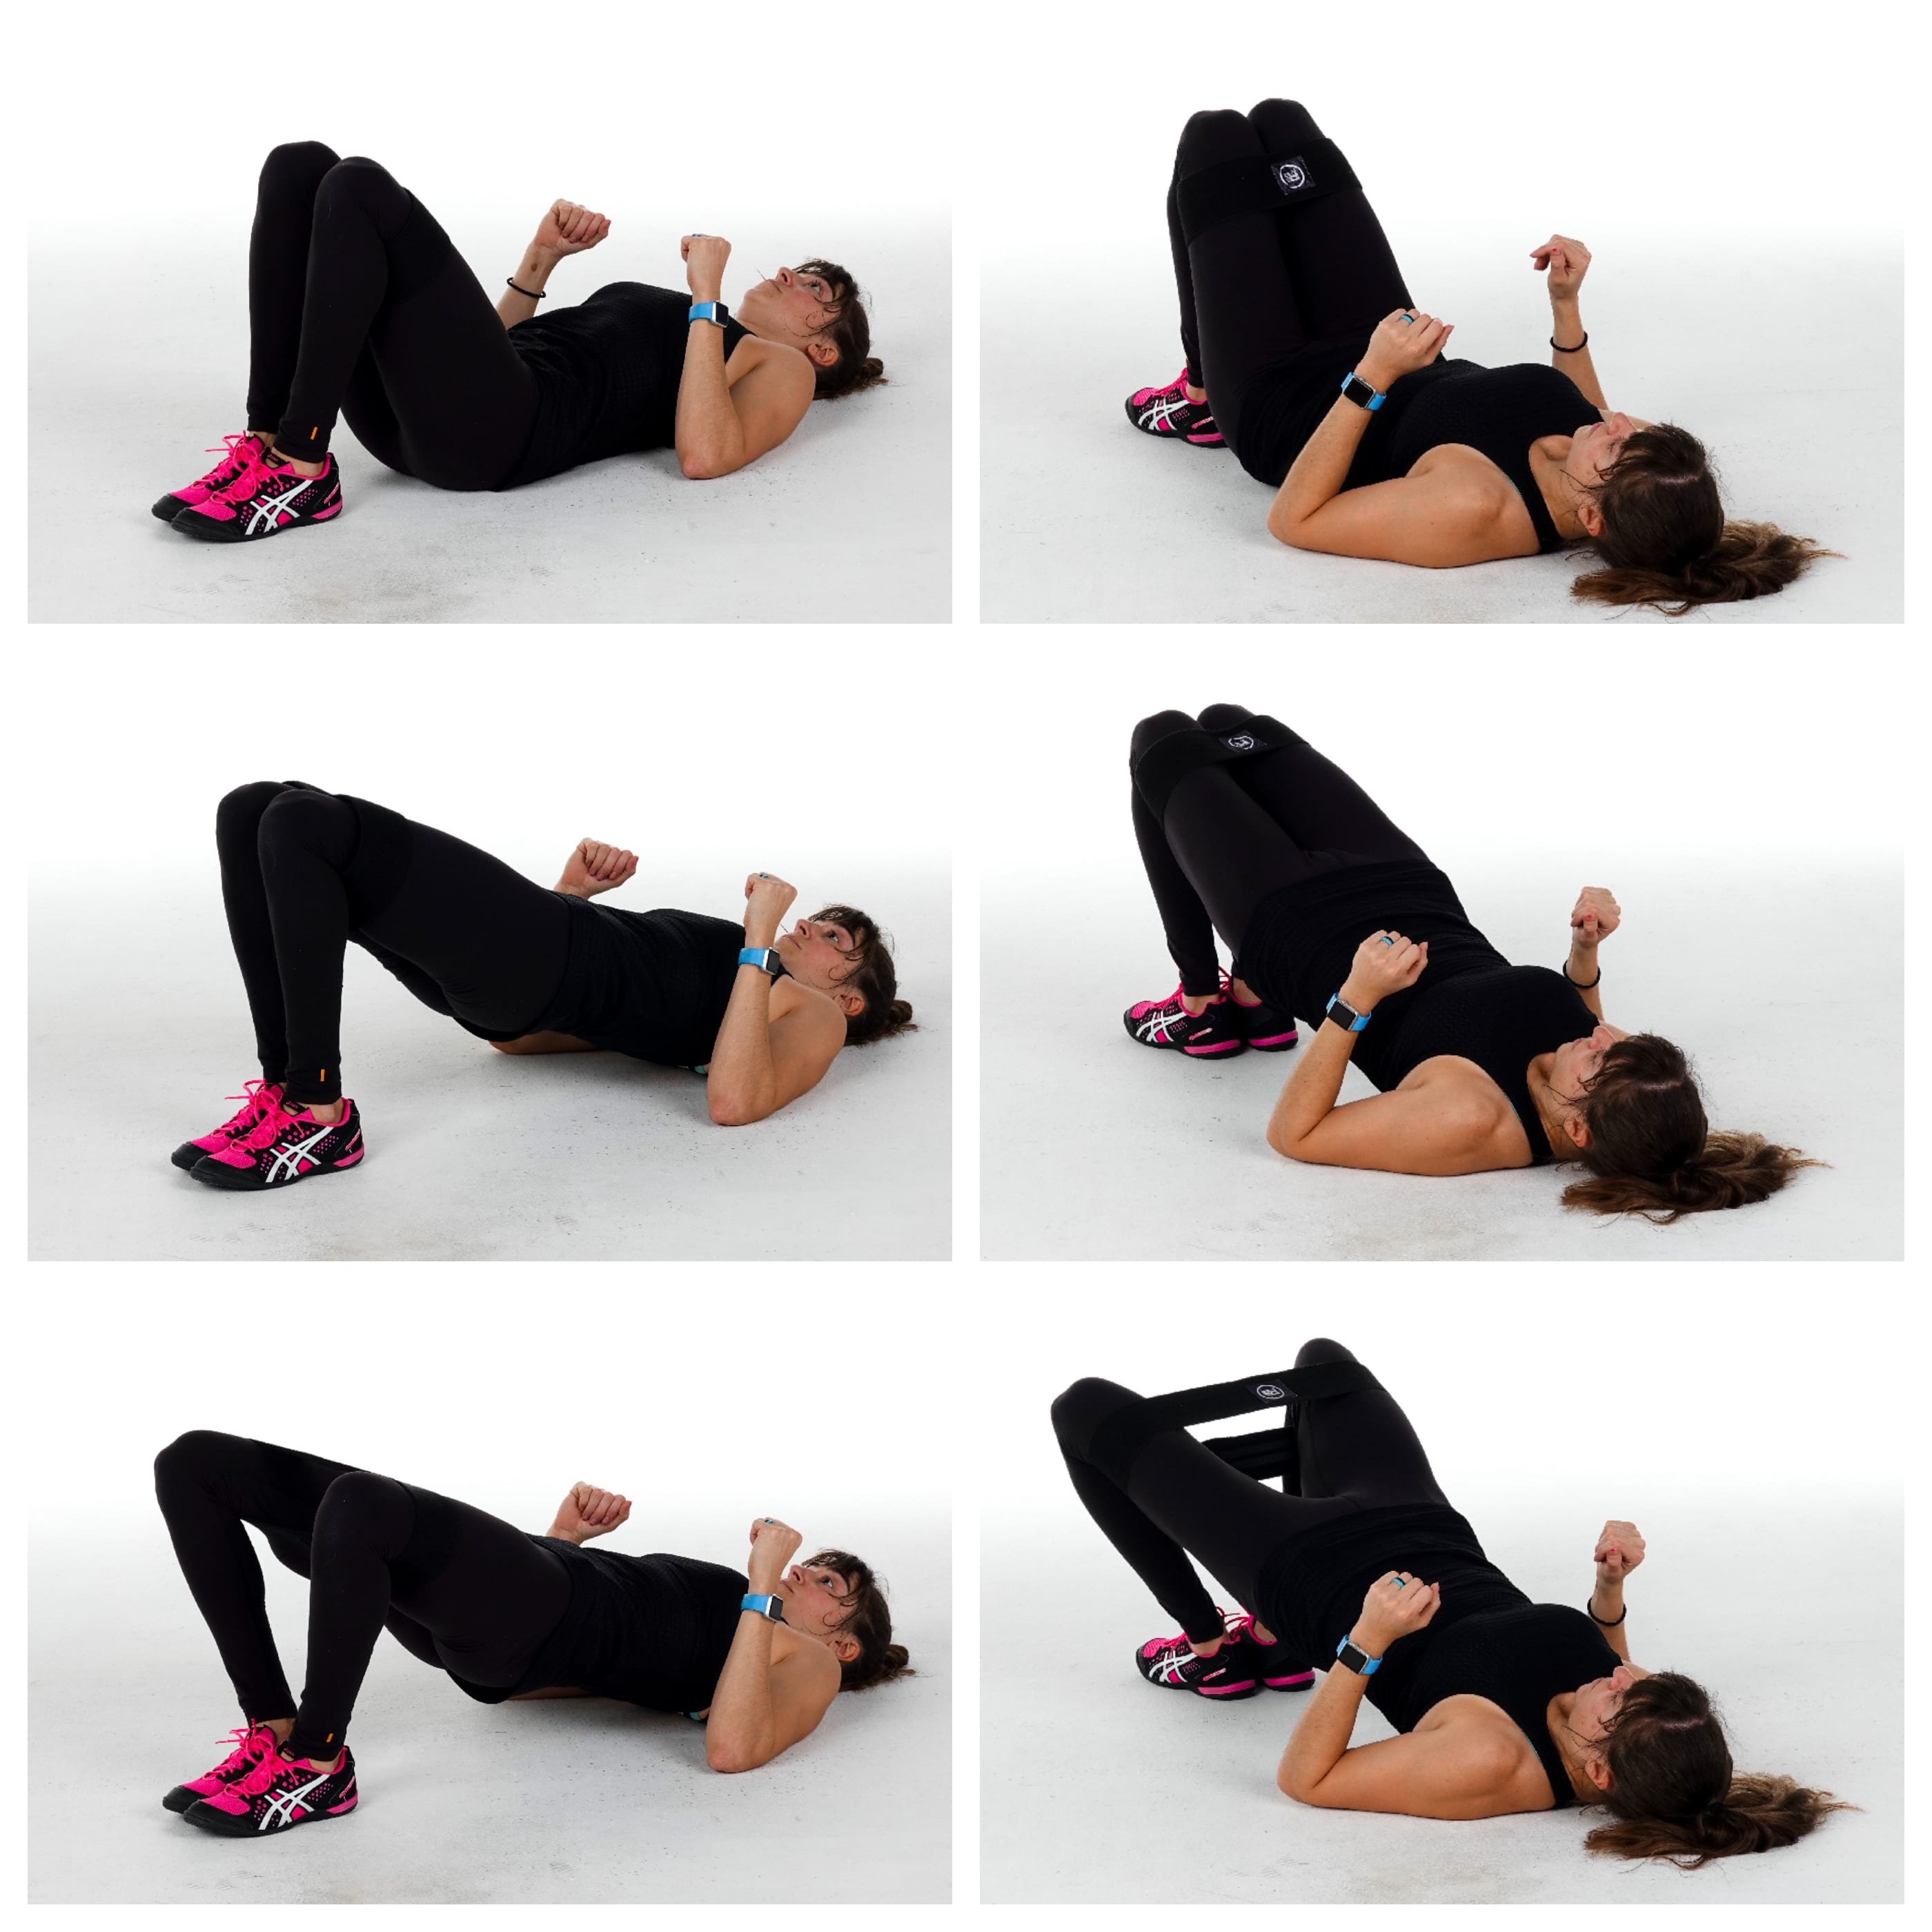
Bridge with Abduction:
This is a great move to work on hip extension while activating your glute medius and maximus.
If you even include a “squeeze” as you bridge up and lower, you can help activate and strengthen your adductors as well, which can be beneficial for anyone with hip or knee pain.
To do the Bridge with Abduction, place the Booty Band right above your knees and lie on your back with your knees bent and feet together and flat on the ground just beyond your finger tips when your arms are stretched down by your sides.
Bend your elbows to 90 degrees and drive your upper arms down into the ground. Squeeze your legs together and even posterior tilt your pelvis, pressing your lower back into the ground.
Then bridge up, driving through your heels. At the top, push your knees out against the band as far apart as you can. Bring your knees back together and squeeze your legs together as you lower down.
Repeat bridging back up. Do not arch your lower back just to bridge up higher. Really feel your glutes working to bridge up then the sides of your butt working to press your knees open. You may even feel your inner thighs working as you lift and lower.
The band may lose tension as you squeeze your legs together but should become tight as you fully press to abduct at the top.
Alternating Side Taps:
This is a great abduction or lateral move to activate your glute medius and it requires less space than the traditional band side shuffle.
To do Booty Band Alternating Side Steps, place a band right above your knees.
Stand with your feet a few inches apart so there is just a little bit of tension on the band. Push your butt back slightly and soften your knees so you are in a slightly hinged position. Then step one foot out to the side. Step the other foot toward it without fully stepping together and losing tension on the band.
Then step that foot back out and bring the other back to the starting position. Keep alternating steps back and forth, staying in that slightly hinged position as you go. Do not step so wide your knees cave in. Make sure you can really press out against the band.
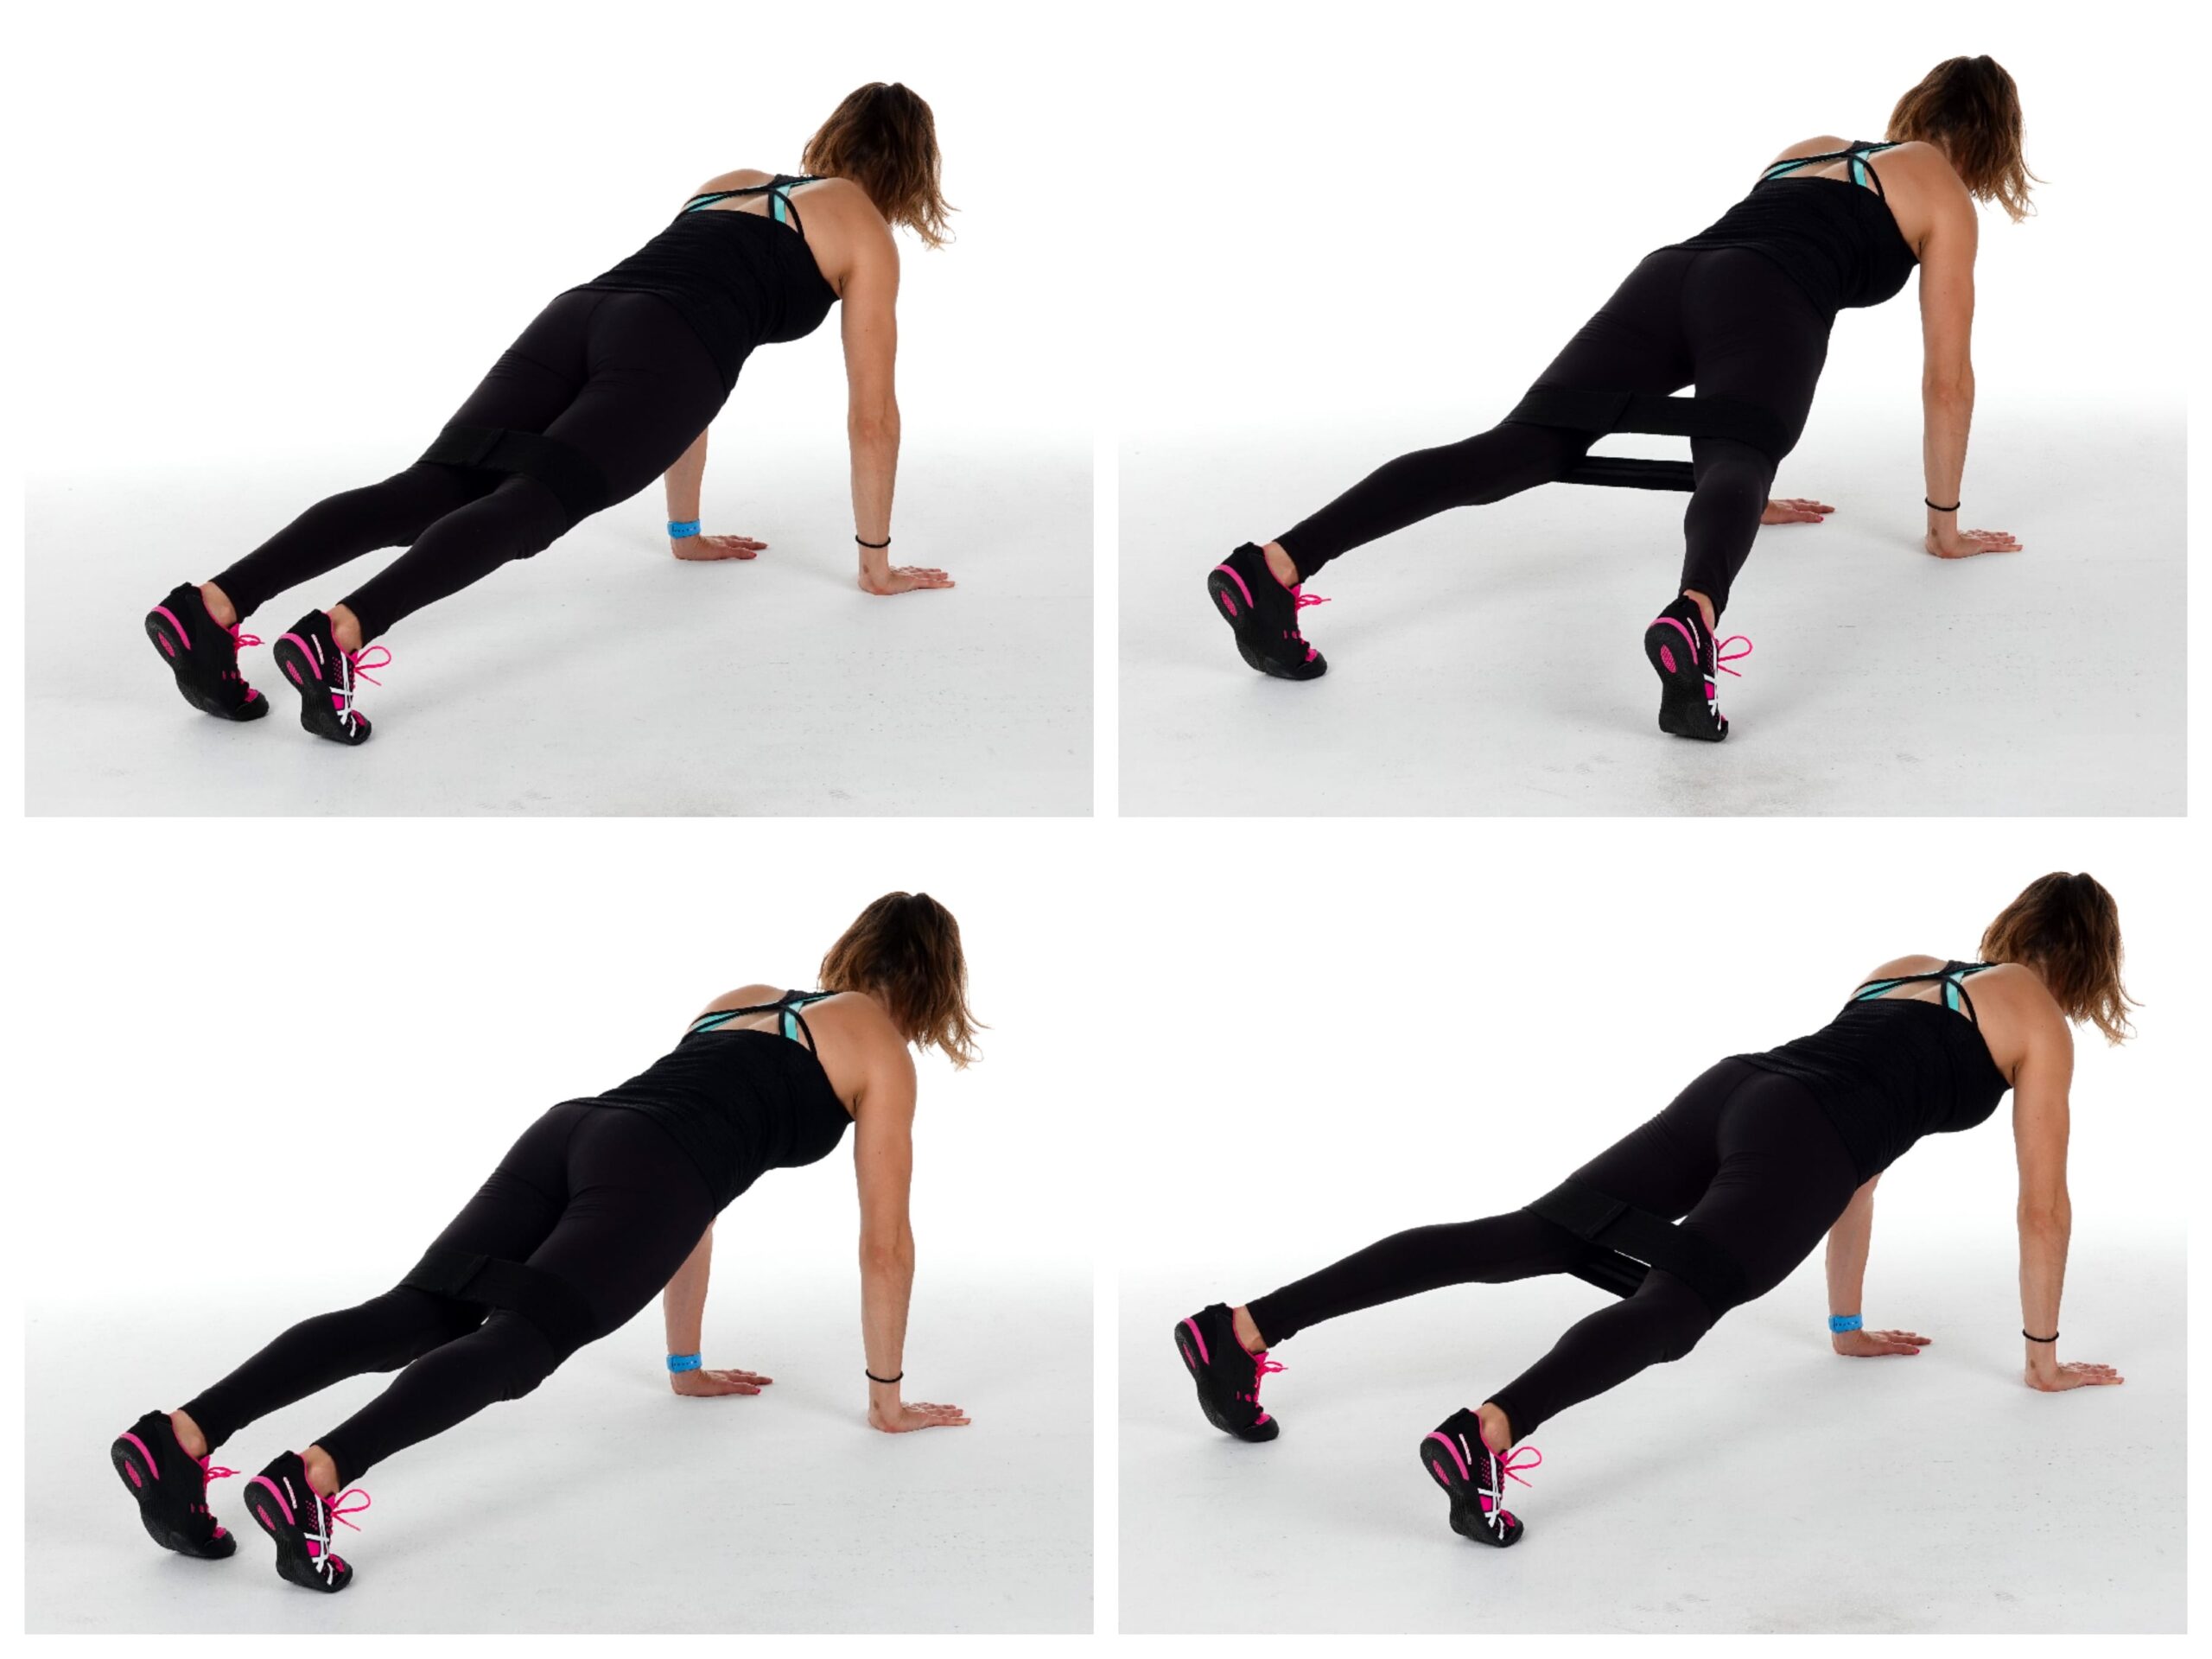
Plank Lateral Taps:
This is a great move to work your entire core with a little extra focus on those glutes! Beginners can always start by doing this move even off an incline with their hands up on a bench.
To do Plank Lateral Taps, set up in a high plank position with the booty band right above your knees. Your hands should be under your shoulders and your feet should be close together, just apart enough that there is a very little bit of tension on the band to hold it in place.
Holding this plank position with your body in a nice straight line and your abs braced, step one foot out to the side. Make sure you fully press out against the band and don’t just reach with your toe. You even want to think about leading with your heel slightly as you step laterally.
Don’t worry about stepping further out if it means swinging or sagging your hips. Also, don’t let your butt go up in the air.
Touch one foot laterally and step back together before stepping out to the other side. Alternate taps to each side, moving at a controlled pace.
Quadruped Straight Leg Lifts:
This move is another great unilateral move to work on activating your glutes and abs.
To do the Quadruped Straight Leg Lifts, place a booty band right above your knees. Set up on your hands and knees with your knees under your hips and your hands under your shoulders. Your feet should be flexed.
Straighten one leg out behind you. Keeping your foot flexed, lift your straight leg up toward the ceiling. Squeeze your glute and lift your leg until it is about parallel to the ground. Only lift higher if you feel your glute working and not your low back. Lower the leg back down to the ground and repeat. Lift the leg straight up and squeeze the glute at the top.
Hold for a second or two and repeat. Focus on keeping both hips square to the ground and make sure you don’t lean too much toward that supporting side or bend your elbows. You can kick slightly out to the side and back too to engage your glute medius more if you’re struggling to feel your glute maximus working (and instead feel your hamstring, right under your butt, or lower back taking over).
Complete all reps on one side before switching. You can even pulse at the end range of motion if you struggle to maintain engagement with a full range of motion to start.
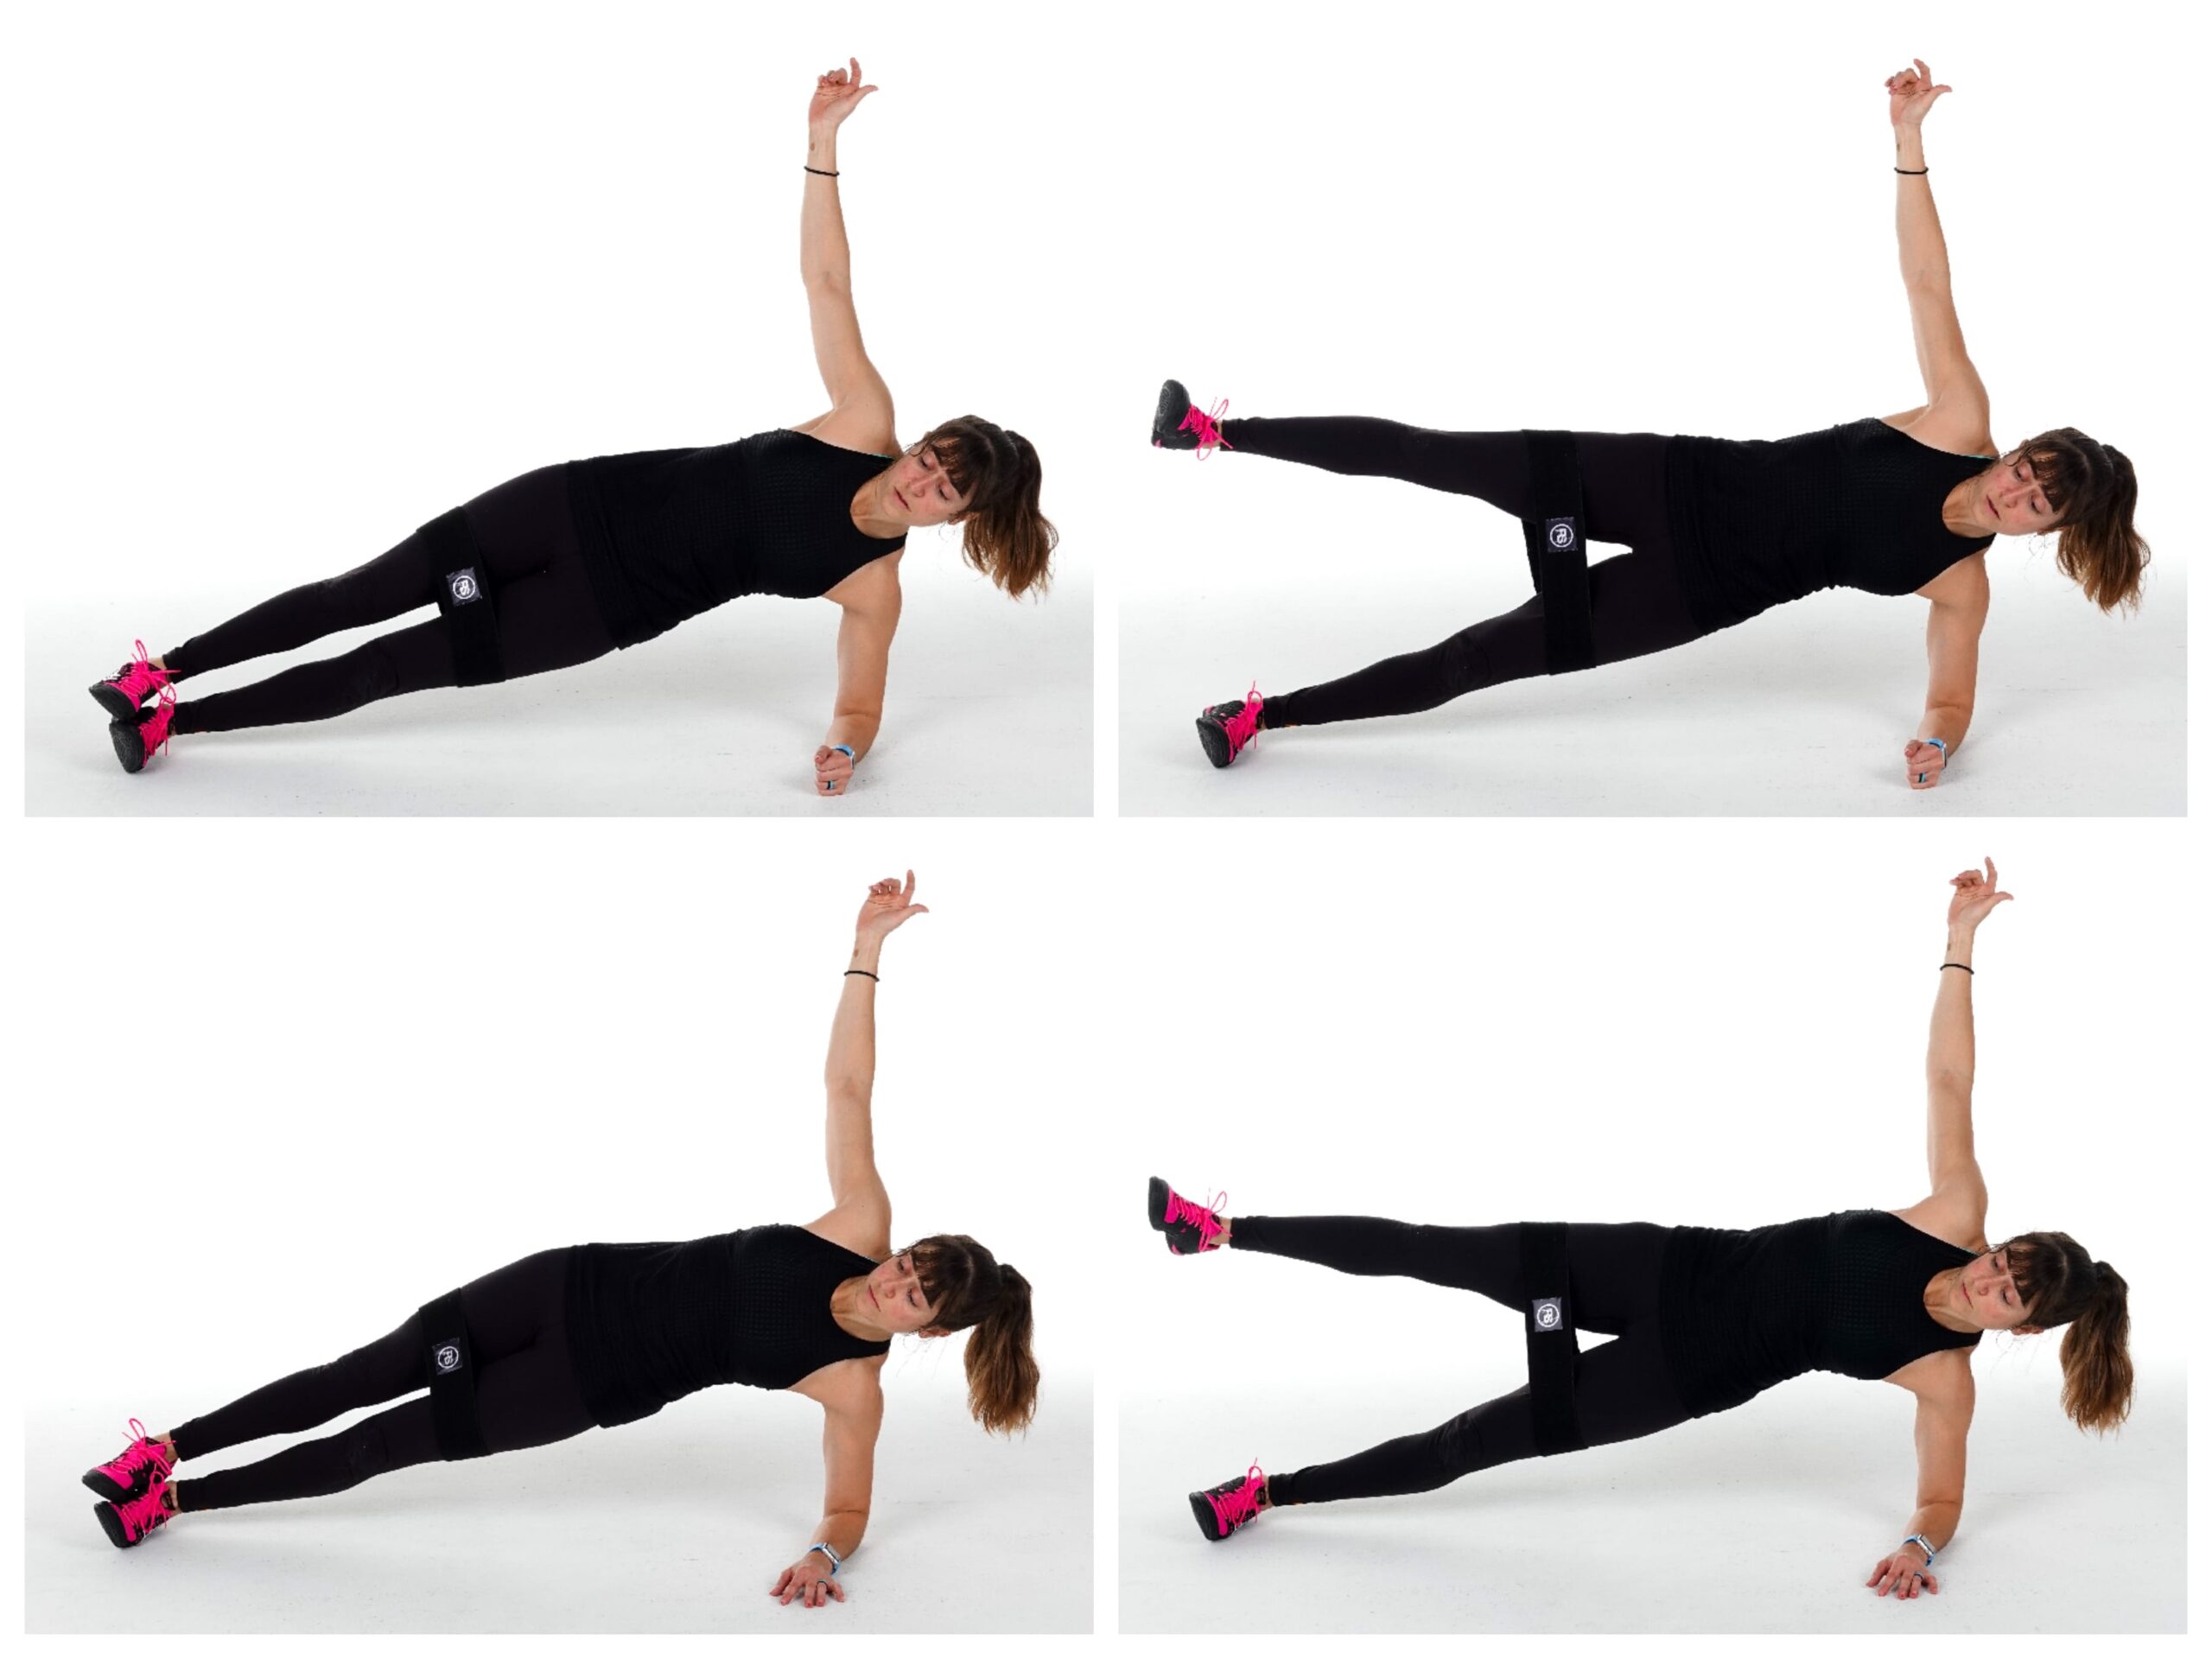
Side Plank Leg Lifts:
This is a great move to strengthen your obliques as well as your glutes. It is, however, a very advanced move. Beginners may do this from their knees or even off a bench and may potentially not use the band to start.
To do Booty Band Side Plank Leg Raises, place the band right above your knees. Set up in a side plank from your forearm with your elbow under your shoulder and your feet stacked. You can drop your bottom knee to the ground if you need to modify. Lift up into the side plank and flex your feet (this is a key point to flex your feet and create tension down your leg).
Then, keeping your bottom hip up, hold in that side plank position as you lift and lower the top leg. Control the lift and lower so that the band isn’t controlling you and making you lower quickly. Don’t dip your hip or swing or rotate just to kick up higher. Hold as you feel your glutes working to lift and lower that top leg.
Also, watch your foot to see if you rotate the toe open toward the ceiling. While external rotation isn’t bad, it does change how the move works your glutes.
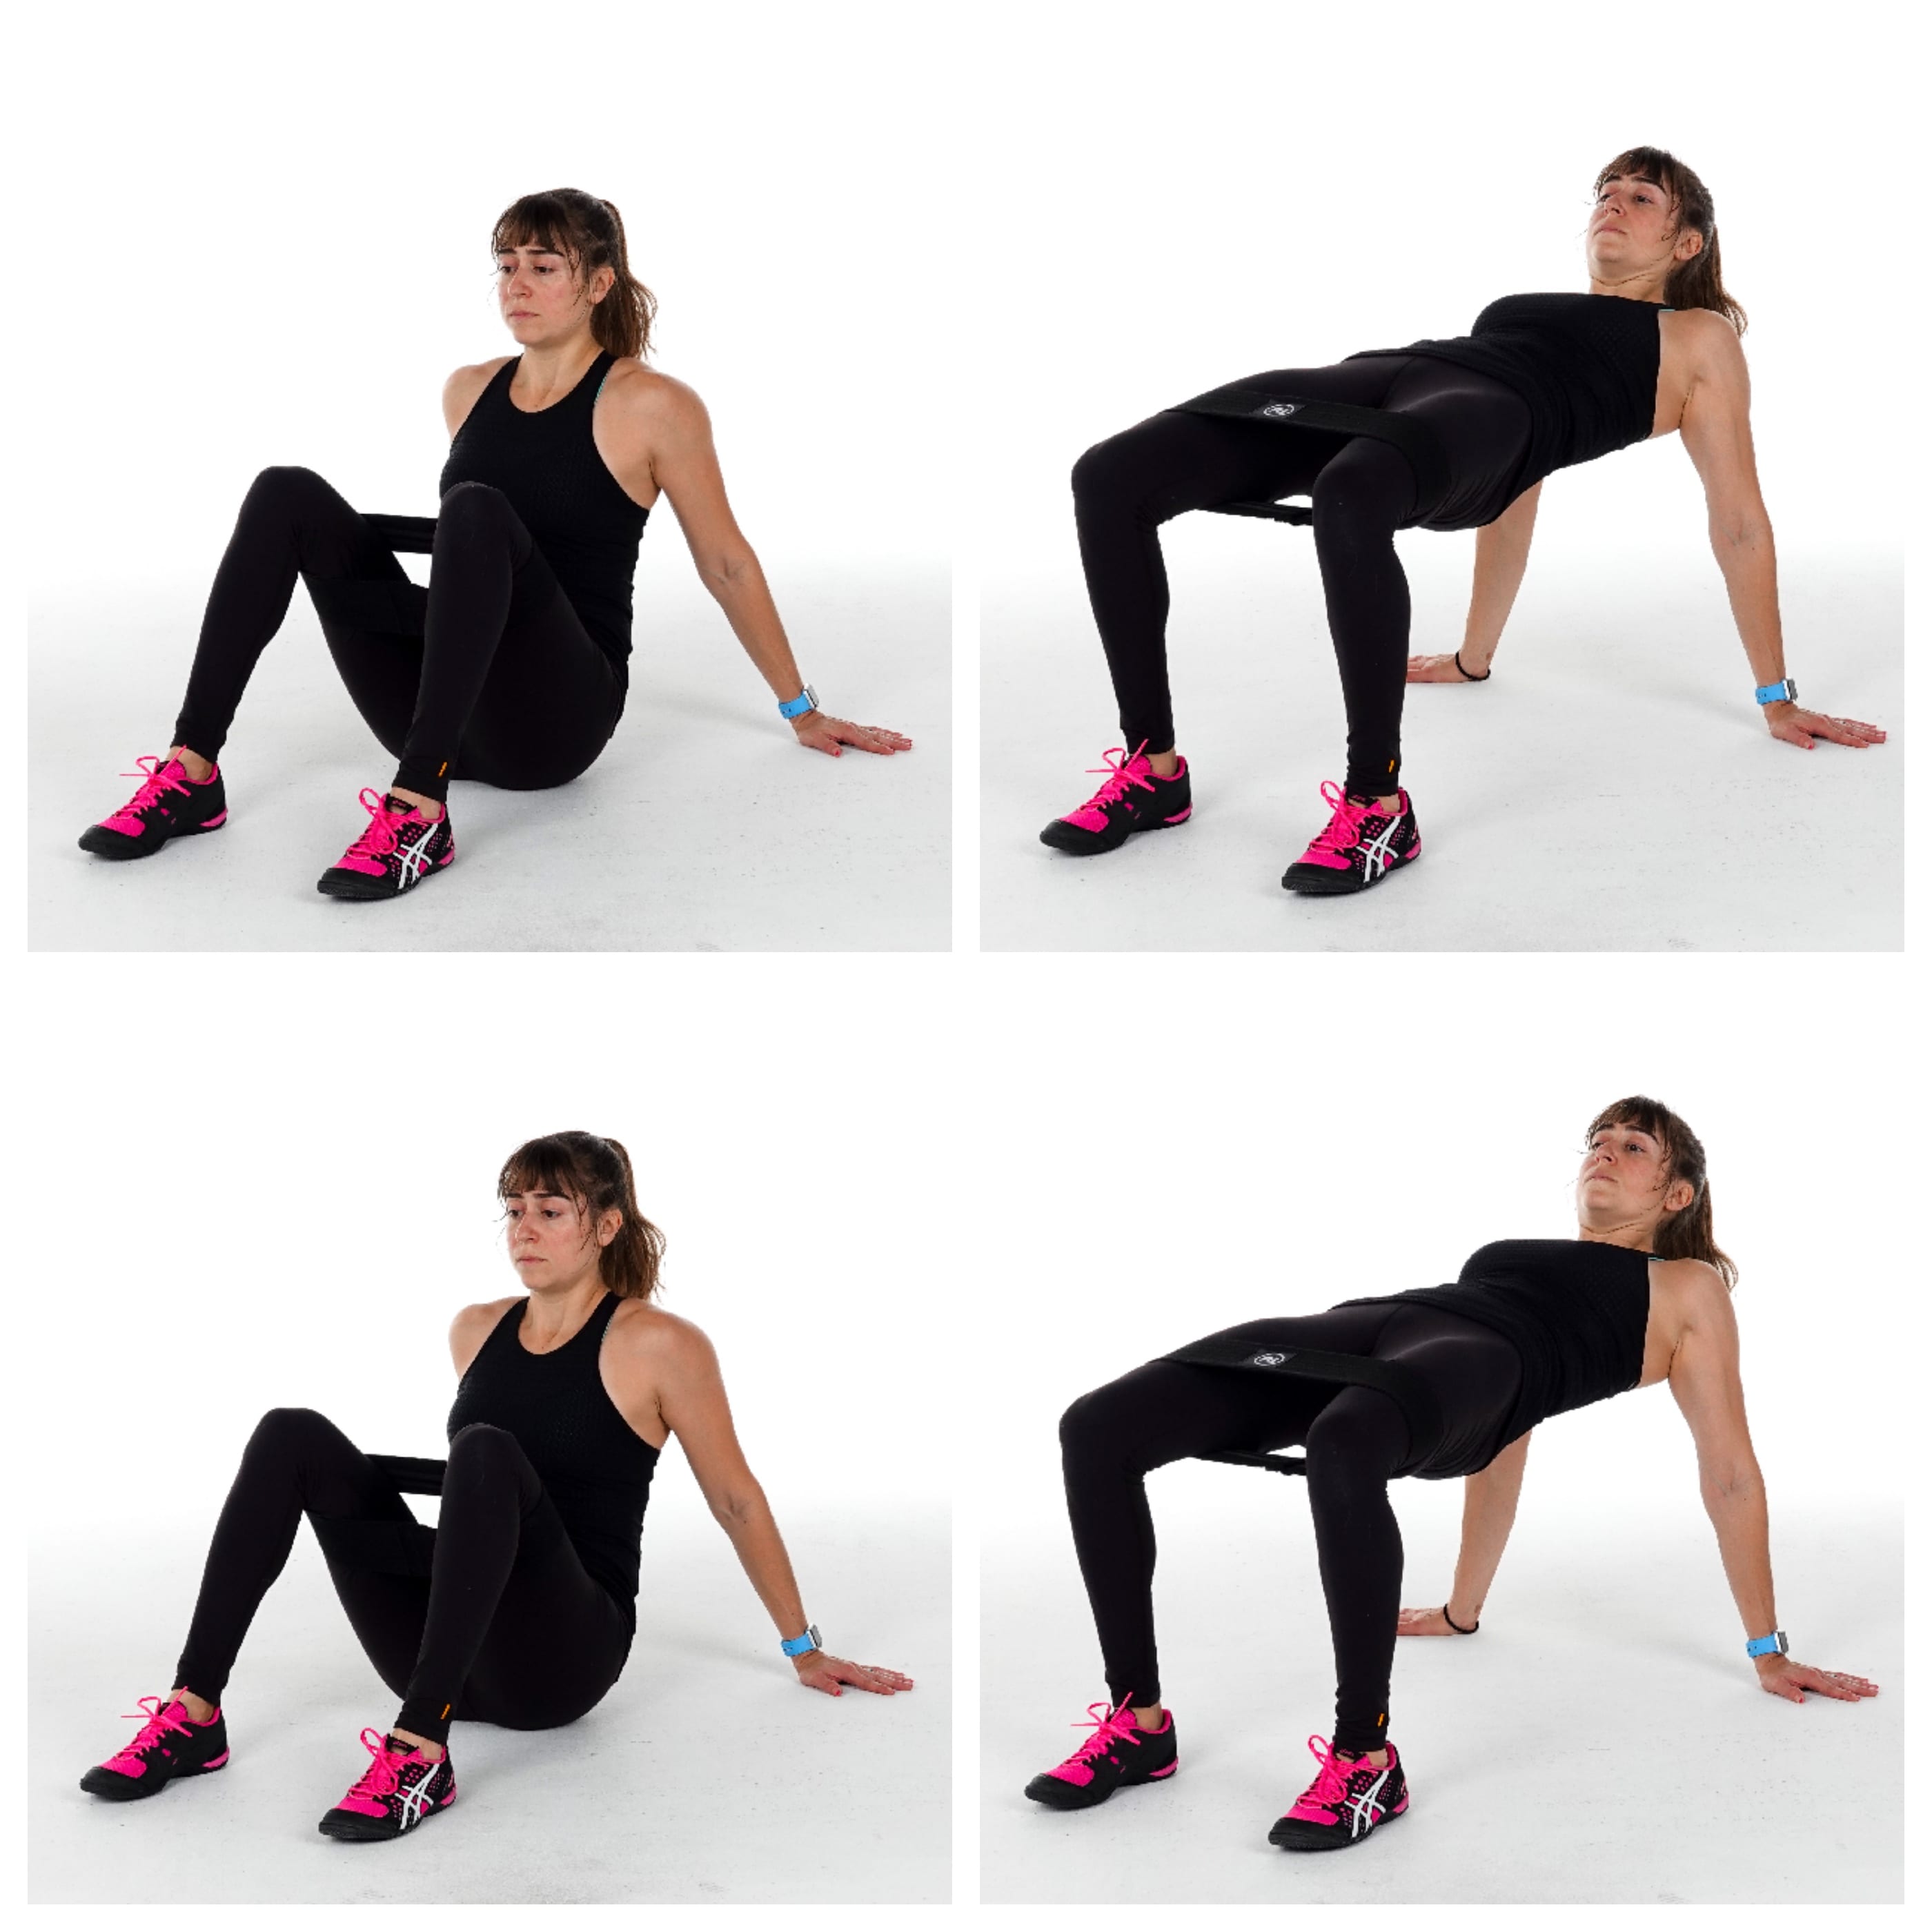
Tabletop Bridge:
The Tabletop Bridge is a must-do activation move if you sit at a desk all day as it opens up your chest as well as your hips while activating your glutes. And when you add a band, you get that glute medius firing too!
To do the Booty Band Tabletop Bridge, place a band right above your knees and start seated on the ground with your feet flat on the ground in front of you and your hands on the ground behind you.
Press out on the band with your feet about hip-width apart. Do not let your knees cave in as you bridge and lower.
Then squeeze your glutes and lift your hips up as high as you can. Press your chest out as you bridge up. You can lean your head back if it helps your neck or slightly tuck to look in front of you to help activate your glutes. Really feel a nice stretch across your chest and shoulders as you squeeze your glutes and press out against the band.
Keep your core tight as you bridge up, even using a slight posterior pelvic tilt to protect your lower back.
Hold for a few second at the top then lower back down and repeat.
Need a Booty Band?
Maybe you even want a whole kit to help you strengthen your glutes and core?
You’re making great progress. Really sticking to the program and seeing great results.
But then…your results start to slow. And a few weeks even go by where you feel like you aren’t making any progress.
You didn’t change anything.
You’re still in a calorie deficit…So why aren’t things working!?
Don’t freak out! Don’t get upset and completely say “SCREW IT!”
First off, there will be periods we don’t “see” results, but changes are still occurring.
And secondly, it may just be time for a little “diet break!”
If your goal is weight loss, you do need to be in a calorie deficit.
BUT our bodies adapt to what we give them – this includes the workouts we do and even our DIET.
But when our body adapts, we can’t just keep cutting calories lower and lower. Instead, it may be time to change up those macro ratios or even BUMP our calories for a bit.
And that is where a diet break comes in handy.
It is simply a change up for our body. It is an increase in calories and often a slight adjustment in macro ratios.
Now a diet break does NOT mean go on a week long binge. And it doesn’t mean you aren’t SATISFIED even with what you’ve been doing.
It is actually a CALCULATED technique used to kickstart progress when results have slowed and help you mentally recharge a bit.
Dieting breaks are a great way to help you intensify your training and break through a weight loss plateau before returning to your calorie deficit.
The change in ratios and bump in calories can help you intensify your training for a bit to build extra muscle and it can help make sure your hormones are at optimal levels, especially if your carbs, or fats, have been at lower levels.
And amazingly, sometime that BUMP in calories and change in ratios can result in WEIGHT LOSS even though it goes against what we think we have to do to lose weight aka be in a calorie deficit.
Not to mention the diet break can mentally recharge us and even kickstart better results as we return to a deficit.
So how can you implement a diet break?
A diet break is not a cheat day or even a carb re-feed. It is actually an EXTENDED period of eating calories more at your maintenance level.
Note too I didn’t say just eat as much as you want. You are just eating more at what your body needs to maintain where you are at – this is still a CALCULATED technique not a free-for-all.
You can do a diet break in a couple of different ways.
You can take a complete diet break, which can be 1-2 weeks of increased calories and even looser tracking.
Or you can take a partial diet break, where you still strictly track but simply increase your calories by 500 or eat more at maintenance level.
How often you include a diet break may also depend on your level of leanness and even how long it may take you to reach your goal.
If you are leaner and looking to maintain that level of leanness, or even drop that last little bit (especially if you are a physique competitor), you may use a diet break every 4-6 weeks.
While if you are just starting out and have more weight to lose, you may implement one every 3 or so months.
However, if you do have more weight to lose, and know your goal may take a year to accomplish, you may find it helpful to include diet breaks at schedule times since you’ll be in a deficit for longer and the mental break will help.
The key is to know that you CAN use a diet break when you mentally feel fatigued, especially if you’ve been dieting for awhile, OR if you’ve even hit a plateau (and don’t want to cut calories lower because your deficit is already larger).
Remember this isn’t just a one day carb re-feed or cheat day.
This is a 7-14 day higher calorie cycle where you are still focused on quality foods and hitting your macros albeit potentially less strictly.
However, if you do a diet break, you do want to up the carbs for this cycle while upping calories if you’ve been on a lower carb ratio.
The increase in carbs is part of why this break works as it helps to regulate hormones so you can potentially drop some extra pounds your body has been holding on to.
Ready to really understand proper nutrition and figure out what will work for YOUR body and YOUR goals, as your body and goals even change over time?