I have mixed feelings about eating “healthier” alternatives to the treats we love and sometimes crave.
I think it is important we know when we need those macro-friendly versions to keep us on track and even when it is simply better to indulge in the real thing.
And I will personally do both, depending on the situation and even the specific craving.
Because we can find a balance between indulging and staying on track toward our goals. What that balance is though, will be unique for each of us!
Like I LOVE dessert.
Do I need a sweet treat at the end of the night?
No.
But do I want one?
HECK YES!
And especially as the weather warms up, my cravings for ice cream increase.
But I know if I get a pint of…well…anything…that whole pint will be gone.
And then I’ll feel crappy and won’t sleep well from the sugar and have a crappy workout the next day.
Now, sometimes, despite the fact I know this will happen, I still indulge and enjoy. (Balance, right!?)
BUT often I find I just feel better, and stay on track toward my goals, when I swap in a satisfying, but more macro-friendly alternative!
That’s why I love this Chocolate Greek Yogurt Ice Cream.
I can make the one serving, satisfy my sweet tooth and even pack in 20 grams of protein!
So if you’re an ice cream fiend too, try this delicious recipe!
Chocolate Greek Yogurt Ice Cream
INGREDIENTS: 2 1/2 oz Fat-Free Plain Greek Yogurt 1/2 scoop Vanilla (or chocolate) Whey Protein 1 tsp Hershey’s Special Dark Cocoa Powder 1/2 cup Unsweetened Vanilla Almond Milk 1 tsp Vanilla Extract 2 tbsp Stevia or sweetener of choice
Blend yogurt, protein powder, cocoa, stevia and almond milk thoroughly.
Place in freezer.
Take out the ice cream after an hour and turn it over gently with a spoon to avoid it becoming one big ice block. Do it again every 30 minutes until it has the right consistency (it should take about 2 hours total).
You can either eat it right away (after the 2 hours) or keep it in the freezer for up to a week. If you leave it in the freezer, take it out 5-10 min before you serve it to let it soften up a bit.
Getting in a killer cardio workout doesn’t have to mean using a piece of cardio equipment.
You don’t need a treadmill or a bike or to spend hours running to improve your cardiovascular health and conditioning while blasting fat to help with your weight loss efforts!
So if you’re short on time and need a workout you can do ANYWHERE, these 10 moves can help you out!
Whether you pick 4-6 and do 30 seconds of work with 15 seconds of rest or even do a 20/20/20 set up, you can get in a killer workout no matter where you are in just under 30 minutes!
Need some killer cardio workouts using these moves?
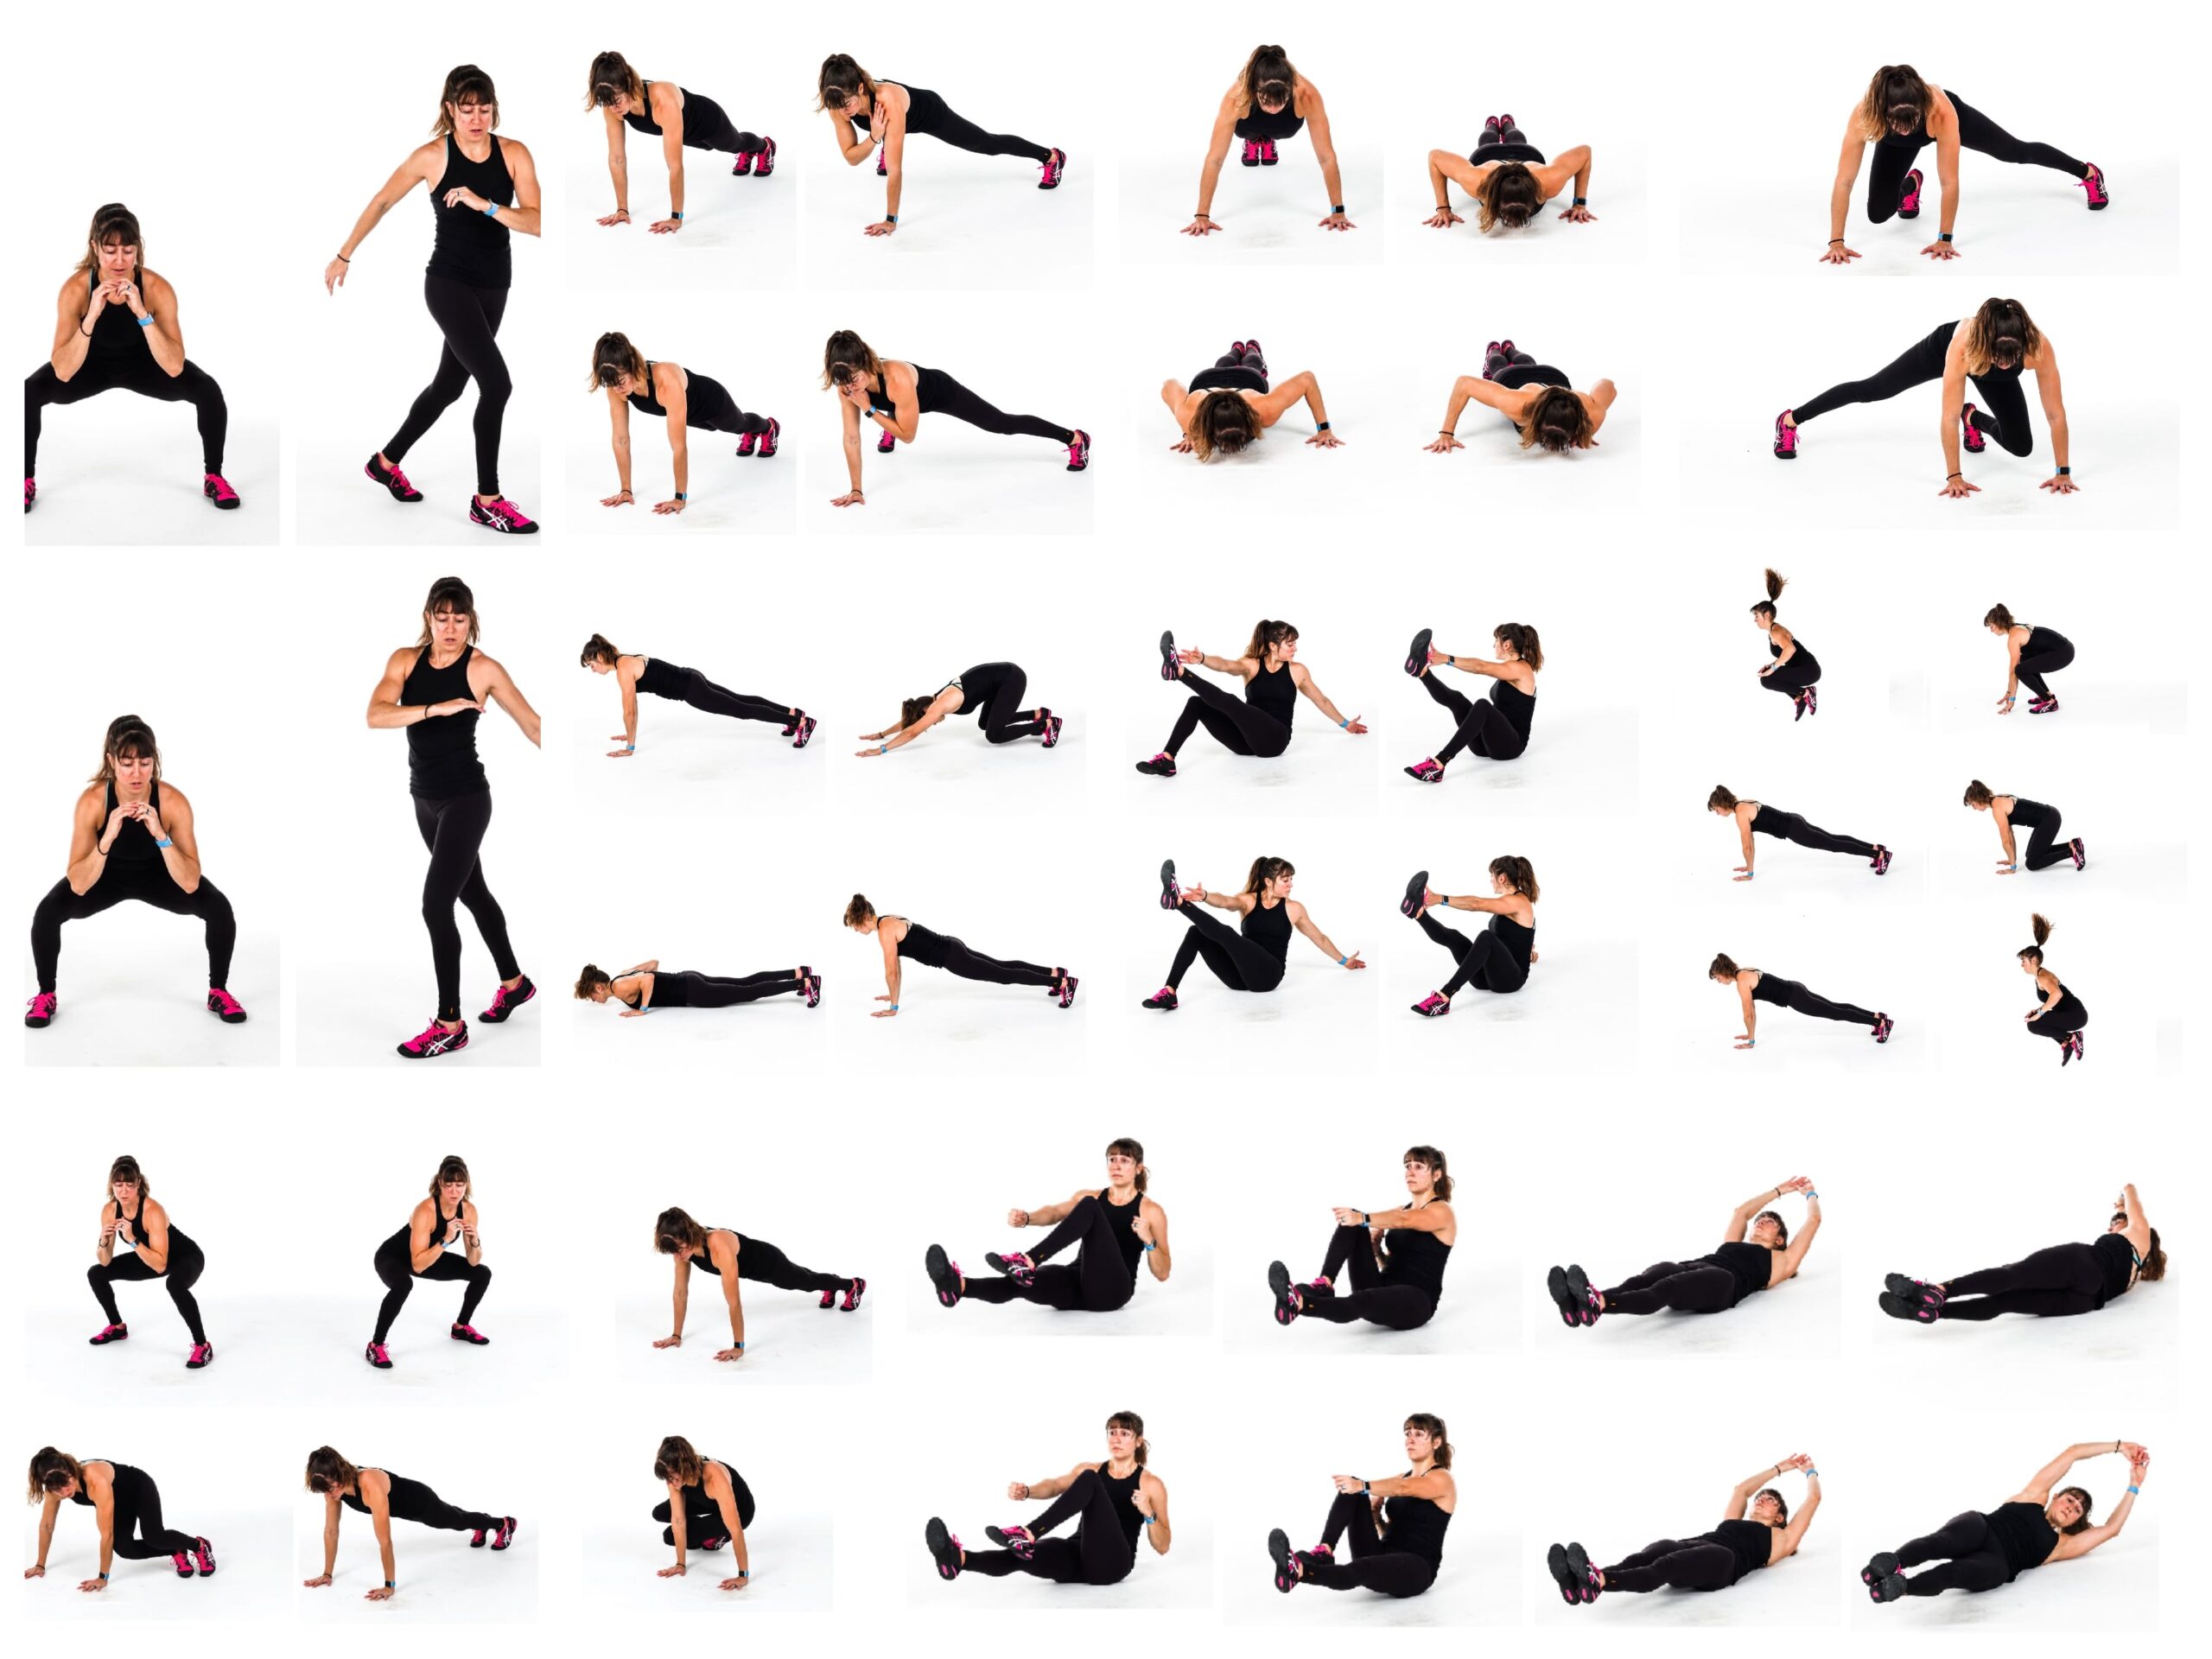
This move will get your blood pumping as it sets your legs, lungs and, even your core, on fire!
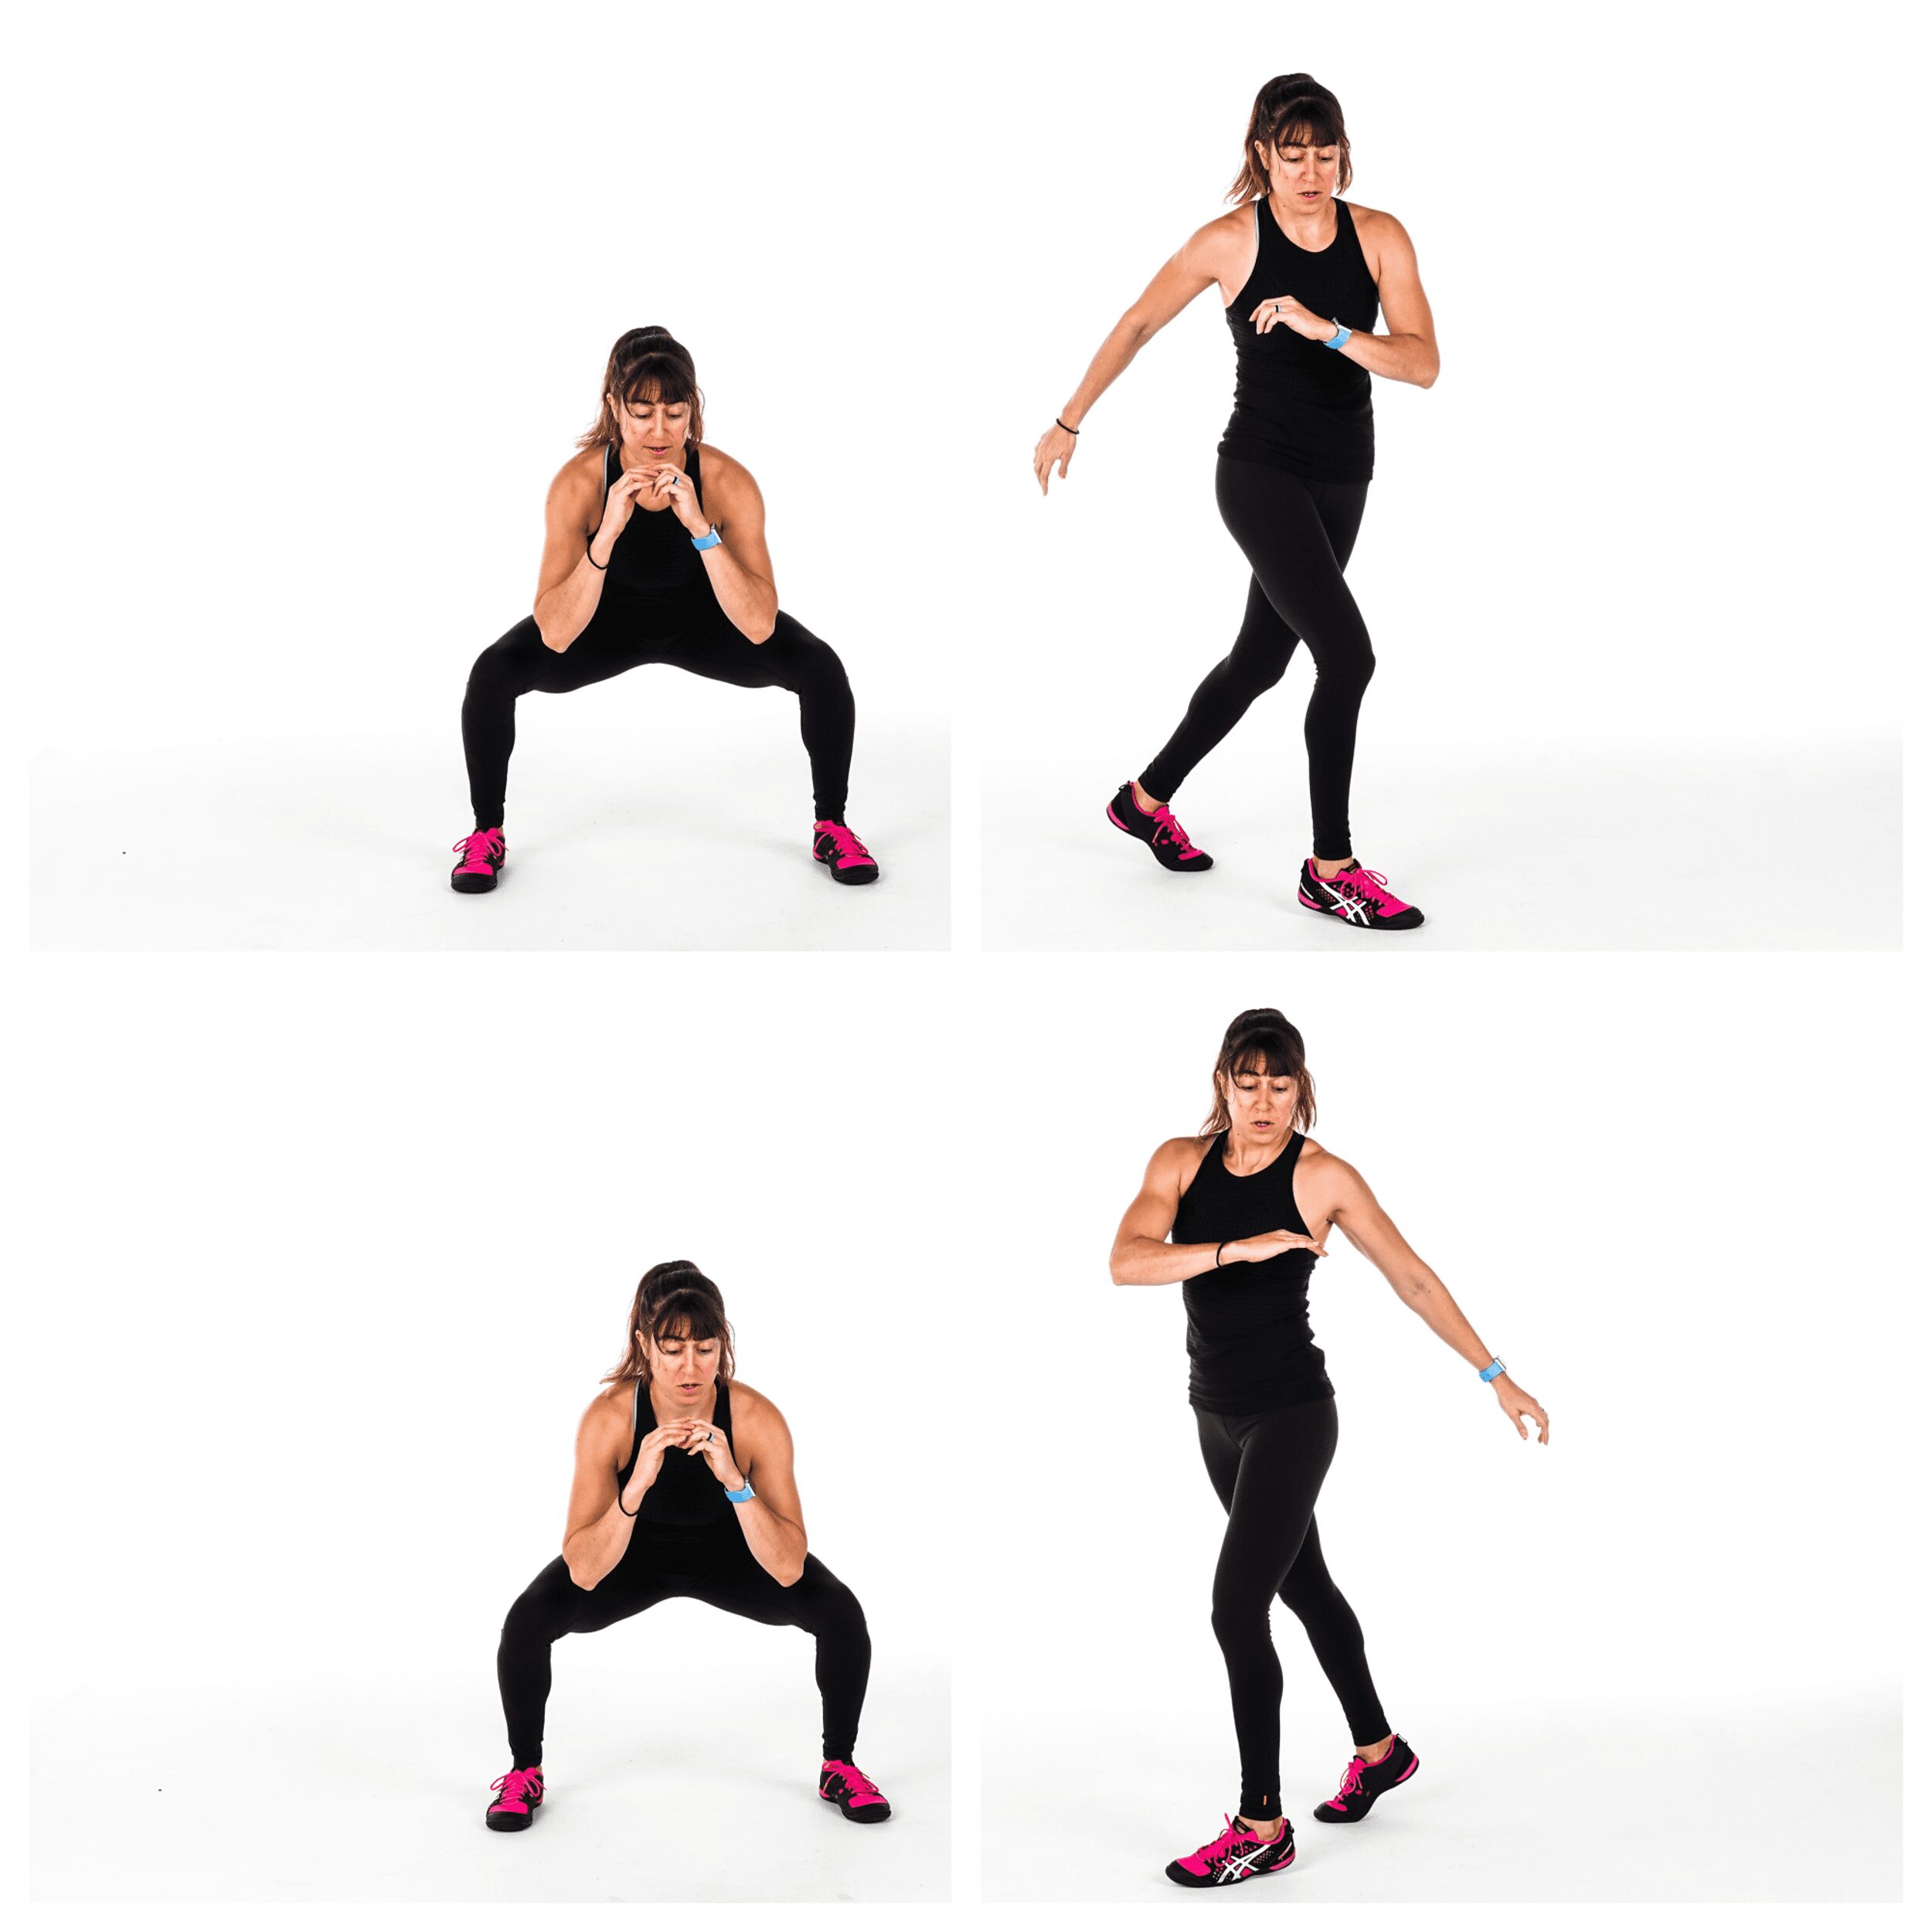
This hybrid move combining Snow Board Hops with Plank Skiers is a great full body movement that’s a “fun” spin on that traditional burpee.
To do Snowboard Hop Skiers, start with your feet in a slightly staggered stance and your back foot out in front of your front foot. Look forward over that front leg and then squat down to place your front hand down on the ground by your toe. Do not simply round over to place your hand on the ground. Squat down. Do not touch the ground if that means rounding over with your butt up.
Then jump up and rotate, switching to land in the slightly staggered stance on the other side. Sink down then reach your hands down to jump back into a high plank position from your feet and hands with your hands under your shoulders and feet close together.
Holding the plank, jump your feet up and in toward one side, bringing your knees as close to the outside of your elbow as possible.
Jump back into the high plank position center then jump your feet up to the other side, again bringing your knees as close to the outside of that elbow as possible. You want to feel your core rotate to tuck your knees up to the outside.
Jump back center then jump up and in to come into that snowboard squat position.
Lift your hands up and jump back to that first side before jumping back again to repeat the plank and skier hops to each side.
You can include just two snowboard hops and always jump back on the same side if you alternate which side you start with and have an even number of rounds. Or you can include 3 snowboard hops even so you are alternating sides you jump back for the skier hops on.
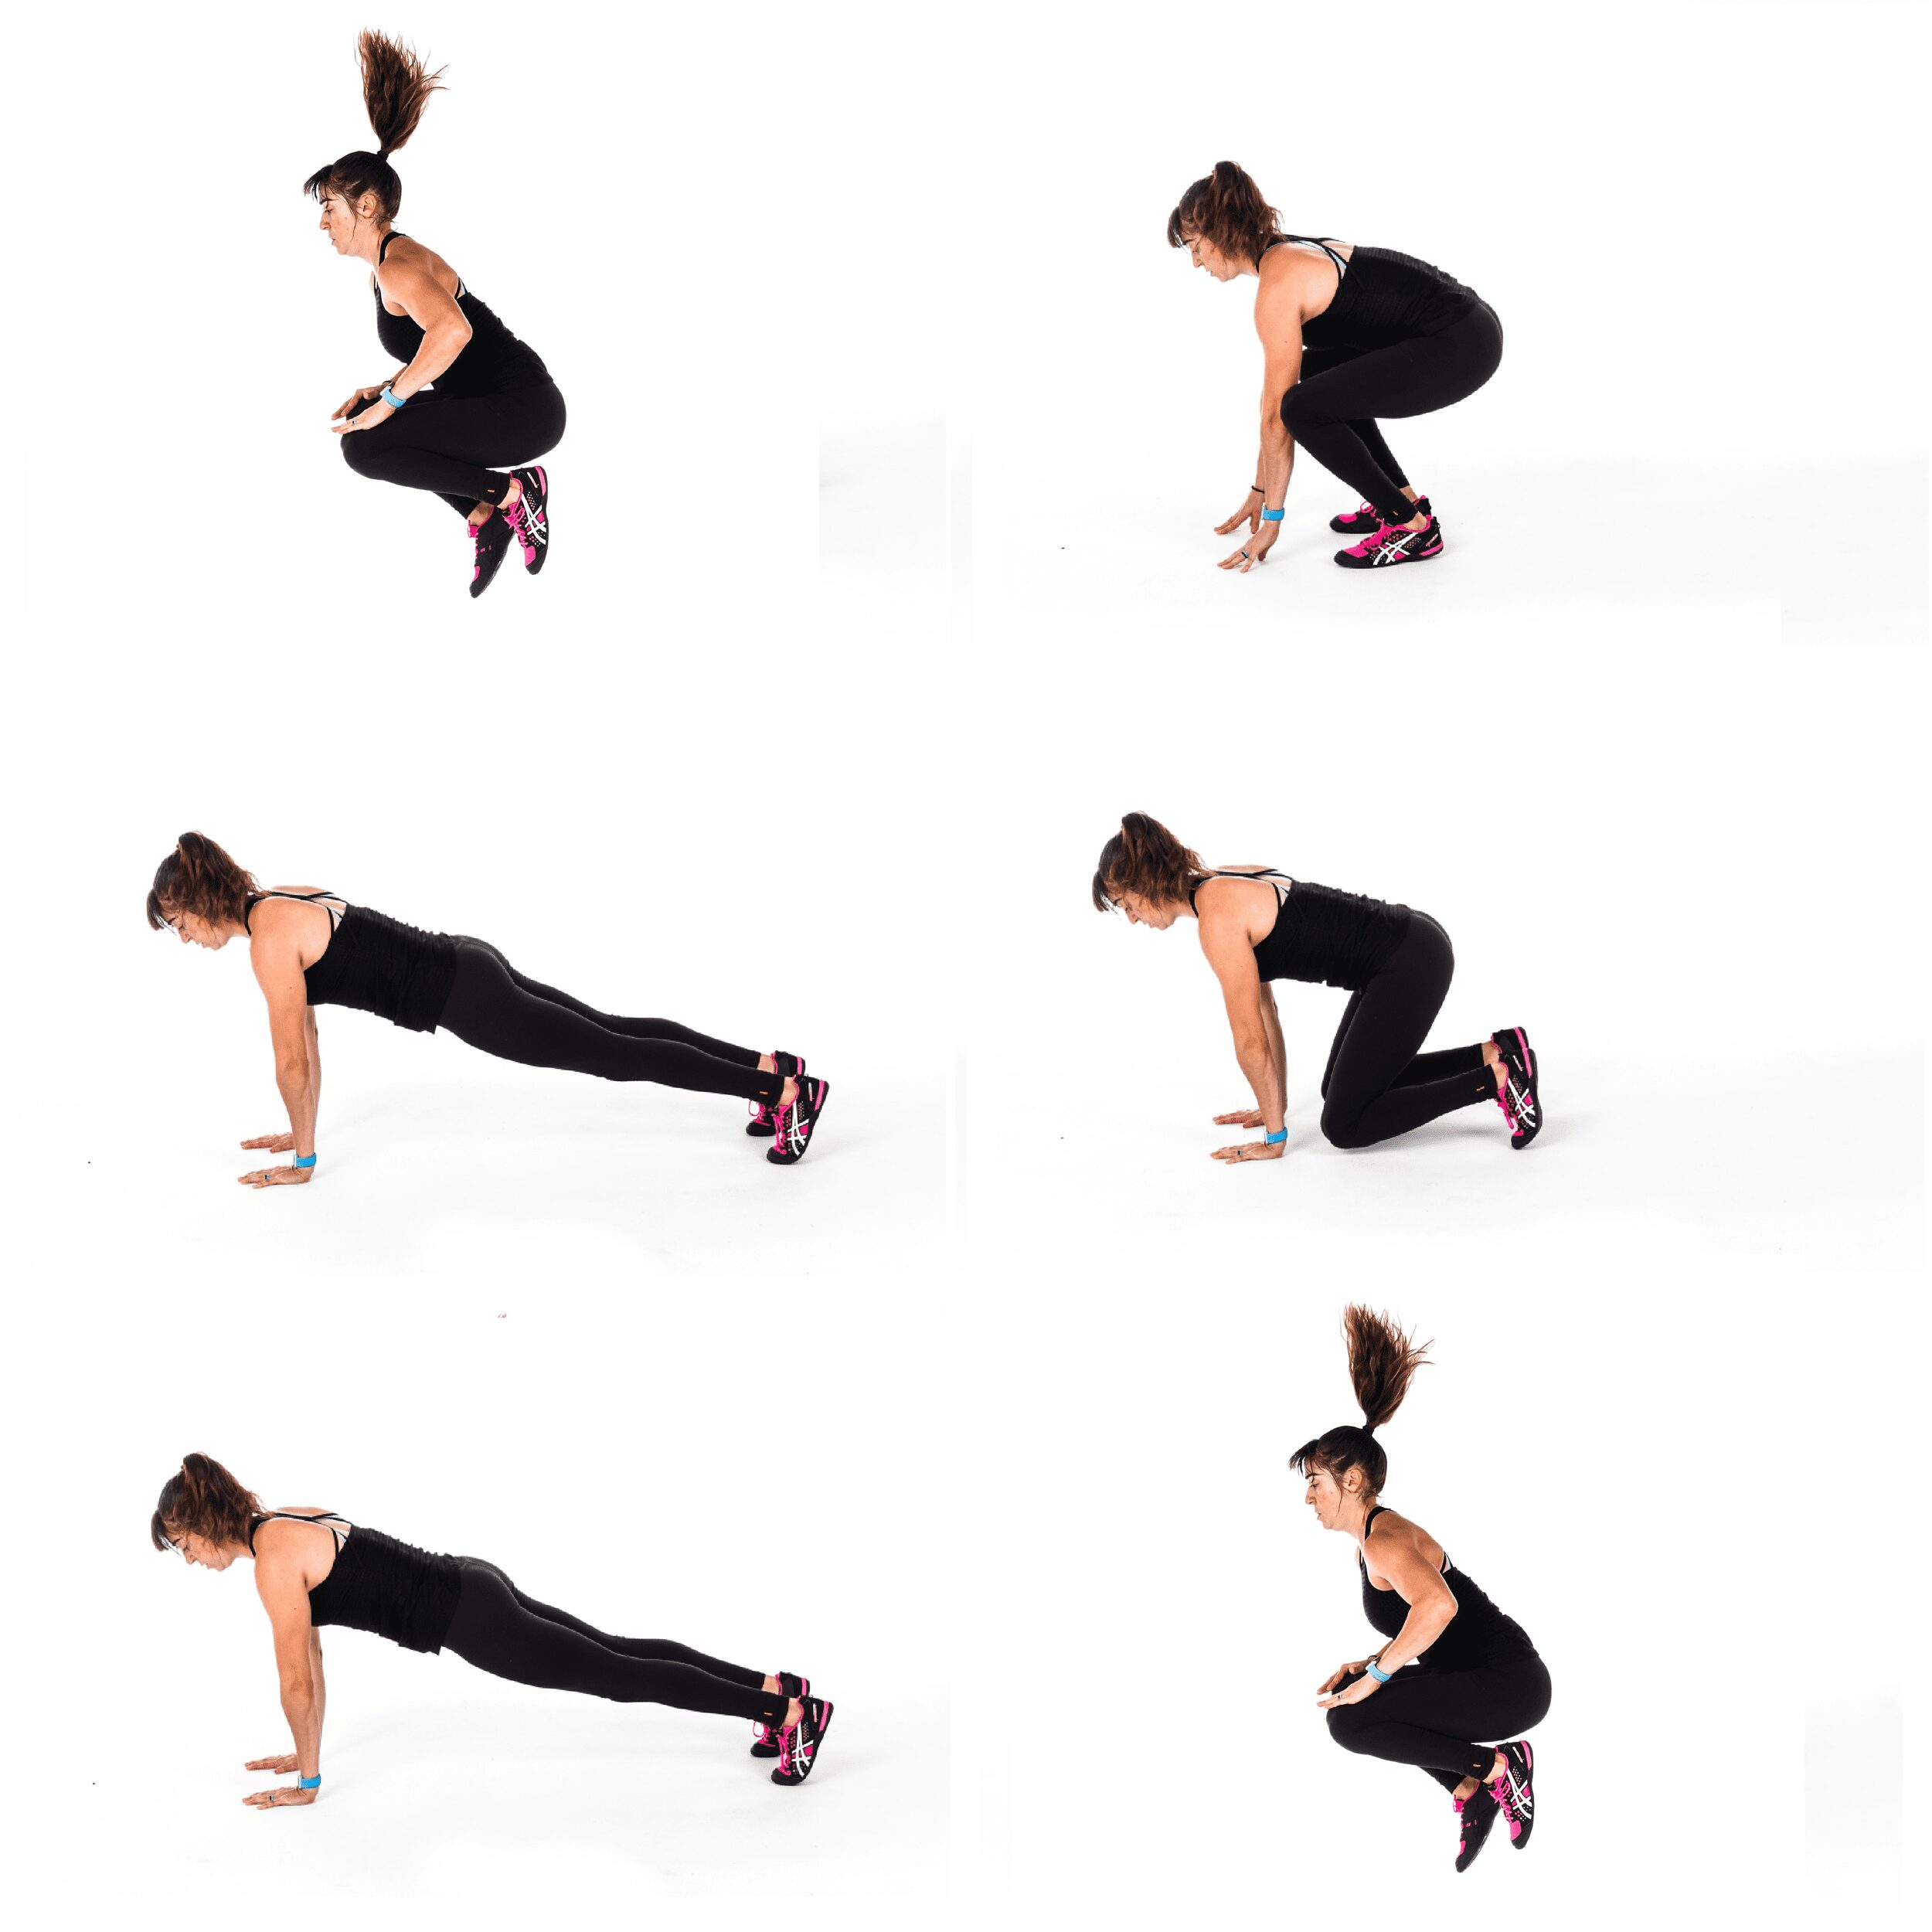
Tuck Jump to Plank Tucks:
This killer burpee twist will work your legs, especially your quads, as well as your abs and shoulders. It is a high impact movement, that requires proper landing mechanics.
So if you have knee pain or need to reduce impact, sub in a bodyweight squat for the tuck jump and step back and in instead of jumping for the plank tucks.
To do Tuck Jump to Plank Tucks, start standing tall before sinking to place your hands on the ground and jump your feet back into a high plank position with your hands under your shoulders and your feet a few inches apart.
Brace your abs and don’t let your hips sag as you jump both feet in to bring your knees close to your elbows. Try to jump in so your knees are at least under your hips if not closer in. Use your abs to try to get them just a few inches from your elbows.
Do not jump in so much that you sit back on your heels.
Then jump back out into the high plank position. Do not let your butt go up in the air and keep your hands under your shoulders.
From the high plank position, jump your feet all the way up to come back up to standing. As you come up to standing, swing your arms back and jump up, tucking your knees up toward your chest.
Land with your knees soft and then sink back down to move back into that high plank position before tucking your knees in again.
Beginners can do a squat jump or bodyweight squat instead of the tuck jump. They can also step back into the plank position and step one knee in at a time. And then extend one leg back out at a time to keep the move lower impact. You can also modify the plank and tuck by placing your hands up on a bench after the bodyweight squat if you can’t get down to the ground.
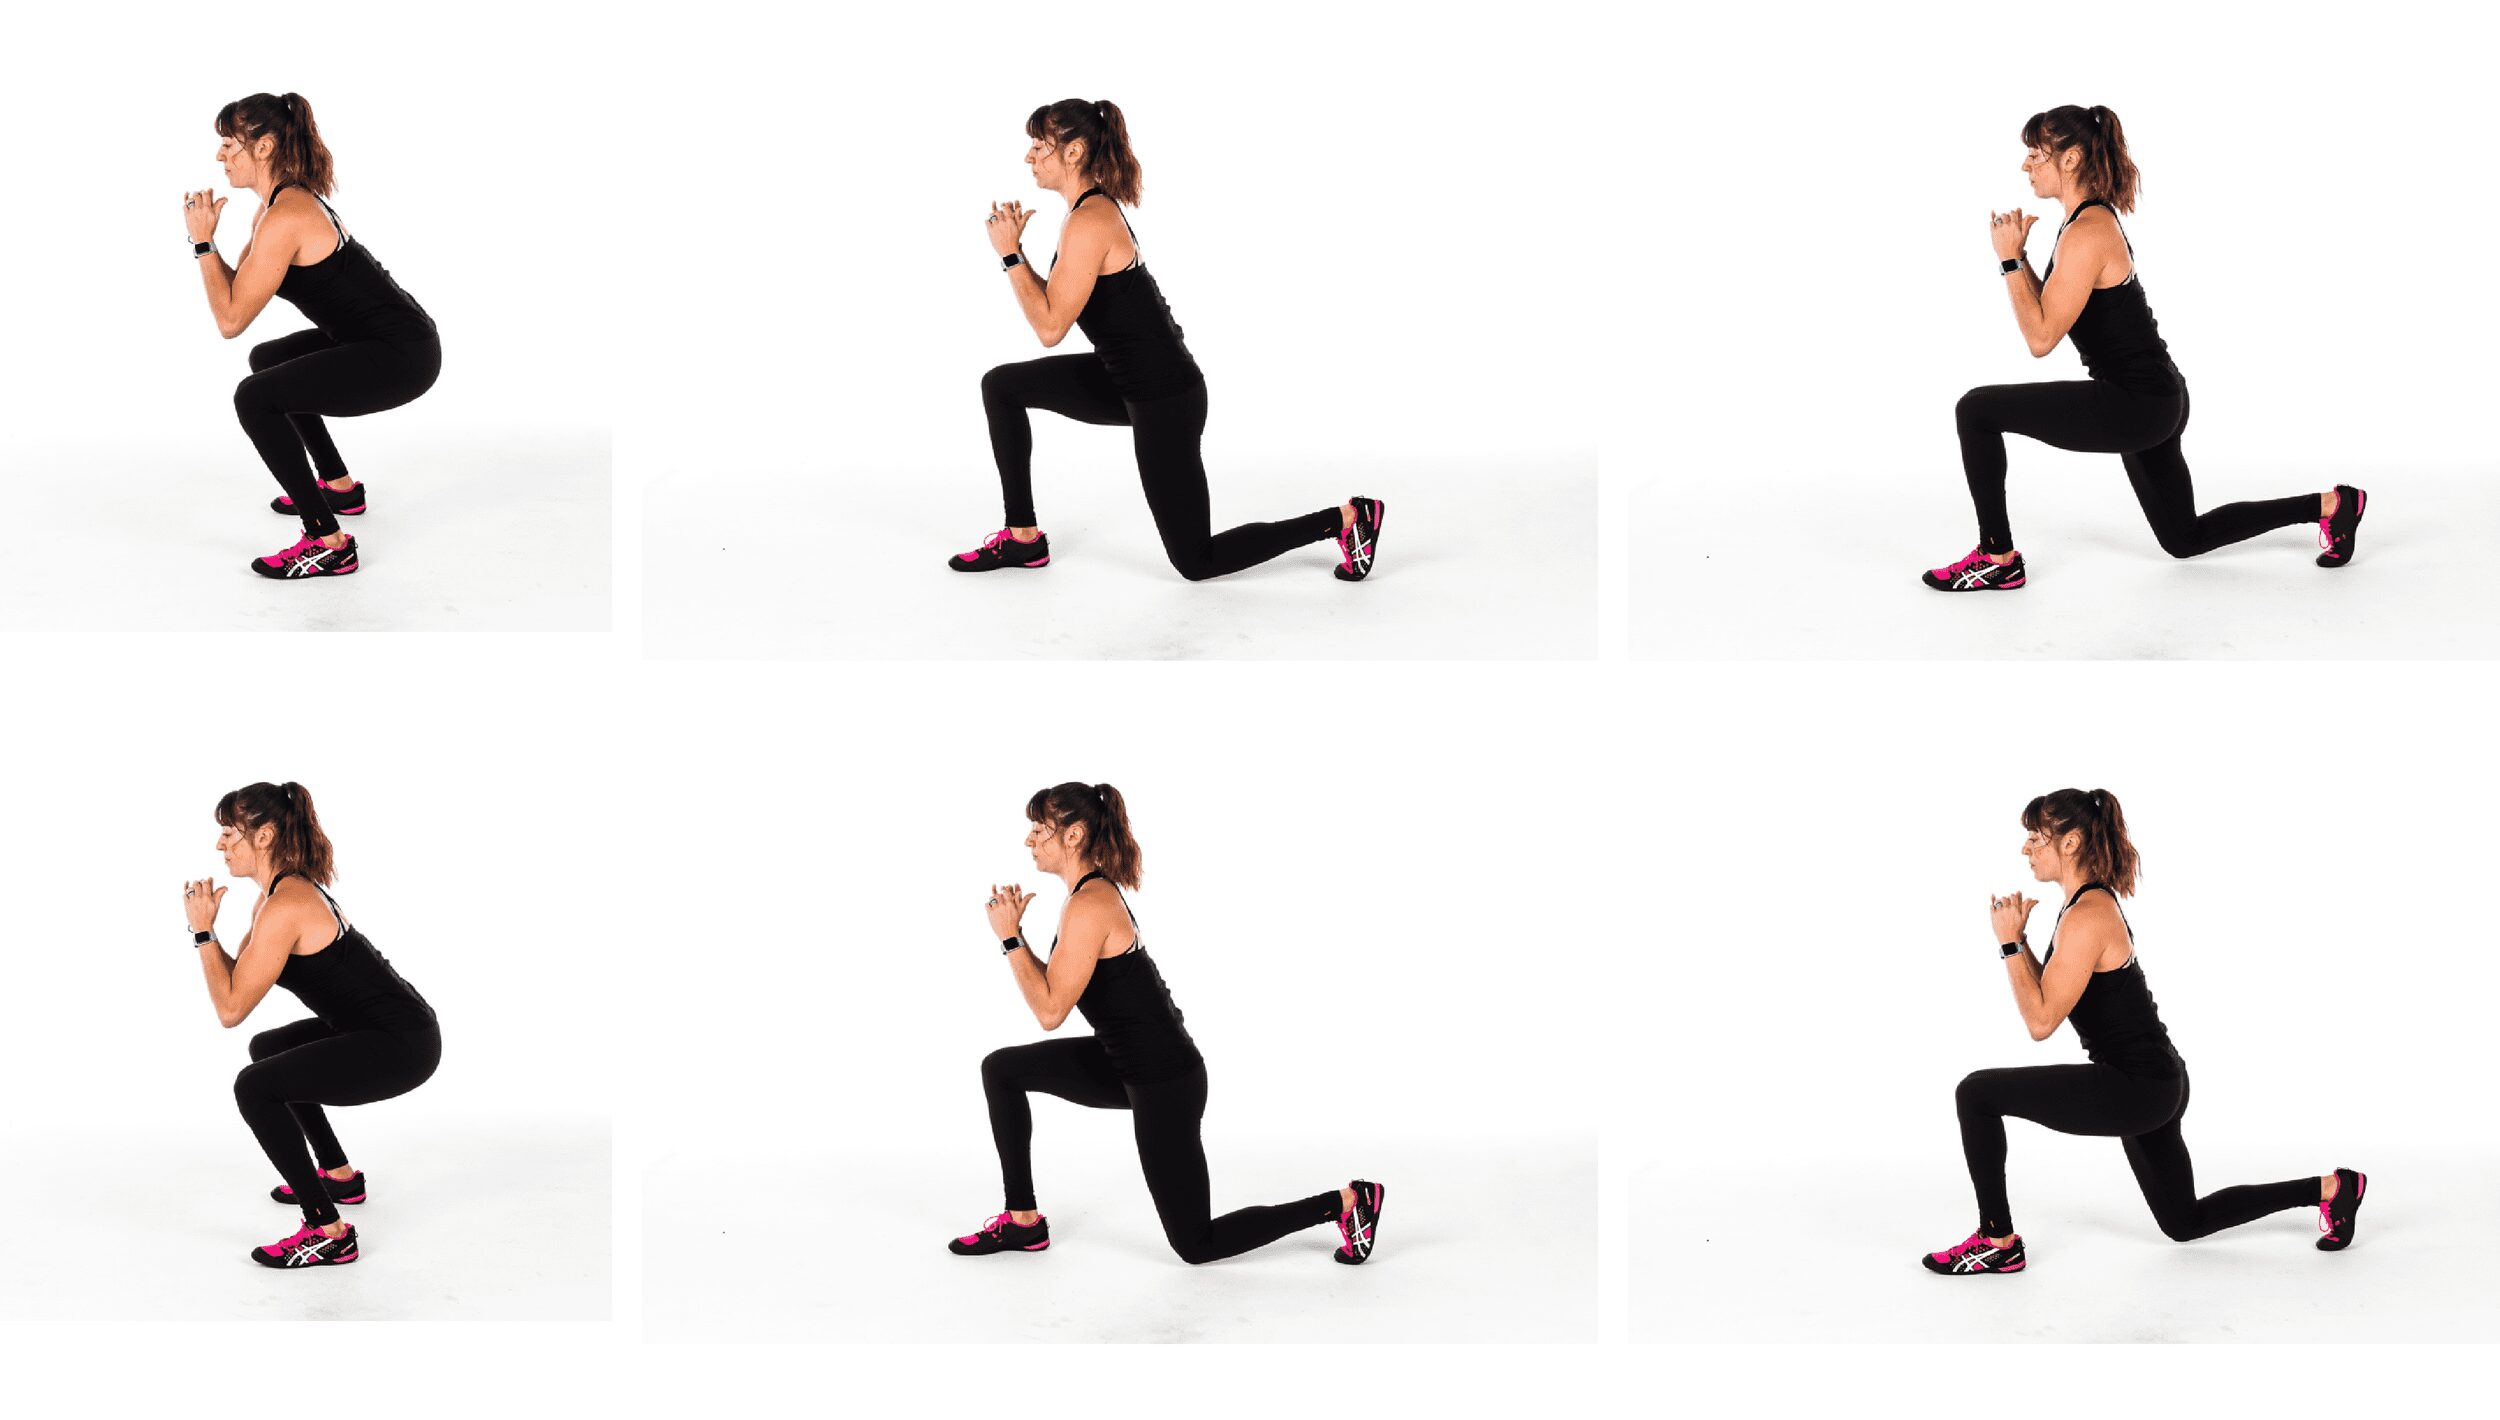
Squat Double Lunge:
Can you say jello legs?!
This hybrid leg exercise will get your blood pumping and really target your legs. (It will also challenge your coordination a bit, which is never a bad thing!)
To do the Squat Double Lunge, start standing with your feet about hip-width to shoulder-width apart. Sink down into a squat, sitting back as you sink to about parallel to the ground. Keep your chest up and your heels down.
Jump up out of the squat and, as you come to land, sink into a lunge with one foot forward and the other foot back. Make sure your front heel is down and all of your weight isn’t in that front leg.
Drop your back knee down toward the ground as you bend that front knee to about 90 degrees then explode up and switch legs, landing in a lunge on the other side.
Again sink into that deep lunge and jump up, bringing both feet back to parallel to sink into a squat.
Make sure that as you land with each move, you bend your knees and don’t land with your legs locked out.
Each time you will perform the squat then a lunge to each side. You can alternate which side you lunge with first.
Beginners may step instead of jumping and may not perform as big a range of motion. You may also step and do a straighter leg lunge if you need to reduce knee flexion.
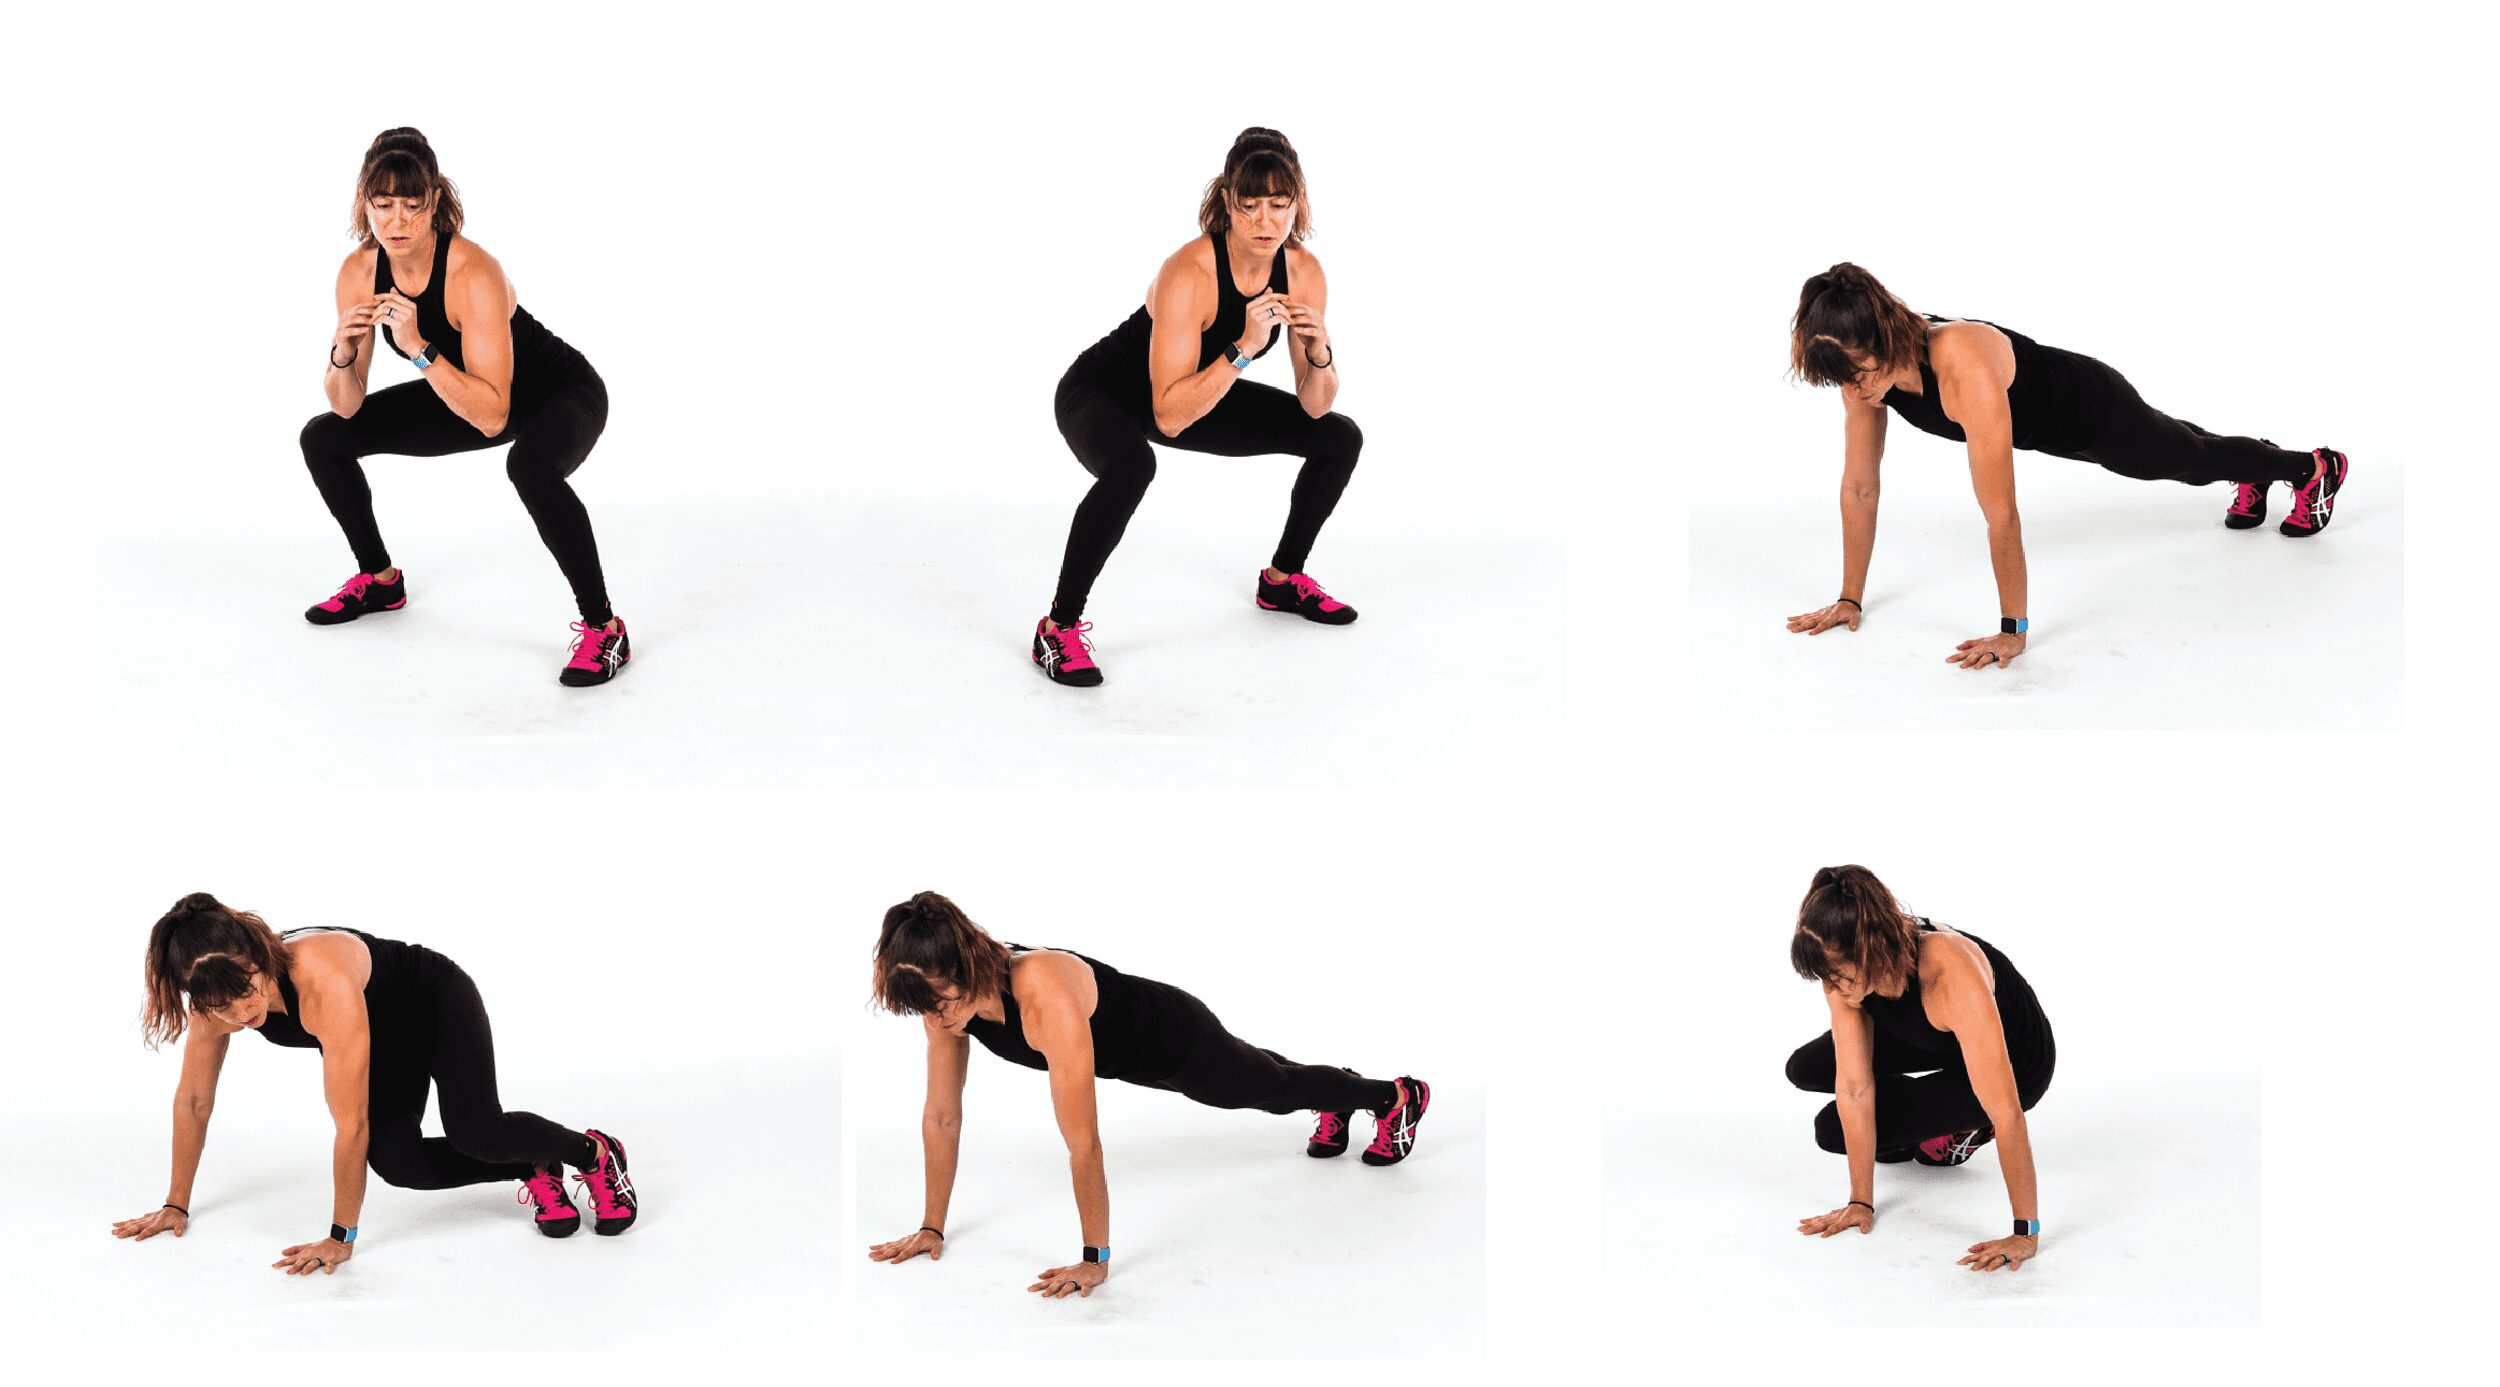
Squat Twists:
Work your legs and your core with this squat to twist movement.
The squat jumps will get your blood pumping and legs working, while the twist is a great move for your core, especially your obliques!
To do Squat Twists, start standing with your feet about hip-width to shoulder-width apart. Sink into a squat to about parallel to the ground, keeping your heels down and chest up. Really sit your butt down and back.
Then jump up out of the squat and, as you leave the ground, rotate your hips to pivot your lower body and feet toward the right or left. Land on the balls of your feet with your hips angled toward one side but your chest still fighting to face forward. Swing your arms to the opposite side you’ve rotated your feet to.
Land quickly on the balls of your feet and push off to move back into the squat facing forward. Bend your knees as you land and quickly sink to then jump back up and rotate your hips the other way. Feel your core working to twist.
Beginners may not sink as low in the squat and may stand up out of the squat, stepping with just one leg in front to twist their hips, touching that toe to the ground before stepping back to sink back down.
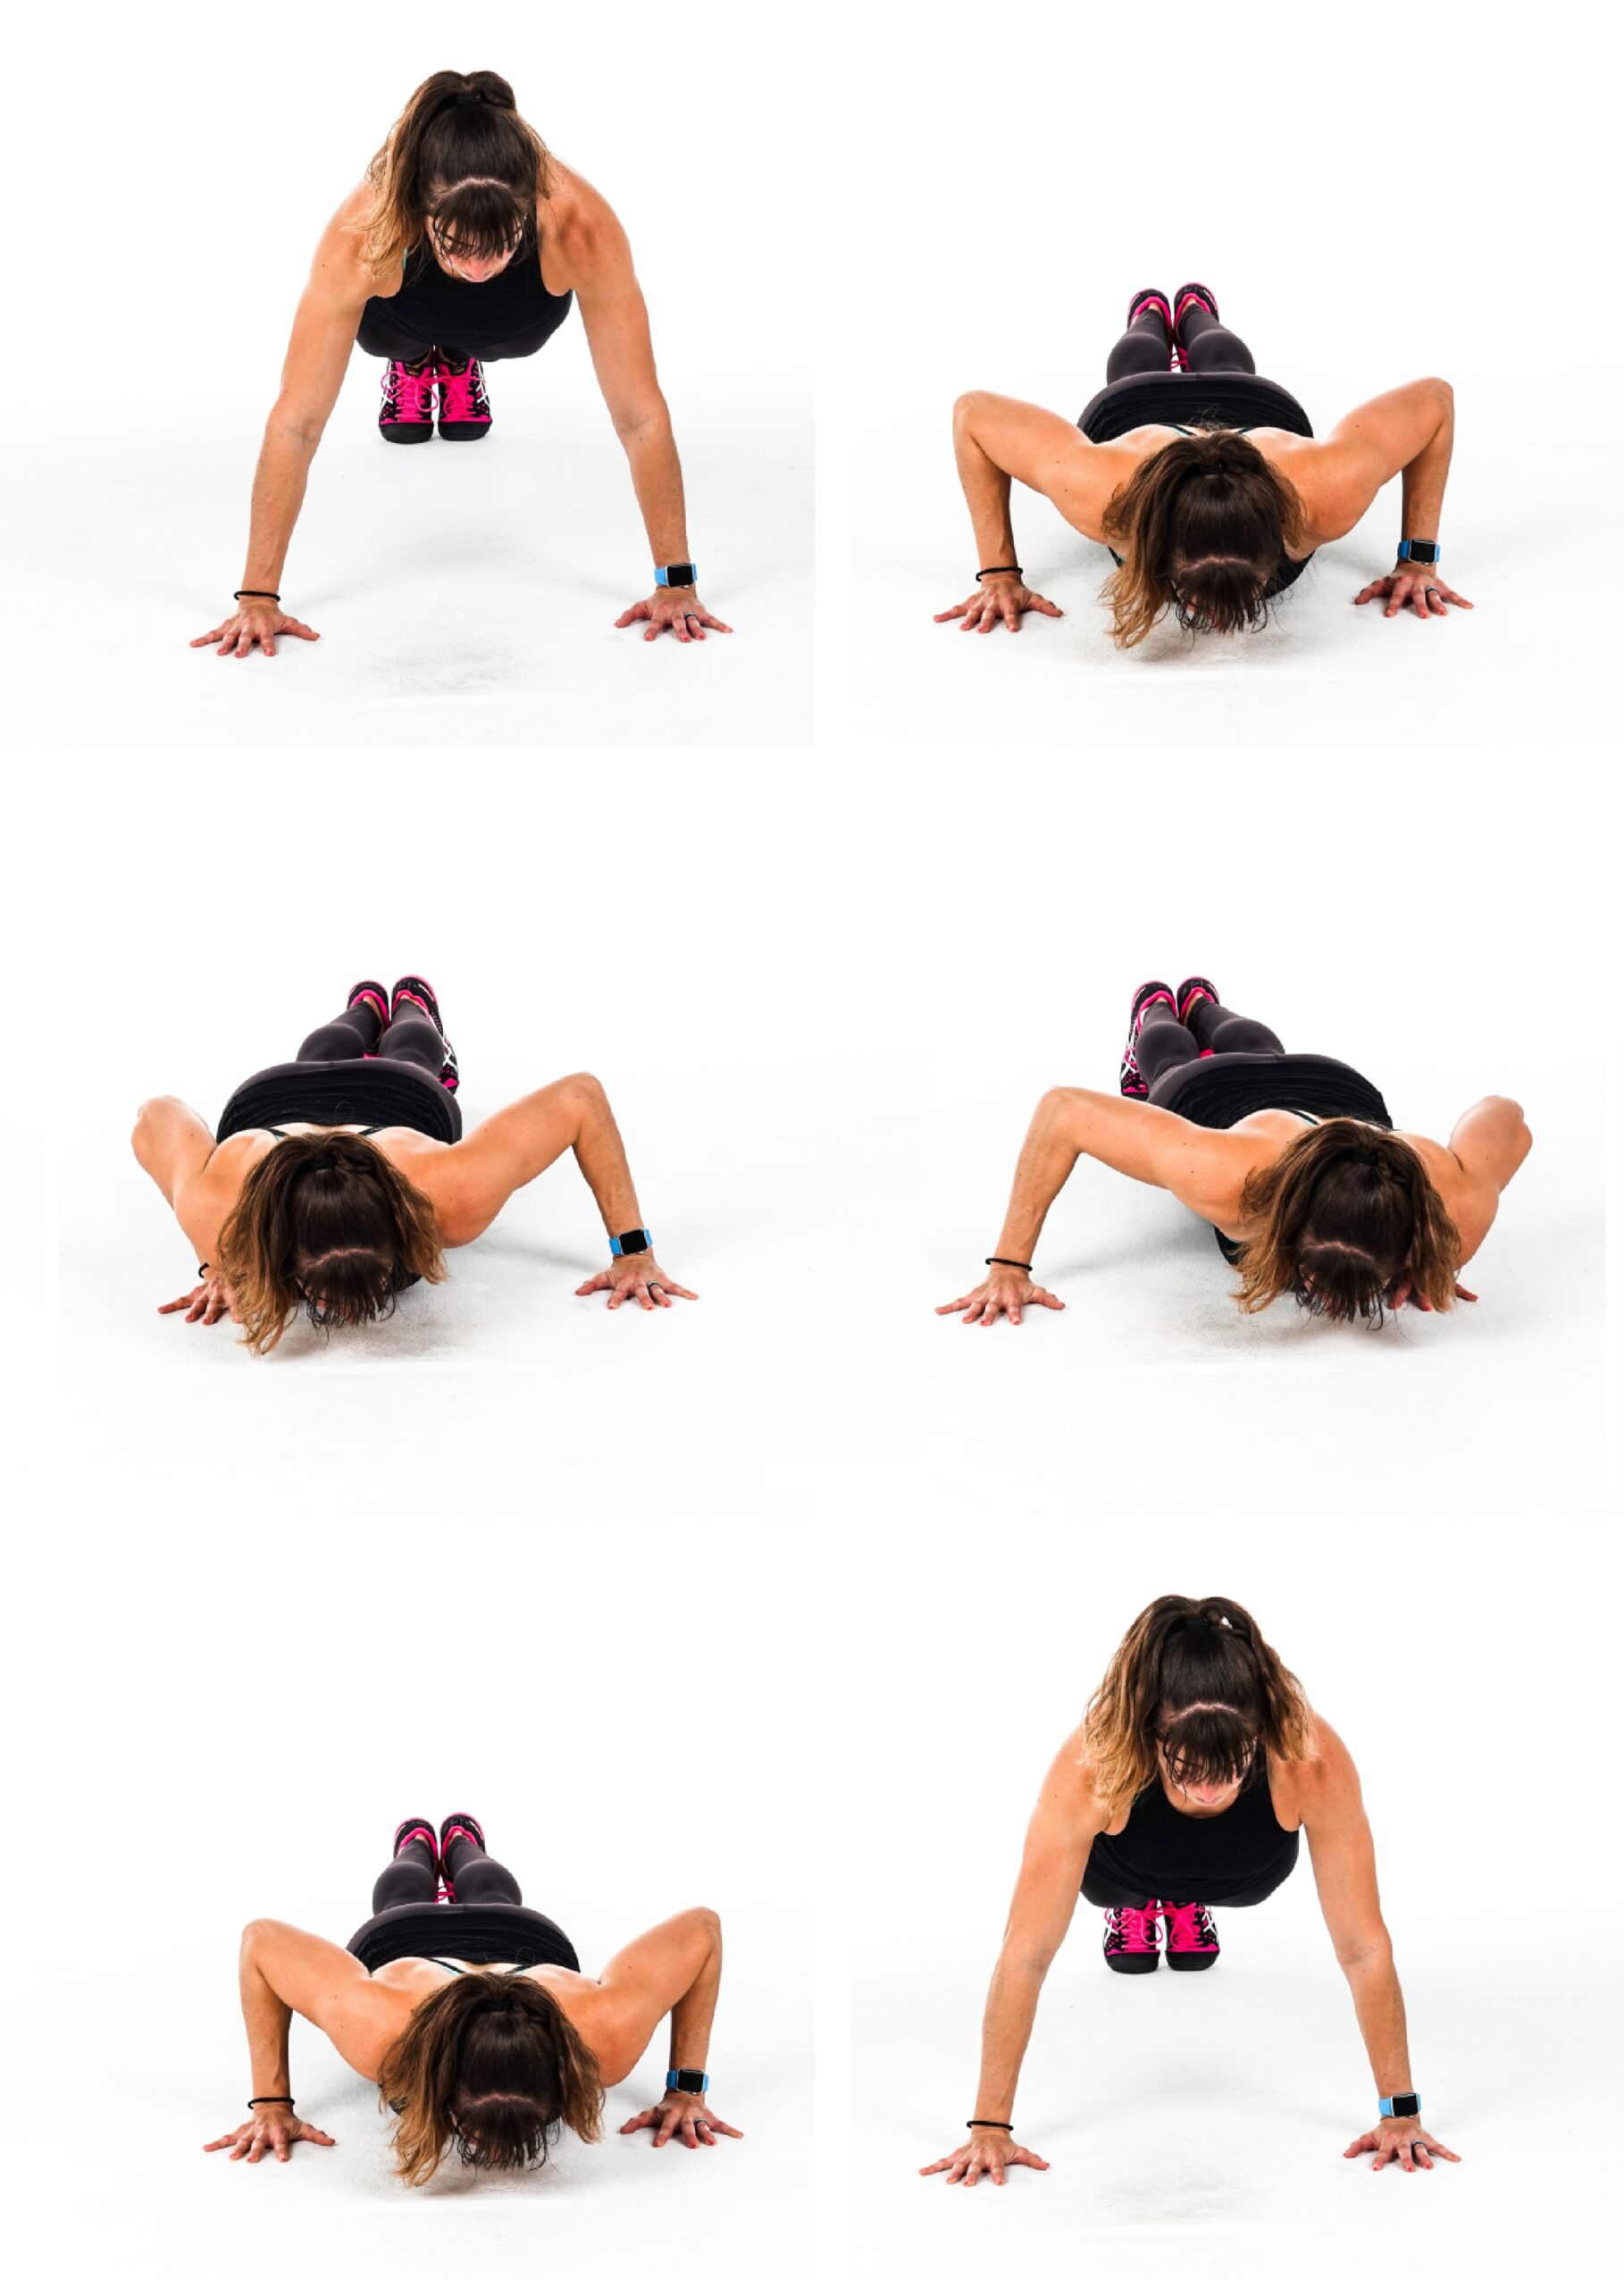
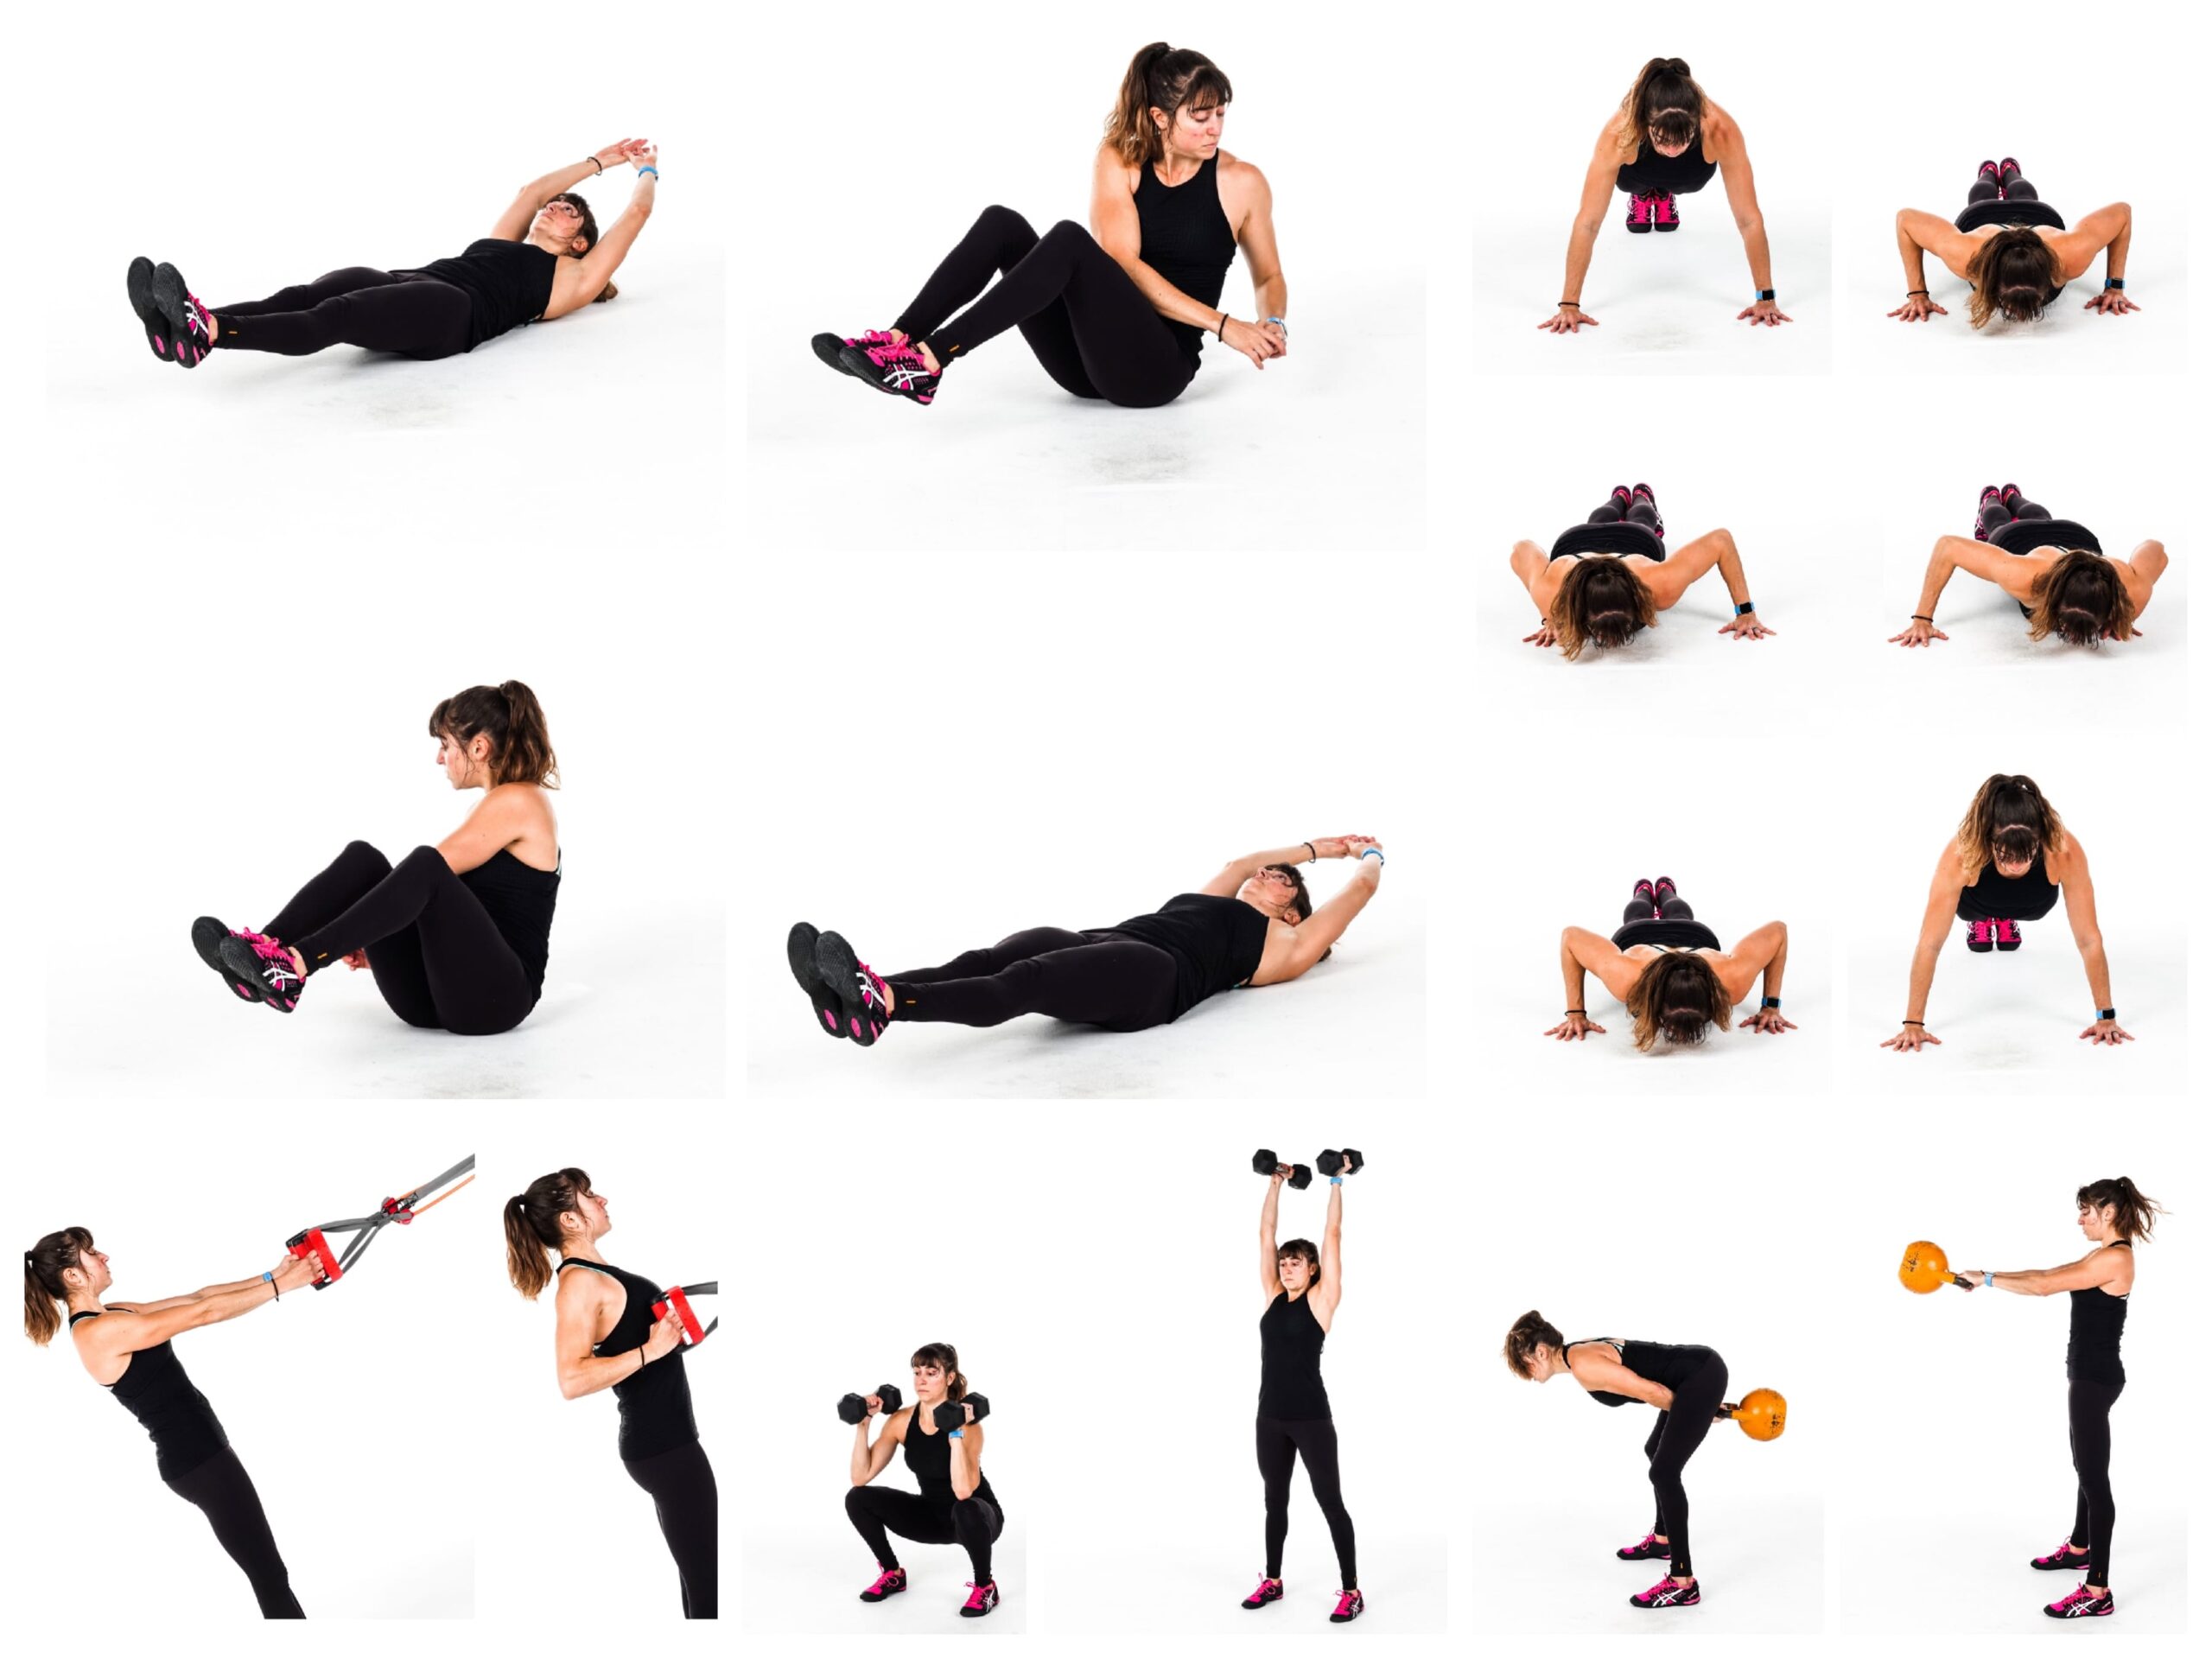
Corn Cob Push Ups:
Not every cardio move we do has to be high impact.
And by mixing up the areas we work over a cardio circuit, we can allow ourselves to recover while not having to fully rest.
So if you did a Squat Double Lunge, you could then “rest” your legs by doing a Corn Cob Push Up to work your chest, shoulders, triceps and core.
This way you’re still getting work done and even keeping your blood pumping while allowing different areas to recover.
To do Corn Cob Push Ups, set up in the high plank position with your feet together. Your hands should be just outside your chest or maybe slightly wider.
With your body in a nice straight line, lower your chest to the ground. Holding just hovering over the ground, shift your weight to one side. Then shift back center. Then shift your weight to the other side.
Come back center and then press back up. Make sure your body is in a nice straight line the entire time.
Beginners can do this from their knees or off an incline. Make sure as you move at the bottom that your butt doesn’t go up in the air.
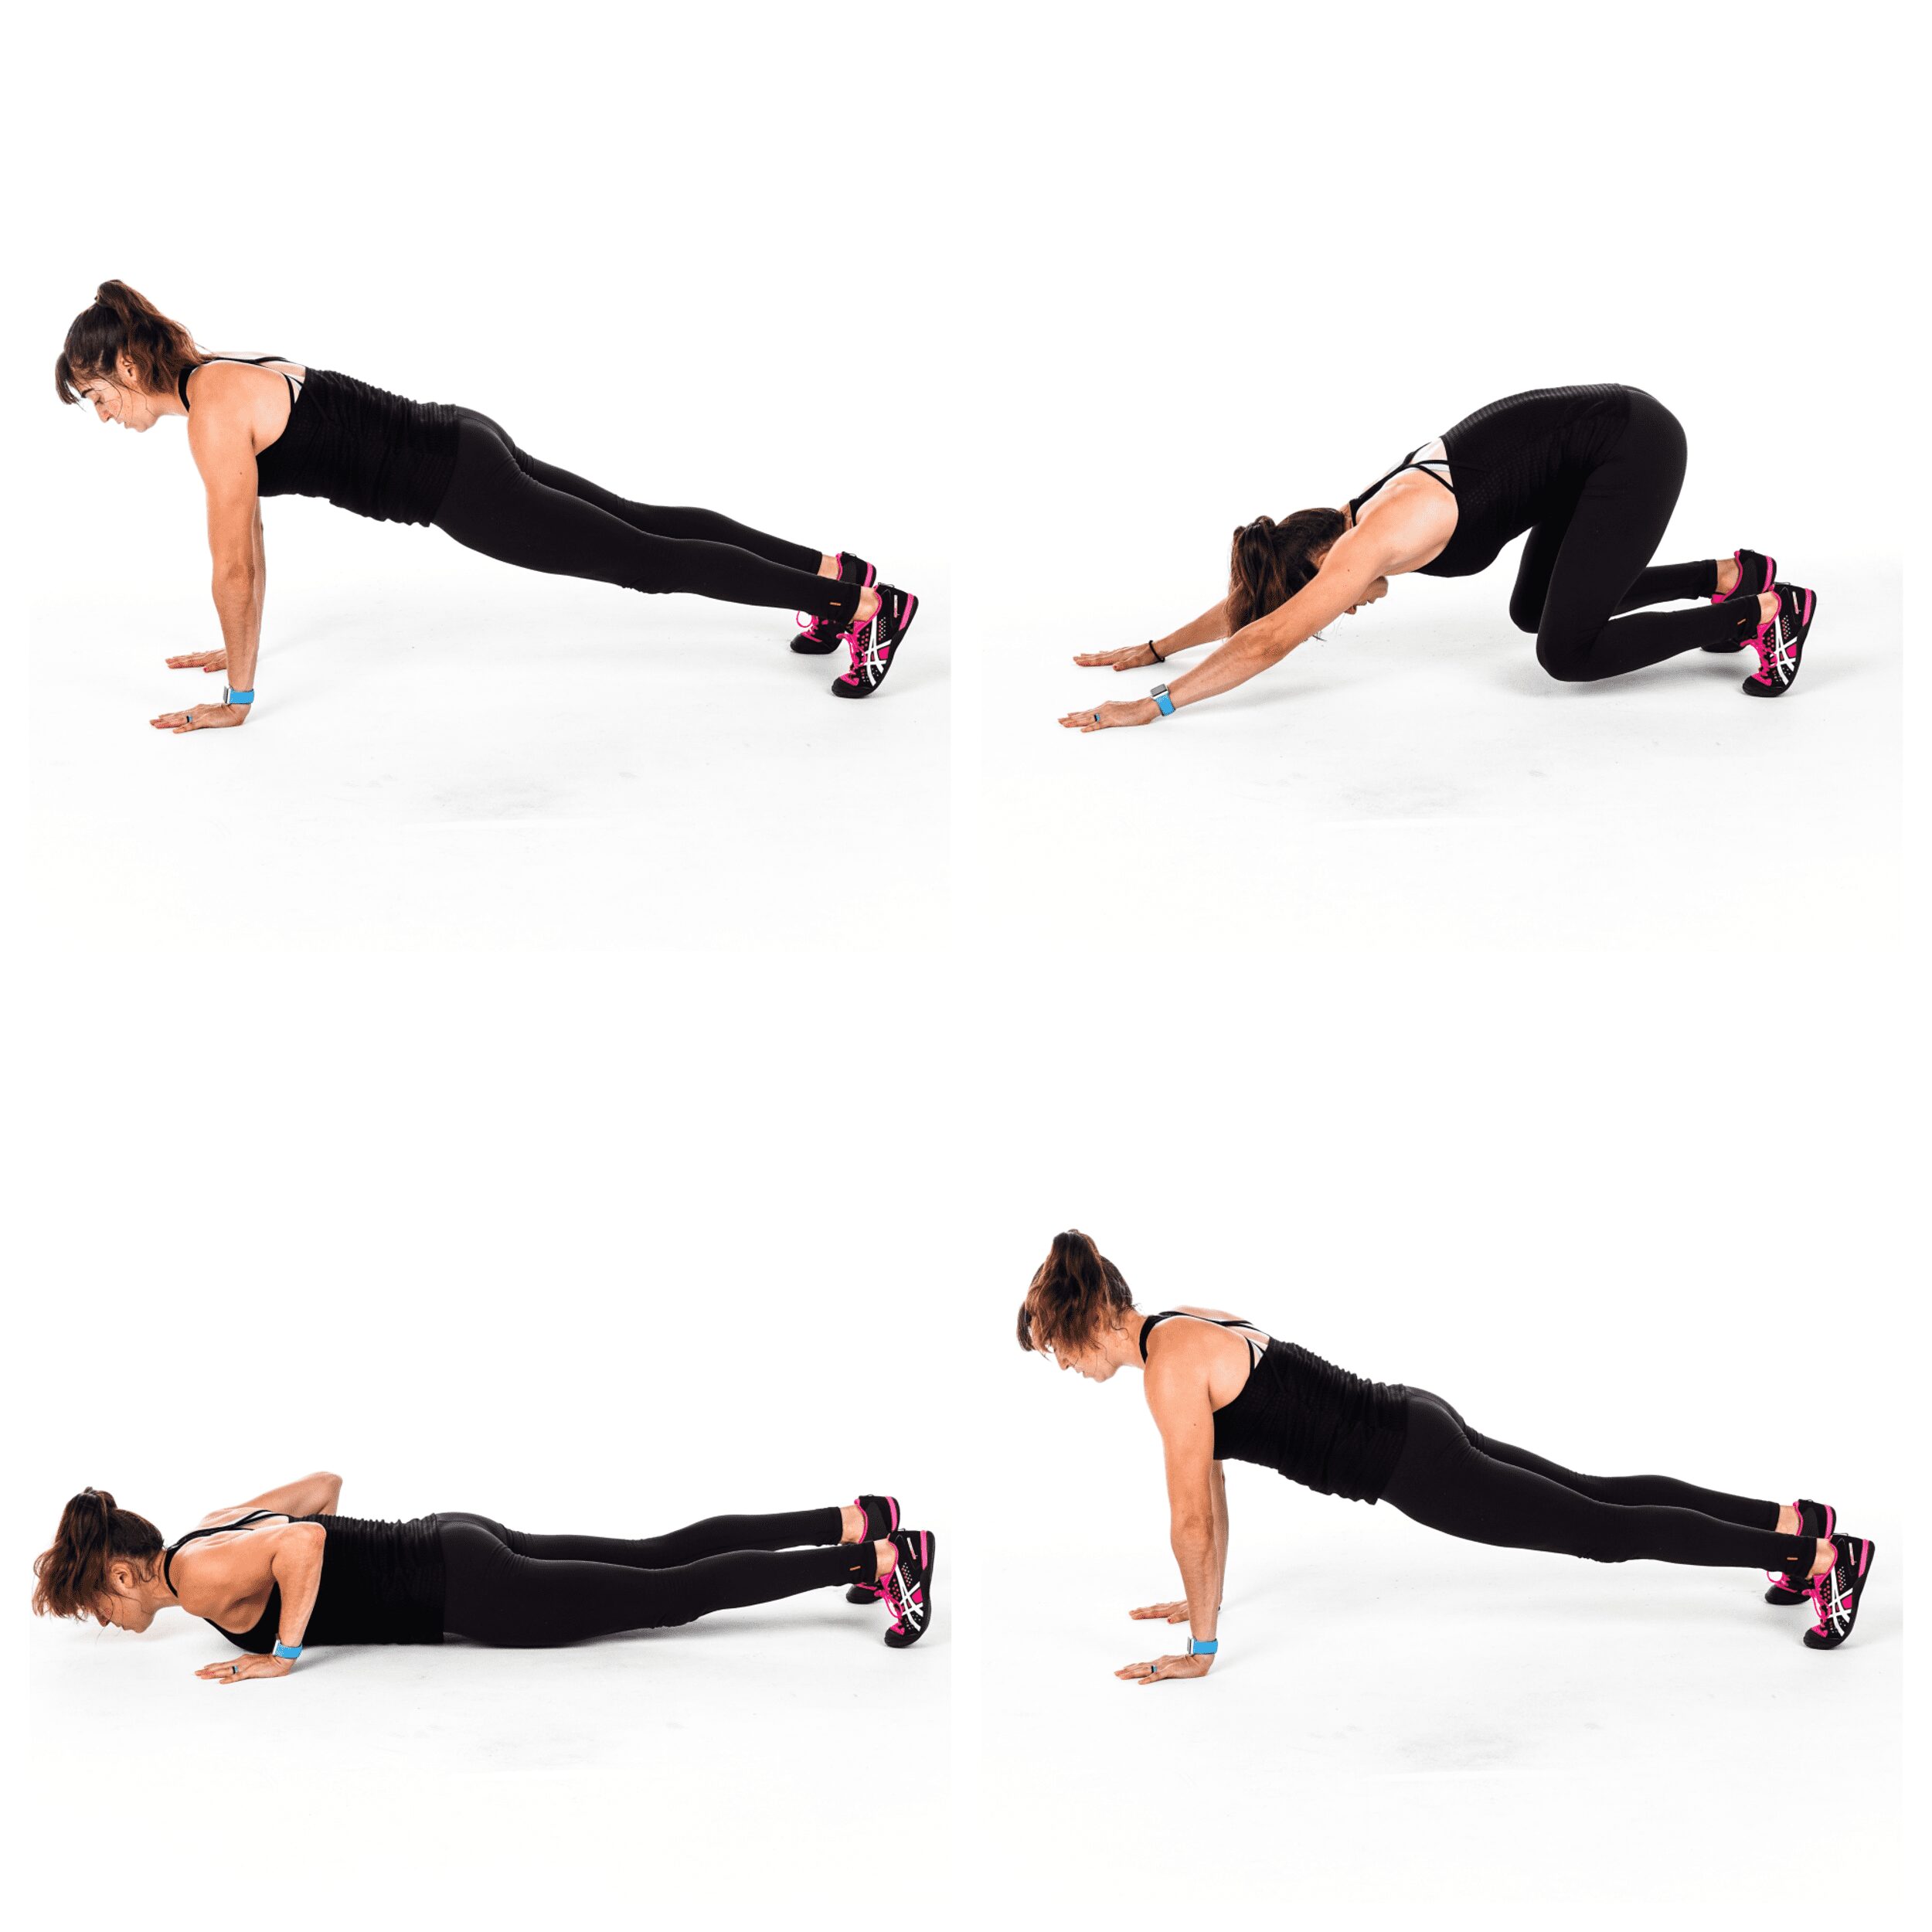
Push Back Push Up:
This push up variation is a great one to include in your cardio workouts as it will not only work your upper body, but also really challenge your core while getting your blood pumping!
However, it is a very challenging variation when done from your toes. So make sure to modify off an incline or from your knees to prevent neck, shoulder or even lower back aches and pains if needed.
To do the Push Back Push Up, set up in the high plank position with your feet about hip-width apart or slightly closer together and your hands just outside your chest. Beginners can also do this from their knees.
Then from this plank position sit your butt back toward your heels as if doing a child’s pose without your knees on the ground. Beginners can actually do child’s pose, sitting back with their knees down.
As you come back forward stay as close to the ground as possible. You are shooting forward into the bottom of the push up. You want to think about skimming forward with your body just off the ground.
Once you’re in a nice straight line at the bottom of a push up, press up to the high plank position then sit back again to repeat.
Do not let your elbows flare way up above your shoulders as you come forward or push up. You want your upper arms to create more of an arrow shape with your body or even stay in slightly closer to your sides.
Beginners can do this all from their knees. To make this move a little less advanced from the toes, you can reverse the move.
Instead go from the high plank to the bottom of the push up then from the bottom of the push up sit your butt back onto your heels. You will then come back forward into the high plank position to repeat. This makes the movement a little easier on your upper body, but far from easy!
If the knee version is too easy but the others from the feet are too much, try placing your hands up on a low incline!
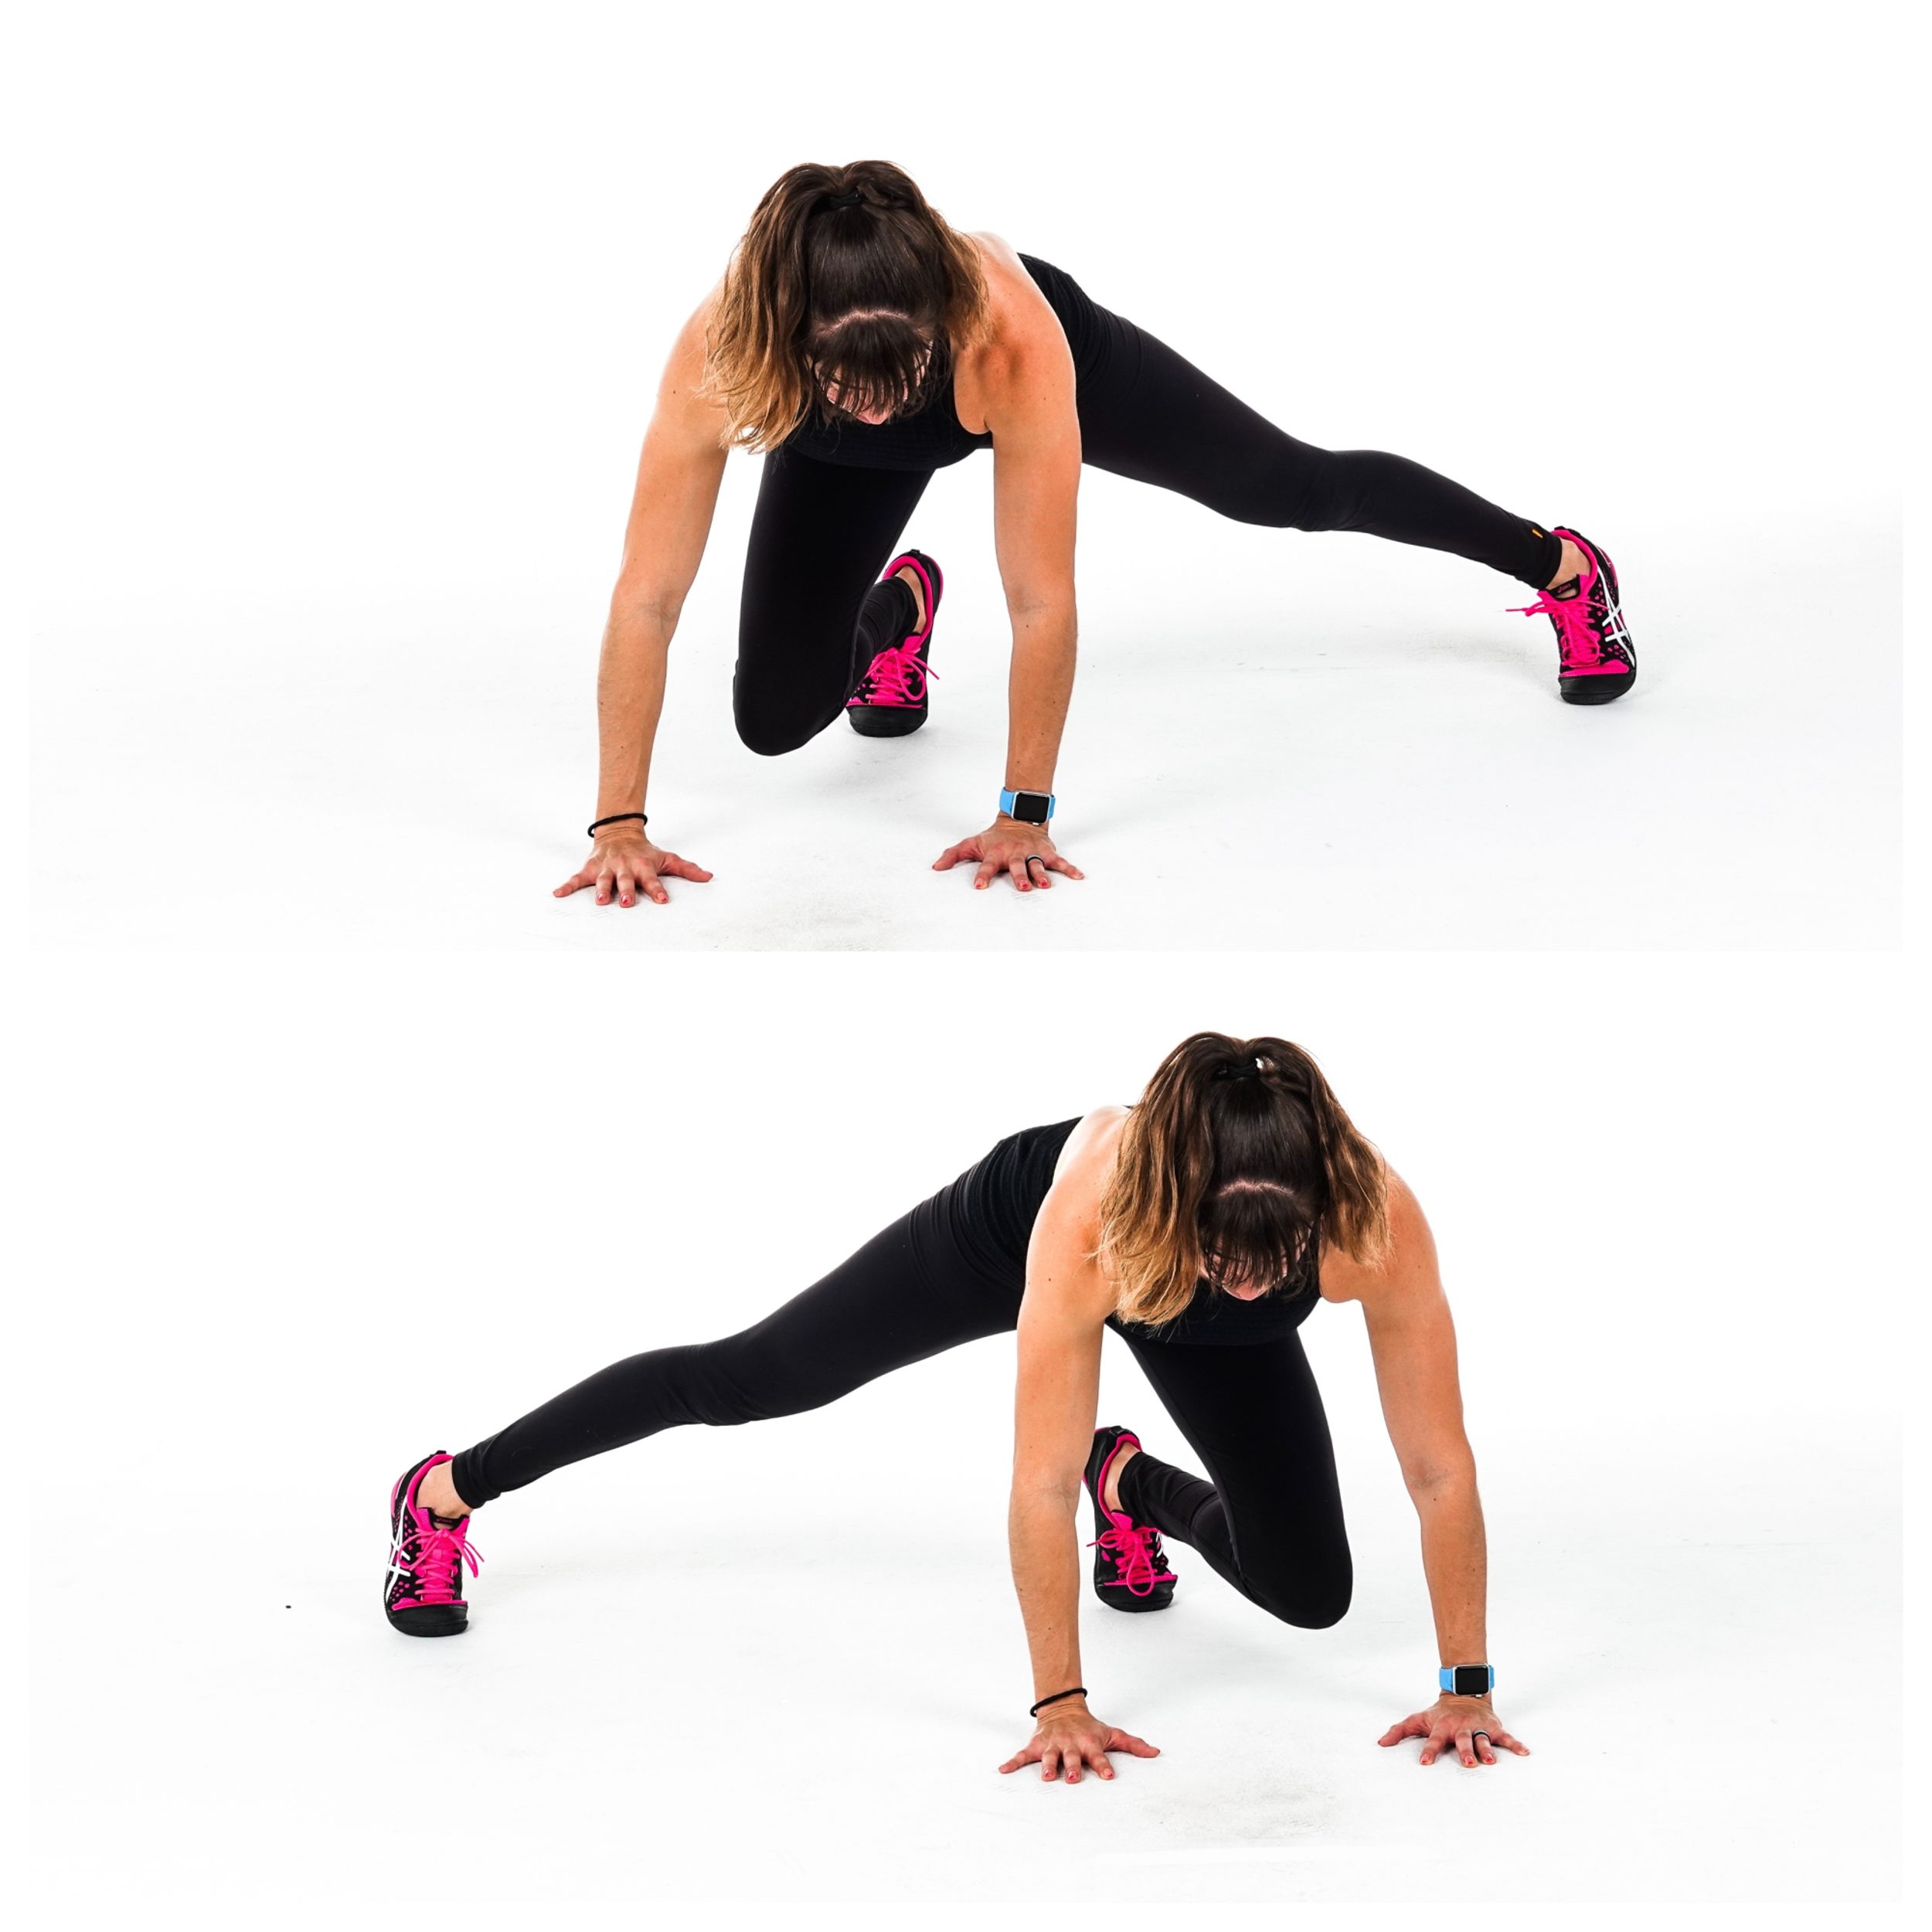
Plank Skater Hops:
Cardio and core all in one move.
This hybrid plank is a great way to challenge your shoulders, abs, obliques and quads while setting those lungs on fire hehe
(It’s always great when we can also include a diversity of movements that get us moving in every direction too!)
To do Plank Skater Hops, start in a bulldog position from your hands and toes with your knees bent to about 90 degrees and feet together behind you. Straighten one leg out to the side and slight back, touching the toe down. You may even slightly shift the other foot more center under your body as you reach the straight leg out to the side.
Then hop that straight leg back in, bending it as you do, as you hop the other leg out laterally. You will almost be shuffling back and forth laterally while in the plank position. Keep your hands under your shoulders as you do. Your butt shouldn’t be way up in the air as you shuffle/hop side to side. You may “bounce” but your butt shouldn’t be up in the air.
Beginners may do less of a hop and move more slowly while advanced exercisers should hop quickly side to side. Remember to keep one knee bent under your body as the other leg goes out to the side. The straight leg will be out to the side and slightly back as you hop back and forth.
Single Arm Plank Jacks:
Work on your anti-rotational core strength, and even your coordination, with this plank jack variation! This is most definitely an advanced movement so you may either need to slow it down to start or stick with the basic plank jack.
But this move is a great way to challenge your shoulder stability while really targeting those obliques, quads, glutes and even your inner thighs!
To do Single Arm Plank Jacks, set up in a high plank position with your hands a bit closer together under your shoulders and your feet together. Brace your abs and make sure your body is in a nice straight line.
Then jump your feet out wide, and as you do, lift one hand to touch your opposite shoulder. Resist the urge to really rotate as you lift the hand or let your butt go up in the air. Try to keep your hips down and your core as square to the ground as possible.
Jump your feet back together and place the hand back down. When you quickly jump your feet out again, this time lift the other hand to touch your opposite shoulder.
Jump quickly back in and lower the hand back down. Keep repeating the jack with your feet, alternating which hand you lift to tap your shoulder.
Run, Punch, Banana:
Just like I like to include push ups so that you can allow areas to recover while still putting in work, I also love including more isolated core movements in my cardio workouts.
Not only can these moves help you build a lean, strong core, but they can also help you lower the intensity for an interval to more fully recover WITHOUT actually having to fully rest.
Sometimes it’s not just cycling the areas you’re working but actually about cycling the intensity of the movements you include!
This is a great way to get more out of less time!
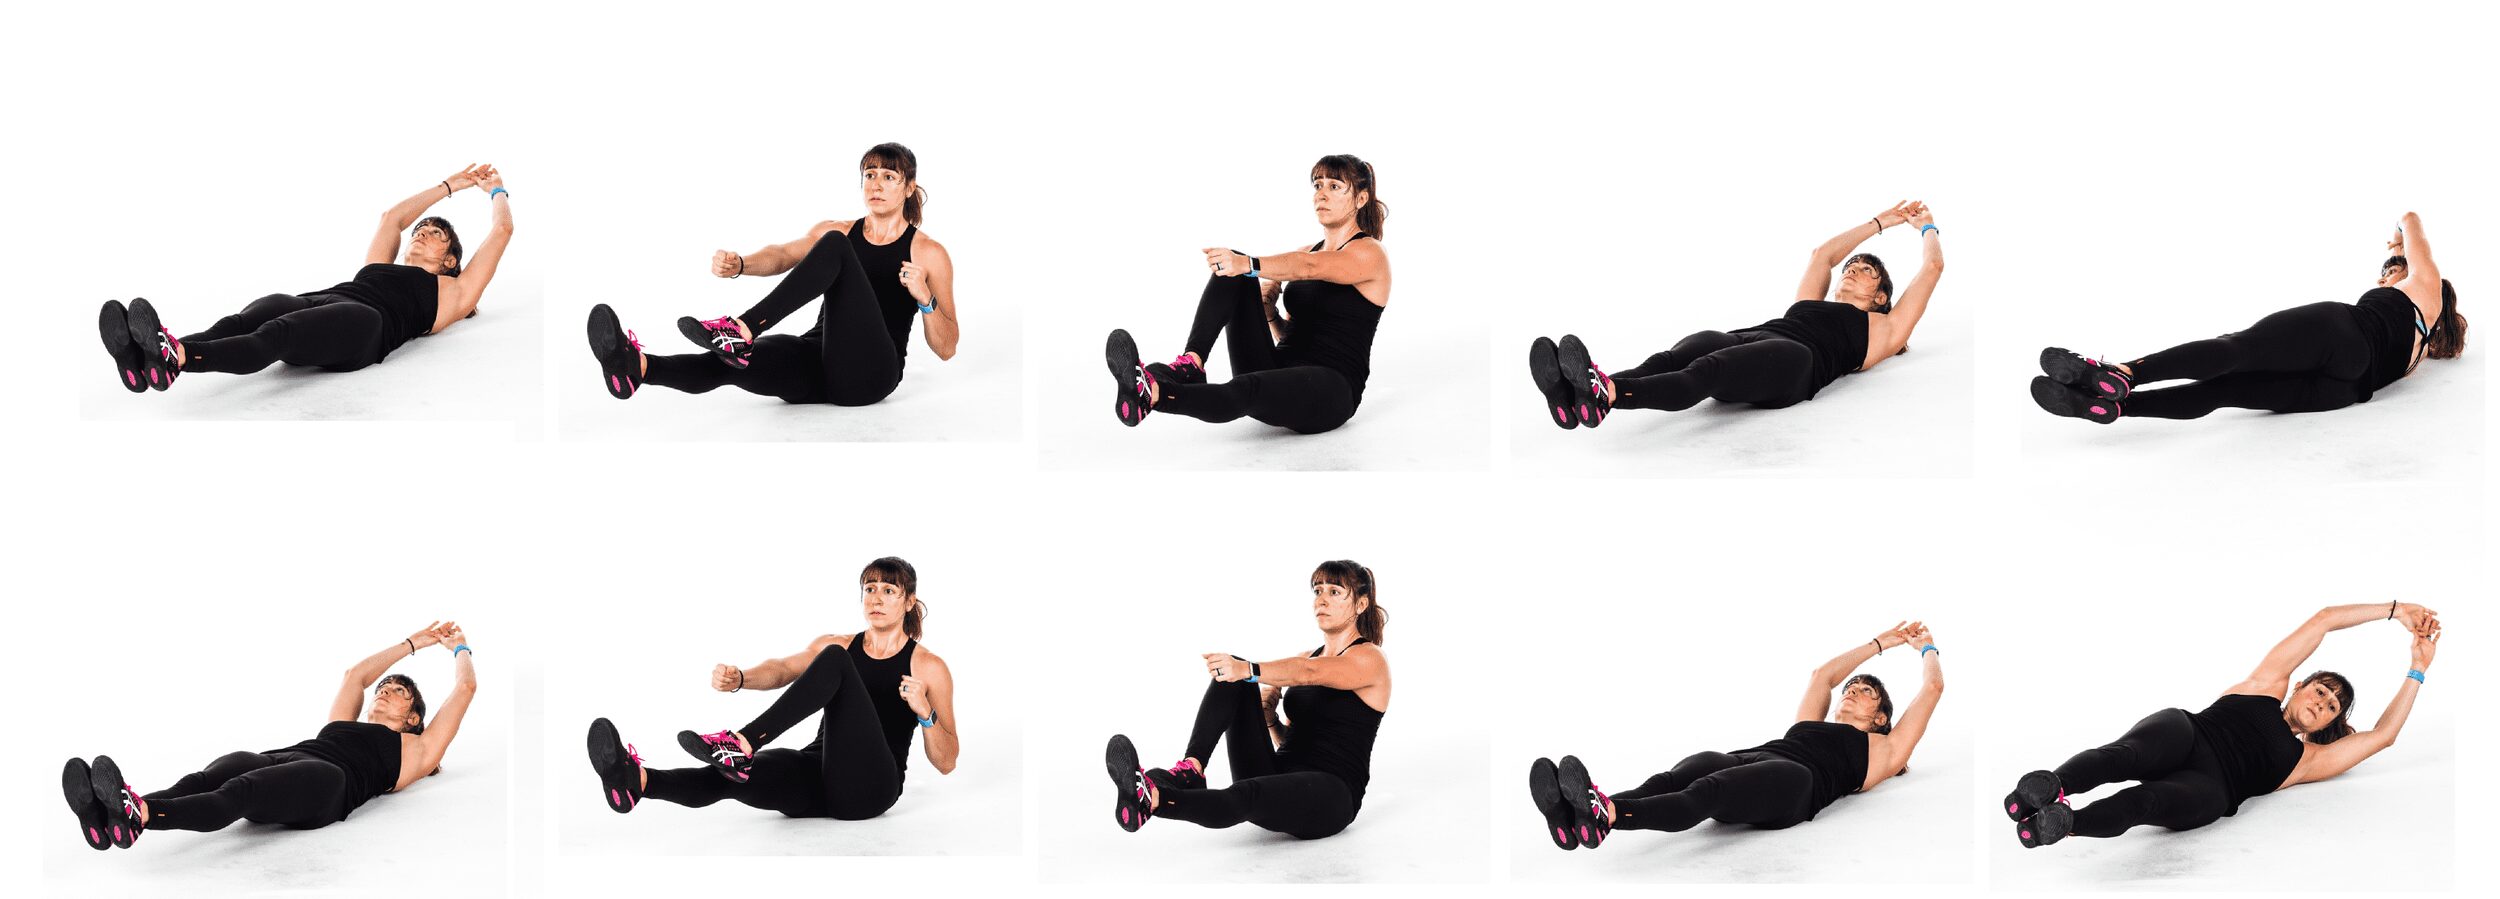
To do Run, Punch, Banana, start lying on your back with your legs out straight and arms reaching back overhead. Lift your shoulder blades and legs off the ground, bracing your abs and engaging your glutes. You can think about pressing your lower back down into the ground to help engage your abs. Your head should be in line with your arms overhead. Do not tuck your chin. This position is the banana.
Then roll to one side. Do not roll all the way over, but just angled onto your side to feel your obliques work. Do not touch your hands or legs down.
Roll back center then sit up, drawing one knee in as you punch the opposite hand out toward your feet. Keep the other leg out straight on the ground as you bring your other hand in at your chest.
Straighten that leg back out as you bring your hand back in toward your chest. You will want to tuck the other knee in and punch the other hand out to switch sides at the same time. (So as one leg is straightening out the other is tucking in so that you can run and punch quickly.)
After performing a knee tuck and punch to each side, straighten both legs out and reach both hands back overhead to lower back down into the banana position.
Roll onto your other side once you’ve lowered down then come back into the banana position and repeat the punch and run sitting up.
Beginners can keep their legs up higher toward the ceiling in banana and perform more of a crunch instead of sitting all the way up to run. They can even touch the toe of the opposite leg from the one they are tucking in down to the ground to reduce the strain on their abs so their lower back doesn’t take over.
If you feel your lower back engaging during this move, it is key you modify so you can feel your abs working!
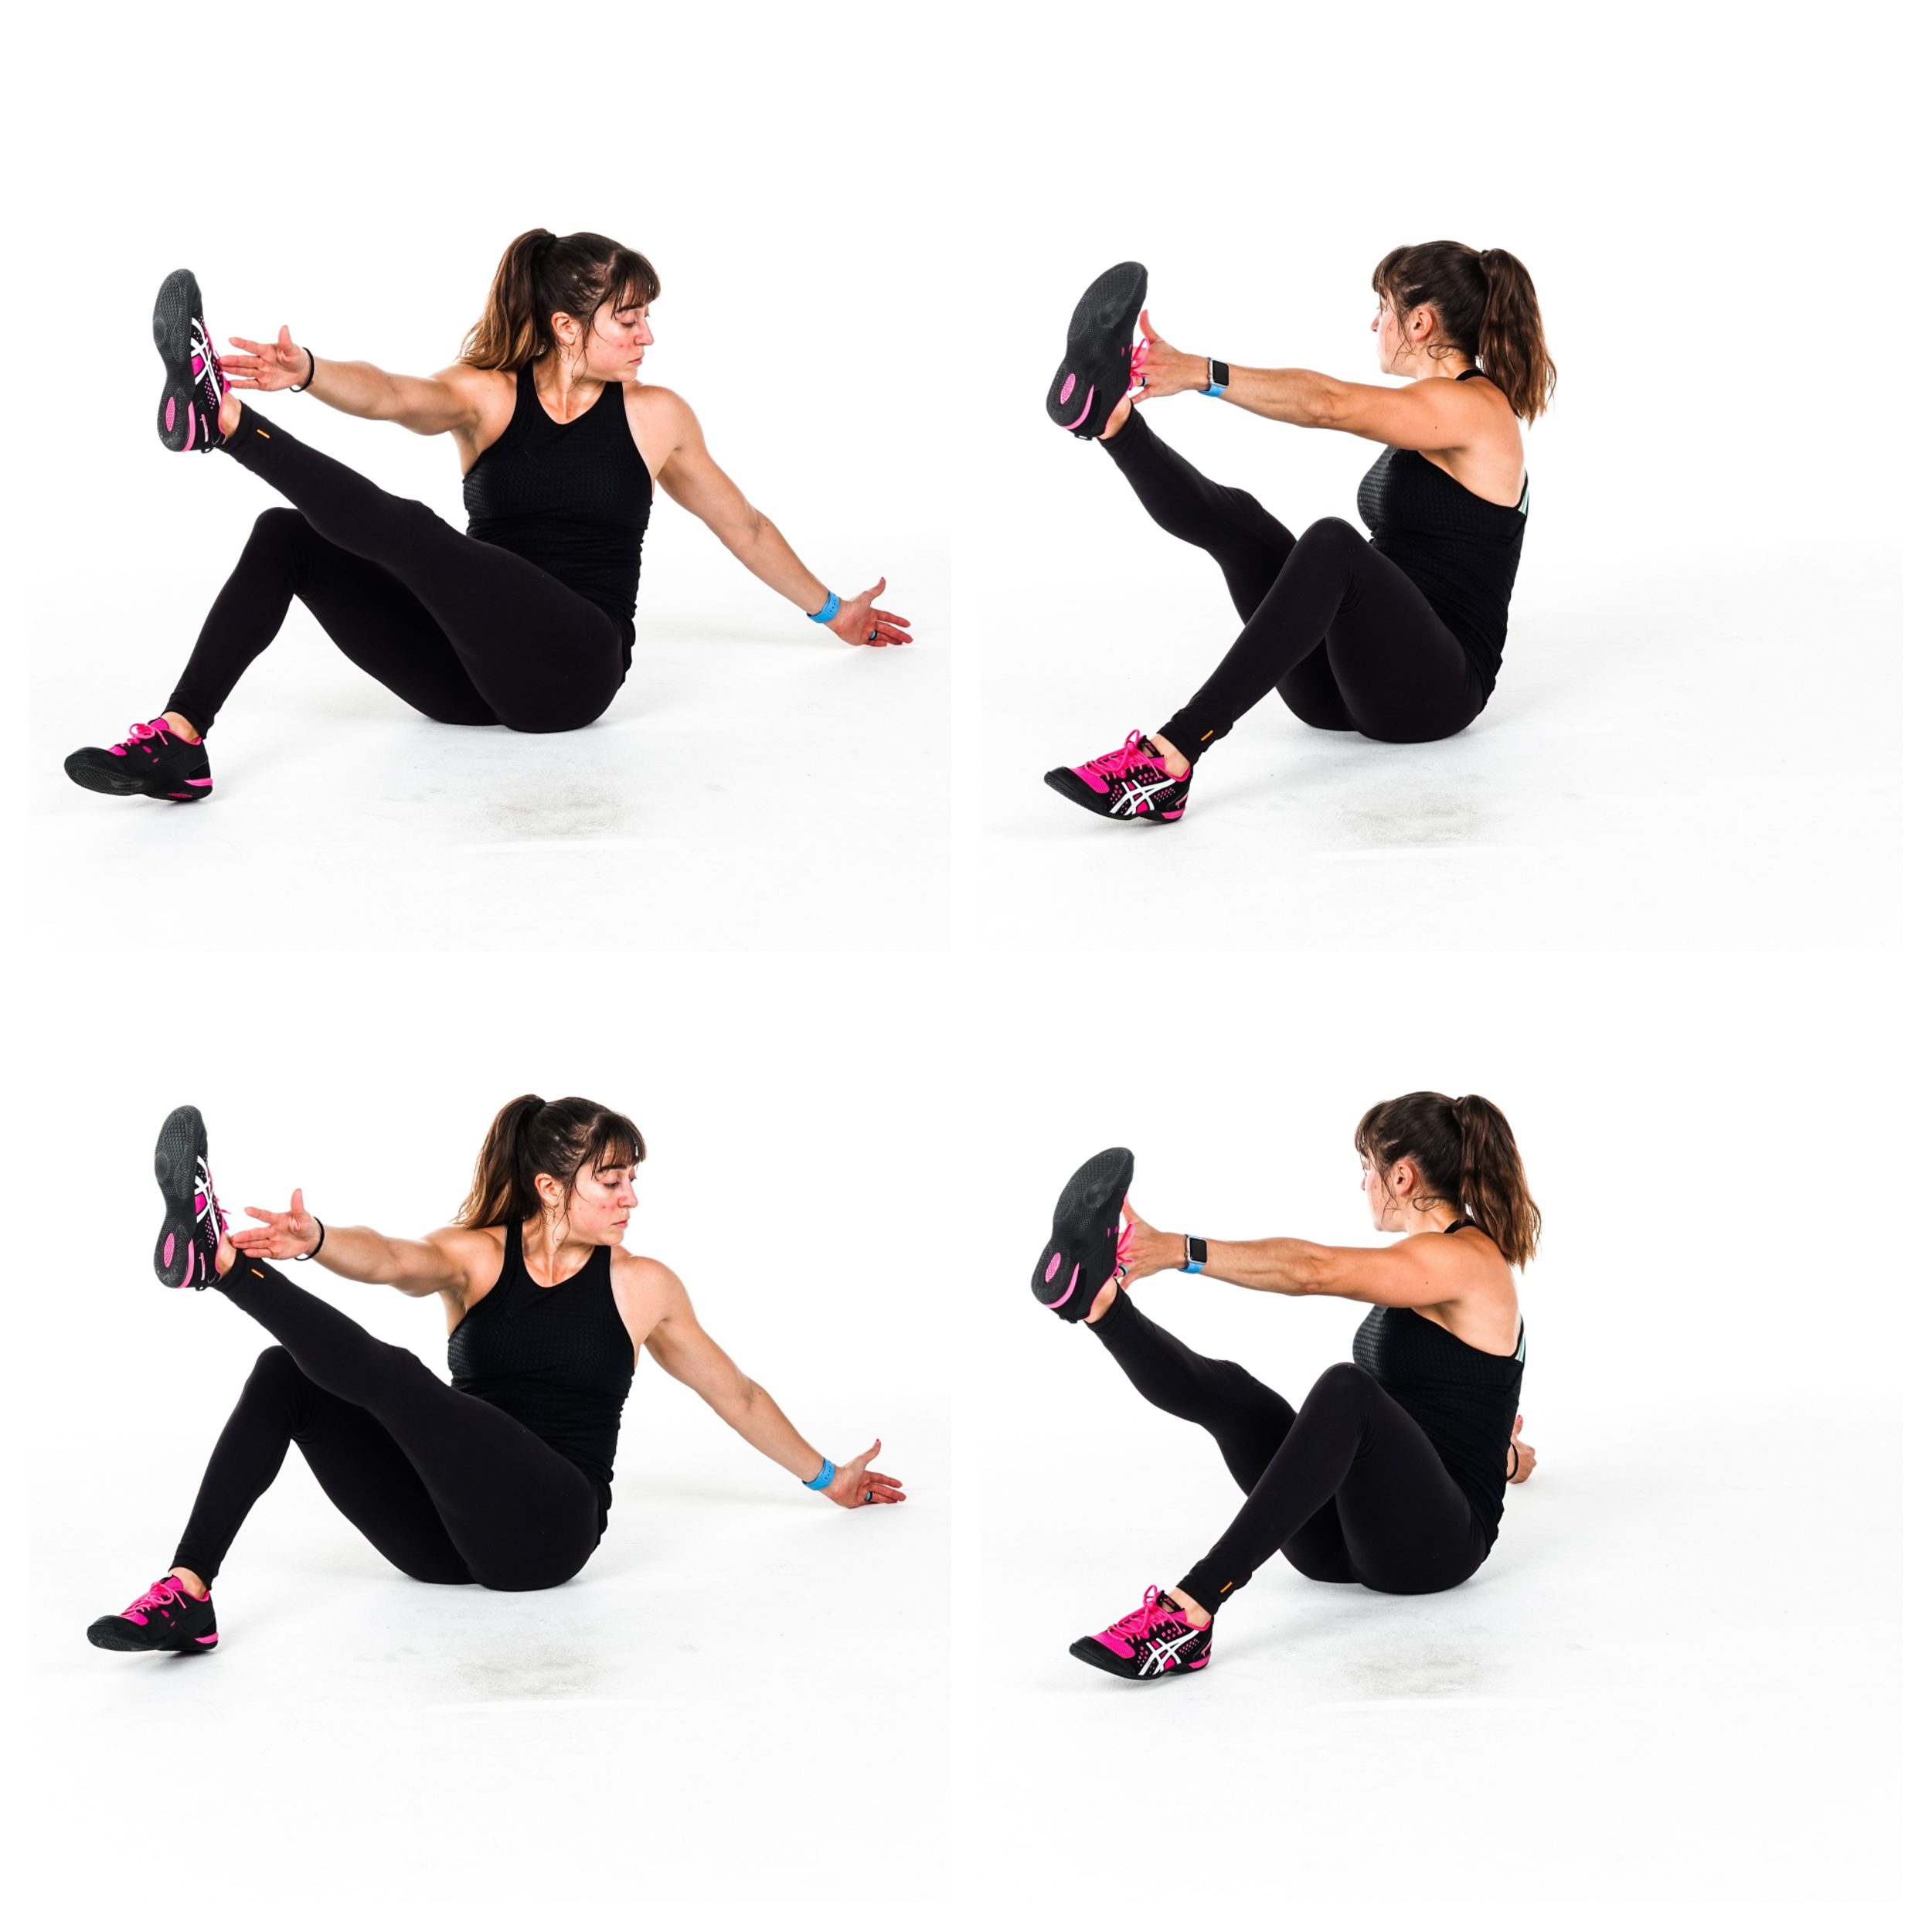
C-Sit With Rotational Chops:
This is another great core-intensive move that, while working your abs, hip flexors and quads, will allow your heart rate to come down and your body to recover a bit for the next intense bout.
This can be a more challenging move if you struggle to prevent your lower back from engaging so make sure to really get that c curve as you sit back. Do not arch! If you feel your lower back engaging, you need to modify.
To do C-Sit Rotational Chops, sit on the ground with your knees bent and heels on the ground. Then hinge back, rounding your back almost as if you are slouching or creating a “c” shape with your back. Engage your abs. Reach both arms out in front of you at about chest height.
Then twist to reach one hand back toward the ground behind you as you kick the leg on that side up toward the ceiling and reach your other hand toward the outside of that foot. You will reach the opposite hand toward the opposite foot as you rotate.
Open your chest up as much as possible and actually twist through your spine don’t just try to reach further from your shoulder.
Then lower the foot back down as you rotate and reach the other way, kicking the other leg up as you reach toward that foot and then also back toward the ground behind you.
Move at a controlled pace as you really reach both back toward the ground behind you and toward your foot. Feel around your rib cage as well as your abs and quads working.
Need some killer cardio workouts using these moves?
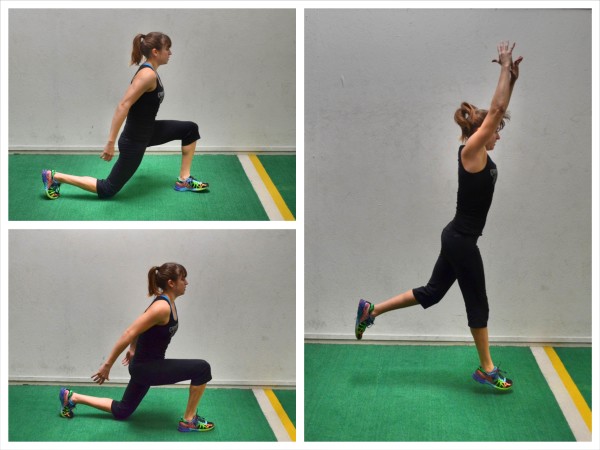
Split Squat Jumps are a great cardio and leg exercise, but also a very challenging movement, requiring strength and balance.
Plus, if you struggle to properly load your glutes during a basic lunge, and tend to put too much strain on your knees, you’re going to struggle to control your recruitment patterns even more as you speed this move up and actually jump up off the ground.
With jumping lunges of any kind, one of the first modifications to try is to reduce the impact.
Start with a smaller jump or even a skip to switch instead of a big jump where both feet leave the ground at the same time.
You can even slow them down, doing a pulse in each lunge to work your legs while reducing the impact and giving you an extra second to stabilize.
If flexion is an issue, you can try not sinking as low and instead do a slight bit more of a hip hinge on the lunge with a straight back leg.
You can also step back instead of jumping or do a skater squat with backward tap.
While stepping back you can use more or less flexion as needed, the skater squat will completely eliminate active flexion as you’ll stay in that high hinged squat and simply touch back.
You can also reduce impact and even make the step back lunge a bit more challenging by adding in sliders!
If you move quickly, all of these can really get your blood pumping!
Another option is to completely swap moves and instead do a kettlebell swing or speed hip hinge if you have knee issues making lunges contraindicated.
These are posterior chain focused leg moves that will get your blood pumping.
While you always want to start by modifying with as similar a movement pattern as possible, both of these two moves are still lower body focused and will get your blood pumping even if they aren’t lunges!
The key is to modify and stay true to what you want to work and get out of the workout!
Want more ways to modify common cardio moves? Want some great cardio workouts to help you burn fat and build strength?
When we think of “cardio,” we think of steady-state endurance activities like cycling and running and cardio machines.
Or we think of interval training and short, quick bursts of activity.
But it isn’t really either or!
There are so many different ways we can design cardio workouts AND they can even help us build strength.
YUP! Your workout doesn’t have to be cardio OR strength training…it can be both!
By using a relay workout design, which is a version of a timed circuit, you can get the metabolic benefits of cardio (and improve your work capacity) as you build strength.
This is a perfect workout design to use if you are short on time, especially if you can only make it to the gym a couple of times a week!
So if you want to include some strength training in your cardio, or some cardio in your strength training, try this Relay Workout!
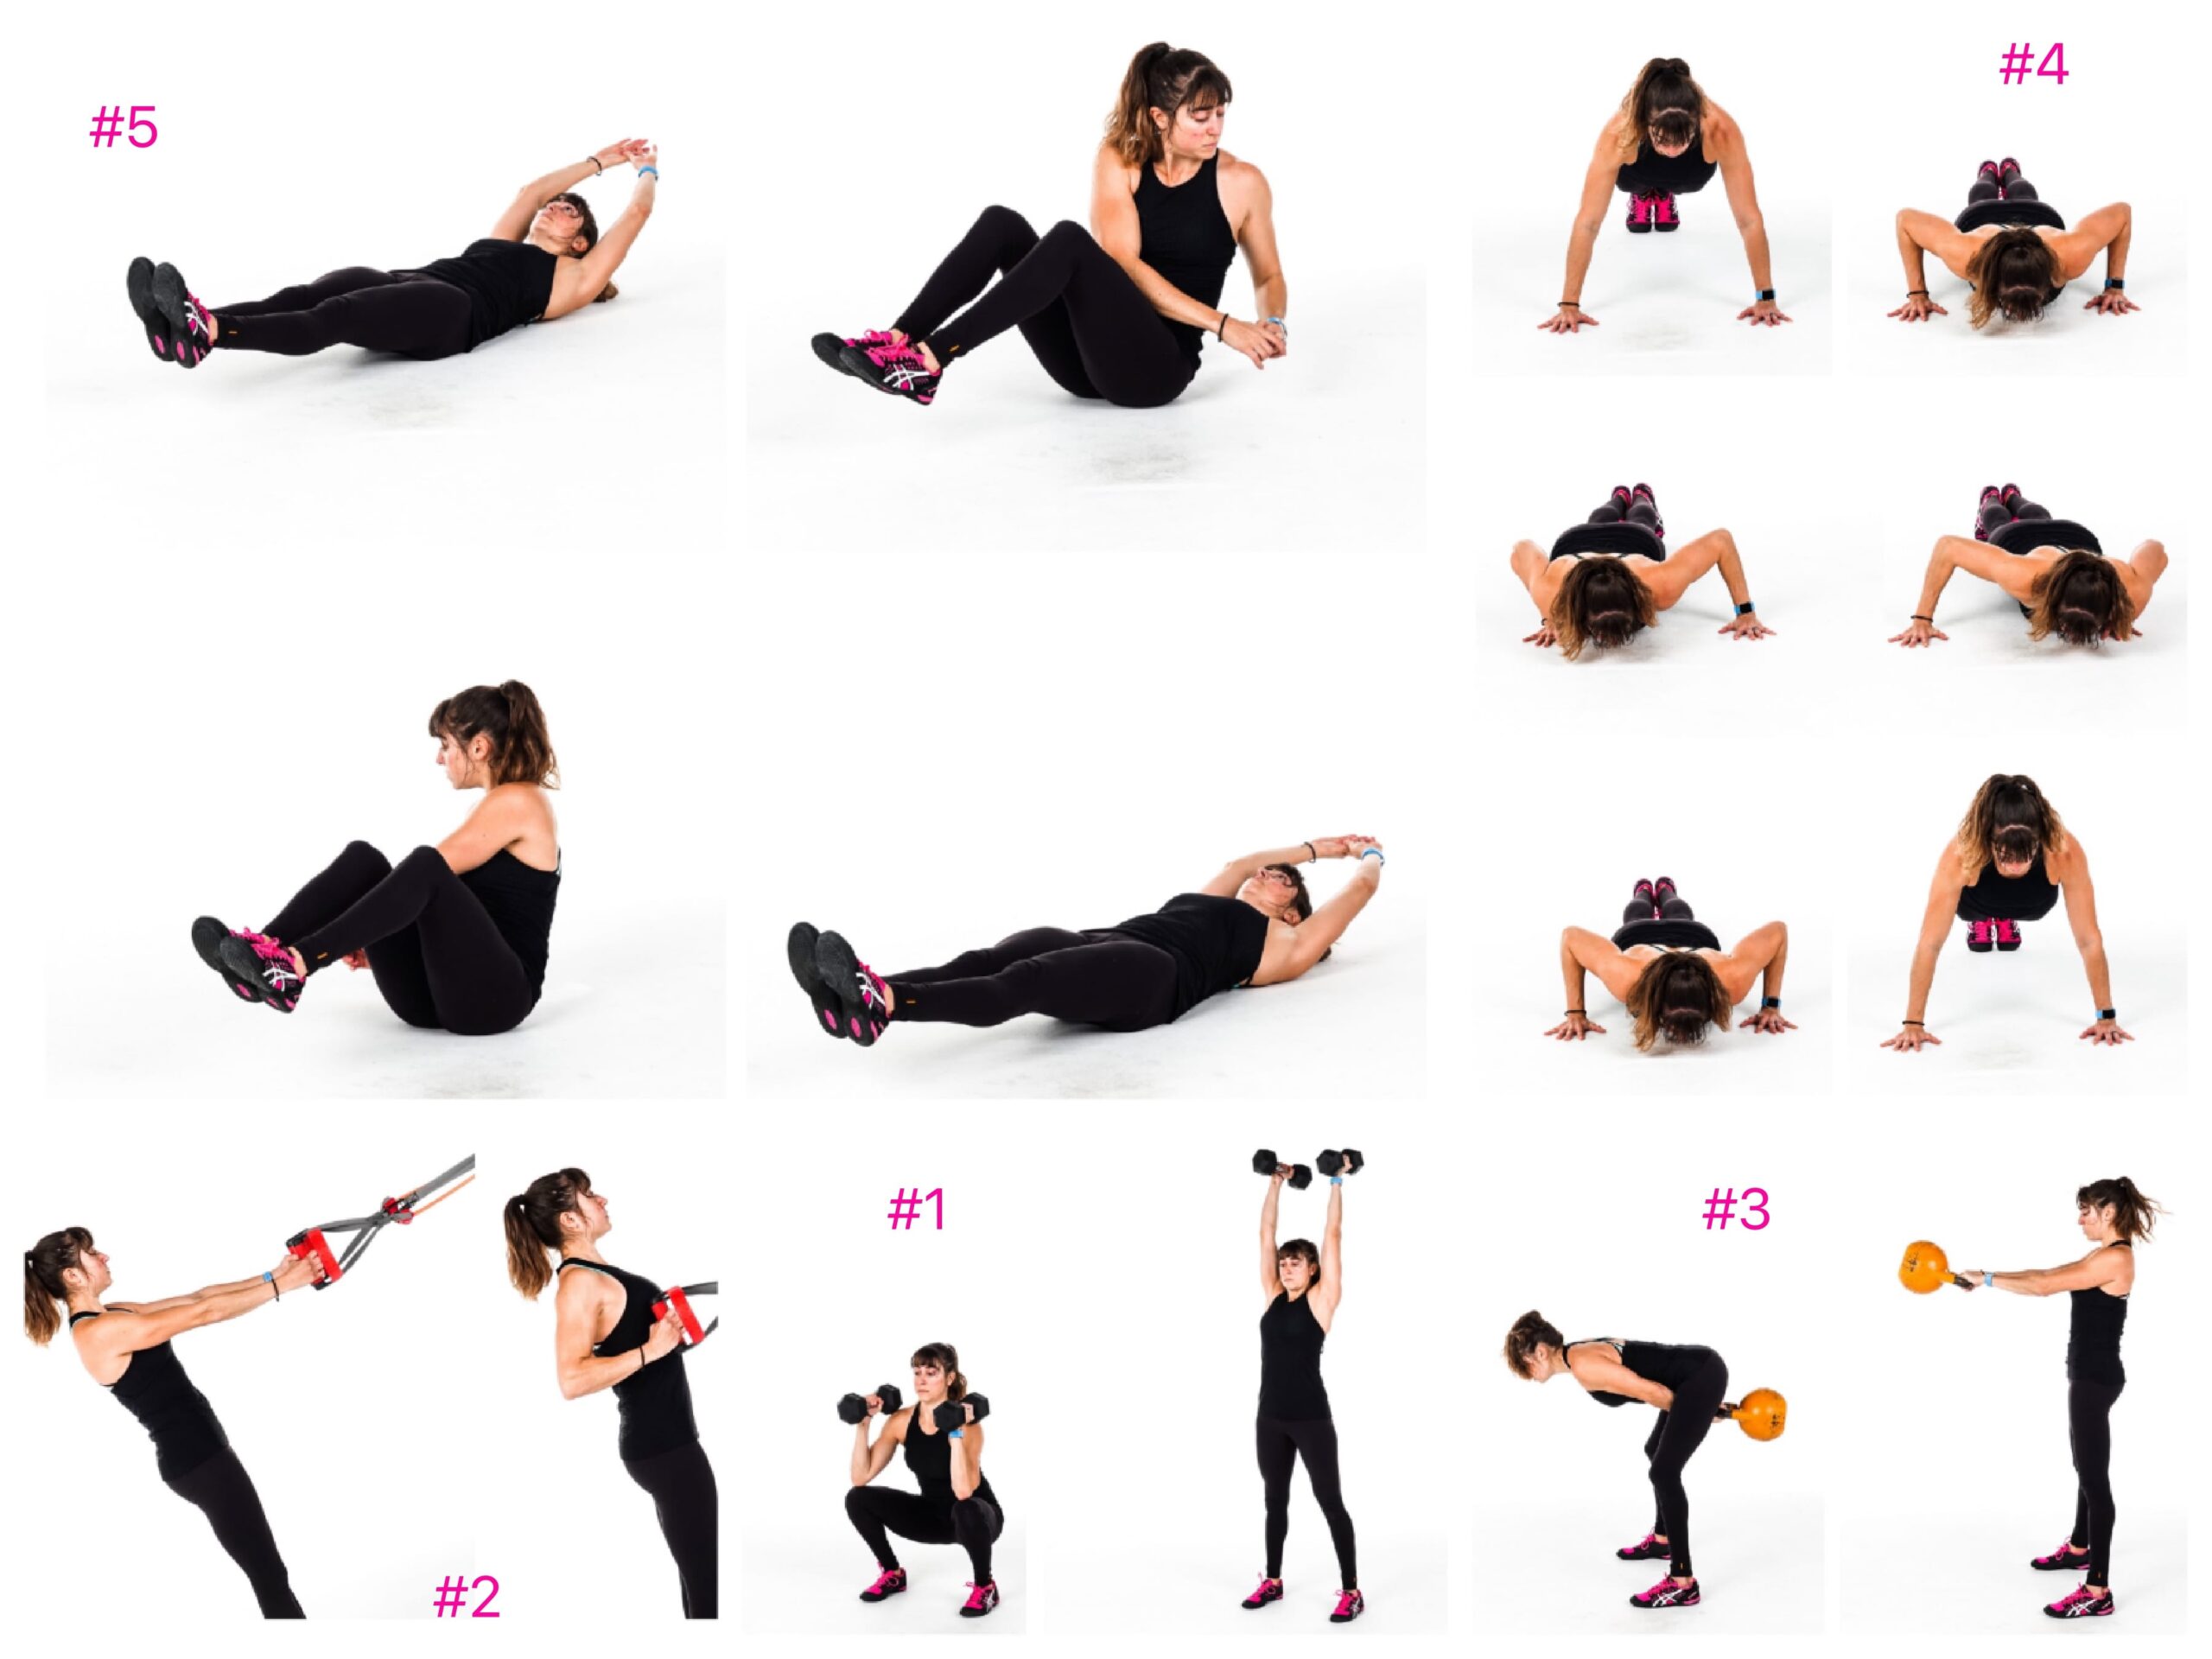
The 30-Minute Relay Strength And Cardio Workout:
Set a timer for 30 minutes and complete as many rounds of the circuit below as possible. Beginners can do shorter distances/lowers reps to start and add reps/distance as they progress. Rest only as needed.
Record how many rounds you complete to beat next time! For the run/ride/row, pick just one to use the entire workout.
Better to do fewer reps of a move but keep moving over doing more reps but have to rest. Also, depending on your fitness level and goals, you can also focus on going heavier for fewer reps over lighter for more!
Ever feel like when you’re designing your own workouts you get stuck in a rut doing the same layout every time?
You just create circuits and do the same reps for the same number of sets?
Do you feel like you’re kind of randomly stringing things together hoping it will be “hard?”
Feel like there just has to be a fun and new and BETTER workout combination you could do to help you train smarter?!
Well there just may be!
There are soooooooo many different workout designs we can use to help us reach our goals.
Supersets, compound sets, trisets, circuits, pyramids, ladders, density intervals, density sets, rest-pause technique….and many many more. (Yup…use them all in Dynamic Strength!)
There are many different training variables we can tweak to make sure our workouts are tailored to our specific needs and goals.
However, all too often people only focus on finding “new” moves instead of trying to figure out different and “new” ways to layout their routines using those SAME moves.
New moves are great. But exercises are just one training variable.
So on that note…I wanted to share with you a great quick tweak you could plan into your routine today even….
A DROP SET!
Ever feel like you have just a little bit left in the tank but not enough to do another rep with the weight you are currently using?
Want to push past failure just a bit to really burn out an area?
Then add in a drop set.
It can be used as part of a burnout OR even as a final set to your primary lift.
I love using it especially for things like hip thrusters or weighted glute bridges to create that little extra pump and burn.
Heck, I love to hate it on bench press even haha
So….What is a drop set?
Basically to do a drop set, you perform a round of an exercise with a certain weight and then reduce the weight to complete more reps without resting immediately after.
You are dropping weight to be able to complete more reps “past failure.”
For instance, if you hit a 6 rep max on hip thrusters, you could instantly finish that round, reduce the weight, and then without resting, bust out 15 more reps for a killer burn.
Those are 15 reps you wouldn’t have been able to do had you not reduced the loads.
And because you are doing them right after the 6 reps, you’re pushing through fatigue instead of getting to recovery like between previous rounds.
When using drop sets, you don’t always have to go up in reps for the drop set. You could do the same number or even fewer depending on how you want to use the drop set and how much you reduce loads.
You can even use more than one drop set in a row, especially if you’re using this as a burner to end your workout.
The point is, this is a new and different technique you may use that challenges your body in a different way with technically LIGHTER loads. (Too often we think adding weight is the only way to challenge ourselves!)
It’s an easy tweak you could make to your workouts TODAY even to test out.
And this technique can be implemented in different ways to benefit you and your specific goals.
Because guess what should ultimately drive EVERY SINGLE VARIABLE you adjust in your program?
YOU AND YOUR GOALS!
Below is one way you can try out a drop set!
Using Drop Sets:
If you set a primary lift to start your workout…say hip thrusters…you could start with 15 reps, rest, 12 reps, rest, 8 reps then immediately perform a drop set of 15 reps.
So you would do max weight for each round of reps, resting 60-90 seconds between rounds until the final round of 8 reps where you would do max weight for those 8 then immediately lower the loads and bust out 15 reps!
Try it today!
You can adjust the reps listed too based on if you want to work more on maximal strength or more on strength endurance.
You can even adjust the number of rounds you do or the reps you perform based on the muscles/moves you plan to include.
Drop sets can be killer for deadlift, bench press, lunges, overhead press…so many different lifts!
So have some fun with this simple workout design tweak!
And for some fun and killer workouts that use training techniques like this, check out my Dynamic Strength program!