by Cori Lefkowith | Jan 15, 2018 | Blog, Butt, Exercises
Glute bridges are a basic bodyweight move.
People will even say, “These are easy!” And think they are beyond that basic bodyweight exercise.
But guess what!?
All too often people aren’t doing them correctly! AND even the most advanced exerciser needs to return to that FUNDAMENTAL move.
Let me ask you a few quick questions too…
- Have ever felt your low back during glute bridges?
- Or maybe your hamstrings are doing all the work?
- Or maybe your quads are working?
- Heck…maybe you even feel your traps and shoulders!
Answer yes to one of these?…Or maybe all of these, huh?
Well it’s called the GLUTE BRIDGE for a reason…Not because these other muscles should be working, but because your GLUTES should be powering the move.
So if you’re feeling these other muscles engaging and taking over for your glutes, you not only aren’t reaping the benefits of the glute bridge, so may need to change your form, but you’ve also got some compensations you may need to address that could lead to injury!
And if you’re now thinking…”Well I just really don’t feel anything. And I don’t feel my glutes at all so I probably just need to do something HARDER…”
You’re also wrong.
Yes, as we advance, we want to add weights and harder variations to keep challenging our muscles so we get results.
BUT…No matter how advanced you are, heck actually even the MORE advanced an exerciser you are, the MORE you should be able to contract your glutes during a basic bodyweight bridge.
Now note I didn’t say it should necessarily be “hard” to do as an advanced exerciser, but you should be able to contract your glutes to create a burn even with just your own bodyweight no matter how much you lift.
Because it all comes down to the mind-body connection.
If you can’t recruit the muscles correctly with your own bodyweight, there is a good chance you won’t recruit the right muscles as you add more and more load or try harder and harder variations.
And if you aren’t using the right muscles?
Well that is when you risk overloading muscles that can’t handle the load, which can lead to INJURY.
That is why I wanted to share a few quick tips and coaching cues hat I use with my clients so they can get those glutes activated and firing.
Because the basic glute bridge is a must-do activation move. It can help activate the glutes and improve your hip extension so you can run faster and lift more.
BUT it must be done correctly so your glutes actually engage!
So if you’re not feeling those glutes working, try these 4 tips to improve your bridging.
Bridging Tip #1: Mind Your Set Up!
Many people when they go to bridge up just lie on their back and lift their butt off the ground. They pay no attention to foot positioning or what muscles they are using to drive up.
But by paying attention to how you are driving up and the positioning of your feet, you can make sure your glutes are working and other muscles, like your hamstrings, aren’t compensating.
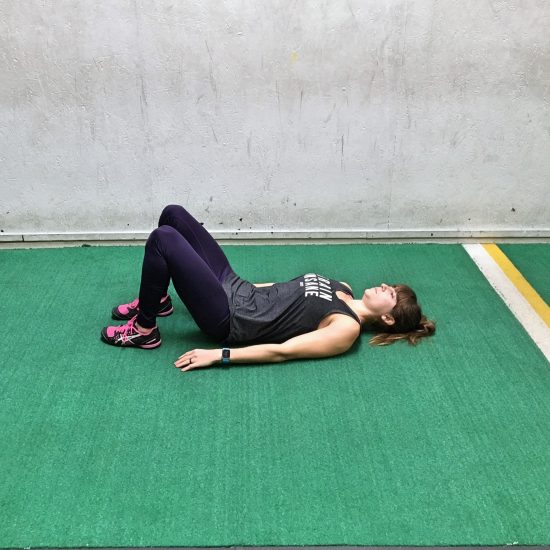
A great way to start to set up is to lie on your back and place your feet flat on the ground just beyond your fingertips when your arms are straight down by your sides. If your feet get too far away from your butt, you are more likely to use your hamstrings.
You also want to make sure your feet are flat on the ground. You’ll sometimes see images of people up on their toes during bridges, but talk about a way to make it more challenging to engage your glutes. Actually, if you struggle to engage your glutes, think about driving more through your HEELS as you bridge up.
Then, once you have this positioning, bend your elbows and drive them into the ground. You want to think about driving your elbows down into the ground and then even drive through your upper back as you bridge up. This will help prevent you from feeling bridges in your upper traps and neck. It can also help you make sure your glutes are working and you aren’t again making your hamstrings the prime movers.
And then when you bridge up, driving your heels and upper back into the ground, think about driving your knees forward over your toes.
Don’t lift your heels to try and do this. Or adjust your feet in closer (adjusting your feet in closer may actually make you start to feel the bridge in your quads if your hips are tight). Your knees will not actually go over your toes!
The point is by thinking about driving your knees toward your toes, you won’t drive yourself backward onto your shoulders. You will also make sure to evenly drive through your upper back. This will help focus on the glutes and make sure your hamstrings and traps don’t get overloaded.
Then make sure your feet are even and about hip-width apart. You don’t want your knees falling open or caving in. You CAN do a close-stance glute bridge or a wide-stance glute bridge but you need to still make sure your ankles, knees and hips are in the proper alignment. If they aren’t in alignment, you are going to perpetuate poor movement patterns.
This proper set up can also help you unlock tight hips by forcing your glutes to create hip extension as you bridge up. It will also prevent your quads from taking over, which if they do start trying to work, won’t help you open up tight hip flexors.
Part of this set up also needs to be learning to engage your abs, which can be done using a posterior pelvic tilt!
Bridging Tip #2: Tilt It Up Aka Stop Trying To Use Your Back To Get Up Higher!
One of the things that happens most often is that, in an attempt to bridge up HIGHER, people arch and use their lower back. And then they just push and ignore the fact that all they feel is their lower back.
Why does this happen? Why aren’t your glutes firing like they should be and you are instead loading your low back?
Because when we are focused on simply bridging up higher to replicate a movement, instead of focusing more on the muscles that should be working, our bodies recruit whatever muscles are easily available to meet our demands.
We will demand mobility out of an area that really shouldn’t be providing that mobility. And we will overuse muscles that aren’t meant to handle the load. Because our body takes the path of least resistance to do the movements that we ask of it.
And this process of compensation often happens because our hips are tight and our glutes, and even our abs, are underactive.
That is why it is key to do bridges correctly so you can improve your hip extension AND activate your glutes and abs. And the key to doing this is the posterior pelvic tilt!
By using the posterior pelvic tilt, you can engage your abs, prevent hyperextension of your lumbar spine AND get your glutes to power the bridge and hip extension.
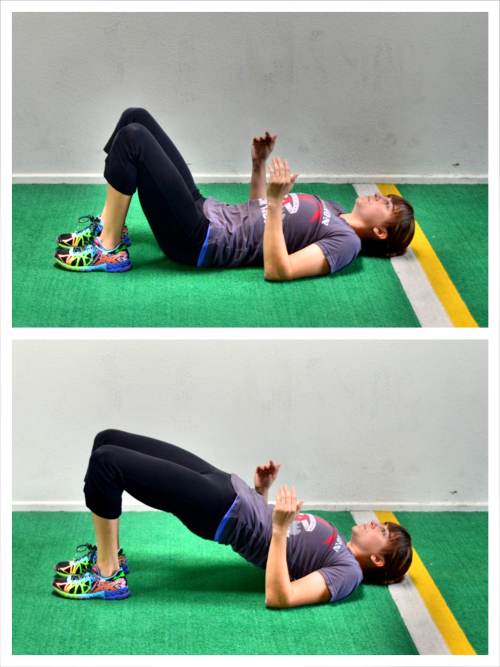
To do the posterior pelvic tilt, set up at the bottom of the bridge with your feet flat on the ground and elbows driving down into the ground too.
Feel the space between your low back and the ground? Push that space away so you are tilting your hips and pressing your low back into the ground.
You may feel too like you are drawing your abs in toward your spine.
Keeping the core engaged like this, bridge up. Squeeze your butt and pause. Do not worry about how high you go. Just squeeze the butt as you keep your abs engaged in this way. Then lower down.
You may notice at the top you start to lose the tilt as you just try to drive up higher. This means you are trying to again arch your lower back instead of just extending your hips.
It is key with all of these tips, and with all exercises for that matter, that not only do you pay attention to form, BUT you THINK about the muscles that are working so you can realize if you lose the posterior pelvic tilt and stop using your glutes.
Lower back down and repeat. If you need, reset that posterior pelvic tilt each time. But focus on maintaining that so you CAN’T arch your low back and can only bridge as high as you glutes, and hips for that matter, allow!
Bridging Tip #3: THINK About The Muscles That Should Be Working
As I mentioned above, you have to THINK about the muscles working. Part of contracting your muscles and feeling them work is about establishing the mind-body connection so your mind can more efficiently and effectively recruit the right muscles for the job.
And basic bodyweight activation moves like the bridge are the easiest way to improve your mind-body connection so things work correctly during more compound lifts.
Think about how many times you’ve just gone through the motions of a workout? Or pushed through even when you sort of know the wrong muscle, aka your low back, is working.
You just figure, “Hey gotta get through the workout!”
The problem is…That attitude can lead to injury. AND it can also mean that all these workouts you’re spending “working your glutes” are actually going to waste.
Cause guess what!?!
Your glutes aren’t working!
So during these moves THINK about your glutes driving the movement. That way you can adjust if they aren’t. And by focusing on your glutes working, you can contract them even harder as you pause at the top of the bridge.
Heck…it can even be fun to see how much shakeage you can create by mentally trying to contract harder!
Bridging Tip #4: What If I STILL Don’t Feel My Glutes?!
There is a chance that you will still struggle, even after trying to tweak your form, with activating your glutes. Heck maybe even just one side doesn’t seem to want to engage!
This is where some mobility work, some Foam Rolling and Dynamic Stretching may need to come into play first to loosen those tight muscles so your glutes can engage properly.
Using rolling first can help you relax tight and overexcited muscles, muscles your mind may want to usually recruit first.
Roll your hamstrings (often for people rolling right under the glute helps).
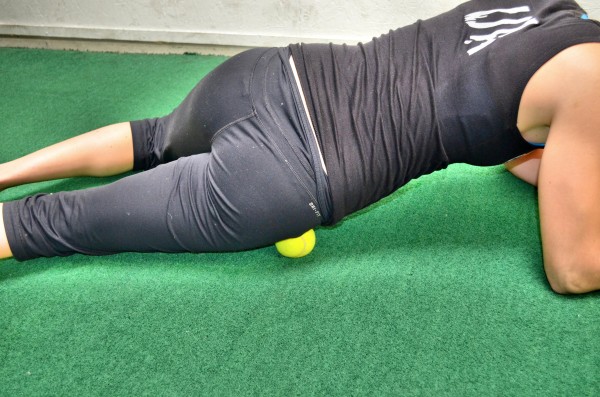
Roll your hips to help loosen tight hips before you bridge. Heck, roll your quads!
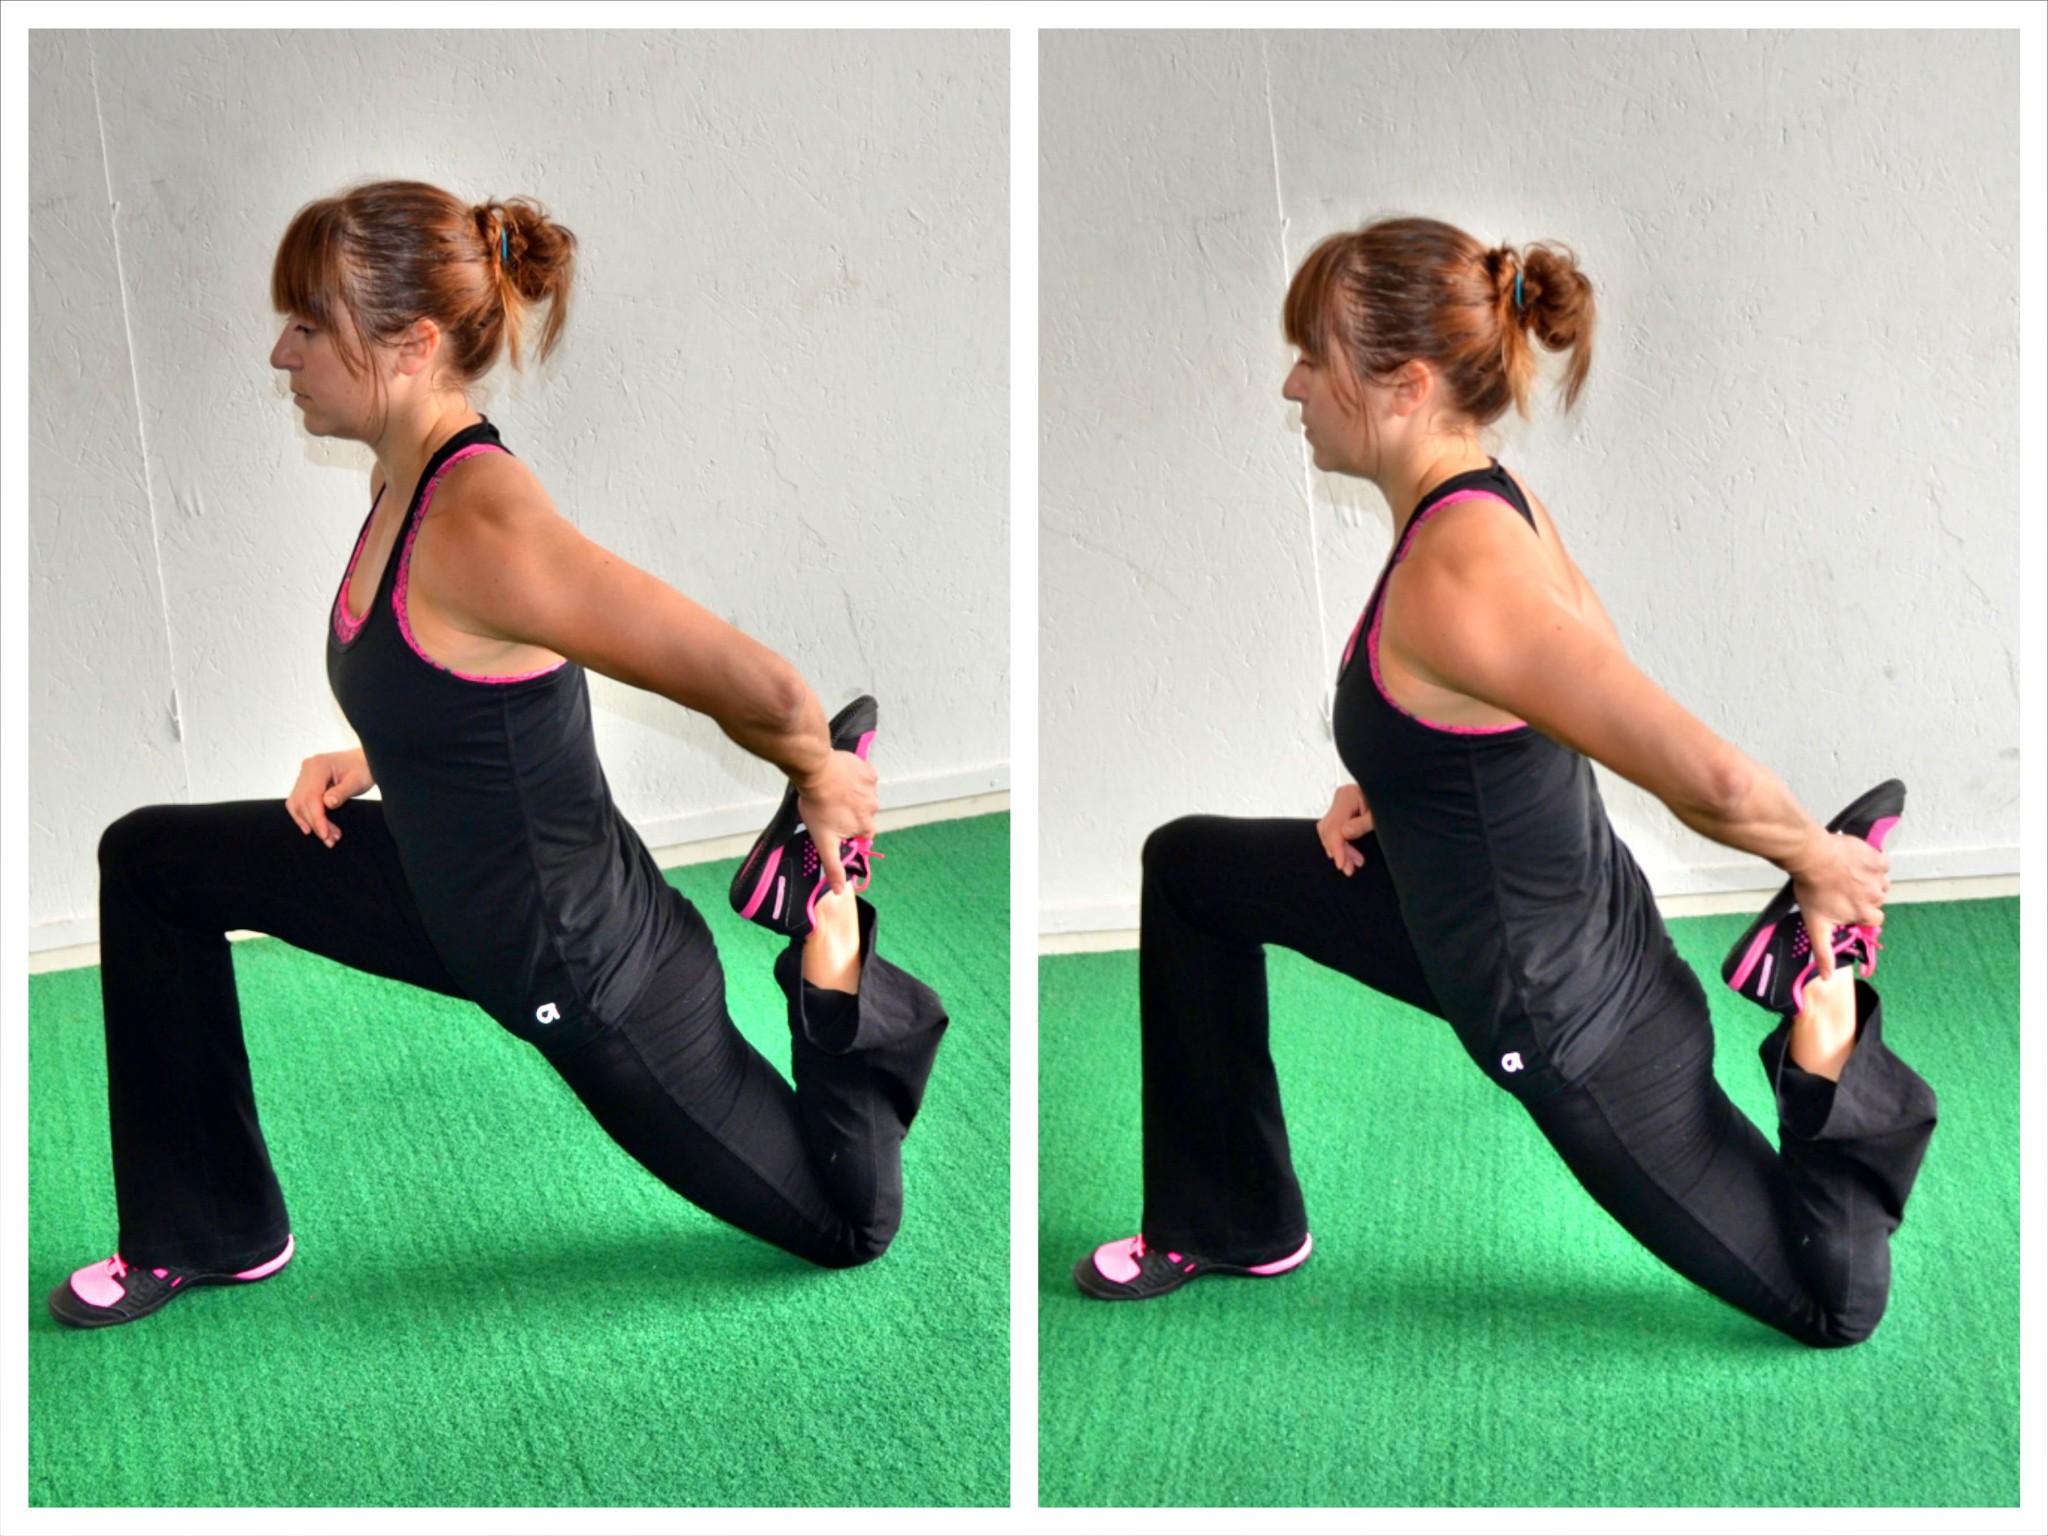
Start there. Then do even a dynamic stretch or two, like the Half-Kneeling Hip And Quad Stretch, to start to open up your hips.
THEN try the glute bridge.
Often rolling, stretching THEN activating can help us FEEL the glutes working when they should be!
That process will allow us to restore muscles to their proper length tension relationships so we can get the right muscles working…AKA our GLUTES!
But what if it is only one side?
Well the focus on that tight side and even try some unilateral activation before.
Try a Fire Hydrant or Donkey Kick. Another basic bodyweight moves to focus on that side that isn’t firing.
THEN return to the bilateral move once you’ve established the mind-body connection! (I mention the Fire Hydrant too because sometimes activating the glute medius helps the glute maximus fire better even during moves like the Glute Bridge!)
But NEVER underestimate the importance of the Basic Bodyweight Glute Bridge. And don’t ignore the importance of those other silly looking basic activation moves for your glutes either!
Those moves are what help you prevent injury and get the right muscles working.
These silly, BASIC moves are so important it’s why I created a 28-Day Booty Burner to help my clients get their glutes working the way they should be!
Learn More About Glute Activation And Unlocking Tight Hips –>
by Cori Lefkowith | Apr 9, 2017 | Blog, Butt, Exercises, Pain Relief, Workouts
So you want a sexy, strong butt…because let’s face it…who doesn’t!?!
Whether you just want your butt to look firm and toned or you want to lift more, run faster or even PREVENT INJURY, glute activation is a MUST.
And it can be done quickly BEFORE you workout so you get even more out of all of those squats, lunges and deadlifts.
Because while squats, lunges and deadlifts are AMAZING compound exercises, if your glutes aren’t ALREADY activated, they won’t work properly during those moves.
Which can not only lead to injury, but also cause your quads and legs to change while your glutes stay the same.
So if you want to get the most out of your workouts, you’ve got to activate your glutes BEFORE.
(And P.S. Guys – this applies to you too. If you want to prevent low back, hip and knee pain, run faster, and lift more, you have to activate those glutes…Plus I won’t lie…Women like a nice backside. 😉 haha)
Below are 3 moves you can do before your lower body workouts to make sure your glutes are activating and firing.
These moves are all BODYWEIGHT because with bodyweight we have the ability to contract our glutes harder and establish the mind-body connection.
Too often we add weight to try to get the glutes to work, but then they stop firing. Bodyweight and light resistance for higher reps is KEY to getting them activated and pumped.
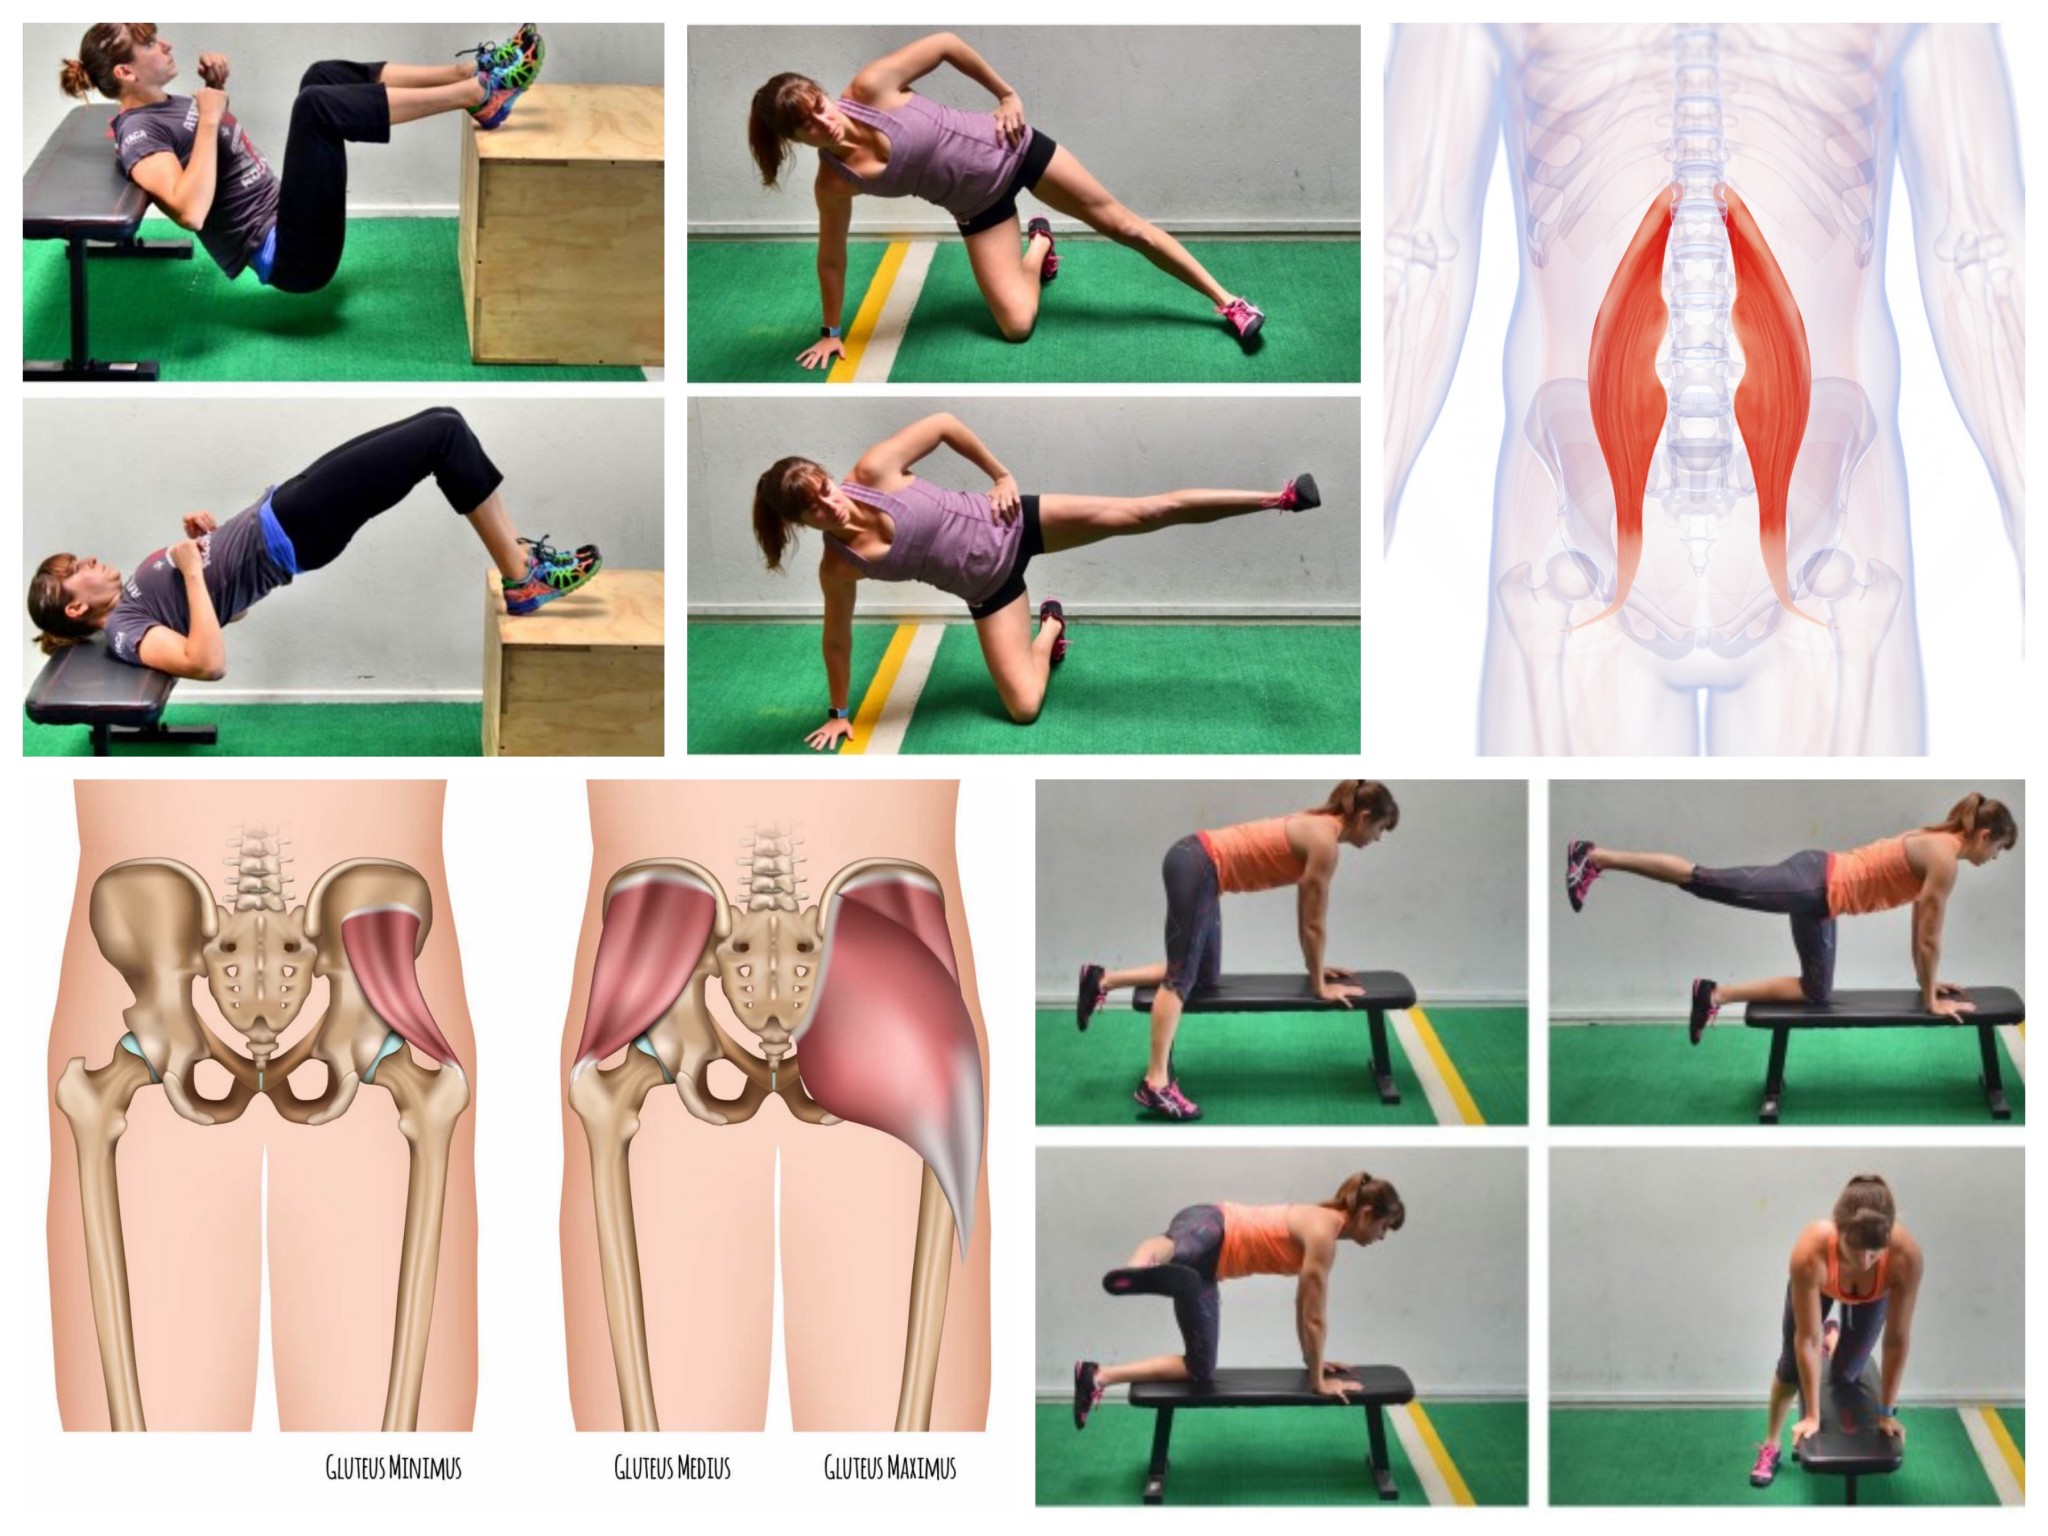
Using these 3 moves you can also unlock your hips to improve hip extension and work all 3 gluteal muscles.
It is important that your glute activation ALSO works on hip extension because tight hips can not only lead to pain and injury, but they can keep your glutes from working proper and cause that LOWER BELLY POOCH!
Use these 3 moves and get your glutes working properly before your workout for a strong and sexy butt!
3 Moves To Activate Your Glutes Before You Workout
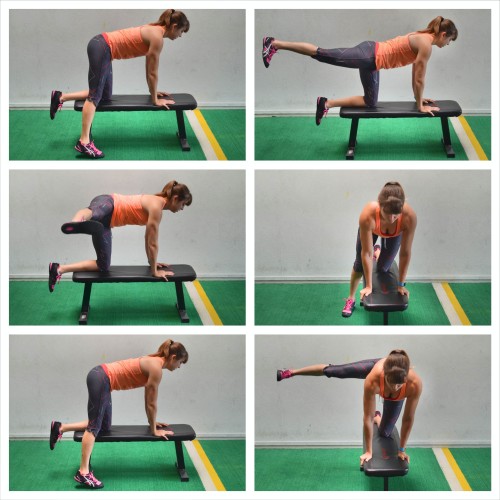
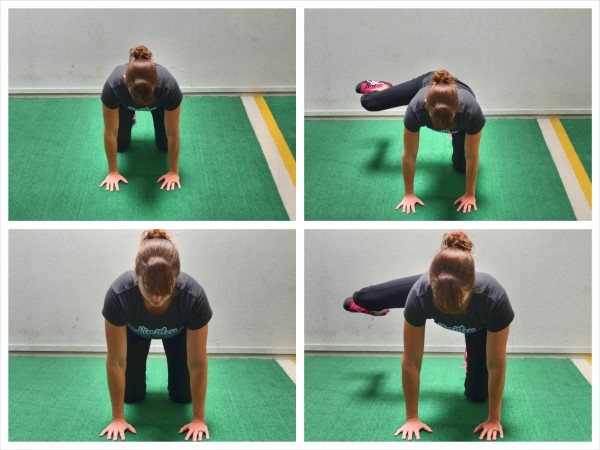
Bench 2-Way Leg Swings:
This move works all three gluteal muscles, opens up your hips AND even helps you build core stability.
It is the perfect move if you can literally only do one thing that day to activate your glutes and core. This move alone will get you ready to feel your glutes during your workout!
To do the Bench 2-Way Leg Swings, place one knee and both hands on a bench with your knee under your hips and your hands under your shoulders. Your other leg will be off to the side of the bench hanging straight down to the ground.
Keeping your arms straight, brace your core and then lift the leg off the bench straight up to the side. Keep the leg straight as you lift and don’t bend your elbows or lean away to try to lift higher. Squeeze your glute to lift the leg up and out to the side. Try to get it as straight out to the side as possible. Feel the outside of your hip working.
Lower back down and then lift the same leg straight back toward the wall behind your. Again, squeeze your glute to lift your leg straight out behind you and extend your hip. Keep your core engaged and do not hyperextend your low back or rotate your hips open just to kick the leg up higher as you lift it back behind you.
Lower back down and repeat the lifts on the same side. Do not bend your arms or really rock away to get the leg up higher. You want to move from the hip and use your glute.
Do not just swing the leg, but focus on FEELING your glute working. Complete all reps on one side before switching. Move quickly between the two lifts.
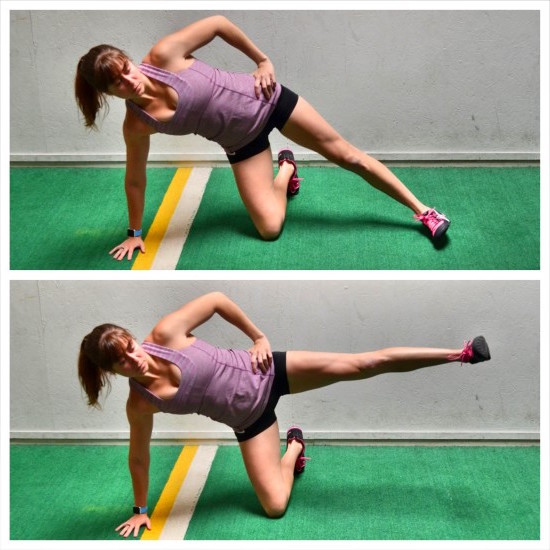
Side Balance Leg Raise:
This is the perfect way to activate your hip stabilizers aka your gluteus medius and minimus to prevent pain and injury AND even make sure your gluteus maximus engages during your workout! PLUS, this move will work your core and even your shoulders!
To do the Side Balance Leg Raise, start on one knee with your other leg out straight to the side. Then place your hand down on the outside of your knee so you are in a side balance position. Your hand should be under your shoulder while your knee will be just slightly below your hip. You want to keep your chest open and not rotate toward the ground.
Then lift your top straight leg up toward the ceiling. Lift the leg as close to parallel to the ground as you can and then lower back down. Do not swing your entire body to lift the leg. Keep your core tight and do not let your body rotate toward the ground or open toward the ceiling as you lift. Make sure your toe doesn’t rotate open as you lift.
Feel the outside of your glute and hip working to lift the leg. Complete all reps on one side before switching.
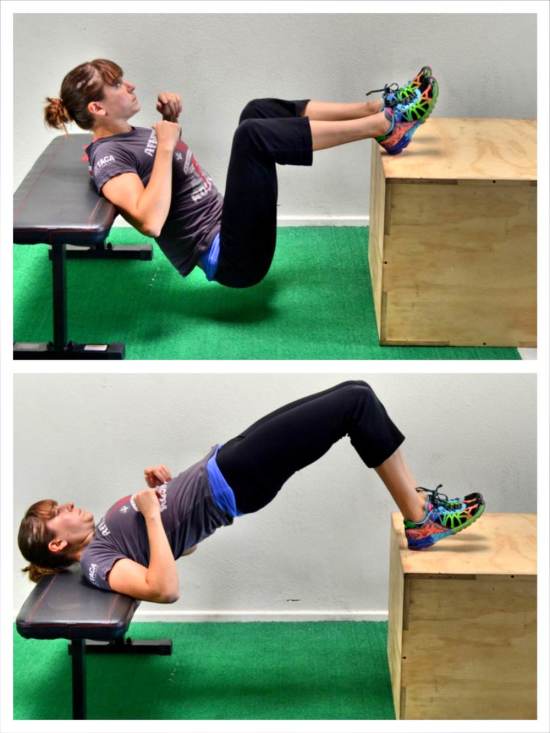
Feet-Raised Hip Thruster:
Take the basic glute bridge and amplify the pump with the Feet-Raised Hip Thruster. This move will work on hip extension and get those glutes burning and engaged! It is the perfect way to unlock your hips as you activate your glutes.
To Feet-Raised Hip Thruster, place a box and a bench close enough together that your back can be on the bench and your feet up on the box. You just don’t want your legs to be out too far. If your legs are out too straight, you will use more hamstrings than glutes.
Then with your feet and back both up on boxes or benches, bridge up, driving up through your heels and your upper back. Make sure to engage your abs and even do a pelvic tilt if you struggle to keep your low back from taking over.
Drive your hips up and squeeze your glutes. Lift your hips to full extension and hold for a second and then lower back down. Make sure you don’t drive yourself backward over the bench. You want to bridge straight up and feel like you are driving your knees forward over your toes.
Lower back down, making sure to drop your butt below the height of the box and repeat. You do not have to touch the ground each time, but you do want to do a bigger range of motion than you could if performing a bridge from the ground.
LEARN MORE –>

 So if you’re feeling these other muscles engaging and taking over for your glutes, you not only aren’t reaping the benefits of the glute bridge, so may need to change your form, but you’ve also got some compensations you may need to address that could lead to injury!
 A great way to start to set up is to lie on your back and place your feet flat on the ground just beyond your fingertips when your arms are straight down by your sides. If your feet get too far away from your butt, you are more likely to use your hamstrings.
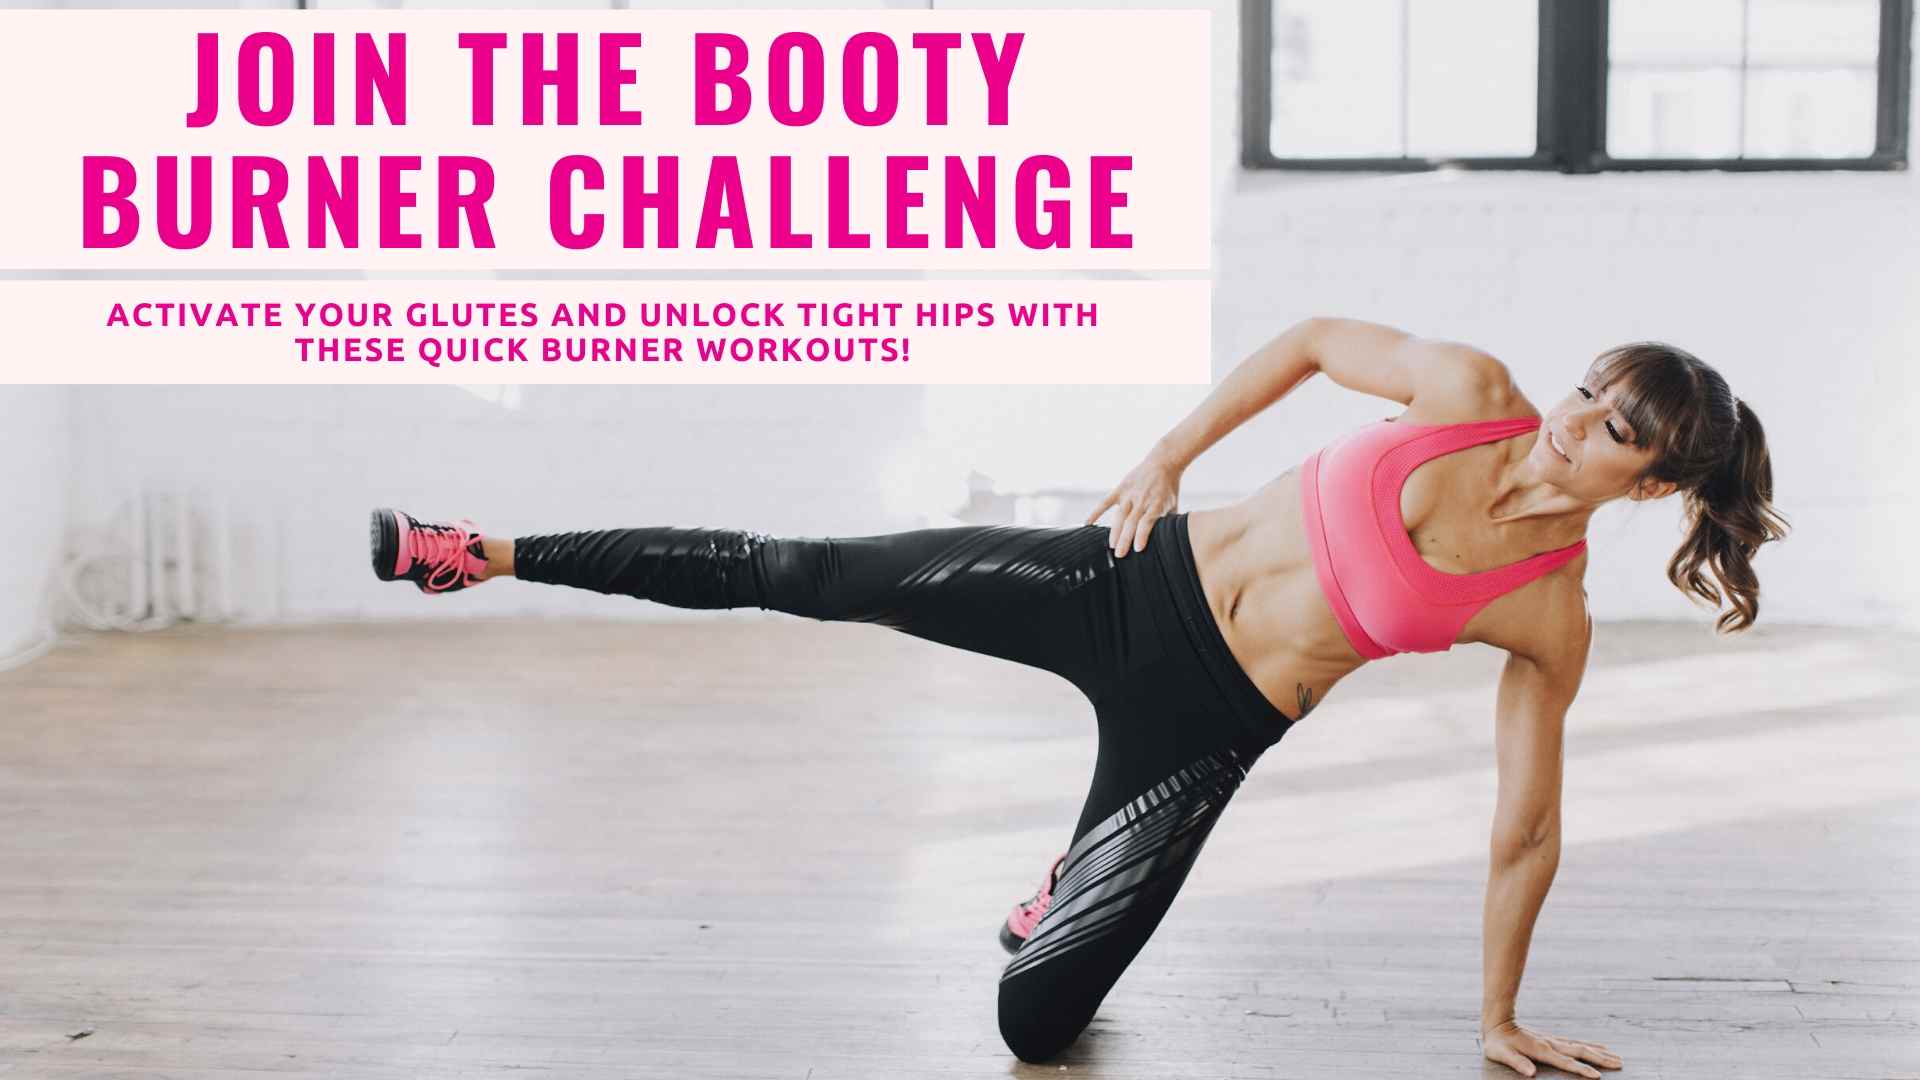
 To do the posterior pelvic tilt, set up at the bottom of the bridge with your feet flat on the ground and elbows driving down into the ground too.
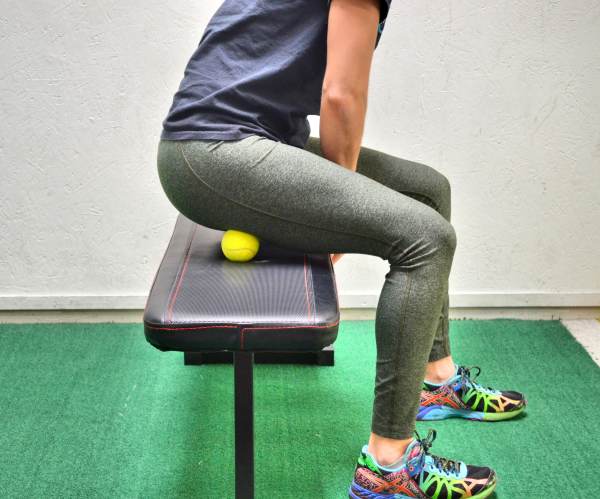
 THEN return to the bilateral move once you’ve established the mind-body connection! (I mention the Fire Hydrant too because sometimes activating the glute medius helps the glute maximus fire better even during moves like the Glute Bridge!)