by Cori Lefkowith | Jan 17, 2018 | Diet, Recipes
Want to lose weight? Or maybe you’re tired of that little bit of body fat that seem to cling to your belly or thighs no matter what you do!?
Well let me tell you….depriving yourself of all of the foods you love is not the way to get the results you want…especially if you want those results to LAST!
Part of staying consistent so you can get the body you’ve always dreamed about, and FEEL great, is getting to still indulge in the types of foods you love.
Like for me…I LOVE sweets.
The second I force myself to cut out sweet treats, like ice cream or cookies, I instantly start craving them and end up binging on them!
So instead of cutting out those delicious treats, I make macro-friendly “tweaks” to those recipes so I can still enjoy them AND get the results I want without risking becoming deprived and binging!
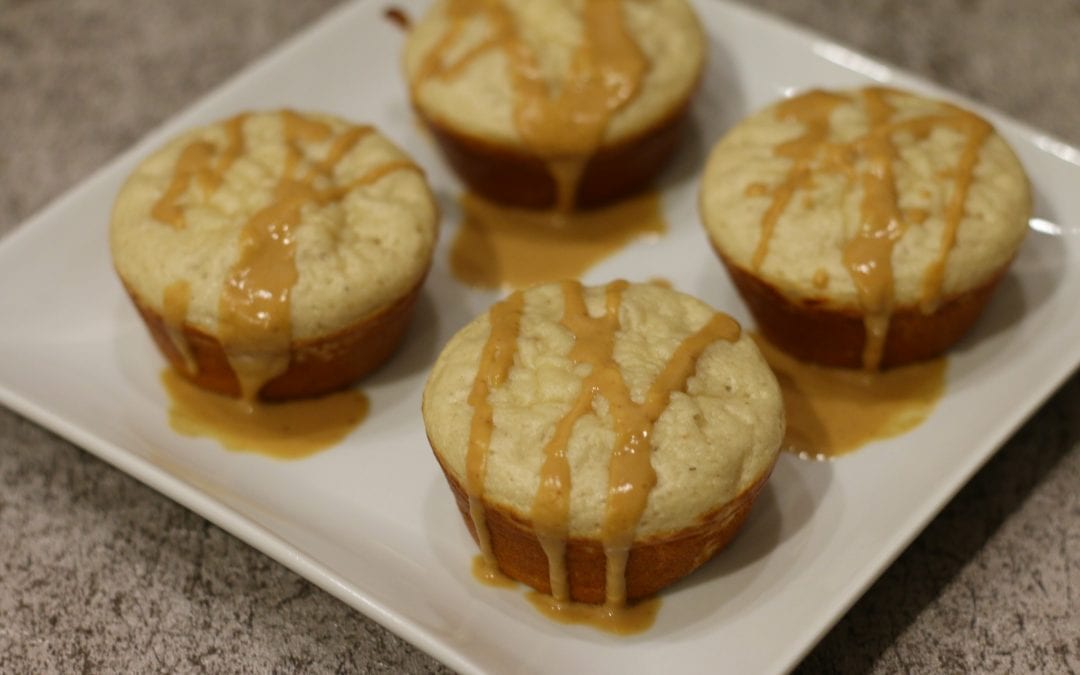
One of my favorite macro-friendly MUFFIN recipes is below…You’ll love it too especially if you’re a PEANUT BUTTER LOVER!
Quick Peanut Butter Protein Muffins

SERVINGS: 4 (1 muffin is a serving)
MACROS (per muffin):
Calories: 69
Protein: 10 grams
Carbs: 4 grams
Fat: 1 grams
INGREDIENTS:
1 scoop PEScience Select Protein Peanut Butter Cookie*
¼ cup Unsweetened Applesauce
1 tbsp Coconut Flour
2 Egg Whites (6 tbsp liquid egg whites)
¼ tsp Baking Soda
¼ tsp Cinnamon
Cooking Spray
Peanut butter drizzle:
12 g (2 tbsp) PB Fit Peanut Butter Powder
1.5 tbsp Water
DIRECTIONS:
Preheat your oven to 350 degrees. Spray a regular sized muffin tin with cooking spray. If you use the regular-sized muffin tin, it will make four muffins. You can use a smaller tin to make more.
Combine all of the ingredient in a bowl and whisk quickly for about a minute to combine and help the batter fluff up.
Then divide evenly between the 4 muffin tins. Bake at 350 for about 10 minutes.
While baking, combine PB Fit and water to create your simple peanut butter drizzle.
Once muffins are done, remove from the oven and top with the drizzle. You can even save some on the side to dip the muffin in!
* You can use any peanut butter flavored protein of choice.
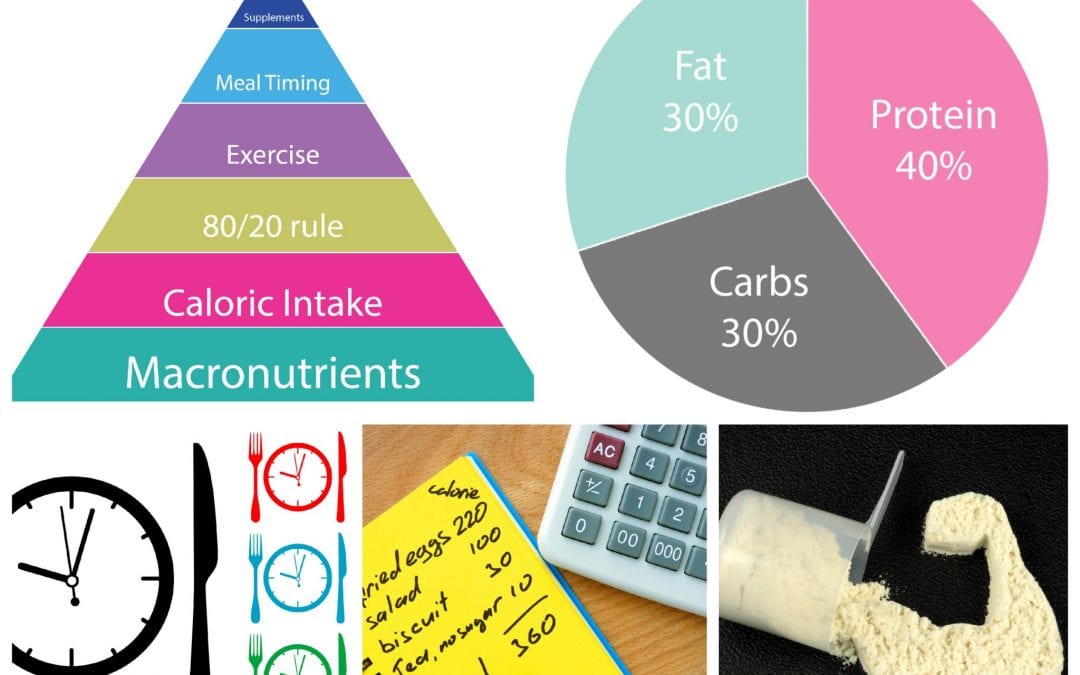
This is why I LOVE Macro Cycling. No foods are off limits. You can still indulge in the treats you love. AND you can get killer results to look and feel great.
Learn more about Macro Cycling –>

by Cori Lefkowith | Jan 15, 2018 | Blog, Butt, Exercises
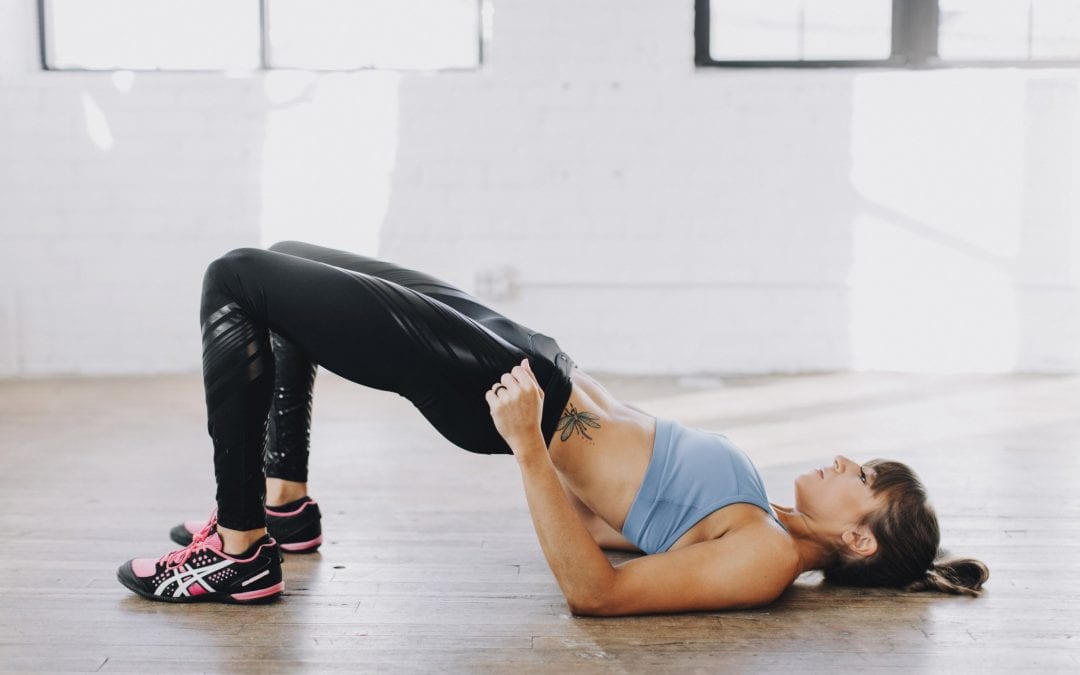
Glute bridges are a basic bodyweight move.
People will even say, “These are easy!” And think they are beyond that basic bodyweight exercise.
But guess what!?
All too often people aren’t doing them correctly! AND even the most advanced exerciser needs to return to that FUNDAMENTAL move.
Let me ask you a few quick questions too…
- Have ever felt your low back during glute bridges?
- Or maybe your hamstrings are doing all the work?
- Or maybe your quads are working?
- Heck…maybe you even feel your traps and shoulders!
Answer yes to one of these?…Or maybe all of these, huh?
Well it’s called the GLUTE BRIDGE for a reason…Not because these other muscles should be working, but because your GLUTES should be powering the move.
So if you’re feeling these other muscles engaging and taking over for your glutes, you not only aren’t reaping the benefits of the glute bridge, so may need to change your form, but you’ve also got some compensations you may need to address that could lead to injury!
And if you’re now thinking…”Well I just really don’t feel anything. And I don’t feel my glutes at all so I probably just need to do something HARDER…”
You’re also wrong.

Yes, as we advance, we want to add weights and harder variations to keep challenging our muscles so we get results.
BUT…No matter how advanced you are, heck actually even the MORE advanced an exerciser you are, the MORE you should be able to contract your glutes during a basic bodyweight bridge.
Now note I didn’t say it should necessarily be “hard” to do as an advanced exerciser, but you should be able to contract your glutes to create a burn even with just your own bodyweight no matter how much you lift.
Because it all comes down to the mind-body connection.
If you can’t recruit the muscles correctly with your own bodyweight, there is a good chance you won’t recruit the right muscles as you add more and more load or try harder and harder variations.

And if you aren’t using the right muscles?
Well that is when you risk overloading muscles that can’t handle the load, which can lead to INJURY.
That is why I wanted to share a few quick tips and coaching cues hat I use with my clients so they can get those glutes activated and firing.
Because the basic glute bridge is a must-do activation move. It can help activate the glutes and improve your hip extension so you can run faster and lift more.
BUT it must be done correctly so your glutes actually engage!
So if you’re not feeling those glutes working, try these 4 tips to improve your bridging.
Bridging Tip #1: Mind Your Set Up!
Many people when they go to bridge up just lie on their back and lift their butt off the ground. They pay no attention to foot positioning or what muscles they are using to drive up.
But by paying attention to how you are driving up and the positioning of your feet, you can make sure your glutes are working and other muscles, like your hamstrings, aren’t compensating.
A great way to start to set up is to lie on your back and place your feet flat on the ground just beyond your fingertips when your arms are straight down by your sides. If your feet get too far away from your butt, you are more likely to use your hamstrings.
You also want to make sure your feet are flat on the ground. You’ll sometimes see images of people up on their toes during bridges, but talk about a way to make it more challenging to engage your glutes. Actually, if you struggle to engage your glutes, think about driving more through your HEELS as you bridge up.
Then, once you have this positioning, bend your elbows and drive them into the ground. You want to think about driving your elbows down into the ground and then even drive through your upper back as you bridge up. This will help prevent you from feeling bridges in your upper traps and neck. It can also help you make sure your glutes are working and you aren’t again making your hamstrings the prime movers.
And then when you bridge up, driving your heels and upper back into the ground, think about driving your knees forward over your toes.
Don’t lift your heels to try and do this. Or adjust your feet in closer (adjusting your feet in closer may actually make you start to feel the bridge in your quads if your hips are tight). Your knees will not actually go over your toes!
The point is by thinking about driving your knees toward your toes, you won’t drive yourself backward onto your shoulders. You will also make sure to evenly drive through your upper back. This will help focus on the glutes and make sure your hamstrings and traps don’t get overloaded.
Then make sure your feet are even and about hip-width apart. You don’t want your knees falling open or caving in. You CAN do a close-stance glute bridge or a wide-stance glute bridge but you need to still make sure your ankles, knees and hips are in the proper alignment. If they aren’t in alignment, you are going to perpetuate poor movement patterns.
This proper set up can also help you unlock tight hips by forcing your glutes to create hip extension as you bridge up. It will also prevent your quads from taking over, which if they do start trying to work, won’t help you open up tight hip flexors.
Part of this set up also needs to be learning to engage your abs, which can be done using a posterior pelvic tilt!

Bridging Tip #2: Tilt It Up Aka Stop Trying To Use Your Back To Get Up Higher!
One of the things that happens most often is that, in an attempt to bridge up HIGHER, people arch and use their lower back. And then they just push and ignore the fact that all they feel is their lower back.
Why does this happen? Why aren’t your glutes firing like they should be and you are instead loading your low back?
Because when we are focused on simply bridging up higher to replicate a movement, instead of focusing more on the muscles that should be working, our bodies recruit whatever muscles are easily available to meet our demands.
We will demand mobility out of an area that really shouldn’t be providing that mobility. And we will overuse muscles that aren’t meant to handle the load. Because our body takes the path of least resistance to do the movements that we ask of it.
And this process of compensation often happens because our hips are tight and our glutes, and even our abs, are underactive.
That is why it is key to do bridges correctly so you can improve your hip extension AND activate your glutes and abs. And the key to doing this is the posterior pelvic tilt!
By using the posterior pelvic tilt, you can engage your abs, prevent hyperextension of your lumbar spine AND get your glutes to power the bridge and hip extension.
To do the posterior pelvic tilt, set up at the bottom of the bridge with your feet flat on the ground and elbows driving down into the ground too.
Feel the space between your low back and the ground? Push that space away so you are tilting your hips and pressing your low back into the ground.
You may feel too like you are drawing your abs in toward your spine.
Keeping the core engaged like this, bridge up. Squeeze your butt and pause. Do not worry about how high you go. Just squeeze the butt as you keep your abs engaged in this way. Then lower down.
You may notice at the top you start to lose the tilt as you just try to drive up higher. This means you are trying to again arch your lower back instead of just extending your hips.
It is key with all of these tips, and with all exercises for that matter, that not only do you pay attention to form, BUT you THINK about the muscles that are working so you can realize if you lose the posterior pelvic tilt and stop using your glutes.
Lower back down and repeat. If you need, reset that posterior pelvic tilt each time. But focus on maintaining that so you CAN’T arch your low back and can only bridge as high as you glutes, and hips for that matter, allow!
Bridging Tip #3: THINK About The Muscles That Should Be Working
As I mentioned above, you have to THINK about the muscles working. Part of contracting your muscles and feeling them work is about establishing the mind-body connection so your mind can more efficiently and effectively recruit the right muscles for the job.
And basic bodyweight activation moves like the bridge are the easiest way to improve your mind-body connection so things work correctly during more compound lifts.
Think about how many times you’ve just gone through the motions of a workout? Or pushed through even when you sort of know the wrong muscle, aka your low back, is working.
You just figure, “Hey gotta get through the workout!”
The problem is…That attitude can lead to injury. AND it can also mean that all these workouts you’re spending “working your glutes” are actually going to waste.
Cause guess what!?!
Your glutes aren’t working!
So during these moves THINK about your glutes driving the movement. That way you can adjust if they aren’t. And by focusing on your glutes working, you can contract them even harder as you pause at the top of the bridge.
Heck…it can even be fun to see how much shakeage you can create by mentally trying to contract harder!
Bridging Tip #4: What If I STILL Don’t Feel My Glutes?!
There is a chance that you will still struggle, even after trying to tweak your form, with activating your glutes. Heck maybe even just one side doesn’t seem to want to engage!
This is where some mobility work, some Foam Rolling and Dynamic Stretching may need to come into play first to loosen those tight muscles so your glutes can engage properly.
Using rolling first can help you relax tight and overexcited muscles, muscles your mind may want to usually recruit first.
Roll your hamstrings (often for people rolling right under the glute helps).

Roll your hips to help loosen tight hips before you bridge. Heck, roll your quads!

Start there. Then do even a dynamic stretch or two, like the Half-Kneeling Hip And Quad Stretch, to start to open up your hips.

THEN try the glute bridge.
Often rolling, stretching THEN activating can help us FEEL the glutes working when they should be!
That process will allow us to restore muscles to their proper length tension relationships so we can get the right muscles working…AKA our GLUTES!
But what if it is only one side?
Well the focus on that tight side and even try some unilateral activation before.
Try a Fire Hydrant or Donkey Kick. Another basic bodyweight moves to focus on that side that isn’t firing.
THEN return to the bilateral move once you’ve established the mind-body connection! (I mention the Fire Hydrant too because sometimes activating the glute medius helps the glute maximus fire better even during moves like the Glute Bridge!)
But NEVER underestimate the importance of the Basic Bodyweight Glute Bridge. And don’t ignore the importance of those other silly looking basic activation moves for your glutes either!
Those moves are what help you prevent injury and get the right muscles working.
These silly, BASIC moves are so important it’s why I created a 28-Day Booty Burner to help my clients get their glutes working the way they should be!
Learn More About Glute Activation And Unlocking Tight Hips –>
by Cori Lefkowith | Jan 12, 2018 | Blog, Bodyweight, Exercises, Push Ups
To improve your Push Ups, you’ve got to actually practice doing them. The problem is…So many of us do them wrong to start!
We have poor form and don’t engage the correct muscles so we are stuck at a modified variation FOREVER.
Or we try and progress too quickly and then get caught up on doing harder variations even though our form is incorrect and we really aren’t getting the most out of the movement.
Below are 5 quick tips to help you improve your push ups!

How To Improve Your Push Ups:
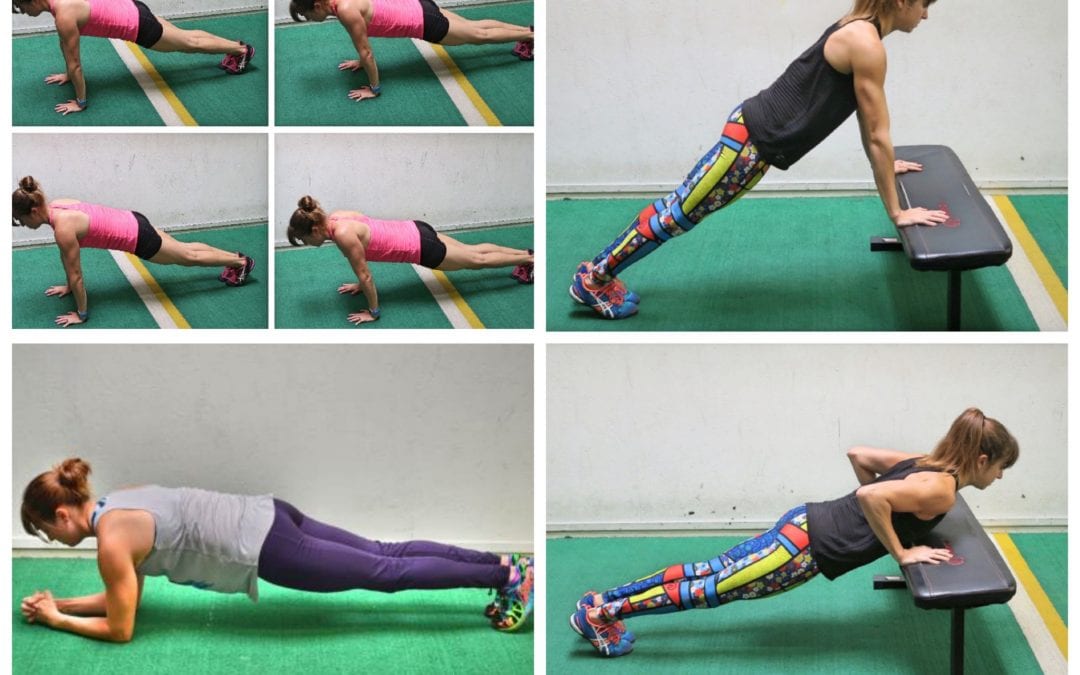
Strengthen Your Core – I say this all the time, but I’m going to repeat it again because it is essential to remember…Push ups are just a moving plank!
If your core isn’t strong and engaging correctly, your hips will sag and your push up will look more like you’re doing the worm than a sleek and graceful upper body and core exercise.
You’ve got to first work on strengthening your core and making sure it engages correctly during the entire push up movement. This means you’ve got to work on your planks. You’ve got to work on engaging your back, not shrugging your shoulders, bracing your abs, engaging your quads and even squeezing your glutes.

So if you want to strengthen your push ups, you should include planks in your workout routines where you focus on really engaging and activating your core!
Here is a great tutorial on Plank Form and 3 Tips To Improve Your Planks.
Another great way to build your core strength is to use Incline Push Ups because Incline Push Ups are a way to modify the push up while still engaging your core in the same way as a full push up. Learn more about Incline Push Ups below!
Activate Your Back – Push ups do focus on your chest, shoulders and triceps. But that doesn’t mean you don’t need to get your back activated and working correctly if you want to do a proper push up.
Getting your back muscles activated and working correctly helps stabilize your shoulders and mobilize your shoulder blades to prevent shoulder injury during push ups. Getting your back and your serratus anterior (the muscle on the sides of our ribs under our chest and in front of our lats) activated and working will not only prevent injury but also improve your pressing strength!
I recommend doing different exercises to improve your scapular mobility and strengthen your upper back. Scapular Push ups are a great way to strengthen your upper back and serratus anterior while also improving your core strength. You can do them from your forearms or your hands

To do a Scapular Push Up from your hands, set up in a high plank position with your hands under your shoulders and your feet together. Your body should be in a nice straight line from head to your heels.
Without bending your elbows or dropping your hips, pinch your shoulder blades together and press your chest out. Do not tuck your chin or jut your head forward. Also do not let your core wiggle or your elbows bend to try to increase your range of motion.
You are not doing a push up. This is a very small range of motion where you are simply focused on pinching your shoulder blades together. Just pinch your shoulder blades together and then relax or even round your back up out of it (rounding your back at the top is another variation but can be very useful for correcting certain push up problems).
Keep your core tight as you pinch your shoulder blades together. As you get stronger and build the mind-body connection you will find your range of motion increases.
If you struggle to pinch your shoulder blades together without wiggling your core or bending your elbows, go down to your knees as if doing a push up from your knees or even come into a quadruped position to start. You can also do this against the wall. Just focus on mobilizing your shoulder blades!
Another push up variation I recommend to activate and strengthen your back and serratus anterior while mobilizing your shoulder blades and strengthen your core and upper body is the Push Up Plus!
You may see what I call the Scapular Push Up also called the Push Up Plus, but the Push Up plus I’m referring to is very different.
This move is very focused on engaging the core and working to mobilize your shoulder blades.

To do the Push Up Plus, you’ll first perform a full push up. I recommend if you can’t do a full push up from the ground that you do this off an incline so you can really engage your core at the top.
Perform a push up and then, at the top, round out as if performing the “cat” stretch. Draw your belly button in toward your spine and perform a pelvic tilt, tucking your hips under toward your ribs as you round your back. You want to hollow out your belly and your round your back out. You should feel your back stretching.
Then return to the nice high plank position and feel your shoulder blades go back to neutral before you perform another push up.
While at the top of the push up, even feel around your rib cage under your armpits engaging to help stabilize your shoulders. You should even feel this if you think about it throughout the entire push up motion.
Use Incline Variations – The Incline Push Up is a must-do push up variation if you aren’t yet able to perform a full one with perfect form.

While I use the Knee Push Up and am not against that variation, I do believe if you’re stuck unable to progress to that first full one, it’s because you’ve only been doing push ups from your knees. Plus the Knee Push Up, may actually be too hard for some people to start. It may cause you to develop bad habits.
You may find you tuck your chin or your elbows flare way out or your core still sags. You may see this in your clients even. And this can be another reason to modify with an incline. It does give you more control and allows you, or your clients, to learn proper form with the right amount of resistance.
When you do push ups from your knees you do build upper body strength and you are working on your core strength; HOWEVER, you also never force yourself to take on your full bodyweight or engage your core in exactly the way you have to do a proper full push up.
With the Incline Push Up, you are working your core and body in the exact form you will with a full push up from the ground. It is also very easy to slowly progress. As you get stronger, you can slowly lower the incline even just ever so slightly each and every workout!
Use Eccentric Variations – If you want to build strength and take your push ups to the next level, you also need to do some Eccentric Push Ups. What this means is you need to do Push Ups where you focus on a slow lower down to the ground. By slowing down the lower down, you can challenge your muscles even more. You can build core strength while challenging your upper body further.
If you can do a full push up, this is a great tool to use to be able to do more push ups and even more challenging variations. And if you can’t yet do a full push up from your toes yet, this is a great way to help yourself progress toward that first full one and start taking on your full bodyweight.
Often before you can do that first full one, you can at least handle your own bodyweight for part of the movement. Which is where the Eccentric Push Up comes into play. By taking on your full bodyweight for a slow lower down, you are building upper body and core strength. You are learning to engage everything correct with perfect form even if you can’t push back up.
So if you aren’t yet at that first full push up, try doing just an Eccentric ONLY Push Up.

To do Eccentric-Only Push Ups, set up in a high plank position with your hands outside your chest and your feet together. Your body should be in a nice straight line. Keeping your body in a nice straight line, slowly lower your chest down to the ground. Try to slowly lower down for at least a 3 count if not a 5 count. Keep everything engaged until you touch the ground.
Here you can release and relax onto the ground and then reset. You do not need to push back up. Simply reset at the top. Your focus is on perfect form for a very slow lower down. At the bottom you can release and simply reset back at the top.
By just doing this slow lower down, you may find you are able to build toward that perfect full push up even when you feel like you’ve been working forever with other modified variations!
Its all about constantly challenging yourself and finding ways you can do as close to a full version as possible!
Mix Up Your Grips – We’ve all heard the phrase, “You’re only as strong as your weakest link.” Well the same is true with push ups. If your shoulders are weakest, triceps are weakest, chest is weakest….WHATEVER is weakest that is what will limit how many push ups you can do.
That is why it is important to include a variety of push up “grips” in your workouts. Do some close grip, some wide grip, some pike presses so T Push Ups…include a variety of hand placements and even movements that focuses on certain areas.

There are so many push up variations out there you can use to target your upper body and core in different ways to strengthen your weak points!
Here are 31 Push Up Variations you can check out to help you!
Ready For Workouts To Improve Your Upper Body Strength, Especially Your Push Ups?
–> Check out my Arm Burner program and WORKOUT CARDS!