by Cori Lefkowith | Jan 30, 2018 | Blog, Bodyweight, Exercises
If 5-minutes is all you have, workout for 5-minutes. You’ll STILL get great results.
I always get the strangest look from people when I tell them that. A look of pure and utter disbelief.
Yes, of course moving more is BEST.
BUT I think our belief that if a workout isn’t a certain length, it doesn’t count, so often holds us back from achieving the great results we deserve.
When you can get killer results from 5, 10 or even 15 minutes a day!
But to get those results out of that time, you have to be SMART with how you create your workouts.
You can’t waste time with a ton of rest. Or with isolated movements that focus on small muscles.
NOPE!
You have to combine moves that work more muscles at once and even get you moving in multiple planes of motion to build functional strength. You have to up your intensity and even shorten your rest.
And to do all of this and get great results in less time, you need to make sure your quick workouts focus on HYBRID EXERCISES!
What Are Hybrid Exercises?
Hybrid Exercises are moves that COMBINE two or more exercises together that flow well with each other and allow you to work more muscles at once and even work your body in different planes of motion in a shorter amount of time.
When I’ve spoken about Hybrid Moves, I’ve gotten asked, “But aren’t those just compound moves?”
NOPE!
Compound exercises are great moves to work multiple large muscle groups and engage two or joints. But with Hybrid Exercises, you are even trying to COMBINE compound moves together.
You are taking it a step further to max out your body in less time by combining moves together.
This can not only allow you to work more large muscle groups at once but even hone in on some of those “trouble zones” as you burn more calories in less time.
So if you want to work more muscles, burn more fat and get in and out and on with your day more quickly, you need to include Hybrid Exercises!
Benefits Of Hybrid Exercises:
The top benefit summed up…Getting better results in less time.
We all have crazy, busy lives with a bazillion demands on our time. Too many of us don’t have hours to spend in a gym.
That is why using Hybrid Exercises is so key!
Hybrid Exercises…
- Work a variety of muscles groups in a short amount of time.
- Help up your intensity to burn more calories and create a better after burn.
- Move you in every plane of motion.
- Build functional strength.
- Are killer cardiovascular movements perfect for interval training
- Help build full body strength WHILE you even target particular trouble zones.
- Help us learn to control acceleration, deceleration and the transition from one movement pattern to another.
- Serve as their OWN “active rest.”
Because these moves work more muscles at once, we can burn more calories in less time. They also work more LARGE muscles at once, which is super key to getting more out of less time.
And when you get more muscles working at once, your body is going to have to work harder to keep up with your energy demands. AKA your workout intensity will go up as well as the benefit of the After Burn, which I talk more about here.
Because these moves can get our blood pumping in less time, they are the perfect moves for interval training. They will help us feel the burn in those quick 20-30 second intervals of work we so often use!
These hybrid moves also create movement patterns working different muscles twisting, turning and lifting to build functional strength.
Let’s face it…In life you aren’t always just squatting. Nope, you’re squatting to get something out of the dishwasher then rotating up to place it in the cabinets…Or at least that is what I have to do haha
The point is, we so often “combine” compound moves in our daily life, why wouldn’t we train some of those same moves and “ideas” in our workouts?
Especially if they help us get more out of less time!
And not only are the functional, increase our intensity and work more muscles at one, but they are a great way to target our “trouble zones” AND even perform “active rest.”
How do they accomplish all of these things…things that honestly seem at times slightly at odds?
Well, Hybrid Exercises are two moves COMBINED. And those moves could be to huge compound lifts OR a compound lift with a more focused moves.
That means you could take a more “isolation” exercise or an exercise that targets a specific area…like say the Bench Dip for Triceps…and combine it with a compound upper body move…like Push Ups…to get the Push Up to Dip.
This move will really burn out your triceps BUT you’ll get more bang for your buck in less time because you’ll also work your chest, shoulders and core WHILE you target your triceps!
And you can do this for just about any area….
For another example…the Squat to Lateral Leg Raise. You not only work your entire leg, BUT you also get in a little extra targeted abduction work to get your glute medius activated and working.
But because you are short on time, you aren’t wasting time on isolation moves. NOPE! You are getting the benefit of targeted work, BUT included with the benefit of compound moves!
And you can change up these same moves so that they DON’T burn out an area and can even allow you to keep moving WITHOUT rest by becoming their own “active rest!”
What do I mean by this?
Well if you only have 5 minutes, you can’t really afford to spend any of it truly resting. That means you can’t just work one area over and over again.
But with Hybrid Exercises, you can combine two moves that allow you to rest one area as you work the other!
This can be combining an upper and lower body move OR even something as simple as combining giving one side of your body a rest after a bilateral compound move, like a Push Up to Toe Touch!
The point is, you can combine moves in so many different ways so that you can get more benefit out of LESS TIME.
And the even BETTER part about Hybrid Moves!? You don’t need any fancy equipment to do them!
Not only are there a ton of great BODYWEIGHT Hybrid Exercises, but even just a basic pair of Dumbbells can help you build full-body strength!
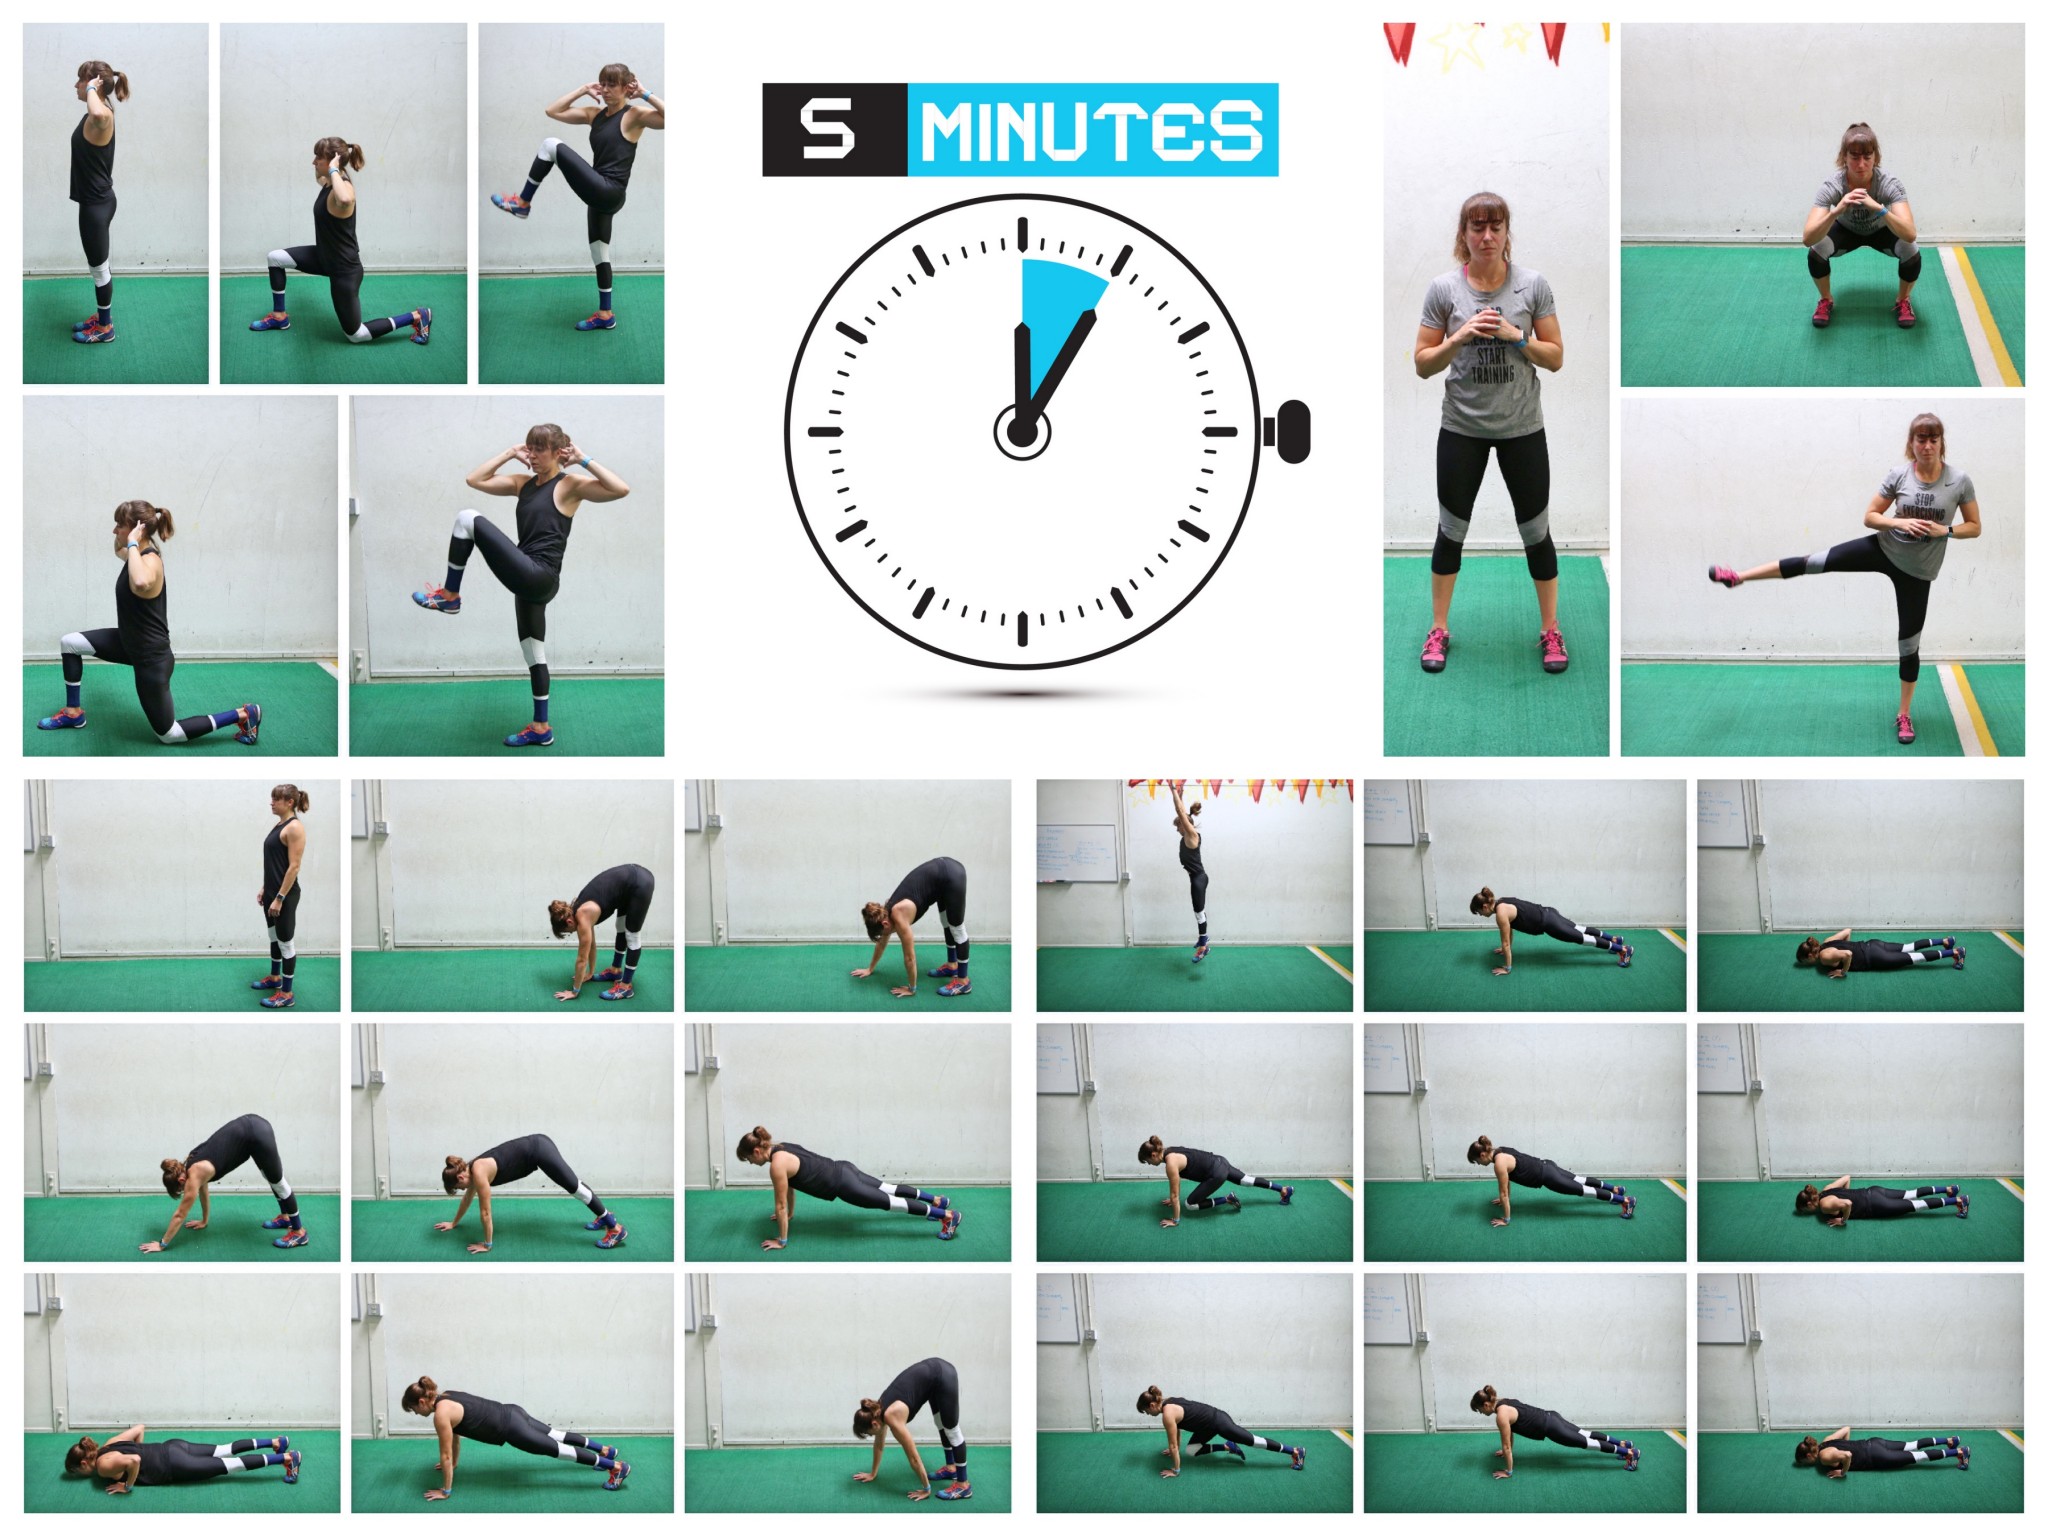
Below are 5 Bodyweight Hybrid Moves I use ALL OF THE TIME. And even one of my go-to dumbbell Hybrid Moves!
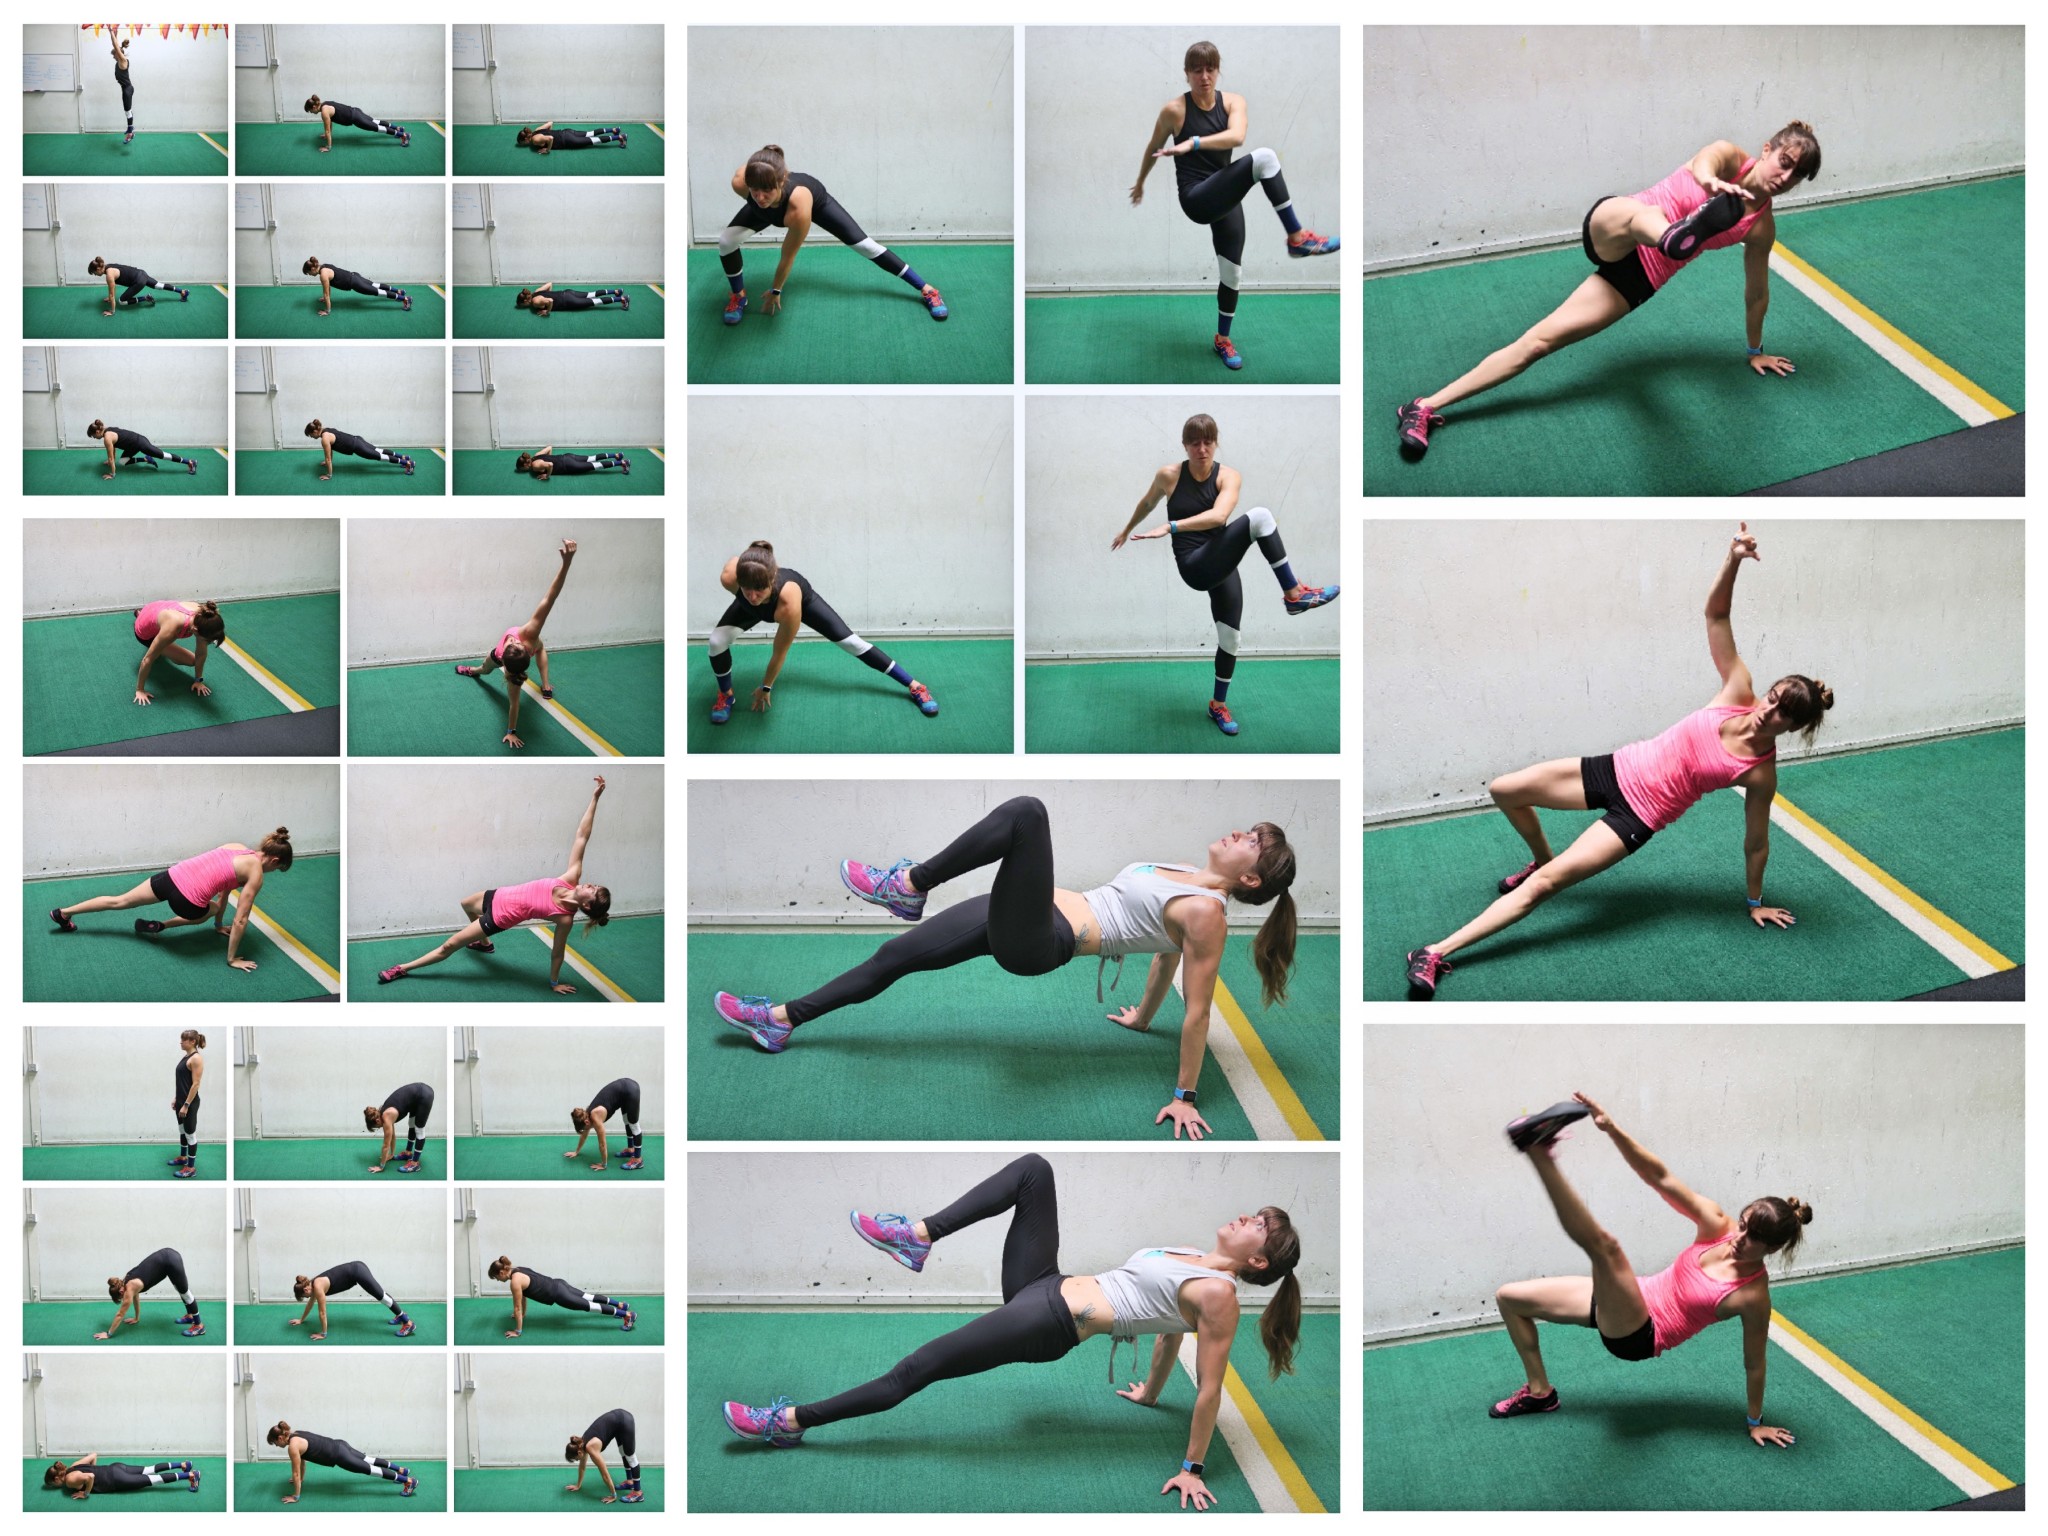
5 Hybrid Exercises:
These are 5 Hybrid Exercises I use all of the time (as well as some of the ones I mentioned above like the Push Up to Dip and Push Up To Toe Touch). They work your entire body and will get your blood pumping in no time! They are also multi-planar movements to get you twisting and turning and moving in every direction to build functional strength. Some combine two compound exercises while others will combine more focused moves with compound moves to target those trouble zones.
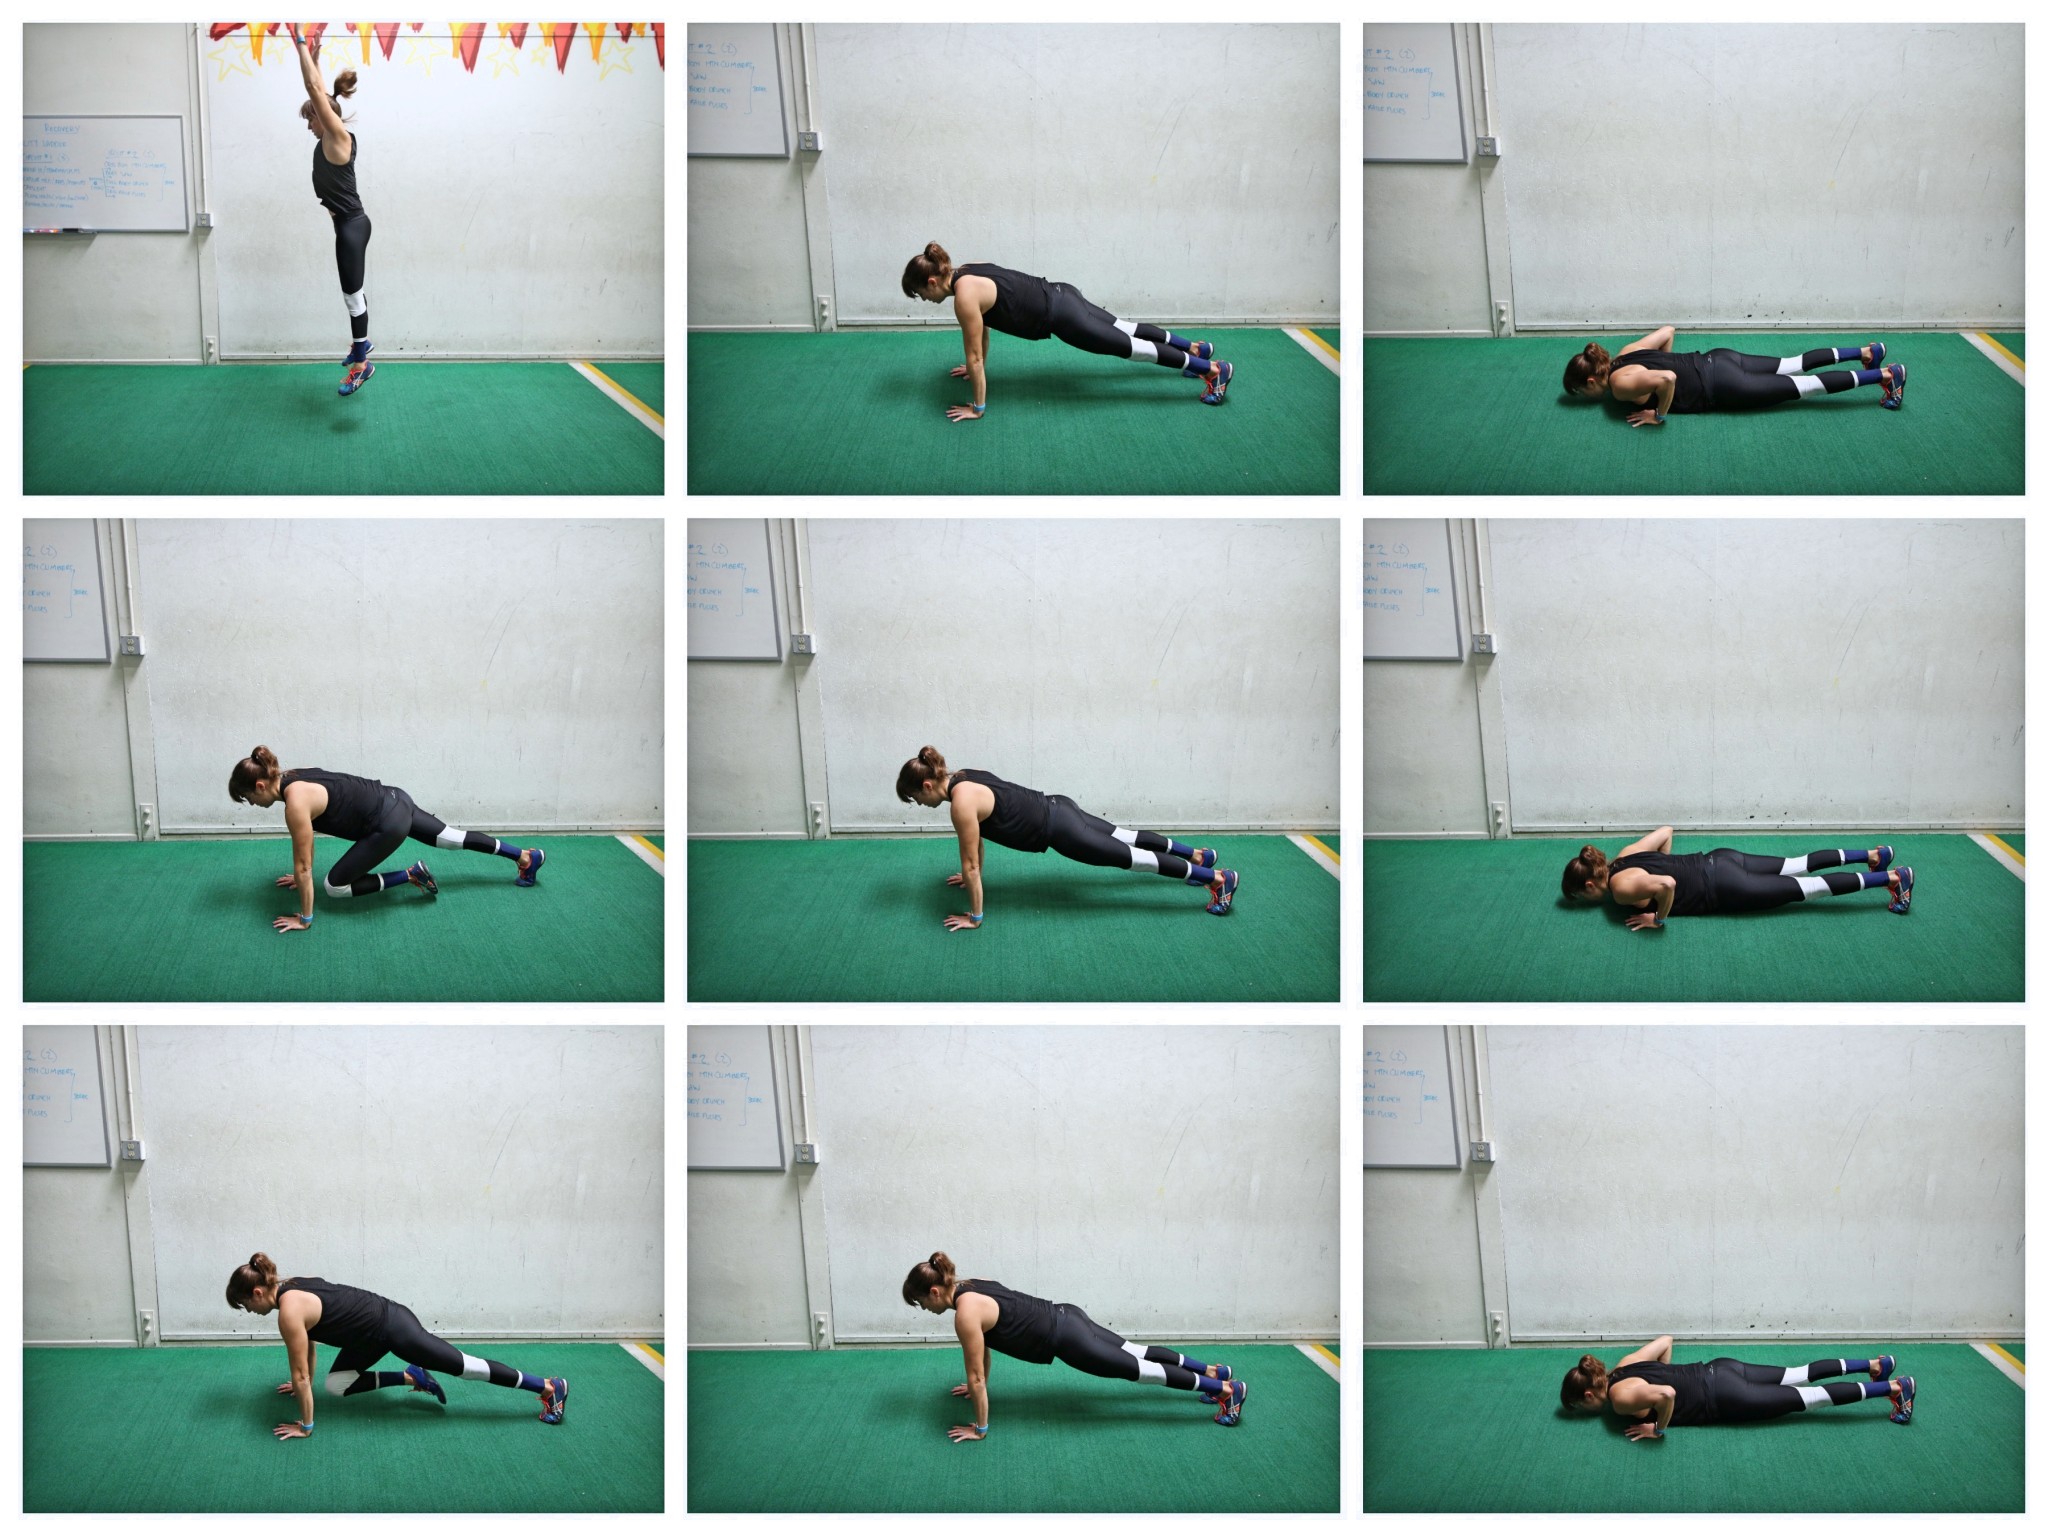
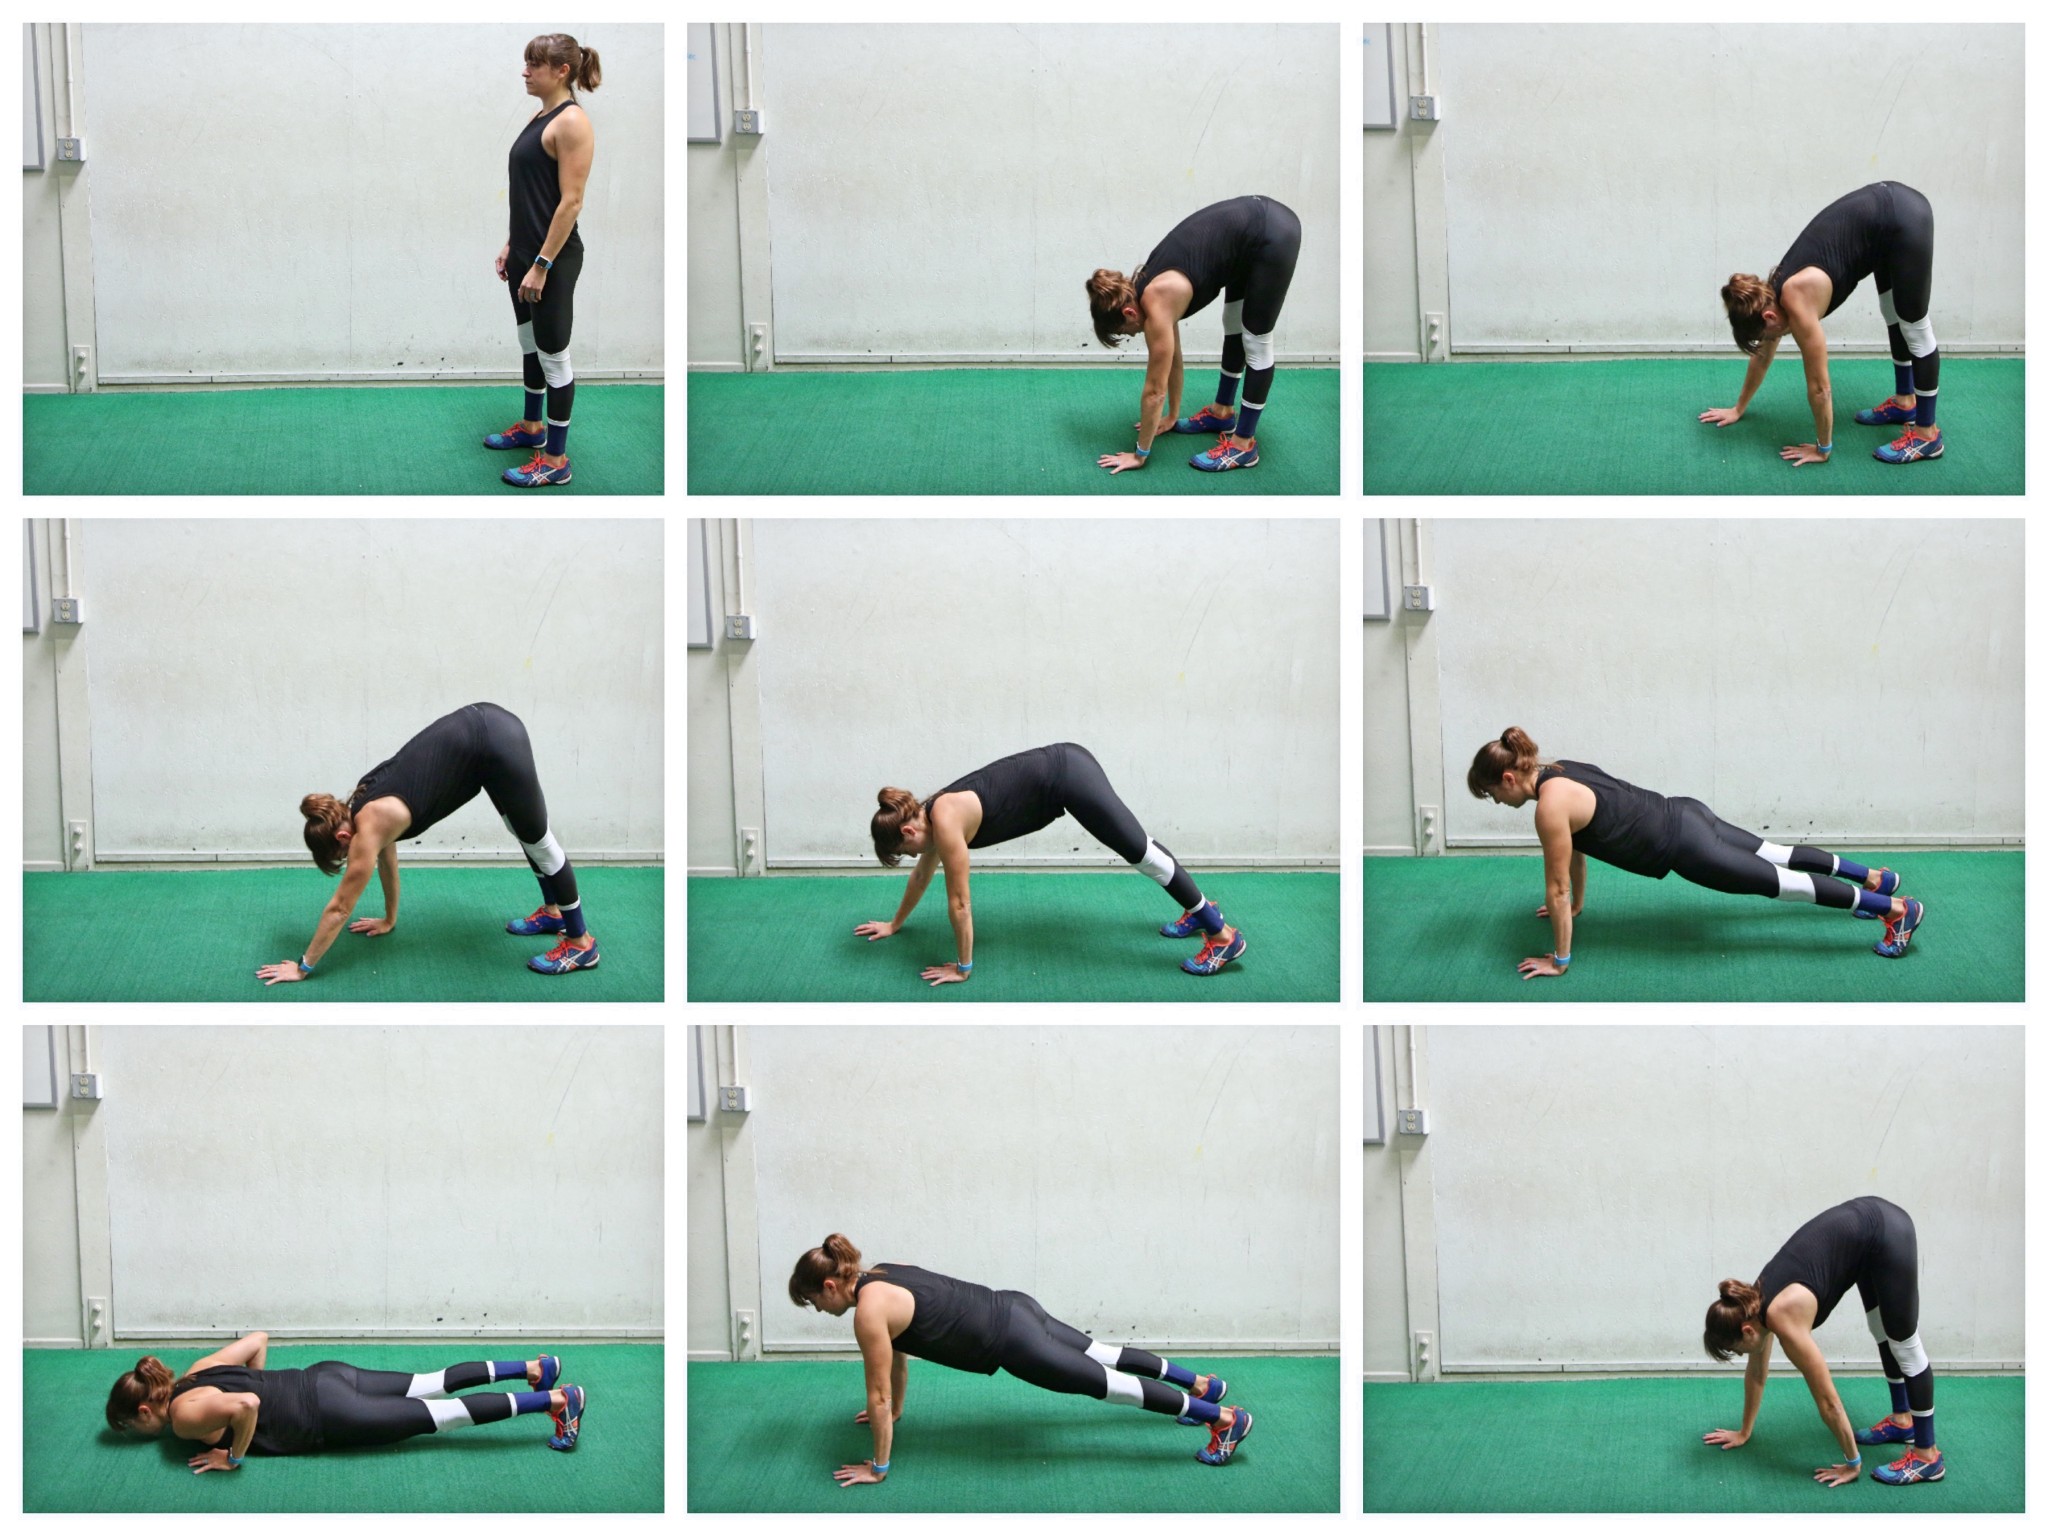
Mountain Climber Burpee:
The Mountain Climber Burpee takes that Basic Burpee and makes it even more core and upper body intensive with 3 push ups and 2 mountain climber knee tucks! Talk about a way to burnout your body quickly and get your blood pumping!
To do the Mountain Climber Burpee, start standing tall. Then bend over and squat down to put your hands on the ground in front of your feet as you jump back into a high plank position. From this high plank position, perform a push up. Keep your body in a nice straight line as you lift and lower. Beginners can go down to their knees and come back up to their toes at the top for the knee tuck.
After pushing back up, tuck one knee in toward the same elbow. Then place the foot back and perform another push up. Once you push back up, tuck the other knee in. Do one final push up then jump your feet into your hands and stand back up. Jump at the top then repeat the move.
Beginners can also do this off an incline. Using a bench, place your hands on the bench and jump back instead of going all of the way to the ground.
And while there are 3 full push ups, you can modify by taking out a push up and doing both knee tucks in a row. You can also modify the push ups by doing them from your knees or off an incline.
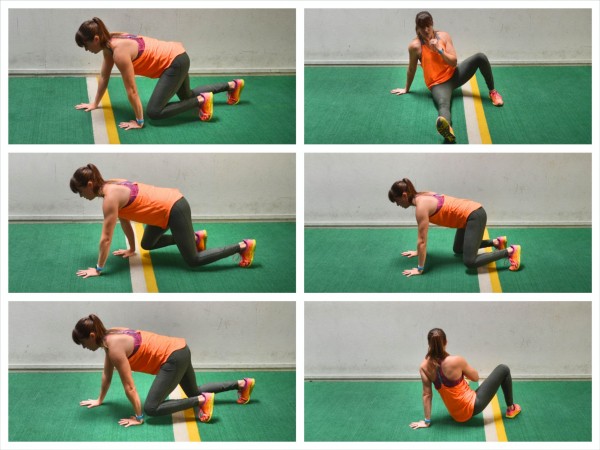
Crawl with Sit Thru:
This move is a staple in my cardio interval workouts. Your blood will be pumping with this contralateral crawl that really works your entire core! Your quads, shoulders and abs will work as you crawl not only forward and backward but also twist with the Sit Thru!
To Crawl with Sit Thru, set up on your hands and knees with your knees under your hips and your hands under your shoulders. Flex your feet and then lift up onto your hands and the balls of your feet. Then begin to move forward or backward, moving your opposite arm and leg together. Step forward with your right hand as you step forward with your left foot. Keep your back flat and core engaged as you move. Try to keep your knees close to the ground.
Think small steps and stable hips over trying to get further faster.
After a few steps forward or backward, perform a Sit Thru.
To perform a Sit Thru, from the crawl position, rotate open toward the right and bring your left leg under and through toward where your right hand is. As you bring your left leg forward and through, lift your right hand. You should almost be sitting when you rotate through with your left hand down to support you.
Then bring the left leg back through and place your right hand back down so that you are back in the starting crawl position. Next rotate to the left and kick your right leg through and forward as you lift your left hand.
Bring the leg back through to the crawling position and then change the direction of your crawl or keep moving in the same direction. Move quickly as you crawl back and forth performing a Sit Thru to each side every few steps or so.
Beginners may crawl on their knees and either do a straighter leg Sit Thru OR keep both hands down.
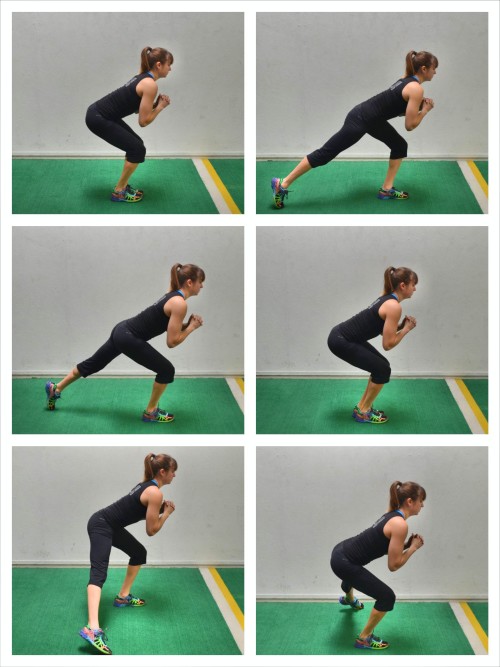
Reverse Lunge to Knee Tuck:
The less you can rest during the short time you have to work, and the more muscles you can work during that time, the more bang for your buck you’ll get! And this move will allow your legs to rest a bit as you work your abs and obliques with a nice Knee Tuck and Twist so you can keep moving for the entire time you have.
Plus this unilateral move will help you improve your leg strength and your balance to correct any imbalances you may have between your dominant and non-dominant sides!
To do the Reverse Lunge to Knee Tuck, start standing tall with your hands on your shoulders or by your head to help with the twist. Then lunge back with your right foot, dropping your back knee down toward the ground as you keep your chest up. Keep your front heel down as you lunge back and bend your front knee to about 90 degrees as you load your glute. Keep your front knee about over your ankle to help you think about loading your glute.
Drive back up to standing, pushing through your left (front) heel. As you drive up, bring your back knee up and forward as you come to standing. Tuck your right knee up and rotate your upper body toward that right knee. You can slight crunch toward the knee but don’t just round over.
Twist toward that knee then lunge back again and repeat on the same side. Make sure to engage the glute of your standing leg and feel your abs work to twist toward your knee. You can tap your toe down to balance if needed between the lunge and knee drive. The less though that you tap down between the harder the move will be.
Beginners may not lunge as low or even perform the twist without the knee tuck if balancing is an issue to start.
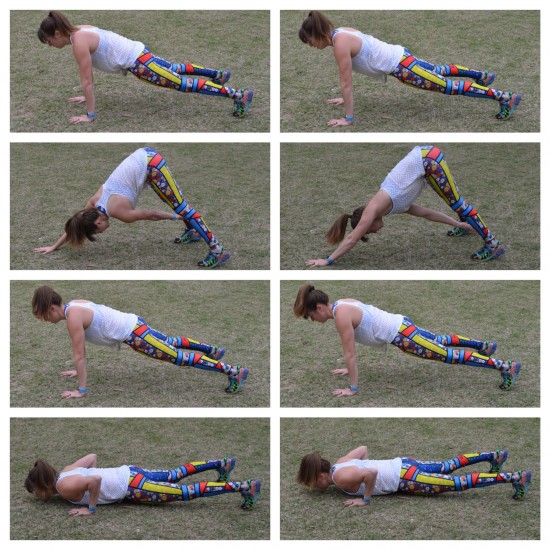
Inchworm Push Ups:
Some Hybrid Exercises are amazing because you can work on your mobility AS you build full-body strength and get your blood pumping. By combining an Inchworm Crawl with a Push Up, you can not only improve your mobility, but also get your blood pumping as you work your upper body and core!
This has fast become one of my favorite Hybrid Push Up Variations for cardio workouts!
To do Inchworm Push Ups, start standing tall. Then place your hands down on the ground, keeping your legs as straight as possible. Then walk your hands out to move into a plank position.
When you reach the high plank position, you will perform a push up. Keep your core engaged and make sure your body moves in one straight line. Do not sag your hips. Beginners can drop to their knees for the push up.
Press back up to the top of the push up and then, from the plank position, walk back in. Keep your legs as straight as possible as you walk in and out.
Beginners may even need to take out the push up to start or do one from their knees every other rep.
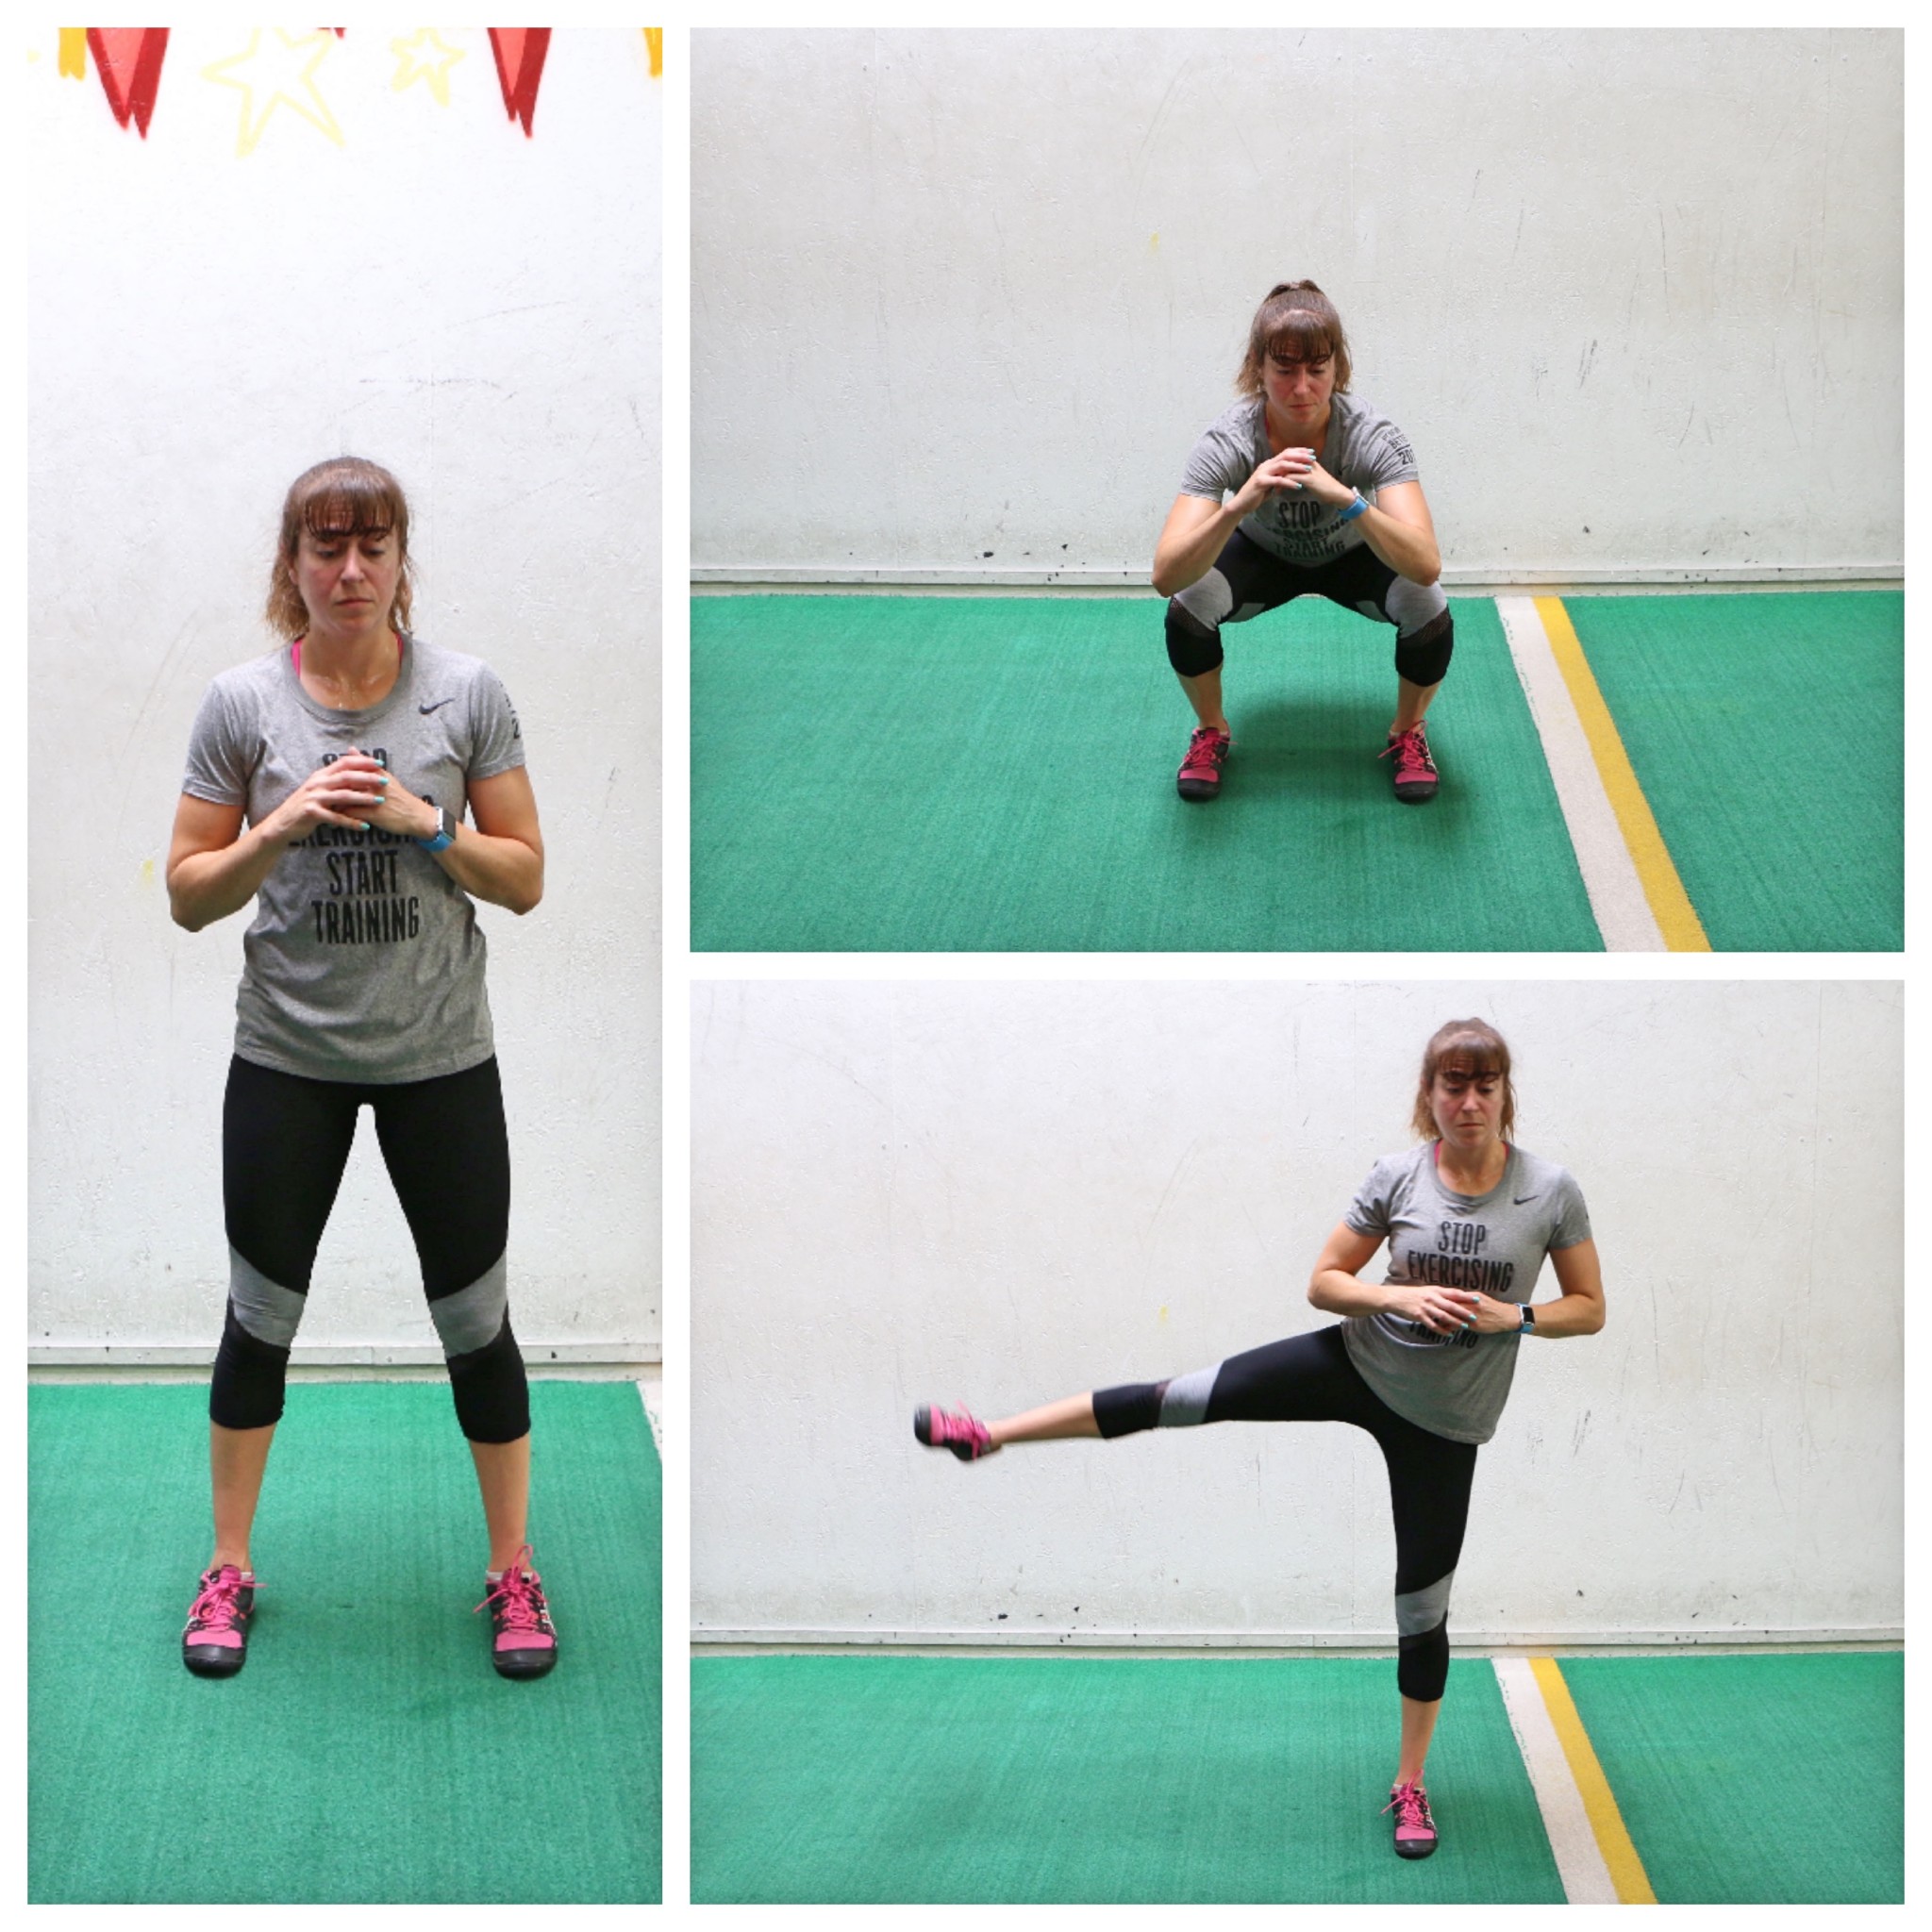
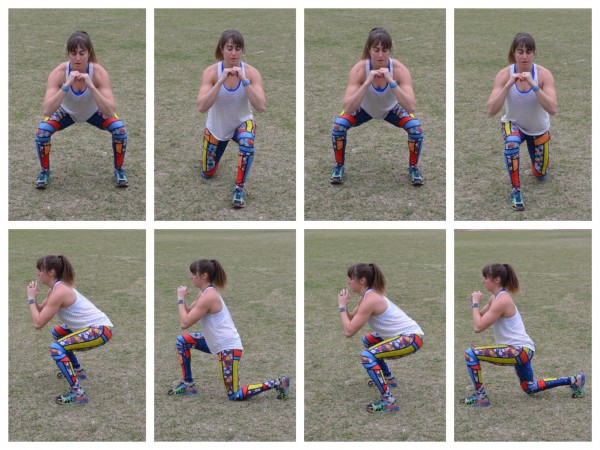
Squat To Lunge:
Don’t have weights and want to toast a body part in less time? Then moves like the Squat to Lunge are the way to do it! Combining these two compound leg moves will have your legs shaking in no time!
To do the Squat to Lunge, start with your feet about hip-width to shoulder-width apart. Squat down, sitting your butt back. Do not round forward as you squat down. Keep your heels down and sink your butt so that your quads are about parallel to the ground.
Then jump up and switch into a lunge stance as you land. One foot will be forward and then other will lunge back as you drop your back knee down toward the ground. Sink low in the low and keep your chest up.
In the lunge, your front heel should be down and your weight should be fairly centered.
Jump back into the squat and then lunge on the other side. Move quickly, exploding up off the ground to switch.
Beginners can start with stepping between the two moves instead of jumping. They can even do more of a Skater Squat Movement shown below.
BONUS:
So there are SO MANY Hybrid Exercise options out there, especially when you start to add in a variety of tools. One of my favorite staple moves using the dumbbell though is the Renegade Row Push Up.
It builds complete upper body strength and I love that it is a press that also includes a pull! Talk about building core stability as well as back, chest, shoulder, arm and even CORE strength!
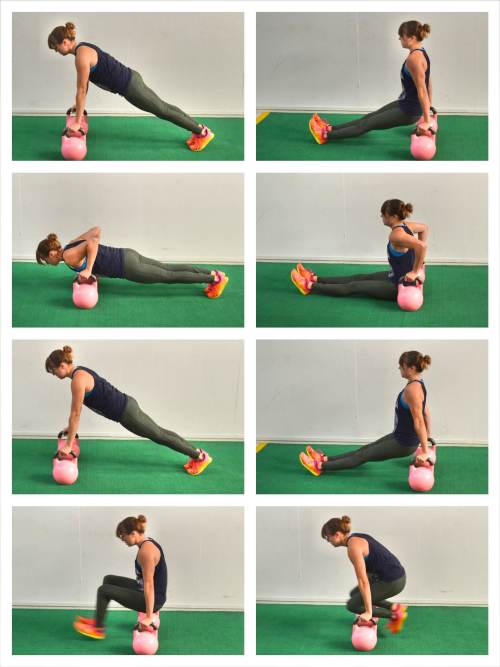
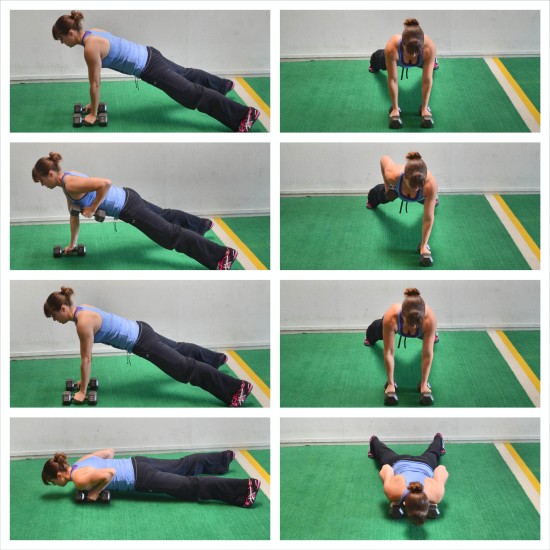
Renegade Row Push Up:
To do the Renegade Row Push Up, you can use dumbbells (or kettlebells). Place them on the ground about shoulder-width apart with them just outside your chest. Place your hand on each dumbbell with your palms facing in so the weights are parallel.
Then set up at the top of a plank with your arms straight and legs out straight behind you. You can do this from your knees or your toes. The closer together your feet/knees are, the harder the move will be on your core because you won’t have as wide a base to fight rotation during the row.
From this plank position, perform a Push Up, dropping your chest to the weights. With your body moving as one unit, lower down and press back up. At the top of the Push Up, row one dumbbell up to your side, driving your elbow down and back toward the ceiling. Lower the weight down and then perform another Push Up. After the Push Up, row the other dumbbell up. Make sure not to shrug your shoulders as you row. You want to feel your back working.
Also, fight the urge to rotate open as you row. Keep your body in a nice straight line from your head to your heals. Really focus on squeezing your glutes.
Beginners may need to do a row on each side after each Push Up to eliminate some of the Push Ups. Advanced exercisers will want to do only one row after each Push Up and use heavy weights.
Heck from here you could even add in a Cross-Body Mountain Climber for what I call the Mountain Climber Row Push Up!
For even more great hybrid moves and the fast and effective workouts I create using them, check out my Bodyweight Shred program! All you need is your own bodyweight even for killer full body workouts to burn fat and build muscle!
by Cori Lefkowith | Jan 25, 2018 | Blog, Foam Rolling, Pain Relief, Warm Up, Workouts
Your sedentary lifestyle is killing you!
I’ve heard this said.
And while it isn’t really “killing” us, it is a cause for a ton of aches and pains AND puts us at an increased risk for injury when we workout.
How?
That forward flexion and constantly hunched posture creates imbalances. Imbalances that create immobility and compensations, which in turn lead to overuse and injury.
Ever see someone’s knees go in as they squat? Or maybe you’ve noticed you walk on the inside of your shoes? Or heck, maybe you’ve noticed your shoulders are rounded forward and low back is arched!
All of these postural distortions can lead to mobility restrictions and us overusing smaller muscles that aren’t meant to carry the load. It’s why so many people at some point will have shoulder, neck, upper or lower back pain. Heck even hip pain is unfortunately becoming more and more common!
That is why the RStoration Method is so key BEFORE you workout and to reverse the constant forward-flexed, hunched-over posture we spend most of the day in.
There are 3 parts to this process – foam rolling, stretching and activation.
And you can spend just 10 minutes a day and see HUGE benefit!
Try this RStoration Core-Focused workout below and start alleviating your back pain as you reverse the hunch and get your core working properly!
The 10-Minute RStoration Alleviate Back Pain Workout
Ready to learn more about the RStoration Method to eliminate aches and pains for good? CLICK HERE!
by Cori Lefkowith | Jan 25, 2018 | Blog, Bodyweight, Core, Exercises
The Side Plank…we love to hate it, but it is a must-do move if you want to build core stability and strength.
It’s a unilateral move that can correct imbalances and really works the abs, obliques, glutes, lats, and shoulders.
However, it is a tough move that many of us don’t do correctly, leaving us feeling like it is impossible to do or not as effective as it should be!
Because, like with all planks, it isn’t just about holding LONGER, but engaging the right muscles HARDER.
Let’s first take a look at the basic Side Plank and proper form. Then I’ll go over some great ways to modify the move to build up as well as some fun variations you can include in your workouts!
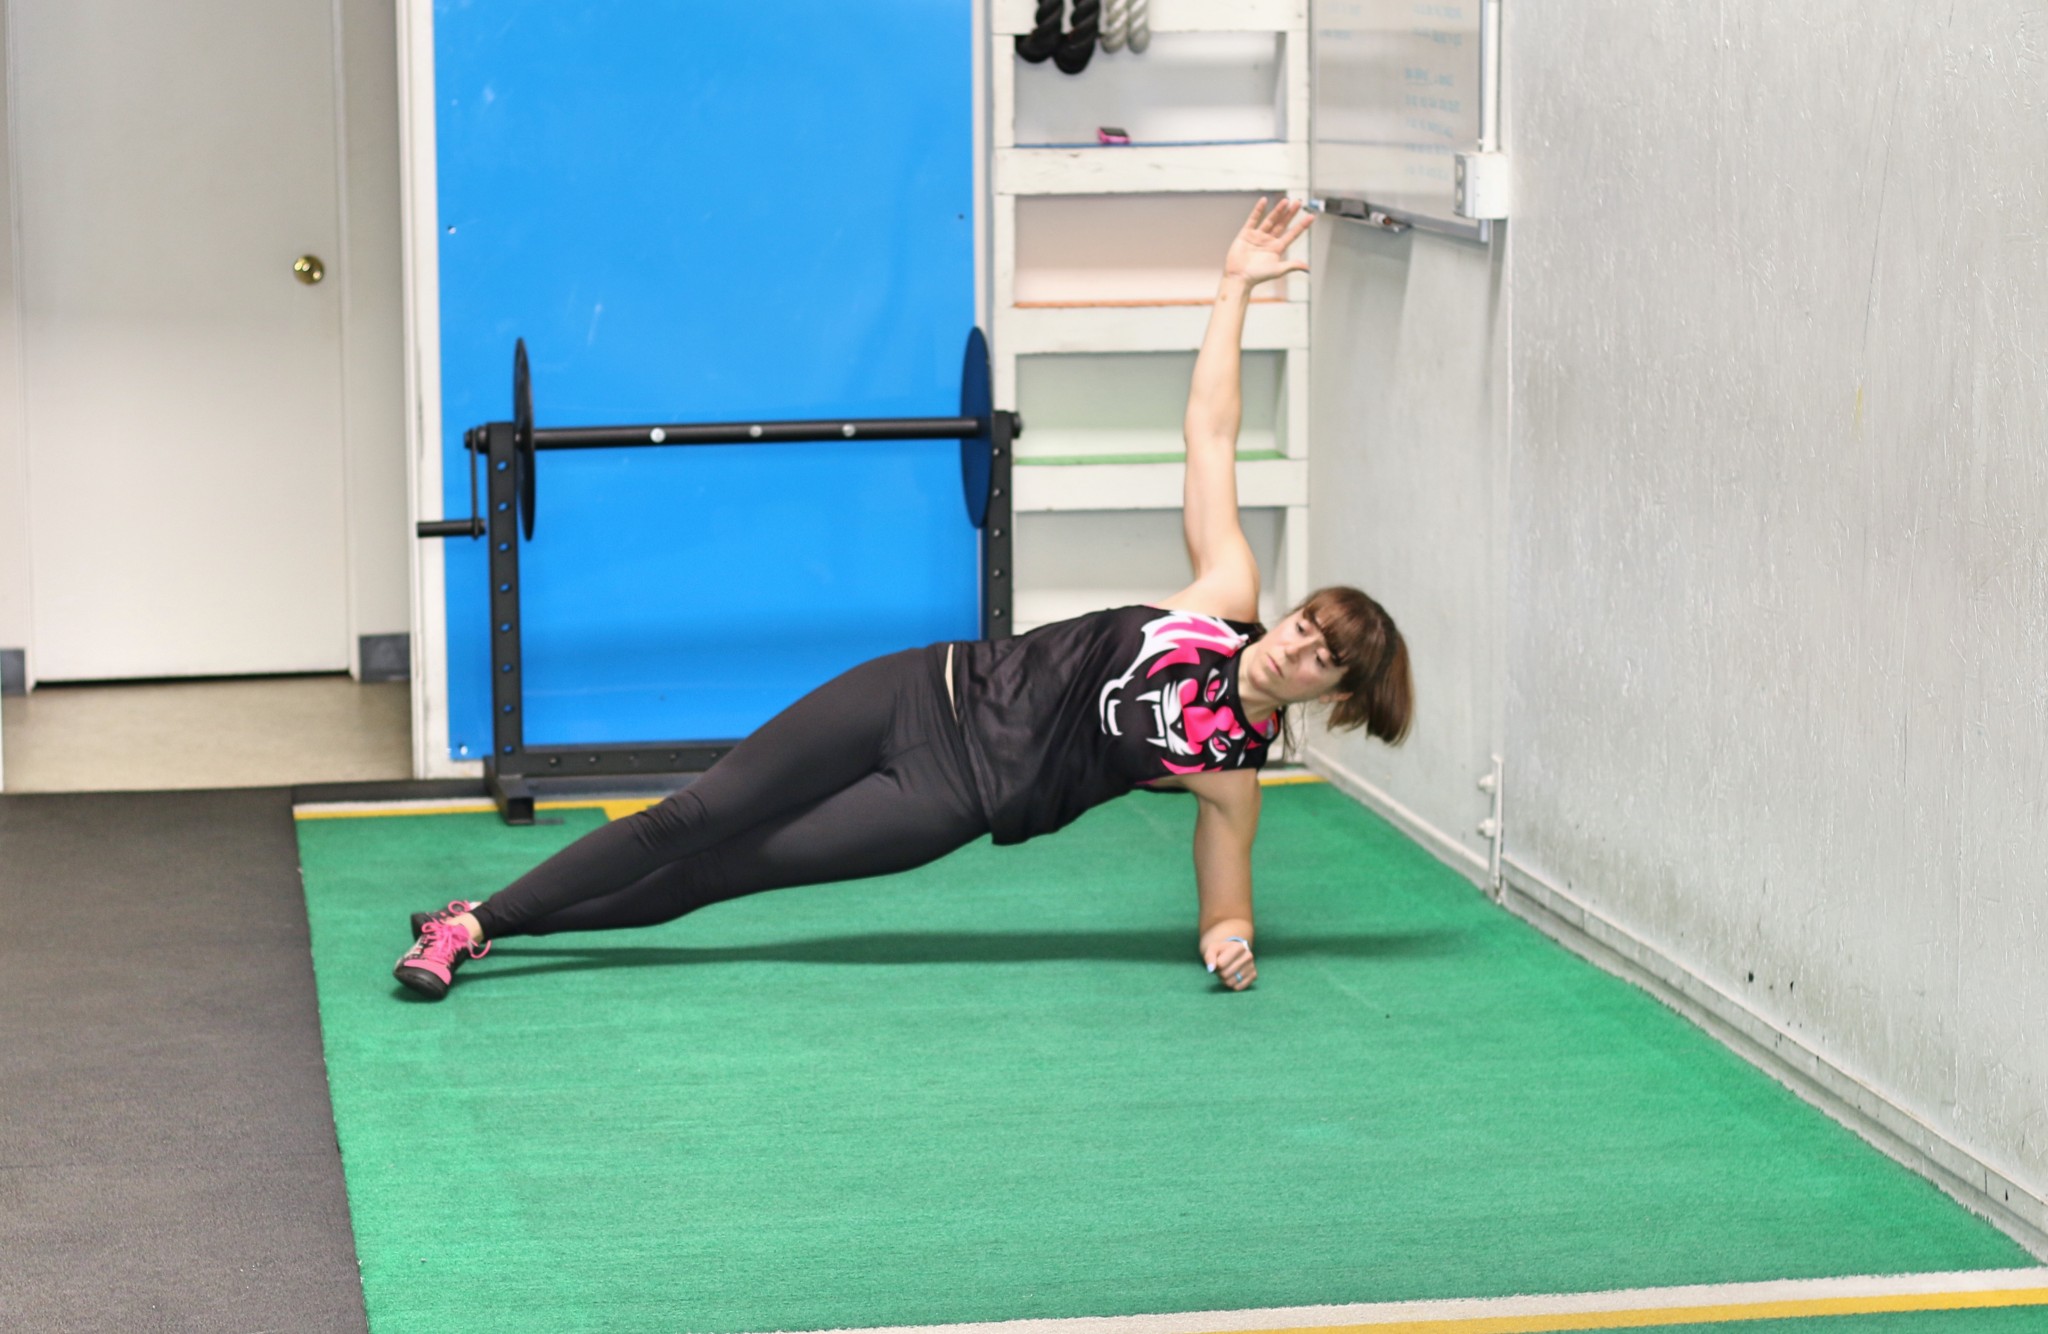
The Basic Side Plank Form:
To do the Side Plank, start lying on your side with your top leg in front of your bottom leg, propped up on your elbow with your elbow under your shoulder. Rest on the inside of your front foot and outside of your back foot and then flex your feet as you lift up.
Lift your body up into a straight line, driving through your feet and elbow. Do not shrug your shoulder as you hold. Make sure that shoulder is aligned right over your elbow. Feel the side of your back under your armpit engage to support your shoulder as you lift up. You may even feel the muscles down the side of your rib cage.
Make sure too that you aren’t rotating toward the ground. Squeeze your butt and keep your body in a nice straight line as you lift up and hold.
Feel your glute and oblique working to lift that bottom hip up. You want to engage everything down the side of your body from your shoulder to your feet. Brace your abs, feeling everything engage.
Too often we just “rest” on the sides of our feet. But especially as we progress the plank, we need to create tension even through our lower leg. This not only helps us stay up and engage our glute, but it also prevents unneeded stress on our knees. So flex your feet to create tension all the way down.
Hold here and focus on what muscles are working. If you feel yourself compensating or your form breaking down, rest or regress. Do not try to focus on how long you hold, but instead on how well you are engaging everything!
From here you can progress or advance the Side Plank by stacking your feet or even lifting your top leg. This can put more force on the spine so make sure your abs are working before progressing to this movement. You do not want your lower back getting overworked or bearing too much load. You can even do the Side Plank from your hand just make sure to keep your hand stacked under your shoulder to protect your shoulder and neck.
Beginners can also regress this move by doing it off an incline or by even dropping their bottom knee to the ground. The incline is a great way to learn to engage everything from your shoulders down to your feet.
However, doing the side plank from your knee is also a great modification especially if you don’t have an appropriate incline near by.
Best to do the version that allows you to do this move with proper form over compensating and letting your bottom hip drop or your chest rotate toward the ground.
Remember form is how you get the most out of the move and the right muscles working to get stronger!
So a quick summary of some important things to remember when working on your Side Planks…
Side Plank Quick Form Tips:
- Create tension all the way down your body, even flexing your feet to engage the outside of your lower leg.
- Stack your shoulder over your elbow and feel the side of your back engage. Do not let your elbow get above your shoulder toward your head so that your upper trap takes over.
- Do not let your bottom hip sag. Feel your oblique and glute on your bottom side lifting you up.
- Brace your abs and engage your glutes to extend your hips. Do not let your chest rotate toward the ground!
- THINK about the muscles working and engage harder instead of focusing on just holding longer!
After learning to do the Side Plank, and hold harder not just longer, you can mix things up and even target your core in different planes and from different angles with some of these fun variations!
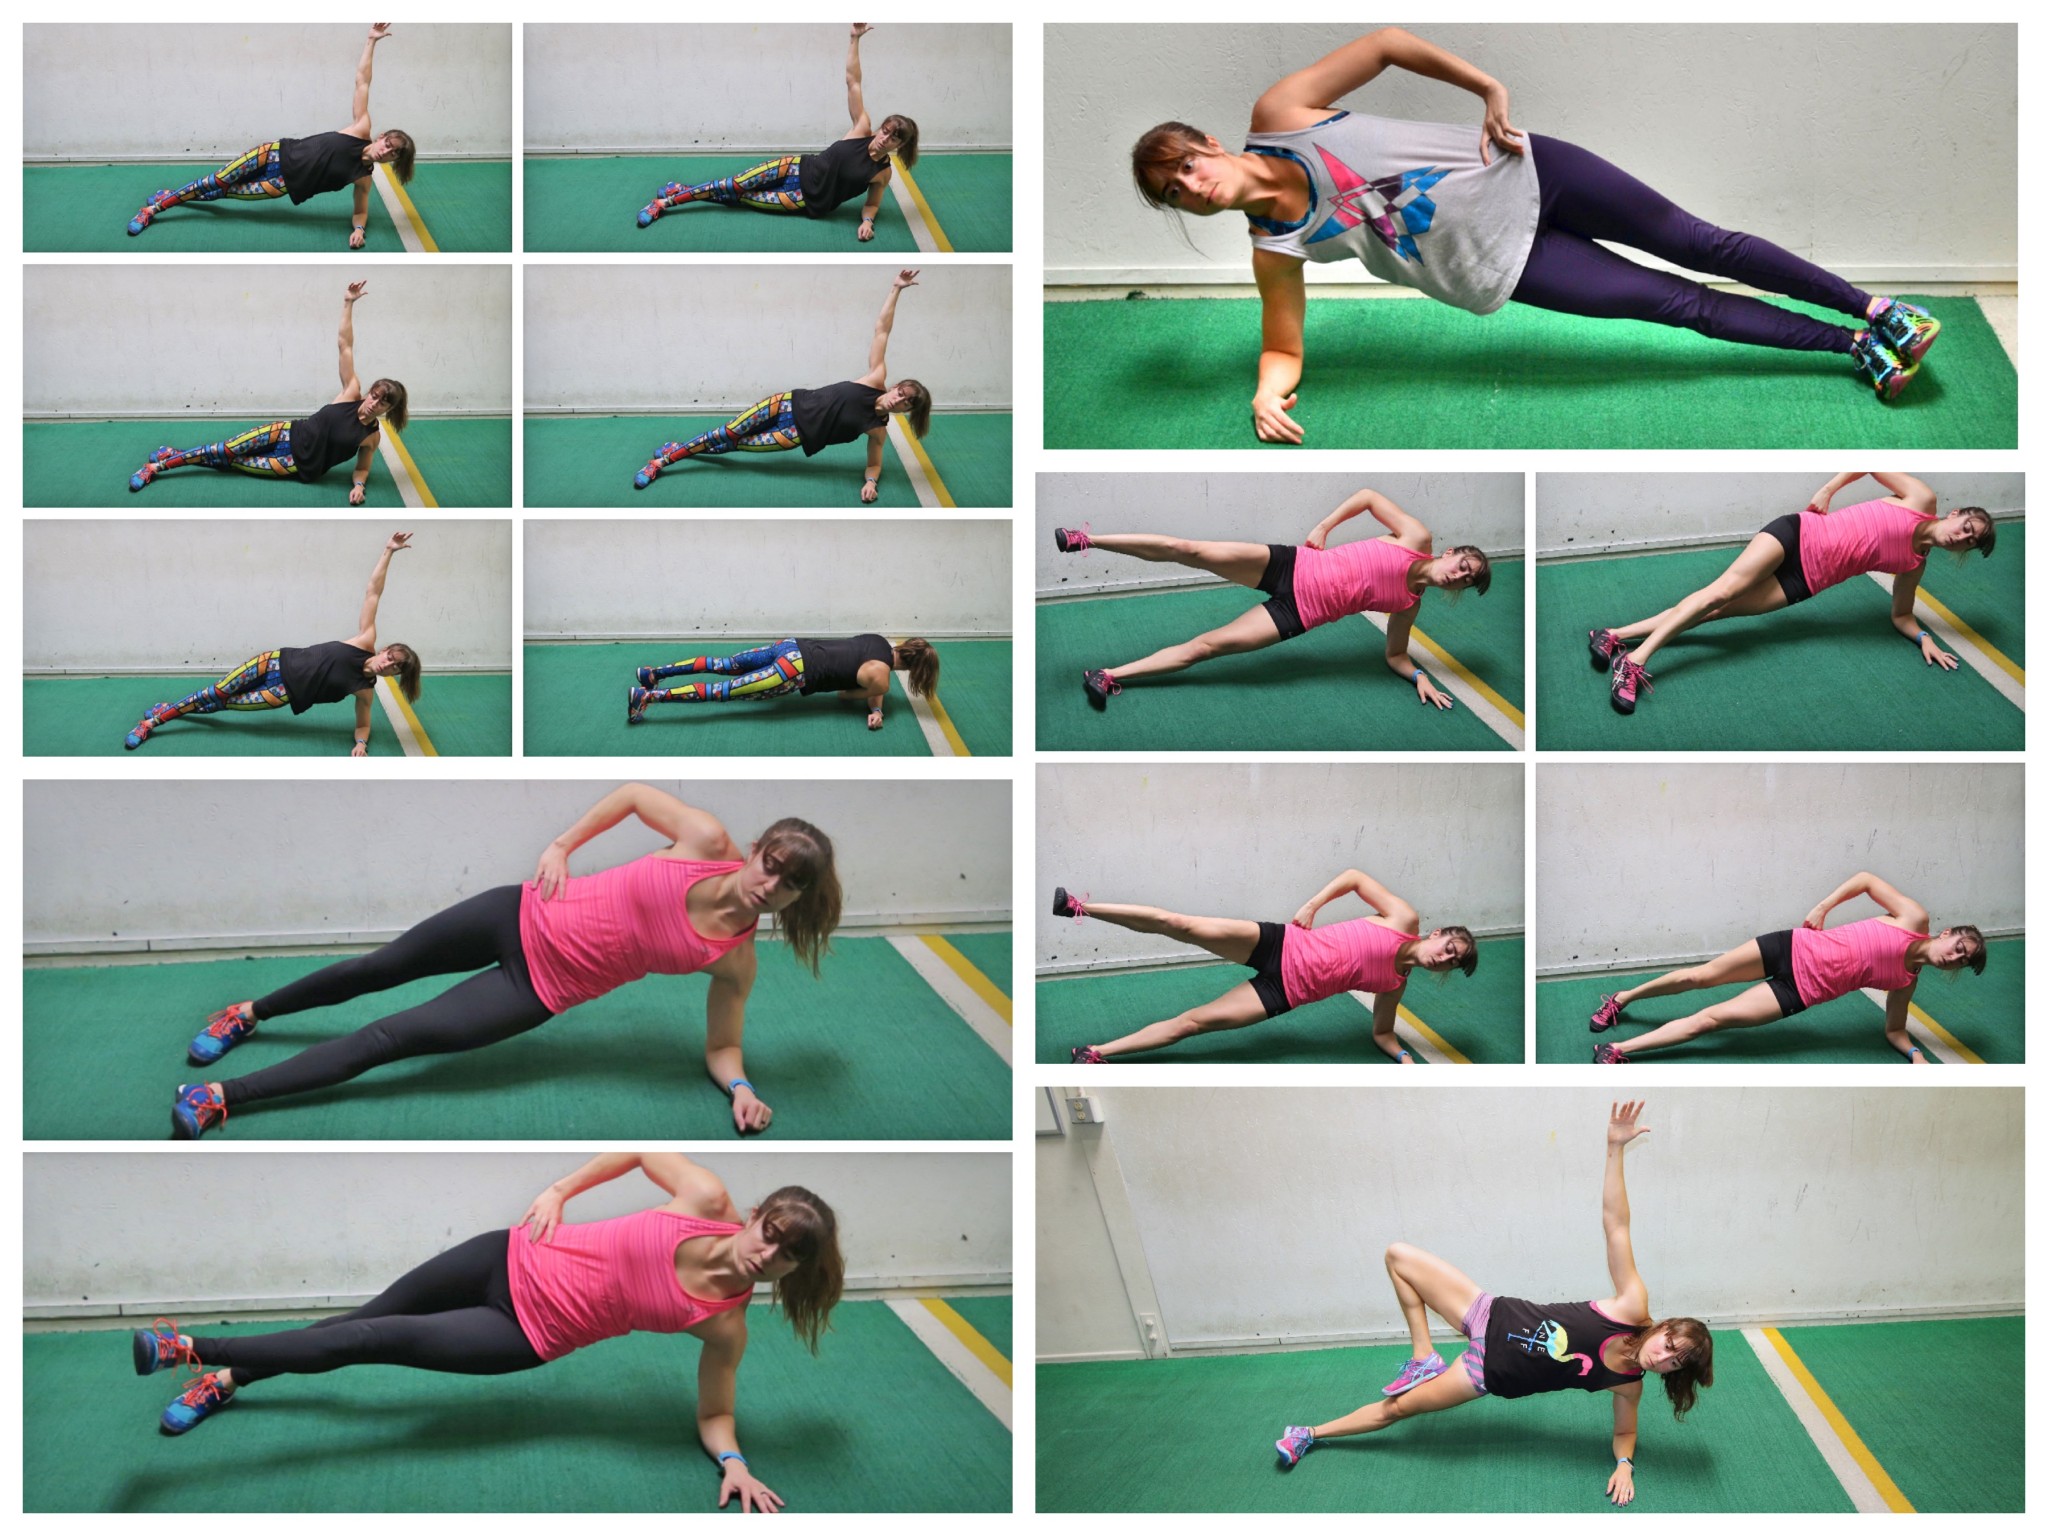
5 Side Plank Variations:
These Side Plank variations are a great way to build core stability and strength and even work your core in multiple planes of motion!
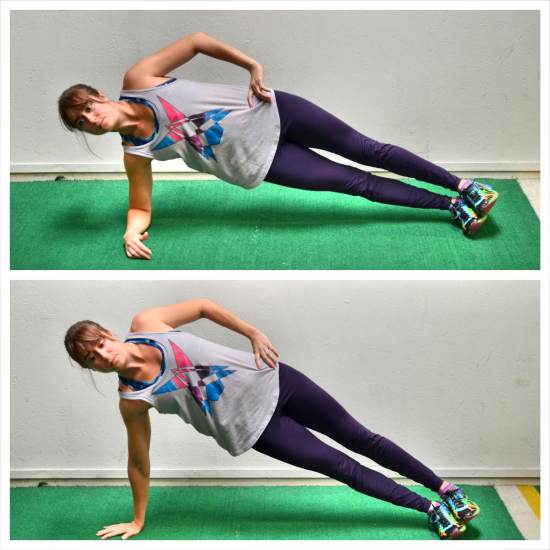
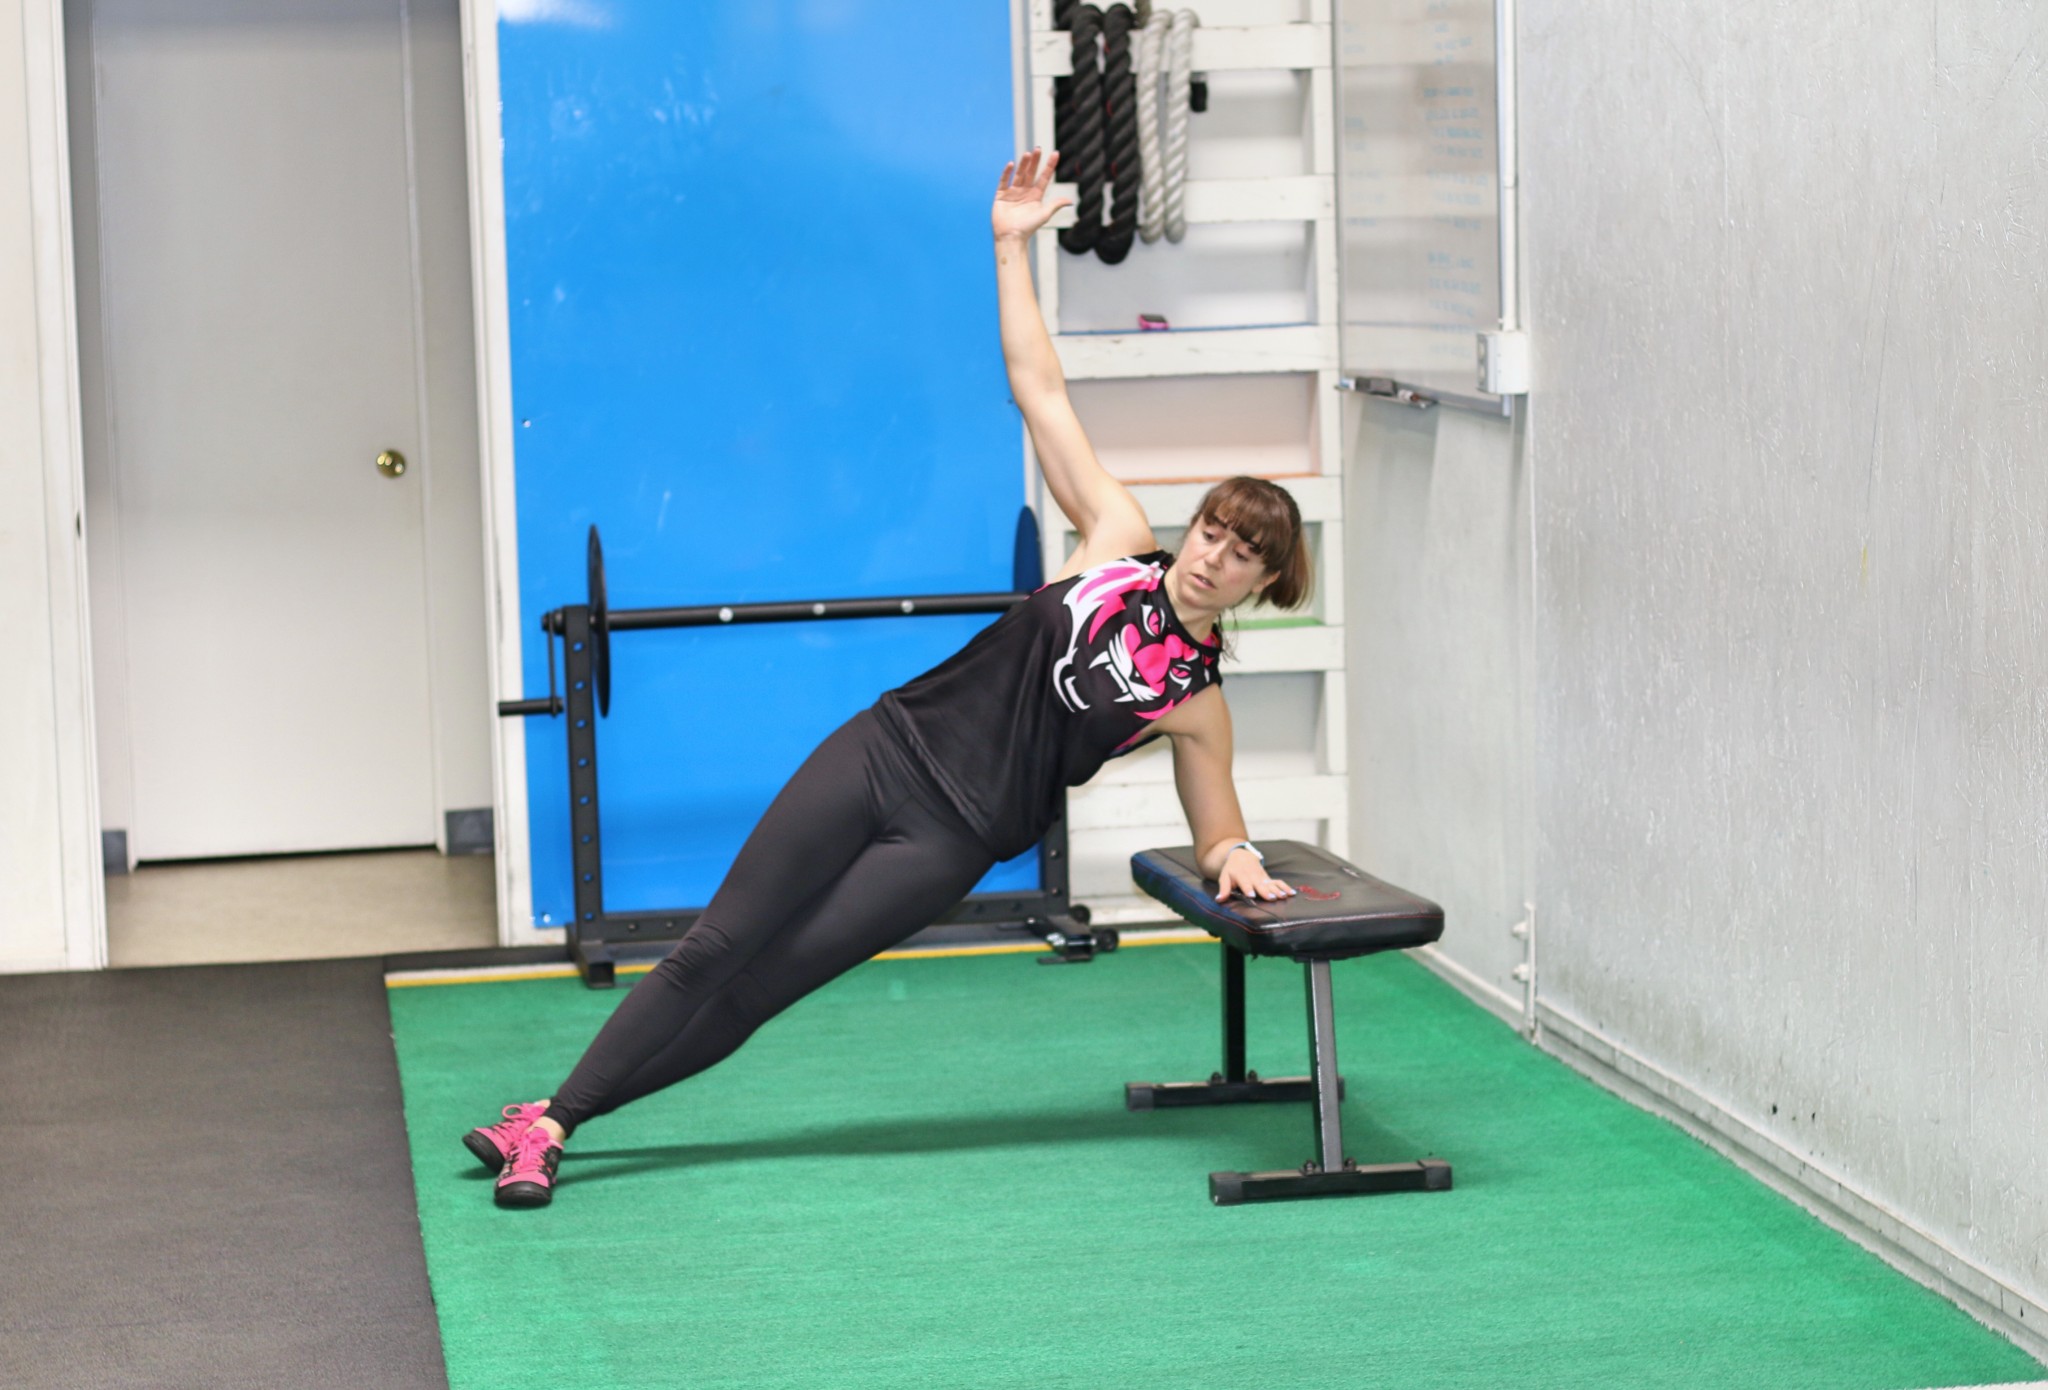
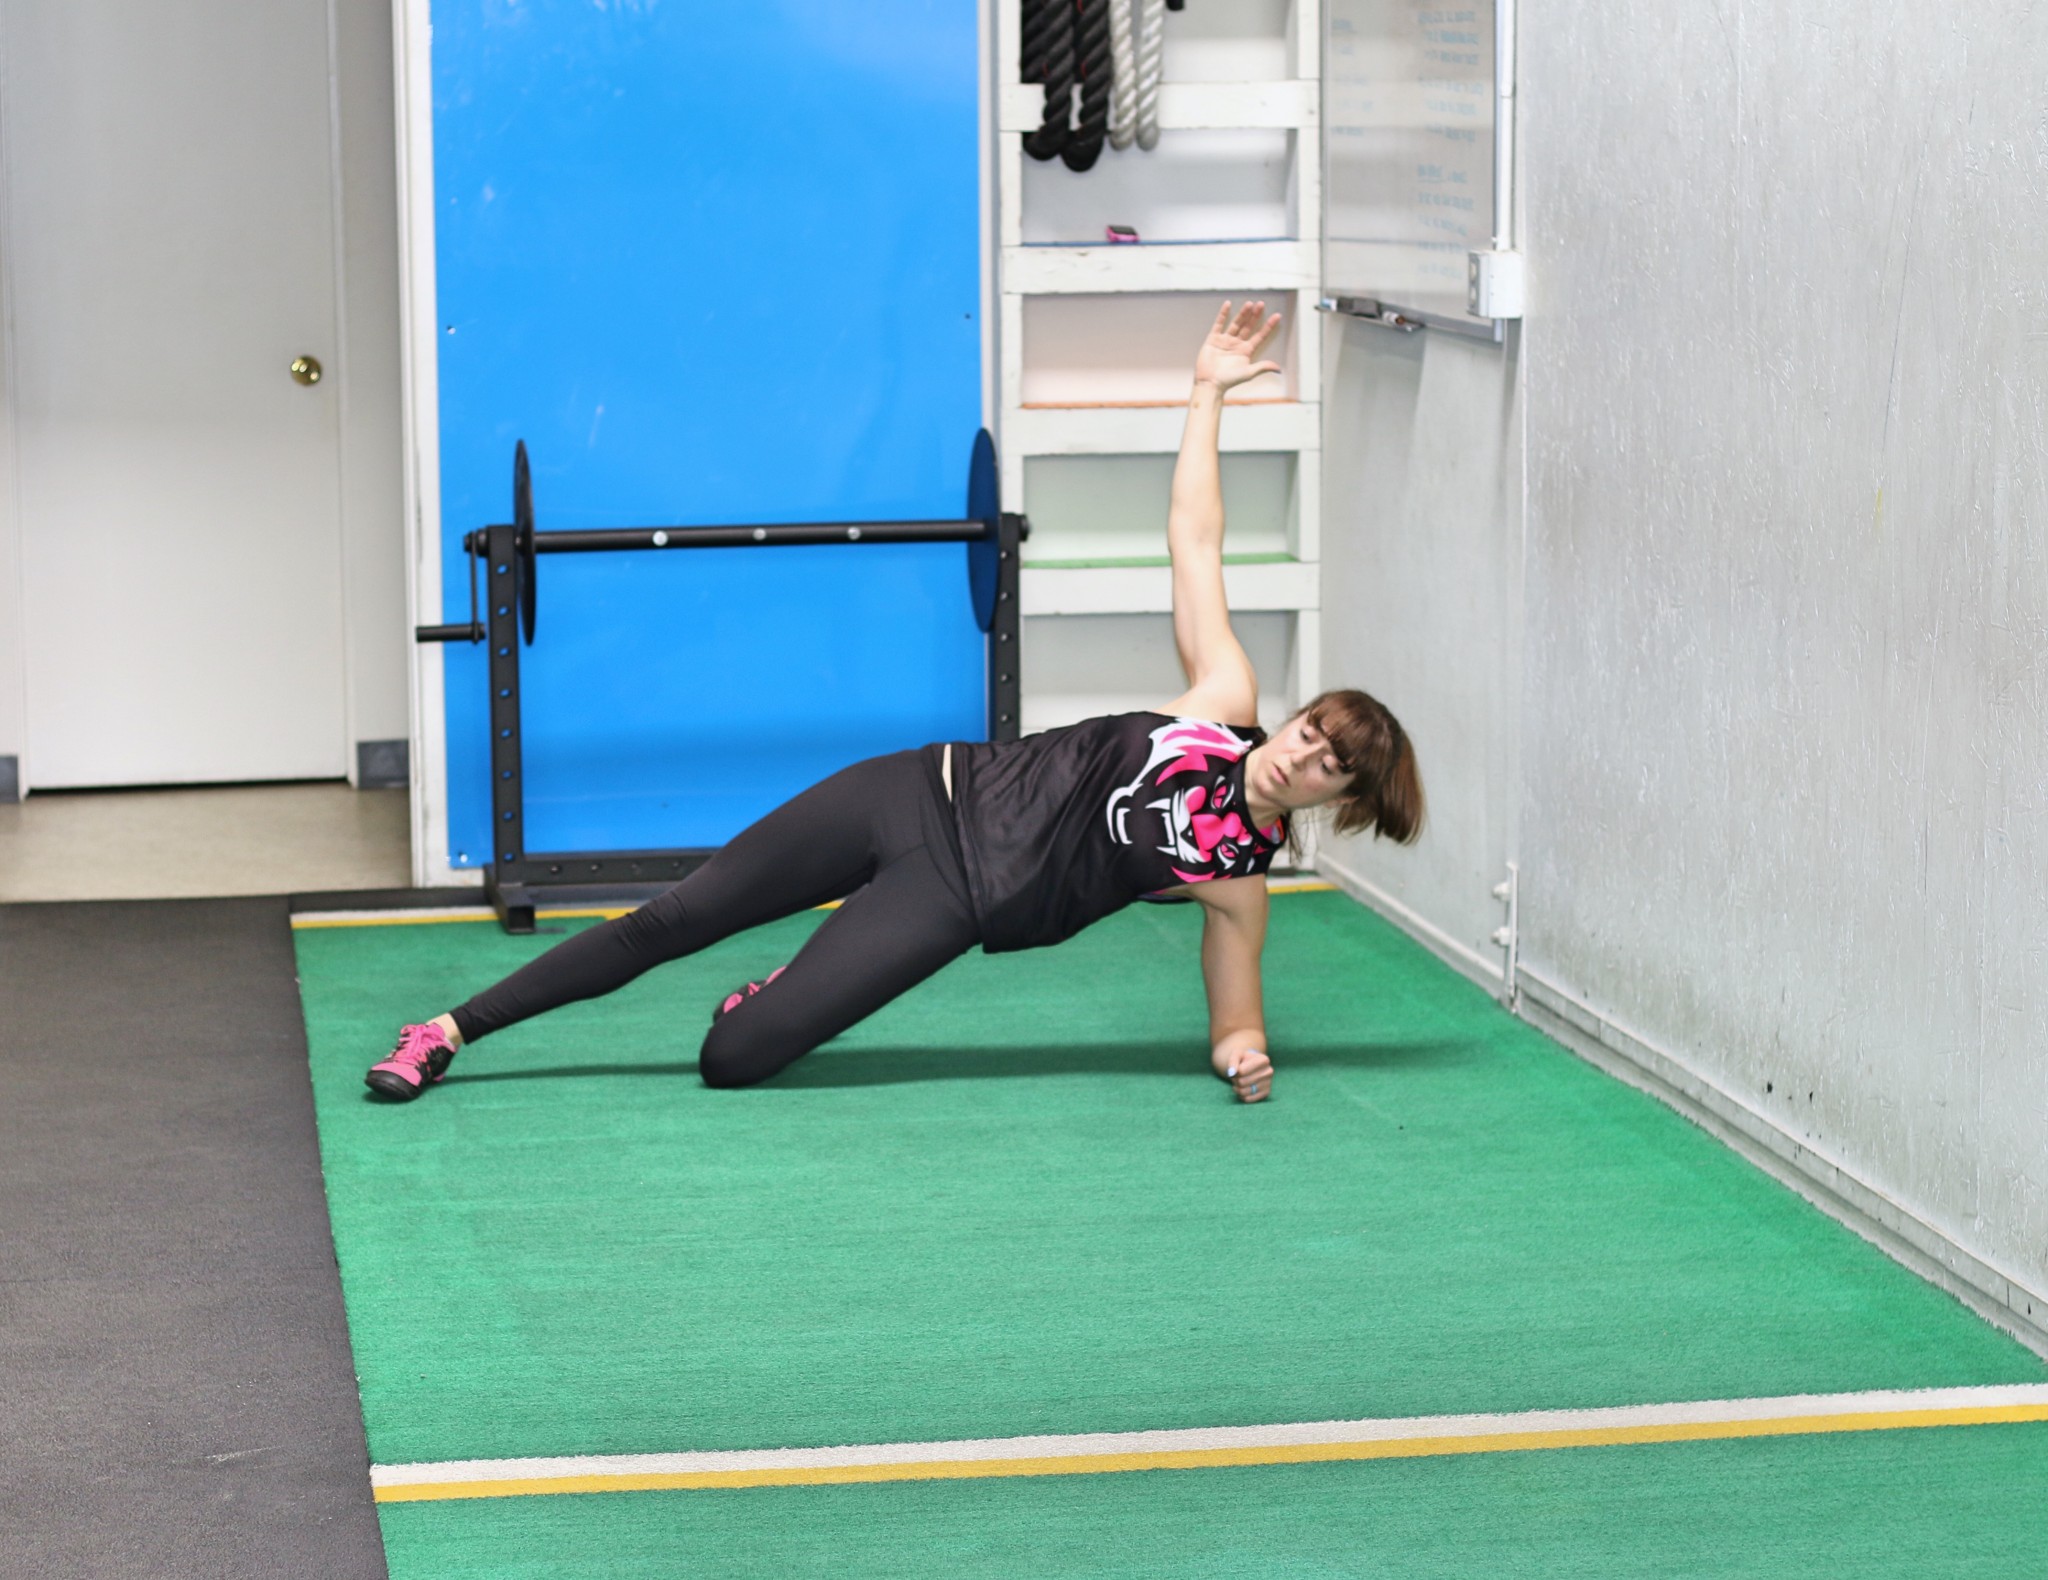
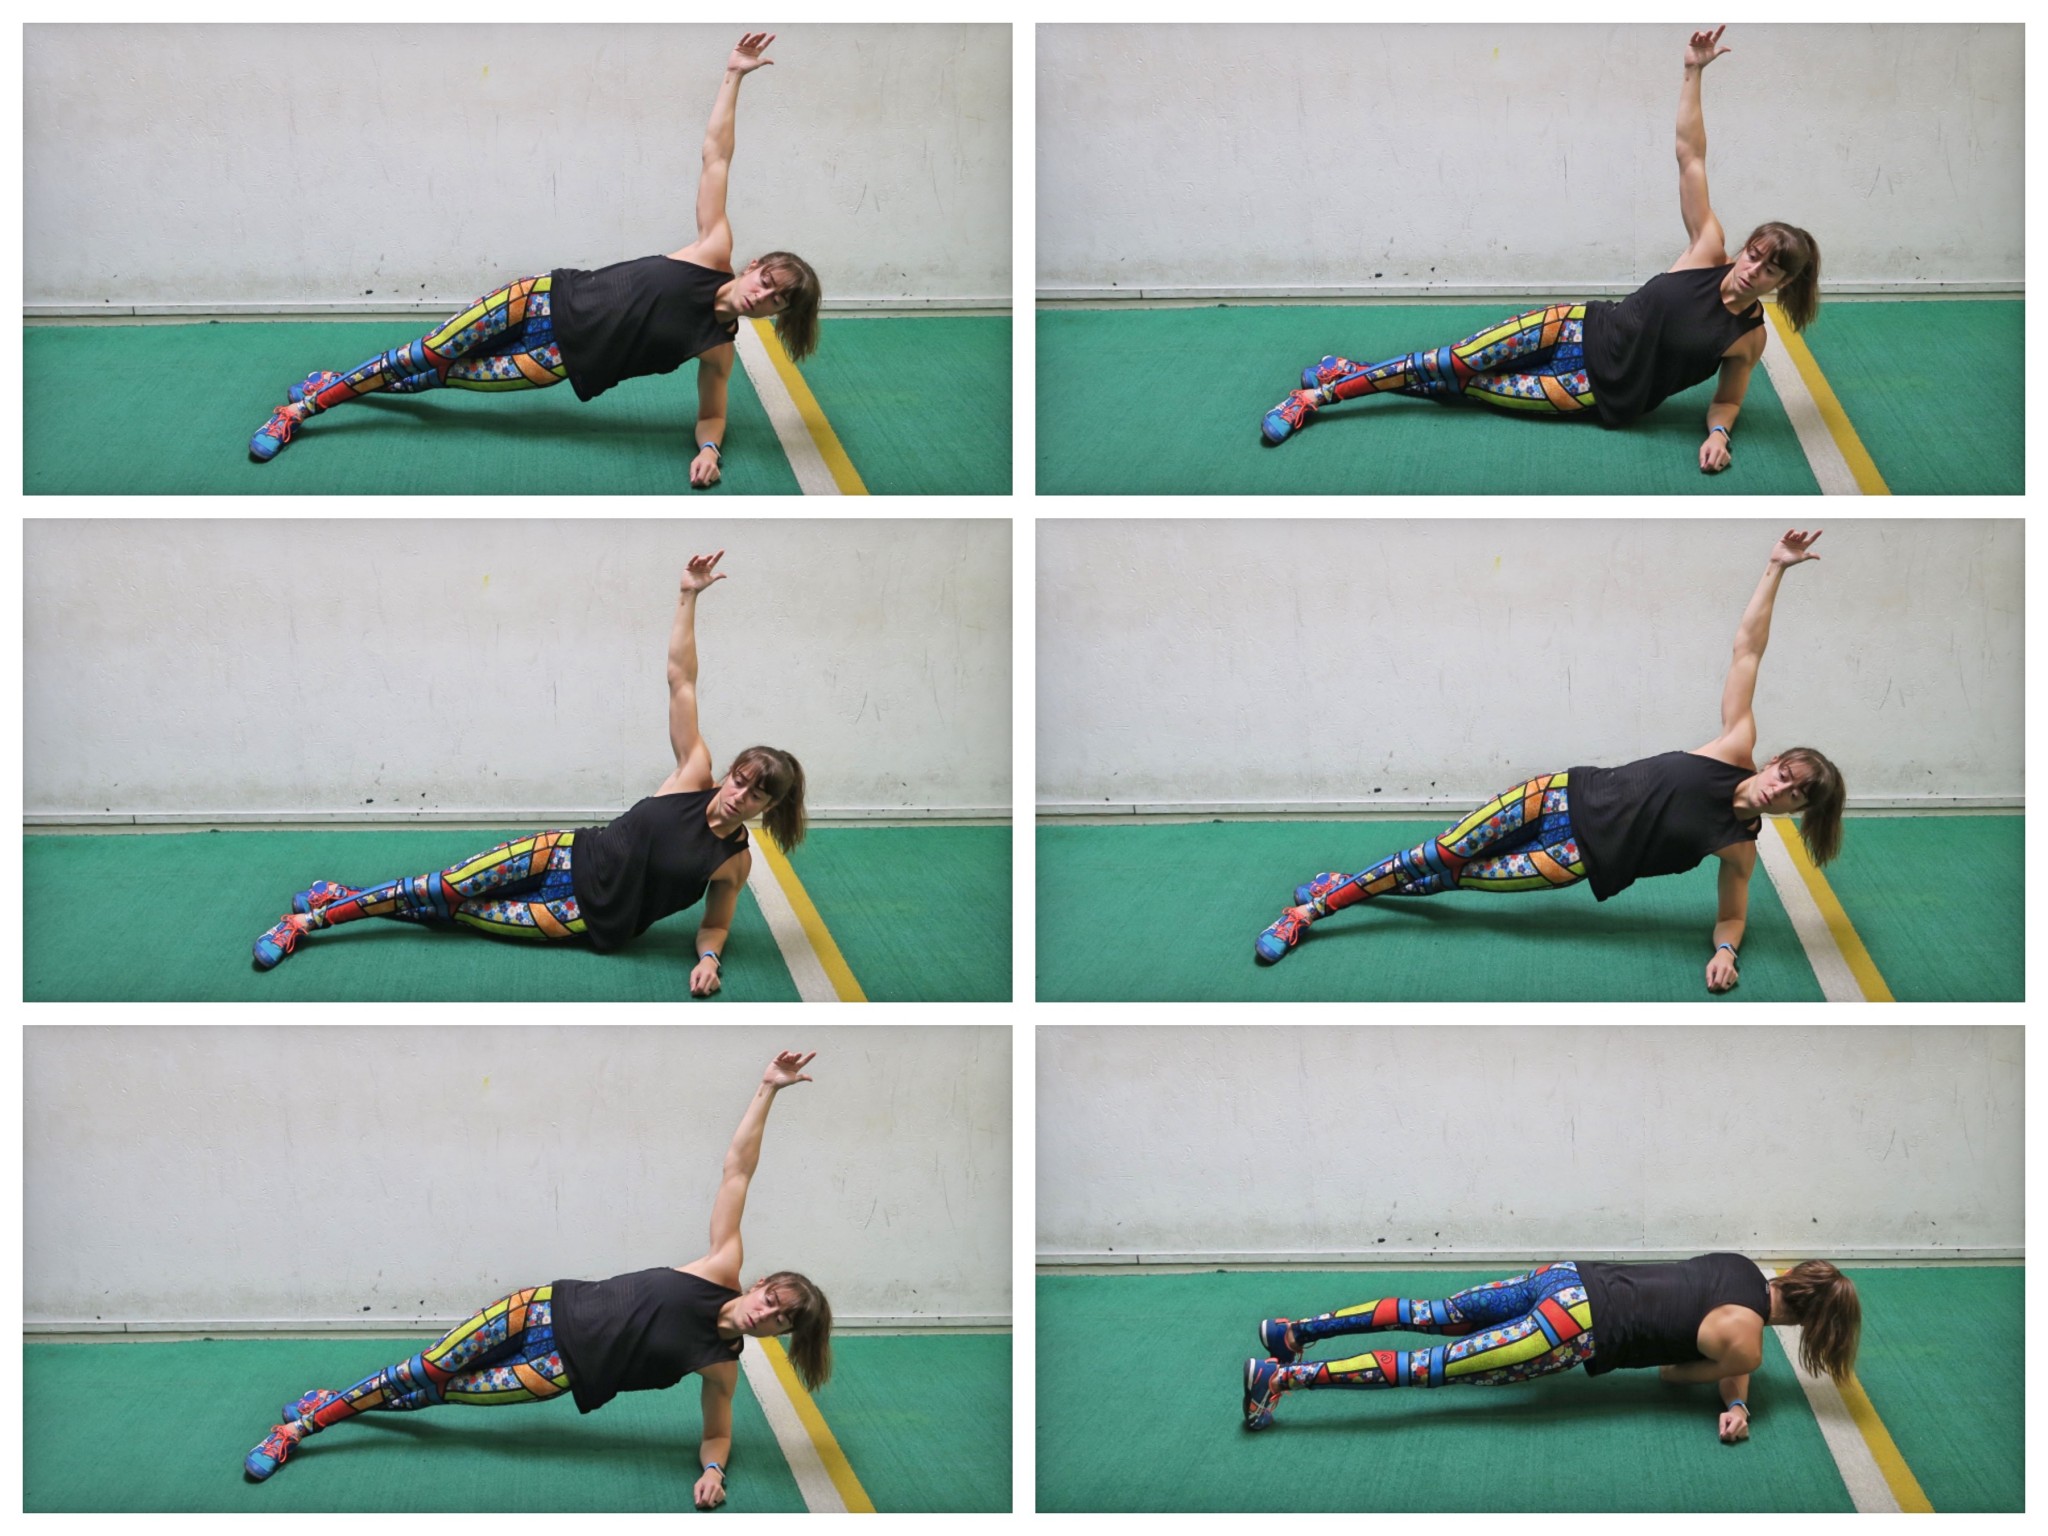
Side Plank Hip Dips with Rotational Reach:
To do Side Plank Hip Dips with Rotational Reach, set up in a side plank from your forearm with your feet unstacked and your top leg in front of your bottom leg. Make sure your elbow is under your shoulder so you can engage your back to support your shoulder instead of just using your shoulder and even irritating your neck.
Then perform two hip dips, dropping your hip down to the ground before lifting back up into the side plank. Do not let your chest rotate toward the ground and really use that bottom side to lift back up as high as you can. Do not relax on the ground when you lower though.
After performing the two dips, reach your top hand down toward the ground and under your body as if reaching for the wall on the other side. As you reach under, pivot your feet as if moving into a front plank. Reach under then rotate back open into the side plank and repeat the hip dips.
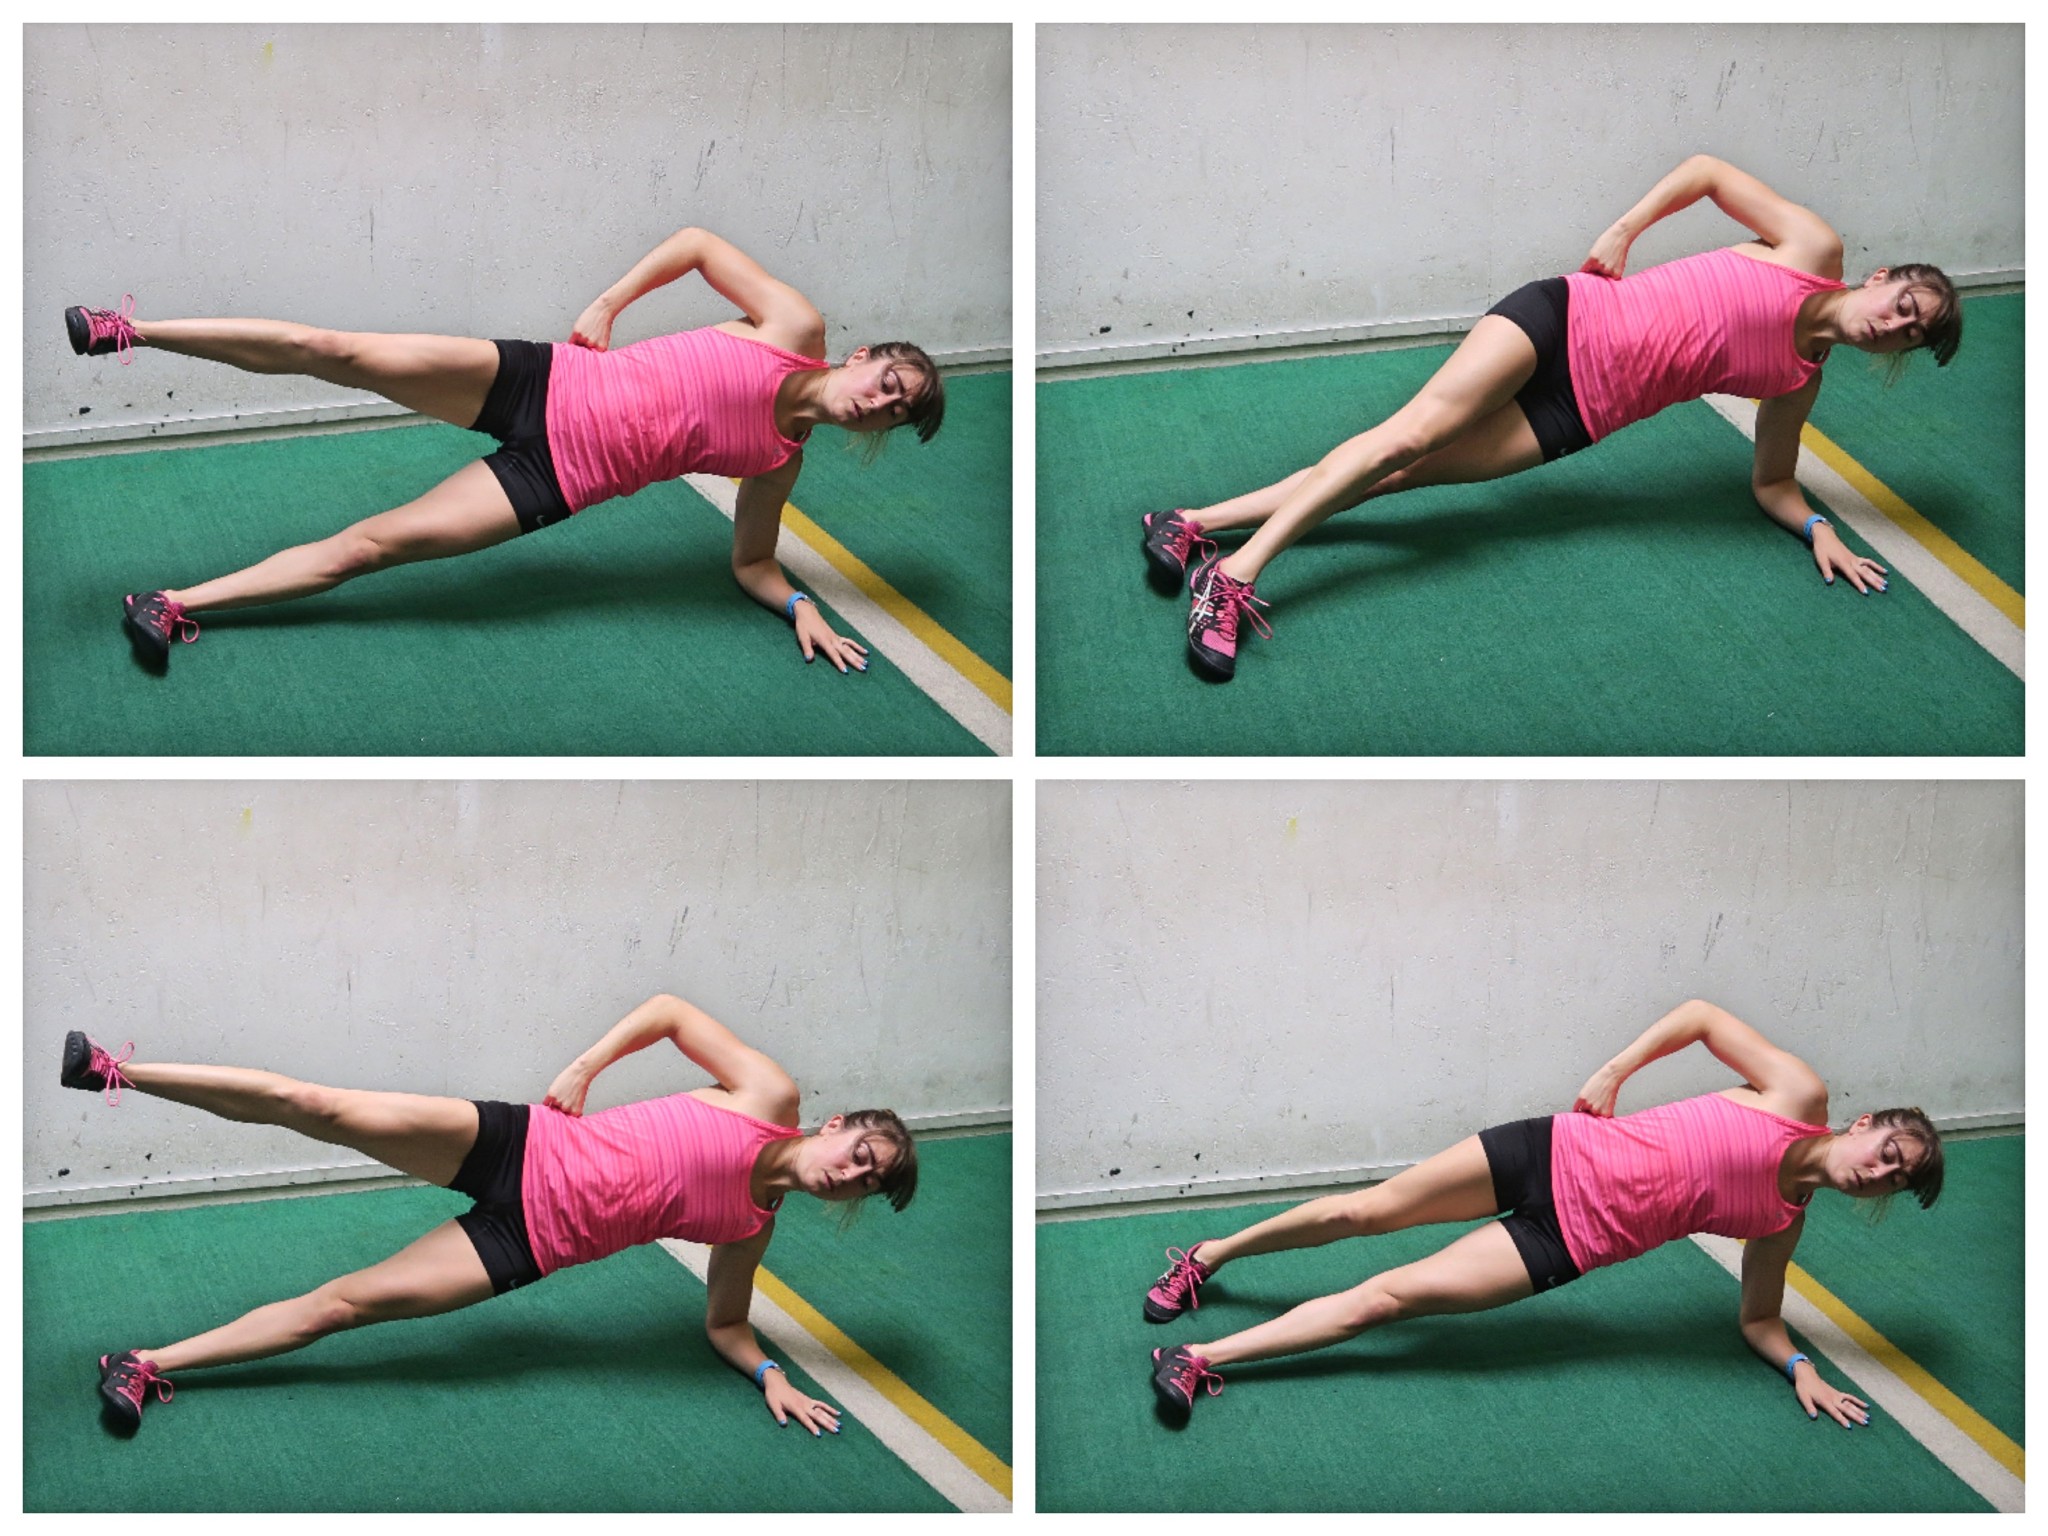
Side Plank with Front and Back Toe Touches:
To do the Side Plank Front to Back Toe Touch, set up on your side and prop yourself up on your forearm with your elbow right below your shoulder. Your legs should be out straight and feet stacked. Then, driving through your forearm and the sides of your feet, lift your bottom hip up off the ground as high as possible while keeping your body in a nice straight line.
Squeeze your belly button in toward your spine and keep your glutes tight. Do not let your chest rotate forward toward the ground or your top hand touch the ground. Keep your top hand on your hip or reach it up toward the ceiling.
Then, holding the Side Plank, lift your top leg up toward the ceiling, then bring it forward to lower down and tap the ground in front of you. Raise it back up center then lower down to tap the ground behind you. Move slowly, lifting and lower with taps front and back.
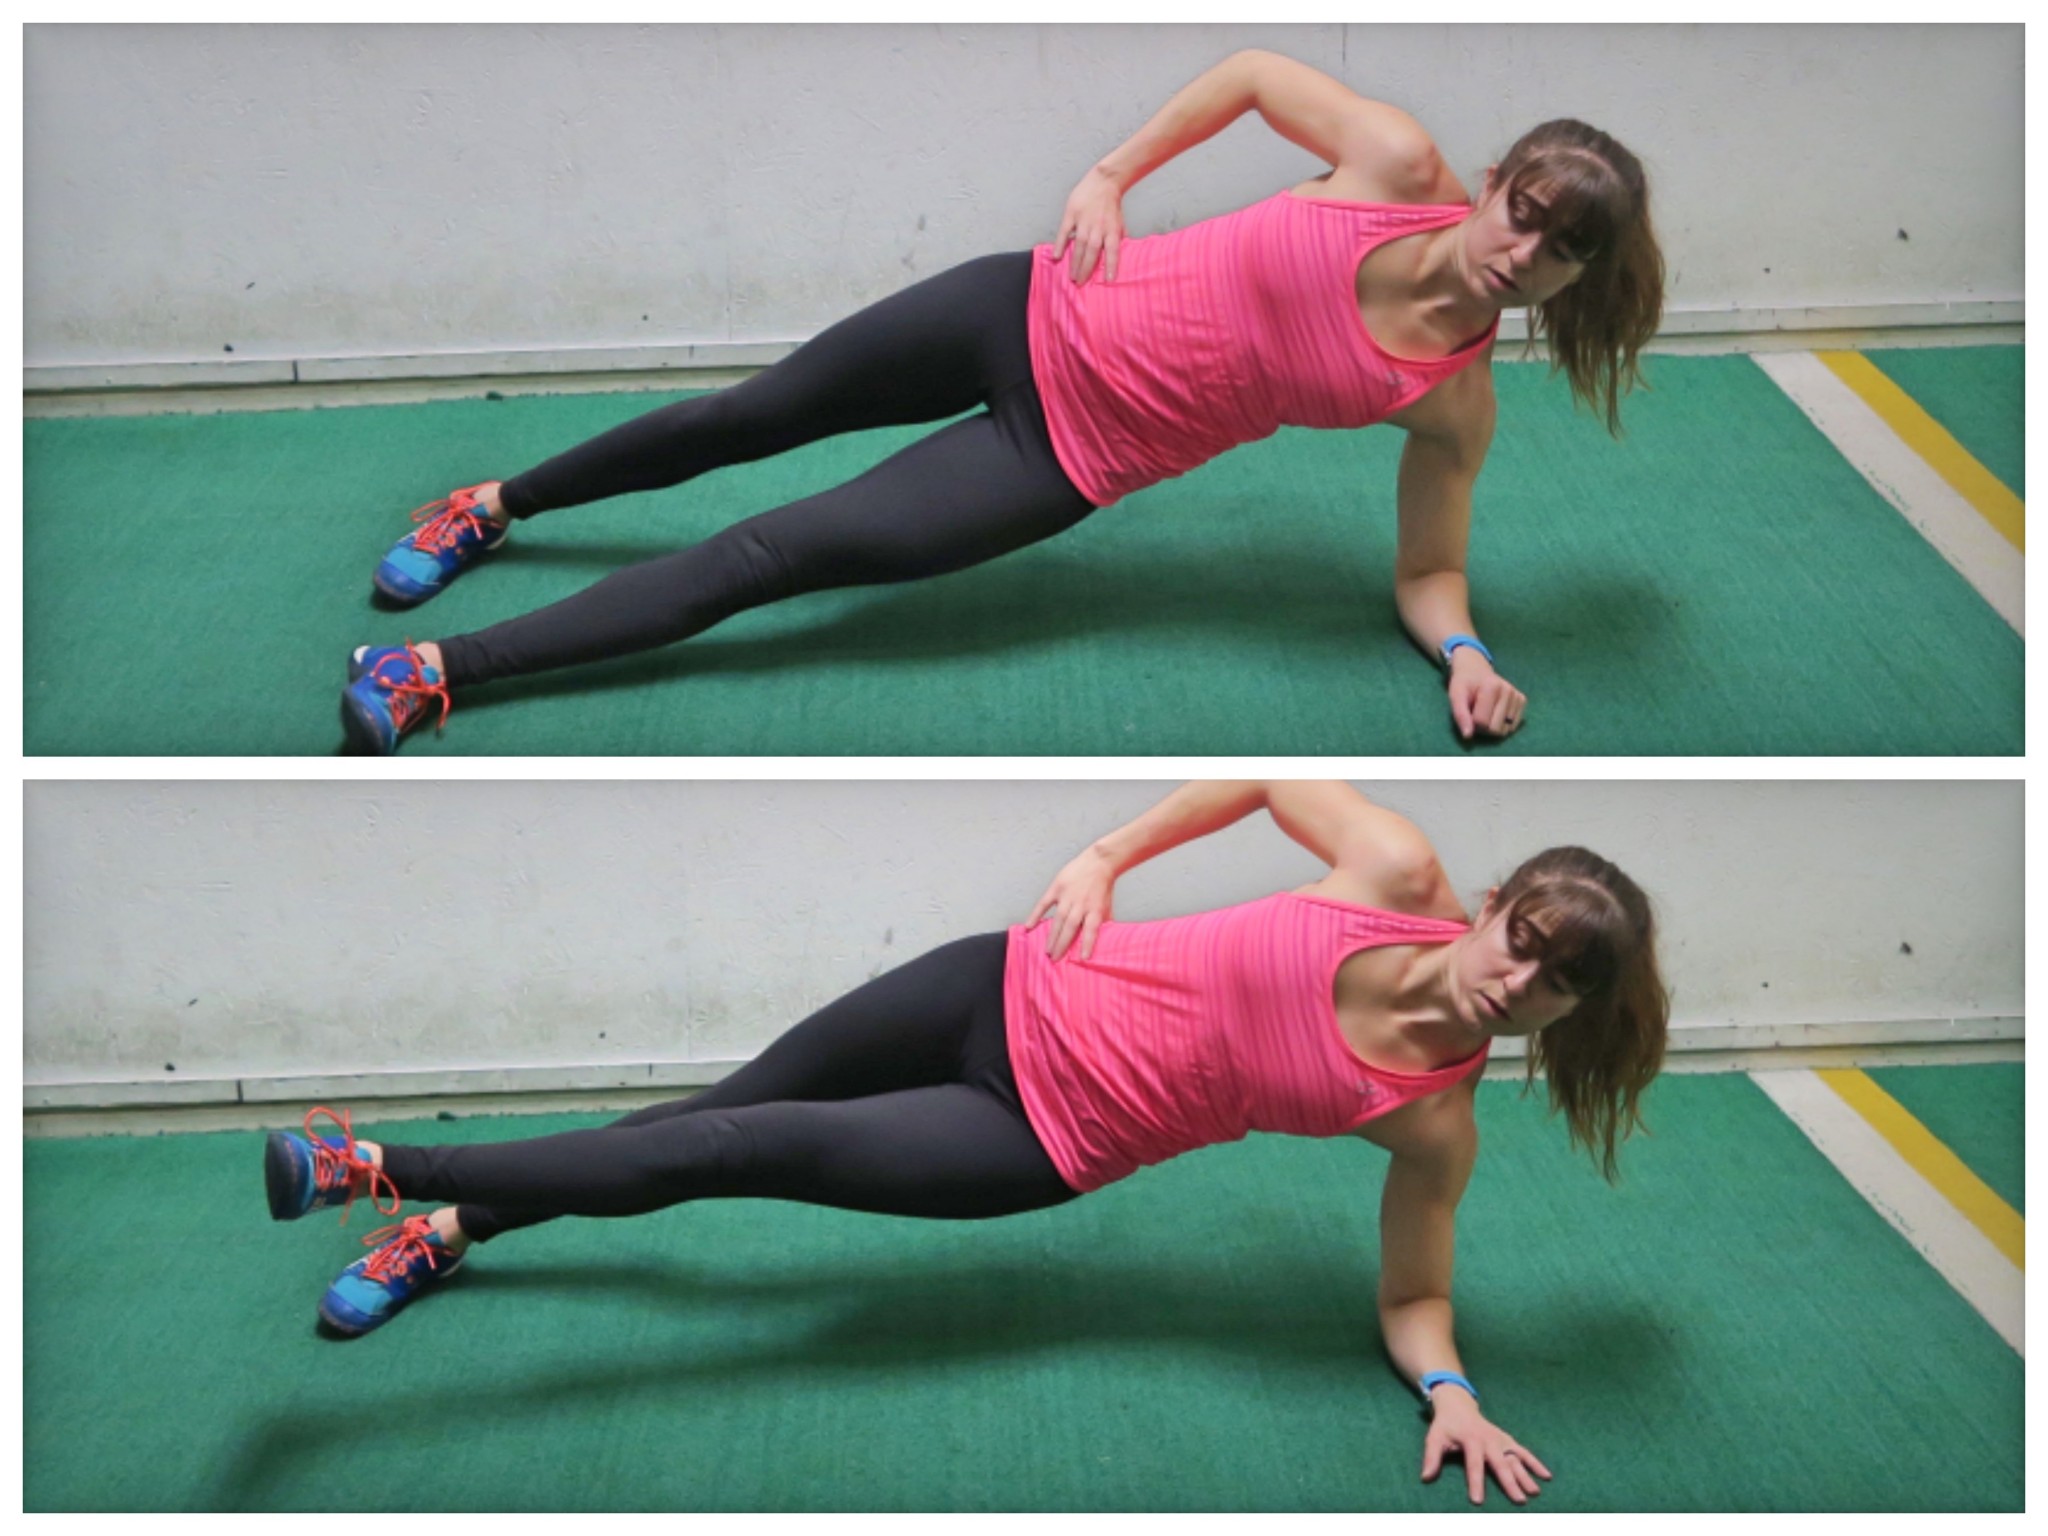
Side Plank Adductor Lift:
To do the Side Plank Adductor Raise, set up in a side plank from your forearm and feet. You will want you elbow to be under your shoulder and your feet unstacked with your bottom foot in front and even slightly angled forward. Lift up into the side plank position with your top hand on your hip and your chest not rotated toward the ground. Drive through the sides of your feet and flex your feet to engage even your lower leg.
Holding this position, lift and lower that bottom leg, raising it up a few inches then putting it back down at a controlled pace. Stay up in the side plank the entire time and don’t let your hips sag. Do not place your top hand down to assisted.
Side Plank Tree Pose:
To do Side Plank Tree Pose, set up in a forearm side plank with your elbow under your shoulders and legs out straight and stacked. Flex your feet to create tension all the way down your leg.
Lift up into the side plank position and bend your top leg and place your foot flat on the inside of your upper thigh. Open your top knee up toward the ceiling and squeeze your butt as you drive your foot into your leg and keep your bottom hip up. Try not to rock open or rotate toward the ground.
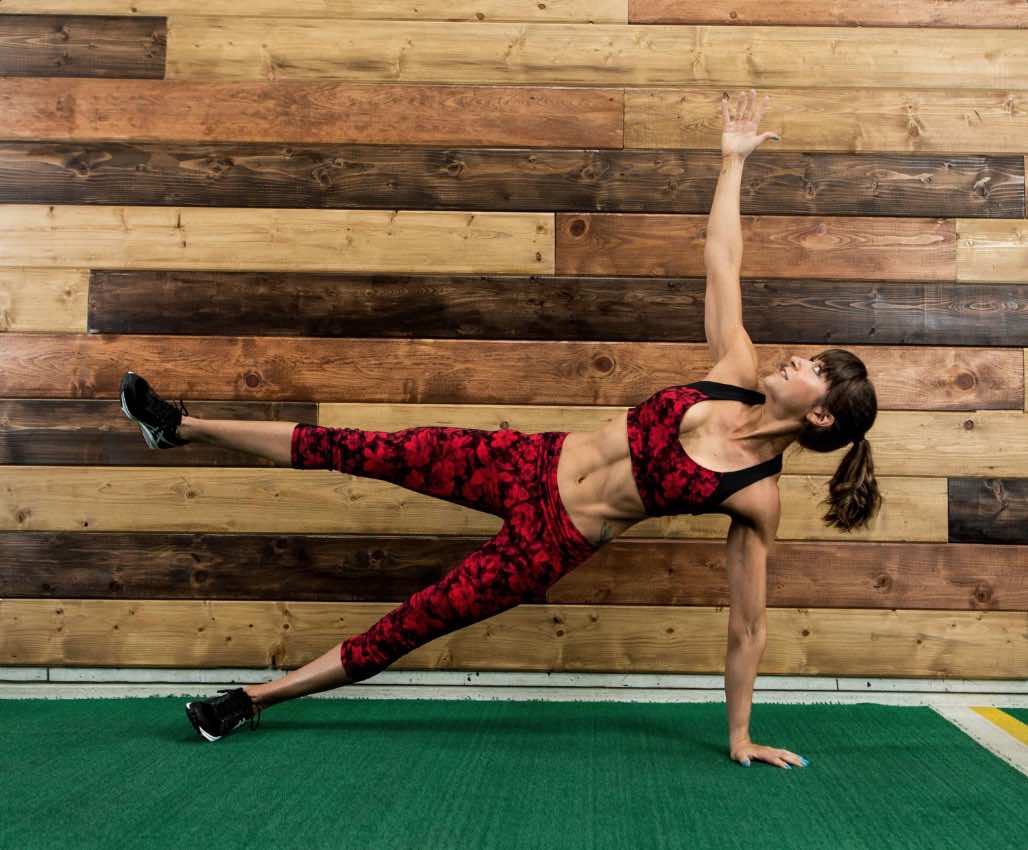
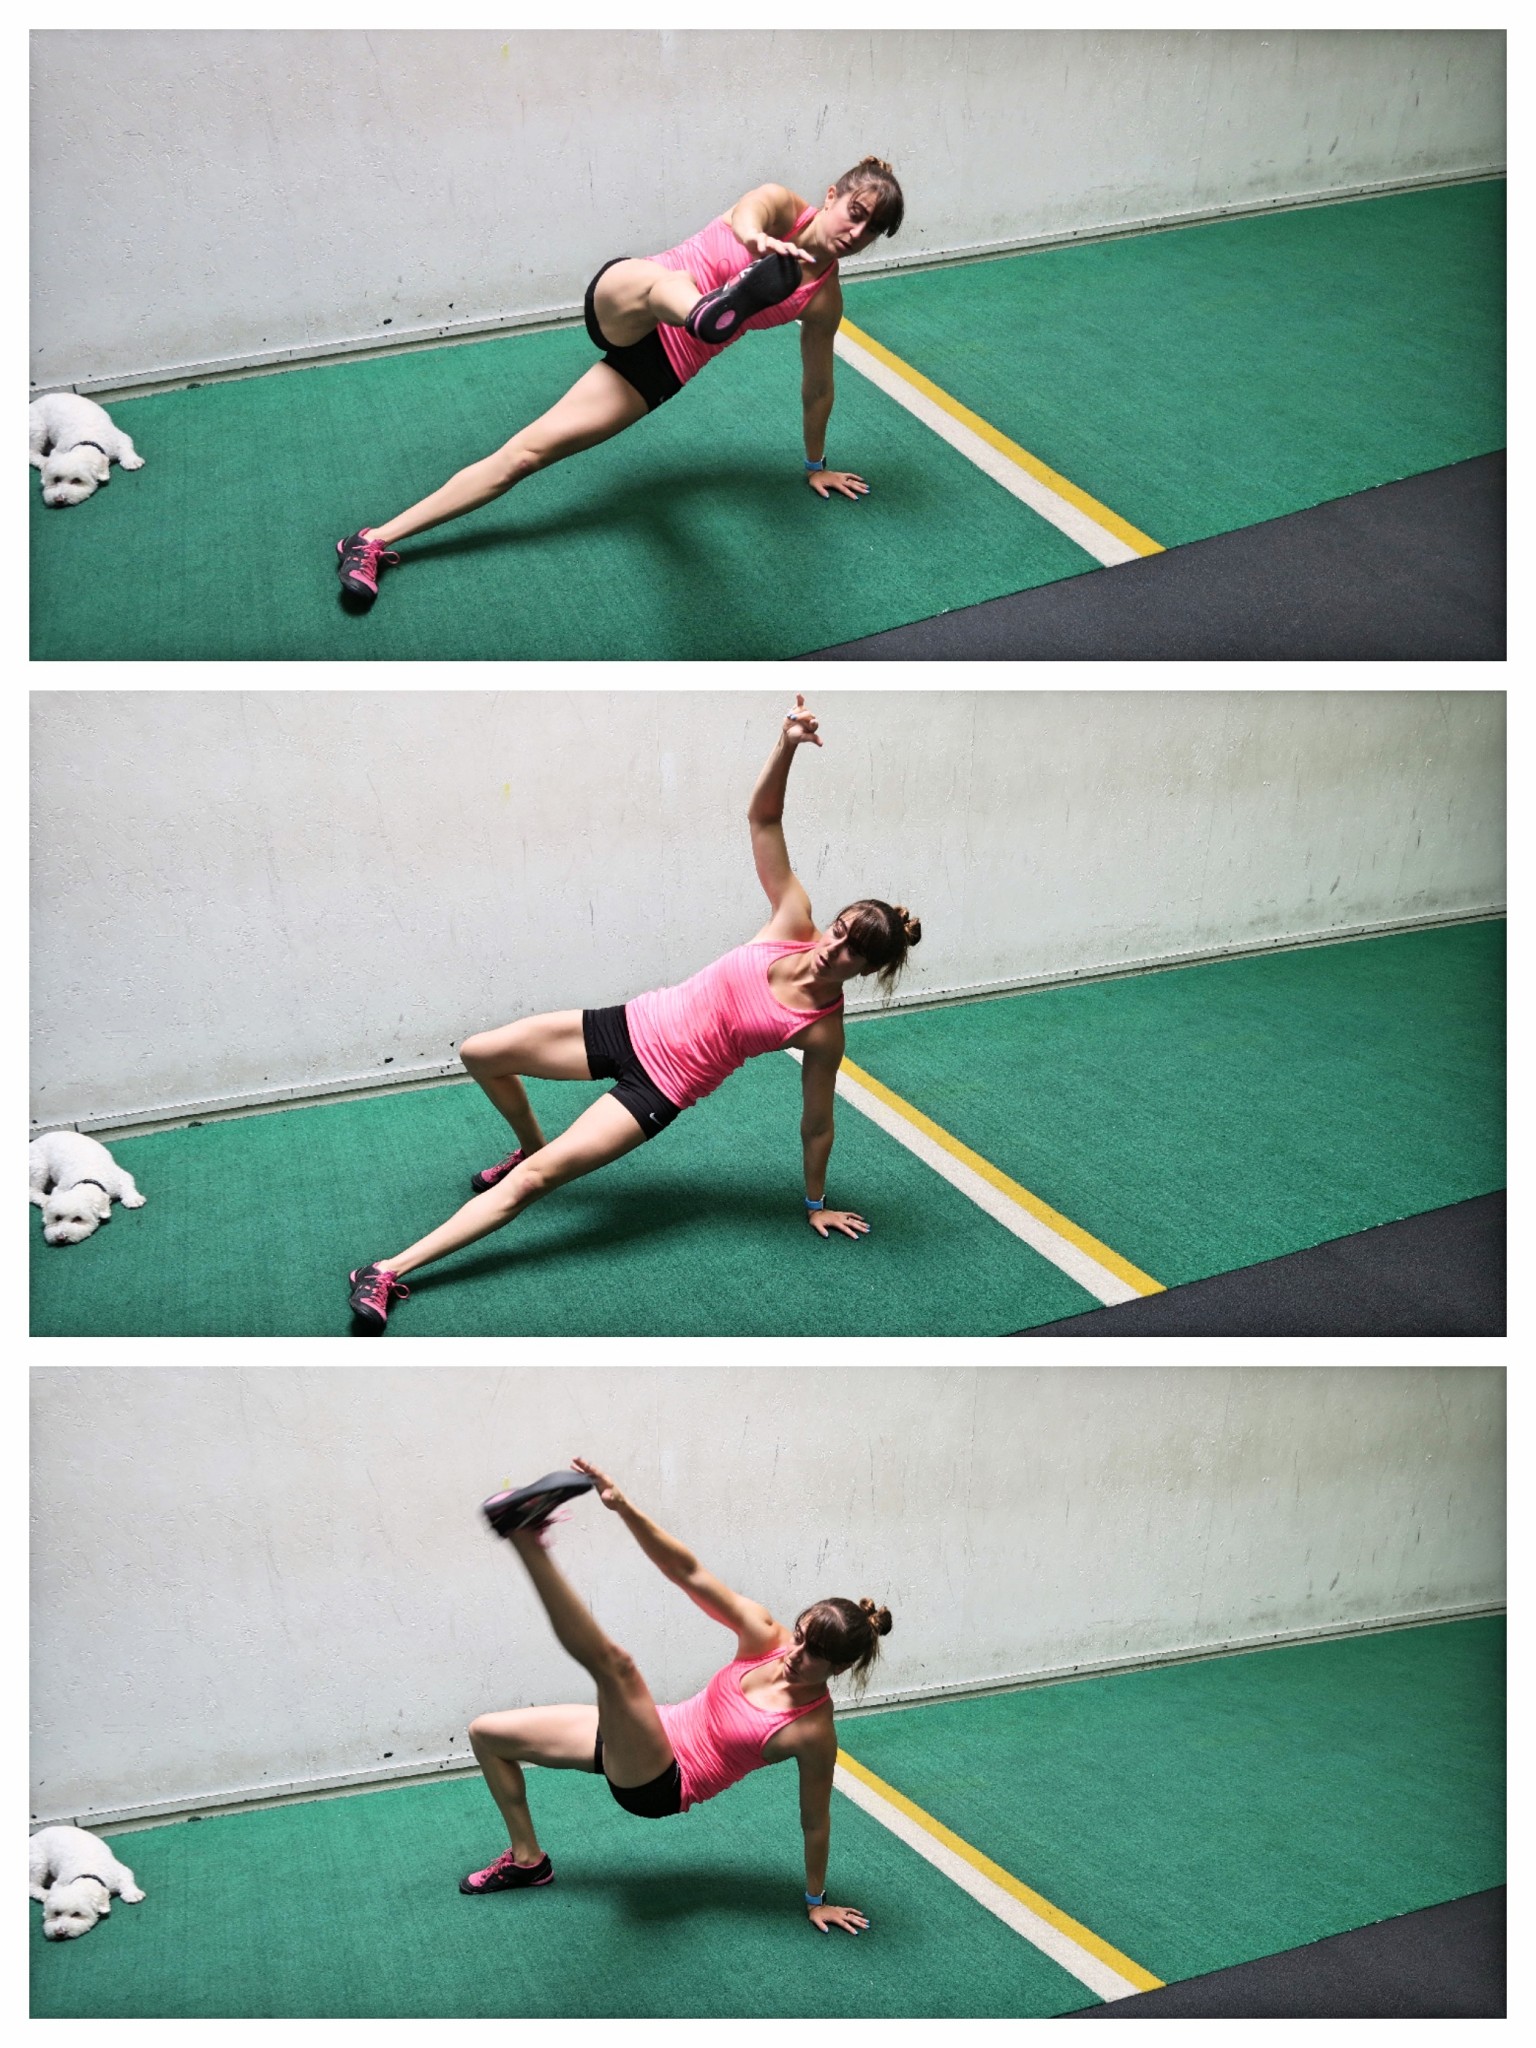
Side Plank to Tabletop Toe Touch:
To do the Tabletop to Side Plank Kick, it may be easiest to set up first in the side plank from your hand. Stack your feet and engage your back to support your shoulder. You can reach your top hand overhead.
From the side plank position, lift your top leg up and kick it forward as you reach your raise hand to touch it. After touching your hand to your foot, straighten them back out.
And as you bring your arm back out and straighten your leg back out toward the side plank position, bend your knee, rotating your body open toward the ceiling as you put that foot on the ground behind. You will move into an almost turkish bridge position.
From here, raise your straight leg up (the one that was your bottom leg in the side plank) and reach the opposite hand to touch your toe. You are doing a kick from a tabletop position and reaching your hand to touch your toe.
Place the straight leg back down and move back into the side plank position and kick the top leg forward as you reach to touch your toe to repeat the move.
Love these Side Plank Variations and want even more fun ones? Ready for a strong, lean core that not only looks amazing but keeps you injury free? Learn more HERE!
by Cori Lefkowith | Jan 23, 2018 | Blog, Functional Fitness
What if I told you longer workouts AREN’T better?
Because…guess what?
They’re NOT!
Length seems to be the main reason why people either feel they DESERVE results OR the reason why they think they’ll never get them
All too often people come to me telling me about all the hours they spend in the gym, wondering why they aren’t getting the results they want.
Or they’ll tell me they just will never be able to get results because they can’t spend hours at the gym.
But guess what?!
Spending hours at the gym IS NOT the secret to success!
Actually SHORTER may often help us achieve BETTER results in less time and it has to do with a term that has become very sexy in fitness – the AFTER BURN.
You know the only reason someone may need to workout longer in my opinion?
They are training for something SPECIFIC…like a marathon where they will have to run for hours.
Other than that…You’ll get way more benefit from focusing on your INTENSITY over the length of your workout.
Because upping your intensity is what gets you better results in less time.
You can get killer results from shorter workouts AND they are way easier to fit into even the busiest of schedules!
But intensity doesn’t just mean rushing through your workout and pushing hard carelessly.
NOPE!
You’ve still got to be SMART with your training.
Turning up your intensity means not only using HIIT or high intensity interval training, but also hybrid exercises WHILE focusing on the right muscles working.
Intensity comes from CHALLENGE yourself during the time you do have to workout.
If you challenge your body to “max out” by doing harder variations, taking less rest, adding more weight…you don’t need to go longer! (I put “max out” in quotes as you want to make sure the right muscles are working to fatigue instead of compensating just to make it through.)
Heck, longer workouts can actually sometimes even work against you.
Long steady state cardio can be catabolic to muscle tissue and intensity and length are inversely proportional.
If you are working out longer your intensity has to go down OR has to start lower in the first place. The only way to workout for hours and keep your intensity high is with longer rests between.
So not only can longer, steady state cardio be catabolic to muscle tissue but a focus on length means you CAN’T focus on intensity.
Plus, often when we get focused on the length of our workout, we stop focusing on the muscles that should be working and instead focus on “just getting through the workout.”
And let me tell you, you need to make sure the RIGHT muscles are powering the movements or you’ll just end up injured!
When the right muscles are working, you’ll get more out of the exercises you include AND be able to go harder.
As I mentioned before it isn’t just HIIT and hybrid exercises that affect intensity but also focusing on the right muscles working.
You need to get the right muscles working, and THINK about the right muscles working during your workout. It is a key part of upping your intensity so you can spend less time in the gym BUT get better results.
But why is INTENSITY so key? And how can it help you get better results in less time?
Well…intensity helps us get more bang for our buck not only WHILE we are at the gym, building muscle and burning more calories, but also even AFTER we leave the gym.
By focusing on INTENSITY at the gym, we can create more muscle damage to create more muscle growth (which in turn means burning more calories even at rest). AND we can work more muscles at once, using hybrid exercises, to burn more calories in less time!
Upping our intensity can also help us burn more calories for even 24 hours after our workouts are over.
How can upping your intensity do this?
Through what is sexily called the AFTER BURN!
The After Burn is technically called EPOC or excess post-exercise oxygen consumption.
EPOC is not as sexy sounding as the AFTER BURN hehe…so we will call it the After Burn.
How does it work?
Basically…The harder you workout the more your body has to work to recover or return to homeostasis after. AKA the higher the intensity of our workout, the more energy we have to expend during the recovery process to return to our resting state.
This means we continue to burn calories even AFTER the workout is over. Hence the name AFTER BURN.
And INTENSITY is the secret to the After Burn.
Remember there are a number of ways to increase your intensity…
You can use HIIT to increase your intensity. Go all out for an interval of work (such as 20, 30 even 40 seconds) and follow that intense bout of work with a short, or even ACTIVE rest periods.
You can’t go all out for long, which is why the rest is needed to keep your intensity up. However, by keeping the rest short or “active,” you can get more bang for your buck in less time. Through HIIT, you force your body to use not only anaerobic but aerobic pathways to create energy, increasing your oxygen debt.
You can use Hybrid Exercises. Working more muscle groups, and larger muscles groups at once, you can not only burn more calories during your workout, but create more muscle tissue breakdown. This can not only help you grow stronger, but will also force your body to expend more energy to recover and repair that “damaged” muscle tissue.
You can CHALLENGE yourself with weights, harder exercise variations and even different tempos. You can place a greater demand on your body by challenging yourself with harder weights, more advanced variations or even more time under tension. All can create more muscle tissue breakdown and increase your energy demands!
You can focus on the right muscles working! This seems like a random one, BUT all too often when we start working out harder and trying to go more intense, we start allowing muscles to compensate as we fatigue, which means we start to perform poor movement patterns.
Not only does this put us at risk for injury, but compensations are also our body’s way of not really engaging and working as hard as they should be. AKA we won’t get as much out of the workout as we want!
For example…a common compensation is our low back working INSTEAD of our glutes and abs. When this occurs not only do we risk low back injury, BUT two important muscle groups aren’t getting the workout they should be getting. AND our glutes are a HUGE muscle group that would only help increase our calorie burn IF they were actually working!
By using these techniques and tips, you can up your intensity so you don’t have to spend as long in the gym to get killer results.
And by increasing your intensity you can get the same After Burn as someone spending hours upon hours working out! Heck, with just a 20 minute intense workout you can get better results than your friend chugging along for hours in the gym!
So by upping our intensity we can increase the AFTER BURN while spending LESS TIME at the gym.
Win win…RIGHT!?
Less time. Better results?!
That means you DO have time to get killer results and can even potentially get BETTER results spending less time in the gym if you are EFFICIENT with your workouts.
Remember it is all about developing a routine and getting consistent as you maximize the time you DO HAVE.
Learn more about how 10-minutes may be all you need to kickstart your results!
Can you really get results from 10-minutes?!
by Cori Lefkowith | Jan 18, 2018 | Blog, Bodyweight, Butt, Workouts
Bridges are a MUST-DO….I mean MUST-DO glute activation move.
They help you improve your hip extension to unlock tight hips as they activate. And all you need is your own bodyweight to start feeling those glute works.
Plus glute bridges are even a great move to start working your abs. By engaging your abs with a posterior pelvic tilt, not only can you activate those core intrinsic stabilizers, but you can actually help get a better glute contraction!
So if you’re ready to loosen up tight hips and activate your glutes, try this Bridge Booty Burner from my 28-Day Booty Burner Series! (BONUS: Some of these bridges will also open up your chest and shoulders to reverse that hunched posture we spend way too much time in during the day!)
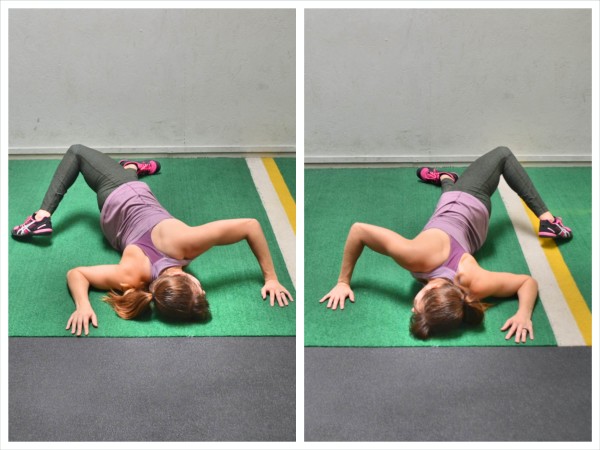
Bridge Booty Burner
Complete 2-4 rounds of the burner below. If you are using it as a warm up, even just 1-2 rounds is all you need! Rest up to 45 seconds between rounds if needed. Make sure your glutes are working. If your low back or hamstrings start to take over, pause or rest to make sure your glutes keep doing the work!
CIRCUIT:
5 reps per side Sit Thru to Thoracic Bridge
10 reps Camel Bridge
15 reps Tabletop Bridge
20 reps Glute Bridge
5 Signs That Your Hips Are Locked Up And Glutes Are Inactive…