by Cori Lefkowith | Mar 31, 2018 | Blog, Diet
Tracking your food SUCKS. It’s the worst.
BUT it is also the BEST way to learn how to eat well and really understand what proper nutrition looks like so you can learn to eat intuitively.
Tracking is like studying for a test. You don’t want to do it. But you’ve got to if you want to really learn and understand the material.
When you study, you’ve got to read and take notes. You take practice tests even and review to really start to learn the information and soak it all in.
BUT hopefully over time studying, you begin to understand the principles and aren’t constantly needing to research or seek out the answers. You’re ready for your test because the information has become INGRAINED and LEARNED.
Same goes for tracking.
You track to LEARN how foods affect you.
What portions sizes really are.
To KNOW what you’re really eating…Because trust me…All too often we don’t really understand what makes up the foods we are eating.
How many hidden carbs there are. Or how many foods have more fat in them than we realize.
We’re not really aware of our macros.
And sometimes we aren’t even fully conscious of how many little “bites” of something we take throughout the day.
Tracking helps us truly understand what we are doing so we can learn from it and make the necessary changes.
Changes we couldn’t make without tracking because we’d only be able to really say “Well, I’m focused on eating whole natural foods and I eat generally well while watching my portions.”
We need something MEASURABLE.
When you have something measurable, something that tells you what is truly going on, you can then more easily make changes. You can realize what you haven’t yet learned how to do.
You can see the answers you may have been missing!
You TRACK to “STUDY.” But at some point this becomes information you KNOW.
The thing is…you can’t just skip ahead to the test!
So as much as tracking may be annoying, it’s only a few minutes out of your day that becomes easier over time.
Any change is hard. But you have to give it a chance.
It’s the way to ensure you get that A+ on your test AKA actually get the results you’re looking for! 😉
That’s why I recommend all of my clients track what they eat. It’s the best way to learn to understand macros and help yourself get the results you’re looking for!
Learn why understanding MACROS is the key to making ANY diet work!
Learn how to take control of your diet!
by Cori Lefkowith | Mar 29, 2018 | Blog, Pain Relief
You get injured…
What is often the first thing you are told to do?
REST!
When someone gets injured, the “safe” thing to say is “Rest it.”
But REST is OVERRATED when it comes to preventing and alleviating injuries.
Now I’m not talking about recovery from workouts or days off during the week.
I’m talking about the fact that anytime someone gets injured, the answer is “Well rest it.”
And don’t get me wrong, certain injuries do need rest.
But rest doesn’t CORRECT the problem. It doesn’t deal with the initial compensation and movement distortions that LED to the injury.
Resting until it feels better and then returning to the exact same poopy movement patterns you were doing before?
Well that is just a recipe to end up injured again!
But that is what happens.
When we are prescribed “rest,” it SHOULDN’T mean doing nothing.
Rest should mean going back to basics and starting to CORRECT the movement patterns that lead to imbalances and compensation and OVERLOAD.
Yea…take time off from the things you are doing wrong. Take time off from OVERLOADING the same area.
But during that time off, work on FIXING the problem.
Start foam rolling overactive muscles. Start working on mobility of other joints that may not have the mobility they should.
Build up supporting muscles and start getting the right muscles working with basic, fundamental movements.
Take this time when you’re RESTING as time to go back to basics, which we never seem to want to do when we are healthy. (Or at least we often get lazy about doing.)
You know how clients don’t actually want to take time off even when they should? Well use that to your advantage and make them do the stuff they need to do to move better!
They can feel like they are at least doing something then AND you’ll make their “REST” actually help prevent the injury from returning!
Plus, exercise actually PROMOTES tissues healing!
Tissues need to be loaded to get stronger and handle day to day tasks and loads. Resting completely takes away any loading to basically every part of your body.
And guess what that means if you aren’t doing any work or load for your body? Your tissues actually get smaller and weaker, which is the OPPOSITE of what you want to happen.
On top of working to correct the imbalances and compensations, you also need to keep your body strong by adding appropriate amounts of load as you are ready so the areas can rebuild strength and stability.
For instance, rehabbing a shoulder injury?
Maybe a plank from the ground isn’t right at that time, BUT instead of doing nothing, your trainer or physio may have you do a plank off an incline. This can train you to engage muscles correctly and add a load your shoulder can handle!
The point is to fix poor movements to prevent future overload, restore proper mobility and regress to REBUILD those weak areas NOT just take time off so everything gets weaker and the pain goes away.
So remember REST doesn’t have to mean sitting on your couch doing nothing. Rest can mean correcting the poor movement patterns and imbalances that led to your injury in the first place!
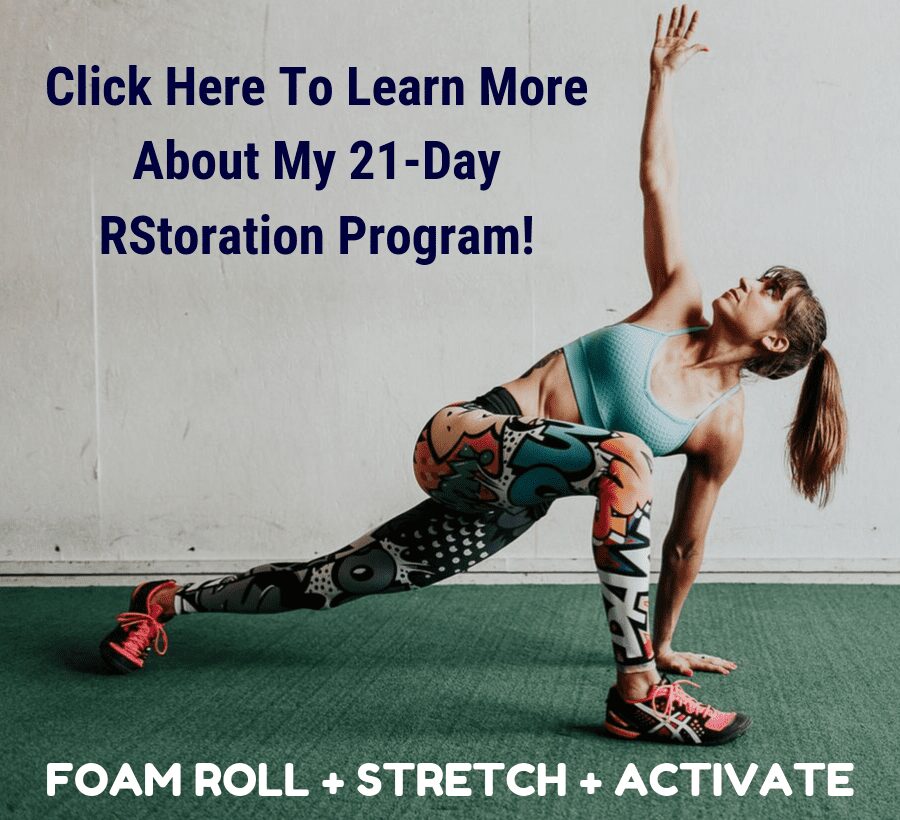
And if you need help with the 3-part process to eliminate aches and pains, you should check out my RStoration program.
by Cori Lefkowith | Mar 22, 2018 | Blog, Bodyweight, Butt, Core, Workouts
Building a strong core means getting your abs and glutes firing properly. It means using moves that target your abs and glutes in a way that you can focus on them working before integrating them into more compound moves.
BUT it isn’t just about activating and then integrating.
It is also key that you correct imbalances to make sure your lumbo-pelvic-hip complex is stable and you can prevent compensations and injury!
That is why using some unilateral movements in your core training is so key.
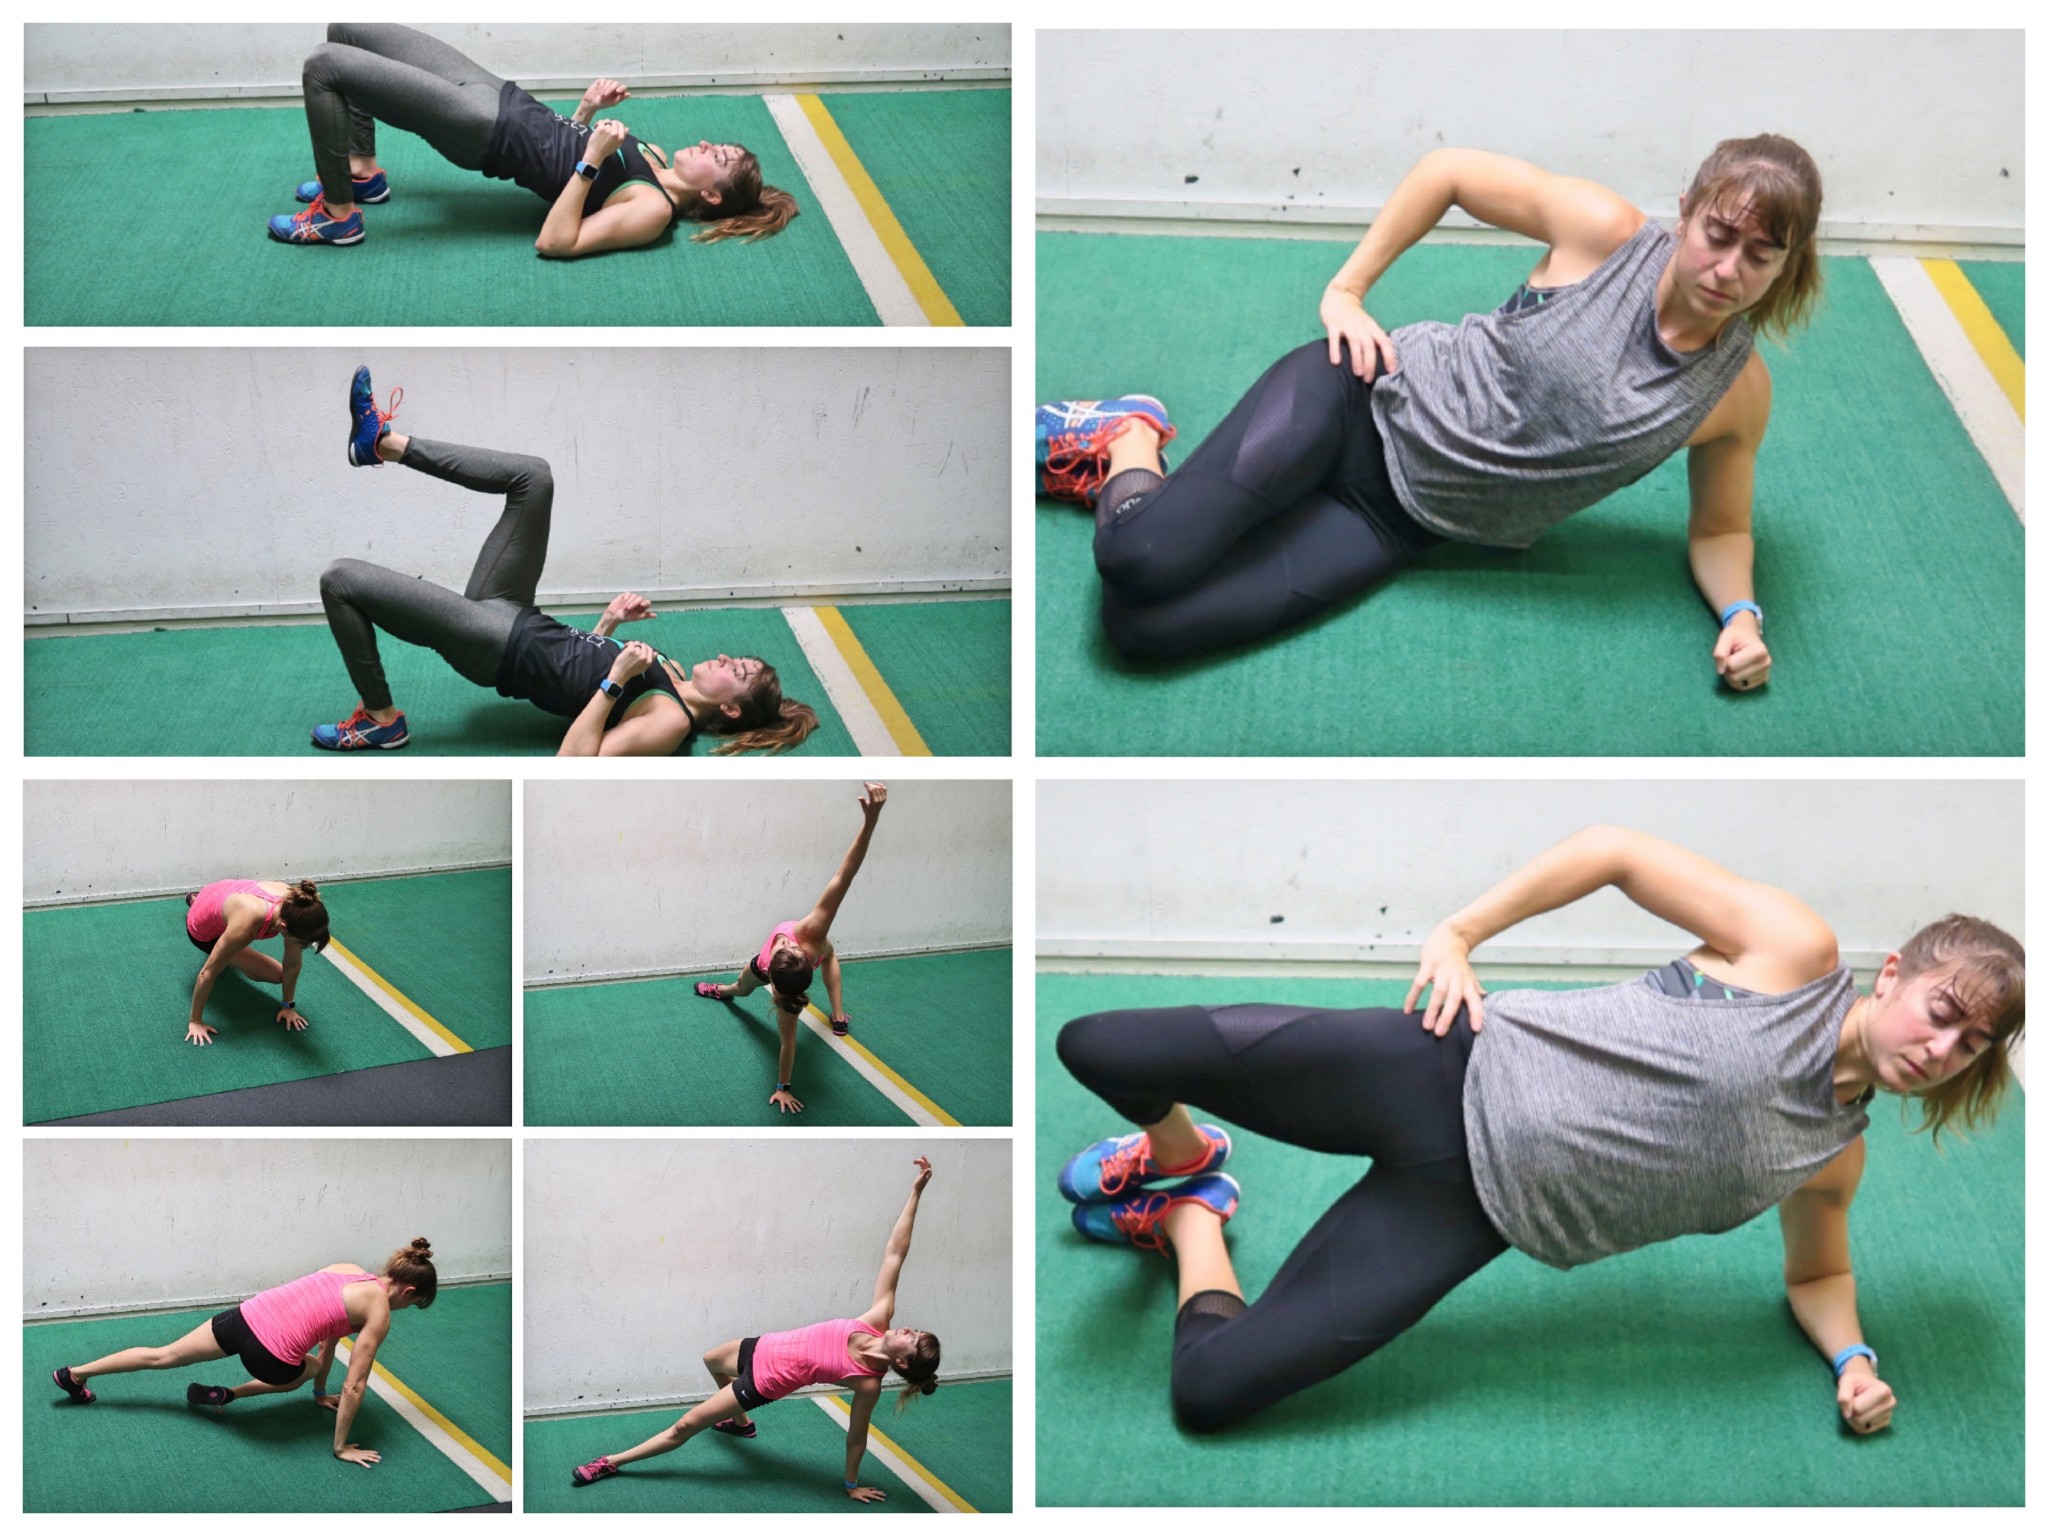
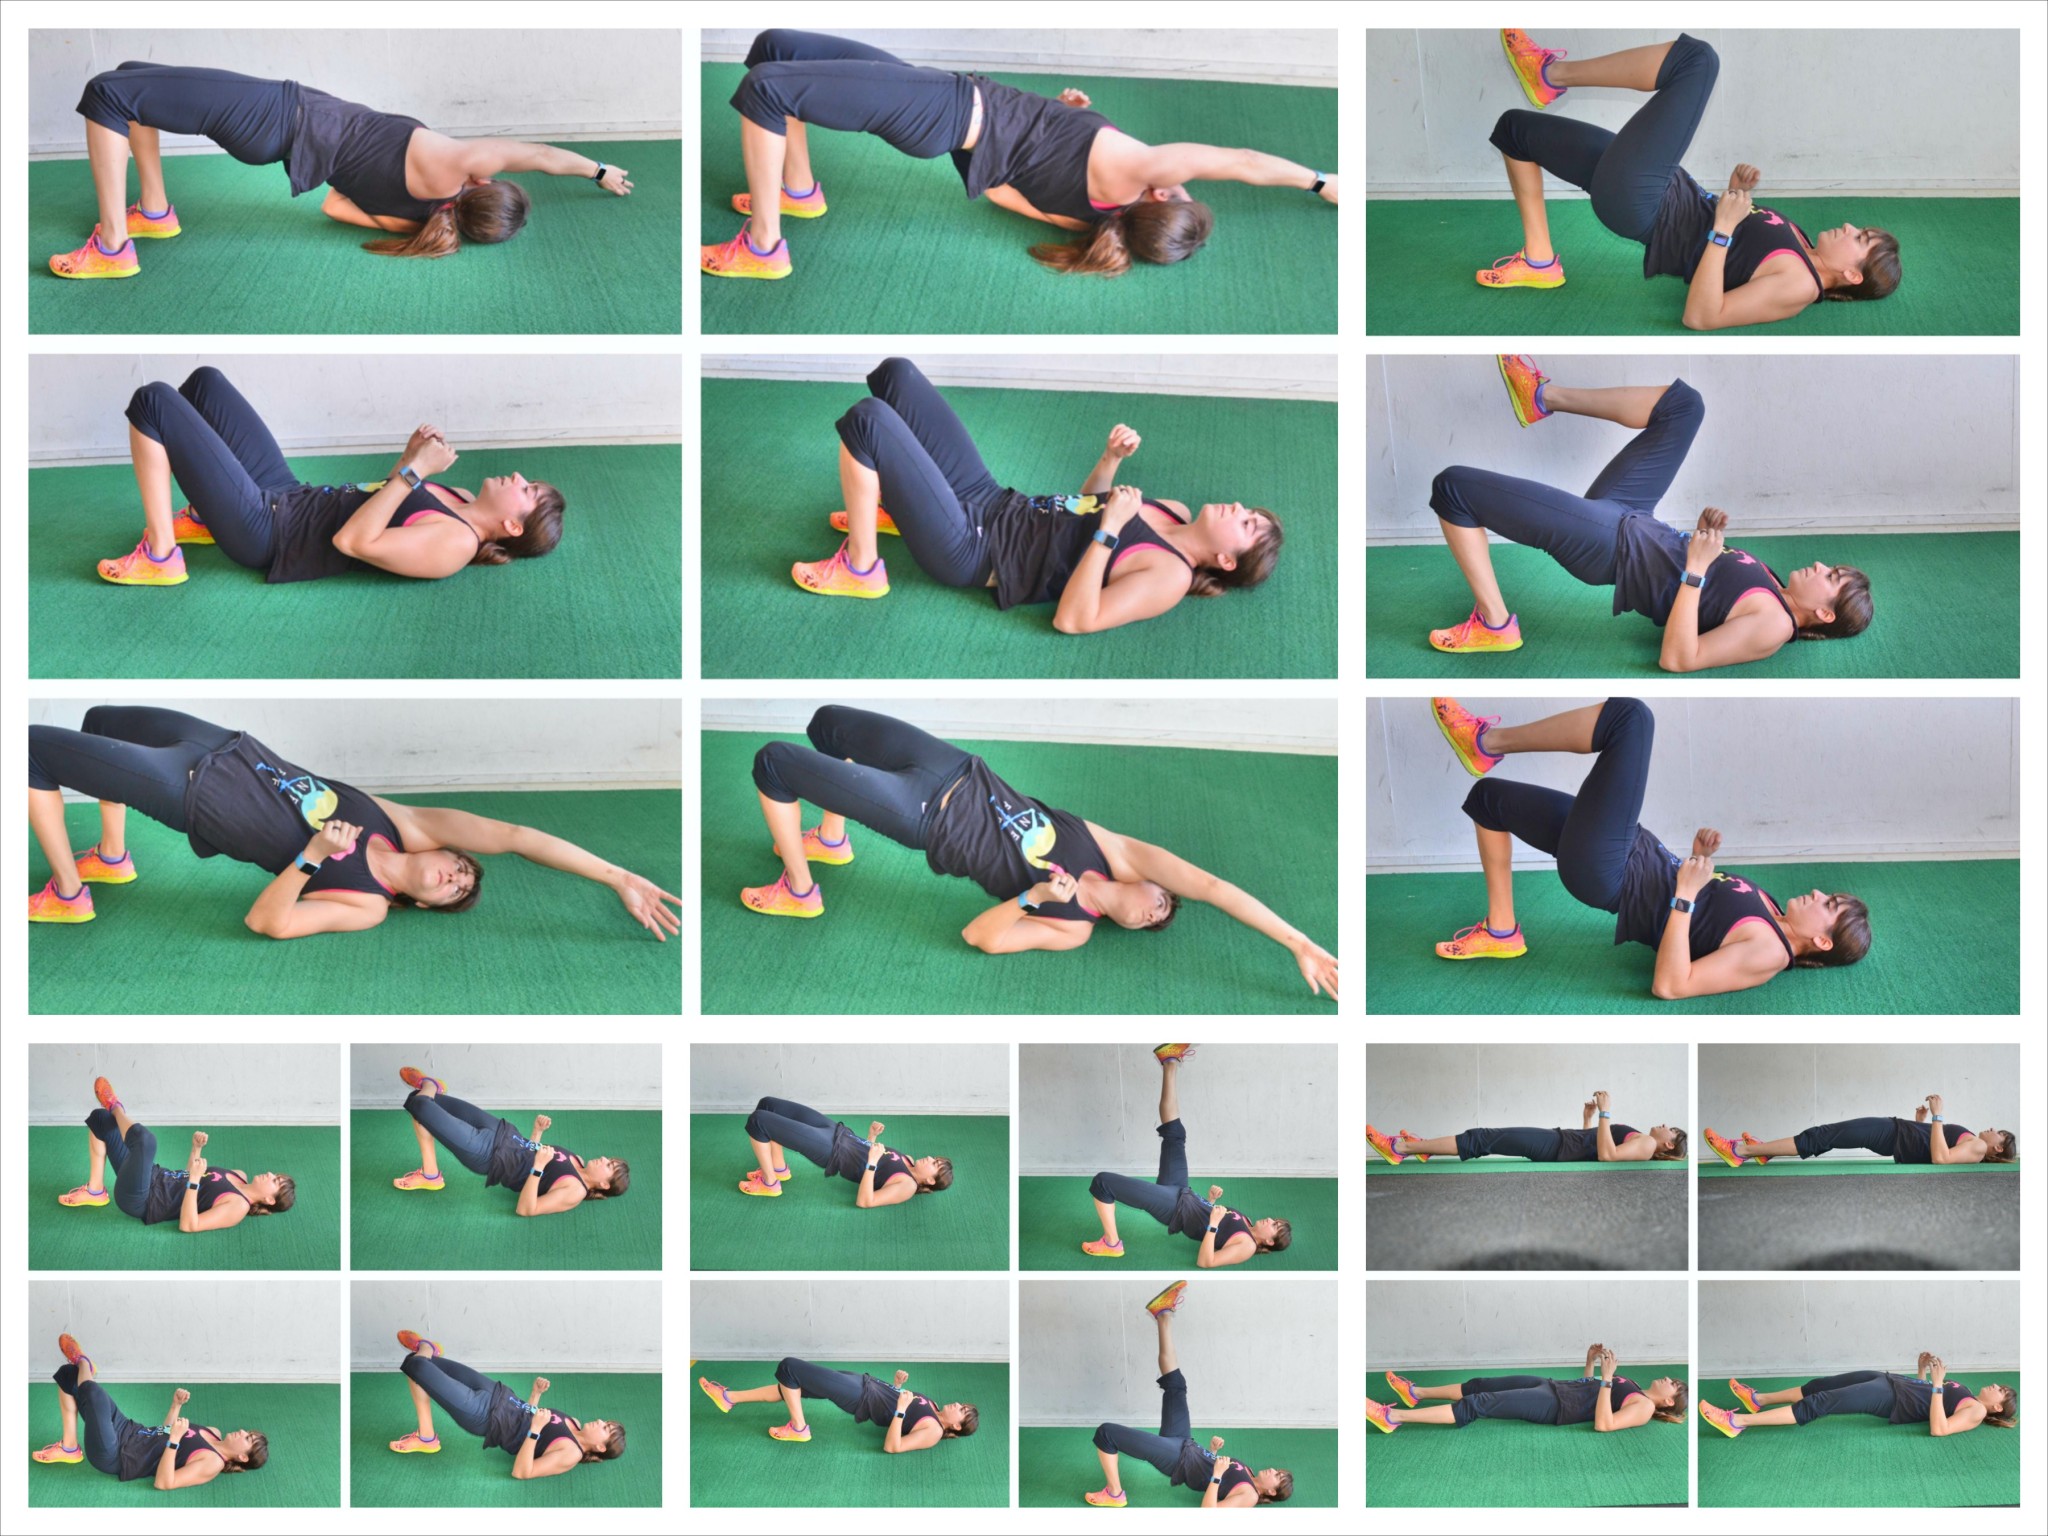
If you’re ready to build a strong, stable core, try this Bodyweight Unilateral Core Burner. It uses 3 simple moves to get your abs, glutes and obliques firing!
The Bodyweight Unilateral Core Burner
This quick workout focused on unilateral moves is just under 15 minutes and can be shortened and used as part of your warm up or even as a burnout to end your workout! Or if you’re short on time, it’s the perfect quick workout to do ANYWHERE!
WORKOUT:
Set a timer for 30 second intervals of work with about 3 seconds to transition from move to move. Do not rest during the 30 seconds of work. Modify if needed to keep moving. Make sure you feel your abs, obliques and glutes working. If your lower back takes over, modify the move. Do not just push through. If you want results, you NEED to get the right muscles working! Complete 2-4 rounds. Beginners may rest up to 30 seconds between rounds.
CIRCUIT:
30 seconds per side Side Plank Clams
30 seconds per side Mountain Climber Turkish Bridge
30 seconds Glute Bridge with March
More advanced exercisers can even sub in the Single Leg Glute Bridge, but this is an advanced move and you don’t want your lower back or hamstrings to take over for your glutes. Moves like the Glute Bridge with March are a great way to get the benefits of a unilateral move without fully having to do a unilateral move!
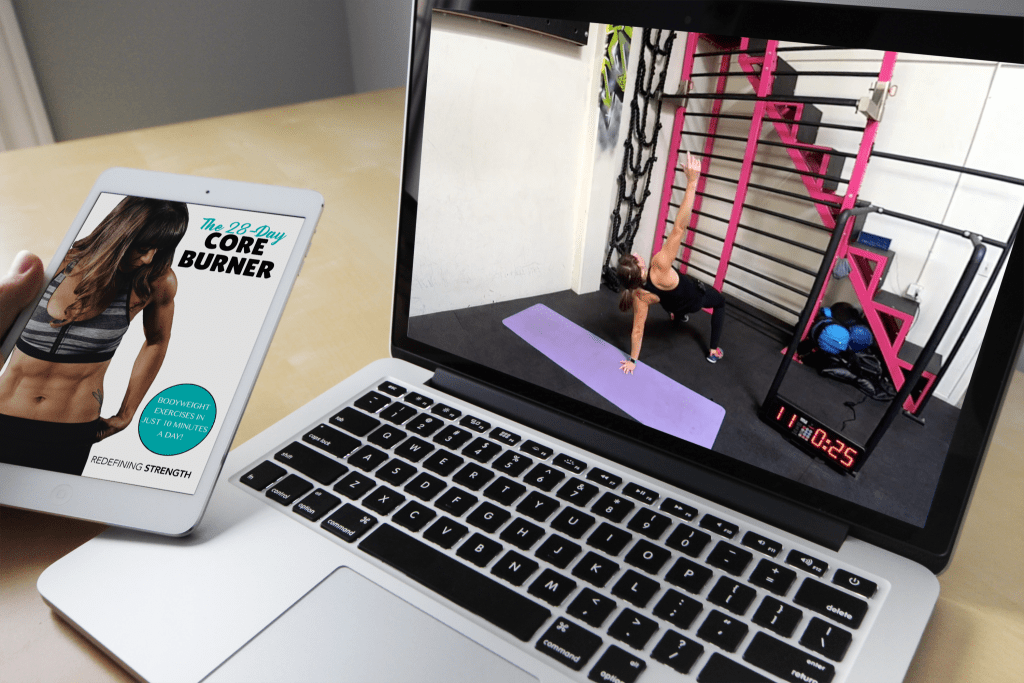
Ready to build a bulletproof core and get flat abs using just your own bodyweight?
Learn more about my 28 day Core Burner!
by Cori Lefkowith | Mar 18, 2018 | Blog, Recipes
I don’t know about all of you, but I LOVE apples and peanut butter!
But I’ve gotten asked, “Is fruit healthy?”
My opinion – HECK YES!
Do I believe that carbs need to be dialed in like all macros?
YUP!
But can fruit provide nutritional benefit and be included in our diet, especially if we ENJOY it?
HECK YES!
And this quick snack is a great way to enjoy your fruit AND even add in a little PROTEIN to that carb and fat heavy snack of apples and peanut butter.
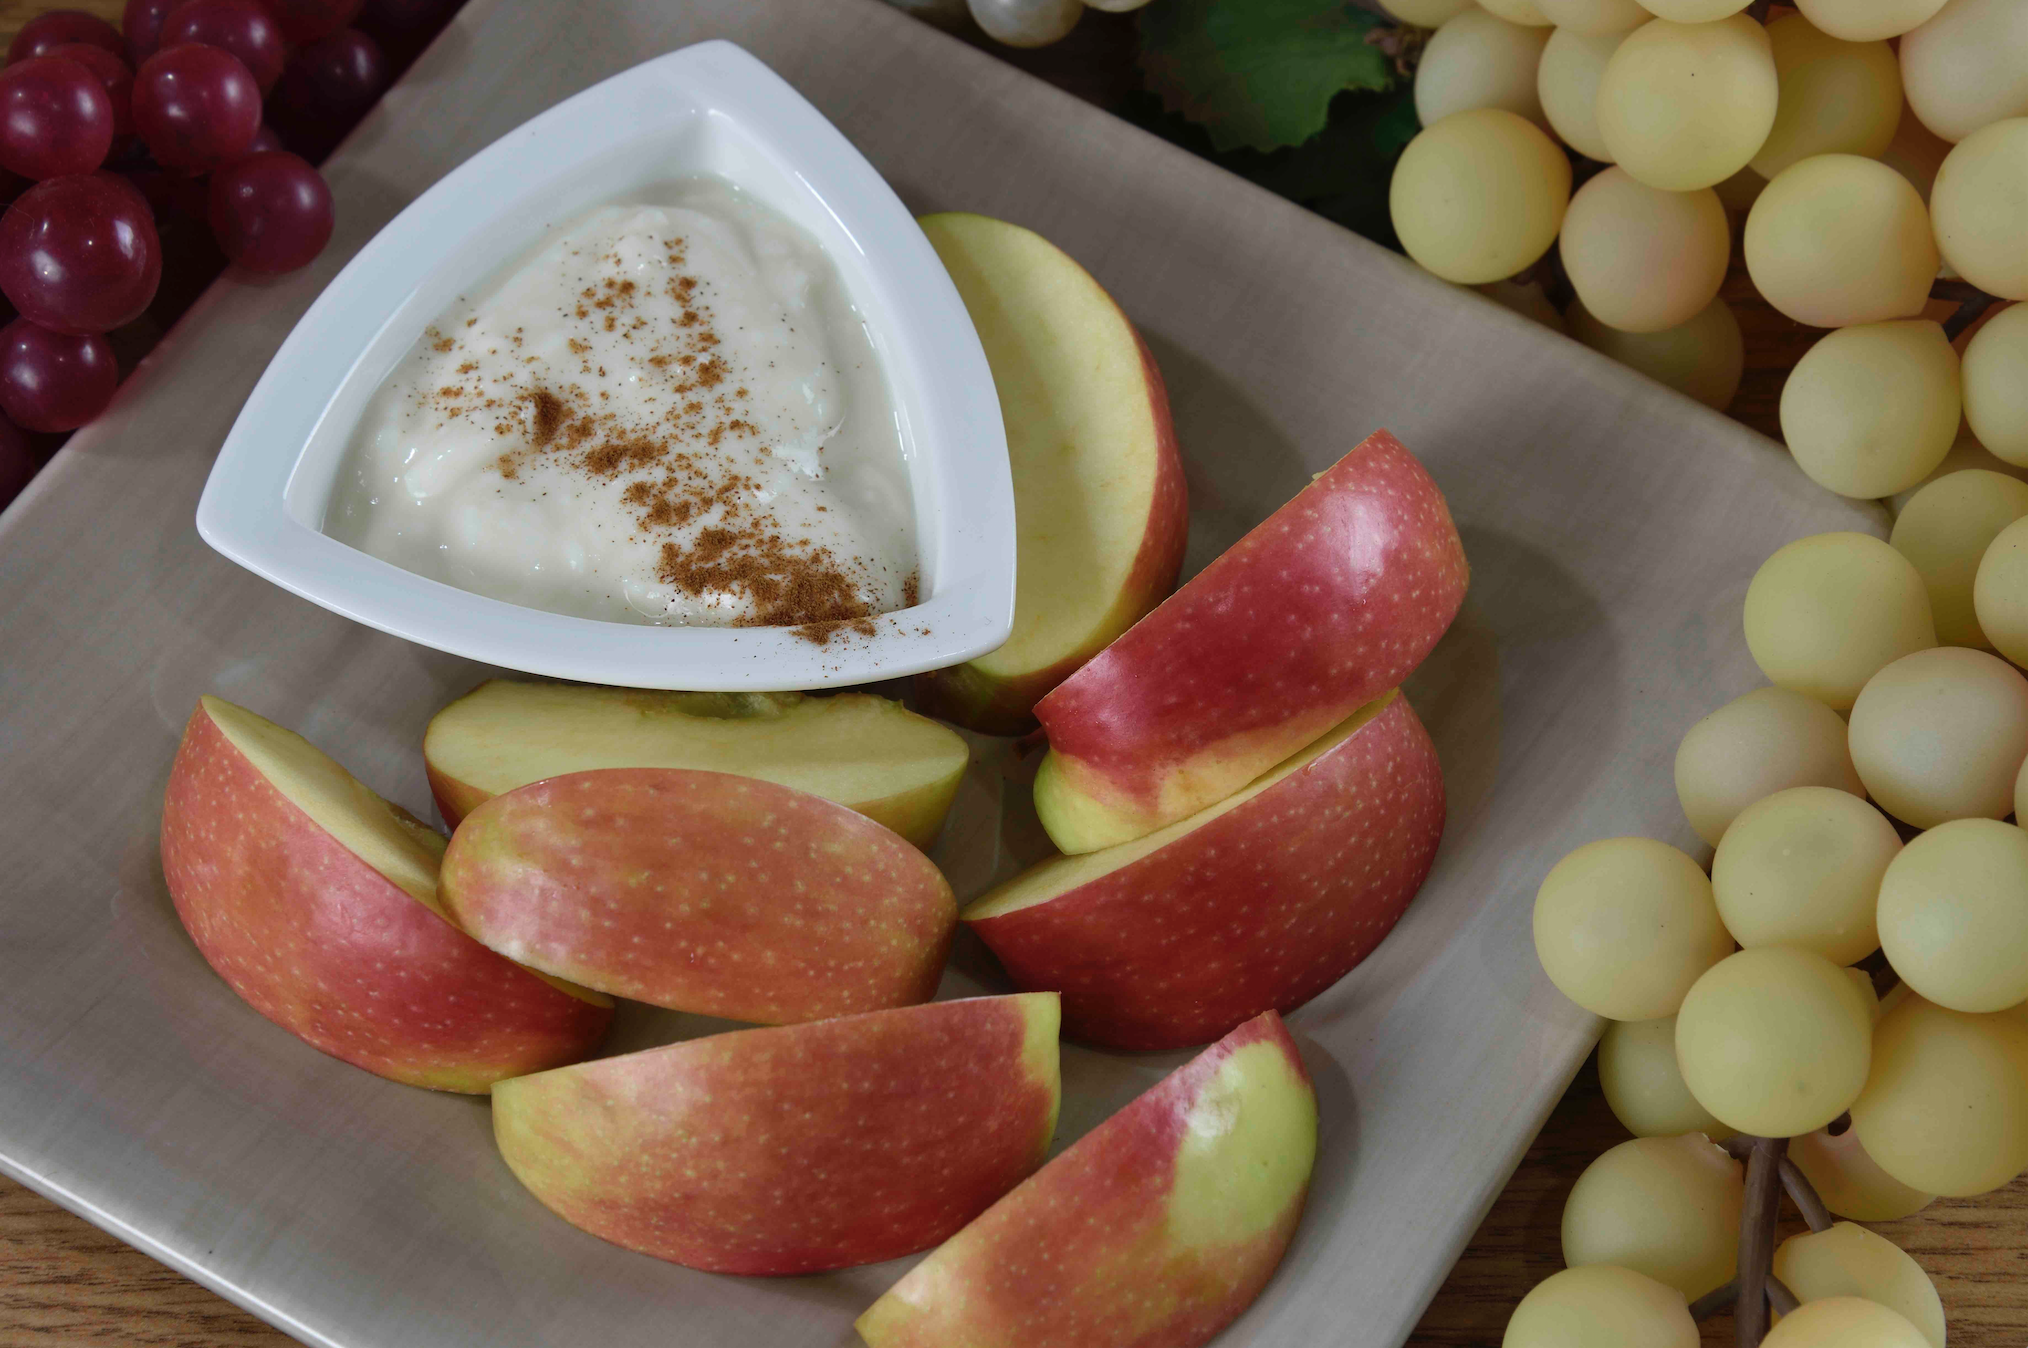
The Greek Yogurt Apple Dipper!
SERVINGS: 1
INGREDIENTS:
1/2 cup Fat-Free Plain Greek Yogurt*
1/8 tsp Cinnamon
1/2 tbsp Honey
1 tbsp All-Natural Peanut Butter
1 small Apple
DIRECTIONS:
Mix yogurt, honey, cinnamon and peanut butter together.
Slice up your apple, dip and enjoy!
MACROS:
Calories: 297
Protein: 15 grams
Carbs: 44 grams
Fat: 7 grams
*You can sub in a diary-free or full fat option. Just adjust the macros
** On occasion, I’ve even added a scoop of vanilla or peanut butter whey protein to this or even an unflavored collagen to boost protein further!
Feel like you’re eating well, but not getting the results you want?
Ready to enjoy the foods you love while getting results?
Learn the 5 Reasons Diets Usually Fail –>
by Cori Lefkowith | Mar 16, 2018 | Blog, Bodyweight, Exercises, Push Ups
Stop wasting time on bicep curls and isolated tricep extensions. If you want strong, and sexy arms, it’s time you started focusing on HYBRID exercises.
These moves will get you better results in less time because they work more muscles at once, including the larger muscle groups of our upper bodies!
And as much as I love weights, you don’t even need weights to build killer functional upper body strength.
Using your own bodyweight, you can get in a great upper body workout AND even work your core! Try these 5 Hybrid Bodyweight Upper Body Exercises that you’ll be sure to feel the next day!
5 Bodyweight Upper Body Exercise (no equipment needed!)
Below are 5 Hybrid Exercises to work your arms, chest, shoulders and even back. Try including these in your next upper body workout, especially if you need something quick at home!
These are some of my favorite moves from my 6-Week Bodyweight Shred to not only work the upper body, but also the CORE!
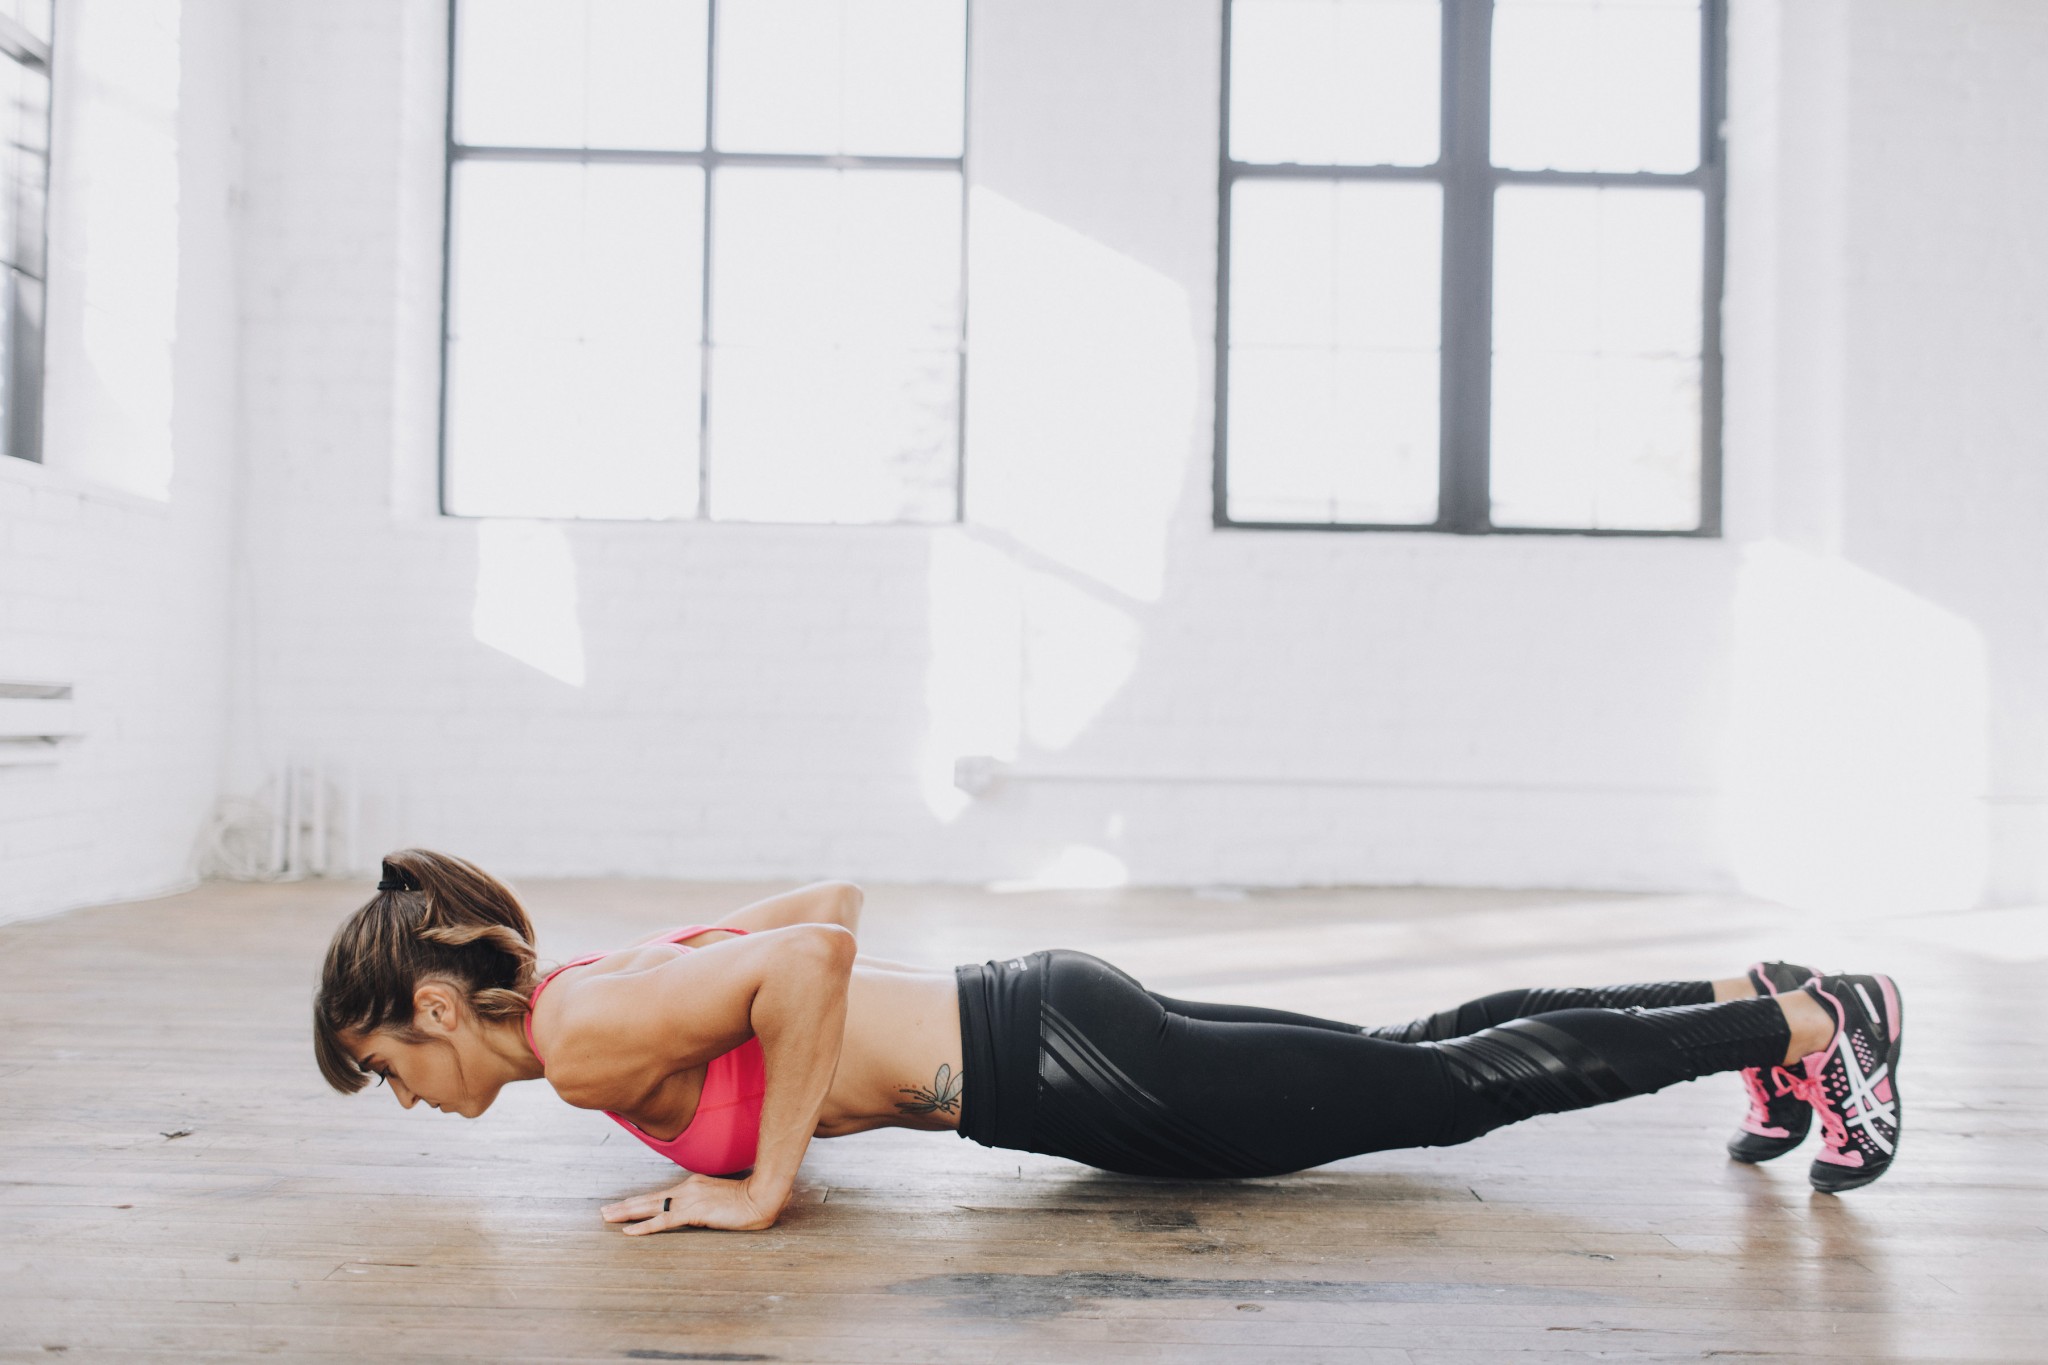
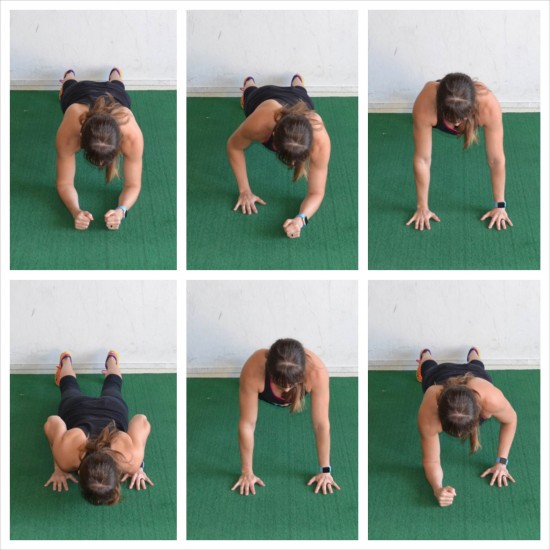
Climber Push Ups:
This core-intensive push up variation will work not only your chest, but really target your triceps and shoulders as well!
To do the Climber Push Up, start in a plank from your forearms. You can set your feet wider apart if needed to create a more stable base. Make sure your body is in a nice straight line from your head to your heels and that your shoulders are stacked over your elbows while on your forearms.
Engage your abs and, keeping your body in a nice straight line, climb one hand at a time up to a plank position from your hands. Place your hands right below your shoulders, but outside your chest as you climb up. Try to wiggle your hips as little as possible as you climb and don’t let your butt go up in the air or your hips sag toward the ground as you climb up.
Then at the top perform a push up. Keep your body in a nice straight line as you drop your chest between your hands and down toward the ground. Press all the way back up.Then climb back down, placing your elbows right below your shoulders. Repeat, climbing back up. Make sure to alternate or switch which hand leads the climb at some point.
Beginners can do the whole thing from their knees or even just drop to their knees for the push up.
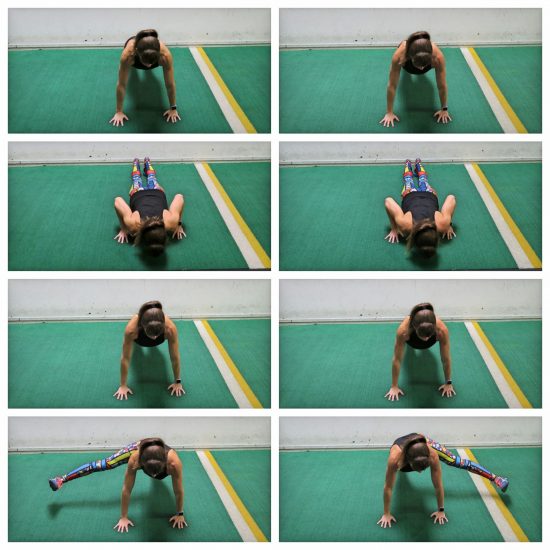
Push Up Leg Kick:
This Push Up is a great way to work your obliques and really toast your entire core!
To do the Push Up Leg Kick, set up in a high plank position with your hands under your shoulders and outside your chest and your feet close together. Your body should be in a nice straight line with your abs braced and glutes and quads engaged.
Then lower down to the bottom of the push up, keeping your body in a nice straight line. Press back up and at the top, kick one leg out to the side toward your elbow. Your hips may rotate slightly as you kick, but your butt shouldn’t go up in the air.
Kick your leg up as close to your elbow as you can and then lower it back down and place your foot back on the ground. Once your foot is back down, repeat the push up then kick the other leg out to the side toward your elbow. Keep your leg as straight as you can as you kick it out. Place your foot back and repeat the push up before repeating on the first side.
You can modify the move by doing it from your knees then come up onto your toes for the kick. You can also do it with your hands up on an incline. To advance the move further, perform the kick at the BOTTOM of the push up!
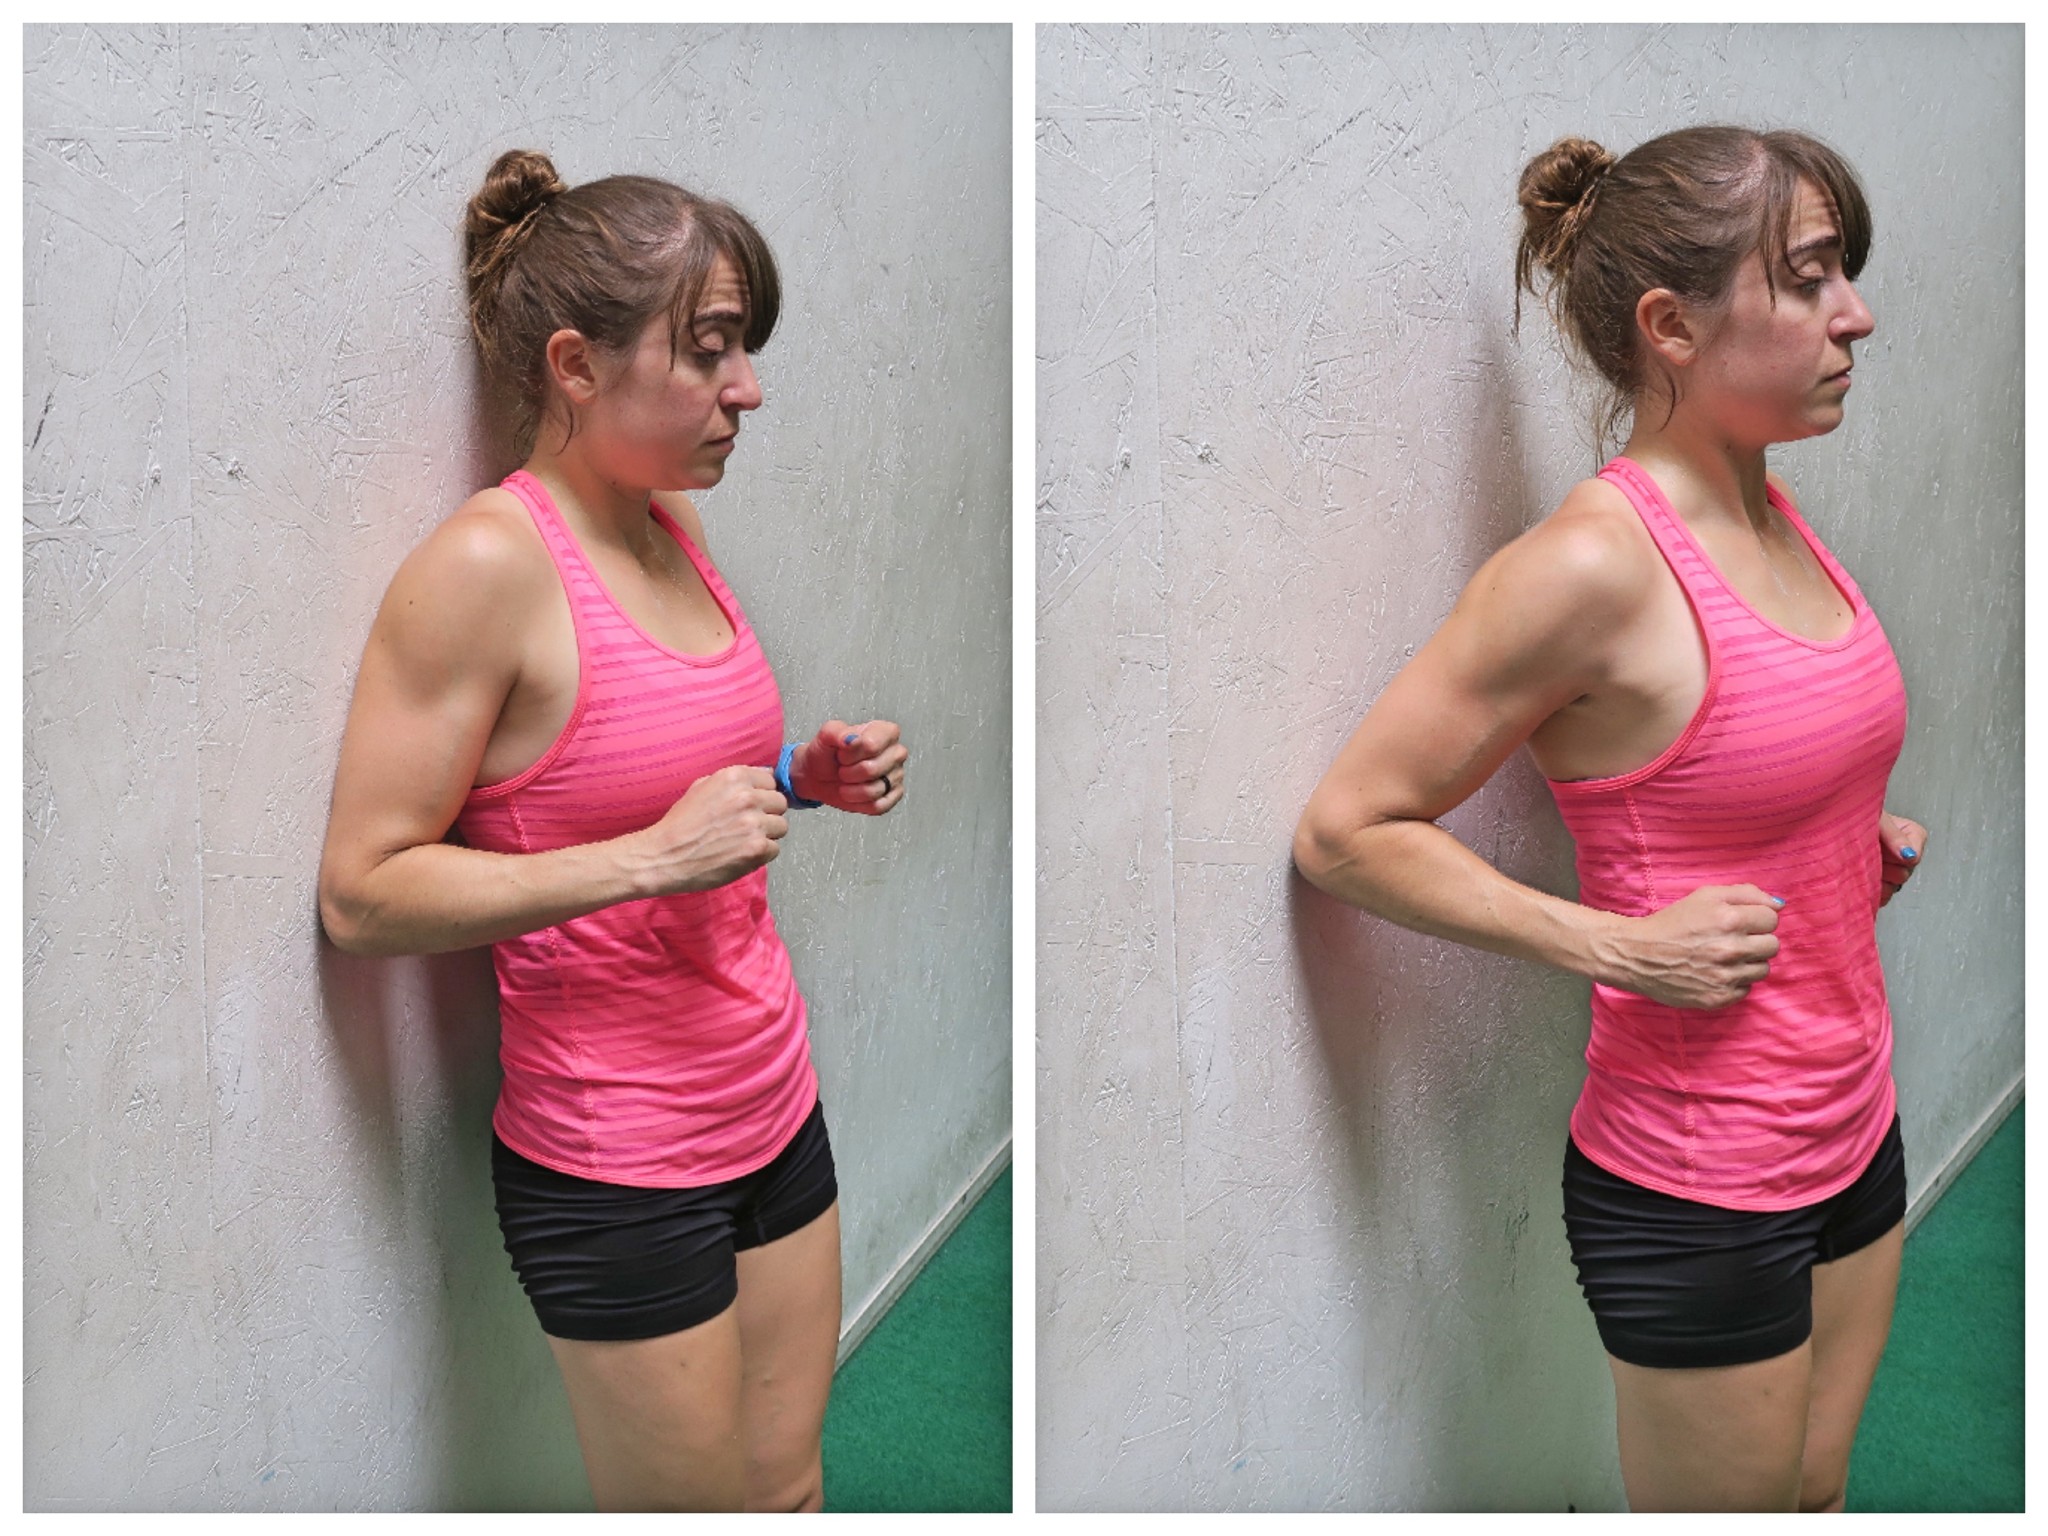
Scapular Wall Hold/Reps:
This move is a must-do if you have a desk job. Whether you perform the isometric or the reps, it is a great way to work your back and open up your chest.
To do the Scapular Wall Hold Reps, stand with your back relaxing against the wall and your feet about six inches away. Bend your arms and drive your elbows back into the wall. With your body in a nice straight line, drive off the wall with your elbows, pressing your chest out and pinching your shoulder blades down and back. Brace your core and squeeze your glutes so your body moves as one unit.
Relax back into against the wall, keeping your body in a nice straight line from your head to your heels. Do not let your hips drop. Then repeat the press out, driving off your elbows. Do not arch your low back as you press out. Also, make sure not to shrug your shoulders. The further from the wall that you walk your feet out, the harder the move will be.
To do the hold, you would simply hold pressed out. That is a great activation move even before your pull up work!
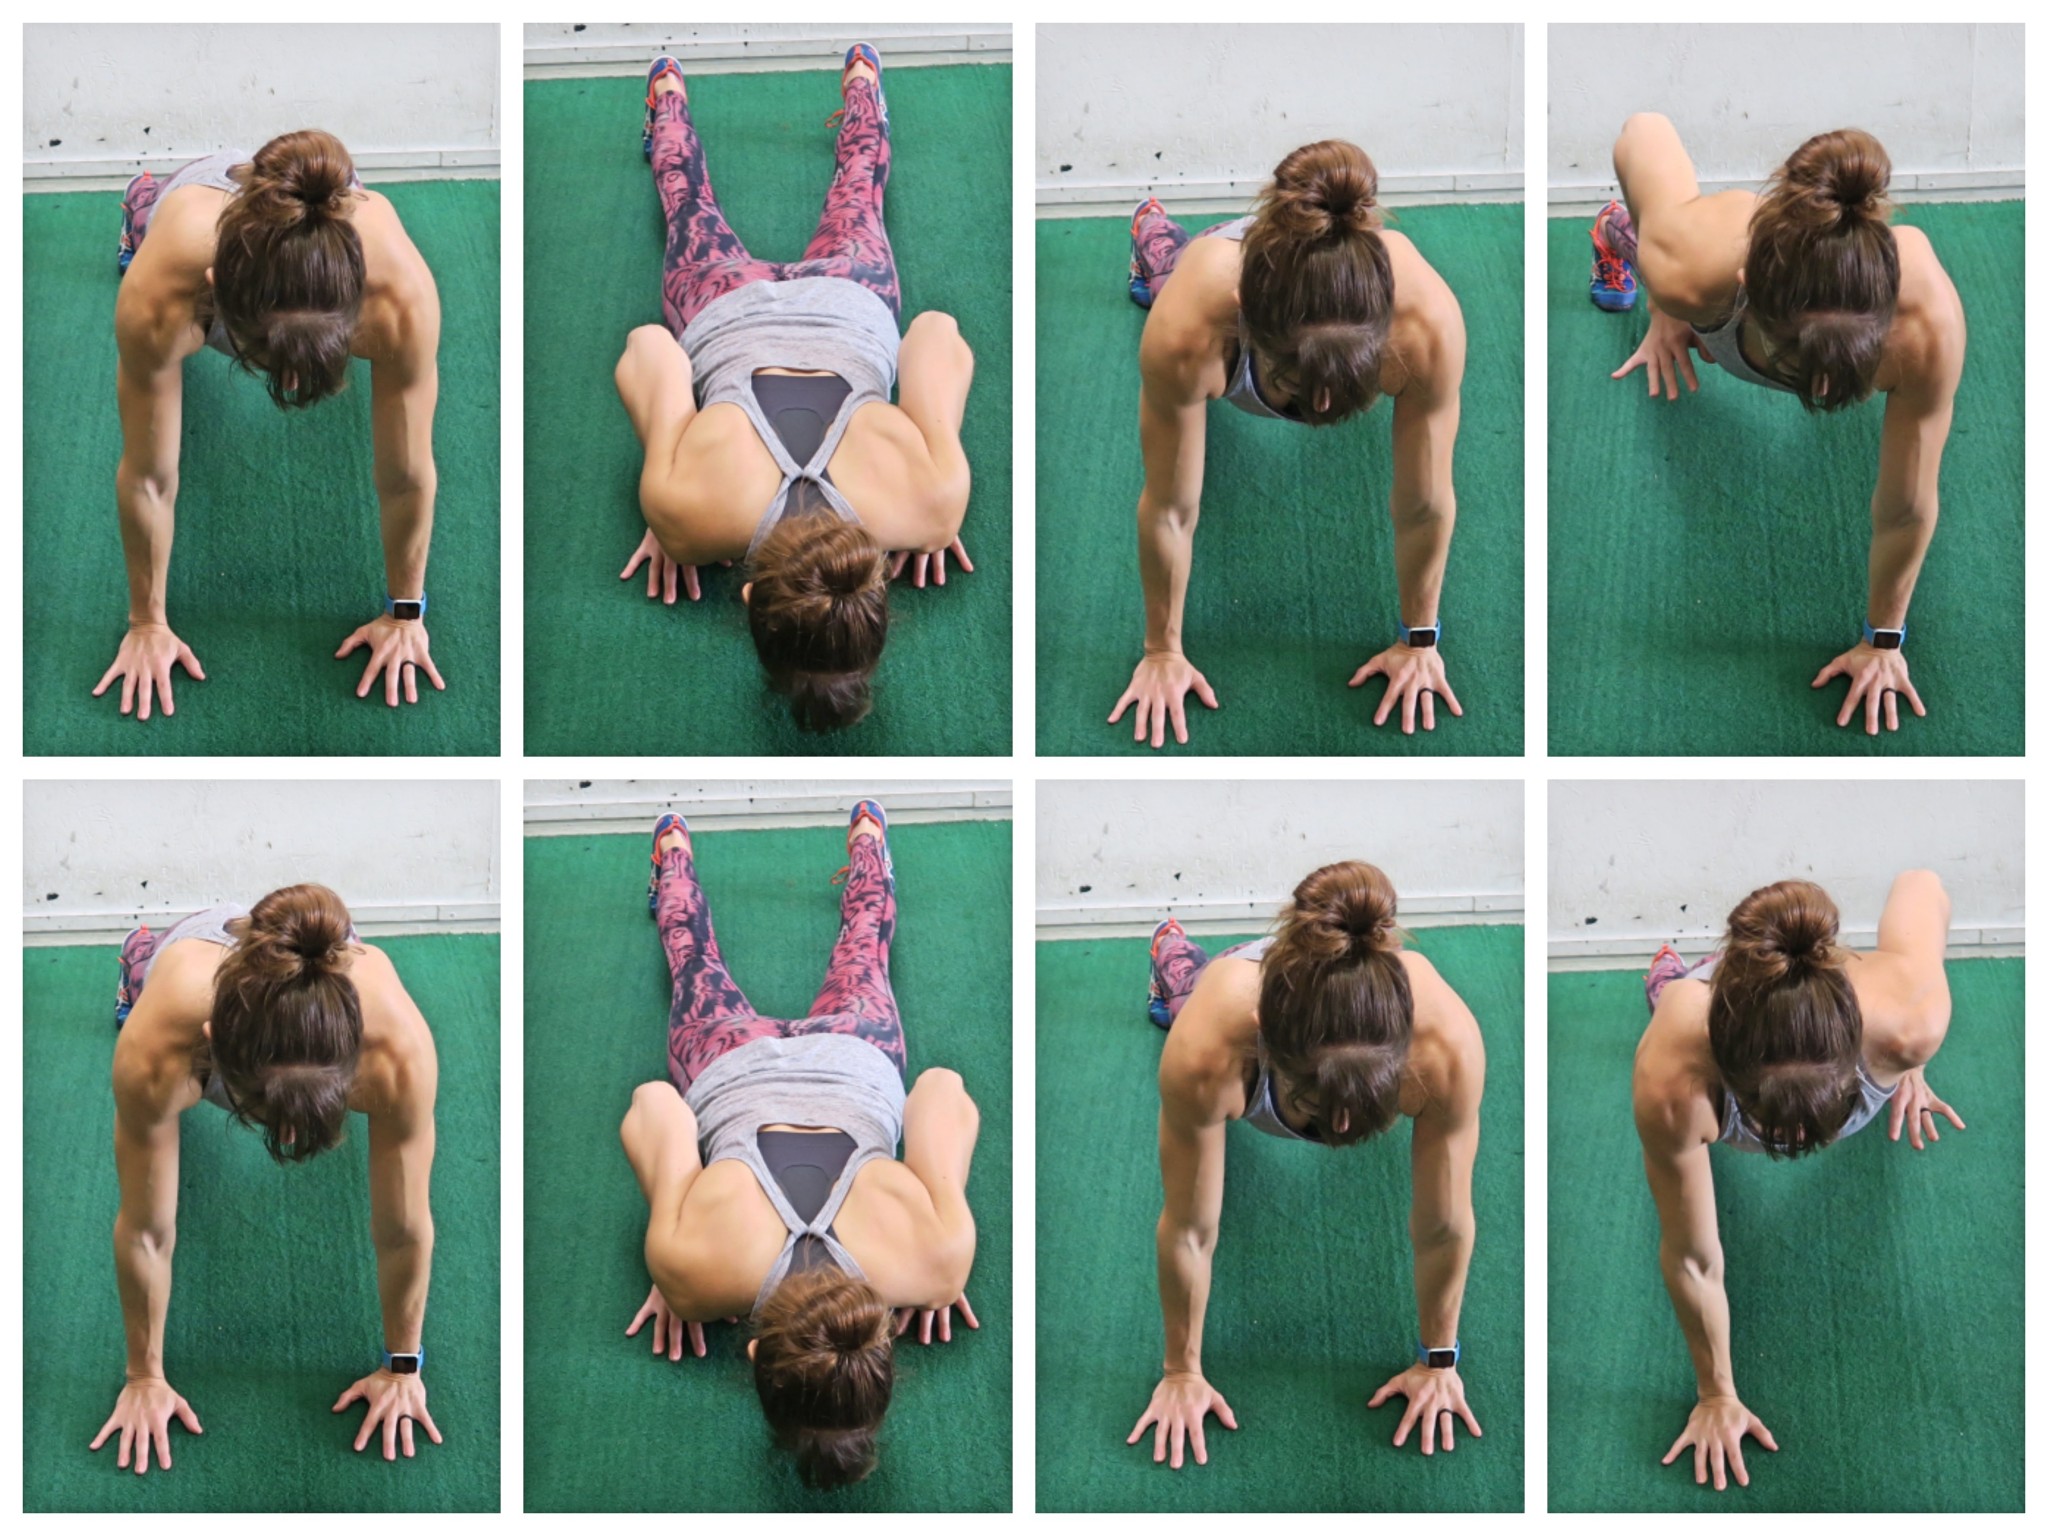
Row Push Up:
This anti-rotational core move will work not only your abs, but also your chest, back, arms and shoulders. Talk about a move that works EVERYTHING!
To do the Row Push Up, set up in a high plank position with your feet about hip-width apart and your hands outside your chest (beginners can do this from their knees). Then perform a push up, lowering your chest to the ground as your body moves as one unit. Do not let your butt go up in the air or your head jut forward. Also, make sure your arms create an arrow shape (–>) with your body instead of flaring way out.
Press back up, again keeping your body in a nice straight line. At the top of the push up, row one arm up. Lift the hand off the ground as you drive your elbow down and back toward the ceiling. Feel your back work to lift your arm. Bring your hand to about chest height then place it back down and repeat the push up.
At the top of the push up, row the other hand up. Try not to let your body rotate as you row. Also, do not let your butt go up in the air. You want to keep your body square to the ground as fighting the rotation works your core more.
If you have weights and really want to use them, you may also do the Renegade Row Push Up.
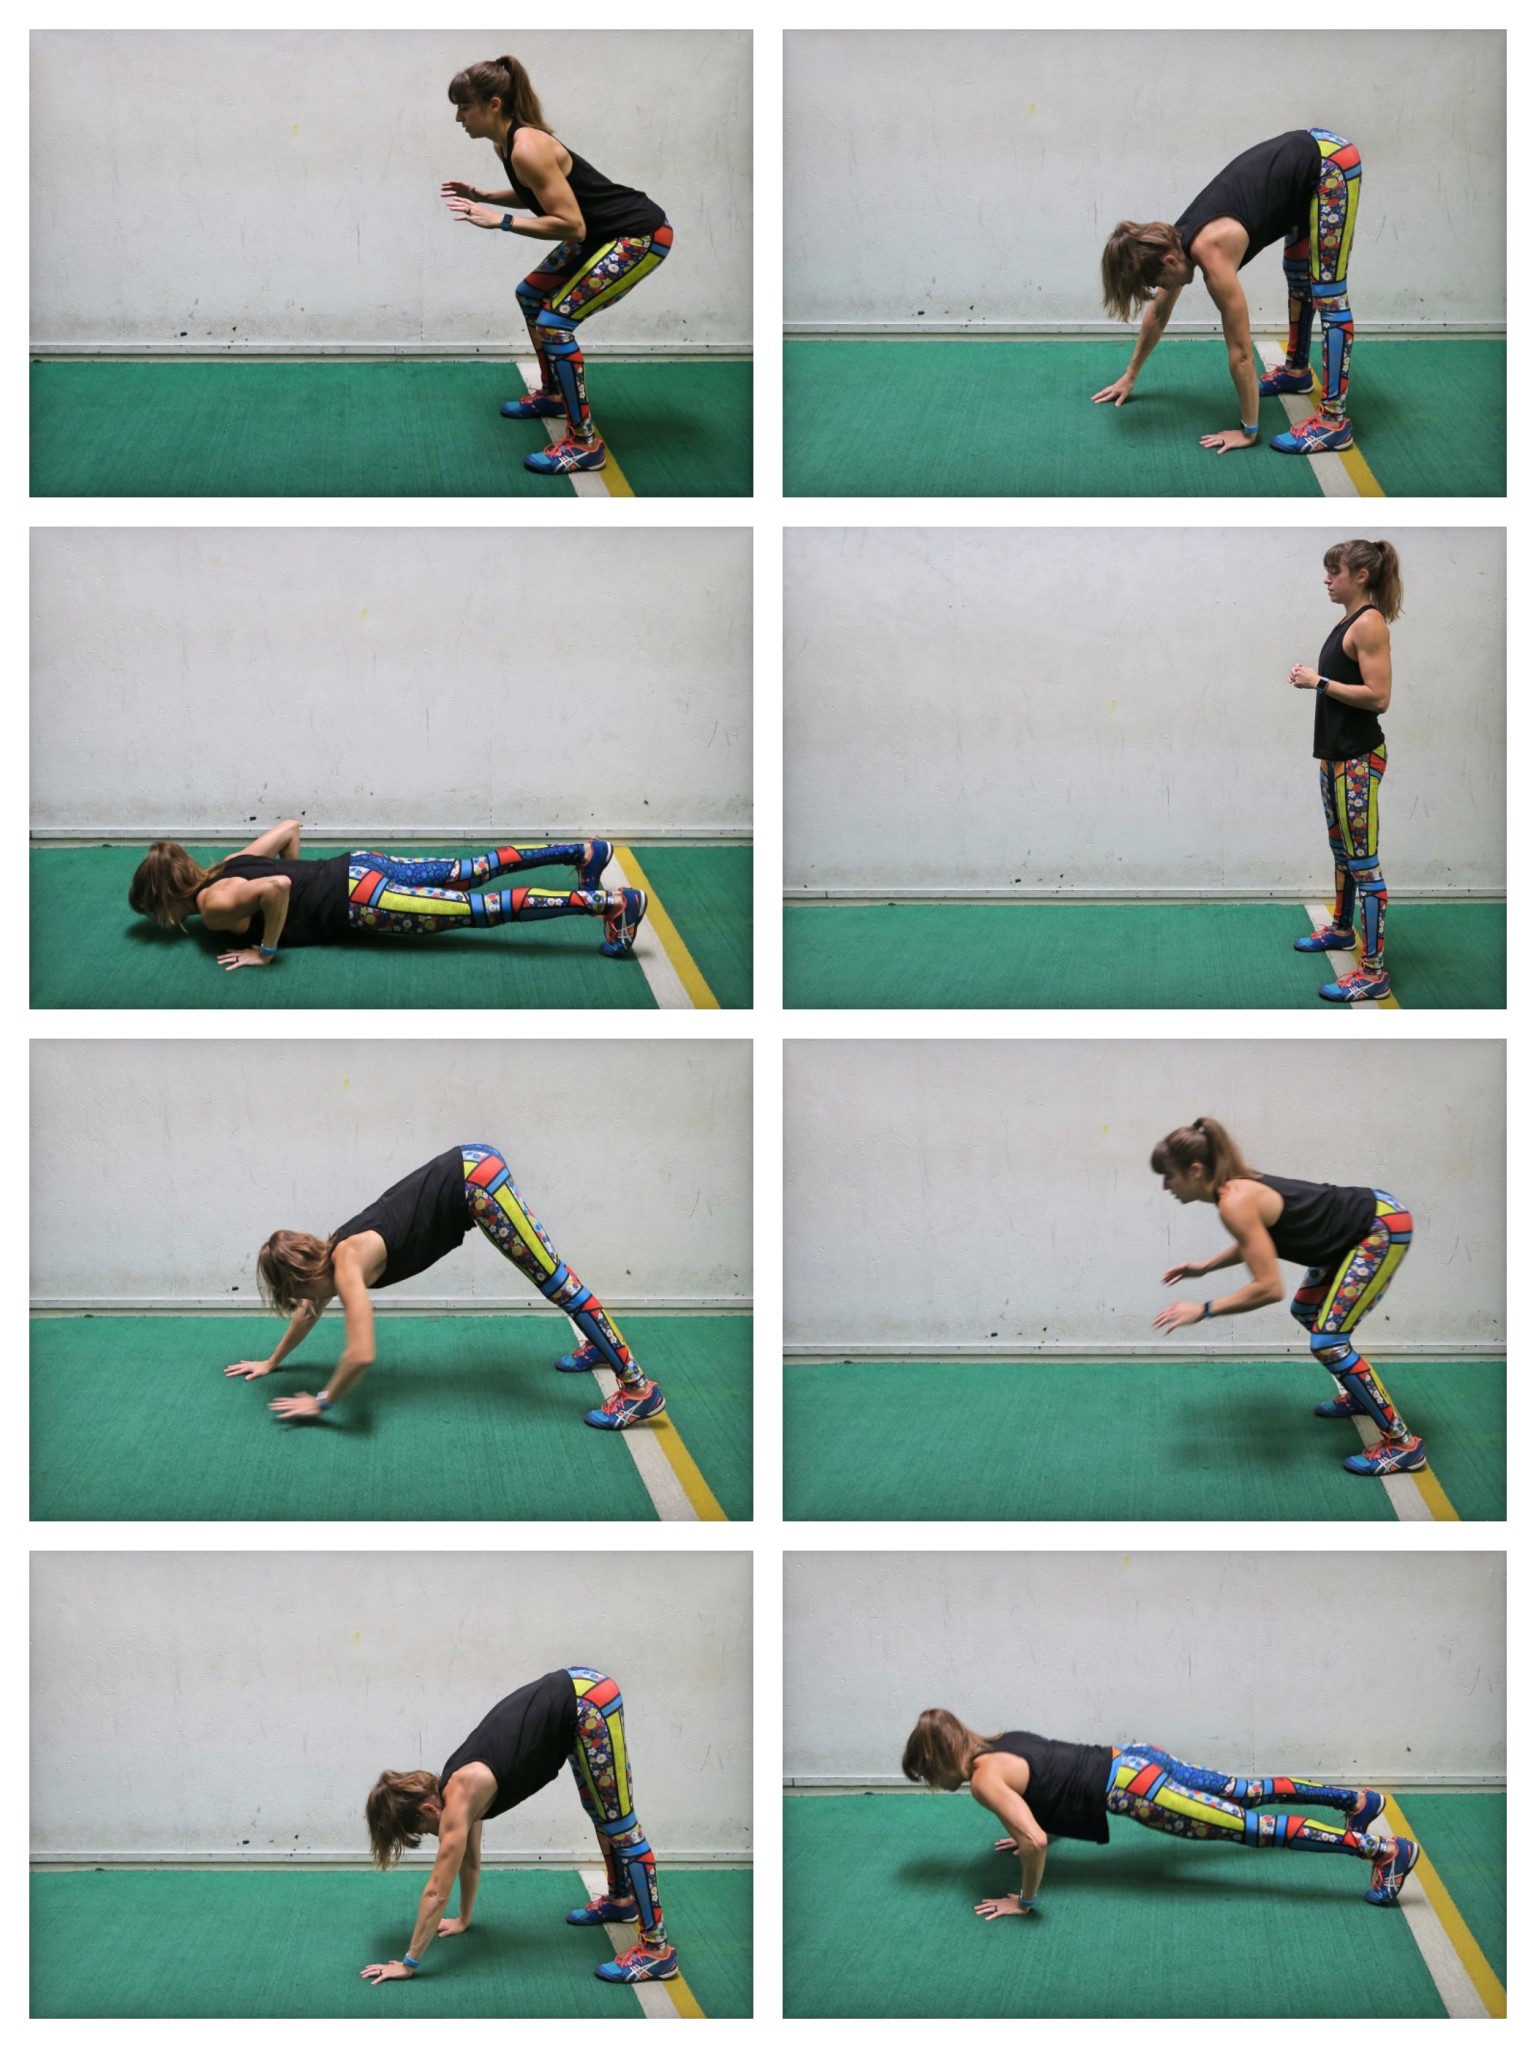
Push Up Walk Back:
This push up variation is going to work your arms, shoulders and abs and get your blood pumping. It is also a great way to work on your mobility with the walk back! (Hey a little extra lower body work never hurts!)
To do the Push Up Walk Back, start standing with your feet close together. Then bend your knees and squat down slightly. Rock forward to “dive out” and extend into a push up.
As you dive out and catch yourself, bend your elbows to absorb the shock of landing. You will perform a push up as you catch yourself and lower your chest to the ground. Push back up to a plank position and then, keeping your legs straight, walk your hands back in toward your feet.
Stand all the way back up and then squat down to repeat the dive back out and push up. This is an advanced move. Beginners may need to walk out instead and go down to their knees for the push up.
Ready to build full-body strength as you burn fat WITHOUT using any equipment?
Learn more about my Bodyweight Shred!
 Yea…take time off from the things you are doing wrong. Take time off from OVERLOADING the same area.