There is nothing better than going on vacation. But it is often where we feel like we sabotage our results and our diet and exercise routines go to die.
I wanted to share 7 tips to help you stay on track while you travel so you can keep moving forward toward your weight loss goals. However, I also want to mention that I believe vacations can, and should, be a time to relax and enjoy. Diets often fail because we force restriction at times when we do need to embrace a balance.
We end up not really being able to diet on vacation while also not really allowing ourselves to relax. And this ultimately backfires.
However, if you travel for work or just travel often and want to find the lifestyle balance right for you, these tips can help you stay consistent with your macros and your workouts while not at home!
Do not feel guilty about not using every time you travel as an excuse to splurge. I know sometimes our friends or family can make us feel awkward for caring, but we need to stay focused on what also makes us happy in our progress toward our goals!
Because we can’t just always make the excuse that this is a once in a lifetime experience if we’re traveling all the time!
So what are the 7 travel hacks to help you stay on track?
#1: Save calories.
I hate saying it this way but it is also the SIMPLEST way to state it…sometimes when on vacation if you know there is going to be a bigger meal or even cocktails at dinner, things you’ll want to enjoy, you want to “save” calories for that meal.
This means you will want to focus on eating lighter, and even increase your protein intake earlier in the day. This can help you find that balance so you don’t go into a huge surplus and you even hit some macro minimums you set.
And while a longer fast can also be an option if you do intermittent fasting already, please don’t turn saving calories into starving yourself or you’ll end up overeating at that later meal.
Just think about going lighter with a protein focus earlier in the day to strike a balance!
#2: Find a few restaurants in the area for go-to healthy meals.
When on vacation, it can be fun to try local spots. And depending on where you’re traveling to, there may be some great local places with super macro friendly meals. Or even meals they can tell you the portions on. Many restaurants even list macros on their website so it never hurts to check.
If you can’t find the nutritional info, even try logging something similar to get an idea of macros. You can often find recipes online that give you an idea of the breakdown.
Also, look for chain restaurants. While yes, we want the best quality fuel, many chains do have nutritional info listed on their website. And if you find a dish or two that really works for you at those places, it can be easy to use that any time you travel as that chain may be everywhere!
But planning ahead to have some options to strike that balance can be key and let you play around with logging the meal to hit any calorie intake or macros you’ve set.
#3: Bring protein powder.
Supplements are supplemental, but protein powder is one of the best things to have with you when you’re on the go as it is generally easier to snack on carbs and fats and harder to eat easy, not refrigerated, protein options.
With a protein powder, you can keep it in your backpack or purse and be able to mix it in a water bottle, coffee or even anything quick you can pick up from the store.
Such an easy way to increase your protein and even save those carbs and fats for that later meal you don’t have as much control over with the family or co-workers.
#4: Don’t buy bulk snacks.
Often when we go on a trip, we buy snacks at the airport. And a bigger bag than we should eat in one serving.
Or we buy snacks for the hotel room or AirBnB for our family even.
And while it can be helpful to have snacks if we don’t know when we will get to eat or if the meals provided us will really work for us, we need to be conscious to not just have extra around as it will be tempting to eat it when you aren’t even hungry!
It’s easy to mindless nibble and let those calories add up.
So be strategic with your snacks especially if you’ll have them around you all the time! Even portion out things so you aren’t as tempted to keep snacking!
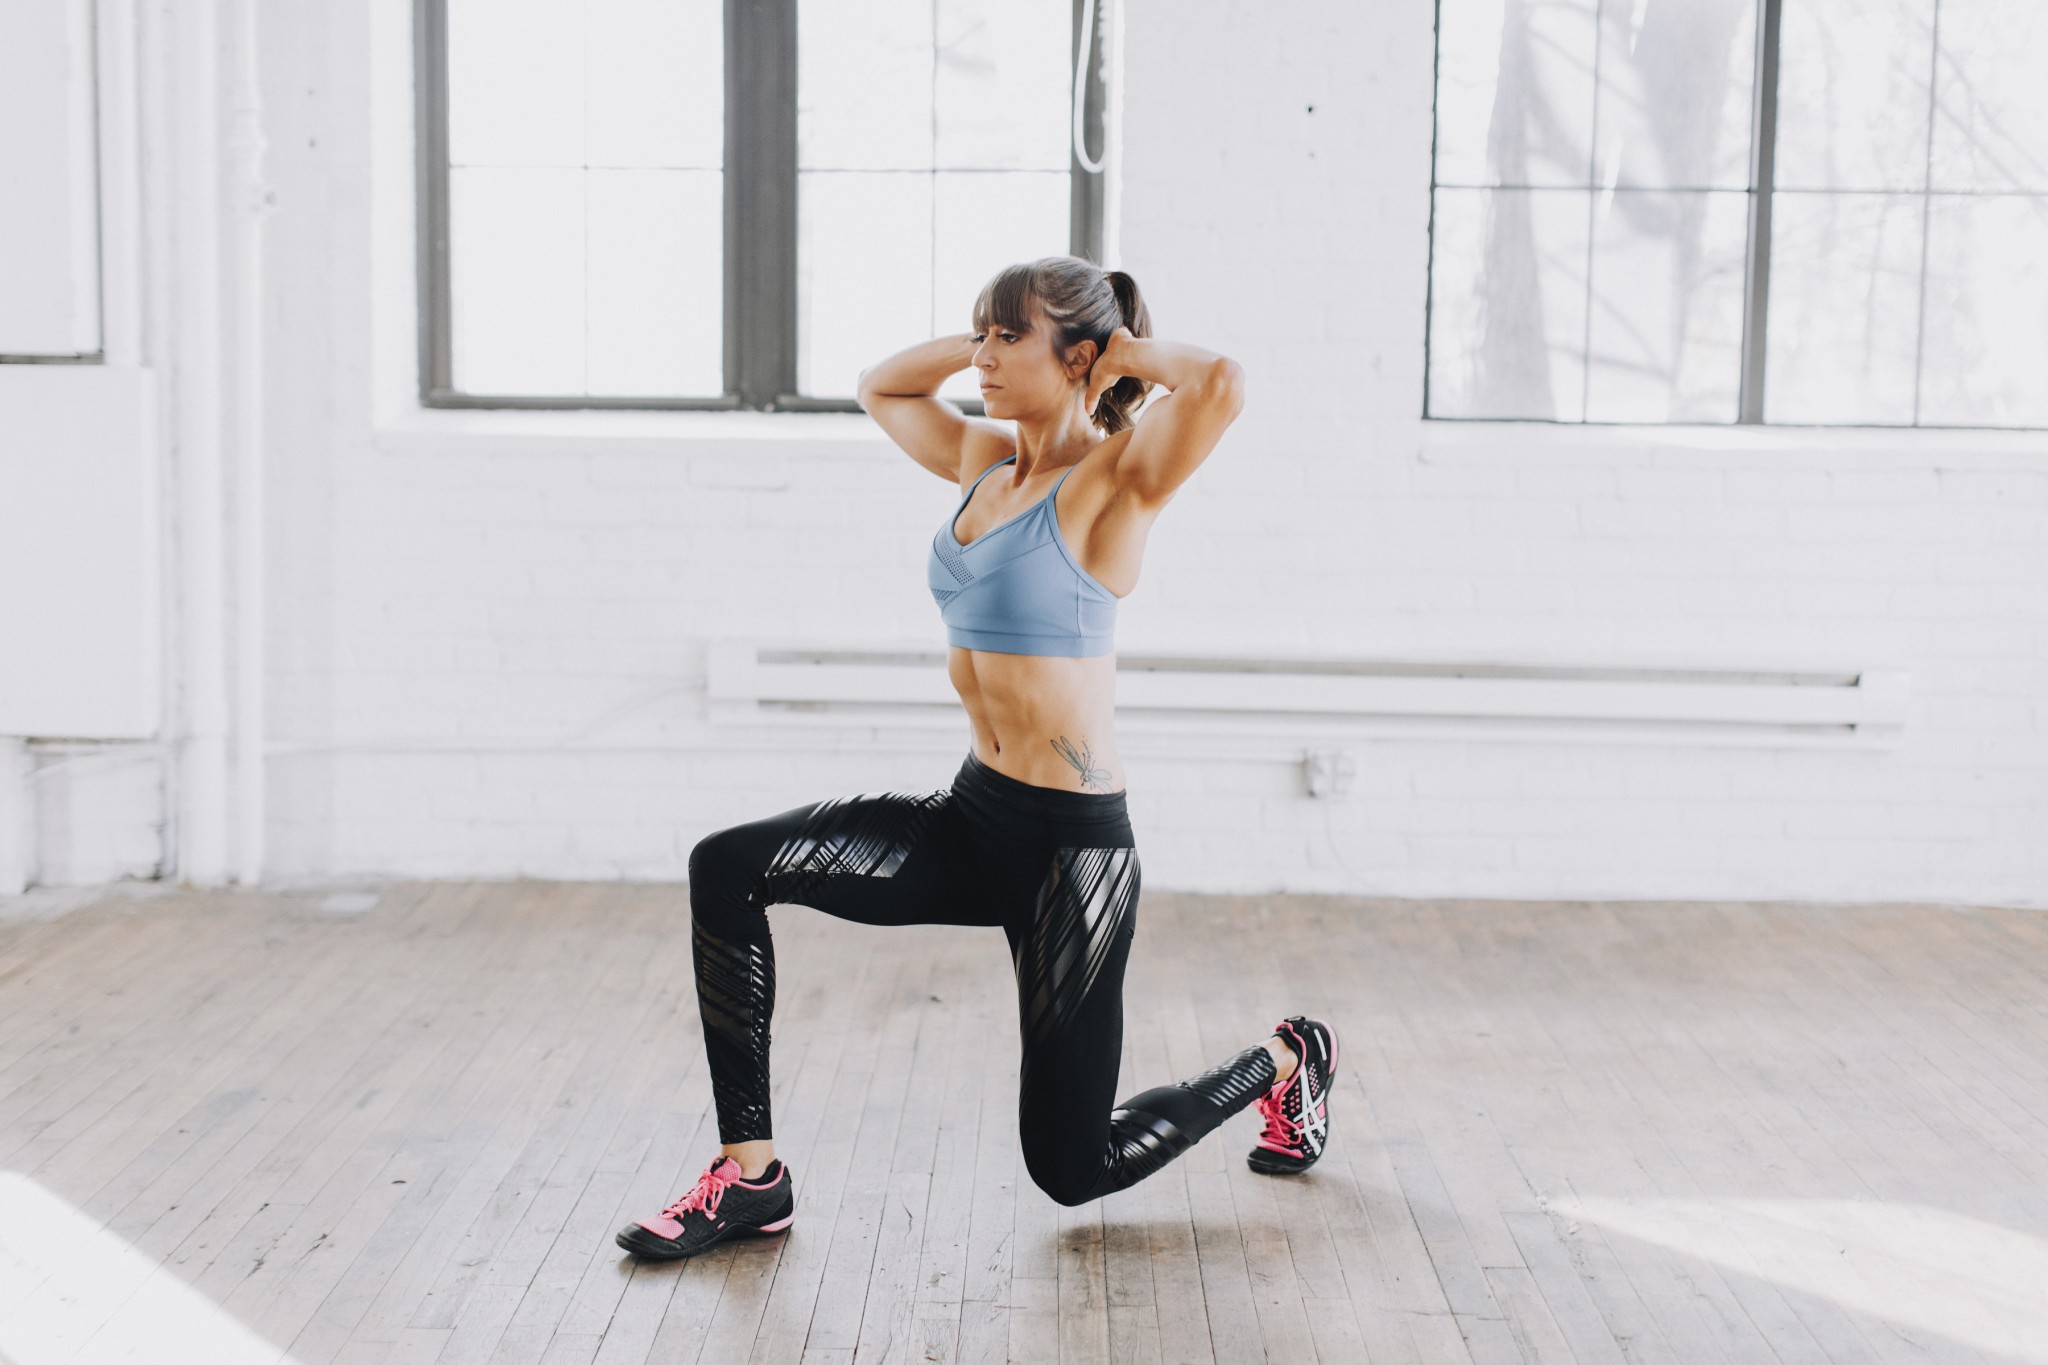
#5: Plan in short workouts.
Instead of trying to force yourself to maintain the same routine you would at home, plan in some workouts you can get in even in your hotel room if you’re super short on time.
That plan to do something may lead to you doing more if you can find a gym or end up with more time. Not to mention often you can find gyms with quick class options if that will help with accountability to get moving!
But simply doing something will also keep you in a routine and habit and mentally make you feel good.
And often when we stay consistent with one habit, we want to stay consistent with others!
So even if it is a 5 minute mobility routine so you feel good when you get back home to train hard, the consistency will pay off…and even reverse some of the aches and pains we get from travel postures!
#6: Get out and walk!
Even if you can’t workout, often you will have little breaks in the day where you can get out and walk.
Not only is this a great way to stop mindless snacking, but it does get you moving and can even allow you to explore the area more!
Even if it is just to get a coffee or grab food, try to move as much as you can during the day! Finding ways to be more active will even help you want to do the other healthy habits and routines you want to maintain.
#7: Increase your intensity AROUND the trip.
In preparation of your trip, it’s not a bad idea to occasionally go a bit more intense with your programming prior, especially so you could even use the trip as a de-load workout week or recovery week.
This may be a time too you are slightly more aggressive prior with the calorie deficit, not extreme but aggressive, and also using more intensive cut macro ratios over easier ratios to hit.
You can then move to minimums on your trip, tracking to stay even just accountable.
And then when you come back, you may go back into things with a bit more intensity even just in your macros before relaxing back into something you can fully be consistent with.
This 1 week before and after just can help with damage control and also mentally make us feel balanced when being a little less conscious of those healthy habits while traveling.
SUMMARY:
Remember vacations shouldn’t the time you stress about your diet, but finding a balance especially when we travel more often can be key!
Focus on doing the minimum even just to maintain those results so you can continue to build when you are back home and in your element!
Ready to dial in your diet and your workouts to fit your lifestyle, needs and goals?
There is always a way to keep moving forward consistently toward our goals working around the challenges life throws our way.
And while it may not be our ideal workout or schedule, doing SOMETHING is always better than nothing and can keep us moving forward toward our goals.
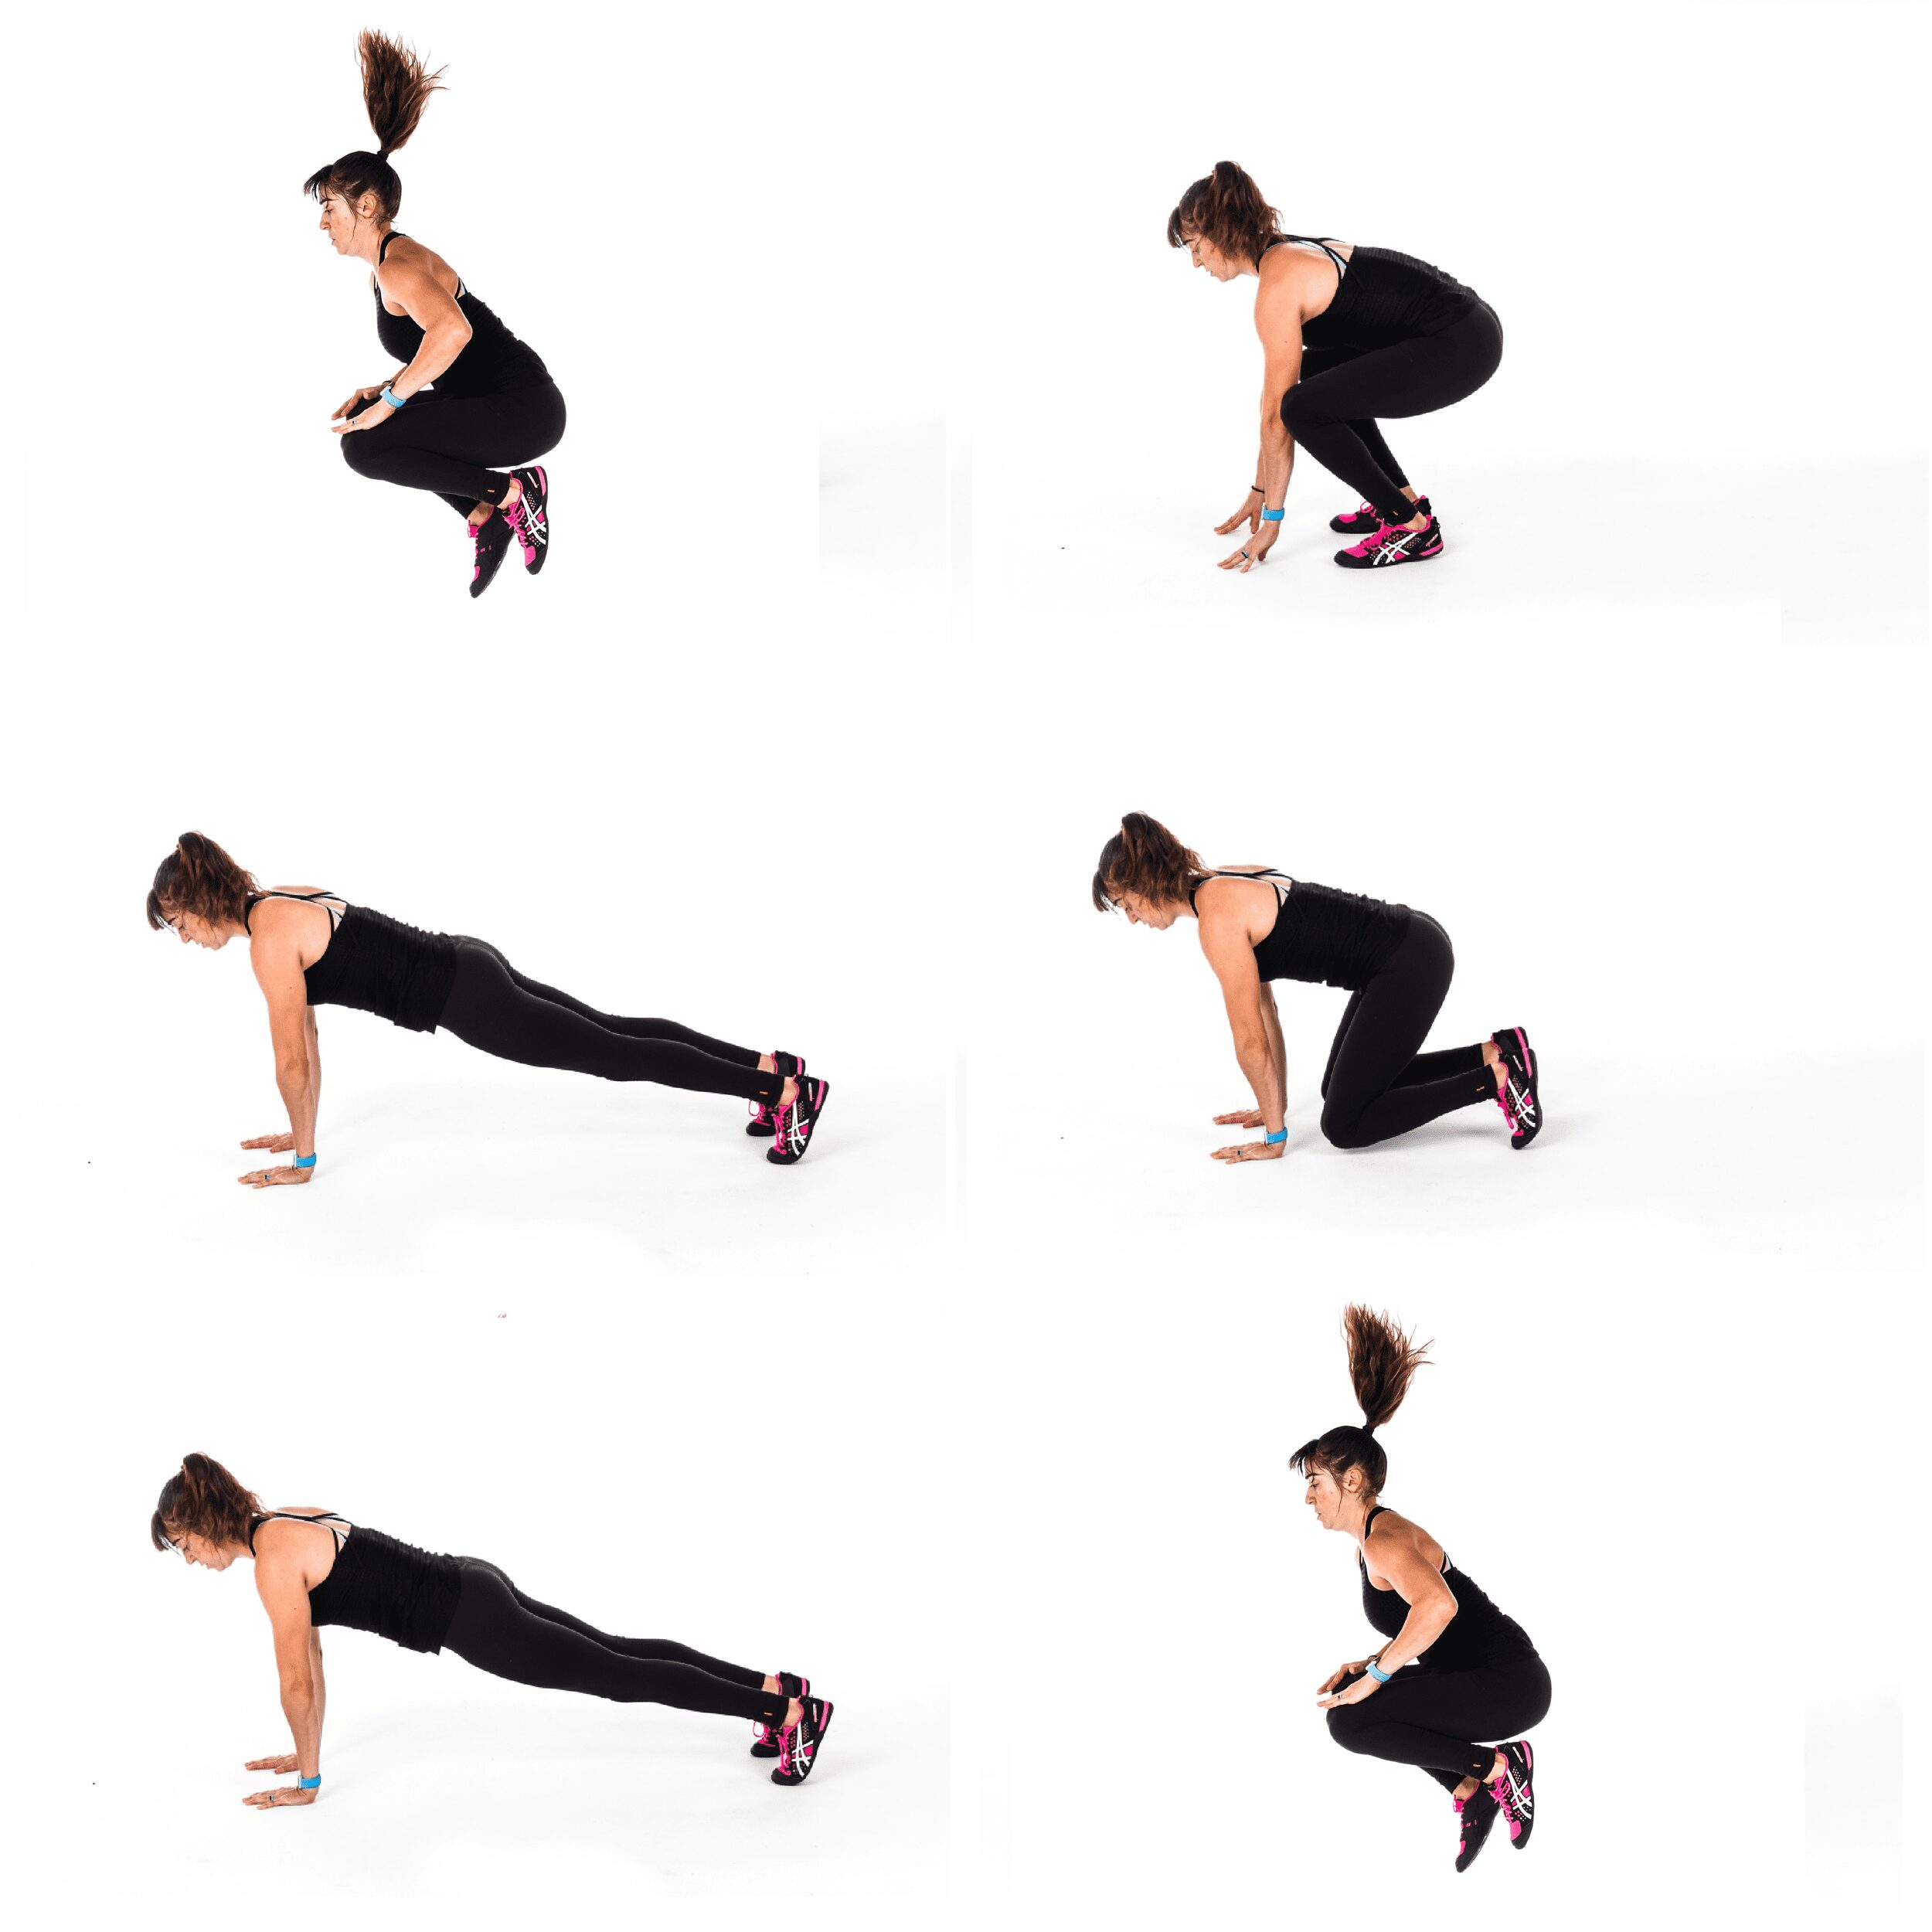
That’s why I wanted to share 10 upper body bodyweight moves to help you build strength even when you don’t have access to a gym or you’re short on time.
These moves will target your arms, shoulders, chest, back and core and can easily be done at home, with a few bonus moves using a towel.
I share quick tips on how to do these moves then 2 amazing workouts you can implement them in!
10 Upper Body Bodyweight Moves:
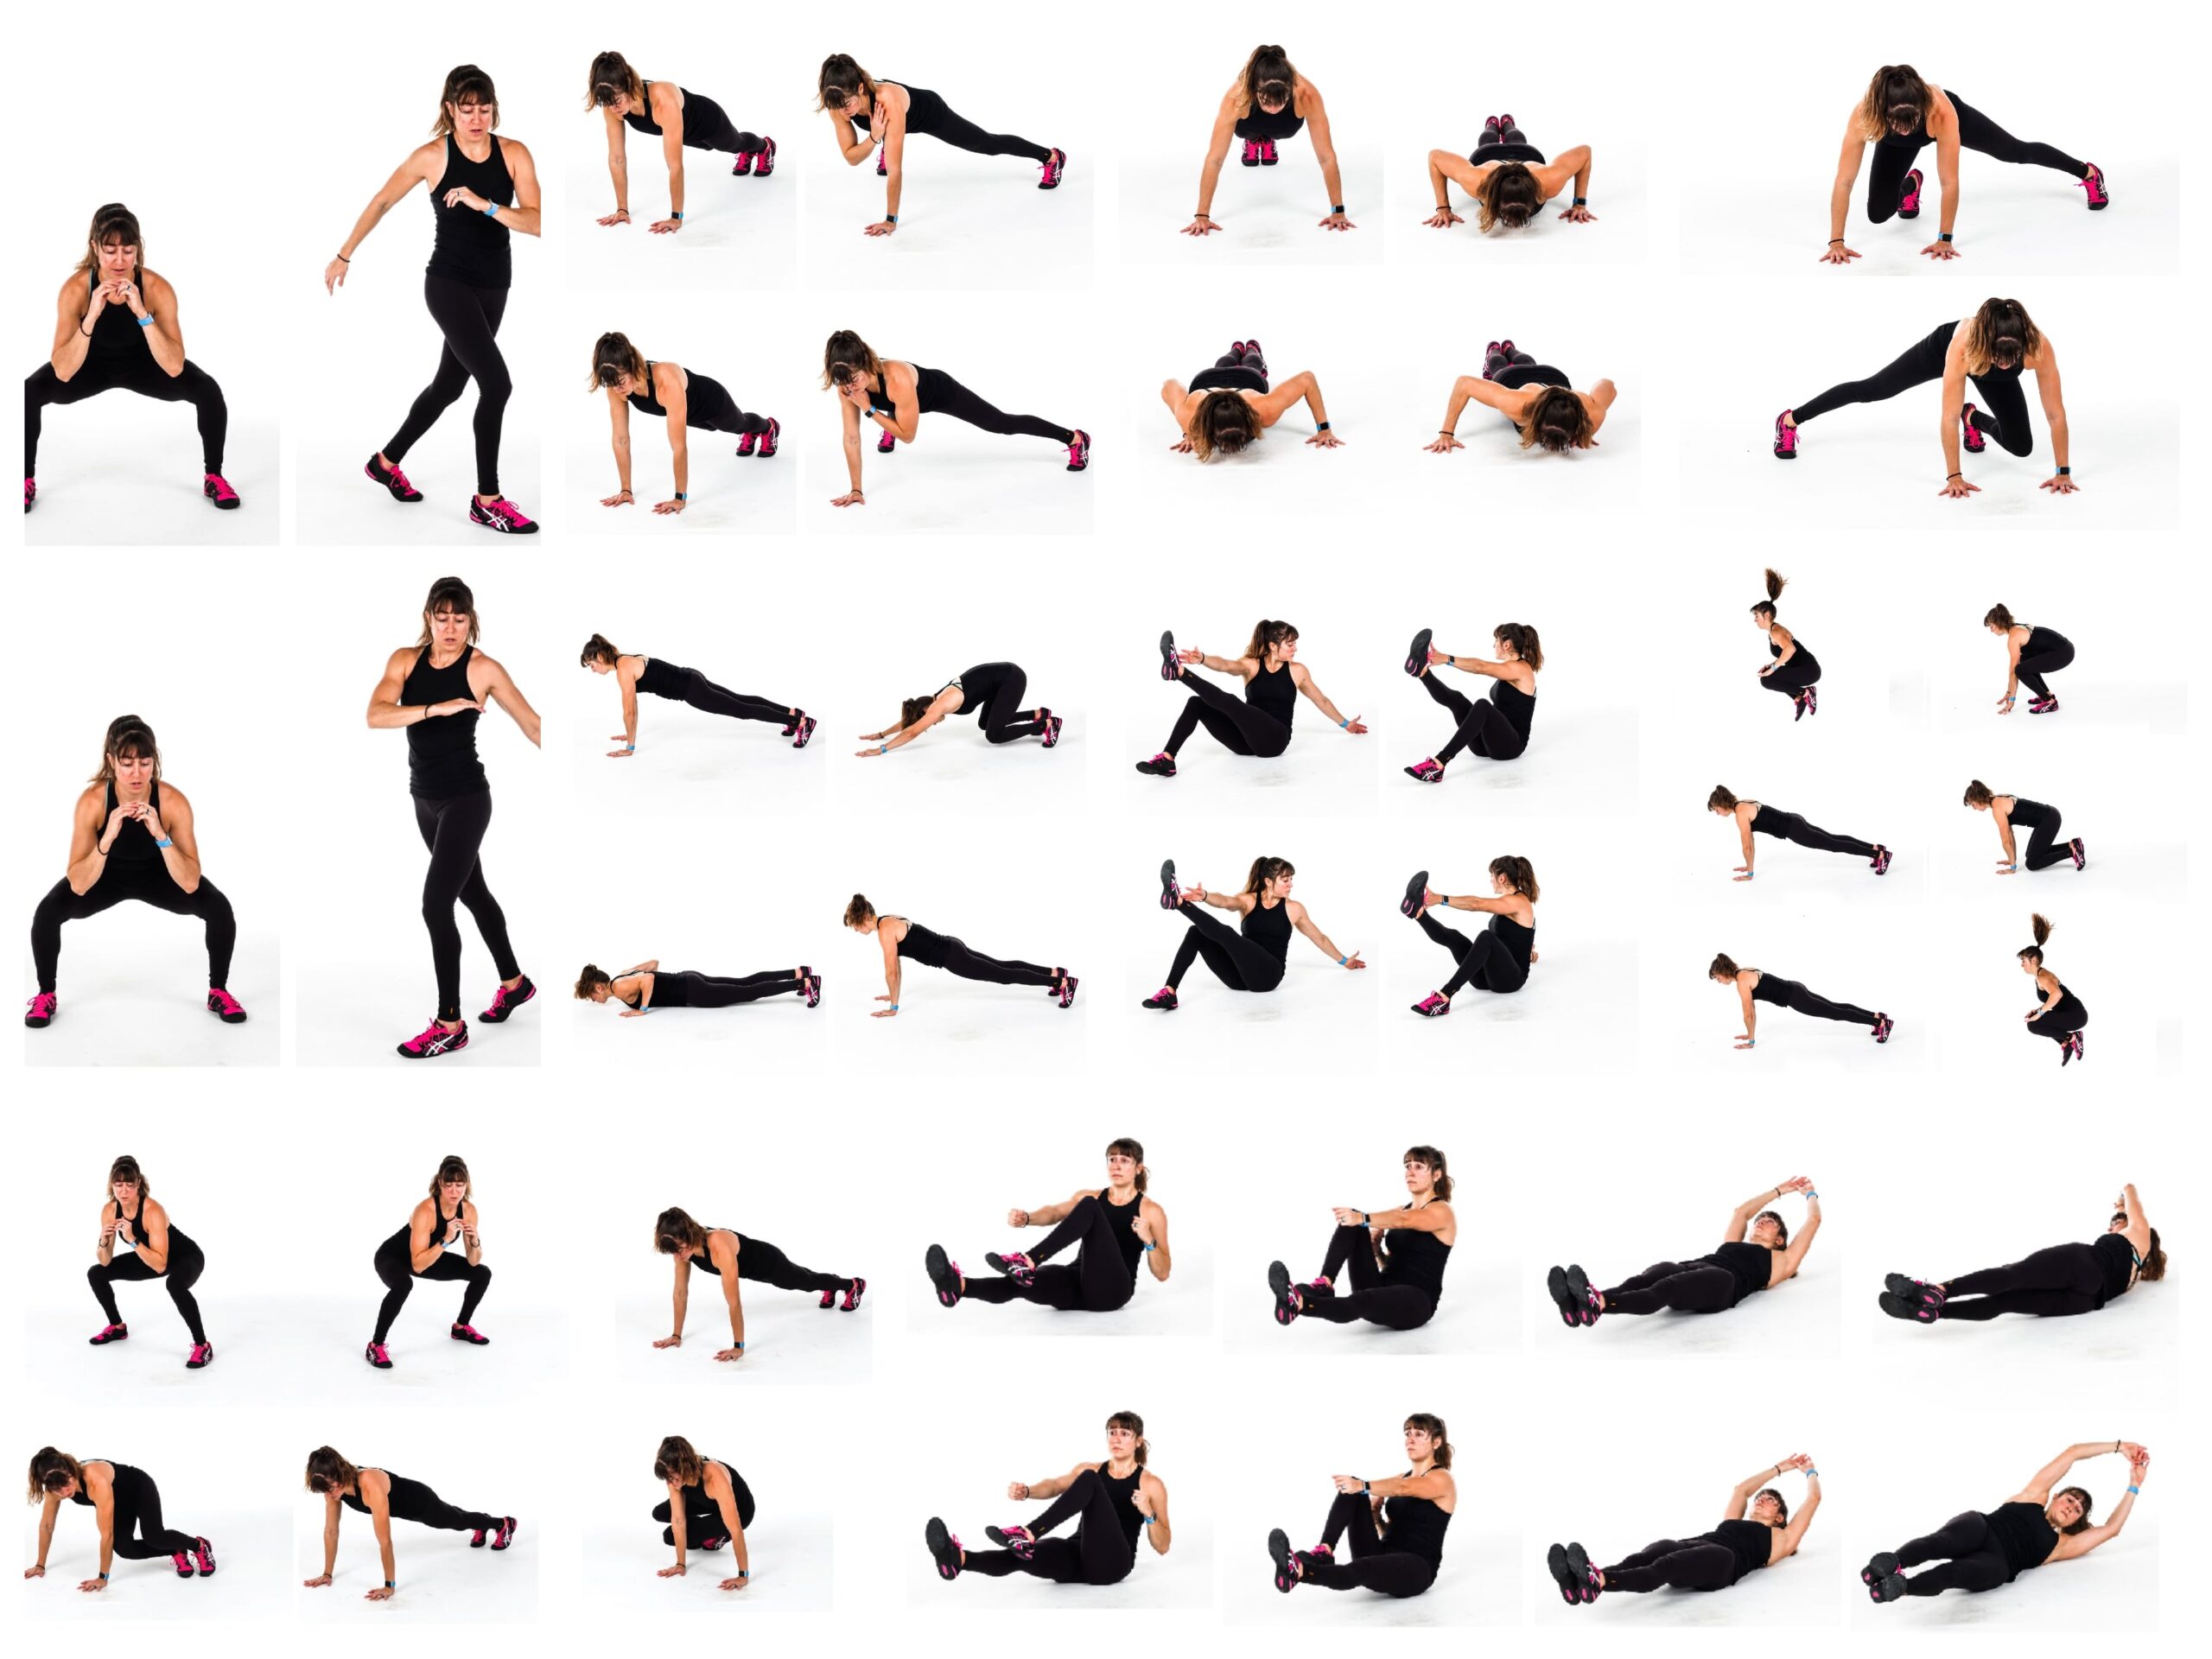
1: Doorway Row
It can be challenging to target your back and perform pulling movements when we don’t have equipment. But by using a simple doorway or even stair banister, we can really challenge our back using our own bodyweight.
And this move is amazing because you can make it unilateral or bilateral to not only challenge one side at a time but even make it harder by using only one side to pull your weight.
Just make sure to stay in that squat and focus on your shoulder blade moving so you’re really initiating the pull with your back!
To modify, start with both hands instead of a unilateral pull.
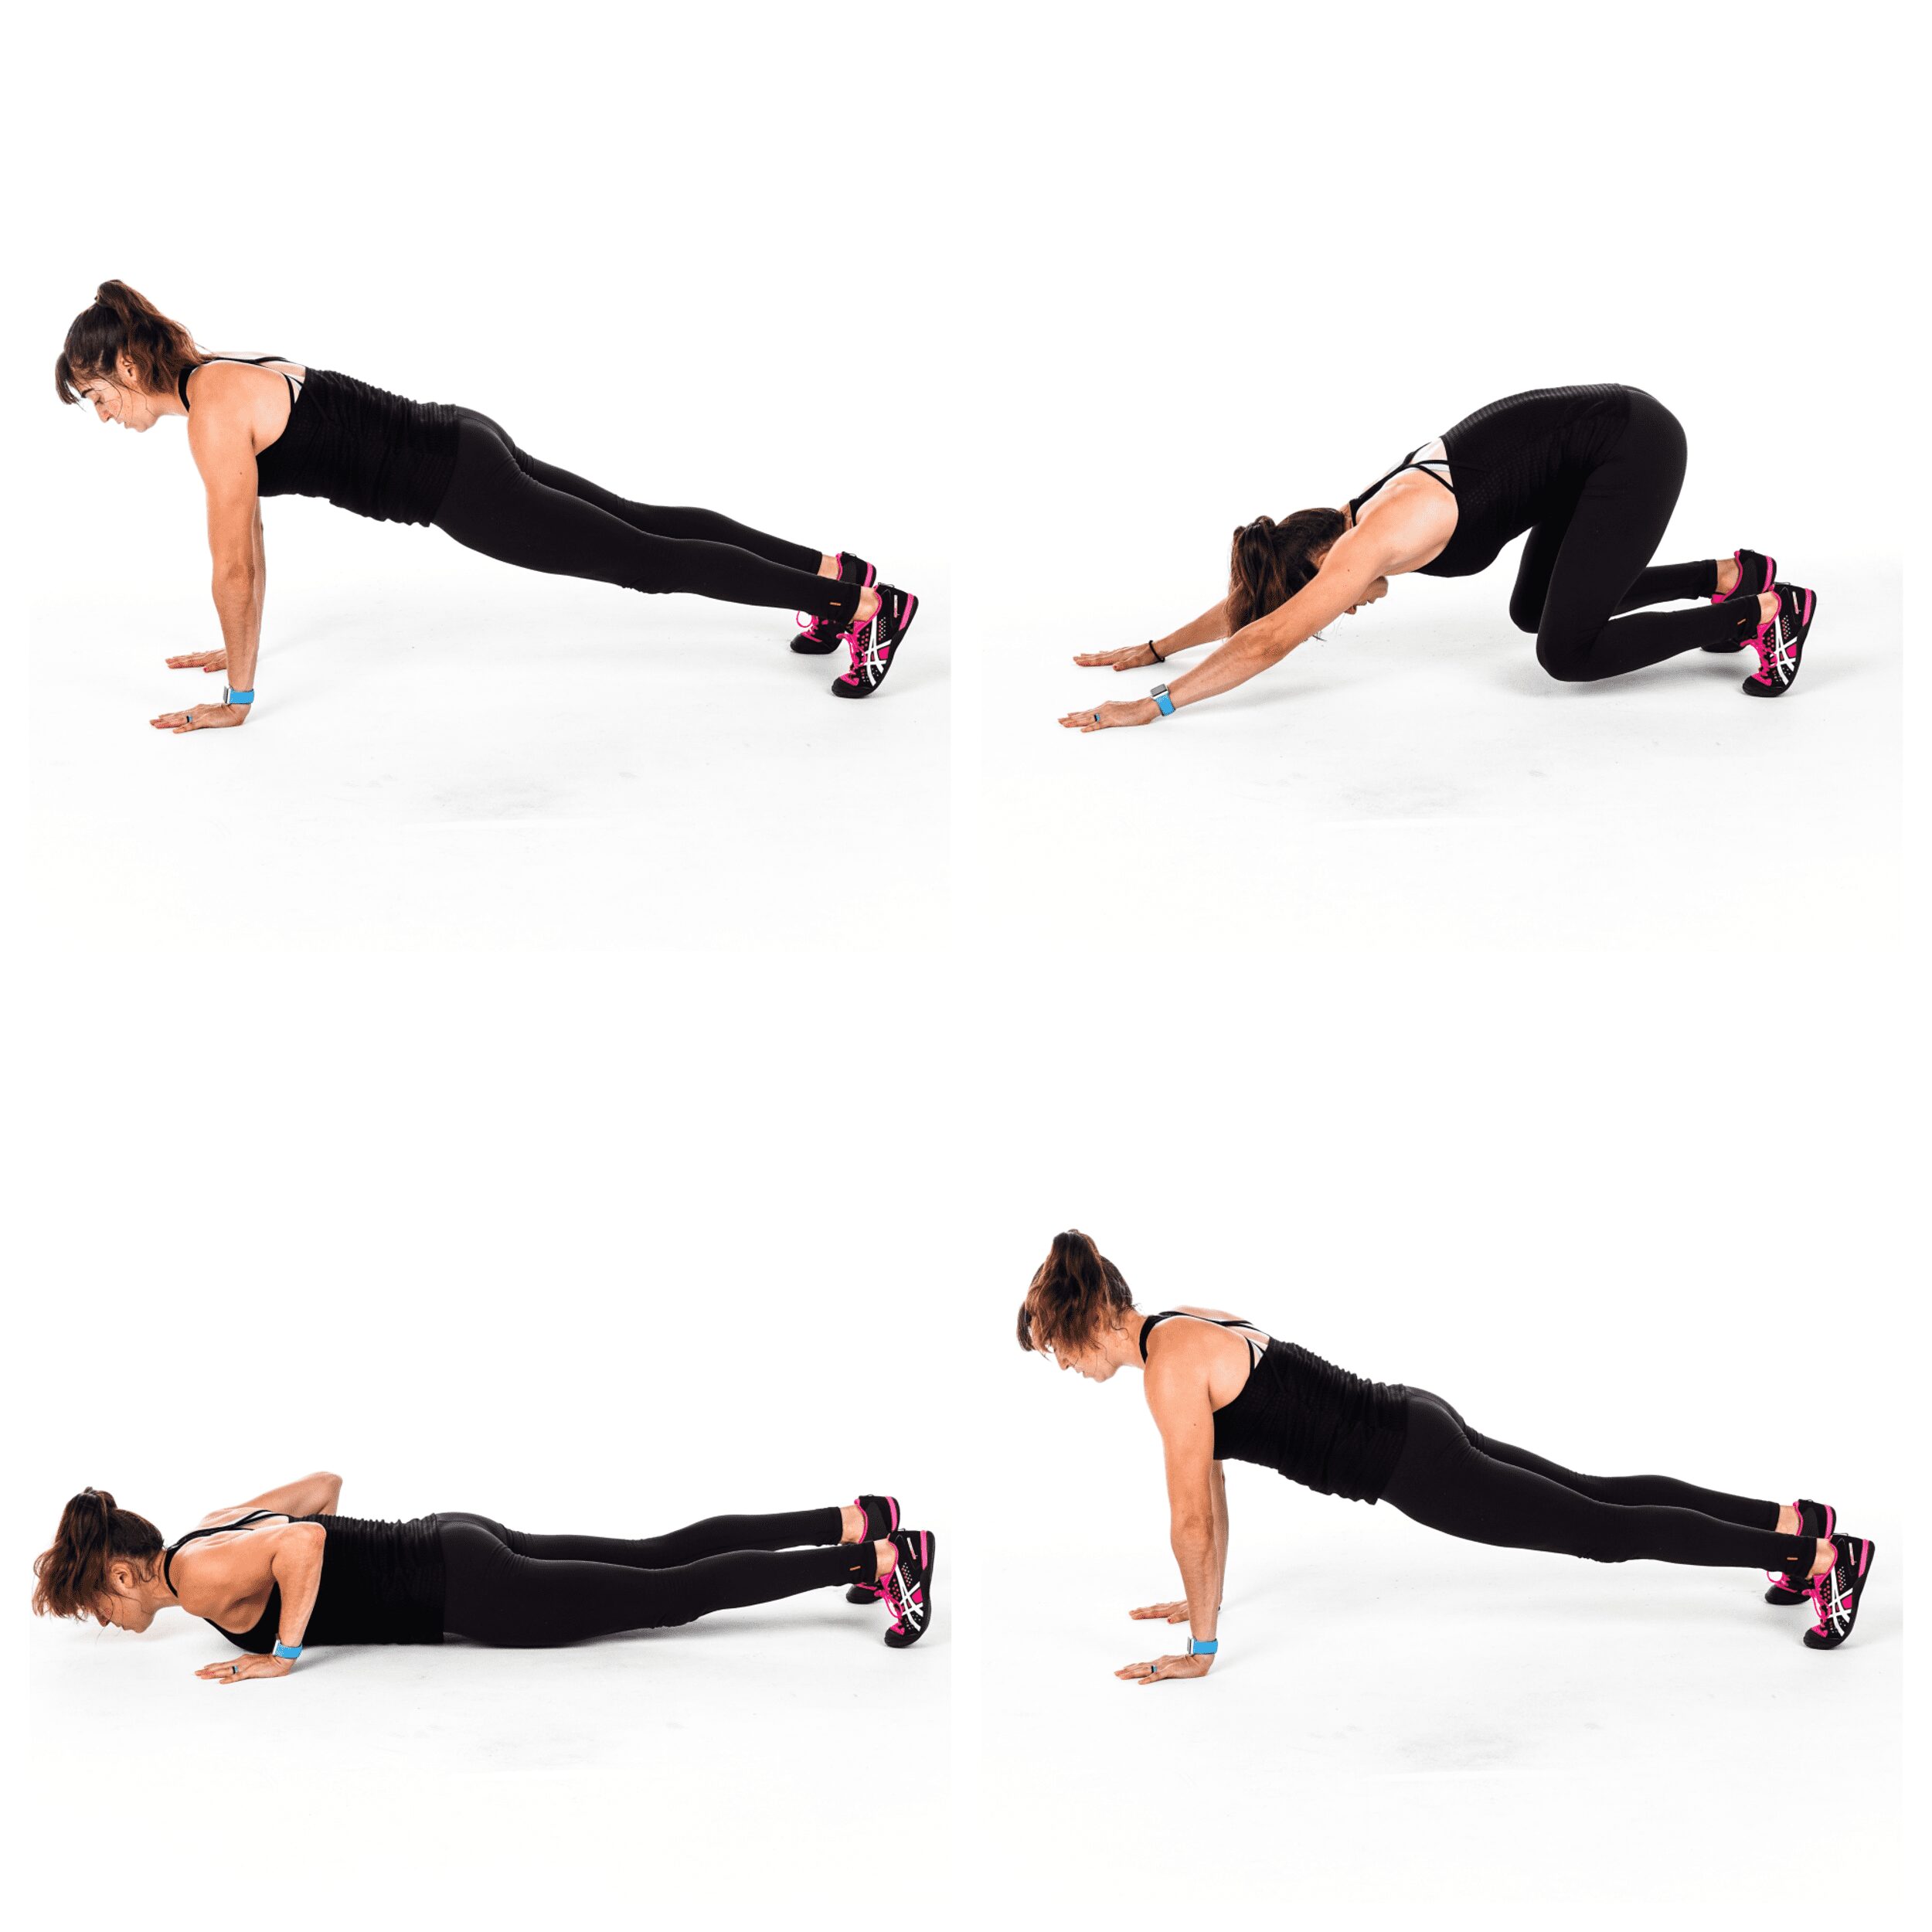
2: Downward Dog Pike Push Ups
Push ups are not only a great chest, shoulders and tricep exercise, but also a great core move. And you can adjust how much you activate each of those muscle groups based on the exact variation you use.
If you want to get your shoulders and get in movement to mimic that vertical press or overhead press, the downward dog pike push up is the perfect move to include.
When you do this move, make sure you don’t turn it into a horizontal press but actually lower your head straight down between your hands to mimic that vertical pressing movement.
To advance this move, place your feet up on a bench or stair. The higher the platform, the harder it will be!
3: Scapular Wall Row
When we think about back exercises, we think about pulling movements. But this amazing back move is actually a press.
If you struggle with engaging your back and that scapular movement, and often feel your biceps taking over, this is a key back exercise to include. And all you need is a wall!
When you do this move, focus on driving off your elbows to push away from the wall and feel your shoulder blades move toward your spine to drive your chest out. Focus less on walking further away from the wall and more on that mind-body connection to engage your back.
To vary this move up, you can also do the press lying on the ground as well.
4: Tricep Push Ups
This amazing unilateral push up is a great way to target each arm independently to correct imbalances and really work those triceps.
It is also easier on the shoulders than the bench dip, which can make it a great option especially if you’ve had shoulder aches and pains in the past.
When you do this move, make sure to press through your entire hand. Move your hand up higher to modify or lower down your side to advance. And make sure not to let your legs flop around.
You can further modify this move to start by pressing off a bench or wall over doing the push up off the ground.
5: Lying W Pull Down
Even when we don’t have equipment, we don’t want to ignore the importance of vertical pulling exercises. Moves like the Lying W Pull Down can help us improve our back strength, working our lats while helping us improve our scapular control and stability.
Really focus on your shoulder blades drawing together and down toward your butt as you pull your arms down from extended overhead as you lie on the ground. Even slightly extend your spine to lift your chest and hold as you perform the movement.
If you do feel your neck during moves like this, rest your head on a towel or even modify this move standing.
6: Chest Fly Push Up
The chest fly is a great move to really work your pecs, which is exactly what muscle you’ll work more with the Chest Fly Push Up.
All you need are two small towels to use on a hardwood floor or even paper plates on carpet.
And bonus, you’ll also really work your core.
When you do this move, really focus on sliding out with control then your pecs working to pull your hands back in as you come up out of the push up.
To modify, try sliding one side out at a time or even move to your knees. You can also modify this move off an incline, sliding one hand out at a time while using your stairs to create that incline.
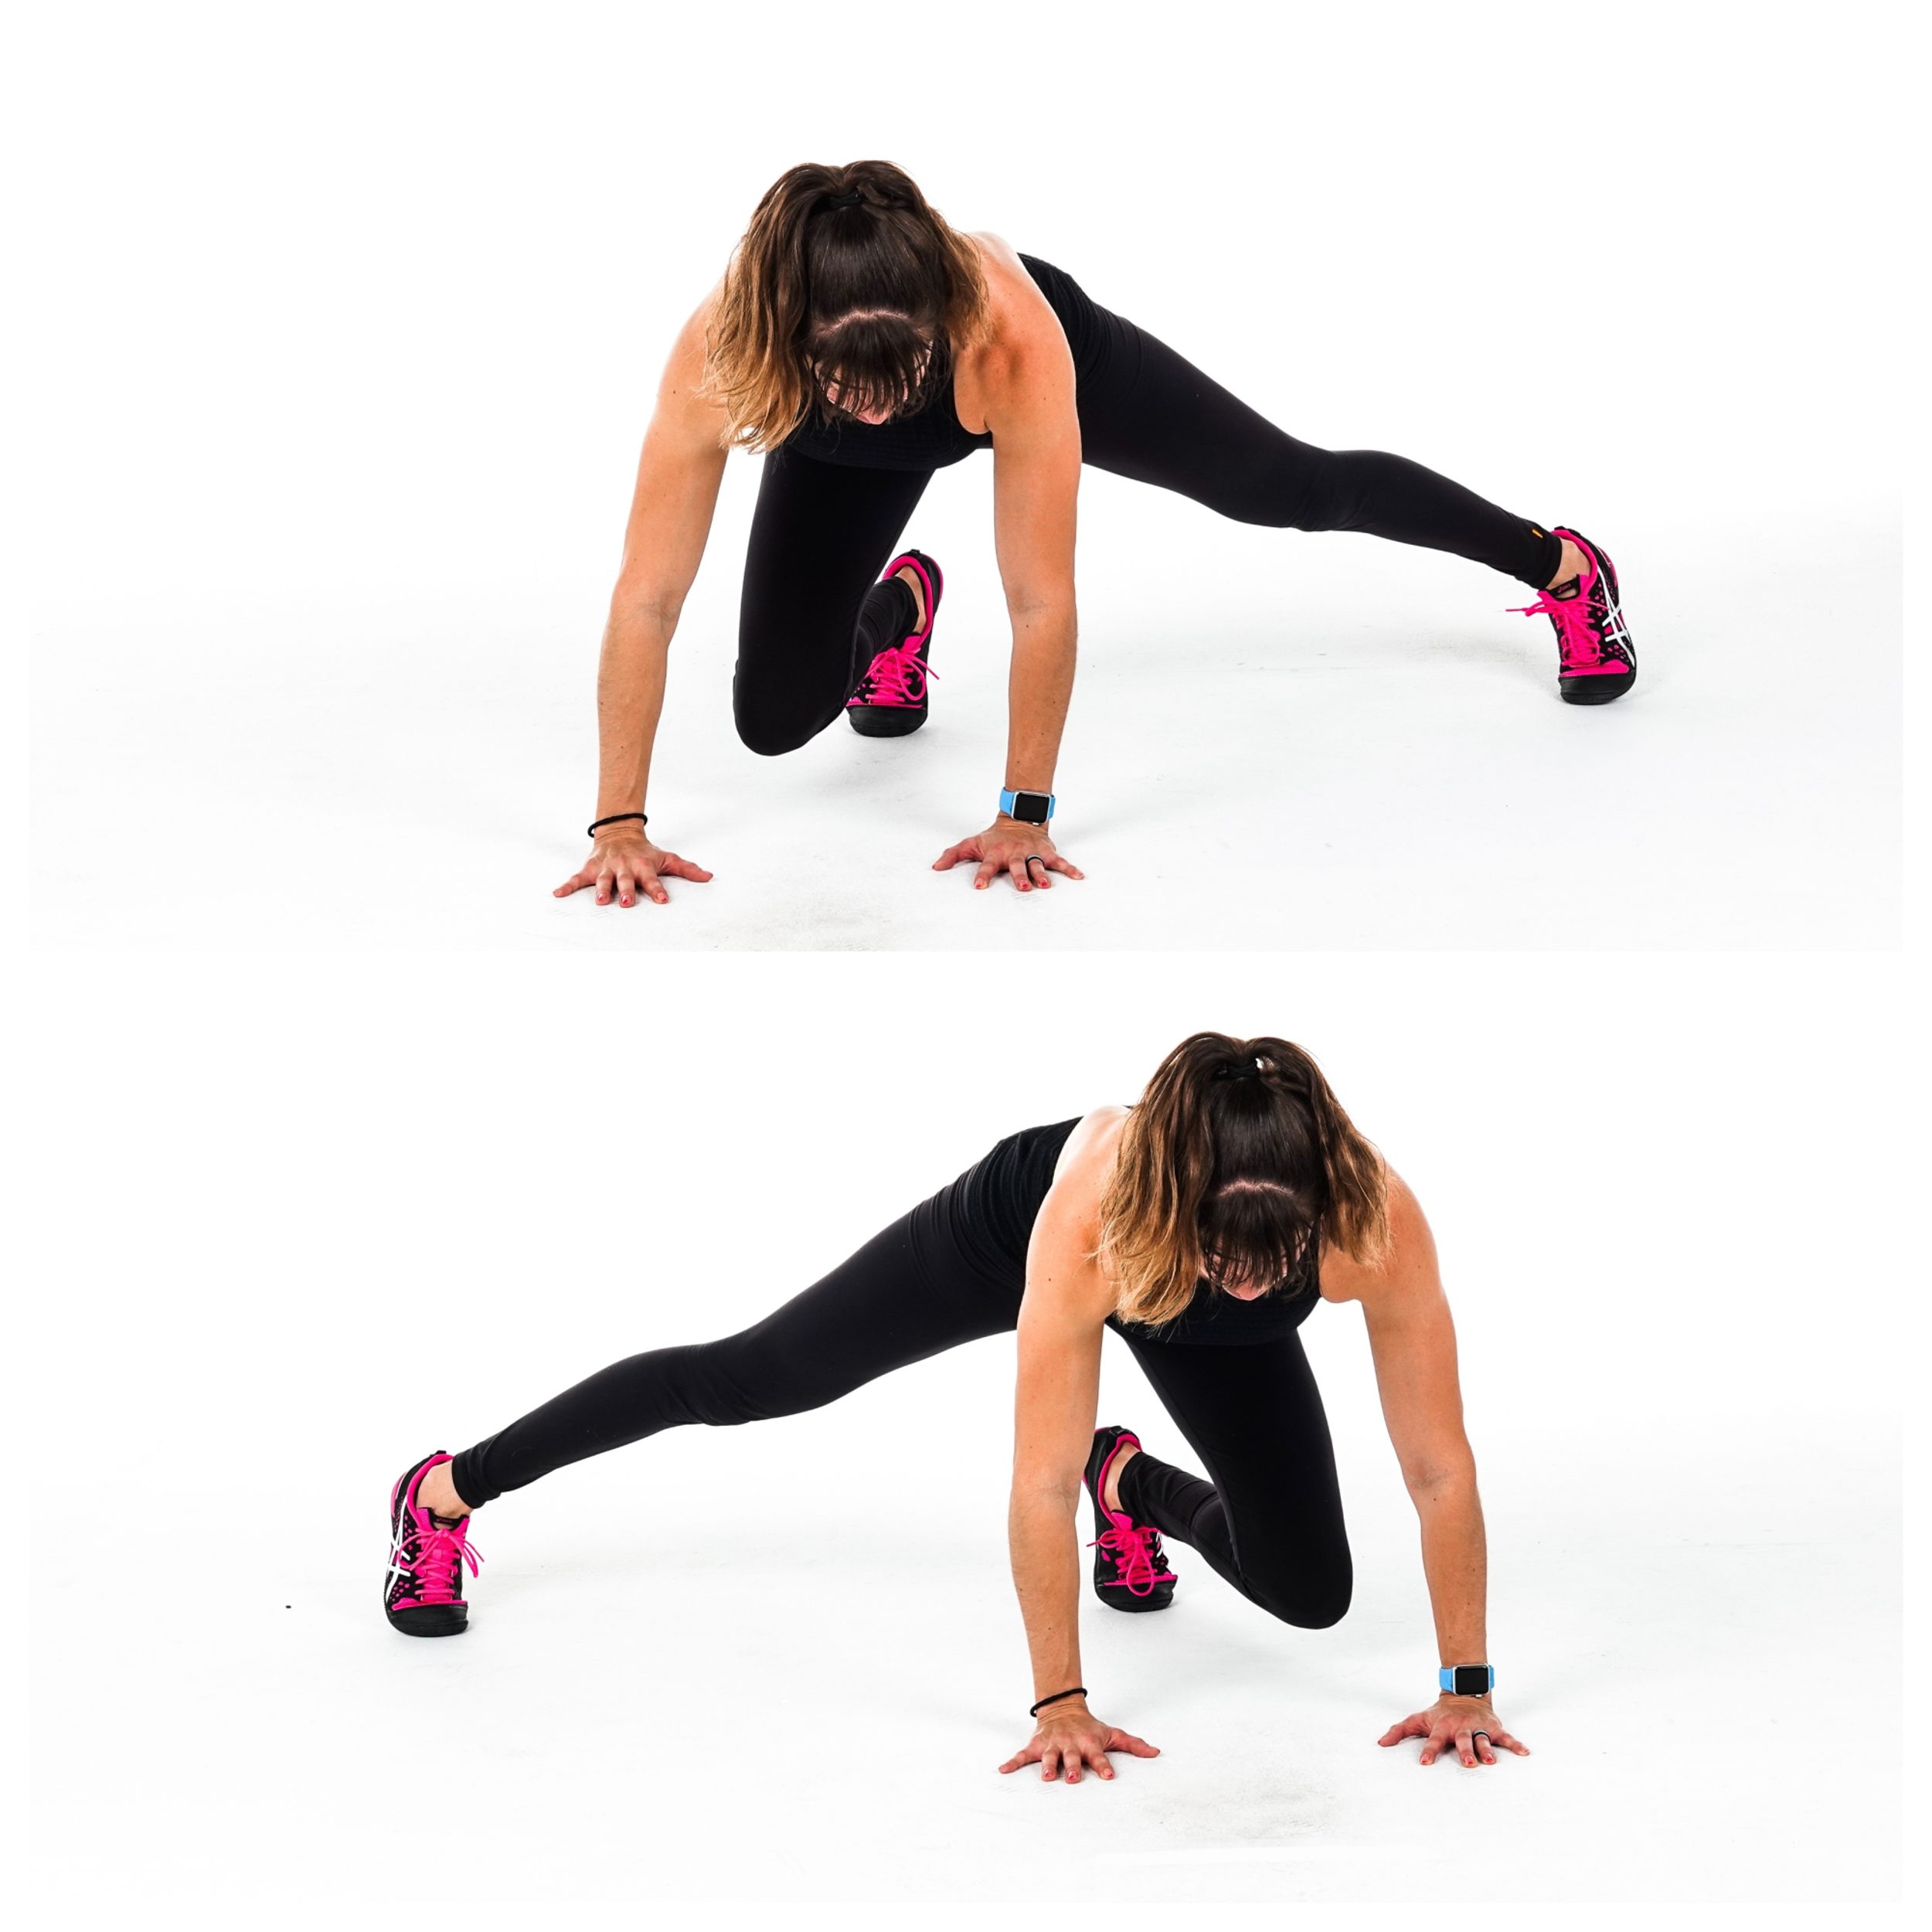
7: Plank Row
This bodyweight exercise is a great way to target your core, especially your obliques, improve your shoulder stability and even work on your scapular control and strengthen your back.
Really focus on avoiding rotation as you row your hand up toward your chest and make sure to initiate the row with your back.
This move is an anti-rotational core exercise so do not rush it but really flex even your quads and glutes to fight opening up as you lift your hand.
To modify, try the plank off an incline, placing your hands up on a bench, couch, table or stair.
8: Climber Plank
Target those arms and shoulders as you work your entire core with this plank variation.
When you do the Climber Plank, really make sure to place your hands under your shoulders over letting your hands sneak out in front of you as you climb up. And as you lower down, place your elbows under your shoulders.
This not only really makes your arms and shoulders work, but it will protect your neck and help you avoid shrugging.
To modify this move, try the plank off an incline.
9: Self Resisted Bicep Curl
You can apply your own resistance when bands or weights aren’t available. And one great way to do this and get in some bonus isolation work for those biceps is using a towel!
To do this curl, loop a towel and hold the ends in one hand to resist your other hand as you curl. You can then make it as easy, or as challenging as you want by pulling against your curl.
Focus on making yourself really fight to curl against the tension. Don’t make it too easy on yourself!
You can even include holds at different points in the move to spend more time under tension.
10: Body Saw
If you want a challenging plank variation that is going to work your triceps and lats, you’ll want to include the Body Saw.
While you can do this move by just walking your feet back, a great way to really make it challenge not only your core to protect your lower back during the extension but also your lats and arms, is to add a towel under your feet.
Instead of walking back, slide back. Do not let your hips sag but focus on lengthening through your arms and shoulders before you pull back in.
Think about pulling back into that plank by feeling the sides of your back working to bring your elbows back under your shoulders.
How Can You Use These Moves In 2 Amazing Workouts?
Workout number 1 is the 1 Minute Max Out. Set a timer for 1 minute and perform as many reps of a move as you can in that time. Move through the 5 exercises, working for 1 minute on each (30 seconds per side) before resting for a minute to repeat for 3-5 rounds through.
1 Minute Max Out
CIRCUIT: 1 minute Doorway Row 1 minute Downward Dog Pike Push Up 1 minute Plank Row 1 minute Tricep Push Up 1 minute Lying W Pull Down 1 minute Rest
The second workout option is the 20-16-12-8 Ladder. You will start with 20 reps per move in the Triset (or per side) then go down to 16 reps the next round, 12 the third round and finally 8 on the last round through the moves. Once all 4 rounds are complete on a Triset, move onto the second set of exercises. Time how long it takes you to beat that time next time through!
Looking to mix up your core training and find something you really feel working those abs, especially the lower abs, while also helping you avoid an achy lower back?
Then you’re going to love these 3 amazing plank variations.
Planks can be both great isometric exercises, but also more dynamic movements to target and strength our abs.
And with some specific variations, we can target that lower portion of the rectus abdominis even more!
That’s why I want to show you 3 ways to use planks to target those lower abs…including one move that is a great untraditional and challenging plank option even if you can’t do traditional planks due to shoulder issues!
And at the end I’ll share a great quick burner layout so you can use these 3 moves at the end of your workout!
3 Lower Ab Focused Planks
1: Dolphin Planks
If you really want to target your lower abs, you need to include exercises that utilize the posterior pelvic tilt.
This tilting of the pelvis, tucking the hips toward the ribs, really engages that lower portion of the rectus abdominis while also working your glutes. And it is a great way to learn how to brace to protect your lower back from aches and pains as well.
While you can use the posterior pelvic tilt in a plank as an isometric hold, doing a plange plank, you can also include this tilting as a dynamic movement during the plank.
This dynamic plank variation using the posterior pelvic tilt is the Dolphin Plank and a great way to challenge your abs.
You will use that tuck up to engage those lower abs, but also challenge your abs to protect your spine as you test out your spinal extension, slightly dropping your hips toward the ground.
This forces your abs to brace as you extend, but be mindful you don’t end up simply engaging your lower back!
To do this move, set up in a plank from your forearms and toes with your feet together. Make sure your shoulders are stacked over your elbows and your upper back is engaged so your shoulders aren’t shrugged.
Drive back through your heels as you flex your quads to hold in a nice straight line. To improve your base, you can widen your feet out to shoulder width.
Then tuck your pelvis under toward your ribs, rounding through your entire spine even to tuck. Do not push your butt up in the air and end up shifting your shoulders back behind your elbows.
You really just want to round through your spine as you tuck your hips toward your ribs, engaging your abs and glutes.
Even think about drawing your belly button in as you exhale to pull your abs in hard.
Then begin to lower back down into that plank position. As you lower though, try to go a little past that straight line as if extending to slightly drop your hips.
You want to feel your abs almost FIGHTING against you lowering to prevent your back from really arching.
You’re testing out your ab brace as you extend.
Then tuck right back up, tilting your pelvis again.
Do not push backward as you do this movement. Keep your shoulders stacked over your elbows.
Pause in each position to really feel your core working. Really move slowly through the movement to focus on feeling your abs.
If you feel your lower back, either modify to the static plange plank hold or use an incline.
To modify this move an incline works best. The higher the incline the less pressure or strain there will be on your shoulders and even core so you can really focus in on those abs working.
You can also do this starting on your hands and knees but be conscious that, while it may look like the cat cow stretch, you are truly engaging your abs to round up. I like to call this variation the vomiting cat because I want my clients drawing in their abs as if trying to really hollow out their belly!
2: Lower Ab Plank
This move is not a traditional hands and feet or forearms and feet plank. But it is an amazing core isometric hold and a move that is great to target those lower abs.
I personally call it a Lower Ab Plank so wanted to include it as an option because often when people have shoulder injuries and can’t do planks they feel a bit lost about what options are out there.
So if you need to take your upper body and shoulders out of the equation, this is a great option to target those lower abs…although don’t forget about using the incline as well to regress moves and build up!
This exercise is advanced though and you need to have mastered that basic pelvic tilt hold to brace so you don’t feel your lower back or hip flexors only working.
To do the move, you will lie on your back with your arms down by your sides or hands behind your head.
To start you can raise your legs straight up toward the ceiling and tilt your hips towards your ribs to press your lower back into the ground. Or you can start with your knees bent to really set up the posterior pelvic tilt before extending your legs.
Maintaining that pelvic tilt, lower your legs down so they are only an inch or two off the ground and hold. Better to even hold up a few inches higher to keep that ab brace and even squeeze your glutes.
Focus on really bracing those abs as you hold.
If you feel your lower back taking over, raise your legs up higher or even bend your knees. You can even start with just one leg extended.
Lifting your head to perform an upper body crunch can both make the move harder, but also help by flexing your spine.
Make sure to breathe and focus on engaging those abs, keeping that tilt. You do not want your lower back taking over. If it does, your lower back and not your lower abs are getting worked by this move.
Better to modify and focus on those abs than do a harder variation where you compensate!
3: Body Saw
Extended planks or long lever planks have actually been shown to increase ab activation over the traditional plank, especially of the lower portion of the rectus abdominis.
That’s why it’s key to include some extended plank positions in your routine.
You just want to be very conscious you don’t overload your neck and shoulder OR let your butt start to hike up in the air as you do these moves.
One great dynamic way to include the extended plank position in your routine over simply holding is with the Body Saw.
The great part about this plank variation, like with all plank variations, is you can also modify this move off an incline.
And if you have wrist issues you can do it from your forearms or you can also give yourself more space and change things up by doing this movement from your hands to work your arms more!
To do the basic Body Saw plank from your forearms, set up in a plank position from your forearms and toes with your feet close together and elbows under your shoulders.
You want a nice straight line from your head to your heels. Make sure to engage your back to support your shoulders and make sure they aren’t shrugged.
Then begin to walk your feet backward, taking small steps. Keep your body in a nice straight line and don’t let your hips sag toward the ground.
Lengthen through your triceps and shoulders as you walk back.
Walk back as far as you can while keeping your core engaged.
Then walk your feet back forward until you are back in the standard plank position. You do not need to walk more forward than simply back so your shoulders are over your elbows.
Make sure you feel your abs bracing as you extend back. Do not push your butt up in the air or let your hips sag toward the ground.
Repeat walking back out.
Remember you can modify the move off an incline to reduce the strain on your upper body and core.
To advance this move as well, you can also add in sliders, sliding back instead of walking. That reduces traction and even makes that pull back in so much harder! Just make sure you can control the move before progressing!
SUMMARY:
Using these 3 plank variations you can really work your abs while targeting that lower portion of your rectus abdominis even more!
To use these as a workout….
Lower Ab Burner:
Set a timer for 20 seconds per move starting with the Body Saw then the Dolphin Plank and ending with the Lower Ab Plank.
Rest 20 seconds between rounds to make sure you can really focus on bracing hard each round and complete 2-3 rounds through.
You want to focus on short intervals so you can engage everything hard over just focusing on holding for longer and letting your lower back or hips become overworked!
The BEST results happen when our diet and our workouts WORK TOGETHER!
Getting in a killer cardio workout doesn’t have to mean using a piece of cardio equipment.
You don’t need a treadmill or a bike or to spend hours running to improve your cardiovascular health and conditioning while blasting fat to help with your weight loss efforts!
So if you’re short on time and need a workout you can do ANYWHERE, these 10 moves can help you out!
Whether you pick 4-6 and do 30 seconds of work with 15 seconds of rest or even do a 20/20/20 set up, you can get in a killer workout no matter where you are in just under 30 minutes!
Need some killer cardio workouts using these moves?
This move will get your blood pumping as it sets your legs, lungs and, even your core, on fire!
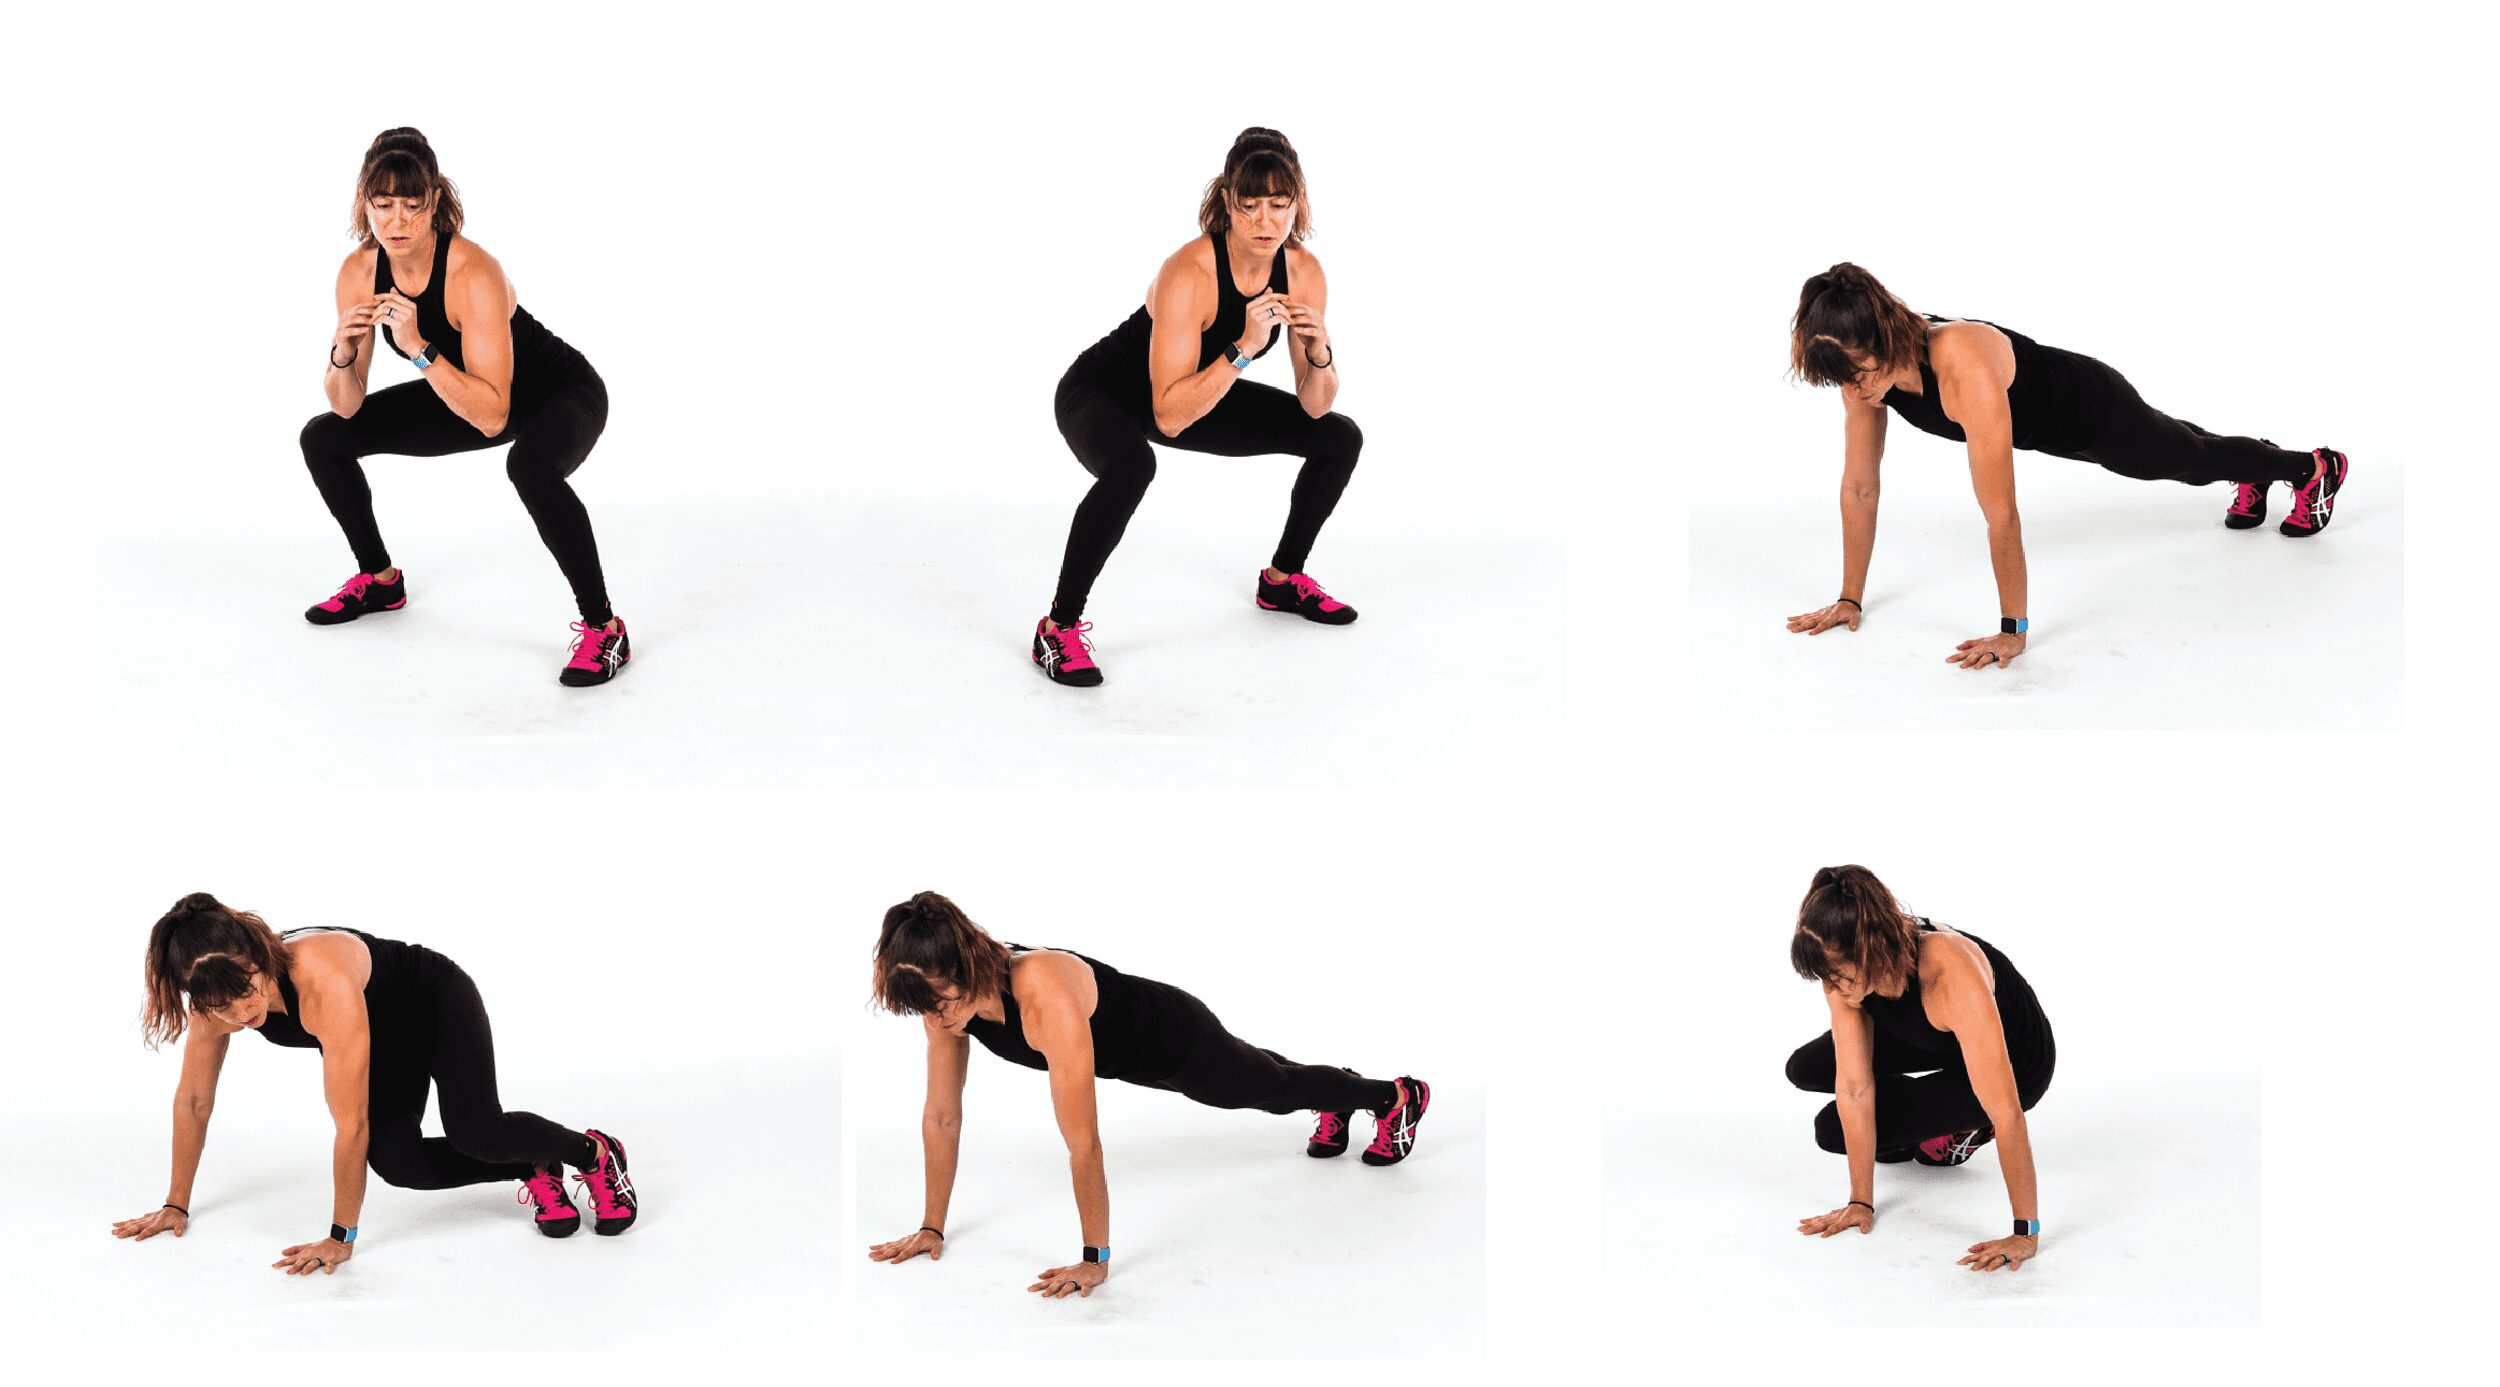
This hybrid move combining Snow Board Hops with Plank Skiers is a great full body movement that’s a “fun” spin on that traditional burpee.
To do Snowboard Hop Skiers, start with your feet in a slightly staggered stance and your back foot out in front of your front foot. Look forward over that front leg and then squat down to place your front hand down on the ground by your toe. Do not simply round over to place your hand on the ground. Squat down. Do not touch the ground if that means rounding over with your butt up.
Then jump up and rotate, switching to land in the slightly staggered stance on the other side. Sink down then reach your hands down to jump back into a high plank position from your feet and hands with your hands under your shoulders and feet close together.
Holding the plank, jump your feet up and in toward one side, bringing your knees as close to the outside of your elbow as possible.
Jump back into the high plank position center then jump your feet up to the other side, again bringing your knees as close to the outside of that elbow as possible. You want to feel your core rotate to tuck your knees up to the outside.
Jump back center then jump up and in to come into that snowboard squat position.
Lift your hands up and jump back to that first side before jumping back again to repeat the plank and skier hops to each side.
You can include just two snowboard hops and always jump back on the same side if you alternate which side you start with and have an even number of rounds. Or you can include 3 snowboard hops even so you are alternating sides you jump back for the skier hops on.
Tuck Jump to Plank Tucks:
This killer burpee twist will work your legs, especially your quads, as well as your abs and shoulders. It is a high impact movement, that requires proper landing mechanics.
So if you have knee pain or need to reduce impact, sub in a bodyweight squat for the tuck jump and step back and in instead of jumping for the plank tucks.
To do Tuck Jump to Plank Tucks, start standing tall before sinking to place your hands on the ground and jump your feet back into a high plank position with your hands under your shoulders and your feet a few inches apart.
Brace your abs and don’t let your hips sag as you jump both feet in to bring your knees close to your elbows. Try to jump in so your knees are at least under your hips if not closer in. Use your abs to try to get them just a few inches from your elbows.
Do not jump in so much that you sit back on your heels.
Then jump back out into the high plank position. Do not let your butt go up in the air and keep your hands under your shoulders.
From the high plank position, jump your feet all the way up to come back up to standing. As you come up to standing, swing your arms back and jump up, tucking your knees up toward your chest.
Land with your knees soft and then sink back down to move back into that high plank position before tucking your knees in again.
Beginners can do a squat jump or bodyweight squat instead of the tuck jump. They can also step back into the plank position and step one knee in at a time. And then extend one leg back out at a time to keep the move lower impact. You can also modify the plank and tuck by placing your hands up on a bench after the bodyweight squat if you can’t get down to the ground.
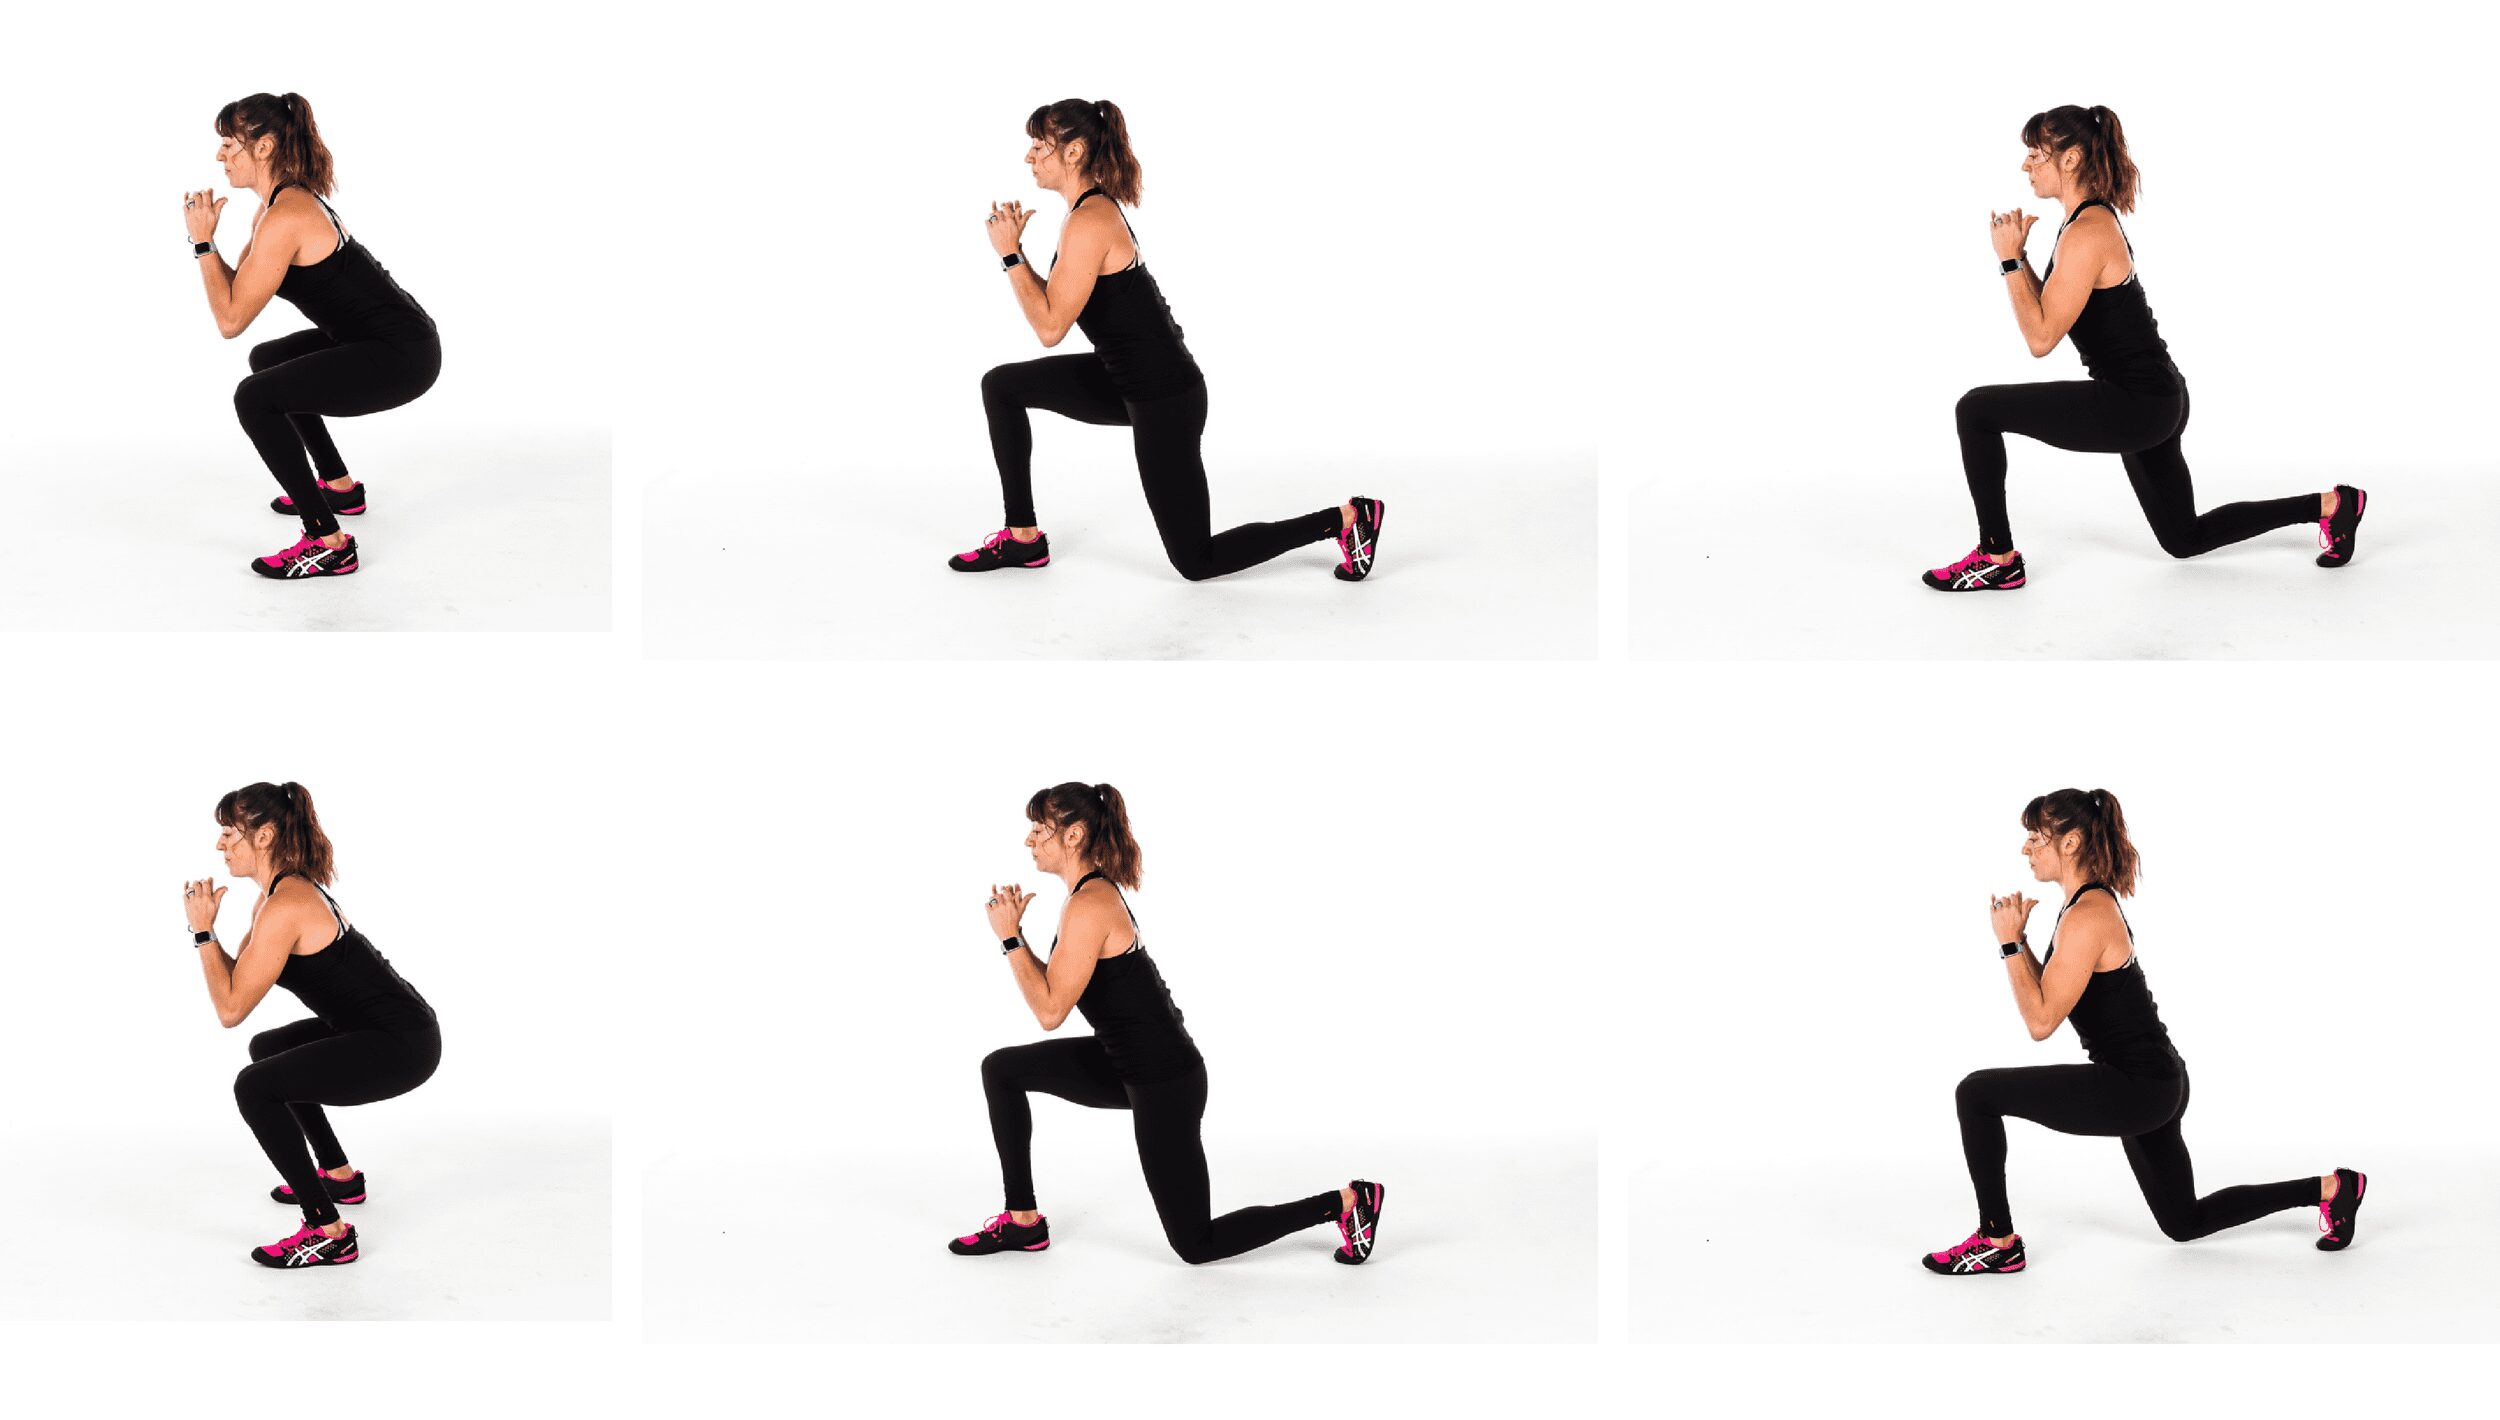
Squat Double Lunge:
Can you say jello legs?!
This hybrid leg exercise will get your blood pumping and really target your legs. (It will also challenge your coordination a bit, which is never a bad thing!)
To do the Squat Double Lunge, start standing with your feet about hip-width to shoulder-width apart. Sink down into a squat, sitting back as you sink to about parallel to the ground. Keep your chest up and your heels down.
Jump up out of the squat and, as you come to land, sink into a lunge with one foot forward and the other foot back. Make sure your front heel is down and all of your weight isn’t in that front leg.
Drop your back knee down toward the ground as you bend that front knee to about 90 degrees then explode up and switch legs, landing in a lunge on the other side.
Again sink into that deep lunge and jump up, bringing both feet back to parallel to sink into a squat.
Make sure that as you land with each move, you bend your knees and don’t land with your legs locked out.
Each time you will perform the squat then a lunge to each side. You can alternate which side you lunge with first.
Beginners may step instead of jumping and may not perform as big a range of motion. You may also step and do a straighter leg lunge if you need to reduce knee flexion.
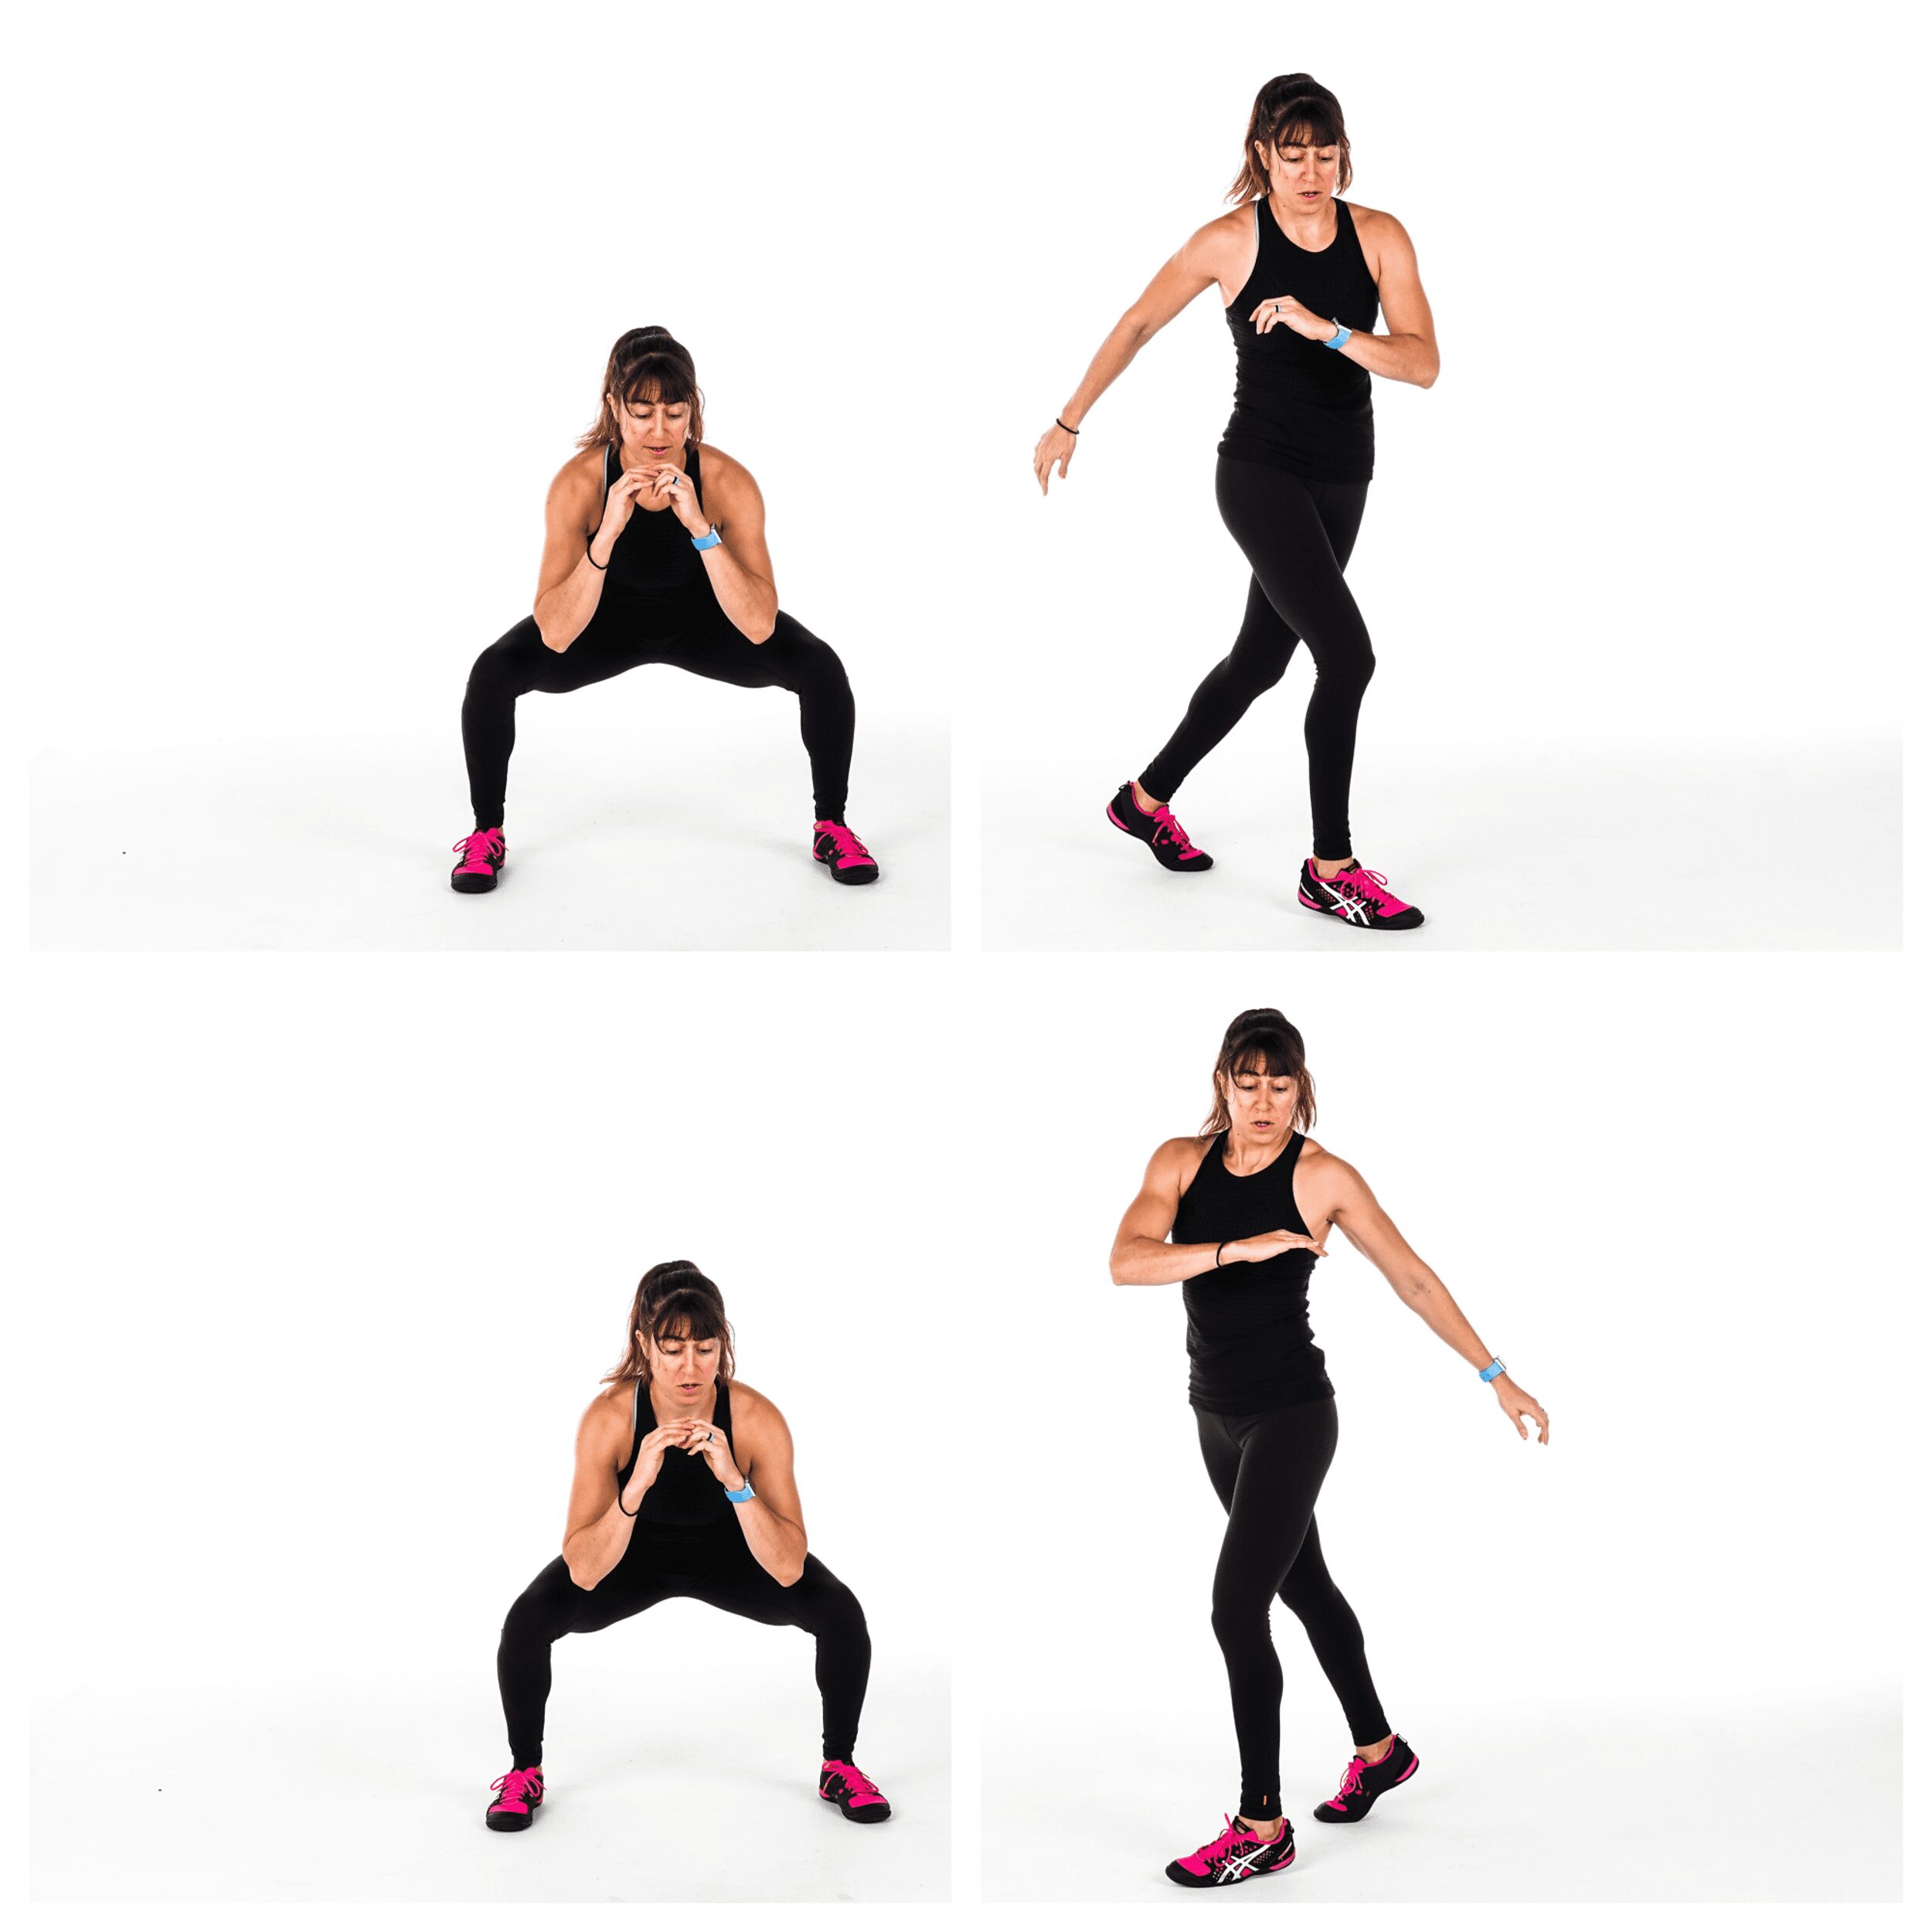
Squat Twists:
Work your legs and your core with this squat to twist movement.
The squat jumps will get your blood pumping and legs working, while the twist is a great move for your core, especially your obliques!
To do Squat Twists, start standing with your feet about hip-width to shoulder-width apart. Sink into a squat to about parallel to the ground, keeping your heels down and chest up. Really sit your butt down and back.
Then jump up out of the squat and, as you leave the ground, rotate your hips to pivot your lower body and feet toward the right or left. Land on the balls of your feet with your hips angled toward one side but your chest still fighting to face forward. Swing your arms to the opposite side you’ve rotated your feet to.
Land quickly on the balls of your feet and push off to move back into the squat facing forward. Bend your knees as you land and quickly sink to then jump back up and rotate your hips the other way. Feel your core working to twist.
Beginners may not sink as low in the squat and may stand up out of the squat, stepping with just one leg in front to twist their hips, touching that toe to the ground before stepping back to sink back down.
Corn Cob Push Ups:
Not every cardio move we do has to be high impact.
And by mixing up the areas we work over a cardio circuit, we can allow ourselves to recover while not having to fully rest.
So if you did a Squat Double Lunge, you could then “rest” your legs by doing a Corn Cob Push Up to work your chest, shoulders, triceps and core.
This way you’re still getting work done and even keeping your blood pumping while allowing different areas to recover.
To do Corn Cob Push Ups, set up in the high plank position with your feet together. Your hands should be just outside your chest or maybe slightly wider.
With your body in a nice straight line, lower your chest to the ground. Holding just hovering over the ground, shift your weight to one side. Then shift back center. Then shift your weight to the other side.
Come back center and then press back up. Make sure your body is in a nice straight line the entire time.
Beginners can do this from their knees or off an incline. Make sure as you move at the bottom that your butt doesn’t go up in the air.
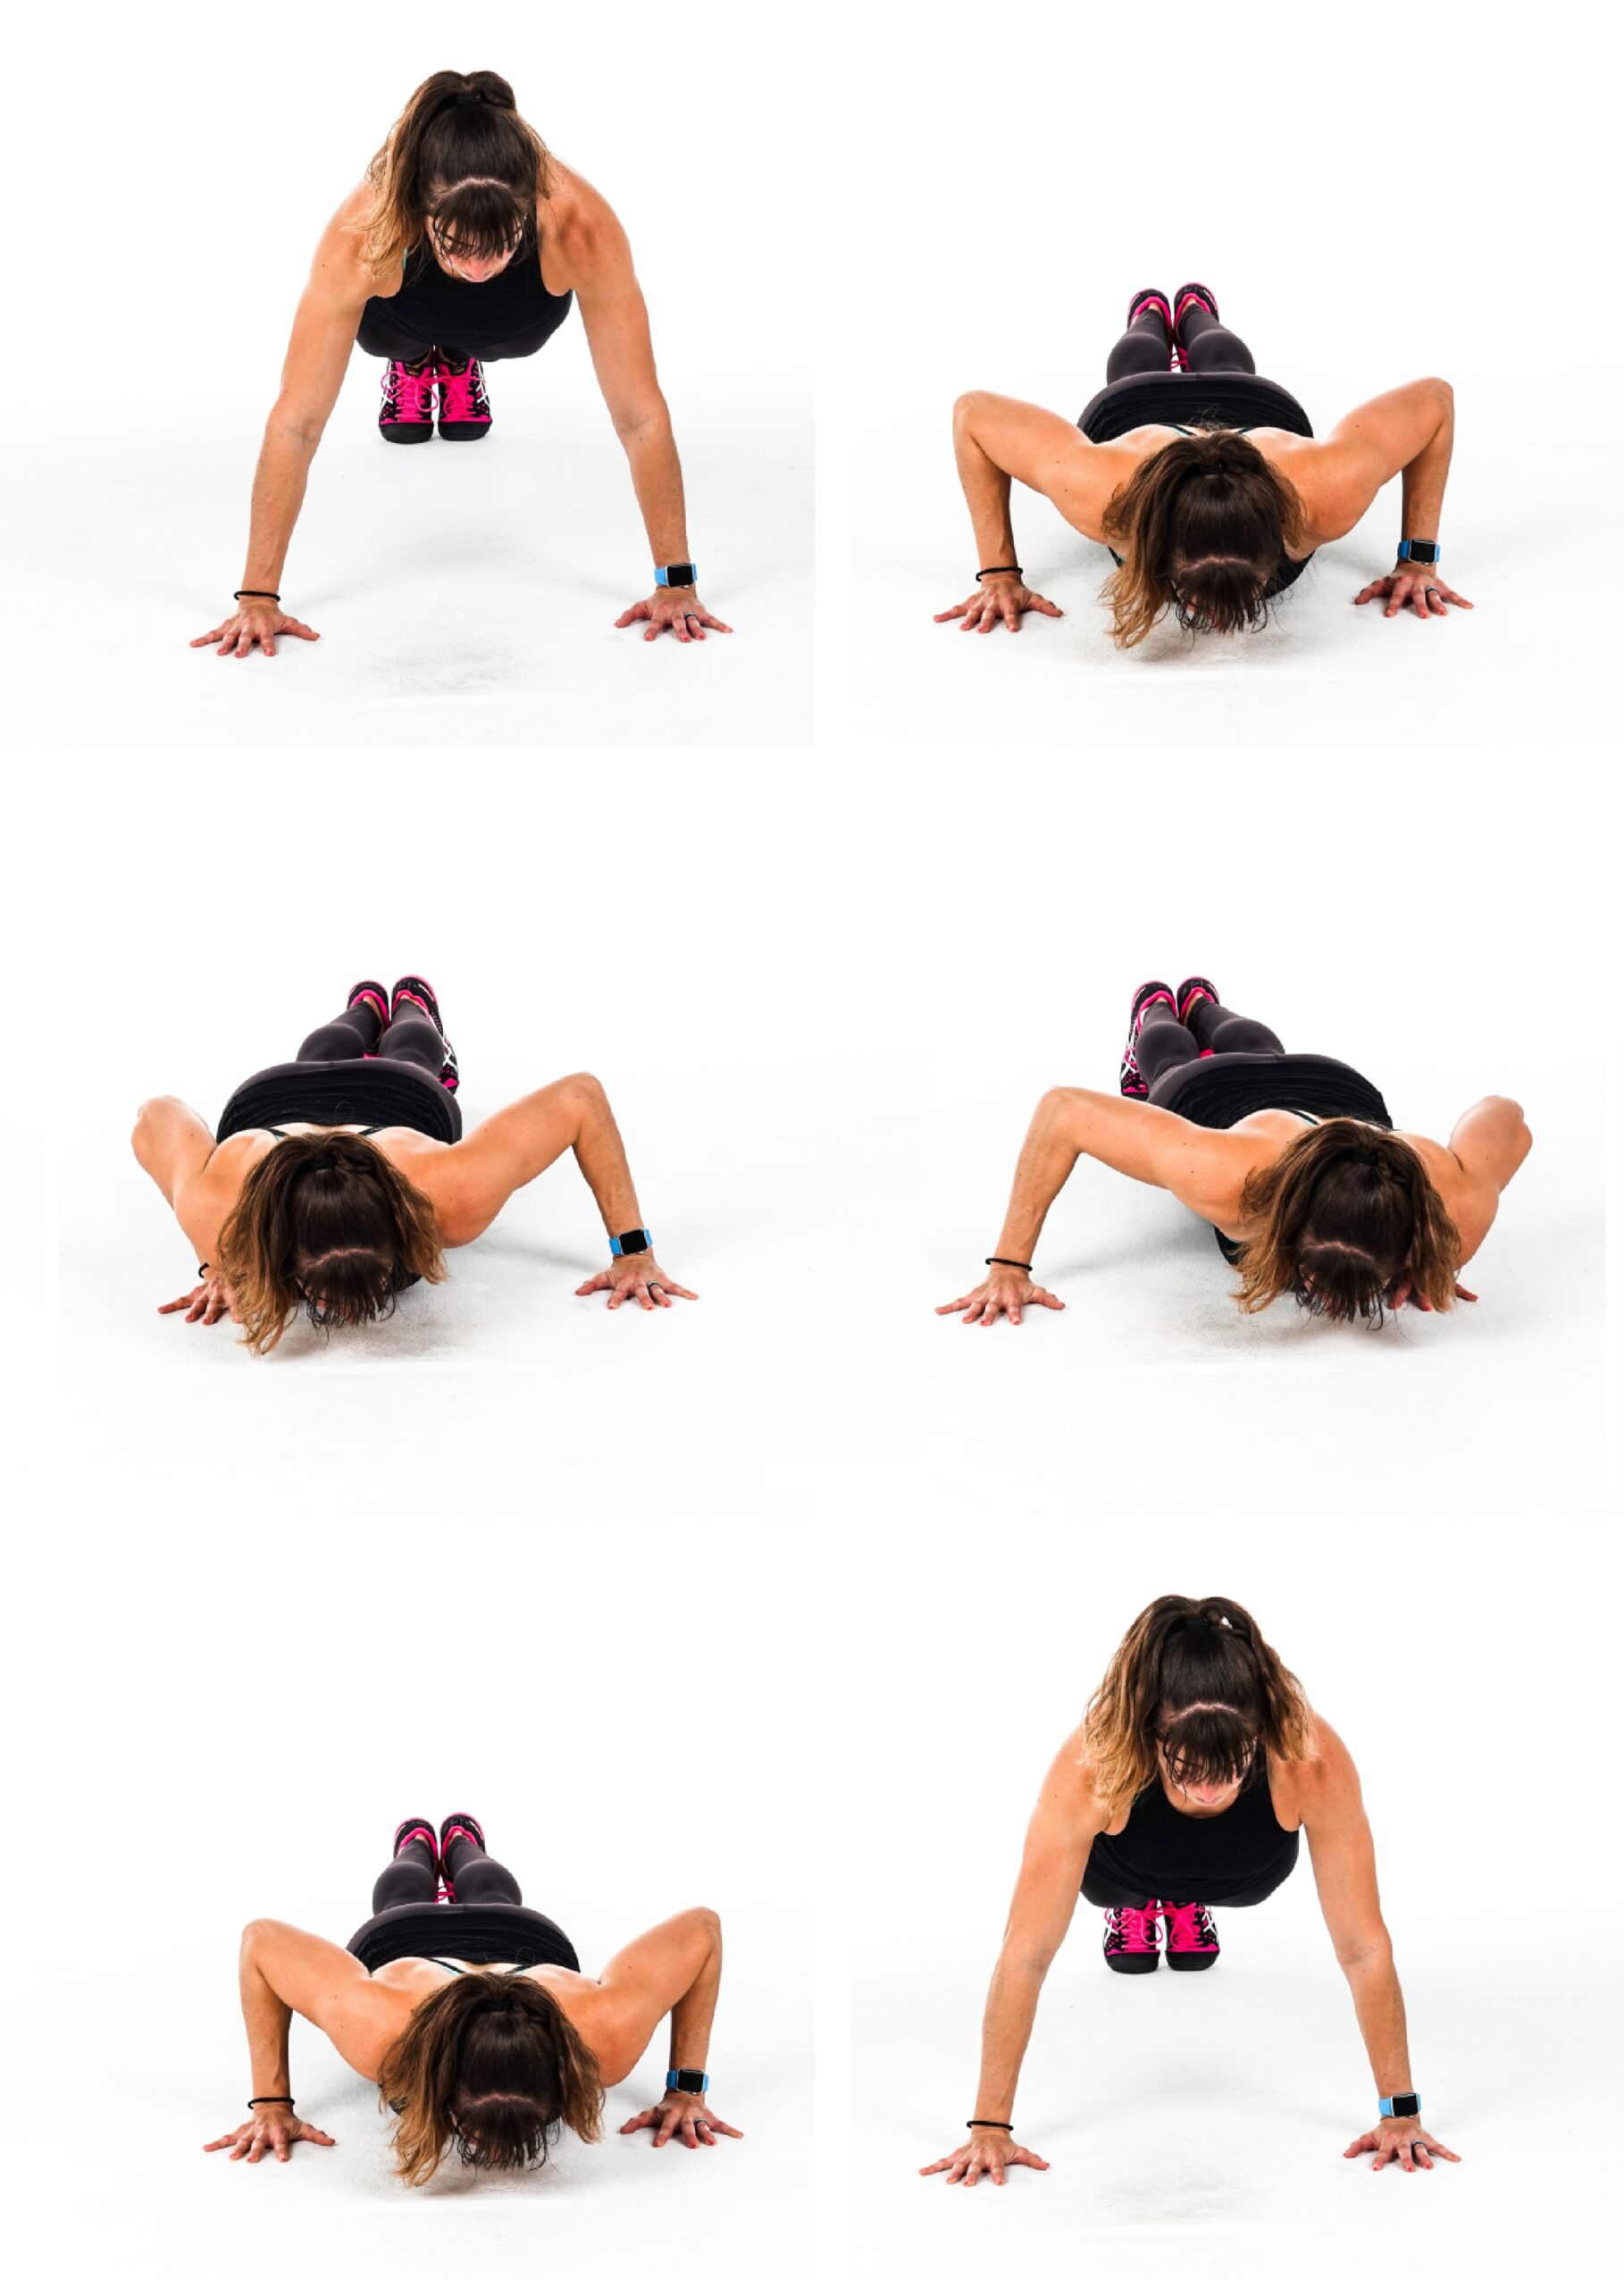
Push Back Push Up:
This push up variation is a great one to include in your cardio workouts as it will not only work your upper body, but also really challenge your core while getting your blood pumping!
However, it is a very challenging variation when done from your toes. So make sure to modify off an incline or from your knees to prevent neck, shoulder or even lower back aches and pains if needed.
To do the Push Back Push Up, set up in the high plank position with your feet about hip-width apart or slightly closer together and your hands just outside your chest. Beginners can also do this from their knees.
Then from this plank position sit your butt back toward your heels as if doing a child’s pose without your knees on the ground. Beginners can actually do child’s pose, sitting back with their knees down.
As you come back forward stay as close to the ground as possible. You are shooting forward into the bottom of the push up. You want to think about skimming forward with your body just off the ground.
Once you’re in a nice straight line at the bottom of a push up, press up to the high plank position then sit back again to repeat.
Do not let your elbows flare way up above your shoulders as you come forward or push up. You want your upper arms to create more of an arrow shape with your body or even stay in slightly closer to your sides.
Beginners can do this all from their knees. To make this move a little less advanced from the toes, you can reverse the move.
Instead go from the high plank to the bottom of the push up then from the bottom of the push up sit your butt back onto your heels. You will then come back forward into the high plank position to repeat. This makes the movement a little easier on your upper body, but far from easy!
If the knee version is too easy but the others from the feet are too much, try placing your hands up on a low incline!
Plank Skater Hops:
Cardio and core all in one move.
This hybrid plank is a great way to challenge your shoulders, abs, obliques and quads while setting those lungs on fire hehe
(It’s always great when we can also include a diversity of movements that get us moving in every direction too!)
To do Plank Skater Hops, start in a bulldog position from your hands and toes with your knees bent to about 90 degrees and feet together behind you. Straighten one leg out to the side and slight back, touching the toe down. You may even slightly shift the other foot more center under your body as you reach the straight leg out to the side.
Then hop that straight leg back in, bending it as you do, as you hop the other leg out laterally. You will almost be shuffling back and forth laterally while in the plank position. Keep your hands under your shoulders as you do. Your butt shouldn’t be way up in the air as you shuffle/hop side to side. You may “bounce” but your butt shouldn’t be up in the air.
Beginners may do less of a hop and move more slowly while advanced exercisers should hop quickly side to side. Remember to keep one knee bent under your body as the other leg goes out to the side. The straight leg will be out to the side and slightly back as you hop back and forth.
Single Arm Plank Jacks:
Work on your anti-rotational core strength, and even your coordination, with this plank jack variation! This is most definitely an advanced movement so you may either need to slow it down to start or stick with the basic plank jack.
But this move is a great way to challenge your shoulder stability while really targeting those obliques, quads, glutes and even your inner thighs!
To do Single Arm Plank Jacks, set up in a high plank position with your hands a bit closer together under your shoulders and your feet together. Brace your abs and make sure your body is in a nice straight line.
Then jump your feet out wide, and as you do, lift one hand to touch your opposite shoulder. Resist the urge to really rotate as you lift the hand or let your butt go up in the air. Try to keep your hips down and your core as square to the ground as possible.
Jump your feet back together and place the hand back down. When you quickly jump your feet out again, this time lift the other hand to touch your opposite shoulder.
Jump quickly back in and lower the hand back down. Keep repeating the jack with your feet, alternating which hand you lift to tap your shoulder.
Run, Punch, Banana:
Just like I like to include push ups so that you can allow areas to recover while still putting in work, I also love including more isolated core movements in my cardio workouts.
Not only can these moves help you build a lean, strong core, but they can also help you lower the intensity for an interval to more fully recover WITHOUT actually having to fully rest.
Sometimes it’s not just cycling the areas you’re working but actually about cycling the intensity of the movements you include!
This is a great way to get more out of less time!
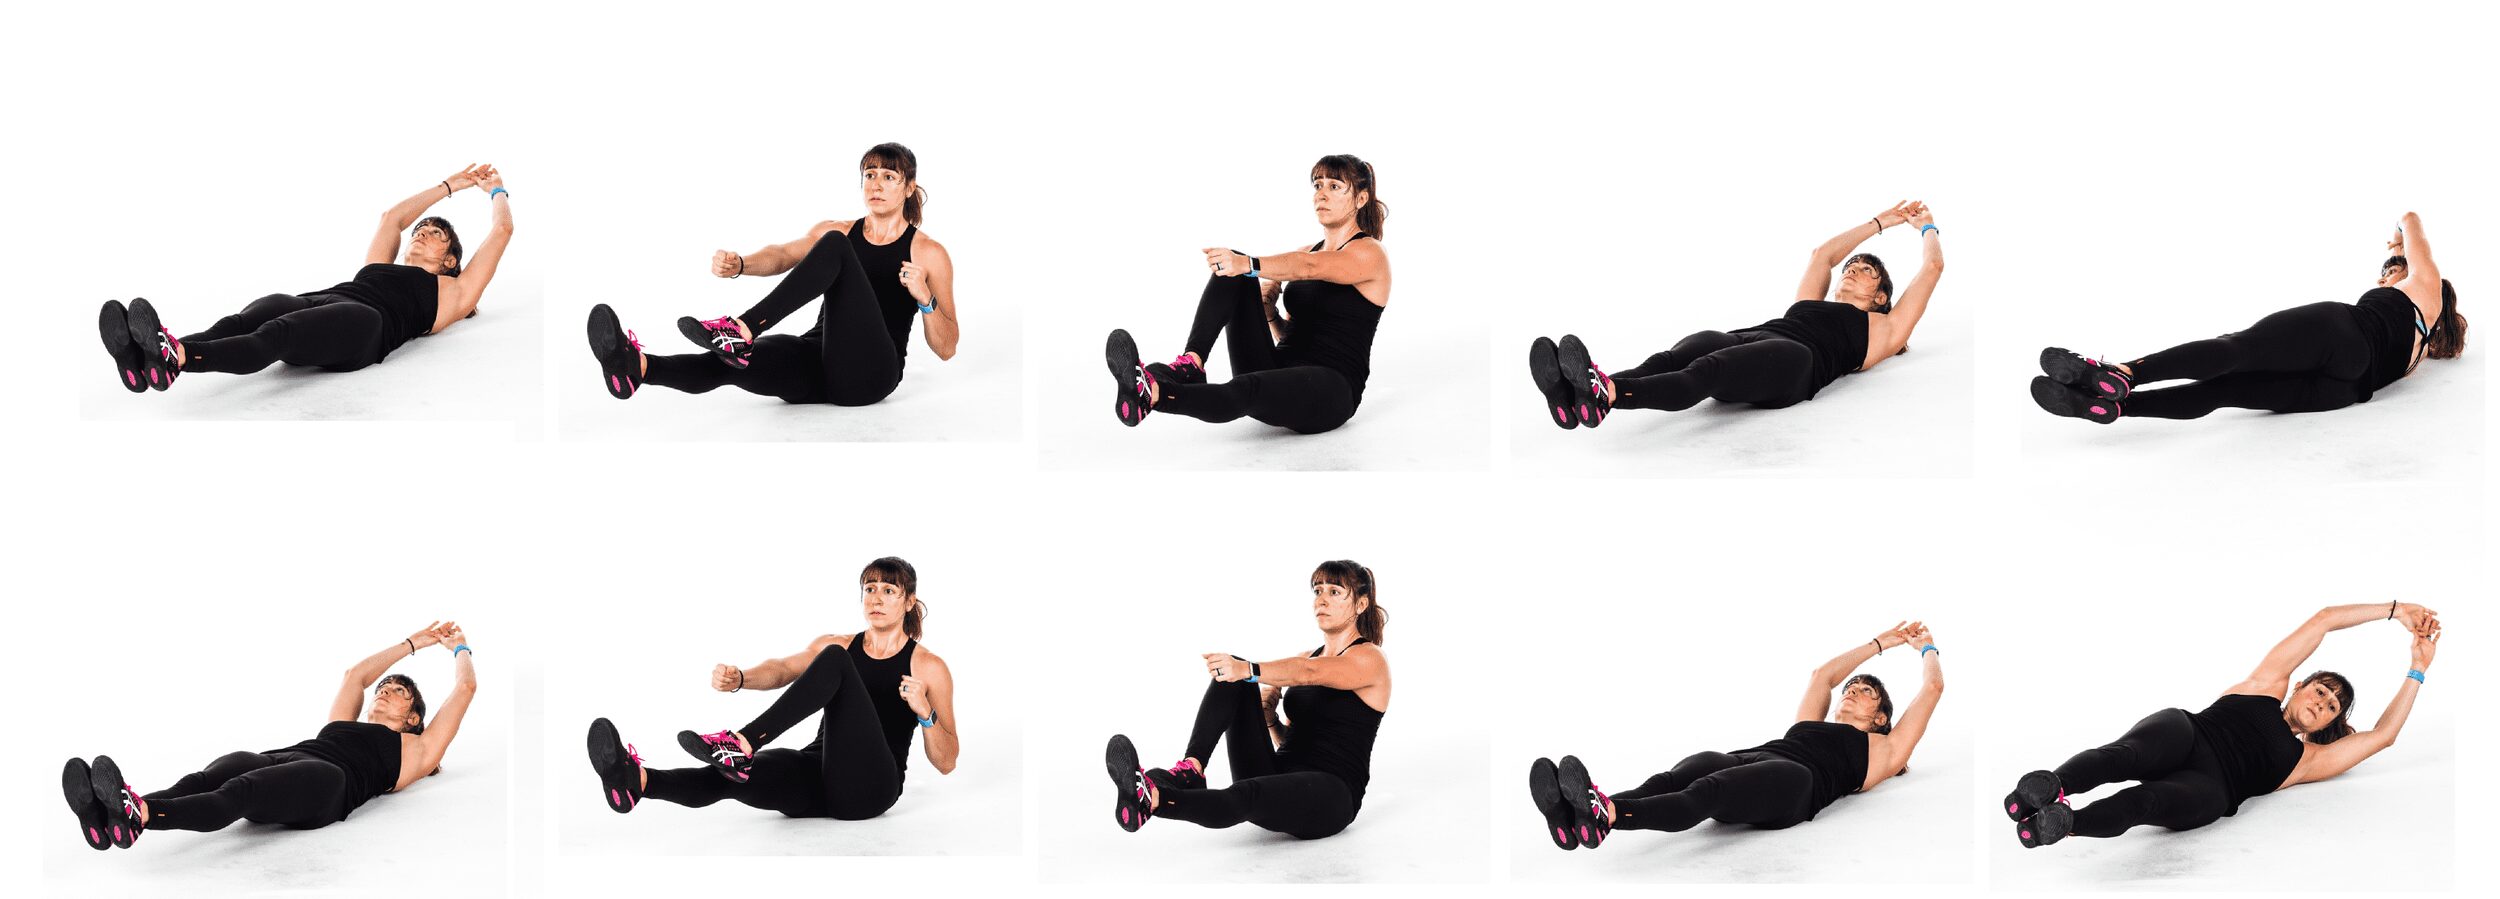
To do Run, Punch, Banana, start lying on your back with your legs out straight and arms reaching back overhead. Lift your shoulder blades and legs off the ground, bracing your abs and engaging your glutes. You can think about pressing your lower back down into the ground to help engage your abs. Your head should be in line with your arms overhead. Do not tuck your chin. This position is the banana.
Then roll to one side. Do not roll all the way over, but just angled onto your side to feel your obliques work. Do not touch your hands or legs down.
Roll back center then sit up, drawing one knee in as you punch the opposite hand out toward your feet. Keep the other leg out straight on the ground as you bring your other hand in at your chest.
Straighten that leg back out as you bring your hand back in toward your chest. You will want to tuck the other knee in and punch the other hand out to switch sides at the same time. (So as one leg is straightening out the other is tucking in so that you can run and punch quickly.)
After performing a knee tuck and punch to each side, straighten both legs out and reach both hands back overhead to lower back down into the banana position.
Roll onto your other side once you’ve lowered down then come back into the banana position and repeat the punch and run sitting up.
Beginners can keep their legs up higher toward the ceiling in banana and perform more of a crunch instead of sitting all the way up to run. They can even touch the toe of the opposite leg from the one they are tucking in down to the ground to reduce the strain on their abs so their lower back doesn’t take over.
If you feel your lower back engaging during this move, it is key you modify so you can feel your abs working!
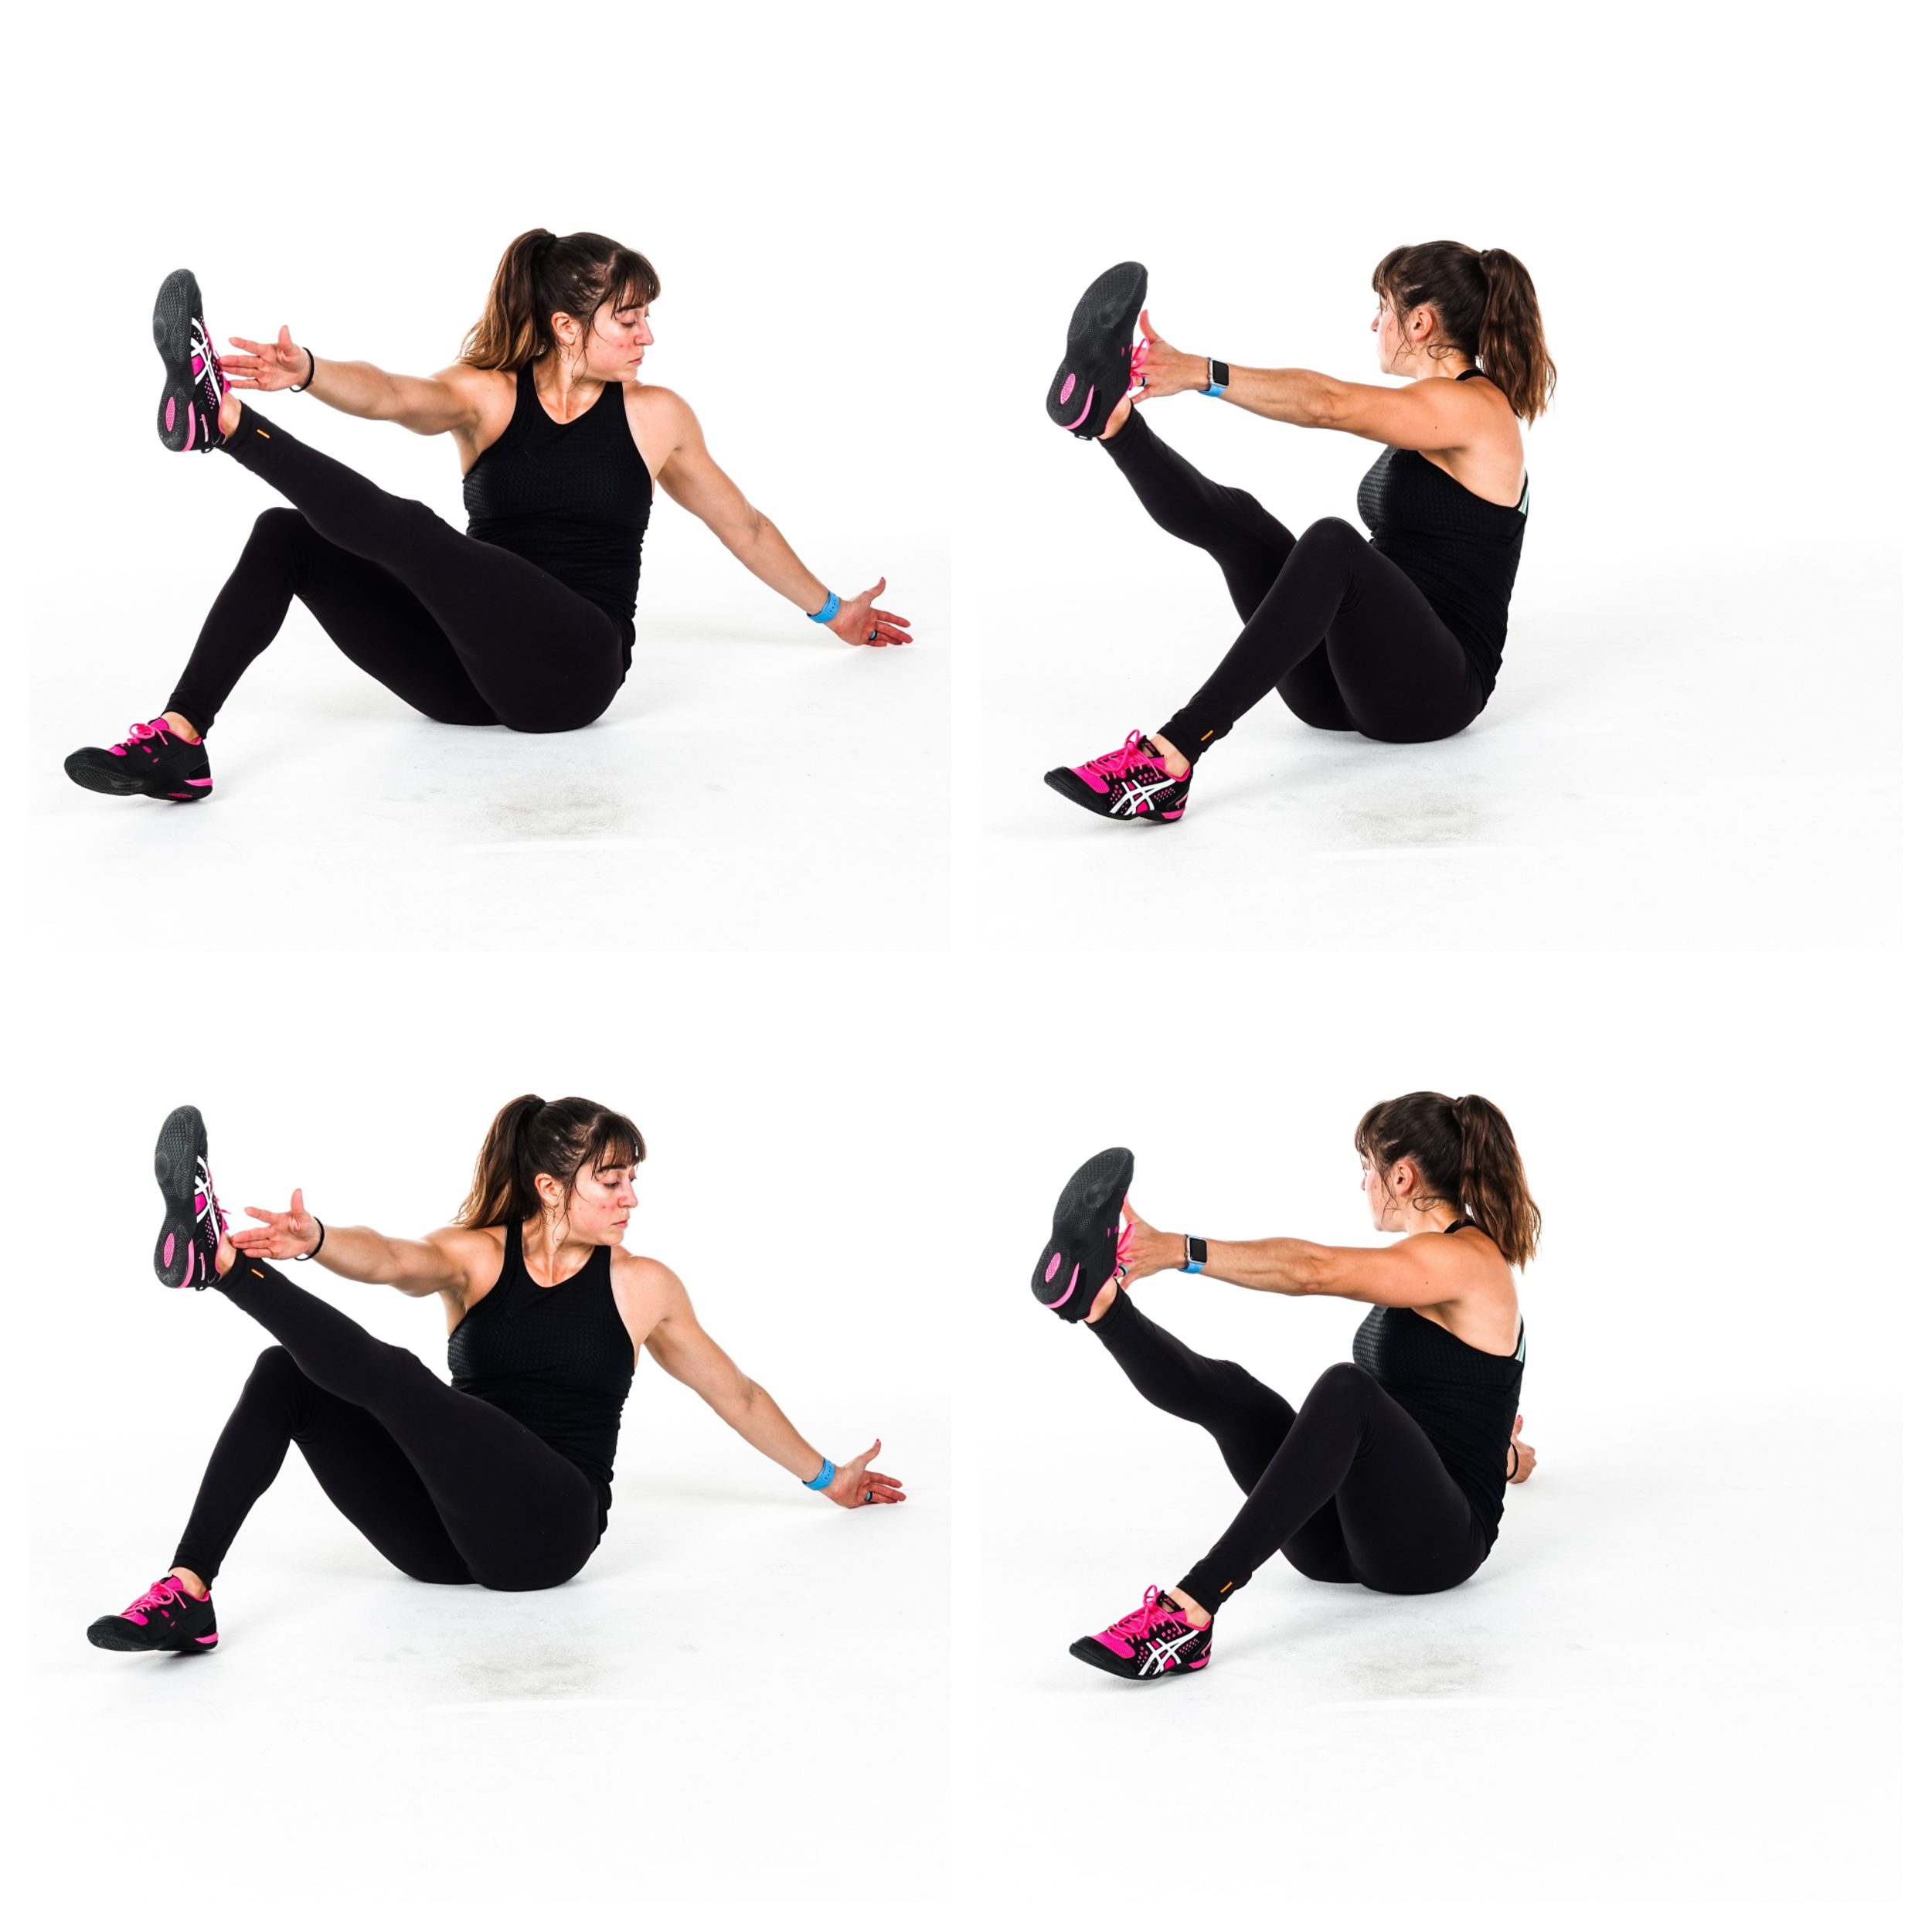
C-Sit With Rotational Chops:
This is another great core-intensive move that, while working your abs, hip flexors and quads, will allow your heart rate to come down and your body to recover a bit for the next intense bout.
This can be a more challenging move if you struggle to prevent your lower back from engaging so make sure to really get that c curve as you sit back. Do not arch! If you feel your lower back engaging, you need to modify.
To do C-Sit Rotational Chops, sit on the ground with your knees bent and heels on the ground. Then hinge back, rounding your back almost as if you are slouching or creating a “c” shape with your back. Engage your abs. Reach both arms out in front of you at about chest height.
Then twist to reach one hand back toward the ground behind you as you kick the leg on that side up toward the ceiling and reach your other hand toward the outside of that foot. You will reach the opposite hand toward the opposite foot as you rotate.
Open your chest up as much as possible and actually twist through your spine don’t just try to reach further from your shoulder.
Then lower the foot back down as you rotate and reach the other way, kicking the other leg up as you reach toward that foot and then also back toward the ground behind you.
Move at a controlled pace as you really reach both back toward the ground behind you and toward your foot. Feel around your rib cage as well as your abs and quads working.
Need some killer cardio workouts using these moves?
All too often we think we need lots of jumping, burpees, and well, cardio in general, if we want to lose fat.
And while all of those moves and exercises should have a place in our routine, overdoing those things may actually be holding us back.
Sometimes those workouts that look “easy,” that seem simple, that won’t have you gasping for air, are the essential workouts we are MISSING.
They are hard in a different way and require you to establish an efficient mind-body connection to build your foundation.
They create proper recruitment patterns to keep you injury free and help your body work well so you can get even more out of all of your workouts.
And while these routines may seem easy, they will challenge your body in a new way and lead to killer results. Hey they can even burn so good!
So if you haven’t ever done a Density Interval Workout, you should try this one below!
By pairing together a basic movement and an isometric, we can not only get the correct muscles working but even build functional, full-body strength!
The Full-Body Density Interval Workout
Complete 3-4 rounds of the following circuit, resting up to 30 seconds between rounds. If the move is done on one side, do the hold then the reps on that side before switching and moving on.
After the circuit, complete 2-3 rounds of the Core Burner with 30 seconds rest between rounds. If one sided, do both moves, the hold and the reps, on that side before moving on. Then stretch and roll out.
Not all workouts to build strength need to be done for reps and sets. Sometimes INTERVALS can help you build strength, especially if you need to challenge yourself with just your own bodyweight!
If you want a 30 minute workout to build your leg, chest, shoulder, arm and CORE strength, you’ll love this Squat and Press 1 Minute Max Out. It’s a great Anterior Chain workout aka you’ll feel your entire frontside working!
Set a timer for 1 minute intervals with no rest between. You have 1 minute to complete as many reps of each move as you can. Record how many you get each minute and try to beat that next time. Rest 1 minute between each round. Complete 3-5 rounds. If you are short on time, just do 3 rounds.
*NOTES: If you have weights this is a great place to use them. You can also simply move faster to get more reps if you don’t have weights…Or hold your dog or child or any heavy object even up at your chest to add some more weight! 😉
Don’t have hours to spend at the gym but want to build full body strength as you lean down?