12 Lunge Variations To Build Strong Legs And Glutes
Lunges are an amazing leg and glute exercise; however, people often fear lunges and blame them for causing knee pain.
But lunges are NOT inherently bad for your knees and even learning how to master the lunge could help you PREVENT knee pain from returning.
It is key you always know how to work around your injuries, and select the variation of a move you need.
But as you tweak movements also take time to learn how to make sure you’re recruiting the correct muscles to get the most out of the exercise!
Depending on your injuries, you may need to reduce knee flexion, so an Anterior Reach Lunge may be right for you.
Or if you aren’t yet able to correctly load your glutes with a Front Lunge, you may find you need to start with a Reverse Lunge instead.
The key is learning how to use the lunge to meet your needs instead of just demonizing it! Because it really is a killer move if you want strong, lean legs and glutes!
How To Lunge Properly:
Quick Lunge Tips:
- Make sure when you lunge forward you don’t let all of your weight shift forward onto the ball of your foot. You want to be able to push back off that front heel.
- While your knee CAN travel past your toe if you want to load your quads more, it will also put more strain on your knee. So if you have knee pain, when you lunge forward, think about keeping your knee over your ankle. A more vertical shin angle can protect your knee and place less strain on the surrounding muscles.
- Start by keeping your lunges smaller. As you advance, you may lunge out further and sink deeper. The further out you lunge the more challenging it is for your legs to push back.
- A Reverse Lunge may also be easier starting out. This lunge can make it easier for you to load your glutes and can be more “knee friendly” if you struggle with lunging forward and properly loading your glutes. (demoed at 2:10)
- With lunges, to target your glutes more, you can perform more of a hip hinge. You do not want to round over, but slightly leaning forward to push your butt back can help you load your glutes more.
- The Split Squat or Static Lunge is also a great place to start if you struggle with forward or backward movement during your lunges. This lunge can help you improve your hip mobility while building killer leg strength (demoed in the video at 2:42). For this move, you can also shrink the range of motion using a pad.
- By adjusting the range of motion of your lunge, you can not only make a lunge easier, but you can also make it more challenging. See some of the great deficit lunge variations below or even try a Balance Lunge (shown at 3:23 in the video).
- You can use lunges to move in every plane of motion! You can even combine lunges in different ways to challenge your legs and even your core without necessarily even having to add weight (like I’ll show you below!)
Working Around Knee Pain:
- Reduce knee flexion if needed!
- Try even more of a hip hinge just touching a foot back instead of including a ton of knee flexion.
- The Anterior Reach Lunge is a great front lunge if you do have knee pain as well (described in the video at 4:18 and shown below)
- Try adding a slider and using more of a hip hinge (shown in the video at :41)
Why You Should Include Lunges:
Lunges are a great compound exercise to build functional leg and glute strength.
They are also unilateral exercises that allow you to isolate each leg and work each side independently to correct any imbalances you may have.
Lunges can also help you improve your hip mobility and build stability through a full range of motion because you can include movements in every plane of motion.
And because there are so many different options, you can even target the muscles of your lower body to different extents based on the version of the lunge you choose to include in your workout routine!
12 Amazing Lunge Variations To Work Your Legs And Glutes:
Using these 12 lunge variations you can build strong legs and glutes that not only look amazing but help you avoid injury!
By lunging in every direction you can build hip mobility and stability, which is key to helping you lift more, cycle further and run faster!
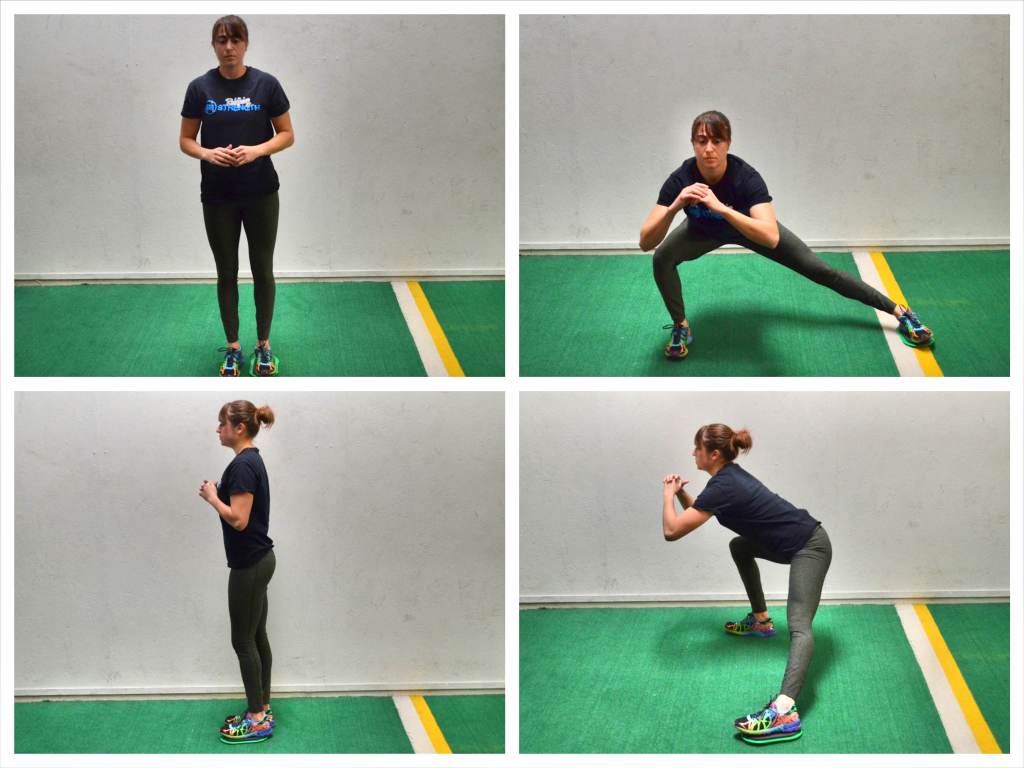
Side to Curtsy Lunge:
This lunge is a great way to really target and strengthen your glutes as well as your adductors.
Especially if you’re a runner, this lunge variation is important to include because it can help you avoid hip and groin injuries!
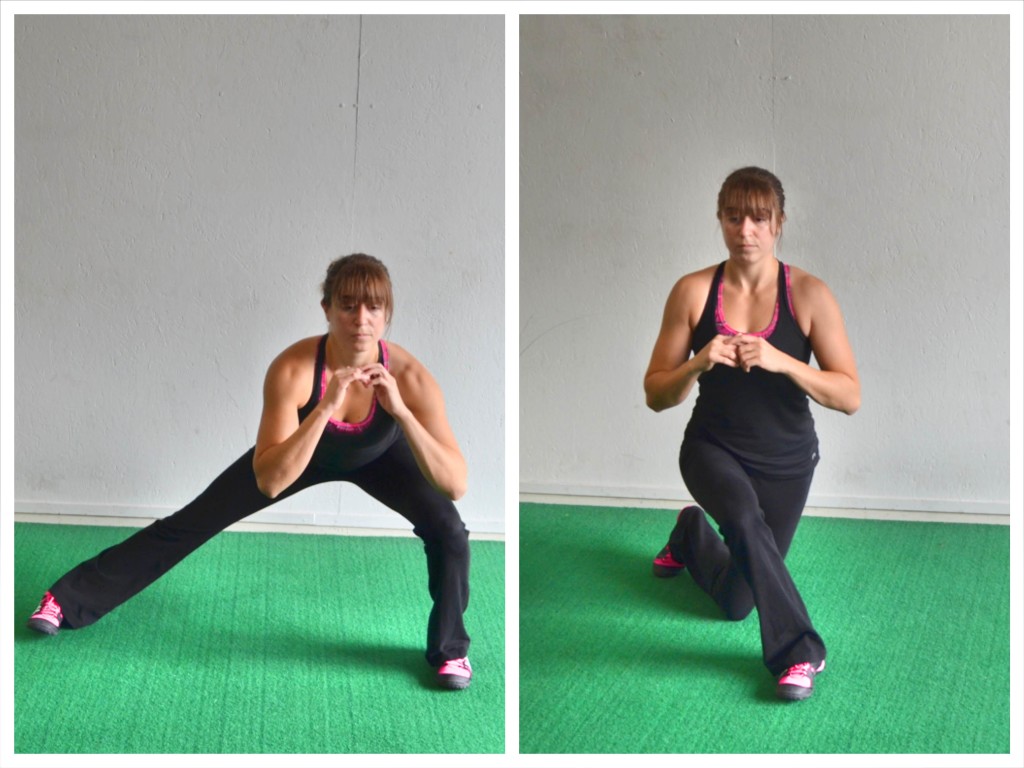
To do the Side to Curtsy Lunge, start with one side, say your left side. Lunging with your left foot, step the left foot out toward “9″ on the clock.
As you lunge out to the side, bend your left knee as you keep your right leg straight and sit your butt back. Don’t be afraid to hinge forward slightly, hinging at the hips. Really push your butt back and bend that left knee as you keep both toes pointing straight ahead. Keep your left heel down as you sink into the lunge. Keep your chest up even if you slightly lean forward to push your butt back.
Then drive back up to standing, pushing off your left foot to come back center. Do not bend your right leg to come back center. Really push off that outside leg and drive off your heel.
If you need to, touch your foot down center as you stand tall to help you balance before moving into the Curtsy Lunge. If you don’t need to tap your foot down, move right into the Curtsy Lunge.
Lunge back into a Curtsy Lunge with your left foot, stepping your left foot back behind your right leg. You will reach your left foot back to about “5″ on the clock as you bend your front and back knee as if you are almost going to half kneel on the ground. Make sure you step far enough back (do not keep your left foot too close to your right) so that you can bend both knees and sink down into a deep lunge. Keep your right heel down on the ground and your chest up. Make sure you feel the outside of the front glute really loading as you sink down.
Then drive through your front heel to come back up to standing center. Squeeze your glutes at the top and move right back into a Side Lunge on the left side.
Complete all reps on one side before switching. Add weight to make the move more challenging. Beginners may not go as low and may use only bodyweight.
Curtsy Lunge to Leg Lift:
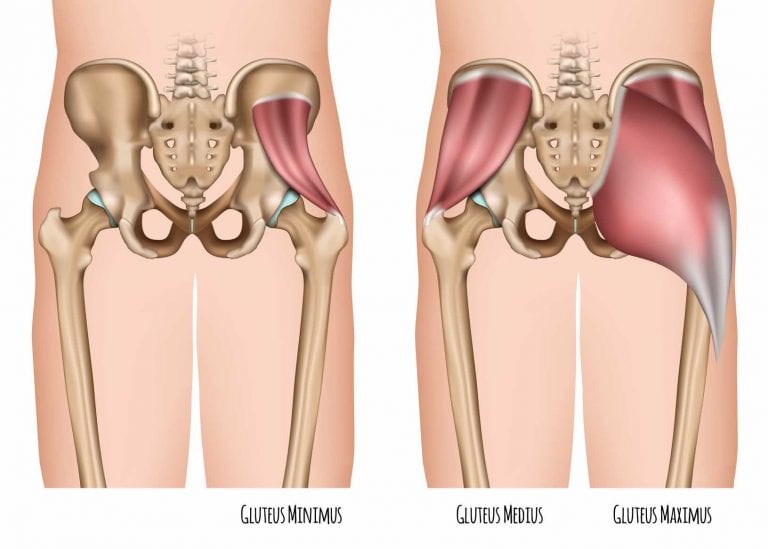
This is another great lunge movement to really target your glutes and even isolate your glute medius a bit more to improve your hip stability!
While the lunge is a compound movement, adding in that leg lift allows for a little glute isolation work. And working the glute medius is so key to helping you prevent and avoid lower back, hip and even knee pain!
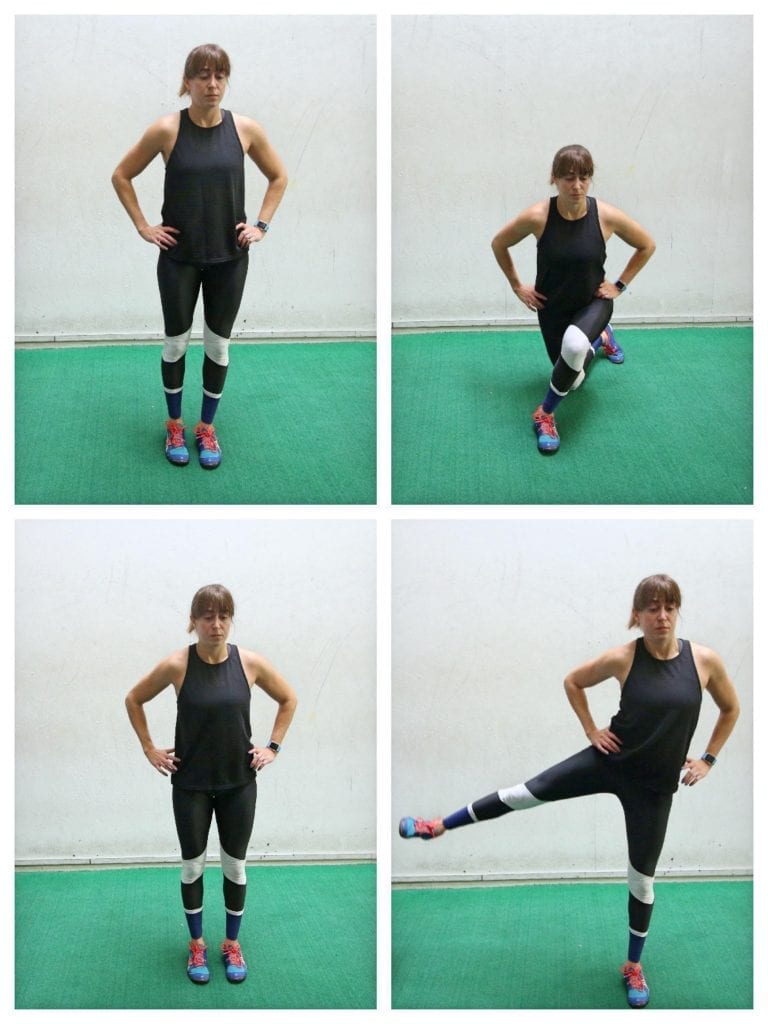
To do the Curtsy Lunge to Leg Lift, start standing tall with your feet together.
Then lunge back, stepping your foot across and behind your front leg so you sit back into your front glute. You aren’t lunging straight back, but are instead crossing behind as you keep your chest facing forward. Keep your front foot pointing straight ahead too.
If you rotate open as you cross behind, you won’t get the benefit of the curtsy lunge.
Sink down into the lunge, sitting back in your front heel as you feel your front glute load. Then drive through your front heel to come back up to standing.
Lightly tap the toe down to balance if needed and then raise your leg out to the side for a lateral raise. Feel your glute on the side lifting your leg laterally then touch the toe down and repeat the lunge.
You will shift your weight toward your standing leg, but don’t lean way to the side just to lift your leg up higher.
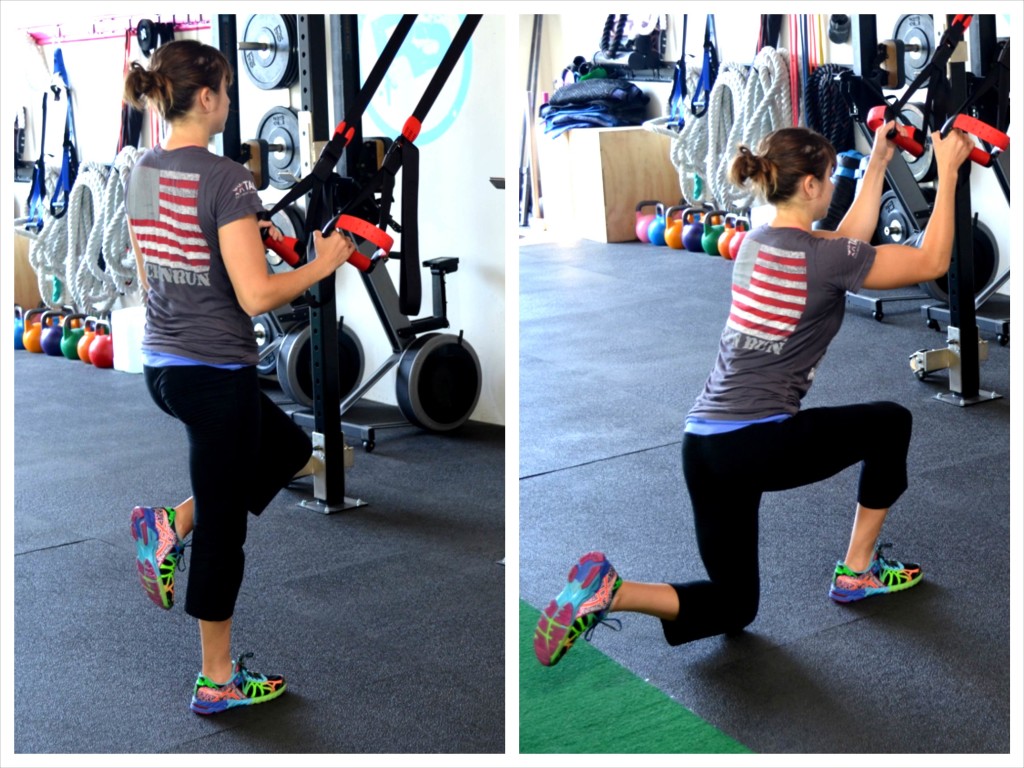
Airborne Lunge:
If you don’t have weights and really want to challenge your legs using just your own bodyweight, you should try the Airborne Lunge! This is a killer glute, and even core, exercise.
This fully unilateral move will help you correct any imbalances between your right and left sides while also helping you build up toward the pistol squat.
And unlike the pistol squat, this single leg move uses more of a hip hinge to target your glutes even more!
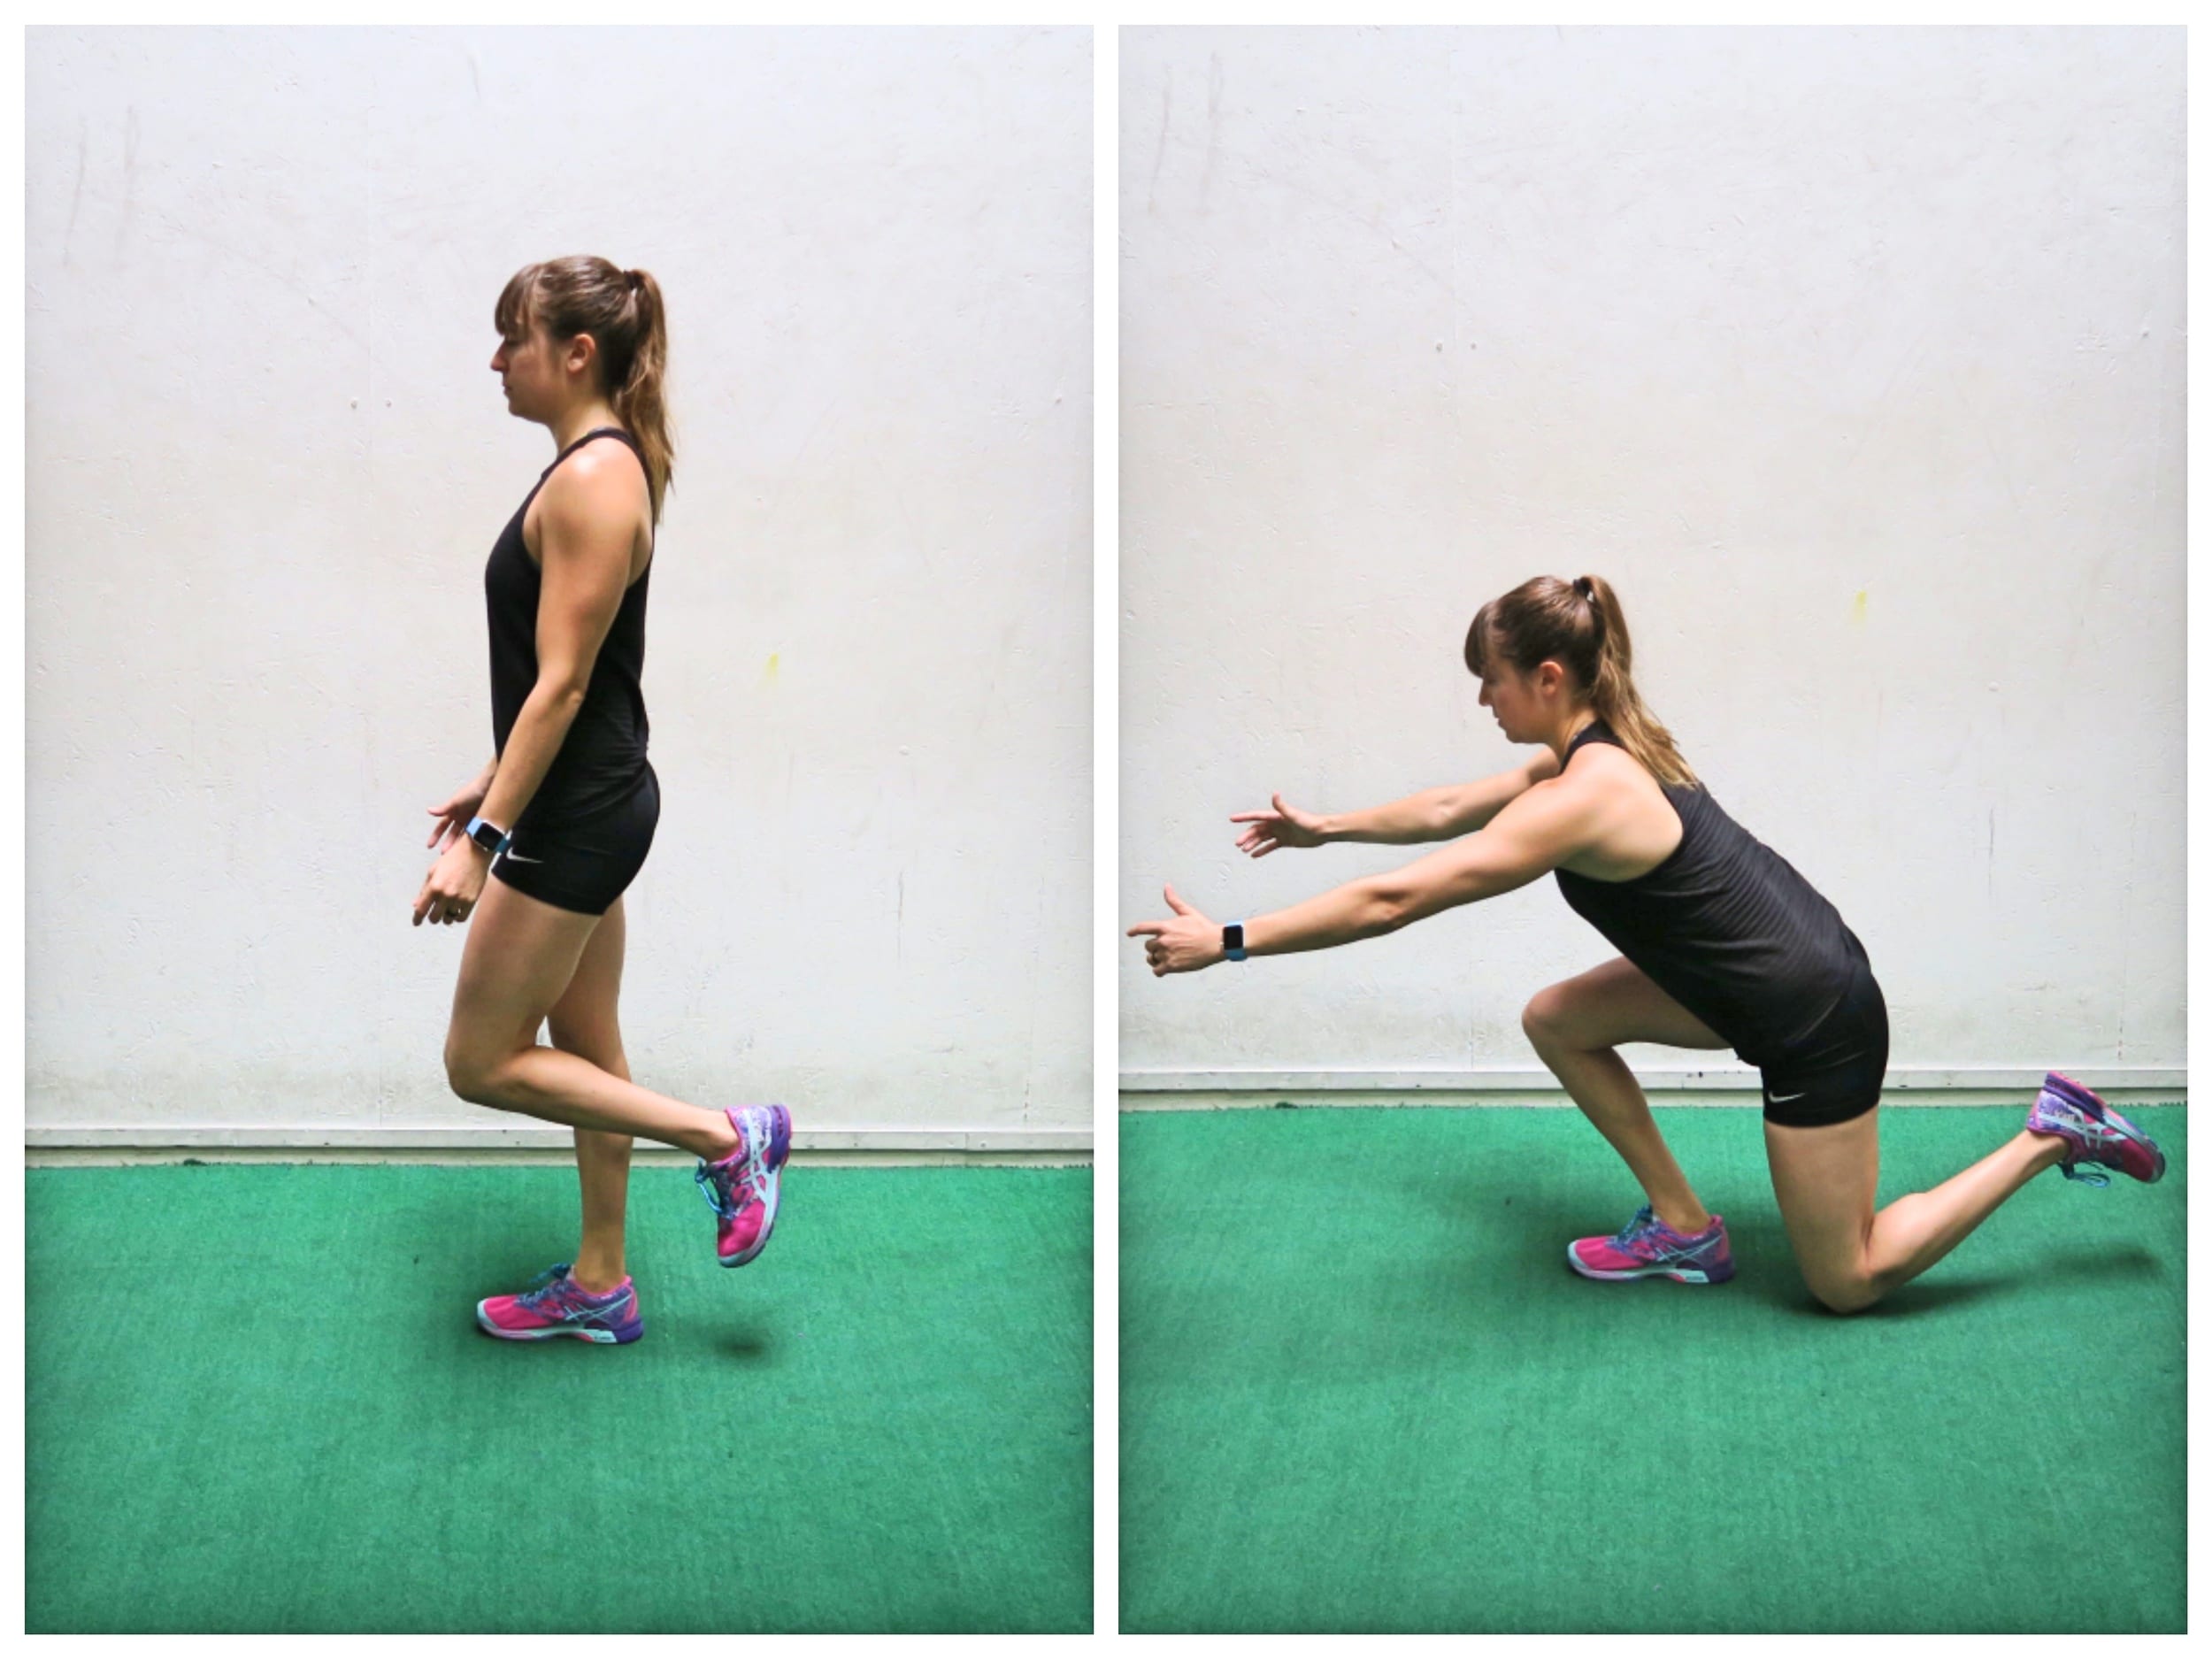
To do the Airborne Lunge, stand on one foot and bend your other knee, bringing your heel back up toward your butt.
Then push your butt back as you bend the knee of your standing leg to sink down into a lunge. Drop the knee of your raised leg back toward the ground near the heel of your standing leg. Make sure to hinge at your hips leaning your chest slightly forward as you sit back and sink down.
Do not touch the foot of the raised leg down when you drop the knee to the ground. Touch your knee down gentle or just hover above the ground.
Then drive through the heel of your standing leg to stand back up. Squeeze your glute at the top and stand tall then repeat the lunge.
Beginners can do a version holding suspension trainer straps to help them balance.
Pulse Side Lunge:
The Side Lunge is a great way to work your glutes and your adductors while even improving your groin flexibility.
When you add in the Pulse, you’ll spend more time under tension to challenge your legs more without adding weight!
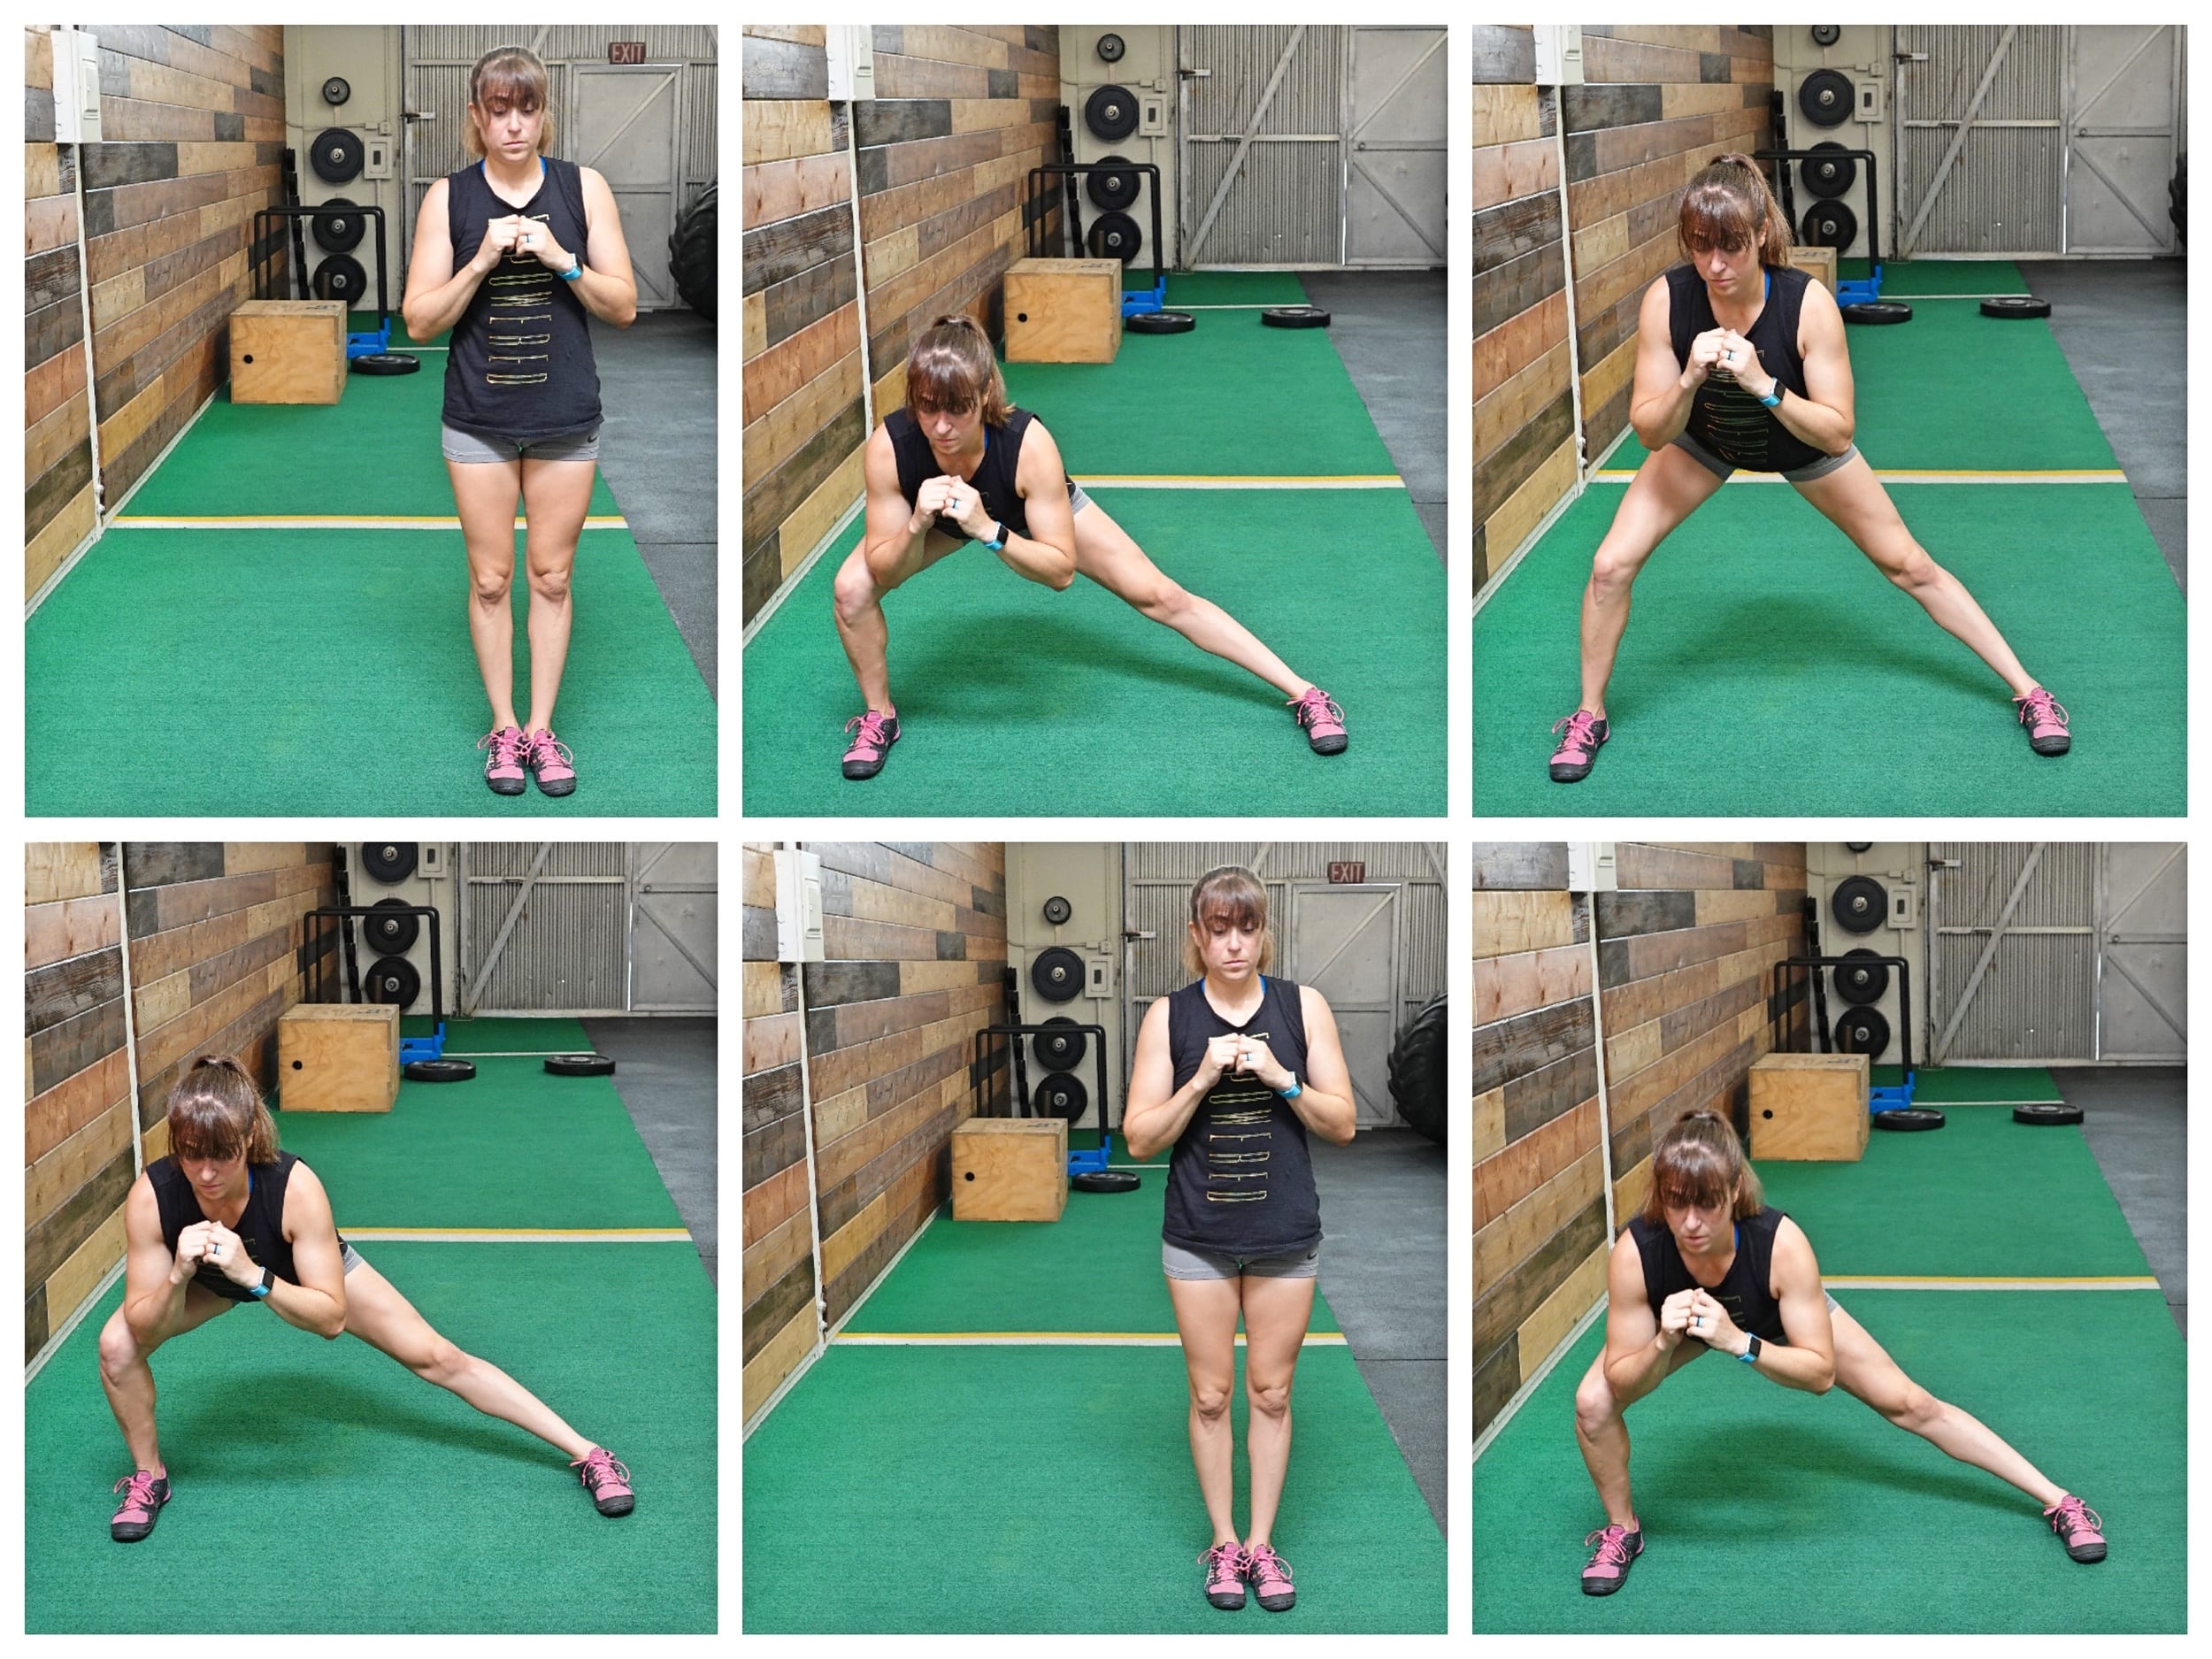
To do the Pulse Side Lunge, start standing with your feet together. Then step out to the side with one foot and sink into a side lunge, bending that leg you stepped out with as you sit your butt back. Keep your other leg straight as you hinge a bit at the hips to sink down and load your glutes.
Then drive through that foot to straighten your leg a bit before sinking back down. You do not want to fully straighten your leg, but instead stay within that working range, coming up a few inches.
After you sink back down, push up and back to standing in one motion. Then repeat, sinking into the side lunge, pulsing up then stepping back and together. Make sure your heels stay down and that you do hinge a bit at the hips to load your glutes. Do not round over!
Reverse Lunge to Knee Tuck:
Work your legs, glutes and even your hip flexors, obliques and abs with this hybrid lunge exercise.
It’s a great way to build strength and even get your blood pumping for a little bit of cardio!
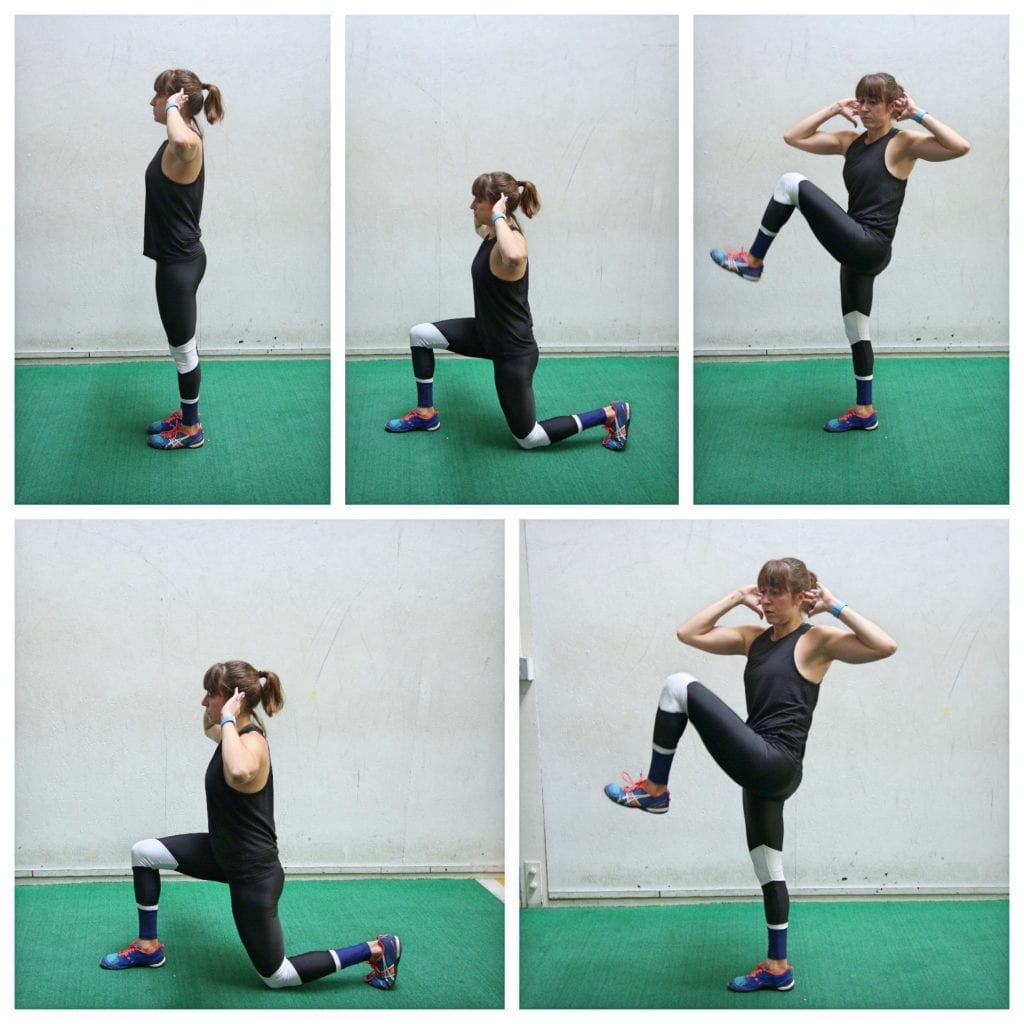
To do the Reverse Lunge to Knee Tuck, start standing tall with your hands on your shoulders or by your head to help with the twist. Then lunge back with your right foot, dropping your back knee down toward the ground as you keep your chest up.
Keep your front heel down as you lunge back and bend your front knee to about 90 degrees as you load your glute. Keep your front knee about over your ankle to help you think about loading your glute.
Drive back up to standing, pushing through your left (front) heel. As you drive up, bring your back knee up and forward as you come to standing. Tuck your right knee up and rotate your upper body toward that right knee. You can slight crunch toward the knee but don’t just round over.
Twist toward that knee then lunge back again and repeat on the same side. Make sure to engage the glute of your standing leg and feel your abs work to twist toward your knee.
You can tap your toe down to balance if needed between the lunge and knee drive. The less though that you tap down between the harder the move will be.
Walking Lunges:
Talk about a move that will build strength and really get you out of breath!
The walking lunge is more of a cardio exercise than you realize and a really great way to target your glutes! And if you don’t touch your other foot down between lunges, it is a great way to advance the basic forward lunge without even adding weights.
To do the Walking Lunge, start standing up nice and tall with your feet together. Then step one foot forward and then bend both knees, dropping the back knee down toward the ground. Even though you’ve lunged forward, your weight shouldn’t be going forward. Drop your knee straight down and keep your chest up. Make sure your front foot stays flat on the ground as you lower down.
Drive back up to standing, pushing off the front heel. As you drive back up to standing and bring your back foot forward, try not to touch it down but swing it forward and out to go right into another lunge. Beginners may need to tap their foot down center to balance, but if you can step right into the next lunge.
Again sink down, keeping your weight centered and chest up. Drive back up to standing and bring that leg forward right into the next lunge.
Add weights to make the move more challenging.
Deficit Curtsy Lunge:
By increasing the range of motion, you can make the curtsy lunge more challenging. You can also improve your mobility by working through a bigger range of motion.
Just make sure that you actually lunge deeper or you won’t get the benefit of the increased range of motion!

To do the Deficit Curtsy Lunge, set up a low box or plate weight and step up on top of the weight. A slightly higher platform will be more challenging. Beginners may want to start with something very small or no box at all.
Stand on top of the weight, holding weights as desired to make the move harder. Then lunge back and off the weight, crossing your foot behind your leg on top of the weight. As you cross the foot behind, sink into that lunge, lowering the knee to touch the ground or hover right above.
Then drive through your front heel to drive back up to standing and repeat the lunge. You can slightly hinge forward at the hips to sit your butt back but do not round over. If you can’t touch that back knee to the ground, lower the step so you can work through a full range of motion.
Do not let your knee cave in or your body rotate. Keep your chest straight ahead as you lunge back and load that front glute, pushing it slightly out to the side as you cross behind.
If you have knee pain, you may reduce knee flexion and lunge back with a straight leg from the ground still crossing behind while adding in more of a hip hinge.
Alternating Dumbbell Reverse Lunges:
Little tweaks can help you tailor moves to fit your needs.
Sometimes you’ll want to complete all reps on one side to really isolate each leg and burn out each side independently and sometimes you’ll want the added metabolic bonus of alternating sides.
If you want the added cardio bonuses of alternating sides, try the Alternating Dumbbell Reverse Lunge. Holding dumbbells down by your sides is a great way to progress the basic bodyweight lunge.
And with the Reverse Lunge, you’ll really be able to target those glutes while still working your quads and even your hamstrings.
Below I show the Reverse Lunge with more of a hip hinge IF you struggle to load your glutes or want to target them more!
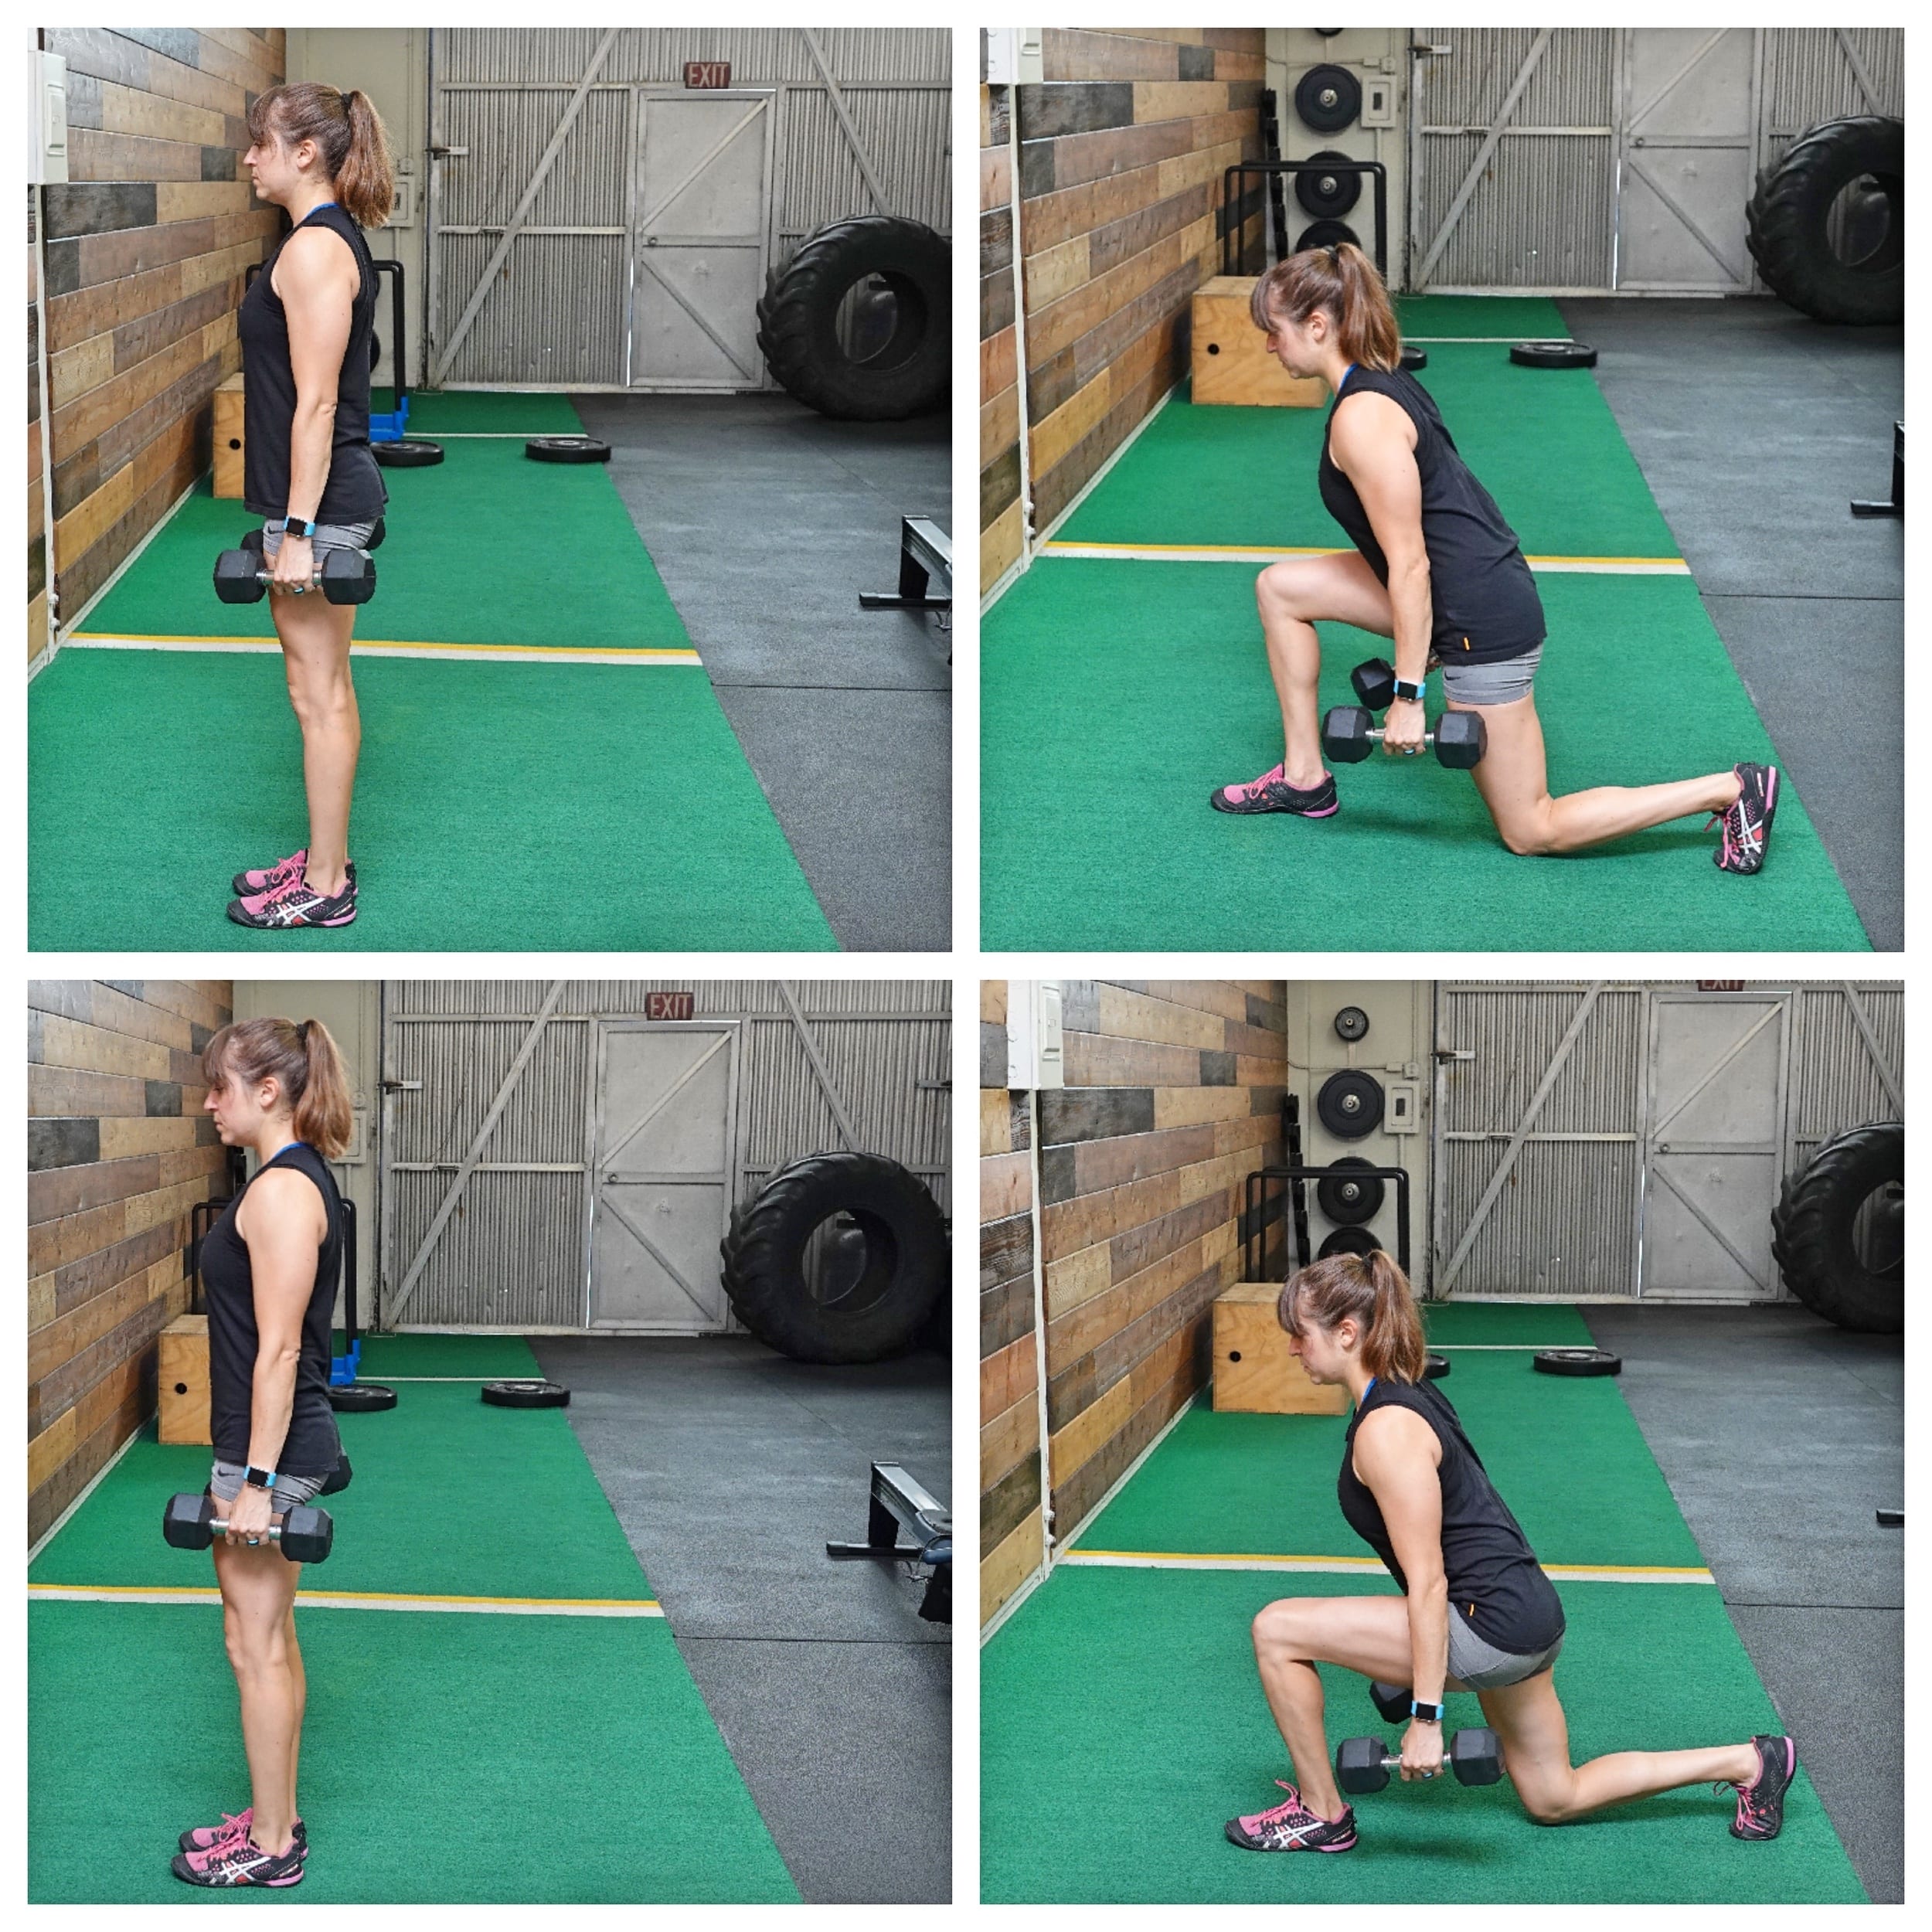
To do Alternating Dumbbell Reverse Lunges, hold a weight in each hand and stand tall with your feet together. Beginners can use no weights.
Lunge back with one leg, sitting your butt back as you hinge slightly forward and drop your back knee down to just touch the ground or hover over it. Really sit back in that front heel.
If you struggle to load your glutes or want to make it more glute intensive, keep that shin more vertical and that knee about over your ankle. Also use the hip hinge instead of staying more upright.
Then drive through your front heel to push back up to standing in one movement. Then lunge back on the other side. Try to get as deep in the lunge as you can to strengthen through that full range of motion. Beginners should start with just bodyweight and limit range of motion as needed.
If you need to reduce knee flexion, use more of a skater squat and hinge at your hips as you step back in a straight leg lunge.
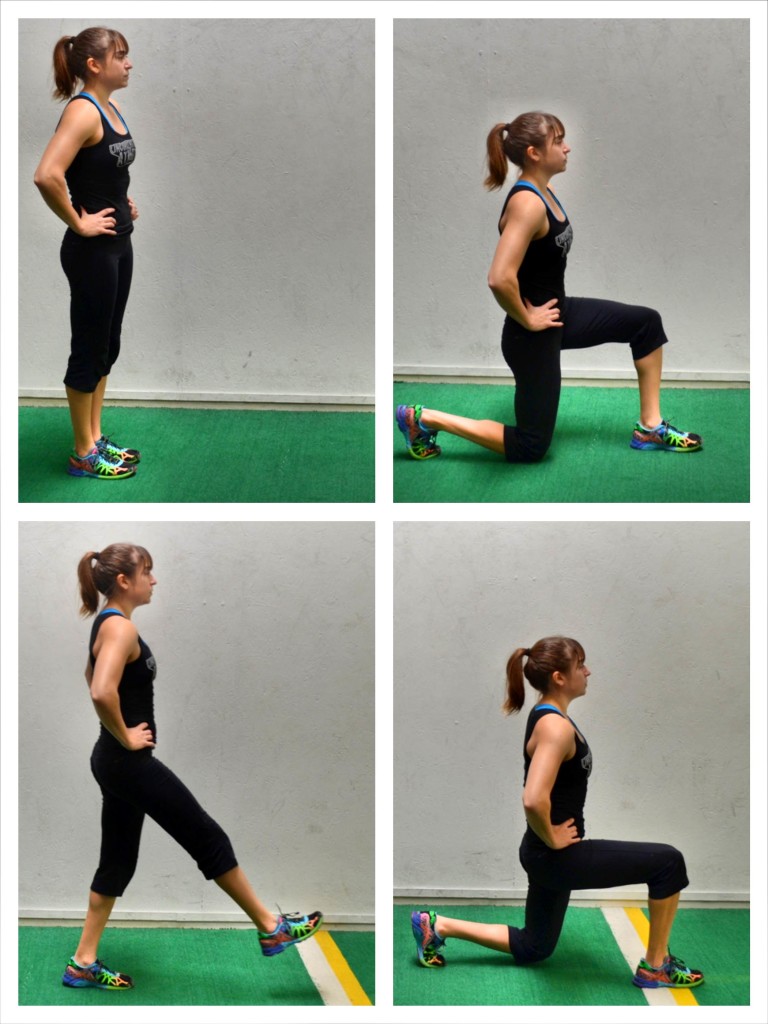
Anterior Reach Lunge:
If you have knee pain and want to work around the pain while strengthening your leg, this is a must do move. It reduces the amount of knee flexion you perform and uses a bit more of a hip hinge movement than the standard lunge.
While this lunge variation will include more of a hip hinge to target your glutes, it will also still work your quads. Strengthening your quads can also help improve your knee stability!
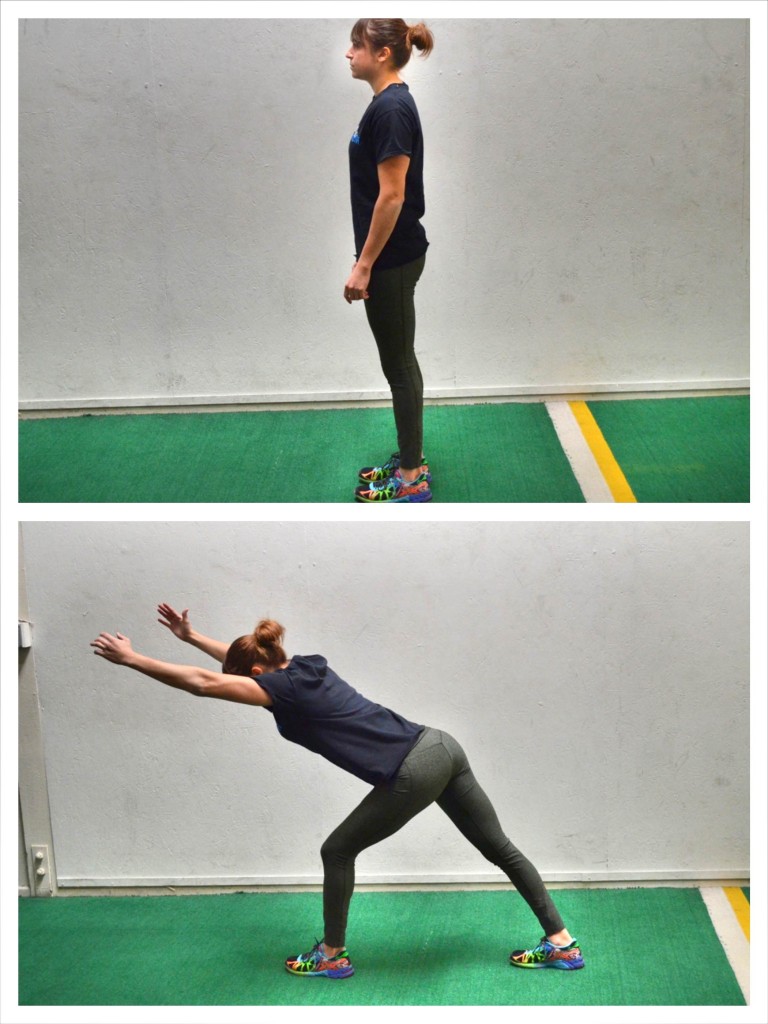
To do the Anterior Reach Lunge, start standing tall with your feet together. Then take a big step forward with one foot and, as you place your foot on the ground, bend that front knee a little bit and push your butt back. Keep your back leg straight as you lunge forward and make sure that, when you step forward, your front heel down stays down and you feel your glute load.
As you’ve stepped forward, you want to hinge over and reach your hands overhead. So you should lunge and hinge at the same time to make sure that, even though you are stepping forward, you are loading your glute.
Do not let your weight go forward and your front knee go over your front toe. If your weight all goes forward and your foot isn’t firmly planted, you may load your knee which could perpetuate your knee pain.
Then, pushing back off the front leg, come back up to standing. Stand nice and tall and then repeat, stepping forward and hinging over to load that front glute.
Make sure that you don’t step out so far that you can’t push back up to standing in one smooth move. Also, you aren’t not trying to bend your knee as much as possible when you lunge forward. You are combining the slight knee bend and lunge with a hinge to load your glute.
You can also either alternate sides or stay on one side until all reps are complete. Add weight to make the move more challenging, but makes sure you have good form and can maintain your balance and feel your glutes working before you do.
Rock Lunges:
This is a great lunge variation to target your quads while improving your hip mobility and stability. If you want to become more mobile, include this lunge as part of your routine.
It can even often be used by those with knee pain if you make sure to set up so you only rock forward to the point that your knee is over your ankle.
Because it isn’t really active knee flexion it can often be ok so is worth testing out if you are looking to work around your knee issues.
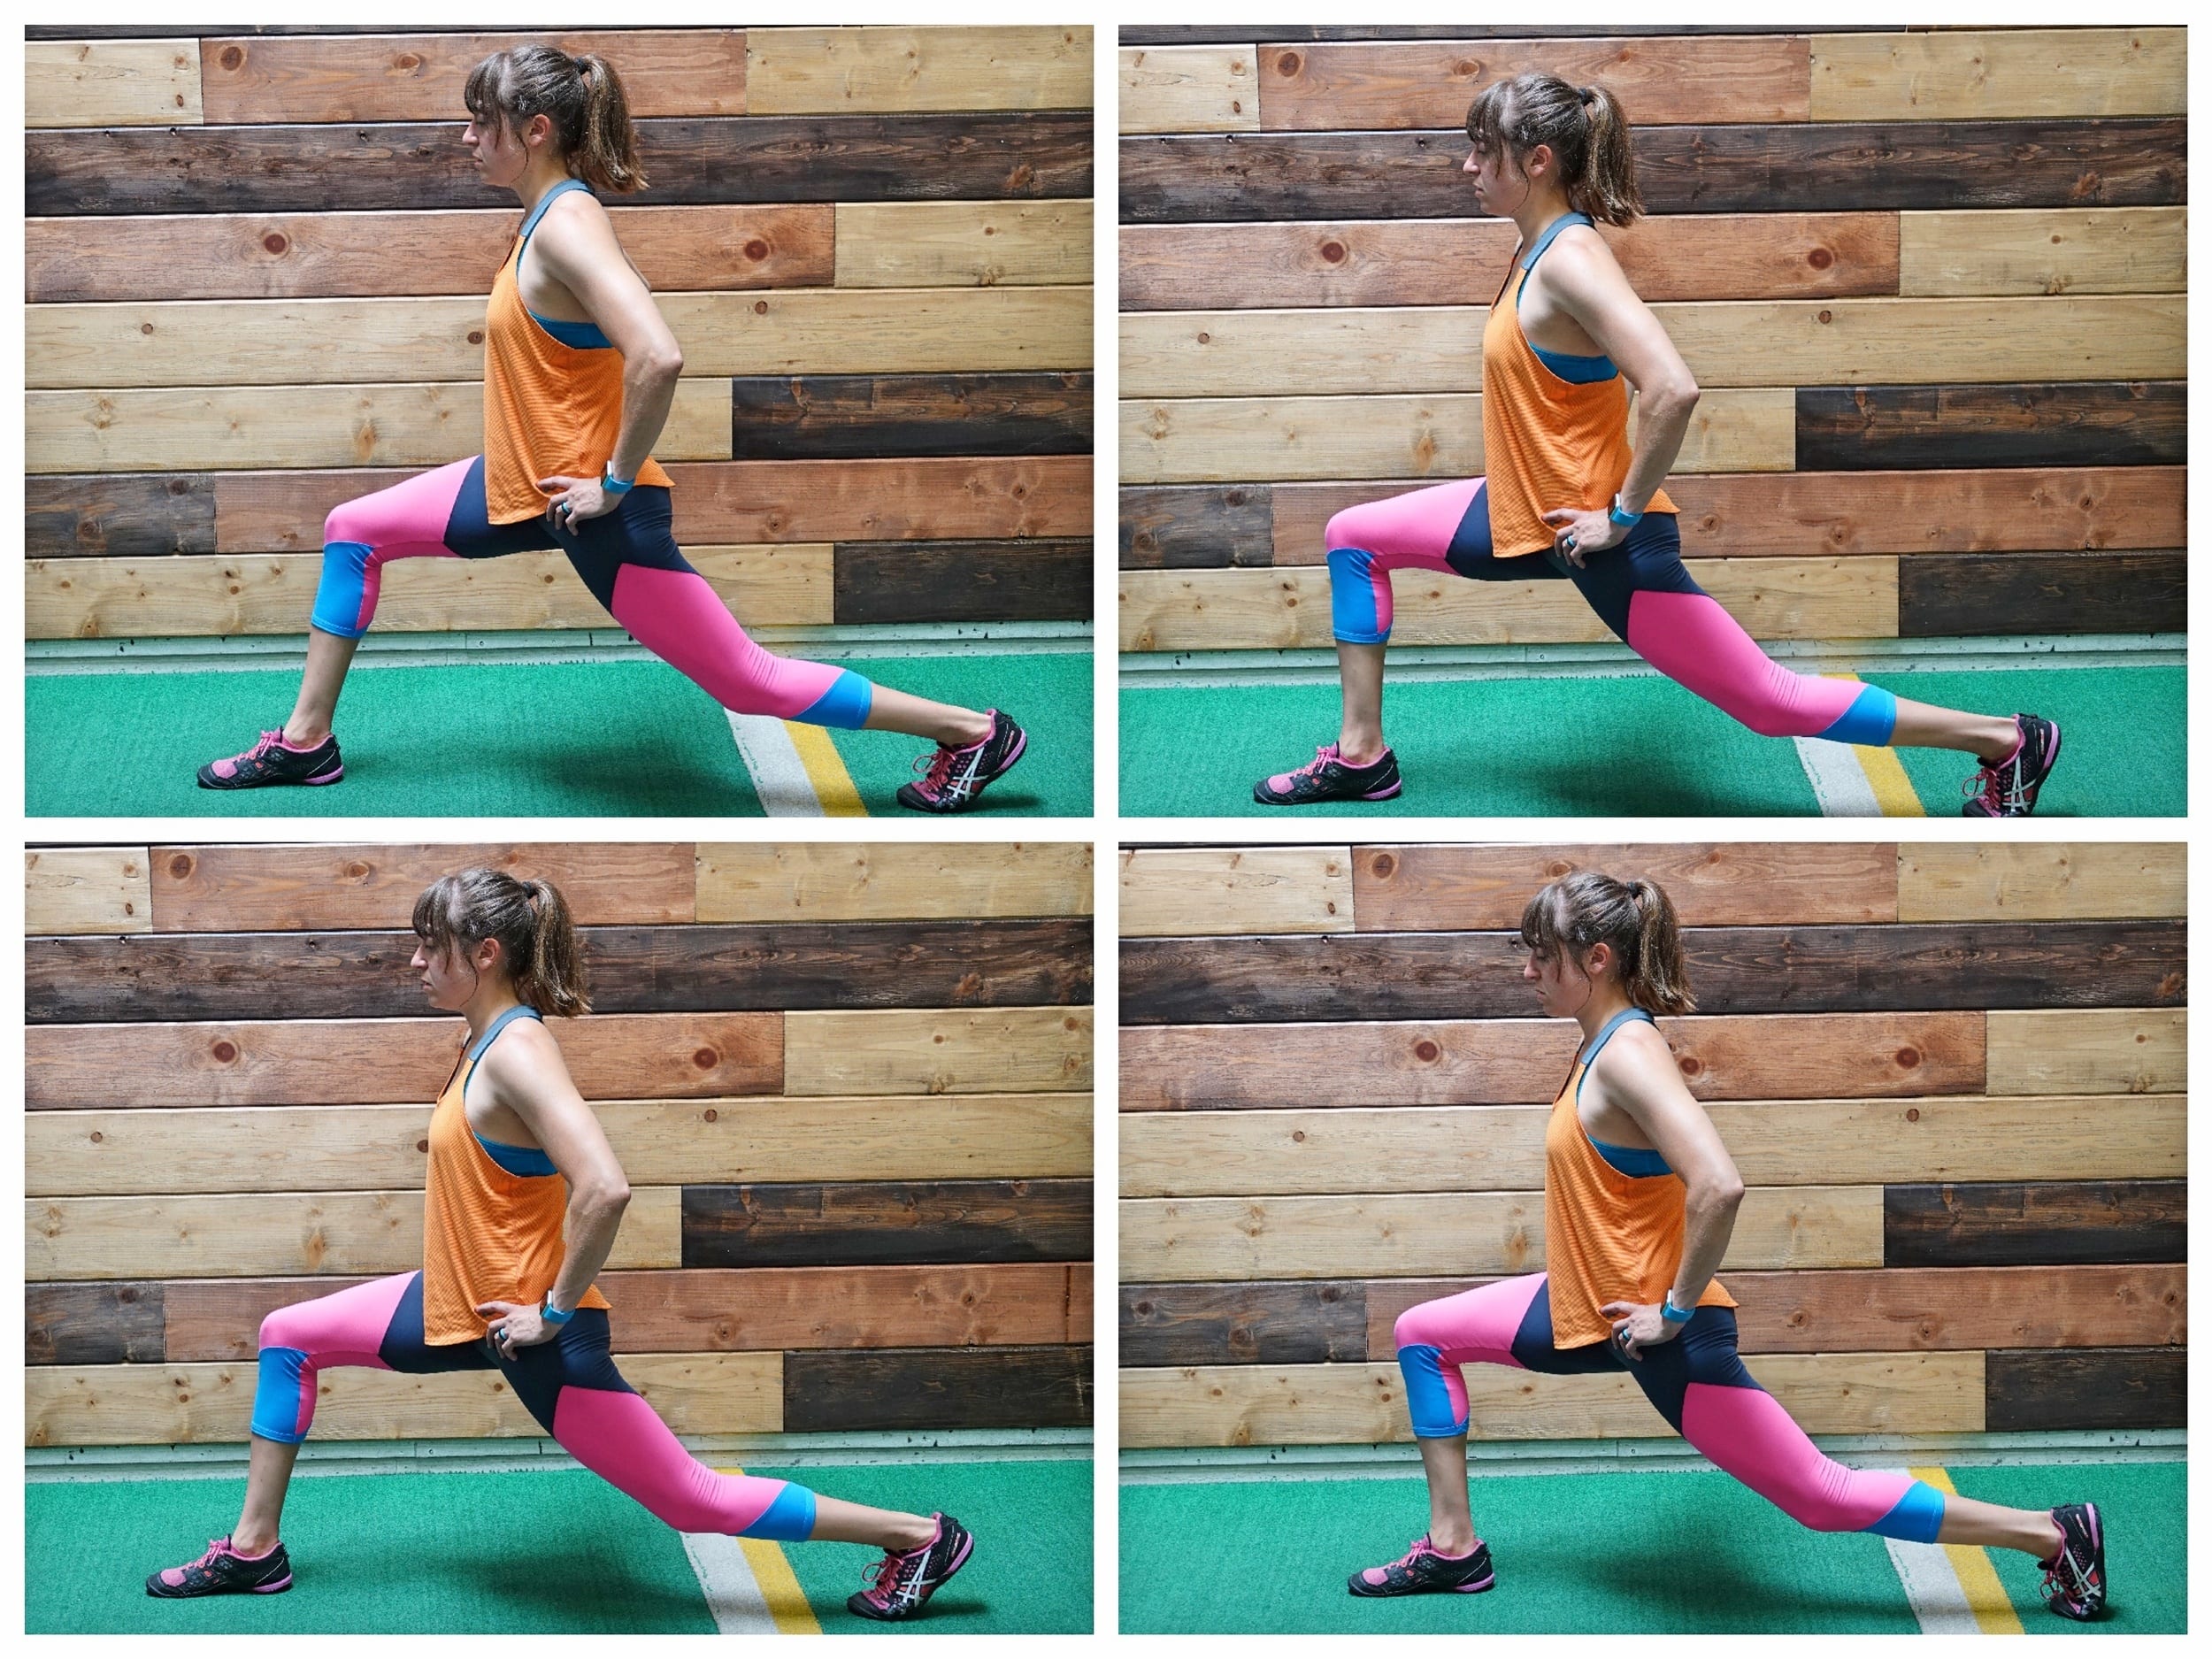
To do Rock Lunges, start standing tall then step one foot back as if you were going to do a reverse lunge. However, you will want to set up in a wider stance than you normally would. Sink down then in this extra wide stance where your back leg will be straight and your front knee will actually be BEHIND your front toe.
Stay in a low extended lunge with your chest up nice and tall and then drive off the ball of your back foot so that you rock forward in the lunge and your knee moves over your ankle or the ball of your foot. The rock back.
You don’t want to bend or extend your back knee or stand up at any time. You are pretending like you have to stay under a ceiling right above your head and you are simply rocking or sliding forward and backward.
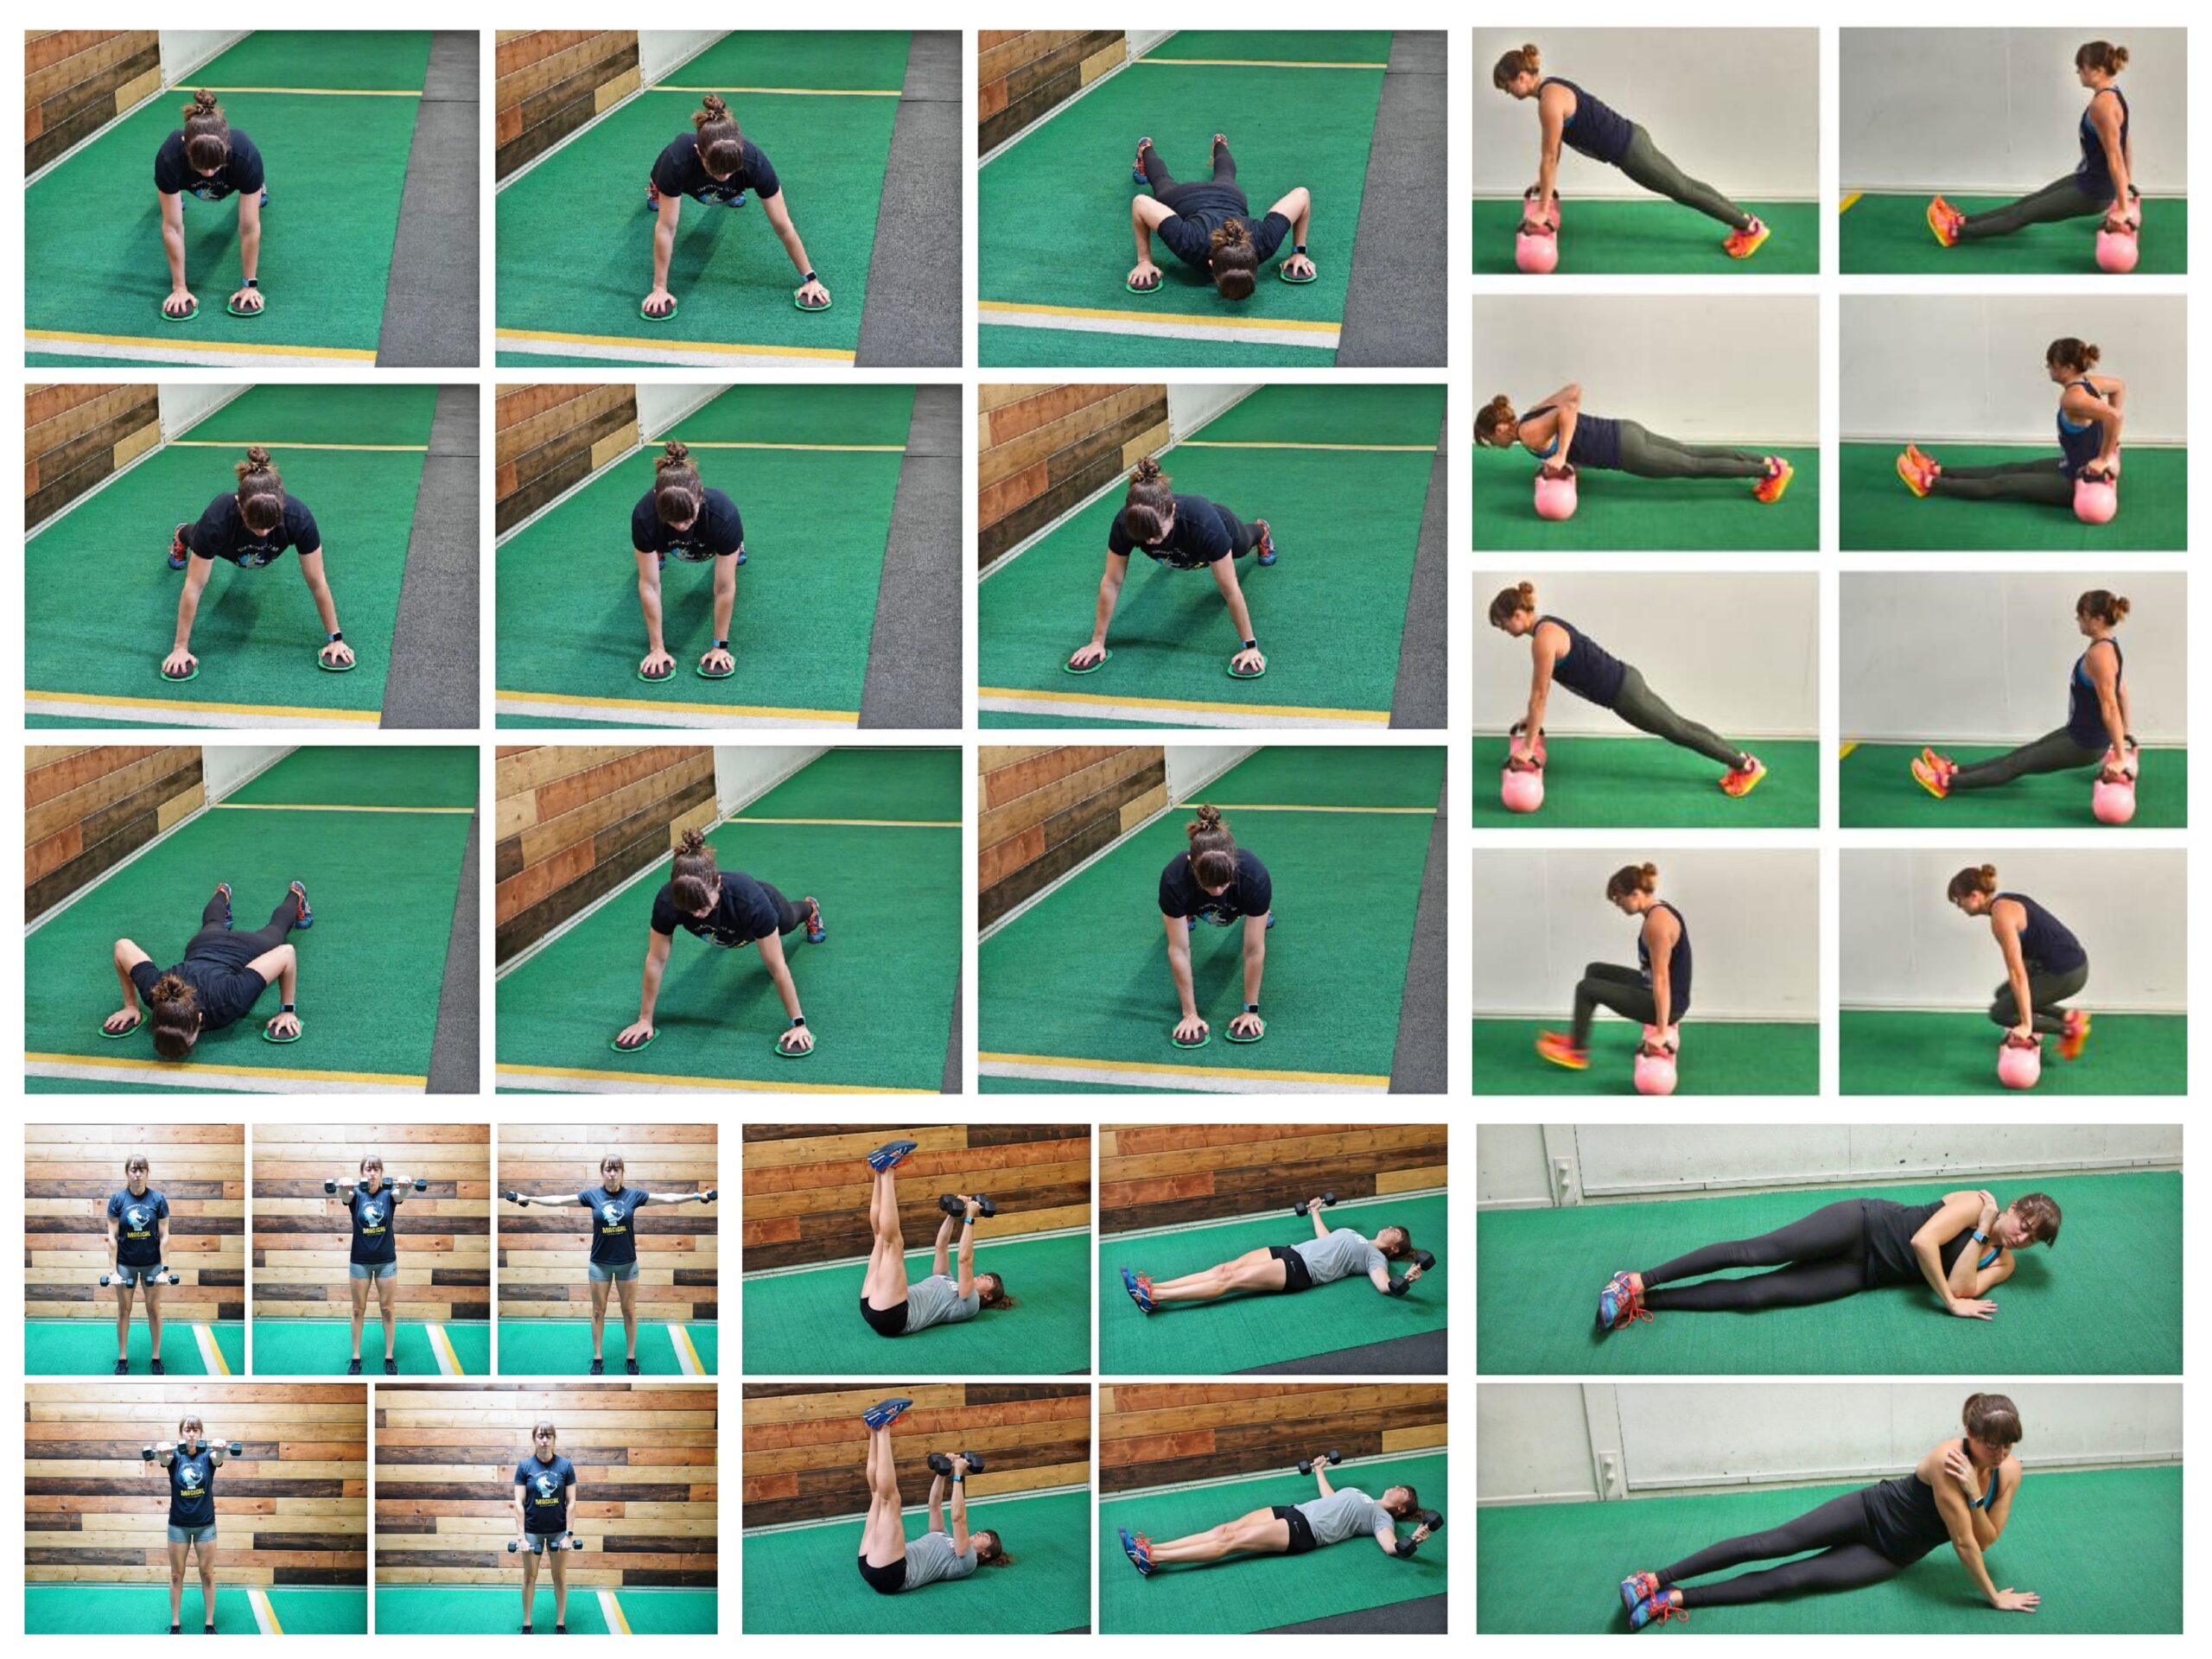
Slider Side Lunge:
There are so many different ways to progress or vary movements to fit our needs. And one great way to make the side lunge target your adductors even more is by adding in a slider.
By sliding your leg out straight to the side instead of stepping out to sink down, you will make your adductors have to work even more while still working your glutes! (Just be careful the first time that you don’t slide out too far or you’ll get stuck!)
To do the Slider Side Lunge, place a towel or slider under one foot. Start standing tall with your feet together.
Then bend your standing leg and sit your butt back as you slide the foot on the towel/slider out to the side. You may hinge a bit at the hips as you sit your butt back and bend your standing leg to sink down, but don’t round forward. Make sure to keep your standing heel firmly planted on the ground. Also, make sure to slide your leg out straight to the side. Do not bend that leg on the slider.
Drive through your standing heel and pull your foot on the towel/slider back in to come back up to standing. Do not allow yourself to go forward as you come back up to standing. You do not want to load your knee. Make sure to really sit back and then drive back up through your standing heel. Keep your back flat as you lunge even if you lean forward a bit because you hinge slightly at the hips. Also make sure to pull your foot on the slider back in using your inner thigh.
Make sure you feel this in your standing glute and the adductor (inner thigh) of the leg on the slider. Complete all reps on one side before switching.
Go lower in the lunge, slow down the tempo, or add weight to make the move harder.
Balance Lunge:
This is a great way to progress the basic static lunge or split squat by adding instability but also by increasing the range of motion.
You can make it more quad intensive by staying more upright with your posture or you can target your glutes more by including more of a hip hinge as you sink down.
You can also advance it further by adding a weight. By front loading the movement, you can make it more core intensive. (You could also create even more instability by putting your back foot in a suspension trainer strap instead of up on a box!
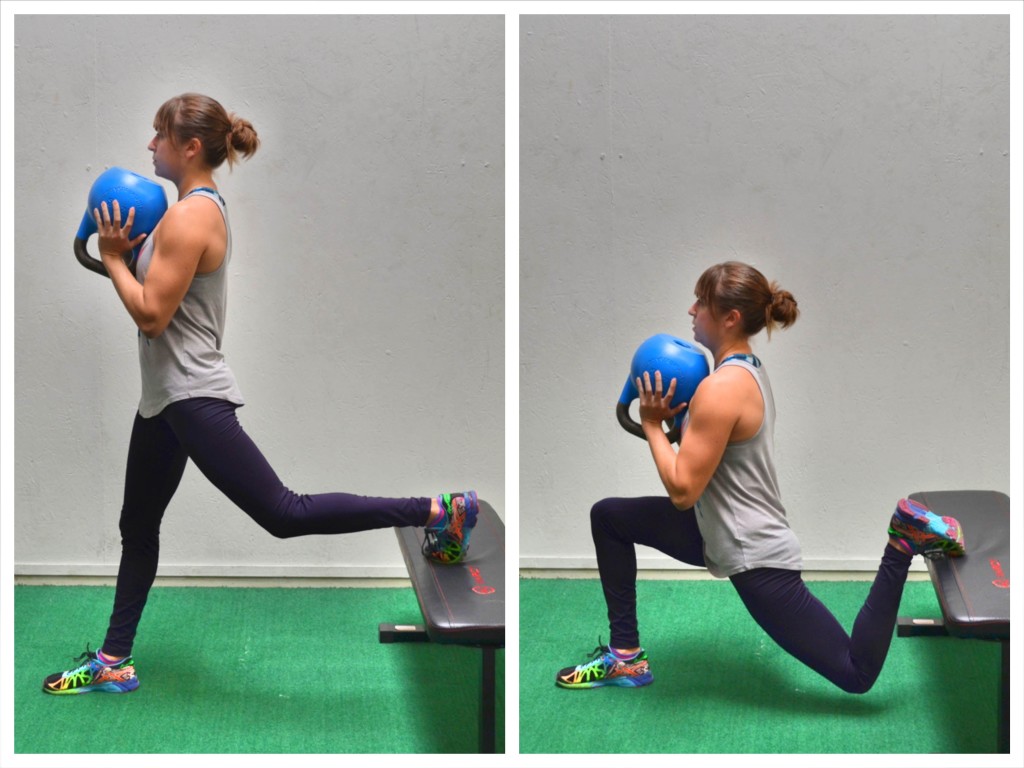
To do Balance Lunges, place one foot back up on a box. You can place the top of your foot on the box by pointing your toe or you can flex your foot and rest the ball of your foot on the box. Hop your front foot out so you are in a nice wide stance with your back foot up on the box.
Then sink down into a lunge, dropping your back knee toward the ground as you bend your front knee to 90 degrees. Really sit back into the lunge. Make sure you aren’t going forward onto your front toe and that your front knee is not going past your toe. You want to sit back to make your glute work. You should also feel a nice stretch in the front of the leg that is back when doing this move.
Keep your chest up nice and tall as you sit down and back. If you are struggling to sit back, you can hinge very slightly forward at the hips.
After sinking down as low as you can, drive back up to standing, driving through your front heel and the back foot. Don’t go forward as you drive up. Then repeat, sinking back down.
Beginners may want to use a super low box or do the move from the ground as a Split Squat. More advanced exercisers, or if you don’t have weights, you may want to do it with your back foot in a suspension trainer. You can also add weight to make the move more challenging.
If you want some killer workouts using these lunges…
Check out my Glute Camp!