by Cori Lefkowith | Jan 23, 2019 | Blog, Butt, Core, Exercises, featured, Pain Relief
This one muscle causes more issues than we often realize. But because the pain and issues it often causes are “elsewhere,” we often don’t realize this nasty little culprit…
Ok…while no muscle is really “nasty” or “evil,” it is important we recognize the different roles specific muscles play in creating imbalances, compensations and injuries up and down our bodies.
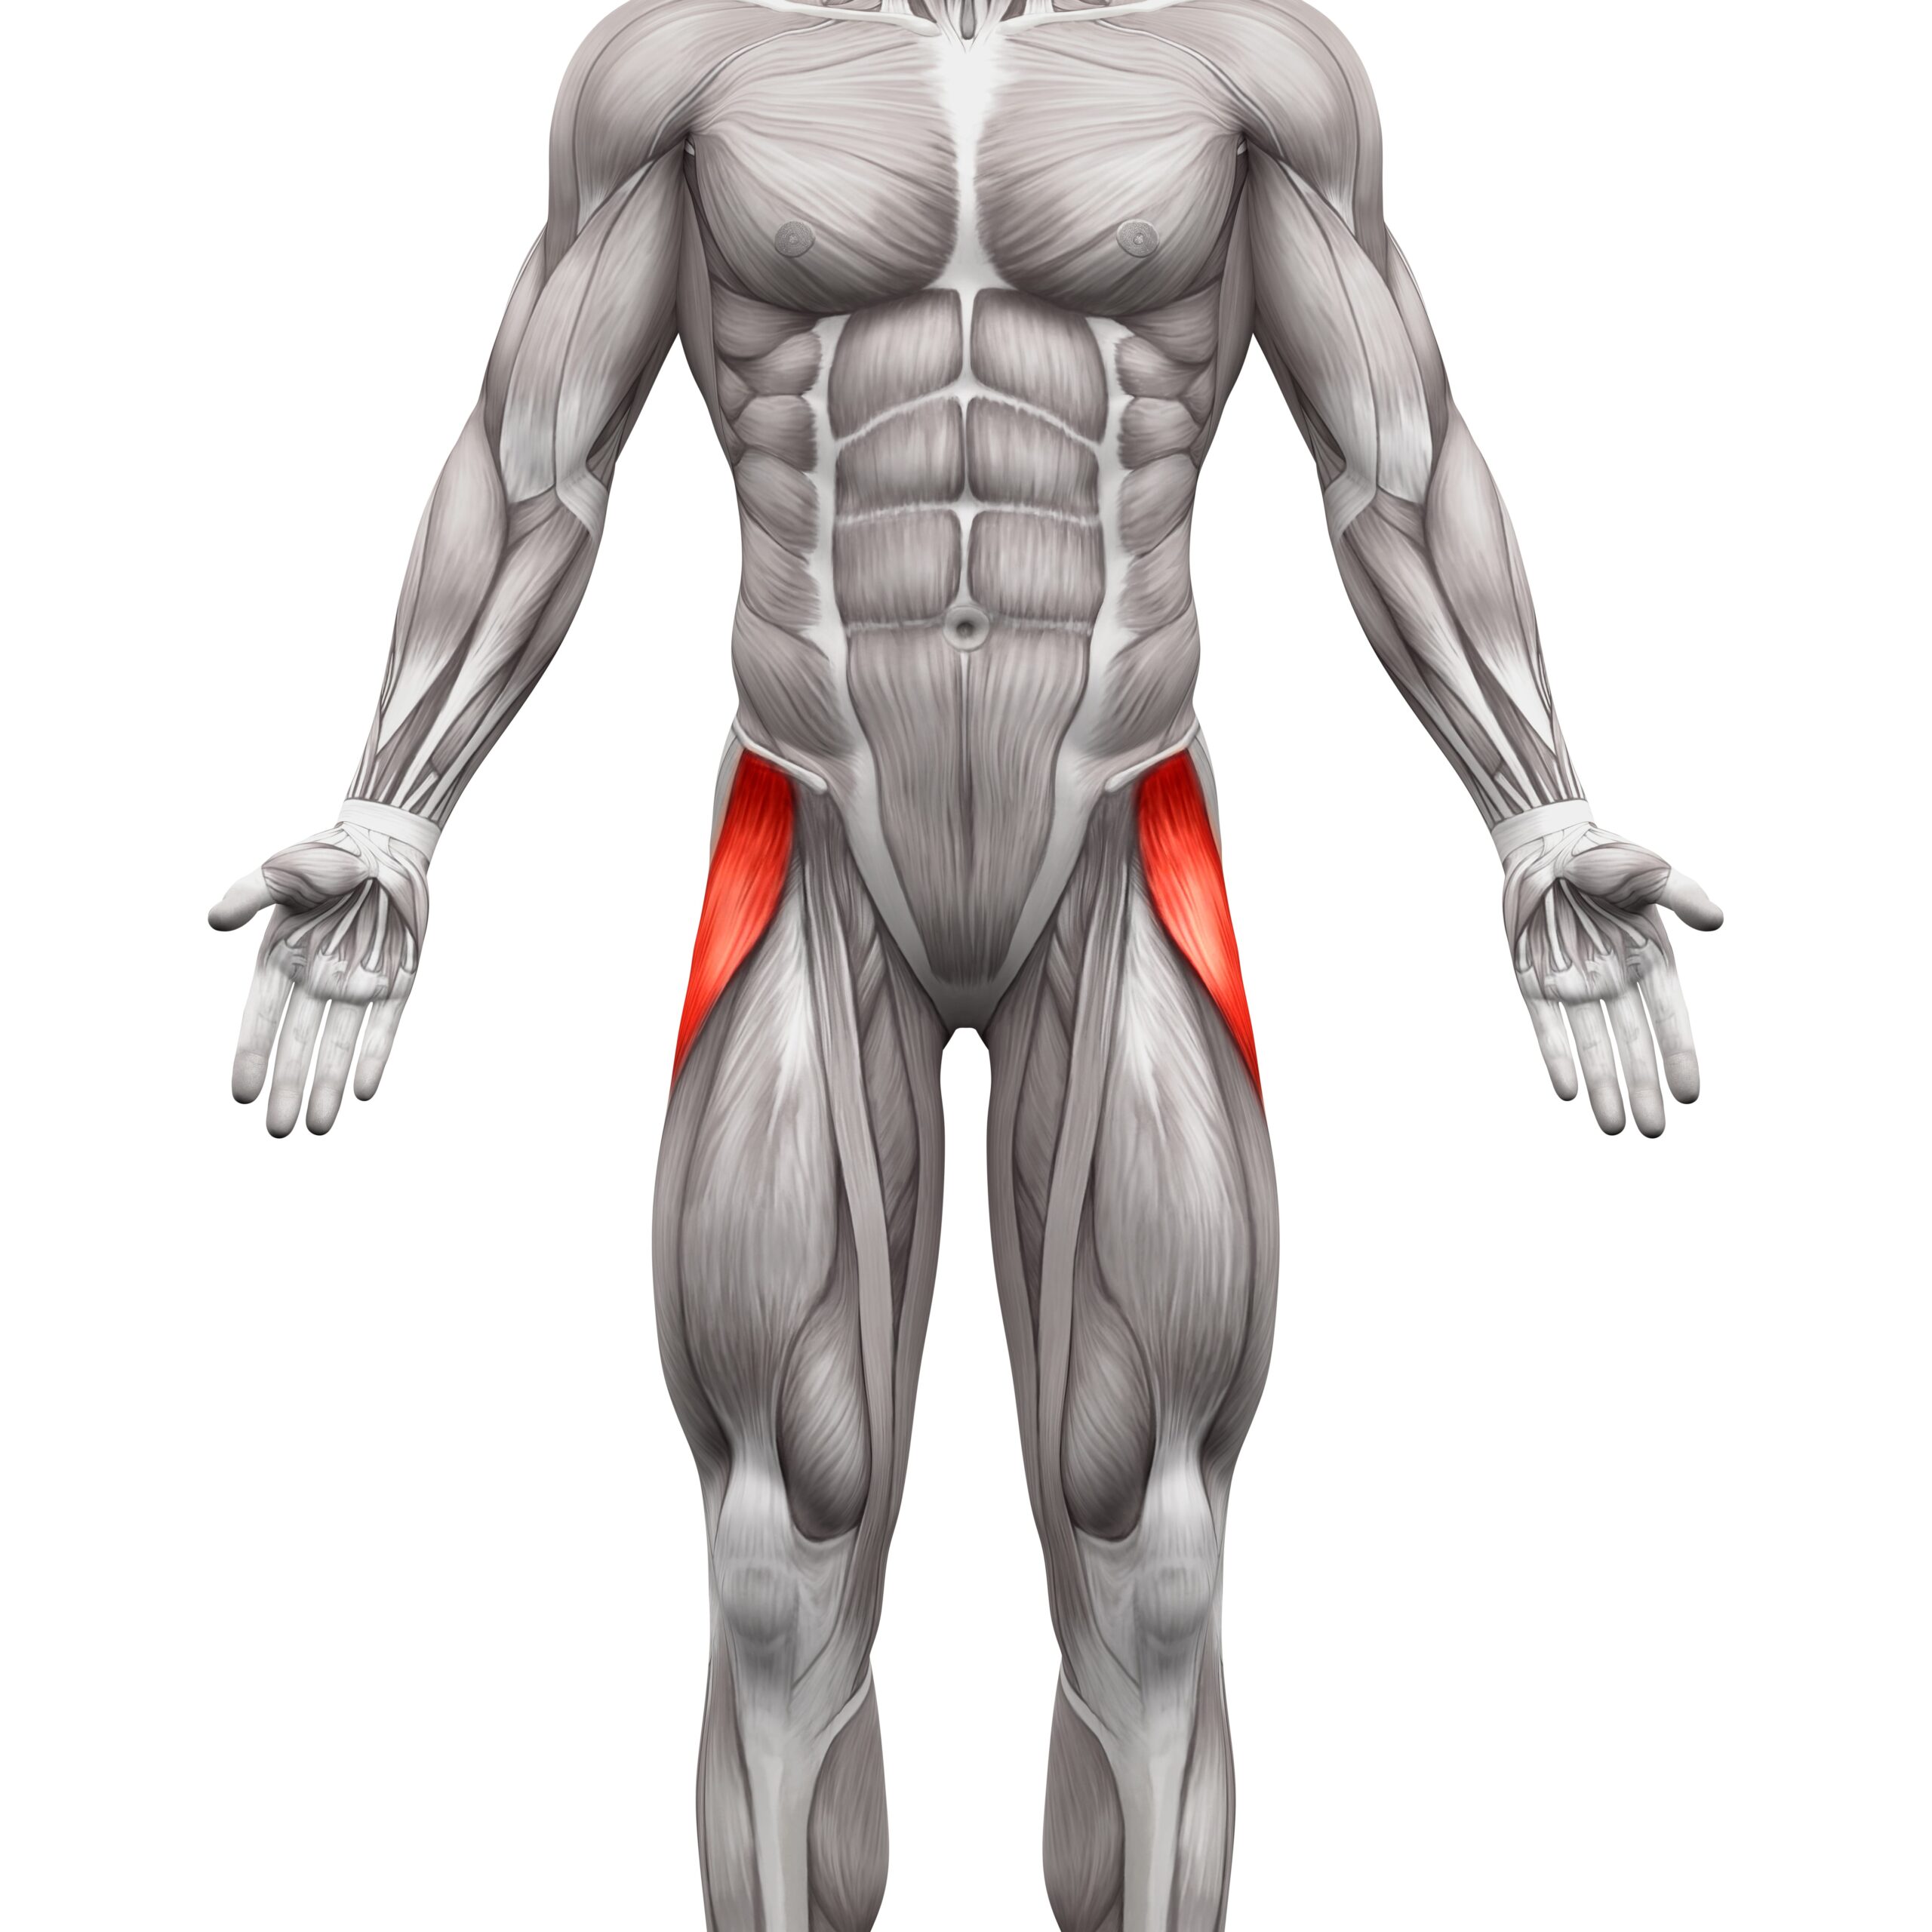
And one muscle we need to pay more attention to is the TFL!
Too often we ignore the issues that can arise from a shortened or tight and overactive TFL or Tensor Fasciae Latae.
This muscle loves to try to take over for other muscles, especially our glute medius. And while often our IT Band, or sometimes even our hip flexors, get blamed, the TFL is ACTUALLY responsible for a variety of low back, hip and knee aches and pains!
The TFL – A Culprit Of IT Band, Low Back, Hip And Knee Pain!?
If you’ve ever had IT Band “issues” or IT Band Syndrome, you may want to take a closer look at your TFL.
A tight, overactive TFL can lead to increased tension on the IT Band, making it feel “tight,” and also cause irritation of the tissue between the IT Band and lateral aspect of the knee joint.
This can lead to knee aches and pains such as patellofemoral pain syndrome (this can also be called runner’s knee or jumper’s knee).
Tightness of the TFL can also restrict hip mobility and contribute to excessive anterior pelvic tilt. Both of these things can lead to hip and low back aches and pains.
And even though there is no direct connection between our TFL and ankle, guess what!?
Everything is connected!
A tight, overactive TFL has even been implicated in causing changes to ankle mobility because of how it also affects the knee joint.
Basically, if your TFL becomes tight and overactive, and you don’t address the imbalances it creates, potentially even because you are wasting time addressing “symptoms” of the problem (aka just focusing only on the point of pain), you can end up with compensations, immobility and imbalances that lead to aches, pains and INJURIES up and down your body!
What Does The TFL Or Tensor Fasciae Latae Do?
While you may be thinking, “Ok I get it. The TFL is a nasty little sucker and I need to relax and lengthen it, especially if I have any of those issues. Now just tell me how to do that!”
And I will provide you with moves below to help you do just that.
HOWEVER, it is important we understand the basic functions of this muscle so we can then be aware of when it may try to compensate during exercises and where we should be feeling the moves instead!
So what does the TFL do?
The TFL contributes to hip abduction (lifting your leg out to the side), hip flexion (bringing your knee up toward your chest) and hip internal rotation (rotating your hip to turn your toe and knee in toward your other leg).
At the knee it also contributes to tibial external rotation, which is when you turn your foot out.
And at your pelvis it assists in anteriorly tilting you pelvis, which, if the muscle is tight, can lead to excessive arching of your lower back.
Why is it important you understand these functions?
Because when you see the movements that the TFL performs, you can also start to see the muscles that may become weak and inhibited (or underactive) because your TFL is tight!
The most common muscle we need to activate, if our TFL is tight, is our GLUTES, especially our glute medius!
The glute medius is supposed to be our primary hip abductor. HOWEVER, if the TFL becomes shortened and overactive, it may restrict our glute medius from firing effectively and efficiently and even try to carry more of the load than it should.
Have you ever done Mini Band Monster Walks or Lateral Raises and really felt your hips burning?
That may be because the TFL is trying to take over for your glute medius instead of allowing it to work as it should!
So how do you avoid letting the TFL take over?
3 Moves To Help Relax The TFL And Activate Your Glute Medius:
The first step is relaxing that overactive muscle. But once you’ve relaxed that muscle, you must then make sure that you improve your mind-body connection to properly RECRUIT your glute medius to do the work it should.
That is why you need to FOAM ROLL + STRETCH + ACTIVATE!
Below is a foam rolling and stretching move for your TFL as well as an activation abduction move to strengthen your glute medius.
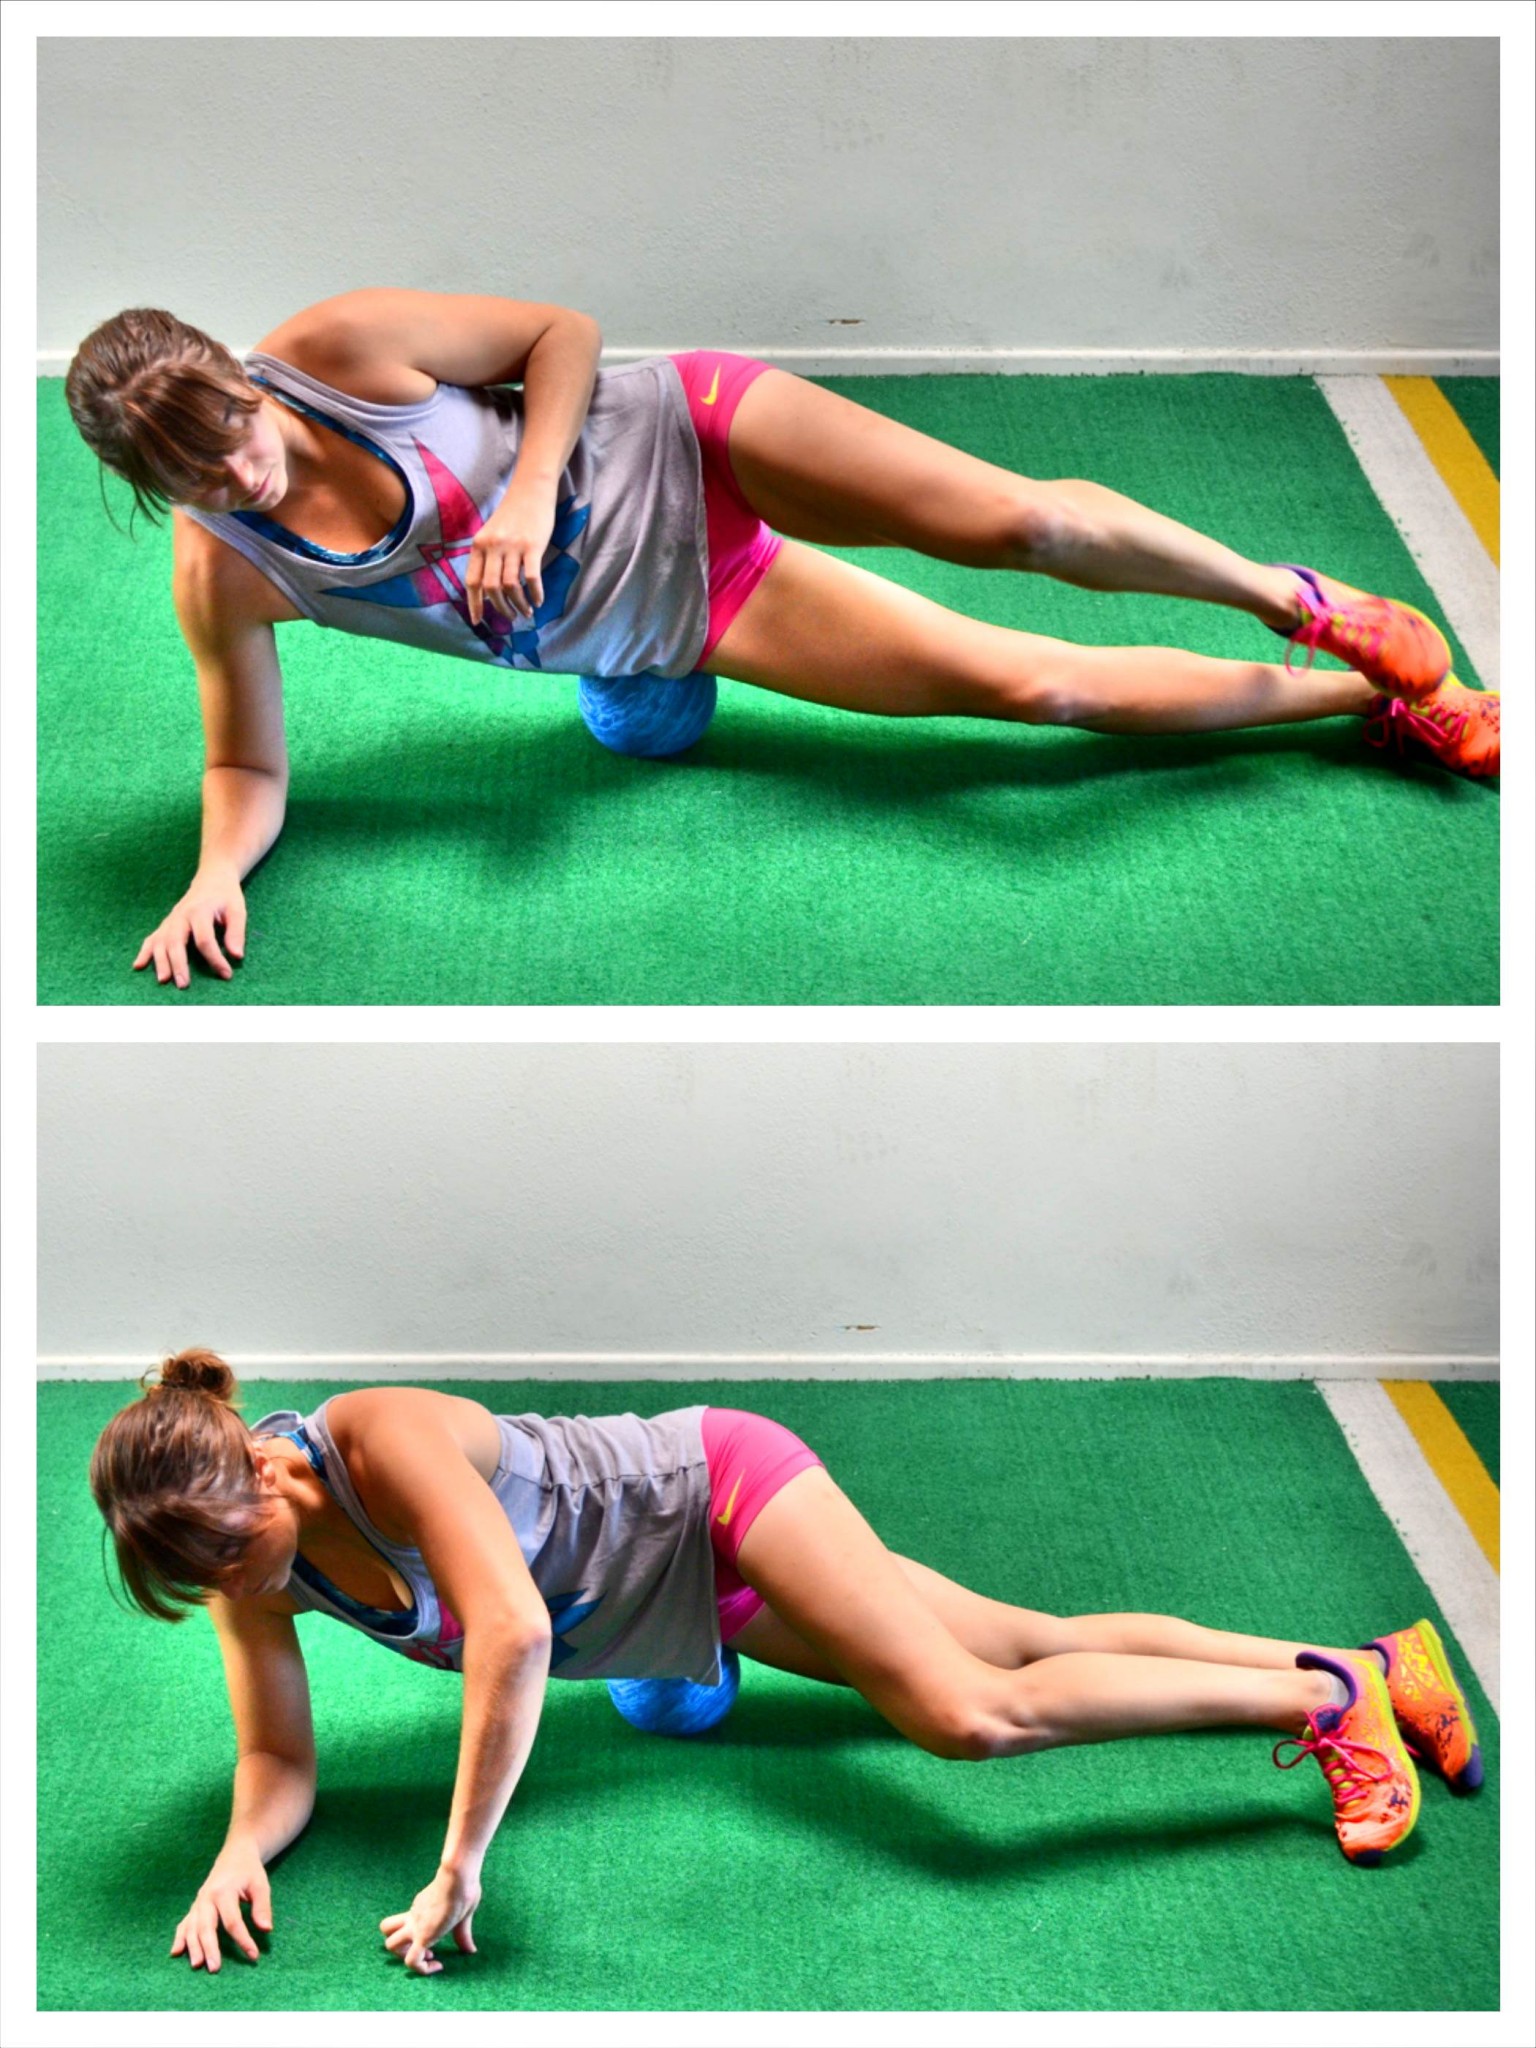
TFL Foam Rolling:
Relax this overactive muscle using this foam rolling move. Relaxing trigger points here may help you find relief too for a tight IT Band. Any time we hear “foam roll your IT Band” we should either focus on our lateral quad or our TFL.
To roll out your TFL, you can use a roller although a ball works best. The smaller and harder the ball, the more it will dig in. If there is too much pressure and you can’t relax while holding on the tight spot, use something softer or a roller without spikes.
Place a ball on the ground then position your body so the ball is just below and outside, or back, from your hip bone. Roll the ball around slowly to find a tight spot and then hold on any tight spots.
If you find a tight spot, hold on that spot and lift and lower your leg up and down. By lifting and lower the leg, you are flexing and relaxing the muscle, which will help loosen everything up as you hold.
As you seek out tight spots in your hip, bring the ball around front and right to the side under your hip bone. Again hold on any tight spots and even flex and relax your leg to help dig in.
You can work your way back out to the side of your hip, and even into your glutes as well, if you find any sore or tight spots. Remember you are holding and breathing to release not rolling fast back and forth over the spot.
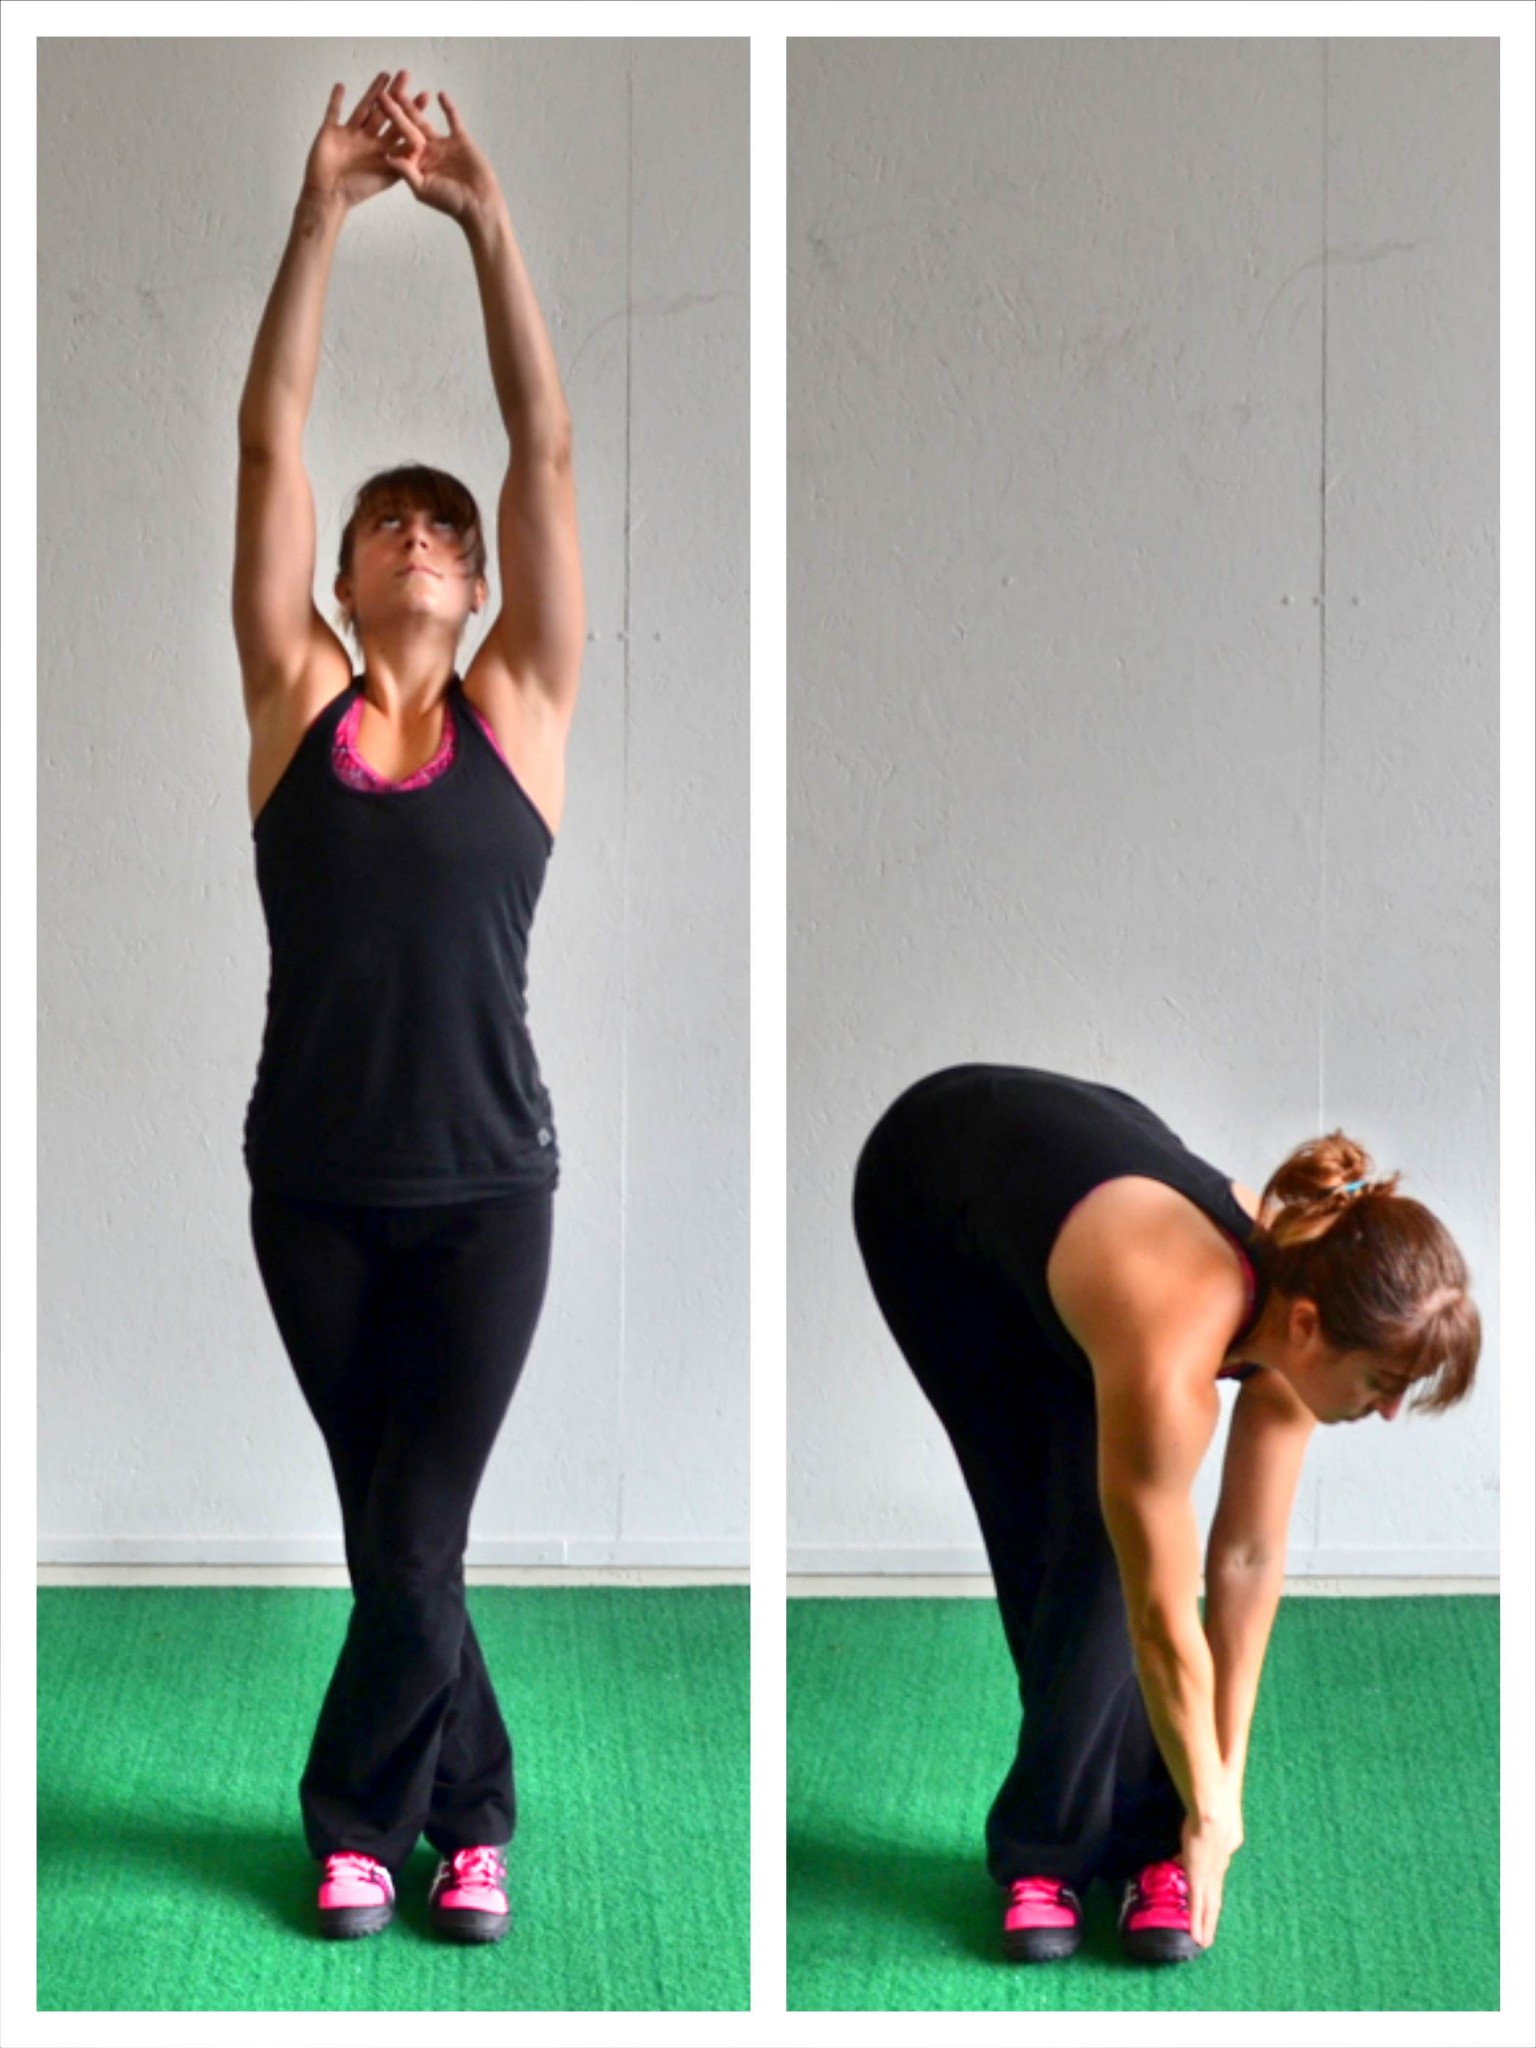
TFL/IT Band Stretch:
I first learned this stretch when it was called the IT Band stretch, but the focus should actually be on your TFL. You may feel it all the way down the outside of that one leg even.
To do the Standing TFL or IT Band Stretch, start standing with your feet together. Then cross your left leg over your right leg. Bring the left foot over and back across until the big toe is even with the big toe of the right foot. You want your feet even so that your front leg (the left leg) is pressing the back leg (right leg) straight during the stretch.
If you struggle to balance or it is too much pressure on your knees to have your legs so tightly crossed, place the front foot a bit out in front, but make sure that you don’t bend that back knee as you hinge over to stretch.
Then reach your arms up overhead for a nice big stretch. After reaching up, hang over, reaching your arms down toward the instep of the back foot (right foot). Push your hips out to the right as you reach toward your right foot so you feel a stretch down the outside of that right hip and side. You may even feel it down your right hamstring and calf.
Hold for a breath or two. Then reach back up overhead and cross your legs the other way so your left foot is back. Again reach up overhead then reach down toward your left instep, pushing your hips out to the left. Keep alternating sides with a reach up overhead in between every time.
Try to touch the ground as you reach down while making sure to keep your legs straight.
If you really struggle to balance, you may need to stand with your feet together and not crossed over as you reach toward the outside of each foot while pushing your hips away.
The key is really pushing that hip out to the side. You can even change things up reaching overhead and even slightly back with the arm on the same side as the hip you are pushing out to the side.
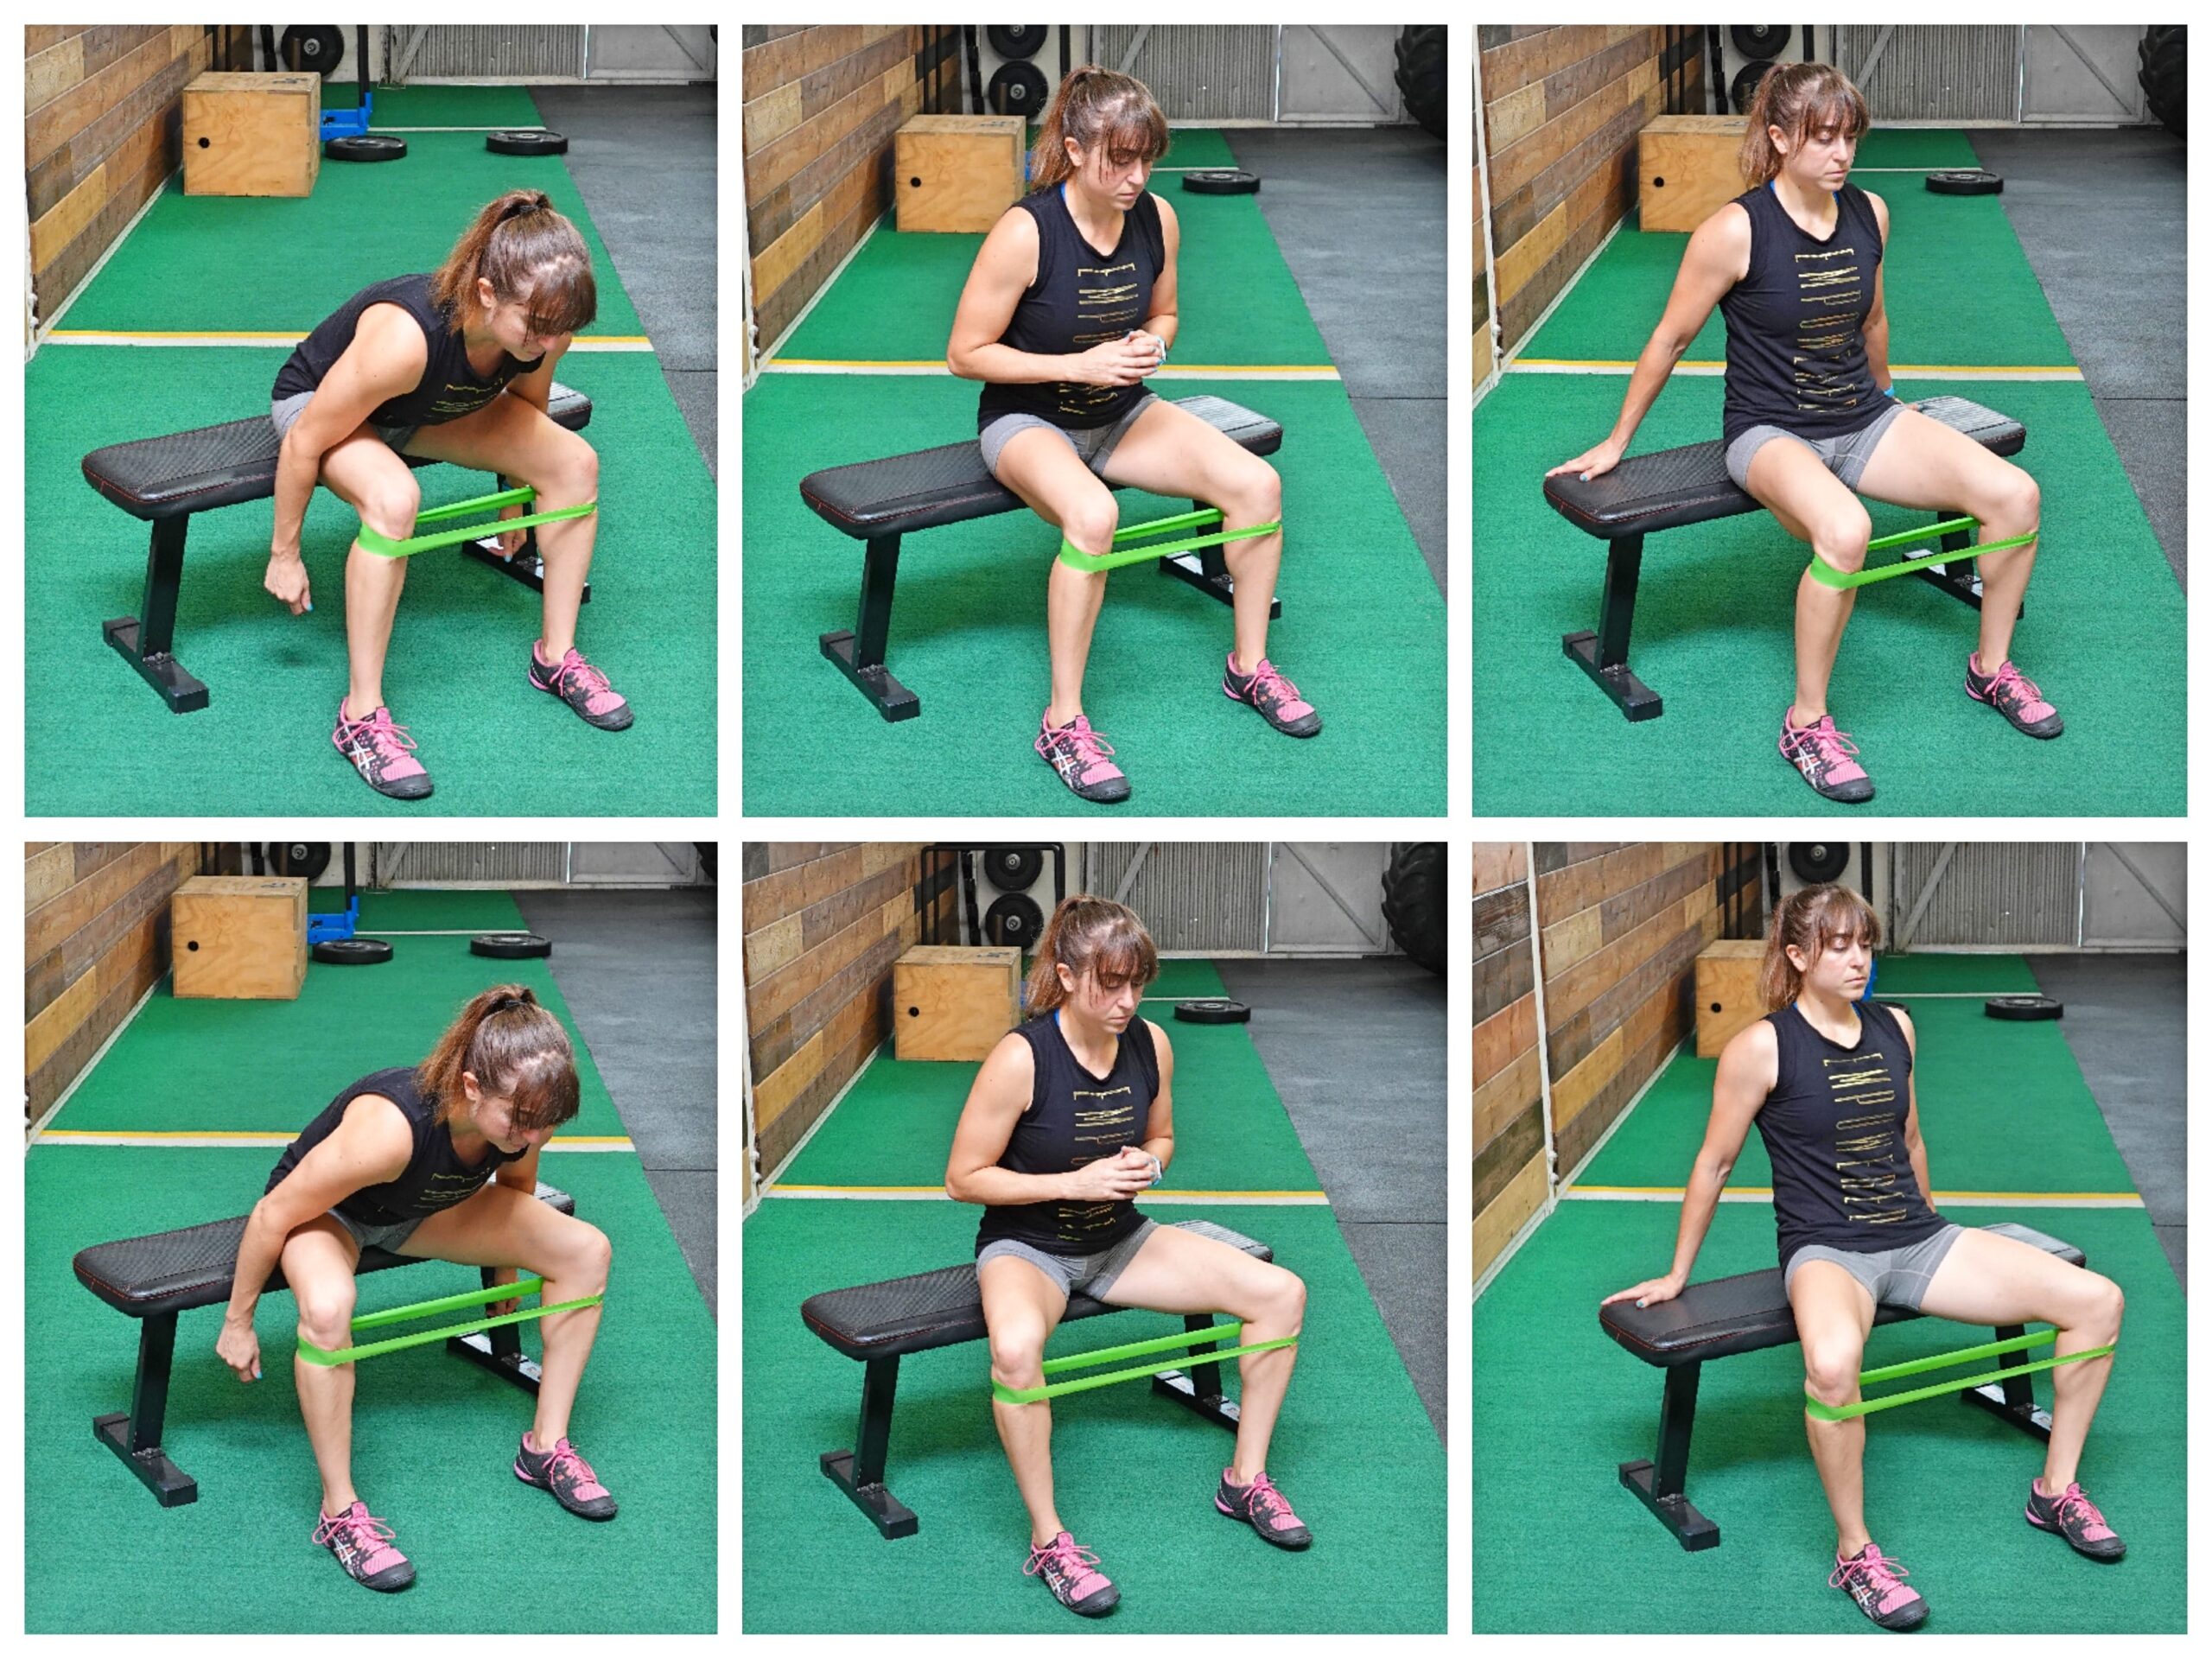
3-Way Seated Abduction:
To target both the anterior and posterior fibers of the glute medius and make sure it is strong and activated from a variety of different angles, the 3-Way Seated Abductions is a great move to use before your workout. In our workouts, and even daily life, we need our glute medius to fire effectively with our body in a variety of positions, it is important we also do work to activate it with different degrees of hip flexion!
Also, if you feel your TFL only taking over during one position, you can make note of that positioning and even roll right prior to that version. You can even use the other two first to make sure your glute medius is fully firing before you get to that variation.
And while your TFL assists with hip flexion, sitting with your hips flexed where your TFL isn’t necessarily trying to flex more (aka relaxed because the bench is supporting you), say unlike standing where you may try to bend at the hips, may even help you prevent your TFL from taking over!
To do 3-Way Seated Mini Band Abductions, place the mini band right below your knees and sit on a bench. Start by sitting toward the front of the bench so you can lean back and put your hands on the bench behind you. Place your feet about hip-width apart.
Then press your knees open against the band as you lean back. Your feet may rock open but focus on using your glutes to press the band open with your knees. Do not let your knees cave in as you come back to the starting position. Complete all reps then move to sit up nice and tall.
Sitting nice and tall repeat, pressing out with your knees so you feel your glutes working. After completing all reps, lean forward and repeat the movement. You can hold on the bench outside your legs to lean forward or just lean over even lightly resting your arms on your legs.
Complete all reps in each of the 3 positions. Make sure you’re really focused on pressing your knees out to feel your glutes while controlling the band back in. To reduce tension, you can start with a lighter band or put your feet slightly closer together, but make sure there is tension on the band even in that starting position.
Don’t Just Go Through The Motions – Form Tweaks That Help Activate Your Glutes:
Now that you know this nasty little sucker is out there causing issues, and even have some good ideas of how to start dealing with those aches and pains, I do want to remind you that doing the “RIGHT” moves isn’t enough if you don’t feel the CORRECT MUSCLES WORKING!
That is part of the problem!
We do these abduction moves and our TFL tries to take over. Heck…it doesn’t try…we LET IT!
So doing more abduction moves for your glute medius can backfire if you aren’t feeling the right areas working. And simply having the move “look right” and performing a proper movement pattern, doesn’t mean you have a proper recruitment pattern.
As you do these moves, or any moves for that matter, make sure you FEEL THE RIGHT MUSCLES WORKING!
You want to use activation moves where your focus isn’t on lifting more to establish that mind-body connection so when you go lift heavy or run, those proper recruitment patterns are AUTOMATIC!
Assess where you feel working and tweak or change moves until you know that your glute medius is actually firing and your TFL isn’t just taking over.
Add in an extra round of foam rolling during your workout if you start to feel your TFL working. Reduce the loads or resistance you are using if you’re fatigued and compensating.
Or make small tweaks to even those activation moves to help prevent your TFL from taking over!
So what are some tweaks you can make? And how can you help yourself know that your glute medius is firing?
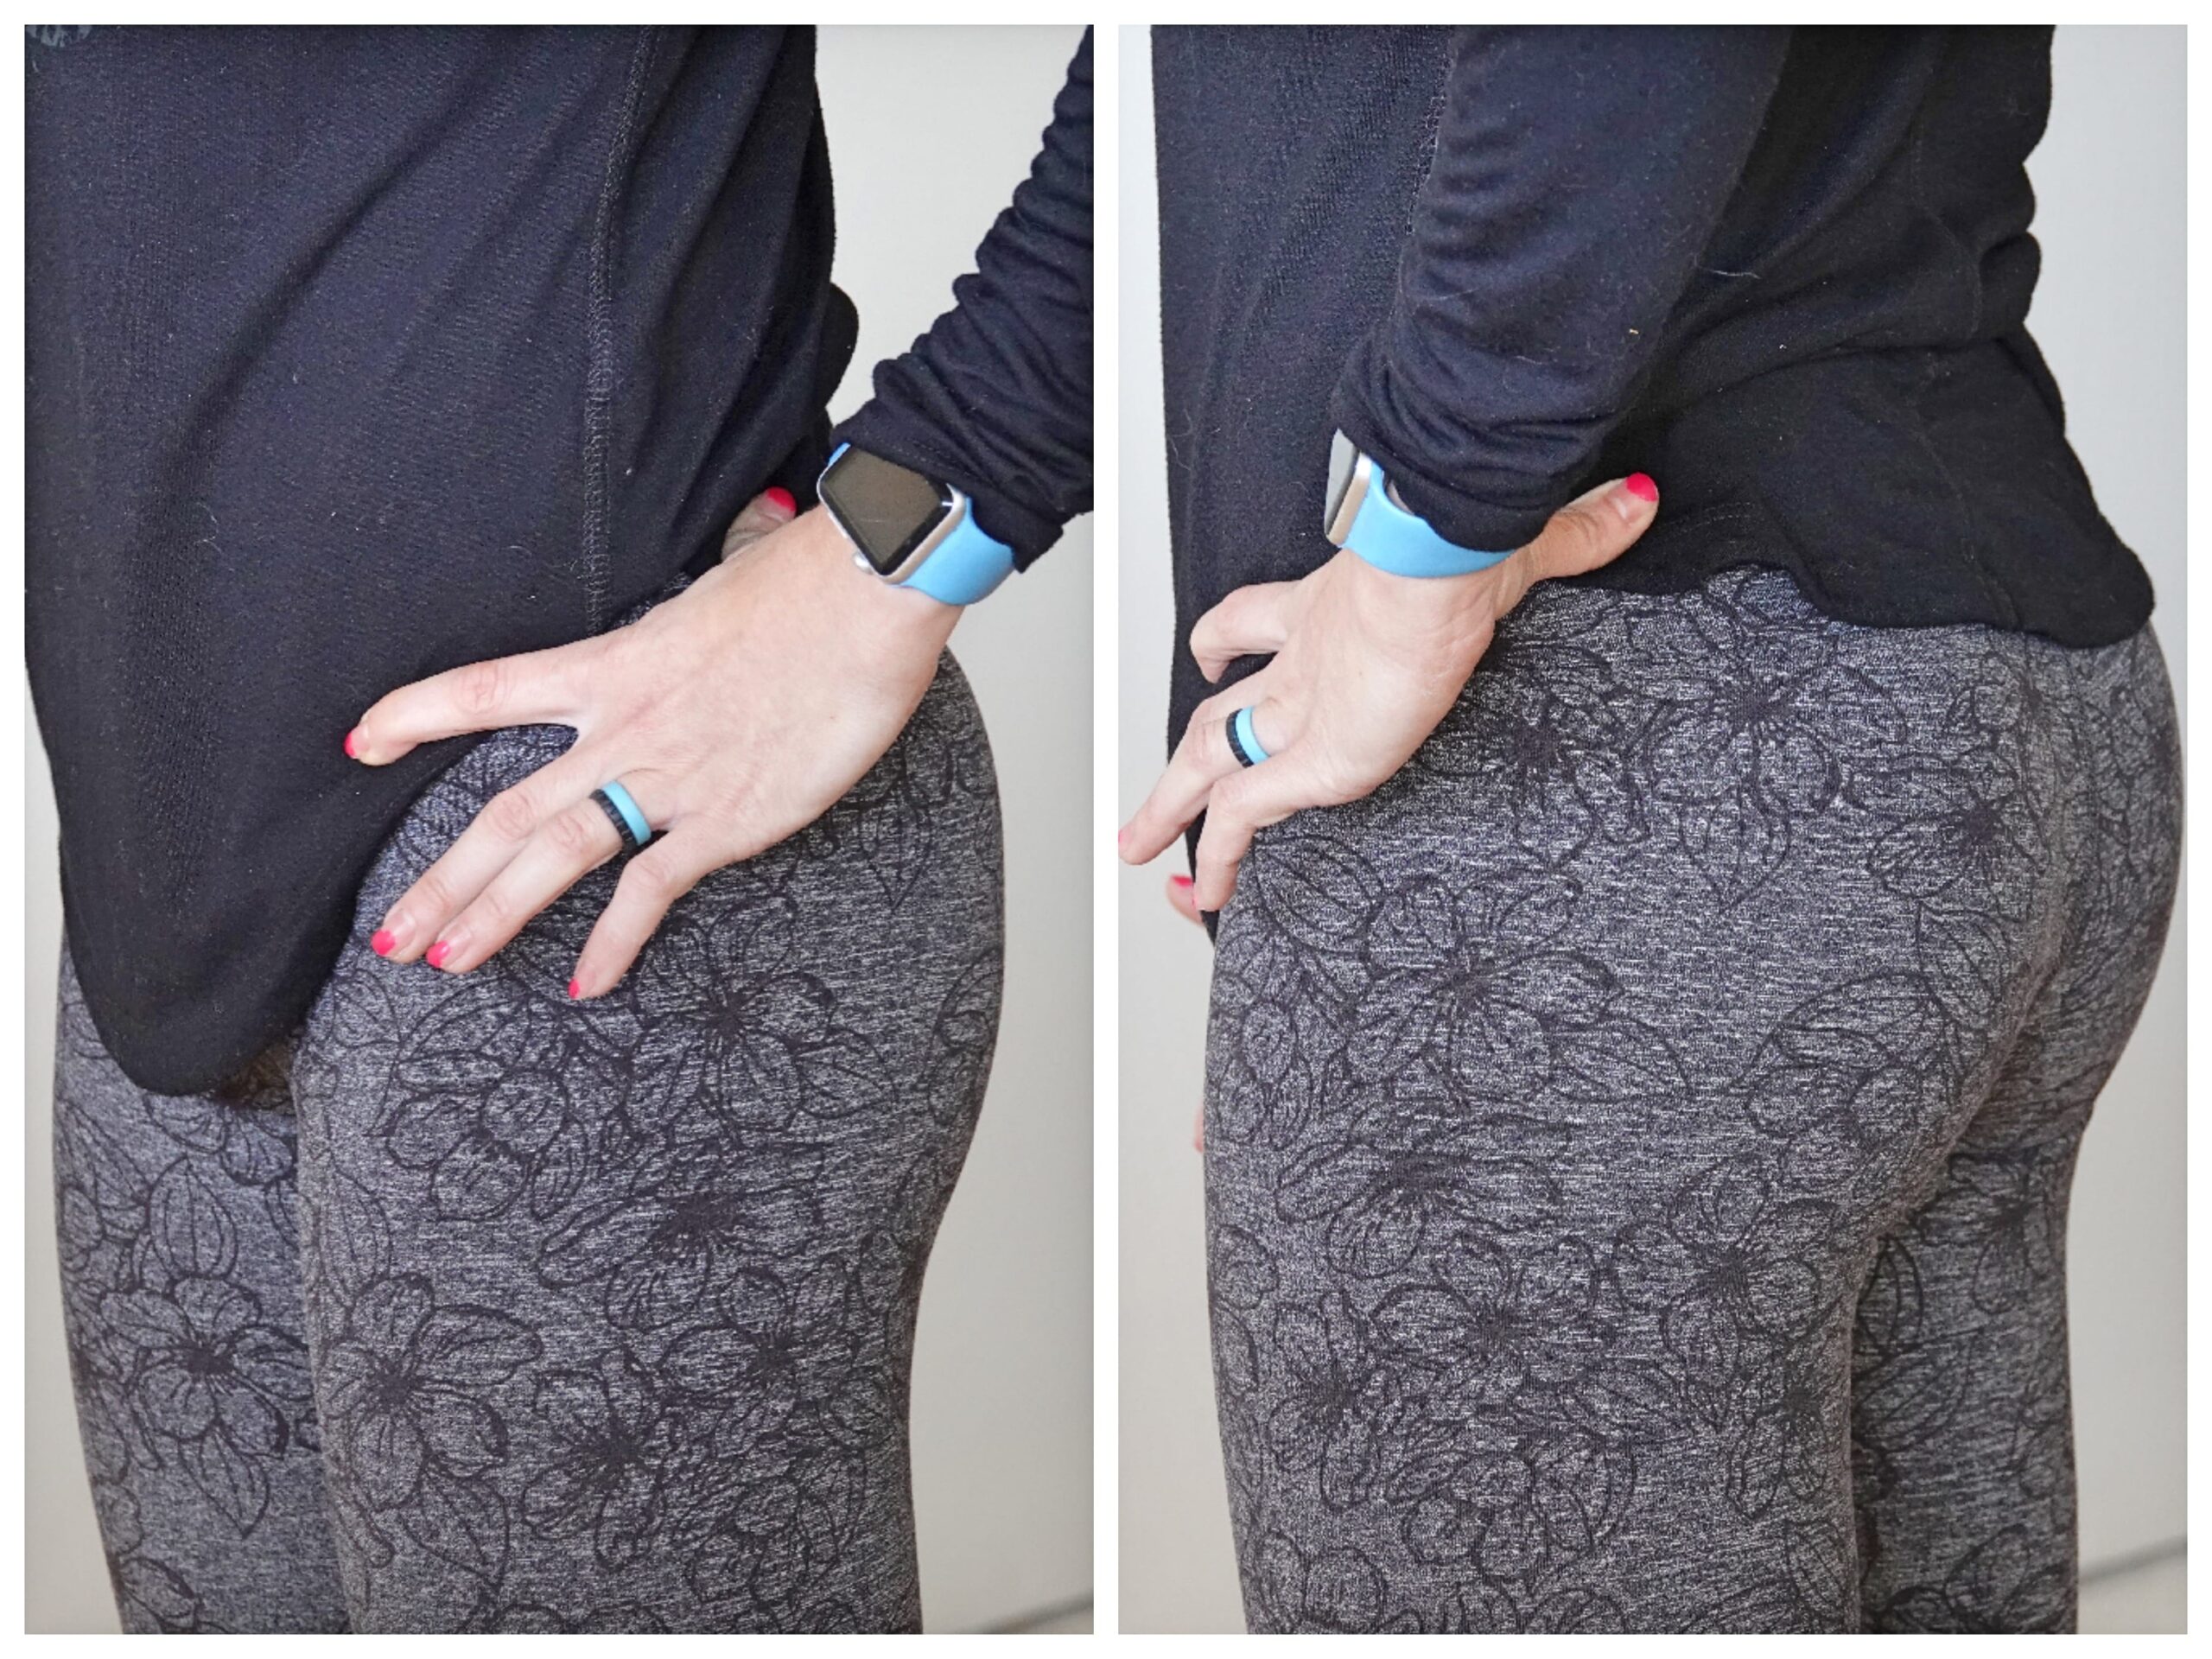
First, to help yourself focus on using your glute medius during abduction moves….
You need to know where you should be feeling it, right?
Place your pointer finger on your hip bone and your thumb back along the top side of your butt.
Where your thumb is?
Well that is where you want to feel those moves! Focus on feeling under your thumb working to start!
Now in terms of tweaking moves?
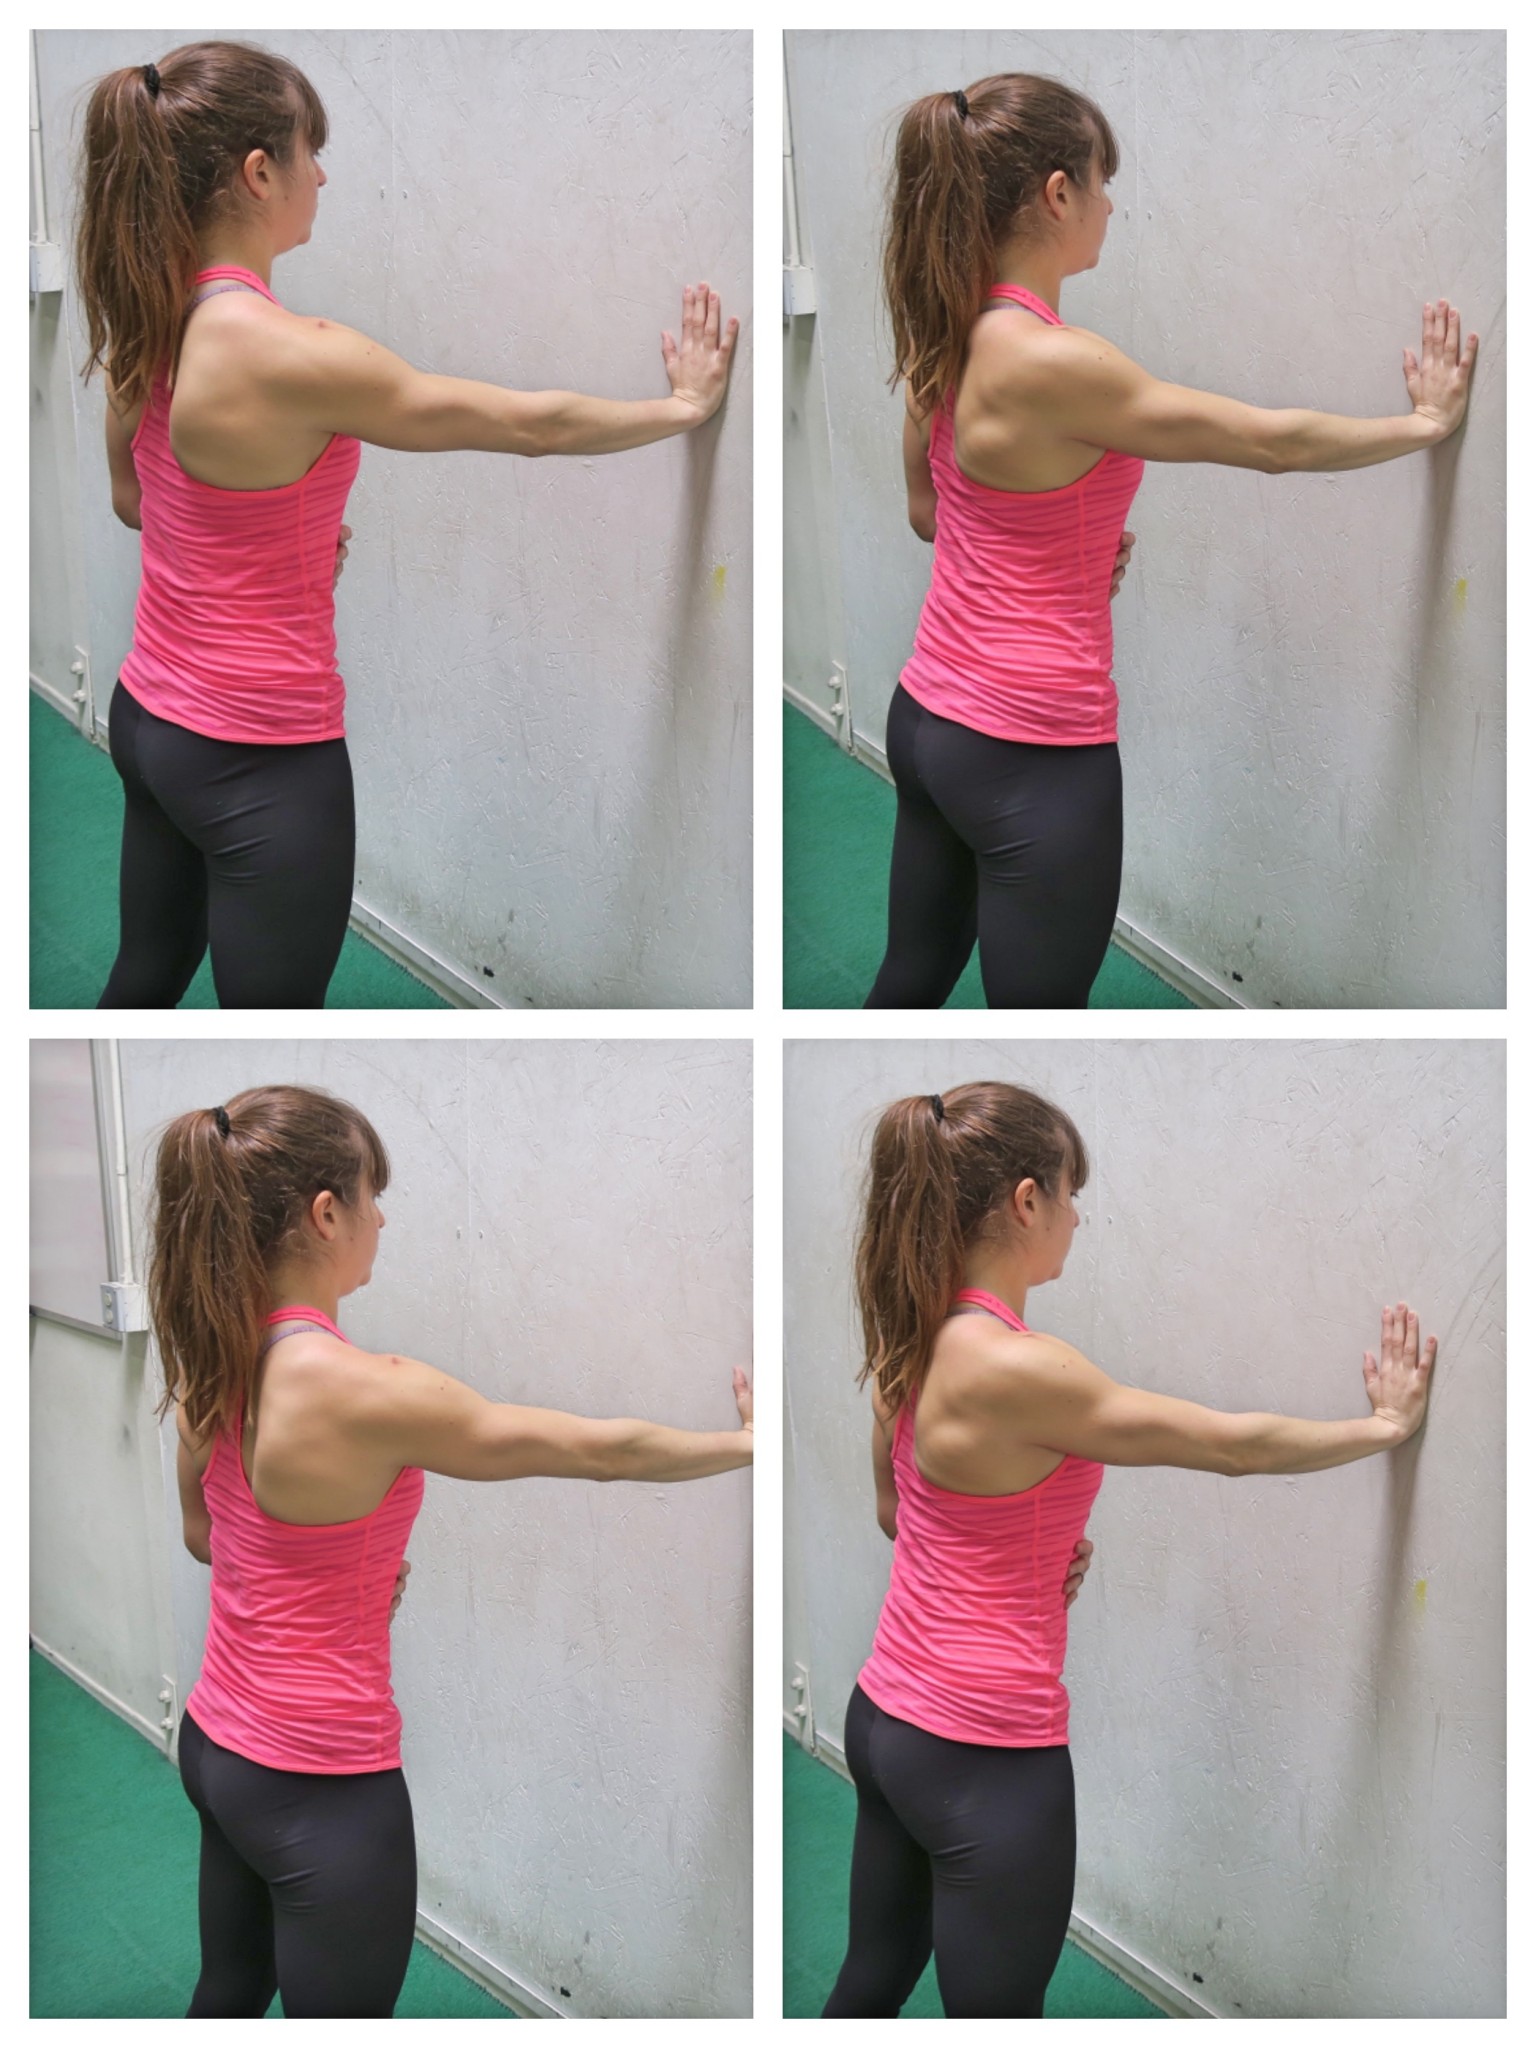
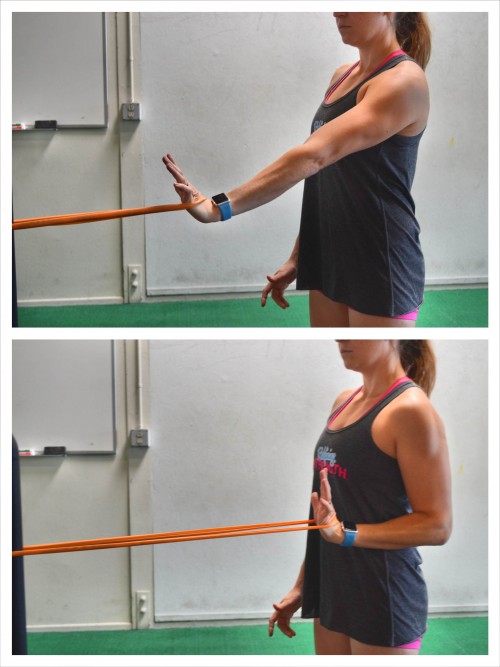
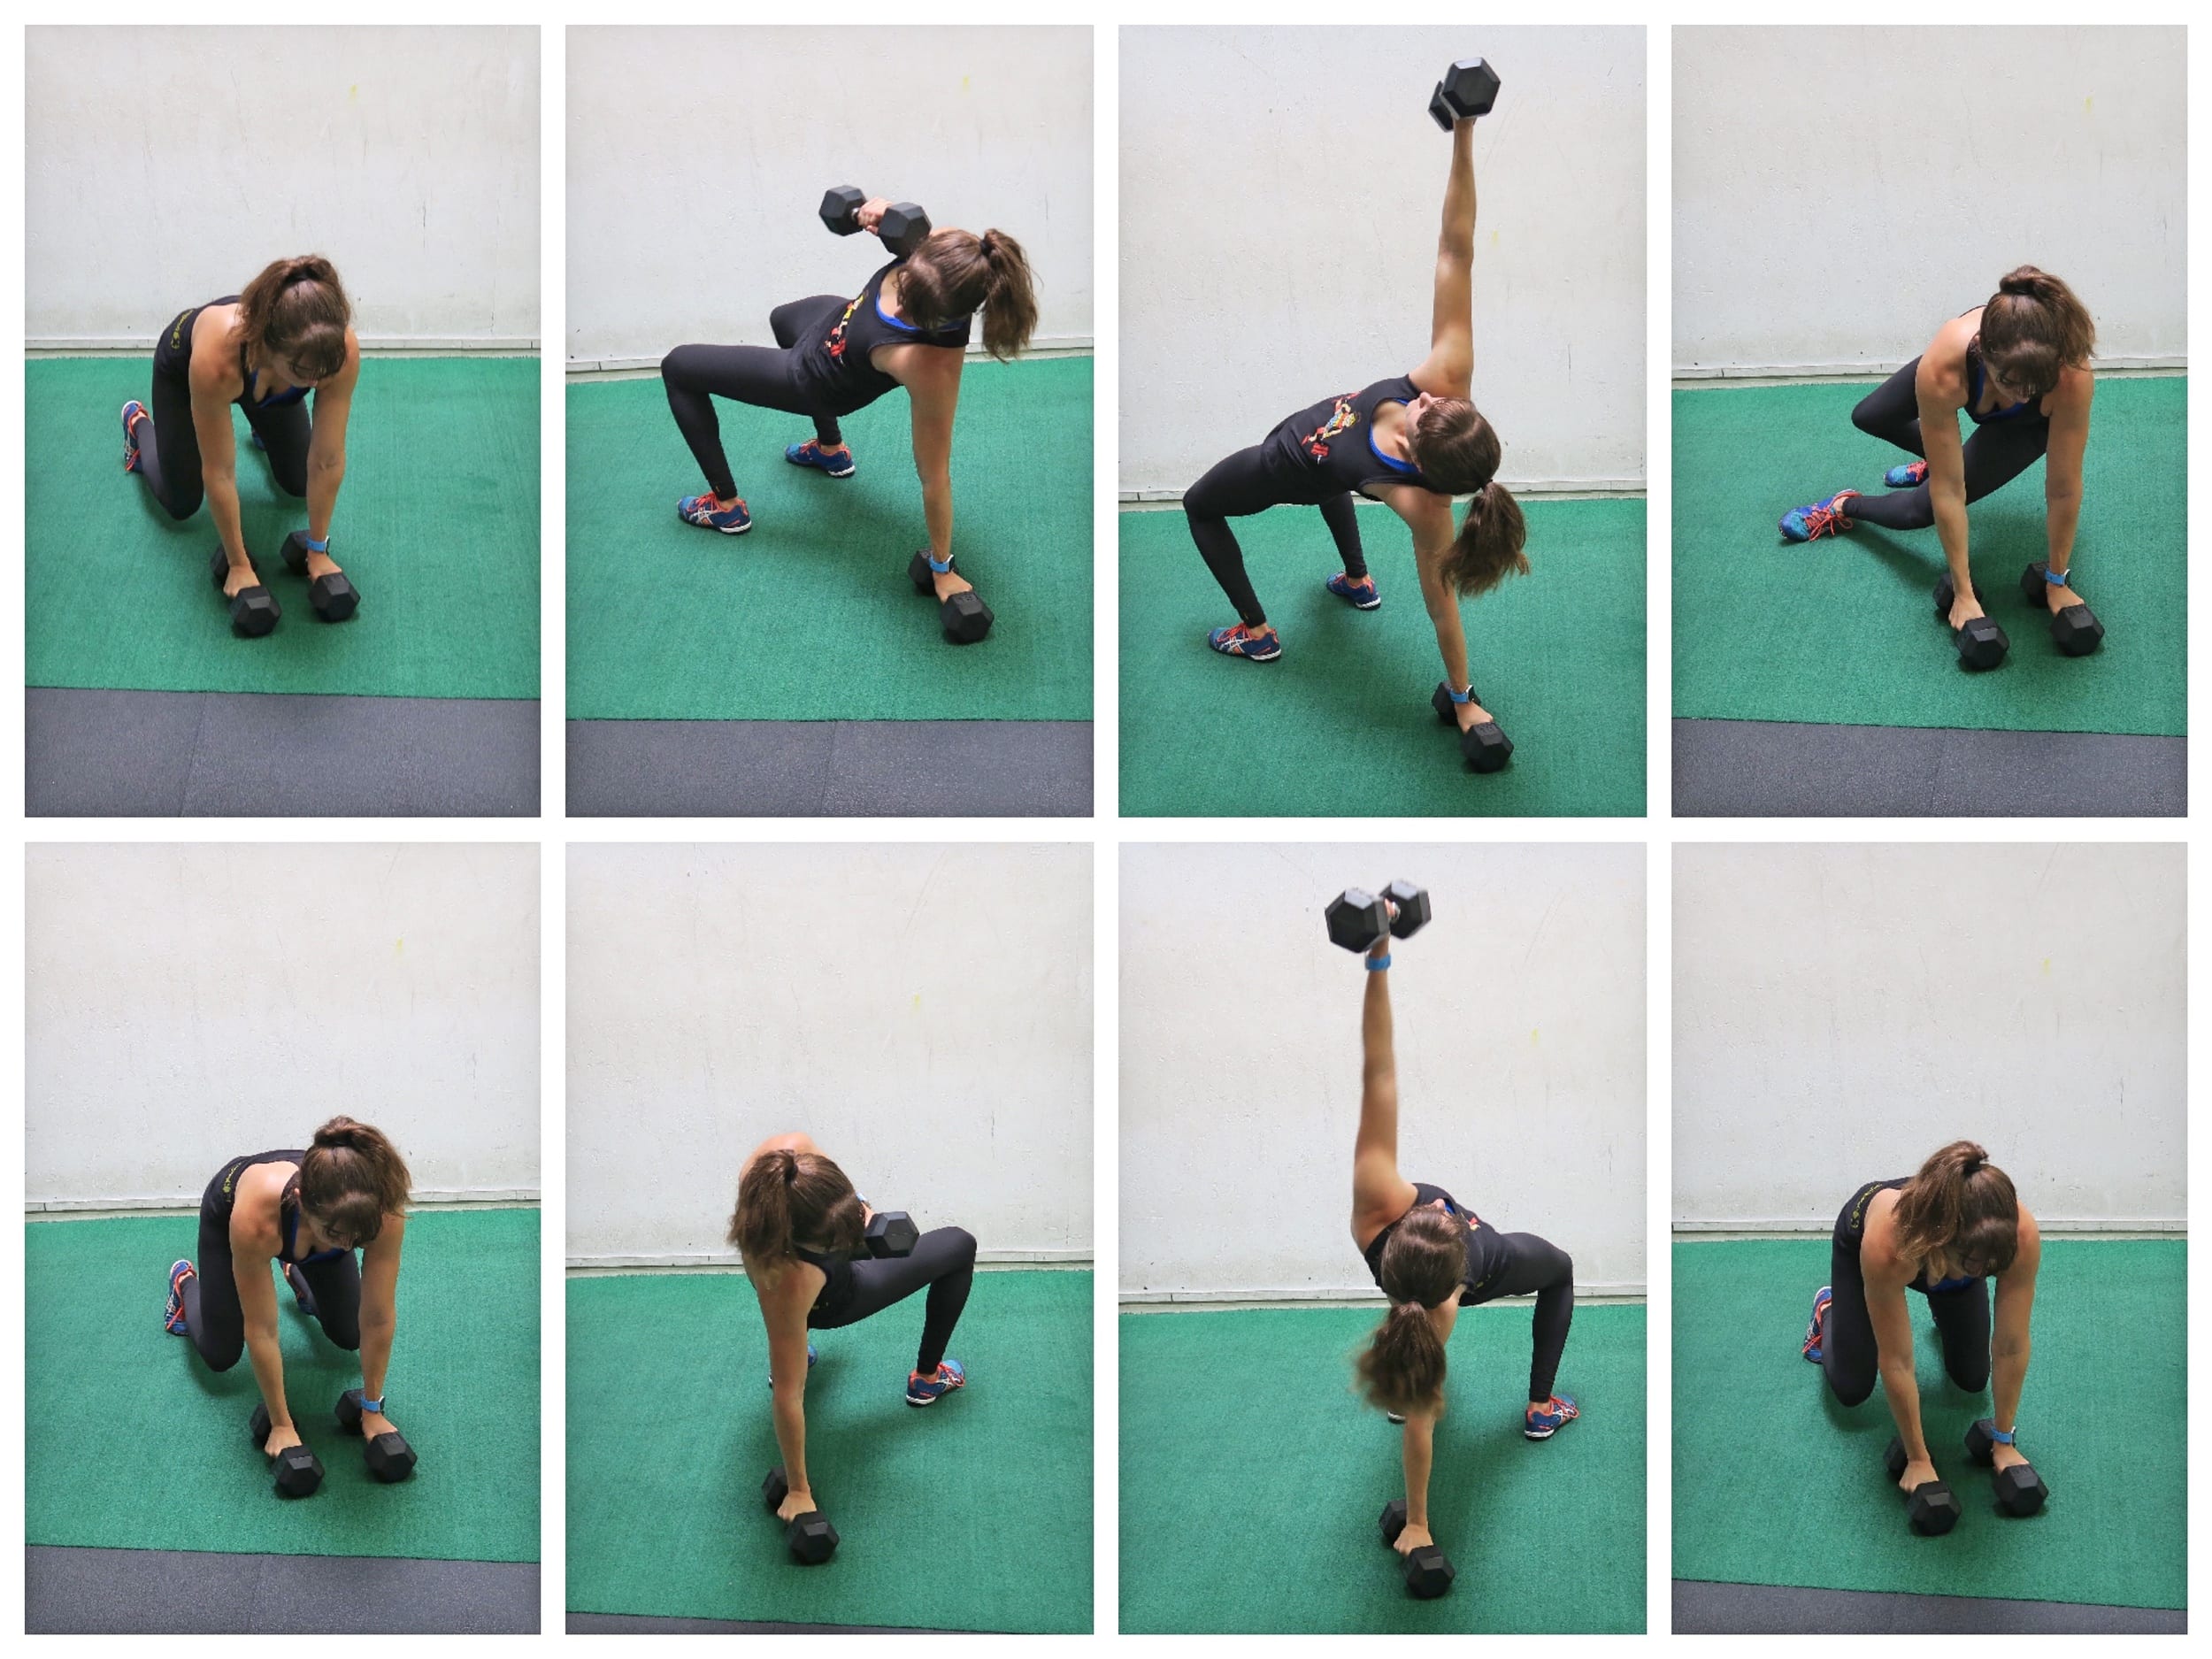
While your TFL assists with hip internal rotation, it also assists in external tibial rotation.
Often when people say they feel their hips during Monster Walks or lateral raises, you’ll notice their toes/feet start to rotate out.
By instead INTERNALLY rotating their foot, or turning their foot down and in, while the TFL does engage to internally rotate the hip, it sort of “keeps the TFL busy” during the lateral raises or abduction moves so the glute medius can act as the prime mover for those movements.
(In the picture above, the left shows external rotation vs. internal rotation on the right. You would want to set up like on the right and maintain that position through the lateral raise. It doesn’t have to be extreme internal rotation, just think slightly lead with your heel).
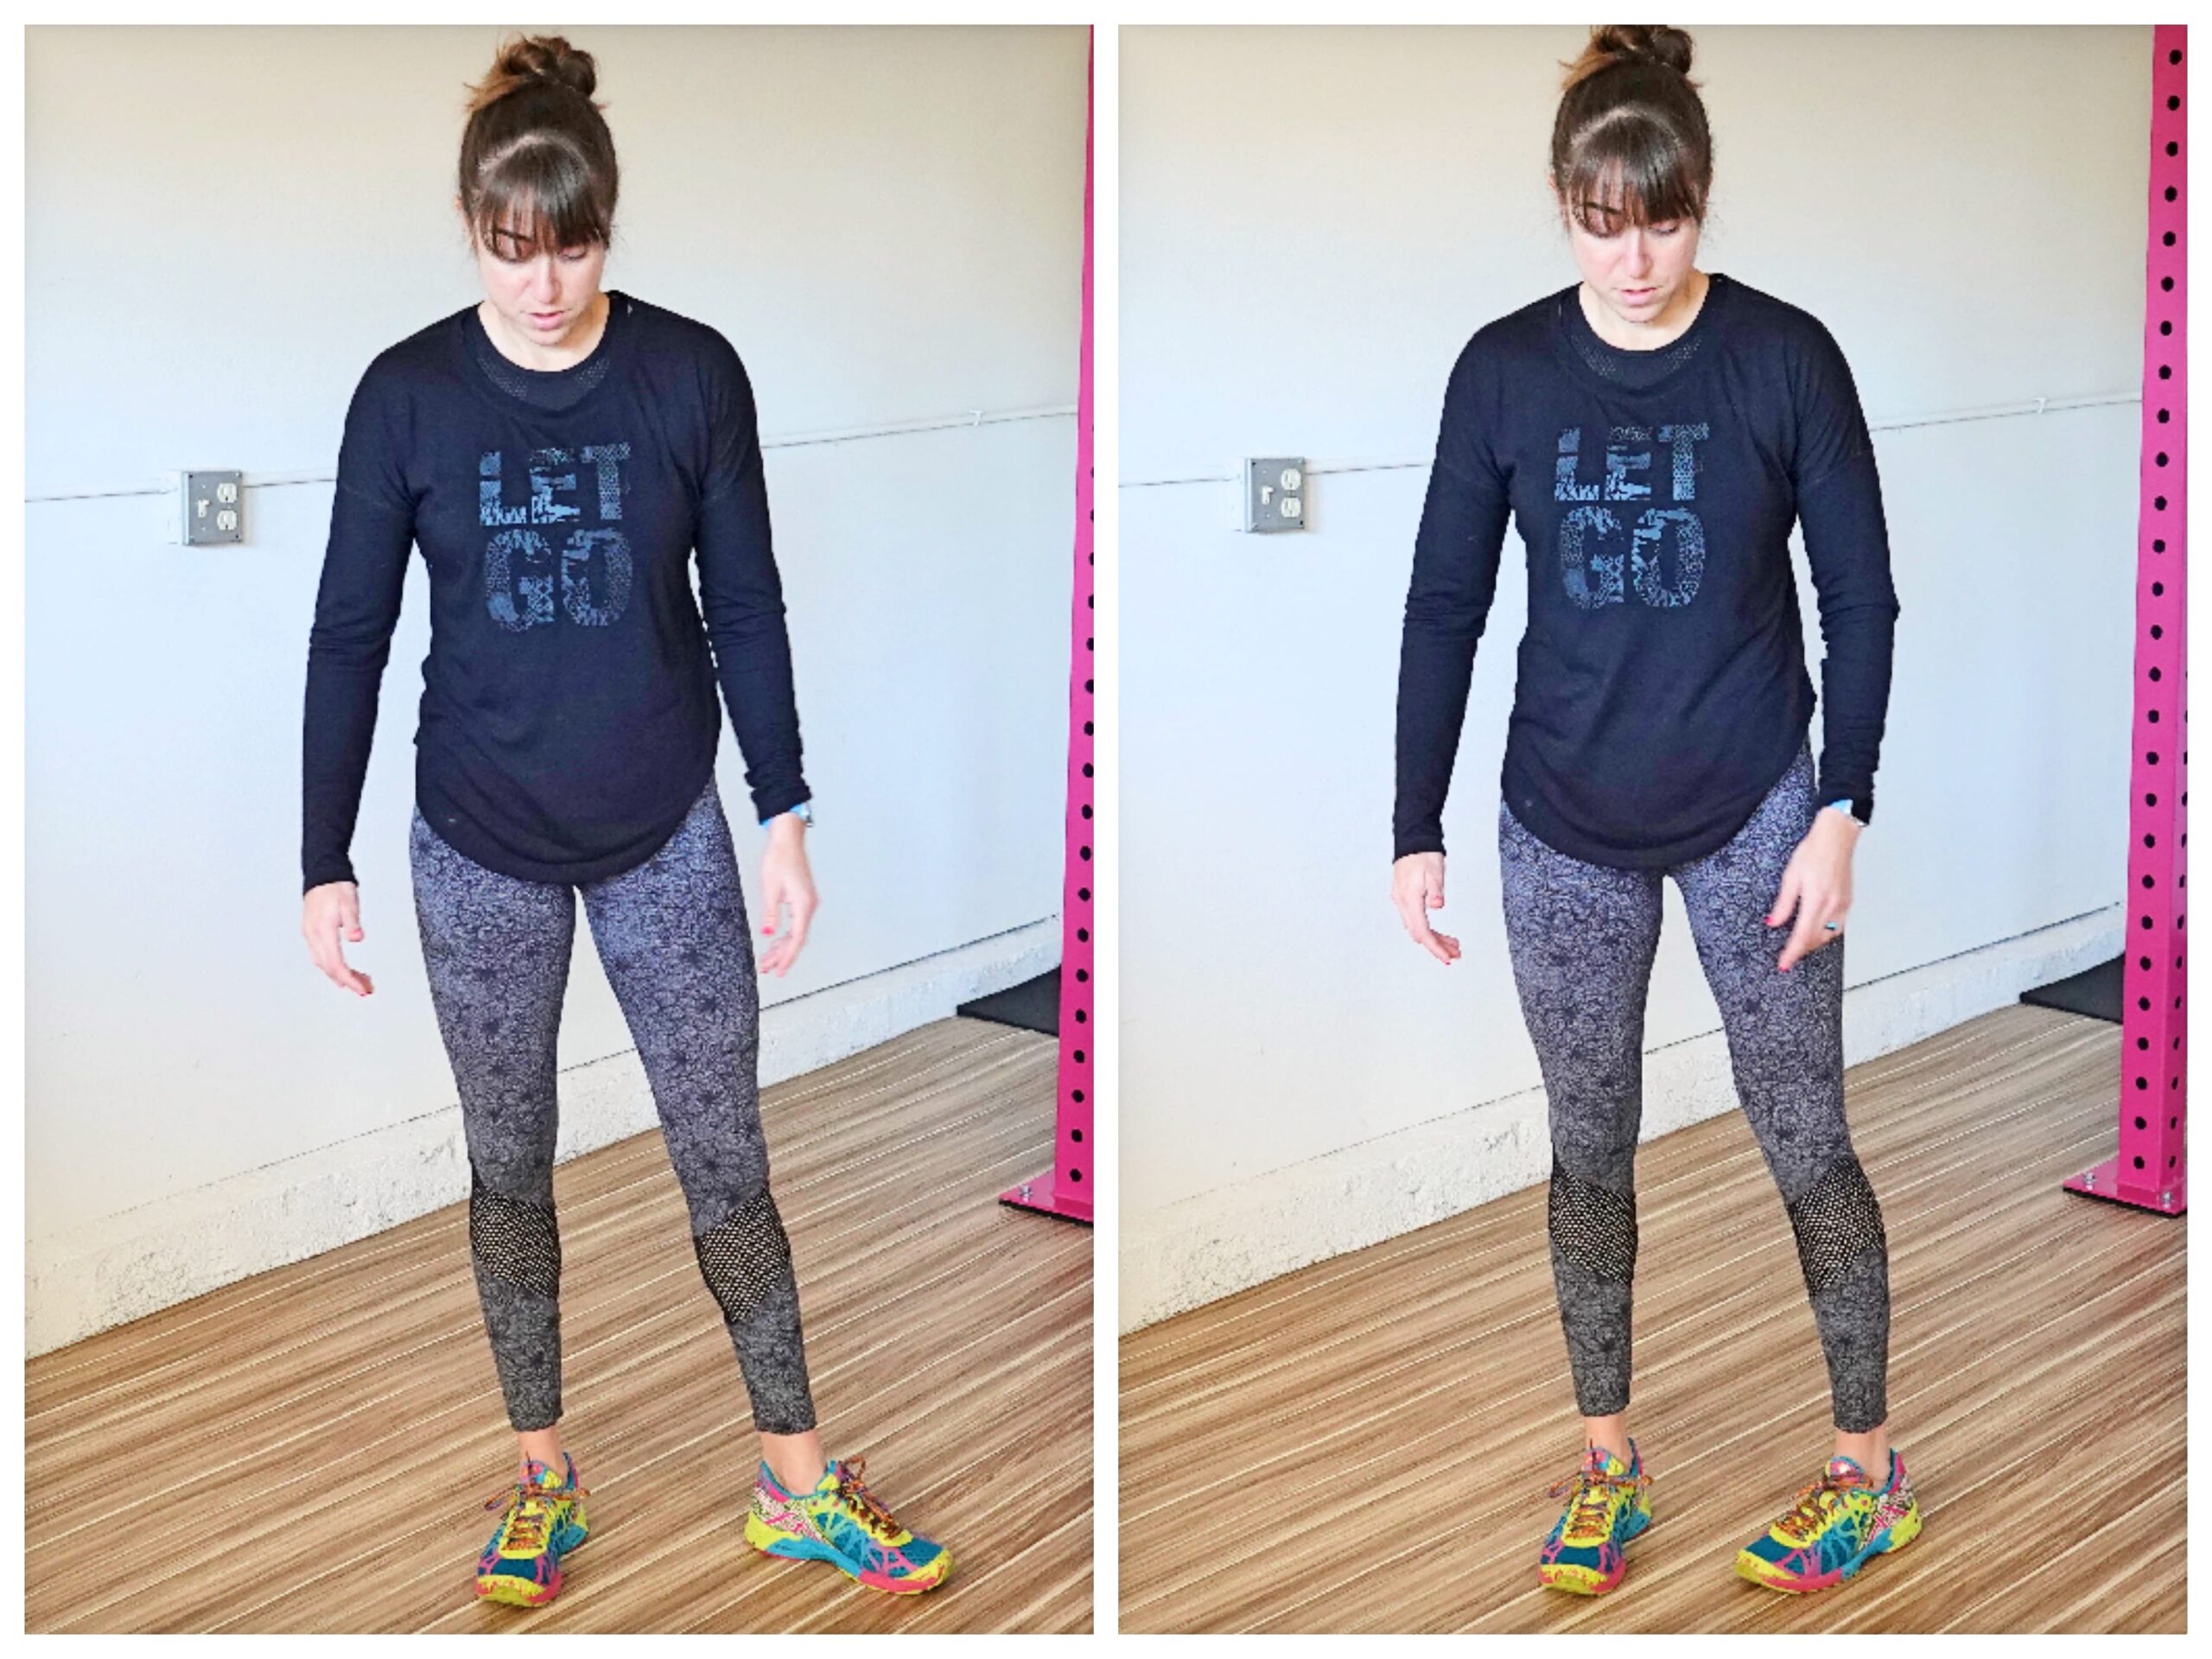
You can also often help engage that glute medius better by kicking slightly BACKWARD as you lift to the side. This prevents the TFL from flexing the hip and instead puts the hip in extension.
(Notice in the left picture I lift straight out to the side versus the right where I kick slightly backward as I raise out to the side. And SIDE NOTE: Especially if you are doing these for reps or adding a mini band, place your hands on a wall or something in front of you to balance. It also helps prevent you from rocking and engaging your lower back!)
Form, while important, isn’t this one solid thing we make it out to be! Try different body positions and tweaks to moves so YOU can establish that mind-body connection. Then start using variations from there as you gain more and more control!
Ready to prevent and alleviate lower back, hip and knee aches and pains?
Heard all too often you need to strengthen your core, especially your glutes?
Want to run faster, lift more, cycle further….and maybe even just build a strong, sexy lower body and butt?
–> Join my Glute Camp! <–
by Cori Lefkowith | Jan 15, 2019 | Blog, Diet
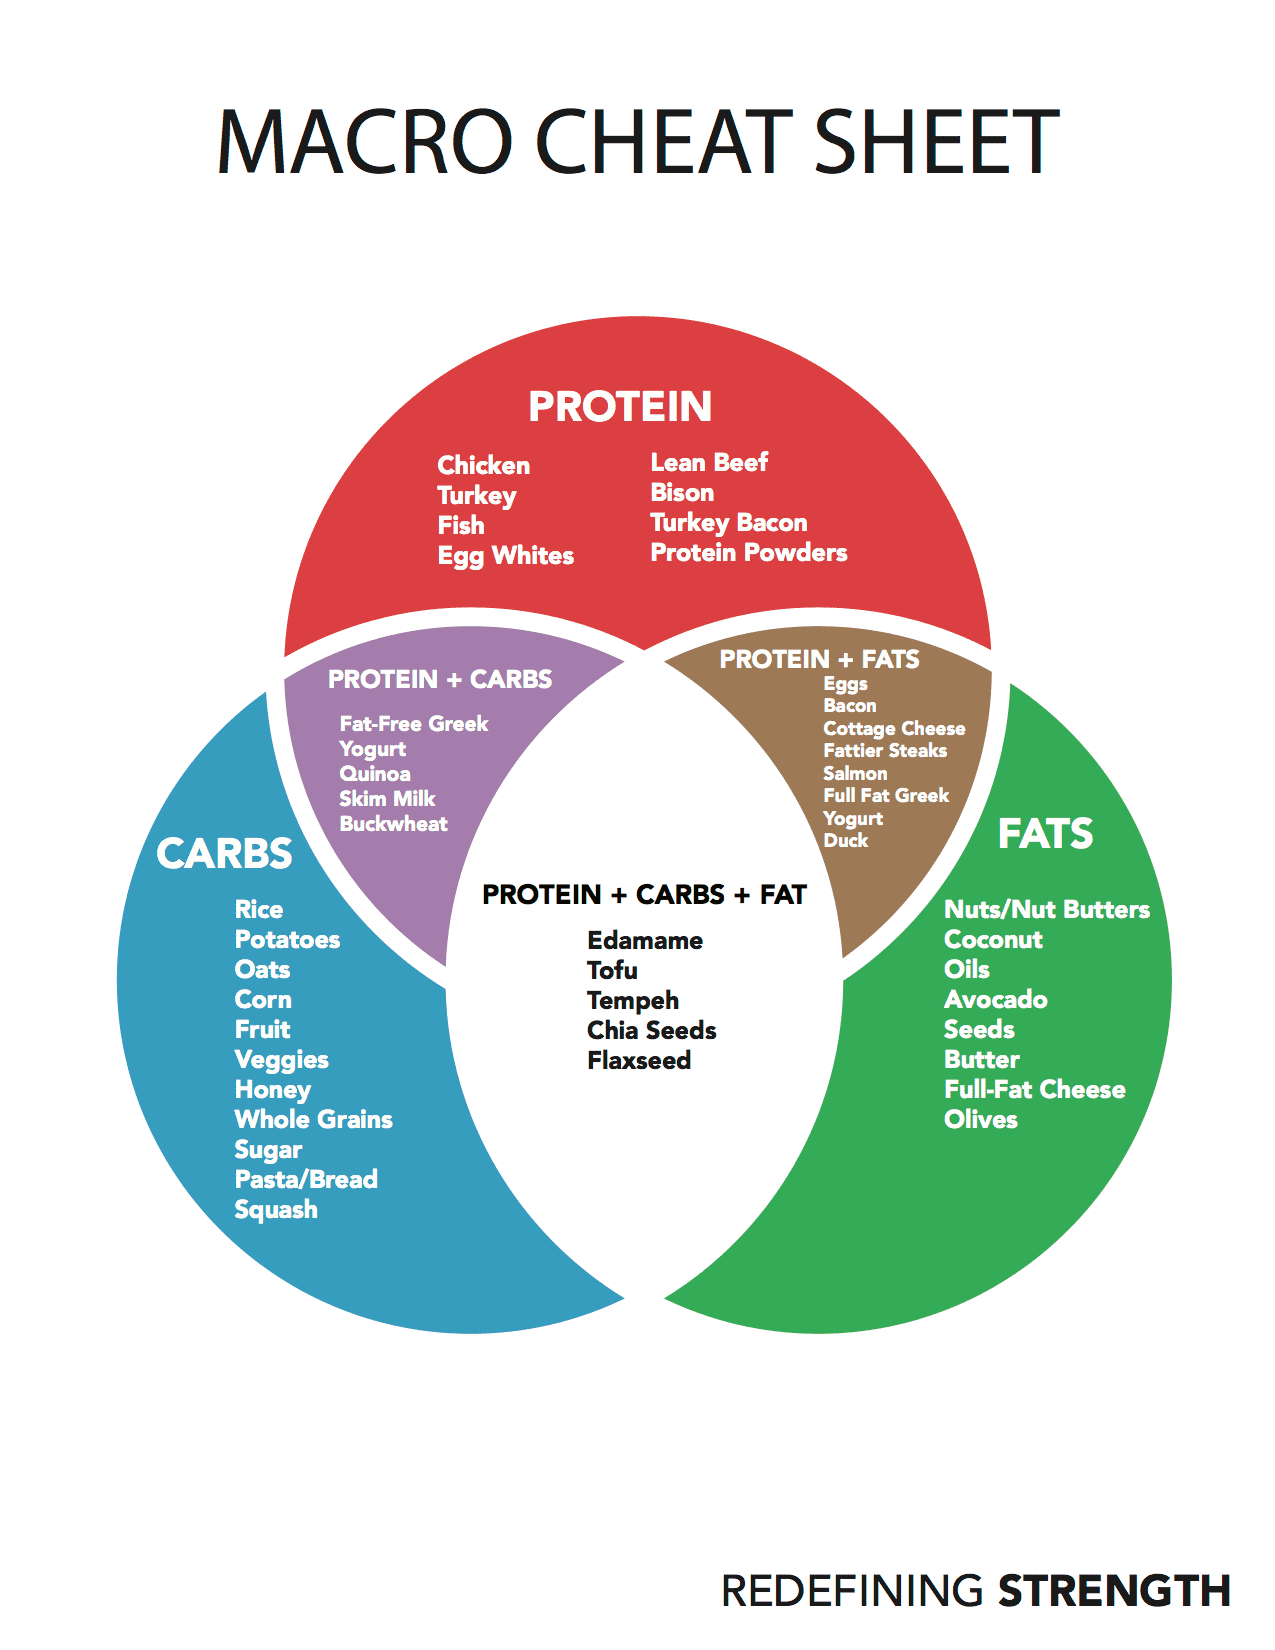
MACROS – You may have heard this word recently when someone mentioned a new diet they were starting. But what the heck are macros and how do you “hit” or “fit” something into them?
I wanted to give you a little “cheat sheet” guide to macros and why paying attention to them may help you get better results FASTER!
So first…
What is a macro?
A macro is a macronutrient or protein, carbs and fats. It is the nutrients your body needs in large quantities.
Almost every popular diet out there manipulates the amount of each macro you consume to get results whether it is promoting low or no carbs, low fat, high protein, or some balance in between!
And all of the foods we consume have a certain amount of each macronutrient.
Animal proteins such as chicken, fish, eggs and beef all have a different amount of protein, and fat. Some are very low in fat, like chicken breast, while some can be higher in fat like say Salmon.
This doesn’t mean one food is BETTER than another.
It just means you can include a variety of protein sources based on your specific needs and goals and even “work around” different fat contents by the foods you include at other times!
For instance, if you’re doing a diet that is lower in fat and higher in protein, you may start to realize that eggs, while protein, also increase your fat intake.
So you may still include eggs, but you may eliminate a less healthy source of fat from somewhere else OR include a leaner protein source at another time.
Or if you’re doing Keto, you may start to look at which foods are higher in fat to focus on those while eliminating some foods that are higher in carbs.
Or if you’re a vegetarian looking to increase protein, you may realize that you need to not only combine certain foods for a completely protein, a complete amino acid chain, but that many of your protein sources also contain more carbs too.
The key is understanding what our food is made of so we can eat according to our goals!
To often we start a diet, dial in our diet with whole, natural foods and then wonder WHY we aren’t getting the results we want.
And it may be because while we think we are following the principles of the diet, we aren’t actually hitting the macronutrient ratios the diet suggests because we don’t actually KNOW what the macros are.
That is where this quick cheat sheet can come in handy!
And it is also important for us to realize that while the quality of our food is key for optimal functioning and better health…for some aesthetic goals…well it kind of doesn’t matter!
Quality Doesn’t Matter!?
This isn’t meant as an excuse to just go eat crap.
BUT I think it is an important fact to recognize because it is a frustration I often hear from clients trying to lose weight.
“Well I cut out all of the processed stuff and am eating one ingredient foods, but I’ve stopped losing weight and I have 10 more pounds!”
It’s because the quality of our food doesn’t fully matter to weight loss.
Because calories in vs calories out is at the heart of what matters, and how we dial in your macros CAN affect how we create a deficit, but you can still OVEREAT even eating only healthy foods.
While the quality of our food does help our body function optimally, I think often the fact that we cut out all of the foods we love to eat “cleaner,” ends up backfiring.
Often I even see clients overeating because they have a craving they aren’t satisfying.
So they hold themselves back from getting the results they want instead of striking a balance.
Instead of also including the foods they love while focusing on whole natural foods, they completely cut them out, and, all too often, end up binging on them at some point and falling off the restrictive diet they’ve created.
You CAN indulge in those foods you love while still dialing in the overall quality of your diet for results.
But realize that no matter how “clean” you eat, the bottom line is that if you want to lose or gain weight, the amount and type (aka macros) of calories that you consume matters most.
What’s Right For Me?
The most confusing part of this is where to start. What ratios or diets do you choose?
How do you create a calorie deficit without cutting out too much?
How can you get fast results without restricting yourself so much you end up binging?
Where is the balance that will work for you!?
The one key to figuring out what is right for YOU since one size doesn’t really fit all with dieting?
START TRACKING!
Learn about the different diets, experiment with different ratios and then track what you eat so you can truly see your calories, your macros and even what may be working or NOT working!
If you don’t track, you don’t know.
And tracking, while annoying yes, not only becomes easier and a HABIT, but it also helps you stop feeling like nothing will work!
What’s worse, not knowing what is or isn’t working and therefore constantly struggling to see the results you want OR taking a few minutes each day to weigh and measure and log?
Take control of your diet today! Join my Metabolic Shred!
by Cori Lefkowith | Jan 10, 2019 | Blog, Exercises, featured, Foam Rolling, Pain Relief, Stretches
Often one of the first “warning signs” of potential injury can be immobility…especially when you notice a lack of mobility only during specific movements or on one SIDE of your body.
Neck pain? Shoulder pain? Upper back aches and pains?
Heck..even wrist and elbow pain!?
If a joint is restricted, it can lead to overload of other joints and overuse of muscles that aren’t meant to handle the load AKA compensations, imbalances and INJURY!
That is why it is key you address any restrictions in mobility you may have from say…YOUR DESK JOB.
Or commuting in the car. Or hunching over your phone as you text…
But improving your mobility isn’t as simple as just stretching.
Often we stretch and just feel like we tighten right back up because we keep replicating the same movement patterns and recruitment patterns that made us tight in the first place.
We may even foam roll having heard that foam rolling is like a massage and can loosen and relax tight muscles.
But again…it may feel good in the moment, but results never really seem to “stick.”
That is why you must include ACTIVATION MOVES and make your mobility work a 3-part process before you include more compound and strengthening or cardio exercises!
This doesn’t have to mean spending hours rolling, stretching and activating. Even just picking 1-2 moves of each for a quick 5-10 minute warm up can work wonders if you’re targeting your areas of tightness or weakness!
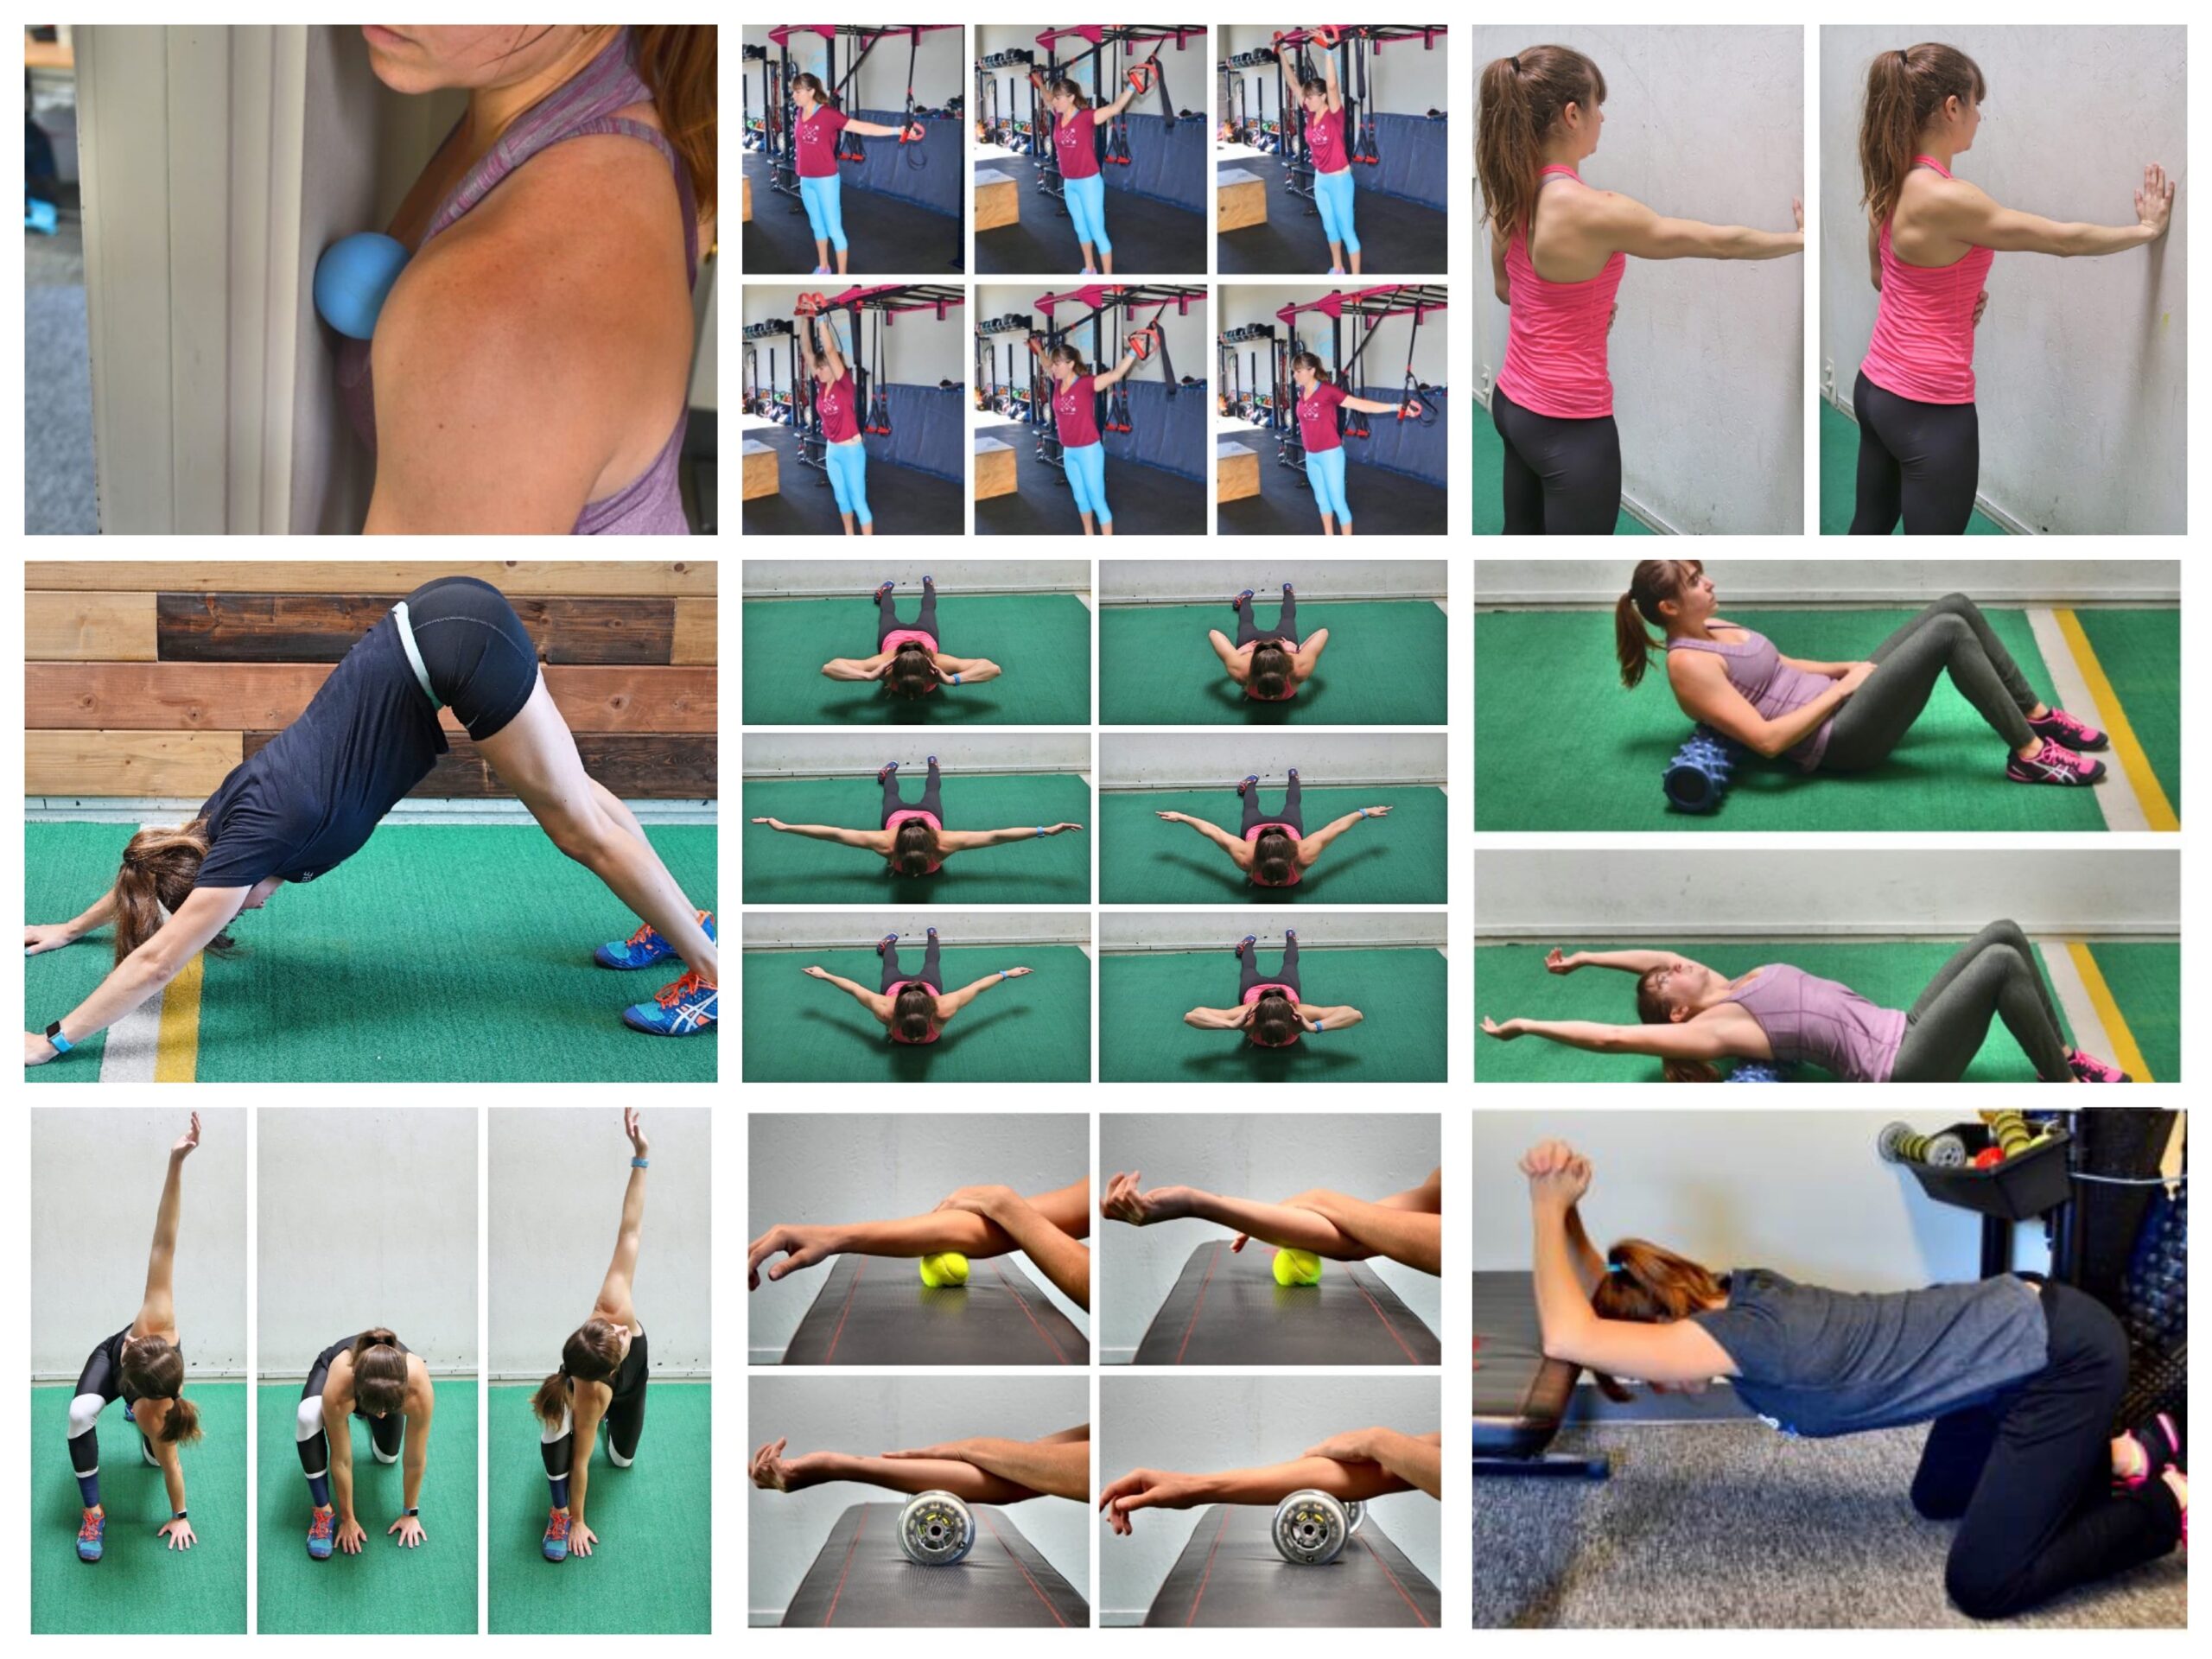
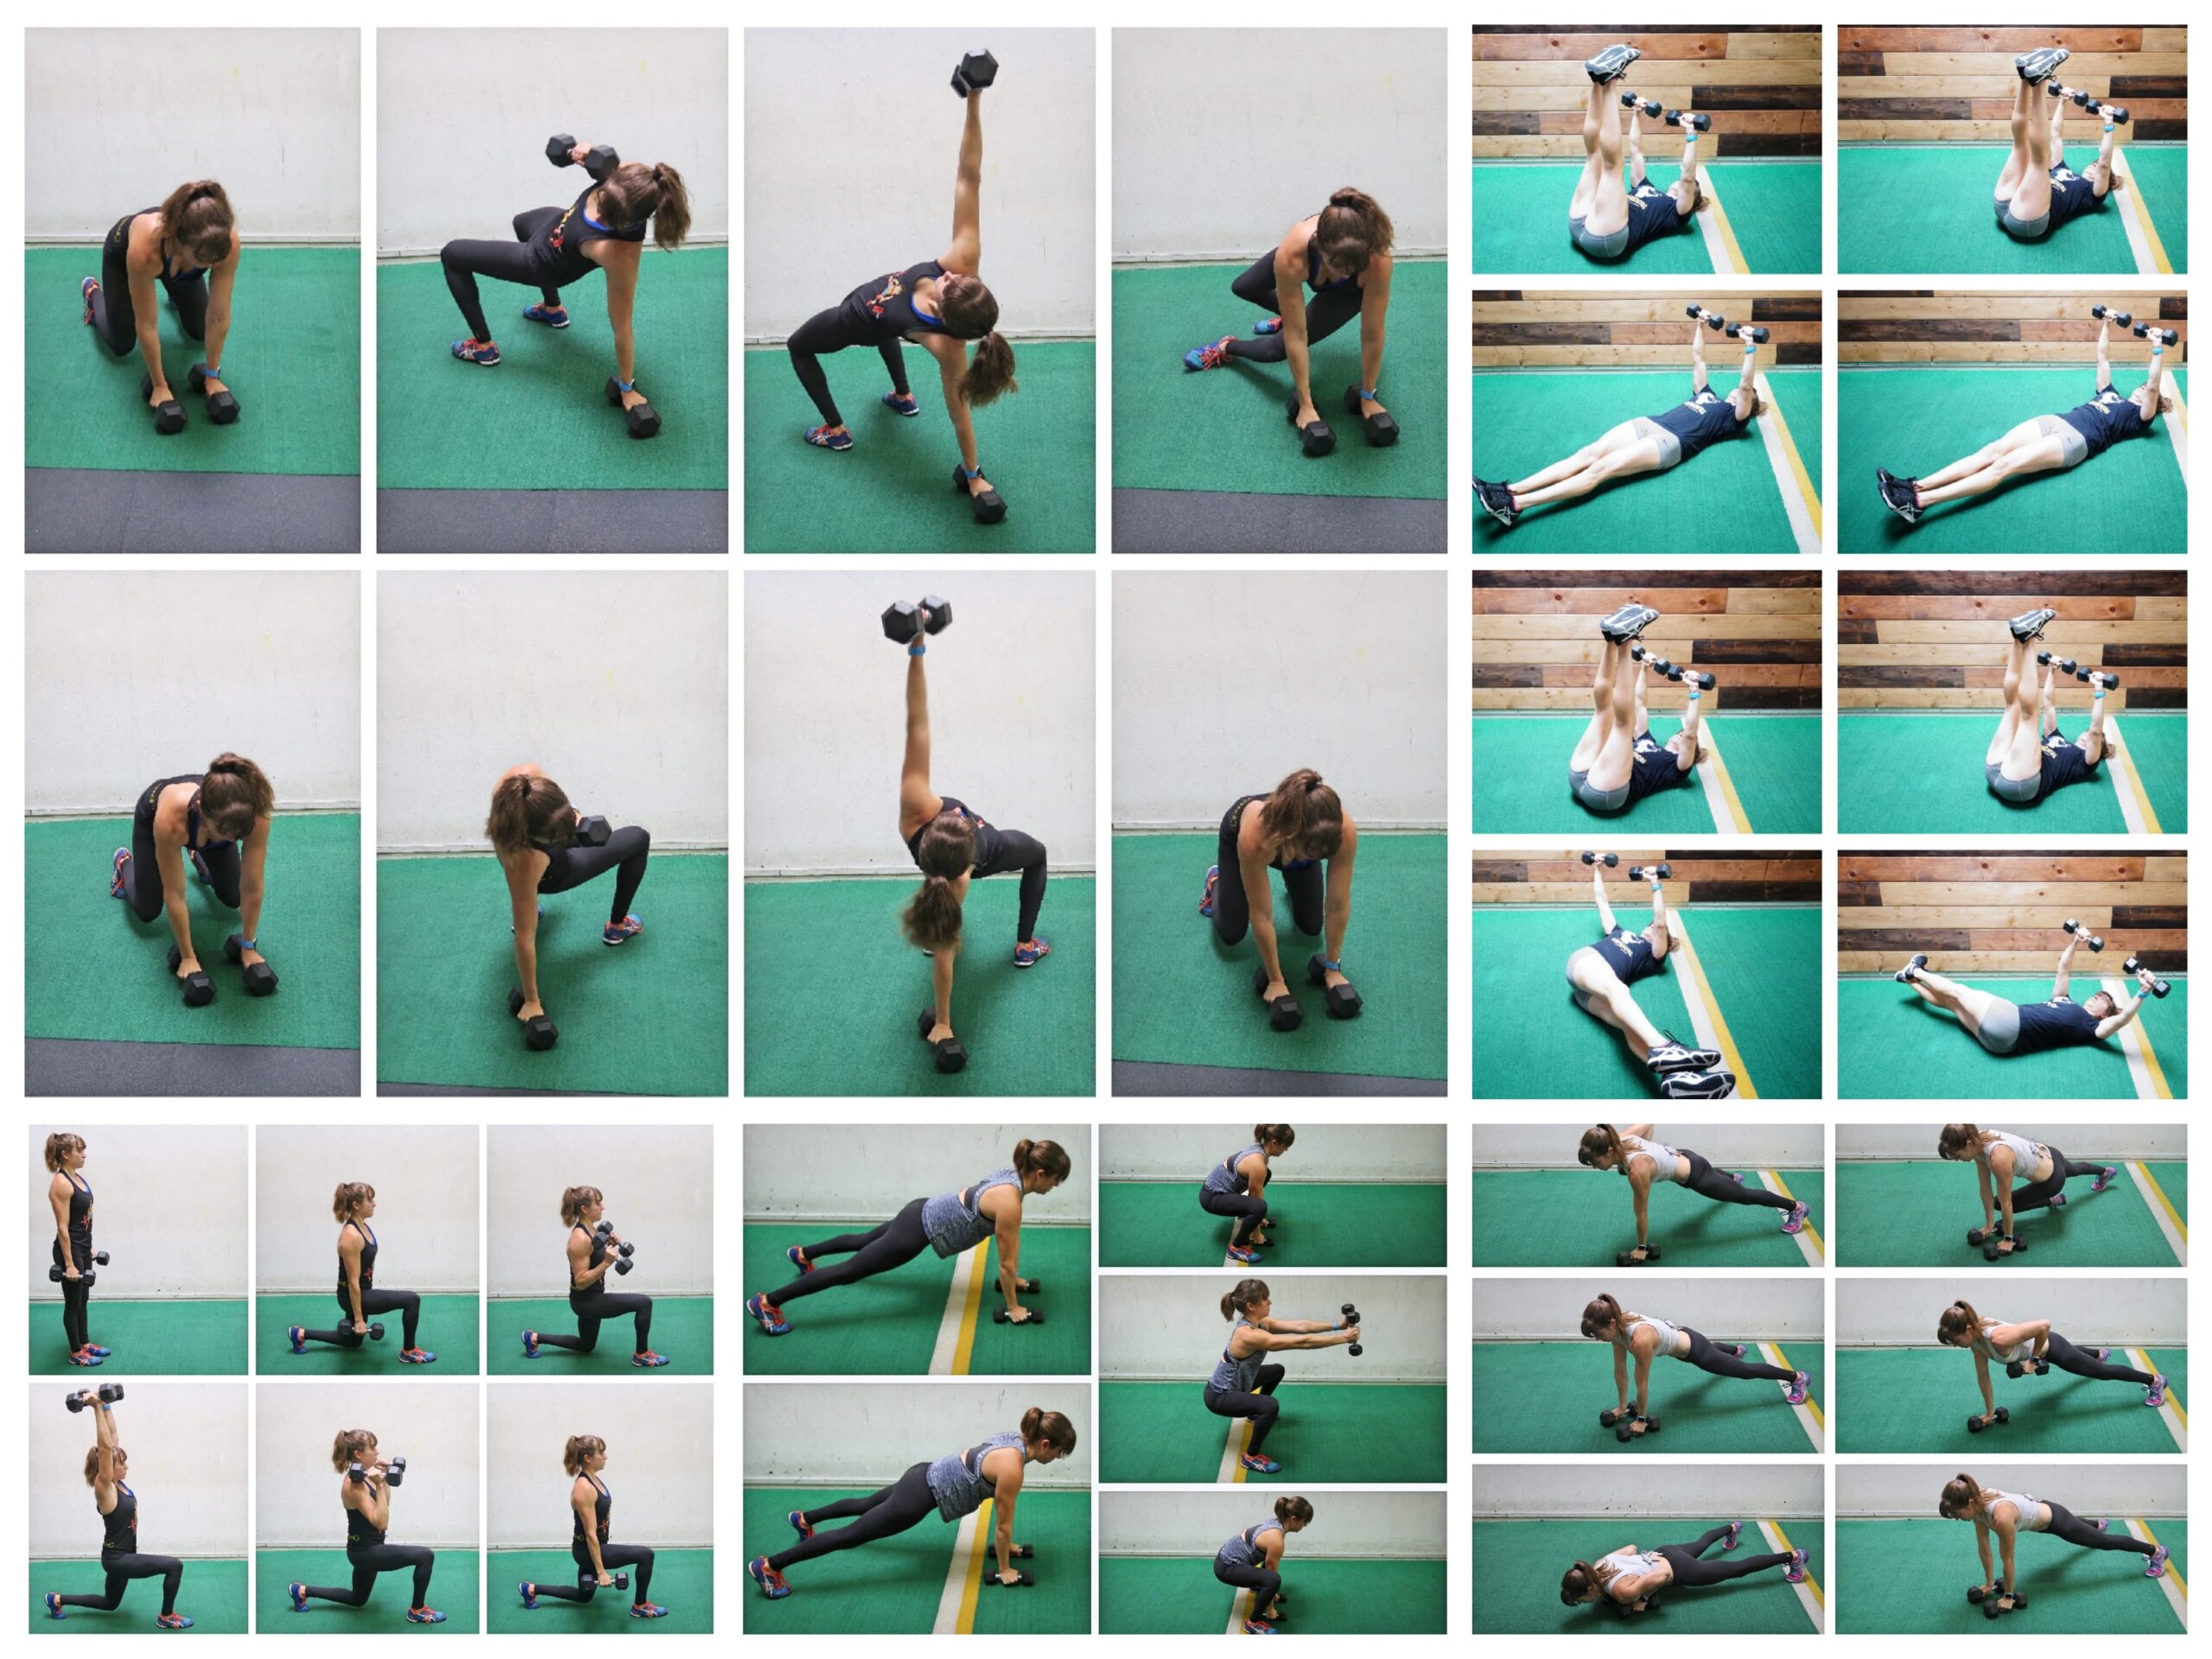
Below are 5 moves of each – Foam Rolling, Stretching and Activation – from my Arm Burner program to help you get started improving your mobility!
How To Improve Your Shoulder Mobility – Try These 15 Exercises
Foam Rolling:
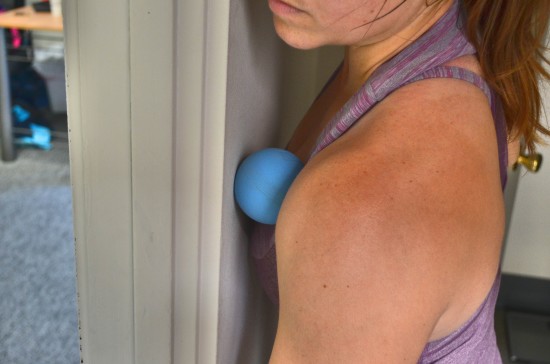
Chest Foam Rolling:
Because so many of us spend so much time hunched over at a computer or seated in a car, our pecs or chest muscles can become tight and shortened.
This can lead to not only shoulder injury, but also be partly responsible for why your upper back and neck always feels tight! This can lead to the muscles of your upper back becoming over stretched and underactive.
That is why it is key that many of us start with relaxing our chest muscles!
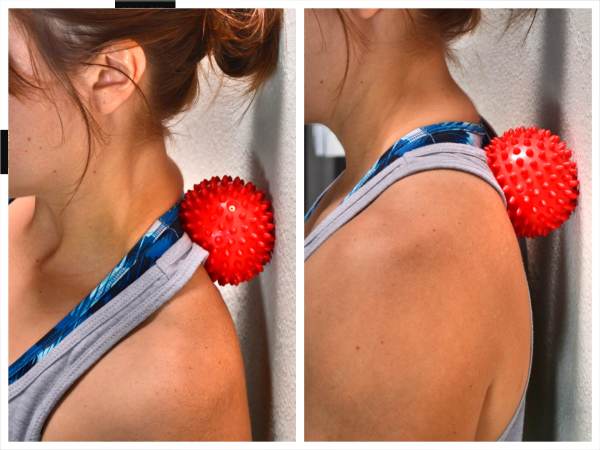
To roll out your chest, you can use a larger foam ball against the ground or a smaller ball against the wall (You can also use a smaller ball against the ground just make sure to elevate it on some books especially if you have carpet!)
If you use the ball against the wall or even on the ground, place the ball right in the side of your chest by your shoulder joint. Do not place it on your shoulder joint.
Then reach your hand up overhead and back down toward your feet. If you are using the ball against a wall in a doorway, reach your hand out in front of you, bringing it up overhead and then down toward the ground.
Roll the ball from your shoulder along the bottom of your collarbone to dig out your entire chest. Hold on any tight spots.
Lat Foam Rolling:
While we often think of our lats as part of our back, which they are, they can also perpetuate our hunched posture and rounded shoulders partly because of their insertion point in our upper arm.
Tight lats can not only limit your shoulder mobility, but lead to scapular pain AND even perpetuate SI Joint Dysfunction, making them an important muscle to pay attention to!
To roll out your lats a roller is best although you can use a foam ball or even a tennis ball.
Start by lying on your side with a roller under one armpit. Extend the arm on the side with the roller up above the roller. Then rock forward and backward on the roller, rotating your chest toward the ground and then up toward the ceiling as you roll on the roller so it hits toward your ribs and then toward your back.
Hold on any tight spots you find then move it lower down the side of your back. Hold on any tight spots as you go and make sure to rock forward and backward as you make your way down your side.
As you work down your side, you may want to rotate slightly more toward your back. Work all the way from your armpit to about the end of your rib cage.
Be careful when rolling lower down your back into your low back. You do not want to arch over the roller and hyperextend your low back.
Trap Foam Rolling:
Our traps are often addressed as three segments – upper, middle and lower traps – as each portion of the muscle does help with different scapular actions.
This is important to note as for many the upper traps may be tight while the lower and mid traps may be weak. (Just to throw a wrench in things though too, I do go into how the upper traps are an interesting muscle as they aren’t always overactive and tight or underactive and weak similar to the psoas in the Arm Burner program.)
But I list the “traps” as an important muscle to roll out, partly too because with this foam rolling move, you can not only address tightness in your traps, but also the other muscles of your upper back, such as your rhomboids, which can become overactive especially if your traps are weak!
This move can be key for anyone who’s suffered from tension headaches in the past.
To roll out your upper back, traps and shoulders with a ball, stand with your back to a wall and place the ball to the side of the base of your neck. Press the ball into the wall and roll it down along your shoulder blade.
Hold on any tight spots. You may even want to pull your arm across your chest as you dig out under the shoulder blade.
You can also use the ball against the wall to dig out right at the top of your armpit behind your shoulder and all along your upper back from the base of your neck to the bottom of your shoulder blade.
If you want to apply more pressure with the ball, you can use a harder ball or use the ball against the ground instead of the wall.
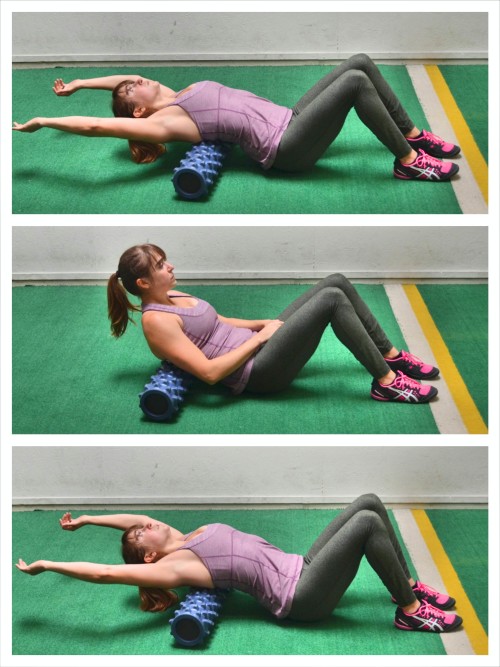
Thoracic Extension:
This move helps relax the muscles along our spine to help us start improving our spinal, specifically thoracic, extension.
If we don’t have proper extension of our spine we will seek mobility from other areas. This can lead to not only upper body aches and pains, but also LOWER BACK pain!
A peanut is a great tool to use for this foam rolling move, or you can use a roller.
To work on your Thoracic Extension using a roller, place the roller on the ground and lie back over the roller with the roller at about your mid-back. You do not want to do this move with the roller in your low back or you could hyperextend your low back.
Cross your hands over your chest and, keeping your butt on the ground, extend your back over the roller. As you extend back over the roller, reach your hands overhead and relax your head and neck. Try to touch the backs of your hands to the ground behind you without lifting up your butt or putting the move all in your low back. Focus on extending your mid and upper back over the roller.
Sit back up and cross your hands back over your chest. You can then repeat, relaxing and extending back over as you relax your arms back overhead.
Perform the extension a few times, especially if the area feels tight, and then move the roller higher up on your back and, again with your butt on the ground, extend back over the roller. Hold for a second or two as you extend so that you can breathe and relax more over the roller.
Work all the way up your mid to upper back. Do not do this on your lower back. If you are going to work into your lower back, a peanut is a better tool that doesn’t hyperextend your lower back.
You can use a Rumble Roller, so a roller with “nobs” instead of a flat roller, if you want to dig in more.
Forearm Foam Rolling:
Our forearms are often forgotten muscles until we have to address them, whether to strengthen our grip to lift more, completely an obstacle course race or because of wrist and elbow pain and injury.
If you are spending a lot of time in the car, gripping the steering wheel or at a computer using your mouse or typing, it is a good idea to roll our your forearm, especially overactive flexors (the underside of your forearm).
However, depending on the elbow or wrist pain, it is important to note, you can also roll out your extensors.
To roll out your forearm, place a small ball or roller up on a table or desk. Place your forearm over the ball with it right below your elbow. You can start with the underside of your forearm down on the ball.
Then press down on your forearm with your other hand to press it into the ball. Start to make small circles on the ball to dig in more. Hold on any tight spots. If you find a tight spot, you can also tense and relax your forearm to help the ball dig in further. To tense and relax your forearm, you can flex and extend your wrist or even make a fist and then relax your hand.
By flexing and relaxing the muscles, you help the ball dig in and release the tight spot.
Roll the ball all along the fleshy part of the underside of your forearm. Then move to the outside of your forearm. Make sure to get the outside and inside of your forearm as there can be trigger points in both spots causing potential wrist and elbow pain.
Don’t waste time on any areas that aren’t tight or sore. Seek out and spend time on any areas of pain.
Apply as much pressure as you can handle and use as small and hard a ball or roller as you can.
Stretching:
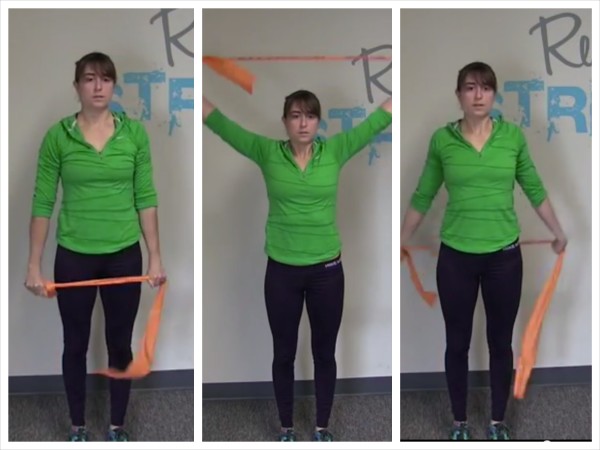
Shoulder Flossing:
Especially if you are loosening up before a workout, you don’t want to HOLD stretches, but instead try to put the joint through a full range of motion so you can then strengthen through that full range of motion.
And shoulder flossing is a great way to start mobilizing the shoulder joint.
To do Shoulder Flossing, hold a band or towel in both hands with your hands about shoulder-width apart. You will adjust your hands in or out based on your mobility. Closer together requires more mobility, while further apart requires less. If you use a band, there will be some give so you can stretch the band if needed; however, with a towel there will be no give so make sure to set up correctly so that you can keep your arms straight through the full range of motion.
Stand up nice and tall with your chest pressed out as you hold the band in both hands in front of your legs.
Keeping your arms straight, lift your arms up overhead and then open them back up behind you. Reach them back toward the ground behind you, bringing them back down toward your butt. Then bring your hands back overhead and forward.
Because the band will stretch, it will give you a little play and allow you to open up wider if needed to get your arms in a full circle unlike the towel. Remember to hold in closer on the band as you gain more mobility and don’t need the band to stretch as much to allow you to complete the circle.
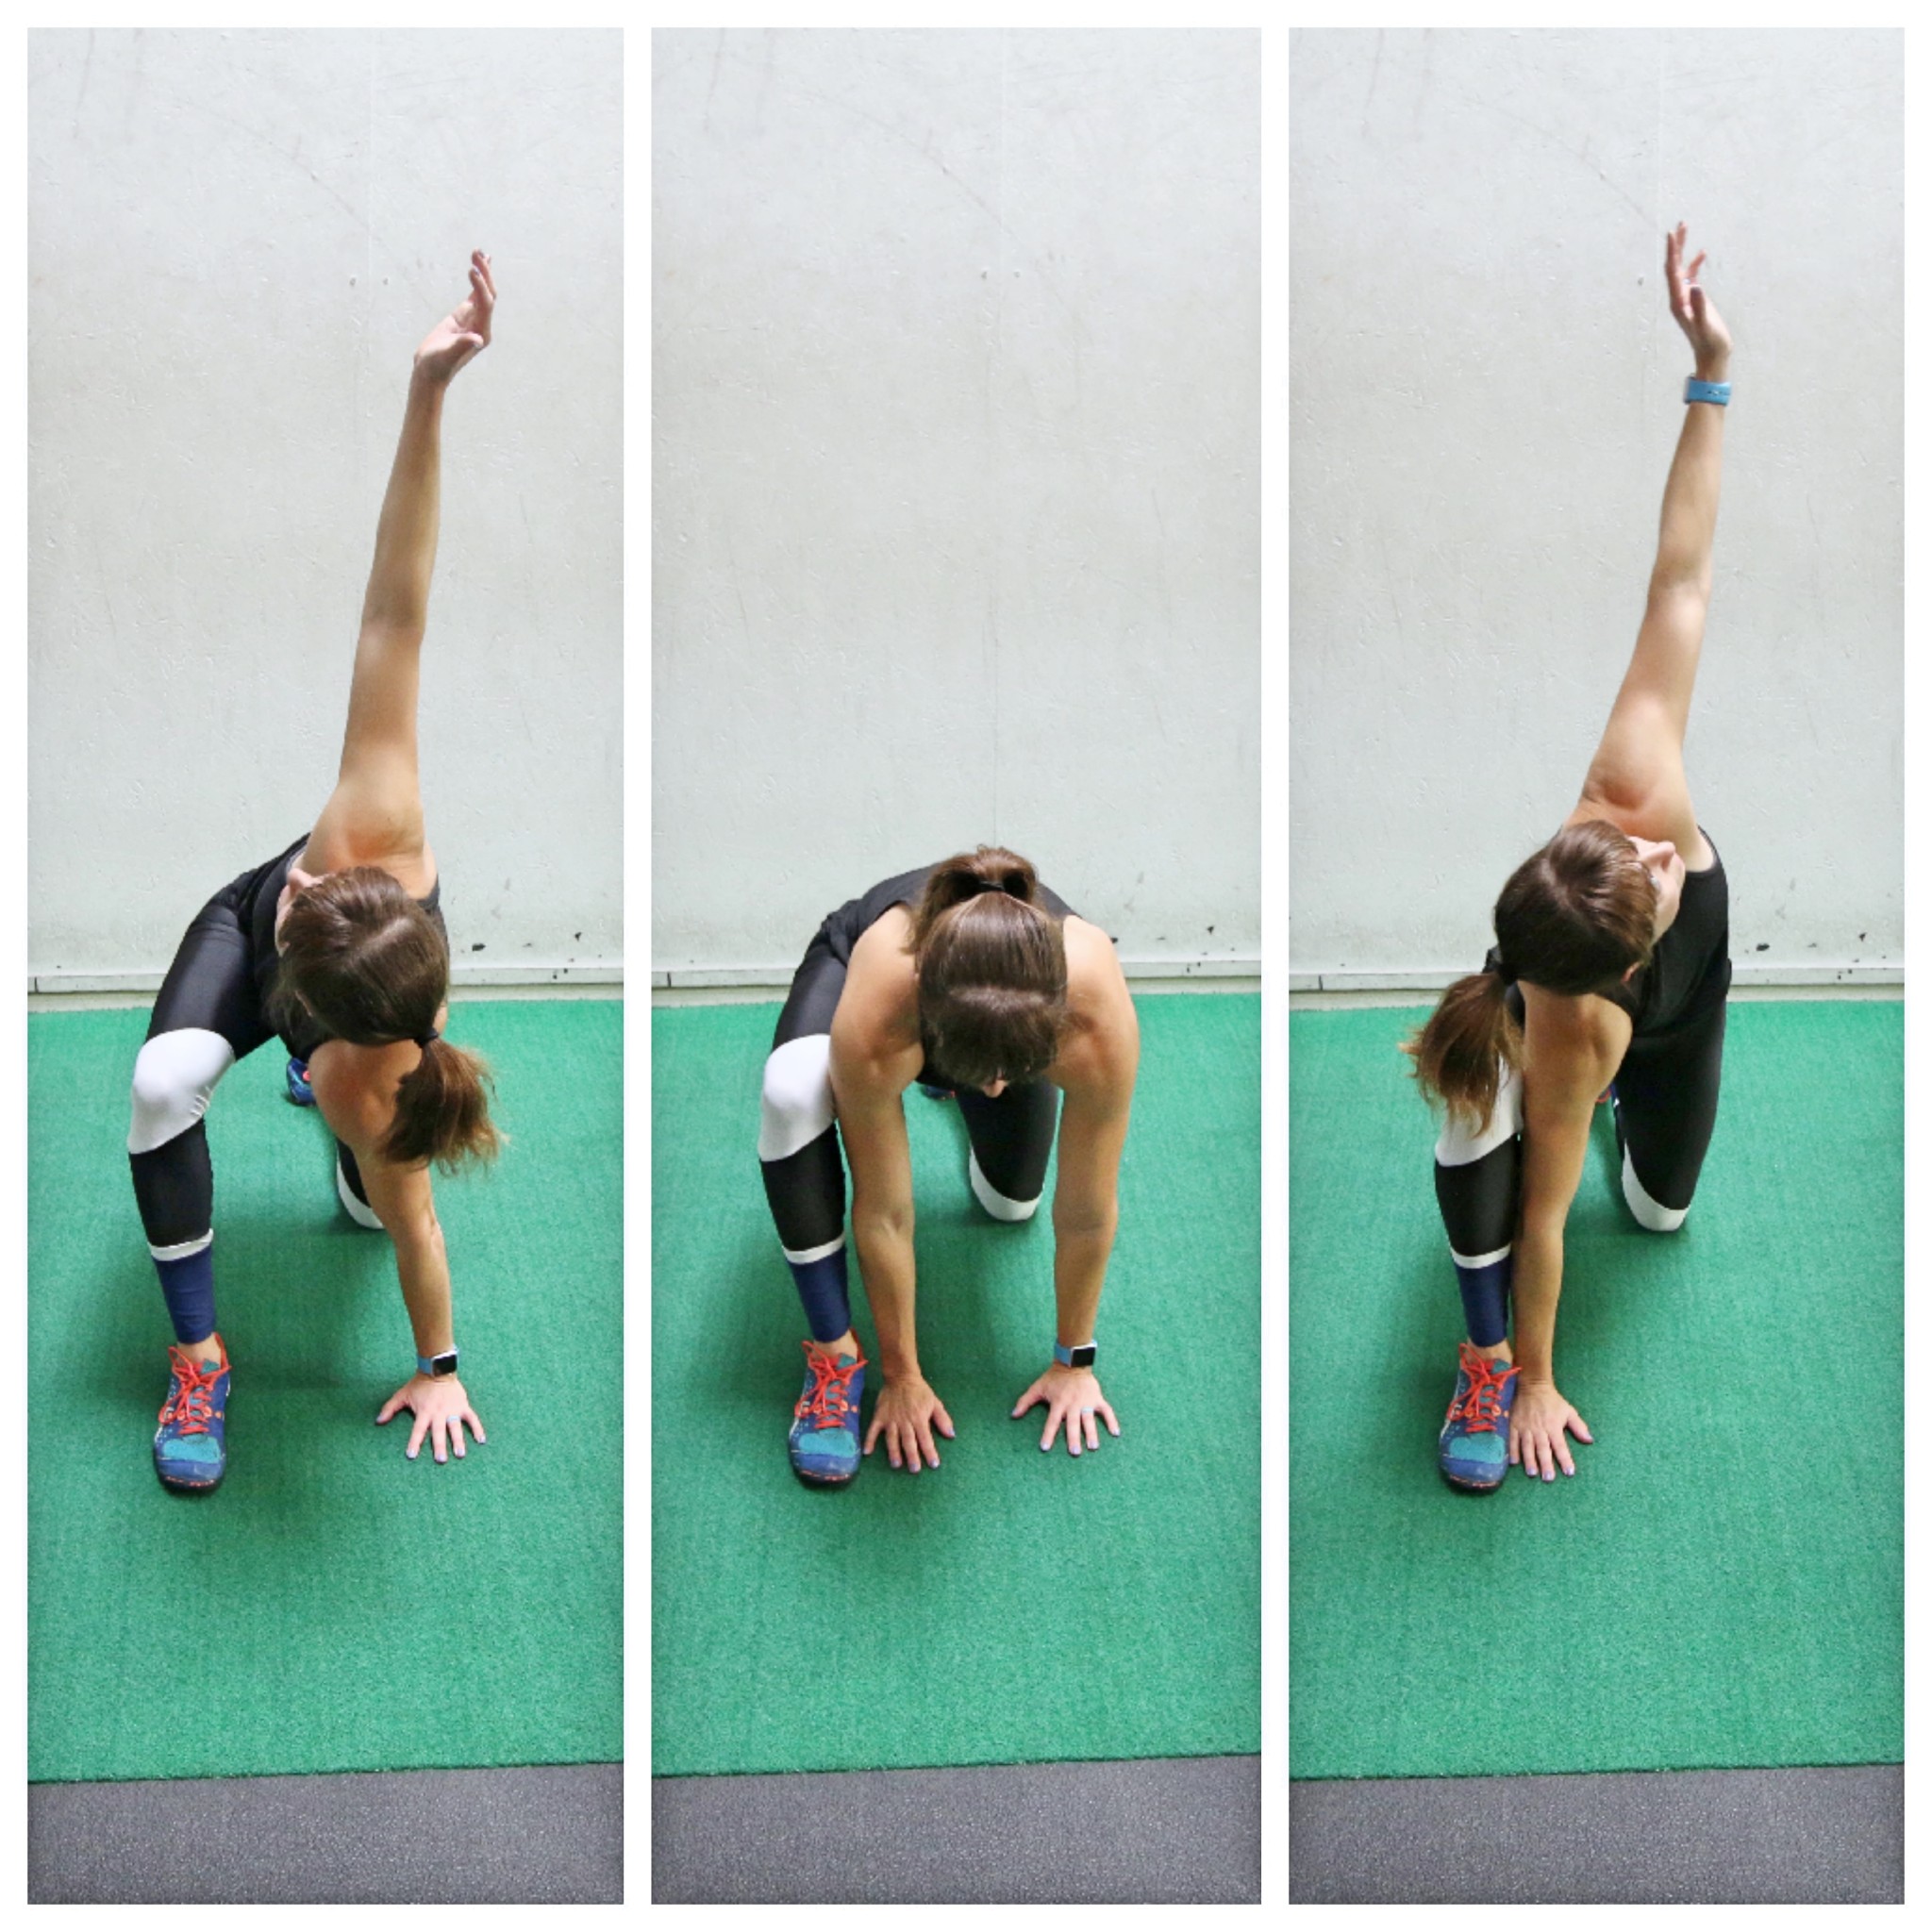
Half-Kneeling Thoracic Rotations:
Spinal mobility is key to helping us prevent neck and shoulder aches and pains. And we have to remember that our spine doesn’t only allow us to flex or extend but also rotate!
With Half-Kneeling Thoracic Rotations, you can improve your spinal mobility, open up your chest and even stretch your glutes a bit!
To do Half Kneeling Thoracic Rotations, set up in a half-kneeling position on the ground with both hands on the ground inside your front foot. Palms should be flat on the ground. If you are less flexible, you may need to come up a bit on your fingers as you rotate.
Then lift one hand and rotate your chest toward the front leg. Keep your front foot flat on the ground as you do it. Reach up and rotate your chest toward that front leg. Place the hand back down on the ground and then lift your other hand up toward the ceiling and rotate your chest away from the front leg. Really reach open and don’t let your front foot rock open.
You can even keep that arm against the leg to help you rotate. Place the hand back down and repeat the rotation toward your front leg. Move slowly and keep your front foot flat on the ground.
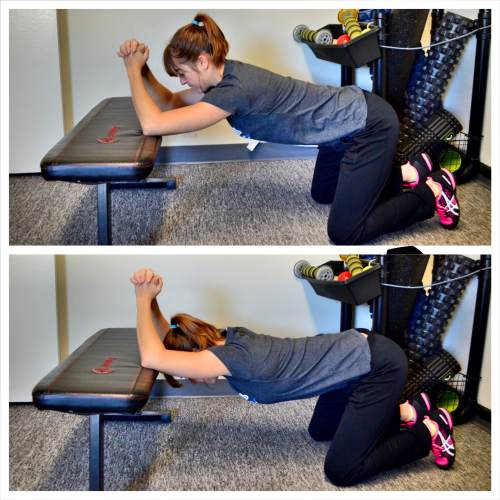
Kneeling Thoracic Extension And Lat Stretch:
This move can help improve your spinal extension aka reverse the constant forward flexion or hunched posture while also improving your shoulder mobility. It can stretch your lats and even your triceps.
To do the Kneeling Thoracic and Lat Stretch, place your elbows up on a bench about shoulder-width apart and kneel on the ground in front of the bench. Make sure you are back far enough that you have room to lean forward and over and drop your head between your elbows.
Then with your elbows on the bench, relax your chest and head over, sitting your butt back just slightly. Press your chest toward the ground and feel a nice stretch down your triceps and lats as well as through your thoracic spine. Try to extend your back as much as possible as you press your chest toward the ground.
You can either hold here and breathe to stretch deeper or you can come out of the stretch and then relax back into it and try to get further with each rep.
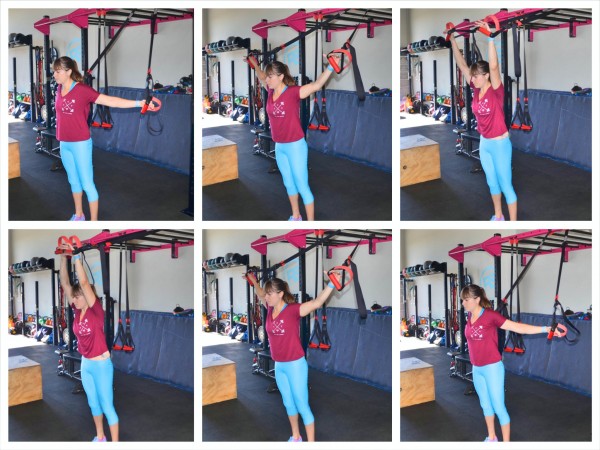
Suspension Trainer Snow Angels:
Since most of us spend so much time seated hunched over, we not only want to relax the muscles of our chest with foam rolling but also stretch them out!
I love this stretch too to open up the chest and improve your posture and shoulder mobility because it can also be a unilateral move if you find one side is tighter!
To do the Suspension Trainer Snow Angels, you will need a suspension trainer, rings or even towels or resistance bands anchored behind you.
Using a Suspension Trainer, hold a handle in each hand and walk away from the anchor point with your back to the anchor point. Extend your arms straight out to your sides at shoulder height and walk away from the anchor point so that you feel a stretch in your chest.
You may have to adjust slightly backward or forward as you begin to do the wave, depending on your mobility.
Then, standing still with your arms starting out at shoulder height, raise your arms up overhead. Keep your arms straight as you extend overhead and even lean slightly forward to increase the stretch.
Hold for a second or two and then bring your arms out and down to the side, lowering them all the way back and down toward the ground. Keep your arms straight as you bring them down.
Feel the muscles of your chest and even around your shoulder stretching as you lower your arms down.
Then bring them back up out to the side and back overhead. Move in a fluid, smooth “wave” as you lift and lower. This movement also sort of looks like you are drawing a snow angel behind you.
Move slowly to wave the arms up and down. Make sure you are far enough out and leaning slightly forward so that you feel a stretch. If it is too much and you can’t move your arms in a full wave, move back slightly or don’t lean in as much.
Hold at any point that feels extra tight for a breath or two.
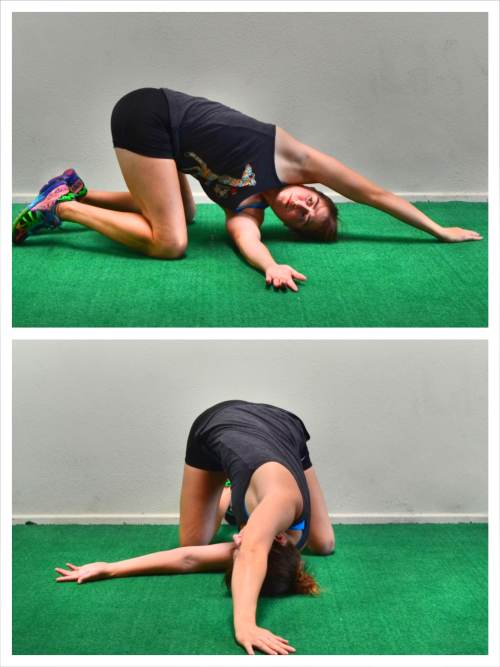
Thread the Needle:
If you’re upper back and neck constantly feel tense, this can provide some more “instant” relief, even if not lasting relief.
You will feel this move all across your upper back and even gently in your neck.
While this can be a move used as part of your warm up if you alternate sides, pausing for only a breath on each side, it is also a great move to include in your cool downs or recovery workouts as a static stretch.
To do the Thread the Needle Stretch, kneel on the ground and then lean forward, reaching one arm overhead to place the palm on the ground as you reach the other one under your arm to relax the side of your head and body down to the ground. As you relax the side of your head and your bottom shoulder down, use the hand overhead to help rotate your chest open toward the ceiling.
You are “threading a needle” by reaching one arm through the “hole” created by the arm reaching overhead.
Breathe and relax into the stretch so that you feel a stretch down your neck and across your shoulder blades. Rotate your chest up and open. You can walk your top arm back behind your head to increase the stretch.
Hold and then thread the other arm under and through.
Hold each stretch for at least a second or two before switching. Sit back onto your heels if you can keep your head and shoulder on the ground.
Activation:
Single Arm Scapular Push Up:
Working on your scapular retraction can be key to keeping your neck, shoulders and upper back aches and pain free! It can also help you improve your pull ups as well while improving your shoulder stability.
The Single Arm Scapular Push Up is a great move to use too because it is a unilateral move that will allow you to address each side independently and correct any imbalances.
To do Single Arm Scapular Push Ups, set up facing a wall. Place one hand up on the wall at about shoulder height. Your arm should be straight, but make sure you aren’t shrugging. You can be at a slight incline to make the move harder by walking your feet back, but start standing more vertical to the wall so you can really focus on proper movement of your shoulder blade.
Then, keeping your elbow straight, press your chest toward the wall as you feel your shoulder blade retract back. You should feel your shoulder blade move toward your spine. Do not shrug your shoulder as you focus on moving the shoulder blade. Pause then relax back out.
Make sure you don’t shrug or bend your elbows or rotate to try to make the movement bigger. Keep your core tight and isolate that one side working. You will feel the muscles along the side of your back and your ribs working. You can even put the opposite hand below your armpit on the working side to feel those muscles working.
Back Of Hand Rows:
I love moves that hit a number of muscles or address a number of issues at once.
Not only is this move a great workaround if you do have elbow pain but want to continue working your back, but it is also a great activation move for your back while improving your wrist extension!
To do the Back of Hand Band Row, anchor a resistance band in front of you and either loop it or make sure it has a handle you can put your hand through. Place the band or handle around the back of your hand and point your fingers up toward the ceiling. Step away from the anchor point so that there is tension in the band with your arm extended in front of you.
Stand up nice and tall and press your chest out as you face the mini band. Your feet should be about hip-width apart. Make sure you aren’t shrugging your shoulders as you hold your arm out in front of you with the band around your hand.
Then drive the elbow down and back as you row the back of your hand and the band into right below your chest. Row low so that you don’t shrug your shoulder. Also, don’t rotate as you row.
Feel your back pull the band back. Don’t just use your arms. Also, make sure that your upper traps don’t try to take over.
Really press the chest out and drive the elbow down and back. Straighten the arm back out and repeat.
Focus on feeling your back pull the band and not just your arm. By focusing on what muscles should be working, you will improve your mind-body connection.
Also, make sure to keep your fingertips pointing up toward the ceiling to engage the extensors in your forearm.
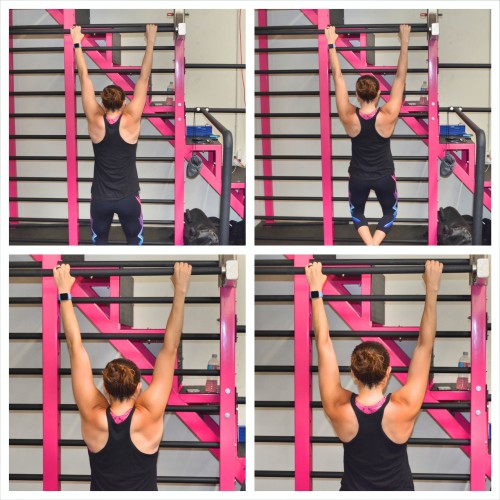
Mini Pull Ups:
This is a more advanced activation move but one that is key if you want to be able to do your first pull up.
Often the hardest part of achieving that first pull up is that initial engagement – that initial retraction and depression of the shoulder blades.
It’s why you may not be able to go from a full dead hang to a pull up, but if you jump just a little over that initial hurdle you can pull all the way up.
The Mini Pull Up is the perfect way to really activate and strengthen your back so that you can retract and depress your shoulder blades and prevent your shoulder from becoming overworked and injured.
To do Mini Pull Ups, start hanging from the bar with your palms facing away from you and your hands about shoulder-width apart.
From this dead hang position, press your chest out and up toward the bar as you draw your shoulder blades down and together. Feel your back engage as you draw your shoulder blades together and press your chest up toward the bar. You will feel your shoulders “unshrugging.”
Don’t bend your elbows and turn this into a pull up. You are simply working on that initial retraction and engagement. Really press your chest out and retract your shoulder blades, bringing them down and together.
Again, do not bend your arms to pull up. Use your back and feel your back engage. You should also feel your shoulders go down as your chest lifts up.
Pause at the top then relax back down to a full dead hang and repeat. Remember, you are not bending your elbows to make this movement bigger.
Because this is an advanced activation move, beginners may need to keep their feet down for assistance.
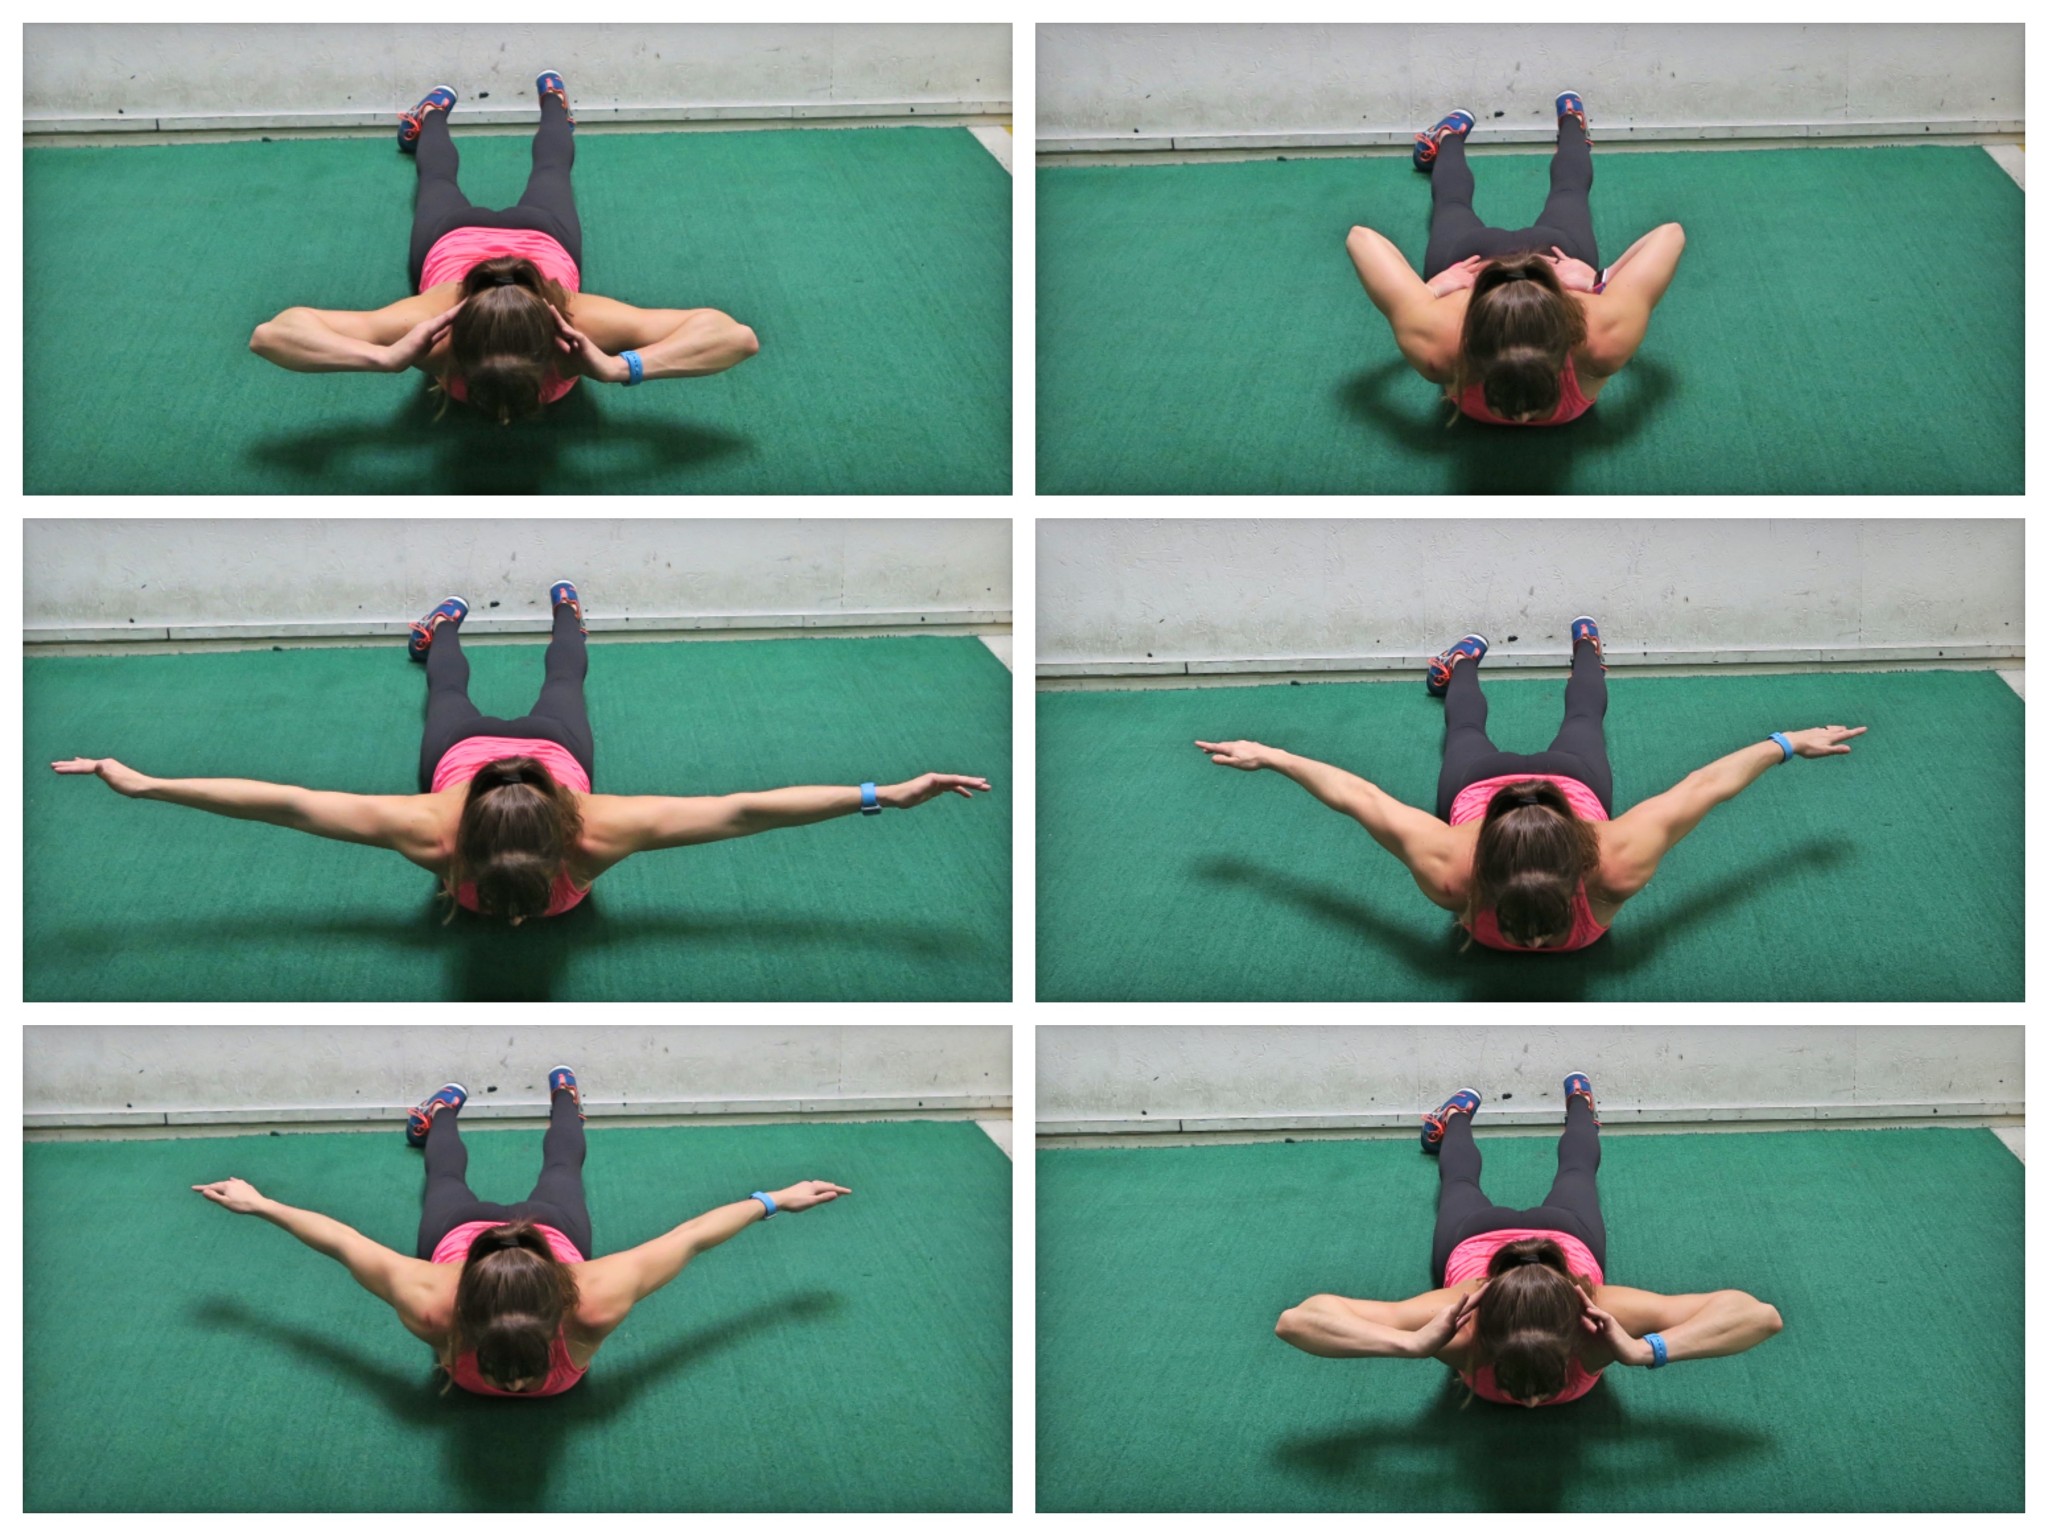
Prone Snow Angels:
Improve your shoulder mobility and activate the muscles of your upper back as well as your rotator cuff with this move. It is also a great move to start working on your scapular mobility.
Clients with less mobility may even need to start with this move standing facing a wall.
To do Prone Snow Angels, lie face down on the ground with your legs relaxed. Place your hands behind your head and then lift your chest up slightly off the ground as with the cobra. Do not arch so much to start using your low back back but just enough to engage your upper back.
Then begin to straighten your arms up and out overhead before slowly moving them out to the side as if creating a snow angel.
As you bring your hands back and down toward your butt, flip your hands over, rotating your shoulders as you bend your elbows to bring the backs of your hands to your low back.
Then reverse the motion, bringing your hands back out to the sides then back behind your head. Make sure to keep your chest slightly up, but do not let your low back take over. Keep your neck also relaxed as you do this and really feel your upper back and the backs of your shoulders working to keep your arms off the ground as you perform the move.
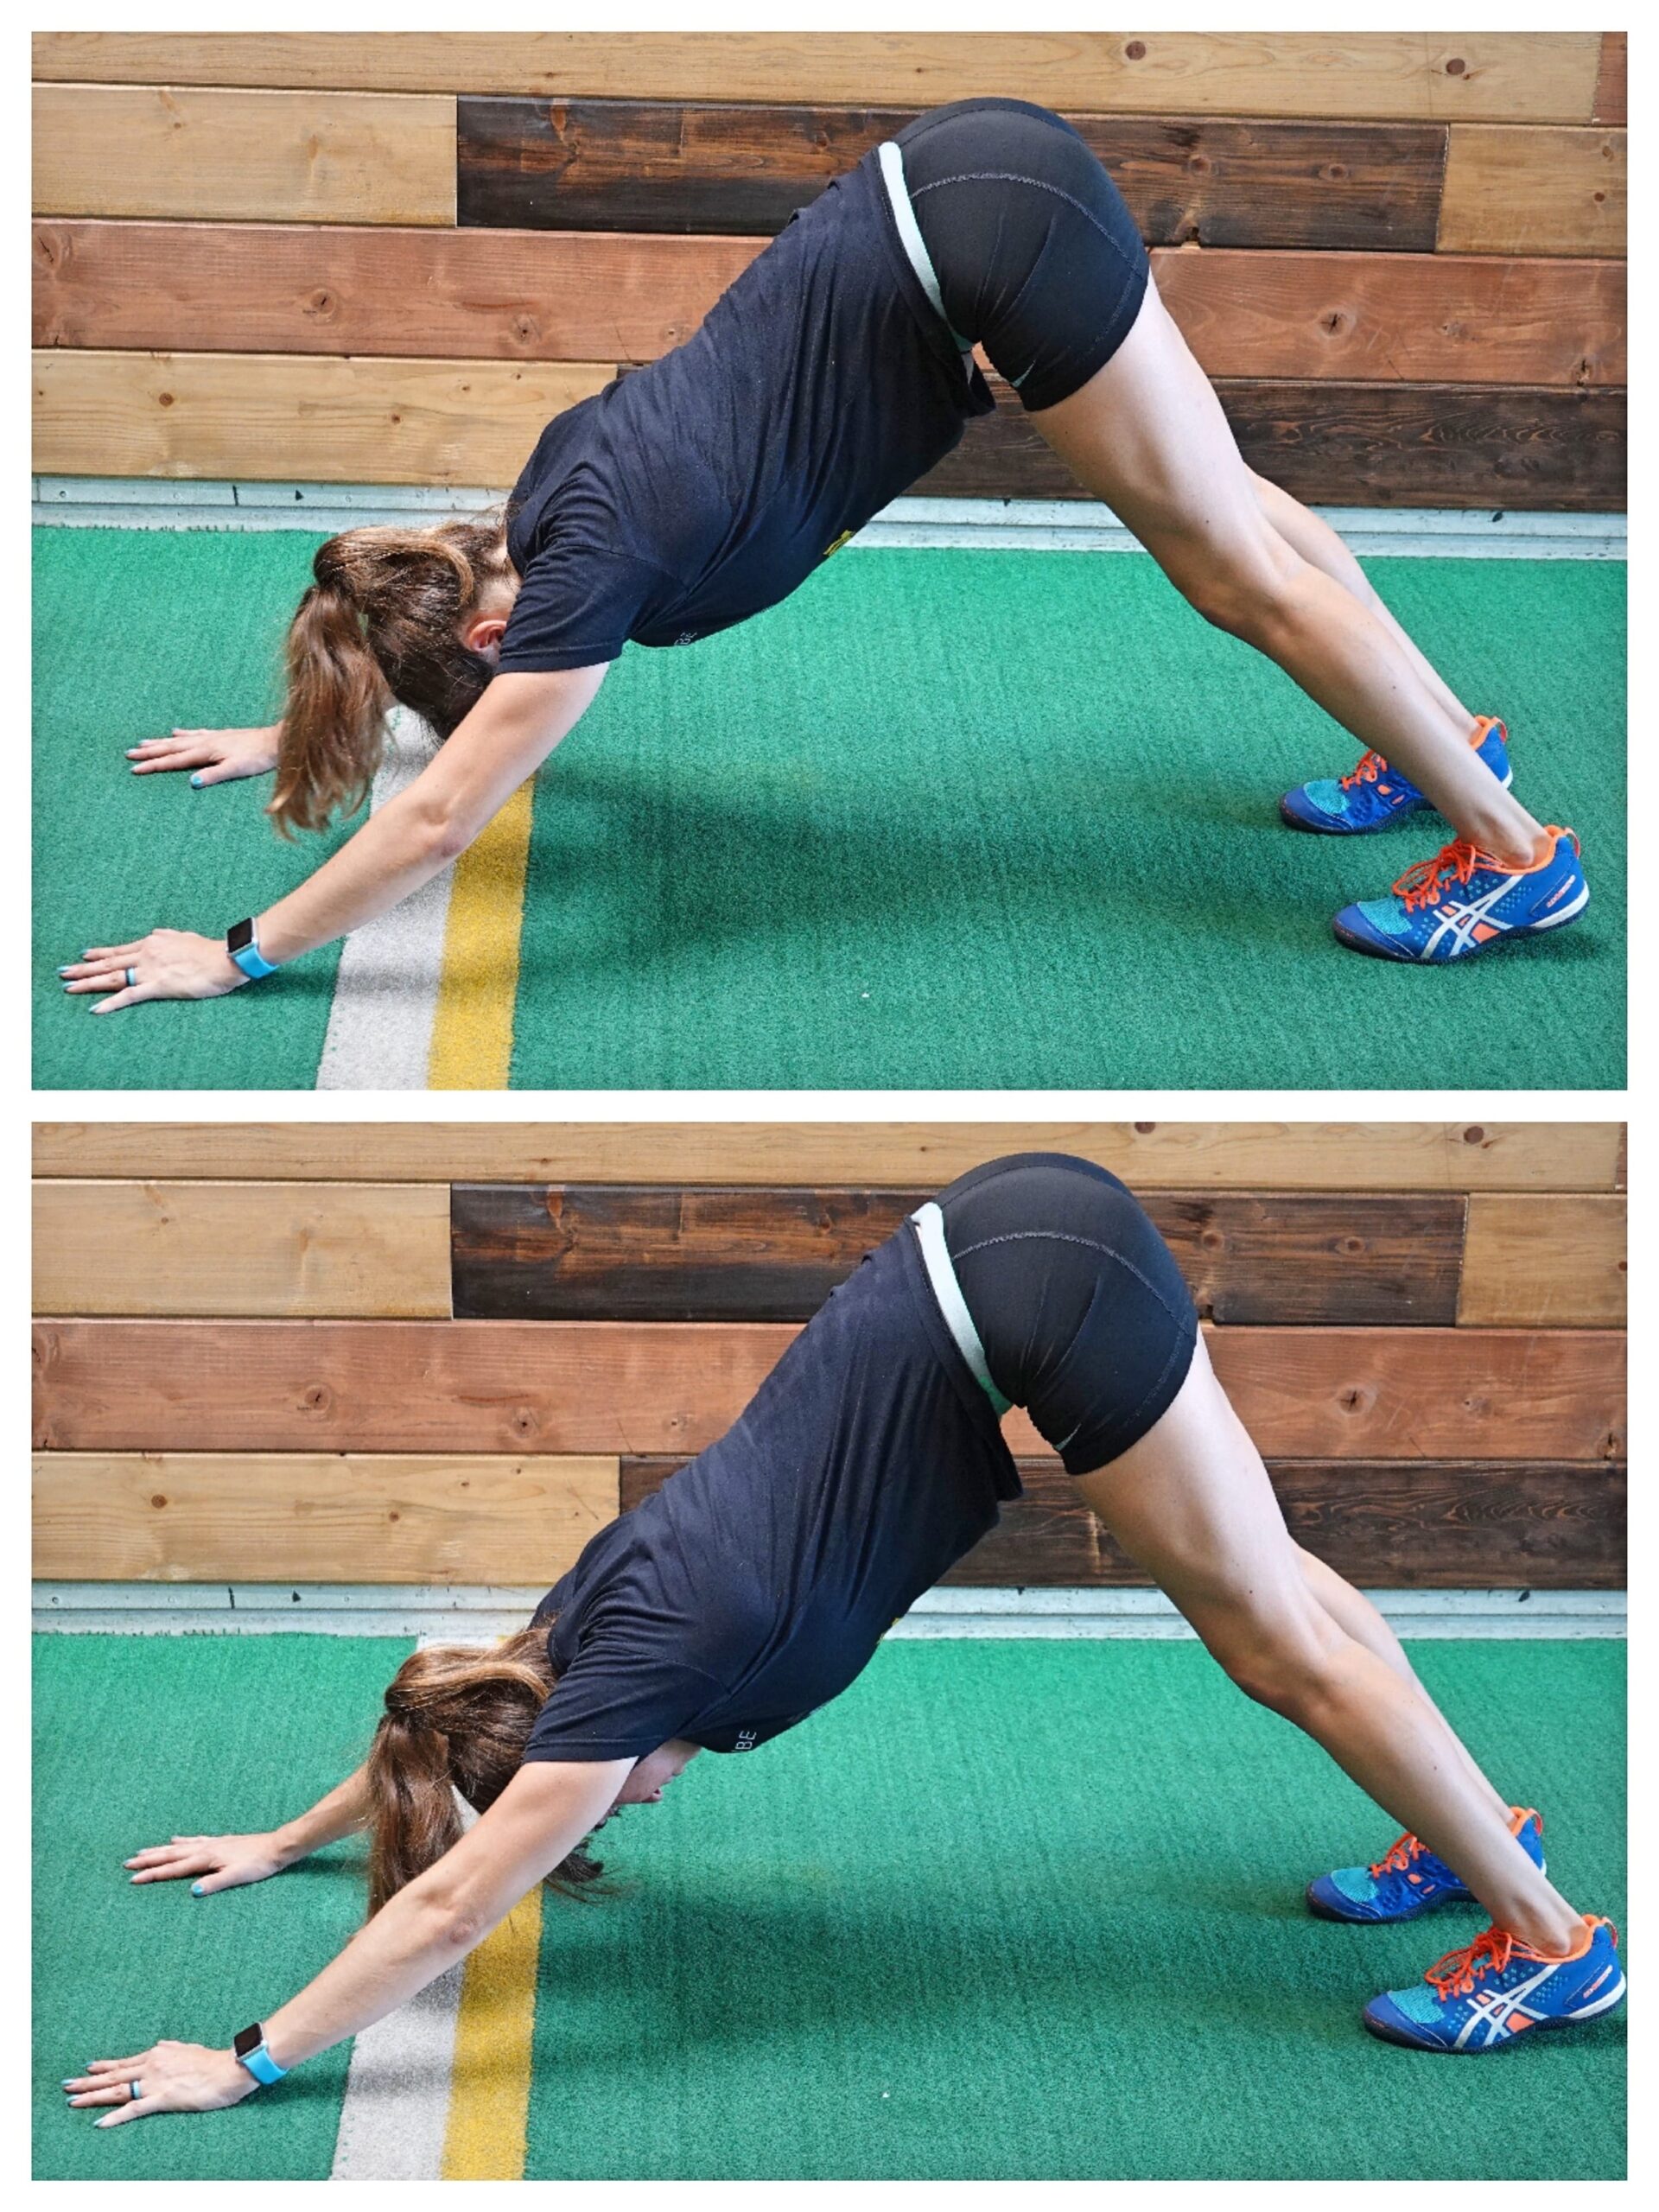
Downward Dog Scapular Presses:
Work on your spinal extension, shoulder stability and the elevation and depression of your shoulder blades with these scapular presses. It can also help activate and strengthen your serratus anterior which is a key muscle for scapular stability and even shoulder health.
Especially if you want to improve your stability with overhead pressing moves, this is a key activation exercise to include!
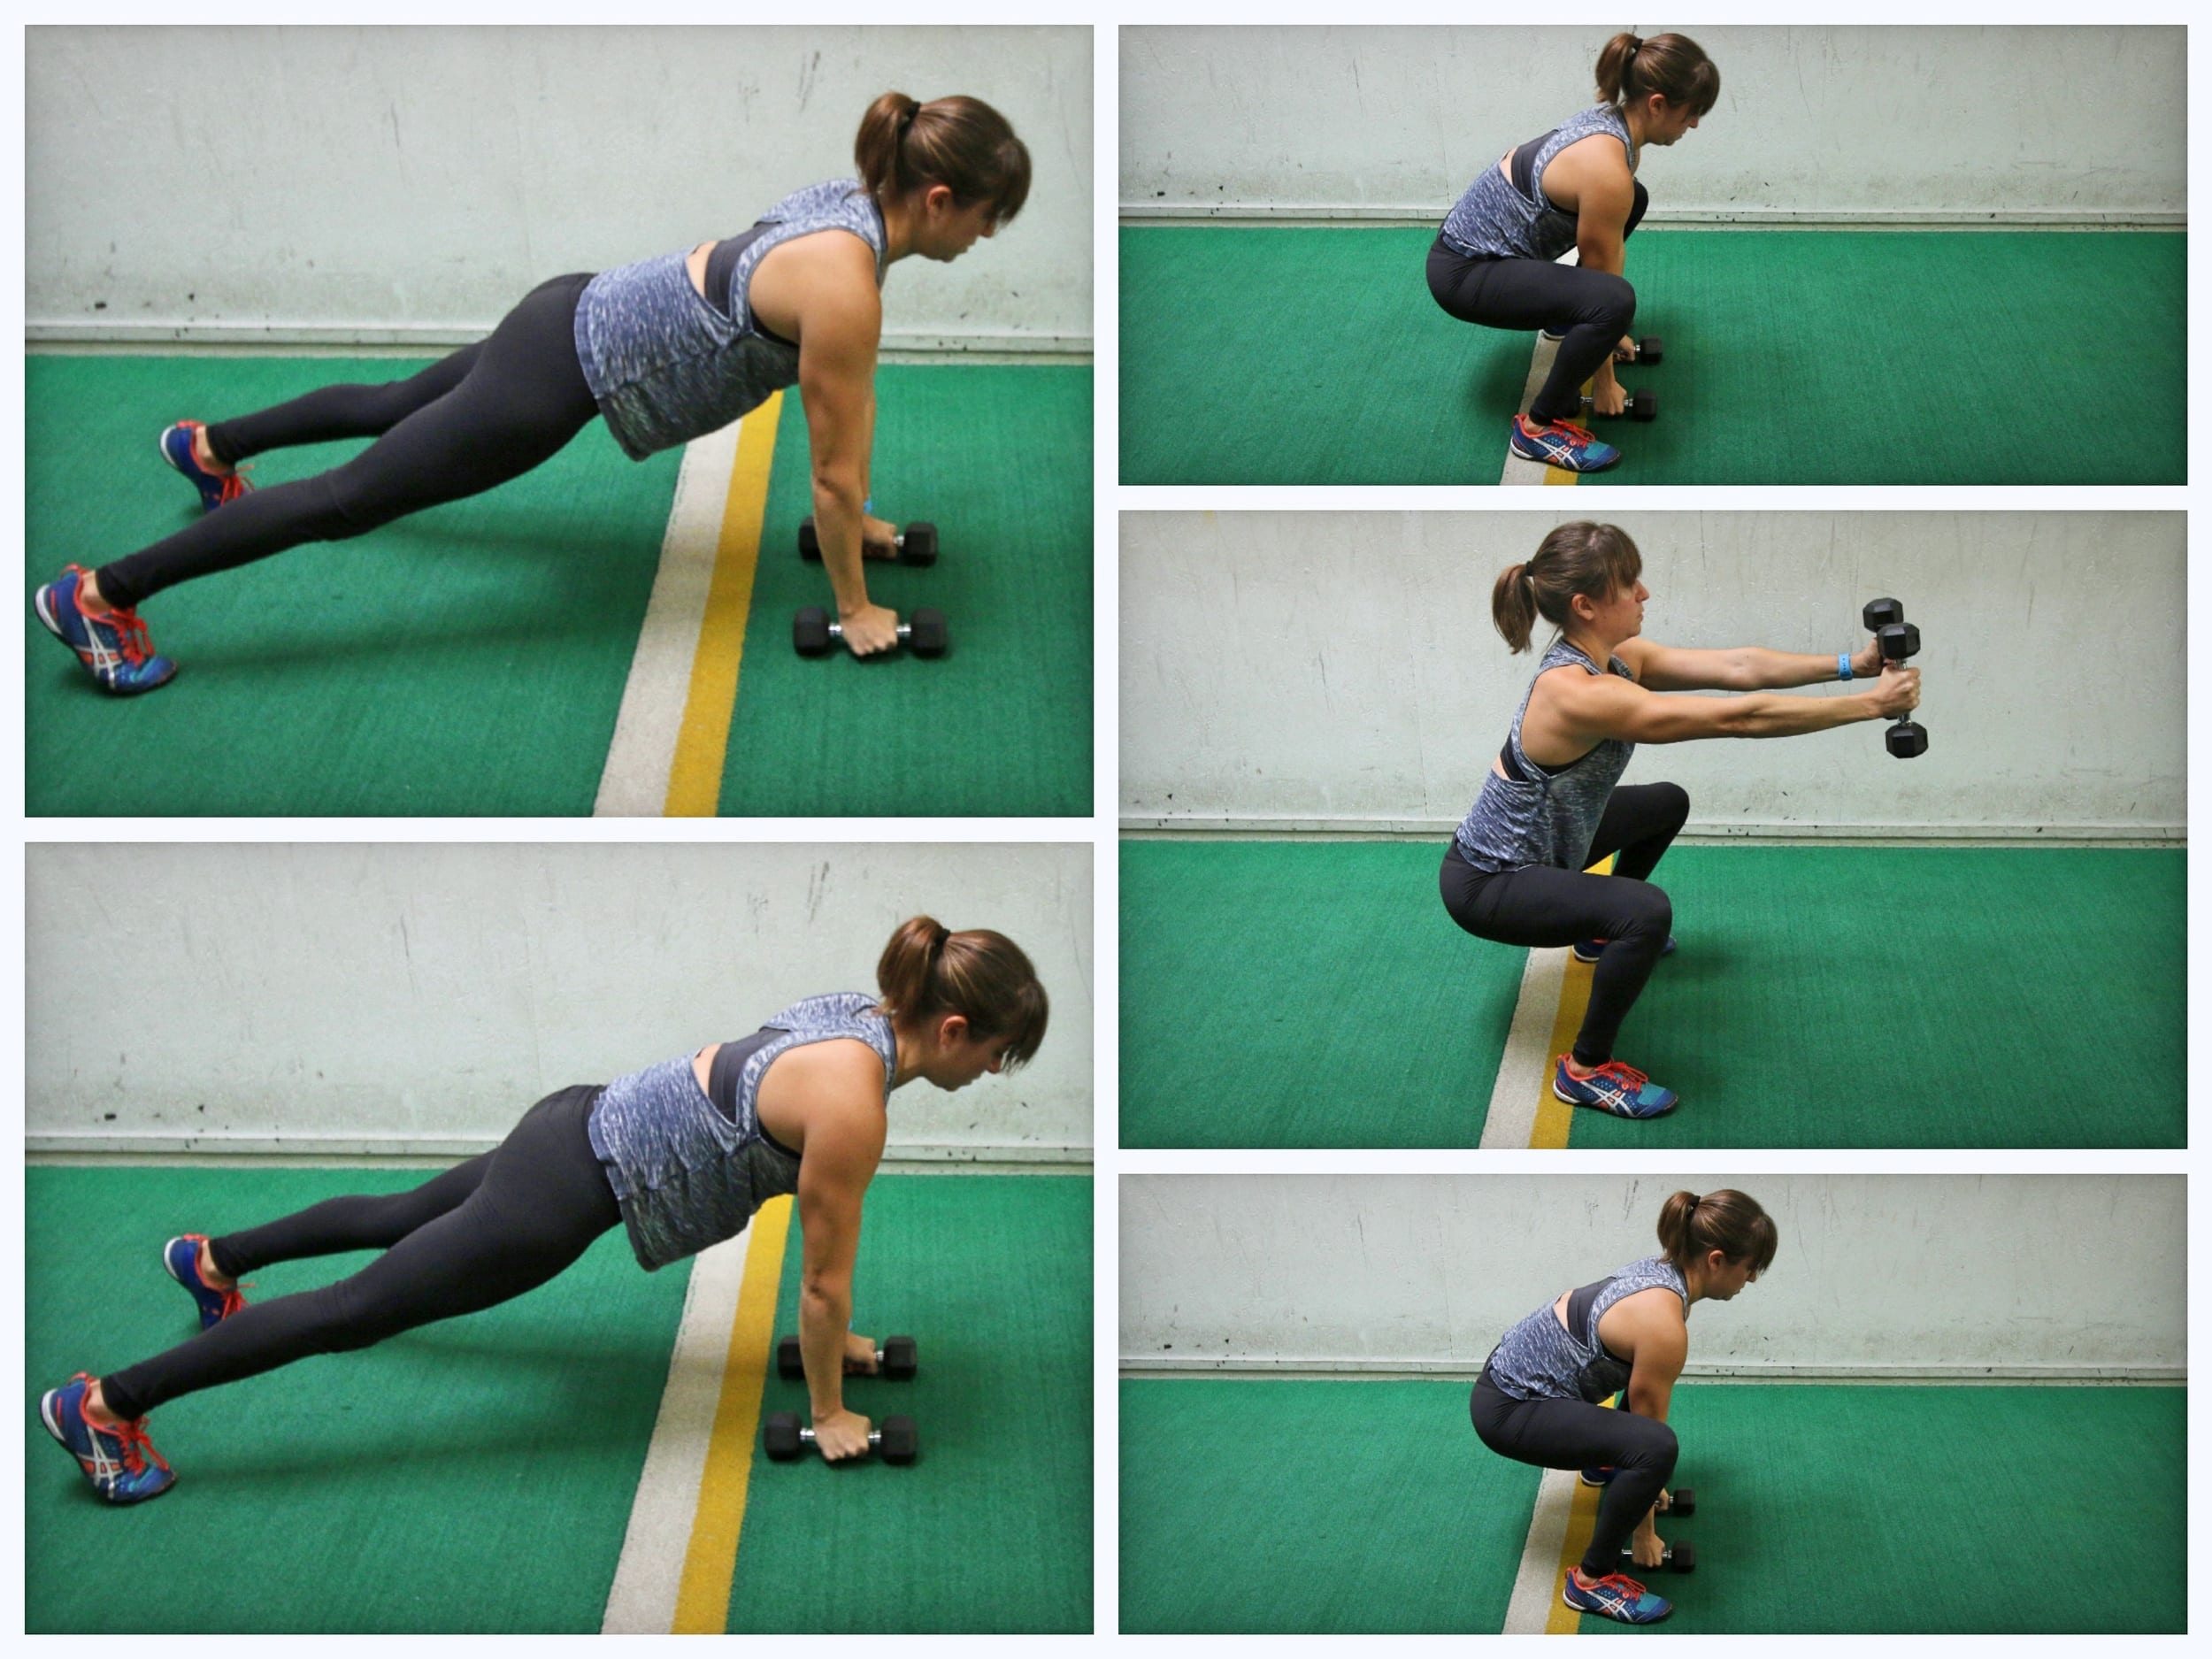
To do the Downward Dog Scapular Presses, start in a high plank position from your feet and hands with your hands under your shoulders and your feet about hip-width apart. Then drive your chest back toward your legs as you push your butt up in the air. Drive your heels down toward the ground as you try to get your biceps by your ears and extend your spine.
Do not walk your hands back and try to really drive through all of your fingers as well as your palm. Do not rock to the outside of your hands. Pause in this Downward Dog position.
Then push the ground away to elevate your shoulders while staying in this downward dog position. Then relax back into the normal downward dog. You are trying to elevate and relax your shoulders. Do not come back forward into plank until all reps are complete.
It will be a small range of motion. Focus on moving your shoulder blades.
Need workouts and a program to get you on track and consistently working to improve your shoulder and scapular mobility snd stability? Then check out my Arm Burner program.
The Arm Burner Program – Avoid aches and pains, strengthen your upper body and improve your pull ups and push ups! LEARN MORE –>
 I remember when I first started writing about fitness and diet because I wanted others to find the empowerment through exercise that I had found growing up…I had this horrible black and purple blog with flames. *shudder*
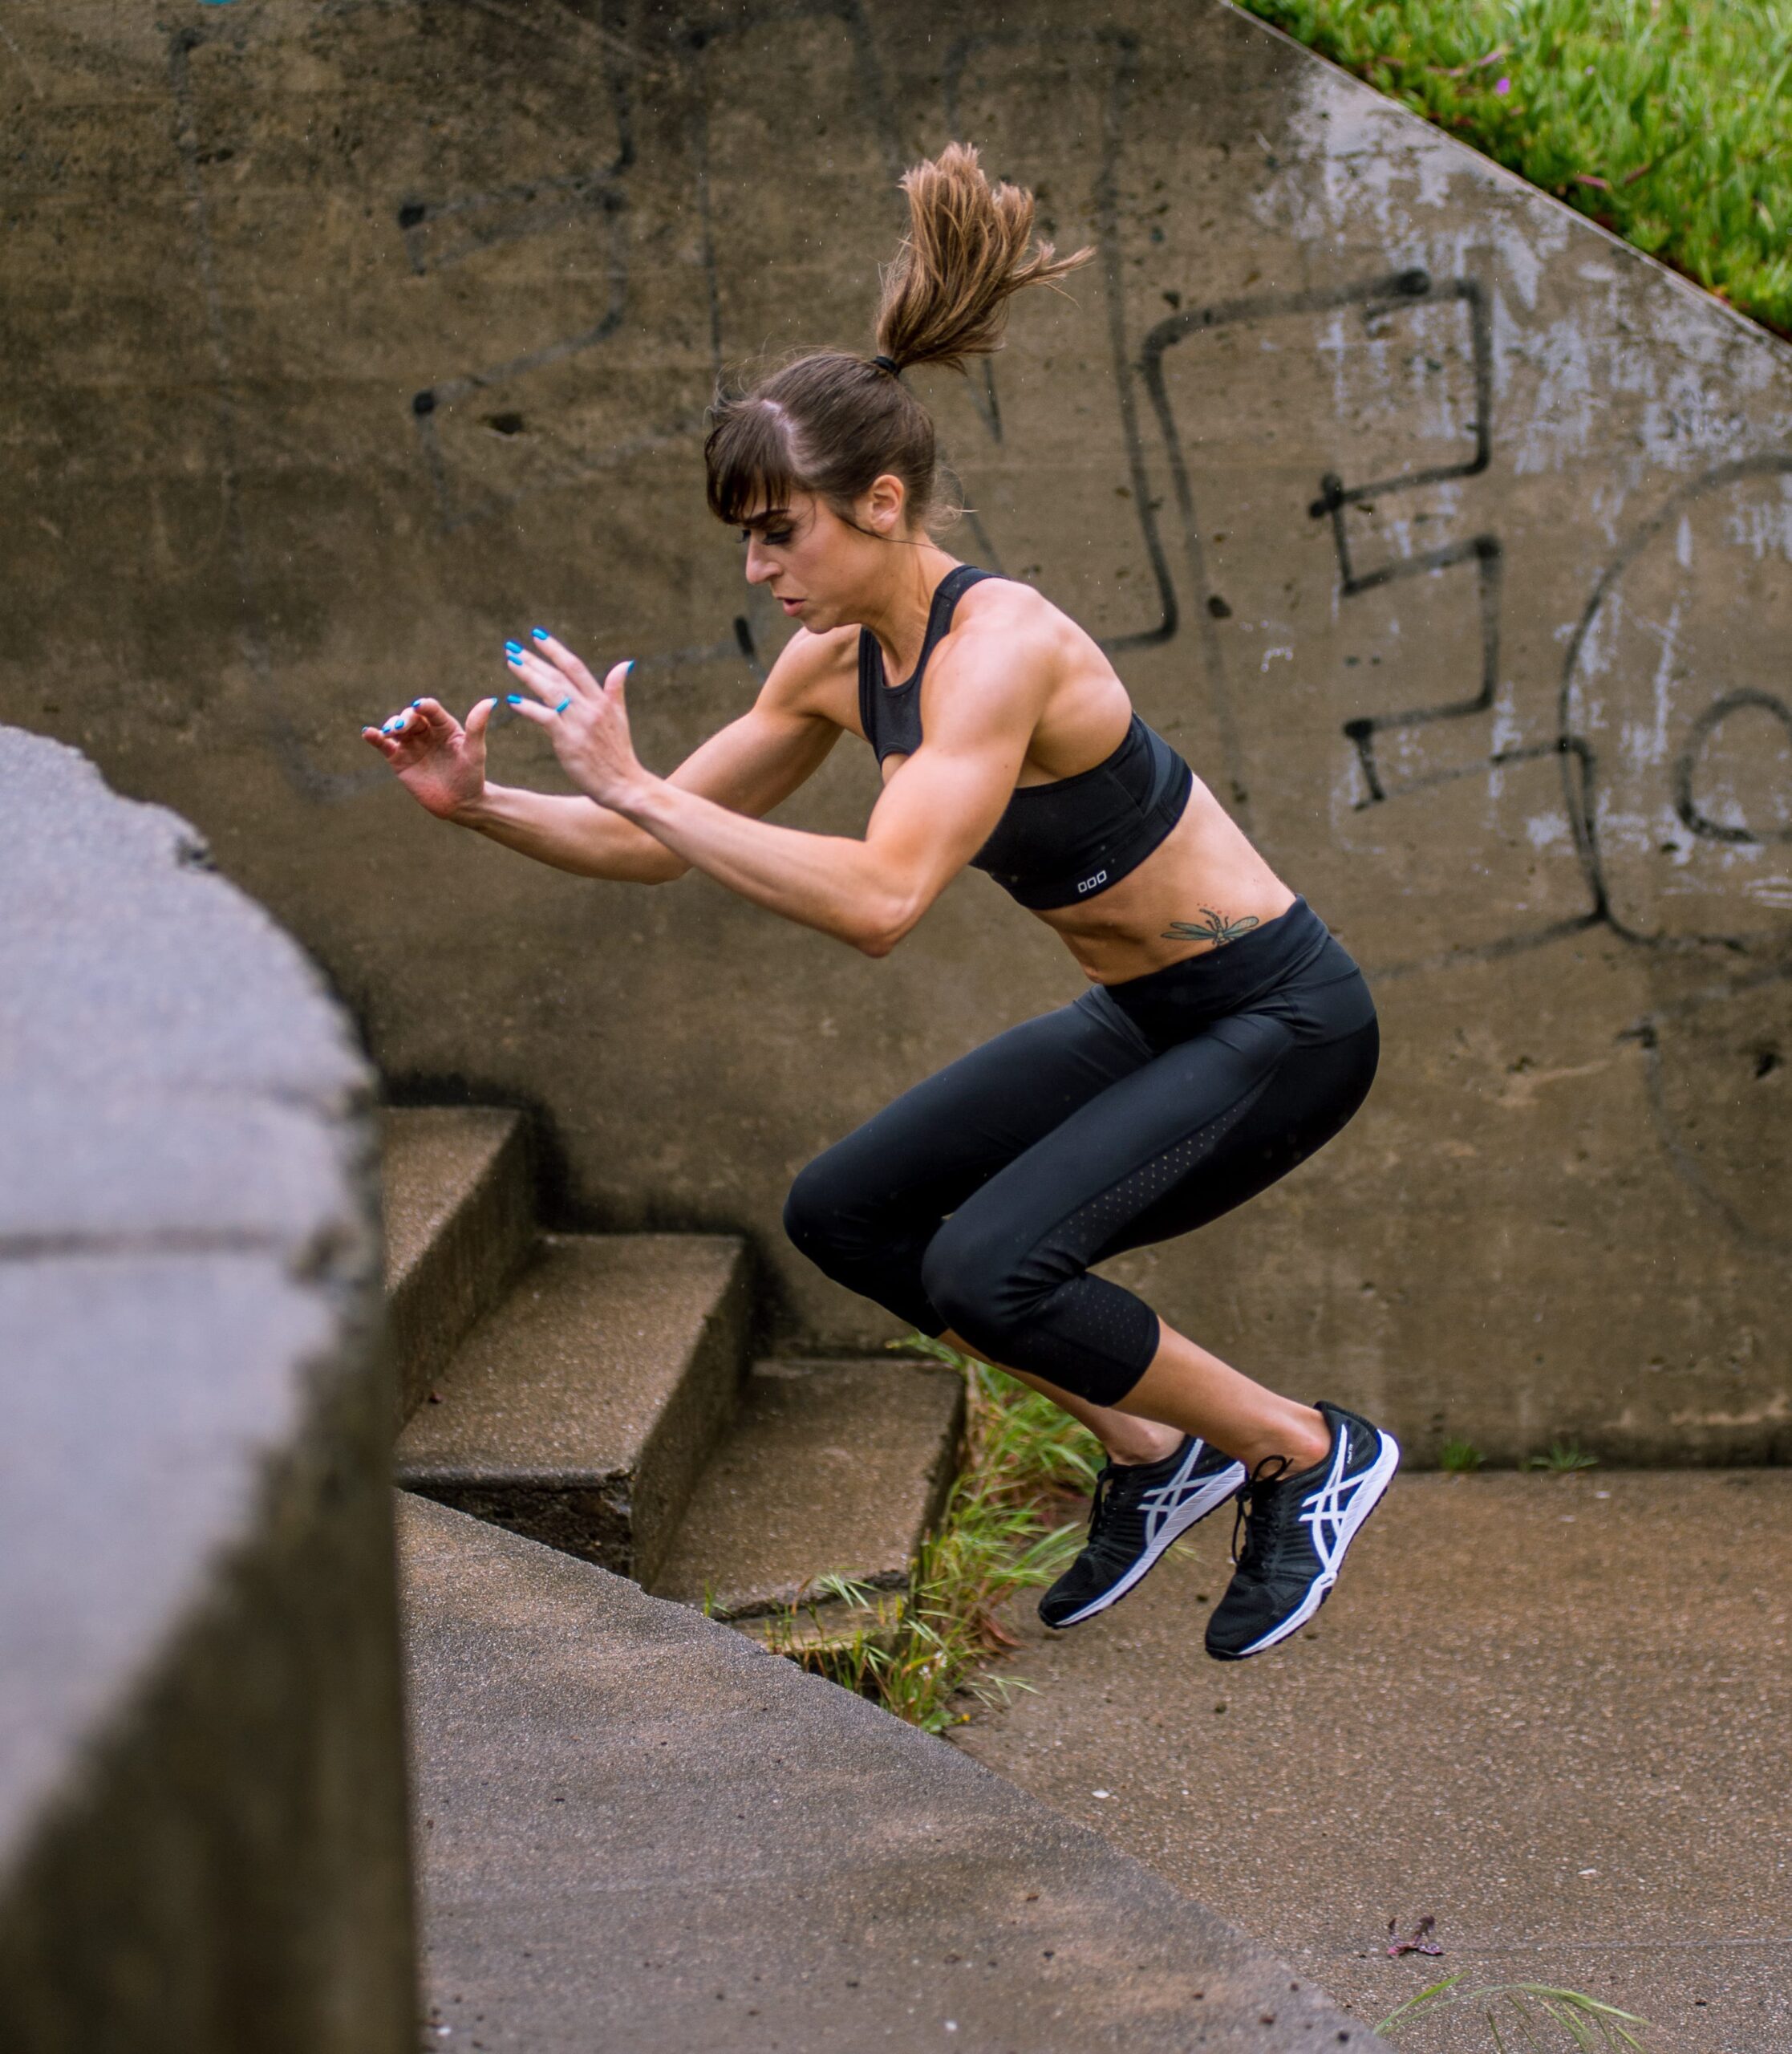 I had my eye on the prize and I had a passion for what I was doing.