by Cori Lefkowith | Jul 23, 2018 | Blog, Diet, featured
We hear all the time…
“It’s not a diet. It’s a lifestyle!”
But let’s face it…With anything where we can’t just do whatever we want, whenever we want, we are going to have some “slip ups.”
We are going to wake up late because we accidentally turned off our alarm.
We are going to skip our workout because we are stressed.
We’re going to buy that outfit we don’t need just because we really really want it!
There really are very few places in life where we can do exactly what we want all of the time.
YET somehow we expect that with our diet.
We think we can “go on a diet,” lose weight, then go back to eating what we were eating before and keep the weight off.
We have this delusion that we can eat whatever we want all of the time.
But it doesn’t work that way.
HOWEVER, that doesn’t mean that we need to continue this cycle of extreme calorie deprivation and cutting out all of the foods we love.
We need to instead realize that it is all about balance and finding something we can do consistently.
Dieting doesn’t have to suck; however, just like everything in life, there will be times we have to do things we don’t fully want to do!
AND I think it is important to recognize that there will be periods where we will be more diligent and times we will…well…”fall off.”
Everything goes in cycles. Here are 5 tips though to help you make dieting suck less!
5 Tips To Make Dieting Suck Less:
1. Find meals you love. Plan those in first.
Dieting has come to mean bland, boring foods. Chicken and broccoli. Bland white fish and asparagus.
But A. These things don’t have to be bland and boring. And B. There has to be a balance which includes foods you enjoy.
If you want to stick with a diet and make it something you actually ENJOY doing, you have to be able to make meals you love.
I always tell people starting my Macro Cycling programs that they should plan in meals with their family or meals they really love first. If you really crave salmon or steak, plan it in. And work your other meals around it.
Really crave chocolate or something sweet at the end of the night? Plan it in first. That way you can work everything else around it!
Remember it is 80/20 not perfection that gets results. Perfection might lead to faster results, but it generally also leads to incredibly short-term results!
2. Stop making it about perfection. Give yourself one focus.
We go in with this all or nothing attitude that often leads to us “falling off” before we really even start.
And if we do get in a routine, at the first sign of life getting in the way, aka work stresses, family pressures, the HOLIDAYS, our goals and diet go completely out the window.
We struggle to stay consistent because we’ve put so much pressure on ourselves to be “perfect.” To only eat whole natural foods. To be within a gram of our goal. To always be under our calories.
But it isn’t about perfection.
It’s about knowing our goals and being consistent.
Especially during those busy times, don’t worry about the details. Give yourself just ONE THING to focus on to keep you on track.
I always tell clients that if they can do just one thing, make protein your focus. If you make protein your focus, you’ll see results.
Or if they’ve even struggled with that, I’ll tell them to simply start by LOGGING. There is accountability in that AND it can help us then slowly make changes as we feel ready.
It doesn’t have to be all or nothing. Those small tweaks, that consistency adds up!
3. Stop cutting out foods you love first.
Ok we all know certain foods are bad for us. But we love them anyway.
Those foods that we love are often also the first things we cut out. And then all we can think about is how much we want those foods.
So what happens?
We end up binging and then struggle to get back on track.
But what if we didn’t first cut out those foods we love the most?
What if instead we first focused on adding in other things? Or making tweaks to those foods we love so they fit our macros better?
What if we got rid of the other fluff so we could even still indulge in those foods we love?
A. Consistency is about balance. It isn’t all or nothing and even unhealthy foods can have a place in our lifestyle!
B. When we make those other changes FIRST, often making the bigger changes. aka sometimes reducing or even eliminating those unhealthy foods we feel we “need,” becomes EASIER because we aren’t then cutting out the things we love first. We don’t feel as DEPRIVED because we’ve made other changes that have created new habits.
So when you’re getting started, start with easy and small tweaks. And even consider how you can make meals more macro friendly!
4. Fuel your body instead. Less isn’t always more.
A big reason why we think diets suck is because we are ALWAYS hungry.
There is legitimately a term for this hunger, and the resulting ANGER from it…HANGER.
So of course feeling hungry and low energy all of the time isn’t going to make us want to stick with our eating plan.
Nope! But it may make you reach for the quickest and most unhealthy thing in sight!
And not only can this constant starvation cause us to fall off our diet, but it can also actually cause our results to stall or plateau. LESS ISN’T ALWAYS MORE!
Yes, a calorie deficit is key. But too little and you can’t workout hard and your body starts to try to conserve energy.
PLUS, it is NOT just about calories in vs. calories out. The quality of those calories matters! And that doesn’t just mean healthy vs. unhealthy foods but even the MACRO ratios that you consume.
Even though you may want to lose weight quickly, don’t starve yourself. Make sure to fuel your activity and it will not only make eating well more pleasant but help you stay consistent long term!
5. Plan for the worst.
It’s easy to eat well and stick to your goals when you aren’t stressed, have full control of your schedule and are 100% motivated and even getting results.
However, that all happens at the same time like maybe 5% of the time if we’re lucky.
Most of the time we are stressed, or tired, or have family obligations…Or heck…we just want to go out and have fun!
But most often we only PLAN for the times that it is easy. We don’t prepare for the times that we are going to have other things going on that may make it seem impossible to prep or stay on track.
That is why it is key that we consider and plan for the “worst.”
How can we provide ourselves with guidance to stay on track even when things aren’t easy? How can we create consistency and balance so we can keep ourselves moving forward or maintaining even when “dieting” isn’t our main focus?
Often I think this means giving ourselves one thing to focus on. One clear and easy goal that we know will keep us on track enough.
I also think it is about remembering it is about CONSISTENCY and not perfection that truly matters in the long run.
And I think it is important that we come up with ways that allow us to diet with balance. Find easy meals out. Plan around the things you love and enjoy.
Find quick snacks that, while maybe not perfect, are way better than the alternative and will keep you feeling fueled and on track.
Dieting may not always be fun but it shouldn’t detract from your life. There will be periods where you will want to be stricter and others you will do the bare minimum. The key is finding a way to make it “not suck” so you can remain consistent and find balance!
And it is also about remembering EVERYTHING goes in cycles. Don’t feel guilty or beat yourself up. Just make small little tweaks to always be getting better and preparing yourself to make the most out of what you can!
With these 5 tips you can get on track and make dieting…well…suck less!
Learn more about the 5 reasons why diets have failed you in the past!
by Cori Lefkowith | Jul 15, 2018 | Blog, Exercises, Pain Relief
Nothing makes me happier than when someone has that AH-HA moment and realizes that they feel the right muscles working.
It legit makes me so excited I often have to share the news with whoever is near me. Usually that’s Ryan.
And I sometimes wonder what must be going on inside Ryan’s head when I randomly look up at him over my computer and am like…
“How awesome is this…She said she did the activation and for the first time felt her glutes when she was squatting! She didn’t realize before that she DIDN’T feel them working!!”
He always nods at me and says, “That’s awesome!”
I’m pretty sure he isn’t as stoked as I am but I don’t care…he gets to hear about it anyway!
Anyway, the reason I get so excited is because it isn’t easy for many of us to change those recruitment patterns.
It isn’t easy to…
A. Realize the right muscles aren’t working
And B. Then put in the work and the focus to get the right muscles working!
It isn’t just about doing the “right moves.”
It is about changing the way our body recruits muscles to perform the moves.
It is about establishing that mind-body connection!
And that is why ACTIVATION EXERCISES are so important.
There isn’t just one move that can be used for activation.
But generally more isolated, simpler movements work best. Movements that don’t take a ton of skill so you can more easily focus and think about what muscles you should be feeling working.
Movements that, in general, allow for less compensation because fewer muscles are working at the same time. Movements that may even help you INHIBIT overactive muscles.
But it isn’t just the MOVEMENTS that lead to ACTIVATION and changes in our mind-body connection.
It’s also WHEN we do the movements.
I get asked all of the time about WHEN to do the RStoration. When to do the Booty Burners.
And if your goal isn’t just to use them as prehab or extra mobility work but as your ACTIVATION for your workouts, then you need to do them right before. Or even DURING your workout if you are struggling to feel muscles engaging.
Those activation exercises establish the mind-body connection in an “easy way.” Because they are more isolated movements, they can make it easier for you THINK about the muscles that are working and start to even create a pump in those muscles.
But muscles don’t operate in isolation in everyday life.
We need to use that connection we’ve created with the activation moves to then help us improve our recruitment patterns during compound movements with heavier loads or faster speeds (aka we want to make sure the right muscles are carrying the loads they should be).
We want to establish that mind-body connection PRIOR TO movements where it is often harder for us to think about, or focus on, the muscles that are working.
By using the activation prior and creating that initial pump and connection, we can make it easier to KNOW the muscles are working during those other moves.
Because if we want to be moving efficiently, we can’t have to consciously think about the muscles that are working every time. We need to know they’ll be recruited correctly because we’ve taken the time to activate and create efficient and effective recruitment patterns!
So when it comes to Activation, moves are a tool. Timing is a tool.
But it comes down to you focusing and thinking about the muscles that are working as you do those initial moves so you can then get the right muscles working during your compound lifts.
Most of us do things in every day life that cause compensations and injuries…that often lead to more compensations and injuries because we don’t keep up with our prehab.
For example…These imbalances and compensations can cause us to have back pain when we run. We sit all day and our hip flexors get tight. We do nothing to reverse our flexed, hunched posture.
Then we go do a repetitive movement and our glutes aren’t firing as they should be and we’re quad dominant so we end up with back pain from our running.
This is why ACTIVATION is so important. It is key to correct those dysfunctional patterns and restore proper movement and engagement!
If you love geeking out about the WHY behind workout design, check out my Training Black Book.
It’s 10 hours of information about designing workouts that work and over 50 done for you workout templates breaking down how and WHY to use all of the different techniques!
–> Learn more about my Training Black Book
(CEUs now available for you trainers out there looking to get continuing education credits! Use code NASM to save $100 off. Currently CEUs are available for NASM (which is also connected to Premier Global) and AFAA!)
by Cori Lefkowith | Jul 10, 2018 | Blog, Bodyweight, Core, Exercises, Travel Workouts, Workouts
All too often we think we need lots of jumping, burpees, and well, cardio in general, if we want to lose fat.
And while all of those moves and exercises should have a place in our routine, overdoing those things may actually be holding us back.
Sometimes those workouts that look “easy,” that seem simple, that won’t have you gasping for air, are the essential workouts we are MISSING.
They are hard in a different way and require you to establish an efficient mind-body connection to build your foundation.
They create proper recruitment patterns to keep you injury free and help your body work well so you can get even more out of all of your workouts.
And while these routines may seem easy, they will challenge your body in a new way and lead to killer results. Hey they can even burn so good!
So if you haven’t ever done a Density Interval Workout, you should try this one below!
By pairing together a basic movement and an isometric, we can not only get the correct muscles working but even build functional, full-body strength!
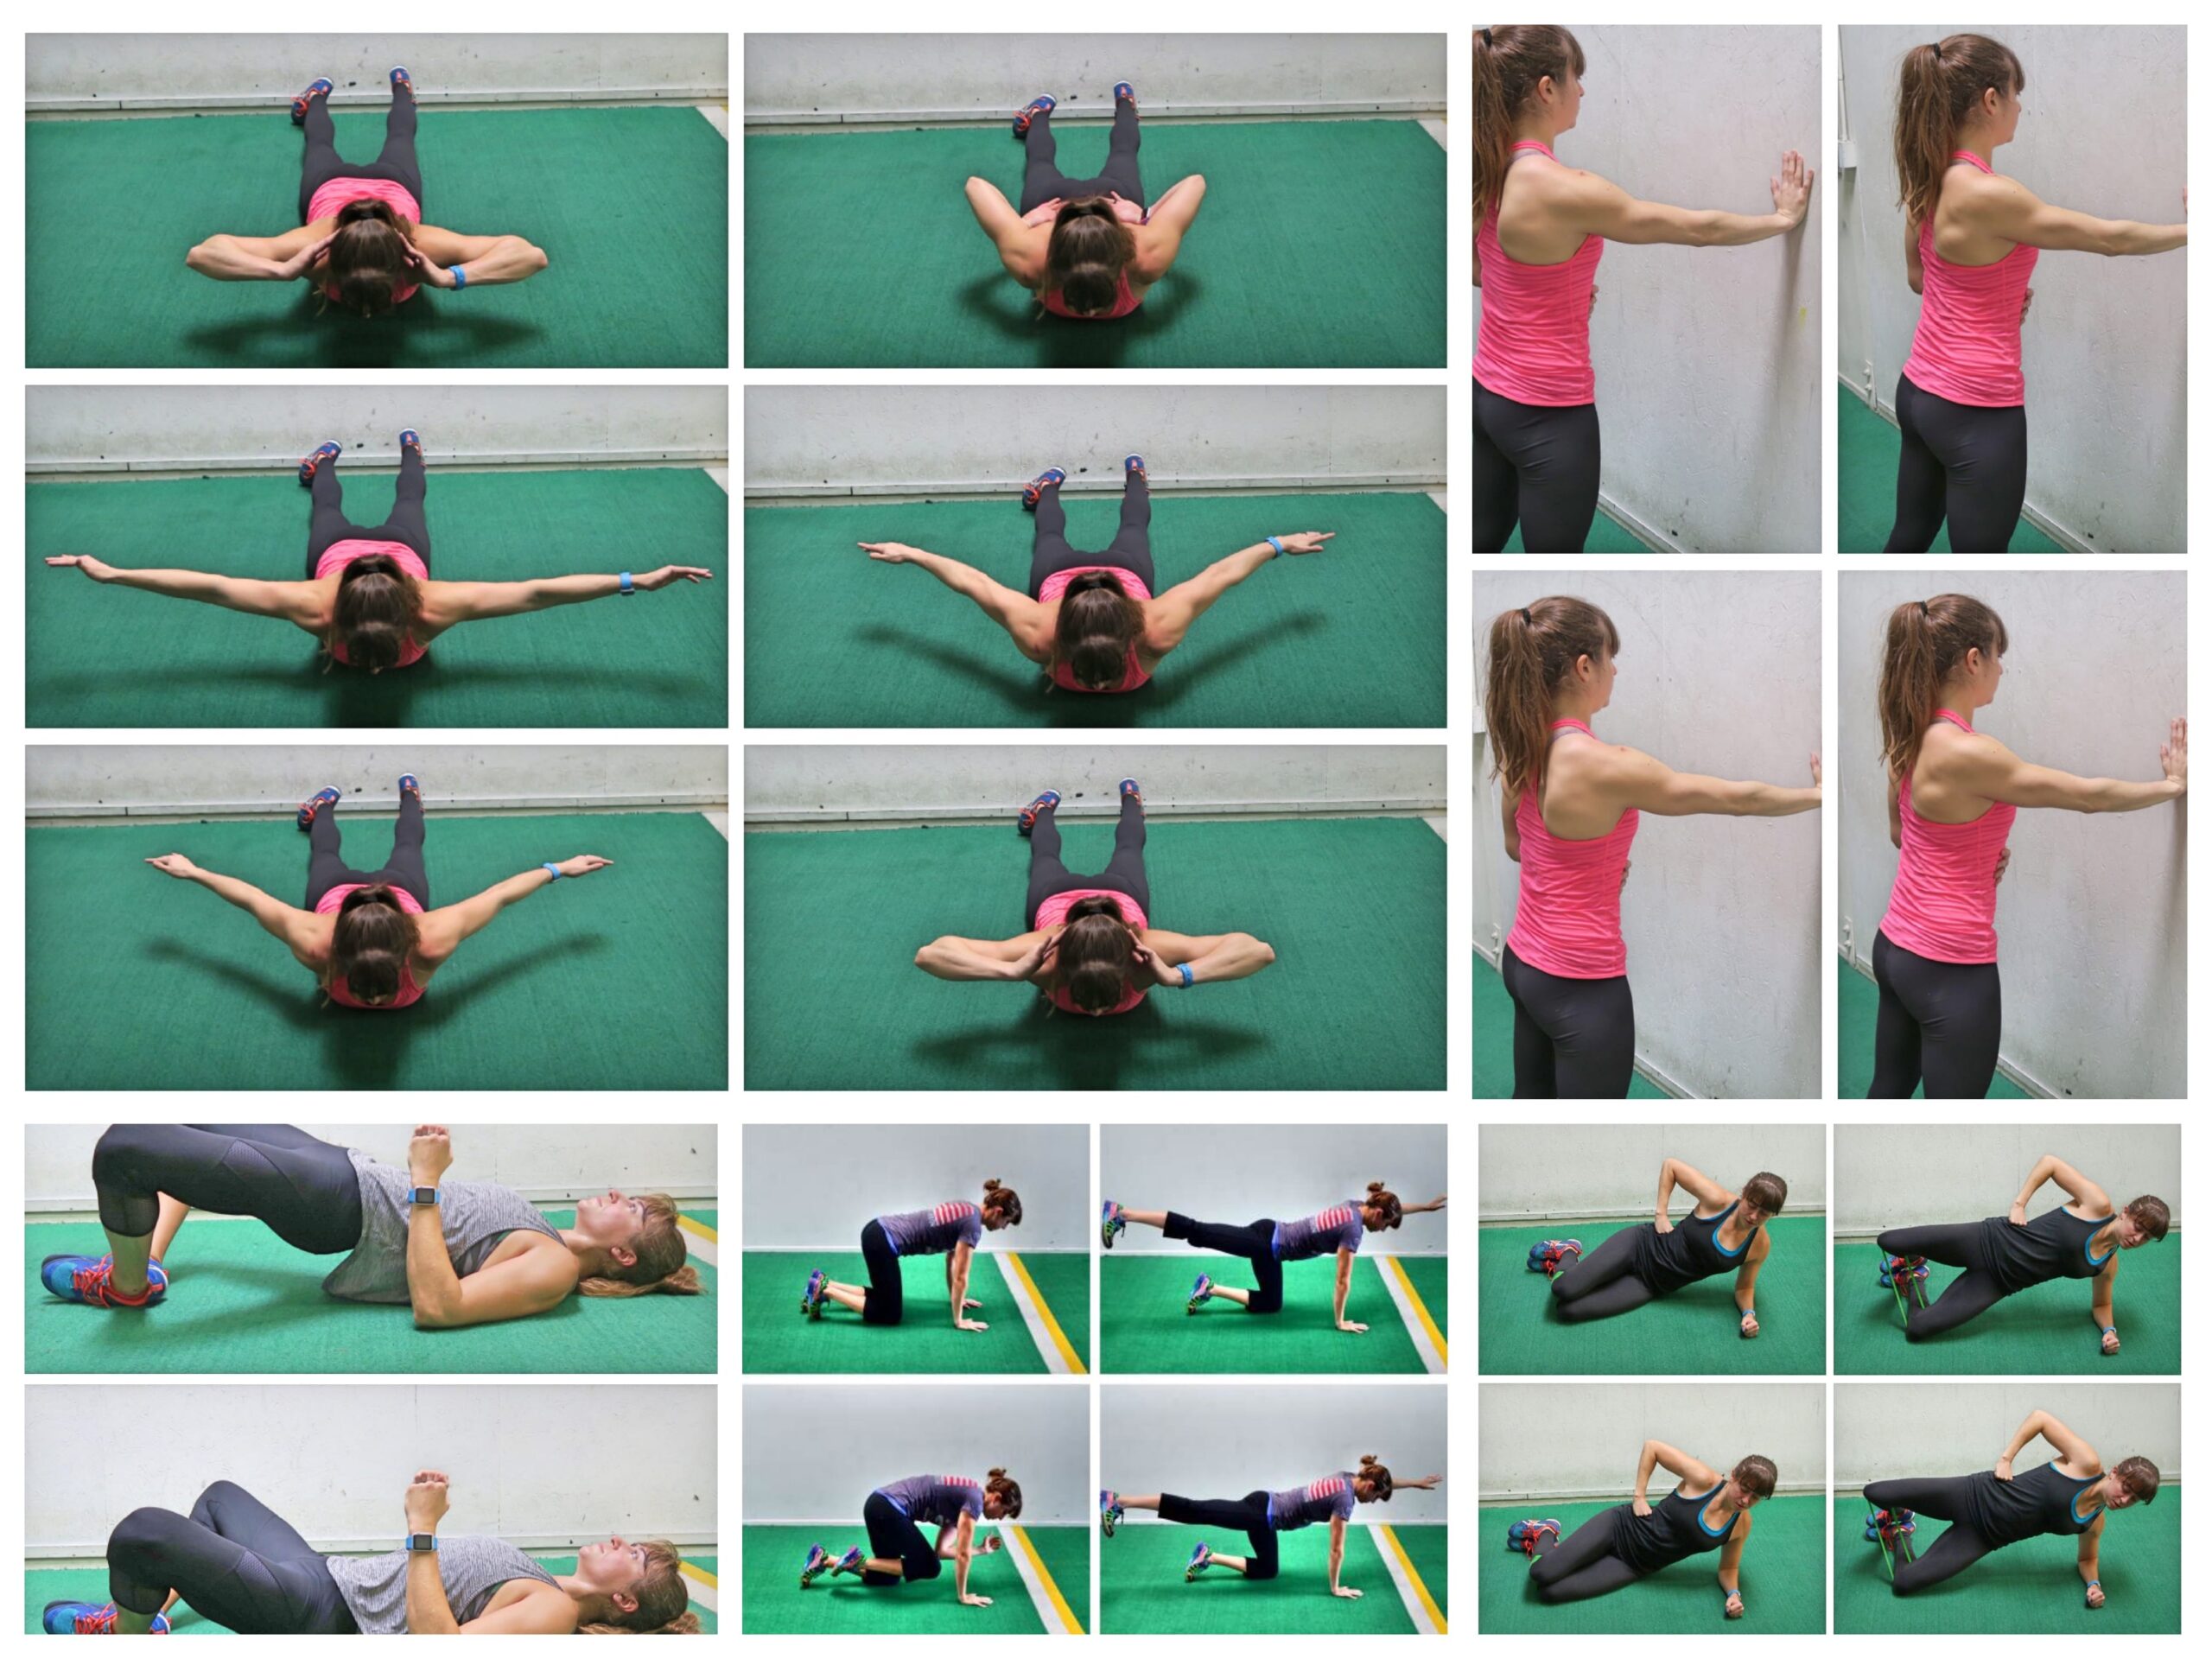
The Full-Body Density Interval Workout
Complete 3-4 rounds of the following circuit, resting up to 30 seconds between rounds. If the move is done on one side, do the hold then the reps on that side before switching and moving on.
After the circuit, complete 2-3 rounds of the Core Burner with 30 seconds rest between rounds. If one sided, do both moves, the hold and the reps, on that side before moving on. Then stretch and roll out.
CIRCUIT:
30 seconds each side Warrior III
30 seconds each side Warrior III Squats
30 seconds Push Up Holds
30 seconds Climber Push Ups
30 seconds Wall Sit
30 seconds Squats
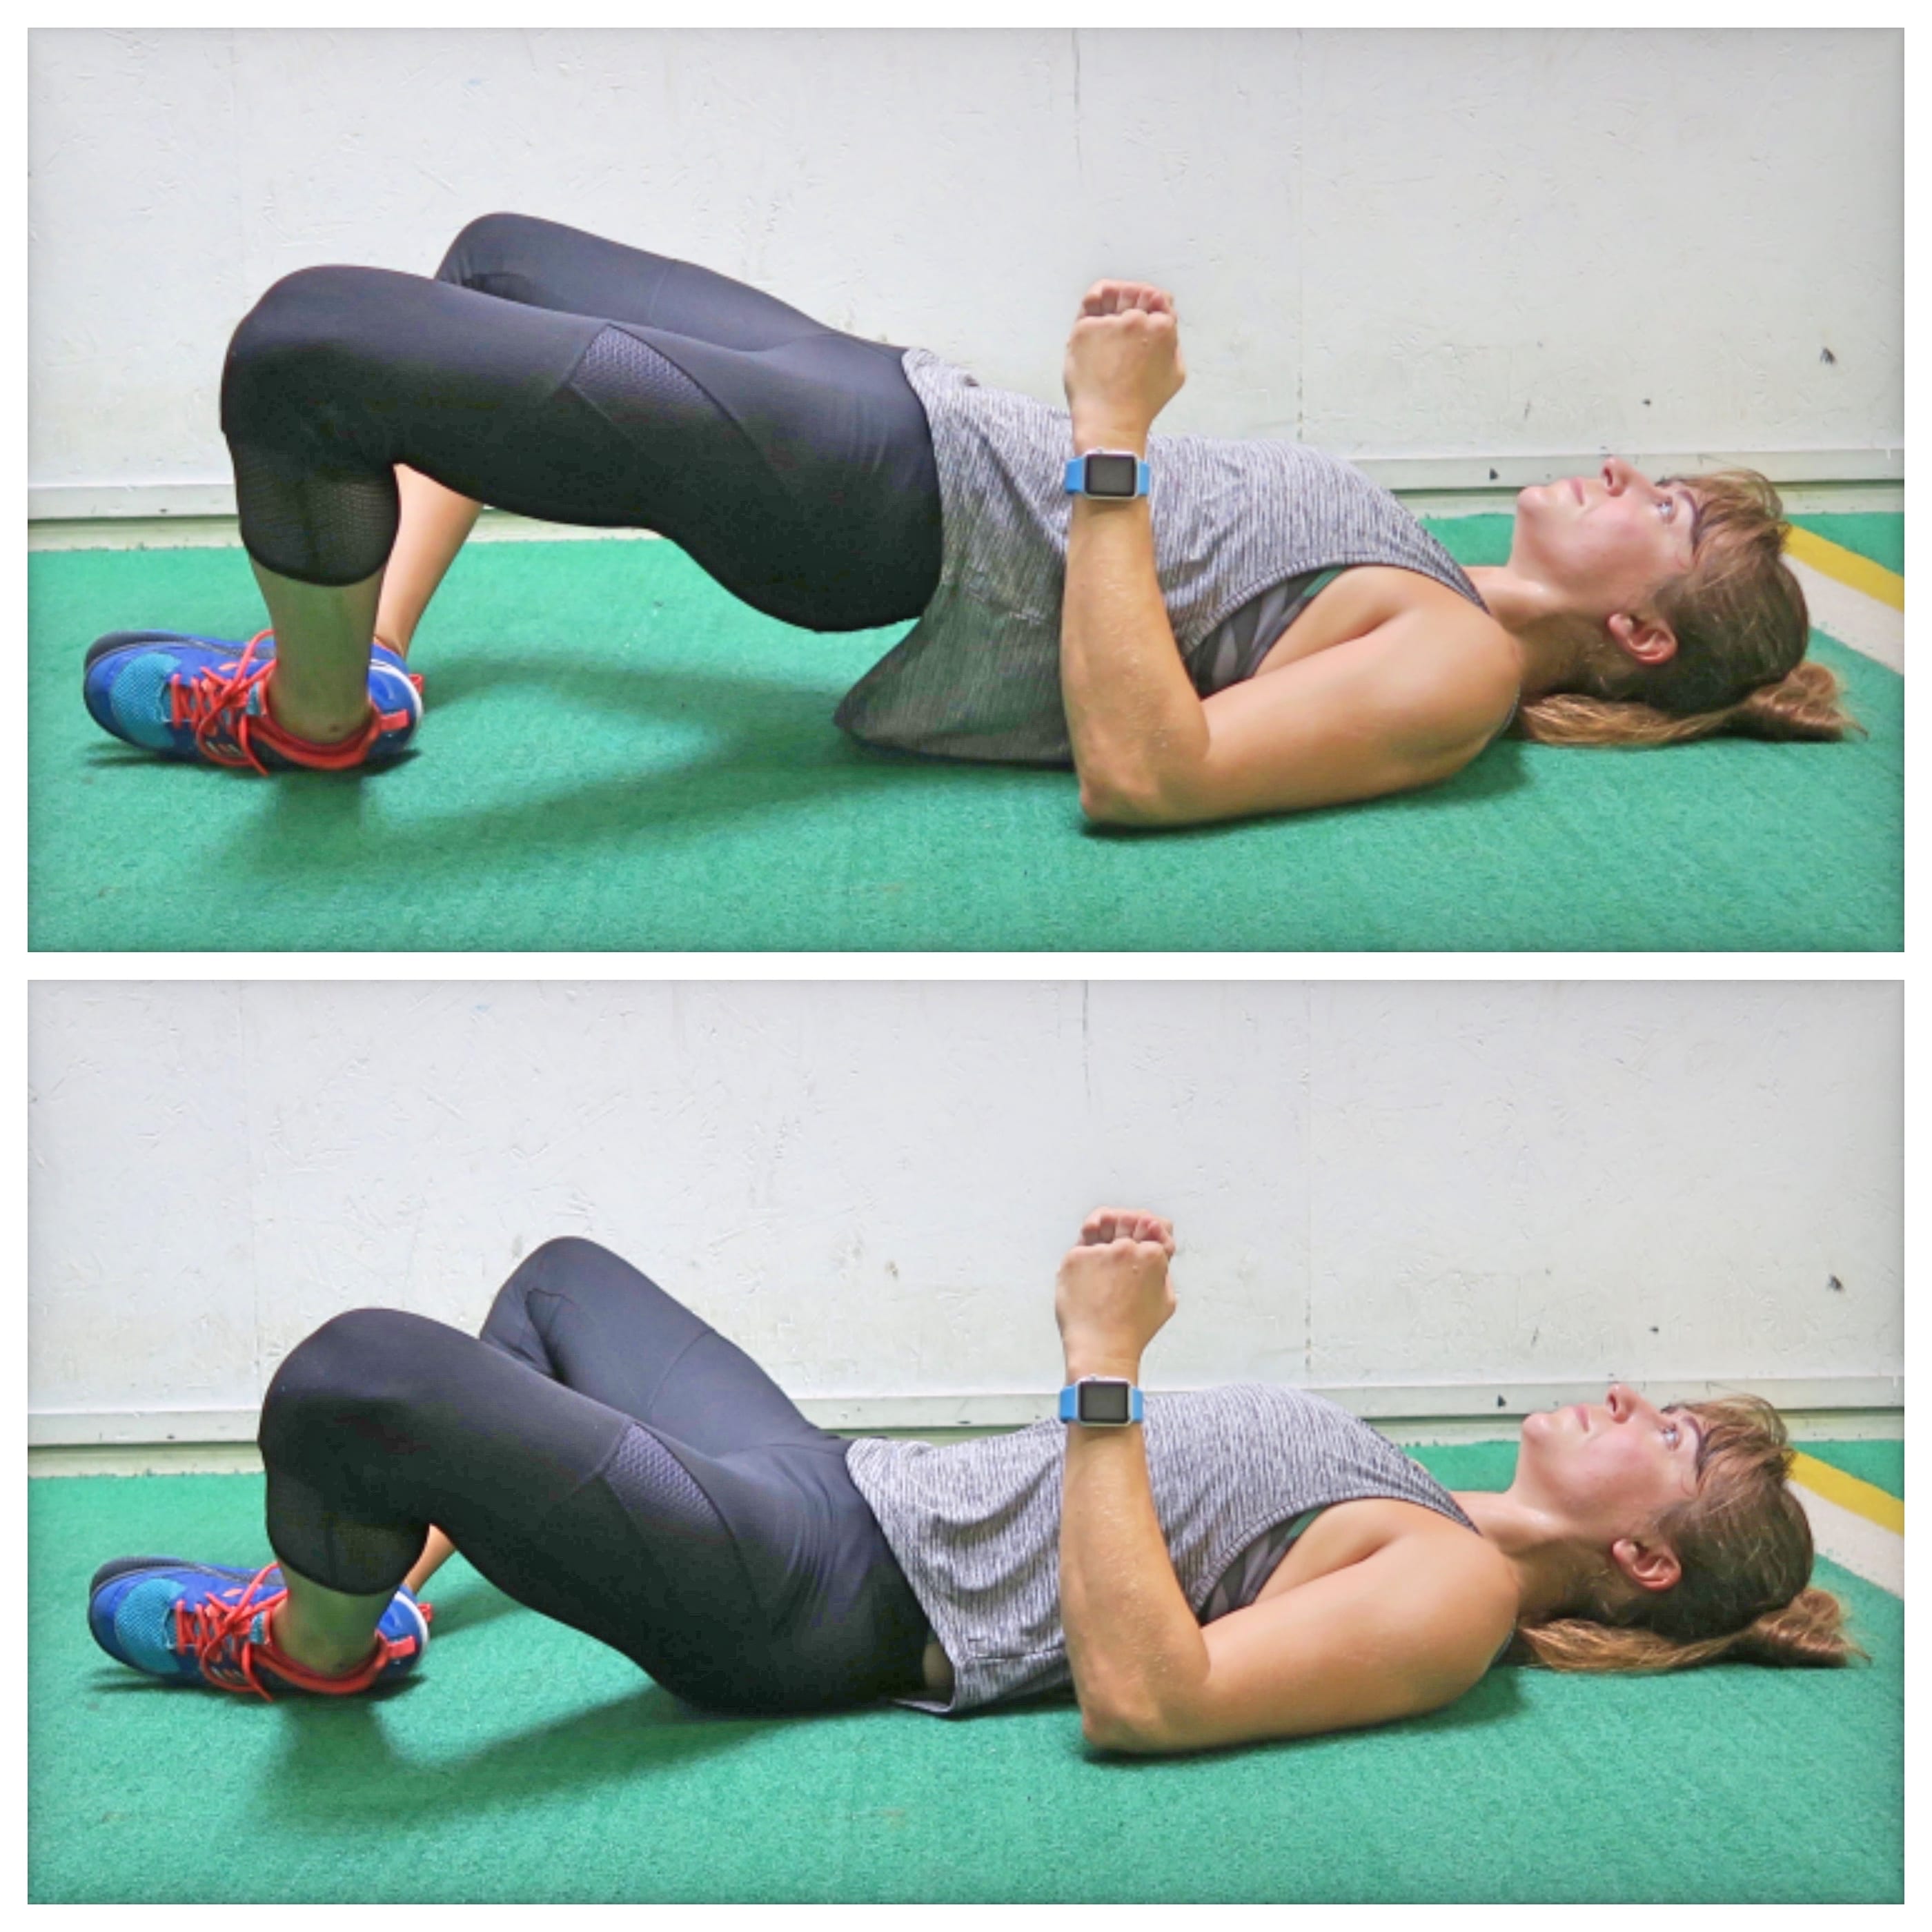
30 seconds Glute Bridge Hold
30 seconds Glute Bridges
CORE BURNER:
30 seconds each side Side Plank
30 seconds each side Side Plank Oblique Twists
30 seconds Forearm Front Plank
30 seconds Plank Hip Dips
35 minutes. No equipment needed! –> The 10-Week Slim Down!
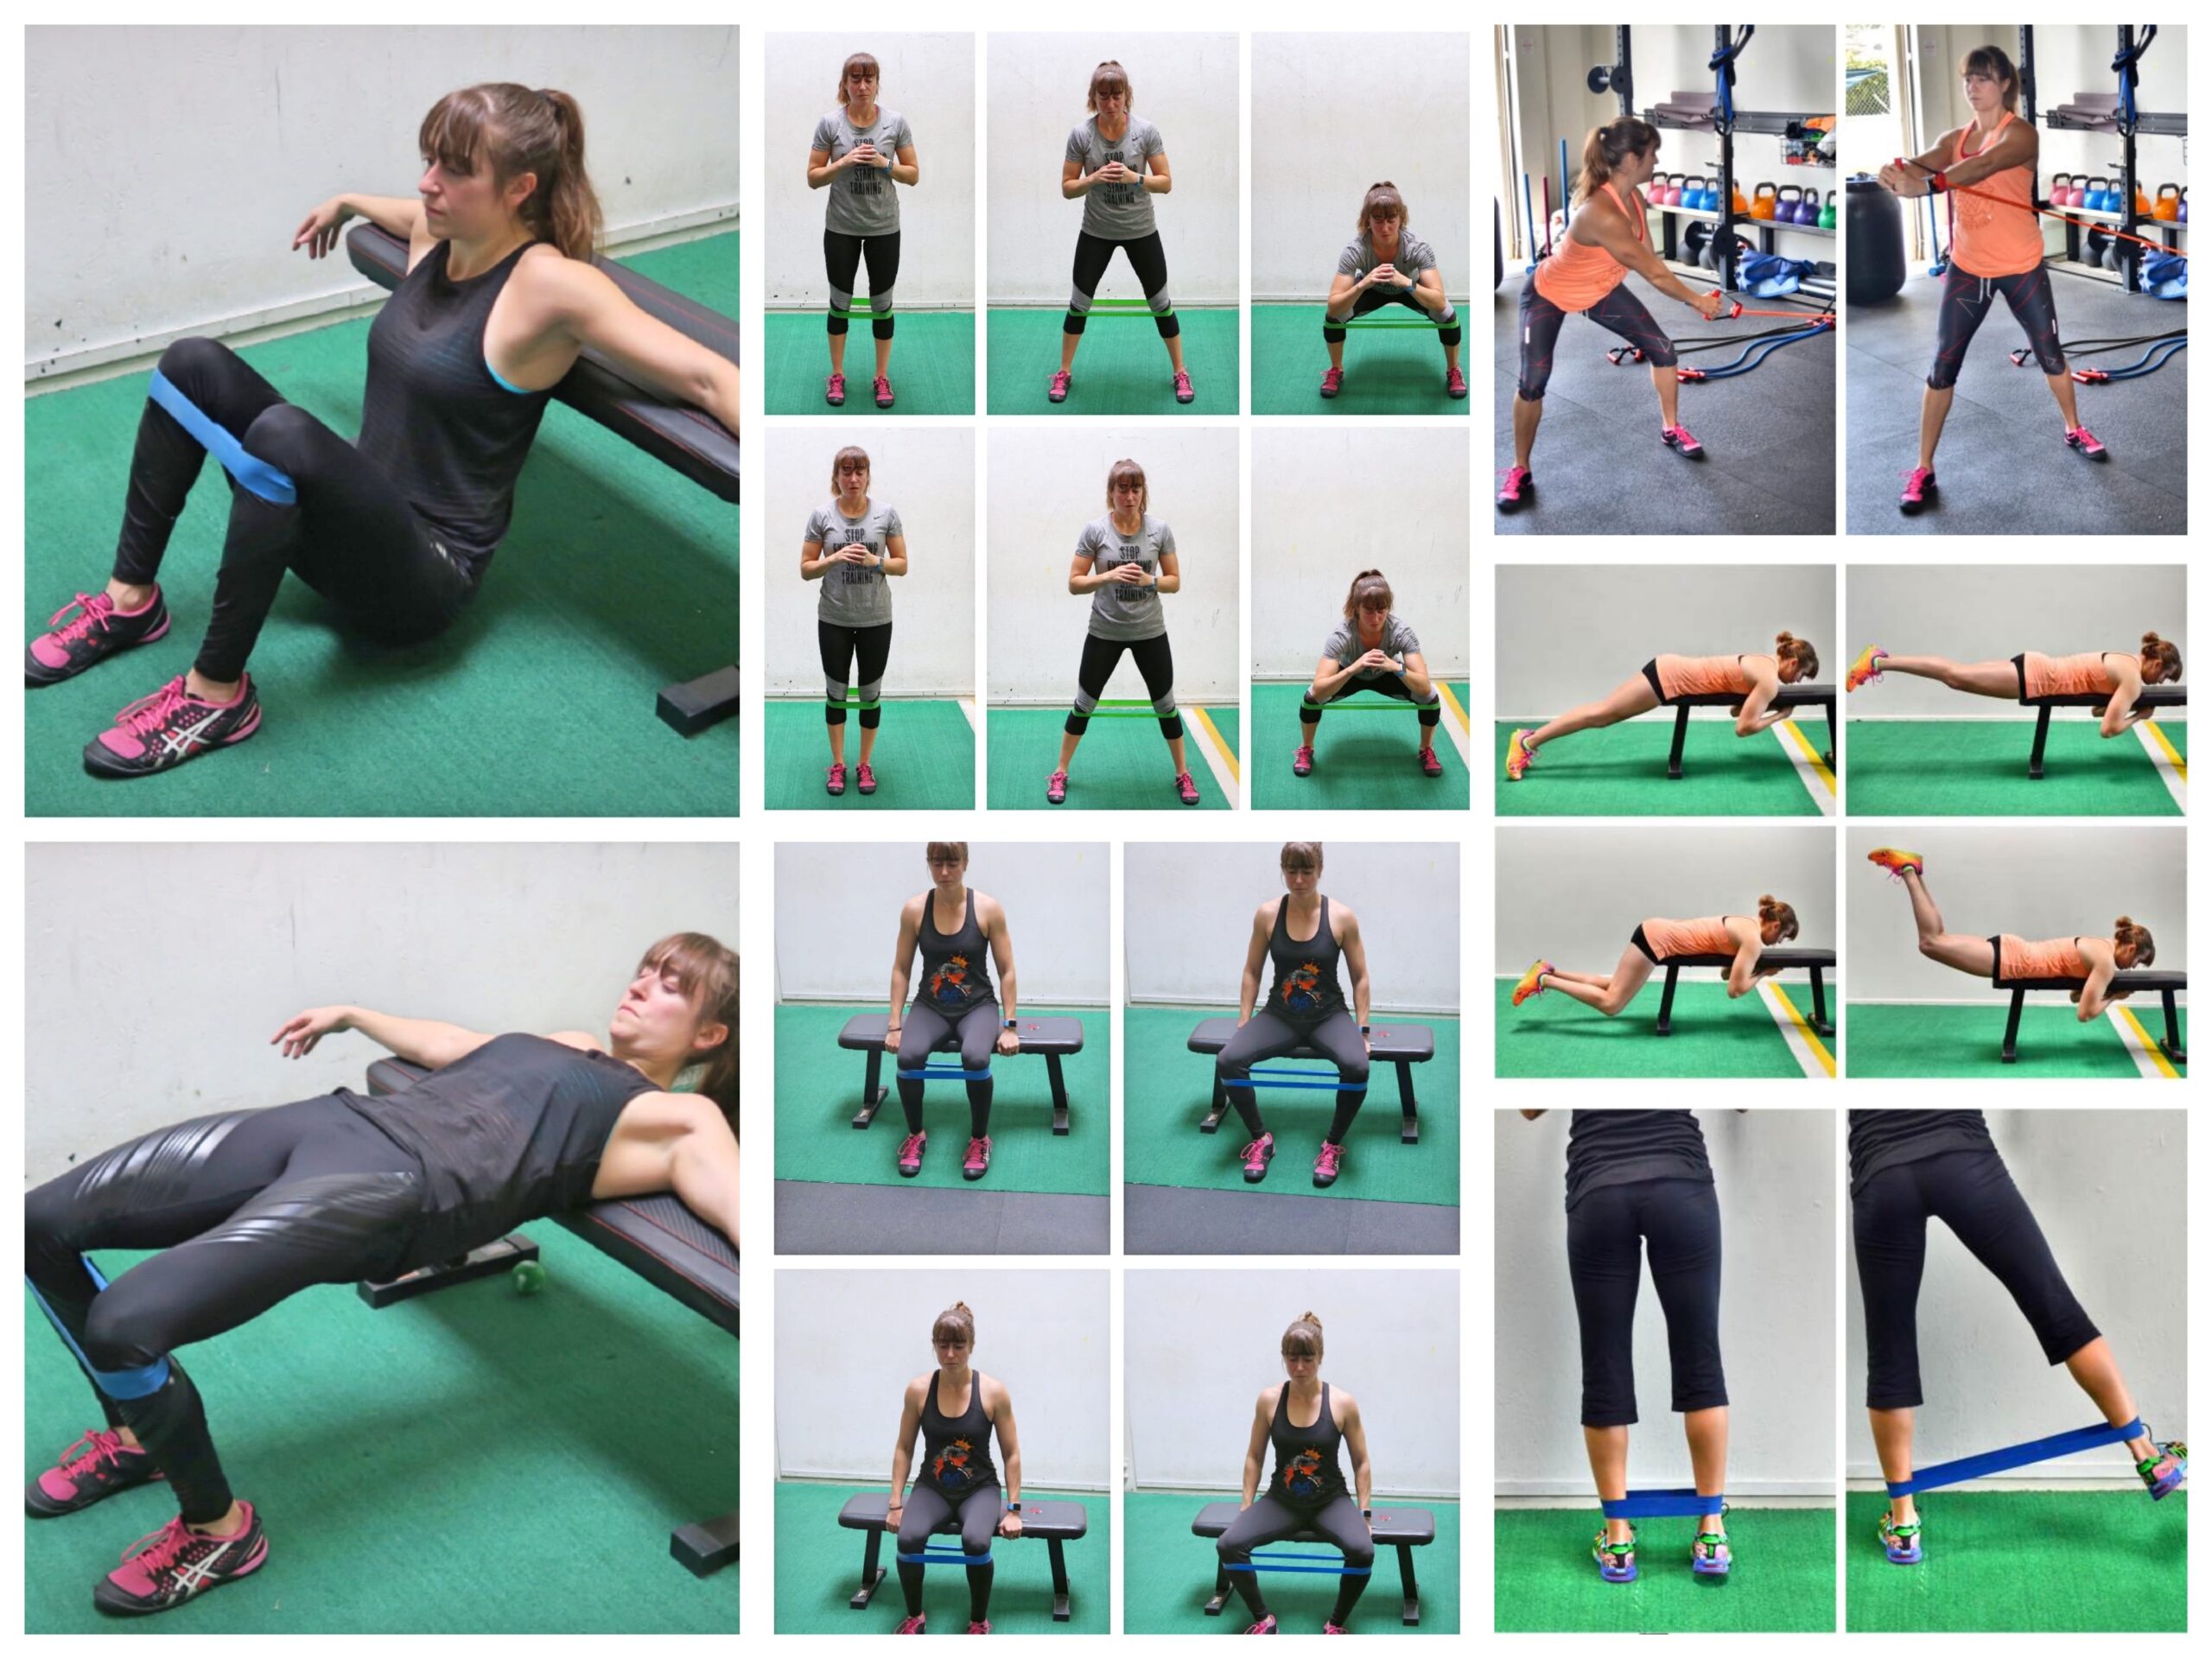
by Cori Lefkowith | Jul 5, 2018 | Blog, Butt, Core, Exercises, Mini Band, Pain Relief, Runner's
When we think “Glute Activation,” we think about all of those amazing moves done on the ground – glute bridges, donkey kicks, fire hydrants…
But what if you can’t get down on the ground?
What if you have knee pain that makes kneeling uncomfortable?
Or what if you have shoulder issues that don’t allow you to really support yourself with your upper body?
You can STILL get those glutes activated and working to strengthen that oh so important muscle group WITHOUT getting down on the ground!
Work your glutes from every angle without getting down on the ground with these 7 Glute Activation Moves!
Standing Mini Band Lateral Raises And Kickbacks:
A must-do glute activation series if you don’t want to get down on the ground is the Standing Mini Band Lateral Raises and Kickbacks.
Pairing these two moves together, allows you to work all three gluteal muscles and you can do so while standing in one place even! No space? No problem!
To do the Standing Lateral Raises, place the band around both legs. Placing it around your ankles will make the movement harder. Face a wall, chair or anything you can use to slightly balance with. Standing tall, lift one leg out to the side.
Keep the leg straight (but don’t lock out the knee) and lift to the side. Try not to let the toe rotate open so that you don’t turn this into external rotation instead of abduction, unless you WANT to. Keep the foot you are lifting parallel to the foot on the ground. Squeeze your butt as you lift.
Do not lean to the side just to lift the leg higher. Keep the core tight and stand up nice and tall. Then lower the leg back down and repeat. You can even pulse more at the end range of motion, never fully bringing the foot back down.
Kick BACKWARD slightly instead of straight out to the side to help yourself focus on the glute medius if you are only feeling your TFL or the front, outside of your hip working instead of your glute.
Complete all reps on that side before switching.
You may also feel this in the standing glute as well because that leg is working to resist the band and keep you stable.
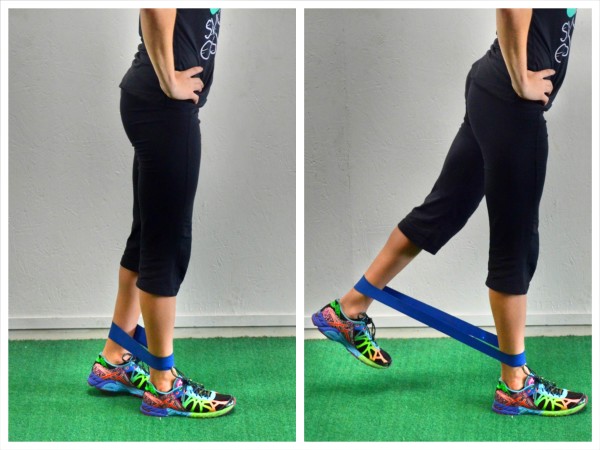
To do the Standing Kickback, place the band around your ankles. Higher up on your leg will make the movement a bit easier. Face a wall, chair or anything you can use to slightly balance with and help make sure you engage your core.
Stand tall and then kick one leg back behind you. Keep the leg fairly straight and flex your foot so you are driving the heel back into the wall behind you. Squeeze your glute as you lift. Do not rock forward to try to get the leg up higher. Height doesn’t matter. Just focus on squeezing your glute and keeping your core tight.
You may have a very slight lean forward as you stabilize on the standing leg, but you don’t want to rock forward and open up your hip just to kick back higher. You also want to engage your abs so you don’t hyperextend your lower back. Rocking forward may also put the move in your low back instead of forcing your glute to work to lift the leg.
It may not be a huge range of motion. The important part is to really feel your glute extending your hip to kick back. You can even pulse at the end range of motion to create a pump.
Two tips to get even more out of these moves:
- Place the mini band up below your knees to start to help you focus on the right muscles working.
- For the Lateral Raises, place your pointer finger on your hip bone and your thumb back along the top of your glute. As you do the raises, feel the muscle under your thumb work. This can help you make sure the right muscles are working AND even help establish that mind-body connection!
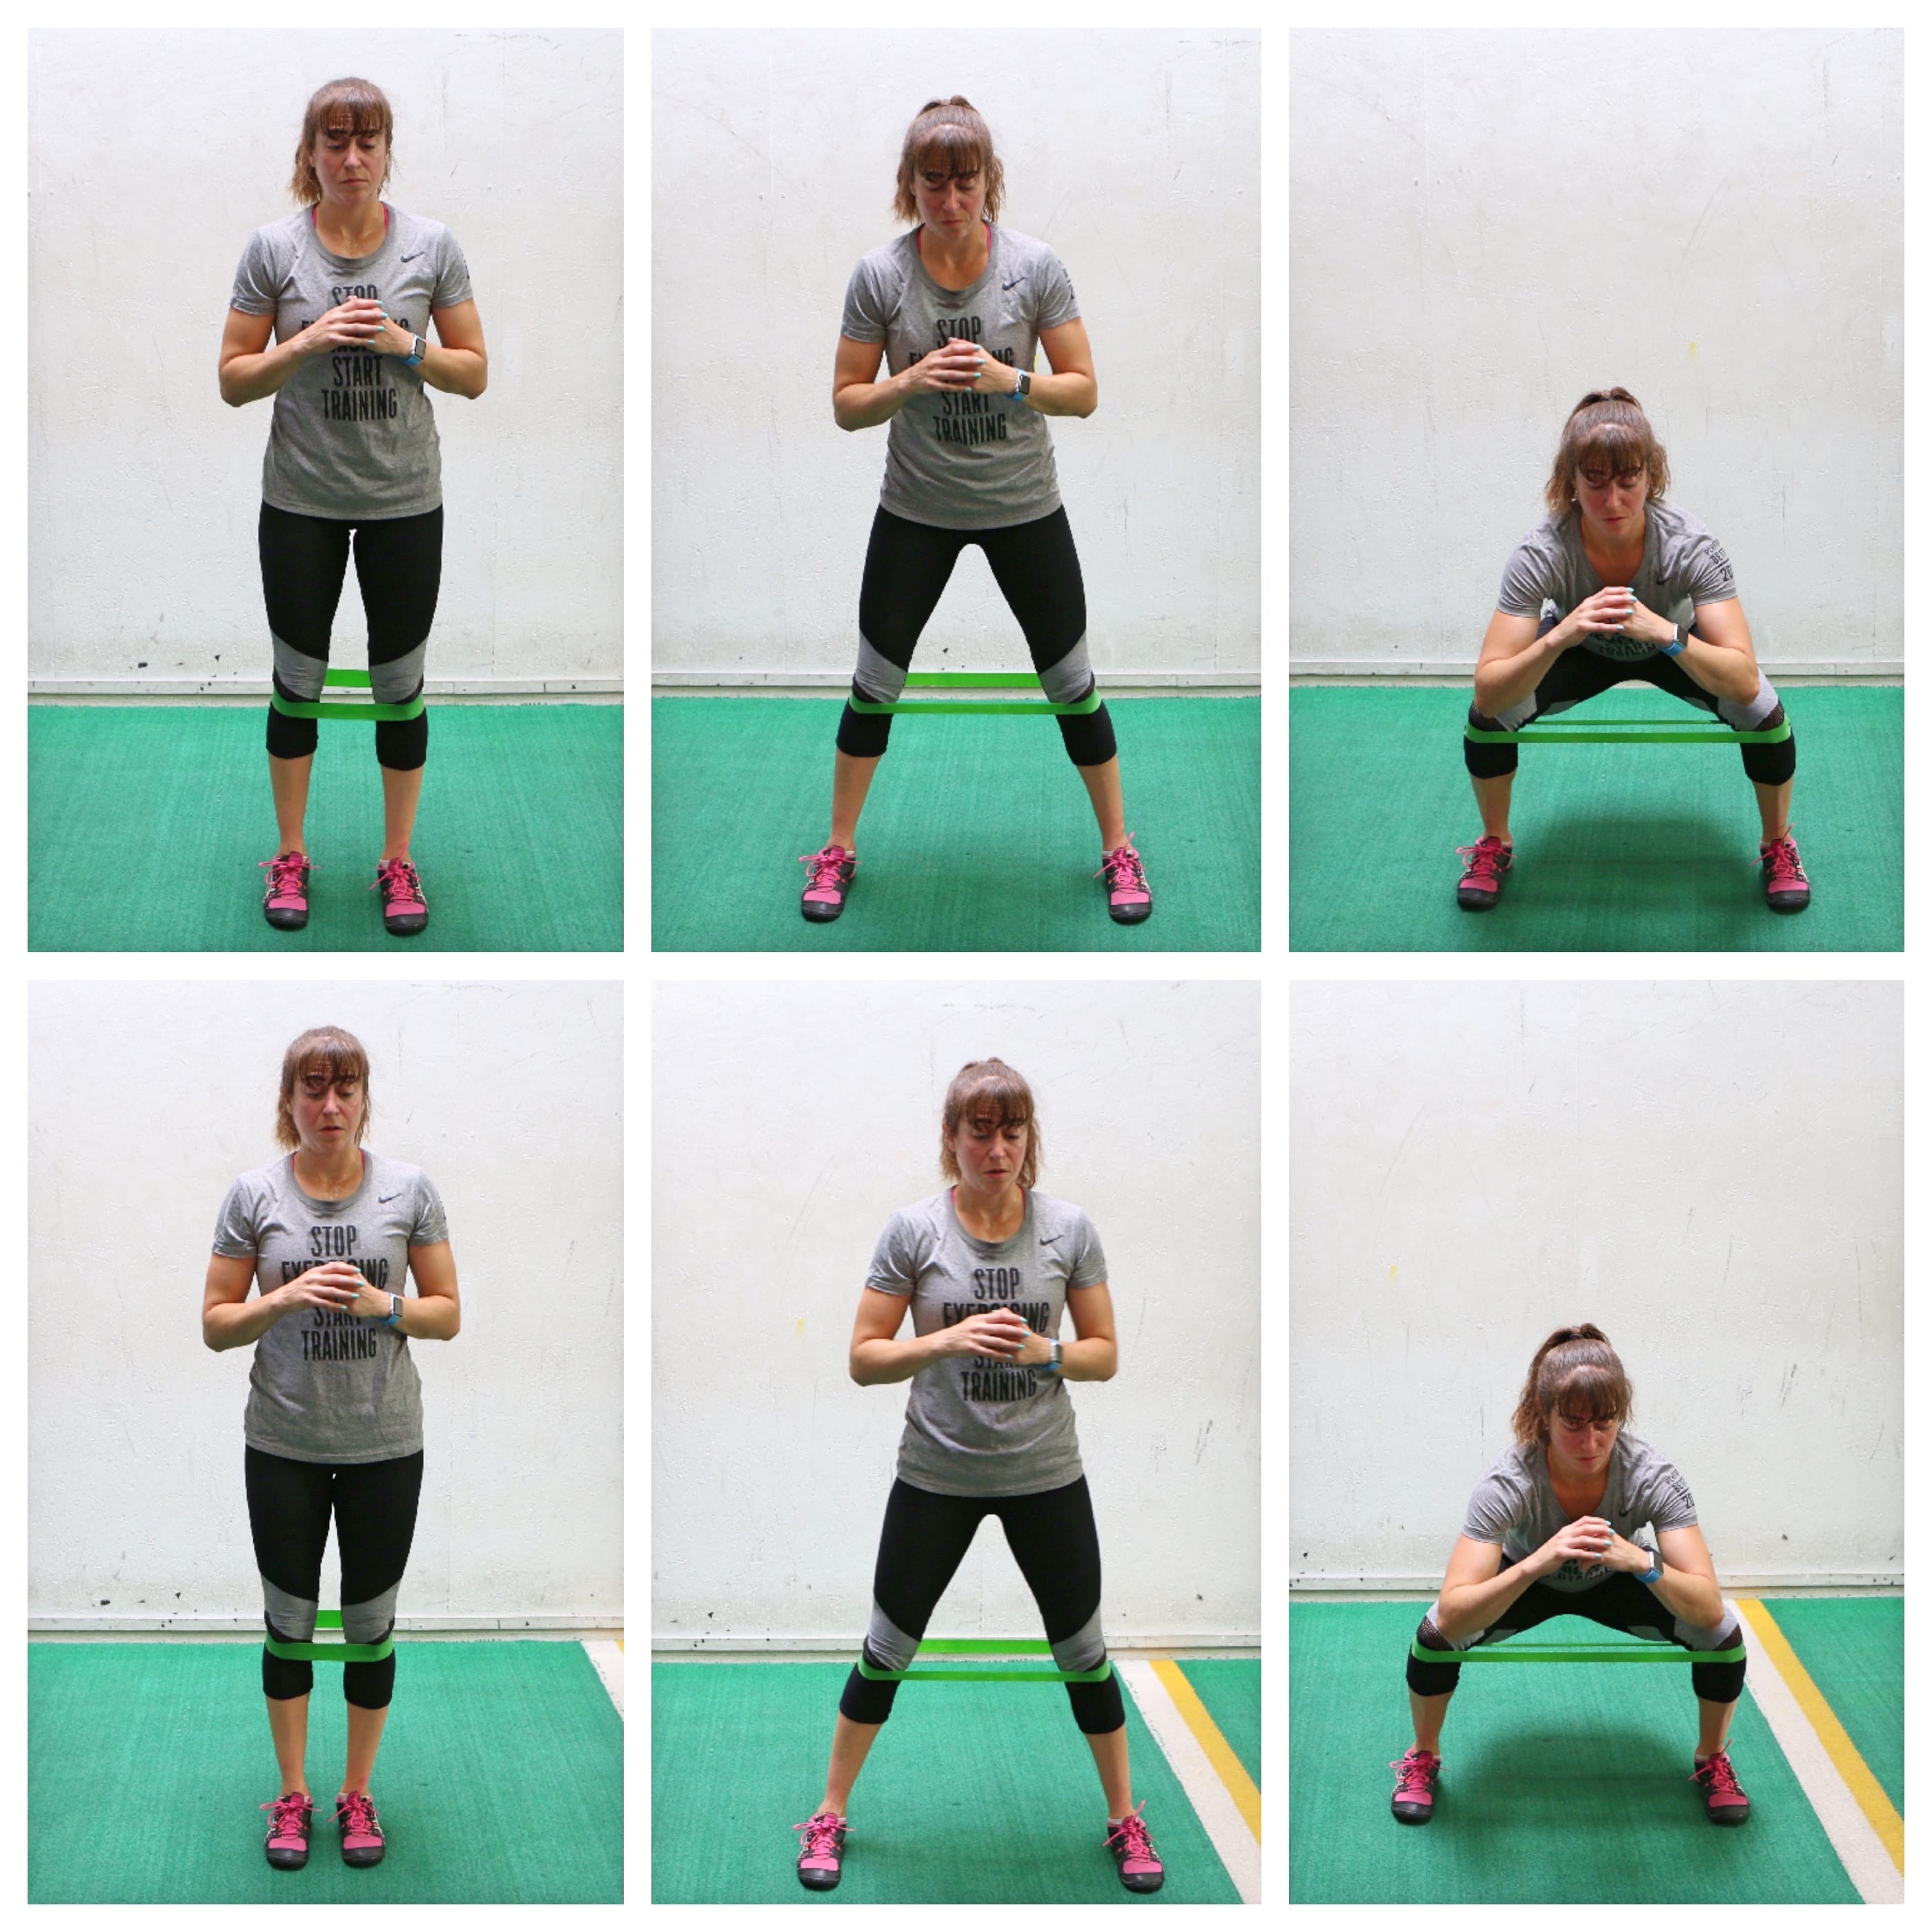
Mini Band Side Step Squats:
If you have no knee pain that would limit your knee flexion and want a great way to get your glutes firing during squats, plus a glute activation move that will get your blood pumping a little bit more, Mini Band Side Step Squats are a great option!
To do Mini Band Side Step Squats, start standing tall with the mini band right below your knees and your feet a few inches apart. To make the move easier, use a lighter resistance or place the band above your knees.
Then step out to one side so your feet are about shoulder-width apart and squat down. Make sure to sit back and keep your chest up. Make sure you also press out against the band. You don’t want your knees to cave in.
Squat down then stand up and step your feet back together. Then step out to the other side and squat down. Alternate stepping out to each side and squatting down. Do not step out too wide and make sure to press your knees out against the band.
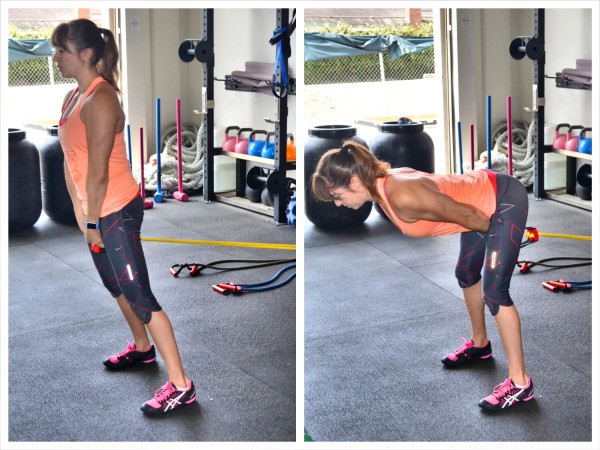
Band Pull Throughs:
This hip hinge exercise is a great way to prime, aka ACTIVATE, your glutes before more compound hinging exercises like the deadlift. It is also the perfect way to really target that glute max.
And while it may look a bit awkward, the pump you’ll feel from this move is worth the awkward looks you may get! (Plus if you are trying to teach anyone a proper hinge hinge, this is a great way to do it!)
To do Resistance Band Pull Throughs, anchor the band around a pole, furniture or in a doorway. Step over the band and reach down between your legs to grab the handles. Walk away from the anchor point with your back to it, holding the handles between your legs.
Then hinge over, keeping your knees soft. Push your butt back toward the anchor point as you lean forward and reach your hands with the bands back between your legs.
Then squeeze your glutes and push your hips forward to come back up to standing. Keep your arms relaxed and straight down, holding the handles between your legs. Stand up nice and tall, fully extending your hips and squeezing your glutes.
Don’t hyperextend your low back as you extend your hips and squeeze your glutes or lean back too much at the top. Almost tuck your hips up forward as you squeeze and contract your glutes.
Then hinge back over, pushing your butt back toward the anchor point. Keep your core tight so that you don’t feel this move in your low back. Also, do not pull the bands with your arms. Your glutes should do all the work. And make sure to keep your back flat. Do not round over as you hinge over.
To make the move harder, use a heavier band or walk further from the anchor point.
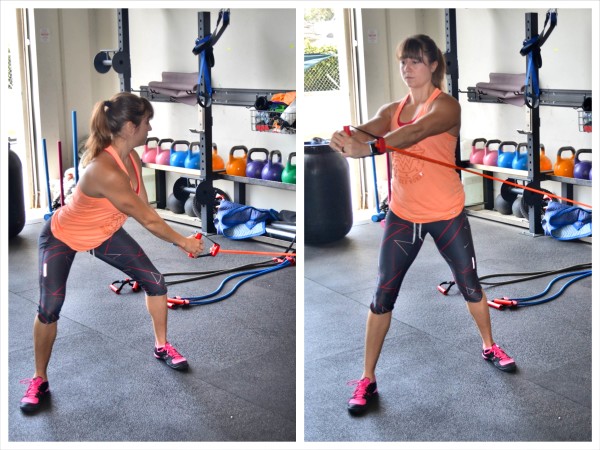
Band Hip Rotations:
For strong glutes and stable hips, you want to work your body in every plane of motion. And that means, including some rotational exercises like the Band Hip Rotations as well. Plus, this glute activation exercise will get your abs working as well!
To do Band Hip Rotations, anchor the band and hold one end in both hands. Stand with your side to the anchor point and your feet about hip-width to shoulder-width apart. Your front toe should be turned slightly open while your back toe should point straight ahead.
Then squat down very slightly, pushing your butt back as you reach your arms back toward the anchor point. Make sure there is tension in the band even as you reach back. Brace your abs and keep your chest up nice and tall. Do not shrug your shoulders.
Keeping your arms fairly straight (aka do not actively bend them, but they may have a slight bend to start), bring the band across your body and up outside your far shoulder. Feel the glute of the leg closest to the anchor point engage and power the rotation. Do not turn it into an arm movement or simply rotate at the waist.
Your back glute should power the rotation. Feel it squeeze as you rotate. Concentrate on using it to power the move. Do not get to focused on bringing the band to a certain point. If you rotate and you don’t bring it up to the shoulder that is ok as long as the glute powers the rotation across.
Bring the band back across your body to the starting position in a controlled fashion. Do not pivot your feet as you perform the move. You want to rotate at the hip because the glute is powering the movement. You do not want your feet to move.
Complete all reps on one side before switching. Focus on squeezing your glutes and bracing your abs. Do not shrug your shoulders or round over.
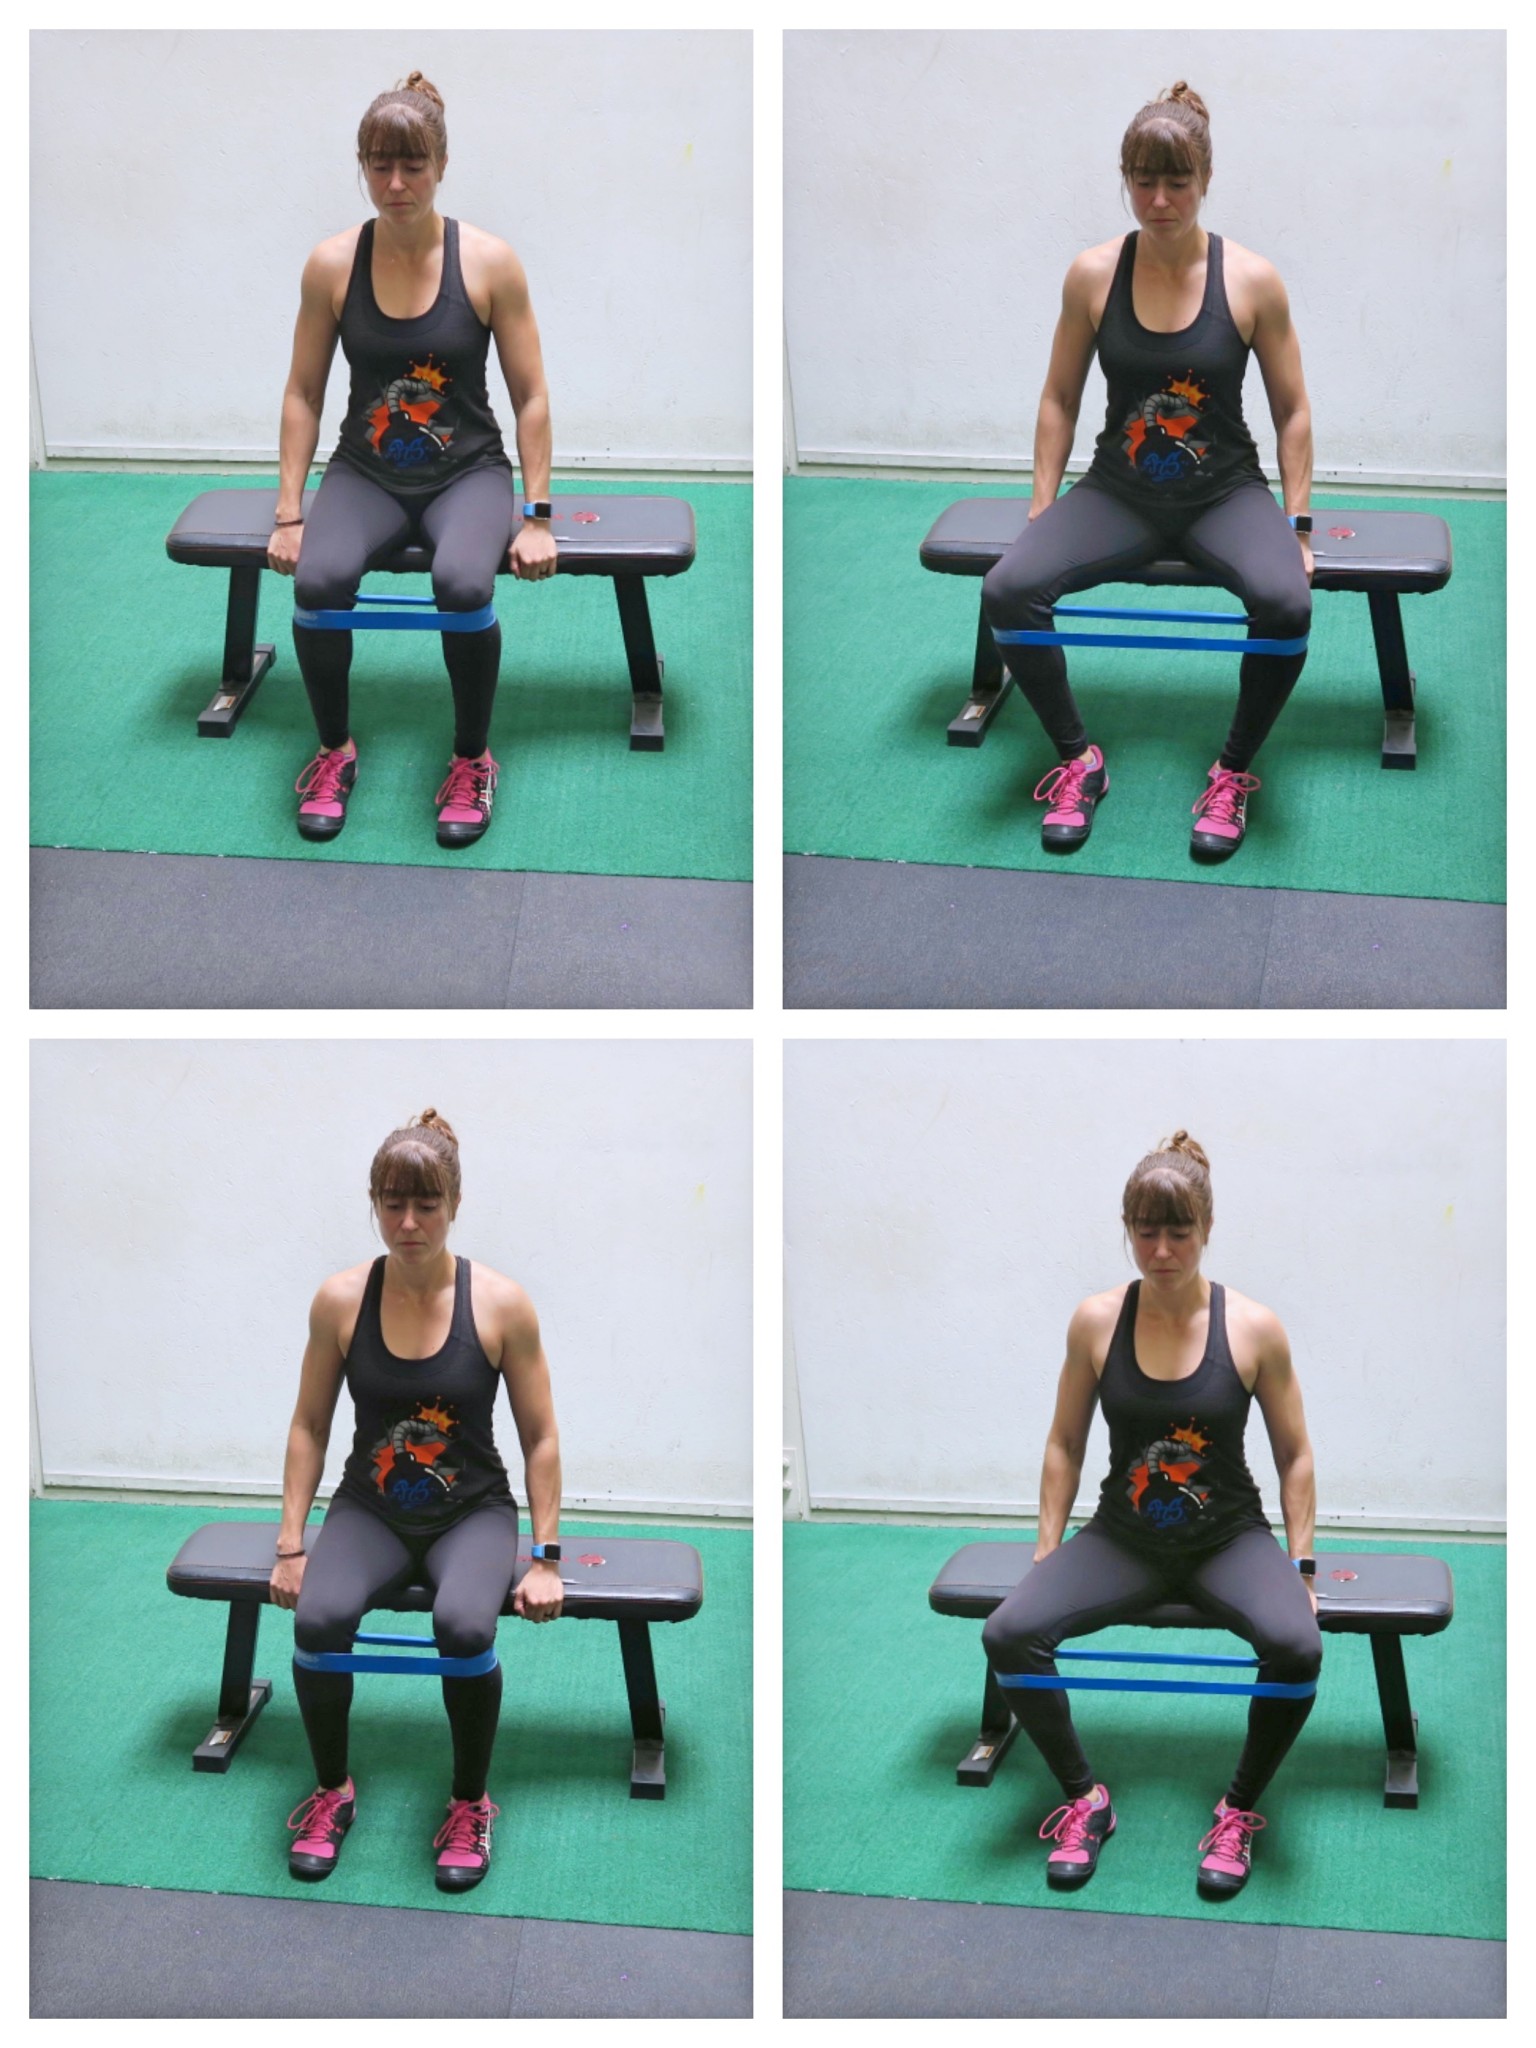
Seated Mini Band Clams:
Seated glute activation exercises are another great option if you can’t get down on the ground. They can also be an option if you have an ankle issue that doesn’t allow you to balance on one side.
One essential seated move to use is the Seated Mini Band Clams. They are a great way to work your glute medius and minimus to improve your hip stability!
To do the Seated Mini Band Clams, place the mini band right below (more advanced) or right above (a bit easier) your knees. Whichever place you choose or whatever weight mini band you use, just make sure you feel your glutes and outside your hips actually working.
Sit up nice and tall with your hands on the edge of the bench and your feet about hip-width apart. Then press your knees open against the band as you sit up tall. Really use your glutes to open the band.
Do not slouch or rock back. Press your hips forward as you press your knees open. You may rock open on your feet, but don’t simply rock and bend your ankles. Really press the band open with your knees.
You can change the way you focus on your glutes by changing your body positioning. You can lean back, not rock back as you do the move, but actually lean back through the entire move, sit up straight or even lean forward. Playing around with all three positions can even help make sure your glutes are firing no matter the degree of hip flexion.
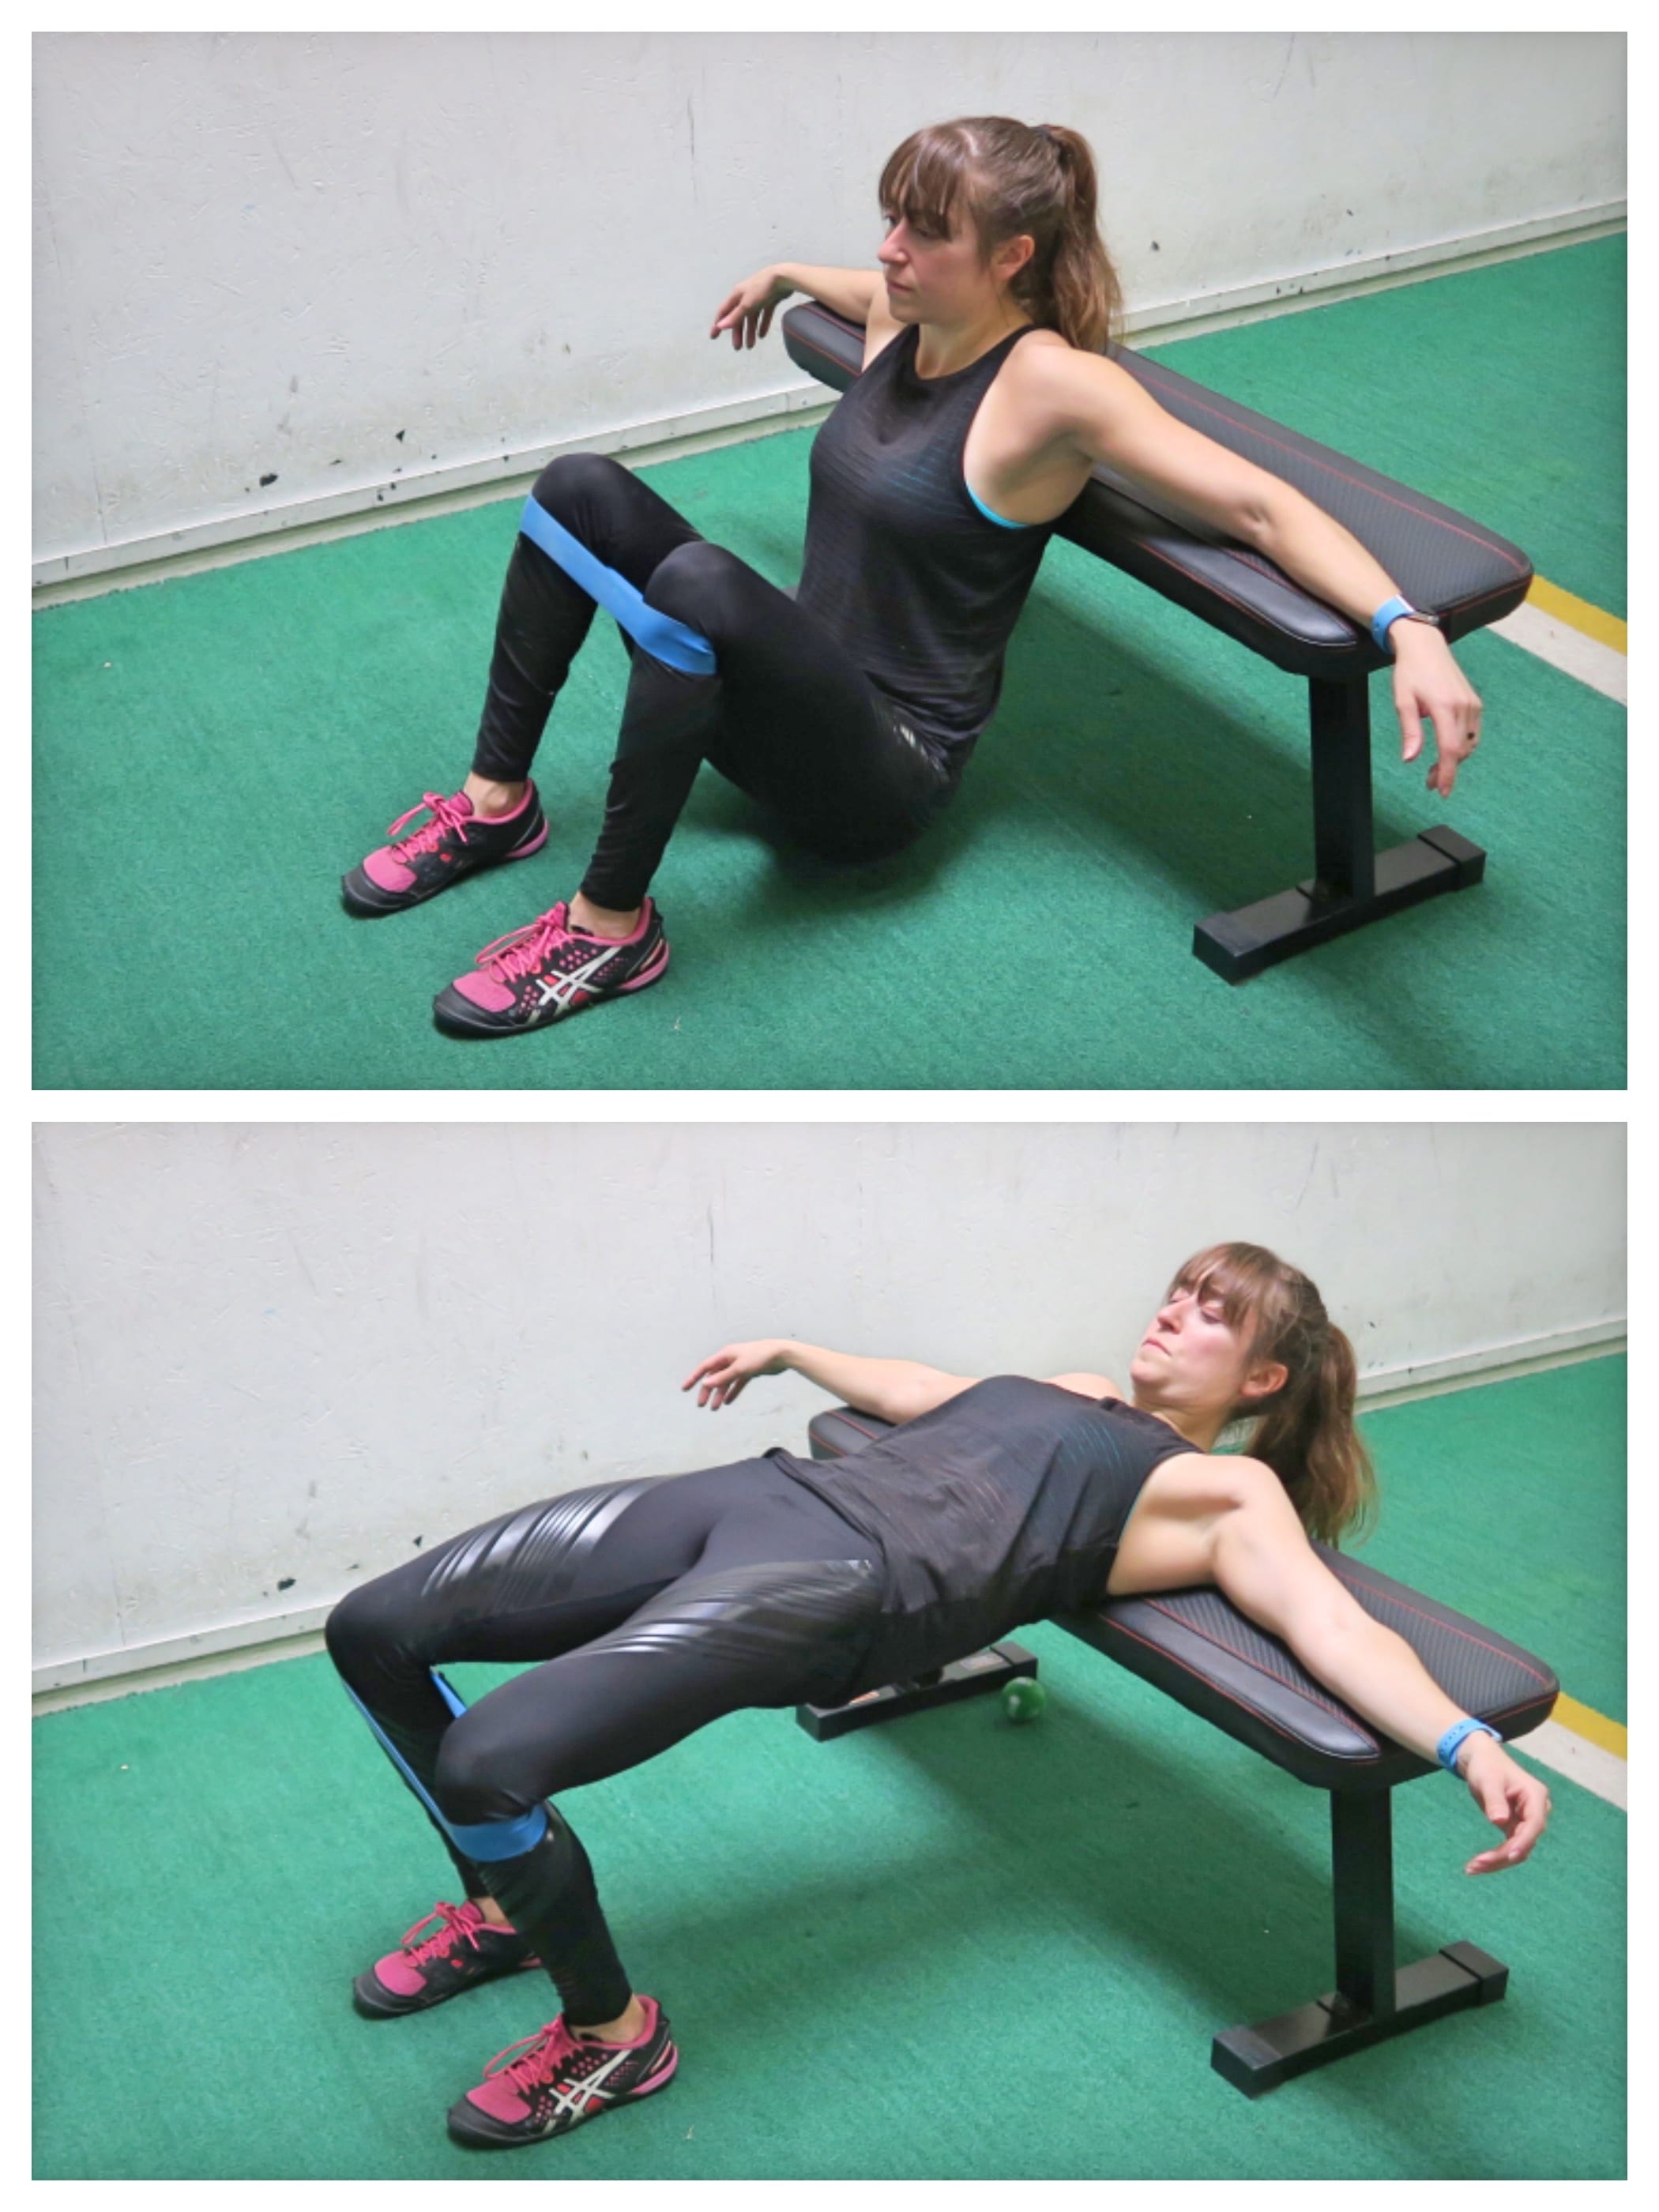
Bench Hip Thrusters:
Improve your hip extension and get your core working with this bridging variation that you don’t have to get down on the ground for – the Bench Hip Thruster!
You can do Hip Thrusters as purely a bodyweight movement, as a feet-raised movement or even perform a single leg variation to help work on correcting imbalances.
Or you can try the Mini Band Bench Hip Thruster Variation below.
To do Mini Band Hip Thrusters, place the mini band right below your knees to make it harder and right above to make it easier. Lie with your back on a bench and feet about hip-width to shoulder-width apart. Press out on the band. Don’t let your knees cave in.
Then bridge up, driving through your heels and upper back on the bench. Make sure to press out on the band as you bridge up. Keep your abs engaged with a pelvic tilt so you don’t hyperextend your back at the top. Pause and engage those glutes then lower back down and repeat. Even slightly tuck your chin to look down at your knees to help engage your abs more.
Feel your glutes working and do not let your knees cave in at any point. Keep constant tension on the band.
Bench Reverse Hypers:
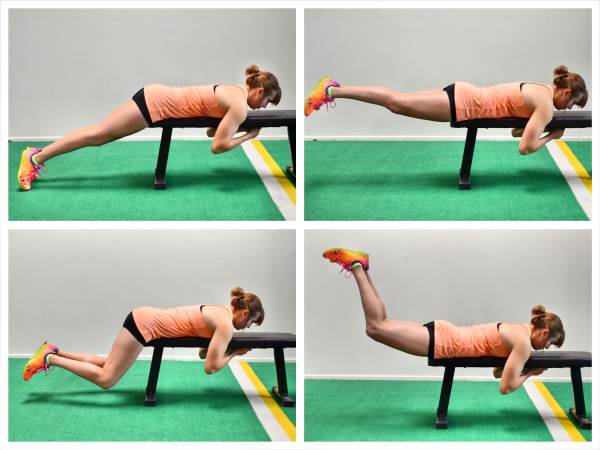
Work on your hip hyperextension with this lying glute activation move you can do off a bench! No need to get down on the ground while you can still reap the benefits of a prone glute activation exercise.
You must be careful though with this movement to not allow your lower back to simply take over. If you feel your lower back trying to compensate for your glutes, modify the movement or pause and reset, even rolling out your hips and lower back to relax the overactive and tight muscles.
To do a Straight Leg Reverse Hyper (top photos), lie face down on a bench with your hips right at the edge of the bench. Make sure you aren’t too far off or you will engage your low back. You will keep your legs straight. You can let your feet stay apart or bring your legs together.
You may need to play around with the positioning to start to see which allows you to get the best glute contraction, especially if you are struggling to engage your glutes. You can also put your heels together and choose to turn your toes out. The external rotation can sometimes make it easier to get your glutes to fire.
Then, keeping your legs straight, raise your heels up toward the ceiling. Squeeze your glutes as you lift. Lift till your legs are about parallel to the ground and lower back down. Only lift higher if you don’t feel your lower back take over. You want to focus on and make sure your glutes are working to lift NOT your low back.
If you do feel your low back, make sure you are pressing your pelvic down into the bench as you squeeze your glutes to lift. Hold at the top and lower back down. Really contract your glutes at the top and don’t worry about swinging your legs up higher. Only lift as high as you need to feel those glutes engage and contract.
To mix things up with the Reverse Hypers, you can even do a bent-knee (bottom photos) or mini band variation!
Ready to get those glutes activated and working?
Check out my Booty Burner Program! 15 minute workouts to get those glutes firing!


 But A. These things don’t have to be bland and boring. And B. There has to be a balance which includes foods you enjoy.
 But what if we didn’t first cut out those foods we love the most?
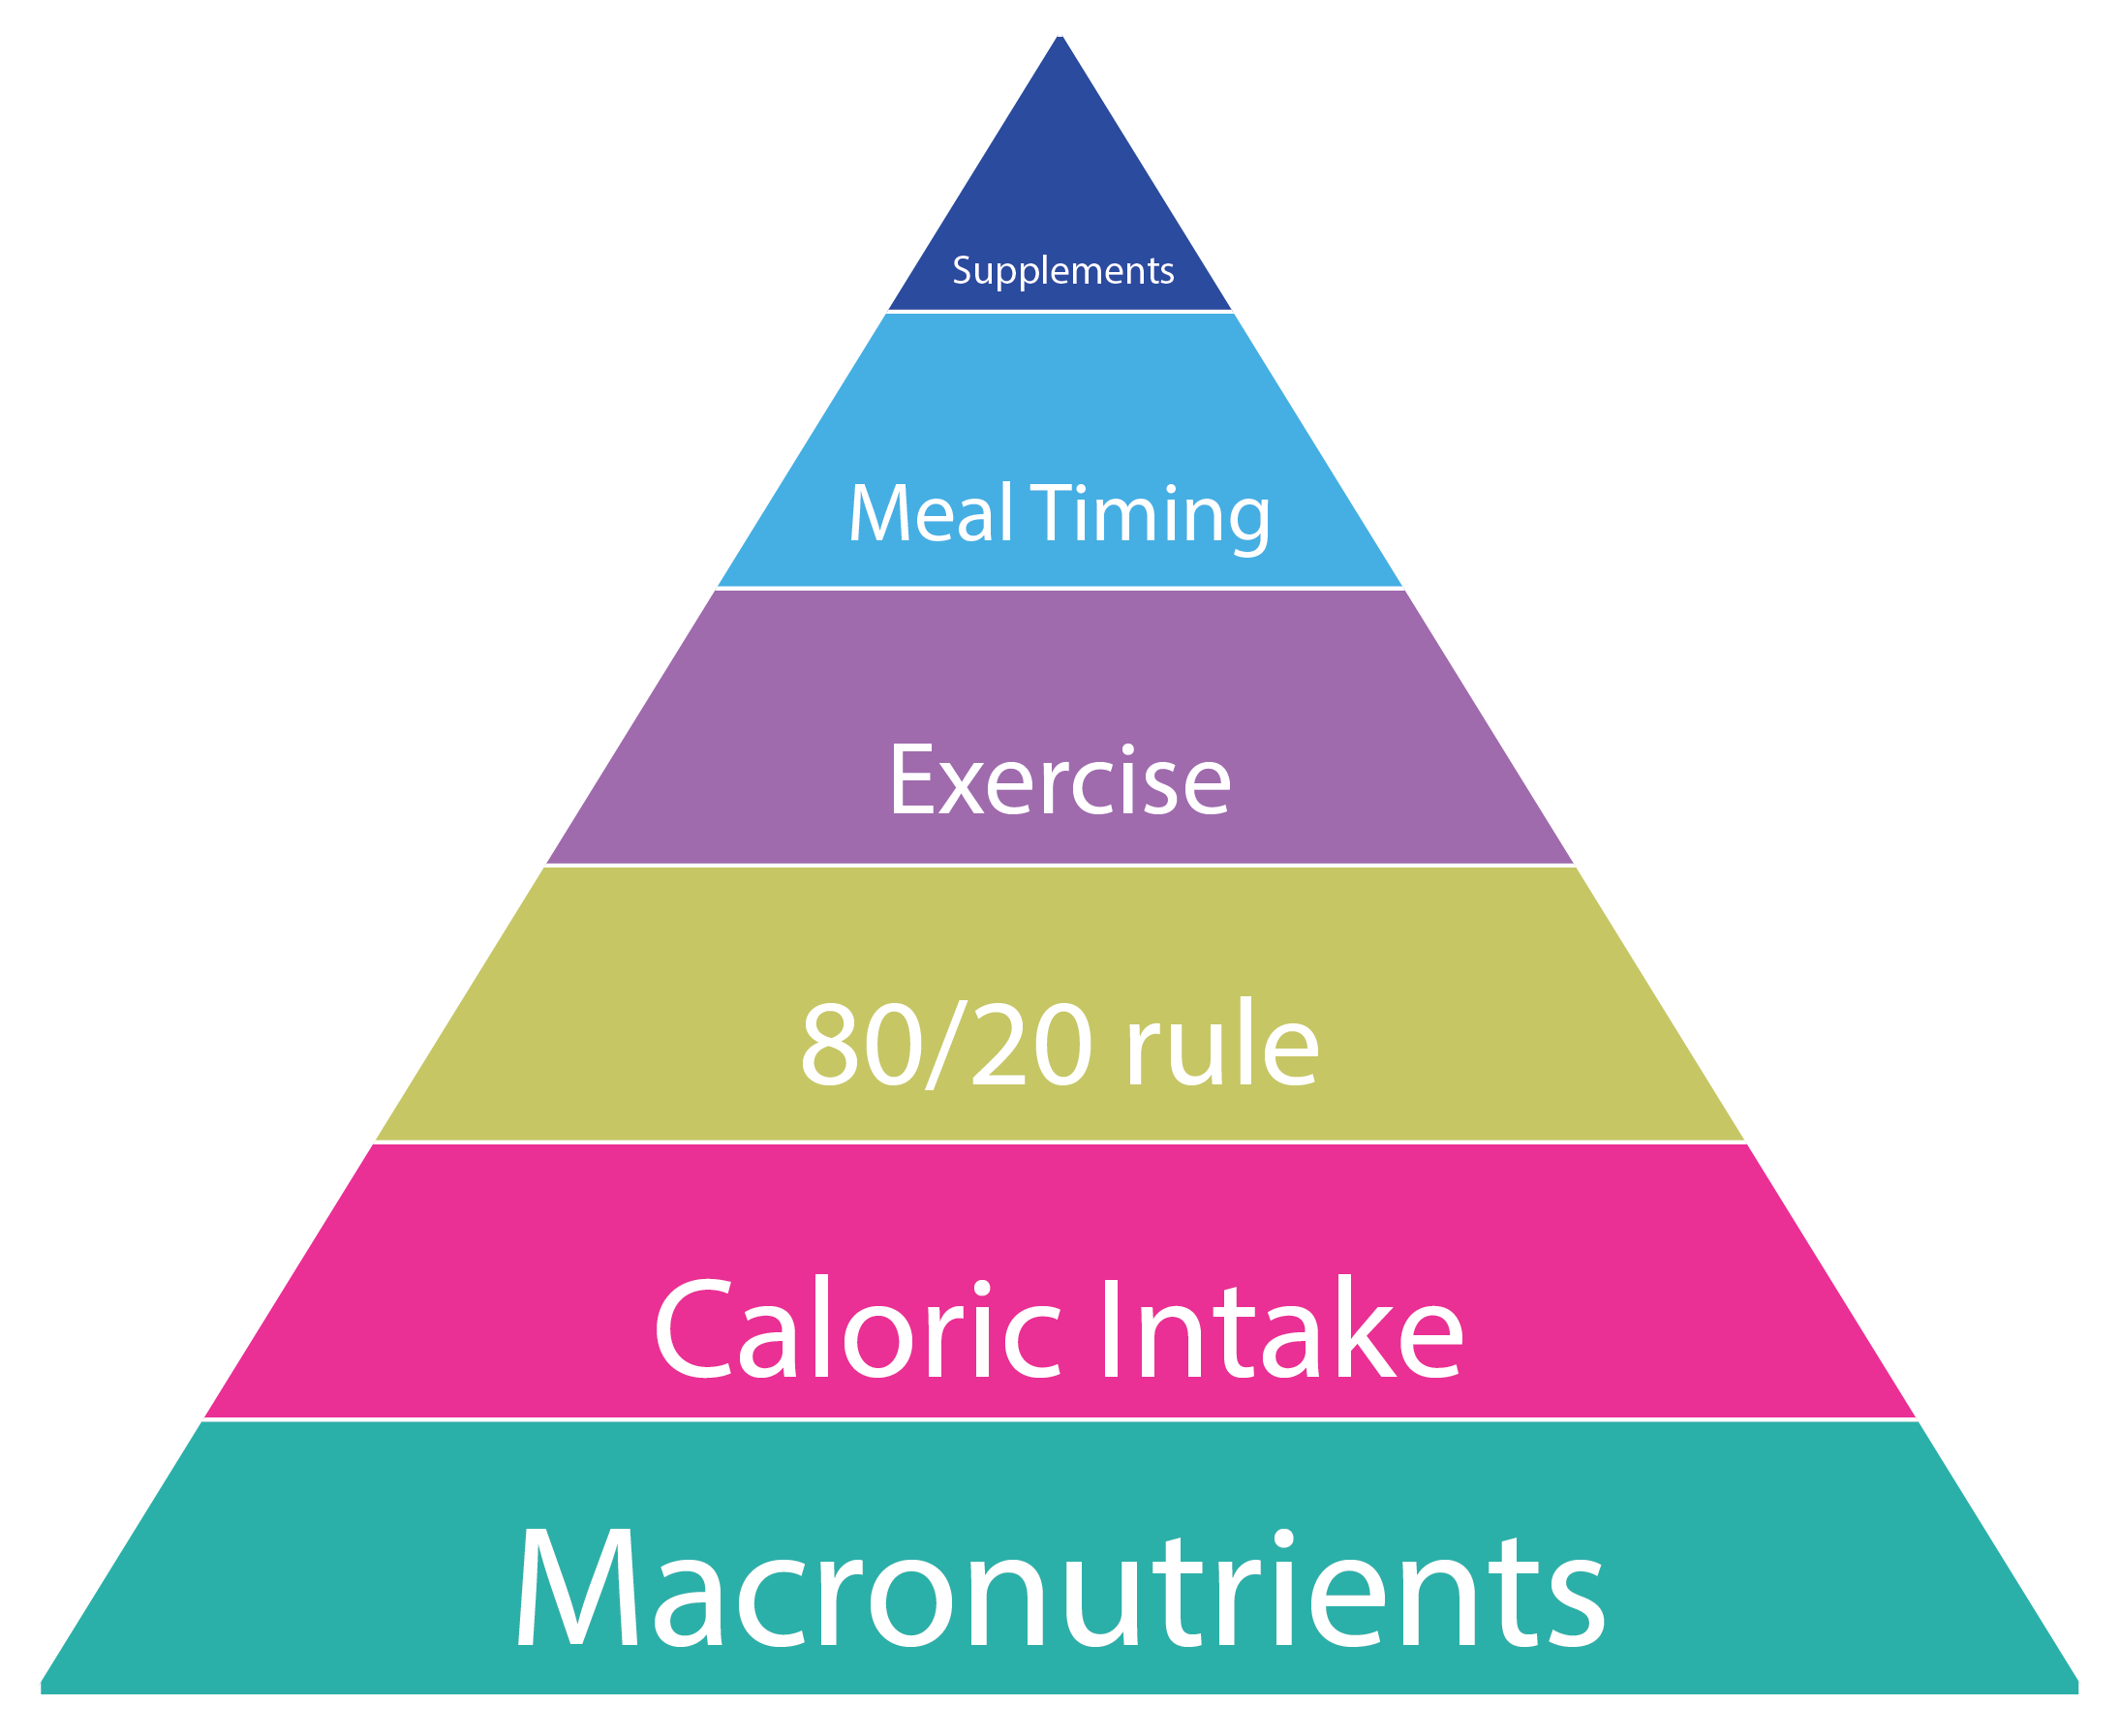
 Movements that, in general, allow for less compensation because fewer muscles are working at the same time. Movements that may even help you INHIBIT overactive muscles.
 For example…These imbalances and compensations can cause us to have back pain when we run. We sit all day and our hip flexors get tight. We do nothing to reverse our flexed, hunched posture.